前言
游戏服务端开发是一个非常神秘的软件开发工种,作为游戏开发的两大子类之一,其关注度远低于游戏客户端开发。常见的游戏开发书籍《游戏引擎架构》、《游戏编程精粹》等基本都是介绍客户端相关的渲染、物理、动画等内容。Bilibili上的知名游戏开发经验分享账号Games Webinar上传的五百多个视频里关于游戏服务端的一只手都数的过来,都集中在Games 104里。相对于汗牛充栋的游戏客户端开发书籍,关于游戏服务端开发的书籍可谓屈指可数,比较知名的只有《网络多人游戏架构与编程》。这些游戏服务端开发相关书籍大多在花一半以上篇幅来介绍网络相关的内容:如何使用基础socket来做网络通信,如何降低延迟,服务器与客户端之间的互联拓扑。由于这些内容与常规的互联网服务端开发重合度太高,同时又缺少类似于分布式一致性这类高端内容的介绍,给了读者一种游戏服务端开发没啥技术含量的错觉,以至于知乎上有这么几个提问:互联网服务端技术领先游戏服务端几十年?; 游戏服务端技术/人员整体水平是不是已经落后于互联网服务端?。
正所谓"指法无优劣,功力有高下",游戏服务端与互联网服务端两者要处理的业务有着很大的差异,无法直接对比技术栈。在上面的知乎问题的回答里,很多人都提到了这两者最大的差别:互联网服务是短连接、无状态、高延迟的,而游戏服务是长连接、有状态、低延迟的。但是这种过于干练的概括对于理解游戏服务端并没有很大的帮助。刚好那段时期本人用Python做了太多的游戏节日活动,有点烦躁,想通过自己从零搭建一些游戏服务端通用的组件来更好的理解隐藏在脚本接口之下的游戏服务端的核心业务。在看到这个知乎问题之后,萌生出了一个大胆的想法:用cpp做一个Demo性质的游戏服务端引擎mosaic_game来复刻当前使用的自研闭源游戏服务端引擎的核心功能,同时将这个引擎的功能设计与实现归纳整理为一本完整的书籍,为那些对游戏服务端有兴趣的开发人员提供一份比较系统且充满细节的参考资料。希望通过本书的介绍,能够让大家对游戏服务端开发有一个更全面的认识,了解其功能集合与职责所在。
随着后续工作的变动,逐渐开始接触到其他的商用游戏服务端引擎,最知名的就是BigWorld和Unreal Engine。我所在的大世界服务端组的业务重心就是将BigWorld核心的无缝大世界功能移植到Unreal Engine上,以提升Unreal Engine的单场景玩家承载能力。在做这个无缝大世界功能移植的过程中需要反复的去查阅这两个引擎的源代码,再加上我自己闭门造车的mosaic_game,发现虽然这三个游戏服务端引擎面对的问题相似,但是对应的解法却各有不同。同一个问题三种解法,着实有趣。
兴致起来了之后,我便修改了原有的开发计划,给mosaic_game增加了无缝大世界的支持。同时本书的内容也进行了大量的扩充,同一个业务主题会多个章节来分别介绍这三个引擎的解决方案,大致覆盖了下述内容:
- 通信管理,包括客户端与服务器之间,服务器与服务器之间的通信
- 会话管理,包括账号创建、登录、顶号、下线、断线重连等
- 数据持久化,包括玩家数据、场景数据、社交数据等
- 客户端请求响应,包括移动、聊天、社交、战斗、场景切换等
- 玩法流程控制,包括副本流程、怪物
AI等 - 实体状态同步,包括实体的位置同步、属性同步等,
- 分布式场景管理,包括分布式场景的动态扩缩容、无缝迁移等
在介绍这这些内容的时候,我都会附加这些内容的核心代码来方便读者去了解这些内容的实现细节。在章节膨胀和代码填充这两个因素的影响下,本书的篇幅也从原来的600页不到扩充到了现在的1500页。太多的代码贴在书中,会导致书籍的可读性下降。如果读者不想深究实现细节的话可以对这些代码进行跳过,对于不感兴趣的章节也可以跳过。
由于本人经验和精力有限,上述内容之外的一些游戏服务端的非常重要的业务并没有在本书中展开介绍,例如技能与战斗系统、脚本系统、日志收集系统、性能监控系统、运维部署系统、热更新系统、容灾系统等,欢迎对这些内容有深刻理解的游戏服务端开发人员来对本书进行补充。
游戏服务端架构介绍
游戏服务端架构演进
其实关于游戏服务端架构演进的内容,已经有很多前辈总结过了。本人从业没多少年,经历过的项目也是屈指可数,所以本章的存在只是为了全书的完整性,简单的介绍一下。对于更多细节感兴趣的读者可以去阅读skywind3000前辈写的游戏服务端架构发展史。
单进程架构
单进程架构是游戏服务端最简单也最久远的架构,起源于1978年诞生的游戏服务器Multi-User Dungeon,简称为MUD1。此时游戏服务器只有一个进程,玩家的客户端可以通过telnet协议连接到游戏服务器,然后就可以通过文本输入来控制自己的角色来进行游戏。
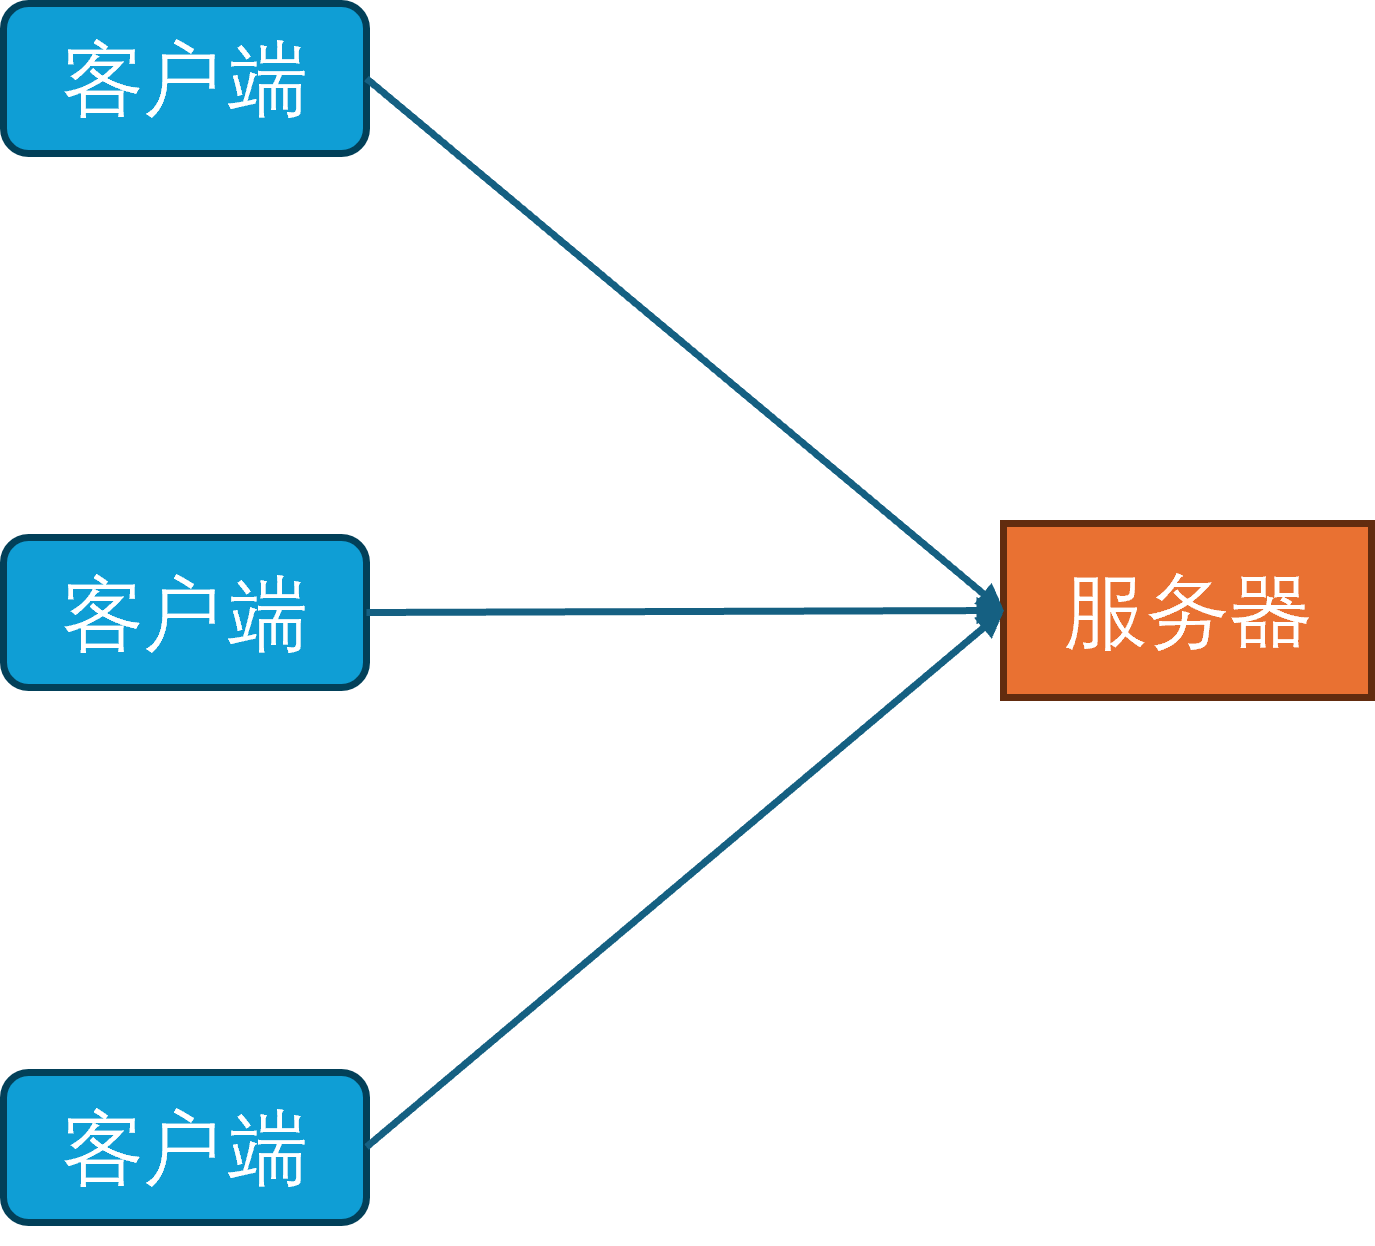
在MUD1中,服务器进程只有一个线程,网络收发使用非阻塞的网络IO模型,同时线程里会每隔1秒钟更新一次所有对象(网络收发,更新对象状态机,处理超时,刷新地图,刷新NPC)。同时玩家数据的持久化使用的是本地文件系统,每个玩家的数据都存储在一个单独的文件中。
数据库进程
随着互联网和硬件的发展,游戏内容也从纯文字进化为了图形化。由于图形化界面相对于纯文本界面能携带更多的信息,就使得单个玩家的游戏数据量急速膨胀。同时由于网络的逐渐普及,游戏服务器要服务器的玩家数量也逐渐增多。在这两个因素的影响下,基于小文件的持久化系统已经力不从心,因此开始引入数据库作为新的持久化手段。
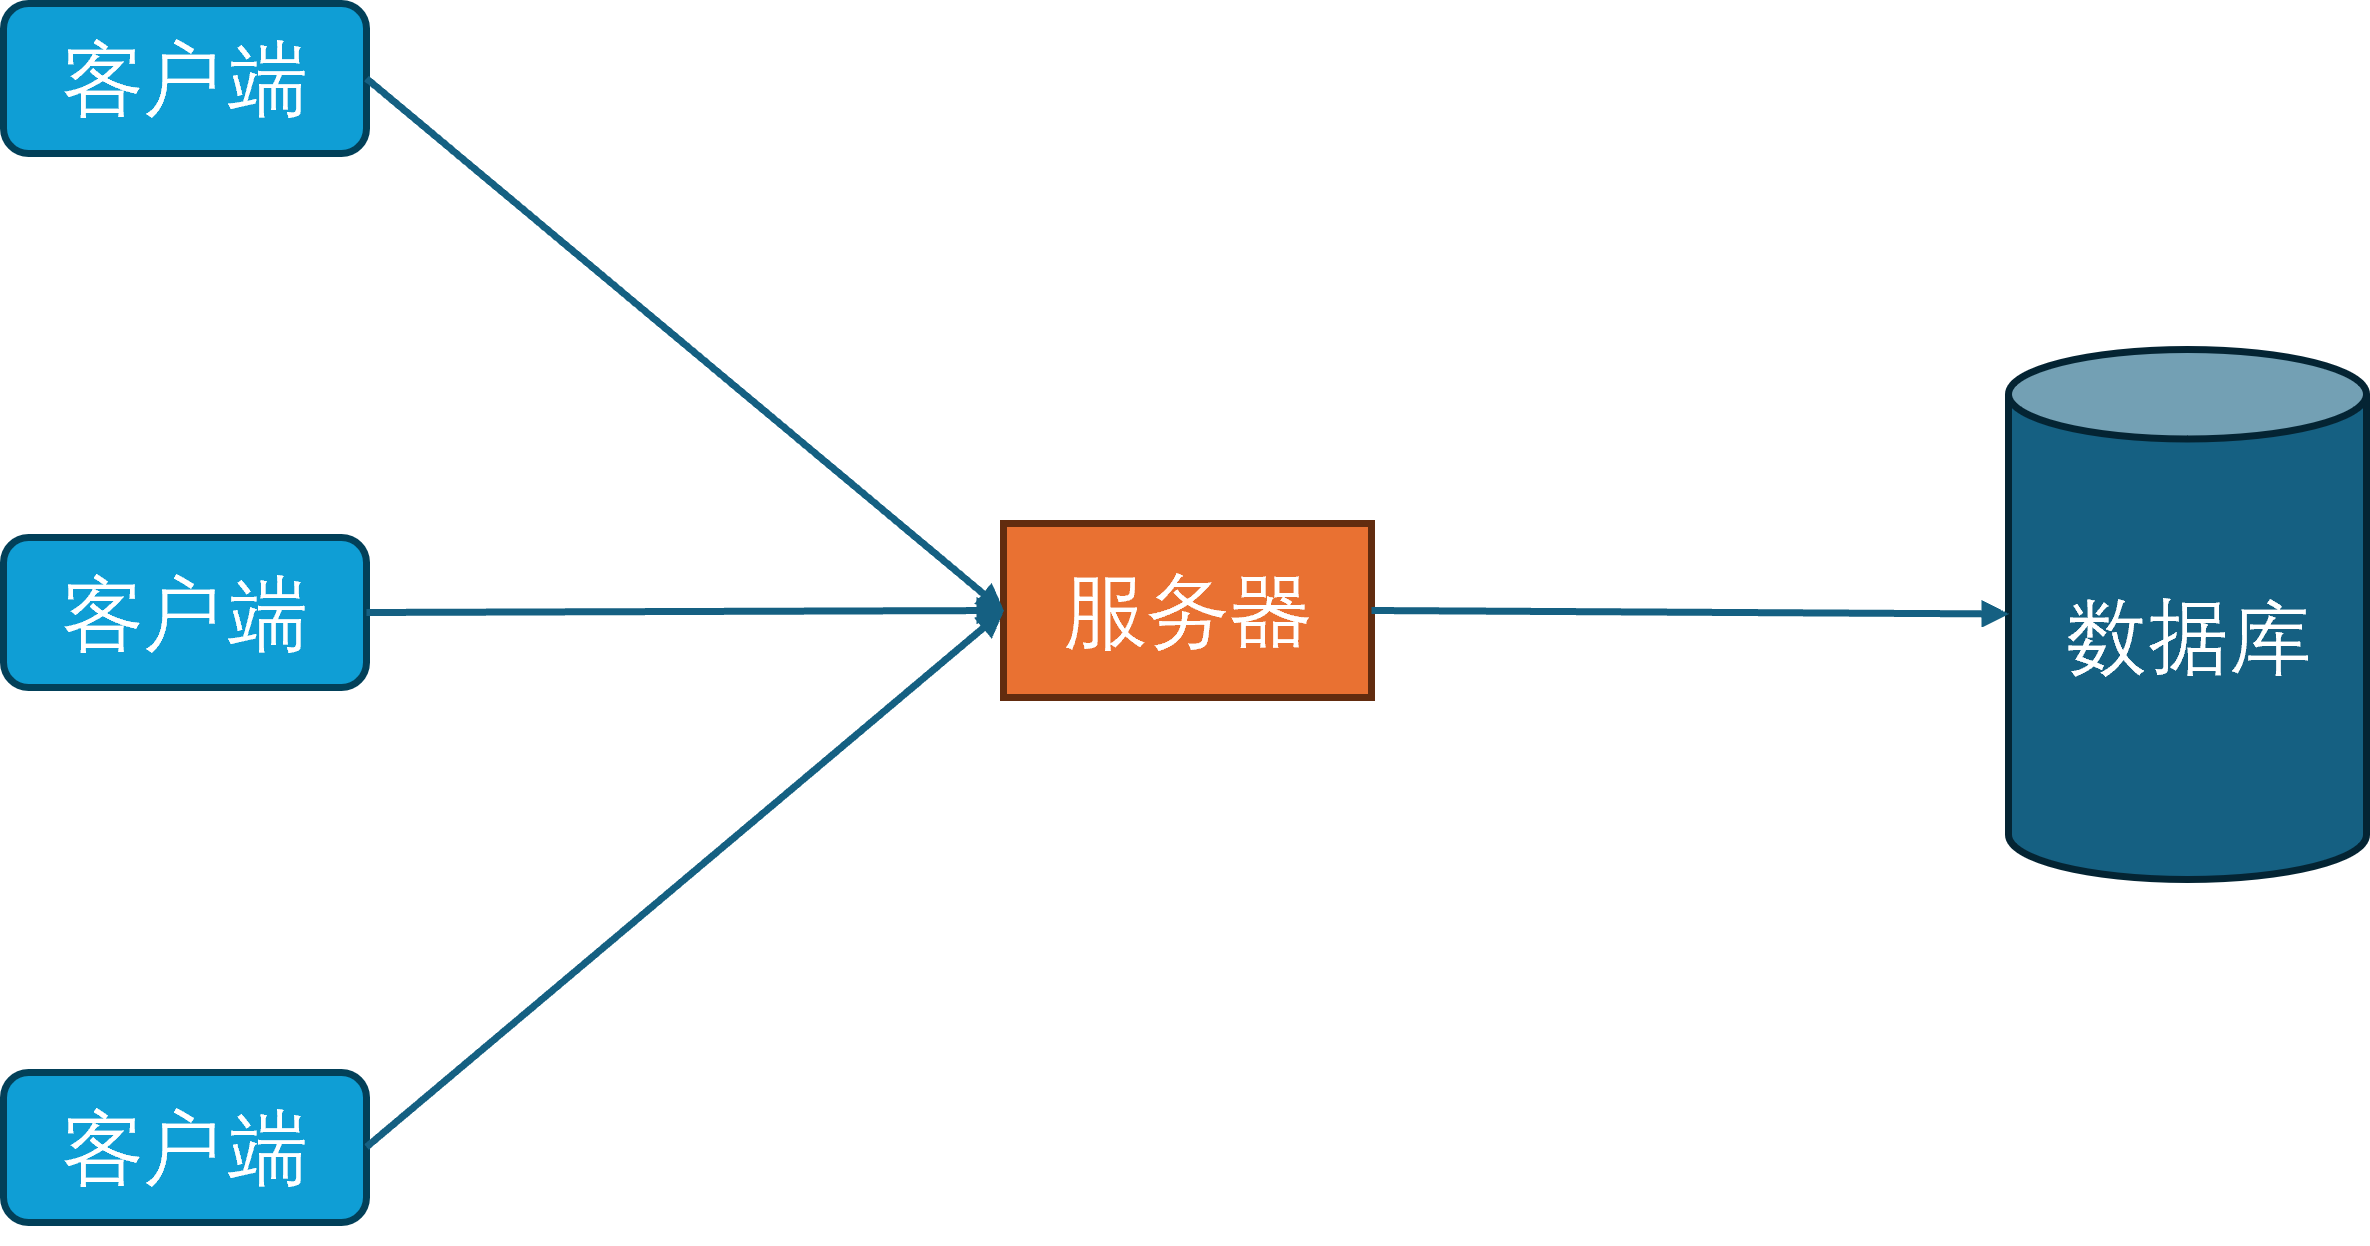
同时为了规范化游戏内对数据库的访问,开始引入数据库访问层。数据库访问层负责处理所有对数据库的访问请求,包括玩家数据的读取和写入。
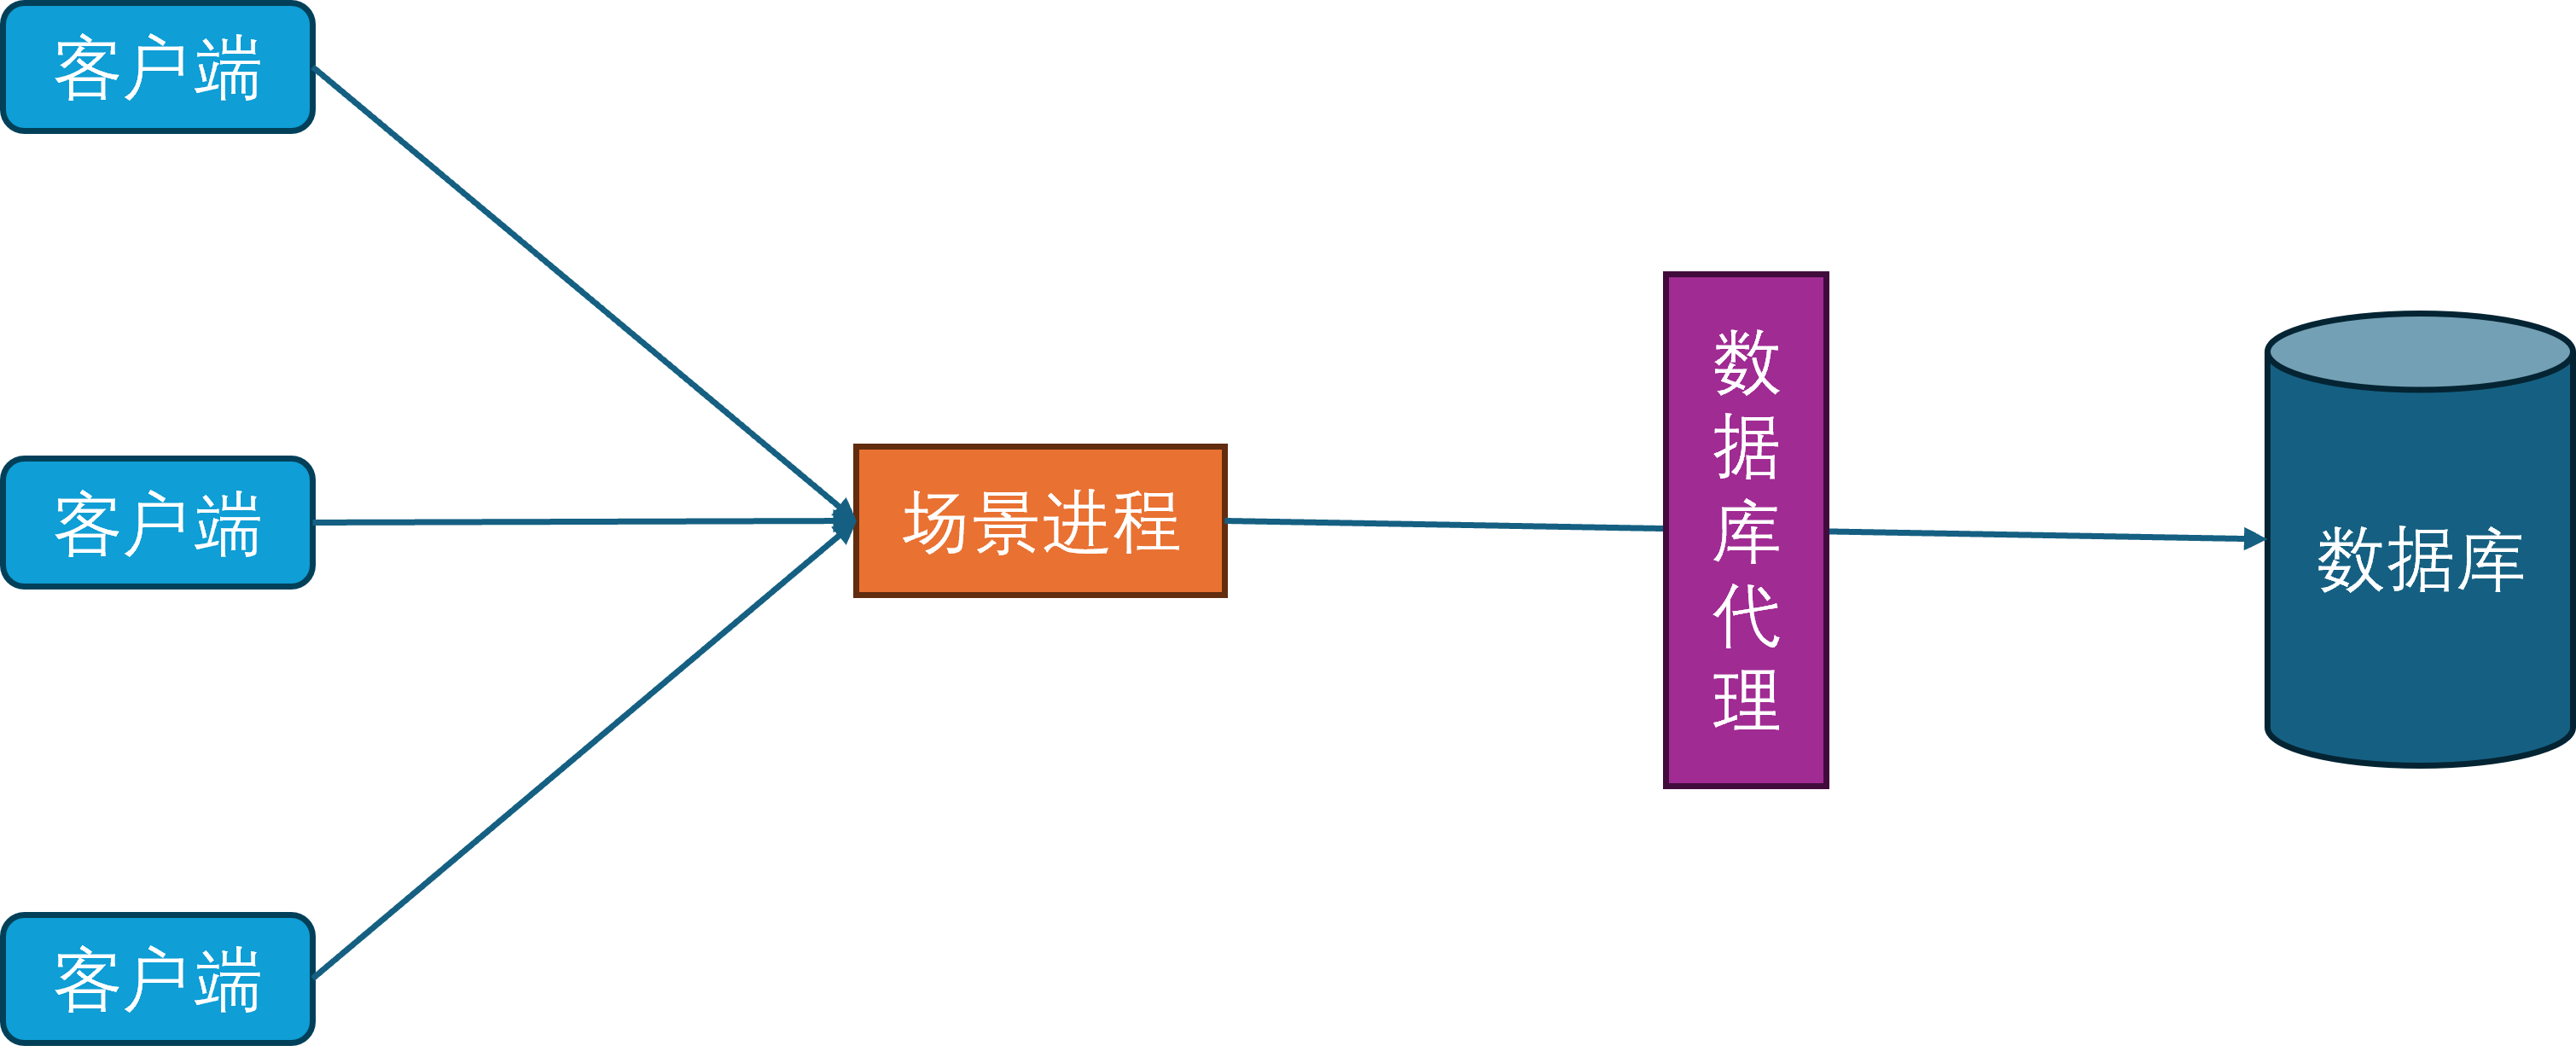
场景进程
当玩家在线数量持续增多时,当前的单场景进程的CPU就成为了瓶颈。为了提高游戏服务器的同时在线人数,开始对游戏场景进行水平划分,每个场景进程负责若干个独立的场景,每个场景负责管理一部分玩家。这种结构也就是常说的分区分服。
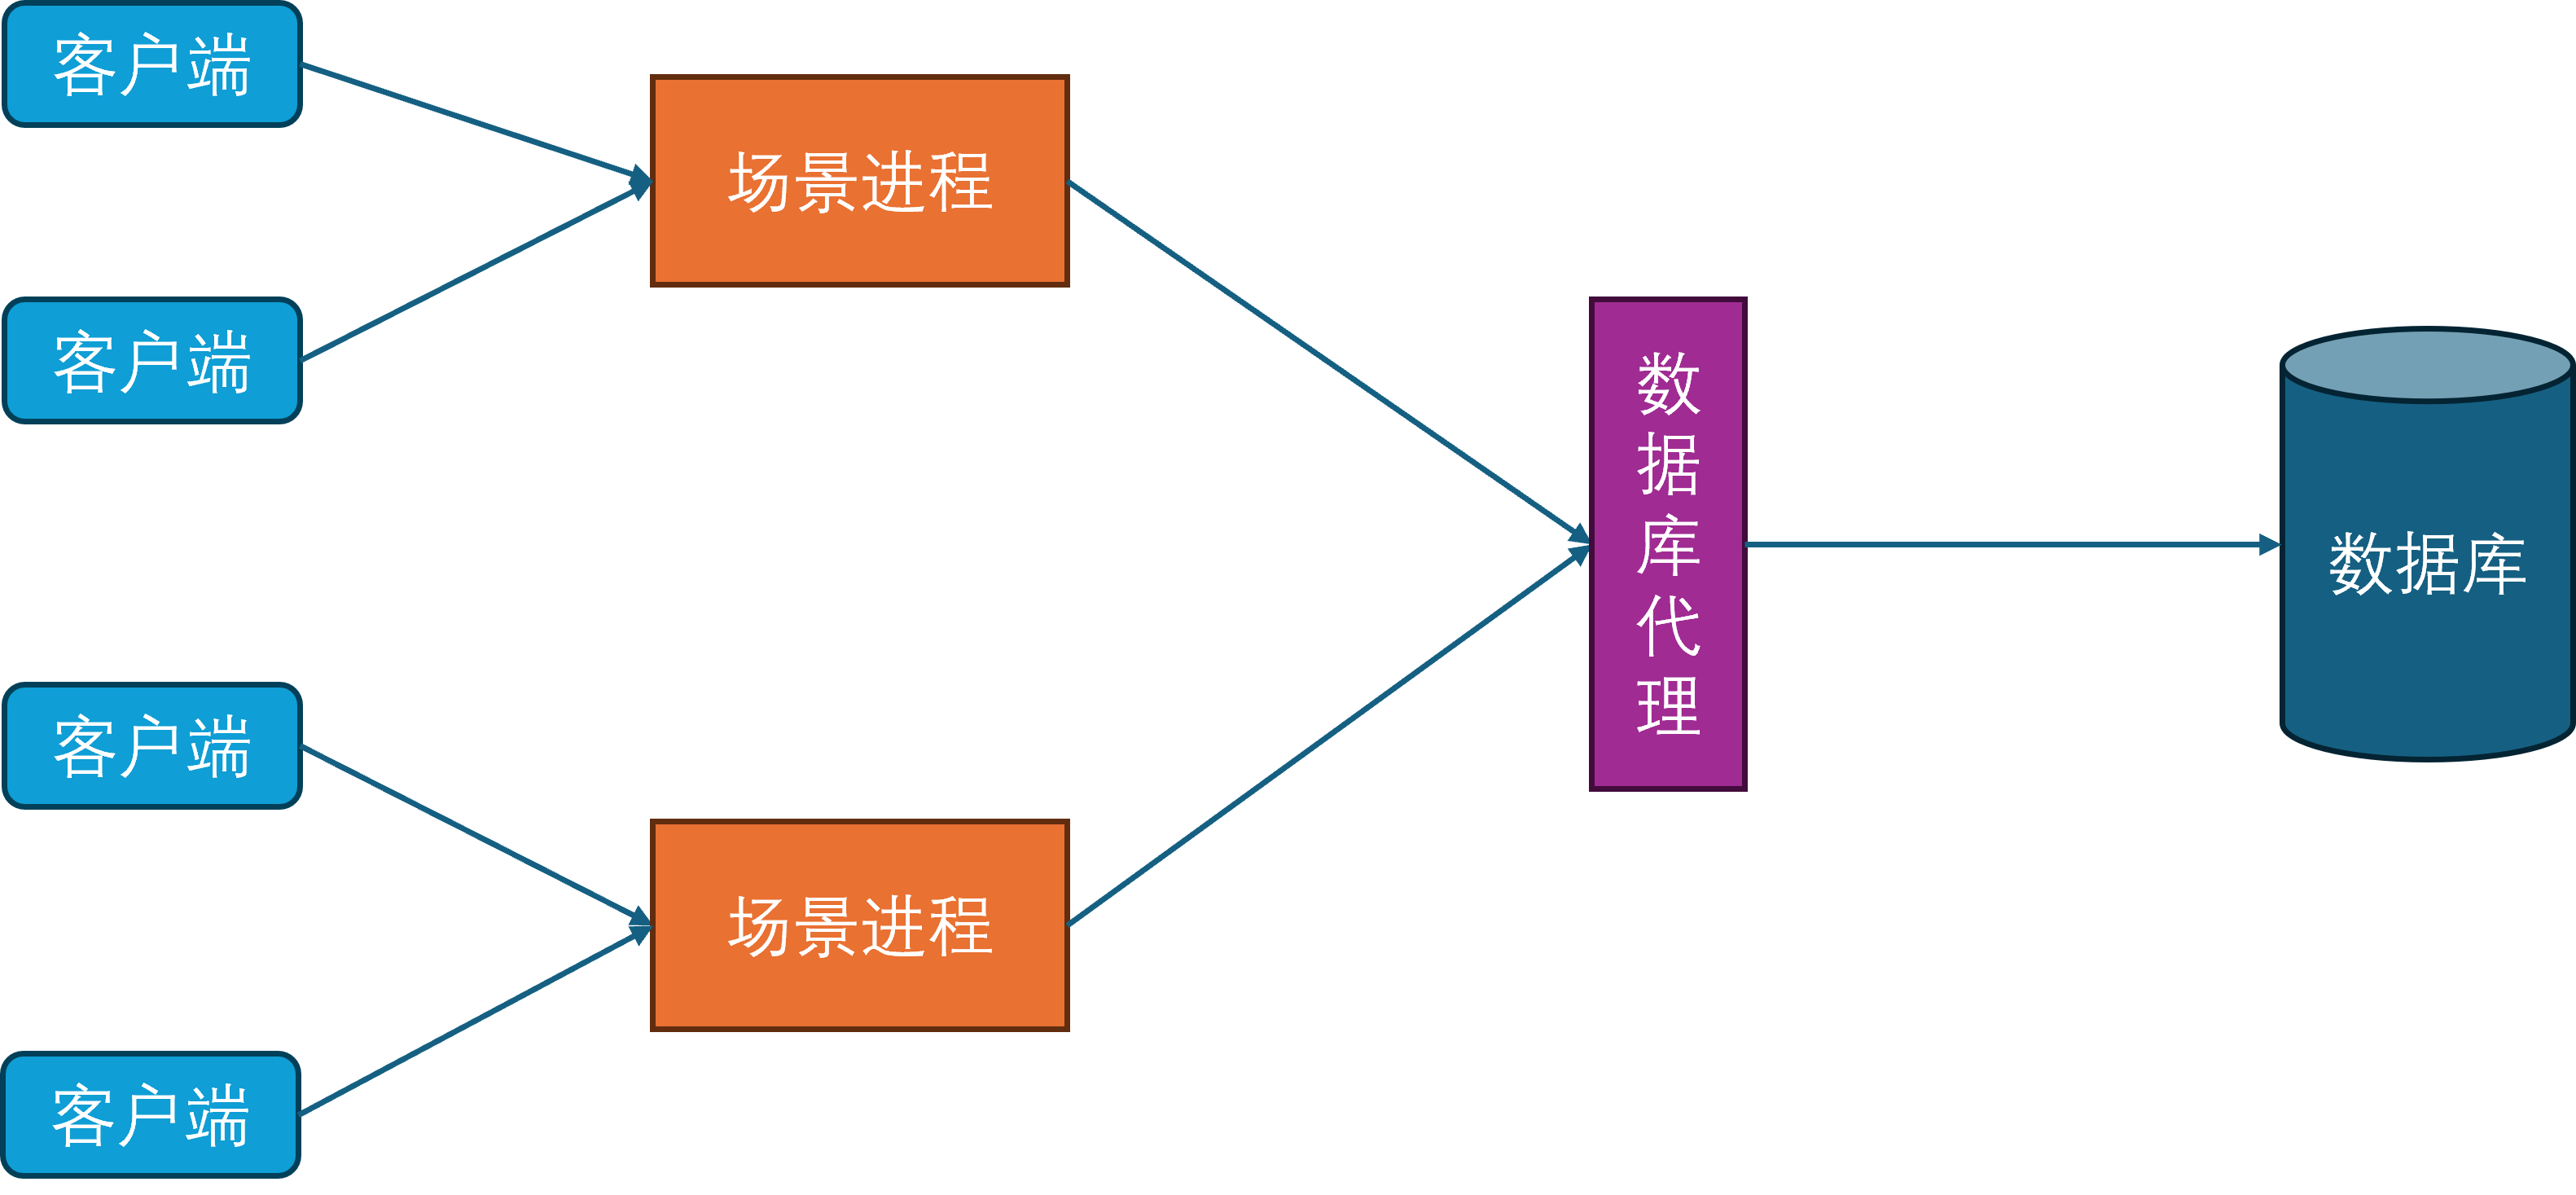
在这样的设计下,只要有无限的场景进程实例,就可以无限的扩展游戏服务器的同时在线人数。
由于玩家不会一直呆在同一个场景里,但是不同的场景被不同的场景进程负责。此时最简单的方法就是从原有的场景进程中下线并断开连接,然后往新的场景进程发起登录请求,这个下线再上线的过程会涉及到非常多的状态修改和数据交互。为了避免这些操作对游戏的影响,不同的场景进程之间开始出现互连,这样玩家数据就可以从一个场景进程传递到另外一个场景进程,避免了存库再从数据库中进行拉取的操作,这个过程就叫做玩家的迁移(Migration)。此时客户端只需要在迁移完成之后根据角色所在的最新场景进程通信地址发起一个新连接,同时断开对老的场景进程的连接,即可恢复游玩。这样就避免了繁重的上下线流程,减少了切换场景进程的延迟。
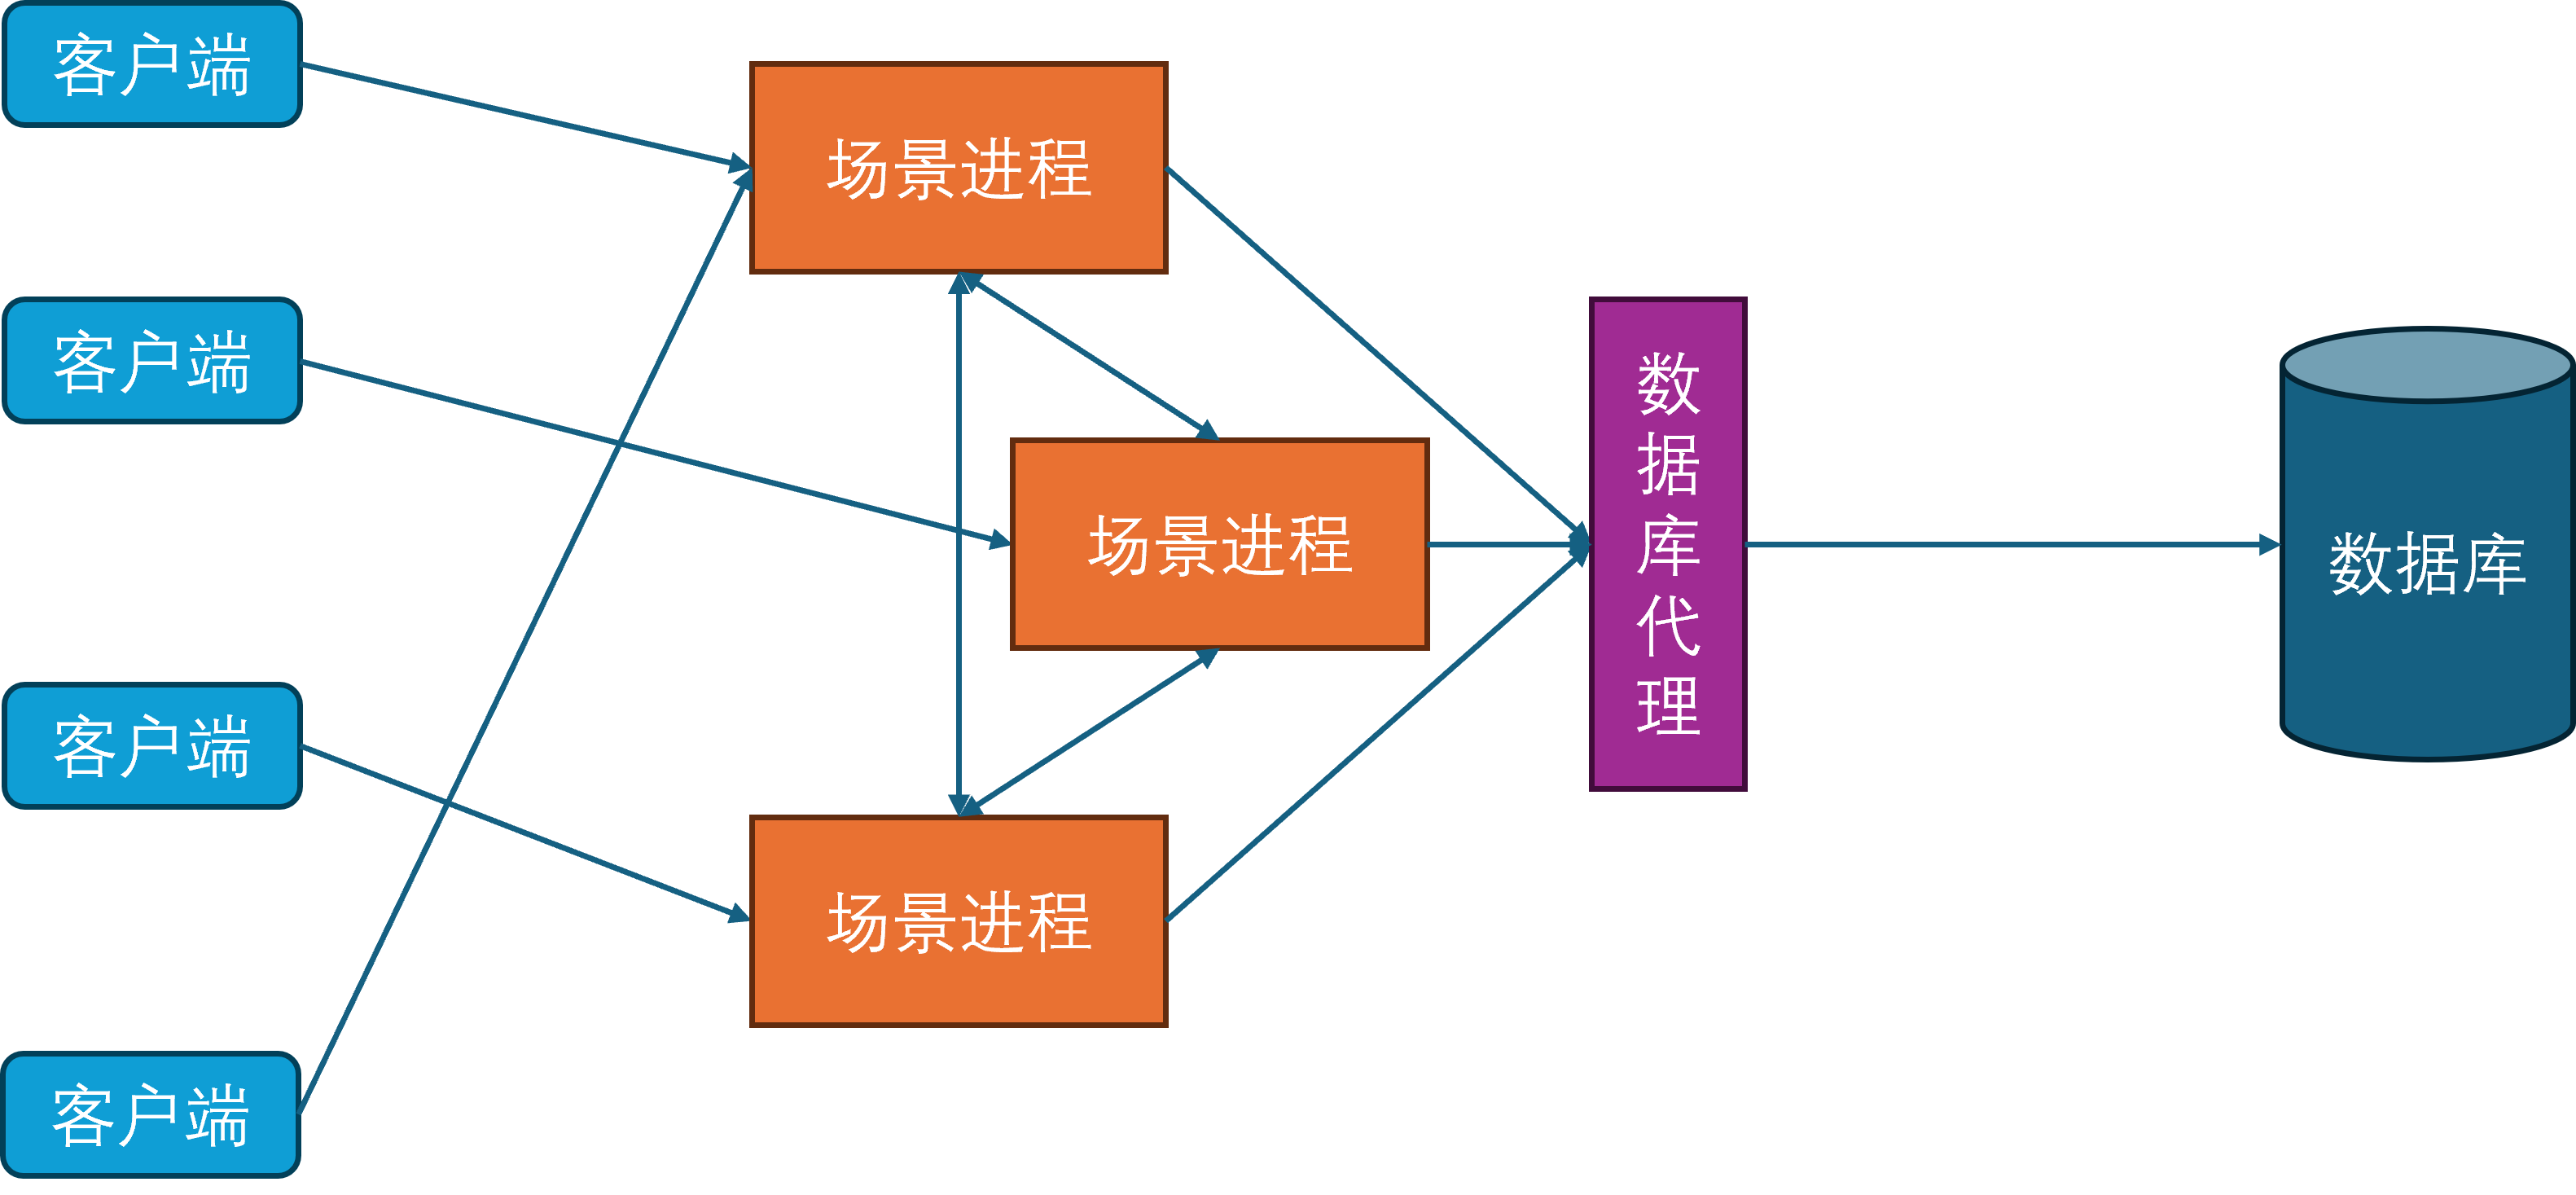
网关进程
由于常见的网络协议都建立在TCP之上,而TCP连接的握手和关闭过程都比较冗长,这就给玩家切换场景进程带来了不少的延迟。为了进一步减少这种迁移延迟,开始引入网关进程。网关进程承担的角色与Nginx类似,作为反向代理中转场景进程与客户端之间的通信,因此网关进程会与所有的场景进程建立连接。
此时客户端不再连接场景进程,只连接网关进程。这样做的好处是当一个玩家切换场景服务器的时候,客户端连接是不会断的,只需要在网关进程上更新一下这个客户端对应的场景进程关联。同时由于网关进程的功能比较简单,基本只负责通信转发,所以其单进程承载量可以达到上万。网关进程的引入还有一个好处就是可以隐藏后面的场景进程,提供一个统一的接入点的同时,避免了内部服务器暴露在公网,从而减少了服务器被DDOS和入侵的风险。
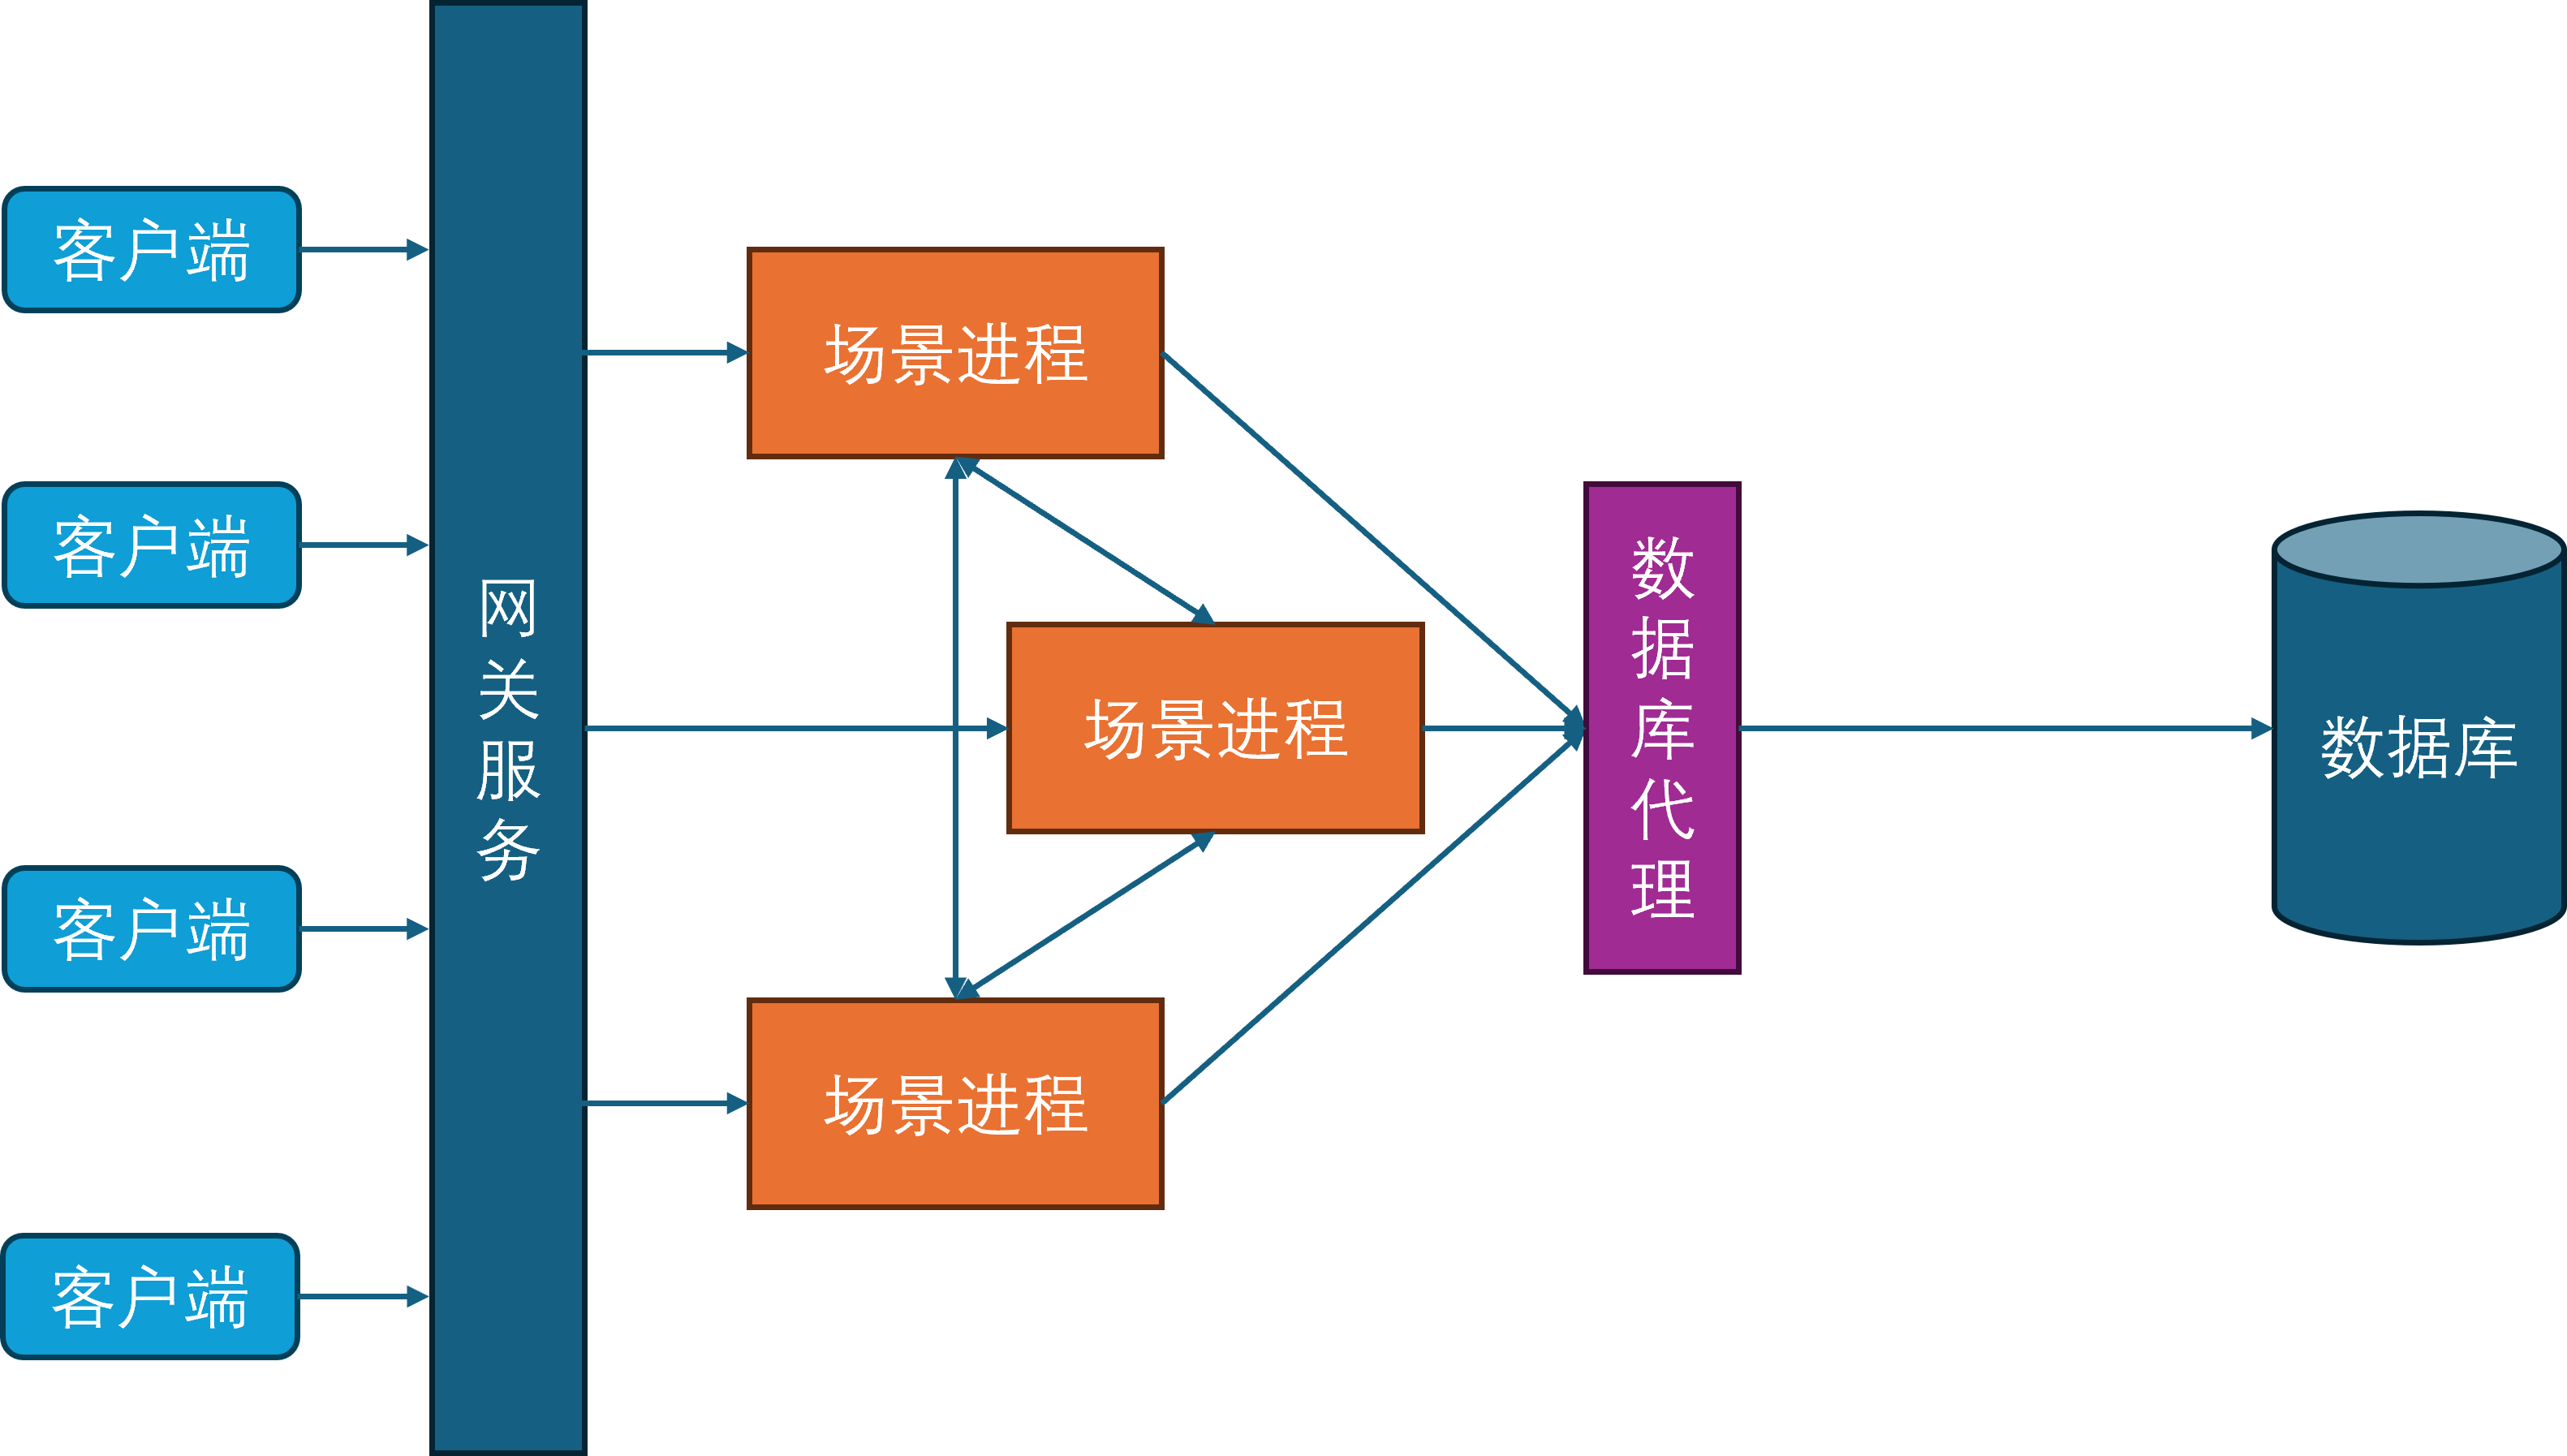
服务进程
随着游戏社交性的增强,游戏内玩家的交互对象不再仅限于同场景的其他玩家,还可以与其他场景的玩家进行交互,典型例子就是在副本内与其他不在当前副本里的好友聊天。为了支持这样的与场景无关的玩法需求,开始引入服务进程。服务进程负责处理所有与场景无关的游戏逻辑,比如登录服务、场景管理服务、玩家之间好友、组队、聊天等。

此时所有的场景进程都与服务进程建立连接,服务进程也会与其他的所有服务进程发起连接,因为服务之间可能出现相互调用,例如给好友发消息会先通过好友服务验证两者之间的好友关系是否存在,然后再通过聊天服务将聊天记录存库,最后再通过在线通知服务来提醒对方进行消息接收。
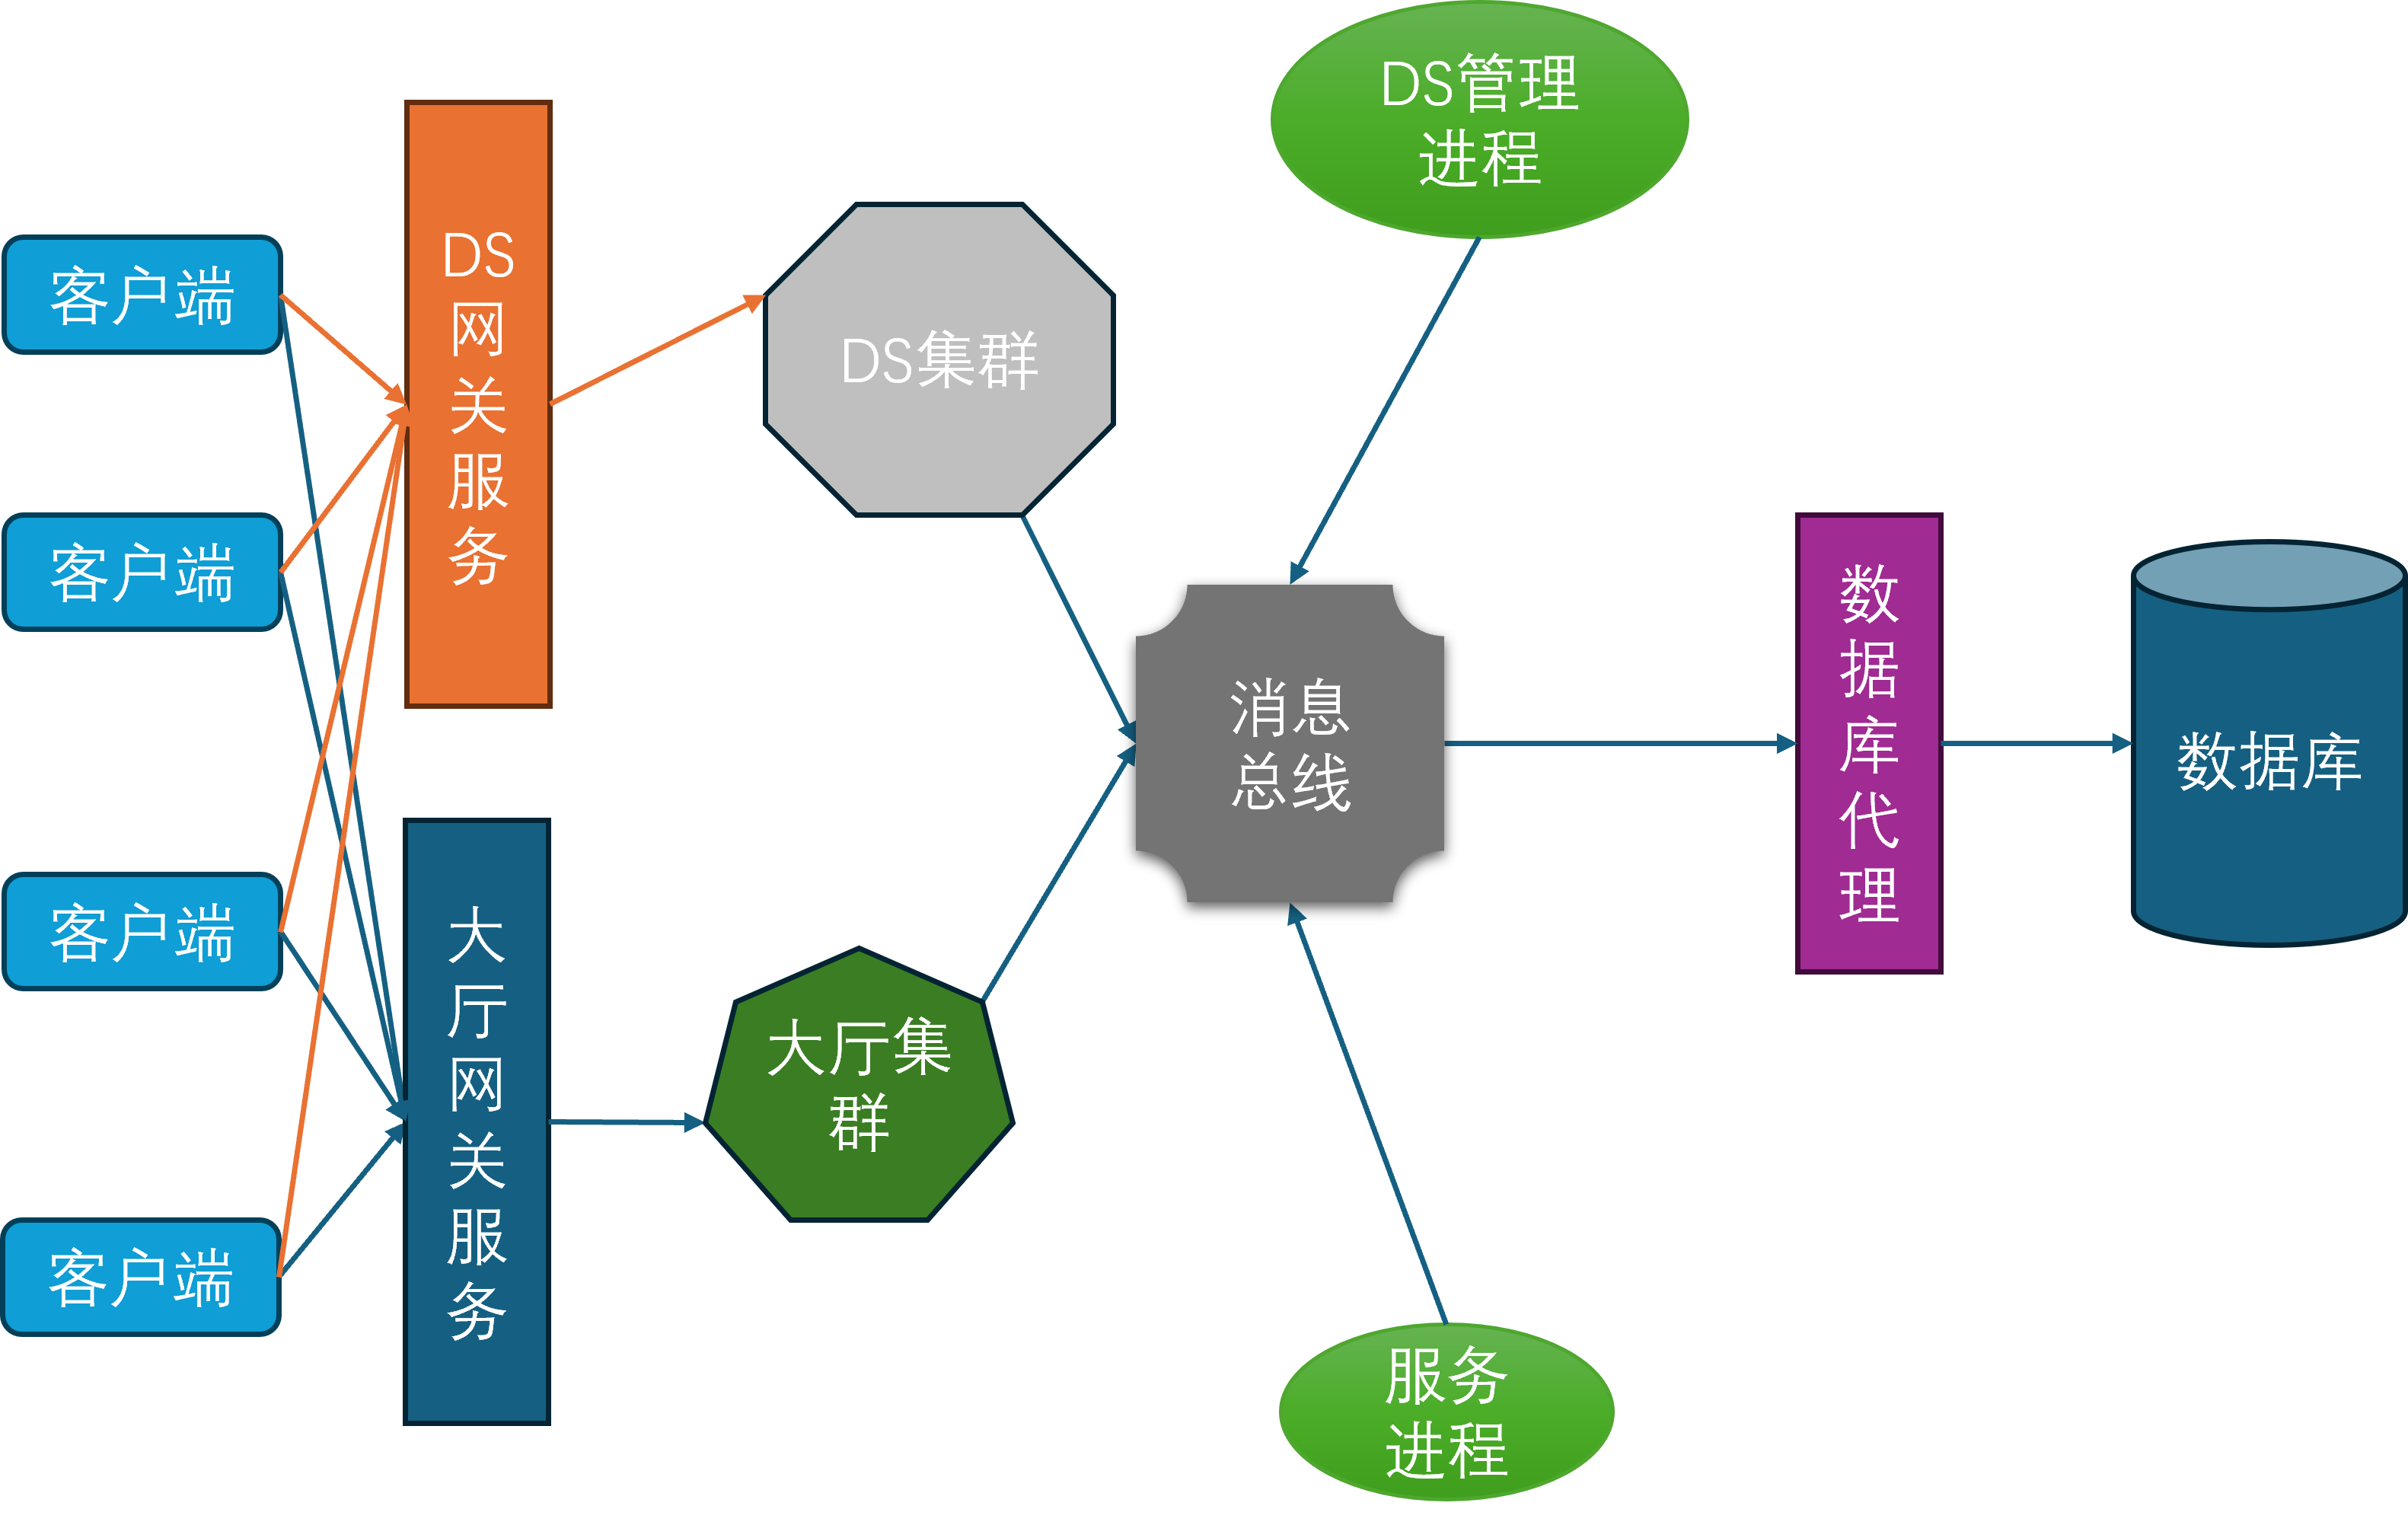
消息总线
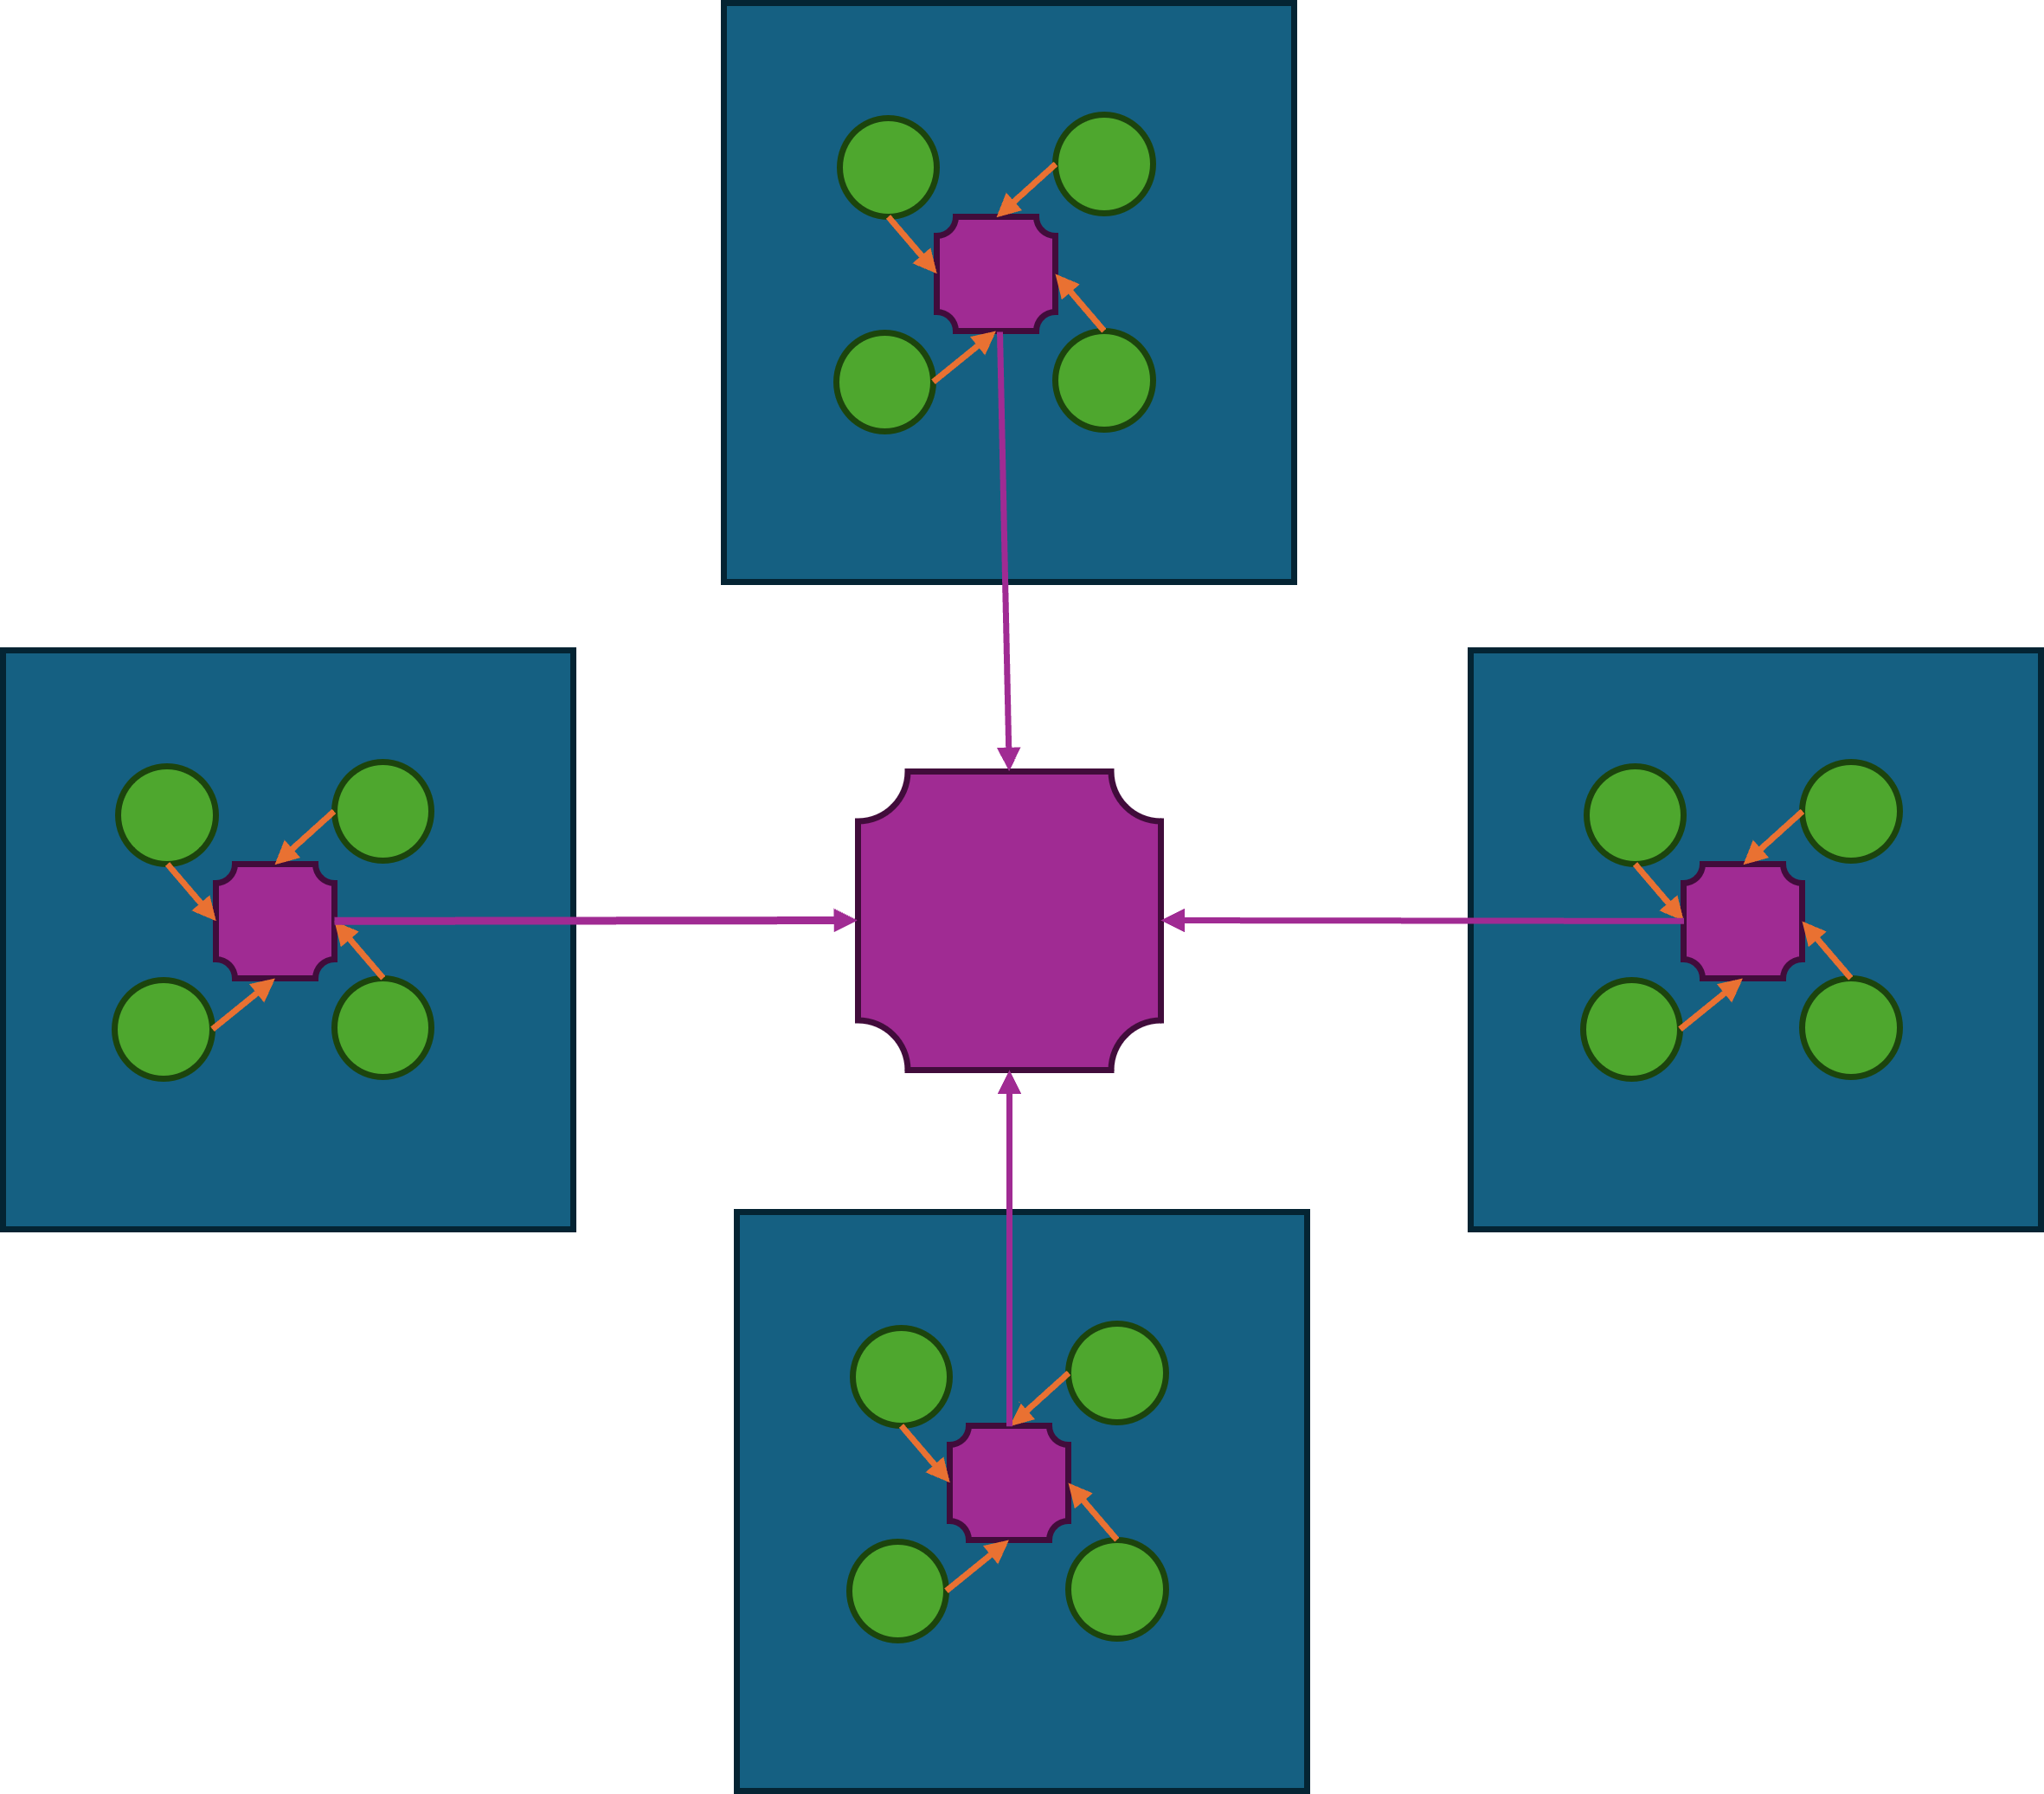
在上面的服务器架构图中可以发现,场景进程与服务进程在某种程度上来说是等价的,对于包含所有场景进程的集合A和包含所有服务进程的集合B而言,A中的任意进程都需要维持到A+B这个集合中任意进程的连接,同时B中的任意进程也需要维持到A+B这个集合中任意进程的连接。所以A+B集合内的连接数量是的,是集合总大小的平方复杂度。虽然服务进程是有限的,但是场景进程基本上可以水平的无限扩充,同时场景进程还可以动态的扩缩容。在这种情况下,随着场景进程的数量逐渐增多,连接管理也会越来越复杂。为了减少连接管理的复杂度,隐藏进程间通信的细节,开始引入消息总线进程。
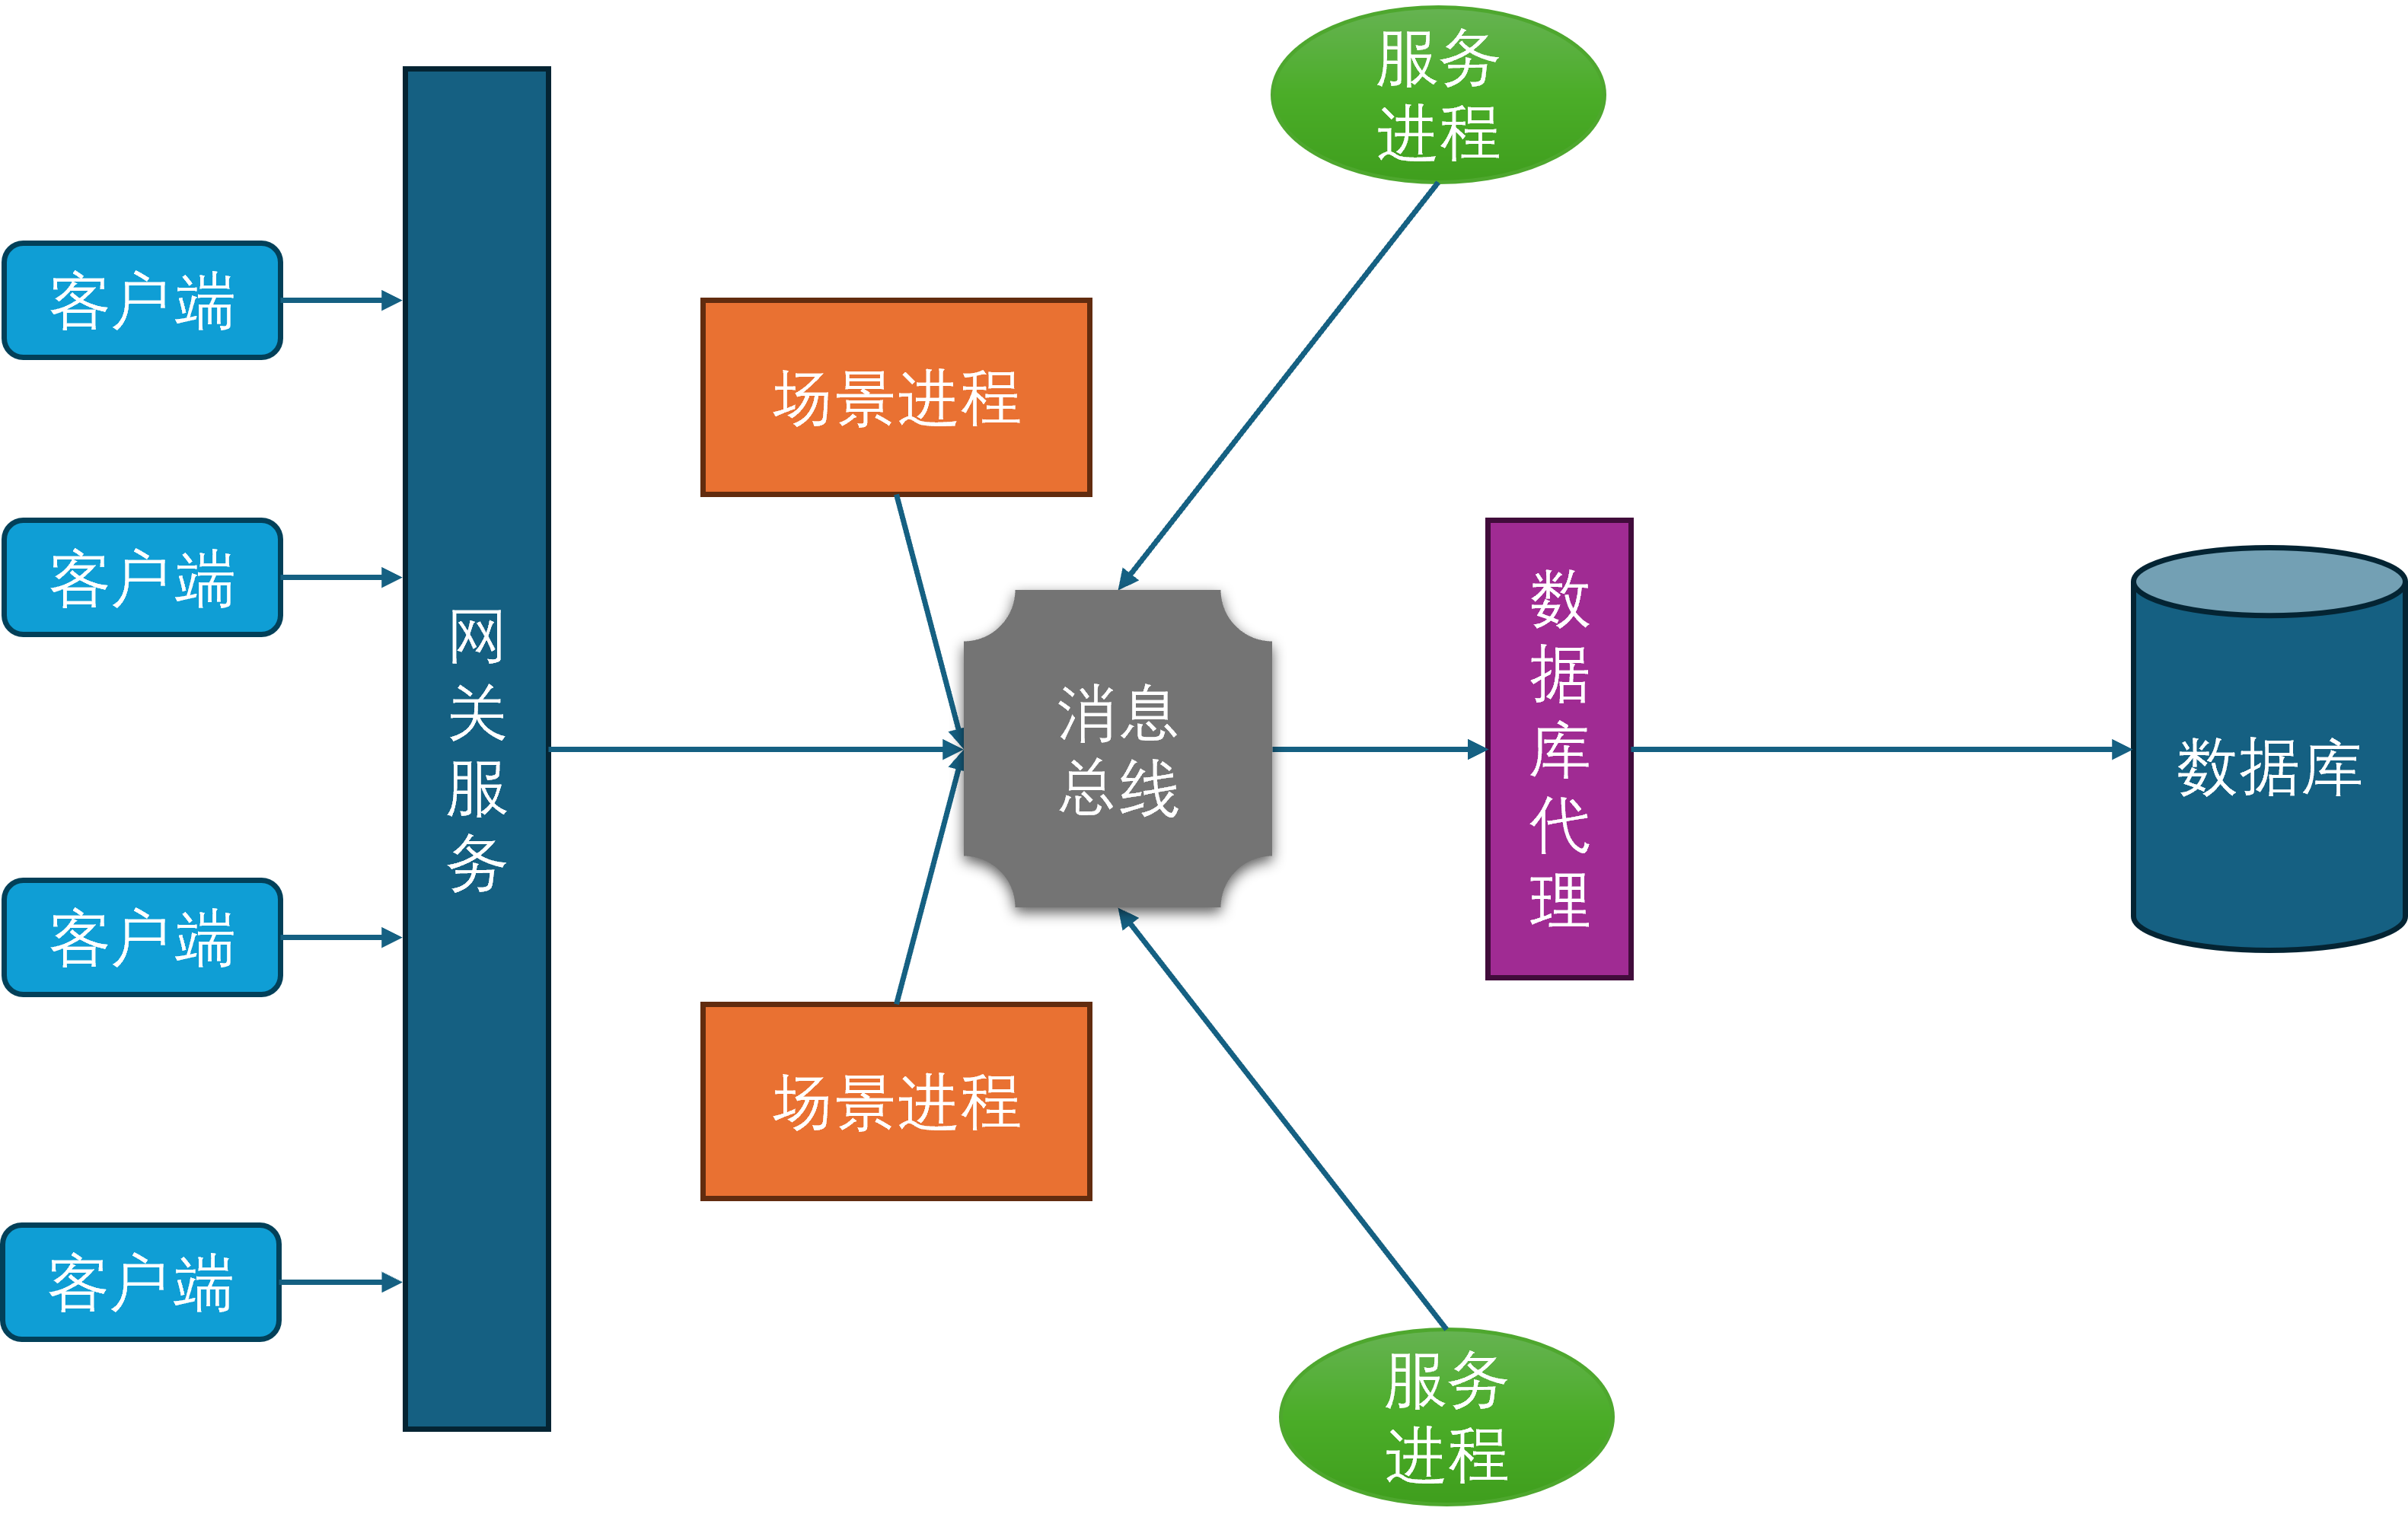
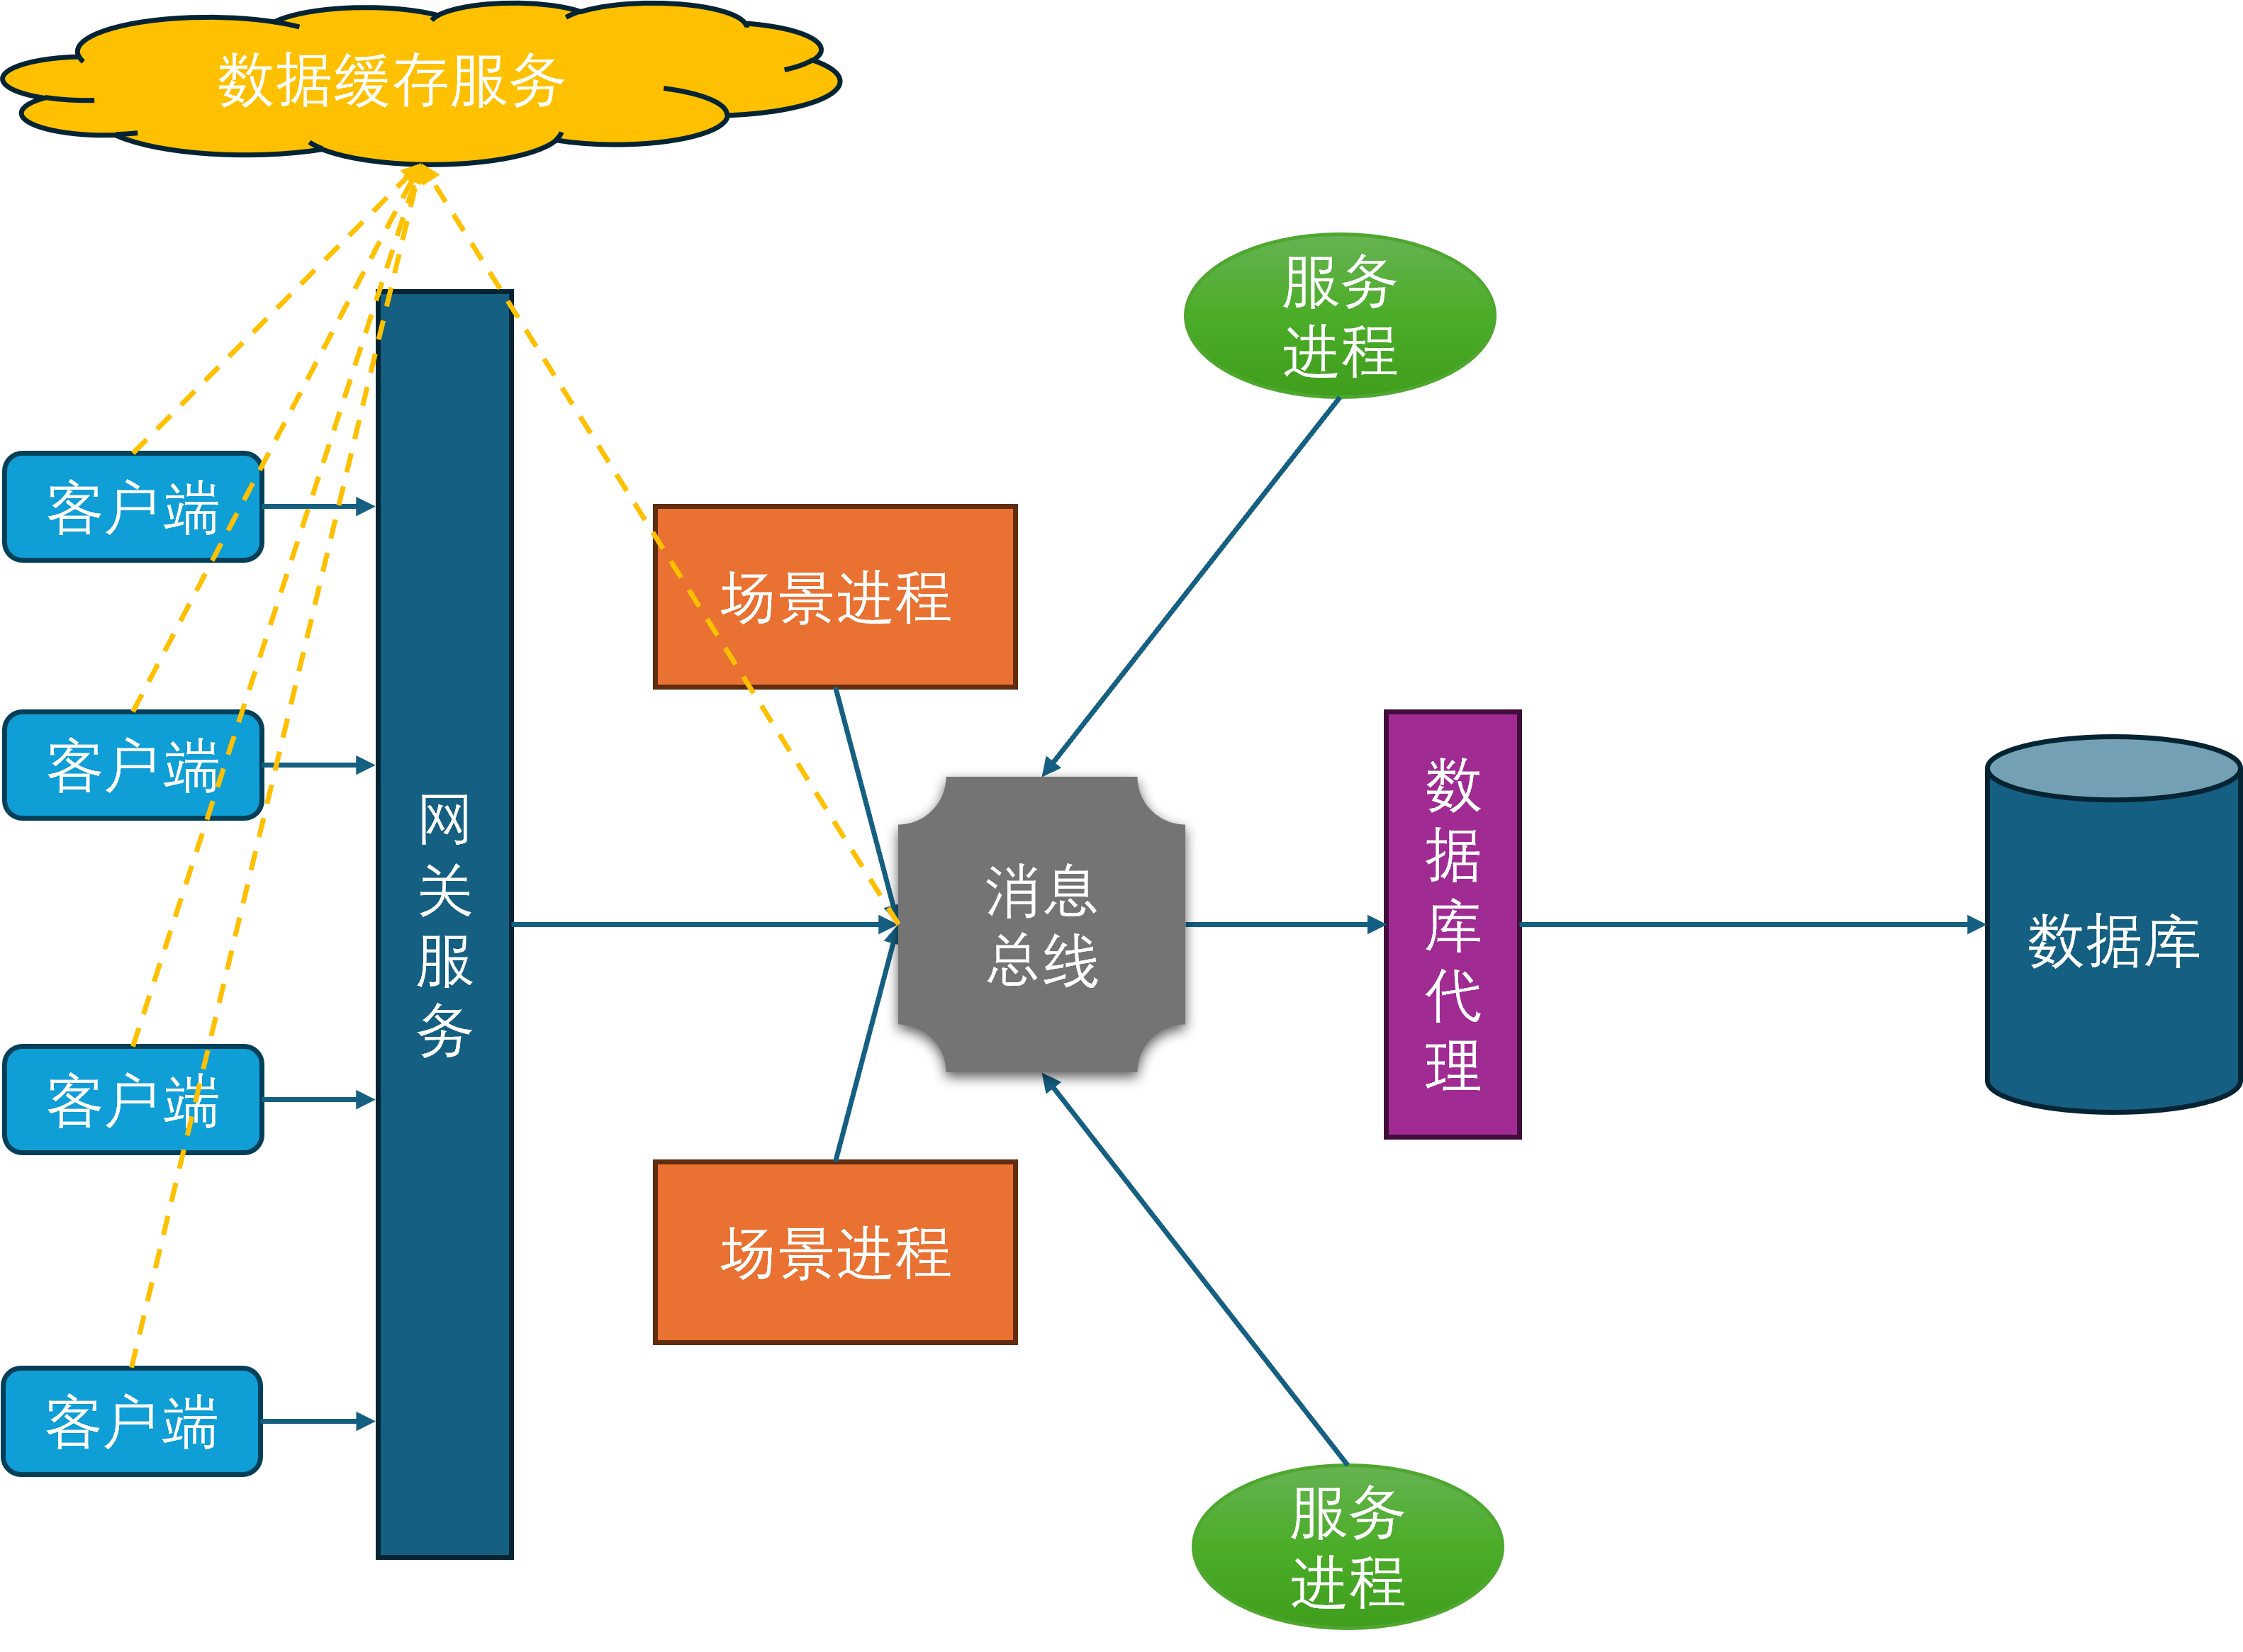
所有的场景进程、服务进程、网关进程、数据库代理进程都与消息总线建立连接,并通过消息总线来进行通信。这样就避免了每个进程都需要维护到其他所有进程的连接,同时也隐藏了进程间通信的细节,简化了开发和运维的复杂度。
一般来说,消息总线相关的进程会在每台物理机器上部署一个,这台物理机上的所有其他进程都会发起到本机消息总线进程的连接。然后每台机器上的消息总线进程又会统一的连接到一个全局的消息总线分发器,这个分发器会负责将消息路由到对应机器的消息总线进程上,并由目标机器的消息总线进程进一步分发到业务进程中。这样设计相对于所有业务进程都直接连接到全局的消息总线分发器来说,能够有效的减少消息总线分发器的网络连接数量。虽然消息转发相对于直接通过消息总线分发器来转发多了两次通信,但是这两次通信都是本机通信,速度很快,因此不会带来显著的延迟。如果消息的目标在本机的话,则不需要经过消息总线分发器,直接可以通过本机的消息总线进程来直接投递。
缓存服务
在当前设计下,客户端对于游戏数据的读取都需要经过网关->场景进程这两层中转,如果数据在服务进程上则会多加一层。对于一些变化频率不高但是拉取次数很多的数据,例如玩家的头像基本信息、定期结算的排行榜等,这些数据可以考虑放到游戏服务器之外去存储。这样客户端对这些数据的查询就可以完全不走前述的网关->场景进程这两层中转,同时有效的降低游戏服务器的CPU负载和流量压力。典型的数据缓存服务就是Redis集群,这个集群通过http的方式来暴露数据的查询与修改接口,这样客户端与服务端都可以很方便的与这个集群执行互操作。同时由于Redis集群的性能与吞吐量都很高,整体的机器收益是正的。而且这个Redis集群一般非常稳定,不需要跟随游戏服务器去更新部署,不会给服务端带来额外的维护负担。综合上述几个优点,基于Redis的数据缓存服务在游戏服务端非常流行。
分布式场景
在上述架构中,一个场景只会存留在一个场景进程中,所以这个场景内的玩家数量就会受到单个进程的计算能力限制。为了提升单场景的玩家数量上限,场景进程开始引入多线程,将一些计算密集型的阻塞任务放到多线程中执行,例如寻路线程、物理线程、网络线程、AOI线程等。这样做的好处是可以充分利用多核处理器的性能,降低主线程的一些负载,从而可以提升主线程单场景的玩家数量。但是由于游戏内的绝大部分的业务逻辑都是线性的,不方便拆分为异步任务投递到其他线程中,所以主线程单场景的玩家数量提升终归有限。
为了绕过这种由于主线程的性能瓶颈导致的单场景玩家数量上限问题,开始引入分布式场景。分布式场景的设计思想是将一个场景拆分成多个子场景,每个子场景都运行在一个独立的场景进程中。这样做的好处是可以将场景内的玩家数量分散到多个进程中,从而可以极大提升单逻辑场景的玩家数量上限。

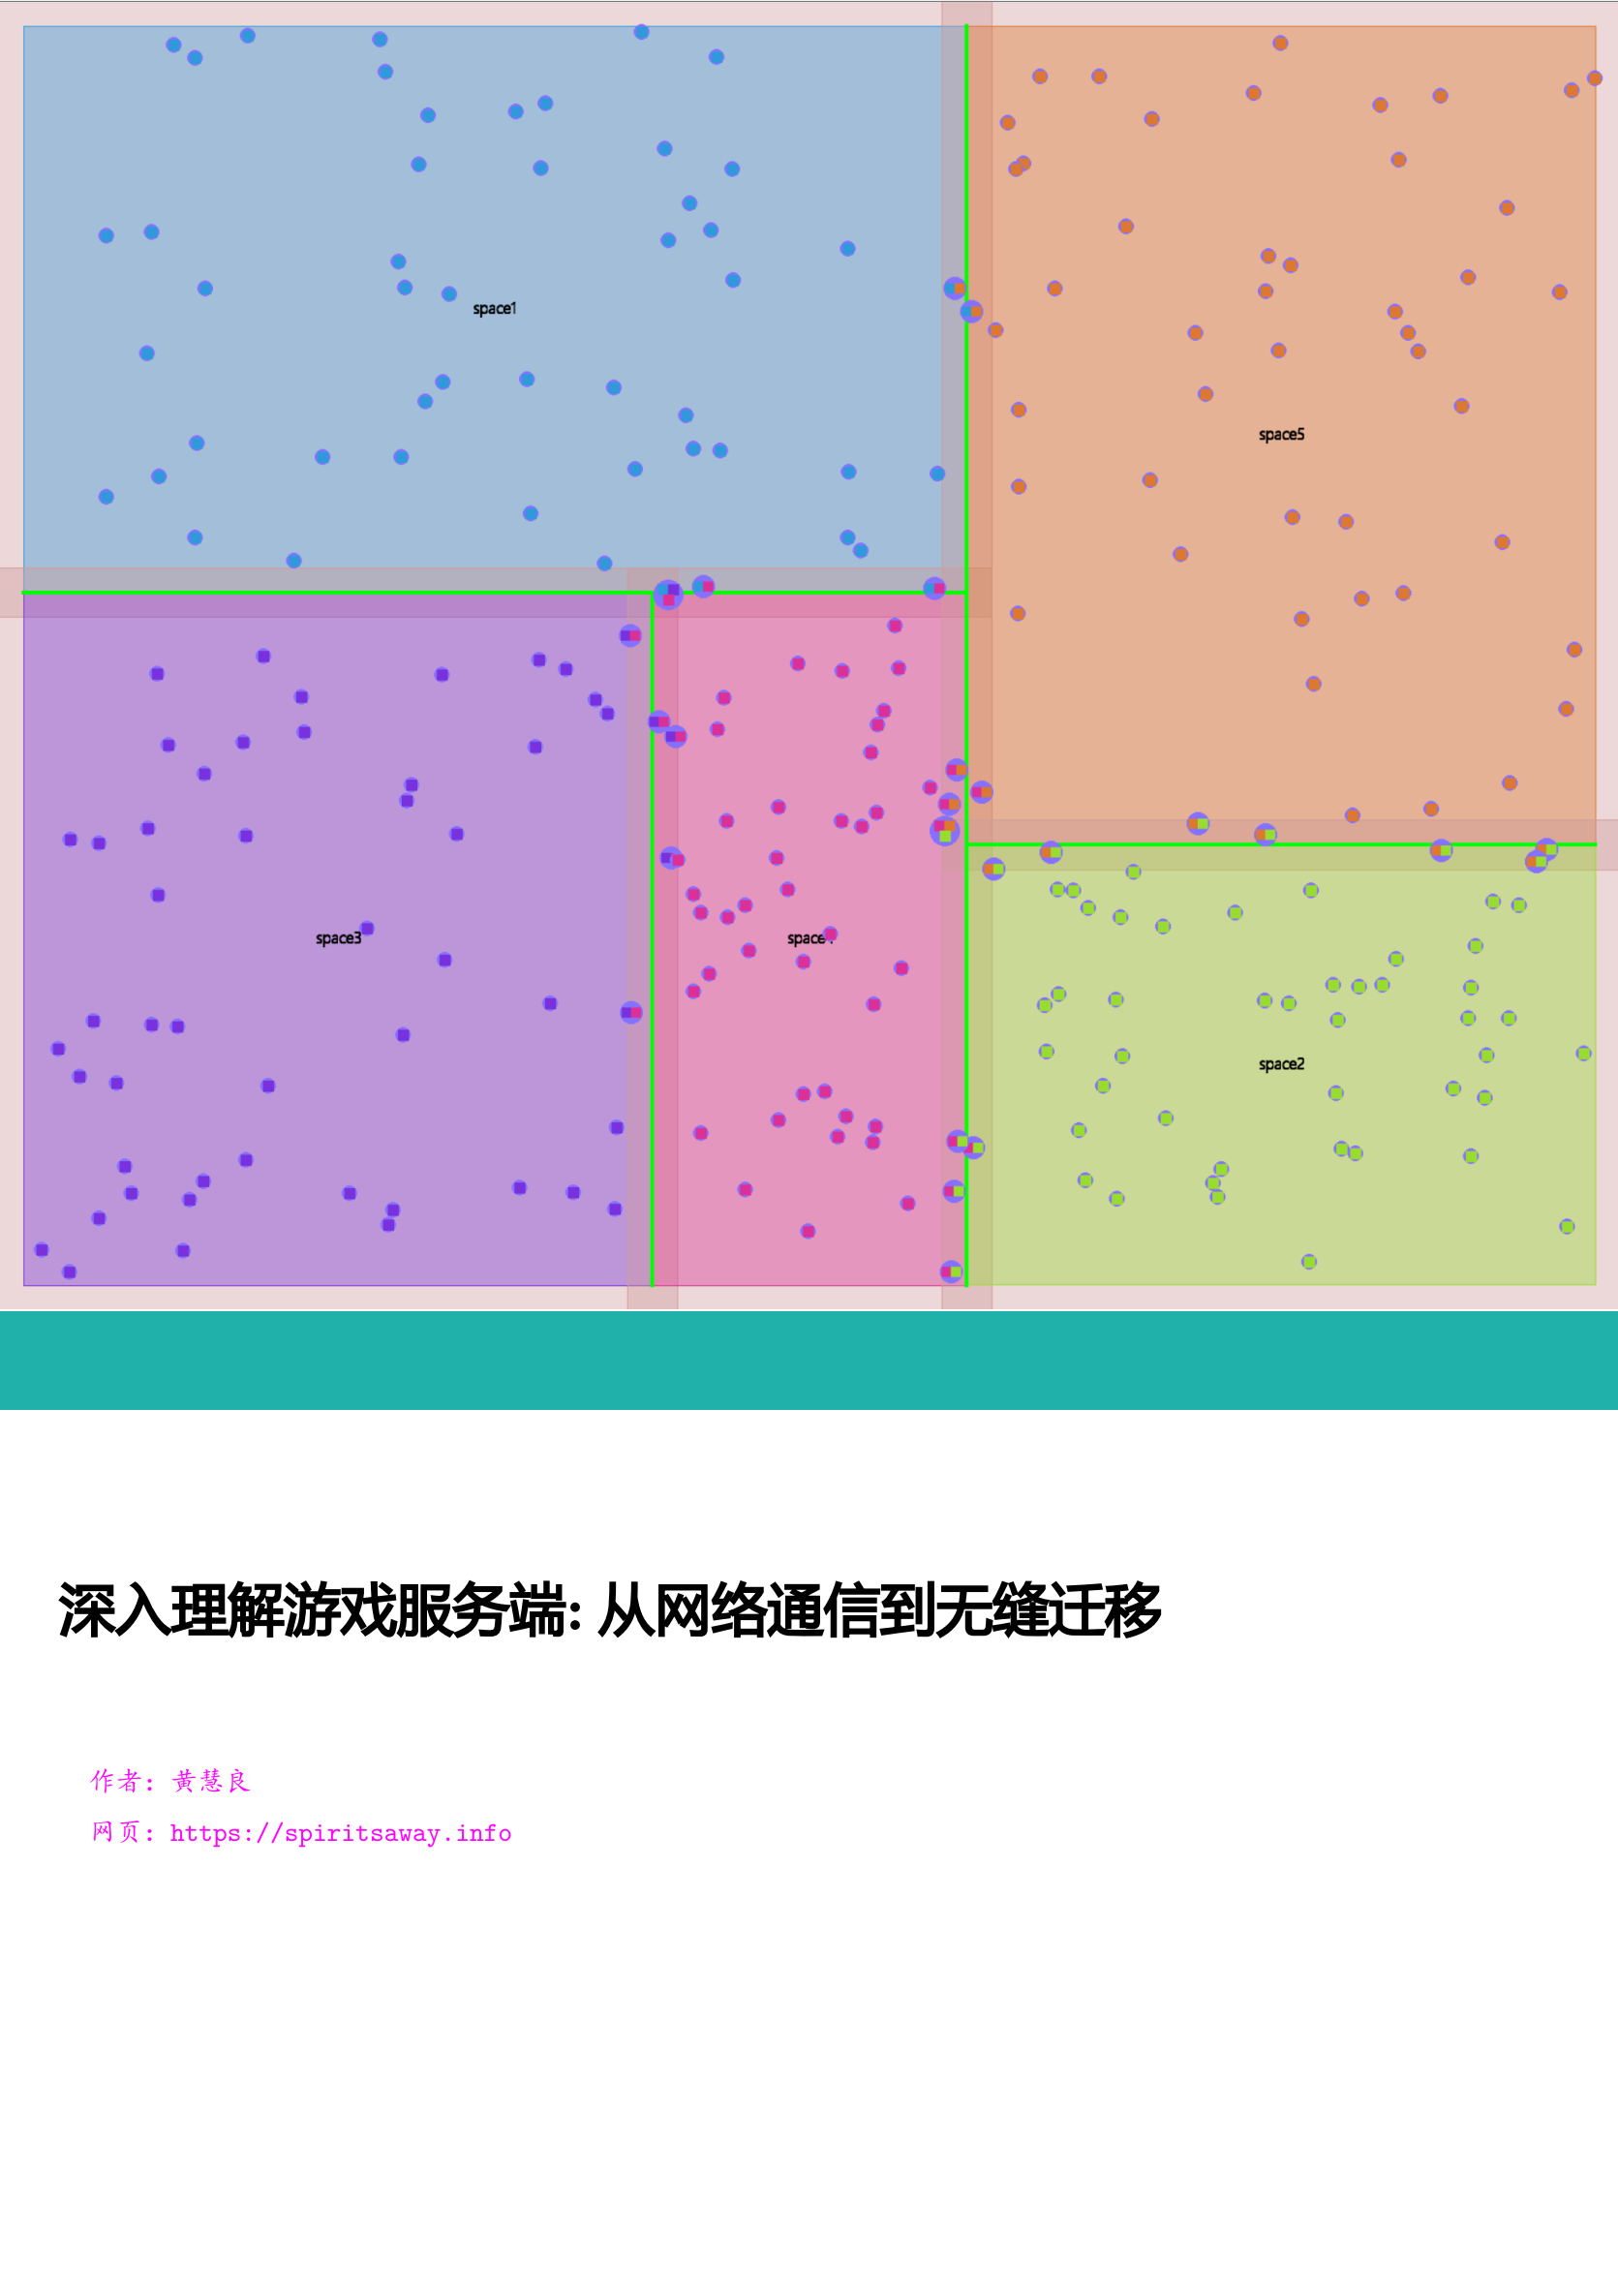
这个场景划分并不是预先指定好的,而是随着场景内玩家数量的变化而动态调整的。例如当场景内玩家数量超过了某个阈值时,就会将场景拆分成多个子场景。当场景内玩家数量减少到某个阈值时,就会将多个子场景合并成一个场景。这个动态调整子场景布局的概念就叫做动态分区(Dynamic Partitioning)。为了方便计算边界以及合并、拆分,这些子场景的形状一般都是矩形。
由于玩家能够自由的在不同的子场景之间移动,一旦玩家从一个子场景移动到另一个子场景,就需要将玩家从原场景进程中移除,并将玩家添加到目标场景进程中,也就是需要执行一次玩家的迁移(migration)流程。由于常规的状态同步设计里一个玩家只能看到单进程内的其他玩家,这种越过边界导致的进程切换就会让客户端出现非常明显的同步状态变化。即属于上一个场景的实体都会被销毁,同时会突然同步当前场景里可见的一些实体。这种突然且剧烈的状态变化会给游戏体验带来非常严重的割裂感,解决这种由于迁移导致的客户端同步状态剧烈变化的技术就是无缝迁移(Seamless Migration)。
游戏服务端架构样例
在本书中,我将详细的介绍Bigworld、Unreal Engine、mosaic_game这三个游戏引擎在服务端的一些业务上的具体实现。为了方面读者理解后面章节中对那些充满了源代码的内容,在这里就先大致的介绍一些这三个引擎的基础设计以及一些核心概念。
BigWorld 服务端介绍
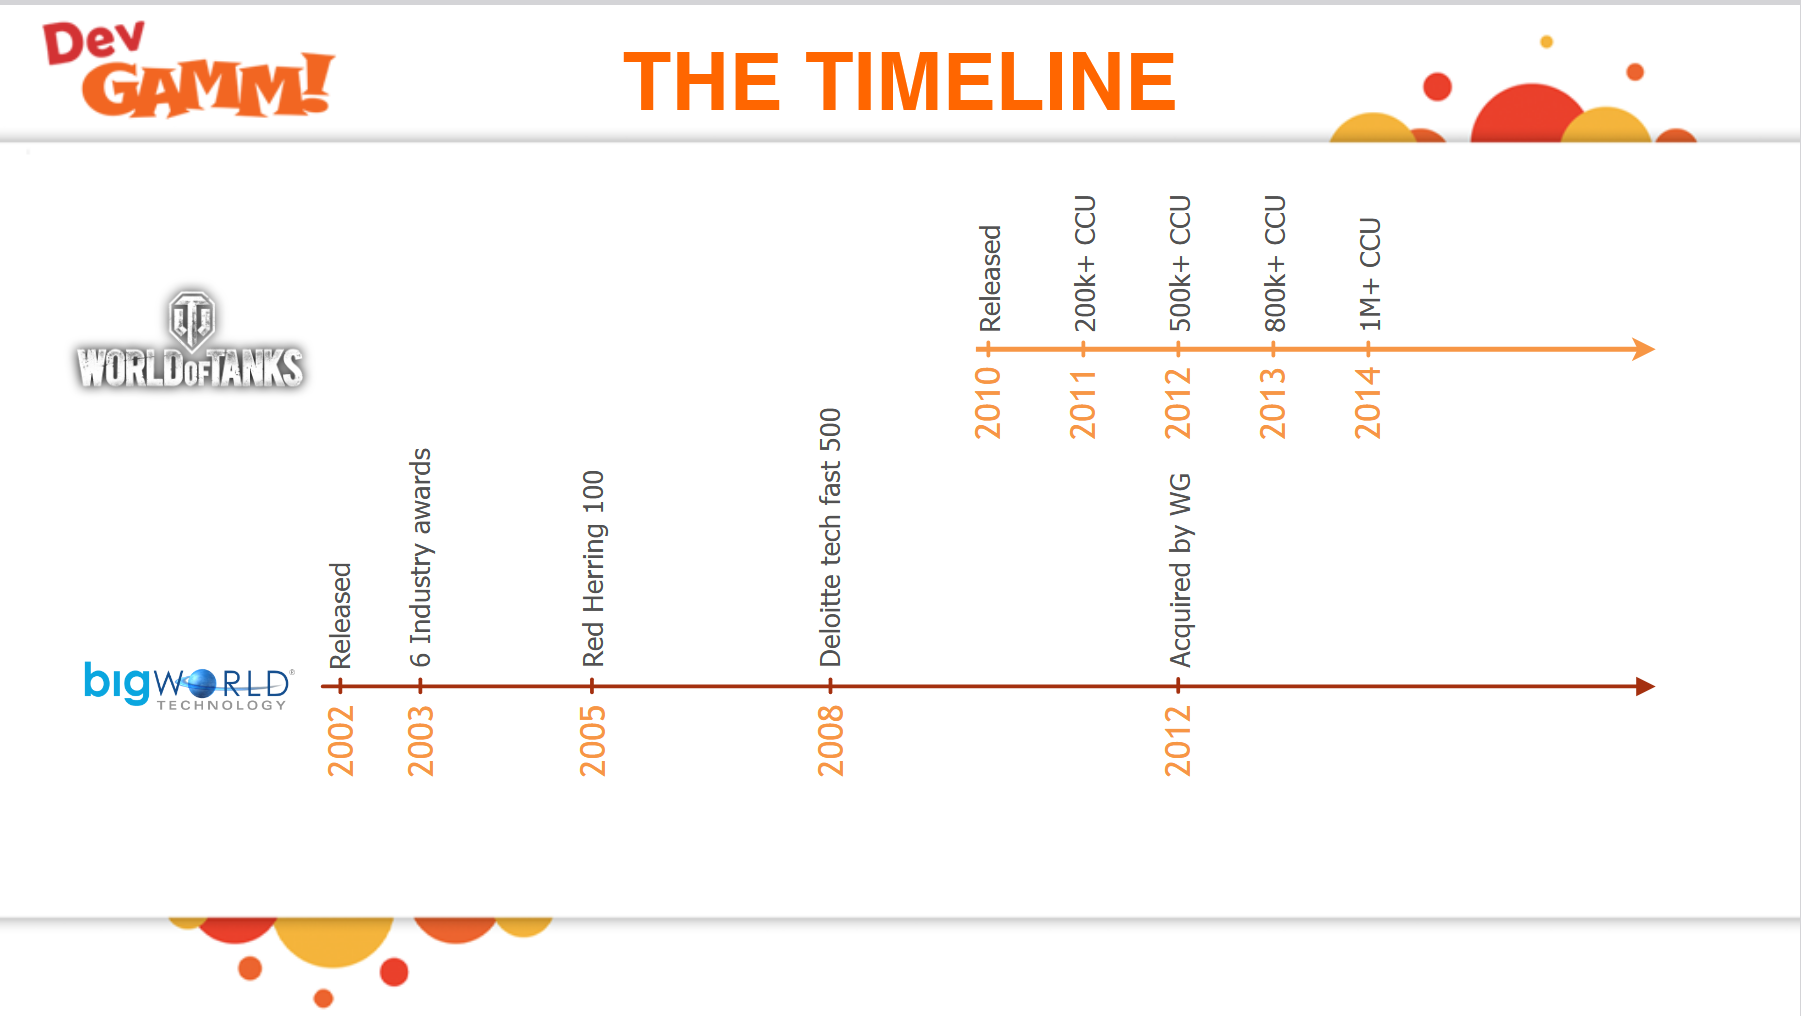
目前可以参考的服务端无缝大世界的资料只有BigWorld游戏引擎,使用这个引擎的游戏少之又少,其中最为知名的是坦克世界WorldOfTanks。根据其官方ppt6-years-of-bigworld-engine-evolution-caused-by-the-success-of-world-of-tanks,上面清楚的写着WorldOfTanks使用BigWorld引擎达到了一百万的ConCurrent User:
虽然使用这个引擎的游戏不多,幸运的是目前在Github上有这个引擎的开源代码,三年前公开在https://github.com/v2v3v4/BigWorld-Engine-14.4.1,我们可以通过这个公开源代码的版本来探究整体的服务端架构设计以及实现细节。下图就是bigworld服务端的整体架构:
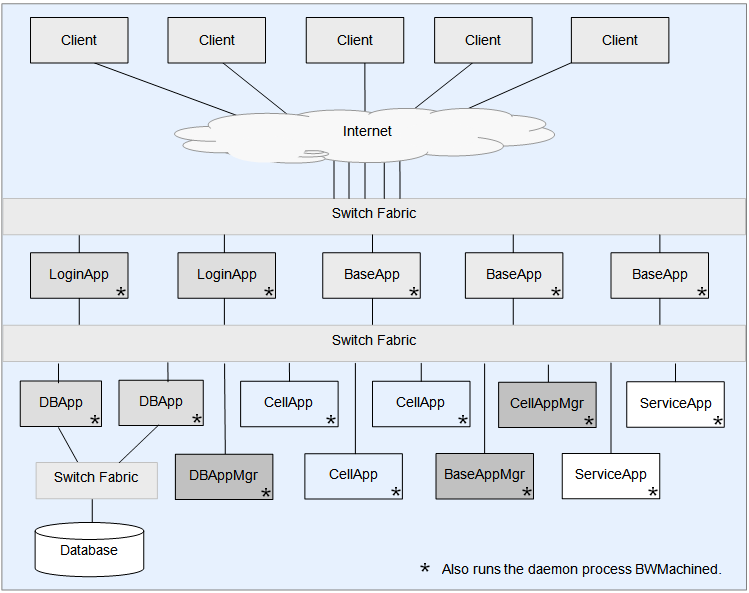
在这个架构图里,我们可以看到bigworld服务端主要由以下几种进程角色组成:
CellApp:场景服务器进程,每个进程负责管理一个或多个Cell。这里的每个Cell都对应一个分布式场景的矩形子区域。CellAppMgr:全局唯一的CellApp管理进程,负责维护所有CellApp的状态以及Cell的创建、销毁、迁移等操作。BaseApp: 实体服务进程,所有的可迁移实体都首先在BaseApp上建立,然后再根据其场景与位置信息往对应的CellApp上创建一个副本。同时对于玩家这种实体,BaseApp还会负责中转CellApp上的实体与对应客户端之间的消息交互。BaseAppMgr:全局唯一的BaseApp管理进程,负责维护所有BaseApp的状态以及BaseApp的创建、销毁、迁移等操作。LoginApp:登录服务器进程,负责处理玩家的登录、注册、验证等操作。DBMgr:全局唯一的数据库服务进程,负责代理所有对数据库的请求,。目前bigworld中使用的数据库是MySQL,但是DBMgr的设计是可以扩展到其他数据库的。
此外还有两个非常重要的进程角色没有在图中体现:一个叫做BWMachined进程,这个进程每个物理机上运行一个,其作用相当于消息总线和运维管理工具;另外一个叫做Reviver进程,这个全局只有一个,负责上述进程的心跳维持和崩溃时的重启。
在上述进程角色中,LoginApp和BaseApp是客户端可以直接连接的,其他进程则不允许客户端连接。因此官方说明书推荐LoginApp和BaseApp所在的物理机配置两个网卡,从而可以接入两个交换机:一个是外网交换机,负责将客户端的请求路由到对应的LoginApp或BaseApp上;另一个是内网交换机,负责将LoginApp或BaseApp上的请求路由到其他角色的进程上。
bigworld中使用一个Space类来表示表示一个完整地图,然后Space又根据负载情况动态分割成一个或多个矩形区域Cell。每个Cell负责Space的矩形区域是不会重叠的,且所有Cell的矩形区域的并集就是这个Space的完整区域。同时一个Cell的区域并不是固定的,会根据其相邻区域之间的负载分布情况来动态调整。全局唯一的CellAppMgr管理所有的CellApp,也就是场景服务器进程,一组服务器一般会有数十个CellApp。然后每个CellApp都会有不定个数的Cell在进程内执行。所以Space与Cell的相关信息都会经由CellApp上传到CellAppMgr上,通过这些信息就可以维护Cell的创建、销毁以及边界调整。
当一个客户端想连接到游戏服务器时,涉及到的流程以及进程角色如下:
- 首先会连接到
LoginApp上。LoginApp会验证客户端的登录信息, - 如果验证成功且通过
DBMgr从数据库里加载出来了对应的玩家数据,然后往BaseAppMgr发送这个玩家数据来请求创建对应实体。 BaseAppMgr接收到这个请求之后就会筛选出合适的BaseApp,并通知选定的BaseApp来创建一个proxy对象,代表对应的玩家。BaseApp创建proxy对象完成之后,就会反向通知BaseAppMgr操作完成,然后BaseAppMgr又会通知回LoginApp。- 此时
LoginApp就可以通知原来的客户端当前登录操作已经成功,且会附带上对应的proxy对象的地址。
客户端接收到登录成功的返回之后,就会以这个proxy对象地址去连接对应的BaseApp,请求将这个proxy对象绑定到当前的客户端连接,绑定的同时会下发这个玩家所有的客户端可见属性,让客户端创建一个对应的对象。
但是此时还没有进入场景,如果玩家想进入场景与其他玩家进行互动,流程链依然很长:
- 首先客户端发送一个进入场景的请求到
BaseApp上的对应proxy对象。 proxy对象就会以此为基础构造一个进入场景的请求,里面填充场景编号、位置数据以及当前proxy对象属性里的Cell可见属性,并将这个请求发送到CellAppMgr。CellAppMgr接收到这个请求之后就会根据传入的场景编号获取对应的Space, 然后再根据出生位置来计算出覆盖这个区域的Cell,并将这个进入场景的请求发送到这个Cell所在的CellApp。CellApp找到对应的Cell后,就会以请求里携带的玩家的属性数据来创建一个真正的RealEntity,并绑定proxy所在的通信地址为数据下行通道。创建成功之后会将这个RealEntity的唯一标识符返回给CellAppMgrCellAppMgr再附带这个Cell的地址返回给proxy对象。- 当
proxy对象接收到对应的RealEntity的地址之后,就会绑定对应RealEntity的通信地址为数据上行通道。
当RealEntity需要给对应的客户端发消息的时候,会先通过与对应proxy之间的通道来传递消息, proxy接收到消息之后,解析发现这是一个发往客户端的消息,就会转发到绑定的客户端连接。同时如果客户端的玩家对象想往对应的RealEntity发送消息,则也需要通过proxy进行中转。
由于Cell的区域是动态调整的,所以Cell之间的边界是会发生变化的,同时玩家又是可以任意移动的,所以玩家的RealEntity并不是一直绑定在同一个Cell上。当一个RealEntity绑定到一个新的Cell时,就会通知新Cell来创建一个新的RealEntity,同时老的RealEntity退化为一个GhostEntity,并通知对应的proxy对象切换上行通道的地址为新的RealEntity。一个RealEntity上发生的所有客户端可见属性的变化都会广播到其管理的GhostEntity集合,同时一个RealEntity下发的其他Entity的状态数据不仅包括周围的RealEntity,还包括周围的GhostEntity。如何通过RealEntity/GhostEntity来将分布式的场景营造成一个支持无缝迁移的统一逻辑场景复杂度其实挺高的,这也是Bigworld的核心技术所在。
Unreal Engine 服务端介绍
Unreal Engine(后文中将简称UE)是由Epic Games开发的商用游戏引擎,最早于1998年发布,之后更新了多个版本。在2014年发布了虚幻四(后文简称UE4),并在Github上公开了其源代码,这种开放使用的策略大大的加速了UE的推广。然后在2022年进一步的发布了UE5,其黑客帝国Demo令人印象深刻,使得UE5次世代大世界这个词组成为了一个不可分割的整体。使用UE开发的游戏有很多,近年来比较知名的有PUBG、堡垒之夜、黑神话悟空、三角洲行动等。而且UE不仅仅能做游戏,还在虚拟现实、增强现实、电影特效、建筑可视化等各种实时互动内容制作里大显身手。
UE引擎有一个跟其他引擎非常不一样的地方,就是他的服务端与客户端源代码是混合在一起的,打包的时候使用同一份代码进行打包。引擎里自动就维护好了客户端与服务端之间的通信协议和状态同步机制,不需要去额外的做开发工作,这种设定下打包出来的服务器叫做专属服务器Dedicated Server,简称DS。如果需要在运行时区分客户端与服务端,那么就需要在代码里进行判断。以官方UE4样例项目ShooterGame的一个函数AShooterCharacter::PostInitializeComponents为例,运行时可以通过GetLocalRole()来判断当前进程是否有这个AShooterCharacter的控制权,然后GetNetMode()这个接口来判断当前进程的角色是客户端还是服务端:
void AShooterCharacter::PostInitializeComponents()
{
	Super::PostInitializeComponents();

	if (GetLocalRole() == ROLE_Authority)
	{
		Health = GetMaxHealth();

		// Needs to happen after character is added to repgraph
		GetWorldTimerManager().SetTimerForNextTick(this, &AShooterCharacter::SpawnDefaultInventory);
	}

	// 省略一些代码

	// play respawn effects
	if (GetNetMode() != NM_DedicatedServer)
	{
		// 省略一些代码
	}
}
更为厉害的是在编辑器内可以通过不同的命令行参数来分别启动客户端与服务端,这样可以非常方便的在编辑器里进行开发与测试。这样前后端代码一体化开发的方式,再加上UE引擎自带的蓝图(Blueprint)这个图形化编程工具,极大提升了非程序人员对UE引擎的接受度。
不过这样的一体化开发方式也有一些弊端,特别是服务端,因为服务端也需要处理物理、移动、骨骼动画等性能消耗非常高的任务,导致服务端的性能受到很大的限制,单进程的玩家承载量也受到了很大的限制,基本只能在100左右。正是由于这种承载量的限制,UE引擎目前适用的联网游戏类型基本都是一些匹配对战的开房间游戏,在需要大量玩家同场景的MMORPG(Massively Multiplayer Online Role-Playing Game)类型游戏中则比较少见。
UE打包生成的DS单个进程基本只能服务一个地图场景,在不深度修改的情况下无法做到多地图共存。而且单个DS进程长时间运行下会有比较严重的内存占用,所以一般来说单个DS进程只能存活比较短的时间,粒度基本都是以小时为单位,无法像MMORPG那样单个进程可以持续运行数周直到版本维护。同时UE开发框架里基本只能写地图内的玩家交互逻辑,无法作为聊天、好友、商城的常见游戏服务的进程宿主,导致还需要使用cpp/python/go等语言额外开发一些联网服务,并修改UE引擎来接入与这些服务相通信的RPC。所以一般使用UE作为房间服务器的服务端架构基本会设计成这个样子:
在这个架构图里,前置的网关分为了两种:一种是对接大厅服务的网关,采用TCP协议;一种是对接DS进程的网关,采用UDP协议。大厅服务主要负责玩家的注册登录、匹配、好友、组队、聊天等功能,而DS进程主要负责游戏场景的运行与玩家的交互逻辑。玩家客户端在启动之后,先连接到大厅网关服务,执行登录验证工作,登录成功之后就可以在大厅内执行一些场景无关操作。如果玩家需要进入特定的场景来进行相关玩法,则需要执行一个比较长的交互链条:
- 首先需要得到大厅服务这边的许可。当大厅服务认为可以进入特定场景的时候,会通知
DS管理进程DS Manager来获取一个可用的DS进程来加载这个场景。 - 其实这里还有一个类似于
Bigworld的BWMachined的DS Agent进程,部署在所有能承载DS的物理机器上,用来管理本机的所有DS的拉起、销毁和负载上报,这些DS Agent进程都受到接受DS Manager的管理。大厅请求DS Manager分配一个新的DS,DS Manager接收到请求之后会去找一个机器负载比较小的DS Agent,通知其创建一个新的DS进程,并加载指定的地图,开启特定的玩法。 - 当
DS Agent执行完这个DS进程的拉起操作之后,就会汇报给DS Manager,DS Manager就带上这个DS进程的地址信息通知回大厅。 - 大厅接收到目标
DS的地址信息之后,先通知到DS网关,给当前玩家加上目标DS的绑定,然后再通知当前玩家的客户端可以去发起到DS网关的连接。 - 客户端接收到
DS的连接允许信息之后,就会以UE的连接协议去连接到DS网关。注意此时客户端与大厅之间的连接是没有断的,所以此时客户端与服务器之间会同时存在两条连接通路。 DS网关此时会验证这个客户端是否有绑定的DS目标进程,如果有则开启一个UDP中转会话,用来桥接客户端与DS进程之间的UDP通信。
有的读者可能注意到UE里也有无缝迁移Seamless Travel的概念,但是这里的无缝迁移指的是一个DS进程以无缝的形式切换地图,此时客户端不需要断开与DS进程之间的连接,玩家控制的角色Character、控制器PlayerController和状态PlayerState能够自动的绑定到新的World。相对应的DS的非无缝迁移就是在切换地图之前DS通知所有客户端断开连接,然后再加载新的地图,此时客户端进程则重新执行连接与登录流程,这就会带来Character、PlayerController和PlayerState在服务端的销毁以及重新创建。
UE引擎是非常庞大的,包含了非常多的概念与模块,而且代码更新也极其频繁。在我有限的工作经历中,引擎重新编译涉及到的编译单元从UE4.23的不到2000个增长到现在UE5.5的将近6000个。不过跟服务端相关的Gameplay和网络相关功能UE4与UE5之间的差异并不大,所以本书所讲解的UE相关内容附带的代码都是基于UE4的。如果读者之前没有接触过UE,可以先去阅读一下Epic中国社区经理大钊在知乎写的系列文章Inside UE4,补充一下知识储备。当然读者如果完全对UE不感兴趣,可以在后文的阅读中直接跳过UE相关的章节。如果不是工作需要查证相关问题的话,我自己都有点看不下去这些源代码。
Mosaic Game 服务端介绍
mosaic_game这个项目创建于2020年,但是其实其使用的核心组件在2018年就可以开始陆陆续续的开发了。当时我负责了项目内的行为树与AI,但是当时的编辑器是PyQt实现的,代码非常扭曲,导出的数据文件居然是基于Pickle的,更新功能难度非常大。备受折磨的我准备使用CPP + QT5来重写,将数据格式改成json,顺带体验一下什么叫做GUI开发。完成了行为树编辑器的重新迭代之后,为了方便日常开发中的行为树问题调试,就给这个编辑器添加了调试器的功能。整个行为树开发套件开源在huangfeidian/behavior_tree上。刚好项目内有一套基于树形结构的角色数值属性计算系统,就顺带以这个图形化的编辑器框架为基础,构造了属性公式编辑器,以及属性公式求值运行时,开源在huangfeidian/formula_tree。
当时项目组使用的服务端引擎是没有源代码的,我们日常开发只能使用Python来写业务逻辑。写Python写烦了就开始琢磨这个引擎的底层实现,特别是玩家属性在Python脚本里修改之后是怎么自动同步到客户端的。当时Bigworld代码还未开源,同时UE4引擎还在我的认知之外,自己对CPP还很热情,因此开始从零开始用CPP来实现一个属性自动同步系统。这个属性自动同步系统还是比较复杂的,为此开发了好几个库:基于json的序列化与反序列化库huangfeidian/any_container;基于libclang的CPP反射库huangfeidian/meta;最终的属性修改自动同步库huangfeidian/property_sync。
在开发huangfeidian/meta这个CPP反射库的过程中,发现这个库提供的元数据收集加代码生成功能不仅可以为上面的属性同步系统服务,还可以来构造基于json的RPC系统,甚至还可以以此来构造基于Actor/Component的Entity系统。构造完这些系统之后发现项目组使用的游戏服务器的大半功能都被覆盖了,为什么不去整个大活,仿造一个完整的游戏服务器!刚好在网络通信上我也有一些积累,基于boost/asio实现过一个带流量加密的http代理服务器huangfeidian/http-proxy。于是就有了mosaic_game这个项目的诞生,开始了我慢慢填坑的过程。
这个mosaic_game是基于纯CPP实现的,但是CPP的包管理功能很弱,不像Python有很多开箱即用的库,因此在开发这个项目的过程中,我需要自己实现很多功能。为了方便游戏内各个功能的验证与调试,避免每次都启动整个游戏服务器通过再添加日志来定位问题,后续功能的添加基本都是以库的形式来组织的,除了上述介绍的功能之外,主要的功能库还有:
- 将
excel表格中的数据转换为json的工具库huangfeidian/typed_matrix。这个库里还引用了我写的另外两个小组件:用来规定和验证excel数据格式的huangfeidian/typed_string和用来读取excel文件的huangfeidian/xlsx_reader。 - 聚合了各种
AOI计算方法的库huangfeidian/aoi。 - 聊天系统huangfeidian/chat。
- 事件和状态机库huangfeidian/events。
- 匹配系统huangfeidian/match_maker。
- 游戏内的
Entity系统huangfeidian/entity_component_factory。 Redis桥接库huangfeidian/http_redis。MongoDB桥接库huangfeidian/http_mongo。- 基于
RecastNavigation的异步寻路库huangfeidian/AsyncDetourCrowd。 - 分布式场景管理库huangfeidian/distributed_scene。
通过集成上述功能,并不断的完善基础的游戏玩法,mosaic_game逐渐有了一个完整的游戏服务器雏形,下图就是最终的服务端架构图:
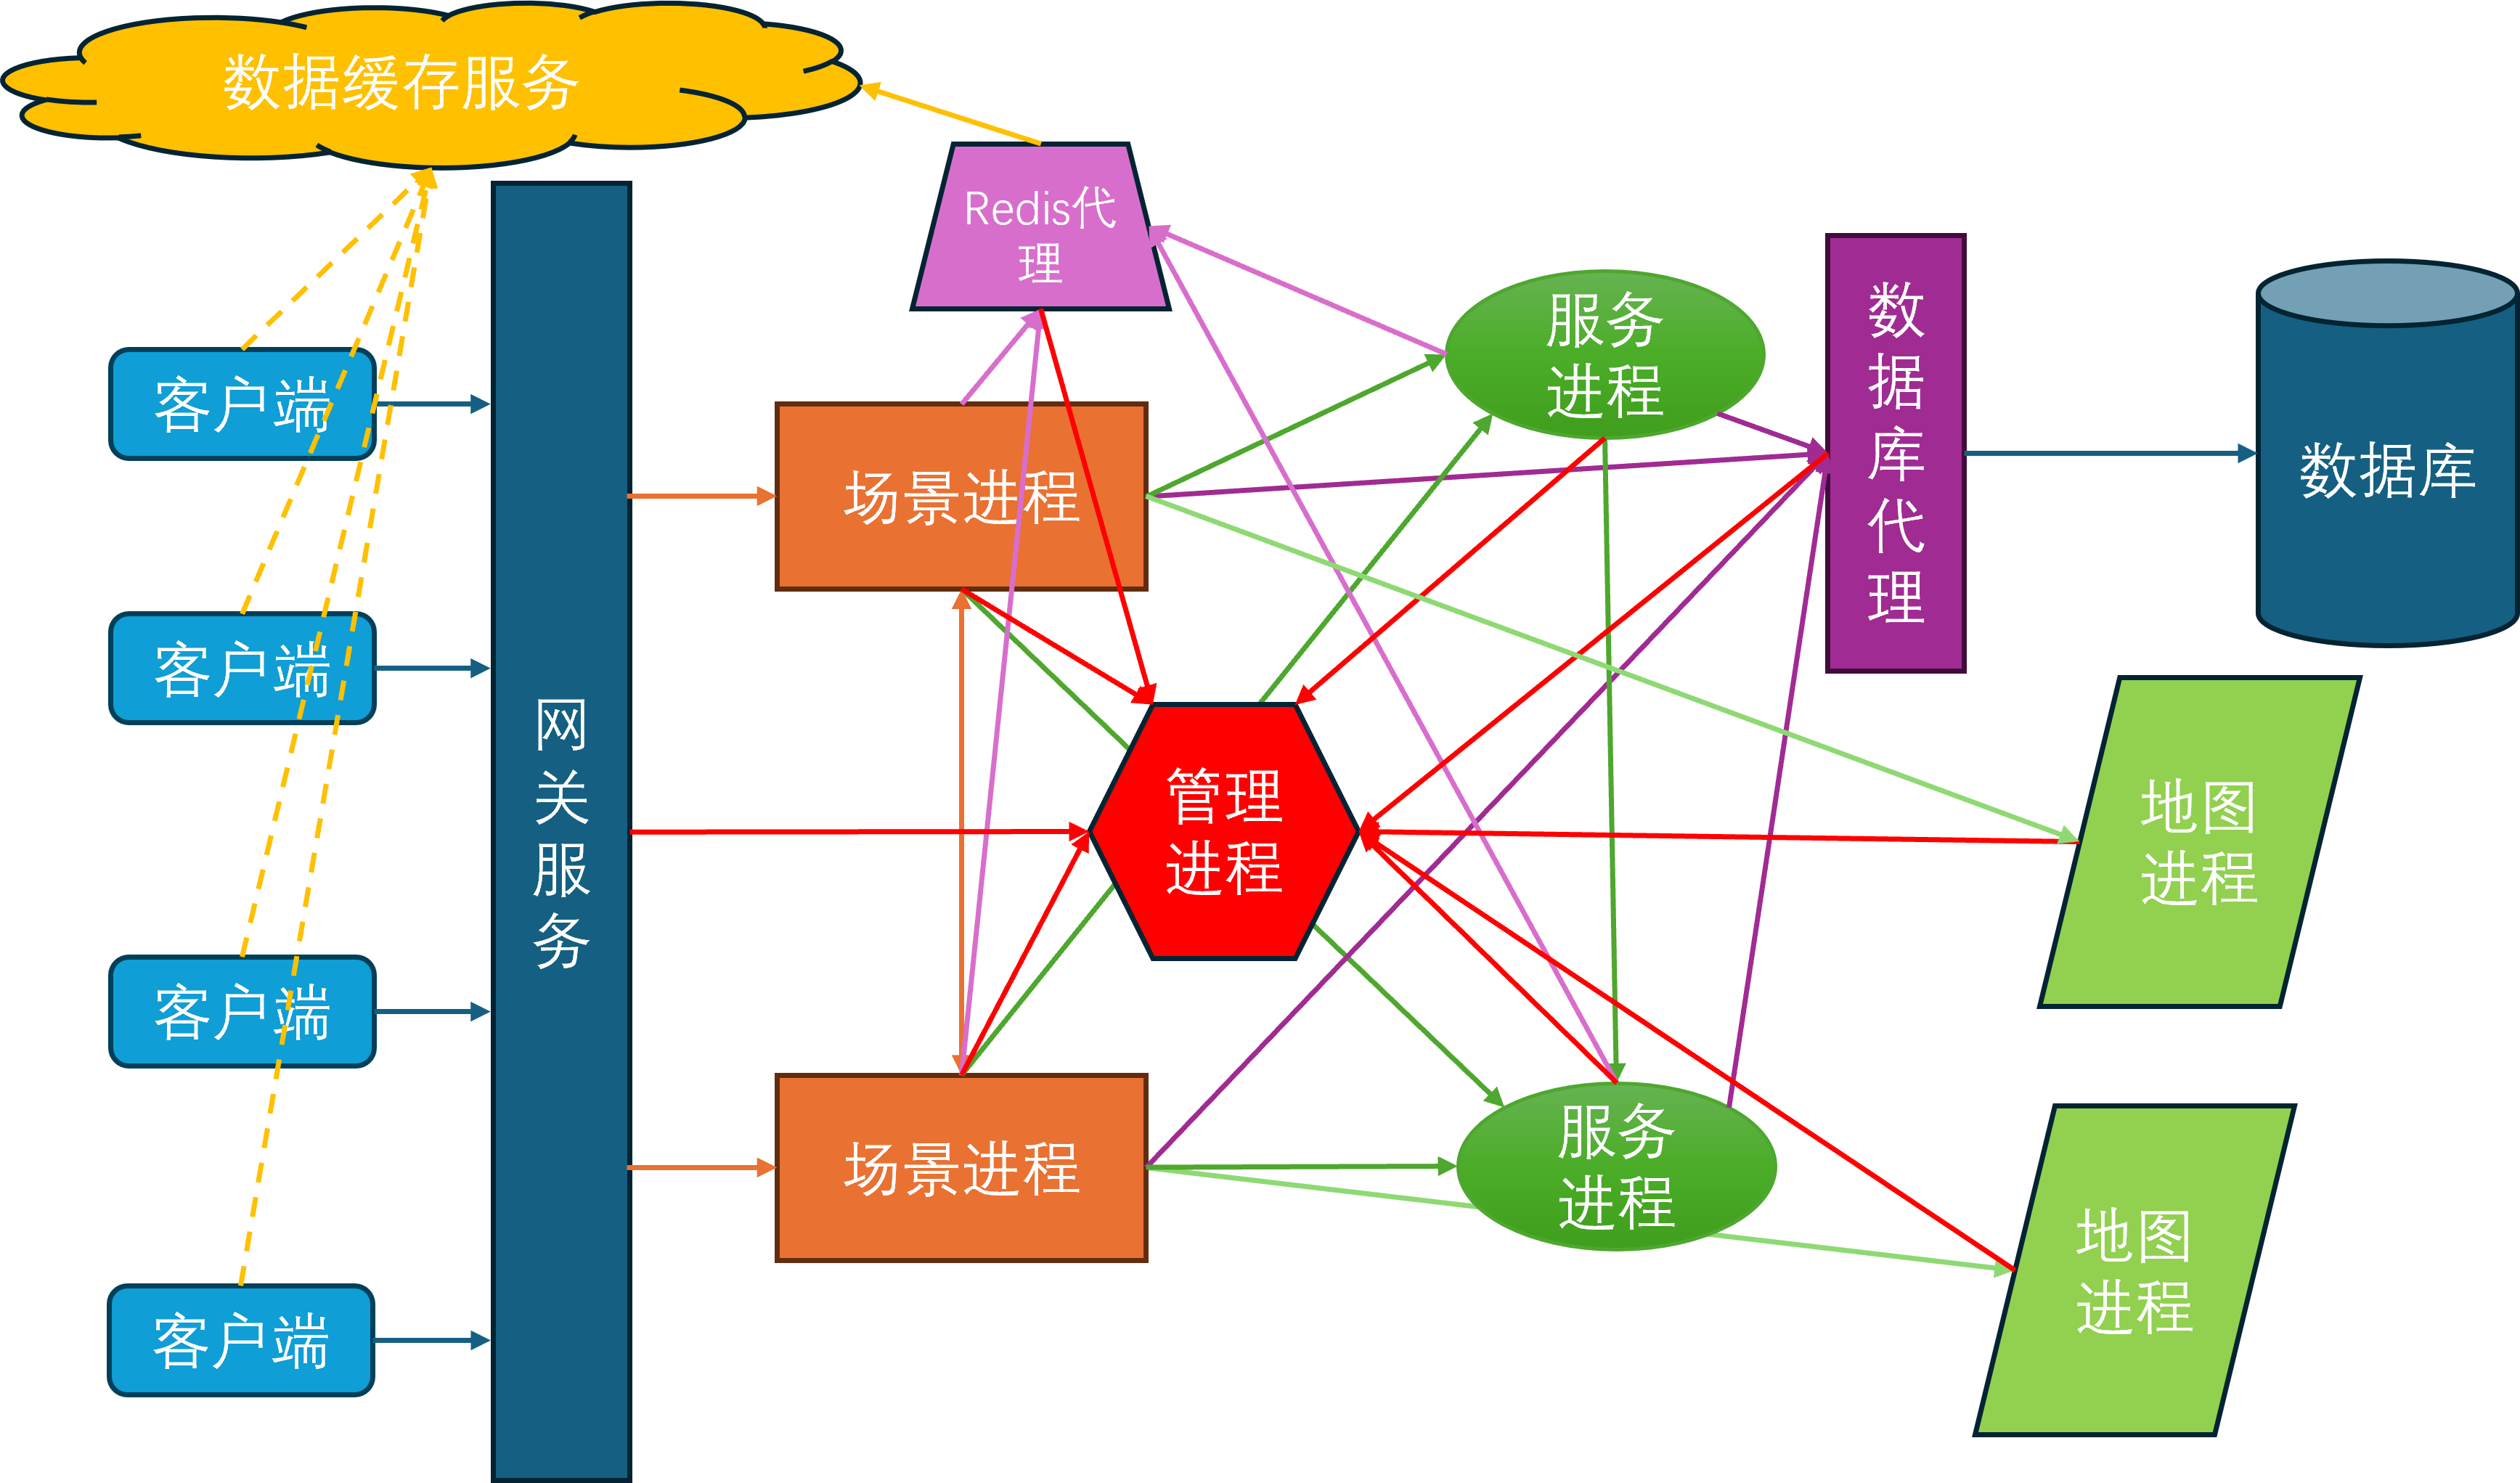
在这个架构图里,除了外部提供的Mongo进程和Redis进程,主要的进程角色有:
- 管理进程
mgr_server,全局唯一,负责管理整体服务器集群的启动与退出,每个其他进程启动之后都需要向mgr_server注册。当一个进程完全可用之后,会通知mgr_server,然后mgr_server会将这个新进程的信息广播到现有的所有进程。同时mgr_server负责收集各个进程的负载信息,以方便执行一些进程角色的负载均衡 Redis代理进程redis_server,可以有多个,负责代理其他进程与Redis服务器进行交互,MongoDB代理进程db_server,可以有多个,负责代理其他进程与MongoDB数据库进行交互- 服务进程
service_server,可以有多个,作为承载社交等场景无关逻辑的容器,一个service_server内可以有多个service - 场景进程
space_server,可以有多个,作为承载游戏场景逻辑的容器,一个space_server内可以有多个space - 网关进程
gate_server,可以有多个,负责中转客户端与space_server之间的通信 - 地图进程
map_server,可以有多个,负责管理游戏场景中的地图数据,目前只承担了地图寻路功能,一个map_server可以为多个场景提供地图服务
由于当前的设计里还没有集成消息总线,所以目前的进程间互联图看上去乱糟糟的,等以后有空了去使用消息总线来简化一下连接拓扑:
- 所有进程都需要连接到
mgr_server - 每个
space_server和每个service_server都需要连接到一个redis_server和一个db_server - 每个
space_server都需要连接到所有的service_server,这样space_server上才知道任意一个service在哪一个service_server上 - 每两个
space_server之间都需要有一个连接 - 每个
space_server都需要连接到一个map_server - 每个
gate_server都需要连接到所有的space_server
在当前的服务端架构之下,只有gate_server是外网可以直接访问的,此时客户端的登录和进入场景的流程是这样的:
- 客户端以某种方式获取当前可用的
gate_server列表,随机选择一个gate_server发送会话建立请求 gate_server接受了这个连接之后,先执行加密握手,验证客户端的身份,创建一个会话,并商定后续的对称加密密钥gate_server随机选择一个space_server来创建这个客户端对应的服务端账号对象account_entity,然后属性同步系统会通知客户端来同步创建这个client_account,之后gate_server就会当作一个透明的通信中转代理的作用,因此不再提及- 客户端
client_account对象再发起一个登录请求,包含账号密码 space_server上的对应account_entity收到登录请求后,将登录请求转发到登录服务login_service上login_service收到登录请求,通过db_server查询账号密码是否正确,并将验证结果下发到account_entity,如果正确则记录当前账号已经在线space_server上的account_entity收到登录验证结果后,根据验证结果来通知客户端登录成功或失败,如果成功则开始往db_server请求这个账号的角色列表数据,并进行角色列表的下发- 客户端的
client_account收到角色列表数据后,通知服务端account_entity来选择其中一个来创建角色 space_server上的account_entity收到角色选择请求后,通过db_server查询所选角色的完整数据,并以此数据来创建角色对象player_entityspace_server上的player_entity创建完成之后,属性同步系统会将player_entity的属性同步到客户端,通知客户端创建角色对象client_player- 客户端的
client_player创建完成之后,可以发送RPC到space_server上的player_entity来申请进入特定场景 space_server上的player_entity收到进入场景请求后,会转发这个请求到场景服务space_service上space_service检查是否有对应的场景space_entity,如果没有则通过负载均衡选择一个space_server来创建一个新的场景space_entityspace_service找到合适的space_entity之后,将这个player_entity添加到space_entity的玩家列表中,同时通知player_entity开始切换到目标space_entity中,space_server上的player_entity开始执行场景切换,这个切换可能发生在同一个space_server上,也可能发生在不同的space_server上,如果是不同的space_server则还涉及到迁移流程,这里就不去展开了space_server上的player_entity进入到新的场景之后,属性同步系统会将新场景的属性同步到客户端,通知客户端切换到新的场景- 客户端的
client_player收到场景切换通知后,开始执行场景切换,并填充场景属性数据,通知space_server上的player_entity场景切换完成 space_server上的player_entity收到客户端场景切换完成通知后,AOI系统就开始工作,开始向客户端同步周围的其他entity的状态
上述流程虽然冗长,但是好在都是面条代码,逻辑复杂度都非常低,实现起来都比较简单,大概2022年就完成了这些内容。但是随着无缝迁移这个目标的引入,场景管理和属性同步系统就需要大修,这样就缝缝补补了一年多才搞好。现在看上去无缝迁移的核心问题都被解决了,但是后面我已经没有多少精力去做各种测试样例,所以不保证当前的mosaic_game能够像想象中的样子来正确支持无缝迁移, BUG应该会有很多。好在应该没有人会在实际项目中使用mosaic_game这个玩具,这样我就先心安理得的休息一段时间,等有空了再去补这些单元测试。
Mosaic Game 的进程生命周期
服务器启动流程
在之前的游戏服务器架构中我们已经初步的介绍了游戏服务器中的一些常见的进程角色,在mosaic_game中也基本复用了相关概念,在服务器集群中的进程角色有如下六种:
- 管理进程,作为全局的单点进程,第一个执行启动,用来提供进程注册和服务发现等功能,其代码在
roles/server/mgr_server目录下 - 场景进程,用来承载各种局内玩法,作为各种
entity与space的容器,其代码在roles/server/space_server目录下 - 网关进程,用来中转客户端与服务端之间的消息,其代码在
roles/server/gate_server目录下 - 服务进程,用来承载各种局外玩法,如聊天、好友、排行榜等,其代码在
roles/server/service_server目录下 - 数据库进程,用来转接游戏内对数据库的读写请求,其使用的后端数据库为
mongodb,其代码在roles/server/db_server目录下 - 缓存进程,用来承接游戏内对一些缓存数据的读写请求,其使用的后端缓存为
redis,其代码在roles/server/redis_server目录下 - 地图进程,用来处理一些场景的寻路、物理、
AOI等资源查询,其代码在roles/server/map_server下
在了解这些进程角色之后,就可以来介绍一下这些进程的启动流程了。我提供了一个非常简陋的服务器启动脚本deploy/scripts/run_servers.py,在这个python文件中,可以指定除了管理进程之外的其他进程的数量,同时还可以指定一些数据文件位置和一些外围服务所需的配置文件位置。在启动流程中,mgr_server会作为第一个进程起来,这个角色的进程只有一个实例。接下来依次会启动缓存进程、数据库进程、服务进程、网关进程、场景进程、地图进程:
cur_server_cmd = "nohup ../bin/mgr_server -c {0}  -l {1} -n mgr_server > /dev/null 2>{1}/mgr_server.log &".format(options.config_path, options.log_path)
os.system(cur_server_cmd)
sleep(1)
for i in range(1):
	cur_server_cmd = "nohup ../bin/redis_server -c {0}  -l {1} -n redis_server_{2}   -f {3}  > /dev/null 2>{1}/redis_server_{2}.log &".format(options.config_path,  options.log_path, i, options.redis_config)
	os.system(cur_server_cmd)

for i in range(options.db_num):
	cur_server_cmd = "nohup ../bin/db_server -c {0}  -l {1} -n db_server_{2}  -m {3}  > /dev/null 2>{1}/db_server_{2}.log &".format(options.config_path,  options.log_path, i, options.mongo_config)
	os.system(cur_server_cmd)

for i in range(options.service_num):
	cur_server_cmd = "nohup ../bin/service_server -c {0}  -l {1} -n service_server_{2} -d {3}> /dev/null 2>{1}/service_server_{2}.log &".format(options.config_path,  options.log_path, i, options.data_dir)
	os.system(cur_server_cmd)

for i in range(options.gate_num):
	cur_server_cmd = "nohup ../bin/gate_server -c {0}  -l {1} -n gate_server_{2} > /dev/null 2>{1}/gate_server_{2}.log &".format(options.config_path,  options.log_path, i)
	os.system(cur_server_cmd)

for i in range(options.game_num):
	cur_server_cmd = "nohup ../bin/space_server -c {0}  -l {1} -n space_server_{2} -d {3}> /dev/null 2>{1}/space_server_{2}.log &".format(options.config_path,  options.log_path, i, options.data_dir)
	os.system(cur_server_cmd)

for i in range(options.map_server_num):
	cur_server_cmd = "nohup ../bin/map_server -c {0}  -l {1} -n map_server_{2} -d {3}> /dev/null 2>{1}/map_server_{2}.log &".format(options.config_path,  options.log_path, i, options.data_dir)
	os.system(cur_server_cmd)
sleep(1)
开头的第一个sleep(1)是为了保证在其他进程初始化时当前的mgr_server已经初始化好,后面的sleep(1)是为了在自动化测试的时候避免出现客户端启动了但是服务器还没有准备好的情况。
上述启动的各种server进程对应的逻辑类都继承自include/stub/json_stub.h里提供的json_stub,roles/basic_client里提供的客户端也继承自json_stub。同时这个json_stub又继承自basic_stub,这个basic_stub就是mosaic_game中所有进程角色的逻辑框架。在进程启动时,会通过相关配置文件来初始化这个逻辑框架运行所需的一些基础信息:
basic_stub::basic_stub(boost::asio::io_context& in_io_con, const stub_info& in_local_server, const stub_info& in_upstream_server, std::size_t in_timeout, utility::ts_t in_timer_check_gap_ms, std::uint32_t async_thread_num)
	: m_io_context(in_io_con)
	, m_local_server(in_local_server)
	, m_upstream_server(in_upstream_server)
	, m_logger(utility::get_logger(in_local_server.name))
	, m_connection_timeout(in_timeout)
	, m_timer_check_gap_ms(in_timer_check_gap_ms)
	, m_local_name_ptr(std::make_shared<const std::string>(in_local_server.name))
	, m_upstream_name_ptr(std::make_shared<const std::string>(in_upstream_server.name))
	, m_start_ts(std::chrono::duration_cast<std::chrono::seconds>(std::chrono::system_clock::now().time_since_epoch()).count())
	, m_anchor_name_prefix(in_local_server.name + utility::rpc_anchor::seperator)
	, m_async_thread_num(async_thread_num)
{
	m_asio_wrapper = std::make_unique<asio_wrapper>(m_io_context);
}
这里的in_local_server与in_upstream_server都是stub_info类型,用来明确一个进程的名字、类型与端口信息:
struct stub_info
{
	std::string ip;
	std::uint16_t port;
	std::string rsa_key;
	std::string name;
	std::string upstream;
	std::uint16_t http_port;
	std::string type;
};
in_local_server代表当前进程的配置信息, in_upstream_server代表当前进程的上游进程对应的信息。除了mgr_server之外的其他进程在初始化的时候都需要传入对应的mgr_server作为上游管理进程,所以这里的ip,port字段其实只有mgr_server对应的stub_info才需要设置,其他时候保留为空。一个集群中的所有stub_info里的name不得重复,因为这个name字段就是此进程的唯一标识符。如果一个stub_info有上游,则upstream字段就是对应上游进程stub_info里的name。
在basic_stub的start函数里会使用create_router来初始化网络相关资源,然后根据upstream_server里的配置调用connect_to_server去对应的上游进程执行注册。同时调用start_accept根据local_server里的port,http_port来分别开启对正常游戏连接端口以及http调试端口的监听:
void basic_stub::start()
{
	m_logger->info("server start");

	create_router();
	if (!m_upstream_server.name.empty())
	{
		add_named_server(m_upstream_server);
		connect_to_server(m_upstream_server.name);
	}
	start_accept();
	m_asio_wrapper->m_timer.expires_from_now(std::chrono::seconds(1));
	m_asio_wrapper->m_timer.async_wait([this](const asio_error_code& error)
		{
			if(error)
			{
				m_logger->error("m_asio_wrapper timer error {}", error.message());
				exit(1);
			}
			this->main_loop();
		});
	keep_alive_callback();
	m_async_task_channels = std::vector<mutex_channel<std::function<void()>>>(m_async_thread_num);
	m_async_threads.reserve(m_async_thread_num);
	for(std::uint32_t i = 0; i< m_async_thread_num; i++)
	{
		m_async_threads.push_back(std::make_unique<std::thread>([this, i](){
			this->async_worker_loop(i);
		}));
	}
}
第一次启动的时候先用一个1s间隔的计时器去延迟启动框架主循环,keep_alive_callback则负责定期向上游进程发送心跳包来执行进程保活,最后再按照配置去创造一些后台worker线程来作为线程池备用。注意主循环的代码是跑在asio相关线程上的,这里的worker线程并不会处理任何asio相关的任务,asio的线程是在main函数里创建的,不归basic_stub维护。下面就是gate_server在main函数里启动asio线程的相关代码,这里设置为threads为1代表只开启一个asio网络线程:
std::uint8_t const threads = 1;
std::size_t expire_time = 30000;
asio::io_context ioc{ threads };

server::gate_server cur_server = server::gate_server(ioc, local_stub_info, upstream_stub_info, expire_time, utility::ts_t(20));
cur_server.start();
std::vector<std::thread> v;
v.reserve(threads);
for (auto i = threads; i > 0; --i)
	v.emplace_back(
		[&ioc]
		{
			ioc.run();
		});
for(auto& one_thread: v)
{
	one_thread.join();
}
事实上除了上面介绍的这些手动创建的线程之外,还会有一个由spdlog自动创建的日志线程,由于这个线程完全由spdlog托管,所以这里就不去深究了。
不同的进程角色在启动时不仅要执行这个start函数,还有一些自己的额外逻辑去处理。所以在子类中,一般会提供一个自己的do_start函数来执行各自的初始化流程,并在这个流程中去调用basic_stub::start:
- 在
map_server的do_start最为简单,只是初始化了内部的地图设置
void map_server::do_start(const map_config& in_map_config)
{
	m_map_config = in_map_config;
	json_stub::start();

}
- 在
redis_server的do_start函数中,会构造线程池去连接后端的redis集群
void redis_server::do_start(const redis_config &redis_servers, std::uint8_t worker_num)
{

	for (std::uint8_t i = 0; i < worker_num; i++)
	{
		auto cur_task_logger = utility::get_logger("redis_worker_" + std::to_string(i) );
		workers.push_back(std::make_shared<redis_worker>(redis_servers, redis_task_channels, cur_task_logger));
	}
	for (auto &one_worker : workers)
	{
		work_threads.emplace_back([=]()
									{ one_worker->run(); });
	}
	json_stub::start();
}
- 在
db_server中的do_start函数中,也会创建线程池去连接后端的mongodb集群
void db_server::do_start(const mongo_config& mongo_servers, std::uint8_t worker_num)
{
	auto cur_task_logger = utility::get_logger("mongo_worker");
	for (std::uint8_t i = 0; i < worker_num; i++)
	{

		workers.push_back(std::make_shared<mongo_worker>(mongo_servers, mongo_task_channels, cur_task_logger));
	}
	for (auto& one_worker : workers)
	{
		work_threads.emplace_back([=]()
			{
				one_worker->run();
			});
	}
	json_stub::start();
}
- 在
space_server中的do_start函数,负责初始化entity系统、manager系统以及配置表系统
void space_server::do_start()
{

	entity::entity_manager::instance().init();

	json_stub::start();
	manager_base::init_managers(this);
	misc::stuff_utils::init();
	global_config_mgr::instance();
}
- 在
service_server中的do_start函数,负责初始化自己的服务管理器以及本地单例manager
void service_server::do_start()
{
	m_service_mgr = &service::service_manager::instance();
	m_service_mgr->init();
	manager_base::init_managers(this);
	json_stub::start();
}
- 在
mgr_server中的do_start函数,负责启动一个创建service的计时器
void mgr_server::do_start()
{
	json_stub::start();
	m_service_create_check_timer = add_timer_with_gap(std::chrono::milliseconds(1000), [this]() {
		check_to_create_service();
		});
}
- 在
gate_server中的do_start函数, 负责启动一个计时器去定期清理无效的会话
void gate_server::do_start()
{
	json_stub::start();
	m_session_remove_timer = add_timer_with_gap(std::chrono::seconds(1), [this]()
	{
		this->check_remove_session();
	});
}
服务器主循环
在框架主循环中main_loop,有五种信息需要处理,分别是:
- 普通网络消息
network::msg_task,对应的是服务器进程之间以及客户端与网关进程之间的业务消息 http消息http_utils::request,对应的是此进程开启的http服务接收的消息,目前主要作为调试命令使用- 业务计时器超时消息,对应的是游戏业务逻辑内的各种计时器,而不是
asio提供的计时器 - 连接控制消息
connection_ctrl_msg,对应的是各进程之间的tcp连接的建立与断开消息 - 主线程回调消息
std::function<void()>,对应的是一些非主线程执行的业务回调,例如http请求以及异步线程池处理的相关业务
void basic_stub::main_loop()
{
	m_logger->flush();
	auto cur_msg_handler = [this](std::shared_ptr<network::net_connection> con, const network::msg_task& one_msg)
	{
		return this->on_msg(con, one_msg);
	};
	auto cur_http_handler = [this](const http_utils::request& req, msg_seq_t req_seq)
	{
		return this->on_http_request(req, req_seq);
	};

	auto cur_conn_ctrl_msg_handler = [this](const network::connection_ctrl_msg& msg)
	{
		return this->on_conn_ctrl_msg(msg);
	};
	std::uint64_t loop_total_ms = 0;
	do
	{
		on_new_frame();
		poll_mainloop_tasks();
		auto poll_begin_ts = utility::timer_manager::now_ts();
		m_router->poll_msg(cur_msg_handler);
		http::http_request_mgr::poll_request(cur_http_handler);
		poll_timers(utility::timer_manager::now_ts());
		m_router->poll_ctrl_msg(cur_conn_ctrl_msg_handler);
		auto poll_end_ts = utility::timer_manager::now_ts();
		loop_total_ms += poll_end_ts - poll_begin_ts;
		if (poll_end_ts - poll_begin_ts > m_high_load_threshold * m_timer_check_gap_ms)
		{
			continue;
		}
		else
		{
			break;

		}

	}while (!m_stopped);

	if(m_stopped)
	{
		//  暂时忽略进程退出相关代码
	}
	m_asio_wrapper->m_timer.expires_from_now(std::chrono::milliseconds(std::max(int64_t(1), int64_t(m_timer_check_gap_ms) - int64_t(loop_total_ms))));
	m_asio_wrapper->m_timer.async_wait([this](const asio_error_code& error)
		{
			(void)error;
			this->main_loop();
		});
	return;

}
在单次主循环处理完成之后,会检查此次主循环的执行时间。如果执行时间小于指定的阈值m_high_load_threshold * m_timer_check_gap_ms,则说明当前要处理的任务比较多,负载比较高,此时会继续执行一次逻辑主循环,直到单次逻辑主循环消耗的时间小于指定值或者外部发起了关服请求。在本批次的逻辑主循环执行完成之后,继续创建一个计时器去延迟执行下一次主循环,这里的延迟设置是为了尽量的保证主循环开始的间隔保持为预设的m_timer_check_gap_ms,同时避免主循环空跑造成的性能浪费。
由于网络相关逻辑由network_router管理,与basic_stub的业务逻辑相解耦,所以在处理这些网络消息的时候,外部需要提供相关的回调函数,也就是上面代码中构造的三个msg_handler。这里的on_msg负责处理进程之间的业务消息,on_ctrl_msg负责处理进程间的连接建立与断开,这两个函数的细节将在后续的网络细节相关章节中介绍。on_http_request则负责处理本地http服务器接收到的http请求,这里的http请求主要是一些运维指令相关,内部会调用on_gm_cmd去分发这些运维指令:
void json_stub::on_http_request(const http_utils::request& req, msg_seq_t req_seq)
{
	std::string cmd;
	json param;
	try
	{
		auto cur_json = json::parse(req.body);
		cur_json.at("cmd").get_to(cmd);
		cur_json.at("param").get_to(param);
	}
	catch(const std::exception& e)
	{
		auto reply = fmt::format("fail to parse http req for req uri {} content {} req_seq {} error {}", req.uri, req.body, req_seq, e.what());
		m_logger->info(reply);
		on_http_reply(req_seq, reply);
		return;
	}
	on_gm_cmd(cmd, param, req_seq);

}
服务器间连接
目前的流程中,所有的进程角色在启动后都会向其上游角色发起连接。上游连接建立成功之后,会在对应的on_connect函数里执行一些自定义的逻辑,其中最重要的就是通过set_stub_info这个指令告诉mgr_server当前连接发起方的进程角色是什么:
void json_stub::on_connect(std::shared_ptr<network::net_connection> connection)
{
	basic_stub::on_connect(connection);

	const auto& cur_connection_dest = get_connection_name(connection.get());
	auto cur_server_iter = m_named_servers.find(*cur_connection_dest);
	if (cur_server_iter == m_named_servers.end())
	{
		close_connection(connection);
		return;
	}


	json request_msg_1;
	request_msg_1["cmd"] = "set_stub_info";
	json local_info;
	local_info["stub_info"] = m_local_server;
	request_msg_1["param"] = local_info;
	std::shared_ptr<std::string> msg_ptr = std::make_shared<std::string>(request_msg_1.dump());
	m_router->push_msg(connection.get(), m_local_name_ptr, cur_connection_dest, msg_ptr, enums::packet_cmd_helper::encode(enums::packet_cmd::server_control, 0));
}
一个进程角色向mgr_server汇报set_stub_info后并不代表这个进程角色已经可用,只有其向mgr_server发送report_server_ready之后这个进程才能作为完整的角色来提供服务。gate_server的功能比较单一,因此在其on_connect函数中会直接向mgr_server汇报当前进程已经可用
void gate_server::on_connect(std::shared_ptr<network::net_connection> connection)
{
	json_stub::on_connect(connection);
	auto connection_name_ptr = connection->get_connection_name();
	auto cur_server_iter = m_named_servers.find(*connection_name_ptr);
	if (cur_server_iter == m_named_servers.end())
	{
		return;
	}
	if (cur_server_iter->second.type == "space_server")
	{
		m_connected_gameservers[*connection_name_ptr] = connection;
	}
	else if(cur_server_iter->second.type == "mgr_server")
	{
		json report_ready_info, temp_param;
		report_ready_info["cmd"] = "report_server_ready";
		temp_param["server_name"] = *m_local_name_ptr;
		temp_param["server_type"] = "gate_server";
		report_ready_info["param"] = temp_param;
		m_router->push_msg(connection.get(), m_local_name_ptr, {}, std::make_shared<std::string>(report_ready_info.dump()), enums::packet_cmd_helper::encode(enums::packet_cmd::server_control, 0));
	}

}
与gate_server类似的进程角色还有map_server,db_server,redis_server,都是上游连接建立之后立即汇报server_ready。但是space_server和service_server就复杂了一些,他们不能在连接到mgr_server之后立即汇报就绪状态,因为这些进程角色需要与其他进程角色相配合才能提供完整的角色服务。这些角色的进程在连接建立之后会向mgr_server请求资源进程角色列表:
void service_server::request_allocate_resource_server(const std::string& resource_server_type)
{
	json request_msg, request_param;
	request_msg["cmd"] = "request_allocate_resource";
	request_param["from_server_name"] = m_local_server.name;
	request_param["from_server_type"] = m_local_server.type;
	request_param["resource_server_type"] = resource_server_type;
	request_msg["param"] = request_param;
	auto msg_ptr = std::make_shared<std::string>(request_msg.dump());
	auto remote_name_ptr = std::make_shared<std::string>(m_upstream_server.name);
	if (!m_router->push_msg(m_local_name_ptr, remote_name_ptr, msg_ptr, enums::packet_cmd_helper::encode(enums::packet_cmd::server_control, 0)))
	{
		add_timer_with_gap(std::chrono::milliseconds(2 * 1000), [resource_server_type, this]() {
			request_allocate_resource_server(resource_server_type);
			});
	}
}
void service_server::on_connect(std::shared_ptr<network::net_connection> connection)
{
	json_stub::on_connect(connection);
	auto connection_name_ptr = get_connection_name(connection.get());
	if (*connection_name_ptr == m_upstream_server.name)
	{
		request_allocate_resource_server("db_server");
		request_allocate_resource_server("redis_server");
	}
}
在mgr_server中接收到这些资源申请请求之后,会选取当前资源池中连接数最少的进程来返回:
std::string mgr_server::allocate_resource_svr(std::unordered_map<std::string, resource_stub_info>& resource_svrs, const std::string& from_server_name)
{
	if(resource_svrs.empty())
	{
		return {};
	}
	std::vector<std::pair<std::string, std::size_t>> resource_server_loads;
	resource_server_loads.reserve(resource_svrs.size());
	for (const auto& one_pair : resource_svrs)
	{
		if(!one_pair.second.ready)
		{
			continue;
		}
		resource_server_loads.emplace_back(one_pair.first, one_pair.second.connected_svrs.size());
	}
	std::sort(resource_server_loads.begin(), resource_server_loads.end(), [](const std::pair<std::string, std::size_t>& a, const std::pair<std::string, std::size_t>& b)
		{
			return a.second < b.second;
		});
	auto dest_resource_svr = resource_server_loads[0].first;
	resource_svrs[dest_resource_svr].connected_svrs.insert(from_server_name);
	return dest_resource_svr;
}
当space_server与service_server收到分配的资源进程列表之后,会主动的向这些资源进程发起连接:
void space_server::on_reply_allocate_resource(std::shared_ptr<network::net_connection> con, std::shared_ptr<const std::string> dest, const json& msg)
{
	stub_info cur_resource_svr;
	std::string resource_server_type;
	std::string cur_err;
	try
	{
		msg.at("resource_server_type").get_to(resource_server_type);
		msg.at("errcode").get_to(cur_err);
		if(!cur_err.empty())
		{
			m_logger->warn("on_reply_allocate_resource errcode {}", cur_err);
			add_timer_with_gap(std::chrono::milliseconds(2 * 1000), [resource_server_type, this]() {
				request_allocate_resource_server(resource_server_type);
			});
			return;
		}
		msg.at("resource_svr").get_to(cur_resource_svr);
	}
	catch (std::exception& e)
	{
		m_logger->warn("on_reply_allocate_resource msg invalid {} error {}", msg.dump(4), e.what());
		return;
	}

	m_named_servers[cur_resource_svr.name] = cur_resource_svr;
	connect_to_server(cur_resource_svr.name);

}
当各项进程角色连接数量得到满足之后,就会向mgr_server汇报自己这个进程已经可用了。
void space_server::on_connect(std::shared_ptr<network::net_connection> connection)
{
	json_stub::on_connect(connection);
	auto connection_name_ptr = get_connection_name(connection.get());
	if (*connection_name_ptr == m_upstream_server.name)
	{
		request_allocate_counter("online_session");
		request_allocate_resource_server("db_server");
		request_allocate_resource_server("redis_server");
	}
	else
	{
		auto cur_server_iter = m_named_servers.find(*connection_name_ptr);
		if (cur_server_iter == m_named_servers.end())
		{
			return;
		}
		if (cur_server_iter->second.type == "db_server")
		{
			m_router->link_anchor_to_connection("db_server", connection.get());
			m_logger->info("m_connected_resource_servers add {}", *connection_name_ptr);
		}
		else if(cur_server_iter->second.type == "redis_server")
		{
			m_router->link_anchor_to_connection("redis_server", connection.get());
			m_logger->info("m_connected_resource_servers add {}", *connection_name_ptr);
		}
		else
		{
			return;
		}
		if(m_router->has_anchor("redis_server") && m_router->has_anchor("db_server"))
		{
			json report_ready_info, temp_param;
			report_ready_info["cmd"] = "report_server_ready";
			temp_param["server_name"] = *m_local_name_ptr;
			temp_param["server_type"] = m_local_server.type;
			report_ready_info["param"] = temp_param;
			m_router->push_msg( m_local_name_ptr,std::make_shared<std::string>(m_upstream_server.name), std::make_shared<std::string>(report_ready_info.dump()), enums::packet_cmd_helper::encode(enums::packet_cmd::server_control, 0));
		}
	}
}
当space_server变成ready之后,会向gate_server进行广播:
// 	void mgr_server::on_report_server_ready(std::shared_ptr<network::net_connection> con, std::shared_ptr<const std::string> dest, const json& msg)
json broadcast_msg, param;
std::vector<stub_info> temp_stub_infos;
temp_stub_infos.push_back(m_named_servers[server_name]);
broadcast_msg["cmd"] = "notify_server_ready";
param["servers"] = temp_stub_infos;
broadcast_msg["param"] = param;
auto cur_info = std::make_shared<std::string>(broadcast_msg.dump(4));
broadcast_to_space_svrs(cur_info);
if(server_type == "space_server")
{
	broadcast_to_gate_svrs(cur_info);
}
gate_server收到space_server的ready消息之后,会主动发起一个连接:
void gate_server::on_notify_server_ready(std::shared_ptr<network::net_connection> con, std::shared_ptr<const std::string> dest, const json& msg)
{
	std::vector<stub_info> ready_servers;
	try
	{
		msg.at("servers").get_to(ready_servers);
	}
	catch (std::exception& e)
	{
		m_logger->error("on_notify_server_ready fail to parse {} error {}", msg.dump(4), e.what());
		return;
	}
	for (const auto& one_server : ready_servers)
	{
		if (one_server.type != "space_server")
		{
			continue;
		}
		m_named_servers[one_server.name] = one_server;

		if (!m_router->has_connection_with_name(one_server.name))
		{
			connect_to_server(one_server.name);
		}

	}
}
当一个service_server变成ready之后,mgr_server并不会立即往这些service_server分配service去创建,而是等待一个计时器超时再去创建:
void mgr_server::check_to_create_service()
{
	if(m_stopped)
	{
		return;
	}
	if (m_service_create_check_timer.valid())
	{
		m_timer_mgr.cancel_timer(m_service_create_check_timer);
		m_service_create_check_timer.reset();

	}
	std::uint32_t need_server_num = 0;
	for (const auto& one_pair : m_services_to_create)
	{
		need_server_num = std::max(need_server_num, one_pair.second);
	}
	std::vector<std::string> ready_service_servers;
	for (const auto& one_pair : m_service_stub_infos)
	{
		if (one_pair.second.ready)
		{
			ready_service_servers.push_back(one_pair.first);
		}
	}
	if (need_server_num > ready_service_servers.size())
	{
		// m_logger->error("need_server_num {} is larger than m_service_stub_infos size {}", need_server_num, ready_service_servers.size());
		add_timer_with_gap(std::chrono::milliseconds(1000), [this]() {
			check_to_create_service();
			});
		return;
	}
	if (m_min_service_server_num > ready_service_servers.size())
	{
		// m_logger->error("m_min_service_server_num {} is larger than m_service_stub_infos size {}", m_min_service_server_num, ready_service_servers.size());
		add_timer_with_gap(std::chrono::milliseconds(1000), [this]() {
			check_to_create_service();
			});
		return;
	}

	std::unordered_map<std::string, std::vector<std::string>> temp_services_on_server;
	std::uint32_t temp_counter = 0;
	for (const auto& one_service_cluster : m_services_to_create)
	{
		for (std::uint32_t i = 0; i < one_service_cluster.second; i++)
		{
			auto cur_select_server = ready_service_servers[temp_counter % ready_service_servers.size()];
			temp_services_on_server[cur_select_server].push_back(one_service_cluster.first);
			request_create_service_on_server(cur_select_server, one_service_cluster.first, {});
			temp_counter++;
		}
	}
}
这样做的目的是为了等待所有的service_server都启动好之后再去平摊各种局外服务的创建,否则就可能出现所有服务都创建在同一个service_server的情况。
服务器关闭流程
服务器关闭指令需要运维人员手动去操作,通过mgr_server的http端口进行通知,在deploy/scripts/stop_servers.py中我们通过curl指令来执行关服通知:
with open(options.config_path, "r") as config_file:
	config_detail = json.load(config_file)
	mgr_server_ip = config_detail["mgr_server"]["ip"]
	mgr_server_http_port = config_detail["mgr_server"]["http_port"]
	curl_cmd = "curl -H \"Accept: application/json\" -H \"Content-type: application/json\" -X GET -d '{\"cmd\": \"stop\", \"param\": {}}'  "
	curl_cmd += "http://" + mgr_server_ip + ":" + str(mgr_server_http_port) + "/gm_cmd/GET/"
	os.system(curl_cmd)
mgr_server接收到这个运维指令之后,会调用notify_stop来开始执行关服逻辑:
void json_stub::on_gm_cmd(const std::string& cmd, const json& param, msg_seq_t req_seq)
{
	if(cmd == "stop")
	{
		notify_stop();
		json reply_json;
		reply_json["params"] = param;
		auto reply_str = reply_json.dump() + "\r\n";

		http::http_request_mgr::finish_request(req_seq, reply_str);
	}
}

void basic_stub::notify_stop()
{
	if(m_stopped)
	{
		m_logger->error("notify stop while already stopping");
		return;
	}
	m_logger->warn("notify_stop");
	m_stopped = true;
	m_stop_report_ts = m_stop_begin_ts = std::chrono::steady_clock::now();
	stop_begin();
}

void basic_stub::stop_begin()
{
	m_logger->info("stop_begin");
}
在notify_stop中我们会设置m_stopped这个bool变量为true,代表当前进程正在关服流程中,至于具体的关服细节则依赖于各个进程角色的重载实现。
在进程主循环中,如果发现自己是关服过程中,则开始定期检查关服过程是否已经执行完毕,如果执行完毕则开始关闭所有的监听端口以及计时器,等待io_service的自然退出:
// void basic_stub::main_loop()
if(m_stopped)
{
	auto stop_check_ts = std::chrono::steady_clock::now();
	bool with_stop_log = false;
	std::chrono::duration<double> stop_elapsed_time = stop_check_ts - m_stop_report_ts;
	if(stop_elapsed_time.count() > m_stop_alert_duration)
	{
		m_logger->warn("stop check fail after {} seconds", stop_elapsed_time.count());
		with_stop_log = true;
		m_stop_report_ts = stop_check_ts;
	}
	if(check_stop_finish(with_stop_log))
	{
		on_stop_finish();
		return;
	}
}

void basic_stub::on_stop_finish()
{
	m_router->disconnect_all();
	m_asio_wrapper->m_acceptor.close();
	m_asio_wrapper->m_timer.cancel();
	m_http_server->stop();
	m_logger->warn("on_stop_finish");
}
这里的check_stop_finish主要检查其他进程发起的连接以及http连接是否为0,都是0的时候再等待所有的线程池退出:
bool basic_stub::check_stop_finish(bool with_log)
{

	std::uint32_t has_upstream_server = 0;
	if(!m_upstream_server.name.empty())
	{
		has_upstream_server = 1;
	}
	if(m_router->get_active_connection_count() > has_upstream_server)
	{
		if(with_log)
		{
			m_logger->debug("router->get_active_connection_count() fail remain {}", m_router->get_active_connection_count());
		}
		return false;
	}
	if(m_http_server)
	{
		if(m_http_server->get_session_count() != 0)
		{
			if(with_log)
			{
				m_logger->debug("_http_server->get_session_count() fail");
			}
			return false;
		}
	}
	if(m_finished_async_thread_counter != m_async_thread_num)
	{
		if(with_log)
		{
			m_logger->debug("m_finished_async_thread_counter fail");
		}
		return false;
	}
	for(auto& one_thread_ptr : m_async_threads)
	{
		one_thread_ptr->join();
	}
	m_async_threads.clear();
	return true;
}
从前面小章节可知各种角色的服务器的就绪状态其实是有依赖的,这种逻辑依赖不仅影响服务器的启动,还影响服务器的关闭,强制关闭所有的连接可能会导致服务器状态没有正确的保存到数据库。所以mgr_server关服的时候是分阶段来通知各个进程角色去退出的的,阶段变量存储在m_stop_stage中,首先通知的是gate_server:
void mgr_server::stop_begin()
{
	json_stub::stop_begin();

	json sync_msg;
	sync_msg["cmd"] = "notify_stop";
	sync_msg["param"] = json::object_t();
	auto cur_stop_msg = std::make_shared<std::string>(sync_msg.dump());
	// 先通知所有的gate 退出
	broadcast_to_gate_svrs(cur_stop_msg);

	m_stop_stage = stop_stage::wait_gate_server_destroy;
	return;
}
gate_server在接收到这个的通知请求之后,会通知所有的客户端服务器关闭,让客户端主动的断开所有的连接,同时拒绝掉后续的所有新客户端发出来的连接:
void gate_server::stop_begin()
{
	json_stub::stop_begin();
	std::vector<std::string> temp_entities;
	for(const auto& one_pair: m_eid_to_conn_id)
	{
		temp_entities.push_back(one_pair.first);
	}
	json::object_t notify_msg;
	notify_msg["msg"] = "server_close";
	for(const auto& one_dest: temp_entities)
	{
		request_client_close_impl(one_dest, notify_msg);
	}
	add_timer_with_gap(std::chrono::seconds(1), [this]()
	{
		m_router->disconnect_all();
	});
}
这里会同时开启一个延迟计时器去强制关闭所有的连接,包括客户端、space_server、mgr_server。mgr_server会收到gate_server的断线通知,当所有的gate_server都退出之后,开始进入第二阶段,通知所有玩家都下线:
void mgr_server::on_gate_all_destroyed()
{
	m_logger->warn("on_gate_all_destroyed");
	if(m_stop_stage != stop_stage::wait_gate_server_destroy)
	{
		return;
	}
	m_stop_stage = stop_stage::wait_account_logout;
	json sync_msg;
	sync_msg["cmd"] = "request_logout_all_accounts";
	sync_msg["param"] = json::object_t();
	auto cur_stop_msg = std::make_shared<std::string>(sync_msg.dump());
	// 通知 所有的space server account准备logout
	broadcast_to_space_svrs(cur_stop_msg);

	// 等待login_service汇报所有玩家都已经下线
}
当这个request_logout_all_accounts消息发送到space_server之后,所有的在线账号都会通知其对应的在线玩家去执行存库后下线操作,如果没有对应在线玩家则直接执行账号下线操作:
void space_server::on_request_logout_all_accounts(std::shared_ptr<network::net_connection> con, std::shared_ptr<const std::string> from, const json& msg)
{
	// 通知所有的account 准备logout
	auto cur_accounts = entity::entity_manager::instance().get_entities_by_exact_type<entity::account_entity>();
	utility::rpc_msg logout_msg;
	logout_msg.cmd = "request_logout_account";
	for(auto one_account: cur_accounts)
	{
		one_account->on_rpc_msg(logout_msg);
	}
	utility::rpc_msg request_msg;
	request_msg.cmd = "request_check_accounts_empty";
	call_service("login_service", request_msg);
}

void account_entity::request_logout_account(const utility::rpc_msg& msg)
{
	if(m_statem.active_state_name() == "logout_account")
	{
		return;
	}
	if(m_player_id.empty())
	{
		utility::rpc_msg request_msg;
		request_msg.cmd = "request_logout_account";
		call_service("login_service", request_msg);
		dispatcher().dispatch(enums::event_category::account, "logout");
		m_statem.change_to("logout_account");
	}
	else
	{
		utility::rpc_msg request_msg;
		request_msg.cmd = "request_logout_player";
		call_player(request_msg);
		m_statem.change_to("logout_account");
	}

}
当所有在线账号都下线之后,login_service会通知mgr_server下线阶段执行完成:
void service_server::report_accounts_all_logout()
{
	m_logger->info("report_accounts_all_logout");
	json report_info;
	report_info["cmd"] = "report_accounts_all_logout";

	report_info["param"] = json::object_t();
	m_router->push_msg(m_local_name_ptr, std::make_shared<std::string>(m_upstream_server.name), std::make_shared<std::string>(report_info.dump()), enums::packet_cmd_helper::encode(enums::packet_cmd::server_control, 0));
}
在此之后mgr_server通知所有的service执行存库后退出操作,:
void mgr_server::on_accounts_all_logout(std::shared_ptr<network::net_connection> con, std::shared_ptr<const std::string> from, const json& msg)
{
	m_logger->warn("on_accounts_all_logout");
	if(m_stop_stage != stop_stage::wait_account_logout)
	{
		return;
	}
	m_stop_stage = stop_stage::wait_service_destroy;
	// login_service汇报所有账号都已经下线
	json sync_msg;
	sync_msg["cmd"] = "notify_stop";
	sync_msg["param"] = json::object_t();
	auto cur_stop_msg = std::make_shared<std::string>(sync_msg.dump());
	// 通知所有的service准备退出
	broadcast_to_service_svrs(cur_stop_msg);
	broadcast_to_space_svrs(cur_stop_msg);
}
同时由于所有的账号都下线了,所有的space_server也不再被需要,开始执行退出流程:
void space_server::stop_begin()
{
	manager_base::stop_managers();
	json_stub::stop_begin();
}
service_server接收到stop通知后,会遍历当前进程上的所有service,执行存库后退出操作:
void service_server::stop_begin()
{
	m_logger->warn("service server {} stop_begin ", *m_local_name_ptr);
	auto cur_services = m_service_mgr->get_all_servicies();
	for(auto one_pair: cur_services)
	{
		one_pair.second->notify_stop();
	}
	manager_base::stop_managers();
}
当一个service完成了自己的退出逻辑之后,会通知到mgr_server:
void service_server::destroy_service(service::base_service* cur_service)
{
	json report_destroy_info, temp_param;
	report_destroy_info["cmd"] = "report_service_destroyed";
	temp_param["service_type"] = cur_service->m_base_desc.m_type_name;
	temp_param["service_id"] = cur_service->global_id();
	report_destroy_info["param"] = temp_param;
	m_router->push_msg( m_local_name_ptr, std::make_shared<std::string>(m_upstream_server.name), std::make_shared<std::string>(report_destroy_info.dump()), enums::packet_cmd_helper::encode(enums::packet_cmd::server_control, 0));
	m_services_by_id.erase(cur_service->global_id());

	m_services_to_destroy.push_back(cur_service);
}
当mgr_server记录的所有service都退出后,开始通知space_server与service_server执行连接清理并退出:
void mgr_server::on_service_all_destroyed()
{
	m_logger->warn("on_service_all_destroyed");
	if(m_stop_stage != stop_stage::wait_service_destroy)
	{
		return;
	}
	m_stop_stage = stop_stage::wait_space_server_destroy;
	// service 都退出之后 通知 space server 与 service server主动退出
	json sync_msg;
	sync_msg["cmd"] = "notify_clear_connection";
	sync_msg["param"] = json::object_t();
	auto cur_stop_msg = std::make_shared<std::string>(sync_msg.dump());

	broadcast_to_space_svrs(cur_stop_msg);
	broadcast_to_service_svrs(cur_stop_msg);
	// 等待 所有的 space 服务器都退出
}
当所有的space_server都下线之后,最后通知所有的资源服务器执行下线操作:
void mgr_server::on_space_server_all_destroyed()
{
	m_logger->warn("on_space_server_all_destroyed");
	if(m_stop_stage != stop_stage::wait_space_server_destroy)
	{
		return;
	}
	m_stop_stage = stop_stage::wait_connection_clear;
	json sync_msg;
	sync_msg["cmd"] = "notify_stop";
	sync_msg["param"] = json::object_t();
	auto cur_stop_msg = std::make_shared<std::string>(sync_msg.dump());
	// 通知所有的资源服务器准备退出
	broadcast_to_map_svrs(cur_stop_msg);
	broadcast_to_redis_svrs(cur_stop_msg);
	broadcast_to_db_svrs(cur_stop_msg);
}
由于redis与db才是最后负责数据落地的角色,所以这两种进程的退出条件优先判断是否所有的读写任务都已经完成:
bool db_server::check_stop_finish(bool with_log)
{

	if (!mongo_task_channels.tasks_all_finished())
	{
		if(with_log)
		{
			m_logger->debug("mongo_task_channels check fail");
		}
		return false;
	}
	else
	{
		for (auto& one_worker : workers)
		{
			one_worker->notify_stop();
		}
		return json_stub::check_stop_finish(with_log);
	}
}

bool redis_server::check_stop_finish(bool with_log)
{

	if (!redis_task_channels.tasks_all_finished())
	{
		if (with_log)
		{
			m_logger->debug("redis_task_channels check fail");
		}
		return false;
	}
	else
	{
		for (auto &one_worker : workers)
		{
			one_worker->notify_stop();
		}
		return json_stub::check_stop_finish(with_log);
	}
}
当所有的连接都断开之后,mgr_server的check_stop_finish就会返回true,并最终导致mgr_server进程退出。
BigWorld 的进程生命周期
启动流程
在Bigworld里,每种进程都有一个专门的main.cpp文件来定义其启动时的main函数,其文件内容大同小异,只是bwMainT< >的模板参数不同。其模板参数就是进程的App类,例如CellApp、BaseApp、LoginApp等:
// server\dbappmgr\main.cpp
int BIGWORLD_MAIN( int argc, char * argv[] )
{
	return bwMainT< DBAppMgr >( argc, argv );
}
// server\loginapp\main.cpp
int BIGWORLD_MAIN( int argc, char * argv[] )
{
	return bwMainT< LoginApp >( argc, argv );
}
这里的BIGWORLD_MAIN宏定义了进程的main函数,来封装一些通用的处理流程,例如初始化Bigworld的资源和配置,解析命令行参数等,最后调用bwMainT< >来启动进程的主循环:
#define BIGWORLD_MAIN 										\
bwMain( int argc, char * argv[] );							\
int main( int argc, char * argv[] )							\
{															\
	BW_SYSTEMSTAGE_MAIN();									\
	BWResource bwresource;									\
	BWResource::init( argc, (const char **)argv );			\
	BWConfig::init( argc, argv );							\
	bwParseCommandLine( argc, argv );						\
	return bwMain( argc, argv );							\
}															\
int bwMain
这个bwMainT< >模板函数负责进程运行环境的准备,包括初始化全局事件驱动器EventDispatcher、网络资源interface以及注册进程退出的信号处理函数signalProcessor。初始化好了这三个重要组件之后,继续利用模板函数doBWMainT< >来启动进程的主循环:
// lib\server\bwservice.hpp
template <class SERVER_APP>
int bwMainT( int argc, char * argv[], bool shouldLog = true )
{
	Mercury::EventDispatcher dispatcher;

	// Find the internal interface IP by querying BWMachined
	if (!Mercury::MachineDaemon::queryForInternalInterface(
			ServerApp::discoveredInternalIP ))
	{
		WARNING_MSG( "bwMainT: "
			"Unable to determine internal interface via BWMachineD query.\n" );
	}

	BW::string internalInterfaceName =
			getBWInternalInterfaceSetting( SERVER_APP::configPath() );

	Mercury::NetworkInterface interface( &dispatcher,
			Mercury::NETWORK_INTERFACE_INTERNAL, 0,
			internalInterfaceName.c_str() );

	SignalProcessor signalProcessor( dispatcher );

	BW_MESSAGE_FORWARDER3( SERVER_APP::appName(), SERVER_APP::configPath(),
		/*ENABLED=*/shouldLog, dispatcher, interface );

	START_MSG( SERVER_APP::appName() );

	if (internalInterfaceName != Mercury::NetworkInterface::USE_BWMACHINED)
	{
		CONFIG_WARNING_MSG( "internalInterface set to '%s' in bw.xml. "
				"This option is deprecated. It is recommended to not set this "
				"value. The default behaviour is to use the same interface as "
				"bwmachined. This is controlled by the broadcast route.\n",
			internalInterfaceName.c_str() );
	}

	int result = doBWMainT< SERVER_APP >( dispatcher, interface, argc, argv );

	INFO_MSG( "%s has shut down.\n", SERVER_APP::appName() );

	return result;
}
这个doBWMainT的实现就非常简单了,主要就是创建一个SERVER_APP的实例,然后调用其runApp方法来启动进程的主循环:
template <class SERVER_APP>
int doBWMainT( Mercury::EventDispatcher & dispatcher,
		Mercury::NetworkInterface & interface,
		int argc, char * argv[] )
{
	if (!ServerAppConfig::init( SERVER_APP::Config::postInit ))
	{
		CONFIG_ERROR_MSG( "Failed to initialise configuration options. "
				"See earlier error message for details.\n" );
		return -1;
	}

	SERVER_APP serverApp( dispatcher, interface );
	serverApp.setBuildDate( __TIME__, __DATE__ );

	return serverApp.runApp( argc, argv ) ? EXIT_SUCCESS : EXIT_FAILURE;
}
每种进程都有一个对应的App类,这些App类都继承自ServerApp类。ServerApp类是Bigworld进程管理的核心类,ServerApp::runApp来调用init初始化相关组件:
/**
 *	This method runs this application.
 */
bool ServerApp::runApp( int argc, char * argv[] )
{
	// calculate the clock speed
	stampsPerSecond();

	bool result = false;

	if (this->init( argc, argv ))
	{
		INFO_MSG( "---- %s is running ----\n", this->getAppName() );
		result = this->run();
	}
	else
	{
		ERROR_MSG( "Failed to initialise %s\n", this->getAppName() );
	}

	this->fini();

	interface_.prepareForShutdown();

#if ENABLE_PROFILER
	g_profiler.fini();
#endif

	return result;
}
这里的init方法负责初始化性能监控g_profiler,退出信号处理函数pSignalHandler_,以及FD的最大打开数,并设置网络接口的日志等级:
/**
 *	Initialisation function.
 *
 *	This needs to be called from subclasses' overrides.
 */
bool ServerApp::init( int argc, char * argv[] )
{
	PROFILER_SCOPED( ServerApp_init );

	bool runFromMachined = false;

	for (int i = 1; i < argc; ++i)
	{
		if (strcmp( argv[i], "-machined" ))
		{
			runFromMachined = true;
		}
	}

	INFO_MSG( "ServerApp::init: Run from bwmachined = %s\n",
			watcherValueToString( runFromMachined ).c_str() );

#if ENABLE_PROFILER
	if (ServerAppConfig::hasHitchDetection())
	{
		g_profiler.setProfileMode( Profiler::SORT_BY_TIME, false );
	}
#endif

	pSignalHandler_.reset( this->createSignalHandler() );

	// Handle signals
	this->enableSignalHandler( SIGINT );

	this->raiseFileDescriptorLimit( ServerAppConfig::maxOpenFileDescriptors() );

	interface_.verbosityLevel( ServerAppConfig::isProduction() ?
		Mercury::NetworkInterface::VERBOSITY_LEVEL_NORMAL :
		Mercury::NetworkInterface::VERBOSITY_LEVEL_DEBUG );

	return true;
}
在完成了init之后,ServerApp::runApp接下来会调用run方法来启动进程的主循环EventDispatcher::processOnce:
/**
 *	This is the default implementation of run. Derived classes to override
 *	this to implement their own functionality.
 */
bool ServerApp::run()
{
	mainDispatcher_.processUntilBreak();

	this->onRunComplete();

	return true;
}

/**
 *	This method call processContinuously until breakProcessing is called.
 */
void EventDispatcher::processUntilBreak()
{
	this->processContinuously();
	pErrorReporter_->reportPendingExceptions( true /* reportBelowThreshold */ );
}

/**
 * 	This method processes events continuously until interrupted by a call to
 * 	breakProcessing.
 *
 *	@see breakProcessing
 */
void EventDispatcher::processContinuously()
{
	breakProcessing_ = false;

	while (!breakProcessing_)
	{
		this->processOnce( /* shouldIdle */ true );
	}
}
在processOnce方法中,会先处理频繁任务processFrequentTasks,然后处理定时器processTimers,随后是性能统计processStats,最后处理网络事件processNetwork:
/**
 *	This method processes the current events.
 *
 *	@param shouldIdle	If set to true, this method will block until the next
 *						timer is due if there is nothing waiting on the network.
 *
 *	@return 			The number of network events processed.
 */
int EventDispatcher::processOnce( bool shouldIdle /* = false */ )
{
	breakProcessing_ = false;

	this->processFrequentTasks();

	if (!breakProcessing_)
	{
		this->processTimers();
	}

	this->processStats();

	if (!breakProcessing_)
	{
		return this->processNetwork( shouldIdle );
	}

	return 0;
}
这个processFrequentTasks方法会通过FrequentTasks::process方法来处理所有通过mainDispatcher_.addFrequentTask注册过来的FrequentTask,目前主要用到这个FrequentTask的地方不多,只有mysql,signal和http相关的任务会注册到FrequentTasks中:
/**
 *	This method calls doTask on all registered FrequentTasks objects.
 */
void EventDispatcher::processFrequentTasks()
{
	PROFILER_SCOPED( processFrequentTasks );
	pFrequentTasks_->process();
}

// lib\db_storage_mysql\mysql_database.cpp
/**
 *	This method implements the FrequentTask method.
 */
void MySqlDatabase::doTask()
{
	bgTaskManager_.tick();
}
// lib\server\signal_processor.cpp
void SignalProcessor::doTask()
{
	this->dispatch();
}
/**
 *	Handle frequent task trigger.
 */
void SignalProcessor::dispatch()
{
	const Signal::Set allSignals( Signal::Set::FULL );
	Signal::Blocker blocker( allSignals );

	int sigNum = SIGMIN;
	while (sigNum <= SIGMAX)
	{
		if (signals_.isSet( sigNum ))
		{
			this->dispatchSignal( sigNum );
		}

		++sigNum;
	}

	signals_.clearAll();
}
在processTimers方法里会调用TimeQueue::process方法来处理全局计时器队列pTimeQueue_里所有到期的定时器任务,这个方法会返回处理的定时器任务数量,我们可以通过这个数量来判断是否有定时器任务到期:
/**
 *	This method processes outstanding timers.
 */
void EventDispatcher::processTimers()
{
	PROFILER_SCOPED( processTimers );
	numTimerCalls_ += pTimeQueue_->process( timestamp() );
}
在processNetwork方法中,会调用Poller::processPendingEvents方法来处理所有等待在网络上的事件,这个方法会返回处理的事件数量,我们可以通过这个数量来判断是否有网络事件发生:
/**
 *	This method processes any activity on the network.
 *
 *	@param shouldIdle If set to true, this method will block until the next
 *	timer is due if there is nothing waiting on the network.
 *	@return	Number of file descriptors that triggered handlers.
 */
int EventDispatcher::processNetwork( bool shouldIdle )
{
	PROFILER_SCOPED( processNetwork );
	// select for network activity until earliest timer
	double maxWait = shouldIdle ? this->calculateWait() : 0.0;

	return pPoller_->processPendingEvents( maxWait );
}
目前这个Poller的实现有三种, 就是常见的Linux系统上的select,poll和epoll:
SelectPoller调用select来等待文件描述符的相关状态改变,并执行对应的事件处理函数。PollPoller调用poll来等待文件描述符的相关状态改变,并执行对应的事件处理函数。EPoller调用epoll_wait来等待文件描述符的相关状态改变,并执行对应的事件处理函数。
运行的时候根据编译选项会选择不同的Poller实现,默认是SelectPoller,如果编译选项中定义了HAS_POLL,则会选择PollPoller,如果定义了HAS_EPOLL,则会选择EPoller。
/**
 *	This static method creates an appropriate EventPoller. It may use select or
 *	epoll.
 */
EventPoller * EventPoller::create()
{
#if defined( HAS_POLL )
	return new PollPoller();

#elif defined( HAS_EPOLL )
	return new EPoller();

#else // !defined( HAS_EPOLL )
	return new SelectPoller();

#endif // defined( HAS_EPOLL )
}
这里的事件循环里并没有处理具体的业务逻辑,只是处理了网络事件和定时器任务。ServerApp的具体子类负责利用这里提供的Task和Timer组件来插入自身的业务逻辑。以最简单的DBApp为例,在其连接到数据库之后会调用initTimers,这里会开启一个固定间隔且重复调用的计时器来驱动GameTick,在其超时处理函数handleTimeout里用来定时调用advanceTime方法来推进时间:
/**
 *  This method sets up required timers.
 *
 *  @return true on success, false otherwise.
 */
bool DBApp::initTimers()
{
    MF_ASSERT( status_.status() < DBStatus::RUNNING );

    // A one second timer to check all sorts of things, including whether to
    // start the server running if we are waiting for other components to
    // be ready.
    statusCheckTimer_ = mainDispatcher_.addTimer( 1000000, this,
            reinterpret_cast< void * >( TIMEOUT_STATUS_CHECK ),
            "StatusCheck" );

    // NOTE: DBApp's time is not synchronised with the rest of the cluster.
    gameTimer_ = mainDispatcher_.addTimer( 1000000/Config::updateHertz(), this,
            reinterpret_cast< void * >( TIMEOUT_GAME_TICK ),
            "GameTick" );

    return true;
}

/**
 *  This method handles timer events. It is called every second.
 */
void DBApp::handleTimeout( TimerHandle handle, void * arg )
{
    switch (reinterpret_cast< uintptr >( arg ))
    {
    case TIMEOUT_GAME_TICK:
        this->advanceTime();
        break;

    case TIMEOUT_STATUS_CHECK:
        this->checkStatus();
        break;
    }
}
这个advanceTime由ServerApp这个基类来提供,主要内容就是推进游戏时间,提供游戏的Tick机制,也就是常说的游戏帧的概念。内部会调用onTickPeriod、onEndOfTick、onStartOfTick、onTickProcessingComplete等回调函数,以及调用callUpdatables方法来更新所有Updatable对象。
/**
 *	This method increments the game time.
 */
void ServerApp::advanceTime()
{
	if (lastAdvanceTime_ != 0)
	{
		double tickPeriod = stampsToSeconds( timestamp() - lastAdvanceTime_ );

		this->onTickPeriod( tickPeriod );
	}

	lastAdvanceTime_ = timestamp();

	this->onEndOfTick();

	++time_;

#if ENABLE_PROFILER
	g_profiler.tick();
#endif

	this->onStartOfTick();

	this->callUpdatables();

	this->onTickProcessingComplete();
}
这里的几个Tick相关函数目前基本都是空实现,主要是为了预留扩展点,方便子类来实现自己的逻辑。只有ServerApp::onTickPeriod提供了一个基础实现,就是对过长的帧时间进行警告并记录:
virtual void onTickPeriod( double tickPeriod );

/*
	* This method gives subclasses a chance to act at the end of a tick
	* immediately before the current server time is incremented.
	*/
virtual void onEndOfTick() {};

/*
	* This method gives subclasses a chance to act at the beginning of a tick
	* immediately after the current server time is incremented.
	*/
virtual void onStartOfTick() {};

/*
	* This method gives subclassses a chance to act at the end of ServerApp's
	* tick processing, immediately before control returns to the caller of
	* ServerApp::advanceTime();
	*/
virtual void onTickProcessingComplete() {};

/*
 * This method gives subclasses the tick period each time advanceTime is
 * called
 */
void ServerApp::onTickPeriod( double tickPeriod )
{
	if (tickPeriod * ServerAppConfig::updateHertz() > 2.0)
	{
		WARNING_MSG( "ServerApp::onTickPeriod: "
					"Last game tick took %.2f seconds. Expected %.2f.\n",
				tickPeriod, 1.0/ServerAppConfig::updateHertz() );
	}

#if ENABLE_PROFILER
	if (ServerAppConfig::hasHitchDetection() &&
		((tickPeriod * ServerAppConfig::updateHertz()) >
			ServerAppConfig::hitchDetectionThreshold()))
	{
		WARNING_MSG( "Service::onTickPeriod: "
			"Server hitch detected, creating JSON dump.\n" );
		g_profiler.dumpThisFrame();
	}
#endif
}
注册互联
Bigworld服务器集群里会存在各种角色的进程,包括DBApp、GameApp、LoginApp等。对于DBApp、BaseApp、CellApp等角色的进程,在一个集群里会有一个到多个具体的实例。为了统一管理这些不定数量的角色实例,Bigworld里设计了DBAppMgr、BaseAppMgr和CellAppMgr等管理器。在这些DBApp、BaseApp、CellApp等角色的进程启动之后,会将这些进程注册到对应的Mgr实例里。这个注册机制依赖于ServerApp上提供的一个ManagerAppGateway类型的对象,默认情况下ServerApp::pManagerAppGateway返回空,只有在这些需要被统一管理的进程角色里会对这个接口进行重载:
// lib\server\server_app.hpp
virtual ManagerAppGateway * pManagerAppGateway() { return NULL; }
// server\baseapp\baseapp.hpp
ManagerAppGateway * pManagerAppGateway() /* override */
{
	return &baseAppMgr_;
}
// server\cellapp\cellapp.hpp
ManagerAppGateway * pManagerAppGateway() /* override */
{
	return &cellAppMgr_;
}
// server\dbapp\dbapp.hpp
ManagerAppGateway * pManagerAppGateway() /* override */
{
	return &dbAppMgr_;
}
这个ManagerAppGateway负责当前进程与对应的管理进程之间的注册与反注册,构造的时候需要提供通信用的网络通道networkInterface和反注册用的RPC retireAppIE:
ManagerAppGateway::ManagerAppGateway( Mercury::NetworkInterface & networkInterface,
			const Mercury::InterfaceElement & retireAppIE ) :
		channel_( networkInterface, Mercury::Address::NONE ),
		retireAppIE_( retireAppIE )
{
	MF_ASSERT( retireAppIE_.lengthStyle() == Mercury::FIXED_LENGTH_MESSAGE );
	MF_ASSERT( retireAppIE_.lengthParam() == 0 );
}

// server\dbapp\dbappmgr_gateway.cpp
DBAppMgrGateway::DBAppMgrGateway( Mercury::NetworkInterface & interface ) :
	ManagerAppGateway( interface, DBAppMgrInterface::retireApp )
{}

// server\cellapp\cellappmgr_gateway.cpp
CellAppMgrGateway::CellAppMgrGateway( Mercury::NetworkInterface & interface ) :
	ManagerAppGateway( interface, CellAppMgrInterface::retireApp )
{}

// server\baseapp\baseappmgr_gateway.cpp
BaseAppMgrGateway::BaseAppMgrGateway( Mercury::NetworkInterface & interface ) :
	ManagerAppGateway( interface, BaseAppMgrInterface::retireApp )
{}
这个ManagerAppGateway构造函数并不直接负责注册,依赖于外部来调用ManagerAppGateway::init来初始化底层的通道Channel。接口需要提供能与目标ManagerApp通信的interfaceName,通过这个interfaceName来查询对应的通信地址:
bool ManagerAppGateway::init( const char * interfaceName, int numRetries, float maxMgrRegisterStagger )
{
	if (!almostZero( maxMgrRegisterStagger ))
	{
		const float MICROSECONDS_IN_SECOND = 1000000.0f;

		// Spread starting time of processes within a tick to avoid possible network peaks during startup
		BWRandom rand( mf_getpid() );
		uint32 delay = static_cast<uint>( rand( 0.0f, maxMgrRegisterStagger ) * MICROSECONDS_IN_SECOND );

		if (delay > 0)
		{
			DEBUG_MSG( "ManagerAppGateway::init: "
					"Manager Registration Stagger mode is active: maxMgrRegisterStagger: %f s. "
					"Delaying process start for %f s.\n",
				maxMgrRegisterStagger, delay / MICROSECONDS_IN_SECOND );

			usleep( delay );
		}
	}

	Mercury::Address addr;

	Mercury::Reason reason =
		Mercury::MachineDaemon::findInterface( interfaceName,
			0, addr, numRetries );

	if (reason == Mercury::REASON_SUCCESS)
	{
		channel_.addr( addr );
	}

	// This channel is irregular until we start the game tick timer.
	this->isRegular( false );

	return reason == Mercury::REASON_SUCCESS;
}
这个Mercury::MachineDaemon::findInterface函数负责查询interfaceName对应的通信地址addr,具体做法是向当前进程所属的MachineDaemon发送一个广播消息ProcessStatsMessage,查询所有能提供interfaceName的进程的通信地址,获取第一个返回的通信地址:
/**
 * 	This method finds a specified interface on the network.
 * 	WARNING: This function always blocks.
 *
 *	@param name			Only interfaces with this name are considered.
 *	@param id			Only interfaces with this ID are considered, if
 *						negative all are considered.
 *	@param addr			Output address of the found interface.
 *	@param retries		The number of retries if no interface is found.
 *	@param verboseRetry	Flag for versbose output on retry.
 *	@param pHandler		Handler to process ProcessStatsMessages responses. If
 *						NULL, the default FindFirstInterfaceHandler is used.
 *
 * 	@return	A Mercury::REASON_SUCCESS if an interface was found, a
 * 	Mercury::REASON_TIMER_EXPIRED if an interface was not found, other
 * 	Mercury::Reasons are returned if there is an error.
 */
Reason findInterface( const char * name, int id,
		Address & addr, int retries, bool verboseRetry,
		IFindInterfaceHandler * pHandler )
{
	ProcessStatsMessage pm;
	pm.param_ = pm.PARAM_USE_CATEGORY |
		pm.PARAM_USE_UID |
		pm.PARAM_USE_NAME |
		(id <= 0 ? 0 : pm.PARAM_USE_ID);
	pm.category_ = pm.SERVER_COMPONENT;
	pm.uid_ = getUserId();
	pm.name_ = name;
	pm.id_ = id;

	IFindInterfaceHandler * pDefaultHandler = NULL;

	if (!pHandler)
	{
		pDefaultHandler = new FindFirstInterfaceHandler();
		pHandler = pDefaultHandler;
	}

	int attempt = 0;

	retries = std::max( retries, 1 );

	while (++attempt <= retries)
	{
		Reason reason = pm.sendAndRecv( 0, BROADCAST, pHandler );

		if (reason != REASON_SUCCESS)
		{
			return reason;
		}

		if (pHandler->hasError())
		{
			return REASON_GENERAL_NETWORK;
		}

		Address result = pHandler->result();

		if (result != Address::NONE)
		{
			addr = result;
			return REASON_SUCCESS;
		}

		if (verboseRetry)
		{
			INFO_MSG( "MachineDaemon::findInterface: "
					"Failed to find %s for UID %d on attempt %d.\n",
				name, pm.uid_, attempt );
		}

		// Sleep a little because sendAndReceiveMGM() is too fast now! :)
#if defined( PLAYSTATION3 )
		sys_timer_sleep( 1 );
#elif !defined( _WIN32 )
		sleep( 1 );
#else
		Sleep( 1000 );
#endif
	}

	if (pDefaultHandler)
	{
		bw_safe_delete( pDefaultHandler );
	}

	return REASON_TIMER_EXPIRED;
}
这个findInterface的核心点在于ProcessStatsMessage的广播,需要探究一下这个消息是如何通知到当前服务器所在集群的MachineDaemon的。
Mercury::Reason MachineGuardMessage::sendAndRecv( uint32 srcip, uint32 destaddr,
	ReplyHandler *pHandler )
{
	BW_GUARD;
	// Set up socket
	Endpoint ep;
	ep.socket( SOCK_DGRAM );

	if (!ep.good() || ep.bind( 0, srcip ) != 0)
	{
		return Mercury::REASON_GENERAL_NETWORK;
	}

	return this->sendAndRecv( ep, destaddr, pHandler );
}

/**
 *	This method sends this MachineGuardMessage message to the bwmachined at the
 *	input address. The reply messages received are handled by the provided
 *	handler.
 *
 *	Note: If sending to BROADCAST, REASON_TIMER_EXPIRED will be returned if not
 *	all bwmachined daemons reply, even if some are successful.
 */
Mercury::Reason MachineGuardMessage::sendAndRecv( Endpoint &ep, uint32 destaddr,
	ReplyHandler *pHandler )
{
	BW_GUARD;

	if (destaddr == BROADCAST)
	{
		ep.setbroadcast( true );
	}

	char recvbuf[ MGMPacket::MAX_SIZE ];

	MachineGuardResponseChecker responseChecker;

	int countdown = 3;
	while (countdown--)
	{
		if (!this->sendto( ep, htons( PORT_MACHINED ), destaddr,
				MGMPacket::PACKET_STAGGER_REPLIES ))
		{
			ERROR_MSG( "MachineGuardMessage::sendAndRecv: "
					"Failed to send entire MGM (#%d tries left)\n",
				countdown );
			continue;
		}
		// 省略很多代码
	}
	ERROR_MSG( "MachineGuardMessage::sendAndRecv: timed out!\n" );
	return Mercury::REASON_TIMER_EXPIRED;
}
这里的sendto函数调用的时候,第二个参数是端口号PORT_MACHINED,这个端口号是bwmachined的监听端口,用于接收MachineGuardMessage消息。第三个参数是目标机器的地址,当前执行findInterface的时候被设置为了const uint32 BROADCAST = 0xFFFFFFFF;,表示广播发送。这个广播的UDP消息包只会发送到当前本地网络里的所有设备,不会被路由器转发到其他网段。这样粗暴的使用广播数据包来执行服务发现的方法真是令人叹为观止!这种方法的成功依赖于局域网内有开启PORT_MACHINED的监听的进程,目前Bigworld里使用了一个单独的BWMachineD进程来监听这个端口
/**
 * Discover the broadcast interface to use and init all the endpoints.
 */
void BWMachined::initNetworkInterfaces()
{
	// Determine which network interface will be sending broadcast messages
	if (broadcastAddr_ == 0 && !this->findBroadcastInterface())
	{
		syslog( LOG_CRIT, "Failed to determine default broadcast interface. "
					"Make sure UDP ports %d and %d are not firewalled and that "
					"your broadcast route is set correctly. e.g. "
					"/sbin/ip route add broadcast 255.255.255.255 dev eth0",
			PORT_MACHINED, PORT_BROADCAST_DISCOVERY );
		exit( EXIT_FAILURE );
	}

	if (!ep_.good() ||
		 ep_.bind( htons( PORT_MACHINED ), broadcastAddr_ ) == -1)
	{
		syslog( LOG_CRIT, "Failed to bind socket to '%s'. %s.",
							inet_ntoa((struct in_addr &)broadcastAddr_),
							strerror(errno) );
		exit( EXIT_FAILURE );
	}
	ep_.setbroadcast( true );

	if (!epLocal_.good() ||
		 epLocal_.bind( htons( PORT_MACHINED ), LOCALHOST ) == -1)
	{
		syslog( LOG_CRIT, "Failed to bind socket to (lo). %s.",
							strerror(errno) );
		exit( EXIT_FAILURE );
	}

	if (!epBroadcast_.good() ||
		 epBroadcast_.bind( htons( PORT_MACHINED ), BROADCAST ) == -1)
	{
		syslog( LOG_CRIT, "Failed to bind socket to '%s'. %s.",
							inet_ntoa((struct in_addr &)BROADCAST),
							strerror(errno) );
		exit( EXIT_FAILURE );
	}

	cluster_.ownAddr_ = broadcastAddr_;
}
这个BWMachineD进程在每个物理机上都有一个实例,然后多个实例之间通过PORT_MACHINED端口进行通信,从而组成一个集群cluster。
当一个ServerApp启动的时候,会将当前进程的地址、端口、pid、网络角色等信息打包成一个MachineGuardMessage消息,然后发送到本机的PORT_MACHINED端口。
// server\baseapp\baseapp.cpp
/**
 *  This method does the portion of the init after this app has been
 *  successfully added to the BaseAppMgr.
 */
bool BaseApp::finishInit( const BaseAppInitData & initData,
		BinaryIStream & stream )
{
	// 省略一些代码
		if (isServiceApp_)
	{
		BaseAppIntInterface::registerWithMachinedAs( "ServiceAppInterface",
				this->intInterface(), id_ );
	}
	else
	{
		BaseAppIntInterface::registerWithMachined( this->intInterface(), id_ );
	}
}

// server\baseappmgr\baseappmgr.cpp
/**
 *	This method initialises this object.
 *
 *	@return True on success, false otherwise.
 */
bool BaseAppMgr::init( int argc, char * argv[] )
{
	// 省略一些代码

	Mercury::Reason reason =
		BaseAppMgrInterface::registerWithMachined( interface_, 0 );
}

// server\cellapp\cellapp.cpp
/**
 *  This method handles the portion of init after registering with the
 *  CellAppMgr.
 */
bool CellApp::finishInit( const CellAppInitData & initData )
{
	// 省略一些代码
	CellAppInterface::registerWithMachined( this->interface(), id_ );
}

// server\cellappmgr\cellappmgr.cpp
/**
 *	The initialisation method.
 */
bool CellAppMgr::init( int argc, char * argv [] )
{
	// 省略一些代码

	{
		CellAppMgrInterface::registerWithInterface( interface_ );

		Mercury::Reason reason =
			CellAppMgrInterface::registerWithMachined( interface_, 0 );
	}
}

// server\dbapp\dbapp.cpp
/**
 *  This method performs initialisation for our newly received DBApp ID.
 *
 *  @return true on success, false otherwise.
 */
bool DBApp::initAppIDRegistration()
{
    // 省略一些代码

    if (DBAppInterface::registerWithMachined( interface_, id_ ) !=
            Mercury::REASON_SUCCESS)
    {
        NETWORK_ERROR_MSG( "DBApp::initAppIDRegistration: "
            "Unable to register with interface. Is machined running?\n" );
        return false;
    }

}

// server\dbappmgr\dbappmgr.cpp

bool DBAppMgr::init( int argc, char * argv [] )
{
	// 省略一些代码

	reason =
		DBAppMgrInterface::registerWithMachined( interface_, 0 );
}

// server\loginapp\loginapp.cpp
/**
 *	This method completes initialisation after registration to DBAppMgr.
 *
 *	@param appID 				The LoginApp ID.
 *	@param dbAppAlphaAddress 	The address of DBApp Alpha.
 */
bool LoginApp::finishInit( LoginAppID appID,
		const Mercury::Address & dbAppAlphaAddress )
{
	DEBUG_MSG( "LoginApp::finishInit: id %d (DBApp Alpha: %s)\n",
		appID, dbAppAlphaAddress.c_str() );

	id_ = appID;
	dbAppAlpha_.addr( dbAppAlphaAddress );

	Mercury::Reason reason =
		LoginIntInterface::registerWithMachined( this->intInterface(), id_ );

	// 省略一些代码
}
上述各种Interface::registerWithMachined执行的都是NetworkInterface::registerWithMachined:
/**
 *	This method is used to register or deregister an interface with the machine
 *	guard (a.k.a. machined).
 */
Reason NetworkInterface::registerWithMachined(
		const BW::string & name, int id )
{
	return this->interfaceTable().registerWithMachined( this->address(),
					name, id );
}
Reason InterfaceTable::registerWithMachined( const Address & addr )
{
	return MachineDaemon::registerWithMachined( addr,
			name_, id_ );
}

Reason InterfaceTable::registerWithMachined( const Address & addr,
				const BW::string & name, int id )
{
	name_ = name;
	id_ = id;
	return this->registerWithMachined( addr );
}
最后这里的MachineDaemon::registerWithMachined就是往LOCALHOST的BWMachineD发送注册信息的过程:
/**
 *	This function registers a socket with BWMachined.
 */
Reason registerWithMachined( const Address & srcAddr,
		const BW::string & name, int id, bool isRegister )
{
	if (name.empty())
	{
		return REASON_SUCCESS;
	}

#ifdef MF_SERVER
	// Do not call blocking reply handler after registering with bwmachined as
	// other processes can now find us and send other messages.
	BlockingReplyHandler::safeToCall( false );
#endif

	ProcessMessage pm;

	pm.param_ = (isRegister ? pm.REGISTER : pm.DEREGISTER) |
		pm.PARAM_IS_MSGTYPE;
	pm.category_ = ProcessMessage::SERVER_COMPONENT;
	pm.port_ = srcAddr.port;
	pm.name_ = name;
	pm.id_ = id;

	pm.majorVersion_ = BWVersion::majorNumber();
	pm.minorVersion_ = BWVersion::minorNumber();
	pm.patchVersion_ = BWVersion::patchNumber();

	ProcessMessageHandler pmh;

	// send and wait for the reply
	const uint32 destAddr = LOCALHOST;

	Reason response = pm.sendAndRecv( srcAddr.ip, destAddr, &pmh );

	return pmh.hasResponded_ ? response : REASON_TIMER_EXPIRED;
}
注意到这里只是往LOCALHOST发送注册消息,而不是广播发送到PORT_MACHINED端口,这样做是没什么问题的。因为目前BWMachineD之间并不会执行信息共享,所以只需要往LOCALHOST发送注册消息即可。只要查询的时候使用的是广播接口0xffffffff就没问题,因为广播消息总是可以发送到同一个集群里的各个物理机器。
当BWMachineD收到注册消息后,会将其记录到其内部的数组procs_中,这个数组里的每个元素都代表本机里能提供注册服务的一个进程:
/**
 *  @internal
 *  A ProcessStatsMessage is a more detailed version of ProcessMessage that
 *  provides CPU and memory usage info about the process.
 */
class ProcessStatsMessage : public ProcessMessage
{
public:
	uint8			cpu_;	//!< Process cpu as proportion of max
	uint8			mem_;	//!< Mem usage as proportion of max

	ProcessStatsMessage() : ProcessMessage(), cpu_( 0 ), mem_( 0 )
	{
		message_ = MachineGuardMessage::PROCESS_STATS_MESSAGE;
	}

	virtual ~ProcessStatsMessage() {}

	virtual const char *c_str() const;

protected:
	virtual void writeImpl( BinaryOStream &os );
	virtual void readImpl( BinaryIStream &is );
};
struct ProcessInfo
{
	ProcessInfo() { starttime = 0; }
	HighResStat cpu, mem;
	int affinity;

	ProcessStatsMessage m;

	// Time (since OS boot) that the process was started
	unsigned long int starttime;

	// Platform specific implementation
	void init( const ProcessMessage &pm );
};

BW::vector< ProcessInfo > procs_;
当接收到findInterface对应的查询请求PROCESS_STATS_MESSAGE的时候,只需要遍历procs_数组,找到所有符合条件的进程,然后将其信息打包成一个ProcessStatsMessage发送回查询请求者:
// bool BWMachined::handleMessage( Endpoint & ep, sockaddr_in & sin,
//	MachineGuardMessage & mgm, MGMPacket & replies )

case MachineGuardMessage::PROCESS_STATS_MESSAGE:
{
	ProcessStatsMessage &query = static_cast< ProcessStatsMessage& >( mgm );

	// Find the processes this matches
	bool found = false;
	for (BW::vector< ProcessInfo >::iterator it = procs_.begin();
			it != procs_.end(); ++it)
	{
		ProcessInfo &pi = *it;
		if (pi.m.matches( query ))
		{
			// Update load and mem stats on the MGM for this process
			SystemInfo &si = systemInfo_;
			uint64 cpuDiff = std::max(
				si.cpu[ pi.affinity % si.nCpus ].max.delta(),
				(uint64)1 );

			if (pi.affinity >= (int)si.nCpus)
				syslog( LOG_ERR, "ProcessInfo (%s) has invalid affinity %d",
					pi.m.c_str(), pi.affinity );

			ProcessStatsMessage &reply = pi.m;
			reply.cpu_ = (uint8)(pi.cpu.delta()*0xff / cpuDiff);
			reply.mem_ = (uint8)(pi.mem.cur()*0xff / si.mem.max.cur());

			// Add reply to the stream
			reply.copySeq( query );
			replies.append( reply );
			found = true;
		}
	}

	// If nothing found, send back a message with pid == 0 so that recv
	// loops can terminate on client side
	if (!found)
	{
		query.pid_ = 0;
		query.outgoing( true );
		replies.append( query );
	}

	return true;
}
当findInterface返回的时候, MgrAppGateway就可以根据结果来正确的获取目标MgrApp的地址信息,并根据地址信息来创建到MgrApp的channel,后续可以通过这个channel来发送注册消息。例如BaseAppMgrGateway上就暴露了一个add方法,来通知到对应的BaseAppMgr进程:
void BaseAppMgrGateway::add( const Mercury::Address & addrForCells,
		const Mercury::Address & addrForClients, bool isServiceApp,
		Mercury::ReplyMessageHandler * pHandler )
{
	Mercury::Bundle	& bundle = channel_.bundle();

	BaseAppMgrInterface::addArgs * args =
		(BaseAppMgrInterface::addArgs*)bundle.startStructRequest(
			BaseAppMgrInterface::add, pHandler );

	args->addrForCells = addrForCells;
	args->addrForClients = addrForClients;
	args->isServiceApp = isServiceApp;

	channel_.send();
}
这个add的调用发生在BaseApp::init函数的最末尾:
/**
 *	This method initialises this object.
 *
 *	@param argc	The number of elements in argv.
 *	@param argv	An array of argument strings.
 */
bool BaseApp::init( int argc, char * argv[] )
{
	if (!this->EntityApp::init( argc, argv ))
	{
		return false;
	}
	// 省略很多逻辑

	// Add ourselves to the BaseAppMgr.  Init will continue once the reply to
	// this message is received.  This object deletes itself.
	new AddToBaseAppMgrHelper( *this );

	return true;
}

/**
 *  This class helps to add this app to the BaseAppMgr.
 */
class AddToBaseAppMgrHelper : public AddToManagerHelper
{
public:
	AddToBaseAppMgrHelper( BaseApp & baseApp ) :
		AddToManagerHelper( baseApp.mainDispatcher() ),
		app_( baseApp )
	{
		// Auto-send on construction.
 		this->send();
	}


	void handleFatalTimeout()
	{
		ERROR_MSG( "AddToBaseAppMgrHelper::handleFatalTimeout: Unable to add "
				"%s to BaseAppMgr. Terminating.\n", app_.getAppName());
		app_.shutDown();
	}


	void doSend()
	{
		app_.baseAppMgr().add( app_.intInterface().address(),
			app_.extInterface().address(), app_.isServiceApp(), this );
	}


	bool finishInit( BinaryIStream & data )
	{
		// Call send now so that any pending ACKs are sent now. This gives
		// finishInit a little longer before resends occur. Should not rely
		// on this as BaseAppMgr already thinks this BaseApp is running
		// normally.
		// TODO:BAR
		app_.baseAppMgr().send();

		BaseAppInitData initData;
		data >> initData;

		return app_.finishInit( initData, data );
	}

private:
	BaseApp & app_;
};
由于BaseApp,CellApp,DbApp都有注册到对应的MgrApp的需求,所以这里还抽象出来一个基类AddToManagerHelper,来统一处理注册逻辑。这个基类的send方法会调用到子类实现的doSend方法,来发送注册消息,对于BaseApp而言就是调用BaseAppMgrGateway::add方法。只有对应的MgrApp响应了这个Add注册请求之后,对应的App角色的finishInit接口才会执行,此时这个App相当于切换到了可用状态,可以承接后续的业务处理了。一般来说所有的游戏帧的启动都是在这个finishInit里,下面就是CellApp::finishInit的逻辑:
/**
 *  This method handles the portion of init after registering with the
 *  CellAppMgr.
 */
bool CellApp::finishInit( const CellAppInitData & initData )
{
	// Make sure that nothing else is read in the main thread.
	BWResource::watchAccessFromCallingThread( true );

	if (int32( initData.id ) == -1)
	{
		ERROR_MSG( "CellApp::finishInit: "
				"CellAppMgr refused to let us join.\n" );
		return false;
	}

	id_ = initData.id;
	this->setStartTime( initData.time );
	baseAppAddr_ = initData.baseAppAddr;
	dbAppAlpha_.addr( initData.dbAppAlphaAddr );
	isReadyToStart_ = initData.isReady;

	// Attach ourselves to an ID server (in this case, the Alpha DBApp).
	if (!idClient_.init( &this->dbAppAlpha(),
			DBAppInterface::getIDs,
			DBAppInterface::putIDs,
			IDConfig::criticallyLowSize(),
			IDConfig::lowSize(),
			IDConfig::desiredSize(),
			IDConfig::highSize() ))
	{
		ERROR_MSG( "CellApp::finishInit: Failed to get IDs\n" );
		return false;
	}

	timeoutPeriod_ = initData.timeoutPeriod;

	// Send app id to loggers
	LoggerMessageForwarder::pInstance()->registerAppID( id_ );

	if (isReadyToStart_)
	{
		this->startGameTime();
	}
	else
	{
		// Let startup() message handler start the game timer.
		isReadyToStart_ = true;
	}

	CONFIG_INFO_MSG( "\tCellApp ID            = %d\n", id_ );
	CONFIG_INFO_MSG( "\tstarting time         = %.1f\n",
		this->gameTimeInSeconds() );

	CellAppInterface::registerWithMachined( this->interface(), id_ );

	// We can safely register a birth listener now since we have mapped the
	// interfaces we are serving.
	Mercury::MachineDaemon::registerBirthListener(
			this->interface().address(),
			CellAppInterface::handleCellAppMgrBirth, "CellAppMgrInterface" );

	// init the watcher stuff
	char	abrv[32];
	bw_snprintf( abrv, sizeof(abrv), "cellapp%02d", id_ );
	BW_REGISTER_WATCHER( id_, abrv, "cellApp",
			mainDispatcher_, this->interface().address() );

	int pythonPort = BWConfig::get( "cellApp/pythonPort",
						PORT_PYTHON_CELLAPP + id_ );
	this->startPythonServer( pythonPort, id_ );

	INFO_MSG( "CellApp::finishInit: CellAppMgr acknowledged our existence.\n" );

	return true;
}
在上面的startGameTime会开启游戏帧定时器:
/**
 *	This method is called when we are ready to start the game timer.
 */
void CellApp::startGameTime()
{
	INFO_MSG( "CellApp is starting\n" );

	MF_ASSERT( !gameTimer_.isSet() && (pTimeKeeper_ == NULL) );
	MF_ASSERT( cellAppMgr_.isInitialised() );

	// start the game timer
	gameTimer_ = this->mainDispatcher().addTimer(
						1000000/Config::updateHertz(), this,
							reinterpret_cast< void * >( TIMEOUT_GAME_TICK ),
							"GameTick" );

	lastGameTickTime_ = timestamp();
	gettimeofday( &oldTimeval_, NULL );
	mainDispatcher_.clearSpareTime();
	this->calcTransientLoadTime();

	pTimeKeeper_ = new TimeKeeper( interface_, gameTimer_, time_,
		Config::updateHertz(), cellAppMgr_.addr(),
		&CellAppMgrInterface::gameTimeReading,
		id_, Config::maxTickStagger() );

	// Now we're sending load updates to the CellAppMgr regularly
	cellAppMgr_.isRegular( true );
}
当gameTimer_成功创建之后,当前CellApp的所有前期准备工作就都做完了,游戏帧定时器也开始运行了,在CellApp的handleTimeout方法中会通过handleGameTickTimeSlice来间接调用之前介绍的ServerApp::advanceTime来驱动各个Tick相关的回调:
/**
 *	This method handles timeout events.
 */
void CellApp::handleTimeout( TimerHandle /*handle*/, void * arg )
{
	switch (reinterpret_cast<uintptr>( arg ))
	{
		case TIMEOUT_GAME_TICK:
			this->handleGameTickTimeSlice();
			break;

		case TIMEOUT_TRIM_HISTORIES:
			this->handleTrimHistoriesTimeSlice();
			break;

		case TIMEOUT_LOADING_TICK:
		{
			// 省略一些代码
		}
	}
}

/**
 *	This method handles the game tick time slice.
 */
void CellApp::handleGameTickTimeSlice()
{
	// 省略一些代码

	this->updateBoundary();

	// Increment the time - we are now into the quantum of the next tick
	this->advanceTime();

	// 省略一些代码
}
对于LoginApp来说,虽然没有对应的LoginAppMgr,但是由于其业务重度依赖于数据库,所以在完成基础的初始化init之后,需要连接到DBApMgr来完成必要的初始化工作,:
bool LoginApp::init( int argc, char * argv[] ) /* override */
{
	// 省略一些代码
	// This calls back on finishInit().
	new AddToDBAppMgrHelper( *this );
	// 省略一些代码
}
在这个注册函数里会发送一个DBAppMgrInterface::addLoginApp的请求到dbAppMgr,在注册完成之后才会调用到LoginApp::finishInit来开启游戏帧Tick计时器:
class AddToDBAppMgrHelper : public AddToManagerHelper
{
public:

	/**
	 *	Constructor.
	 *
	 *	@param loginApp 	The LoginApp instance.
	 */
	AddToDBAppMgrHelper( LoginApp & loginApp ) :
		AddToManagerHelper( loginApp.mainDispatcher() ),
		app_( loginApp )
	{
		// Auto-send on construction.
		this->send();
	}


	/* Override from AddToManagerHelper. */
	void handleFatalTimeout() /* override */
	{
		ERROR_MSG( "AddToDBAppMgrHelper::handleFatalTimeout: Unable to add "
				"LoginApp to DBAppMgr (%s). Terminating.\n",
			app_.dbAppMgr().addr().c_str() );
		app_.mainDispatcher().breakProcessing();
	}


	/* Override from AddToDBAppHelper. */
	void doSend() /* override */
	{
		Mercury::Bundle	& bundle = app_.dbAppMgr().bundle();
		bundle.startRequest( DBAppMgrInterface::addLoginApp, this );
		app_.dbAppMgr().send();
	}


	/* Override from AddToDBAppHelper. */
	bool finishInit( BinaryIStream & data ) /* override */
	{
		LoginAppID appID;
		Mercury::Address dbAppAlphaAddr;
		data >> appID >> dbAppAlphaAddr;
		return app_.finishInit( appID, dbAppAlphaAddr );
	}

private:
	LoginApp & app_;
};
这里的doSend会往LoginApp::dbAppMgr发送消息,但是发送消息的前提是知道发送目标的ip:port,这个dbAppMgr的地址获取是在LoginApp::init中完成的:
bool LoginApp::init( int argc, char * argv[] ) /* override */
{
	// 省略一些代码
	int numStartupRetries = Config::numStartupRetries();

	if (!BW_INIT_ANONYMOUS_CHANNEL_CLIENT( dbAppMgr_, this->intInterface(),
			LoginIntInterface, DBAppMgrInterface, numStartupRetries ))
	{
		ERROR_MSG( "LoginApp::init: Could not find DBAppMgr\n" );
		return false;
	}
	// 省略一些代码
}
这个宏展开之后会调用下面的AnonymousChannelClient::init方法,内部会调用MachineDaemon::findInterface来查找DBAppMgr的地址:
/**
 *	This method initialises this object.
 *
 *	@return true on success, otherwise false.
 */
bool AnonymousChannelClient::init( Mercury::NetworkInterface & interface,
		Mercury::InterfaceMinder & interfaceMinder,
		const Mercury::InterfaceElement & birthMessage,
		const char * componentName,
		int numRetries )
{
	interfaceName_ = componentName;

	bool result = true;

	interfaceMinder.handler( birthMessage.id(), this );

	if (Mercury::MachineDaemon::registerBirthListener(
				interface.address(), birthMessage, componentName ) !=
			Mercury::REASON_SUCCESS)
	{
		NETWORK_ERROR_MSG( "AnonymousChannelClient::init: "
			"Failed to register birth listener for %s\n",
			componentName );

		result = false;
	}

	Mercury::Address serverAddr( Mercury::Address::NONE );

	if (Mercury::MachineDaemon::findInterface(
			componentName, 0, serverAddr, numRetries ) !=
		Mercury::REASON_SUCCESS)
	{
		result = false;
	}

	// Everyone talking to another process via this mechanism is doing it
	// irregularly at the moment.  Could make this optional.
	pChannelOwner_ = new Mercury::ChannelOwner( interface, serverAddr );
	pChannelOwner_->channel().isLocalRegular( false );
	pChannelOwner_->channel().isRemoteRegular( false );

	return result;
}
如果LoginApp启动的时候对应的DBAppMgr进程还没有启动,上面注册的BirthListener就会起作用,因为其会监听广播出来的DBAppMgrInterfaceBirth消息。
/**
 *	This method is used to register a birth or death listener with machined.
 */
Reason registerListener( const Address & srcAddr,
		UDPBundle & bundle, int addrStart,
		const char * ifname, bool isBirth, bool anyUID = false )
{
	// finalise the bundle first
	bundle.finalise();
	const Packet * p = bundle.pFirstPacket();

	MF_ASSERT( p->flags() == 0 );

	// prepare the message for machined
	ListenerMessage lm;
	lm.param_ = (isBirth ? lm.ADD_BIRTH_LISTENER : lm.ADD_DEATH_LISTENER) |
		lm.PARAM_IS_MSGTYPE;
	lm.category_ = lm.SERVER_COMPONENT;
	lm.uid_ = anyUID ? lm.ANY_UID : getUserId();
	lm.pid_ = mf_getpid();
	lm.port_ = srcAddr.port;
	lm.name_ = ifname;

	const int addrLen = 6;
	unsigned int postSize = p->totalSize() - addrStart - addrLen;

	lm.preAddr_ = BW::string( p->data(), addrStart );
	lm.postAddr_ = BW::string( p->data() + addrStart + addrLen, postSize );

	const uint32 destAddr = LOCALHOST;
	return lm.sendAndRecv( srcAddr.ip, destAddr, NULL );
}


/**
 *  This method registers a callback with machined to be called when a certain
 *	type of process is started.
 *
 *	@note This needs to be fixed up if rebind is called on this nub.
 */
Reason registerBirthListener( const Address & srcAddr,
		UDPBundle & bundle, int addrStart, const char * ifname )
{
	return registerListener( srcAddr, bundle, addrStart, ifname, true );
}
这个ListenerMessage的发送目标还是LOCALHOST,当LOCALHOST上的BWMachineD接收到这个消息的时候,会先存储这个Listener到内部的birthListeners_数组里:
bool BWMachined::handleMessage( Endpoint & ep, sockaddr_in & sin,
	MachineGuardMessage & mgm, MGMPacket & replies )
{
	// If the message we received is not known, don't attempt to process
	// any further. It is possible the data received is a valid structure
	// that has had its tail corrupted.
	if (mgm.flags_ & mgm.MESSAGE_NOT_UNDERSTOOD)
	{
		syslog( LOG_ERR, "Received unknown message: %s", mgm.c_str() );
		mgm.outgoing( true );
		replies.append( mgm );
		return true;
	}

	switch (mgm.message_)
	{

	case MachineGuardMessage::LISTENER_MESSAGE:
	{
		ListenerMessage &lm = static_cast< ListenerMessage& >( mgm );

		if (lm.param_ == (lm.ADD_BIRTH_LISTENER | lm.PARAM_IS_MSGTYPE))
		{
			birthListeners_.add( lm, sin.sin_addr.s_addr );
		}
		else if (lm.param_ == (lm.ADD_DEATH_LISTENER | lm.PARAM_IS_MSGTYPE))
		{
			deathListeners_.add( lm, sin.sin_addr.s_addr );
		}
		else
		{
			syslog( LOG_ERR, "Unrecognised param field for ListenerMessage: %x",
				lm.param_ );
			return false;
		}

		// Ack to sender
		lm.outgoing( true );
		replies.append( lm );

		return true;
	}
	// 省略其他代码
	}
}
但是DBAppMgr可能是在其他机器上启动的,所以肯定有某种机制在DBAppMgr启动之后,将其ip:port广播出来,为了跟踪这个广播过程,我们需要查看使用这个BirthListener的地方,依然在BWMachined::handleMessage方法中,在处理ProcessMessage::NOTIFY_BIRTH消息的分支里:
case MachineGuardMessage::PROCESS_MESSAGE:
{
	ProcessMessage &pm = static_cast< ProcessMessage& >( mgm );

	// Explicit instances of this class shouldn't be using param filters
	if (!(pm.param_ & pm.PARAM_IS_MSGTYPE))
	{
		syslog( LOG_ERR, "PROCESS_MESSAGE tried to use param filters! (%x)",
			pm.param_ );
		return false;
	}

	int msgtype = pm.param_ & ~pm.PARAM_IS_MSGTYPE;

	// Don't allow other machines to register/deregister their processes
	// on this machine.
	if ((msgtype == pm.REGISTER || msgtype == pm.DEREGISTER) &&
		(uint32&)sin.sin_addr != cluster_.ownAddr_ &&
		(uint32&)sin.sin_addr != LOCALHOST)
	{
		syslog( LOG_ERR, "%s tried to register a process here!",
			inet_ntoa( sin.sin_addr ) );
		return false;
	}

	switch (msgtype)
	{
	case ProcessMessage::REGISTER:
	{
		// 省略相关代码
	}

	case ProcessMessage::DEREGISTER:
	{
		// 省略相关代码
	}

	case ProcessMessage::NOTIFY_BIRTH:
	{
		birthListeners_.handleNotify( this->endpoint(), pm, sin.sin_addr );
		return true;
	}

	case ProcessMessage::NOTIFY_DEATH:
	{
		deathListeners_.handleNotify( this->endpoint(), pm, sin.sin_addr );
		return true;
	}

	default:
		syslog( LOG_ERR, "Unrecognised ProcessMessage type: %d", msgtype );
		return false;
	}
}
这里接收到ProcessMessage::NOTIFY_BIRTH类型的消息的时候会调用Listeners::handleNotify方法,这个方法会遍历内部的birthListeners_数组,将消息发送给所有注册的BirthListener:
void Listeners::handleNotify( const Endpoint & endpoint,
	const ProcessMessage & pm, in_addr addr )
{
	char address[6];
	memcpy( address, &addr, sizeof( addr ) );
	memcpy( address + sizeof( addr ), &pm.port_, sizeof( pm.port_ ) );

	Members::iterator iter = members_.begin();

	while (iter != members_.end())
	{
		ListenerMessage &lm = iter->lm_;

		if (lm.category_ == pm.category_ &&
			(lm.uid_ == lm.ANY_UID || lm.uid_ == pm.uid_) &&
			(lm.name_ == pm.name_ || lm.name_.size() == 0))
		{
			int msglen = lm.preAddr_.size() + sizeof( address ) +
				lm.postAddr_.size();
			char *data = new char[ msglen ];
			int preSize = lm.preAddr_.size();
			int postSize = lm.postAddr_.size();

			memcpy( data, lm.preAddr_.c_str(), preSize );
			memcpy( data + preSize, address, sizeof( address ) );
			memcpy( data + preSize + sizeof( address ), lm.postAddr_.c_str(),
				postSize );

			// and send to the appropriate port locally
			endpoint.sendto( data, msglen, lm.port_, iter->addr_ );
			delete [] data;
		}

		++iter;
	}
}
因此需要继续跟踪一下这个ProcessMessage::NOTIFY_BIRTH消息又是在哪里发出来的,还是在上面的MachineGuardMessage::PROCESS_MESSAGE分支里,不过是在处理ProcessMessage::REGISTER消息的时候,这里会使用broadcastToListeners执行NOTIFY_BIRTH消息的广播,这个broadcastToListeners的发送目标是广播地址BROADCAST,因此任何本地局域网里的机器上的BWMachineD都可以接收到这个NOTIFY_BIRTH的消息:
switch (msgtype)
{
case ProcessMessage::REGISTER:
{
	// 省略一些代码

	// platform-specific initialisation
	pi.init( pm );

	// Tell listeners about it
	broadcastToListeners( pm, pm.NOTIFY_BIRTH );

	// and confirm the registration to the sender
	pm.outgoing( true );
	replies.append( pm );

	syslog( LOG_INFO, "Added %s for uid:%d (debug: at index %d)\n",
		pm.c_str(), pm.uid_, i );
	return true;
}
// 省略一些代码
}

/**
 * Inform other machined's on the network about the birth or death of a process
 * on this machine so that they can in turn inform their registered listeners
 * about it.
 */
bool BWMachined::broadcastToListeners( ProcessMessage &pm, int type )
{
	uint8 oldparam = pm.param_;
	pm.param_ = type | pm.PARAM_IS_MSGTYPE;

	bool ok = pm.sendto( ep_, htons( PORT_MACHINED ), BROADCAST,
		MGMPacket::PACKET_STAGGER_REPLIES );

	pm.param_ = oldparam;
	return ok;
}
跟踪完整个BirthListener的调用链,可以知道当DBAppMgr进程启动之后,会向本地的BWMachineD发送ProcessMessage::REGISTER消息,本地的BWMachineD就会以ProcessMessage::NOTIFY_BIRTH类型的消息广播给所有局域网机器上注册的BirthListener,包括LoginApp,因此LoginApp就会收到BirthListener的回调,从而完成DBAppMgr的地址获取:
/**
 *	This method handles a birth message telling us that a new server has
 *	started.
 */
void AnonymousChannelClient::handleMessage(
		const Mercury::Address & srcAddr,
		Mercury::UnpackedMessageHeader & header,
		BinaryIStream & data )
{
	Mercury::Address serverAddr;
	data >> serverAddr;

	MF_ASSERT( data.remainingLength() == 0 && !data.error() );

	pChannelOwner_->addr( serverAddr );

	PROC_IP_INFO_MSG( "AnonymousChannelClient::handleMessage: "
		"Got new %s at %s\n",
		interfaceName_.c_str(), pChannelOwner_->channel().c_str() );
}
退出流程
基于信号的退出
Bigworld里的进程都注册了强制退出信号处理函数,目前处理的退出信号是SIGINT,在ServerApp的初始化函数init里会调用enableSignalHandler方法注册这个SIGINT信号处理函数到自身的pSignalHandler_:
bool ServerApp::init( int argc, char * argv[] )
{

	// 省略一些代码

	pSignalHandler_.reset( this->createSignalHandler() );

	// Handle signals
	this->enableSignalHandler( SIGINT );

	return true;
}

SignalHandler * ServerApp::createSignalHandler()
{
	return new ServerAppSignalHandler( *this );
}
/**
 *	Enables or disables the handling of a given signal by the ServerApp
 *	instance's signal handler.
 */
void ServerApp::enableSignalHandler( int sigNum, bool enable )
{
	if (pSignalHandler_.get() == NULL)
	{
		ERROR_MSG( "ServerApp::enableSignalHandler: no signal handler set\n" );
		return;
	}

	if (enable)
	{
		SignalProcessor::instance().addSignalHandler( sigNum,
			pSignalHandler_.get() );
	}
	else
	{
		SignalProcessor::instance().clearSignalHandler( sigNum,
			pSignalHandler_.get() );
	}
}
这个pSignalHandler_负责将信号处理函数转发到ServerApp::onSignalled方法,这里会利用signal( sigNum, SIG_DFL )重置为默认的信号处理函数,来避免Python脚本那边设置了这个信号的处理,然后使用kill( getpid(), sigNum )来重新发送这个信号,从而导致进程的强制退出:
class ServerAppSignalHandler : public SignalHandler
{
public:
	ServerAppSignalHandler( ServerApp & serverApp ):
			serverApp_( serverApp )
	{}

	virtual ~ServerAppSignalHandler()
	{}

	virtual void handleSignal( int sigNum )
	{
		serverApp_.onSignalled( sigNum );
	}
private:
	ServerApp & serverApp_;
};

/**
 *	Default signal handling.
 */
void ServerApp::onSignalled( int sigNum )
{
	switch (sigNum)
	{
	case SIGINT:
		// This is really just to make sure that Python does not install its
		// own SIGINT handler.
		// It would probably be better to just revert to SIG_DFL straight after
		// Py_Initialize in Script::init().
		signal( sigNum, SIG_DFL );
		kill( getpid(), sigNum );
		break;

	default:
		break;
	}

}
基于shutdown的退出
上述的强制kill会导致进程立即退出,缺少很多资源的释放与清理操作,所以一般不在迫不得已的情况下不会去使用这个退出信号。在ServerApp上提供了一个更加优雅的退出接口ServerApp::shutDown,ServerApp::shutDown方法里会调用mainDispatcher_.breakProcessing方法来通知事件循环处理processContinuously可以结束了:
void ServerApp::shutDown()
{
	INFO_MSG( "ServerApp::shutDown: shutting down\n" );
	mainDispatcher_.breakProcessing();
}
/**
 *	This method breaks out of 'processContinuously' at the next opportunity.
 *	Any messages in bundles that are being processed or timers that have
 *	expired will still get called. Note: if this is called from another
 *	thread it will NOT interrupt a select call if one is in progress, so
 *	processContinuously will not return. Try sending the process a (handled)
 *	signal if this is your intention.
 */
INLINE void EventDispatcher::breakProcessing( bool breakState )
{
	breakProcessing_ = breakState;
}

void EventDispatcher::processContinuously()
{
	breakProcessing_ = false;

	while (!breakProcessing_)
	{
		this->processOnce( /* shouldIdle */ true );
	}
}
当这个processContinuously方法返回时,ServerApp就会执行onRunComplete方法,开始执行清理操作:
/**
 *	This is the default implementation of run. Derived classes to override
 *	this to implement their own functionality.
 */
bool ServerApp::run()
{
	mainDispatcher_.processUntilBreak();

	this->onRunComplete();

	return true;
}
这个onRunComplete是一个虚函数,目前在ServerApp里的实现是空,在子类里会根据需要去重载:
/*
 *	Override from ServerApp.
 */
void LoginApp::onRunComplete() /* override */
{
	INFO_MSG( "LoginApp::run: Terminating normally.\n" );
	this->ServerApp::onRunComplete();
	bool sent = false;

	if (this->isDBAppMgrReady())
	{
		Mercury::Bundle	& dbMgrBundle = dbAppMgr_.pChannelOwner()->bundle();
		DBAppMgrInterface::controlledShutDownArgs args;
		args.stage = SHUTDOWN_REQUEST;
		dbMgrBundle << args;
		dbAppMgr_.pChannelOwner()->send();
		sent = true;
	}

	if (sent)
	{
		this->intInterface().processUntilChannelsEmpty();
	}
}
/**
 *  This method is run when the runloop has finished.
 */
void DBApp::onRunComplete()
{
    this->ScriptApp::onRunComplete();
    this->finalise();
}
在ServerApp::run返回之后,会接下来执行fini方法来清理,并在fini结束之后调用interface_.prepareForShutdown方法来准备网络接口的关闭:
bool ServerApp::runApp( int argc, char * argv[] )
{
	// calculate the clock speed
	stampsPerSecond();

	bool result = false;

	if (this->init( argc, argv ))
	{
		INFO_MSG( "---- %s is running ----\n", this->getAppName() );
		result = this->run();
	}
	else
	{
		ERROR_MSG( "Failed to initialise %s\n", this->getAppName() );
	}

	this->fini();

	interface_.prepareForShutdown();

#if ENABLE_PROFILER
	g_profiler.fini();
#endif

	return result;
}
这个fini方法也是一个声明在ServerApp里的空的虚函数,在子类里会根据需要去重载,用来执行一些清理操作。不过目前好像没有在哪个ServerApp的子类里看到重载这个方法的情况。
至于interface_.prepareForShutdown方法,主要任务是用来调用mainDispatcher.prepareforshutdown,然后通过finaliseRequestManager方法来清理请求管理器,这样就不再处理任何网络请求:
/**
 *	This method prepares this NetworkInterface for being shut down.
 */
void NetworkInterface::prepareForShutdown()
{
	if (pMainDispatcher_)
	{
		pMainDispatcher_->prepareForShutdown();
	}

	this->finaliseRequestManager();
}

/**
 *	This method destroys the RequestManager. It should be called when shutting
 *	down to ensure that no ReplyMessageHandler instances are cancelled when the
 *	server is in a bad state (e.g. after the App has been destroyed.)
 */
void NetworkInterface::finaliseRequestManager()
{
	this->interfaceTable().serve( InterfaceElement::REPLY, NULL );

	RequestManager * pRequestManager = pRequestManager_;
	pRequestManager_ = NULL;
	bw_safe_delete( pRequestManager );
}
在EventDispatcher::prepareForShutdown方法中,会重新使用循环来调用processOnce方法,处理退出阶段的所有逻辑,这里设置了处理的最大超时时间为2s,避免业务逻辑出错引发退出失败:
void EventDispatcher::prepareForShutdown()
{
	const uint64 SECONDS_TO_ATTEMPT_SEND = 2;

	const uint64 startTime = timestamp();
	uint64 timePeriod = (stampsPerSecond() * SECONDS_TO_ATTEMPT_SEND);

	while (!pPoller_->isReadyForShutdown() &&
		(timestamp() - startTime < timePeriod))
	{
		this->processOnce();

		// Wait 100ms
#if defined( PLAYSTATION3 )
		sys_timer_usleep( 100000 );
#elif !defined( _WIN32 )
		usleep( 100000 );
#else
		Sleep( 100 );
#endif
	}
}
当这些流程都走完之后,就开始调用各个ServerApp的析构函数,虽然这个基类上的析构函数是一个空实现,各个子类里的重载内容就十分丰富了,简单点的就是LoginApp,在析构函数里关闭对外开放的网络端口extInterface:
/**
 *	Destructor.
 */
LoginApp::~LoginApp()
{
	this->extInterface().prepareForShutdown();
	statsTimer_.cancel();
	tickTimer_.cancel();
}
在DBApp的析构函数里会执行数据库的断开操作:
/**
 *  Destructor.
 */
DBApp::~DBApp()
{
    interface_.cancelRequestsFor( &baseAppMgr_.channel() );

    statusCheckTimer_.cancel();
    gameTimer_.cancel();

    bw_safe_delete( pBillingSystem_ );
    pBillingSystem_ = NULL;

    bw_safe_delete( pDatabase_ );
    // Destroy entity descriptions before calling Script::fini() so that it
    // can clean up any PyObjects that it may have.
    bw_safe_delete( pEntityDefs_ );
    DataType::clearStaticsForReload();

    // Now done in ~ScriptApp
    // Script::fini();
}
这样就完成了有序退出shutDown流程。
至于这个shutDown接口什么时候被调用,则根据具体的ServerApp子类来管理,最简单的就是将这个接口暴露给Python,让业务逻辑来决定什么时候当前进程应该退出,例如在CellApp和BaseApp里就提供了shutDownApp方法给Python调用:
// server\baseapp\script_bigworld.cpp
/*~ function BigWorld.shutDownApp
 *	@components{ base }
 *
 *	This method induce a shutdown of this BaseApp.
 */
void shutDownApp()
{
	BaseApp::instance().shutDown();
}
PY_AUTO_MODULE_FUNCTION( RETVOID, shutDownApp, END, BigWorld )

// server\cellapp\cellapp.cpp
/*~ function BigWorld.shutDownApp
 *	@components{ cell }
 *
 *	This method induce a controlled shutdown of this CellApp.
 */
void shutDownApp()
{
	CellApp::instance().shutDown();
}
PY_AUTO_MODULE_FUNCTION( RETVOID, shutDownApp, END, BigWorld )
基于retire的退出
如果要一个ServerApp执行安全退出,上述的shutDownApp是一个非常方便的方法。此外还有一种方法可以触发ServerApp::shutDown方法来执行安全的退出逻辑,这个方法是通过BWMachineD发送的retireApp指令。每个ServerApp在启动时都会通过ServerApp::addWatchers注册一个command/retireXXX指令的监听,这里的XXX是当前进程的在集群里的名字AppName:当BWMachineD发送retireApp指令时,ServerApp会收到这个指令,然后执行安全退出逻辑。
/**
 *	This method adds the watchers associated with this class.
 */
void ServerApp::addWatchers( Watcher & watcher )
{
	watcher.addChild( "nub",
			Mercury::NetworkInterface::pWatcher(), &interface_ );

	if (this->pManagerAppGateway())
	{
		char buf[ 256 ];
		snprintf( buf, sizeof( buf ), "command/retire%s",
				this->getAppName() );

		watcher.addChild( buf, new RetireAppCommand( *this ) );
	}
}
class RetireAppCommand : public NoArgCallableWatcher
{
public:
	RetireAppCommand( ServerApp & app ) :
		// TODO: BWT-29273 Enable DBApp watcher forwarding
		NoArgCallableWatcher( strcmp( app.getAppName(), "DBApp" ) == 0 ?
					CallableWatcher::LOCAL_ONLY : CallableWatcher::LEAST_LOADED,
				"Retire the least loaded app." ),
		app_( app )
	{
	}

private:
	virtual bool onCall( BW::string & output, BW::string & value )
	{
		INFO_MSG( "Requesting to retire this app.\n" );
		app_.requestRetirement();
		return true;
	}

	ServerApp & app_;
};
当ServerApp接收到了command/retireXXX指令后,会调用ServerApp::requestRetirement方法来请求退休。在ServerApp::requestRetirement方法里,会判断当前进程是否有ManagerAppGateway,如果有,就会调用ManagerAppGateway::retireApp方法来发送退休请求。
/**
 *	This method requests that this application should be retired.
 */
void ServerApp::requestRetirement()
{
	if (!this->pManagerAppGateway())
	{
		ERROR_MSG( "ServerApp::requestRetirement: "
				"%s has no manager app gateway configured\n",
			this->getAppName() );
		return;
	}

	this->pManagerAppGateway()->retireApp();
}
void ManagerAppGateway::retireApp()
{
	Mercury::Bundle & bundle = channel_.bundle();
	bundle.startMessage( retireAppIE_ );
	channel_.send();
}
这个retireAppIE_是在ManagerAppGateway初始化的时候就设置好了的,CellAppMgrGateway、BaseAppMgrGateway和DBAppMgrGateway都是ManagerAppGateway的子类,在构造函数里就初始化好了retireAppIE_。
ManagerAppGateway::ManagerAppGateway( Mercury::NetworkInterface & networkInterface,
			const Mercury::InterfaceElement & retireAppIE ) :
		channel_( networkInterface, Mercury::Address::NONE ),
		retireAppIE_( retireAppIE )
{
	MF_ASSERT( retireAppIE_.lengthStyle() == Mercury::FIXED_LENGTH_MESSAGE );
	MF_ASSERT( retireAppIE_.lengthParam() == 0 );
}

/**
 *	The constructor for CellAppMgrGateway.
 */
CellAppMgrGateway::CellAppMgrGateway( Mercury::NetworkInterface & interface ) :
	ManagerAppGateway( interface, CellAppMgrInterface::retireApp )
{}

BaseAppMgrGateway::BaseAppMgrGateway( Mercury::NetworkInterface & interface ) :
		ManagerAppGateway( interface, BaseAppMgrInterface::retireApp )
{
}
/**
 *	The constructor for DBAppMgrGateway.
 */
DBAppMgrGateway::DBAppMgrGateway( Mercury::NetworkInterface & interface ) :
	ManagerAppGateway( interface, DBAppMgrInterface::retireApp )
{}
这三个AppMgr处理retireApp指令的方式基本一样,这里只分析CellAppMgr里对应的处理逻辑,这个retireApp的指令会发送到CellAppMgr里创建的对应的CellApp对象:
/**
 *	This method is called by the cell application when it wants to be shut down.
 */
void CellApp::retireApp()
{
	INFO_MSG( "CellApp::retireApp: CellApp %u is requesting to retire.\n",
			this->id() );
	this->startRetiring();
}
/**
 *	This method starts the process of shutting down the application
 *	associated with this object.
 */
void CellApp::startRetiring()
{
	INFO_MSG( "CellApp::startRetiring: Retiring CellApp %u - %s\n",
			id_, this->addr().c_str() );

	isRetiring_ = true;

	if (!cells_.empty())
	{
		this->retireAllCells();
	}
	else
	{
		this->shutDown();
	}
}

/**
 *	This method shuts down the cell application associated with this object.
 */
void CellApp::shutDown()
{
	CellAppInterface::shutDownArgs args;
	args.isSigInt = false; // Not used.

	this->bundle() << args;
	this->send();
}
CellApp接收到这个retireApp指令后,会调用CellApp::startRetiring方法来启动退休过程。在CellApp::startRetiring方法里,会判断当前CellApp是否管理着cells(游戏区域),如果有,就会调用CellApp::retireAllCells方法来迁移cells到其他CellApp,如果没有,就会调用CellApp::shutDown方法来退出进程。
当CellApp管理的cells都迁移到其他CellApp后,如果发现当前已经设置好了retire标记位,则也会调用CellApp::shutDown方法来发送RPC通知对应的CellApp进程去退出:
/**
 *	This method starts retiring all cells from this app.
 */
void CellApp::retireAllCells()
{
	cells_.retireAll();
}

/**
 *	This method erases the input cell from this application.
 */
void CellApp::eraseCell( CellData * pCellData )
{
	cells_.erase( pCellData );

	if (isRetiring_ && cells_.empty())
	{
		this->shutDown();
	}
}
当CellApp进程收到shutDown指令后,会调用CellApp::shutDown方法来退出安全退出:
/**
 *	This method handles a shutDown message.
 */
void CellApp::shutDown( const CellAppInterface::shutDownArgs & /*args*/ )
{
	TRACE_MSG( "CellApp::shutDown: Told to shut down\n" );
	this->shutDown();
}
集群的有序退出
上面暴露的shutDownApp方法只会触发当前进程的退出,如果要当前服务器集群里的所有进程都有序退出,一个一个的去通知shutDownApp不太灵活,因此在CellApp和BaseApp这两个能绑定Python的ServerApp子类里,提供了一个controlledShutDown方法,用来触发有序退出流程:
// server\baseapp\script_bigworld.cpp
/*~ function BigWorld.controlledShutDown
 *	@components{ base }
 *
 *	This method induces a controlled shutdown of the cluster.
 */
void controlledShutDown()
{
	BaseApp::instance().triggerControlledShutDown();
}
PY_AUTO_MODULE_FUNCTION( RETVOID, controlledShutDown, END, BigWorld )

// server\cellapp\cellapp.cpp
/*~ function BigWorld.controlledShutDown
 *	@components{ cell }
 *
 *	This method induces a controlled shutdown of the cluster.
 */
void controlledShutDown()
{
	CellApp::instance().triggerControlledShutDown();
}
PY_AUTO_MODULE_FUNCTION( RETVOID, controlledShutDown, END, BigWorld )
这两个不同的ServerApp执行controlledShutDown方法的后续流程大同小异。这里先分析一下CellApp的triggerControlledShutDown方法:
/**
 *	This method triggers a controlled shutdown of the cluster.
 */
void CellApp::triggerControlledShutDown()
{
	CellAppMgrGateway & cellAppMgr = this->cellAppMgr();
	Mercury::Bundle & bundle = cellAppMgr.bundle();

	CellAppMgrInterface::controlledShutDownArgs &args =
		CellAppMgrInterface::controlledShutDownArgs::start( bundle );

	args.stage = SHUTDOWN_TRIGGER;

	cellAppMgr.send();
}
这个函数会向CellAppMgr发送一个controlledShutDown消息,携带的stage参数为SHUTDOWN_TRIGGER,CellAppMgr收到这个消息之后,会执行自己的triggerControlledShutDown方法:
/**
 *	This method handles a message to start shutting down in a controlled way.
 */
void CellAppMgr::controlledShutDown(
			const CellAppMgrInterface::controlledShutDownArgs & args )
{
	INFO_MSG( "CellAppMgr::controlledShutDown: stage = %s\n",
		ServerApp::shutDownStageToString( args.stage ) );

	switch (args.stage)
	{
		case SHUTDOWN_TRIGGER:
			this->triggerControlledShutDown();
			break;
s
		case SHUTDOWN_REQUEST:
			this->controlledShutDown();
			break;

		default:
			ERROR_MSG( "CellAppMgr::controlledShutDown: "
					"Stage %s not handled.\n",
				ServerApp::shutDownStageToString( args.stage ) );
			break;
	}
}
这个CellAppMgr::triggerControlledShutDown负责将SHUTDOWN_TRIGGER消息发送给BaseAppMgr:
/**
 *	This method triggers a controlled shutdown of the cluster.
 */
void CellAppMgr::triggerControlledShutDown()
{
	Mercury::Bundle & bundle = baseAppMgr_.bundle();
	BaseAppMgrInterface::controlledShutDownArgs &args =
		BaseAppMgrInterface::controlledShutDownArgs::start( bundle );
	args.stage = SHUTDOWN_TRIGGER;
	args.shutDownTime = 0; // unused on receiving side

	baseAppMgr_.send();
}
BaseAppMgr收到这个消息之后,会执行自己的triggerControlledShutDown方法:
/**
 *	This method responds to a message telling us what stage of the controlled
 *	shutdown process the server is at.
 */
void BaseAppMgr::controlledShutDown(
		const BaseAppMgrInterface::controlledShutDownArgs & args )
{
	INFO_MSG( "BaseAppMgr::controlledShutDown: stage = %s\n",
		ServerApp::shutDownStageToString( args.stage ) );

	switch (args.stage)
	{
		// 省略一些代码

		case SHUTDOWN_TRIGGER:
		{
			this->controlledShutDownServer();
			break;
		}

		case SHUTDOWN_NONE:
		case SHUTDOWN_DISCONNECT_PROXIES:
			break;
	}
}
类似的,如果是BaseApp发起的triggerControlledShutDown方法,会向BaseAppMgr发送一个controlledShutDown消息,携带的stage参数为SHUTDOWN_TRIGGER,此时也会调用到BaseAppMgr::controlledShutDownServer方法:
/**
 *	This method triggers a controlled shutdown of the cluster.
 */
void BaseApp::triggerControlledShutDown()
{
	BaseAppMgrGateway & baseAppMgr = this->baseAppMgr();

	Mercury::Bundle & bundle = baseAppMgr.bundle();
	BaseAppMgrInterface::controlledShutDownArgs &args =
		BaseAppMgrInterface::controlledShutDownArgs::start( bundle );

	args.stage = SHUTDOWN_TRIGGER;
	args.shutDownTime = 0; // unused on receiving side

	baseAppMgr.send();
}
所以不管是CellApp还是BaseApp发起的triggerControlledShutDown方法,最终都会调用到BaseAppMgr::controlledShutDownServer方法。在BaseAppMgr::controlledShutDownServer里,会将controlledShutDown请求发送到DbAppMgr和LoginApp上,然后以SHUTDOWN_REQUEST消息的形式重新执行controlledShutDown方法:
/**
 *  Trigger a controlled shutdown of the entire server.
 */
void BaseAppMgr::controlledShutDownServer()
{
	if (shutDownStage_ != SHUTDOWN_NONE)
	{
		DEBUG_MSG( "BaseAppMgr::controlledShutDownServer: "
			"Already shutting down, ignoring duplicate shutdown request.\n" );
		return;
	}

	// First try to trigger controlled shutdown via the loginapp
	Mercury::Address loginAppAddr;
	Mercury::Reason reason = Mercury::MachineDaemon::findInterface(
				"LoginIntInterface", -1, loginAppAddr );

	if (reason == Mercury::REASON_SUCCESS)
	{
		Mercury::ChannelSender sender( BaseAppMgr::getChannel( loginAppAddr ) );
		Mercury::Bundle & bundle = sender.bundle();

		bundle.startMessage( LoginIntInterface::controlledShutDown );

		INFO_MSG( "BaseAppMgr::controlledShutDownServer: "
			"Triggering server shutdown via LoginApp @ %s\n",
			loginAppAddr.c_str() );

		return;
	}
	else
	{
		ERROR_MSG( "BaseAppMgr::controlledShutDownServer: "
			"Couldn't find a LoginApp to trigger server shutdown\n" );
	}

	// Next try to trigger shutdown via the DBApp.
	// TODO: Scalable DB. Talk directly to DBAppMgr, instead of DBApp. DBApp
	// will forward to DBAppMgr currently.
	if (dbAppAlpha_.channel().isEstablished())
	{
		Mercury::Bundle & bundle = dbAppAlpha_.bundle();
		DBAppInterface::controlledShutDownArgs::start( bundle ).stage =
			SHUTDOWN_REQUEST;
		dbAppAlpha_.send();

		INFO_MSG( "BaseAppMgr::controlledShutDownServer: "
				"Triggering server shutdown via the Alpha DBApp%02d (%s)\n",
			dbApps_.alpha().id(),
			dbAppAlpha_.addr().c_str() );
		return;
	}
	else
	{
		ERROR_MSG( "BaseAppMgr::controlledShutDownServer: "
			"Couldn't find the DBApp to trigger server shutdown\n" );
	}

	// Alright, the shutdown starts with me then
	BaseAppMgrInterface::controlledShutDownArgs args;
	args.stage = SHUTDOWN_REQUEST;
	INFO_MSG( "BaseAppMgr::controlledShutDownServer: "
		"Starting controlled shutdown here (no LoginApp or DBApp found)\n" );
	this->controlledShutDown( args );
}
在CellAppMgr::controlledShutDown里,遇到SHUTDOWN_REQUEST消息时,会将这个controlledShutDown请求发送到CellAppMgr上。当CellAppMgr接收到这个SHUTDOWN_REQUEST消息时,会执行自己的controlledShutDown方法,开启自身的退出流程:
/**
 *	This method handles a message to start shutting down in a controlled way.
 */
void CellAppMgr::controlledShutDown(
			const CellAppMgrInterface::controlledShutDownArgs & args )
{
	INFO_MSG( "CellAppMgr::controlledShutDown: stage = %s\n",
		ServerApp::shutDownStageToString( args.stage ) );

	switch (args.stage)
	{
		case SHUTDOWN_TRIGGER:
			this->triggerControlledShutDown();
			break;

		case SHUTDOWN_REQUEST:
			this->controlledShutDown();
			break;

		default:
			ERROR_MSG( "CellAppMgr::controlledShutDown: "
					"Stage %s not handled.\n",
				ServerApp::shutDownStageToString( args.stage ) );
			break;
	}
}
/**
 *	This method initiates a controlled shutdown of the system.
 */
void CellAppMgr::controlledShutDown()
{
	// Stop sending to anonymous channels etc.
	interface_.stopPingingAnonymous();

	ShutDownHandler::start( *this );
}
这里的ShutDownHandler::start的作用是通知当前CellAppMgr管理的所有CellApp和BaseAppMgr开始执行退出流程controlledShutDown,此时的stage为SHUTDOWN_INFORM:
/**
 *	This method starts the process of shutting down the server.
 */
void ShutDownHandler::start( CellAppMgr & mgr )
{
	// No delay if we haven't started yet since game time won't go forward.
	int shuttingDownDelay = 0;

	if (mgr.hasStarted())
	{
		shuttingDownDelay = CellAppMgrConfig::shuttingDownDelayInTicks();
	}

	mgr.setShutDownHandler(
		new InformHandler( mgr, mgr.time() + shuttingDownDelay ) );
}

InformHandler::InformHandler( CellAppMgr & mgr, GameTime shutDownTime ) :
	mgr_( mgr ),
	shutDownTime_( shutDownTime ),
	baseAppsAcked_( false ),
	ackedCellApps_()
{
	// Inform the BaseAppMgr.
	{
		Mercury::Bundle & bundle = mgr_.baseAppMgr().bundle();
		BaseAppMgrInterface::controlledShutDownArgs args;
		args.stage = SHUTDOWN_INFORM;
		args.shutDownTime = shutDownTime_;
		bundle << args;

		mgr_.baseAppMgr().send();
	}

	// Inform all of the CellApps.
	mgr_.cellApps().controlledShutDown( SHUTDOWN_INFORM, shutDownTime_ );
}


/**
 *
 */
void CellApps::controlledShutDown( ShutDownStage stage, GameTime shutDownTime )
{
	Map::iterator iter = map_.begin();

	while (iter != map_.end())
	{
		iter->second->controlledShutDown( stage, shutDownTime );

		++iter;
	}
}
/**
 *	This method shuts down the cell application associated with this object in
 *	a controlled way.
 */
void CellApp::controlledShutDown( ShutDownStage stage, GameTime shutDownTime )
{
	CellAppInterface::controlledShutDownArgs args;
	args.stage = stage;
	args.shutDownTime = shutDownTime;

	this->bundle() << args;
	this->send();
}
在BaseAppMgr::controlledShutDown方法中,当stage为SHUTDOWN_INFORM时,会通知当前管理的所有BaseApp开启退出流程:
/**
 *	This method responds to a message telling us what stage of the controlled
 *	shutdown process the server is at.
 */
void BaseAppMgr::controlledShutDown(
		const BaseAppMgrInterface::controlledShutDownArgs & args )
{
	INFO_MSG( "BaseAppMgr::controlledShutDown: stage = %s\n",
		ServerApp::shutDownStageToString( args.stage ) );

	switch (args.stage)
	{
		case SHUTDOWN_REQUEST:
		{
			if (cellAppMgr_.channel().isEstablished())
			{
				Mercury::Bundle & bundle = cellAppMgr_.bundle();
				CellAppMgrInterface::controlledShutDownArgs args;
				args.stage = SHUTDOWN_REQUEST;
				bundle << args;
				cellAppMgr_.send();
			}
			break;
		}

		case SHUTDOWN_INFORM:
		{
			shutDownStage_ = args.stage;
			shutDownTime_ = args.shutDownTime;

			if (baseAndServiceApps_.empty())
			{
				this->ackBaseAppsShutDownToCellAppMgr( args.stage );
			}
			else
			{
				// Inform all base apps, once the requests are complete the
				// CellAppMgr is notified via ackBaseAppsShutDownToCellAppMgr().
				this->informBaseAppsOfShutDown( args );
			}

			break;
		}

		case SHUTDOWN_PERFORM:
		{
			this->startAsyncShutDownStage( SHUTDOWN_DISCONNECT_PROXIES );
			break;
		}

		case SHUTDOWN_TRIGGER:
		{
			this->controlledShutDownServer();
			break;
		}

		case SHUTDOWN_NONE:
		case SHUTDOWN_DISCONNECT_PROXIES:
			break;
	}
}

/**
 *	This method informs base and service apps of the controlled shutdown process.
 *	@param args Shutdown stage and time.
 */
void BaseAppMgr::informBaseAppsOfShutDown(
	const BaseAppMgrInterface::controlledShutDownArgs & args )
{
	MF_ASSERT( !baseAndServiceApps_.empty() );
	SyncControlledShutDownHandler * pHandler = new SyncControlledShutDownHandler(
		args.stage, baseAndServiceApps_.size() );
	MemoryOStream payload;
	payload << args.stage << args.shutDownTime;
	sendToBaseApps( BaseAppIntInterface::controlledShutDown, payload,
		BaseAppsIterator( baseAndServiceApps_ ), pHandler );
}
此时BaseAppMgr和CellAppMgr的shutDownStage_都被设置为SHUTDOWN_INFORM,同时所有的CellApp和BaseApp都接收到了controlledShutDown方法,且stage为SHUTDOWN_INFORM。
对应的处理逻辑都类似,记录当前的shutDownTime_和shutDownReplyID_,并触发onAppShuttingDown事件:
/**
 *	This method is called by the BaseAppMgr to tell us to shut down.
 */
void BaseApp::controlledShutDown( const Mercury::Address& srcAddr,
		const Mercury::UnpackedMessageHeader& header,
		BinaryIStream & data )
{
	ShutDownStage stage;
	GameTime shutDownTime;
	data >> stage >> shutDownTime;

	INFO_MSG( "BaseApp::controlledShutDown: stage = %s\n",
		ServerApp::shutDownStageToString( stage ) );

	switch (stage)
	{
		case SHUTDOWN_INFORM:
		{
			// Make sure that we no longer process the external nub.
			extInterface_.detach();

			shutDownTime_ = shutDownTime;
			shutDownReplyID_ = header.replyID;

			if (this->hasStarted())
			{
				this->scriptEvents().triggerTwoEvents( "onAppShuttingDown",
						isServiceApp_ ?
							"onServiceAppShuttingDown" :
							"onBaseAppShuttingDown",
						Py_BuildValue( "(d)",
							(double)shutDownTime/Config::updateHertz() ) );

				// Don't send reply immediate to allow scripts to do some stuff.
			}
			else
			{
				baseAppMgr_.bundle().startReply( shutDownReplyID_ );
				baseAppMgr_.send();
			}
		}
		// 省略其他分支的处理
	}
}

/**
 *	This method handles a message telling us to shut down in a controlled way.
 */
void CellApp::controlledShutDown(
		const CellAppInterface::controlledShutDownArgs & args )
{
	switch (args.stage)
	{
		case SHUTDOWN_INFORM:
		{
			if (shutDownTime_ != 0)
			{
				ERROR_MSG( "CellApp::controlledShutDown: "
						"Setting shutDownTime_ to %u when already set to %u\n",
					args.shutDownTime, shutDownTime_ );
			}

			shutDownTime_ = args.shutDownTime;

			hasAckedCellAppMgrShutDown_ = false;

			if (this->hasStarted())
			{
				this->scriptEvents().triggerTwoEvents(
					"onAppShuttingDown", "onCellAppShuttingDown",
					Py_BuildValue( "(d)",
						(double)shutDownTime_/Config::updateHertz() ) );

				// Don't send ack immediately to allow scripts to do stuff.
			}
			else
			{
				this->sendShutdownAck( SHUTDOWN_INFORM );
			}
		}
		break;

		case SHUTDOWN_PERFORM:
		{
			ERROR_MSG( "CellApp::controlledShutDown: "
					"CellApp does not do SHUTDOWN_PERFORM stage.\n" );
			// TODO: It could be good to call this so that we can call a script
			// method.
			break;
		}

		case SHUTDOWN_NONE:
		case SHUTDOWN_REQUEST:
		case SHUTDOWN_DISCONNECT_PROXIES:
		case SHUTDOWN_TRIGGER:
			break;
	}
}
这两个事件都会发送到Python脚本里去处理,然后在下一帧里的计时器操作中会检查是设置了shutDownTime_,如果设置了就会发送这个退出消息的ACK确认消息到对应的MgrApp里:
/**
 *	This method handles timeout events.
 */
void BaseApp::handleTimeout( TimerHandle /*handle*/, void * arg )
{
	uintptr timerType = reinterpret_cast<uintptr>( arg );

	// TODO: Should investigate whether all this can be done in tickGameTime()
	// instead, since we only seem to start a timer with TIMEOUT_GAME_TICK.

	// Secondary database is used even during shutdown
	if (pSqliteDB_ && (timerType == TIMEOUT_GAME_TICK))
	{
		pArchiver_->tickSecondaryDB( pSqliteDB_ );
	}

	bgTaskManager_.tick();

	if (this->inShutDownPause())
	{
		if (shutDownReplyID_ != Mercury::REPLY_ID_NONE)
		{
			baseAppMgr_.bundle().startReply( shutDownReplyID_ );
			baseAppMgr_.send();

			// No longer regularly sending the load from now on.
			baseAppMgr_.isRegular( false );

			shutDownReplyID_ = Mercury::REPLY_ID_NONE;
		}

		return;
	}

	switch (timerType)
	{
		case TIMEOUT_GAME_TICK:
			this->tickGameTime();
			break;
	}
}

/**
 *
 */
void CellApp::tickShutdown()
{
	if (!hasAckedCellAppMgrShutDown_)
	{
		this->sendShutdownAck( SHUTDOWN_INFORM );

		// No longer regularly sending the load from now on.
		cellAppMgr_.isRegular( false );

		hasAckedCellAppMgrShutDown_ = true;
	}
}
/**
 * 	This method sends an ack to the CellAppMgr to indicate that we've
 * 	finished one of our shutdown stages.
 */
void CellApp::sendShutdownAck( ShutDownStage stage )
{
	cellAppMgr_.ackShutdown( stage );
}

void CellAppMgrGateway::ackShutdown( ShutDownStage stage )
{
	Mercury::Bundle & bundle = channel_.bundle();
	CellAppMgrInterface::ackCellAppShutDownArgs & rAckCellAppShutDown =
		CellAppMgrInterface::ackCellAppShutDownArgs::start( bundle );

	rAckCellAppShutDown.stage = stage;

	channel_.send();
}
当对应的MgrApp收到了所有的子ServerApp的SHUTDOWN_INFORM的确认消息后,才能开启后续的SHUTDOWN_PERFORM阶段的关闭流程。
BaseAppMgr处理ACK的地方则是在SyncControlledShutDownHandler::handleMessage里,每收到一个ACK就执行一次decCount,当这个count_字段为0时,就代表所有的子BaseApp都已经ACK完毕,就会去执行ackBaseAppsShutDownToCellAppMgr来处理下一个阶段的关闭流程:
SyncControlledShutDownHandler::SyncControlledShutDownHandler(
									ShutDownStage stage, int count ) :
		stage_( stage ),
		count_( count )
{
	MF_ASSERT( count_ > 0 );
}


/**
 *	This method handles the reply message.
 */
void SyncControlledShutDownHandler::handleMessage(
		const Mercury::Address & srcAddr,
		Mercury::UnpackedMessageHeader & header,
		BinaryIStream & data, void * )
{
	this->decCount();
}

/**
 *	This method finalises and deletes this handler.
 */
void SyncControlledShutDownHandler::finalise()
{
	BaseAppMgr * pApp = BaseAppMgr::pInstance();

	if (pApp)
	{
		pApp->ackBaseAppsShutDownToCellAppMgr( stage_ );
	}

	delete this;
}


/**
 *	This method decrements the number of outstanding requests.
 */
void SyncControlledShutDownHandler::decCount()
{
	--count_;

	if (count_ == 0)
	{
		this->finalise();
	}
}
而这里的ackBaseAppsShutDownToCellAppMgr作用就是通知CellAppMgr当前所有的BaseApp都已经ACK完毕,对应的处理函数还是在之前的InformHandler里,这里会设置成员变量baseAppsAcked_为true:
/**
 *	This method is called to inform CellAppMgr that the base apps are in a
 *	particular shutdown stage.
 *	@param stage	Shutdown stage.
 */
void BaseAppMgr::ackBaseAppsShutDownToCellAppMgr( ShutDownStage stage )
{
	DEBUG_MSG( "BaseAppMgr::ackBaseAppsShutDownToCellAppMgr: "
			"All BaseApps have shut down, informing CellAppMgr\n" );
	Mercury::Bundle & bundle = this->cellAppMgr().bundle();
	CellAppMgrInterface::ackBaseAppsShutDownArgs & rAckBaseAppsShutDown =
		CellAppMgrInterface::ackBaseAppsShutDownArgs::start( bundle );

	rAckBaseAppsShutDown.stage = stage;

	this->cellAppMgr().send();
}

/**
 *	This method is called to acknowledge that the base apps are in a particular
 *	shutdown stage.
 */
void CellAppMgr::ackBaseAppsShutDown(
			const CellAppMgrInterface::ackBaseAppsShutDownArgs & args )
{
	if (pShutDownHandler_)
	{
		pShutDownHandler_->ackBaseApps( args.stage );
	}
}
void InformHandler::ackBaseApps( ShutDownStage stage )
{
	if (stage != SHUTDOWN_INFORM)
	{
		ERROR_MSG( "InformHandler::ackBaseApps: Incorrect stage %s\n",
			ServerApp::shutDownStageToString( stage ) );
	}

	baseAppsAcked_ = true;
	this->checkStatus();
}
CellAppMgr处理ACK的地方在InformHandler::ackBaseApps,每个确认了ACK的CellApp都会放到ackedCellApps_这个集合里,当集合的大小大于等于当前管理的CellApp的大小且baseAppsAcked_为true时,就代表所有的BaseApp和所有的CellApp都接收到了SHUTDOWN_INFORM,接下来会去执行PerformBaseAppsHandler,这里会使用writeSpacesToDB将所有的Space数据进行存库,同时往BaseAppMgr发送controlledShutDown通知可以切换到SHUTDOWN_PERFORM了:
void InformHandler::checkStatus()
{
	INFO_MSG( "InformHandler::checkStatus: "
			"baseAppsAcked_ = %d. cells %" PRIzu "/%d shutDownTime %u time %u\n",
			baseAppsAcked_,
			ackedCellApps_.size(), mgr_.numCellApps(),
			shutDownTime_, mgr_.time() );

	if (this->isPaused() &&
		baseAppsAcked_ &&
		ackedCellApps_.size() >= size_t(mgr_.numCellApps()))
	{
		// TODO: Could check that the correct ones are ack'ed.
		// mgr_.setShutDownHandler( new PerformCellAppHandler( mgr_ ) );
		mgr_.setShutDownHandler( new PerformBaseAppsHandler( mgr_ ) );
		delete this;
	}
}

void InformHandler::ackCellApp( ShutDownStage stage, CellApp & app )
{
	if (stage != SHUTDOWN_INFORM)
	{
		ERROR_MSG( "InformHandler::ackCellApp: Incorrect stage %s\n",
				ServerApp::shutDownStageToString( stage ) );
	}

	ackedCellApps_.insert( &app );

	this->checkStatus();
}

PerformBaseAppsHandler::PerformBaseAppsHandler( CellAppMgr & mgr ) : mgr_( mgr )
{
	CellAppMgr & app = CellAppMgr::instance();

	app.writeGameTimeToDB();
	app.writeSpacesToDB();

	// Tell the BaseAppMgr to perform.
	{
		BaseAppMgrInterface::controlledShutDownArgs args;
		args.stage = SHUTDOWN_PERFORM;
		args.shutDownTime = 0;


		Mercury::Bundle & bundle = app.baseAppMgr().bundle();
		bundle << args;

		app.baseAppMgr().send();
	}
}

/**
 *	This method writes space information to the database.
 */
void CellAppMgr::writeSpacesToDB()
{
	if (Config::archivePeriodInTicks() == 0 ||
		!Config::shouldArchiveSpaceData())
	{
		return;
	}

	if (this->dbAppAlpha().channel().isEstablished())
	{
		Mercury::Bundle & bundle = this->dbAppAlpha().bundle();
		bundle.startMessage( DBAppInterface::writeSpaces );
		bundle << uint32( spaces_.size() );

		Spaces::const_iterator iter = spaces_.begin();

		while (iter != spaces_.end())
		{
			iter->second->sendToDB( bundle );
			++iter;
		}

		this->dbAppAlpha().send();
	}
	else
	{
		WARNING_MSG( "CellAppMgr::writeSpacesToDB: "
			"No known DBApp, not writing to DB.\n" );
	}
}
当BaseAppMgr::controlledShutDown处理SHUTDOWN_PERFORM时,会触发BaseAppMgr::startAsyncShutDownStage,这里收集当前所有的BaseApp的地址,使用AsyncControlledShutDownHandler来发送controlledShutDown通知,并等待这些BaseApp的ACK:
/**
 *	This method responds to a message telling us what stage of the controlled
 *	shutdown process the server is at.
 */
void BaseAppMgr::controlledShutDown(
		const BaseAppMgrInterface::controlledShutDownArgs & args )
{
	INFO_MSG( "BaseAppMgr::controlledShutDown: stage = %s\n",
		ServerApp::shutDownStageToString( args.stage ) );

	switch (args.stage)
	{
		// 省略之前已经介绍过的两个分支
		case SHUTDOWN_PERFORM:
		{
			this->startAsyncShutDownStage( SHUTDOWN_DISCONNECT_PROXIES );
			break;
		}

		case SHUTDOWN_TRIGGER:
		{
			this->controlledShutDownServer();
			break;
		}

		case SHUTDOWN_NONE:
		case SHUTDOWN_DISCONNECT_PROXIES:
			break;
	}
}

void BaseAppMgr::startAsyncShutDownStage( ShutDownStage stage )
{
	BW::vector< Mercury::Address > addrs;
	addrs.reserve( baseAndServiceApps_.size() );

	BaseApps::const_iterator iter = baseAndServiceApps_.begin();

	while (iter != baseAndServiceApps_.end())
	{
		addrs.push_back( iter->first );

		++iter;
	}

	// This object deletes itself.
	new AsyncControlledShutDownHandler( stage, addrs );
}
这里的AsyncControlledShutDownHandler会遍历初始时传入的BaseApp地址集合,发送一个controlledShutDown通知,此时的stage为SHUTDOWN_DISCONNECT_PROXIES:
AsyncControlledShutDownHandler::AsyncControlledShutDownHandler(
			ShutDownStage stage, BW::vector< Mercury::Address > & addrs ) :
		stage_( stage ),
		numToSend_( 0 )
{
	addrs_.swap( addrs );
	this->sendNext();
}

void AsyncControlledShutDownHandler::sendNext()
{
	bool shouldDeleteThis = true;
	BaseAppMgr * pApp = BaseAppMgr::pInstance();

	if (pApp)
	{
		while (true)
		{
			if (numToSend_ < int(addrs_.size()))
			{
				Mercury::ChannelOwner * pChannelOwner =
					pApp->findChannelOwner( addrs_[ numToSend_ ] );

				if (pChannelOwner != NULL &&
						!pChannelOwner->channel().hasRemoteFailed())
				{
					Mercury::Bundle & bundle = pChannelOwner->bundle();
					bundle.startRequest(
							BaseAppIntInterface::controlledShutDown, this );
					shouldDeleteThis = false;
					bundle << stage_;
					bundle << 0;
					pChannelOwner->send();
				}
				else
				{
					WARNING_MSG( "AsyncControlledShutDownHandler::sendNext: "
									"Could not find channel for %s\n",
							addrs_[ numToSend_ ].c_str() );
					++numToSend_;
					continue;
				}

				++numToSend_;
			}
			else if (stage_ == SHUTDOWN_DISCONNECT_PROXIES)
			{
				// This object deletes itself.
				new AsyncControlledShutDownHandler( SHUTDOWN_PERFORM, addrs_ );
			}
			else
			{
				Mercury::Bundle & bundle = pApp->cellAppMgr().bundle();
				CellAppMgrInterface::ackBaseAppsShutDownArgs &
					rAckBaseAppsShutDown =
						CellAppMgrInterface::ackBaseAppsShutDownArgs::start(
							bundle );

				rAckBaseAppsShutDown.stage = stage_;

				pApp->cellAppMgr().send();
				pApp->shutDown( false );
			}
			break;
		}
	}

	if (shouldDeleteThis)
	{
		delete this;
	}
}
这个SHUTDOWN_DISCONNECT_PROXIES的作用是通知当前BaseApp上的所有Proxy使用onClientDeath( CLIENT_DISCONNECT_SHUTDOWN )去强制断开客户端的连接,也就是常说的关服封网:
case SHUTDOWN_DISCONNECT_PROXIES:
{
	if (this->hasStarted())
	{
		this->callShutDownCallback( 0 );

		// TODO: Should probably spread this out over time.
		typedef BW::vector< SmartPointer< Proxy > > CopiedProxies;
		CopiedProxies copyOfProxies;

		{
			copyOfProxies.reserve( proxies_.size() );

			Proxies::iterator iter = proxies_.begin();

			while (iter != proxies_.end())
			{
				copyOfProxies.push_back( iter->second );
				++iter;
			}
		}

		{
			CopiedProxies::iterator iter = copyOfProxies.begin();

			while (iter != copyOfProxies.end())
			{
				(*iter)->onClientDeath( CLIENT_DISCONNECT_SHUTDOWN );

				++iter;
			}
		}
	}


	IF_NOT_MF_ASSERT_DEV( baseAppMgr_.addr() == srcAddr )
	{
		break;
	}

	baseAppMgr_.bundle().startReply( header.replyID );
	baseAppMgr_.send();

	break;
}
当所有的Proxy都被通知断开连接后,SHUTDOWN_DISCONNECT_PROXIES阶段就完成了,开始发送消息到BaseAppMgr来通知此阶段结束,然后BaseAppMgr的AsyncControlledShutDownHandler就会切换到SHUTDOWN_PERFORM阶段:
void AsyncControlledShutDownHandler::handleMessage(
		const Mercury::Address & srcAddr,
		Mercury::UnpackedMessageHeader & header,
		BinaryIStream & data, void * )
{
	DEBUG_MSG( "AsyncControlledShutDownHandler::handleMessage: "
			"BaseApp %s has finished stage %s\n",
		srcAddr.c_str(), ServerApp::shutDownStageToString( stage_ ) );

	if (stage_ == SHUTDOWN_PERFORM)
	{
		BaseAppMgr * pApp = BaseAppMgr::pInstance();
		pApp->removeControlledShutdownBaseApp( srcAddr );
	}

	this->sendNext();
}
void AsyncControlledShutDownHandler::sendNext()
{
	bool shouldDeleteThis = true;
	BaseAppMgr * pApp = BaseAppMgr::pInstance();

	if (pApp)
	{
		while (true)
		{
			if (numToSend_ < int(addrs_.size()))
			{
				// 省略一些代码
			}
			else if (stage_ == SHUTDOWN_DISCONNECT_PROXIES)
			{
				// This object deletes itself.
				new AsyncControlledShutDownHandler( SHUTDOWN_PERFORM, addrs_ );
			}
		}
	}
}
这样又会对所有的子BaseApp发送SHUTDOWN_PERFORM阶段的消息,在对应的BaseApp::controlledShutDown会构造一个ControlledShutdown::start来开启清理流程:
void BaseApp::controlledShutDown( const Mercury::Address& srcAddr,
		const Mercury::UnpackedMessageHeader& header,
		BinaryIStream & data )
{
	ShutDownStage stage;
	GameTime shutDownTime;
	data >> stage >> shutDownTime;

	INFO_MSG( "BaseApp::controlledShutDown: stage = %s\n",
		ServerApp::shutDownStageToString( stage ) );

	switch (stage)
	{
		// 省略其他分支
		case SHUTDOWN_PERFORM:
		{
			if (this->hasStarted())
			{
				this->callShutDownCallback( 1 );
			}

			ControlledShutdown::start( pSqliteDB_,
					bases_, localServiceFragments_,
					header.replyID, srcAddr );

			break;
		}
	}
}


namespace ControlledShutdown
{

void start( SqliteDatabase * pSecondaryDB,
			const Bases & bases,
			Bases & localServiceFragments,
			Mercury::ReplyID replyID,
			const Mercury::Address & srcAddr )
{
	localServiceFragments.discardAll();

	// This object deletes itself.
	ControlledShutDownHandler * pHandler = NULL;

	if (pSecondaryDB)
	{
		pHandler = new ShutDownHandlerWithSecondaryDB( *pSecondaryDB );
	}
	else
	{
		pHandler = new ShutDownHandlerWithoutSecondaryDB();
	}
	pHandler->init( bases, replyID, srcAddr );
}

} // namespace ControlledShutdown
这里的ShutDownHandlerWithSecondaryDB和ShutDownHandlerWithoutSecondaryDB都是ControlledShutDownHandler的子类,作用都是将所有的Base执行存库操作,它们的区别是是否有二级数据库。当所有的Base数据都存入数据库了之后,开始通知BaseAppMgr当前BaseApp的清理流程已经完成,同时当前BaseApp调用shutDown函数来执行进行最后的清理并退出:
void ControlledShutDownHandler::checkFinished()
{
	if (numOutstanding_ != 0)
	{
		return;
	}

	BaseApp * pApp = BaseApp::pInstance();

	if (pApp == NULL)
	{
		ERROR_MSG( "ControlledShutDownHandler::checkFinished: pApp is NULL\n" );
		return;
	}

	BaseAppMgrGateway & baseAppMgr = pApp->baseAppMgr();

	IF_NOT_MF_ASSERT_DEV( srcAddr_ == baseAppMgr.addr() )
	{
		return;
	}

	baseAppMgr.bundle().startReply( replyID_ );
	baseAppMgr.send();

	pApp->callShutDownCallback( 2 );

	delete this;
	pApp->shutDown();
}
当BaseAppMgr接收到了所有的BaseApp都存库完成的回应之后,开始给CellAppMgr来发送SHUTDOWN_PERFORM阶段的消息,同时这里也会调用shutDown函数来触发当前BaseAppMgr的进程退出:
void AsyncControlledShutDownHandler::sendNext()
{
	bool shouldDeleteThis = true;
	BaseAppMgr * pApp = BaseAppMgr::pInstance();

	if (pApp)
	{
		while (true)
		{
			if (numToSend_ < int(addrs_.size()))
			{
				// 省略一些代码
			}
			else if (stage_ == SHUTDOWN_DISCONNECT_PROXIES)
			{
				// This object deletes itself.
				new AsyncControlledShutDownHandler( SHUTDOWN_PERFORM, addrs_ );
			}
			else
			{
				Mercury::Bundle & bundle = pApp->cellAppMgr().bundle();
				CellAppMgrInterface::ackBaseAppsShutDownArgs &
					rAckBaseAppsShutDown =
						CellAppMgrInterface::ackBaseAppsShutDownArgs::start(
							bundle );

				rAckBaseAppsShutDown.stage = stage_;

				pApp->cellAppMgr().send();
				pApp->shutDown( false );
			}
			break;
		}
	}

	if (shouldDeleteThis)
	{
		delete this;
	}
}
当CellAppMgr接收到这个ackBaseAppsShutDown的消息时,当前的pShutDownHandler_已经是PerformBaseAppsHandler了,此时的处理就是通知DBAppMgr当前CellAppMgr的清理流程已经完成,同时调用shutDown来触发当前CellAppMgr的进程退出:
/**
 *	This method is called to acknowledge that the base apps are in a particular
 *	shutdown stage.
 */
void CellAppMgr::ackBaseAppsShutDown(
			const CellAppMgrInterface::ackBaseAppsShutDownArgs & args )
{
	if (pShutDownHandler_)
	{
		pShutDownHandler_->ackBaseApps( args.stage );
	}
}
/**
 *	This method is called when the BaseApps have all completed the perform
 *	stage.
 */
void PerformBaseAppsHandler::ackBaseApps( ShutDownStage stage )
{
	DBAppMgrInterface::controlledShutDownArgs args;
	args.stage = SHUTDOWN_PERFORM;

	mgr_.dbAppMgr().bundle() << args;

	mgr_.dbAppMgr().send();
	mgr_.setShutDownHandler( NULL );
	mgr_.shutDown( /* shutDownOthers */ true );
	delete this;
}
注意到这里并没有通知所有的CellApp去执行SHUTDOWN_PERFORM,因为CellApp压根没有SHUTDOWN_PERFORM阶段,下面这两个函数的注释里都强调了这个问题:
/**
 *	This method handles an ack from a CellApp. This should not be called because
 *	the CellApps are not involved in this stage.
 */
void PerformBaseAppsHandler::ackCellApp( ShutDownStage stage, CellApp & app )
{
	ERROR_MSG( "PerformBaseAppsHandler::ackCellApp: Got stage %s from %s\n",
		ServerApp::shutDownStageToString( stage ), app.addr().c_str() );
}

/**
 *	This method handles a message telling us to shut down in a controlled way.
 */
void CellApp::controlledShutDown(
		const CellAppInterface::controlledShutDownArgs & args )
{
	switch (args.stage)
	{
		case SHUTDOWN_INFORM:
		{
			// 省略代码
		}
		break;

		case SHUTDOWN_PERFORM:
		{
			ERROR_MSG( "CellApp::controlledShutDown: "
					"CellApp does not do SHUTDOWN_PERFORM stage.\n" );
			// TODO: It could be good to call this so that we can call a script
			// method.
			break;
		}

		case SHUTDOWN_NONE:
		case SHUTDOWN_REQUEST:
		case SHUTDOWN_DISCONNECT_PROXIES:
		case SHUTDOWN_TRIGGER:
			break;
	}
}
这些CellApp的关闭则是在PerformBaseAppsHandler::ackBaseApps里的mgr_.cellAppMgr().shutDown( true );函数调用里触发的,这个函数会遍历当前的所有CellApp,并调用每个CellApp的shutDown函数来触发发送一个shutDown请求到这个CellApp,并最终执行进程退出:
void PerformBaseAppsHandler::ackBaseApps( ShutDownStage stage )
{
	DBAppMgrInterface::controlledShutDownArgs args;
	args.stage = SHUTDOWN_PERFORM;

	mgr_.dbAppMgr().bundle() << args;

	mgr_.dbAppMgr().send();
	mgr_.setShutDownHandler( NULL );
	mgr_.shutDown( /* shutDownOthers */ true );
	delete this;
}
/**
 *	This method shuts down this application.
 */
void CellAppMgr::shutDown( bool shutDownOthers )
{
	INFO_MSG( "CellAppMgr::shutDown: shutDownOthers = %d\n", shutDownOthers );
	if (shutDownOthers)
	{
		cellApps_.shutDownAll();
	}


	INFO_MSG( "CellAppMgr::shutDown: Told to shut down. shutDownOthers = %d\n",
			shutDownOthers );
	isShuttingDown_ = true;
	this->mainDispatcher().breakProcessing();
}

void CellApps::shutDownAll()
{
	Map::iterator appIter = map_.begin();

	while (appIter != map_.end())
	{
		CellApp * pApp = appIter->second;
		pApp->shutDown();

		++appIter;
	}
}
void CellApp::shutDown()
{
	CellAppInterface::shutDownArgs args;
	args.isSigInt = false; // Not used.

	this->bundle() << args;
	this->send();
}
/**
 *	This method handles a shutDown message.
 */
void CellApp::shutDown( const CellAppInterface::shutDownArgs & /*args*/ )
{
	TRACE_MSG( "CellApp::shutDown: Told to shut down\n" );
	this->shutDown();
}
前面PerformBaseAppsHandler::ackBaseApps在CellAppMgr执行shutDown之前会通知controlledShutDown到DBAppMgr,当DBAppMgr收到这个消息的时候,就会通知所有的DbApp执行SHUTDOWN_PERFORM,并调用shutDown来触发当前DBAppMgr的进程退出:
/**
 *	This method shut down the system in a controlled manner.
 */
void DBAppMgr::controlledShutDown(
		const DBAppMgrInterface::controlledShutDownArgs & args )
{
	DEBUG_MSG( "DBAppMgr::controlledShutDown: stage = %s\n",
		ServerApp::shutDownStageToString( args.stage ) );

	switch (args.stage)
	{
	case SHUTDOWN_REQUEST:
	{
		// 省略一些代码
	}

	case SHUTDOWN_PERFORM:
	{
		INFO_MSG( "DBAppMgr::controlledShutDown: "
				"Telling %" PRIzu " DBApps to shut down\n",
			dbApps_.size() );
		for (DBApps::const_iterator iter = dbApps_.begin();
				iter != dbApps_.end();
				++iter)
		{
			iter->second->controlledShutDown( SHUTDOWN_PERFORM );
		}

		this->interface().processUntilChannelsEmpty();
		this->shutDown();
		break;
	}

	default:
		ERROR_MSG( "DBAppMgr::controlledShutDown: Stage %s not handled.\n",
			ServerApp::shutDownStageToString( args.stage ) );
		break;
	}
}
现在DBAppMgr, DbApp, CellAppMgr, CellApp, BaseAppMgr, BaseApp都已经完成了有序退出,就剩LoginApp了。事实上前面的BaseAppMgr::controlledShutDownServer有通知LoginApp::controlledShutDown的代码,所以LoginApp也会收到controlledShutDown的消息,从而调用mainDispatcher_.breakProcessing触发进程退出:
void BaseAppMgr::controlledShutDownServer()
{
	if (shutDownStage_ != SHUTDOWN_NONE)
	{
		DEBUG_MSG( "BaseAppMgr::controlledShutDownServer: "
			"Already shutting down, ignoring duplicate shutdown request.\n" );
		return;
	}

	// First try to trigger controlled shutdown via the loginapp
	Mercury::Address loginAppAddr;
	Mercury::Reason reason = Mercury::MachineDaemon::findInterface(
				"LoginIntInterface", -1, loginAppAddr );

	if (reason == Mercury::REASON_SUCCESS)
	{
		Mercury::ChannelSender sender( BaseAppMgr::getChannel( loginAppAddr ) );
		Mercury::Bundle & bundle = sender.bundle();

		bundle.startMessage( LoginIntInterface::controlledShutDown );

		INFO_MSG( "BaseAppMgr::controlledShutDownServer: "
			"Triggering server shutdown via LoginApp @ %s\n",
			loginAppAddr.c_str() );

		return;
	}
	else
	{
		ERROR_MSG( "BaseAppMgr::controlledShutDownServer: "
			"Couldn't find a LoginApp to trigger server shutdown\n" );
	}
	// 省略一些代码
}

/**
 *  Handles incoming shutdown requests.  This is basically another way of
 *  triggering a controlled system shutdown instead of sending a SIGUSR1.
 */
void LoginApp::controlledShutDown( const Mercury::Address &source,
	Mercury::UnpackedMessageHeader &header,
	BinaryIStream &data )
{
	INFO_MSG( "LoginApp::controlledShutDown: "
		"Got shutdown command from %s\n", source.c_str() );

	this->controlledShutDown();
}


void LoginApp::controlledShutDown()
{
	mainDispatcher_.breakProcessing();
}
在LoginApp进程退出的时候,还会通知一下DbAppMgr执行SHUTDOWN_REQUEST:
void LoginApp::onRunComplete() /* override */
{
	INFO_MSG( "LoginApp::run: Terminating normally.\n" );
	this->ServerApp::onRunComplete();
	bool sent = false;

	if (this->isDBAppMgrReady())
	{
		Mercury::Bundle	& dbMgrBundle = dbAppMgr_.pChannelOwner()->bundle();
		DBAppMgrInterface::controlledShutDownArgs args;
		args.stage = SHUTDOWN_REQUEST;
		dbMgrBundle << args;
		dbAppMgr_.pChannelOwner()->send();
		sent = true;
	}

	if (sent)
	{
		this->intInterface().processUntilChannelsEmpty();
	}
}
但是这里DBAppMgr::controlledShutDown处理SHUTDOWN_REQUEST时,又会去通知BaseAppMgr执行SHUTDOWN_REQUEST,感觉有点没必要,因为CellApp和BaseApp发起的SHUTDOWN_REQUEST都会通知到BaseAppMgr:
void DBAppMgr::controlledShutDown(
		const DBAppMgrInterface::controlledShutDownArgs & args )
{
	DEBUG_MSG( "DBAppMgr::controlledShutDown: stage = %s\n",
		ServerApp::shutDownStageToString( args.stage ) );

	switch (args.stage)
	{
	case SHUTDOWN_REQUEST:
	{
		// Make sure we no longer send to anonymous channels etc.
		interface_.stopPingingAnonymous();

		isShuttingDown_ = true;

		BaseAppMgrInterface::controlledShutDownArgs & args =
			args.start( baseAppMgr_.bundle() );
		args.stage = SHUTDOWN_REQUEST;
		args.shutDownTime = 0;
		baseAppMgr_.send();

		break;
	}

	case SHUTDOWN_PERFORM:
	{
		// 省略一些代码
	}

	default:
		ERROR_MSG( "DBAppMgr::controlledShutDown: Stage %s not handled.\n",
			ServerApp::shutDownStageToString( args.stage ) );
		break;
	}
}
后面继续分析代码发现,LoginApp可以单独接受SIGUSR1信号,触发controlledShutDown,从而导致进程退出。此时由于不是通过CellApp或BaseApp发起的SHUTDOWN_REQUEST,所以这里LoginApp退出的时候通知DBAppMgr并间接通知BaseAppMgr执行SHUTDOWN_REQUEST是有必要的:
void LoginApp::controlledShutDown()
{
	mainDispatcher_.breakProcessing();
}
/*
 *	Override from ServerApp.
 */
void LoginApp::onSignalled( int sigNum ) /* override */
{
	this->ServerApp::onSignalled( sigNum );

	if (sigNum == SIGUSR1)
	{
		this->controlledShutDown();
	}
}
BWMachineD的清理
当一个进程对应的ServerApp执行完逻辑之后,需要从本地的BWMachineD里彻底删除这个ServerApp的注册信息。这个注册信息的删除逻辑在NetworkInterface的析构函数里。这个析构函数会通知本地的BWMachineD来执行进程的反注册并关闭所有的网络连接,最后关闭监听socket:
/**
 *	Destructor.
 */
NetworkInterface::~NetworkInterface()
{
	this->interfaceTable().deregisterWithMachined( this->address() );

	// This cancels outstanding requests. Need to make sure no more are added.
	this->finaliseRequestManager();

	pChannelMap_->destroyOwnedChannels();

	this->detach();

	this->closeSocket();

	bw_safe_delete( pDelayedChannels_ );
	bw_safe_delete( pIrregularChannels_ );
	bw_safe_delete( pKeepAliveChannels_ );
	bw_safe_delete( pCondemnedChannels_ );
	bw_safe_delete( pOnceOffSender_ );
	bw_safe_delete( pInterfaceTable_ );
	bw_safe_delete( pPacketSender_ );
	bw_safe_delete( pPacketReceiver_ );
	bw_safe_delete( pPacketLossParameters_ );
	bw_safe_delete( pDispatcher_ );
	bw_safe_delete( pChannelMap_ );
	bw_safe_delete( pRecentlyDeadChannels_ );
}
这里的deregisterWithMachined会调用之前提到的registerWithMachined方法,只是将最后一个参数isRegister设置为false,来表示这是一个反注册请求:
/**
 *	This function deregisters a socket with BWMachined.
 */
Reason deregisterWithMachined( const Address & srcAddr,
		const BW::string & name, int id )
{
	return name.empty() ?
		REASON_SUCCESS :
		registerWithMachined( srcAddr, name, id, /*isRegister:*/ false );
}
当本机的BWMachineD接收到这个反注册请求之后,会调用removeRegisteredProc方法来移除这个进程的注册信息:
case ProcessMessage::DEREGISTER:
{
	unsigned int i;
	for (i=0; i < procs_.size(); i++)
		if (pm.pid_ == procs_[i].m.pid_)
			break;

	if (i >= procs_.size())
		syslog( LOG_ERR, "Couldn't find pid %d to deregister it\n",
			pm.pid_ );
	else
		removeRegisteredProc( i );

	// confirm the deregistration to the sender
	pm.outgoing( true );
	replies.append( pm );

	syslog( LOG_INFO, "Deregistered %s for uid:%d\n",
		pm.c_str(), pm.uid_ );
	return true;
}
在这个方法里,除了会从procs数组里进行元素的移除之外,还会调用broadcastToListeners方法来广播到所有的BWMachineD进程,通知所有监听者这个进程已经死亡:
void BWMachined::removeRegisteredProc( unsigned index )
{
	if (index >= procs_.size())
	{
		syslog( LOG_ERR, "Can't remove reg proc at index %d/%" PRIzu "",
			index, procs_.size() );
		return;
	}

	ProcessInfo &pinfo = procs_[ index ];
	ProcessMessage pm;
	pm << pinfo.m;
	this->broadcastToListeners( pm, pm.NOTIFY_DEATH );

	procs_.erase( procs_.begin() + index );
}

case ProcessMessage::NOTIFY_DEATH:
{
	deathListeners_.handleNotify( this->endpoint(), pm, sin.sin_addr );
	return true;
}
走完这个流程之后,这个进程就彻底的从集群里的BWMachined里消失了,其他进程再也无法连接到这个进程了。
Mosaic Game 的玩家流程管理
玩家登录流程
在服务器完全准备好之后,就可以接受客户端的登录请求了。由于客户端只能与gate_server进行通信,所以客户端需要以某种方式去获取目标gate_server的ip:port。服务器可以用各种方式去分发当前可用的gate_server列表,这些列表里包含了每个gate_server对外服务的ip:port信息,运维人员会配置好这些ip:port的流量转发到gate_server的监听端口上。客户端选择了一个gate_server之后会将这个gate_server当作其上游进程来开启连接,连接建立之后开始创建client_session:
void basic_client::on_connect(std::shared_ptr<network::net_connection> connection)
{
	basic_stub::on_connect(connection);

	auto cur_con_name = get_connection_name(connection.get());
	if (cur_con_name && *cur_con_name == m_upstream_server.name)
	{
		m_gate_connection = connection;
		m_logger->info("set gate connection with name {}", *cur_con_name);
		if (!m_main_player)
		{
			request_create_session(connection);
		}
		else
		{
			request_reconnect_session(connection);
		}
	}
}
这个client_session其实就是唯一会话id,同一个会话里保证网络包的顺序以及实现断线重连功能 这里会通过m_main_player是否已经初始化来判断是创建一个新的client_session还是复用之前的client_session:
void gate_server::on_request_create_session(std::shared_ptr<network::net_connection> con, std::shared_ptr<const std::string> dest, const json& msg)
{
	if(m_stopped)
	{
		return;
	}
	std::string error_info = std::string();
	std::string cur_session_str;
	std::shared_ptr<network::net_connection> outbound_con;
	do {
		if (m_connection_sessions.find(con->inbound_connection_idx) != m_connection_sessions.end())
		{
			error_info = "already has session";
			break;
		}
		outbound_con = choose_space_server();
		if (!outbound_con)
		{
			error_info = "no game server available";
			break;
		}
		cur_session_str = generate_session_str();
	} while (0);

	json reply_msg, reply_param;
	reply_msg["cmd"] = "reply_create_session";
	reply_param["errcode"] = error_info;
	if (error_info.empty())
	{
		reply_param["account_id"] = on_session_created(con, outbound_con, cur_session_str);
	}
	else
	{
		reply_param["account_id"] = std::string{};
	}
	reply_param["session"] = cur_session_str;

	reply_msg["param"] = reply_param;

	m_router->push_msg(con.get(), m_local_name_ptr, {}, std::make_shared<const std::string>(reply_msg.dump()), enums::packet_cmd_helper::encode(enums::packet_cmd::server_control, 0));


}
当客户端选择好一个gate_server后就会发送request_create_session消息,如果gate_server允许登录则会发送一个reply_create_session的消息,这个消息里会带上协商好的session与对应新创建的account_entity的account_id:
void basic_client::on_reply_create_session(std::shared_ptr<network::net_connection> con,  const json& msg)
{
	std::string errcode;
	std::string account_id;
	std::string session_str;
	try
	{
		msg.at("errcode").get_to(errcode);
		msg.at("account_id").get_to(account_id);
		msg.at("session").get_to(session_str);
	}
	catch (std::exception& e)
	{
		m_logger->error("on_reply_create_session fail to parse {} error {}", msg.dump(), e.what());
		errcode = e.what();
	}
	if (errcode.empty())
	{
		m_main_account = entity::entity_manager::instance().create_entity<entity::client_account>(account_id, 0);
		m_main_account->set_basic_client(this);
		m_main_account->init({});

		return;
	}
	else
	{
		m_logger->error("on_reply_create_session error {}", errcode);
		restore();
	}
}
basic_client会以这个account_id创建一个client_account,内部会创建一个登录状态机对象client_login_statem:
class  client_account final: public entity_manager::sub_class<client_account>, public utility::component_owner<account_component, client_account>
{
protected:
	std::map<utility::persist_entity_id, json> m_player_datas;
	statem::client_login_statem m_statem;
	// 省略很多代码
};
在服务端的account_entity上也有一个登录状态机login_statem:
class Meta(rpc(owner=1)) account_entity final: public entity_manager::sub_class<account_entity>, public utility::component_owner<account_component, account_entity>
{
	using account_entity_RpcSuper = utility::component_owner<account_component, account_entity>;
protected:
	std::unordered_map<utility::persist_entity_id, json> m_player_datas;
	statem::login_statem m_statem;
	// 省略很多代码
};
由于登录流程比较冗长,期间可能出现各种逻辑错误与网络错误,所以客户端与服务端都会用状态机来维护当前的登录状态。这里的登录状态机使用了一个自己做的简单实现,每个状态都继承自下面的state:
template <typename Owner, typename... Args>
class state_machine;
template <typename Owner, typename... Args>
class state
{
public:
	state_machine<Owner, Args...>& m_statem;
	dispatcher<Args...> m_dispatcher;
	virtual void on_create(){}
	virtual void on_enter(){}
	virtual void on_exit(){}

	virtual std::string name() const
	{
		return "invalid";
	}
	static std::string static_name()
	{
		return "invalid";
	}
	bool change_to(const std::string& dest_state)
	{
		return m_statem.change_to(dest_state);
	}
	template <typename K, typename T>
	void process_event(const K& event, const T& data)
	{
		m_dispatcher.dispatch(event, data);
	}
	template <typename K, typename T>
	void notify_statem(const K& event, const T& data);
public:
	state(state_machine<Owner, Args...>& in_statem)
	: m_statem(in_statem)
	{

	}
	virtual ~state()
	{

	}
	bool active() const
	{
		return m_statem.active_state() == this;
	}
};
这里的state作为所有状态的基类,提供了状态的标识接口与状态的创建与进出回调接口,子类继承的时候需要对这些virtual的接口进行复写。同时process_event接口与notify_statem接口负责提供状态与状态机之间的事件通信。以basic_client为例,登录状态机client_login_statem创建的时候会注册好各种状态,同时设置默认状态为wait_login:
client_login_statem::client_login_statem(entity::client_account* owner)
: utility::state_machine<entity::client_account, enums::account_statem_actions, std::string>(wait_login::static_name(), owner)
{
	add_state<auth_account>();
	add_state<fetch_players>();
	add_state<show_players>();
	add_state<wait_login>();
	add_state<player_online>();
	add_state<create_account>();
	add_state<replace_account>();
	add_state<logout_account>();
	change_to(wait_login::static_name());
}
客户端的输入目前通过basic_client:on_gm_cmd的input_action来通知到client_account的dispatcher:
void basic_client::on_gm_cmd(const std::string& cmd, const json& param, msg_seq_t req_seq)
{
	if (cmd == "rpc_msg")
	{
		// 省略很多代码
	}
	else if (cmd == "input_action")
	{
		std::string action_cmd;
		std::vector<json> action_args;
		try
		{
			param.at("cmd").get_to(action_cmd);
			param.at("args").get_to(action_args);
		}
		catch (std::exception& e)
		{
			auto reply = fmt::format("fail to decode action_msg {} e {}", param.dump(), e.what());
			m_logger->error("on_gm_cmd {}", reply);
			on_http_reply(req_seq, reply);
			return;
		}
		if(m_main_player)
		{
			m_main_player->set_http_reply("");
			m_main_player->dispatcher().dispatch(action_cmd, action_args);
			on_http_reply(req_seq, m_main_player->http_reply());
			return;
		}
		if (m_main_account)
		{
			m_main_account->set_http_reply("");
			m_main_account->dispatcher().dispatch(action_cmd, action_args);
			on_http_reply(req_seq, m_main_account->http_reply());
			return;
		}
		on_http_reply(req_seq, "no entity");

	}
	else
	{
		json_stub::on_gm_cmd(cmd, param, req_seq);

	}
}
同时client_account的所有rpc消息处理都是直接发往login_statem上,通过当前状态m_cur_state的dispatcher执行分发:
utility::rpc_msg::call_result client_account::on_rpc_msg(const utility::rpc_msg& msg) override
{
	return rpc_owner_on_rpc(msg);
}
utility::rpc_msg::call_result client_account::rpc_owner_on_rpc(const utility::rpc_msg& msg)
{
	return m_statem.on_msg(msg.cmd, msg);
}
utility::rpc_msg::call_result client_login_statem::on_msg(const std::string& cmd, const utility::rpc_msg& detail)
{
	if(!m_cur_state)
	{
		return utility::rpc_msg::call_result::rpc_not_found;
	}
	if(m_cur_state->m_dispatcher.dispatch(cmd, detail))
	{
		return utility::rpc_msg::call_result::suc;
	}
	return utility::rpc_msg::call_result::rpc_not_found;
}
每个状态创建的时候都会注册自己感兴趣的相关事件回调,这里既可以注册到状态机自身的state::m_dispatcher上也可以注册到owner()->dispatcher()上,m_dispatcher上的事件对应rpc处理,owner()->dispatcher()对应输入处理:
void wait_login::on_create()
{

	owner()->dispatcher().add_listener(std::string("auth_account"), make_active_listener(&wait_login::try_auth_account, this));
	owner()->dispatcher().add_listener(std::string("create_account"), make_active_listener(&wait_login::try_create_account, this));

}
void replace_account::on_create()
{
	m_dispatcher.add_listener<std::string, utility::rpc_msg, replace_account>("reply_replace_account", &replace_account::on_reply_replace_account, this);
	owner()->dispatcher().add_listener(std::string("replace_account"), make_active_listener(&replace_account::try_replace_account, this));
}
但是处理owner()->dispatcher()的时候需要判断自己这个state的状态是不是active的,这样才能维护好状态之间的跳转,所以这里使用了一个封装函数make_active_listener,这样就避免每次在真正的回调里去判断是否是active的:
template<typename K, typename V, typename S>
static std::function<void(const K&, const V&)>  make_active_listener(void(S::*cur_callback)(const K&, const V&), S* self)
{
	return [=](const K& event, const V& arg)
	{
		if(!self->active())
		{
			self->owner()->logger()->error("login state {} not active when handle cmd {}", self->name(), event);
			return;
		}
		else
		{
			(self->*cur_callback)(event, arg);
		}
	};
}
账号的登录状态机初始状态为wait_login,在初始的空白账号情况下,wait_login需要先通过create_account来创建一个账号,当创建账号成功的时候会自动切换到展示空角色列表的状态show_players中:
void wait_login::try_create_account(const std::string& cmd, const std::vector<json>& data)
{
	if(!active())
	{
		owner()->logger()->error("login state {} not active when handle cmd {}", name(), cmd);
		return;
	}
	auto cur_owner = owner();


	std::string account_name;
	std::string account_passwd;
	try
	{
		data.at(0).get_to(account_name);
		data.at(1).get_to(account_passwd);
	}
	catch (const std::exception& e)
	{
		cur_owner->logger()->error("try_create_account fail to parse {} error {}", json(data).dump(), e.what());
		return;
	}
	cur_owner->try_create_account(account_name, account_passwd);
	if(!change_to("create_account"))
	{
		owner()->logger()->info("wait_login change to create_account false");
		return;
	}
	owner()->logger()->info("wait_login change to create_account true");
}

void create_account::on_reply_create_account(const std::string& cmd, const utility::rpc_msg& data)
{
	if(!active())
	{
		owner()->logger()->error("login state {} not active when handle cmd {}", name(), cmd);
		return;
	}
	if (!data.err.empty())
	{
		change_to("wait_login");
		return;
	}

	else
	{
		owner()->logger()->info("on_reply_create_account enter show_players");
		change_to("show_players");
	}
}
cur_owner->try_create_account会发起一个rpc,并最终转移到服务端登录状态机里的wait_login状态去处理:
void wait_login::try_create_account(const std::string& cmd, const utility::rpc_msg& data)
{
	owner()->logger()->info("try_create_account with data {}", json(data).dump());
	auto cur_owner = owner();
	std::uint32_t cmd_err = 0;

	std::string account_name;
	std::string account_passwd;
	try
	{
		data.args.at(0).get_to(account_name);
		data.args.at(1).get_to(account_passwd);
	}
	catch (const std::exception& e)
	{
		cur_owner->logger()->error("try_create_account fail to parse {} error {}", json(data).dump(), e.what());
		cmd_err = int(account_errcodes::invalid_msg);
	}

	if (cmd_err == int(account_errcodes::ok))
	{
		utility::rpc_msg cur_msg;
		cur_msg.cmd = "request_create_account";
		cur_msg.args.push_back(account_name);
		cur_msg.args.push_back(account_passwd);
		owner()->call_service("login_service", cur_msg);
		change_to("create_account");
	}
	else
	{
		utility::rpc_msg return_info;
		return_info.cmd = "reply_create_account";
		return_info.err = std::to_string(cmd_err);
		return_info.args.push_back(account_name);
		owner()->call_client(return_info);
	}
}
如果参数校验通过,则会将账号密码信息发送到登录服务login_service上去执行。如果login_service上的创建账号检查通过,会返回一个reply_create_account的rpc到服务端的account_entity,此时服务端的登录状态机的create_account状态会接收这个rpc来执行状态切换以及消息下发:
void create_account::on_create()
{
	m_dispatcher.add_listener<std::string, utility::rpc_msg>("reply_create_account", &create_account::reply_create_account, this);

}


void create_account::reply_create_account(const std::string& cmd, const utility::rpc_msg& detail)
{
	std::string account_name;
	utility::rpc_msg return_info;
	return_info.err = detail.err;
	try
	{
		detail.args.at(0).get_to(account_name);
	}
	catch(std::exception& e)
	{
		owner()->logger()->error("on_create_account_back fail to parse  with error {}", e.what());
		return_info.err = "invalid server msg";
	}


	return_info.cmd = "reply_create_account";
	owner()->call_client(return_info);
	if(return_info.err.empty())
	{
		owner()->set_account(account_name);
		owner()->dispatcher().dispatch(enums::event_category::account, std::string("auth_account_suc"));
		change_to("show_players");
	}
	else
	{
		owner()->dispatcher().dispatch(enums::event_category::account,std::string("auth_account_fail"));
		change_to("wait_login");
	}
}
这个reply_create_account的rpc传递到客户端之后,会由客户端登录状态机的create_account状态来接力处理,这样就是客户端与服务端的登录状态机的典型交互流程:
void create_account::on_create()
{
	m_dispatcher.add_listener<std::string, utility::rpc_msg, create_account>("reply_create_account", &create_account::on_reply_create_account, this);
}


void create_account::on_reply_create_account(const std::string& cmd, const utility::rpc_msg& data)
{
	if (!data.err.empty())
	{
		change_to("wait_login");
		return;
	}

	else
	{
		owner()->logger()->info("on_reply_create_account enter show_players");
		change_to("show_players");
	}
}
注意这里的password是明文密码,为了增强账号密码的安全性最好对密码执行一个单向变换生成一个password_hash字符串,最简单的就是password_hash=md5(password),或者password_hash=md5(account_name+password)。更优的策略是每次账号注册的时候给这个account生成一个随机的长字符串salt,同时存储到数据库之中。在账号创建时,对密码做加盐变换password_hash=md5(password+salt),将(account,password_hash,salt)这个三元组同时存储在数据库中,这样就可以有效避免数据库泄露之后的暴力破解。如果网络连接是未加密状态的话,客户端需要提前做一次password=md5(password)这样的映射,避免网络中出现明文密码。
如果登录一个已经创建的账号,则会通过try_auth_account来执行账号验证,如果账号验证通过则会切换到获取玩家列表的状态fetch_players:
void wait_login::try_auth_account(const std::string& cmd, const std::vector<json>& data)
{
	if(!active())
	{
		owner()->logger()->error("login state {} not active when handle cmd {}", name(), cmd);
		return;
	}
	auto cur_owner = owner();

	std::string account_name;
	std::string account_passwd;
	try
	{
		data.at(0).get_to(account_name);
		data.at(1).get_to(account_passwd);
	}
	catch (std::exception& e)
	{
		cur_owner->logger()->error("try_auth_account fail to parse {} error {}", json(data).dump(), e.what());
		return;
	}
	cur_owner->try_auth_account(account_name, account_passwd);
	change_to("auth_account");

}

void auth_account::on_reply_auth_account(const std::string& cmd, const utility::rpc_msg& data)
{
	if(!active())
	{
		owner()->logger()->error("login state {} not active when handle cmd {}", name(), cmd);
		return;
	}

	if(data.err.empty())
	{
		owner()->enum_dispatcher().dispatch(enums::event_category::account, std::string("auth_account_suc"));
		change_to("fetch_players");
	}
	else
	{
		if(data.err == "replace account needed")
		{
			change_to("replace_account");
		}
		else
		{
			owner()->enum_dispatcher().dispatch(enums::event_category::account, std::string("auth_account_fail"));
			change_to("wait_login");
		}

	}
}
在fetch_players状态下,服务端会去拉取这个账号下创建的所有角色列表,当角色列表数据返回之后,就会切换到展示角色列表的状态show_players:
void fetch_players::on_reply_fetch_players(const std::string& cmd, const utility::rpc_msg& player_data)
{
	if(!active())
	{
		owner()->logger()->error("login state {} not active when handle cmd {}", name(), cmd);
		return;
	}

	if (!player_data.err.empty())
	{
		owner()->enum_dispatcher().dispatch(enums::event_category::account, std::string("fetch_players_fail"));
		return;
	}
	std::vector<json::object_t> temp_player_data;
	try
	{
		player_data.args.at(0).get_to(temp_player_data);
	}
	catch (std::exception& e)
	{
		owner()->logger()->error("on_fetch_players_back fail to parse args: {} error: {}", json(player_data.args).dump(), e.what());
		return;
	}
	owner()->set_player_datas(temp_player_data);
	m_statem.change_to("show_players");
	owner()->enum_dispatcher().dispatch(enums::event_category::account, std::string("fetch_players_suc"));

}
在show_players状态下,支持对角色的增删,以及选择一个角色进行become_player上线操作:
void show_players::on_create()
{
	owner()->dispatcher().add_listener(std::string("create_player"),make_active_listener(&show_players::try_create_player, this));
	owner()->dispatcher().add_listener(std::string("delete_player"), make_active_listener(&show_players::try_delete_player, this));
	owner()->dispatcher().add_listener(std::string("become_player"),make_active_listener(&show_players::try_become_player, this));
	owner()->dispatcher().add_listener(std::string("logout_account"),make_active_listener(&show_players::try_logout_account, this));
	owner()->dispatcher().add_listener(std::string("show_players"),make_active_listener(&show_players::on_show_players, this));

	m_dispatcher.add_listener<std::string, utility::rpc_msg, show_players>("reply_create_player", &show_players::on_reply_create_player, this);
	m_dispatcher.add_listener<std::string, utility::rpc_msg, show_players>("reply_delete_player", &show_players::on_reply_delete_player, this);
	m_dispatcher.add_listener<std::string, utility::rpc_msg, show_players>("reply_become_player", &show_players::on_reply_become_player, this);
}
这个become_player成功之后,服务端与客户端都会以这个player的数据执行player_entity的创建,同时切换到player_online状态:
void show_players::on_reply_become_player(const std::string& cmd, const utility::rpc_msg& detail)
{
	m_pending_cmd.clear();
	if(!detail.err.empty())
	{
		owner()->enum_dispatcher().dispatch(enums::event_category::account,std::string("become_player_fail"));
		return;
	}
	utility::persist_entity_id player_id;
	json::object_t player_init_info;
	try
	{
		detail.args.at(0).get_to(player_id);
		detail.args.at(1).get_to(player_init_info);

	}
	catch (const std::exception& e)
	{
		owner()->logger()->warn("on_reply_become_player decode fail {} error {}", json(detail.args).dump(), e.what());

		return;
	}
	m_statem.change_to("player_online");
	owner()->on_become_player(player_id, player_init_info);
}
玩家登出流程
在player_online状态,唯一支持的操作是退出当前玩家的登录:
void player_online::try_logout_player(const std::string& cmd, const std::vector<json>& data)
{
	owner()->logger()->info("player_online::try_logout_player");
	owner()->try_logout_player();
	owner()->enum_dispatcher().dispatch(enums::event_category::account, std::string("logout"));

}

void client_account::try_logout_player()
{
	return call_server("request_logout_player", {});
}
在client_account::try_logout_player函数中,只会发送一个request_logout_player的RPC到服务端的account_entity去处理。这里会检查当前是否已经创建了player_entity,如果已经有player_entity,则需要先执行这个player_entity的注销:
void account_entity::request_logout_account(const utility::rpc_msg& msg)
{
	if(m_statem.active_state_name() == "logout_account")
	{
		return;
	}
	if(m_player_id.empty())
	{
		utility::rpc_msg request_msg;
		request_msg.cmd = "request_logout_account";
		call_service("login_service", request_msg);
		dispatcher().dispatch(enums::event_category::account, "logout");
		m_statem.change_to("logout_account");
	}
	else
	{
		utility::rpc_msg request_msg;
		request_msg.cmd = "request_logout_player";
		call_player(request_msg);
		m_statem.change_to("logout_account");
	}

}
不管有没有对应的在线玩家,这个RPC执行之后都会强行切换到logout_account状态下,此时会等待退出登录的RPC返回,然后切换到未登录wait_login状态。
void logout_account::reply_logout_account(const std::string& cmd, const utility::rpc_msg& data)
{
	owner()->call_client(data);
	owner()->finish_logout();
	m_statem.change_to("wait_login");
}
上面的流程对应的是客户端主动发起的退出登录操作,实际上游戏内会有服务端主动将一个玩家踢出登录的需求,因此在服务端登录状态机player_online监听了退出登录的RPC:
void player_online::on_create()
{
	m_dispatcher.add_listener<std::string, utility::rpc_msg, player_online>("notify_player_logout", &player_online::notify_player_logout, this);
}


void player_online::on_enter()
{

}
void player_online::notify_player_logout(const std::string& cmd, const utility::rpc_msg& data)
{
	change_to("show_player");
	owner()->dispatcher().dispatch(enums::event_category::account, std::string("logout_player"));
	owner()->call_client(data);
}
但是此时只是在客户端与服务端同时删除了对应的在线玩家角色player_entity,账号account_entity是依然在线的,登录状态机会切换到show_player状态,即账号仍然在线。如果要彻底回到登录前状态,需要在show_players状态下发起logout_account请求,这样才会将服务端客户端的account_entity彻底销毁,同时服务端客户端之间的网络连接也会断开。
void show_players::try_logout_account(const std::string& cmd, const std::vector<json>& data)
{
	owner()->try_logout_account();
	m_statem.change_to("logout_account");
}
玩家进出场景与迁移流程
当客户端登录完成并创建出对应的player_entity之后,还需要进入游戏场景中与环境和其他玩家进行交互。这个进入场景的操作由player_space_component::request_enter_space这个rpc来发起:
void player_space_component::request_enter_space(const utility::rpc_msg& msg, std::uint32_t space_no, const std::string& space_id, json::object_t& enter_info);
这里rpc制定了要进入的场景编号space_no和场景实例space_id,enter_info里可以携带进入场景的位置与朝向信息。在各项检查都通过之后,player_entity会向管理场景的服务space_service发出进入场景请求,同时将正在进入的场景编号记录在当前玩家的属性上,避免rpc返回之前发起下一个切换场景的请求:
if(cur_space)
{
	leave_space_impl();
}
utility::rpc_msg request_msg;
request_msg.cmd = "request_enter_space";

request_msg.args.push_back(m_owner->entity_id());
request_msg.args.push_back(m_player->prop_data().team().id());
request_msg.args.push_back(space_no);
request_msg.args.push_back(space_id);
request_msg.args.push_back(enter_info);
m_owner->call_service("space_service", request_msg);
m_player->prop_proxy().space().entering_space_no().set(space_no);
return;
如果玩家当前已经在一个场景中,此时还会自动的触发场景的离开操作:
void player_space_component::leave_space_impl()
{
	utility::rpc_msg notify_service_msg;
	notify_service_msg.cmd = "report_leave_space";
	notify_service_msg.args.push_back(m_owner->entity_id());
	m_owner->call_service("space_service", notify_service_msg);
	auto cur_space = m_owner->get_space();
	cur_space->leave_space(m_owner);
}
这里的space_service::report_leave_space里会在space_service上解除当前玩家绑定的场景,而request_enter_space则会添加玩家与指定场景的映射关系,因此需要先执行leave操作,才能去执行enter。
值得注意的是这里的space_id可以传递空字符串,代表选择当前space_no的任一场景实例进入即可,对应的常见的进入主城场景的任意分线。如果space_id不为空且对应的场景实例不存在,这个请求将会执行失败。如果对应的场景实例存在,且各种场景进入的检查都通过了,space_service会发送reply_enter_space到这个player_entity上:
if(!msg.err.empty())
{
	m_player->prop_proxy().space().entering_space_no().set(0);
	return;
}

if(game_id == m_owner->get_local_server_name())
{

	auto new_space = server::space_manager::instance().get_space(space_id);
	if(!new_space)
	{
		m_owner->logger()->error("cant find space {}", space_id);
		return;
	}
	new_space->enter_space(m_owner, enter_info);
	return;
}
else
{
	utility::rpc_msg request_msg;
	request_msg.cmd = "request_migrate_begin";
	request_msg.args.push_back(game_id);
	request_msg.args.push_back(space_id);
	request_msg.args.push_back(union_space_id);
	request_msg.args.push_back(enter_info);
	m_owner->call_relay_anchor(request_msg);
}
这里首先把之前记录的正在进入的场景编号清空,然后判断要进入的场景是否是同一个进程上。如果是同一个进程,则直接调用这个space_entity::enter_space即可,这个函数里会执行一些数据的记录以及玩家的位置设置,并触发AOI的重新计算。
如果不是同一个进程,则首先需要将当前玩家迁移到目标进程,此时会将玩家的所有数据进行打包,但是打包之前需要先用request_migrate_begin通知对应的relay_anchor设置当前player_entity的状态为迁移中,避免迁移时的消息丢失。至于relay_anchor的具体作用将在后面进行详细解释。
当relay_anchor设置后迁移中的状态之后,会发送reply_migrate_begin回当前的player_entity,此时会通知当前进程的space_manager来执行迁移出去的操作:
void player_space_component::reply_migrate_begin(const utility::rpc_msg& msg, const std::string& game_id, const std::string& space_id, const std::string& union_space_id, const json::object_t& enter_info)
{
	auto new_enter_info = enter_info;
	server::space_manager::instance().migrate_out(m_owner, game_id, space_id, union_space_id, new_enter_info);
}
void space_manager::migrate_out(entity::actor_entity *cur_entity, const std::string &game_id, const std::string &space_id, const std::string &union_space_id, json::object_t &enter_info)
{
	json::object_t migrate_info;
	bool enter_new_space = true;
	auto pre_space = cur_entity->get_space();
	if(pre_space && pre_space->union_space_id() == union_space_id)
	{
		enter_new_space = false;
		enter_info["pos"] = cur_entity->pos();
		enter_info["yaw"] = cur_entity->yaw();
	}
	if(pre_space && enter_new_space)
	{
		pre_space->leave_space(cur_entity);
	}
	enter_info["enter_new_space"] = enter_new_space;
	cur_entity->migrate_out(migrate_info, enter_new_space);
	utility::rpc_msg cur_msg;
	cur_msg.cmd = "migrate_in";
	m_logger->info("migrate out entity {} to game {} space {} union_space_id {} with info {} enter_new_space {} ", cur_entity->entity_id(), game_id, space_id, union_space_id, json(migrate_info).dump(), enter_new_space);
	cur_msg.args.push_back(cur_entity->entity_id());
	cur_msg.args.push_back(cur_entity->online_entity_id());
	cur_msg.args.push_back(cur_entity->m_base_desc.m_type_name);
	cur_msg.args.push_back(space_id);
	cur_msg.args.push_back(union_space_id);
	cur_msg.args.push_back(enter_info);
	cur_msg.args.push_back(migrate_info);
	if(enter_new_space)
	{
		m_server->destroy_entity(cur_entity);
	}

	m_server->call_server(utility::rpc_anchor::concat(game_id,  "space_manager"), cur_msg);
}
这个space_manager::migrate_out会通知当前player_entity先退出已有场景,然后通过player_entity::migrate_out接口来将所有需要迁移的数据打包到migrate_info中,数据打包完成之后会往目标进程的space_manager发送一个migrate_in请求。
void actor_entity::migrate_out(json::object_t& migrate_info, bool enter_new_space)
{
	encode_migrate_out_data(migrate_info, enter_new_space);


	auto migrate_out_lambda = [=](actor_component* cur_comp)
	{
		cur_comp->migrate_out(enter_new_space);
	};
	call_component_interface(migrate_out_lambda);
	if(!enter_new_space)
	{
		m_is_ghost = true;
		auto become_ghost_lambda = [=](actor_component* cur_comp)
		{
			cur_comp->on_become_ghost();
		};
		call_component_interface(become_ghost_lambda);
	}

}
发送到目标进程之后再进行解包并重新创建player_entity,然后执行player_entity::migrate_in操作来恢复一些打包的数据:
if(enter_new_space)
{
	cur_entity = dynamic_cast<entity::actor_entity*>(m_server->create_entity(type_id, entity_id, online_entity_id, init_info, error));
	if (!cur_entity)
	{
		m_logger->error("fail to create entity {} type {} with error {}", entity_id, type_id, error);
		return;
	}
}
else
{
	// 省略一些无缝大世界代码
}

cur_entity->migrate_in(init_info, enter_new_space);
if(enter_new_space)
{
	cur_space_iter->second->enter_space(cur_entity, enter_info);
}
最后利用打包的场景数据enter_info来执行玩家的进入场景操作,至此一个带迁移的场景切换流程就结束了。
玩家断线流程
玩家的网络状态是不可控的,特别是使用移动网络的手机设备在执行位置移动时可能会出现基站的切换从而导致连接的断开。如果粗暴的将连接断开处理为客户端被动下线的话,玩家的体验就会变得非常的差。因为重新走一遍登录流程来继续游戏会导致服务端角色的销毁后再重新创建,会浪费好几秒的时间,同时玩家状态的重新同步也是非常耗流量的。为了提升玩家在网络突然断开然后又重新连接时的游戏体验,减少重新全同步时的流量成本,现在的游戏服务器基本都会有断线重连这个功能。断线重连功能需要服务端和客户端一起协作:
- 服务端在往客户端发消息的时候,每个包都赋予一个唯一递增序列号,同时本地用滑动窗口的形式存储最近一小段时间内发送到客户端的所有消息,
- 当服务端发现客户端断线时,需要将下发到这个客户端的消息进行缓存住,避免消息的丢失,
- 客户端在发现自己断线之后,立即开启连接到服务器的重试,重试的时候带上最后收到的服务端消息包序列号
- 服务端收到重连的消息请求时,根据上发过来的包序列号进行比对,
- 如果这个包序列号在滑动窗口内,则重连成功,服务端将这个序列号之后的所有消息执行重发
- 如果这个包序列号不在滑动窗口内,则重连失败,服务端通知客户端重新走登录流程
上面介绍的只是一个大概的断线重连步骤,实际的实现中会涉及到很多的细节,这些细节将在网络相关章节中具体阐述。
玩家顶号流程
当一个账号A已经在某个客户端B上成功执行了登录后,玩家选择在另外一个客户端C上尝试登录同样的账号A时,会收到该账号已经在线的错误提示。如果我们要求账号必须要在不在线的时候执行登录,则玩家需要手动在设备B上执行登出操作,然后再在客户端C上执行登录操作,这个流程会伴随着服务端角色的销毁与重建,以及新客户端的重新同步,也是非常影响玩家的体验以及浪费服务端资源。面对这种情景,最好的方式是如果客户端C收到了账号已经在线的错误提示,可以选择执行顶号操作:即通知服务端将这个角色的客户端连接由B切换为C,这样就可以避免服务端角色的销毁与创建。因此在auth_account状态下收到账号已经在线的通知时,会自动切换到replace_account状态:
void auth_account::on_reply_auth_account(const std::string& cmd, const utility::rpc_msg& data)
{

	if(data.err.empty())
	{
		owner()->enum_dispatcher().dispatch(enums::event_category::account, std::string("auth_account_suc"));
		change_to("fetch_players");
	}
	else
	{
		if(data.err == "replace account needed")
		{
			change_to("replace_account");
		}
		else
		{
			owner()->enum_dispatcher().dispatch(enums::event_category::account, std::string("auth_account_fail"));
			change_to("wait_login");
		}

	}
}
在replace_account状态下接收到客户端发起的顶号确认时,会发送顶号try_replace_account这个RPC到服务器,这里需要带上被顶号的账号other_account_id,这个参数在上面的reply_auth_account会下发:
void replace_account::try_replace_account(const std::string& cmd, const std::vector<json>& data)
{
	std::string account_name;
	std::string other_account_id;
	try
	{
		data.at(0).get_to(account_name);
		data.at(1).get_to(other_account_id);
	}
	catch(const std::exception& e)
	{
		owner()->logger()->error("try_replace_account fail to parse {} with error {}", json(data).dump(), e.what());
		return;
	}
	owner()->try_replace_account(account_name, other_account_id);
}
服务端对应的状态机replace_account会将这个请求转发到管理登录与在线的服务login_service上,检查通过之后会通知到replace_account状态机开启顶号流程:
void login_service::replace_account_impl(const std::string& new_account_id, const std::string& account_name, const std::string& gate_name)
{
	auto pre_account_info = m_online_accounts[account_name];
	utility::rpc_msg reply;
	reply.cmd = "notify_account_client_replaced";
	reply.args.push_back(new_account_id);
	reply.args.push_back(gate_name);

	auto cur_server = get_server();
	cur_server->call_server(this, pre_account_info.account_id, reply);
}
void account_entity::notify_account_client_replaced(const utility::rpc_msg& msg, const std::string& new_account, const std::string& new_gate_name)
{
	m_logger->info("{} notify_account_client_replaced new_account {} new_gate {}", m_base_desc.m_persist_entity_id, new_account, new_gate_name);
	get_server()->rebind_gate_client_begin(this, new_account, new_gate_name);
}
顶号的时候需要通知原有的pre_account_info.account_id对应的account_entity重新绑定到新的客户端连接上,这个客户端连接的标识符就是(new_gate_name,new_account)这两个字符串组成的pair:
void space_server::rebind_gate_client_begin(entity::account_entity* cur_account, const std::string& new_account, const std::string& new_gate_name)
{
	auto temp_iter = new_account.rfind(utility::rpc_anchor::seperator);
	if(temp_iter == std::string::npos)
	{
		m_logger->error("invalid new_account id {}", new_account);
		return;
	}
	auto new_account_id = new_account.substr(temp_iter + 2);
	// 这里可能出现同进程的情况
	auto new_account_gate_con = m_router->get_connection_with_name(new_gate_name);
	if(!new_account_gate_con)
	{
		m_logger->error("fail to find gate connection for client {}", new_gate_name);
		return;
	}
	json replace_msg, replace_param;

	// 通知老的client 对应的gate 被顶号
	auto old_gate_id = cur_account->get_gate_id();
	auto new_gate_id = get_connection_inbound_idx(new_account_gate_con);
	replace_msg["cmd"] = "notify_client_remove_account";
	replace_msg["param"] = json::object_t();
	m_router->push_msg(old_gate_id, m_local_name_ptr, cur_account->get_shared_global_id(), std::make_shared<std::string>(replace_msg.dump(4)), enums::packet_cmd_helper::encode(enums::packet_cmd::server_control, 0));

	// 通知新的account对应的entity顶号成功 触发这个account的自动销毁
	utility::rpc_msg replace_info;
	replace_info.cmd = "reply_replace_account";
	replace_info.args.push_back(cur_account->is_player_online());
	call_server(cur_account, new_account, replace_info);

	replace_msg["cmd"] = "notify_client_rebind_account";
	replace_param["pre_connected_account"] = new_account_id;
	replace_param["new_connected_account"] = cur_account->entity_id();
	replace_msg["param"] = replace_param;
	m_router->push_msg(new_gate_id, m_local_name_ptr, {}, std::make_shared<std::string>(replace_msg.dump(4)), enums::packet_cmd_helper::encode(enums::packet_cmd::server_control, 0));
	// 切换entity的gate 开启客户端掉线的timer 等待重新绑定之后会取消这个timer
	m_gate_entities[old_gate_id].erase(cur_account);
	cur_account->set_gate(std::string{}, 0);

}
在这个执行顶号的核心函数中,主要完成了如下任务:
- 使用
notify_client_remove_account,通知老的client连接,其连接因为顶号被断开,避免其触发断线重连
void gate_server::on_notify_client_remove_account(std::shared_ptr<network::net_connection> con, std::shared_ptr<const std::string> dest, const json& msg)
{
	if(!dest)
	{
		return;
	}
	json replay_msg;
	replay_msg["msg"] = "client replaced";
	request_client_close_impl(*dest, replay_msg);
}
- 使用
reply_replace_account通知新的account其顶号成功,并触发新account的自动销毁
void replace_account::on_reply_replace_account(const std::string& cmd, const utility::rpc_msg& data)
{
	if(!data.err.empty())
	{
		owner()->call_client(data);
		change_to("wait_login");
		return;
	}
	else
	{
		// 顶号成功时 需要在切换完client之后再下发这个顶号成功消息
		owner()->on_replace_account_suc(data);
	}
}

void account_entity::on_replace_account_suc(const utility::rpc_msg& msg)
{
	m_logger->info("{} on_replace_account_suc {} ", m_base_desc.m_persist_entity_id, json(msg.args).dump());
	get_server()->replace_client_remove_account(this);
}
void space_server::replace_client_remove_account(entity::account_entity* cur_account)
{
	auto cur_gate_id = cur_account->get_gate_id();
	m_gate_entities[cur_gate_id].erase(cur_account);
	entity::entity_manager::instance().destroy_entity(cur_account);
}
-
使用
notify_client_rebind_account通知新client对应的gate将其绑定的account的地址切换为老的account地址,这个rpc函数如果执行成功,会以notify_rebind_gate_client_finish这个rpc来通知回当前的account_entity -
通过
set_gate来清空当前account的gate信息,触发创建自动倒计时销毁的计时器,同时通知在线玩家客户端已经丢失
void account_entity::set_gate(const std::string& gate_name, std::uint64_t gate_id, bool during_replace)
{
	m_gate_name = gate_name;
	m_gate_id = gate_id;
	m_relay_entity->setup_client_info(m_gate_id, get_call_proxy());
	if(gate_id != 0)
	{
		// 设置新的有效gate部分代码 此处先暂时省略
	}
	else
	{
		if(is_player_online())
		{
			utility::rpc_msg client_destory_msg;
			client_destory_msg.cmd = "notify_player_client_destroyed";
			call_player(client_destory_msg);
		}
		cancel_timer(m_destroy_client_timer);
		m_destroy_client_timer.reset();
		m_destroy_client_timer = add_timer_with_gap(std::chrono::seconds(m_auto_logout_second_when_client_destroy), [this]()
		{
			request_logout_account(utility::rpc_msg());
		});
	}
}
当notify_rebind_gate_client_finish通知回当前的account_entity之后,完整的顶号流程就算完成了,这里会通过set_gate重更新绑定一下新client连接对应的gate,并删除之前添加的自动销毁计时器,同时通知对应的在线玩家连接到了新的客户端:
void space_server::notify_rebind_gate_client_finish(std::shared_ptr<network::net_connection> con, std::shared_ptr<const std::string> from, const json& msg)
{
	std::string entity_id;
	try
	{
		msg.at("entity_id").get_to(entity_id);
	}
	catch (std::exception& e)
	{
		m_logger->error("notify_rebind_gate_client_finish fail parse {} error {}", msg.dump(), e.what());
		return;
	}
	auto cur_account = entity::entity_manager::instance().get_entity<entity::account_entity>(entity_id);
	if (!cur_account)
	{
		m_logger->error("notify_rebind_gate_client_finish cant find account entity {}", entity_id);
		return;
	}
	if(cur_account->get_gate_id() != 0)
	{
		m_logger->error("notify_rebind_gate_client_finish {} expect gate_id 0 while meet", entity_id, cur_account->get_gate_id());
		return;
	}
	auto cur_con_id = get_connection_inbound_idx(con.get());
	m_gate_entities[cur_con_id].insert(cur_account);

	// 触发重新同步数据
	cur_account->set_gate(*get_connection_name(con.get()), cur_con_id, true);
}

void account_entity::set_gate(const std::string& gate_name, std::uint64_t gate_id, bool during_replace)
{
	m_gate_name = gate_name;
	m_gate_id = gate_id;
	m_relay_entity->setup_client_info(m_gate_id, get_call_proxy());
	if(gate_id != 0)
	{
		m_logger->info("{} notify_rebind_gate_client_finish with new_gate {}", m_base_desc.m_persist_entity_id, gate_name);
		cancel_timer(m_destroy_client_timer);
		m_destroy_client_timer.reset();
		if(during_replace)
		{
			utility::rpc_msg replace_info;
			replace_info.cmd = "reply_replace_account";
			replace_info.args.push_back(is_player_online());
			call_client(replace_info);
		}
		if(!is_player_online())
		{
			m_statem.change_to("show_players");
		}
		else
		{
			// 触发重新同步数据
			utility::rpc_msg account_replace_msg;
			account_replace_msg.cmd = "notify_player_client_replaced";
			account_replace_msg.args.push_back(m_gate_name);
			account_replace_msg.args.push_back(m_relay_entity->gate_version());
			call_player(account_replace_msg);
		}
	}
	// 省略之前介绍的客户端断线部分
}
这里的set_gate传递了during_replace=true,因此会向client发送顶号彻底完成的消息,让其客户端登录状态机进行状态切换。
当服务端玩家player_entity收到其连接到新客户端的notify_player_client_replaced请求之后,会将当前玩家的数据打包之后进行重新同步:
void player_entity::notify_player_client_replaced(const utility::rpc_msg& msg, const std::string& new_gate_name, std::uint8_t new_gate_version)
{
	m_logger->warn("player client replaced by new gate {} version {}", new_gate_name, new_gate_version);
	m_gate_version = new_gate_version;
	if(new_gate_name.empty())
	{
		return;
	}

	auto sync_info = encode_with_flag(std::uint32_t(enums::encode_flags::self_client));
	utility::rpc_msg full_sync_msg;
	full_sync_msg.cmd = "create_player";
	full_sync_msg.args.push_back(entity_id());
	full_sync_msg.args.push_back(std::move(sync_info));
	call_client(full_sync_msg);
	m_login_dispatcher.dispatch(true);

}
当客户端接收到这个create_player数据之后,就会创建出对应的玩家、所在的场景以及周围的其他同步entity。
BigWorld 的玩家流程管理
客户端的登录流程
玩家登录的时候客户端会首先连接到LoginApp,执行login请求:
void LoginApp::login( const Mercury::Address & source,
		Mercury::UnpackedMessageHeader & header,
		BinaryIStream & data )
这个函数超级长,这里就不贴他的逻辑代码了,大概总结一下这个接口的流程:
- 判定当前
LoginApp是否可对外服务,如果不能对外服务,则拒绝登录 - 判断当前客户端的
ip是否是在黑名单内,如果是则拒绝服务 - 根据参数里传入的握手协议版本号与服务器的协议版本号进行比较,如果不等则拒绝登录
- 如果当前客户端已经在登录流程中,则拒绝登录
- 检查登录限流,这个是通过一个配置项来设定一定时间内能登录的玩家数量,如果当前超过这个数量,则拒绝登录
- 如果当前
LoginApp还没有连接到数据库,则拒绝登录 - 如果当前
LoginApp的负载太高,则拒绝登录 - 如果当前
LoginApp配置了Challenge,则会判断是否需要为这个客户端创建一个Challenge,等待客户端正确的完成这个Challenge之后才能继续后续的流程,这个Challenge一般设计为一种解算时非常消耗CPU但验证时非常容易的问题,典型样例是大质数的分解,服务端随机生成一个256字节的整数,让客户端计算出质因子 - 开始解析参数里携带的用户名和密码,检查其长度是否过长,如果过长则拒绝登录。这些数据都是使用
rsa公钥非对称加密的,只有服务器这里有私钥,所以不用担心泄露 - 检查客户端是否提供了对称加密的密钥,如果没有提供且当前设置强制要求连接加密,则拒绝登录
当这一切都判断通过之后,会构造一个发送给数据库服务的请求DBAppInterface::logOn,来验证这个登录,验证结果的处理依赖于这里创建的DatabaseReplyHandler:
INFO_MSG( "LoginApp::login: Logging in user '%s' (%s)\n",
	pParams->username().c_str(),
	source.c_str() );

// Remember that this attempt is now in progress and discard further
// attempts from that address for some time after it completes.
ClientLoginRequest & loginRequest = loginRequests_[ source ];
loginRequest.reset();
loginRequest.pChannel( pChannel );
loginRequest.pParams( pParams );

DatabaseReplyHandler * pDBHandler =
	new DatabaseReplyHandler( *this, source, pChannel,
		header.replyID, pParams );

Mercury::Bundle	& dbBundle = this->dbAppAlpha().bundle();
dbBundle.startRequest( DBAppInterface::logOn, pDBHandler );

dbBundle << source << *pParams;

this->dbAppAlpha().send();
当DBApp处理logOn请求时,会判断客户端提供的属性定义系统的摘要是否与当前数据库里的属性定义摘要是否匹配,如果不匹配则代表数据库里的数据客户端是无法正确映射的,因此会拒绝登录:
/**
 *  This method handles a logOn request.
 */
void DBApp::logOn( const Mercury::Address & srcAddr,
        const Mercury::UnpackedMessageHeader & header,
        BinaryIStream & data )
{
    Mercury::Address addrForProxy;
    LogOnParamsPtr pParams = new LogOnParams();

    data >> addrForProxy >> *pParams;

    if (pParams->digest() != this->getEntityDefs().getDigest())
    {
        ERROR_MSG( "DBApp::logOn: Incorrect digest\n" );
        this->sendFailure( header.replyID, srcAddr,
            LogOnStatus::LOGIN_REJECTED_BAD_DIGEST,
            "Defs digest mismatch." );
        return;
    }

    this->logOn( srcAddr, header.replyID, pParams, addrForProxy );
}
接下来的logOn调用代码没有贴出来的价值,大概说一下流程:
- 如果当前服务器还没有准备好,则拒绝登录
- 如果当前进程负载比较高,则拒绝登录
- 如果集群中有任意的
CellApp负载比较高,则拒绝登录
全都判断通过之后,创建一个LoginHandler来委托后续的处理:
LoginHandler * pHandler =
	new LoginHandler( pParams, addrForProxy, srcAddr, replyID );

pHandler->login();
这个pHandler->login则由多个异步查询组成,首先是验证用户名和密码是否匹配,这里会去查询账号数据库:
/**
 *  Start the login process
 */
void LoginHandler::login()
{
    DBApp::instance().pBillingSystem()->getEntityKeyForAccount(
        pParams_->username(), pParams_->password(), clientAddr_, *this );

    // When getEntityKeyForAccount() completes, onGetEntityKeyForAccount*()
    // will be called.
}
根据查询结果,会有四个返回分支,这里我们为了简化,忽略掉新建账号和新建角色这两个分支,只考虑下面的两个回调分支:
onGetEntityKeyForAccountFailure,代表没有用户或者密码不匹配,直接通知回LoginApponGetEntityKeyForAccountSuccess,这个代表用户名密码匹配,这里的返回结果里会带上账号对应角色在数据库里的唯一标识符
这里BigWorld的账号与角色数据是一对一映射的,不像我们在mosaic_game中设计的一个账号可以有多个角色数据,所以这里就没有选择角色这一步,直接在查询回来之后以这个EntityKey来查询角色数据库,获取角色的所有属性数据:
/*
 *  IGetEntityKeyForAccountHandler override
 */
void LoginHandler::onGetEntityKeyForAccountSuccess( const EntityKey & ekey,
    const BW::string & dataForClient,
    const BW::string & dataForBaseEntity )
{
    dataForClient_ = dataForClient;
    dataForBaseEntity_ = dataForBaseEntity;
    this->loadEntity( EntityDBKey( ekey ) );
}

/**
 *  This method loads the entity with the given key.
 */
void LoginHandler::loadEntity( const EntityDBKey & ekey )
{
    entityKey_ = ekey;

    // Start "create new base" message even though we're not sure entity
    // exists. This is to take advantage of getEntity() streaming properties
    // into the bundle directly.
    pStrmDbID_ = DBApp::prepareCreateEntityBundle( entityKey_.typeID,
        entityKey_.dbID, clientAddr_, this, bundle_, pParams_,
        &dataForBaseEntity_ );

    // Get entity data
    pBaseRef_ = &baseRef_;

    DBApp::instance().getEntity( ekey, &bundle_, true, *this );
    // When getEntity() completes, onGetEntityCompleted() is called.
}
这里的DBApp::prepareCreateEntityBundle负责开始构造一个往BaseAppMgr投递的CreateEntity的请求数据,但是这个数据还并没有构造完全,因为当前角色的数据还没开始加载。当角色数据加载完成之后,会使用checkOutEntity将玩家数据发送到一个BaseApp上,来创建一个Base对象:
/**
 *  This function checks out the login entity. Must be called after
 *  entity has been successfully retrieved from the database.
 */
void LoginHandler::checkOutEntity()
{
    if ((pBaseRef_ == NULL) &&
        DBApp::instance().onStartEntityCheckout( entityKey_ ))
    {
        // Not checked out and not in the process of being checked out.
        DBApp::setBaseRefToLoggingOn( baseRef_, entityKey_.typeID );
        pBaseRef_ = &baseRef_;

        DBApp::instance().setBaseEntityLocation( entityKey_, baseRef_,
                reserveBaseMailboxHandler_ );
        // When completes, onReservedBaseMailbox() is called.
    }
    else    // Checked out
    {
        DBApp::instance().onLogOnLoggedOnUser( entityKey_.typeID,
            entityKey_.dbID, pParams_, clientAddr_, replyAddr_, replyID_,
            pBaseRef_, dataForClient_, dataForBaseEntity_ );

        delete this;
    }
}
这里checkOutEntity的else分支处理的是顶号的情况,我们目前可以先忽略。DBApp::instance().setBaseEntityLocation负责在数据库中先增加这个角色到所属BaseApp的映射,即使目前的被分配BaseApp是空的。这个操作结束的时候,reserveBaseMailboxHandler_会被调用,通过onReservedBaseMailbox来触发之前填充好的bundle_的发送:
/**
 *  This method is called when the record in bigworldLogOns has been created
 *  or returned.
 */
void LoginHandler::onReservedBaseMailbox( bool isOK, DatabaseID dbID )
{
    if (isOK)
    {
        this->sendCreateEntityMsg();
    }
    else
    {
        DBApp::instance().onCompleteEntityCheckout( entityKey_, NULL );
        // Something horrible like database disconnected or something.
        this->sendFailureReply(
                LogOnStatus::LOGIN_REJECTED_DB_GENERAL_FAILURE,
                "Unexpected database failure." );
    }
}
这里的sendCreateEntityMsg负责最终的createEntity buindle_的send,发送的目标是BaseAppMgr:
/**
 *  This method sends the BaseAppMgrInterface::createEntity message.
 *  Assumes bundle has the right data.
 */
inline void LoginHandler::sendCreateEntityMsg()
{
    INFO_MSG( "DBApp::logOn: %s\n", pParams_->username().c_str() );

    DBApp::instance().baseAppMgr().send( &bundle_ );
}
BaseAppMgr::createEntity里会根据负载均衡来寻找一个负载最低且小于指定阈值的的BaseApp,如果找不到则通知DbApp请求失败,否则调用addEntity接口来转发创建Entity的请求
/**
 *	This method handles the createEntity message. It is called by DBApp when
 *	logging in.
 */
void BaseAppMgr::createEntity( const Mercury::Address & srcAddr,
		const Mercury::UnpackedMessageHeader & header,
		BinaryIStream & data )
{
	Mercury::Address baseAppAddr( 0, 0 );

	BaseApp * pBest = baseApps_.findLeastLoadedApp();

	// 省略一些负载检查的代码

	// Copy the client endpoint address
	baseAppAddr = pBest->externalAddr();

	CreateBaseReplyHandler * pHandler =
		new CreateBaseReplyHandler( srcAddr, header.replyID,
			baseAppAddr );

	// Tell the BaseApp about the client's new proxy
	Mercury::Bundle	& bundle = pBest->bundle();
	bundle.startRequest( BaseAppIntInterface::createBaseWithCellData,
			pHandler );

	bundle.transfer( data, data.remainingLength() );
	pBest->send();

	// Update the load estimate.
	pBest->addEntity();
}
当BaseApp接收到这个createBaseWithCellData的时候,会直接转发到全局的EntityCreator上:
/**
 *	This method creates a base entity on this app. It is used to create a client
 *	proxy or base entities.
 */
void BaseApp::createBaseWithCellData( const Mercury::Address& srcAddr,
		const Mercury::UnpackedMessageHeader& header,
		BinaryIStream & data )
{
	pEntityCreator_->createBaseWithCellData( srcAddr, header, data,
			pLoginHandler_.get() );
}
EntityCreator::createBaseWithCellData这里根据传入的数据来确定要创建的是不带客户端的Base对象还是带客户端的Proxy对象。这里的Proxy是Base的子类,所以createBaseFromStream的返回值是BasePtr:
/**
 *	This method creates a base entity on this app. It is used to create a client
 *	proxy or base entities.
 */
void EntityCreator::createBaseWithCellData( const Mercury::Address& srcAddr,
		const Mercury::UnpackedMessageHeader& header,
		BinaryIStream & data,
		LoginHandler * pLoginHandler )
{
	// TRACE_MSG( "BaseApp::createBaseWithCellData:\n" );

	// The format of the data is as follows:
	// EntityID		id
	// EntityTypeID typeId;
	// DatabaseID	databaseID;
	//
	// For proxy:
	// 	clientAddr
	//#include "address_load_pair.hpp"

	// BASE_DATA
	// CELL_DATA (if needed)
	// Vector3 position (if needed)
	// Vector3 direction (if needed)

	Mercury::Address clientAddr = Mercury::Address::NONE;
	BW::string encryptionKey;

	BasePtr pBase =
		this->createBaseFromStream( data, &clientAddr, &encryptionKey );

	// Replying with an empty response is considered to be a failure report, so
	// any of the early returns from this method will cause this ChannelSender
	// to do just that.
	Mercury::ChannelSender sender( BaseApp::getChannel( srcAddr ) );
	sender.bundle().startReply( header.replyID );

	EntityMailBoxRef ref;
	ref.init();

	if (!pBase)
	{
		sender.bundle() << ref;
		return;
	}

	// Note: If the reply format changes, check that BaseApp::logOnAttempt is
	// okay.
	ref = pBase->baseEntityMailBoxRef();
	sender.bundle() << ref;

	// This is ugly. We should avoid differences in Base and Proxy.
	if (pBase->isProxy() && clientAddr != Mercury::Address::NONE)
	{
		Proxy * pProxy = (Proxy*)pBase.get();
		SessionKey loginKey = pProxy->prepareForLogin( clientAddr );
		sender.bundle() << loginKey;

		if (!encryptionKey.empty())
		{
			pProxy->encryptionKey( encryptionKey );
		}
	}
}
创建完Proxy之后,就开始通知请求的发起方BaseAppMgr当前的CreateEntity操作执行完成,返回的数据里首先填入的就是当前Base对象的通信地址baseEntityMailBoxRef。如果创建的是Proxy且 传入的参数中对应的客户端地址不为空,则调用Proxy::prepareForLogin(clientAddr)来获取一个作为登录SessionId的loginKey,并把该loginKey写入reply bundle中。这里创建loginkey的职责会一路转发,并最终执行到PendingLogins::add:
/**
 *	This method adds a proxy to the set of pending logins. A baseAppLogin
 *	request is now expected from the client to take it out of this set.
 */
SessionKey PendingLogins::add( Proxy * pProxy,
		const Mercury::Address & loginAppAddr )
{
	SessionKey loginKey = pProxy->sessionKey();
	pProxy->regenerateSessionKey();

	// Make sure proxy is only in the pending list once.
	// Note: Brute-force but not too much of an issue here.
	for (iterator iter = container_.begin(); iter != container_.end(); ++iter)
	{
		if (iter->second.pProxy() == pProxy)
		{
			container_.erase( iter );
			break;
		}
	}

	container_.insert( Container::value_type( loginKey,
		PendingLogin( pProxy, loginAppAddr ) ) );

	// Could make this configurable.
	const int PENDING_LOGINS_TIMEOUT = 30; // 30 seconds

	queue_.push_back( QueueElement(
			BaseApp::instance().time() +
				PENDING_LOGINS_TIMEOUT * BaseAppConfig::updateHertz(),
			pProxy->id(), loginKey ) );

	return loginKey;
}

/**
 * When a client logs in, we give a different session key to the login key
 * used to first connect. This one makes a new one, presumably it should only
 * be used soon before the key is sent to the client.
 */
void Proxy::regenerateSessionKey()
{
	do
	{
		// TODO: Not sure why this cannot be 0. If anyone finds out why, write
		// a comment!!
		sessionKey_ = uint32( timestamp() );
	}
	while (sessionKey_ == 0);
}
PendingLogins::add生成loginkey的生成规则其实很简单,就是当前的时间戳。Proxy对象创建的时候就会调用这个regenerateSessionKey来初始化,从而保证不同的客户端利用同一个Proxy来登录的时候其唯一标识符是不一样的。创建完loginkey之后,就会将(loginkey, proxy, loginappaddr)这三元组塞入到等待登录的队列中,同时还会加入到一个默认30s超时的队列来执行自动超时清除操作。
当BaseAppMgr接收到这个CreateEntity的应答返回之后,其对应的CreateBaseReplyHandler负责将这个数据再转发到DbApp上的所属LoginHandler去处理,这里解析出所创建的Proxy的通信地址proxyAddr以及对应的baseRef之后, 会通过DBApp::instance().setBaseEntityLocation将当前entityKey_与baseRef的映射建立出来,这样就记录好了当前账号对应的Proxy对象现在在哪一个BaseApp上:
/*
 *  Mercury::ReplyMessageHandler override.
 */
void LoginHandler::handleMessage( const Mercury::Address & source,
    Mercury::UnpackedMessageHeader & header,
    BinaryIStream & data,
    void * arg )
{
    Mercury::Address proxyAddr;

    data >> proxyAddr;

    if (proxyAddr.ip == 0)
    {
        LogOnStatus::Status status;
        switch (proxyAddr.port)
        {
            case BaseAppMgrInterface::CREATE_ENTITY_ERROR_NO_BASEAPPS:
                status = LogOnStatus::LOGIN_REJECTED_NO_BASEAPPS;
                break;
            case BaseAppMgrInterface::CREATE_ENTITY_ERROR_BASEAPPS_OVERLOADED:
                status = LogOnStatus::LOGIN_REJECTED_BASEAPP_OVERLOAD;
                break;
            default:
                status = LogOnStatus::LOGIN_CUSTOM_DEFINED_ERROR;
                break;
        }

        this->handleFailure( &data, status );
    }
    else
    {
        data >> baseRef_;

        bundle_.clear();
        bundle_.startReply( replyID_ );

        // Assume success.
        bundle_ << (uint8)LogOnStatus::LOGGED_ON;
        bundle_ << proxyAddr;

        // session key
        MF_ASSERT_DEV( data.remainingLength() == sizeof( SessionKey ) );
        bundle_.transfer( data, data.remainingLength() );

        bundle_ << dataForClient_;

        if (entityKey_.dbID != 0)
        {
            pBaseRef_ = &baseRef_;
            DBApp::instance().setBaseEntityLocation( entityKey_,
                    baseRef_, setBaseMailboxHandler_ );
            // When completes, onSetBaseMailbox() is called.
        }
        else
        {
            // Must be "createUnknown", and "rememberUnknown" is false.
            this->sendReply();
        }
    }
}
这里的setBaseEntityLocation作用就是将Proxy对应的MailBox数据记录到数据库里,这里的putExplicitID会被设置为false,同时mailbox的地址也会传递进去:
void setBaseEntityLocation( const EntityKey & entityKey,
		EntityMailBoxRef & mailbox,
		IDatabase::IPutEntityHandler & handler,
		UpdateAutoLoad updateAutoLoad = UPDATE_AUTO_LOAD_RETAIN )
{
	this->putEntity( entityKey, mailbox.id, NULL, &mailbox,
		false, false,
		updateAutoLoad,
		handler );
}
/**
 *  This method is meant to be called instead of IDatabase::putEntity() so that
 *  we can muck around with stuff before passing it to IDatabase.
 */
void DBApp::putEntity( const EntityKey & entityKey,
        EntityID entityID,
        BinaryIStream * pStream,
        EntityMailBoxRef * pBaseMailbox,
        bool removeBaseMailbox,
        bool putExplicitID,
        UpdateAutoLoad updateAutoLoad,
        IDatabase::IPutEntityHandler& handler )
{
    // Update mailbox for dead BaseApps.
    if (this->hasMailboxRemapping() && pBaseMailbox)
    {
        // Update mailbox for dead BaseApps.
        this->remapMailbox( *pBaseMailbox );
    }

    pDatabase_->putEntity( entityKey, entityID,
            pStream, pBaseMailbox, removeBaseMailbox,
            putExplicitID, updateAutoLoad, handler );
}

/**
 *	Override from IDatabase
 */
void MySqlDatabase::putEntity( const EntityKey & entityKey,
						EntityID entityID,
						BinaryIStream * pStream,
						const EntityMailBoxRef * pBaseMailbox,
						bool removeBaseMailbox,
						bool putExplicitID,
						UpdateAutoLoad updateAutoLoad,
						IPutEntityHandler & handler )
{
	const EntityTypeMapping * pEntityTypeMapping =
			entityTypeMappings_[ entityKey.typeID ];
	if (pEntityTypeMapping == NULL)
	{
		ERROR_MSG( "MySqlDatabase::putEntity: Entity with id \'%d\' is invalid."
				" Aborting. Please remove from entities.xml or fix def"
				" and script of this entity. ", entityKey.typeID );
		handler.onPutEntityComplete( false, entityKey.dbID );
		return;
	}

	// Note: gameTime is provided to PutEntityTask via the stream
	pBufferedEntityTasks_->addBackgroundTask(
			new PutEntityTask( pEntityTypeMapping,
				entityKey.dbID, entityID,
				pStream, pBaseMailbox, removeBaseMailbox, putExplicitID,
				updateAutoLoad, handler ) );
}
这里会一路传递到底层的MySqlDatabase::putEntity方法,在这个方法里会创建一个PutEntityTask任务,然后将这个任务添加到pBufferedEntityTasks_队列里,等待后续的执行。此时构造函数里会将pBaseMailbox赋值给baseMailbox_,同时writeBaseMailbox_会被设置为true,putExplicitID_会被设置为false,updateAutoLoad_会被设置为UPDATE_AUTO_LOAD_RETAIN, writeEntityData_被设置为false:
/**
 *	Constructor.
 *
 *	Stores all required information so that the task can be executed in a
 *	separate thread.
 */
PutEntityTask::PutEntityTask( const EntityTypeMapping * pEntityTypeMapping,
								DatabaseID databaseID,
								EntityID entityID,
								BinaryIStream * pStream,
								const EntityMailBoxRef * pBaseMailbox,
								bool removeBaseMailbox,
								bool putExplicitID,
								UpdateAutoLoad updateAutoLoad,
								IDatabase::IPutEntityHandler & handler,
								GameTime * pGameTime ) :
	EntityTaskWithID( *pEntityTypeMapping, databaseID, entityID, "PutEntityTask" ),
	writeEntityData_( false ),
	writeBaseMailbox_( false ),
	removeBaseMailbox_( removeBaseMailbox ),
	putExplicitID_( putExplicitID ),
	updateAutoLoad_( updateAutoLoad ),
	handler_( handler ),
	pGameTime_( pGameTime )
{
	if (pStream != NULL)
	{
		stream_.transfer( *pStream, pStream->remainingLength() );
		writeEntityData_ = true;
	}

	if (pBaseMailbox)
	{
		baseMailbox_ = *pBaseMailbox;
		writeBaseMailbox_ = true;
	}
}
当这个PutEntityTask任务被执行的时候,会调用PutEntityTask::performBackgroundTask方法,在这个方法里会执行到writeBaseMailbox_=true的分支,这里会通过entityTypeMapping_.addLogOnRecord方法将Proxy对应的MailBox数据记录到数据库里:
/**
 *	This method writes the entity data into the database.
 */
void PutEntityTask::performBackgroundTask( MySql & conn )
{
	bool definitelyExists = false;

	MF_ASSERT( dbID_ != PENDING_DATABASE_ID );

	if (writeEntityData_)
	{
		// 省略无关代码
	}
	if (writeBaseMailbox_)
	{
		// Check for existence to prevent adding invalid LogOn records
		if (definitelyExists ||
			entityTypeMapping_.checkExists( conn, dbID_ ))
		{
			// Add or update the log on record.
			entityTypeMapping_.addLogOnRecord( conn,
					dbID_, baseMailbox_ );
		}
	}
	// 省略一些代码
}
这个EntityTypeMapping::addLogOnRecord其实就是将当前Proxy的MailBox数据记录到数据库里, 表为bigworldLogOns:
namespace
{
const Query addLogOnQuery(
	"INSERT INTO bigworldLogOns "
			"(databaseID, typeID, objectID, ip, port, salt) "
		"VALUES (?,?,?,?,?,?) "
		"ON DUPLICATE KEY "
		"UPDATE "
			"objectID = VALUES(objectID), "
			"ip = VALUES(ip), "
			"port = VALUES(port), "
			"salt = VALUES(salt)" );
}
/**
 *
 */
void EntityTypeMapping::addLogOnRecord( MySql & connection,
			DatabaseID dbID, const EntityMailBoxRef & mailbox ) const
{
	addLogOnQuery.execute( connection,
			dbID, this->getDatabaseTypeID(),
			mailbox.id,
			htonl( mailbox.addr.ip ),
			htons( mailbox.addr.port ),
			mailbox.addr.salt,
			NULL );
}
这个数据库任务执行完成之后,会一路回调,调用到setBaseEntityLocation时设置好的setBaseMailboxHandler_,这里会调用到LoginHandler::onSetBaseMailbox方法,内部将之前构造好的reply发送回LoginApp:
/**
 *  This method is called when the record in bigworldLogOns has been set.
 */
void LoginHandler::onSetBaseMailbox( bool isOK, DatabaseID dbID )
{
    DBApp::instance().onCompleteEntityCheckout( entityKey_,
            isOK ? &baseRef_ : NULL );

    if (isOK)
    {
        this->sendReply();
    }
    else
    {
        // Something horrible like database disconnected or something.
        this->sendFailureReply(
                LogOnStatus::LOGIN_REJECTED_DB_GENERAL_FAILURE,
                "Unexpected database failure." );
    }
}
这个Reply的内容就是Proxy的通信地址以及对应的LoginKey。不过当LoginApp接收到这个返回消息的时候,并不是分开解析这两个字段,而是使用一个LoginReplyRecord来封装一下:
/**
 * 	This structure contains the reply from a successful login.
 */
struct LoginReplyRecord
{
	Mercury::Address	serverAddr;			// send to here
	uint32				sessionKey;			// use this session key
};


/**
 *  This method is called when a message comes back from the system.
 *  It deletes itself at the end.
 */
void DatabaseReplyHandler::handleMessage(
    const Mercury::Address & /*source*/,
    Mercury::UnpackedMessageHeader & header,
    BinaryIStream & data,
    void * /*arg*/ )
{
    uint8 status;
    data >> status;

    if (status != LogOnStatus::LOGGED_ON)
    {
        // 忽略许多错误处理
        delete this;
        return;
    }

    if (data.remainingLength() < int(sizeof( LoginReplyRecord )))
    {
        // 忽略一些错误处理

        delete this;
        return;
    }

    LoginReplyRecord lrr;
    data >> lrr;

    BW::string serverMsg;

    if (data.remainingLength() > 0)
    {
        data >> serverMsg;
    }

	// 省略网络NAT映射的代码

    loginApp_.sendAndCacheSuccess( clientAddr_, pChannel_.get(),
            replyID_, lrr, serverMsg, pParams_ );

    delete this;
}
这里的sendAndCacheSuccess会将当前的登录信息存储在loginRequests_这个map上,key为客户端地址,value为一个ClientLoginRequest。填充好这个ClientLoginRequest之后,调用sendSuccess将登录成功的数据下发到客户端:
/**
 *	This method sends a reply to a client indicating that logging in has been
 *	successful. It also caches this information so that it can be resent if
 *	necessary.
 */
void LoginApp::sendAndCacheSuccess( const Mercury::Address & addr,
		Mercury::Channel * pChannel, Mercury::ReplyID replyID,
		const LoginReplyRecord & replyRecord,
		const BW::string & serverMsg, LogOnParamsPtr pParams )
{
	ClientLoginRequest & request = loginRequests_[ addr ];
	request.setData( replyRecord, serverMsg );

	MF_ASSERT_DEV( *pParams == *request.pParams() );

	this->sendSuccess( addr, pChannel, replyID, request );

	// Do not let the map get too big. Just check every so often to get rid of
	// old caches.

	// 省略一些清除过期的loginrequests的代码
}
sendSuccess这里往下发送成功的数据的时候,会使用客户端传递过来的对称加密密钥encryptionKey来进行数据加密,加密之后再调用sendRawReply发送到客户端:
/**
 *	This method sends a reply to a client indicating that logging in has been
 *	successful.
 */
void LoginApp::sendSuccess( const Mercury::Address & addr,
		Mercury::Channel * pChannel, Mercury::ReplyID replyID,
		const ClientLoginRequest & request )
{
	MemoryOStream data;

	data << (int8)LogOnStatus::LOGGED_ON;

	const BW::string & encryptionKey = request.pParams()->encryptionKey();

	if (!encryptionKey.empty())
	{
		// We have to encrypt the reply record because it contains the session
		// key
		Mercury::EncryptionFilterPtr pFilter =
			Mercury::EncryptionFilter::create(
				Mercury::SymmetricBlockCipher::create( encryptionKey ) );
		MemoryOStream clearText;
		request.writeSuccessResultToStream( clearText );
		pFilter->encryptStream( clearText, data );
	}
	else
	{
		request.writeSuccessResultToStream( data );
	}

	loginStats_.incSuccesses();
	++gNumLogins;

	this->sendRawReply( addr, pChannel, replyID, data );
}
当loginApp_.sendAndCacheSuccess执行完之后,LoginApp就会删除当前的DatabaseReplyHandler,至此LoginApp的登录流程彻底结束。
当客户端收到这个登录成功的消息之后,客户端就拿到了对应的Proxy的通信地址以及登录的会话标识符LoginKey,这样客户端就会发送一个baseAppLogin登录请求到这个Proxy:
/**
 *	This method handles a message from the client. Should be the first message
 *	received from the client.
 */
void BaseApp::baseAppLogin( const Mercury::Address& srcAddr,
			const Mercury::UnpackedMessageHeader& header,
			const BaseAppExtInterface::baseAppLoginArgs & args )
{
	pLoginHandler_->login( extInterface_, srcAddr, header, args );
}

/**
 *	This method is called by a client to make initial contact with the BaseApp.
 *	It should be called after the client has logged in via the LoginApp.
 */
void LoginHandler::login( Mercury::NetworkInterface & networkInterface,
			const Mercury::Address& srcAddr,
			const Mercury::UnpackedMessageHeader& header,
			const BaseAppExtInterface::baseAppLoginArgs & args )
{
	PendingLogins::iterator pendingIter = pPendingLogins_->find( args.key );

	if (pendingIter == pPendingLogins_->end())
	{
		INFO_MSG( "LoginHandler::login(%s): "
				"No pending login for loginKey %u. Attempt = %u\n",
			srcAddr.c_str(), args.key, args.numAttempts );
		// Bad bundle so break out of dispatching the rest.
		header.breakBundleLoop();

		return;
	}

	const PendingLogin & pending = pendingIter->second;

	SmartPointer<Proxy> pProxy = pending.pProxy();

	if (pProxy->isDestroyed())
	{
		return;
	}

	if (networkInterface.findChannel( srcAddr ) != NULL)
	{
		++numLoginCollisions_;

		INFO_MSG( "LoginHandler::login(%s): "
				"%u collided with an existing channel. Attempt = %u\n",
			srcAddr.c_str(), pProxy->id(), args.numAttempts );

		return;
	}

	this->updateStatistics( srcAddr, pending.addrFromLoginApp(), args.numAttempts );

	pPendingLogins_->erase( pendingIter );

	if (pProxy->attachToClient( srcAddr, header.replyID,
			header.pChannel.get() ))
	{
		INFO_MSG( "LoginHandler::login: "
			"%u attached from %s. Attempt %u\n",
			pProxy->id(), srcAddr.c_str(), args.numAttempts );
	}
}
这里会解析出args.key,也就是我们之前在proxy创建成功之后记录的LoginKey, 通过这个LoginKey来查询所关联的Proxy对象,最终使用attachToClient来绑定客户端的地址到当前Proxy的客户端信道pChannel上:
/**
 *	This method attaches this proxy to the client at the input address.
 *	It is only used the first time this client is attached to a proxy on this
 *	BaseApp, local handoffs are entirely handled by @see giveClientTo.
 *
 *	@param clientAddr 		The client address.
 *	@param loginReplyID		The reply ID of the login request message.
 *	@param pChannel			If this is a Mercury/TCP request, the associated
 *							TCP channel, otherwise NULL.
 */
bool Proxy::attachToClient( const Mercury::Address & clientAddr,
		Mercury::ReplyID loginReplyID,
		Mercury::Channel * pChannel )
{
	AUTO_SCOPED_THIS_ENTITY_PROFILE;

	IF_NOT_MF_ASSERT_DEV( pClientChannel_ == NULL )
	{
		return false;
	}

	BaseApp & baseApp = BaseApp::instance();

	bool hasClient = (clientAddr != Mercury::Address::NONE);

	if (hasClient)
	{
		// Create the BlockCipher to encrypt the channel with.
		Mercury::BlockCipherPtr pBlockCipher = NULL;

		if (encryptionKey_.empty())
		{
			ERROR_MSG( "Proxy::attachToClient( %s ): "
					"No session encryption key, falling back to unencrypted "
					"connection\n",
				clientAddr.c_str() );
		}
		else
		{
			pBlockCipher =
				Mercury::SymmetricBlockCipher::create( encryptionKey_ );

			if (!pBlockCipher)
			{
				ERROR_MSG( "Proxy::attachToClient( %s ): "
						"Invalid encryption key, falling back to unencrypted "
						"connection\n",
					clientAddr.c_str() );
			}
		}

		if (pChannel == NULL)
		{
			// TCP Channels have already been created before we process
			// bundles, UDP channels need to be created explicitly.

			pChannel = new Mercury::UDPChannel(
				baseApp.extInterface(),
				clientAddr,
				Mercury::UDPChannel::EXTERNAL,
				MIN_CLIENT_INACTIVITY_RESEND_DELAY );
		}

		if (pBlockCipher)
		{
			pChannel->setEncryption( pBlockCipher );
		}

		this->setClientChannel( pChannel );

		// 省略一些代码

		// now we are ready for the world to know about us.
		baseApp.addProxy( this );

		// create an object to push ourselves internally
		MF_ASSERT( pProxyPusher_ == NULL );
		if (!this->hasCellEntity())
		{
			pProxyPusher_ = new ProxyPusher( this );
		}

		// Send the login reply before anything else (if required).  This must
		// be the first message on this channel and must be on a bundle by
		// itself.  Even though the login message is off-channel (because it has
		// to be - we don't know the client's address until we get it), we want
		// to send back the reply on the channel because the client has a
		// channel for us now and if we send this off-channel the PacketFilters
		// won't work.  Also - this means that all downstream traffic to the
		// client is filtered (i.e. encrypted).
		if (loginReplyID != Mercury::REPLY_ID_NONE)
		{
			// Make a new session key to send with the reply.
			// Don't buffer this messages behind createBasePlayer
			Mercury::Bundle & bundle = pClientChannel_->bundle();
			bundle.startReply( loginReplyID );
			bundle << sessionKey_;
			this->sendBundleToClient();
		}

		// Now that the external interface will have the ClientInterface
		// registered, we can prime bundles with those messages.
		pClientChannel_->bundlePrimer( &clientBundlePrimer_ );

		// Don't buffer these messages behind createBasePlayer
		Mercury::Bundle & b = pClientChannel_->bundle();

		ClientInterface::updateFrequencyNotificationArgs & frequencyArgs =
			ClientInterface::updateFrequencyNotificationArgs::start( b );

		frequencyArgs.hertz = uint8(BaseAppConfig::updateHertz());

		ClientInterface::setGameTimeArgs::start( b ).gameTime = baseApp.time();

		// 省略一些代码
	}
	else
	{
		INFO_MSG( "Proxy::attachToClient: "
			"Channel not created for %u. No client yet.\n", id_ );
	}

	return true;
}
至此,客户端的登录流程彻底结束,整体流程图参见下图:
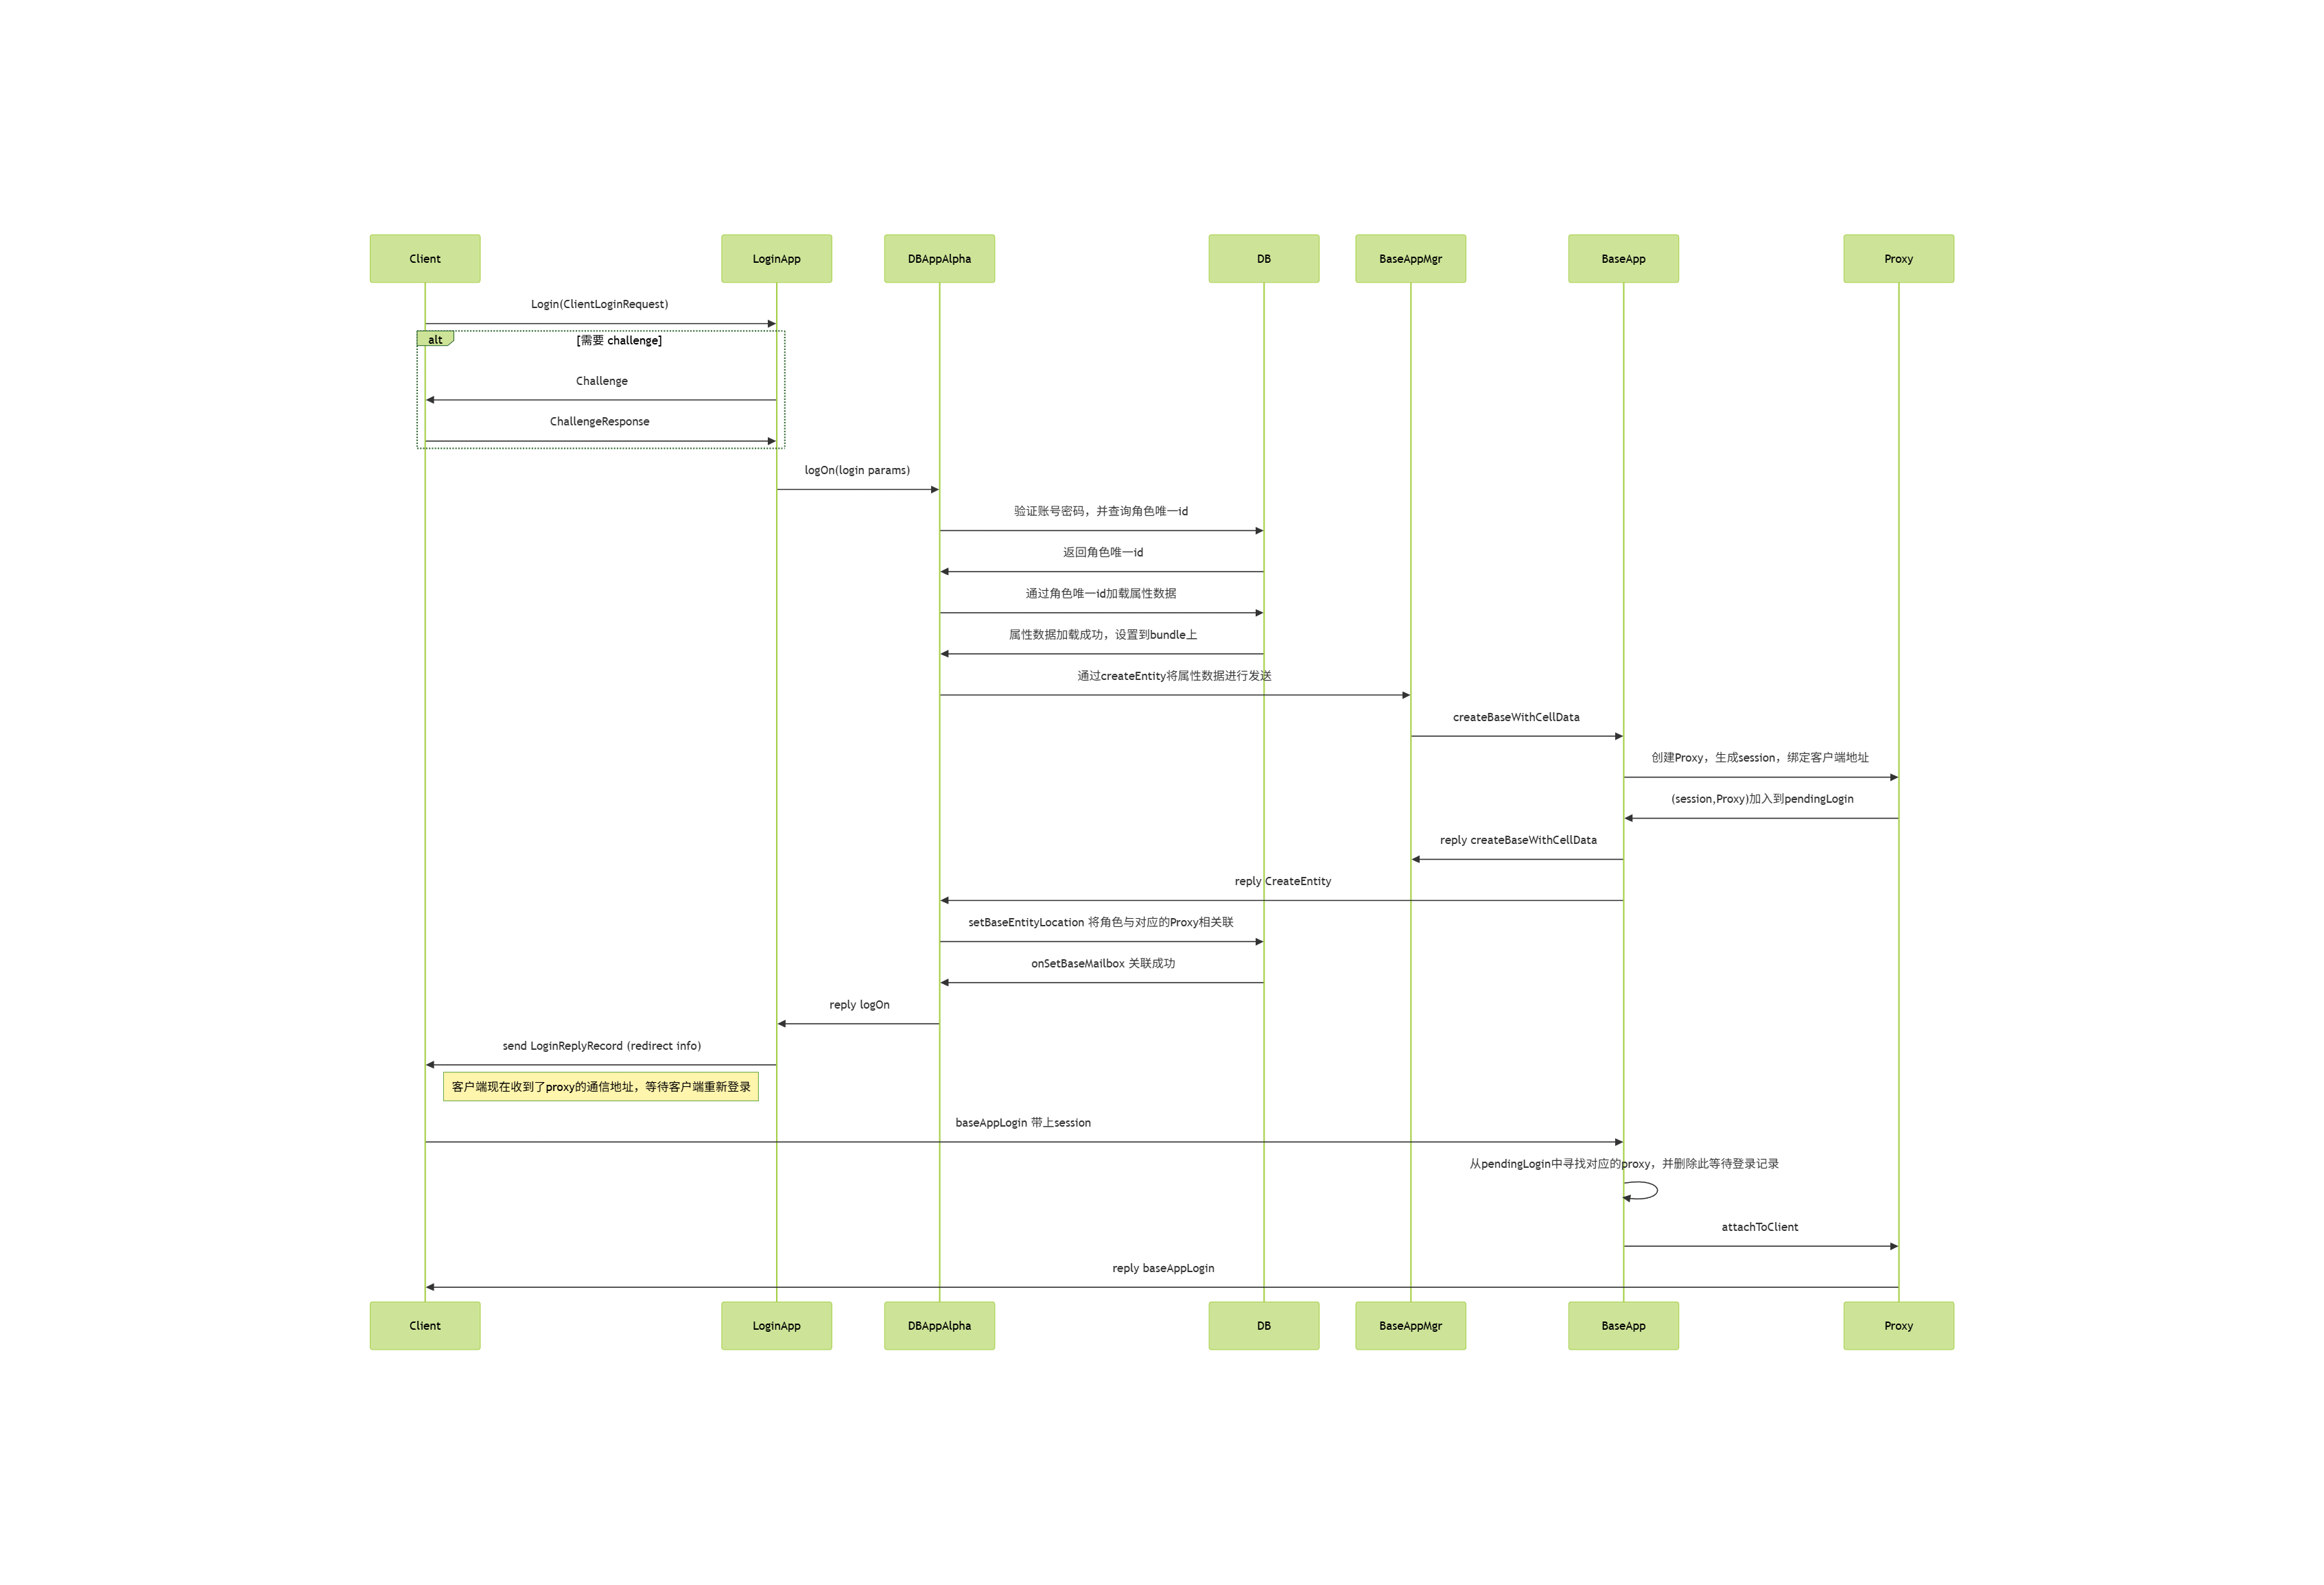
客户端现在知道了对应Proxy的通信地址,同时Proxy也根据clientAddr创建了一个UDPChannel并设置到了pChannel_上,两者之间的通信都使用了一个对称加密密钥encryptionKey_来加密。
客户端连接确立之后,整个信道就建立了,消息可以这个信道中按序收发,直到异常状况发生。这些异常情况主要有三类:主动下线、超时掉线和顶号登录,接下来将逐个介绍这三种情况的处理流程。
客户端的下线流程
如果客户端想要通知服务器当前当前角色需要主动下线,那么客户端会发送一个disconnectClient消息到服务器,服务器收到这个消息之后会主动调用Proxy::disconnectClient函数来处理这个请求,此时第一个参数reason被填充为CLIENT_DISCONNECT_CLIENT_REQUESTED:
/**
 *	This method handles a message from the client telling us that we should
 *	disconnect it.
 */
void Proxy::disconnectClient(
		const BaseAppExtInterface::disconnectClientArgs & args )
{
	this->onClientDeath( CLIENT_DISCONNECT_CLIENT_REQUESTED );
}
上面的函数onClientDeath会根据channel查找绑定的Proxy,通知其客户端断线,这里会把逻辑处理委托到logOffClient函数上:
/**
 *	This gets called when a client dies. Currently, we use it to not send them
 *	any more packets. It also informs the client's relatives (the Cell), which
 *	grieves for a few microseconds then removes it.
 */
void Proxy::onClientDeath( ClientDisconnectReason reason,
		bool shouldExpectClient /* = true */ )
{
	AUTO_SCOPED_THIS_ENTITY_PROFILE;

	TRACE_MSG( "Proxy::onClientDeath: Client id %u has disconnected (%s)\n",
		this->id(), clientDisconnectReasonToString( reason ) );

	// we can be called again if we are already dead if we try to send more
	// stuff to the client ... for now we just ignore it but could do no more...
	if (!this->hasClient() && shouldExpectClient)
	{
		return;	// already dead and told the cell about it
	}

	if (shouldExpectClient || this->hasClient())
	{
		// If we don't expect a client, we don't care about finalising
		// acks from the channel
		bool shouldCondemnClient = shouldExpectClient;

		if (reason == CLIENT_DISCONNECT_TIMEOUT ||
			reason == CLIENT_DISCONNECT_RATE_LIMITS_EXCEEDED )
		{
			// We don't care about finalising acks from a timed-out channel
			shouldCondemnClient = false;
		}
		this->logOffClient( shouldCondemnClient );
	}

	// OK, we know the cell and we haven't told it about it yet. Call away
	PyObject * pFunc = PyObject_GetAttrString( this, "onClientDeath" );

	// 这里会通知脚本对象执行onClientDeath回调
}
logOffClient需要一个参数shouldCondemnClient,表示在断开客户端连接时是否应该保留该底层通道,而不是立即销毁它,在主动下线时这个参数为true:
/**
 *  Send the client a disconnect message, then disconnect.
 *
 *	@param shouldCondemnChannel	True if any client channel should be condemned,
 *								false if it should be immediately destroyed.
 *								Generally true unless it was a client time-out
 *								or other situation where the client channel is
 *								probably no longer in a good state.
 */
void Proxy::logOffClient( bool shouldCondemnChannel )
{
	AUTO_SCOPED_THIS_ENTITY_PROFILE;

	// Abort any pending downloads, and then tell the script about it after
	// the client has gone.
	DownloadCallbacks callbacks;
	dataDownloads_.abortDownloads( callbacks );

	if (this->isClientConnected())
	{
		// Send a message to the client telling it that it has been logged off.
		// The reason parameter is not yet used.
		Mercury::Bundle & bundle = pClientChannel_->bundle();
		ClientInterface::loggedOffArgs::start( bundle ).reason = 0;
		this->sendBundleToClient();
	}

	this->detachFromClient( shouldCondemnChannel );

	callbacks.triggerCallbacks( this );
}
这个shouldCondemnChannel参数会顺带的传递到detachFromClient接口中,来做真正的断线处理:
- 如果为
true:会调用channel->shutDown(),这里会保留通道让它继续发送/接收剩余的确认(ACKs)、完成待发的可靠数据,然后再关闭(优雅断开,允许尾包/重传完成)。 - 如果为
false:会调用channel->destroy(),立即销毁通道,不再等ACK和重传(适用于超时、被速率限制或通道状态不可用的情况)。
/**
 *  Finalise a session with the currently attached client.
 *
 *	@param shouldCondemn 	If true, the client channel is condemned (and so
 *				will continue to send acknowledgements for some
 *				time), otherwise, the channel is reset.
 */
void Proxy::detachFromClient( bool shouldCondemn )
{
	isGivingClientAway_ = false;

	if (this->hasClient())
	{
		BaseApp::instance().removeProxy( this );
	}

	if (pClientChannel_ != NULL)
	{
		// Put aside the pointer which setClientChannel
		// uses and then sets to NULL, so we can clean it up.
		pClientChannel_->pChannelListener( NULL );

		Mercury::ChannelPtr pSavedClientChannel = pClientChannel_;
		this->setClientChannel( NULL );

		if (pSavedClientChannel->isConnected())
		{
			if (shouldCondemn)
			{
				pSavedClientChannel->shutDown();
			}
			else
			{
				pSavedClientChannel->destroy();
			}
		}
	}

	// Don't try to disable the witness if we've already sent the
	// destroyCell message.
	if (cellHasWitness_ && this->shouldSendToCell())
	{
		this->sendEnableDisableWitness( /*enable:*/false );
	}
	cellHasWitness_ = false;

	pBufferedClientBundle_.reset();
	// 省略很多代码
}
原来的pClientChannel_会被设置为nullptr,同时如果在CellApp上有了对应的RealEntity,则通过sendEnableDisableWitness(false)来通知这个RealEntity停止向客户端发送任何消息。
在Proxy::onClientDeath调用完logOffClient后,Proxy的Python脚本那边会调用onClientDeath回调,来通知脚本对象客户端断开连接,此时脚本层可以调用self.destroy()来调用Base::py_destroy来销毁Proxy对象:
PY_KEYWORD_METHOD_DECLARE( py_destroy )
PY_METHOD( destroy )
/**
* This method destroys this object when the script says so.
*/
PyObject * Base::py_destroy( PyObject * args, PyObject * kwargs )
{
if (PyTuple_Size( args ) != 0)
{
PyErr_SetString( PyExc_TypeError, "Only expecting keyword arguments" );
return NULL;
}
if (this->hasCellEntity() || this->isGetCellPending())
{
PyErr_SetString( PyExc_ValueError,
"Still has cell entity. Use Base.destroyCellEntity" );
return NULL;
}
if (isDestroyed_)
{
PyErr_SetString( PyExc_ValueError, "Base entity already destroyed" );
return NULL;
}
static char * keywords[] =
{
const_cast< char *> ( "deleteFromDB" ),
const_cast< char *> ( "writeToDB" ),
NULL
};
PyObject * pDeleteFromDB = NULL;
PyObject * pWriteToDB = NULL;
if (!PyArg_ParseTupleAndKeywords( args, kwargs, "|OO", keywords,
&pDeleteFromDB, &pWriteToDB ))
{
return NULL;
}
bool deleteFromDB = (pDeleteFromDB != NULL) ?
PyObject_IsTrue( pDeleteFromDB ) : false;
bool writeToDB = (pWriteToDB != NULL) ?
PyObject_IsTrue( pWriteToDB ) : this->hasWrittenToDB();
if (pWriteToDB && !writeToDB && BaseApp::instance().pSqliteDB())
{
// Writes lost due to flip-floping
SECONDARYDB_WARNING_MSG( "Base::py_destroy: %s %d destroyed with "
"writeToDB=False. All writes to the secondary "
"database will be lost.\n", pType_->name(), id_ );
}
this->destroy( deleteFromDB, writeToDB );
Py_RETURN_NONE;
}
当Proxy对象上的destory接口被调用时,参数logOffFromDB参数默认为true,此时会设置WriteDBFlags中的WRITE_LOG_OFF标志。
接下来调用Base::writeToDB(flags),其中flags包含WRITE_LOG_OFF标志:
void destroy( bool deleteFromDB, bool writeToDB, bool logOffFromDB = true );
/**
* This method destroys this base.
*/
void Base::destroy( bool deleteFromDB, bool writeToDB, bool logOffFromDB )
{
IF_NOT_MF_ASSERT_DEV( !isDestroyed_ )
{
return;
}
if (inDestroy_)
{
return;
}
inDestroy_ = true;
Script::call( PyObject_GetAttrString( this, "onDestroy" ),
PyTuple_New( 0 ), "onDestroy", true );
// TRACE_MSG( "Base(%d)::destroy: deleteFromDB=%d, writeToDB=%d\n",
// id_, deleteFromDB, writeToDB );
keepAliveTimerHandle_.cancel();
// Inform our backup that we've been destroyed.
const Mercury::Address backupAddr =
BaseApp::instance().backupAddrFor( this->id() );
if (backupAddr != Mercury::Address::NONE)
{
Mercury::ChannelSender sender( BaseApp::getChannel( backupAddr ) );
BaseAppIntInterface::stopBaseEntityBackupArgs::start(
sender.bundle() ).entityID = this->id();
}
if (this->hasWrittenToDB())
{
WriteDBFlags flags = 0;
if (logOffFromDB)
{
flags |= WRITE_LOG_OFF;
}
if (deleteFromDB)
{
flags |= WRITE_DELETE_FROM_DB;
}
else if (writeToDB)
{
flags |= WRITE_BASE_CELL_DATA;
}
this->writeToDB( flags );
}
BaseApp::instance().pGlobalBases()->onBaseDestroyed( this );
this->discard();
inDestroy_ = false;
}
这个writeToDB接口会根据flags来判断是否需要写入数据库。如果flags中包含WRITE_LOG_OFF标志,则此时存库消息的回调会被设置为LogOffReplyHandler:
/**
* This method writes the entity to the database.
*/
bool Base::writeToDB( WriteDBFlags flags, WriteToDBReplyStructPtr pReplyStruct,
PyObjectPtr pCellData, DatabaseID explicitDatabaseID )
{
// 省略很多代码
bool isLogOff =(flags & WRITE_LOG_OFF);
if (!shouldWriteToSecondary || isLogOff)
{
BaseApp & baseApp = BaseApp::instance();
DatabaseID dbID = (flags & WRITE_EXPLICIT_DBID) ?
explicitDatabaseID : databaseID_;
if (dbID == PENDING_DATABASE_ID)
{
DEBUG_MSG( "Base::writeToDB: %s %d is still pending initial "
"database write.\n",
this->pType()->name(), id_ );
// Set the dbID to 0, which will distribute this operation to
// the Alpha DBApp.
dbID = 0;
}
const DBAppGateway & dbApp = baseApp.dbAppGatewayFor( dbID );
if (dbApp.address().isNone())
{
ERROR_MSG( "Base::writeToDB: No DBApp is available, "
"data for %" PRI64 " has been lost\n", dbID );
return false;
}
Mercury::Channel & channel = baseApp.getChannel( dbApp.address() );
std::auto_ptr< Mercury::Bundle > pBundle( channel.newBundle() );
BinaryOStream * pStream = pBundle.get();
bool shouldSetToPending = false;
// We expect a reply if we are getting a database id. That is, this is
// the first time that we are being written to the database.
if (pReplyStruct->expectsReply() ||
(!isLogOff && !this->hasWrittenToDB()))
{
shouldSetToPending = (databaseID_ == 0);
pBundle->startRequest( DBAppInterface::writeEntity,
new WriteEntityReplyHandler( this, pReplyStruct ) );
}
else if (isLogOff && this->hasWrittenToDB())
{
// Owned by LogOffReplyHandler
MemoryOStream * pMemoryStream = new MemoryOStream;
pStream = pMemoryStream;
pBundle->startRequest( DBAppInterface::writeEntity,
new LogOffReplyHandler( this->id(), pMemoryStream ) );
}
else
{
pBundle->startMessage( DBAppInterface::writeEntity );
}
if (flags & WRITE_EXPLICIT_DBID)
{
MF_ASSERT_DEV( (flags & WRITE_EXPLICIT_DBID) && (databaseID_ == 0) );
MF_ASSERT_DEV( (flags & WRITE_EXPLICIT_DBID) && (explicitDatabaseID != 0) );
}
*pStream << flags << this->pType()->id() << dbID << this->id();
if (shouldSetToPending)
{
// This needs to be done after databaseID_ is streamed on.
databaseID_ = PENDING_DATABASE_ID;
}
if (!this->addToStream( flags, *pStream, pCellData ))
{
return false;
}
if (flags & WRITE_BASE_CELL_DATA)
{
*pStream << BaseApp::instance().time();
}
// If the stream is not already on the bundle, place it on now.
if (pStream != pBundle.get())
{
pBundle->addBlob(
static_cast< MemoryOStream * >( pStream )->data(),
static_cast< MemoryOStream * >( pStream )->size() );
}
persistentSize = pBundle->size();
channel.send( pBundle.get() );
}
}
DBApp::writeEntity处理这个writeEntity请求时,会继续将这个flags传递到WriteEntityHandler里,这个Handler负责处理当前writeEntity请求的具体执行:
/**
* This method handles the writeEntity mercury message.
*/
void DBApp::writeEntity( const Mercury::Address & srcAddr,
const Mercury::UnpackedMessageHeader & header,
BinaryIStream & data )
{
AUTO_SCOPED_PROFILE( "writeEntity" );
WriteDBFlags flags;
data >> flags;
// if this fails then the calling component had no need to call us
MF_ASSERT( flags &
(WRITE_BASE_CELL_DATA | WRITE_LOG_OFF | WRITE_AUTO_LOAD_MASK) );
EntityDBKey ekey( 0, 0 );
data >> ekey.typeID >> ekey.dbID;
// TRACE_MSG( "DBApp::writeEntity: %lld flags=%i\n",
// ekey.dbID, flags );
bool isOkay = this->getEntityDefs().isValidEntityType( ekey.typeID );
if (!isOkay)
{
ERROR_MSG( "DBApp::writeEntity: Invalid entity type %d\n",
ekey.typeID );
if (header.replyID != Mercury::REPLY_ID_NONE)
{
Mercury::ChannelSender sender( DBApp::getChannel( srcAddr ) );
sender.bundle().startReply( header.replyID );
sender.bundle() << isOkay << ekey.dbID;
}
}
else
{
EntityID entityID;
data >> entityID;
WriteEntityHandler* pHandler =
new WriteEntityHandler( ekey, entityID, flags,
header.replyID, srcAddr );
if (flags & WRITE_DELETE_FROM_DB)
{
pHandler->deleteEntity();
}
else
{
pHandler->writeEntity( data, entityID );
}
}
}
WriteEntityHandler::writeEntity执行存库操作的时候,如果发现flags中包含WRITE_LOG_OFF标志,则调用putEntity方法时的第四个参数removeBaseMailbox为true,表示需要删除该实体的BaseMailbox对象:
/**
* This method writes the entity data into the database.
*
* @param data Stream should be currently at the start of the entity's
* data.
* @param entityID The entity's base mailbox object ID.
*/
void WriteEntityHandler::writeEntity( BinaryIStream & data, EntityID entityID )
{
BinaryIStream * pStream = NULL;
UpdateAutoLoad updateAutoLoad =
(flags_ & WRITE_AUTO_LOAD_YES) ? UPDATE_AUTO_LOAD_TRUE :
(flags_ & WRITE_AUTO_LOAD_NO) ? UPDATE_AUTO_LOAD_FALSE:
UPDATE_AUTO_LOAD_RETAIN;
if (flags_ & WRITE_BASE_CELL_DATA)
{
pStream = &data;
}
if (flags_ & WRITE_LOG_OFF)
{
this->putEntity( pStream, updateAutoLoad,
/* pBaseMailbox: */ NULL,
/* removeBaseMailbox: */ true );
}
else if (ekey_.dbID == 0 ||(flags_ & WRITE_EXPLICIT_DBID))
{
// New entity is checked out straight away
baseRef_.init( entityID, srcAddr_, EntityMailBoxRef::BASE,
ekey_.typeID );
this->putEntity( pStream, updateAutoLoad, &baseRef_ );
}
else
{
this->putEntity( pStream, updateAutoLoad );
}
// When putEntity() completes onPutEntityComplete() is called.
}
/**
* This method is invoked by WriteEntityHandler::writeEntity to pass through
* a putEntity request to the database implementation.
*/
void WriteEntityHandler::putEntity( BinaryIStream * pStream,
UpdateAutoLoad updateAutoLoad,
EntityMailBoxRef * pBaseMailbox,
bool removeBaseMailbox )
{
DBApp::instance().putEntity( ekey_, entityID_,
pStream, pBaseMailbox, removeBaseMailbox,
flags_ & WRITE_EXPLICIT_DBID,
updateAutoLoad, *this );
}
/**
* This method is meant to be called instead of IDatabase::putEntity() so that
* we can muck around with stuff before passing it to IDatabase.
*/
void DBApp::putEntity( const EntityKey & entityKey,
EntityID entityID,
BinaryIStream * pStream,
EntityMailBoxRef * pBaseMailbox,
bool removeBaseMailbox,
bool putExplicitID,
UpdateAutoLoad updateAutoLoad,
IDatabase::IPutEntityHandler& handler )
{
// Update mailbox for dead BaseApps.
if (this->hasMailboxRemapping() && pBaseMailbox)
{
// Update mailbox for dead BaseApps.
this->remapMailbox( *pBaseMailbox );
}
pDatabase_->putEntity( entityKey, entityID,
pStream, pBaseMailbox, removeBaseMailbox,
putExplicitID, updateAutoLoad, handler );
}
/**
* Override from IDatabase
*/
void MySqlDatabase::putEntity( const EntityKey & entityKey,
EntityID entityID,
BinaryIStream * pStream,
const EntityMailBoxRef * pBaseMailbox,
bool removeBaseMailbox,
bool putExplicitID,
UpdateAutoLoad updateAutoLoad,
IPutEntityHandler & handler )
{
const EntityTypeMapping * pEntityTypeMapping =
entityTypeMappings_[ entityKey.typeID ];
if (pEntityTypeMapping == NULL)
{
ERROR_MSG( "MySqlDatabase::putEntity: Entity with id \'%d\' is invalid."
" Aborting. Please remove from entities.xml or fix def"
" and script of this entity. ", entityKey.typeID );
handler.onPutEntityComplete( false, entityKey.dbID );
return;
}
// Note: gameTime is provided to PutEntityTask via the stream
pBufferedEntityTasks_->addBackgroundTask(
new PutEntityTask( pEntityTypeMapping,
entityKey.dbID, entityID,
pStream, pBaseMailbox, removeBaseMailbox, putExplicitID,
updateAutoLoad, handler ) );
}
这个PutEntityTask在执行任务的时候,如果发现removeBaseMailbox为true,则会执行entityTypeMapping_.removeLogOnRecord方法来从bigworldLogOns表里删除该实体的BaseMailbox记录,刚好对应了登录时的setBaseEntityLocation所添加的记录:
else if (removeBaseMailbox_)
{
entityTypeMapping_.removeLogOnRecord( conn, dbID_ );
}
namespace
{
const Query removeLogOnQuery(
"DELETE FROM bigworldLogOns WHERE databaseID = ? AND typeID = ?" );
}
void EntityTypeMapping::removeLogOnRecord( MySql & conn, DatabaseID id ) const
{
removeLogOnQuery.execute( conn, id, this->getDatabaseTypeID(), NULL );
}
客户端的掉线流程
BigWorld中客户端连接使用的是无连接的UDP而不是有连接的TCP,所以并没有断线这一说。但是可靠UDP在逻辑层模拟了一个可靠连接,当发出的数据长时间没有收到ACK回复的时候,这个通道就会因为超时而被设置为不可用,执行销毁操作:
/**
* This method "destroys" this channel. It should be considered similar to
* delete pChannel except that there may be other references remaining.
*/
void Channel::destroy()
{
IF_NOT_MF_ASSERT_DEV( !isDestroyed_ )
{
return;
}
inactivityTimerHandle_.cancel();
this->doDestroy();
isDestroyed_ = true;
pNetworkInterface_->onChannelGone( this );
if (this->pChannelListener())
{
this->pChannelListener()->onChannelGone( *this );
}
this->decRef();
}
销毁时会通知绑定在其身上的channelListener来通知onChannelGone。而在Proxy绑定到一个客户端的Channel的时候, 会执行BaseApp:addProxy,这里会将当前的BaseApp注册为这个通道的ChannelListener:
/**
* This method adds a proxy from this manager.
*/
void BaseApp::addProxy( Proxy * pNewProxy )
{
Mercury::ChannelPtr pChannel = pNewProxy->pClientChannel();
Mercury::Address address = pChannel->addr();
address.salt = (pChannel->isTCP() ? 1 : 0);
TRACE_MSG( "BaseApp: Adding proxy %u at %s\n",
pNewProxy->id(), pChannel->c_str() );
// set ourselves in the map from ip address to proxy
Proxy *& rpProxy = proxies_[address];
// 省略一些代码
pChannel->pChannelListener( this );
}
所以当这个客户端通道状态变成超时断线时,BaseApp::onChannelGone就会被执行:
/*
* Override from Mercury::ChannelListener.
*/
void BaseApp::onChannelGone( Mercury::Channel & channel )
{
TRACE_MSG( "BaseApp::onChannelGone: %s\n", channel.c_str() );
Proxies::iterator iProxy = proxies_.find( channel.addr() );
if (iProxy != proxies_.end())
{
ProxyPtr pProxy = iProxy->second;
pProxy->onClientDeath( CLIENT_DISCONNECT_TIMEOUT );
}
}
上面的函数会根据channel查找绑定的Proxy,使用onClientDeath通知其客户端断线。这个onClientDeath已经在前面的小节里介绍过了,与之前的主动下线的差别是这里的shouldCondemnClient参数被设置为false,所以这里会直接销毁Channel,而不是等待ACK:
if (shouldExpectClient || this->hasClient())
{
// If we don't expect a client, we don't care about finalising
// acks from the channel
bool shouldCondemnClient = shouldExpectClient;
if (reason == CLIENT_DISCONNECT_TIMEOUT ||
reason == CLIENT_DISCONNECT_RATE_LIMITS_EXCEEDED )
{
// We don't care about finalising acks from a timed-out channel
shouldCondemnClient = false;
}
this->logOffClient( shouldCondemnClient );
}
客户端的顶号流程
从上述流程代码可以看出,一旦客户端连接超时,则Proxy会通过detachFromClient将此Channel直接销毁,抛弃当前未ACK以及后续的所有发往客户端的消息。所以这里并没有mosaic_game中的断线重连机制,只有断线。那客户端怎么重新连接到服务器呢,答案是走重新登录顶号机制。
重新登录时,客户端发送的数据与常规登录没有任何区别,所以顶号流程与常规登录流程前期的执行是一摸一样的,只有在DbApp查询完这个Entity的数据的时候,会带上之前绑定的Proxy地址一起返回:
/**
* DBApp::GetEntityHandler override
*/
void LoginHandler::onGetEntityCompleted( bool isOK,
const EntityDBKey & entityKey,
const EntityMailBoxRef * pBaseEntityLocation )
{
// 忽略一些错误处理代码
entityKey_ = entityKey;
if (pBaseEntityLocation != NULL)
{
baseRef_ = *pBaseEntityLocation;
pBaseRef_ = &baseRef_;
}
else
{
pBaseRef_ = NULL;
}
if (pStrmDbID_)
{
// Means ekey.dbID was 0 when we called prepareCreateEntityBundle()
// Now fix up everything.
*pStrmDbID_ = entityKey.dbID;
}
this->checkOutEntity();
}
这个Proxy的地址就存储在pBaseEntityLocation里,当这个指针不是nullptr的时候,代表这个Entity对应的Proxy已经创建好了,baseRef就会被赋值为对应的Proxy的地址,随后在checkOutEntity的时候根据baseRef里是否有值来执行不同的操作:
/**
* This function checks out the login entity. Must be called after
* entity has been successfully retrieved from the database.
*/
void LoginHandler::checkOutEntity()
{
if ((pBaseRef_ == NULL) &&
DBApp::instance().onStartEntityCheckout( entityKey_ ))
{
// 之前通知baseappmgr创建proxy的逻辑 这里先忽略
}
else // Checked out
{
DBApp::instance().onLogOnLoggedOnUser( entityKey_.typeID,
entityKey_.dbID, pParams_, clientAddr_, replyAddr_, replyID_,
pBaseRef_, dataForClient_, dataForBaseEntity_ );
delete this;
}
}
我们重点关注的是这里的else分支,即尝试登录到已登录对象onLogOnLoggedOnUser:
/**
* This method is called when there is a log on request for an entity that is
* already logged on.
*/
void DBApp::onLogOnLoggedOnUser( EntityTypeID typeID, DatabaseID dbID,
LogOnParamsPtr pParams,
const Mercury::Address & clientAddr, const Mercury::Address & replyAddr,
Mercury::ReplyID replyID, const EntityMailBoxRef * pExistingBase,
const BW::string & dataForClient, const BW::string & dataForBaseEntity )
{
// 先忽略一些容错代码
INFO_MSG( "DBApp::onLogOnLoggedOnUser: name = %s. databaseID = "
"%" FMT_DBID ". typeID = %d. entityID = %d. BaseApp = %s\n",
pParams->username().c_str(),
dbID,
typeID,
pExistingBase->id,
pExistingBase->addr.c_str() );
// Log on to existing base
Mercury::ChannelSender sender(
DBApp::getChannel( pExistingBase->addr ) );
Mercury::Bundle & bundle = sender.bundle();
bundle.startRequest( BaseAppIntInterface::logOnAttempt,
new RelogonAttemptHandler( pExistingBase->type(), dbID,
replyAddr, replyID, pParams, clientAddr, dataForClient ) );
bundle << pExistingBase->id;
bundle << clientAddr;
bundle << pParams->encryptionKey();
bundle << dataForBaseEntity;
}
onLogOnLoggedOnUser在处理完一些错误情况之后,会将新客户端的信息打包到logOnAttempt这个请求中,并发送到现有的Proxy的通信地址pExistingBase->addr 上,然后将RelogonAttemptHandler注册为这个RPC的回包函数。
当BaseApp接收到这个RPC之后,先通过id找到对应的Proxy,然后调用脚本层的回调onLogOnAttempt来判定是否接受这个顶号操作,根据接受的结果来决定后续的顶号流程:
/**
* This method handles a message from the database telling us that a player is
* trying to log on to an active entity.
*/
void BaseApp::logOnAttempt( const Mercury::Address & srcAddr,
const Mercury::UnpackedMessageHeader & header,
BinaryIStream & data )
{
MF_ASSERT( srcAddr == this->dbApp().addr() );
EntityID id;
Mercury::Address clientAddr;
data >> id >> clientAddr;
Base * pBase = bases_.findEntity( id );
if (pBase == NULL)
{
WARNING_MSG( "BaseApp::logOnAttempt: No base %u\n", id );
Mercury::ChannelSender sender( this->dbApp().channel() );
sender.bundle().startReply( header.replyID );
sender.bundle() << BaseAppIntInterface::LOG_ON_ATTEMPT_WAIT_FOR_DESTROY;
return;
}
// We never expect this to happen, but reject the login just in case
IF_NOT_MF_ASSERT_DEV( pBase->isProxy() )
{
ERROR_MSG( "BaseApp::logOnAttempt:"
"%u is not a proxy, rejecting login attempt.\n",
id );
Mercury::ChannelSender sender( this->dbApp().channel() );
sender.bundle().startReply( header.replyID );
sender.bundle() << BaseAppIntInterface::LOG_ON_ATTEMPT_REJECTED;
return;
}
Proxy * pProxy = static_cast< Proxy * >( pBase );
PyObject * pResult;
BW::string encryptionKey;
data >> encryptionKey;
BW::string logOnData;
data >> logOnData;
bool tookControl;
PyObject* pFunction = PyObject_GetAttrString( pBase, "onLogOnAttempt" );
if (pFunction)
{
// 暂时省略脚本层处理顶号判定的代码
}
else
{
NOTICE_MSG( "BaseApp::logOnAttempt: "
"Rejecting relogon attempt for entity %u. "
"No script method %s.onLogOnAttempt\n",
id, pBase->pType()->name() );
PyErr_Clear();
tookControl = false;
}
// 判定了是否能被顶号的后处理
}
这里脚本层onLogOnAttempt的处理主要是处理一些奇怪的边界条件,例如脚本调用trace,以及当前entity正在被销毁。判定的结果会存储在tookControl这个变量里,代表是否允许顶号, 然后再根据这个变量来做后续的逻辑:
if (tookControl)
{
if (!clientAddr.ip)
{
// only clear base's client channel if this is not a web login
// (check clientAddr.ip)
INFO_MSG( "BaseApp::logOnAttempt: "
"For %u from web login.\n", pBase->id() );
}
else
{
// 省略一些错误检查
pProxy->logOffClient( /* shouldCondemnChannel */ true );
}
pProxy->completeReLogOnAttempt( clientAddr, header.replyID,
encryptionKey );
}
else
{
NOTICE_MSG( "BaseApp::logOnAttempt: "
"Rejecting relogin attempt. " \
"Have not taken control.\n" );
Mercury::ChannelSender sender( this->dbApp().channel() );
Mercury::Bundle & bundle = sender.bundle();
bundle.startReply( header.replyID );
bundle << BaseAppIntInterface::LOG_ON_ATTEMPT_REJECTED;
}
这里很神奇的就是,如果允许被顶号,则会立即执行logoffClient来关掉老的客户端连接。如果老的客户端连接存在,则在关闭之前会发送一个ClientInterface::loggedOffArgs的消息到客户端,以通知其下线理由为被顶号:
/**
* Send the client a disconnect message, then disconnect.
*
* @param shouldCondemnChannel True if any client channel should be condemned,
* false if it should be immediately destroyed.
* Generally true unless it was a client time-out
* or other situation where the client channel is
* probably no longer in a good state.
*/
void Proxy::logOffClient( bool shouldCondemnChannel )
{
AUTO_SCOPED_THIS_ENTITY_PROFILE;
// Abort any pending downloads, and then tell the script about it after
// the client has gone.
DownloadCallbacks callbacks;
dataDownloads_.abortDownloads( callbacks );
if (this->isClientConnected())
{
// Send a message to the client telling it that it has been logged off.
// The reason parameter is not yet used.
Mercury::Bundle & bundle = pClientChannel_->bundle();
ClientInterface::loggedOffArgs::start( bundle ).reason = 0;
this->sendBundleToClient();
}
this->detachFromClient( shouldCondemnChannel );
callbacks.triggerCallbacks( this );
}
关闭客户端连接之后,再执行detachFromClient来清理掉之前的连接信息,注意这里的shouldCondemnChannel是true,所以这个通道会存在一个备份之中,等待所有数据下发完成,而不是之前超时的时候直接强制关闭。
detachFromClient之后通过completeReLogOnAttempt来通知DbApp顶号已完成了老连接的销毁,这里会通过prepareForLogin生成一个新的LoginKey,同时将这个(LoginKey,Proxy)添加到PendingLogin这个Map里:
/**
* This method completes a re-log-on attempt.
*
* @param clientAddress The client address that is now expected to log on.
* @param replyID The reply ID for the request for onLogOnAttempt.
* @param encryptionKey The encryption key to be used.
*/
void Proxy::completeReLogOnAttempt( const Mercury::Address & clientAddress,
Mercury::ReplyID replyID,
const BW::string & encryptionKey )
{
INFO_MSG( "Proxy::completeReLogOnAttempt( %s %d ): "
"Waiting to accept re-log-on attempt from %s\n",
this->pType()->name(),
id_,
clientAddress.c_str() );
BaseApp & baseApp = BaseApp::instance();
SessionKey loginKey = 0;
if (clientAddress.ip)
{
loginKey = this->prepareForLogin( clientAddress );
}
this->encryptionKey( encryptionKey );
Mercury::ChannelSender sender( baseApp.dbApp().channel() );
Mercury::Bundle & bundle = sender.bundle();
bundle.startReply( replyID );
bundle << BaseAppIntInterface::LOG_ON_ATTEMPT_TOOK_CONTROL;
// This needs to match what the BaseAppMgr sends back to the
// database.
bundle << baseApp.extInterface().address();
bundle << this->baseEntityMailBoxRef();
bundle << loginKey;
pPendingReLogOn_.reset( NULL );
}
当DbApp收到这个回包之后,之前创建的RelogonAttemptHandler就会被执行,这里会通知LoginApp当前登录成功,并附上现有Proxy的地址以及新的LoginKey:
/*
* Mercury::ReplyMessageHandler override.
*/
void RelogonAttemptHandler::handleMessage(
const Mercury::Address & source,
Mercury::UnpackedMessageHeader & header,
BinaryIStream & data,
void * arg )
{
uint8 result;
data >> result;
if (hasAborted_)
{
DEBUG_MSG( "RelogonAttemptHandler: DBID %" FMT_DBID ": "
"Ignoring BaseApp reply, re-logon attempt has been aborted.\n",
ekey_.dbID );
// Delete ourselves as we have been aborted.
delete this;
return;
}
switch (result)
{
case BaseAppIntInterface::LOG_ON_ATTEMPT_TOOK_CONTROL:
{
INFO_MSG( "RelogonAttemptHandler: DBID %" FMT_DBID ": "
"It's taken over.\n",
ekey_.dbID );
Mercury::Address proxyAddr;
data >> proxyAddr;
EntityMailBoxRef baseRef;
data >> baseRef;
replyBundle_.startReply( replyID_ );
// Assume success.
replyBundle_ << (uint8)LogOnStatus::LOGGED_ON;
replyBundle_ << proxyAddr;
replyBundle_.transfer( data, data.remainingLength() );
replyBundle_ << dataForClient_;
DBApp::instance().interface().sendOnExistingChannel( replyAddr_,
replyBundle_ );
delete this;
break;
}
// 省略其他错误情况
default:
CRITICAL_MSG( "RelogonAttemptHandler: DBID %" FMT_DBID ": "
"Invalid result %d\n",
ekey_.dbID,
int(result) );
delete this;
break;
}
}
对于LoginApp来说,顶号成功与登录成功的处理是一样的,所以这里不再介绍相关处理代码。客户端接收到登录成功的消息之后,再向Proxy发送一个正常的登录请求, 此时根据LoginKey去查找对应的PendingLogin,并获取对应的Proxy,并执行attachToClient来重新绑定客户端连接,这样完整的顶号流程就结束了。
/**
* This method is called by a client to make initial contact with the BaseApp.
* It should be called after the client has logged in via the LoginApp.
*/
void LoginHandler::login( Mercury::NetworkInterface & networkInterface,
const Mercury::Address& srcAddr,
const Mercury::UnpackedMessageHeader& header,
const BaseAppExtInterface::baseAppLoginArgs & args )
{
PendingLogins::iterator pendingIter = pPendingLogins_->find( args.key );
if (pendingIter == pPendingLogins_->end())
{
INFO_MSG( "LoginHandler::login(%s): "
"No pending login for loginKey %u. Attempt = %u\n",
srcAddr.c_str(), args.key, args.numAttempts );
// Bad bundle so break out of dispatching the rest.
header.breakBundleLoop();
return;
}
const PendingLogin & pending = pendingIter->second;
SmartPointer<Proxy> pProxy = pending.pProxy();
// 省略一些代码
this->updateStatistics( srcAddr, pending.addrFromLoginApp(), args.numAttempts );
pPendingLogins_->erase( pendingIter );
if (pProxy->attachToClient( srcAddr, header.replyID,
header.pChannel.get() ))
{
INFO_MSG( "LoginHandler::login: "
"%u attached from %s. Attempt %u\n",
pProxy->id(), srcAddr.c_str(), args.numAttempts );
}
}
现在再来思考一下在当前的顶号流程中是否会出现与mosaic_game顶号过程中类似的老客户端数据发往新客户端的行为。仔细想想,还真可能有,即在CellApp上的RealEntity发往老客户端的数据在顶号结束绑定新客户端之后才被Proxy收到,此时如果直接往新的ClientChannel进行投递的话,就会有出现上面担心的问题。这个问题BigWorld中也考虑到了,他这里引入了一个切换客户端之后通知RealEntity的握手机制,具体细节在下面的小节里进行阐述。
客户端进入场景流程
前面的四个小节里我们详尽的介绍了客户端的登录、断线、顶号流程,了解了为了有效的维护Proxy与客户端之间的消息通信所做的各项准备工作。但是消息通道的建立只是开始,我们还需要通过这个通道来同步角色在服务器的各种状态到客户端,然而此时客户端并没有任何entity对象。因此客户端知道Proxy已经接纳了当前的登录之后,会主动发送一个enableEntities请求过来,通知服务器可以向客户端推送相关的entity数据了:
/**
* This method handles a request from the client to enable or disable updates
* from the cell. It forwards this message on to the cell.
*/
void Proxy::enableEntities()
{
DEBUG_MSG( "Proxy::enableEntities(%u)\n", id_ );
// if this is the first we've heard of it, then send the client the props
// it shares with us, call the base script...
if (!basePlayerCreatedOnClient_)
{
this->addCreateBasePlayerToChannelBundle();
this->sendExposedForReplayClientPropertiesToCell();
if (pBufferedClientBundle_.get())
{
// Make sure the BasePlayer arrives before the buffered messages
this->sendBundleToClient();
// TODO: This is because Channel::send will not send arbitrary
// bundles on a channel with a bundle primer present.
// Would it work to copy the messages into the clientBundle instead?
pClientChannel_->bundlePrimer( NULL );
Mercury::Bundle & bundle = pClientChannel_->bundle();
pBufferedClientBundle_->applyToBundle( bundle );
pClientChannel_->send( &bundle );
pClientChannel_->bundlePrimer( &clientBundlePrimer_ );
pBufferedClientBundle_.reset();
}
}
// ... and tell the cell the game is on
if (!entitiesEnabled_)
{
entitiesEnabled_ = true;
if (this->hasCellEntity())
{
this->sendEnableDisableWitness( /*enable:*/true );
// remove ProxyPusher
if (pProxyPusher_ != NULL)
{
delete pProxyPusher_;
pProxyPusher_ = NULL;
}
}
else
{
// Add a proxy pusher because we don't have a cell to do it.
if (pProxyPusher_ == NULL)
{
pProxyPusher_ = new ProxyPusher( this );
}
}
}
if (shouldRunCallbackOnEntitiesEnabled_)
{
// call the script and let it have its naughty way with the client
Script::call( PyObject_GetAttrString( this, "onEntitiesEnabled" ),
PyTuple_New( 0 ), "", true );
shouldRunCallbackOnEntitiesEnabled_ = false;
}
}
这个函数分为两个部分,一个是通过addCreateBasePlayerToChannelBundle将当前Player Entity的数据通过ClientInterface::createBasePlayer请求下发到客户端,让客户端创建PlayerEntity。这些数据在创建Proxy的时候就已经被DBApp填充好了,设置在当前Proxy的Properties里,打包的时候使用EntityDescription::FROM_BASE_TO_CLIENT_DATA来过滤出所有客户端所需要的属性,并组成一个PythonDict,添加到bundle里:
/**
* This method adds the createBasePlayer message to the given bundle
*
* It should immediately follow a successful login or full
* entity reset, so the client is never operating without
* a Base Player entity.
* Note: When this method is called,
* Proxy::sendExposedForReplayClientPropertiesToCell() should be called
* together at the same time.
*
* @param bundle The Mercury::Bundle to add the message to
*/
void Proxy::addCreateBasePlayerToChannelBundle()
{
DEBUG_MSG( "Proxy::addCreateBasePlayerToChannelBundle(%u): "
"Creating player on client\n",
id_ );
MF_ASSERT( pClientChannel_ != NULL );
MF_ASSERT( shouldRunCallbackOnEntitiesEnabled_ == false );
MF_ASSERT( basePlayerCreatedOnClient_ == false );
Mercury::Bundle & bundle = pClientChannel_->bundle();
bundle.startMessage( ClientInterface::createBasePlayer );
bundle << id_ << pType_->description().clientIndex();
this->addAttributesToStream( bundle,
EntityDescription::FROM_BASE_TO_CLIENT_DATA );
shouldRunCallbackOnEntitiesEnabled_ = true;
basePlayerCreatedOnClient_ = true;
}
/**
* This method writes attributes of the entity related to the given dataDomains
* to stream.
*/
bool Base::addAttributesToStream( BinaryOStream & stream, int dataDomains )
{
const EntityDescription & entityDesc = this->pType()->description();
ScriptObject self( this, ScriptObject::FROM_BORROWED_REFERENCE );
ScriptDict attrs = createDictWithAllProperties(entityDesc,
self, pEntityDelegate_.get(), dataDomains);
if (!attrs)
{
return false;
}
return entityDesc.addDictionaryToStream( attrs, stream, dataDomains );
}
另外一个部分是通过sendEnableDisableWitness来通知对应的RealEntity(如果已经创建了RealEntity),新的客户端已经允许同步AOI内的其他对象,可以往客户端发送所有AOI可见对象的相关数据了:
/**
* This method sends an enable or disable witness message to our cell entity.
*
* @param enable whether to enable or disable the witness
* @param isRestore is this an explicit witness enable/disable send as a
* result of a restore cell entity?
*/
void Proxy::sendEnableDisableWitness( bool enable, bool isRestore )
{
AUTO_SCOPED_THIS_ENTITY_PROFILE;
Mercury::Bundle & bundle = this->cellBundle();
bundle.startRequest( CellAppInterface::enableWitness,
new EnableWitnessReplyHandler( this ) );
bundle << id_;
bundle << isRestore;
++numOutstandingEnableWitness_;
cellHasWitness_ = enable;
if (enable)
{
bundle << BaseAppConfig::bytesPerPacketToClient();
}
// else just send an empty stream
this->sendToCell(); // send it straight away
}
在之前的detachFromClient函数中,也会调用sendEnableDisableWitness,不过此时的参数是false,这样就会通知RealEntity先暂停AOI的同步,来节省流量和CPU等资源。因为即使发过来,也会因为没有客户端而被抛弃。
注意到sendEnableDisableWitness这里有一个特殊的自增操作,++numOutstandingEnableWitness_,这个就是记录现在还有多少个CellAppInterface::enableWitness没有收到reply。如果收到了reply, 则在EnableWitnessReplyHandler会对这个字段做减一操作:
/**
* This reply handler is used to keep track of how many outstanding
* enableWitness there are for each proxy.
*/
class EnableWitnessReplyHandler :
public Mercury::ShutdownSafeReplyMessageHandler
{
public:
EnableWitnessReplyHandler( ProxyPtr pProxy ) :
pProxy_( pProxy )
{
}
void handleMessage( const Mercury::Address& /*srcAddr*/,
Mercury::UnpackedMessageHeader& /*header*/,
BinaryIStream& data, void * /*arg*/ )
{
this->onReply();
}
void onReply()
{
pProxy_->onEnableWitnessAck();
delete this;
}
private:
ProxyPtr pProxy_;
};
/**
* This method is called when there is confirmation that the witness has been
* created.
*/
void Proxy::onEnableWitnessAck()
{
MF_ASSERT( numOutstandingEnableWitness_ > 0 );
--numOutstandingEnableWitness_;
}
如果numOutstandingEnableWitness_的值不为0,则代表CellApp中的RealEntity暂时还没有确认我们发出的客户端连接状态变化。此时可以认为RealEntity下发的客户端数据的目的地是老客户端,而不是新客户端,因此应该抛弃。所以只要在所有往客户端投递数据的接口里做一下这个握手检查,就能有效的避免顶号之后目的地为老客户端的数据被传递到新客户端的错误:
bool Proxy::hasOutstandingEnableWitness() const
{ return numOutstandingEnableWitness_ != 0; }
/**
* This message is the cell telling us that it has now sent us all the
* updates for the given tick, and we should forward them on to the client.
*/
void Proxy::sendToClient()
{
// Do nothing. It's for an old client.
if (!this->hasOutstandingEnableWitness())
{
this->sendBundleToClient();
}
}
/**
* This method forwards this message to the client.
*/
void Proxy::sendMessageToClientHelper( BinaryIStream & data, bool isReliable )
{
AUTO_SCOPED_THIS_ENTITY_PROFILE;
if (this->hasOutstandingEnableWitness())
{
// Do nothing. It's for an old client.
data.finish();
return;
}
// 省略很多代码
}
/**
* This method forwards this message to the client (reliably)
*/
#define STRUCT_CLIENT_MESSAGE_FORWARDER( MESSAGE ) \
void Proxy::MESSAGE( const BaseAppIntInterface::MESSAGE##Args & args ) \
{ \
if (this->hasOutstandingEnableWitness()) \
{ \
/* Do nothing. It's for an old client. */ \
} \
\\ 省略很多代码
} \
/**
* This method tells us about a change in the status of one of our wards.
* We modify our internal list, then forward the message on to the client.
*/
void Proxy::modWard( const BaseAppIntInterface::modWardArgs & args )
{
if (this->hasOutstandingEnableWitness())
{
// TODO: Should make sure that the wards are reset when given a new
// client.
ERROR_MSG( "Proxy::modWard( %d ): Has outstanding enableWitness\n",
id_ );
return;
}
// 省略很多代码
}
// 省略其他往客户端投递数据的接口
当客户端的PlayerEntity创建完成之后,就可以准备进入特定的游戏场景了。这个部分的逻辑并没有写在cpp代码中,而是在Base对象上增加了几个可以给Python脚本调用的接口,让逻辑层自己决定进入场景的相关参数,典型接口就是createCellEntity:
/*~ function Base.createCellEntity
* @components{ base }
* <i>createCellEntity</i> makes a request to create an associated entity
* within a cell.
*
* The information used to create the cell entity is stored in the
* cellData property of this entity. This property is a dictionary
* corresponding to the values in the entity's .def file plus a
* "position" and "direction" entries for the entity's position
* and (roll, pitch, yaw) direction as well as optional "spaceID"
* and "templateID" entries. In case if "templateID" entry is present
* the non-spatial properties are not transmitted, instead the "templateID"
* is used on CellApp to populate the cell entity's properties
* from a local storage.
*
* If nearbyMB is not passed in, the "spaceID" entry in cellData is
* used to indicate which space to create the cell entity in.
*
* @param nearbyMB an optional mailbox argument which is used to indicate
* which space to create the cell entity in. Ideally, the two entities
* are near so that it is likely that the correct cell will be found
* immediately. Either the base or the cell mailbox of the nearby entity
* can be used; when using base or cell-via-base mailboxes, the entity
* reference will be passed to the __init__() method of the cell entity so
* the nearby entity's position can be used to set the new cell entity's
* position.
*/
PY_METHOD( createCellEntity )
类似的脚本接口还有createInDefaultSpace, 其实这两个接口都是下面接口的封装:
/**
* This method creates the cell entity associated with this entity into the
* input space.
*/
bool Base::createInSpace( SpaceID spaceID, const char * pyErrorPrefix )
{
BaseApp & app = BaseApp::instance();
// TODO:
// As an optimisation, try to find a cell entity mailbox for an existing
// base entity that is in the same space.
//
// This is currently not implemented as there is a potential race-condition.
// The entity may currently be in the same space but may be in a different
// space by the time the createCellEntity message arrives.
std::auto_ptr< Mercury::ReplyMessageHandler > pHandler(
this->prepareForCellCreate( pyErrorPrefix ) );
if (!pHandler.get())
{
return false;
}
Mercury::Channel & channel = BaseApp::getChannel( app.cellAppMgrAddr() );
// We don't use the channel's own bundle here because the streaming might
// fail and the message might need to be aborted halfway through.
std::auto_ptr< Mercury::Bundle > pBundle( channel.newBundle() );
pBundle->startRequest( CellAppMgrInterface::createEntity, pHandler.get() );
*pBundle << spaceID;
// stream on the entity channel version
*pBundle << this->channel().version();
*pBundle << false; /* isRestore */
// See if we can add the necessary data to the bundle
if (!this->addCellCreationData( *pBundle, pyErrorPrefix ))
{
isCreateCellPending_ = false;
isGetCellPending_ = false;
return false;
}
channel.send( pBundle.get() );
pHandler.release(); // Handler deletes itself on callback.
return true;
}
这个函数负责往CellAppMgr发起一个createEntity的请求,参数里传入了要进入的场景标识符spaceID,同时使用addCellCreationData将当前Base里存储的创建CellEntity的相关信息也打包Bundle中。这个addCellCreationData实现比较长,这里就大概介绍一下需要打包那些数据:
- 进入场景的位置、朝向、是否贴地
- 当前
Base所在的BaseApp的通信地址 - 当前
Base属性系统所采取的模板ID,属性模板负责填充一些属性的默认值,这样就没必要将默认值传递过去,只需要传递模板ID - 当前
Base的属性系统里标记为exposedForReplay的client-server属性。
数据打包完成之后,就会发送到CellAppMgr来处理,此时会根据传入的spaceID来找到对应的Space对象,然后执行在Space内创建RealEntity的操作:
/**
* This method creates a new entity on the system. It finds the appropriate
* cell to create the entity on and does so.
*
* @todo Currently adds the entity to the first space but the correct space
* will need to be specified in the message.
*/
void CellAppMgr::createEntity( const Mercury::Address& srcAddr,
const Mercury::UnpackedMessageHeader& header,
BinaryIStream & data )
{
SpaceID spaceID;
data >> spaceID;
Space * pSpace = this->findSpace( spaceID );
if (pSpace == NULL)
{
ERROR_MSG( "CellAppMgr::createEntity: Invalid space id %u\n", spaceID );
// Rely on createEntityCommon to send the error reply.
}
else
{
pSpace->hasHadEntities( true );
}
this->createEntityCommon( pSpace, srcAddr, header, data );
}
这个createEntityCommon负责根据出生点的位置来寻找一个合适的Cell,并将这个createEntity的请求转发到Cell上:
/**
* This private method is used by createEntity and createSpace to implement
* their common functionality.
*/
void CellAppMgr::createEntityCommon( Space * pSpace,
const Mercury::Address& srcAddr,
const Mercury::UnpackedMessageHeader& header,
BinaryIStream & data )
{
Mercury::ChannelVersion channelVersion = Mercury::SEQ_NULL;
data >> channelVersion;
bool isRestore;
data >> isRestore;
StreamHelper::AddEntityData entityData;
StreamHelper::removeEntity( data, entityData );
const Vector3 & pos = entityData.position;
CellData * pCellData = pSpace ? pSpace->findCell( pos.x, pos.z ) : NULL;
if (pCellData)
{
Mercury::Bundle & bundle = pCellData->cellApp().bundle();
bundle.startRequest( CellAppInterface::createEntity,
new CreateEntityReplyHandler( srcAddr, header.replyID ) );
bundle << pCellData->space().id();
bundle << channelVersion;
bundle << isRestore;
StreamHelper::addEntity( bundle, entityData );
bundle.transfer( data, data.remainingLength() );
pCellData->cellApp().send();
}
else
{
ERROR_MSG( "CellAppMgr::createEntity: "
"No cell found to place entity\n" );
data.finish();
Mercury::ChannelSender sender( CellAppMgr::getChannel( srcAddr ) );
Mercury::Bundle & bundle = sender.bundle();
bundle.startReply( header.replyID );
bundle << NULL_ENTITY_ID;
}
}
当这个Cell接收到CreateEntity请求之后,就开始使用传入的相关参数真正的创建一个Entity,并将创建的Entity的唯一标识符作为结果返回给CellAppMgr:
/**
* This method creates a new real entity on this cell according to the
* parameters in 'data'.
*
* @param srcAddr The address from which this request originated.
* @param header The mercury header
* @param data The data stream
* @param pNearbyEntity A pointer to a nearby entity to use during entity
* creation.
*
* @see createEntityInternal
*/
void Cell::createEntity( const Mercury::Address& srcAddr,
const Mercury::UnpackedMessageHeader& header,
BinaryIStream & data,
EntityPtr pNearbyEntity )
{
Mercury::ChannelVersion channelVersion = Mercury::SEQ_NULL;
data >> channelVersion;
bool isRestore;
data >> isRestore;
EntityPtr pEntity = this->createEntityInternal( data, ScriptDict(),
isRestore, channelVersion, pNearbyEntity );
if (isRestore)
{
return;
}
if (header.replyID == Mercury::REPLY_ID_NONE)
{
WARNING_MSG( "Cell::createEntity: Handling non-request createEntity\n" );
return;
}
if (pNearbyEntity == NULL)
{
// Only CellAppMgr sends without a nearby entity.
CellAppMgrGateway & cellAppMgr = CellApp::instance().cellAppMgr();
cellAppMgr.bundle().startReply( header.replyID );
cellAppMgr.bundle() << (pEntity ? pEntity->id() : NULL_ENTITY_ID);
cellAppMgr.send();
return;
}
// 忽略一些代码
}
当createEntityInternal内一个Entity被创建的时候,对应的RealEntity就会在Entity::initReal中尝试被创建,并通过addRealEntity加入到当前的Cell中:
// Build up the Entity structure
EntityPtr pNewEntity = space_.newEntity( id, entityTypeID );
if (!pNewEntity)
{
return NULL;
}
MF_ASSERT( pNewEntity->nextInChunk() == NULL );
MF_ASSERT( pNewEntity->prevInChunk() == NULL );
MF_ASSERT( pNewEntity->pChunk() == NULL );
Entity::callbacksPermitted( false ); // {
if (!pNewEntity->initReal( data, properties, isRestore, channelVersion,
pNearbyEntity ))
{
// 忽略容错代码
return NULL;
}
// And add it to our list of reals
// TODO: If init method destroyed or teleported this entity
// then we should not do this (and destroying/offloading
// would have caused an assert when it removed the entity anyway)
//
// Delay sending the currentCell message to the base so that it will be on
// the same bundle as the backup. This guarantees that there is no window
// between losing cellData and getting the first backup data.
this->addRealEntity( pNewEntity.get(), /*shouldSendNow:*/false );
INFO_MSG( "Cell::createEntityInternal: %s %-10s (%u)\n",
isRestore ? "Restored" : "New",
pNewEntity->pType() ?
pNewEntity->pType()->name() : "INVALID",
pNewEntity->id() );
Entity::population().notifyObservers( *pNewEntity );
// Note: This causes the currentCell message from above to be sent too.
if (pNewEntity->pReal())
{
pNewEntity->pReal()->backup(); // Send backup to BaseApp immediately.
}
return pNewEntity;
对于Space里的一个Entity,要么其拥有RealEntity,要么其拥有GhostEntity,所以这里的注释标注了initReal与initGhost两者必须调用其中一个,且必须在Entity构造之后立即调用:
/**
* This method should be called on a newly created entity to make it a real
* entity. Either this method or initGhost should be called immediately after
* the constructor.
*
* @see initGhost
*/
bool Entity::initReal( BinaryIStream & data, const ScriptDict & properties,
bool isRestore,
Mercury::ChannelVersion channelVersion,
EntityPtr pNearbyEntity )
由于我们当前是第一次进入Space,所以创建的肯定是RealEntity。
当CellAppMgr的CreateEntityReplyHandler接收到创建结果之后,其唯一作用就是将这个回复进一步的转发到发起createEntity调用的Base上的CreateCellEntityHandler去处理:
/*
* This method handles the reply from the cellapp.
*/
void CreateCellEntityHandler::handleMessage( const Mercury::Address & source,
Mercury::UnpackedMessageHeader & header,
BinaryIStream & data, void * arg )
{
EntityID entityID;
data >> entityID;
// MF_ASSERT( entityID == pBase_->id() );
if (entityID == pBase_->id())
{
// INFO_MSG( "CreateCellEntityHandler::handleMessage: "
// "Cell entity (%lu) created\n",
// entityID );
pBase_->cellCreationResult( true );
}
else
{
WARNING_MSG( "CreateCellEntityHandler::handleMessage: "
"Failed to create associated cell entity for %u.\n"
"\tResponse was entity id %u\n", pBase_->id(), entityID );
pBase_->cellCreationResult( false );
}
delete this;
}
当成功创建的时候,返回的EntityId肯定是当前Base存储的EntityId,成功之后会执行cellCreationResult来标记当前已经在Cell里创建好了RealEntity:
/**
* This method is called when we find out whether or not creating an
* entity on the cell succeeded.
*/
void Base::cellCreationResult( bool success )
{
if (isDestroyed_)
{
return;
}
// isCreateCellPending_ is also clear before onGetCell is called
if (!isCreateCellPending_)
{
// This may occur in a very rare situation. If the cell was created via
// the CellAppMgr, it's possible (although unlikely) for the CellApp to
// have responded with success but the CellAppMgr responds with failure.
// This occurrs when the CellApp crashes while a
// CreateEntityReplyHandler is outstanding but after setCurrentCell.
if (!success)
{
ERROR_MSG( "Base::cellCreationResult: Ignoring failure after "
"setCurrentCell\n" );
}
return;
}
isCreateCellPending_ = false;
if (!success)
{
isGetCellPending_ = false;
Script::call( PyObject_GetAttrString( this, "onCreateCellFailure" ),
PyTuple_New( 0 ), "onCreateCellFailure", true );
DEBUG_MSG( "Base::cellCreationResult: Failed for %u\n", id_ );
}
}
但是只是标记好了这个isCreateCellPending_,现在的Base里还是不知道所创建的RealEntity的相关信息。这些信息通过addRealEntity触发填充和发送,调用者是createEntityInternal,大家可以回顾一下:
/**
* This method adds the input entity to the cell's internal list of real
* entities.
*
* It is called from Cell::createEntity and by the Entity itself when it is
* onloaded.
*/
void Cell::addRealEntity( Entity * pEntity, bool shouldSendNow )
{
if (!pEntity->isReal())
{
ERROR_MSG( "Cell::addRealEntity called on ghost entity id %u!\n",
pEntity->id() );
return;
}
pEntity->informBaseOfAddress( CellApp::instance().interface().address(),
this->spaceID(), shouldSendNow );
realEntities_.add( pEntity );
}
informBaseOfAddress负责将当前的CellApp的地址与当前场景的SpaceID塞入到BaseAppIntInterface::currentCellArgs这里:
/**
* This method informs the base entity of the address of the cell entity.
*/
void Entity::informBaseOfAddress( const Mercury::Address & addr,
SpaceID spaceID, bool shouldSendNow )
{
AUTO_SCOPED_THIS_ENTITY_PROFILE;
// TODO: Move this to RealEntity
MF_ASSERT( this->isReal() );
if (this->hasBase())
{
Mercury::Bundle & bundle = pReal_->channel().bundle();
BaseAppIntInterface::setClientArgs & setClientArgs =
BaseAppIntInterface::setClientArgs::start( bundle );
setClientArgs.id = id_;
// Our base knowing where we are is considered to be critical. In
// particular, if the base doesn't know about this real it may try to
// restore this entity somewhere else following a cellapp crash which
// will cause the !pOtherGhost->isReal() assertion.
BaseAppIntInterface::currentCellArgs & currentCellArgs =
BaseAppIntInterface::currentCellArgs::start(
bundle, Mercury::RELIABLE_CRITICAL );
currentCellArgs.newSpaceID = spaceID;
currentCellArgs.newCellAddr = addr;
if (shouldSendNow)
{
pReal_->channel().send();
}
}
}
当Base接收到currentCell这个RPC的时候,就会设置
/**
* This method is used to inform the base that the cell we send to has changed.
*/
void Base::currentCell( const Mercury::Address & srcAddr,
const Mercury::UnpackedMessageHeader & header,
const BaseAppIntInterface::currentCellArgs & args )
{
this->setCurrentCell( args.newSpaceID, args.newCellAddr,
&srcAddr );
}
/**
* This method is used to inform the base that the cell we send to has changed.
*/
void Base::setCurrentCell( SpaceID spaceID,
const Mercury::Address & cellAppAddr,
const Mercury::Address * pSrcAddr, bool shouldReset )
{
// Make sure that we are still around after any script call.
PyObjectPtr pThis = this;
// If we're losing our cell entity, flush the channel.
if (cellAppAddr == Mercury::Address::NONE)
{
if (pChannel_->isEstablished())
{
pChannel_->send();
// We have to reset the channel here because we might get another
// cell entity later on and that cell entity will expect the channel
// to be in a reset state. This will put the channel into the
// 'wantsFirstPacket_' state, so even if a packet arrives from the
// old app, it will be dropped.
pChannel_->reset( Mercury::Address::NONE, false );
}
}
// If we're getting a cell entity or offloading, just switch the address.
else
{
// Usually we don't need to manually switch address here, since the
// channel has the autoSwitchToSrcAddr flag enabled and it has already
// been done by Mercury. We still need to do this when called from
// emergencySetCurrentCell() however.
if (shouldReset)
{
pChannel_->reset( cellAppAddr );
}
else
{
pChannel_->setAddress( cellAppAddr );
}
}
// 暂时先省略一部分代码
}
这个setCurrentCell的作用就是将pChannel_的地址设置为当前CellAppAddr,之后Base与RealEntity之间的通信就可以使用这个pChannel_了。同时我们再回顾一下Proxy与客户端的通信使用的是pClientChannel_,不要跟这里的pChannel_搞混了。
在pChannel_设置之后,setCurrentCell开始通知其他组件当前的RealEntity已经创建,下面就是之前省略的后续代码:
if (pCellEntityMailBox_ != NULL)
{
bool hadCell = (pCellEntityMailBox_->address().ip != 0);
bool haveCell = (cellAppAddr.ip != 0);
pCellEntityMailBox_->address( pChannel_->addr() );
spaceID_ = spaceID;
if (hadCell != haveCell)
{
isGetCellPending_ = false;
if (haveCell)
{
pCellData_ = NULL;
}
else
{
cellBackupData_.clear();
}
// inform the proxy that the cell entity has gone
// (even if a new one is requested by the script method below)
if (this->isProxy() && hadCell)
{
((Proxy*)this)->cellEntityDestroyed( pSrcAddr );
}
if (haveCell)
{
isCreateCellPending_ = false;
// There might still be stuff waiting for a valid IP address to
// come along
pChannel_->send();
}
// call the script method notifying it of this event
char * methodName = (char*)(haveCell ? "onGetCell" : "onLoseCell");
PyObject * pMethod = PyObject_GetAttrString( this, methodName );
if (pMethod == NULL)
PyErr_Clear();
// inform the proxy that the cell entity is ready
if (this->isProxy() && this->hasCellEntity())
{
((Proxy*)this)->cellEntityCreated();
}
if (pMethod)
{
Script::call( pMethod, PyTuple_New( 0 ), methodName );
}
// notify the delegate about this event
if (pEntityDelegate_)
{
if (haveCell)
{
//TODO: maybe we should add the handling of this condition to the delegate,
// but meanwhile it's not needed/handled.
//
//pEntityDelegate_->onGetCell();
}
else
{
pEntityDelegate_->onLoseCell();
}
}
}
}
由于这个SetCurrentCell应对了很多种RealEntity地址修改的情况,我们目前先聚焦于RealEntity第一次创建时的处理,也就是这里的cellEntityCreated函数:
/**
* This method deals with our cell entity being created.
*/
void Proxy::cellEntityCreated()
{
AUTO_SCOPED_THIS_ENTITY_PROFILE;
if (!entitiesEnabled_) return;
MF_ASSERT( this->hasClient() );
MF_ASSERT( this->hasCellEntity() );
// create the witness
this->sendEnableDisableWitness( /*enable:*/true );
// get rid of the proxy pusher now that the witness will be sending us
// regular updates (the self motivator should definitely be there).
MF_ASSERT( pProxyPusher_ != NULL );
delete pProxyPusher_;
pProxyPusher_ = NULL;
}
这里的sendEnableDisableWitness我们之前在顶号的时候介绍过了,其作用是通知RealEntity开始处理自身以及AOI向客户端的同步。
Unreal Engine 的玩家流程管理
端口监听
在UE中网络相关功能由网络驱动类型UNetDriver来提供,这个UNetDriver是一个虚基类,提供了各种网络收发和管理功能。实际被使用的主要是其子类IpNetDriver或者DemoNetDriver, IpNetDriver负责处理正常的游戏,而DemoNetDriver负责处理游戏录像的回放。UNetDriver可以继续扩展,但是每个扩展出来的子类都需要在BaseEngine.ini通过NetDriverDefinitions注册到引擎:
+NetDriverDefinitions=(DefName="GameNetDriver",DriverClassName="/Script/OnlineSubsystemUtils.IpNetDriver",DriverClassNameFallback="/Script/OnlineSubsystemUtils.IpNetDriver")
+NetDriverDefinitions=(DefName="BeaconNetDriver",DriverClassName="/Script/OnlineSubsystemUtils.IpNetDriver",DriverClassNameFallback="/Script/OnlineSubsystemUtils.IpNetDriver")
+NetDriverDefinitions=(DefName="DemoNetDriver",DriverClassName="/Script/Engine.DemoNetDriver",DriverClassNameFallback="/Script/Engine.DemoNetDriver")
同时引擎里提供一个CreateNamedNetDriver的接口,来通过传入的DefName来创建对应的NetDriver:
bool UEngine::CreateNamedNetDriver(UWorld *InWorld, FName NetDriverName, FName NetDriverDefinition)
{
return UE::Private::CreateNamedNetDriver_Local(this, GetWorldContextFromWorldChecked(InWorld), NetDriverName, NetDriverDefinition);
}
UNetDriver* CreateNetDriver_Local(UEngine* Engine, FWorldContext& Context, FName NetDriverDefinition, FName InNetDriverName)
{
UNetDriver* ReturnVal = nullptr;
FNetDriverDefinition* Definition = nullptr;
auto FindNetDriverDefPred =
[NetDriverDefinition](const FNetDriverDefinition& CurDef)
{
return CurDef.DefName == NetDriverDefinition;
};
{
Definition = Engine->NetDriverDefinitions.FindByPredicate(FindNetDriverDefPred);
}
if (Definition != nullptr)
{
UClass* NetDriverClass = StaticLoadClass(UNetDriver::StaticClass(), nullptr, *Definition->DriverClassName.ToString(), nullptr,
LOAD_Quiet);
// if it fails, then fall back to standard fallback
if (NetDriverClass == nullptr || !NetDriverClass->GetDefaultObject<UNetDriver>()->IsAvailable())
{
NetDriverClass = StaticLoadClass(UNetDriver::StaticClass(), nullptr, *Definition->DriverClassNameFallback.ToString(),
nullptr, LOAD_None);
}
if (NetDriverClass != nullptr)
{
ReturnVal = NewObject<UNetDriver>(GetTransientPackage(), NetDriverClass);
check(ReturnVal != nullptr);
const FName DriverName = InNetDriverName.IsNone() ? ReturnVal->GetFName() : InNetDriverName;
const bool bInitializeWithIris = Engine->WillNetDriverUseIris(Context, NetDriverDefinition, DriverName);
ReturnVal->SetNetDriverName(DriverName);
ReturnVal->SetNetDriverDefinition(NetDriverDefinition);
ReturnVal->PostCreation(bInitializeWithIris);
new(Context.ActiveNetDrivers) FNamedNetDriver(ReturnVal, Definition);
FWorldDelegates::OnNetDriverCreated.Broadcast(Context.World(), ReturnVal);
}
}
if (ReturnVal == nullptr)
{
UE_LOG(LogNet, Log, TEXT("CreateNamedNetDriver failed to create driver from definition %s"), *NetDriverDefinition.ToString());
}
return ReturnVal;
}
当服务器启动并加载地图之后,就会去调用UWorld::Listen来开启网络的监听,也就是在这里会创建GameNetDriver:
bool UWorld::Listen( FURL& InURL )
{
#if WITH_SERVER_CODE
LLM_SCOPE(ELLMTag::Networking);
if( NetDriver )
{
GEngine->BroadcastNetworkFailure(this, NetDriver, ENetworkFailure::NetDriverAlreadyExists);
return false;
}
// Create net driver.
if (GEngine->CreateNamedNetDriver(this, NAME_GameNetDriver, NAME_GameNetDriver))
{
NetDriver = GEngine->FindNamedNetDriver(this, NAME_GameNetDriver);
NetDriver->SetWorld(this);
FLevelCollection* const SourceCollection = FindCollectionByType(ELevelCollectionType::DynamicSourceLevels);
if (SourceCollection)
{
SourceCollection->SetNetDriver(NetDriver);
}
FLevelCollection* const StaticCollection = FindCollectionByType(ELevelCollectionType::StaticLevels);
if (StaticCollection)
{
StaticCollection->SetNetDriver(NetDriver);
}
}
if (NetDriver == nullptr)
{
GEngine->BroadcastNetworkFailure(this, NULL, ENetworkFailure::NetDriverCreateFailure);
return false;
}
AWorldSettings* WorldSettings = GetWorldSettings();
const bool bReuseAddressAndPort = WorldSettings ? WorldSettings->bReuseAddressAndPort : false;
FString Error;
if( !NetDriver->InitListen( this, InURL, bReuseAddressAndPort, Error ) )
{
// 忽略一些错误处理代码
return false;
}
static const bool bLanPlay = FParse::Param(FCommandLine::Get(),TEXT("lanplay"));
const bool bLanSpeed = bLanPlay || InURL.HasOption(TEXT("LAN"));
if ( !bLanSpeed && (NetDriver->MaxInternetClientRate < NetDriver->MaxClientRate) && (NetDriver->MaxInternetClientRate > 2500) )
{
NetDriver->MaxClientRate = NetDriver->MaxInternetClientRate;
}
NextSwitchCountdown = NetDriver->ServerTravelPause;
return true;
#else
return false;
#endif // WITH_SERVER_CODE
}
当一个NetDriver被成功的创建之后,其InitListen接口负责开启指定端口的监听。由于默认配置文件里GameNetDriver使用的是UIpNetDriver,所以这个开启监听的逻辑在UIpNetDriver::InitListen里:
bool UIpNetDriver::InitListen( FNetworkNotify* InNotify, FURL& LocalURL, bool bReuseAddressAndPort, FString& Error )
{
if( !InitBase( false, InNotify, LocalURL, bReuseAddressAndPort, Error ) )
{
UE_LOG(LogNet, Warning, TEXT("Failed to init net driver ListenURL: %s: %s"), *LocalURL.ToString(), *Error);
return false;
}
InitConnectionlessHandler();
// Update result URL.
//LocalURL.Host = LocalAddr->ToString(false);
LocalURL.Port = LocalAddr->GetPort();
UE_LOG(LogNet, Log, TEXT("%s IpNetDriver listening on port %i"), *GetDescription(), LocalURL.Port );
return true;
}
这个InitListen函数的重点是InitBase,这个函数里面负责真正的创建Socket并在指定的端口进行监听:
bool UIpNetDriver::InitBase( bool bInitAsClient, FNetworkNotify* InNotify, const FURL& URL, bool bReuseAddressAndPort, FString& Error )
{
using namespace UE::Net::Private;
if (!Super::InitBase(bInitAsClient, InNotify, URL, bReuseAddressAndPort, Error))
{
return false;
}
ISocketSubsystem* SocketSubsystem = GetSocketSubsystem();
if (SocketSubsystem == nullptr)
{
UE_LOG(LogNet, Warning, TEXT("Unable to find socket subsystem"));
return false;
}
const int32 BindPort = bInitAsClient ? GetClientPort() : URL.Port;
// Increase socket queue size, because we are polling rather than threading
// and thus we rely on the OS socket to buffer a lot of data.
const int32 DesiredRecvSize = bInitAsClient ? ClientDesiredSocketReceiveBufferBytes : ServerDesiredSocketReceiveBufferBytes;
const int32 DesiredSendSize = bInitAsClient ? ClientDesiredSocketSendBufferBytes : ServerDesiredSocketSendBufferBytes;
const EInitBindSocketsFlags InitBindFlags = bInitAsClient ? EInitBindSocketsFlags::Client : EInitBindSocketsFlags::Server;
FCreateAndBindSocketFunc CreateAndBindSocketsFunc = [this, BindPort, bReuseAddressAndPort, DesiredRecvSize, DesiredSendSize]
(TSharedRef<FInternetAddr> BindAddr, FString& Error) -> FUniqueSocket
{
return this->CreateAndBindSocket(BindAddr, BindPort, bReuseAddressAndPort, DesiredRecvSize, DesiredSendSize, Error);
};
bool bInitBindSocketsSuccess = Resolver->InitBindSockets(MoveTemp(CreateAndBindSocketsFunc), InitBindFlags, SocketSubsystem, Error);
if (!bInitBindSocketsSuccess)
{
UE_LOG(LogNet, Error, TEXT("InitBindSockets failed: %s"), ToCStr(Error));
return false;
}
// If the cvar is set and the socket subsystem supports it, create the receive thread.
if (CVarNetIpNetDriverUseReceiveThread.GetValueOnAnyThread() != 0 && SocketSubsystem->IsSocketWaitSupported())
{
SocketReceiveThreadRunnable = MakeUnique<FReceiveThreadRunnable>(this);
SocketReceiveThread.Reset(FRunnableThread::Create(SocketReceiveThreadRunnable.Get(), *FString::Printf(TEXT("IpNetDriver Receive Thread: %s"), *NetDriverName.ToString())));
}
SetSocketAndLocalAddress(Resolver->GetFirstSocket());
bool bRecvMultiEnabled = CVarNetUseRecvMulti.GetValueOnAnyThread() != 0;
bool bRecvThreadEnabled = CVarNetIpNetDriverUseReceiveThread.GetValueOnAnyThread() != 0;
if (bRecvMultiEnabled && !bRecvThreadEnabled)
{
// 忽略多线程收发的处理
}
else if (bRecvMultiEnabled && bRecvThreadEnabled)
{
UE_LOG(LogNet, Warning, TEXT("NetDriver RecvMulti is not yet supported with the Receive Thread enabled."));
}
// Success.
return true;
}
这里的CreateAndBindSocket是最终负责绑定的地方,由于指定的端口可能已经被使用了,所以这里内部会使用BindNextPort来不断递增从而获取下一个可以使用的端口号:
int32 ISocketSubsystem::BindNextPort(FSocket* Socket, FInternetAddr& Addr, int32 PortCount, int32 PortIncrement)
{
// go until we reach the limit (or we succeed)
for (int32 Index = 0; Index < PortCount; Index++)
{
// try to bind to the current port
if (Socket->Bind(Addr) == true)
{
// if it succeeded, return the port
if (Addr.GetPort() != 0)
{
return Addr.GetPort();
}
else
{
return Socket->GetPortNo();
}
}
// if the address had no port, we are done
if( Addr.GetPort() == 0 )
{
break;
}
// increment to the next port, and loop!
Addr.SetPort(Addr.GetPort() + PortIncrement);
}
return 0;
}
FUniqueSocket UIpNetDriver::CreateAndBindSocket(TSharedRef<FInternetAddr> BindAddr, int32 Port, bool bReuseAddressAndPort, int32 DesiredRecvSize, int32 DesiredSendSize, FString& Error)
{
ISocketSubsystem* SocketSubsystem = GetSocketSubsystem();
if (SocketSubsystem == nullptr)
{
Error = TEXT("Unable to find socket subsystem");
return nullptr;
}
// Create the socket that we will use to communicate with
FUniqueSocket NewSocket = CreateSocketForProtocol(BindAddr->GetProtocolType());
// 忽略一些参数设置代码
int32 ActualRecvSize(0);
int32 ActualSendSize(0);
NewSocket->SetReceiveBufferSize(DesiredRecvSize, ActualRecvSize);
NewSocket->SetSendBufferSize(DesiredSendSize, ActualSendSize);
UE_LOG(LogInit, Log, TEXT("%s: Socket queue. Rx: %i (config %i) Tx: %i (config %i)"), SocketSubsystem->GetSocketAPIName(),
ActualRecvSize, DesiredRecvSize, ActualSendSize, DesiredSendSize);
// Bind socket to our port.
BindAddr->SetPort(Port);
int32 AttemptPort = BindAddr->GetPort();
int32 BoundPort = SocketSubsystem->BindNextPort(NewSocket.Get(), *BindAddr, MaxPortCountToTry + 1, 1);
if (BoundPort == 0)
{
Error = FString::Printf(TEXT("%s: binding to port %i failed (%i)"), SocketSubsystem->GetSocketAPIName(), AttemptPort,
(int32)SocketSubsystem->GetLastErrorCode());
if (bExitOnBindFailure)
{
UE_LOG(LogNet, Fatal, TEXT("Fatal error: %s"), *Error);
}
return nullptr;
}
if (NewSocket->SetNonBlocking() == false)
{
Error = FString::Printf(TEXT("%s: SetNonBlocking failed (%i)"), SocketSubsystem->GetSocketAPIName(),
(int32)SocketSubsystem->GetLastErrorCode());
return nullptr;
}
return NewSocket;
}
虽然UE的底层Socket系统同时支持了UDP和TCP的通信,但是这里的UIpNetDriver默认使用的是基于UDP的Socket通信:
FUniqueSocket UIpNetDriver::CreateSocketForProtocol(const FName& ProtocolType)
{
// Create UDP socket and enable broadcasting.
ISocketSubsystem* SocketSubsystem = GetSocketSubsystem();
if (SocketSubsystem == NULL)
{
UE_LOG(LogNet, Warning, TEXT("UIpNetDriver::CreateSocket: Unable to find socket subsystem"));
return NULL;
}
return SocketSubsystem->CreateUniqueSocket(NAME_DGram, TEXT("Unreal"), ProtocolType);
}
由于UDP是无连接的,所以不像TCP一样有accept连接建立回调,只能通过接收到的数据来区分发送端属于哪个逻辑连接。因此在UIpNetDriver::InitListen里会执行InitConnectionlessHandle来注册消息处理函数PacketHandler来应对这个无状态网络连接的入站消息:
void UNetDriver::InitConnectionlessHandler()
{
check(!ConnectionlessHandler.IsValid());
#if !UE_BUILD_SHIPPING
if (!FParse::Param(FCommandLine::Get(), TEXT("NoPacketHandler")))
#endif
{
ConnectionlessHandler = MakeUnique<PacketHandler>(&DDoS);
if (ConnectionlessHandler.IsValid())
{
ConnectionlessHandler->NotifyAnalyticsProvider(AnalyticsProvider, AnalyticsAggregator);
ConnectionlessHandler->Initialize(UE::Handler::Mode::Server, MAX_PACKET_SIZE, true, nullptr, nullptr, NetDriverDefinition);
// Add handling for the stateless connect handshake, for connectionless packets, as the outermost layer
TSharedPtr<HandlerComponent> NewComponent =
ConnectionlessHandler->AddHandler(TEXT("Engine.EngineHandlerComponentFactory(StatelessConnectHandlerComponent)"), true);
StatelessConnectComponent = StaticCastSharedPtr<StatelessConnectHandlerComponent>(NewComponent);
if (StatelessConnectComponent.IsValid())
{
StatelessConnectComponent.Pin()->SetDriver(this);
}
ConnectionlessHandler->InitializeComponents();
}
}
}
在这个函数里会注册一个StatelessConnectHandlerComponent来处理逻辑层网络连接的握手。
连接建立
当客户端准备连接到指定服务器的时候,需要以某种途径获取服务器的URL,然后通过UEngine::Browse来触发客户端的NetDriver初始化:
EBrowseReturnVal::Type UEngine::Browse( FWorldContext& WorldContext, FURL URL, FString& Error )
{
Error = TEXT("");
WorldContext.TravelURL = TEXT("");
UE_LOGSTATUS(Log, TEXT("Started Browse: \"%s\""), *URL.ToString());
// 省略很多代码
if( URL.IsLocalInternal() )
{
// Local map file.
return LoadMap( WorldContext, URL, NULL, Error ) ? EBrowseReturnVal::Success : EBrowseReturnVal::Failure;
}
else if( URL.IsInternal() && GIsClient )
{
// Network URL.
if( WorldContext.PendingNetGame )
{
CancelPending(WorldContext);
}
// Clean up the netdriver/socket so that the pending level succeeds
if (WorldContext.World() && ShouldShutdownWorldNetDriver())
{
ShutdownWorldNetDriver(WorldContext.World());
}
WorldContext.PendingNetGame = NewObject<UPendingNetGame>();
WorldContext.PendingNetGame->Initialize(URL); //-V595
WorldContext.PendingNetGame->InitNetDriver(); //-V595
// 省略很多代码
return EBrowseReturnVal::Pending;
}
}
这里会创建一个UPendingNetGame对象来处理客户端到服务端连接正式建立之前的一些握手逻辑,首先就是创建一个GameNetDriver,也就是之前介绍过的UIpNetDriver:
void UPendingNetGame::InitNetDriver()
{
LLM_SCOPE(ELLMTag::Networking);
if (!GDisallowNetworkTravel)
{
NETWORK_PROFILER(GNetworkProfiler.TrackSessionChange(true, URL));
// Try to create network driver.
if (GEngine->CreateNamedNetDriver(this, NAME_PendingNetDriver, NAME_GameNetDriver))
{
NetDriver = GEngine->FindNamedNetDriver(this, NAME_PendingNetDriver);
}
if (NetDriver == nullptr)
{
UE_LOG(LogNet, Warning, TEXT("Error initializing the pending net driver. Check the configuration of NetDriverDefinitions and make sure module/plugin dependencies are correct."));
ConnectionError = NSLOCTEXT("Engine", "NetworkDriverInit", "Error creating network driver.").ToString();
return;
}
if( NetDriver->InitConnect( this, URL, ConnectionError ) )
{
FNetDelegates::OnPendingNetGameConnectionCreated.Broadcast(this);
ULocalPlayer* LocalPlayer = GEngine->GetFirstGamePlayer(this);
if (LocalPlayer)
{
LocalPlayer->PreBeginHandshake(ULocalPlayer::FOnPreBeginHandshakeCompleteDelegate::CreateWeakLambda(this,
[this]()
{
BeginHandshake();
}));
}
else
{
BeginHandshake();
}
}
else
{
// 忽略一些错误处理代码
}
}
}
在NetDriver被创建之后,接下来使用InitConnect来向服务端URL发起一个连接建立请求,这里的InitBase我们在前面已经介绍过了,会注册一个UDP端口的监听,同时注册StatelessConnectHandlerComponent为消息处理函数:
bool UIpNetDriver::InitConnect( FNetworkNotify* InNotify, const FURL& ConnectURL, FString& Error )
{
using namespace UE::Net::Private;
ISocketSubsystem* SocketSubsystem = GetSocketSubsystem();
if (SocketSubsystem == nullptr)
{
UE_LOG(LogNet, Warning, TEXT("Unable to find socket subsystem"));
return false;
}
if( !InitBase( true, InNotify, ConnectURL, false, Error ) )
{
UE_LOG(LogNet, Warning, TEXT("Failed to init net driver ConnectURL: %s: %s"), *ConnectURL.ToString(), *Error);
return false;
}
// Create new connection.
ServerConnection = NewObject<UNetConnection>(GetTransientPackage(), NetConnectionClass);
ServerConnection->InitLocalConnection(this, SocketPrivate.Get(), ConnectURL, USOCK_Pending);
Resolver->InitConnect(ServerConnection, SocketSubsystem, GetSocket(), ConnectURL);
UIpConnection* IpServerConnection = Cast<UIpConnection>(ServerConnection);
if (FNetConnectionAddressResolution* ConnResolver = FNetDriverAddressResolution::GetConnectionResolver(IpServerConnection))
{
if (ConnResolver->IsAddressResolutionEnabled() && !ConnResolver->IsAddressResolutionComplete())
{
SocketState = ESocketState::Resolving;
}
}
UE_LOG(LogNet, Log, TEXT("Game client on port %i, rate %i"), ConnectURL.Port, ServerConnection->CurrentNetSpeed );
CreateInitialClientChannels();
return true;
}
在这里终于看到逻辑层连接对象ServerConnection,这个对象会在InitConnect的时候被创建,创建之后的Resolver->InitConnect负责发起执行服务端URL的DNS查询,同时这里的SocketState的状态会被标记为ESocketState::Resolving。最后面的CreateInitialClientChannels会创建一些初始的Channel,每个Channel相当于一个信道,往同一个信道里投递的可靠消息能保证被对端有序接收:
void UNetDriver::CreateInitialClientChannels()
{
if (ServerConnection != nullptr)
{
for (const FChannelDefinition& ChannelDef : ChannelDefinitions)
{
if (ChannelDef.bInitialClient && (ChannelDef.ChannelClass != nullptr))
{
ServerConnection->CreateChannelByName(ChannelDef.ChannelName, EChannelCreateFlags::OpenedLocally, ChannelDef.StaticChannelIndex);
}
}
}
}
在默认配置里,会配置下面四个Channel:
[/Script/Engine.NetDriver]
+ChannelDefinitions=(ChannelName=Control, ClassName=/Script/Engine.ControlChannel, StaticChannelIndex=0, bTickOnCreate=true, bServerOpen=false, bClientOpen=true, bInitialServer=false, bInitialClient=true)
+ChannelDefinitions=(ChannelName=Voice, ClassName=/Script/Engine.VoiceChannel, StaticChannelIndex=1, bTickOnCreate=true, bServerOpen=true, bClientOpen=true, bInitialServer=true, bInitialClient=true)
+ChannelDefinitions=(ChannelName=DataStream, ClassName=/Script/Engine.DataStreamChannel, StaticChannelIndex=2, bTickOnCreate=true, bServerOpen=true, bClientOpen=true, bInitialServer=true, bInitialClient=true)
+ChannelDefinitions=(ChannelName=Actor, ClassName=/Script/Engine.ActorChannel, StaticChannelIndex=-1, bTickOnCreate=false, bServerOpen=true, bClientOpen=false, bInitialServer=false, bInitialClient=false)
当UIpNetDriver::InitConnect结束之后,控制流回到了UPendingNetGame::InitNetDriver,这里开始正式的向服务器发起handshake:
void UPendingNetGame::BeginHandshake()
{
// Kick off the connection handshake
UNetConnection* ServerConn = NetDriver->ServerConnection;
if (ServerConn->Handler.IsValid())
{
ServerConn->Handler->BeginHandshaking(
FPacketHandlerHandshakeComplete::CreateUObject(this, &UPendingNetGame::SendInitialJoin));
}
else
{
SendInitialJoin();
}
}
这里的serverConn->Handler对象就是之前的PacketHandler,在PacketHandler::BeginHandShaking里会遍历所有的注册过来的HandlerComponent来执行握手操作:
void PacketHandler::BeginHandshaking(FPacketHandlerHandshakeComplete InHandshakeDel/*=FPacketHandlerHandshakeComplete()*/)
{
check(!bBeganHandshaking);
bBeganHandshaking = true;
HandshakeCompleteDel = InHandshakeDel;
for (int32 i=HandlerComponents.Num() - 1; i>=0; --i)
{
HandlerComponent& CurComponent = *HandlerComponents[i];
if (CurComponent.RequiresHandshake() && !CurComponent.IsInitialized())
{
CurComponent.NotifyHandshakeBegin();
break;
}
}
}
这里我们只需要关心之前创建的StatelessConnectHandlerComponent相关握手逻辑:
void StatelessConnectHandlerComponent::NotifyHandshakeBegin()
{
using namespace UE::Net;
SendInitialPacket(static_cast<EHandshakeVersion>(CurrentHandshakeVersion));
}
void StatelessConnectHandlerComponent::SendInitialPacket(EHandshakeVersion HandshakeVersion)
{
using namespace UE::Net;
if (Handler->Mode == UE::Handler::Mode::Client)
{
UNetConnection* ServerConn = (Driver != nullptr ? ToRawPtr(Driver->ServerConnection) : nullptr);
if (ServerConn != nullptr)
{
const int32 AdjustedSize = GetAdjustedSizeBits(HANDSHAKE_PACKET_SIZE_BITS, HandshakeVersion);
FBitWriter InitialPacket(AdjustedSize + (BaseRandomDataLengthBytes * 8) + 1 /* Termination bit */);
BeginHandshakePacket(InitialPacket, EHandshakePacketType::InitialPacket, HandshakeVersion, SentHandshakePacketCount, CachedClientID,
(bRestartedHandshake ? EHandshakePacketModifier::RestartHandshake : EHandshakePacketModifier::None));
uint8 SecretIdPad = 0;
uint8 PacketSizeFiller[28];
InitialPacket.WriteBit(SecretIdPad);
FMemory::Memzero(PacketSizeFiller, UE_ARRAY_COUNT(PacketSizeFiller));
InitialPacket.Serialize(PacketSizeFiller, UE_ARRAY_COUNT(PacketSizeFiller));
SendToServer(HandshakeVersion, EHandshakePacketType::InitialPacket, InitialPacket);
}
else
{
UE_LOG(LogHandshake, Error, TEXT("Tried to send handshake connect packet without a server connection."));
}
}
}
这里的InitialPacket的具体格式在源代码文件里的注释里写的非常清楚:
* Handshake Process/Protocol:
* --------------------------
*
* The protocol for the handshake involves the client sending an initial packet to the server,
* and the server responding with a unique 'Cookie' value, which the client has to respond with.
*
* Client - Initial Connect:
*
* [?:MagicHeader][2:SessionID][3:ClientID][HandshakeBit][RestartHandshakeBit]
* [8:MinVersion][8:CurVersion][8:HandshakePacketType][8:SentPacketCount][32:NetworkVersion]
* [16:NetworkFeatures][SecretIdBit][28:PacketSizeFiller][AlignPad][?:RandomData]
填充好InitialPacket之后,调用SendToServer往服务器端发送这个握手消息,这里会有一个比较特殊的标记SetRawSend,作用是发送消息的时候直接走底层的发送接口,不要被上层的Handler托管:
void StatelessConnectHandlerComponent::SendToServer(EHandshakeVersion HandshakeVersion, EHandshakePacketType PacketType, FBitWriter& Packet)
{
if (UNetConnection* ServerConn = (Driver != nullptr ? Driver->ServerConnection : nullptr))
{
CapHandshakePacket(Packet, HandshakeVersion);
// Disable PacketHandler parsing, and send the raw packet
Handler->SetRawSend(true);
{
if (Driver->IsNetResourceValid())
{
FOutPacketTraits Traits;
Driver->ServerConnection->LowLevelSend(Packet.GetData(), Packet.GetNumBits(), Traits);
}
}
Handler->SetRawSend(false);
LastClientSendTimestamp = FPlatformTime::Seconds();
}
}
/**
* Sets whether or not outgoing packets should bypass this handler - used when raw packet sends are necessary
* (such as for the stateless handshake)
*
* @param bInEnabled Whether or not raw sends are enabled
*/
FORCEINLINE void SetRawSend(bool bInEnabled)
{
bRawSend = bInEnabled;
}
由于当前的UIpNetDriver使用的是UDP通信,所以有可能出现消息丢失的问题。为了处理可能的握手消息丢失的情况,StatelessConnectHandlerComponent的Tick函数里会检查之前发送的握手包是不是超时了,如果超时了则再次执行SendInitialPacket:
void StatelessConnectHandlerComponent::Tick(float DeltaTime)
{
using namespace UE::Net;
if (Handler->Mode == UE::Handler::Mode::Client)
{
if (State != UE::Handler::Component::State::Initialized && LastClientSendTimestamp != 0.0)
{
double LastSendTimeDiff = FPlatformTime::Seconds() - LastClientSendTimestamp;
if (LastSendTimeDiff > UE::Net::HandshakeResendInterval)
{
const bool bRestartChallenge = Driver != nullptr && ((Driver->GetElapsedTime() - LastChallengeTimestamp) > MIN_COOKIE_LIFETIME);
if (bRestartChallenge)
{
SetState(UE::Handler::Component::State::UnInitialized);
}
if (State == UE::Handler::Component::State::UnInitialized)
{
UE_LOG(LogHandshake, Verbose, TEXT("Initial handshake packet timeout - resending."));
EHandshakeVersion ResendVersion = static_cast<EHandshakeVersion>(CurrentHandshakeVersion);
// 忽略一些无关代码
SendInitialPacket(ResendVersion);
}
else if (State == UE::Handler::Component::State::InitializedOnLocal && LastTimestamp != 0.0)
{
UE_LOG(LogHandshake, Verbose, TEXT("Challenge response packet timeout - resending."));
SendChallengeResponse(LastRemoteHandshakeVersion, LastSecretId, LastTimestamp, LastCookie);
}
}
}
}
else
{
// 省略服务器相关逻辑
}
}
UE接收网络数据的位置在UIpNetDriver::TickDispatch里,这个函数每帧都会被调用,这个函数里处理的逻辑太多了,这里就先考虑服务端处理新的客户端连接相关内容:
void UIpNetDriver::TickDispatch(float DeltaTime)
{
LLM_SCOPE_BYTAG(NetDriver);
Super::TickDispatch( DeltaTime );
// Process all incoming packets
for (FPacketIterator It(this); It; ++It)
{
FReceivedPacketView ReceivedPacket;
FInPacketTraits& ReceivedTraits = ReceivedPacket.Traits;
bool bOk = It.GetCurrentPacket(ReceivedPacket);
const TSharedRef<const FInternetAddr> FromAddr = ReceivedPacket.Address.ToSharedRef();
UNetConnection* Connection = nullptr;
UIpConnection* const MyServerConnection = GetServerConnection();
bool bIgnorePacket = false;
// If we didn't find a client connection, maybe create a new one.
if (Connection == nullptr)
{
// Determine if allowing for client/server connections
const bool bAcceptingConnection = Notify != nullptr && Notify->NotifyAcceptingConnection() == EAcceptConnection::Accept;
if (bAcceptingConnection)
{
if (!DDoS.CheckLogRestrictions() && !bExceededIPAggregationLimit)
{
TrackAndLogNewIP(FromAddr.Get());
}
FPacketBufferView WorkingBuffer = It.GetWorkingBuffer();
Connection = ProcessConnectionlessPacket(ReceivedPacket, WorkingBuffer);
bIgnorePacket = ReceivedPacket.DataView.NumBytes() == 0;
}
}
}
}
这个函数会使用FPacketIterator来遍历当前Socket上接收到的网络数据,业务层数据包的最小粒度就是Packet。如果这个Packet的客户端地址并没有绑定好的UNetConnection,则可以认为这个Packet一定是来自于新客户端的相关数据包,这里会使用ProcessConnectionlessPacket来处理这些包:
UNetConnection* UIpNetDriver::ProcessConnectionlessPacket(FReceivedPacketView& PacketRef, const FPacketBufferView& WorkingBuffer)
{
UNetConnection* ReturnVal = nullptr;
TSharedPtr<StatelessConnectHandlerComponent> StatelessConnect;
const TSharedPtr<const FInternetAddr>& Address = PacketRef.Address;
FString IncomingAddress = Address->ToString(true);
bool bPassedChallenge = false;
bool bRestartedHandshake = false;
bool bIgnorePacket = true;
if (Notify != nullptr && ConnectionlessHandler.IsValid() && StatelessConnectComponent.IsValid())
{
StatelessConnect = StatelessConnectComponent.Pin();
EIncomingResult Result = ConnectionlessHandler->IncomingConnectionless(PacketRef);
// 省略后续所有代码
}
// 省略后续所有代码
}
每个包都会通过ConnectionlessHandler->IncomingConnectionless的处理,这个函数会最终调用到StatelessConnectHandlerComponent::IncomingConnectionless,这个函数里会重点处理handshake包逻辑:
void StatelessConnectHandlerComponent::IncomingConnectionless(FIncomingPacketRef PacketRef)
{
using namespace UE::Net;
FBitReader& Packet = PacketRef.Packet;
const TSharedPtr<const FInternetAddr> Address = PacketRef.Address;
if (MagicHeader.Num() > 0)
{
uint32 ReadMagic = 0;
Packet.SerializeBits(&ReadMagic, MagicHeader.Num());
if (GVerifyMagicHeader && ReadMagic != MagicHeaderUint)
{
#if !UE_BUILD_SHIPPING
UE_CLOG(TrackValidationLogs(), LogNet, Log, TEXT("Rejecting packet with invalid magic header '%08X' vs '%08X' (%i bits)"),
ReadMagic, MagicHeaderUint, MagicHeader.Num());
#endif
Packet.SetError();
return;
}
}
bool bHasValidSessionID = true;
uint8 SessionID = 0;
uint8 ClientID = 0;
if (CurrentHandshakeVersion >= static_cast<uint8>(EHandshakeVersion::SessionClientId))
{
Packet.SerializeBits(&SessionID, SessionIDSizeBits);
Packet.SerializeBits(&ClientID, ClientIDSizeBits);
bHasValidSessionID = GVerifyNetSessionID == 0 || (SessionID == CachedGlobalNetTravelCount && !Packet.IsError());
// No ClientID validation until connected
}
const bool bHandshakePacket = !!Packet.ReadBit() && !Packet.IsError();
LastChallengeSuccessAddress = nullptr;
// 忽略一些容错代码
FParsedHandshakeData HandshakeData;
const bool bValidHandshakePacket = ParseHandshakePacket(Packet, HandshakeData);
//忽略bValidHandshakePacket为false的处理的代码
const bool bIsServer = Handler->Mode == UE::Handler::Mode::Server;
if (UNLIKELY(!bIsServer))
{
// Only server can negotiate handshake requests here
return;
}
EHandshakeVersion TargetVersion = EHandshakeVersion::Latest;
const bool bValidVersion = CheckVersion(HandshakeData, TargetVersion);
const bool bInitialConnect = HandshakeData.HandshakePacketType == EHandshakePacketType::InitialPacket && HandshakeData.Timestamp == 0.0;
const double ElapsedTime = Driver ? Driver->GetElapsedTime() : 0.0;
const bool bIsValidRequest = bValidVersion && (bHasValidSessionID || bInitialConnect);
// Handle invalid requests
if (!bIsValidRequest)
{
// 忽略错误的包数据的处理
return;
}
if (bInitialConnect)
{
SendConnectChallenge(FCommonSendToClientParams(Address, TargetVersion, ClientID), HandshakeData.RemoteSentHandshakePacketCount);
}
// 省略后续所有代码
}
上面的函数负责解析和验证一个有效的HandshakePacket,如果这个HandshakePacket是有效的,则会使用SendConnectChallenge来通知客户端:
void StatelessConnectHandlerComponent::SendConnectChallenge(FCommonSendToClientParams CommonParams, uint8 ClientSentHandshakePacketCount)
{
using namespace UE::Net;
if (Driver != nullptr)
{
const int32 AdjustedSize = GetAdjustedSizeBits(HANDSHAKE_PACKET_SIZE_BITS, CommonParams.HandshakeVersion);
FBitWriter ChallengePacket(AdjustedSize + (BaseRandomDataLengthBytes * 8) + 1 /* Termination bit */);
BeginHandshakePacket(ChallengePacket, EHandshakePacketType::Challenge, CommonParams.HandshakeVersion, ClientSentHandshakePacketCount,
CommonParams.ClientID);
double Timestamp = Driver->GetElapsedTime();
uint8 Cookie[COOKIE_BYTE_SIZE];
GenerateCookie(CommonParams.ClientAddress, ActiveSecret, Timestamp, Cookie);
ChallengePacket.WriteBit(ActiveSecret);
ChallengePacket << Timestamp;
ChallengePacket.Serialize(Cookie, UE_ARRAY_COUNT(Cookie));
SendToClient(CommonParams, EHandshakePacketType::Challenge, ChallengePacket);
}
}
这个SendConnectChallenge的作用是生成一个Challenge包,包里会塞入当前时间戳和一个随机生成的与这个ClientAddress所绑定的Cookie,作为临时的Session标识符来使用。这个Packet填充完成之后,使用SendToClient发送回对应的客户端地址,这个SendToClient的具体实现与之前介绍的SendToServer的实现基本一样,都是使用底层的LowLevelSend来跳过PacketHandler直接调用系统接口来执行数据发送。
接下来要考虑的是客户端如何接收这个Challenge包,虽然数据接收的地方依然是在UIpNetDriver::TickDispatch,但是由于此时客户端早就建立好了与服务端之间的网络连接对象,因此走的代码分支是不一样的:
void UIpNetDriver::TickDispatch(float DeltaTime)
{
LLM_SCOPE_BYTAG(NetDriver);
Super::TickDispatch( DeltaTime );
// Process all incoming packets
for (FPacketIterator It(this); It; ++It)
{
FReceivedPacketView ReceivedPacket;
FInPacketTraits& ReceivedTraits = ReceivedPacket.Traits;
bool bOk = It.GetCurrentPacket(ReceivedPacket);
const TSharedRef<const FInternetAddr> FromAddr = ReceivedPacket.Address.ToSharedRef();
UNetConnection* Connection = nullptr;
UIpConnection* const MyServerConnection = GetServerConnection();
// Figure out which socket the received data came from.
if (MyServerConnection)
{
if (MyServerConnection->RemoteAddr->CompareEndpoints(*FromAddr))
{
Connection = MyServerConnection;
}
}
// Send the packet to the connection for processing.
if (Connection != nullptr && !bIgnorePacket)
{
if (DDoS.IsDDoSDetectionEnabled())
{
DDoS.IncNetConnPacketCounter();
DDoS.CondCheckNetConnLimits();
}
if (bRetrieveTimestamps)
{
It.GetCurrentPacketTimestamp(Connection);
}
Connection->ReceivedRawPacket((uint8*)ReceivedPacket.DataView.GetData(), ReceivedPacket.DataView.NumBytes());
}
}
}
客户端处理消息的时候会将Packet的来源地址与当前记录的服务端连接MyServerConnection的地址相比较,如果相等则会直接使用这个Connection的ReceivedRawPacket来处理当前的ReceivedPacket:
void UNetConnection::ReceivedRawPacket( void* InData, int32 Count )
{
using namespace UE::Net;
uint8* Data = (uint8*)InData;
++InTotalHandlerPackets;
if (Handler.IsValid())
{
FReceivedPacketView PacketView;
PacketView.DataView = {Data, Count, ECountUnits::Bytes};
EIncomingResult IncomingResult = Handler->Incoming(PacketView);
// 省略后续代码
}
// 省略后续代码
}
这个ReceivedRawPacket又会调用到Handler->Incoming,这个函数是所有包处理的通用接口,这里重点关注Challenge包的逻辑处理,也就是下面的bIsChallengePacket=true的部分:
void StatelessConnectHandlerComponent::Incoming(FBitReader& Packet)
{
using namespace UE::Net;
if (MagicHeader.Num() > 0)
{
// Don't bother with the expense of verifying the magic header here.
uint32 ReadMagic = 0;
Packet.SerializeBits(&ReadMagic, MagicHeader.Num());
}
bool bHasValidSessionID = true;
bool bHasValidClientID = true;
uint8 SessionID = 0;
uint8 ClientID = 0;
if (LastRemoteHandshakeVersion >= EHandshakeVersion::SessionClientId)
{
Packet.SerializeBits(&SessionID, SessionIDSizeBits);
Packet.SerializeBits(&ClientID, ClientIDSizeBits);
bHasValidSessionID = GVerifyNetSessionID == 0 || (SessionID == CachedGlobalNetTravelCount && !Packet.IsError());
bHasValidClientID = GVerifyNetClientID == 0 || (ClientID == CachedClientID && !Packet.IsError());
}
bool bHandshakePacket = !!Packet.ReadBit() && !Packet.IsError();
if (bHandshakePacket)
{
FParsedHandshakeData HandshakeData;
bHandshakePacket = ParseHandshakePacket(Packet, HandshakeData);
if (bHandshakePacket)
{
const bool bIsChallengePacket = HandshakeData.HandshakePacketType == EHandshakePacketType::Challenge && HandshakeData.Timestamp > 0.0;
const bool bIsInitialChallengePacket = bIsChallengePacket && State != UE::Handler::Component::State::Initialized;
const bool bIsUpgradePacket = HandshakeData.HandshakePacketType == EHandshakePacketType::VersionUpgrade;
if (Handler->Mode == UE::Handler::Mode::Client && bHasValidClientID && (bHasValidSessionID || bIsInitialChallengePacket || bIsUpgradePacket))
{
if (State == UE::Handler::Component::State::UnInitialized || State == UE::Handler::Component::State::InitializedOnLocal)
{
if (HandshakeData.bRestartHandshake)
{
#if !UE_BUILD_SHIPPING
UE_LOG(LogHandshake, Log, TEXT("Ignoring restart handshake request, while already restarted."));
#endif
}
// Receiving challenge
else if (bIsChallengePacket)
{
#if !UE_BUILD_SHIPPING
UE_LOG(LogHandshake, Log, TEXT("Cached server SessionID: %u"), SessionID);
#endif
CachedGlobalNetTravelCount = SessionID;
LastChallengeTimestamp = (Driver != nullptr ? Driver->GetElapsedTime() : 0.0);
SendChallengeResponse(HandshakeData.RemoteCurVersion, HandshakeData.SecretId, HandshakeData.Timestamp, HandshakeData.Cookie);
// Utilize this state as an intermediary, indicating that the challenge response has been sent
SetState(UE::Handler::Component::State::InitializedOnLocal);
// 省略后续所有代码
}
}
}
}
}
}
bIsChallengePacket的处理结果就是客户端会通过SendChallengeResponse发送一个ChallengeResponse包到服务器,这里会将服务端Challenge包里的SecretID,Cookie,Timestamp等字段再次打包进去:
void StatelessConnectHandlerComponent::SendChallengeResponse(EHandshakeVersion HandshakeVersion, uint8 InSecretId, double InTimestamp,
uint8 InCookie[COOKIE_BYTE_SIZE])
{
using namespace UE::Net;
UNetConnection* ServerConn = (Driver != nullptr ? ToRawPtr(Driver->ServerConnection) : nullptr);
if (ServerConn != nullptr)
{
const int32 AdjustedSize = GetAdjustedSizeBits((bRestartedHandshake ? RESTART_RESPONSE_SIZE_BITS : HANDSHAKE_PACKET_SIZE_BITS),
HandshakeVersion);
FBitWriter ResponsePacket(AdjustedSize + (BaseRandomDataLengthBytes * 8) + 1 /* Termination bit */);
EHandshakePacketType HandshakePacketType = bRestartedHandshake ? EHandshakePacketType::RestartResponse : EHandshakePacketType::Response;
BeginHandshakePacket(ResponsePacket, HandshakePacketType, HandshakeVersion, SentHandshakePacketCount, CachedClientID,
(bRestartedHandshake ? EHandshakePacketModifier::RestartHandshake : EHandshakePacketModifier::None));
ResponsePacket.WriteBit(InSecretId);
ResponsePacket << InTimestamp;
ResponsePacket.Serialize(InCookie, COOKIE_BYTE_SIZE);
if (bRestartedHandshake)
{
ResponsePacket.Serialize(AuthorisedCookie, COOKIE_BYTE_SIZE);
}
#if !UE_BUILD_SHIPPING
UE_LOG(LogHandshake, Log, TEXT("SendChallengeResponse. Timestamp: %f, Cookie: %s"), InTimestamp,
*FString::FromBlob(InCookie, COOKIE_BYTE_SIZE));
#endif
SendToServer(HandshakeVersion, HandshakePacketType, ResponsePacket);
int16* CurSequence = (int16*)InCookie;
LastSecretId = InSecretId;
LastTimestamp = InTimestamp;
LastServerSequence = *CurSequence & (MAX_PACKETID - 1);
LastClientSequence = *(CurSequence + 1) & (MAX_PACKETID - 1);
LastRemoteHandshakeVersion = HandshakeVersion;
FMemory::Memcpy(LastCookie, InCookie, UE_ARRAY_COUNT(LastCookie));
}
else
{
UE_LOG(LogHandshake, Error, TEXT("Tried to send handshake response packet without a server connection."));
}
}
这里在使用SendToServer发送完数据之后,会将Cookie的头两个int16数据当作服务端客户端通信的包序列号,这样强制转换的作用是为了随机初始化第一个包的序列号。
数据走到服务端之后,仍然会调用到StatelessConnectHandlerComponent::IncomingConnectionless来处理,同样的这里我们只关心ChallengeResponse的部分,也就是bInitialConnect=false的分支:
void StatelessConnectHandlerComponent::IncomingConnectionless(FIncomingPacketRef PacketRef)
{
using namespace UE::Net;
FBitReader& Packet = PacketRef.Packet;
const TSharedPtr<const FInternetAddr> Address = PacketRef.Address;
// 省略很多代码
if (bInitialConnect)
{
SendConnectChallenge(FCommonSendToClientParams(Address, TargetVersion, ClientID), HandshakeData.RemoteSentHandshakePacketCount);
}
else
{
// Challenge response
// NOTE: Allow CookieDelta to be 0.0, as it is possible for a server to send a challenge and receive a response,
// during the same tick
bool bChallengeSuccess = false;
const double CookieDelta = ElapsedTime - HandshakeData.Timestamp;
const double SecretDelta = HandshakeData.Timestamp - LastSecretUpdateTimestamp;
const bool bValidCookieLifetime = CookieDelta >= 0.0 && (MAX_COOKIE_LIFETIME - CookieDelta) > 0.0;
const bool bValidSecretIdTimestamp = (HandshakeData.SecretId == ActiveSecret) ? (SecretDelta >= 0.0) : (SecretDelta <= 0.0);
if (bValidCookieLifetime && bValidSecretIdTimestamp)
{
// Regenerate the cookie from the packet info, and see if the received cookie matches the regenerated one
uint8 RegenCookie[COOKIE_BYTE_SIZE];
GenerateCookie(Address, HandshakeData.SecretId, HandshakeData.Timestamp, RegenCookie);
bChallengeSuccess = FMemory::Memcmp(HandshakeData.Cookie, RegenCookie, COOKIE_BYTE_SIZE) == 0;
if (bChallengeSuccess)
{
if (HandshakeData.bRestartHandshake)
{
FMemory::Memcpy(AuthorisedCookie, HandshakeData.OrigCookie, UE_ARRAY_COUNT(AuthorisedCookie));
}
else
{
int16* CurSequence = (int16*)HandshakeData.Cookie;
LastServerSequence = *CurSequence & (MAX_PACKETID - 1);
LastClientSequence = *(CurSequence + 1) & (MAX_PACKETID - 1);
FMemory::Memcpy(AuthorisedCookie, HandshakeData.Cookie, UE_ARRAY_COUNT(AuthorisedCookie));
}
bRestartedHandshake = HandshakeData.bRestartHandshake;
LastChallengeSuccessAddress = Address->Clone();
LastRemoteHandshakeVersion = TargetVersion;
CachedClientID = ClientID;
if (TargetVersion < MinClientHandshakeVersion && static_cast<uint8>(TargetVersion) >= MinSupportedHandshakeVersion)
{
MinClientHandshakeVersion = TargetVersion;
}
// Now ack the challenge response - the cookie is stored in AuthorisedCookie, to enable retries
SendChallengeAck(FCommonSendToClientParams(Address, TargetVersion, ClientID), HandshakeData.RemoteSentHandshakePacketCount, AuthorisedCookie);
}
}
}
}
在这里会利用时间戳和客户端地址重新生成一次Cookie,如果客户端发送过来的包里携带的Cookie与此时生成的RegenCookie一致,则代表ChallengeResponse被成功接收,此时也会从Cookie的前两个int16转换为客户端与服务端两者通信的包序列号,这样就实现了上行包序列号与下行包序列号的第一次同步。最后再发送一个ChallengeAck包通知到客户端连接建立完成。在StatelessConnectHandlerComponent::IncomingConnectionless处理完成了Challenge的验证之后,其外层调用UIpNetDriver::ProcessConnectionlessPacket会再次检查是否Challenge接收成功,如果成功了则会创建一个对应的客户端连接UIpConnection:
UNetConnection* UIpNetDriver::ProcessConnectionlessPacket(FReceivedPacketView& PacketRef, const FPacketBufferView& WorkingBuffer)
{
UNetConnection* ReturnVal = nullptr;
TSharedPtr<StatelessConnectHandlerComponent> StatelessConnect;
const TSharedPtr<const FInternetAddr>& Address = PacketRef.Address;
FString IncomingAddress = Address->ToString(true);
bool bPassedChallenge = false;
bool bRestartedHandshake = false;
bool bIgnorePacket = true;
if (Notify != nullptr && ConnectionlessHandler.IsValid() && StatelessConnectComponent.IsValid())
{
StatelessConnect = StatelessConnectComponent.Pin();
EIncomingResult Result = ConnectionlessHandler->IncomingConnectionless(PacketRef);
if (Result == EIncomingResult::Success)
{
bPassedChallenge = StatelessConnect->HasPassedChallenge(Address, bRestartedHandshake);
// 省略一些代码
}
}
if (bPassedChallenge)
{
if (!bRestartedHandshake)
{
SCOPE_CYCLE_COUNTER(Stat_IpNetDriverAddNewConnection);
UE_LOG(LogNet, Log, TEXT("Server accepting post-challenge connection from: %s"), *IncomingAddress);
ReturnVal = NewObject<UIpConnection>(GetTransientPackage(), NetConnectionClass);
check(ReturnVal != nullptr);
ReturnVal->InitRemoteConnection(this, SocketPrivate.Get(), World ? World->URL : FURL(), *Address, USOCK_Open);
// Set the initial packet sequence from the handshake data
if (StatelessConnect.IsValid())
{
int32 ServerSequence = 0;
int32 ClientSequence = 0;
StatelessConnect->GetChallengeSequence(ServerSequence, ClientSequence);
ReturnVal->InitSequence(ClientSequence, ServerSequence);
}
if (ReturnVal->Handler.IsValid())
{
ReturnVal->Handler->BeginHandshaking();
}
Notify->NotifyAcceptedConnection(ReturnVal);
AddClientConnection(ReturnVal);
RemoveFromNewIPTracking(*Address.Get());
}
if (StatelessConnect.IsValid())
{
StatelessConnect->ResetChallengeData();
}
}
// 省略后续代码
}
这个ClientConnection被创建之后,会利用StatelessConnect里的数据做一些字段初始化,例如ServerSequence,ClientSequence。初始化完成之后还会通过Notify来通知到当前的World新的客户端连接:
void UWorld::NotifyAcceptedConnection( UNetConnection* Connection )
{
check(NetDriver!=NULL);
check(NetDriver->ServerConnection==NULL);
UE_LOG(LogNet, Log, TEXT("NotifyAcceptedConnection: Name: %s, TimeStamp: %s, %s"), *GetName(), FPlatformTime::StrTimestamp(), *Connection->Describe() );
NETWORK_PROFILER( GNetworkProfiler.TrackEvent( TEXT( "OPEN" ), *( GetName() + TEXT( " " ) + Connection->LowLevelGetRemoteAddress() ), Connection ) );
}
同时NetDriver里也会收到通知,会加入到所有的客户端连接集合MappedClientConnections里,同通知ReplicationDriver在执行后续的Actor同步的时候考虑这个新连接:
void UNetDriver::AddClientConnection(UNetConnection* NewConnection)
{
LLM_SCOPE_BYTAG(NetDriver);
SCOPE_CYCLE_COUNTER(Stat_NetDriverAddClientConnection);
UE_CLOG(!DDoS.CheckLogRestrictions(), LogNet, Log, TEXT("AddClientConnection: Added client connection: %s"), *NewConnection->Describe());
ClientConnections.Add(NewConnection);
TSharedPtr<const FInternetAddr> ConnAddr = NewConnection->GetRemoteAddr();
if (ConnAddr.IsValid())
{
MappedClientConnections.Add(ConnAddr.ToSharedRef(), NewConnection);
// On the off-chance of the same IP:Port being reused, check RecentlyDisconnectedClients
int32 RecentDisconnectIdx = RecentlyDisconnectedClients.IndexOfByPredicate(
[&ConnAddr](const FDisconnectedClient& CurElement)
{
return *ConnAddr == *CurElement.Address;
});
if (RecentDisconnectIdx != INDEX_NONE)
{
RecentlyDisconnectedClients.RemoveAt(RecentDisconnectIdx);
}
}
if (ReplicationDriver)
{
ReplicationDriver->AddClientConnection(NewConnection);
}
// 省略一些代码
}
至此在UE的服务端,这个客户端连接建立的流程就完整走完了。
前面说过在StatelessConnectHandlerComponent验证完Challenge之后会发送一个ACK包到客户端,客户端处理这个包的代码仍然是StatelessConnectHandlerComponent::Incoming,只不过分支不一样:
void StatelessConnectHandlerComponent::Incoming(FBitReader& Packet)
{
bool bHandshakePacket = !!Packet.ReadBit() && !Packet.IsError();
if (bHandshakePacket)
{
FParsedHandshakeData HandshakeData;
bHandshakePacket = ParseHandshakePacket(Packet, HandshakeData);
if (bHandshakePacket)
{
const bool bIsChallengePacket = HandshakeData.HandshakePacketType == EHandshakePacketType::Challenge && HandshakeData.Timestamp > 0.0;
const bool bIsInitialChallengePacket = bIsChallengePacket && State != UE::Handler::Component::State::Initialized;
const bool bIsUpgradePacket = HandshakeData.HandshakePacketType == EHandshakePacketType::VersionUpgrade;
if (Handler->Mode == UE::Handler::Mode::Client && bHasValidClientID && (bHasValidSessionID || bIsInitialChallengePacket || bIsUpgradePacket))
{
if (State == UE::Handler::Component::State::UnInitialized || State == UE::Handler::Component::State::InitializedOnLocal)
{
if (HandshakeData.bRestartHandshake)
{
#if !UE_BUILD_SHIPPING
UE_LOG(LogHandshake, Log, TEXT("Ignoring restart handshake request, while already restarted."));
#endif
}
// Receiving challenge
else if (bIsChallengePacket)
{
// 忽略已经介绍过的部分代码
}
// Receiving challenge ack, verify the timestamp is < 0.0f
else if (HandshakeData.HandshakePacketType == EHandshakePacketType::Ack && HandshakeData.Timestamp < 0.0)
{
if (!bRestartedHandshake)
{
UNetConnection* ServerConn = (Driver != nullptr ? ToRawPtr(Driver->ServerConnection) : nullptr);
// Extract the initial packet sequence from the random Cookie data
if (ensure(ServerConn != nullptr))
{
int16* CurSequence = (int16*)HandshakeData.Cookie;
int32 ServerSequence = *CurSequence & (MAX_PACKETID - 1);
int32 ClientSequence = *(CurSequence + 1) & (MAX_PACKETID - 1);
ServerConn->InitSequence(ServerSequence, ClientSequence);
}
// Save the final authorized cookie
FMemory::Memcpy(AuthorisedCookie, HandshakeData.Cookie, UE_ARRAY_COUNT(AuthorisedCookie));
}
// Now finish initializing the handler - flushing the queued packet buffer in the process.
SetState(UE::Handler::Component::State::Initialized);
Initialized();
bRestartedHandshake = false;
// Reset packet count clientside, due to how it affects protocol version fallback selection
SentHandshakePacketCount = 0;
}
}
}
}
}
}
在这里又会通过Cookie重新解析出下行包的初始序列号ServerSequence和上行包的初始序列号ClientSequence,并用这两个序列号来初始化服务端连接。同时这个完整的Cookie会被拷贝到AuthorisedCookie,以方便后面的断线重连来使用。
玩家登录
后续的Initialized函数调用会最终触发到PacketHandler::HandlerInitialized,在这个函数的末尾会调用创建PacketHandler的时候传入来的HandshakeCompleteDel:
void PacketHandler::HandlerInitialized()
{
// 省略一些代码
SetState(UE::Handler::State::Initialized);
if (bBeganHandshaking)
{
HandshakeCompleteDel.ExecuteIfBound();
}
}
void UPendingNetGame::BeginHandshake()
{
// Kick off the connection handshake
UNetConnection* ServerConn = NetDriver->ServerConnection;
if (ServerConn->Handler.IsValid())
{
ServerConn->Handler->BeginHandshaking(
FPacketHandlerHandshakeComplete::CreateUObject(this, &UPendingNetGame::SendInitialJoin));
}
else
{
SendInitialJoin();
}
}
而这个HandshakeCompleteDel在UPendingNetGame::BeginHandshake的时候会设置为SendInitialJoin,在这个函数里会发送一个NMT_Hello消息到服务器端,这个消息里会带上可能的加密密钥EncryptionToken:
void UPendingNetGame::SendInitialJoin()
{
if (NetDriver != nullptr)
{
UNetConnection* ServerConn = NetDriver->ServerConnection;
if (ServerConn != nullptr)
{
uint8 IsLittleEndian = uint8(PLATFORM_LITTLE_ENDIAN);
check(IsLittleEndian == !!IsLittleEndian); // should only be one or zero
const int32 AllowEncryption = CVarNetAllowEncryption.GetValueOnGameThread();
FString EncryptionToken;
if (AllowEncryption != 0)
{
EncryptionToken = URL.GetOption(TEXT("EncryptionToken="), TEXT(""));
}
bool bEncryptionRequirementsFailure = false;
// 忽略加密检查相关代码
if (!bEncryptionRequirementsFailure)
{
uint32 LocalNetworkVersion = FNetworkVersion::GetLocalNetworkVersion();
UE_LOG(LogNet, Log, TEXT("UPendingNetGame::SendInitialJoin: Sending hello. %s"), *ServerConn->Describe());
EEngineNetworkRuntimeFeatures LocalNetworkFeatures = NetDriver->GetNetworkRuntimeFeatures();
FNetControlMessage<NMT_Hello>::Send(ServerConn, IsLittleEndian, LocalNetworkVersion, EncryptionToken, LocalNetworkFeatures);
ServerConn->FlushNet();
}
else
{
UE_LOG(LogNet, Error, TEXT("UPendingNetGame::SendInitialJoin: EncryptionToken is empty when 'net.AllowEncryption' requires it."));
ConnectionError = TEXT("EncryptionToken not set.");
}
}
}
}
这个FNetControlMessage会发送一个ControlMessage通过UControllChannel到对端,发送接口调用的是UChannel::SendBunch函数,而不是之前提到的LowLevelSend。通过UControllChannel发送的消息将会带上bReliable标记,如果消息丢失会执行重传。
UE针对接收到的UControllChannel数据会有专门的函数void UControlChannel::ReceivedBunch( FInBunch& Bunch )去处理,对于NMT_Hello这个消息会通过NetDriver上的Notify对象进行转发:
if (Connection->Driver->Notify != nullptr)
{
// Process control message on client/server connection
Connection->Driver->Notify->NotifyControlMessage(Connection, MessageType, Bunch);
}
在服务端这个Notify对象就是UWorld,在客户端这个Notify对象就是UPendingNetGame,所以服务端这里会调用到UWorld::NotifyControlMessage:
void UWorld::NotifyControlMessage(UNetConnection* Connection, uint8 MessageType, class FInBunch& Bunch)
{
if( NetDriver->ServerConnection )
{
// 客户端代码 先忽略
}
else
{
// We are the server.
#if !(UE_BUILD_SHIPPING || UE_BUILD_TEST)
UE_LOG(LogNet, Verbose, TEXT("Level server received: %s"), FNetControlMessageInfo::GetName(MessageType));
#endif
if ( !Connection->IsClientMsgTypeValid( MessageType ) )
{
// If we get here, either code is mismatched on the client side, or someone could be spoofing the client address
UE_LOG(LogNet, Error, TEXT( "IsClientMsgTypeValid FAILED (%i): Remote Address = %s" ), (int)MessageType,
ToCStr(Connection->LowLevelGetRemoteAddress(true)));
Bunch.SetError();
return;
}
switch (MessageType)
{
// 暂时省略每个类型的消息处理
}
}
}
这里的NotifyControlMessage会根据传入的MessageType来执行各自的逻辑,对于NMT_Hello来说,会首先利用FNetControlMessage来反序列化出来传入的各种字段,检查完网络兼容性和加密Token之后,会通过SendChallengeControlMessage予以回包:
case NMT_Hello:
{
uint8 IsLittleEndian = 0;
uint32 RemoteNetworkVersion = 0;
uint32 LocalNetworkVersion = FNetworkVersion::GetLocalNetworkVersion();
FString EncryptionToken;
EEngineNetworkRuntimeFeatures LocalNetworkFeatures = NetDriver->GetNetworkRuntimeFeatures();
EEngineNetworkRuntimeFeatures RemoteNetworkFeatures = EEngineNetworkRuntimeFeatures::None;
if (FNetControlMessage<NMT_Hello>::Receive(Bunch, IsLittleEndian, RemoteNetworkVersion, EncryptionToken, RemoteNetworkFeatures))
{
const bool bIsNetCLCompatible = FNetworkVersion::IsNetworkCompatible(LocalNetworkVersion, RemoteNetworkVersion);
const bool bAreNetFeaturesCompatible = FNetworkVersion::AreNetworkRuntimeFeaturesCompatible(LocalNetworkFeatures, RemoteNetworkFeatures);
if (!bIsNetCLCompatible || !bAreNetFeaturesCompatible)
{
// 忽略网络格式不匹配的处理
}
else
{
if (EncryptionToken.IsEmpty())
{
EEncryptionFailureAction FailureResult = EEncryptionFailureAction::Default;
if (FNetDelegates::OnReceivedNetworkEncryptionFailure.IsBound())
{
FailureResult = FNetDelegates::OnReceivedNetworkEncryptionFailure.Execute(Connection);
}
const bool bGameplayDisableEncryptionCheck = FailureResult == EEncryptionFailureAction::AllowConnection;
const bool bEncryptionRequired = NetDriver->IsEncryptionRequired() && !bGameplayDisableEncryptionCheck;
if (!bEncryptionRequired)
{
Connection->SendChallengeControlMessage();
}
else
{
// 忽略强制要求加密的错误处理
}
}
}
}
}
这个SendChallengeControlMessage又是发送一个FNetControlMessage<NMT_Challenge>的包到客户端,这个包里唯一的参数就是当前服务器的时间:
void UNetConnection::SendChallengeControlMessage()
{
if (GetConnectionState() != USOCK_Invalid && GetConnectionState() != USOCK_Closed && Driver)
{
Challenge = FString::Printf(TEXT("%08X"), FPlatformTime::Cycles());
SetExpectedClientLoginMsgType(NMT_Login);
FNetControlMessage<NMT_Challenge>::Send(this, Challenge);
FlushNet();
}
else
{
UE_LOG(LogNet, Log, TEXT("UWorld::SendChallengeControlMessage: connection in invalid state. %s"), *Describe());
}
}
客户端接收这个NMT_Challenge的地方在UPendingNetGame::NotifyControlMessage,解析完Challenge之后,又会构造一个FNetControlMessage<NMT_Login>消息发送到服务端,这个消息里会带上当前客户端玩家的唯一ID、用户名以及一些登录相关的额外信息:
case NMT_Challenge:
{
// Challenged by server.
if (FNetControlMessage<NMT_Challenge>::Receive(Bunch, Connection->Challenge))
{
FURL PartialURL(URL);
PartialURL.Host = TEXT("");
PartialURL.Port = PartialURL.UrlConfig.DefaultPort; // HACK: Need to fix URL parsing
PartialURL.Map = TEXT("");
for (int32 i = URL.Op.Num() - 1; i >= 0; i--)
{
if (URL.Op[i].Left(5) == TEXT("game="))
{
URL.Op.RemoveAt(i);
}
}
ULocalPlayer* LocalPlayer = GEngine->GetFirstGamePlayer(this);
if (LocalPlayer)
{
// Send the player nickname if available
FString OverrideName = LocalPlayer->GetNickname();
if (OverrideName.Len() > 0)
{
PartialURL.AddOption(*FString::Printf(TEXT("Name=%s"), *OverrideName));
}
// Send any game-specific url options for this player
FString GameUrlOptions = LocalPlayer->GetGameLoginOptions();
if (GameUrlOptions.Len() > 0)
{
PartialURL.AddOption(*FString::Printf(TEXT("%s"), *GameUrlOptions));
}
// Send the player unique Id at login
Connection->PlayerId = LocalPlayer->GetPreferredUniqueNetId();
}
// Send the player's online platform name
FName OnlinePlatformName = NAME_None;
if (const FWorldContext* const WorldContext = GEngine->GetWorldContextFromPendingNetGame(this))
{
if (WorldContext->OwningGameInstance)
{
OnlinePlatformName = WorldContext->OwningGameInstance->GetOnlinePlatformName();
}
}
Connection->ClientResponse = TEXT("0");
FString URLString(PartialURL.ToString());
FString OnlinePlatformNameString = OnlinePlatformName.ToString();
FNetControlMessage<NMT_Login>::Send(Connection, Connection->ClientResponse, URLString, Connection->PlayerId, OnlinePlatformNameString);
NetDriver->ServerConnection->FlushNet();
}
else
{
Connection->Challenge.Empty();
}
break;
}
当服务端的UWorld收到这个NMT_Login消息之后,先解析出传入参数,然后通知GameMode来检查这个玩家是否被允许登录,如果允许则会调用到UWorld::PreLoginComplete来准备登录:
case NMT_Login:
{
// Admit or deny the player here.
FUniqueNetIdRepl UniqueIdRepl;
FString OnlinePlatformName;
FString& RequestURL = Connection->RequestURL;
// Expand the maximum string serialization size, to accommodate extremely large Fortnite join URL's.
Bunch.ArMaxSerializeSize += (16 * 1024 * 1024);
bool bReceived = FNetControlMessage<NMT_Login>::Receive(Bunch, Connection->ClientResponse, RequestURL, UniqueIdRepl,
OnlinePlatformName);
Bunch.ArMaxSerializeSize -= (16 * 1024 * 1024);
if (bReceived)
{
// Only the options/portal for the URL should be used during join
const TCHAR* NewRequestURL = *RequestURL;
for (; *NewRequestURL != '\0' && *NewRequestURL != '?' && *NewRequestURL != '#'; NewRequestURL++){}
UE_LOG(LogNet, Log, TEXT("Login request: %s userId: %s platform: %s"), NewRequestURL, UniqueIdRepl.IsValid() ? *UniqueIdRepl.ToDebugString() : TEXT("UNKNOWN"), *OnlinePlatformName);
// Compromise for passing splitscreen playercount through to gameplay login code,
// without adding a lot of extra unnecessary complexity throughout the login code.
// NOTE: This code differs from NMT_JoinSplit, by counting + 1 for SplitscreenCount
// (since this is the primary connection, not counted in Children)
FURL InURL( NULL, NewRequestURL, TRAVEL_Absolute );
if ( !InURL.Valid )
{
RequestURL = NewRequestURL;
UE_LOG( LogNet, Error, TEXT( "NMT_Login: Invalid URL %s" ), *RequestURL );
Bunch.SetError();
break;
}
int32 SplitscreenCount = FMath::Min(Connection->Children.Num() + 1, 255);
// Don't allow clients to specify this value
InURL.RemoveOption(TEXT("SplitscreenCount"));
InURL.AddOption(*FString::Printf(TEXT("SplitscreenCount=%i"), SplitscreenCount));
RequestURL = InURL.ToString();
// skip to the first option in the URL
const TCHAR* Tmp = *RequestURL;
for (; *Tmp && *Tmp != '?'; Tmp++);
// keep track of net id for player associated with remote connection
Connection->PlayerId = UniqueIdRepl;
// keep track of the online platform the player associated with this connection is using.
Connection->SetPlayerOnlinePlatformName(FName(*OnlinePlatformName));
// ask the game code if this player can join
AGameModeBase* GameMode = GetAuthGameMode();
AGameModeBase::FOnPreLoginCompleteDelegate OnComplete = AGameModeBase::FOnPreLoginCompleteDelegate::CreateUObject(
this, &UWorld::PreLoginComplete, TWeakObjectPtr<UNetConnection>(Connection));
if (GameMode)
{
GameMode->PreLoginAsync(Tmp, Connection->LowLevelGetRemoteAddress(), Connection->PlayerId, OnComplete);
}
else
{
OnComplete.ExecuteIfBound(FString());
}
}
else
{
Connection->ClientResponse.Empty();
RequestURL.Empty();
}
break;
}
由于GameMode验证登录是一个异步操作,所以这里使用的是连接对象弱指针,如果允许登录,则会执行WelcomePlayer操作:
void UWorld::PreLoginComplete(const FString& ErrorMsg, TWeakObjectPtr<UNetConnection> WeakConnection)
{
UNetConnection* Connection = WeakConnection.Get();
if (!PreLoginCheckError(Connection, ErrorMsg))
{
return;
}
WelcomePlayer(Connection);
}
在WelComePlayer内部会发送一个NMT_Welcome的控制消息到客户端,参数里会填充好当前服务器的LevelName,GameName,以通知客户端去加载指定的地图:
void UWorld::WelcomePlayer(UNetConnection* Connection)
{
#if !WITH_EDITORONLY_DATA
ULevel* CurrentLevel = PersistentLevel;
#endif
check(CurrentLevel);
FString LevelName;
const FSeamlessTravelHandler& SeamlessTravelHandler = GEngine->SeamlessTravelHandlerForWorld(this);
if (SeamlessTravelHandler.IsInTransition())
{
// Tell the client to go to the destination map
LevelName = SeamlessTravelHandler.GetDestinationMapName();
Connection->SetClientWorldPackageName(NAME_None);
}
else
{
LevelName = CurrentLevel->GetOutermost()->GetName();
Connection->SetClientWorldPackageName(CurrentLevel->GetOutermost()->GetFName());
}
if (UGameInstance* GameInst = GetGameInstance())
{
GameInst->ModifyClientTravelLevelURL(LevelName);
}
FString GameName;
FString RedirectURL;
if (AuthorityGameMode != NULL)
{
GameName = AuthorityGameMode->GetClass()->GetPathName();
AuthorityGameMode->GameWelcomePlayer(Connection, RedirectURL);
}
FNetControlMessage<NMT_Welcome>::Send(Connection, LevelName, GameName, RedirectURL);
// 忽略一些代码
Connection->FlushNet();
// don't count initial join data for netspeed throttling
// as it's unnecessary, since connection won't be fully open until it all gets received, and this prevents later gameplay data from being delayed to "catch up"
Connection->QueuedBits = 0;
Connection->SetClientLoginState( EClientLoginState::Welcomed ); // Client has been told to load the map, will respond via SendJoin
}
客户端收到这个消息的额时候并不会立即就加载地图,而是将地图信息填充到UPendingGame::URL里,最后再给服务器发送一个NMT_Netspeed控制消息来通知当前的网速限制:
case NMT_Welcome:
{
// Server accepted connection.
FString GameName;
FString RedirectURL;
if (FNetControlMessage<NMT_Welcome>::Receive(Bunch, URL.Map, GameName, RedirectURL))
{
//GEngine->NetworkRemapPath(this, URL.Map);
UE_LOG(LogNet, Log, TEXT("Welcomed by server (Level: %s, Game: %s)"), *URL.Map, *GameName);
// extract map name and options
{
FURL DefaultURL;
FURL TempURL(&DefaultURL, *URL.Map, TRAVEL_Partial);
URL.Map = TempURL.Map;
URL.RedirectURL = RedirectURL;
URL.Op.Append(TempURL.Op);
}
if (GameName.Len() > 0)
{
URL.AddOption(*FString::Printf(TEXT("game=%s"), *GameName));
}
// Send out netspeed now that we're connected
FNetControlMessage<NMT_Netspeed>::Send(Connection, Connection->CurrentNetSpeed);
// We have successfully connected
// TickWorldTravel will load the map and call LoadMapCompleted which eventually calls SendJoin
bSuccessfullyConnected = true;
}
else
{
URL.Map.Empty();
}
break;
}
客户端地图加载的逻辑则是在UEngine::TickWorldTravel里,这个函数会检查PendingGame的URL是否被设置了,
void UEngine::TickWorldTravel(FWorldContext& Context, float DeltaSeconds)
{
// Handle seamless traveling
if (Context.SeamlessTravelHandler.IsInTransition())
{
// Note: SeamlessTravelHandler.Tick may automatically update Context.World and GWorld internally
Context.SeamlessTravelHandler.Tick();
}
// 忽略服务端加载地图的逻辑
// Handle client traveling.
// 忽略一些其他分支的代码
if( Context.PendingNetGame )
{
Context.PendingNetGame->Tick( DeltaSeconds );
if ( Context.PendingNetGame && Context.PendingNetGame->ConnectionError.Len() > 0 )
{
BroadcastNetworkFailure(NULL, Context.PendingNetGame->NetDriver, ENetworkFailure::PendingConnectionFailure, Context.PendingNetGame->ConnectionError);
CancelPending(Context);
}
else if (Context.PendingNetGame && Context.PendingNetGame->bSuccessfullyConnected && !Context.PendingNetGame->bSentJoinRequest && !Context.PendingNetGame->bLoadedMapSuccessfully && (Context.OwningGameInstance == NULL || !Context.OwningGameInstance->DelayPendingNetGameTravel()))
{
if (Context.PendingNetGame->HasFailedTravel())
{
BrowseToDefaultMap(Context);
BroadcastTravelFailure(Context.World(), ETravelFailure::TravelFailure, TEXT("Travel failed for unknown reason"));
}
else if (!MakeSureMapNameIsValid(Context.PendingNetGame->URL.Map))
{
BrowseToDefaultMap(Context);
BroadcastTravelFailure(Context.World(), ETravelFailure::PackageMissing, Context.PendingNetGame->URL.Map);
}
else if (!Context.PendingNetGame->bLoadedMapSuccessfully)
{
// Attempt to load the map.
FString Error;
const bool bLoadedMapSuccessfully = LoadMap(Context, Context.PendingNetGame->URL, Context.PendingNetGame, Error);
if (Context.PendingNetGame != nullptr)
{
if (!Context.PendingNetGame->LoadMapCompleted(this, Context, bLoadedMapSuccessfully, Error))
{
BrowseToDefaultMap(Context);
BroadcastTravelFailure(Context.World(), ETravelFailure::LoadMapFailure, Error);
}
}
else
{
BrowseToDefaultMap(Context);
BroadcastTravelFailure(Context.World(), ETravelFailure::TravelFailure, Error);
}
}
}
// 省略一些代码
}
else if (TransitionType == ETransitionType::WaitingToConnect)
{
TransitionType = ETransitionType::None;
}
return;
}
LoadMap内部会通过MovePendingLevel这个接口将当前NetDriver所绑定的Notify从PendingNetGame切换为当前的Uworld,这样后续的ControlChannel的消息回调都会通过UWorld来处理了,与服务器一样:
void UEngine::MovePendingLevel(FWorldContext &Context)
{
check(Context.World());
check(Context.PendingNetGame);
Context.World()->SetNetDriver(Context.PendingNetGame->NetDriver);
UNetDriver* NetDriver = Context.PendingNetGame->NetDriver;
if (NetDriver)
{
// The pending net driver is renamed to the current "game net driver"
NetDriver->SetNetDriverName(NAME_GameNetDriver);
NetDriver->SetWorld(Context.World());
FLevelCollection& SourceLevels = Context.World()->FindOrAddCollectionByType(ELevelCollectionType::DynamicSourceLevels);
SourceLevels.SetNetDriver(NetDriver);
if (FLevelCollection* StaticLevels = Context.World()->FindCollectionByType(ELevelCollectionType::StaticLevels))
{
StaticLevels->SetNetDriver(NetDriver);
}
}
// Attach the DemoNetDriver to the world if there is one
if (UDemoNetDriver* DemoNetDriver = Context.PendingNetGame->GetDemoNetDriver())
{
DemoNetDriver->SetWorld(Context.World());
Context.World()->SetDemoNetDriver(DemoNetDriver);
FLevelCollection& MainLevels = Context.World()->FindOrAddCollectionByType(ELevelCollectionType::DynamicSourceLevels);
MainLevels.SetDemoNetDriver(DemoNetDriver);
}
// Reset the Navigation System
Context.World()->SetNavigationSystem(nullptr);
}
由于LoadMap是一个异步的过程,所以加载完成的检查依然需要在UEngine::TickWorldTravel里去做,当地图加载完成之后,PendingNetGame->TravelCompleted就会被调用到,在这个函数里会发送一个NMT_Join控制消息来通知服务器客户端已经加载完了地图,可以进入服务器地图了:
if (Context.PendingNetGame && Context.PendingNetGame->bLoadedMapSuccessfully && (Context.OwningGameInstance == NULL || !Context.OwningGameInstance->DelayCompletionOfPendingNetGameTravel()))
{
if (!Context.PendingNetGame->HasFailedTravel() )
{
Context.PendingNetGame->TravelCompleted(this, Context);
Context.PendingNetGame = nullptr;
}
else
{
CancelPending(Context);
BrowseToDefaultMap(Context);
BroadcastTravelFailure(Context.World(), ETravelFailure::LoadMapFailure, TEXT("Travel failed for unknown reason"));
}
}
void UPendingNetGame::TravelCompleted(UEngine* Engine, FWorldContext& Context)
{
// Show connecting message, cause precaching to occur.
Engine->TransitionType = ETransitionType::Connecting;
Engine->RedrawViewports(false);
// Send join.
Context.PendingNetGame->SendJoin();
Context.PendingNetGame->NetDriver = NULL;
UE_LOGSTATUS(Log, TEXT("Pending net game travel completed"));
}
void UPendingNetGame::SendJoin()
{
bSentJoinRequest = true;
FNetControlMessage<NMT_Join>::Send(NetDriver->ServerConnection);
NetDriver->ServerConnection->FlushNet(true);
}
这里将Context.PendingNetGame设置为nullptr的目的就是彻底消除对PendingNetGame的引用,这样在后续的GC过程中可以回收这个对象。
当服务端的UWorld接收到这个NMT_Join控制消息之后,开始为这个客户端连接创建对应的PlayerController,同时利用这个PlayerController来调用ClientTravel来跳转到最终的关卡:
case NMT_Join:
{
if (Connection->PlayerController == NULL)
{
// Spawn the player-actor for this network player.
FString ErrorMsg;
UE_LOG(LogNet, Log, TEXT("Join request: %s"), *Connection->RequestURL);
FURL InURL( NULL, *Connection->RequestURL, TRAVEL_Absolute );
if ( !InURL.Valid )
{
UE_LOG( LogNet, Error, TEXT( "NMT_Login: Invalid URL %s" ), *Connection->RequestURL );
Bunch.SetError();
break;
}
Connection->PlayerController = SpawnPlayActor( Connection, ROLE_AutonomousProxy, InURL, Connection->PlayerId, ErrorMsg );
if (Connection->PlayerController == NULL)
{
// 忽略错误处理
}
else
{
// Successfully in game.
UE_LOG(LogNet, Log, TEXT("Join succeeded: %s"), *Connection->PlayerController->PlayerState->GetPlayerName());
NETWORK_PROFILER(GNetworkProfiler.TrackEvent(TEXT("JOIN"), *Connection->PlayerController->PlayerState->GetPlayerName(), Connection));
Connection->SetClientLoginState(EClientLoginState::ReceivedJoin);
// if we're in the middle of a transition or the client is in the wrong world, tell it to travel
FString LevelName;
FSeamlessTravelHandler &SeamlessTravelHandler = GEngine->SeamlessTravelHandlerForWorld( this );
if (SeamlessTravelHandler.IsInTransition())
{
// tell the client to go to the destination map
LevelName = SeamlessTravelHandler.GetDestinationMapName();
}
else if (!Connection->PlayerController->HasClientLoadedCurrentWorld())
{
// tell the client to go to our current map
FString NewLevelName = GetOutermost()->GetName();
UE_LOG(LogNet, Log, TEXT("Client joined but was sent to another level. Asking client to travel to: '%s'"), *NewLevelName);
LevelName = NewLevelName;
}
if (LevelName != TEXT(""))
{
Connection->PlayerController->ClientTravel(LevelName, TRAVEL_Relative, true);
}
// @TODO FIXME - TEMP HACK? - clear queue on join
Connection->QueuedBits = 0;
}
}
break;
}
在这个UWorld::SpawnPlayActor里会通过GameMode::Login来创建指定类型的PlayerController对象,同时设置好对应的Role:
APlayerController* UWorld::SpawnPlayActor(UPlayer* NewPlayer, ENetRole RemoteRole, const FURL& InURL, const FUniqueNetIdRepl& UniqueId, FString& Error, uint8 InNetPlayerIndex)
{
Error = TEXT("");
// Make the option string.
FString Options;
for (int32 i = 0; i < InURL.Op.Num(); i++)
{
Options += TEXT('?');
Options += InURL.Op[i];
}
if (AGameModeBase* const GameMode = GetAuthGameMode())
{
// Give the GameMode a chance to accept the login
APlayerController* const NewPlayerController = GameMode->Login(NewPlayer, RemoteRole, *InURL.Portal, Options, UniqueId, Error);
if (NewPlayerController == NULL)
{
UE_LOG(LogSpawn, Warning, TEXT("Login failed: %s"), *Error);
return NULL;
}
UE_LOG(LogSpawn, Log, TEXT("%s got player %s [%s]"), *NewPlayerController->GetName(), *NewPlayer->GetName(), UniqueId.IsValid() ? *UniqueId->ToString() : TEXT("Invalid"));
// Possess the newly-spawned player.
NewPlayerController->NetPlayerIndex = InNetPlayerIndex;
NewPlayerController->SetRole(ROLE_Authority);
NewPlayerController->SetReplicates(RemoteRole != ROLE_None);
if (RemoteRole == ROLE_AutonomousProxy)
{
NewPlayerController->SetAutonomousProxy(true);
}
NewPlayerController->SetPlayer(NewPlayer);
GameMode->PostLogin(NewPlayerController);
return NewPlayerController;
}
UE_LOG(LogSpawn, Warning, TEXT("Login failed: No game mode set."));
return nullptr;
}
在最后的GameMode->PostLogin里,还会建立这个客户端玩家对应的Pawn对象,并尝试去开启当前的Match:
void AGameModeBase::PostLogin(APlayerController* NewPlayer)
{
// Runs shared initialization that can happen during seamless travel as well
GenericPlayerInitialization(NewPlayer);
// Perform initialization that only happens on initially joining a server
UWorld* World = GetWorld();
NewPlayer->ClientCapBandwidth(NewPlayer->Player->CurrentNetSpeed);
// 忽略观战相关的代码
if (GameSession)
{
GameSession->PostLogin(NewPlayer);
}
DispatchPostLogin(NewPlayer);
// Now that initialization is done, try to spawn the player's pawn and start match
HandleStartingNewPlayer(NewPlayer);
}
void AGameMode::HandleStartingNewPlayer_Implementation(APlayerController* NewPlayer)
{
// If players should start as spectators, leave them in the spectator state
if (!bStartPlayersAsSpectators && !MustSpectate(NewPlayer))
{
// If match is in progress, start the player
if (IsMatchInProgress() && PlayerCanRestart(NewPlayer))
{
RestartPlayer(NewPlayer);
}
// Check to see if we should start right away, avoids a one frame lag in single player games
else if (GetMatchState() == MatchState::WaitingToStart)
{
// Check to see if we should start the match
if (ReadyToStartMatch())
{
StartMatch();
}
}
}
}
在StartMatch里会为每一个PlayerController分配一个出生点,并在这个出生点使用GameModeBase::DefaultPawnClass这个配置来创建初始的客户端对应的Pawn:
APawn* AGameModeBase::SpawnDefaultPawnFor_Implementation(AController* NewPlayer, AActor* StartSpot)
{
// Don't allow pawn to be spawned with any pitch or roll
FRotator StartRotation(ForceInit);
StartRotation.Yaw = StartSpot->GetActorRotation().Yaw;
FVector StartLocation = StartSpot->GetActorLocation();
FTransform Transform = FTransform(StartRotation, StartLocation);
return SpawnDefaultPawnAtTransform(NewPlayer, Transform);
}
APawn* AGameModeBase::SpawnDefaultPawnAtTransform_Implementation(AController* NewPlayer, const FTransform& SpawnTransform)
{
FActorSpawnParameters SpawnInfo;
SpawnInfo.Instigator = GetInstigator();
SpawnInfo.ObjectFlags |= RF_Transient; // We never want to save default player pawns into a map
UClass* PawnClass = GetDefaultPawnClassForController(NewPlayer);
APawn* ResultPawn = GetWorld()->SpawnActor<APawn>(PawnClass, SpawnTransform, SpawnInfo);
if (!ResultPawn)
{
UE_LOG(LogGameMode, Warning, TEXT("SpawnDefaultPawnAtTransform: Couldn't spawn Pawn of type %s at %s"), *GetNameSafe(PawnClass), *SpawnTransform.ToHumanReadableString());
}
return ResultPawn;
}
对应的还有一个与玩家绑定的重要的类型PlayerState,会在PlayerController的初始化函数里创建:
void AController::InitPlayerState()
{
if ( GetNetMode() != NM_Client )
{
UWorld* const World = GetWorld();
const AGameModeBase* GameMode = World ? World->GetAuthGameMode() : NULL;
// If the GameMode is null, this might be a network client that's trying to
// record a replay. Try to use the default game mode in this case so that
// we can still spawn a PlayerState.
if (GameMode == NULL)
{
const AGameStateBase* const GameState = World ? World->GetGameState() : NULL;
GameMode = GameState ? GameState->GetDefaultGameMode() : NULL;
}
if (GameMode != NULL)
{
FActorSpawnParameters SpawnInfo;
SpawnInfo.Owner = this;
SpawnInfo.Instigator = GetInstigator();
SpawnInfo.SpawnCollisionHandlingOverride = ESpawnActorCollisionHandlingMethod::AlwaysSpawn;
SpawnInfo.ObjectFlags |= RF_Transient; // We never want player states to save into a map
TSubclassOf<APlayerState> PlayerStateClassToSpawn = GameMode->PlayerStateClass;
if (PlayerStateClassToSpawn.Get() == nullptr)
{
UE_LOG(LogPlayerController, Log, TEXT("AController::InitPlayerState: the PlayerStateClass of game mode %s is null, falling back to APlayerState."), *GameMode->GetName());
PlayerStateClassToSpawn = APlayerState::StaticClass();
}
SetPlayerState(World->SpawnActor<APlayerState>(PlayerStateClassToSpawn, SpawnInfo));
// force a default player name if necessary
if (PlayerState && PlayerState->GetPlayerName().IsEmpty())
{
// don't call SetPlayerName() as that will broadcast entry messages but the GameMode hasn't had a chance
// to potentially apply a player/bot name yet
PlayerState->SetPlayerNameInternal(GameMode->DefaultPlayerName.ToString());
}
}
}
}
至此,一个客户端玩家对应的PlayerController, PlayerState, PlayerPawn三个Actor都在登录成功之后创建出来了。
玩家下线
在UE里玩家下线有只有一个入口,就是客户端对应的UNetConnection的CleanUp函数。这个UNetConnection::CleanUp函数的调用时机有很多,包括但不限于:客户端主动登出、客户端进程退出、网络异常以及服务器主动断开等。
void UNetConnection::CleanUp()
{
// Remove UChildConnection(s)
for (int32 i = 0; i < Children.Num(); i++)
{
Children[i]->CleanUp();
}
Children.Empty();
if ( State != USOCK_Closed )
{
UE_LOG( LogNet, Log, TEXT( "UNetConnection::Cleanup: Closing open connection. %s" ), *Describe() );
}
Close();
if (Driver != nullptr)
{
// Remove from driver.
if (Driver->ServerConnection)
{
check(Driver->ServerConnection == this);
Driver->ServerConnection = NULL;
}
else
{
check(Driver->ServerConnection == NULL);
Driver->RemoveClientConnection(this);
}
}
// 省略一些关于netchannel清理的代码
if (GIsRunning)
{
DestroyOwningActor();
}
CleanupDormantActorState();
Handler.Reset(NULL);
SetClientLoginState(EClientLoginState::CleanedUp);
Driver = nullptr;
}
在这个UNetConnection::CleanUp函数里,会调用Close函数,这个函数里会往当前的ControlChannel也就是Channels[0]发送一个关闭包,这个关闭包会触发ControlChannel的Close函数,然后调用FlushNet来将所有未发送的包都发送出去,这样对端就知道当前连接已经不在可用了,:
void UNetConnection::Close()
{
if (IsInternalAck())
{
SetReserveDestroyedChannels(false);
SetIgnoreReservedChannels(false);
}
if (Driver != nullptr && State != USOCK_Closed)
{
if (Channels[0] != nullptr)
{
Channels[0]->Close(EChannelCloseReason::Destroyed);
}
State = USOCK_Closed;
if ((Handler == nullptr || Handler->IsFullyInitialized()) && HasReceivedClientPacket())
{
FlushNet();
}
// 省略一些代码
}
LogCallLastTime = 0;
LogCallCount = 0;
LogSustainedCount = 0;
}
在执行完成Close操作之后,接下来会调用DestroyOwningActor函数来销毁当前UNetConnection对应的Actor,这个Actor就是PlayerController:
void UNetConnection::DestroyOwningActor()
{
if (OwningActor != nullptr)
{
// Cleanup/Destroy the connection actor & controller
if (!OwningActor->HasAnyFlags(RF_BeginDestroyed | RF_FinishDestroyed))
{
// UNetConnection::CleanUp can be called from UNetDriver::FinishDestroyed that is called from GC.
OwningActor->OnNetCleanup(this);
}
OwningActor = nullptr;
PlayerController = nullptr;
}
else
{
if (ClientLoginState < EClientLoginState::ReceivedJoin)
{
UE_LOG(LogNet, Log, TEXT("UNetConnection::PendingConnectionLost. %s bPendingDestroy=%d "), *Describe(), bPendingDestroy);
FGameDelegates::Get().GetPendingConnectionLostDelegate().Broadcast(PlayerId);
}
}
}
默认的Actor::OnNetCleanup的实现是空的,没有任何逻辑,只是为了方便子类重写。当前的APlayerController::OnNetCleanup函数会通过Destroy函数来强行销毁自己:
void APlayerController::OnNetCleanup(UNetConnection* Connection)
{
UWorld* World = GetWorld();
// destroy the PC that was waiting for a swap, if it exists
if (World != NULL)
{
World->DestroySwappedPC(Connection);
}
check(UNetConnection::GNetConnectionBeingCleanedUp == NULL);
UNetConnection::GNetConnectionBeingCleanedUp = Connection;
//@note: if we ever implement support for splitscreen players leaving a match without the primary player leaving, we'll need to insert
// a call to ClearOnlineDelegates() here so that PlayerController.ClearOnlineDelegates can use the correct ControllerId (which lives
// in ULocalPlayer)
Player = NULL;
NetConnection = NULL;
Destroy( true );
UNetConnection::GNetConnectionBeingCleanedUp = NULL;
}
PlayerController在销毁之后会触发AController::Destroyed函数,这个函数会通知当前的GameMode执行Logout函数,:
void AController::Destroyed()
{
if (GetLocalRole() == ROLE_Authority && PlayerState != NULL)
{
// if we are a player, log out
AGameModeBase* const GameMode = GetWorld()->GetAuthGameMode();
if (GameMode)
{
GameMode->Logout(this);
}
CleanupPlayerState();
}
UnPossess();
GetWorld()->RemoveController( this );
Super::Destroyed();
}
这个AGameModeBase::Logout会执行这个玩家下线的事件广播FGameModeEvents::GameModeLogoutEvent,然后通知GameSession执行NotifyLogout函数,这个函数会通知所有玩家当前玩家下线了,并一路通知到当前的OnlineSubsystem::UnregisterPlayer:
void AGameModeBase::Logout(AController* Exiting)
{
APlayerController* PC = Cast<APlayerController>(Exiting);
if (PC != nullptr)
{
FGameModeEvents::GameModeLogoutEvent.Broadcast(this, Exiting);
K2_OnLogout(Exiting);
if (GameSession)
{
GameSession->NotifyLogout(PC);
}
}
}
void AGameSession::NotifyLogout(const APlayerController* PC)
{
// Unregister the player from the online layer
UnregisterPlayer(PC);
}
void AGameSession::UnregisterPlayer(const APlayerController* ExitingPlayer)
{
if (GetNetMode() != NM_Standalone &&
ExitingPlayer != NULL &&
ExitingPlayer->PlayerState &&
ExitingPlayer->PlayerState->GetUniqueId().IsValid())
{
UnregisterPlayer(ExitingPlayer->PlayerState->SessionName, ExitingPlayer->PlayerState->GetUniqueId());
}
}
void AGameSession::UnregisterPlayer(FName InSessionName, const FUniqueNetIdRepl& UniqueId)
{
UWorld* World = GetWorld();
if (GetNetMode() != NM_Standalone &&
UniqueId.IsValid() &&
UniqueId->IsValid())
{
// Remove the player from the session
UOnlineEngineInterface::Get()->UnregisterPlayer(World, InSessionName, *UniqueId);
}
}
此外在AGameMode这个子类里还有额外的Logout逻辑,在这个子类的Logout重载里,会通过AddInactivePlayer函数构造当前PlayerState的一个副本,复制所有的属性字段,然后将这个副本添加到InactivePlayers数组中,这个数组会在后续的断线重连里使用:
void AGameMode::Logout( AController* Exiting )
{
APlayerController* PC = Cast<APlayerController>(Exiting);
if ( PC != nullptr )
{
RemovePlayerControllerFromPlayerCount(PC);
AddInactivePlayer(PC->PlayerState, PC);
}
Super::Logout(Exiting);
}
void AGameMode::AddInactivePlayer(APlayerState* PlayerState, APlayerController* PC)
{
check(PlayerState)
UWorld* LocalWorld = GetWorld();
// don't store if it's an old PlayerState from the previous level or if it's a spectator... or if we are shutting down
if (!PlayerState->IsFromPreviousLevel() && !MustSpectate(PC) && !LocalWorld->bIsTearingDown)
{
APlayerState* const NewPlayerState = PlayerState->Duplicate();
if (NewPlayerState)
{
// Side effect of Duplicate() adding PlayerState to PlayerArray (see APlayerState::PostInitializeComponents)
GameState->RemovePlayerState(NewPlayerState);
// make PlayerState inactive
NewPlayerState->SetReplicates(false);
// delete after some time
NewPlayerState->SetLifeSpan(InactivePlayerStateLifeSpan);
// On console, we have to check the unique net id as network address isn't valid
const bool bIsConsole = !PLATFORM_DESKTOP;
// Assume valid unique ids means comparison should be via this method
const bool bHasValidUniqueId = NewPlayerState->GetUniqueId().IsValid();
// Don't accidentally compare empty network addresses (already issue with two clients on same machine during development)
const bool bHasValidNetworkAddress = !NewPlayerState->SavedNetworkAddress.IsEmpty();
const bool bUseUniqueIdCheck = bIsConsole || bHasValidUniqueId;
// make sure no duplicates
// 省略一些容错代码
InactivePlayerArray.Add(NewPlayerState);
// 省略一些容错代码
}
}
}
这个PlayerState->Duplicate会调用到APlayerState::CopyProperties,这里会复制当前PlayerState的所有属性字段到新创建的PlayerState中,如果创建了子类,则需要重载这个函数来增加子类属性的复制:
void APlayerState::CopyProperties(APlayerState* PlayerState)
{
PlayerState->SetScore(GetScore());
PlayerState->SetPing(GetPing());
PlayerState->ExactPing = ExactPing;
PlayerState->SetPlayerId(GetPlayerId());
PlayerState->SetUniqueId(GetUniqueId().GetUniqueNetId());
PlayerState->SetPlayerNameInternal(GetPlayerName());
PlayerState->SetStartTime(GetStartTime());
PlayerState->SavedNetworkAddress = SavedNetworkAddress;
}
当然这个离线的PlayerState并不是永久保存在InactivePlayerArray中的,而是会在InactivePlayerStateLifeSpan时间之后被销毁,目前这个时间默认是300秒,也就是五分钟,同时这个InactivePlayerArray有最大容量MaxInactivePlayers限制,默认为16个:
AGameMode::AGameMode(const FObjectInitializer& ObjectInitializer)
: Super(ObjectInitializer)
{
bDelayedStart = false;
// One-time initialization
PrimaryActorTick.bCanEverTick = true;
PrimaryActorTick.TickGroup = TG_PrePhysics;
MatchState = MatchState::EnteringMap;
EngineMessageClass = UEngineMessage::StaticClass();
GameStateClass = AGameState::StaticClass();
MinRespawnDelay = 1.0f;
InactivePlayerStateLifeSpan = 300.f;
MaxInactivePlayers = 16;
}
完成了GameMode->Logout之后,还会调用CleanupPlayerState函数来销毁当前玩家的PlayerState:
void AController::CleanupPlayerState()
{
PlayerState->Destroy();
PlayerState = NULL;
}
然后调用AController::UnPossess来取消控制当前玩家的Pawn:
void AController::UnPossess()
{
APawn* CurrentPawn = GetPawn();
// No need to notify if we don't have a pawn
if (CurrentPawn == nullptr)
{
return;
}
OnUnPossess();
// Notify only when pawn has been successfully unpossessed by the native class.
APawn* NewPawn = GetPawn();
if (NewPawn != CurrentPawn)
{
ReceiveUnPossess(CurrentPawn);
OnNewPawn.Broadcast(NewPawn);
}
}
void AController::OnUnPossess()
{
// Should not be called when Pawn is null but since OnUnPossess could be overridden
// the derived class could have already cleared the pawn and then call its base class.
if ( Pawn != NULL )
{
Pawn->UnPossessed();
SetPawn(NULL);
}
}
值得注意的是APawn::UnPossessed内部并不会执行当前APawn的销毁,只是将当前APawn的Controller设置为nullptr,并通知当前GameInstance当前Pawn的Controller变化为nullptr:
void APawn::UnPossessed()
{
AController* const OldController = Controller;
ForceNetUpdate();
SetPlayerState(nullptr);
SetOwner(nullptr);
Controller = nullptr;
// Unregister input component if we created one
DestroyPlayerInputComponent();
// dispatch Blueprint event if necessary
if (OldController)
{
ReceiveUnpossessed(OldController);
}
if (UGameInstance* GameInstance = GetGameInstance())
{
GameInstance->GetOnPawnControllerChanged().Broadcast(this, nullptr);
}
ConsumeMovementInputVector();
}
但是AController的子类APlayerController在Destroyed函数里会通过PawnLeavingGame来销毁当前玩家的APawn:
void APlayerController::Destroyed()
{
if (GetPawn() != NULL)
{
// Handle players leaving the game
if (Player == NULL && GetLocalRole() == ROLE_Authority)
{
PawnLeavingGame();
}
else
{
UnPossess();
}
}
if (GetSpectatorPawn() != NULL)
{
DestroySpectatorPawn();
}
// 省略一些代码
}
void APlayerController::PawnLeavingGame()
{
if (GetPawn() != NULL)
{
GetPawn()->Destroy();
SetPawn(NULL);
}
}
综上,如果客户端的连接关闭了,对应的APlayerController、APlayerState、APawn三个对象都会被强制销毁。如果想在断线之后保留APawn,则需要在子类里重载APlayerController::PawnLeavingGame。
/** Clean up when a Pawn's player is leaving a game. Base implementation destroys the pawn. */
virtual void PawnLeavingGame();
断线重连
当前UE实现的断线重连支持两种情况:
- 一种是在
UNetConnection没有关闭情况下的断线重连,此时常见于客户端的网络切换导致的ip:port变化 - 一种是
UNetConnection关闭了,但是玩家的PlayerState、APawn等对象还没有被销毁时的重新登录,此时常见客户端的重启以及客户端设备的更换
客户端重启之后的重新登录这种情况最为简单,当服务端接收到这个新客户端的登录请求时,会在AGameMode::PostLogin里利用FindInactivePlayer来检查当前新登录玩家的UniqueId或者PlayerName是否匹配上了有之前存储的已经断开连接的PlayerState,如果匹配上了,就会将这个新的UNetConnection绑定到之前的PlayerState、APawn等对象上:
void AGameMode::PostLogin( APlayerController* NewPlayer )
{
UWorld* World = GetWorld();
// 省略一些无关代码
// save network address for re-associating with reconnecting player, after stripping out port number
FString Address = NewPlayer->GetPlayerNetworkAddress();
int32 pos = Address.Find(TEXT(":"), ESearchCase::CaseSensitive);
NewPlayer->PlayerState->SavedNetworkAddress = (pos > 0) ? Address.Left(pos) : Address;
// check if this player is reconnecting and already has PlayerState
FindInactivePlayer(NewPlayer);
Super::PostLogin(NewPlayer);
}
bool AGameMode::FindInactivePlayer(APlayerController* PC)
{
check(PC && PC->PlayerState);
// don't bother for spectators
if (MustSpectate(PC))
{
return false;
}
// On console, we have to check the unique net id as network address isn't valid
const bool bIsConsole = !PLATFORM_DESKTOP;
// Assume valid unique ids means comparison should be via this method
const bool bHasValidUniqueId = PC->PlayerState->GetUniqueId().IsValid();
// Don't accidentally compare empty network addresses (already issue with two clients on same machine during development)
const bool bHasValidNetworkAddress = !PC->PlayerState->SavedNetworkAddress.IsEmpty();
const bool bUseUniqueIdCheck = bIsConsole || bHasValidUniqueId;
const FString NewNetworkAddress = PC->PlayerState->SavedNetworkAddress;
const FString NewName = PC->PlayerState->GetPlayerName();
for (int32 i=0; i < InactivePlayerArray.Num(); i++)
{
APlayerState* CurrentPlayerState = InactivePlayerArray[i];
if ( (CurrentPlayerState == nullptr) || CurrentPlayerState->IsPendingKill() )
{
InactivePlayerArray.RemoveAt(i,1);
i--;
}
else if ((bUseUniqueIdCheck && (CurrentPlayerState->GetUniqueId() == PC->PlayerState->GetUniqueId())) ||
(!bUseUniqueIdCheck && bHasValidNetworkAddress && (FCString::Stricmp(*CurrentPlayerState->SavedNetworkAddress, *NewNetworkAddress) == 0) && (FCString::Stricmp(*CurrentPlayerState->GetPlayerName(), *NewName) == 0)))
{
// found it!
APlayerState* OldPlayerState = PC->PlayerState;
PC->PlayerState = CurrentPlayerState;
PC->PlayerState->SetOwner(PC);
PC->PlayerState->SetReplicates(true);
PC->PlayerState->SetLifeSpan(0.0f);
OverridePlayerState(PC, OldPlayerState);
GameState->AddPlayerState(PC->PlayerState);
InactivePlayerArray.RemoveAt(i, 1);
OldPlayerState->SetIsInactive(true);
// Set the uniqueId to nullptr so it will not kill the player's registration
// in UnregisterPlayerWithSession()
OldPlayerState->SetUniqueId(nullptr);
OldPlayerState->Destroy();
PC->PlayerState->OnReactivated();
return true;
}
}
return false;
}
如果我们的APlayerController在PawnLeavingGame的时候没有销毁对应的APawn,那么在这里找到老的PlayerState之后,还需要自己做一下逻辑来执行重新Posses。
UNetConnection没有关闭情况下的断线重连则复杂一些,涉及到一个重新握手的过程。但是此时客户端与服务器都不知道当前客户端的ip:port发生了改变,仍然以之前的UNetConnection来进行通信。此时服务端发现这个新的数据包来自于一个未知的ip:port,因此会使用StatelessConnectHandlerComponent来处理这个包。当发现这个数据包并不是请求连接建立的握手包,此时会通过StatelessConnectHandlerComponent::SendRestartHandshakeRequest发送一个回包,提示客户端重新执行身份验证来绑定之前的UNetConnection:
void StatelessConnectHandlerComponent::IncomingConnectionless(FIncomingPacketRef PacketRef)
{
FBitReader& Packet = PacketRef.Packet;
const TSharedPtr<const FInternetAddr> Address = PacketRef.Address;
if (MagicHeader.Num() > 0)
{
// Don't bother with the expense of verifying the magic header here.
uint32 ReadMagic = 0;
Packet.SerializeBits(&ReadMagic, MagicHeader.Num());
}
bool bHandshakePacket = !!Packet.ReadBit() && !Packet.IsError();
LastChallengeSuccessAddress = nullptr;
if (bHandshakePacket)
{
// 省略正常的代码
}
#if !UE_BUILD_SHIPPING
else if (Packet.IsError())
{
UE_LOG(LogHandshake, Log, TEXT("IncomingConnectionless: Error reading handshake bit from packet."));
}
#endif
// Late packets from recently disconnected clients may incorrectly trigger this code path, so detect and exclude those packets
else if (!Packet.IsError() && !PacketRef.Traits.bFromRecentlyDisconnected)
{
// The packet was fine but not a handshake packet - an existing client might suddenly be communicating on a different address.
// If we get them to resend their cookie, we can update the connection's info with their new address.
SendRestartHandshakeRequest(Address);
}
}
在SendRestartHandshakeRequest里会构造一个RestartPacket,这个RestartPacket开头会先填充MagicHeader,然后接着两个都是1的bit,表示这是一个重启握手包,然后通过Driver->LowLevelSend发送回这个客户端:
void StatelessConnectHandlerComponent::SendRestartHandshakeRequest(const TSharedPtr<const FInternetAddr> ClientAddress)
{
if (Driver != nullptr)
{
FBitWriter RestartPacket(GetAdjustedSizeBits(RESTART_HANDSHAKE_PACKET_SIZE_BITS) + 1 /* Termination bit */);
uint8 bHandshakePacket = 1;
uint8 bRestartHandshake = 1;
if (MagicHeader.Num() > 0)
{
RestartPacket.SerializeBits(MagicHeader.GetData(), MagicHeader.Num());
}
RestartPacket.WriteBit(bHandshakePacket);
RestartPacket.WriteBit(bRestartHandshake);
CapHandshakePacket(RestartPacket);
// Disable PacketHandler parsing, and send the raw packet
PacketHandler* ConnectionlessHandler = Driver->ConnectionlessHandler.Get();
if (ConnectionlessHandler != nullptr)
{
ConnectionlessHandler->SetRawSend(true);
}
{
if (Driver->IsNetResourceValid())
{
FOutPacketTraits Traits;
Driver->LowLevelSend(ClientAddress, RestartPacket.GetData(), RestartPacket.GetNumBits(), Traits);
}
}
if (ConnectionlessHandler != nullptr)
{
ConnectionlessHandler->SetRawSend(false);
}
}
else
{
#if !UE_BUILD_SHIPPING
UE_LOG(LogHandshake, Error, TEXT("Tried to send restart handshake packet without a net driver."));
#endif
}
}
当客户端接收到这个握手包的时候,发现这个bRestartHandshake为1,此时会认为这是一个重启握手包,然后会通过NotifyHandshakeBegin重新执行身份验证,此时内部的bRestartedHandshake字段会被设置为true:
void StatelessConnectHandlerComponent::Incoming(FBitReader& Packet)
{
if (MagicHeader.Num() > 0)
{
// Don't bother with the expense of verifying the magic header here.
uint32 ReadMagic = 0;
Packet.SerializeBits(&ReadMagic, MagicHeader.Num());
}
bool bHandshakePacket = !!Packet.ReadBit() && !Packet.IsError();
if (bHandshakePacket)
{
bool bRestartHandshake = false;
uint8 SecretId = 0;
double Timestamp = 1.;
uint8 Cookie[COOKIE_BYTE_SIZE];
uint8 OrigCookie[COOKIE_BYTE_SIZE];
bHandshakePacket = ParseHandshakePacket(Packet, bRestartHandshake, SecretId, Timestamp, Cookie, OrigCookie);
if (bHandshakePacket)
{
if (Handler->Mode == Handler::Mode::Client)
{
if (State == Handler::Component::State::UnInitialized || State == Handler::Component::State::InitializedOnLocal)
{
// 忽略正常分支的处理
}
else if (bRestartHandshake)
{
uint8 ZeroCookie[COOKIE_BYTE_SIZE] = {0};
bool bValidAuthCookie = FMemory::Memcmp(AuthorisedCookie, ZeroCookie, COOKIE_BYTE_SIZE) != 0;
// The server has requested us to restart the handshake process - this is because
// it has received traffic from us on a different address than before.
if (ensure(bValidAuthCookie))
{
bool bPassedDelayCheck = false;
bool bPassedDualIPCheck = false;
double CurrentTime = FPlatformTime::Seconds();;
if (!bRestartedHandshake)
{
// 省略一些检查逻辑 内部会设置 bPassedDelayCheck, bPassedDualIPCheck
}
LastRestartPacketTimestamp = CurrentTime;
if (!bRestartedHandshake && bPassedDelayCheck && bPassedDualIPCheck)
{
UE_LOG(LogHandshake, Log, TEXT("Beginning restart handshake process."));
bRestartedHandshake = true;
SetState(Handler::Component::State::UnInitialized);
NotifyHandshakeBegin();
}
}
}
}
}
}
}
然后在NotifyHandshakeComplete中会构造一个新的握手包,此时bRestartHandshake对应的bit会被设置为1,然后往ServerConnection发送这个新的握手包:
void StatelessConnectHandlerComponent::NotifyHandshakeBegin()
{
if (Handler->Mode == Handler::Mode::Client)
{
UNetConnection* ServerConn = (Driver != nullptr ? Driver->ServerConnection : nullptr);
if (ServerConn != nullptr)
{
FBitWriter InitialPacket(GetAdjustedSizeBits(HANDSHAKE_PACKET_SIZE_BITS) + 1 /* Termination bit */);
uint8 bHandshakePacket = 1;
if (MagicHeader.Num() > 0)
{
InitialPacket.SerializeBits(MagicHeader.GetData(), MagicHeader.Num());
}
InitialPacket.WriteBit(bHandshakePacket);
// In order to prevent DRDoS reflection amplification attacks, clients must pad the packet to match server packet size
uint8 bRestartHandshake = bRestartedHandshake ? 1 : 0;
uint8 SecretIdPad = 0;
uint8 PacketSizeFiller[28];
InitialPacket.WriteBit(bRestartHandshake);
InitialPacket.WriteBit(SecretIdPad);
FMemory::Memzero(PacketSizeFiller, UE_ARRAY_COUNT(PacketSizeFiller));
InitialPacket.Serialize(PacketSizeFiller, UE_ARRAY_COUNT(PacketSizeFiller));
CapHandshakePacket(InitialPacket);
// Disable PacketHandler parsing, and send the raw packet
Handler->SetRawSend(true);
{
if (ServerConn->Driver->IsNetResourceValid())
{
FOutPacketTraits Traits;
ServerConn->LowLevelSend(InitialPacket.GetData(), InitialPacket.GetNumBits(), Traits);
}
}
Handler->SetRawSend(false);
LastClientSendTimestamp = FPlatformTime::Seconds();
}
else
{
UE_LOG(LogHandshake, Error, TEXT("Tried to send handshake connect packet without a server connection."));
}
}
}
然后当服务端收到这个新的握手包的时候,对应的处理函数依然是StatelessConnectHandlerComponent::IncomingConnectionless,但是此时会暂时忽视解析出来的bRestartHandshake,而是把这个当作一个初始握手包来看待,此时会利用SendConnectChallenge来构造一个新的Cookie往下发一个Chanllenge包:
void StatelessConnectHandlerComponent::IncomingConnectionless(FIncomingPacketRef PacketRef)
{
FBitReader& Packet = PacketRef.Packet;
const TSharedPtr<const FInternetAddr> Address = PacketRef.Address;
if (MagicHeader.Num() > 0)
{
// Don't bother with the expense of verifying the magic header here.
uint32 ReadMagic = 0;
Packet.SerializeBits(&ReadMagic, MagicHeader.Num());
}
bool bHandshakePacket = !!Packet.ReadBit() && !Packet.IsError();
LastChallengeSuccessAddress = nullptr;
if (bHandshakePacket)
{
bool bRestartHandshake = false;
uint8 SecretId = 0;
double Timestamp = 1.0;
uint8 Cookie[COOKIE_BYTE_SIZE];
uint8 OrigCookie[COOKIE_BYTE_SIZE];
bHandshakePacket = ParseHandshakePacket(Packet, bRestartHandshake, SecretId, Timestamp, Cookie, OrigCookie);
if (bHandshakePacket)
{
if (Handler->Mode == Handler::Mode::Server)
{
const bool bInitialConnect = Timestamp == 0.0;
if (bInitialConnect)
{
SendConnectChallenge(Address);
}
// 省略后续代码
}
}
}
}
当客户端收到这个Challenge包的时候,会利用SendChallengeResponse来构造一个回包,不过此时发现当前自己已经记录了正在重连的状态,因此会额外附加之前已经商定的AuthorisedCookie:
void StatelessConnectHandlerComponent::SendChallengeResponse(uint8 InSecretId, double InTimestamp, uint8 InCookie[COOKIE_BYTE_SIZE])
{
UNetConnection* ServerConn = (Driver != nullptr ? Driver->ServerConnection : nullptr);
if (ServerConn != nullptr)
{
int32 RestartHandshakeResponseSize = RESTART_RESPONSE_SIZE_BITS;
#if RESTART_HANDSHAKE_DIAGNOSTICS && !DISABLE_SEND_HANDSHAKE_DIAGNOSTICS
bool bEnableDiagnostics = bRestartedHandshake && !!CVarNetRestartHandshakeDiagnostics.GetValueOnAnyThread();
RestartHandshakeResponseSize = bEnableDiagnostics ? RESTART_RESPONSE_DIAGNOSTICS_SIZE_BITS : RestartHandshakeResponseSize;
#endif
const int32 BaseSize = GetAdjustedSizeBits(bRestartedHandshake ? RestartHandshakeResponseSize : HANDSHAKE_PACKET_SIZE_BITS);
FBitWriter ResponsePacket(BaseSize + 1 /* Termination bit */);
uint8 bHandshakePacket = 1;
uint8 bRestartHandshake = (bRestartedHandshake ? 1 : 0);
if (MagicHeader.Num() > 0)
{
ResponsePacket.SerializeBits(MagicHeader.GetData(), MagicHeader.Num());
}
ResponsePacket.WriteBit(bHandshakePacket);
ResponsePacket.WriteBit(bRestartHandshake);
ResponsePacket.WriteBit(InSecretId);
ResponsePacket << InTimestamp;
ResponsePacket.Serialize(InCookie, COOKIE_BYTE_SIZE);
if (bRestartedHandshake)
{
ResponsePacket.Serialize(AuthorisedCookie, COOKIE_BYTE_SIZE);
#if RESTART_HANDSHAKE_DIAGNOSTICS && !DISABLE_SEND_HANDSHAKE_DIAGNOSTICS
if (bEnableDiagnostics)
{
ResponsePacket << HandshakeDiagnostics;
}
#endif
}
}
// 省略后续代码
}
当服务端收到这个ChallengeResponse包的时候,会发现此时bRestartHandshake为1,因此会认为这是一个重启握手包,此时会利用客户端发送过来的老的OrigCookie来填充AuthorisedCookie,而不是用新Challenge时构造的Cookie:
if (bValidCookieLifetime && bValidSecretIdTimestamp)
{
// Regenerate the cookie from the packet info, and see if the received cookie matches the regenerated one
uint8 RegenCookie[COOKIE_BYTE_SIZE];
GenerateCookie(Address, SecretId, Timestamp, RegenCookie);
bChallengeSuccess = FMemory::Memcmp(Cookie, RegenCookie, COOKIE_BYTE_SIZE) == 0;
if (bChallengeSuccess)
{
if (bRestartHandshake)
{
FMemory::Memcpy(AuthorisedCookie, OrigCookie, UE_ARRAY_COUNT(AuthorisedCookie));
}
else
{
int16* CurSequence = (int16*)Cookie;
LastServerSequence = *CurSequence & (MAX_PACKETID - 1);
LastClientSequence = *(CurSequence + 1) & (MAX_PACKETID - 1);
FMemory::Memcpy(AuthorisedCookie, Cookie, UE_ARRAY_COUNT(AuthorisedCookie));
}
bRestartedHandshake = bRestartHandshake;
LastChallengeSuccessAddress = Address->Clone();
// Now ack the challenge response - the cookie is stored in AuthorisedCookie, to enable retries
SendChallengeAck(Address, AuthorisedCookie);
}
}
同时外层处理函数UIpNetDriver::ProcessConnectionlessPacket发现此时重新握手成功之后,会执行客户端地址与之前UNetConnection的重新绑定,重点就是更新MappedClientConnections这个映射表:
UNetConnection* UIpNetDriver::ProcessConnectionlessPacket(FReceivedPacketView& PacketRef, const FPacketBufferView& WorkingBuffer)
{
UNetConnection* ReturnVal = nullptr;
TSharedPtr<StatelessConnectHandlerComponent> StatelessConnect;
const TSharedPtr<const FInternetAddr>& Address = PacketRef.Address;
FString IncomingAddress = Address->ToString(true);
bool bPassedChallenge = false;
bool bRestartedHandshake = false;
bool bIgnorePacket = true;
if (ConnectionlessHandler.IsValid() && StatelessConnectComponent.IsValid())
{
StatelessConnect = StatelessConnectComponent.Pin();
EIncomingResult Result = ConnectionlessHandler->IncomingConnectionless(PacketRef);
if (Result == EIncomingResult::Success)
{
bPassedChallenge = StatelessConnect->HasPassedChallenge(Address, bRestartedHandshake);
if (bPassedChallenge)
{
if (bRestartedHandshake)
{
UE_LOG(LogNet, Log, TEXT("Finding connection to update to new address: %s"), *IncomingAddress);
TSharedPtr<StatelessConnectHandlerComponent> CurComp;
UIpConnection* FoundConn = nullptr;
for (UNetConnection* const CurConn : ClientConnections)
{
CurComp = CurConn != nullptr ? CurConn->StatelessConnectComponent.Pin() : nullptr;
if (CurComp.IsValid() && StatelessConnect->DoesRestartedHandshakeMatch(*CurComp))
{
FoundConn = Cast<UIpConnection>(CurConn);
break;
}
}
if (FoundConn != nullptr)
{
UNetConnection* RemovedConn = nullptr;
TSharedRef<FInternetAddr> RemoteAddrRef = FoundConn->RemoteAddr.ToSharedRef();
verify(MappedClientConnections.RemoveAndCopyValue(RemoteAddrRef, RemovedConn) && RemovedConn == FoundConn);
// @todo: There needs to be a proper/standardized copy API for this. Also in IpConnection.cpp
bool bIsValid = false;
const FString OldAddress = RemoteAddrRef->ToString(true);
RemoteAddrRef->SetIp(*Address->ToString(false), bIsValid);
RemoteAddrRef->SetPort(Address->GetPort());
MappedClientConnections.Add(RemoteAddrRef, FoundConn);
// Make sure we didn't just invalidate a RecentlyDisconnectedClients entry, with the same address
int32 RecentDisconnectIdx = RecentlyDisconnectedClients.IndexOfByPredicate(
[&RemoteAddrRef](const FDisconnectedClient& CurElement)
{
return *RemoteAddrRef == *CurElement.Address;
});
if (RecentDisconnectIdx != INDEX_NONE)
{
RecentlyDisconnectedClients.RemoveAt(RecentDisconnectIdx);
}
ReturnVal = FoundConn;
// We shouldn't need to log IncomingAddress, as the UNetConnection should dump it with it's description.
UE_LOG(LogNet, Log, TEXT("Updated IP address for connection. Connection = %s, Old Address = %s"), *FoundConn->Describe(), *OldAddress);
}
else
{
UE_LOG(LogNet, Log, TEXT("Failed to find an existing connection with a matching cookie. Restarted Handshake failed."));
}
}
// 省略无关代码
}
}
}
// 省略其他分支的代码
}
当客户端收到这个ChallengeAck包的时候,就可以认为连接已经重建好了,可以继续利用之前的UNetConnection来发送消息了。整个过程可以简化为下面这个流程图:
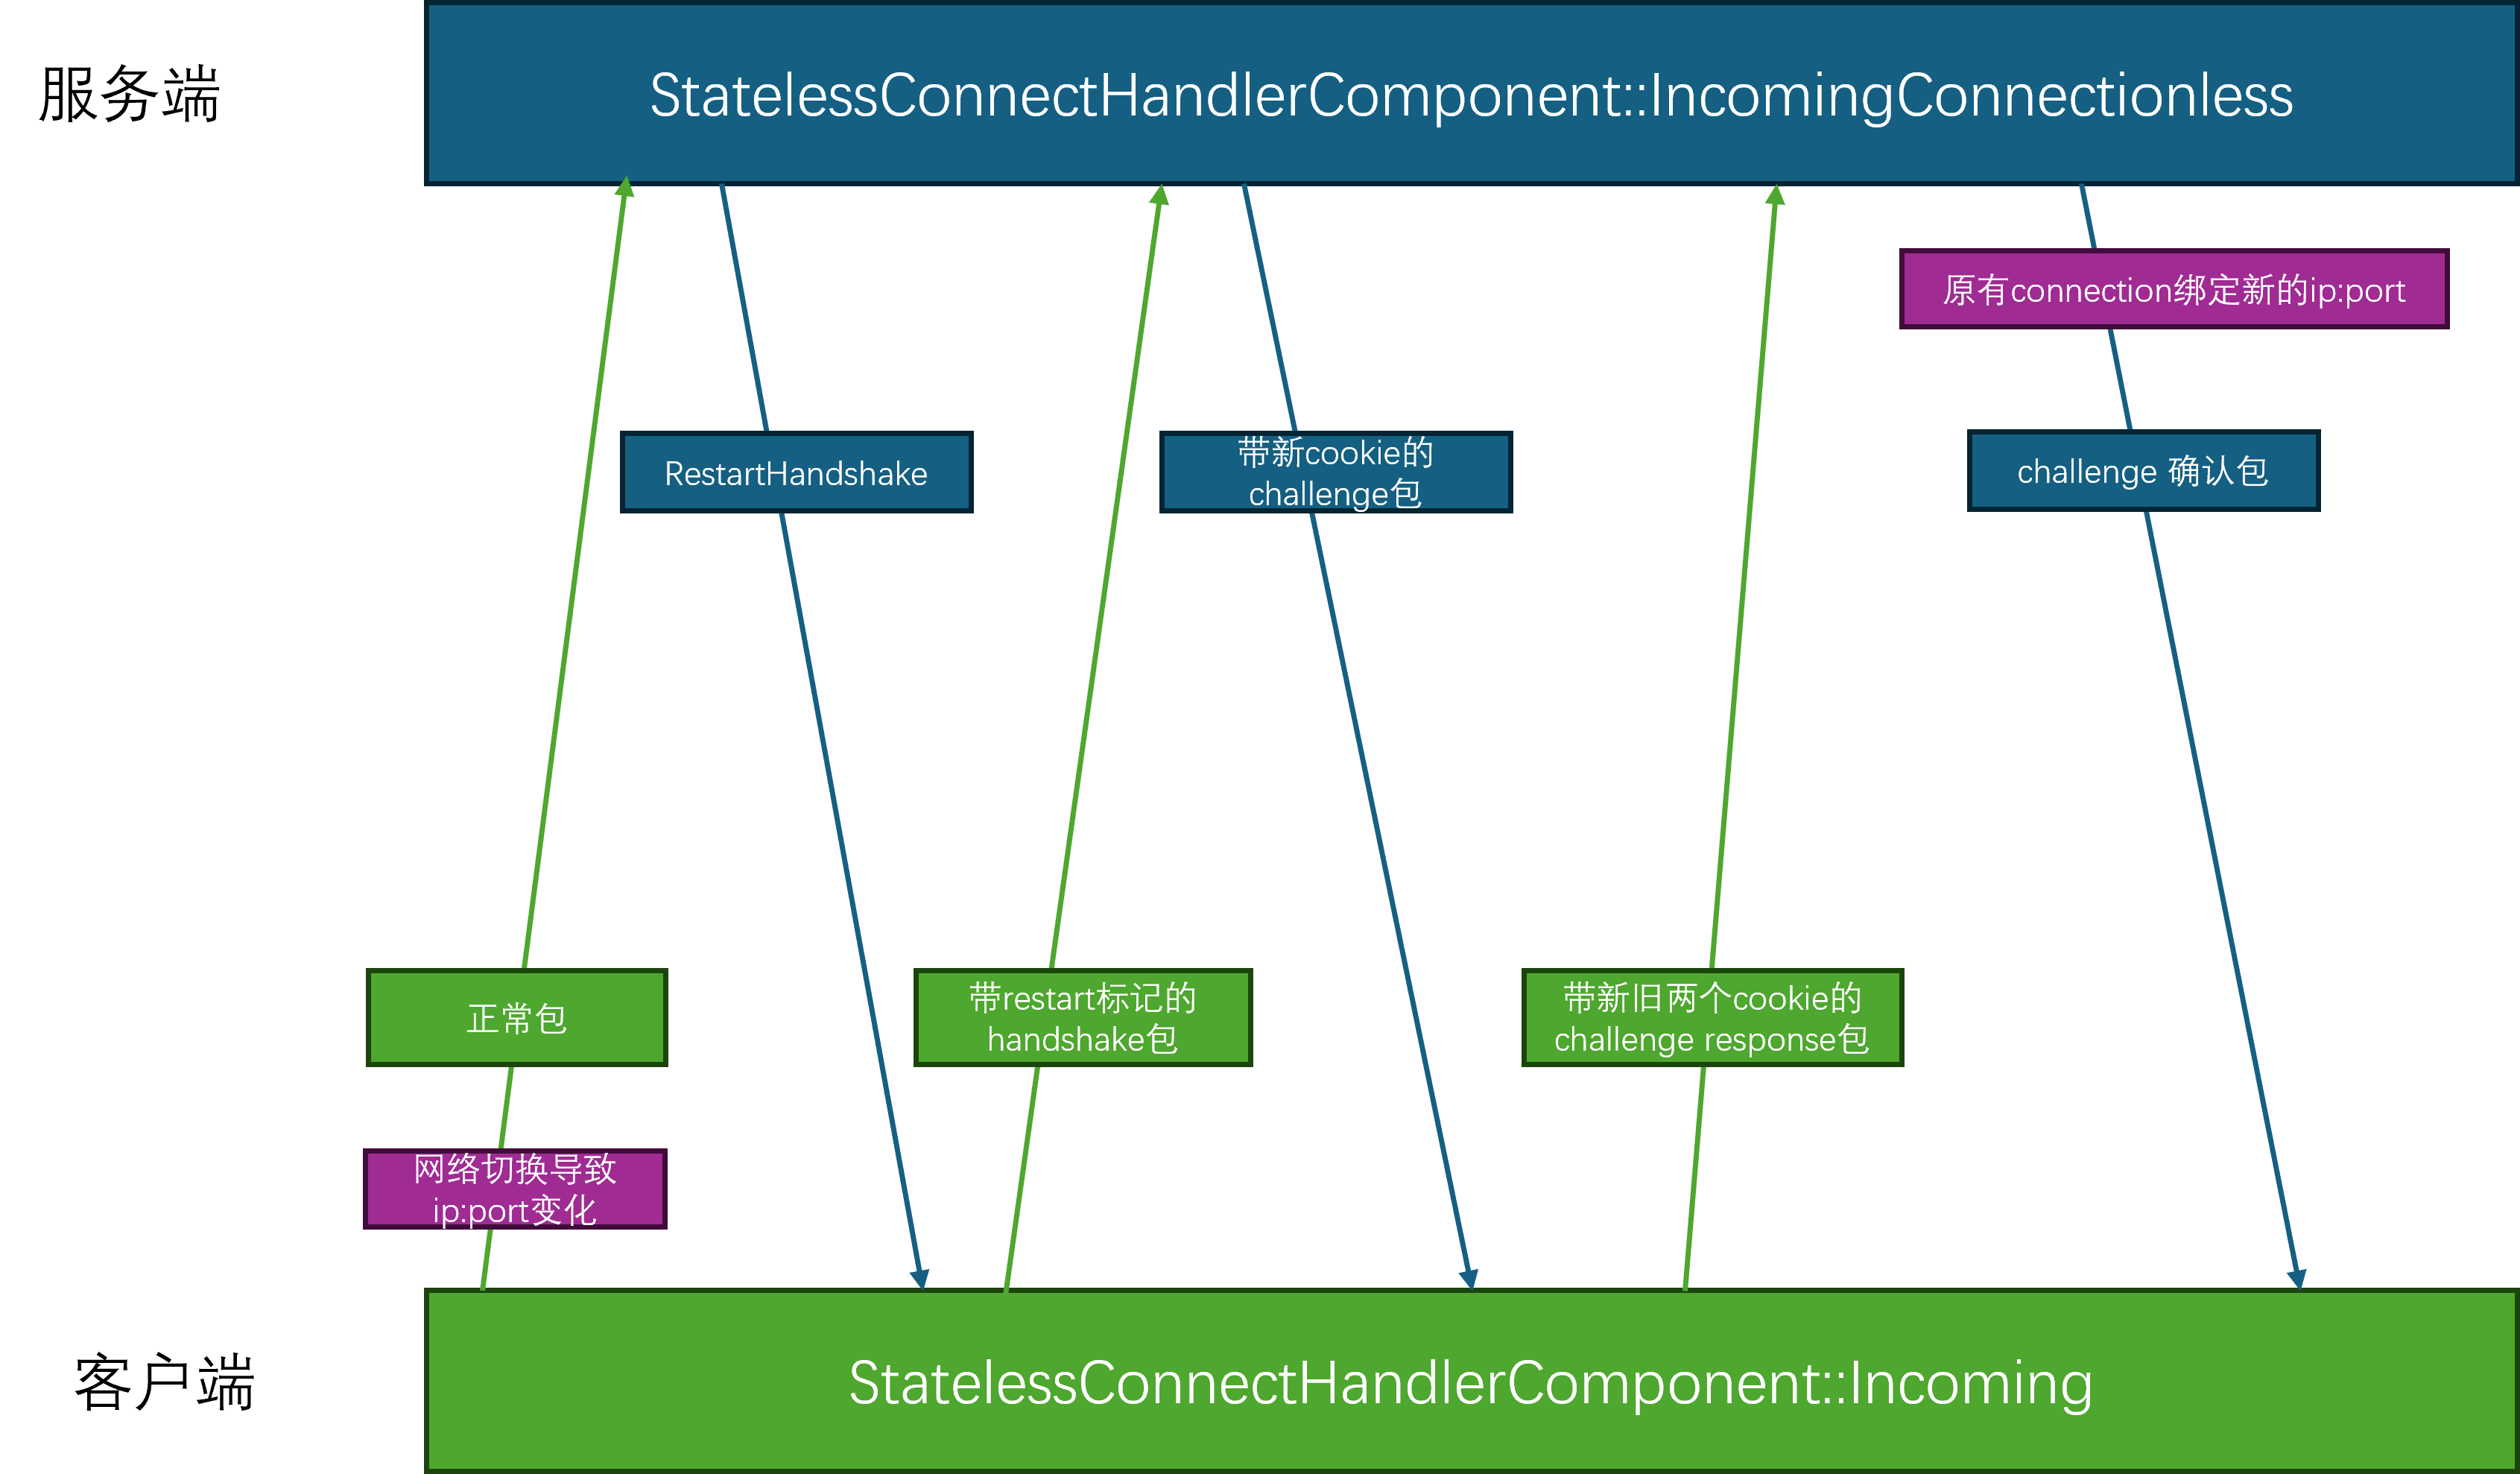
Mosaic Game 的场景管理
场景space是游戏中玩家之间绝大部分玩法活动的逻辑承载空间,特别是玩家间的强实时互动。脱离了场景这个实体的话,游戏服务器的逻辑就只剩下服务service承载的聊天、好友之类的弱实时互动,这样就退化成为了普通互联网服务器的样子。因此强实时场景的存在是游戏服务器和互联网服务器之间最大的差异。在游戏服务器中,一般会有一个场景服务space_service来集中管理所有space的生命周期,同时管理玩家进出场景相关流程。
场景创建流程
游戏中的场景是多种多样的,策划一般会以一个场景编号space_no来方便的区分各个不同的场景。在不同的数据表中,通过使用相同的space_no来配置同一个场景的各种相关数据, 这个space_no就充当了场景配置索引的作用。同时游戏里可以为同一个蓝本的场景建立各自独立的实例,所以在场景管理中,一般会使用唯一的索引space_id来标识服务器内的单个具体场景实例。因此在创建场景实体space_entity的时候,需要提供space_no与space_id:
void Meta(rpc) request_create_space(const utility::rpc_msg& data, std::uint32_t space_no, const std::string& space_id, const std::string& pref_game_id, const json::object_t& init_info);
由于这两个参数是外部传入的,所以有可能是非法的,例如不存在的space_no或者重复的space_id,所以这个函数的开头要做一堆的合法性检查:
if (!m_space_config_data)
{
m_logger->error("fail to create space {} m_space_config_data null ", space_no);
reply_msg.err = "m_space_config_data null";
break;
}
cur_space_sysd = m_space_config_data->get_row(space_no);
if (!cur_space_sysd.valid())
{
m_logger->error("fail to create space {} invalid space no ", space_no);
reply_msg.err = "invalid space no";
break;
}
if (!cur_space_sysd.expect_value(std::string("space_type"), cur_space_type_no))
{
m_logger->error("fail to create space {} space_type empty ", space_no);
reply_msg.err = "invalid space_no";
break;
}
cur_space_type_info = misc::space_type_info_mgr::get_space_type_info(cur_space_type_no);
if (!cur_space_type_info)
{
m_logger->error("fail to create space {} space type info empty for space type {}", space_no, cur_space_type_no);
reply_msg.err = "invalid space_no";
break;
}
if (!cur_space_sysd.expect_value(std::string("map_range"), map_range))
{
m_logger->error("fail to create space {} map_range empty ", space_no);
reply_msg.err = "invalid space_no";
break;
}
if(space_id.empty())
{
m_logger->error("fail to create space {} space_id empty ");
reply_msg.err = "duplicated space_id";
break;
}
if (m_space_types.find(space_id) != m_space_types.end())
{
m_logger->error("fail to create space {} duplicated space id ", space_id);
reply_msg.err = "duplicated space_id";
break;
}
在space_service上使用了一个map来记录每个已经创建了space的space_id对应场景类型信息space_type_info:
struct space_type_info
{
union
{
struct
{
std::uint32_t is_union_space:1; //是否是大世界可分块场景
std::uint32_t is_town_space:1; // 是否是城镇场景
std::uint32_t is_player_dungeon:1; // 是否是单人副本
std::uint32_t is_team_dungeon:1; //是否是组队副本
std::uint32_t is_match_space:1; // 是否是匹配场景
std::uint32_t auto_select_when_empty_id:1; // 空space_id进入时自动选择负载最低的instance
std::uint32_t auto_create_new_heavy_load:1; // 高负载下自动创建新场景
std::uint32_t support_back_return:1; // 是否支持离开后再回来
};
std::uint32_t all_flags = 0;
};
std::uint32_t space_type; // 场景类型
std::uint32_t max_player_load; // 单场景最大玩家数量
};
std::unordered_map<std::string, const misc::space_type_info*> m_space_types;
这里并没有存储space_id到space_no的直接映射,因为所有场景相关接口里都会同时提供space_id,space_no这两个参数,校验这两个参数是否匹配可以通过space_service上的m_spaces_by_no字段来实现,这个字段存储了space_no到space_id集合的映射:
std::unordered_map<std::uint32_t, std::unordered_set<std::string>> m_spaces_by_no;
request_create_space里还有一个非常重要的参数pref_game_id,这个参数代表要将这个场景创建在哪一个进程上,如果没有指定的话,space_service会使用自己的负载均衡策略来选择一个合适的game_id来做填充:
if (dest_game_id.empty())
{
dest_game_id = choose_game_for_space(space_no, cur_space_sysd);
if (dest_game_id.empty())
{
m_logger->error("fail to choose game for space {}", space_no);
reply_msg.err = "cant find allocate game_id";
break;
}
}
else
{
auto cur_game_iter = m_game_loads.find(dest_game_id);
if (cur_game_iter == m_game_loads.end())
{
m_logger->error("fail to find game {} to create space {}", dest_game_id, space_no);
reply_msg.err = "invalid game_id";
break;
}
}
目前的负载均衡策略非常的简陋,直接选取当前负载最低的进程作为结果返回,这里对于正在创建过程中的场景增加10的权重,以避免场景负载延迟上报的影响:
std::string space_service::choose_game_for_space(std::uint32_t space_no, typed_matrix::typed_row space_sysd)
{
float temp_min_load = 10000.0f;
std::string min_game_id;
for (const auto &one_game_info : m_game_loads)
{
auto cur_game_load = one_game_info.second.cur_load + 10.0*one_game_info.second.creating_spaces.size();
if (cur_game_load < temp_min_load)
{
min_game_id = one_game_info.first;
temp_min_load = cur_game_load;
}
}
return min_game_id;
}
在所有的合法性检查都通过之后,开始通知目标进程来创建这个场景:
std::string space_service::do_create_space(std::uint32_t cur_space_no, std::uint32_t cur_space_type, const std::string& pref_space_id, const std::string& dest_game_id, const json::object_t &init_info)
{
auto cur_space_sysd = m_space_config_data->get_row(cur_space_no);
auto cur_game_id = dest_game_id;
if(cur_game_id.empty())
{
choose_game_for_space(cur_space_no, cur_space_sysd);
}
auto cur_space_id = pref_space_id;
if(pref_space_id.empty())
{
cur_space_id = get_server()->gen_unique_str();
}
m_logger->info("try create space no {} with id {}", cur_space_no, cur_space_id);
auto cur_space_type_info = misc::space_type_info_mgr::get_space_type_info(cur_space_type);
std::string cell_space_id;
std::string union_space_id;
json::object_t space_init_info = init_info;
utility::rpc_msg cur_msg;
cur_msg.cmd = "notify_create_space";
cur_msg.args.reserve(10);
if(cur_space_type_info->is_union_space)
{
cell_space_id = get_server()->gen_unique_str();
union_space_id = cur_space_id;
std::array<std::array<double, 3>, 2> map_range;
if(!cur_space_sysd.expect_value(std::string("map_range"), map_range))
{
return {};
}
utility::cell_region::cell_bound cur_map_range;
cur_map_range.left_x = map_range[0][0];
cur_map_range.right_x = map_range[1][0];
cur_map_range.low_z = map_range[0][2];
cur_map_range.high_z = map_range[1][2];
std::unique_ptr<union_space_info> cur_union_space_ptr = std::make_unique<union_space_info>(union_space_id, cur_map_range, cur_space_no, cur_game_id, cell_space_id);
space_init_info["components"]["cell"] = cur_union_space_ptr->cells.encode();
m_union_spaces[union_space_id] = std::move(cur_union_space_ptr);
m_space_types[union_space_id] = cur_space_type_info;
m_logger->info("create cell {} for union space {}", cell_space_id, union_space_id);
}
else
{
cell_space_id = cur_space_id;
}
add_space_load_to_game(cur_space_no, cell_space_id, cur_game_id, union_space_id, cur_space_type_info);
cur_msg.args.push_back(cell_space_id);
cur_msg.args.push_back(cur_space_no);
cur_msg.args.push_back(union_space_id);
cur_msg.args.push_back(space_init_info);
call_space_manager(cur_game_id, cur_msg);
return cell_space_id;
}
这里的add_space_load_to_game会将这个场景加入到此game的正在创建场景集合creating_spaces中,作为一个临时占位的场景负载。因为进程的负载是定期采样的,如果在采样间隔内某个进程是负载最低的,负载均衡策略会将这一期间的所有场景都创建在同一进程上,从而导致此进程负载爆炸。所以为了避免出现短期内单一进程创建的场景太多,优化负载均衡:
void space_service::add_space_load_to_game(std::uint32_t space_no, const std::string &space_id, const std::string &game_id, const std::string &union_space_id, const misc::space_type_info *cur_space_type_info)
{
if (union_space_id.empty())
{
std::unique_ptr<mono_space_info> cur_space_info = std::make_unique<mono_space_info>();
cur_space_info->game_id = game_id;
cur_space_info->space_id = space_id;
cur_space_info->space_no = space_no;
m_mono_spaces[space_id] = std::move(cur_space_info);
m_game_loads[game_id].mono_spaces.insert(space_id);
m_spaces_by_no[space_no].insert(space_id);
}
else
{
// 省略无关代码
}
m_space_types[space_id] = cur_space_type_info;
m_game_loads[game_id].creating_spaces.insert(space_id);
}
在选择最佳game的时候会将这里creating_spaces所带来的预先负载设置为了常量10,无视了场景间的差异,其实更好的方法是在场景表中配置每个space_no对应的预先负载,这样就能更加精确的估算。
通知指定space_server进程创建新space的方式是往这个space_server上的space_manager发送创建场景的请求notify_create_space:
void space_service::call_space_manager(const std::string &game_id, const utility::rpc_msg &msg)
{
get_server()->call_server(this, game_id + utility::rpc_anchor::seperator + "space_manager", msg);
}
这里的space_manager是每个space_server上都会存在的一个单例,space_server启动的时候就会自动初始化:
void manager_base::init_managers(space_server* in_space_server)
{
offline_msg_manager::instance().init(in_space_server);
email_manager::instance().init(in_space_server);
notify_manager::instance().init(in_space_server);
rank_manager::instance().init(in_space_server);
space_manager::instance().init(in_space_server);
}
void space_server::do_start()
{
entity::entity_manager::instance().init();
json_stub::start();
manager_base::init_managers(this);
misc::stuff_utils::init();
global_config_mgr::instance();
}
因此可以使用game_id + utility::rpc_anchor::seperator + "space_manager"的形式来拼接出对应的远程调用地址,因为在entity_manager没有处理这个rpc的情况下,会再往manager_base上尝试分发:
utility::rpc_msg::call_result manager_base::dispatch_rpc(const std::string& dest, const utility::rpc_msg& msg)
{
auto temp_iter = m_managers.find(dest);
if(temp_iter == m_managers.end())
{
return utility::rpc_msg::call_result::dest_not_found;
}
if(!temp_iter->second->support_rpc())
{
return utility::rpc_msg::call_result::rpc_not_found;
}
return temp_iter->second->rpc_owner_on_rpc(msg);
}
utility::rpc_msg::call_result space_server::on_server_rpc_msg(const std::string& dest, const utility::rpc_msg& cur_rpc_msg)
{
auto dispatch_result = entity::entity_manager::instance().dispatch_rpc_msg(dest, cur_rpc_msg);
if(dispatch_result != utility::rpc_msg::call_result::dest_not_found)
{
return dispatch_result;
}
return manager_base::dispatch_rpc(dest, cur_rpc_msg);
}
在space_manager接收到创建新场景的rpc请求之后,就会通过entity_manager来使用指定的参数来创建对应的space_entity:
void space_manager::notify_create_space(const utility::rpc_msg &data, const std::string &space_id, std::uint32_t space_no, const std::string& union_space_id, json::object_t &init_info)
{
m_logger->info("notify_create_space space_id {} space_no {} union_space_id {} init_info {}", space_id, space_no, union_space_id, json(init_info).dump());
std::string create_entity_error;
init_info["space_no"] = space_no;
init_info["union_space_id"] = union_space_id;
auto cur_entity = m_server->create_entity("space_entity", space_id, m_server->gen_online_entity_id(), init_info, create_entity_error);
if (!cur_entity)
{
m_logger->error("fail to create_space id {} with error {}", space_id, create_entity_error);
return;
}
entity::space_entity *cur_space = dynamic_cast<entity::space_entity*>(cur_entity);
m_spaces[space_id] = cur_space;
report_space_created(space_id);
}
void space_manager::report_space_created(const std::string &space_id)
{
utility::rpc_msg cur_msg;
cur_msg.cmd = "report_space_created";
cur_msg.args.push_back(m_server->local_stub_info().name);
cur_msg.args.push_back(space_id);
m_server->call_service( "space_service", cur_msg);
}
创建完成之后再通知space_service,可以走后续流程了。这个后续流程主要是将这个space的状态切换为ready,然后处理等待进入当前场景的所有玩家与队伍,逐个通知其可以进入:
void space_service::report_space_created(const utility::rpc_msg &data, const std::string &game_id, const std::string &space_id)
{
auto cur_space_type_iter = m_space_types.find(space_id);
if (cur_space_type_iter == m_space_types.end())
{
m_logger->error("cant find space {} report space created", space_id);
return;
}
if (!cur_space_type_iter->second->is_union_space)
{
auto cur_space_iter = m_mono_spaces.find(space_id);
if (cur_space_iter->second->game_id != game_id)
{
m_logger->error("space {} game id {} not match", space_id, game_id);
return;
}
if (cur_space_iter->second->ready)
{
m_logger->error("space {} no {} game id {} already ready", space_id, cur_space_iter->second->space_no, game_id);
return;
}
cur_space_iter->second->ready = true;
for (const auto &one_pair : cur_space_iter->second->players)
{
// 之前在等待进入场景的玩家 现在重新开始进入场景
utility::rpc_msg cur_msg;
cur_msg.args.push_back(game_id);
cur_msg.args.push_back(cur_space_iter->second->space_no);
cur_msg.args.push_back(space_id);
cur_msg.args.push_back(std::string());
cur_msg.args.push_back(one_pair.second.enter_info);
cur_msg.cmd = "reply_enter_space";
get_server()->call_server(this, one_pair.second.call_anchor, cur_msg);
}
if (!cur_space_iter->second->team_id.empty())
{
utility::rpc_msg team_forward_msg;
team_forward_msg.cmd = "notify_team_dungeon_created";
team_forward_msg.set_args(cur_space_iter->second->team_id, cur_space_iter->second->space_no, space_id, game_id);
get_server()->call_service("team_service", team_forward_msg);
}
}
return;
}
了解了完整的场景创建流程之后,我们还需要明确场景的创建时机。常规的场景创建时机为按需创建,这种模式主要处理的是单人场景以及组队场景。每次玩家发起进入场景请求时,space_service会以这个场景编号space_no和场景实例space_id开启新场景实例的创建,同时将这个玩家记录在此创建中场景的等待进入玩家列表中。这个场景需要创建在游戏服务器另外的场景进程上,当这个场景创建完成之后会通知回space_service这个新场景实例已经可用,此时通知这个场景等待列表的玩家场景进入得到允许,可以迁入此场景。
在这种模式下,玩家进入一个场景的延迟会比较高,因为场景创建是一个比较消耗CPU的操作,需要加载很多资源和配置表格数据。特别是这个场景比较大,依赖的资源与数据非常多的情况下,玩家进入指定场景的延迟可能会有数秒。所以一般对于主城等大场景,采取的是预先创建的模式,在服务器启动的时候就创建好一定数量的常用场景,这样玩家进入这些场景的时候就可以避免巨大的等待延迟,达到秒切的目的。space_service::init中的代码就是为这个预先创建常用场景服务的,会遍历场景表里的每行配置数据,如果发现配置数据里开启了自动选择同编号随机场景auto_select_when_empty_id的功能,则会开启一个定时器来渐进的创建这些场景:
bool space_service::init(const json::object_t& data)
{
if(!base_service::init(data))
{
return false;
}
auto cur_data_mgr = utility::typed_matrix_data_manager::instance();
if(!cur_data_mgr)
{
return false;
}
m_space_config_data = cur_data_mgr->get("space");
if (!m_space_config_data)
{
m_logger->error("cant get data config for space");
return false;
}
auto space_no_column = m_space_config_data->get_column_idx("space_no");
auto space_type_column = m_space_config_data->get_column_idx("space_type");
if(!space_no_column.valid() || ! space_type_column.valid())
{
return false;
}
auto temp_row = m_space_config_data->begin_row();
while(temp_row.valid())
{
auto cur_row = temp_row;
temp_row = m_space_config_data->next_row(temp_row);
std::uint32_t cur_space_no;
std::uint32_t cur_space_type;
if(!cur_row.expect_value(space_no_column, cur_space_no))
{
continue;
}
if(!cur_row.expect_value(space_type_column, cur_space_type))
{
continue;
}
auto cur_space_type_info = misc::space_type_info_mgr::get_space_type_info(cur_space_type);
if(!cur_space_type_info)
{
continue;
}
if(cur_space_type_info->auto_select_when_empty_id)
{
m_init_spaces_to_create.push_back(std::make_pair(cur_space_no, cur_space_type));
}
}
m_logger->info("init space is {}", serialize::encode(m_init_spaces_to_create).dump());
add_timer_with_gap(std::chrono::milliseconds(5 * 1000), [=]()
{
create_init_spaces();
});
report_ready();
return true;
}
这里加一个计时器是为了等待所有的space_server进程注册过来,避免创建场景时找不到可用的space_server进程。极端情况下,这个5s的超时过后space_server进程还没有注册过来,此时需要继续等待:
void space_service::create_init_spaces()
{
if(m_game_loads.empty())
{
add_timer_with_gap(std::chrono::milliseconds(5 * 1000), [=]()
{
create_init_spaces();
});
return;
}
for(const auto& one_pair: m_init_spaces_to_create)
{
do_create_space(one_pair.first, one_pair.second, std::string{});
}
m_init_spaces_to_create.clear();
}
上面的实现其实也有很大的问题,如果只有一部分的space_server注册过来,这些预创建的场景的压力就全都在少数的space_server进程上了。正常的做法是限定一个space_server的最大负载。如果大于此负载,则后续场景不再创建,继续开启计时器等待,在下次create_init_spaces时继续寻找合适的space_server去消耗m_init_spaces_to_create中剩下的场景。
实际的项目中单space_no的预先创建场景数量并不永远是1,因为单个进程单个场景里的人数承载是有限的,为了处理大量的玩家,一般会给每个space_no来指定需要预先创建的场景的个数,这里的实现只是为了偷懒。
此外预先创建并不只是在服务器启动的时候去执行,还可以在某些需要大量的小场景创建的活动开始之前执行。例如游戏每周五晚上八点会开启某种1v1的匹配活动,每组人员匹配成功之后都会进入一个专属的小场景中进行决斗。由于这个玩法的奖励丰厚,导致参与的玩家非常的多,在八点之后的瞬间就会创建巨量的小场景,此时全服的CPU都会有一个非常明显的上升,出现长时间的卡顿。为了解决这个卡顿问题,我们采取了每周五晚上七点开始慢慢的每隔10s创建一个小场景实例,直到九点钟此玩法结束。这样的慢慢预先创建就达到了削峰的作用,从而解决了瞬间批量创建导致的长时间卡顿。
上面介绍的就是预先创建场景的流程,实际情况下可能会出现玩家人数太多导致场景太拥挤,负载太高的问题。此时我们需要做定期的基于负载均衡的场景数量扩张,如果场景配置数据里开启了auto_create_new_heavy_load的话就会自动执行此流程。这个流程的入口在check_heavy_load_auto_create函数中,这个函数会定期的扫描这些开启了自动扩容的场景里的平均人数负载,如果大于了80%则会自动的创建一个新实例。space_service在初始化的时候会收集这些类型的space,并存储到m_check_load_create_spaces:
bool space_service::init(const json::object_t& data)
{
// 省略很多代码
auto temp_row = m_space_config_data->begin_row();
while(temp_row.valid())
{
auto cur_row = temp_row;
temp_row = m_space_config_data->next_row(temp_row);
std::uint32_t cur_space_no;
std::uint32_t cur_space_type;
if(!cur_row.expect_value(space_no_column, cur_space_no))
{
continue;
}
if(!cur_row.expect_value(space_type_column, cur_space_type))
{
continue;
}
auto cur_space_type_info = misc::space_type_info_mgr::get_space_type_info(cur_space_type);
if(!cur_space_type_info)
{
continue;
}
if(cur_space_type_info->auto_create_new_heavy_load)
{
m_check_load_create_spaces.push_back(std::make_pair(cur_space_no, cur_space_type));
}
}
m_logger->info("auto crate space is {}", serialize::encode(m_check_load_create_spaces).dump())
add_timer_with_gap(std::chrono::milliseconds(5 * 1000), [=]()
{
check_heavy_load_auto_create();
});
report_ready();
return true;
}
void space_service::check_heavy_load_auto_create()
{
// 会定期的扫描这些开启了自动扩容的场景里的平均人数负载,如果大于了`80%`则会自动的创建一个新实例:
add_timer_with_gap(std::chrono::milliseconds(5 * 1000), [=]()
{
check_heavy_load_auto_create();
});
std::vector<std::pair<std::uint32_t, std::uint32_t>> need_create_spaces;
for(auto [cur_space_no, cur_space_type]: m_check_load_create_spaces)
{
auto temp_iter = m_spaces_by_no.find(cur_space_no);
if(temp_iter == m_spaces_by_no.end())
{
continue;
}
const auto& cur_space_ids = temp_iter->second;
int space_instance_count = 0;
int space_player_count = 0;
for(const auto& one_space_id: cur_space_ids)
{
auto cur_mono_space_instance_iter = m_mono_spaces.find(one_space_id);
if(cur_mono_space_instance_iter != m_mono_spaces.end())
{
space_instance_count++;
space_player_count += cur_mono_space_instance_iter->second->players.size();
}
}
auto cur_space_type_info = misc::space_type_info_mgr::get_space_type_info(cur_space_type);
if(cur_space_type_info && space_player_count > (space_instance_count * cur_space_type_info->max_player_load) * 0.8)
{
need_create_spaces.push_back(std::make_pair(cur_space_no, cur_space_type));
}
}
m_logger->info("check_heavy_load_auto_create with result {}", serialize::encode(need_create_spaces).dump());
for(auto one_space_pair: need_create_spaces)
{
do_create_space(one_space_pair.first, one_space_pair.second, std::string{}, std::string{}, json::object_t{});
}
}
场景内实体创建流程
场景创建结束之后这个space_entity就根据自己的space_no对应的配置文件来开启自身独特的逻辑。由于场景作为游戏活动的主要承载容器,根据玩法的不同会执行各种不同的逻辑,因此这些逻辑都放在了space_entity的组件space_component上,space_entity在创建的时候会顺带的初始化这些component:
// bool space_entity::init(const json::object_t& data)
json::object_t components_data;
auto components_data_iter = data.find("components");
if(components_data_iter != data.end())
{
try
{
components_data_iter->second.get_to(components_data);
}
catch(const std::exception& e)
{
m_logger->error("components data not map");
return false;
}
}
if(!add_components<
space_cell_component,
space_navi_component,
space_event_component,
space_spawn_component,
space_match_component,
space_quest_component
>(components_data))
{
m_logger->error("fail to add components ");
return false;
}
其中最基础的逻辑就是创建场景中的所有entity,因为一个空荡荡的场景实在是毫无可玩性,这部分逻辑由space_spawn_component负责,目前只给space_entity设计了两种可以创建的server_entity,分别是陷阱trap_entity和怪物monster_entity。
在space_spawn_component组件启动的时候会从场景的配置文件中加载这些要创建的陷阱与怪物数据主要是其创建的位置、朝向、类型等信息。由于场景中的每个陷阱和怪物都可能带有独特的逻辑,所以我们创建这些server_entity的时候需要标注其对应的数据表的配置行是哪一个,也就是sid字段,代表这个server_entity的配置表流水号:
struct trap_sysd_columns
{
typed_matrix::typed_matrix::column_index spawn;
typed_matrix::typed_matrix::column_index pos;
typed_matrix::typed_matrix::column_index sid;
typed_matrix::typed_matrix::column_index trap_type;
typed_matrix::typed_matrix::column_index trap_radius;
typed_matrix::typed_matrix::column_index trap_height;
typed_matrix::typed_matrix::column_index player_trigger;
typed_matrix::typed_matrix::column_index monster_trigger;
bool valid() const
{
return spawn.valid() && pos.valid() && sid.valid() && trap_type.valid() && trap_radius.valid() && trap_height.valid() && player_trigger.valid() && monster_trigger.valid();
}
bool load(const typed_matrix::typed_matrix* trap_sysd);
};
struct monster_sysd_columns
{
typed_matrix::typed_matrix::column_index spawn;
typed_matrix::typed_matrix::column_index pos;
typed_matrix::typed_matrix::column_index sid;
typed_matrix::typed_matrix::column_index yaw;
typed_matrix::typed_matrix::column_index no;
typed_matrix::typed_matrix::column_index name;
bool valid() const
{
return spawn.valid() && pos.valid() && sid.valid() && no.valid() && name.valid() && yaw.valid();
}
bool load(const typed_matrix::typed_matrix* trap_sysd);
};
private:
class rpc_helper;
trap_sysd_columns m_trap_columns;
monster_sysd_columns m_monster_columns;
const typed_matrix::typed_matrix* m_trap_sysd;
const typed_matrix::typed_matrix* m_monster_sysd;
当space_spawn_component组件被激活的时候开始正式的通过space_traps和space_monster来根据数据来创建server_entity:
bool space_spawn_component::init(const json &data)
{
m_trap_sysd = m_owner->space_sysd("trap");
m_monster_sysd = m_owner->space_sysd("monster");
return m_trap_sysd && m_monster_sysd && m_trap_columns.load(m_trap_sysd) && m_monster_columns.load(m_monster_sysd);
}
void space_spawn_component::activate()
{
m_owner->logger()->info("space_spawn_component activate");
if (!spawn_traps())
{
m_owner->logger()->error("spawn_traps fail");
}
if (!spawn_monsters())
{
m_owner->logger()->error("spawn_monsters fail");
}
}
而根据一行配置数据去创建一个server_entity就是将所有相关配置数据填入初始化参数init_info和创生位置enter_info中,然后调用space_entity上提供的create_entity接口:
json cur_trap_prop;
cur_trap_prop["no"] = temp_trap_type;
cur_trap_prop["sid"] = temp_sid;
cur_trap_prop["trap_height_min"] = temp_trap_height[0];
cur_trap_prop["trap_height_max"] = temp_trap_height[1];
cur_trap_prop["trap_radius"] = temp_trap_radius;
cur_trap_prop["client_visible"] = true;
std::uint64_t cur_entity_flag = 0;
if (temp_player_trigger)
{
cur_entity_flag |= 1ull << std::uint64_t(enums::entity_flag::is_player);
}
if (temp_monster_trigger)
{
cur_entity_flag |= 1ull << std::uint64_t(enums::entity_flag::is_monster);
}
cur_trap_prop["trap_cb_any_flag"] = cur_entity_flag;
json::object_t trap_init_info, trap_enter_info;
trap_init_info["prop"] = cur_trap_prop;
trap_init_info["is_ghost"] = false;
trap_init_info["call_proxy"] = "";
trap_enter_info["pos"] = temp_born_pos;
trap_enter_info["yaw"] = 0;
return m_owner->create_entity("trap_entity", m_owner->gen_entity_id(), trap_init_info, trap_enter_info);
这个space_entity::create_entity就是一个对space_server::create_entity的简单封装,主要目的是为了保证每个被创建的actor_entity都能执行到enter_space:
actor_entity* space_entity::create_entity(const std::string& entity_type, const std::string& entity_id, json::object_t& init_info, const json::object_t& enter_info, std::uint64_t online_entity_id)
{
if(online_entity_id == 0)
{
online_entity_id = gen_online_entity_id();
}
std::string create_entity_error;
auto cur_entity = get_server()->create_entity(entity_type, entity_id, online_entity_id, init_info, create_entity_error);
if(!cur_entity)
{
m_logger->error("fail to create_entity type {} id {} with error {}", entity_type, entity_id, create_entity_error);
return nullptr;
}
auto cur_actor_entity = dynamic_cast<actor_entity*>(cur_entity);
if(!cur_actor_entity)
{
m_logger->error("fail to create actor_entity with entity_type {}", cur_entity->type_name());
get_server()->destroy_entity(cur_entity);
return nullptr;
}
// 省略一些代码
enter_space(cur_actor_entity, enter_info);
return cur_actor_entity;
}
场景进出流程
这里的enter_space负责设置actor_entity的位置,并在space_entity上构建每个类型的查找map,方便快速的根据online_entity_id查找当前场景内的某个actor_entity:
void space_entity::enter_space(actor_entity* cur_entity, const json::object_t& enter_info)
{
std::array<double, 3> cur_enter_pos = {0.0};
double cur_enter_yaw = 0;
try
{
enter_info.at("pos").get_to(cur_enter_pos);
enter_info.at("yaw").get_to(cur_enter_yaw);
}
catch(std::exception& e)
{
m_logger->error("enter info doesnt has pos yaw{}", e.what());
}
// 省略一些非重点代码
m_logger->info("entity {} enter space {} pos {}", cur_entity->entity_id(), entity_id(), json(cur_enter_pos).dump());
cur_entity->set_pos_yaw(cur_enter_pos, cur_enter_yaw);
m_total_entities[cur_entity->m_base_desc.m_type_id][cur_entity->m_base_desc.m_local_entity_id] = cur_entity;
if(cur_entity->is_player())
{
m_players[cur_entity->m_base_desc.m_local_entity_id] = cur_entity;
}
// 省略一些非重点代码
m_actors_by_online_id[cur_entity->online_entity_id()] = cur_entity;
m_entity_enter_counter[cur_entity->m_base_desc.m_type_id]++;
cur_entity->set_space(this);
auto cur_lambda = [cur_entity](space_component* cur_comp)
{
cur_comp->on_enter_space(cur_entity);
};
call_component_interface(cur_lambda);
}
同时这里先执行actor_entity::set_space来通知这个actor_entity来执行场景绑定,并通知这个actor_entity进入了新的场景, actor_entity所有组件执行on_enter_space。当set_space完成之后,再通知当前场景上的所有space_component来接受新的actor_entity进入:
void actor_entity::set_space(space_entity* in_space)
{
if(!m_space)
{
m_space = in_space;
enter_space();
}
else
{
assert(!in_space);
auto pre_space = m_space;
m_space = nullptr;
leave_space(pre_space);
}
}
class actor_component_interface
{
public:
virtual void on_leave_space(space_entity* cur_space)
{
}
virtual void on_enter_space()
{
}
};
void actor_entity::enter_space()
{
m_prop_flags = actor_data_prop_queue::get_actor_property_flags();
auto cur_lambda = [](actor_component* cur_comp)
{
cur_comp->on_enter_space();
};
call_component_interface(cur_lambda);
}
每个具体的actor_entity都可以复写这个enter_space,例如trap_entity就在enter_space的时候创建了两个AOI区域,来接收其他actor_entity的进出陷阱消息:
void trap_entity::enter_space()
{
actor_entity::enter_space();
get_space()->register_sid_entity<trap_entity>(this);
if(is_ghost())
{
return;
}
auto cur_actor_aoi_comp = get_component<actor_aoi_component>();
aoi::aoi_radius_controller cur_aoi_ctrl;
cur_aoi_ctrl.any_flag = m_prop_data.trap_cb_any_flag();
m_logger->info("trap aoi flag is {}", cur_aoi_ctrl.any_flag);
cur_aoi_ctrl.need_flag = m_prop_data.trap_cb_need_flag();
cur_aoi_ctrl.forbid_flag = m_prop_data.trap_cb_forbid_flag();
cur_aoi_ctrl.radius = m_prop_data.trap_radius();
cur_aoi_ctrl.min_height = m_prop_data.trap_height_min();
cur_aoi_ctrl.max_height = m_prop_data.trap_height_max();
cur_aoi_ctrl.max_interest_in = 30;
cur_actor_aoi_comp->add_aoi_radius(cur_aoi_ctrl, [this](actor_entity* other, bool is_enter)
{
if(is_enter)
{
if(m_aoi_in_cb)
{
m_aoi_in_cb(other);
}
}
else
{
if(m_aoi_leave_cb)
{
m_aoi_leave_cb(other->entity_id(), other->aoi_idx(), *other->get_call_proxy());
}
}
}, static_type_name());
}
上面介绍的是由场景负责创建的actor_entity的进入场景流程,由于玩家实体player_entity并不是由场景创建的,因此可以跳过开头的space_entity::create_entity流程,直接切入到space_entity::enter_space来执行,后面会在玩家进出场景中介绍。
当单次陷阱被触发或者怪物被杀死时,他们会主动的调用space_entity上销毁自己的接口:
void space_entity::on_entity_killed(actor_entity* target, actor_entity* killer)
{
if(!target->is_player())
{
// 处理非玩家的死亡逻辑
get_server()->destroy_entity(target);
return;
}
// 省略非重点代码
}
这里的destroy_entity会调用到server_entity::deactivate,如果当前是actor_entity,则会判断自身是否已经在场景内,如果有的话先执行leave_space操作:
void space_server::destroy_entity(entity::server_entity* cur_entity)
{
m_logger->info("deactive entity {} with type {}", cur_entity->entity_id(), cur_entity->m_base_desc.m_type_name);
cur_entity->deactivate();
m_entities_to_destroy.push_back(cur_entity);
}
void actor_entity::deactivate()
{
auto cur_space = get_space();
if(cur_space)
{
cur_space->leave_space(this);
}
clear_components();
m_dispatcher.clear();
m_misc_dispatcher.clear();
m_prop_dispatcher.clear();
m_migrate_in_finish_dispatcher.clear();
server_entity::deactivate();
}
这里的space_entity::leave_space刚好是之前enter_space的逆操作,会优先通知space_component这个actor_entity的离开,然后再执行actor_entity::set_space(nullptr)来通知到这个actor_entity上的所有actor_component来执行on_leave_space操作,最后再清除当前space_entity上对这个actor_entity的所有记录:
bool space_entity::leave_space(actor_entity* cur_entity)
{
if(!cur_entity)
{
return false;
}
if(cur_entity->get_space() != this)
{
return false;
}
auto cur_lambda = [cur_entity](space_component* cur_comp)
{
cur_comp->on_leave_space(cur_entity);
};
call_component_interface(cur_lambda);
m_aoi_manager->remove_pos_entity(aoi::aoi_pos_idx{cur_entity->aoi_idx()});
cur_entity->set_space(nullptr);
auto cur_entity_id = cur_entity->entity_id();
// 省略非重点代码
m_actors_by_online_id.erase(cur_entity->online_entity_id());
m_entity_leave_counter[cur_entity->m_base_desc.m_type_id]++;
// 省略非重点代码
return true;
}
场景任务流程
不同的场景提供了不同的游戏体验,玩家、怪物、陷阱等实体都是这些游戏体验中的角色。但是体验中光有角色是远远不够的,好需要有剧本,在剧本中来制定整个体验中各个角色所承担的任务,以及任务之间的关联。由于游戏场景中的策划快速铺量和定制化的需求,这些任务的关联不会直接在代码里实现,而是策划指定一些基础的任务规则需求,然后策划在配置数据中利用这些规则来创建具体的任务流程实例,并增加一些逻辑判定来处理任务之间的关联。这就是基于配表的场景流程,在space_entity中提供了一个space_quest_component组件来对这些任务规则做支持,为了统一管理各项规则,这里给所有的任务规则建立了一个基类space_quest:
class space_quest
{
public:
typed_matrix::typed_row m_sysd;
space_quest_component* m_quest_component;
space_quest(space_quest_component* in_quest_component, typed_matrix::typed_row in_sysd)
: m_sysd(in_sysd)
, m_quest_component(in_quest_component)
{
}
virtual bool enter()
{
return true;
}
virtual void leave()
{
}
virtual ~space_quest()
{
}
protected:
void change_to_next(std::uint32_t next_quest_id);
};
这里的space_quest里的m_sysd对应了场景任务表里的一行配置数据,每行配置数据都有一个流水号quest_id来关联,当这个流程被激活的时候会触发其enter()函数来开启自定义逻辑,当流程结束的时候调用leave()函数来做一些清理工作,流程之间的跳转则需要借助change_to_next来执行:
void space_quest::change_to_next(std::uint32_t next_quest_id)
{
m_quest_component->change_to_quest(next_quest_id);
}
void space_quest_component::change_to_quest(std::uint32_t next_quest_id)
{
auto pre_quest = m_current_quest;
m_current_quest = nullptr;
if(pre_quest)
{
pre_quest->leave();
delete pre_quest;
}
auto cur_row = m_quest_sysd->get_row(next_quest_id);
if(!cur_row.valid())
{
return;
}
std::string cur_quest_type;
if(!cur_row.expect_value("quest_type", cur_quest_type))
{
m_owner->logger()->error("cant find quest_type for row {}", next_quest_id);
return;
}
if(cur_quest_type == "wait_seconds")
{
m_current_quest = new wait_second_quest(this, cur_row);
}
else if(cur_quest_type == "kill_all_monsters")
{
m_current_quest = new kill_all_monsters_quest(this, cur_row);
}
// 省略很多具体的quest子类
else if(cur_quest_type == "final")
{
m_current_quest = new final_quest(this, cur_row);
}
if(!m_current_quest)
{
m_owner->logger()->error("fail to create quest of type {}", cur_quest_type);
return;
}
m_owner->logger()->info("enter quest type {} id {}", cur_quest_type, next_quest_id);
if(!m_current_quest->enter())
{
m_owner->logger()->error("enter quest fail type {} id {}", cur_quest_type, next_quest_id);
}
// 先enter 再设置quest 这样等到客户端接收到quest id改变之后 相关的数据已经设置好了
m_owner->set_quest_id(next_quest_id);
}
在space_quest_component上有m_current_quest字段来记录当前正在执行的任务流程,当要切换任务流程的时候,会先调用之前任务流程的leave,并delete来释放内存。然后再通过读表来获取新流程的类型并创建新的space_quest实例,并调用其enter函数,这样流程的切换就完成了。space_quest_component在激活的时候会默认强制切换到流水号为1的任务上:
bool space_quest_component::init(const json& data)
{
m_quest_sysd = m_owner->space_sysd("quest");
return true;
}
void space_quest_component::activate()
{
if(m_owner->is_cell_space())
{
return;
}
change_to_quest(1);
}
但是流程什么时候切换还是得依靠space_quest的具体子类逻辑去执行,space_quest_component无法控制。就以最简单的wait_seconds来说,需要在对应的配置数据里提供好等待时间delay和下一个任务的流水号next:
class wait_second_quest: public space_quest
{
public:
using space_quest::space_quest;
bool enter() override
{
std::uint32_t next_sid;
float delay_seconds;
if(!m_sysd.expect_value("next", next_sid) || !m_sysd.expect_value("delay", delay_seconds))
{
return false;
}
m_quest_component->get_owner()->add_timer_with_gap(std::chrono::milliseconds(int(delay_seconds*1000)), [this, next_sid]()
{
change_to_next(next_sid);
});
return true;
}
};
而对于比较复杂的space_quest,则需要在space_entity上增加各种事件监听函数,来获取当前子任务的进度。就以kill_all_monsters_quest来说,这个任务需要击杀指定流水号集合里的所有怪物,因此自身需要提供一个m_monster_sids来存储还需要击杀的怪物流水号,同时在enter的时候根据配表来初始化这个集合,并在space_entity上注册sid_monster_killed这个事件来对接on_monster_killed函数,从而更新m_monster_sids,并判定当前任务的完成以及执行后续任务的跳转:
class kill_all_monsters_quest: public space_quest
{
std::unordered_set<std::uint32_t> m_monster_sids;
std::uint32_t m_next_sid;
utility::listen_handler<std::string> m_listen_handler;
private:
void on_monster_killed(std::uint32_t monster_sid)
{
if(m_monster_sids.erase(monster_sid))
{
auto cur_space_data_entity = m_quest_component->get_owner()->get_space_data_entity();
for(const auto& one_pair: cur_space_data_entity->prop_data().quest_monsters())
{
if(one_pair.second == monster_sid)
{
cur_space_data_entity->prop_proxy().quest_monsters().erase(one_pair.first);
break;
}
}
}
if(m_monster_sids.empty())
{
change_to_next(m_next_sid);
}
}
public:
using space_quest::space_quest;
bool enter() override
{
if(!m_sysd.expect_value("next", m_next_sid) || !m_sysd.expect_value("monsters", m_monster_sids))
{
return false;
}
std::function<void(const std::string&, const json&)> cur_lambda = [this](const std::string& event, const json& detail)
{
if(detail.is_number_unsigned())
{
on_monster_killed(detail.get<std::uint32_t>());
}
};
m_listen_handler = m_quest_component->get_owner()->dispatcher().add_listener(std::string("sid_monster_killed"), cur_lambda);
return true;
}
void leave() override
{
m_quest_component->get_owner()->dispatcher().remove_listener(m_listen_handler);
}
};
当这个kill_all_monsters_quest彻底完成的时候,其leave函数就会删除之前注册的sid_monster_killed事件处理handler,避免其被delete之后还接受新的怪物被击杀事件,引发crash。
在space_quest_component中提供了一些基础的流程定义,后续有需要的话可以非常方便的进行扩展,根据之前的项目经验,大型MMO一般100个流程规则基本就可以覆盖了:
if(cur_quest_type == "wait_seconds")
{
m_current_quest = new wait_second_quest(this, cur_row);
}
else if(cur_quest_type == "kill_all_monsters")
{
m_current_quest = new kill_all_monsters_quest(this, cur_row);
}
else if(cur_quest_type == "kill_one_monster")
{
m_current_quest = new kill_one_monster_quest(this, cur_row);
}
else if(cur_quest_type == "trig_one_trap")
{
m_current_quest = new wait_one_trap_trig_quest(this, cur_row);
}
else if(cur_quest_type == "trig_all_traps")
{
m_current_quest = new wait_all_traps_trig_quest(this, cur_row);
}
else if(cur_quest_type == "fill_all_traps")
{
m_current_quest = new wait_traps_fill_quest(this, cur_row);
}
else if(cur_quest_type == "wait_one_event")
{
m_current_quest = new wait_one_event_quest(this, cur_row);
}
else if(cur_quest_type == "wait_all_events")
{
m_current_quest = new wait_all_events_quest(this, cur_row);
}
else if(cur_quest_type == "final")
{
m_current_quest = new final_quest(this, cur_row);
}
在副本流程逻辑彻底完成之后,m_current_quest应该会切换到final_quest上,这个space_quest什么都不做,不执行任何的跳转,代表终止流程:
class final_quest: public space_quest
{
public:
using space_quest::space_quest;
};
场景销毁流程
场景流程完成之后,服务器就需要回收这个场景所占据的所有资源。例如在space_entity的leave_space逻辑中,会记录当前剩下的玩家数量,如果剩下的玩家数量变成了0,也会开启一个自动销毁逻辑:
bool space_entity::leave_space(actor_entity* cur_entity)
{
// 省略一些代码
if(cur_entity->is_player() && m_total_entities[cur_entity->m_base_desc.m_type_id].empty())
{
add_auto_destroy_timer();
}
// 省略一些代码
return true;
}
const std::uint32_t m_auto_desctroy_gap_seconds = 60;
void space_entity::add_auto_destroy_timer()
{
if(m_auto_destroy_timer.valid())
{
return;
}
if(!m_space_type_info->is_town_space && !m_space_type_info->is_union_space)
{
m_auto_destroy_timer = add_timer_with_gap(std::chrono::milliseconds(m_auto_desctroy_gap_seconds * 1000), [this]()
{
auto_destroy();
});
}
}
这里设置为了所有玩家离开之后,60秒倒计时销毁:
void space_entity::auto_destroy()
{
m_auto_destroy_timer.reset();
if(!m_players.empty())
{
// 有玩家 暂时不销毁
return;
}
// 如果场景内没有玩家 则尝试自动销毁
m_logger->warn("space_entity::auto_destroy");
utility::rpc_msg cur_request_msg;
cur_request_msg.cmd = "request_destroy_space";
cur_request_msg.args.push_back(entity_id());
cur_request_msg.from = *get_call_proxy();
get_server()->call_service("space_service", cur_request_msg);
}
这里并不执行真正的销毁逻辑,而是向space_service发起notify_destroy_space这个rpc来通知此场景进程上的space_manager执行场景销毁逻辑。这个notify_destroy_space有一个前提条件,此space内已经没有玩家:
void space_service::request_destroy_space(const utility::rpc_msg &data, const std::string &space_id)
{
auto cur_space_type_iter = m_space_types.find(space_id);
utility::rpc_msg cur_msg;
do
{
if (cur_space_type_iter == m_space_types.end())
{
cur_msg.err = "invalid space";
break;
}
if (!cur_space_type_iter->second->is_union_space)
{
auto cur_space_iter = m_mono_spaces.find(space_id);
if (cur_space_iter == m_mono_spaces.end())
{
cur_msg.err = "invalid space";
break;
}
if (!cur_space_iter->second->players.empty())
{
cur_msg.err = "space has player";
break;
}
}
else
{
// 暂时省略另外一个分支
}
} while (0);
cur_msg.cmd = "reply_destroy_space";
cur_msg.args.push_back(space_id);
get_server()->call_server(this, data.from, cur_msg);
if (cur_msg.err.empty())
{
destroy_space_impl(space_id, cur_space_type_iter->second);
}
else
{
m_logger->error("request_destroy_space space_id {} err {}", space_id, cur_msg.err);
}
}
void space_service::destroy_space_impl(const std::string &space_id, const misc::space_type_info *space_type)
{
m_logger->info("destroy_space_impl {}", space_id);
if (!space_type->is_union_space)
{
auto cur_space_iter = m_mono_spaces.find(space_id);
if (cur_space_iter == m_mono_spaces.end())
{
return;
}
if (!cur_space_iter->second->players.empty())
{
return;
}
auto cur_game_iter = m_game_loads.find(cur_space_iter->second->game_id);
if (cur_game_iter == m_game_loads.end())
{
return;
}
m_spaces_by_no[cur_space_iter->second->space_no].erase(cur_space_iter->first);
utility::rpc_msg cur_msg;
cur_msg.cmd = "notify_destroy_space";
cur_msg.args.push_back(space_id);
auto cur_game_id = cur_space_iter->second->game_id;
call_space_manager(cur_game_id, cur_msg);
m_mono_spaces.erase(cur_space_iter);
cur_game_iter->second.mono_spaces.erase(space_id);
}
else
{
// 暂时省略另外一个分支
}
}
这里的space_manager::notify_destroy_space执行的就很暴力了,通知指定场景内的所有actor执行退出逻辑,然后执行这个space_entity的自毁:
void space_manager::notify_destroy_space(const utility::rpc_msg &data, const std::string &space_id)
{
auto cur_iter = m_spaces.find(space_id);
if (cur_iter == m_spaces.end())
{
m_logger->error("fail to destroy id {} ", space_id);
return;
}
cur_iter->second->clear_actors();
m_server->destroy_entity(cur_iter->second);
m_spaces.erase(cur_iter);
}
这里的clear_actors区分了一下是否是玩家类型,如果不是玩家类型则在退出之后直接销毁自身:
void space_entity::clear_actors()
{
m_logger->warn("clear_actors");
for(auto& one_type_ent_vec: m_total_entities)
{
std::vector<actor_entity*> temp_actors;
for(auto one_entity_pair: one_type_ent_vec)
{
auto cur_entity = one_entity_pair.second;
if(!cur_entity)
{
continue;
}
temp_actors.push_back(cur_entity);
}
for(auto one_actor: temp_actors)
{
leave_space(one_actor);
if(!one_actor->is_player() && !one_actor->is_exact_type<space_data_entity>())
{
get_server()->destroy_entity(one_actor);
}
}
}
}
对于有些类型的场景来说这个60秒的等待时间可能太长了,特别是一些高频创建和销毁的场景,典型例子就是匹配场景。为了加速场景资源的回收,在比赛结束finish_match中会触发一个十秒的销毁倒计时, 内部会通知space_service来执行request_countdown_destroy:
void space_match_component::finish_match()
{
m_owner->cancel_timer(m_match_finish_timer);
m_match_finish_timer.reset();
m_is_match_finish = true;
m_owner->get_space_data_entity()->prop_proxy().match_finish().set(true);
std::uint32_t cur_winner_faction = m_faction_num;
// 省略一些代码
utility::rpc_msg finish_msg;
finish_msg.cmd = "report_match_finish";
finish_msg.set_args(m_owner->match_uid(), cur_winner_faction, delta_scores);
m_owner->call_service("match_service", finish_msg);
utility::rpc_msg countdown_msg;
countdown_msg.cmd = "request_countdown_destroy";
std::uint32_t countdown_ts = 10; // 10s之后自动销毁
countdown_msg.set_args(m_owner->entity_id(), countdown_ts);
m_owner->call_service("space_service", countdown_msg);
m_owner->get_space_data_entity()->prop_proxy().destroy_ts().set(utility::timer_manager::now_ts() + 1000 * countdown_ts);
}
这个request_countdown_destroy负责在space_service上开启一个销毁计时器,时间到了之后直接执行之前介绍的destroy_space_impl:
void space_service::request_countdown_destroy(const utility::rpc_msg& data, const std::string& space_id, std::uint32_t countdown_seconds)
{
m_logger->info("request_countdown_destroy space_id {} countdown_seconds {}", space_id, countdown_seconds);
auto cur_space_type_iter = m_space_types.find(space_id);
if(cur_space_type_iter == m_space_types.end())
{
return;
}
auto cur_space_type_info = cur_space_type_iter->second;
if(cur_space_type_info->is_union_space)
{
return;
}
auto cur_mono_space_iter = m_mono_spaces.find(space_id);
if(cur_mono_space_iter == m_mono_spaces.end())
{
return;
}
kick_players_impl(space_id, cur_space_type_info);
add_timer_with_gap(std::chrono::milliseconds(countdown_seconds * 1000), [=]()
{
kick_players_impl(space_id, cur_space_type_info);
destroy_space_impl(space_id, cur_space_type_info);
});
}
这里在开启计时器之间和计时器到期之后都会执行一下kick_players_impl来通知踢出当前场景里的所有玩家,因为异步过程中可能会出现玩家传送到当前场景的情况,所以这里剔除两次来保证destroy_space_impl执行的时候场景内玩家已经空了。
BigWorld 的场景管理
Cell与Space
在bigworld中每个场景都有一个Space结构来表示,每个Space都有一个uint32的唯一标识符:
class Space
{
public:
Space( SpaceID id = 0, bool isNewSpace = true,
bool isFromDB = false, uint32 preferredIP = 0 );
~Space();
void shutDown();
SpaceID id() const { return id_; }
CellData * addCell( CellApp & cellApp, CellData * pCellToSplit = NULL );
CellData * addCell();
void addCell( CellData * pCell );
CellData * addCellTo( CellData * pCellToSplit );
private:
SpaceID id_;
Cells cells_;
CM::BSPNode * pRoot_;
};
然后对于分布式的场景,整个逻辑场景会由多个方块场景聚合而成,每个方块部分对应一个CellData,然后所有的方块存储在Cells这个CellData的线性容器中:
class Cells
{
private:
typedef BW::vector< CellData * > Container;
public:
Cells() {}
~Cells();
void add( CellData * pData ) { cells_.push_back( pData ); }
void erase( CellData * pData );
private:
Container cells_;
};
值得注意的是每个CellData除了在这个Cells里线性存储之外,CellData其实还有一个二叉树状结构,它继承自BSPNode,这个BSP其实就是Binary Space Partitioning的简称。每个Space都有一个CM::BSPNode * pRoot_的成员变量来存储二叉分割树的根节点,同时每个BSPNode都有一个BW::Rect range_代表当前Cell负责的场景区域:
class CellData : public CM::BSPNode
{
public:
CellData( CellApp & cellApp, Space & space );
CellData( Space & space, BinaryIStream & data );
~CellData();
};
class BSPNode : public WatcherProvider
{
public:
BSPNode( const BW::Rect & range );
virtual ~BSPNode() {};
protected:
BW::Rect range_;
EntityBoundLevels entityBoundLevels_;
BW::Rect chunkBounds_;
};
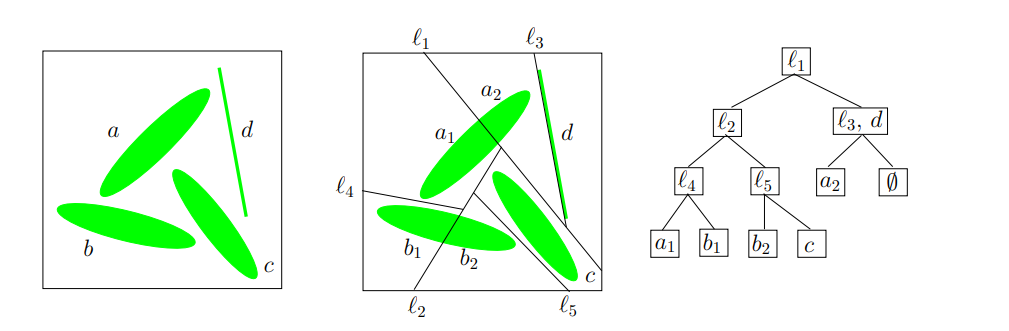
在二维平面里的二叉分割允许使用任意的直线,不过这里的Binary Space Partitioning会限制为只能水平划分或者垂直划分,对应的addCell接口里需要显示用bool isHorizontal来表明是水平划分还是垂直划分:
virtual CM::BSPNode * addCell( CellData * pCell, bool isHorizontal );
此时就退化成了一个KDTree:
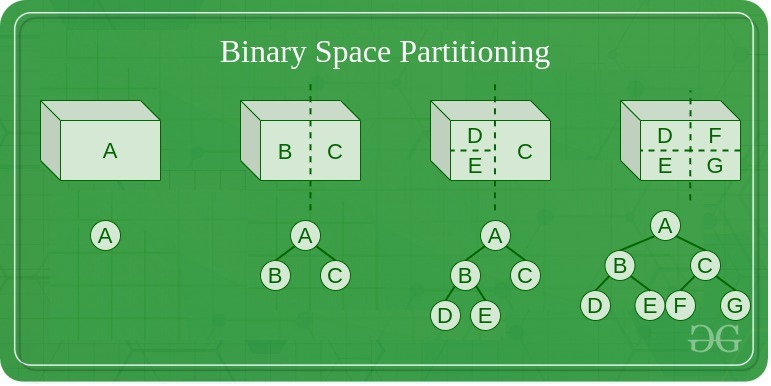
下面就是一个具体按照水平或者竖直方向进行划分的的Space实例:
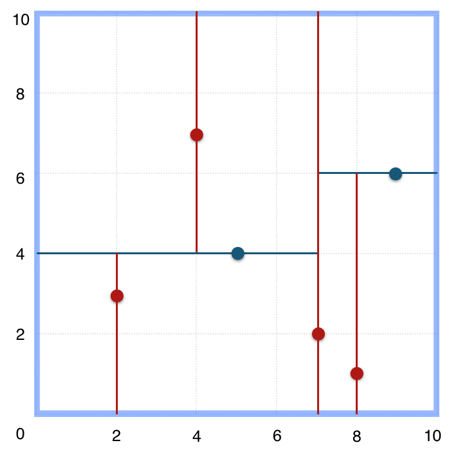
此时对应的KDTree就是这样的:
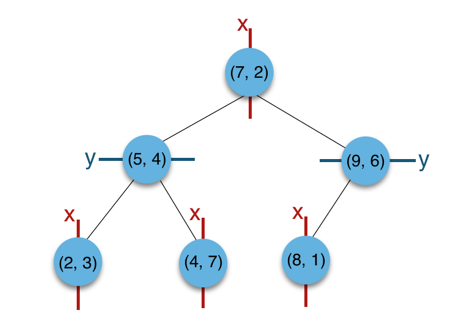
注意到前面addCell的时候,新的Cell对应的分割轴上的区间大小其实是0,也就是说新Cell对应的Rect面积是0。新添加的Cell的Rect会在后续的负载均衡中进行调整:
CM::BSPNode * CellData::addCell( CellData * pCell, bool isHorizontal )
{
const float partitionPt = range_.range1D( isHorizontal ).max_;
BW::Rect newRange = range_;
newRange.range1D( isHorizontal ).min_ = partitionPt;
newRange.range1D( isHorizontal ).max_ = partitionPt;
pCell->setRange( newRange );
// TODO: At the moment, the new cell is always added to the right or top. It
// may be better to choose the side based on which side is unbounded. A
// simple test might be to check if fabs( min_ ) < fabs( max_ ) of
// range_.range1D( isHorizontal ).
return new CM::InternalNode( this, pCell,
isHorizontal, range_, partitionPt );
}
注意这里最后的返回值是CM::InternalNode,这个类型也继承自BSPNode,传入的两个CellData会作为当前InternalNode的左右子节点存在:
InternalNode::InternalNode( BSPNode * pLeft, BSPNode * pRight,
bool isHorizontal, const BW::Rect & range, float position ) :
// Note: There are three constructors.
BSPNode( range )
{
this->init();
pLeft_ = pLeft;
pRight_ = pRight;
isHorizontal_ = isHorizontal;
position_ = position;
}
所以整个BSPNode被划分为了两种类型:
- 一种是有两个子节点的
InternalNode类型,是BSP树里的内部节点,这个类型不负责具体的场景区域, - 另外一种是没有子节点的
CellData类型,是BSP树里的叶子节点,每个叶子节点负责一块具体的场景区域
Space里存储的根节点CM::BSPNode * pRoot_则可能是两种节点类型中的一种。
Space的创建
在Bigworld里,CellAppMgr负责创建Space,并将其分配到合适的CellApp上运行。这个创建Space的入口函数是createEntityInNewSpace,这个函数会在CellAppMgr收到创建新Space的请求时被调用:
void CellAppMgr::createEntityInNewSpace( const Mercury::Address& srcAddr,
const Mercury::UnpackedMessageHeader& header,
BinaryIStream & data )
{
bool doesSpaceHavePreferredIP;
data >> doesSpaceHavePreferredIP;
uint32 preferredIP = (doesSpaceHavePreferredIP ? srcAddr.ip : 0);
if (doesSpaceHavePreferredIP)
{
TRACE_MSG( "CellAppMgr::createEntityInNewSpace: "
"Creating space with preferred IP %s\n",
srcAddr.ipAsString() );
}
Space * pSpace = new Space( this->generateSpaceID(),
/*isNewSpace*/ true, /*isFromDB*/ false,
preferredIP );
if (pSpace->addCell())
{
this->addSpace( pSpace );
}
else
{
ERROR_MSG( "CellAppMgr::createEntityInNewSpace: "
"Unable to add a cell to space %u.\n", pSpace->id() );
bw_safe_delete( pSpace );
}
//passing pSpace==NULL is needed here to send the errors (and is safe)
this->createEntityCommon( pSpace, srcAddr, header, data );
}
这个RPC的第一个参数是bool doesSpaceHavePreferredIP,表示是否要求在RPC发送者的IP地址上创建Space。如果为false,则会将这个preferredIP设置为0,代表随机选择一个CellApp作为Space的CellApp。然后CellAppMgr会通过generateSpaceID来生成一个随机生成的SpaceID作为唯一标识符,并以这些参数来New一个新的Space对象:
Space::Space( SpaceID id, bool isNewSpace, bool isFromDB, uint32 preferredIP ) :
id_( id ),
pRoot_( NULL ),
isBalancing_( false ),
preferredIP_( preferredIP ),
isFirstCell_( isNewSpace ),
isFromDB_( isFromDB ),
hasHadEntities_( !isFromDB ),
waitForChunkBoundUpdateCount_( 0 ),
spaceGrid_( 0.f ),
spaceBounds_( 0.f, 0.f, 0.f, 0.f ),
artificialMinLoad_( 0.f )
{
}
在Space的构造函数里,pRoot_被初始化为nullptr, 为了维持树结构的有效性,Space被CellAppMgr创建的时候会自动的通过addCell接口来创建根节点:
CellData * Space::addCell()
{
CellAppGroup * pGroup = NULL;
if (!cells_.empty())
{
pGroup = cells_.front()->cellApp().pGroup();
}
const CellApps & cellApps = CellAppMgr::instance().cellApps();
CellApp * pCellApp = cellApps.findBestCellApp( this, pGroup );
return pCellApp != NULL ? this->addCell( *pCellApp ) : NULL;
}
Space::addCell这个接口会通过findBestCellApp选择一个负载合适的CellApp来承载这个完整的Space。然后再以这个pCellApp作为唯一参数去调用双参数形式的addCell,此时第二个参数默认为nullptr:
CellData * Space::addCell( CellApp & cellApp, CellData * pCellToSplit = NULL )
{
INFO_MSG( "Space::addCell: Space %u. CellApp %u (%s)\n",
id_, cellApp.id(), cellApp.addr().c_str() );
if (cellApp.isRetiring())
{
WARNING_MSG( "Space::addCell: Adding a cell to CellApp %u (%s) which "
"is retiring.\n", cellApp.id(), cellApp.addr().c_str() );
}
CellData * pCellData = new CellData( cellApp, *this );
if (pCellToSplit)
{
MF_ASSERT( pRoot_ != NULL );
pRoot_ = pRoot_->addCellTo( pCellData, pCellToSplit );
MF_ASSERT( pRoot_ != NULL );
}
else
{
pRoot_ = (pRoot_ ? pRoot_->addCell( pCellData ) : pCellData);
}
pRoot_->updateLoad();
// 省略后续代码
}
这里的会发现此时的pRoot_为空,因此直接使用新创建的pCellData作为pRoot_,因此刚创建的时候Space的BSP树只有一个叶子节点CellData,负责所有区域。
在初始状态下,Space的BSP树只有一个叶子节点CellData,负责所有区域,后续会根据负载均衡的结果来不断的调整BSP树的结构,来增减CellData节点。这部分的内容将留到后续的章节中介绍。
目前执行这个远程调用的代码只有一处,在BaseApp暴露给Python脚本的Base::py_createInNewSpace里:
/**
* This method implements the base's script method to create an associated
* entity on a cell in a new space.
*/
PyObject * Base::py_createInNewSpace( PyObject * args, PyObject * kwargs )
{
const char * errorPrefix = "Base.createEntityInNewSpace: ";
PyObject * pPreferThisMachine = NULL;
static char * keywords[] =
{
const_cast< char * >( "shouldPreferThisMachine" ),
NULL
};
if (!PyArg_ParseTupleAndKeywords( args, kwargs,
"|O:Base.createEntityInNewSpace", keywords, &pPreferThisMachine ))
{
return NULL;
}
std::auto_ptr< Mercury::ReplyMessageHandler > pHandler(
this->prepareForCellCreate( errorPrefix ) );
if (!pHandler.get())
{
return NULL;
}
bool shouldPreferThisMachine = false;
if (pPreferThisMachine)
{
shouldPreferThisMachine = PyObject_IsTrue( pPreferThisMachine );
}
Mercury::Channel & channel =
BaseApp::getChannel( BaseApp::instance().cellAppMgrAddr() );
// We don't use the channel's own bundle here because the streaming might
// fail and the message might need to be aborted halfway through.
std::auto_ptr< Mercury::Bundle > pBundle( channel.newBundle() );
// Start a request to the Cell App Manager.
pBundle->startRequest( CellAppMgrInterface::createEntityInNewSpace,
pHandler.get() );
*pBundle << shouldPreferThisMachine;
*pBundle << this->channel().version();
*pBundle << false; /* isRestore */
// See if we can add the necessary data to the bundle
if (!this->addCellCreationData( *pBundle, errorPrefix ))
{
isCreateCellPending_ = false;
isGetCellPending_ = false;
return NULL;
}
// Send it to the Cell App Manager.
channel.send( pBundle.get() );
pHandler.release(); // Now owned by Mercury.
Py_RETURN_NONE;
}
这个接口会暴露给Python脚本调用,从而创建一个新的Space,并在这个Space里创建一个新的实体。这个接口唯一的参数是shouldPreferThisMachine,表示是否要求在当前BaseApp所在的机器上创建Space。如果为true,则会将当前机器的IP地址传递给CellAppMgr。在选择合适的CellApp的时候会通过BaseCellTrafficScorer来提升指定IP的CellApp的优先级:
/**
* This method calculates the score for a CellApp's base-to-cell traffic.
* This is determined by comparing the IP address of the CellApp with the
* preferred IP of the space on which a new cell is being added. If this
* CellApp is running on the preferred machine, then it is likely that many
* of the space's Base entities will exist on that machine. This means that
* much of the base-to-cell traffic will occur between processes on the same
* machine, reducing network load.
* This method returns 1 if the CellApp is on the preferred IP, and 0 if not.
*/
float BaseCellTrafficScorer::getScore( const CellApp * pApp,
const Space * pSpace ) const
{
MF_ASSERT( pSpace );
return (pApp->addr().ip == pSpace->preferredIP()) ? 1.f : 0.f;
}
这个时候大家可能有点疑问了,BaseApp上只能管理Base,是不能管理Cell的,那为什么要通知CellAppMgr优先使用当前BaseApp的IP呢?其实BaseApp与CellApp只是进程之间隔离,并不需要使用机器来隔离,一个物理机器上可以同时部署多个BaseApp和CellApp。所以BaseApp暴露自己的IP给CellAppMgr去创建Space是没有什么问题的,这样做的好处就是CellApp与相关的BaseApp之间通信延迟会大大减小,因为只需要本机通信即可。
Space的销毁
Space的销毁同样是由CellAppMgr来负责的,CellAppMgr会收到一个远程调用shutDownSpace,这个调用会传入需要销毁的SpaceID,然后通过findSpace找到对应的Space对象,然后调用其shutDown接口来销毁:
/**
* This method handles a message informing us to shut down a space.
*/
void CellAppMgr::shutDownSpace(
const CellAppMgrInterface::shutDownSpaceArgs & args )
{
Space * pSpace = this->findSpace( args.spaceID );
if (pSpace)
{
if (pSpace->hasHadEntities())
{
// Delay shutting down the space until the end of tick
// don't shutdown twice
if (spacesShuttingDown_.insert( args.spaceID ).second)
{
pSpace->shutDown();
}
}
else
{
NOTICE_MSG( "CellAppMgr::shutDownSpace: Not shutting down space "
"%u since it has not had any entities\n",
pSpace->id() );
}
}
else
{
ERROR_MSG( "CellAppMgr::shutDownSpace: Could not find space %u\n",
args.spaceID );
}
}
这里的spacesShuttingDown_是一个std::set< SpaceID >,用来记录正在销毁的Space,防止重复销毁。
在执行Space::shutDown的时候,会遍历所有的Cell,并通知其CellApp来销毁Space:
/**
* This method shuts down this space and removes it from the system.
*/
void Space::shutDown()
{
INFO_MSG( "Space::shutDown: Shutting down space %u "
"(remaining cells: %" PRIzu ")\n",
id_, cells_.size() );
Cells::iterator iter = cells_.begin();
while (iter != cells_.end())
{
CellApp * pApp = (*iter)->pCellApp();
if (pApp)
{
pApp->shutDownSpace( this->id() );
}
++iter;
}
}
这里的CellApp::shutDownSpace接口会将销毁Space的请求构造为CellAppInterface::shutDownSpace消息,然后发送给对应的CellApp:
/**
* This method lets the CellApp know that the space is being destroyed.
*/
void CellApp::shutDownSpace( SpaceID spaceID )
{
Mercury::Bundle & bundle = this->bundle();
bundle.startMessage( CellAppInterface::shutDownSpace );
bundle << spaceID;
this->send();
}
当CellApp收到CellAppInterface::shutDownSpace消息的时候,会调用Space::shutDownSpace接口来销毁Space。这里并不会执行立即销毁,而是注册一个定时器shuttingDownTimerHandle_,计时器的超时时间为1s:
/**
* This method handles a message from the CellAppMgr telling us that the space
* has been destroyed. It may take some time before all the cells are removed.
*/
void Space::shutDownSpace( BinaryIStream & data )
{
if (!shuttingDownTimerHandle_.isSet())
{
// Register a timer to go off in one second.
shuttingDownTimerHandle_ =
CellApp::instance().mainDispatcher().addTimer( 1000000, this, NULL,
"ShutdownSpace" );
}
else
{
INFO_MSG( "Space::shutDownSpace: Already shutting down.\n" );
}
}
这个销毁计时器超时之后,会调用pCell_->onSpaceGone接口来通知Cell开始执行退出逻辑,然后检查是否还有其他Cell在Space中,如果没有其他Cell在Space中且Space中没有其他实体在存在,那么就会调用CellApp::destroyCell来彻底销毁Cell:
/**
* This method handles the timer associated with the space.
* Currently it is only used for the shutting down timer.
*/
void Space::handleTimeout( TimerHandle handle, void * arg )
{
if (pCell_)
{
pCell_->onSpaceGone();
if (this->hasSingleCell() && entities_.empty())
{
CellApp::instance().destroyCell( pCell_ );
// when the cell is destructed it will clear our ptr to it
MF_ASSERT( pCell_ == NULL );
}
}
}
这里的onSpaceGone接口会遍历所有的实体,调用实体的onSpaceGone脚本接口,然后检查实体是否需要被销毁。如果实体需要被销毁且是RealEntity,那么就会调用实体的destroy接口来销毁实体:
/**
* This method is called when this space wants to be destroyed.
*/
void Cell::onSpaceGone()
{
BW::vector< EntityPtr > entities( realEntities_.size() );
std::copy( realEntities_.begin(), realEntities_.end(), entities.begin() );
BW::vector< EntityPtr >::iterator iter = entities.begin();
while (iter != entities.end())
{
EntityPtr pEntity = *iter;
if (!pEntity->isDestroyed())
{
Entity::nominateRealEntity( *pEntity );
PyObject * pMethod =
PyObject_GetAttrString( pEntity.get(), "onSpaceGone" );
Script::call( pMethod, PyTuple_New( 0 ),
"onSpaceGone", true/*okIfFnNull*/ );
if (!pEntity->isDestroyed() &&
pEntity->isReal() &&
&pEntity->space() == &this->space())
{
pEntity->destroy();
}
Entity::nominateRealEntityPop();
}
++iter;
}
}
/**
* This method kills a cell.
*/
void CellApp::destroyCell( Cell * pCell )
{
cells_.destroy( pCell );
}
void Cells::destroy( Cell * pCell )
{
Container::iterator iter = container_.find( pCell->spaceID() );
MF_ASSERT( iter != container_.end() );
if (iter != container_.end())
{
container_.erase( iter );
delete pCell;
}
else
{
ERROR_MSG( "Cells::deleteCell: Unable to kill cell %u\n",
pCell->spaceID() );
}
}
/**
* The destructor for Cell.
*/
Cell::~Cell()
{
TRACE_MSG( "Cell::~Cell: for space %u\n", space_.id() );
while (!realEntities_.empty())
{
int prevSize = realEntities_.size();
realEntities_.front()->destroy();
MF_ASSERT( prevSize > (int)realEntities_.size() );
if (prevSize <= (int)realEntities_.size())
{
break;
}
}
bw_safe_delete( pReplayData_ );
MF_ASSERT_DEV( space_.pCell() == this );
space_.pCell( NULL );
}
在CellAppMgr帧末尾的时候,会遍历spacesShuttingDown_集合,来强行删除所有的成员Space:
{
SpaceIDs::iterator iter = spacesShuttingDown_.begin();
while (iter != spacesShuttingDown_.end())
{
Spaces::iterator found = spaces_.find( *iter );
if (found != spaces_.end())
{
delete found->second;
spaces_.erase( found );
}
++iter;
}
spacesShuttingDown_.clear();
}
看上去一旦接收到销毁Space的请求,就会立即添加到spacesShuttingDown_集合中,然后在CellAppMgr帧末尾的时候,会遍历spacesShuttingDown_集合,来强行删除所有的成员Space。完全没有等待所有的CellSpace销毁完成的步骤,由于CellSpace的销毁是异步的,所以在CellAppMgr帧末尾的时候,可能还有CellSpace在CellApp里处于销毁中的状态。
为了避免异步操作可能出现的问题,需要在销毁的RPC发起者那里确保后续不再需要这些CellSpace去执行逻辑。目前这个shutDownSpace的唯一调用位置就在CellApp上的Space::requestShutDown接口中:
/**
*
*/
void CellAppMgrGateway::shutDownSpace( SpaceID spaceID )
{
CellAppMgrInterface::shutDownSpaceArgs args;
args.spaceID = spaceID;
channel_.bundle() << args;
channel_.send();
}
/**
* This method sends a request to the CellAppMgr to shut this space down.
*/
void Space::requestShutDown()
{
if ( CellAppConfig::useDefaultSpace() && this->id() == 1 )
{
ERROR_MSG( "Space::requestShutDown: Requesting shut down for "
"the default space\n" );
}
CellApp::instance().cellAppMgr().shutDownSpace( this->id() );
}
这个接口有两个调用位置,一个是Entity::destroySpace,这个destroySpace暴露给了Python,用来让逻辑层来强行驱动一个场景的销毁;另一个是Space::checkForShutDown,用来检查场景是否需要被销毁。
/*~ function Entity destroySpace
* @components{ cell }
* This method attempts to shut down the space that the entity is in.
* It is not possible to shut down the default space.
*/
PY_METHOD( destroySpace )
/**
* This method allows script to destroy a space.
*
* @return Whether we were allowed to destroy the space
*/
bool Entity::destroySpace()
{
AUTO_SCOPED_THIS_ENTITY_PROFILE;
if ( CellAppConfig::useDefaultSpace() && this->space().id() == 1)
{
PyErr_Format( PyExc_ValueError,
"destroySpace called on entity %d in default space", int(id_) );
return false;
}
this->space().requestShutDown();
return true;
}
/**
* This method checks whether we should request for this space to shut down.
* If we have no entities and we're the only cell, request a shutdown.
* We won't actually be deleted however until we've unloaded all our chunks.
*/
void Space::checkForShutDown()
{
if (this->hasSingleCell() &&
entities_.empty() && CellApp::instance().hasStarted() &&
!this->isShuttingDown() &&
!CellApp::instance().mainDispatcher().processingBroken() &&
!(CellAppConfig::useDefaultSpace() && id_ == 1)) // Not for the default space.
{
INFO_MSG( "Space::checkForShutDown: Space %u is now empty.\n", id_ );
this->requestShutDown();
}
}
这个Space::checkForShutDown的销毁条件比较符合预期,就是当前场景没有实体,也只有一个Cell在运行,且不是默认场景。所以此时通知CellAppMgr来销毁这个场景是没有任何问题的。所以这个checkForShutDown接口的调用时机就是两个地方:一个是Space::removeEntity,代表一个Entity离开场景的时候;以及Space::updateGeometry,代表Cell格局被修改的时候:
/**
* This method removes an entity from this space.
*/
void Space::removeEntity( Entity * pEntity )
{
// 省略一些代码
if (entities_.empty())
{
if (pCell_ != NULL)
{
this->checkForShutDown();
}
}
}
/**
* This method handles a message from the server that updates geometry
* information.
*/
void Space::updateGeometry( BinaryIStream & data )
{
bool wasMulticell = !this->hasSingleCell();
// 省略一些代码
// see if we want to expressly shut down this space now
if (wasMulticell)
{
this->checkForShutDown();
}
}
网络通信
本章介绍一下如何使用asio进行网络通信, 介绍tcp与udp的区别,并手动实现一个加密连接的http 代理服务器,最后比较一下tcp与udp的差异.
IO模型
本项目的网络通信功能建立在cpp语言里使用最广的网络库Asio之上,此网络库同时支持了阻塞网络模型与异步网络模型:
- 阻塞
blocking,当前线程发出IO请求后阻塞在等待IO就绪,然后再发去数据复制请求,然后再阻塞在等待数据拷贝完成; - 异步
asynchronouse,线程提交IO请求之后直接返回,系统在执行完IO请求并复制到用户提供的数据区之后再通知完成 这两种网络模型在代码编写时有很大的差别,这里我们用一个非常简单的Echo网络程序来说明一下他们之间的差异:
同步阻塞通信模型
首先我们用asio构造一个同步通信的Echo客户端,这个客户端的负责读取一行用户提供的输入,传输到服务器上,然后等待服务器发回这段输入,接收完数据之后就退出。
const int max_length = 1024;
int main(int argc, char* argv[])
{
try
{
if (argc != 3)
{
// 命令行需要传递两个参数 第一个为服务器的ip 第二个为服务器的端口
std::cerr << "Usage: blocking_tcp_echo_client <host> <port>\n";
return 1;
}
// 构造一个asio的执行环境
asio::io_context io_context;
// 使用执行环境构造一个tcp的socket
tcp::socket s(io_context);
// resolver负责解析服务器 作用是将 类似于 www.baidu.com:80这样的网址 解析到对应的ip地址和tcp端口
tcp::resolver resolver(io_context);
// 将构造的socket连接到指定的服务器
asio::connect(s, resolver.resolve(argv[1], argv[2]));
std::cout << "Enter message: ";
char request[max_length];
std::cin.getline(request, max_length);
size_t request_length = std::strlen(request);
// 将输入的string 构造一个buffer 然后通过之前构造的socket 将这个buffer里的所有数据发送到连接到的服务器
// 发送期间 当前程序阻塞 直到发送完成或者报错
asio::write(s, asio::buffer(request, request_length));
char reply[max_length];
// 构造一个读取数据的buffer 然后等待服务器发送数据过来
size_t reply_length = asio::read(s,
asio::buffer(reply, request_length));
std::cout << "Reply is: ";
// 输出服务器发送过来的信息
std::cout.write(reply, reply_length);
std::cout << "\n";
}
catch (std::exception& e)
{
// asio 提供的resolve connect read write等操作都是通过系统提供的相关接口执行的
// 如果这些接口返回了错误, asio则会将这些错误转换为异常 抛出
std::cerr << "Exception: " << e.what() << "\n";
}
return 0;
}
对应的Echo同步服务器则需要在特定Tcp端口上开启监听,等待客户端进行连接,读取数据之后再往客户端发回去:
const int max_length = 1024;
void session(tcp::socket sock)
{
try
{
// 当一个客户端连接过来的时候 开启这个无限循环
for (;;)
{
char data[max_length];
std::error_code error;
// 这里调用read_some来读取客户端连接发送过来的数据到data构造的buffer,
// 如果调用出错 则将错误码写入error参数
// 调用成功则返回读取的字节数量
size_t length = sock.read_some(asio::buffer(data), error);
if (error == asio::error::eof)
break; // Connection closed cleanly by peer.
else if (error)
throw std::system_error(error); // Some other error.
// 将读取的数据再写回客户端
asio::write(sock, asio::buffer(data, length));
}
}
catch (std::exception& e)
{
// 为了避免一个客户端连接出异常导致服务器崩溃 这里使用try将异常打印出来 然后结束循环
std::cerr << "Exception in thread: " << e.what() << "\n";
}
}
void server(asio::io_context& io_context, unsigned short port)
{
// 这里的tcp:v4()返回的就是本机所有IPV4地址 等价于0.0.0.0
// 这里构造一个tcp::acceptor的监听结构 开启对localhost:port的端口监听
tcp::acceptor a(io_context, tcp::endpoint(tcp::v4(), port));
for (;;)
{
// 这里的a.accept是一个阻塞调用 当客户端连接到此服务器时
// 返回此连接对应的socket
// accept返回后会构造一个thread 来执行session(socket)这个函数
// thread构造好之后 开启另外一个线程进行执行 同时detach 避免阻塞当前线程
std::thread(session, a.accept()).detach();
// 有多少个同时活动的客户端连接 就会有多少个额外线程
}
}
int main(int argc, char* argv[])
{
try
{
if (argc != 2)
{
//
std::cerr << "Usage: blocking_tcp_echo_server <port>\n";
return 1;
}
// asio的网络功能依赖于io_context作为执行环境
asio::io_context io_context;
server(io_context, std::atoi(argv[1]));
}
catch (std::exception& e)
{
std::cerr << "Exception: " << e.what() << "\n";
}
return 0;
}
从上述的Echo代码样例可以看出,同步网络编程是从逻辑结构上来说非常简单的,这里的read, write基本可以等价于在执行cin, cout, 函数返回时即可认为对应数据操作已经完成。但是这种逻辑上的简单也有其附加的代价,这几个接口的调用期间,所在线程是完全阻塞住的,无法执行其他任务。客户端程序能够接受这种阻塞,但是对于服务器来说,这样的阻塞是不可接受的,因为服务器要同时服务多个客户端。所以这里服务器每次接收到一个客户端连接时,都会创建一个额外的线程来处理这个客户端连接的所有逻辑。创建线程是一个消耗很大的函数,线程太多也会让系统的线程调度器负担增大。因此生产环境面向并发的网络程序基本不会采用阻塞的网络通信模型。
异步通信模型
由于异步通信模型会导致代码量增加很多,因此这里只提供异步的Echo服务器端的代码展示,上一节中的同步阻塞客户端仍然可以连接到新的异步服务器。在使用异步的监听服务器时,我们使用一个session的结构来管理一个客户端连接, 而不是上一节中给每个客户端连接分配一个线程。
class session
: public std::enable_shared_from_this<session>
{
public:
session(tcp::socket socket)
: socket_(std::move(socket))
{
}
void start()
{
do_read();
}
private:
void do_read()
{
auto self(shared_from_this());
// 这里提供一个buffer 然后在对应的socket上发起一个异步读取的操作
// async_read_some这个操作会立即返回 等到socket接收到一些数据或报错的时候
// 才执行我们提供的lambda函数
socket_.async_read_some(asio::buffer(data_, max_length),
[this, self](std::error_code ec, std::size_t length)
{
if (!ec)
{
do_write(length);
}
});
}
void do_write(std::size_t length)
{
auto self(shared_from_this());
// 这里提供一个buffer 然后在对应的socket上发起一个异步发送的操作
// async_write这个操作会立即返回 等到socket发送完buffer指定的数据或报错的时候
// 才执行我们提供的lambda函数
socket_.async_write(asio::buffer(data_, length),
[this, self](std::error_code ec, std::size_t /*length*/)
{
if (!ec)
{
// 如果没有报错 则继续执行do_read
do_read();
}
});
}
tcp::socket socket_;
enum { max_length = 1024 };
char data_[max_length];
};
相对于之前同步阻塞的数据收发接口,新的异步收发接口都有一个async_的前缀,同时函数都有一个额外参数来接受一个能转换为std::function<void(std::error_code, std::size_t)>类型的回调函数。这些异步收发接口调用之后会立即返回,不会去等待对应的操作执行结束,只是往asio::io_context发起这个操作并注册这个操作执行结束(包括失败)时的回调函数。在开启多线程处理同一个asio:io_context的情况下,这个回调函数的不保证在发起对应操作的线程上执行,因此逻辑层需要自己处理好回调函数的多线程数据读写问题。值得注意的是这个session结构继承自std::enable_shared_from_this<T>,这个enable_shared_from_this父类的存在导致session的实例必须通过std::make_shared的形式进行创建。同时这个父类还提供了shared_from_this()接口来获取当前this指针对应的shared_ptr<session>。每次发起一个异步操作时我们都通过auto self(shared_from_this())来构造当前实例的一个shared_ptr,然后传递到异步函数的回调lambda中。这样就可以保证异步函数回调时session的生命周期仍然是有效的,对应的由data_构造的buffer也是有效的。
有了这个session结构去管理客户端连接之后,服务器的监听逻辑如下:
class server
{
public:
server(asio::io_context& io_context, short port)
: acceptor_(io_context, tcp::endpoint(tcp::v4(), port))
{
do_accept();
}
private:
void do_accept()
{
acceptor_.async_accept(
[this](std::error_code ec, tcp::socket socket)
{
if (!ec)
{
std::make_shared<session>(std::move(socket))->start();
}
do_accept();
});
}
tcp::acceptor acceptor_;
};
int main(int argc, char* argv[])
{
try
{
if (argc != 2)
{
std::cerr << "Usage: async_tcp_echo_server <port>\n";
return 1;
}
asio::io_context io_context;
server s(io_context, std::atoi(argv[1]));
io_context.run();
}
catch (std::exception& e)
{
std::cerr << "Exception: " << e.what() << "\n";
}
return 0;
}
这里使用一个server结构体去管理监听,核心逻辑就在do_accept里,内部发起一个async_accept的异步监听操作,每次一个新的客户端连接上来的时候都会执行这个监听函数的回调函数。回调函数负责使用make_shared将acceptor创建的新socket构造出一个新的session,并立即启动这个session。此时server并没有保存session的shared_ptr,这个session的生命周期完全由session内部逻辑去管理,所以session内每个异步操作的回调lambda都需要去捕获这个session的一个shared_ptr以维持引用计数。
TCP的封包与解包
上面的Echo程序是一个使用Asio编写的非常简单的TCP网络通信例子,在这个例子中服务器接收到任意字节数量的数据之后并不做任何逻辑处理直接往回转发。但是在真正有意义的通信程序中,这种无视传输内容的通信是不存在的。在业务层看来,客户端与服务器之间通信传输的是一个个业务层的数据包,由于业务逻辑的不同会导致不同的数据包的大小各不一样。而TCP协议是基于数据流的协议,它的write接口发送的是一段字节,他的read接口获取也是一段字节,这些字节片段基本不可能业务层传递过来的数据包Packet一一对应。
每次read接口读取过来的一段数据就是多个包按序组成的字节流的一部分,这段数据可能不足以包含一个包,也可能包含多个包。所以在TCP接收到数据到将Packet传递给业务逻辑处理中间,我们需要执行一个解包的过程。解包首先要明确的是每一个Packet的边界,即获取下一个完整数据包的大小。为了达到此目的,我们一般在接收到业务层发送一个Packet字节片段的请求时,构造一个新的Packet,这个新Packet的前四个字节用原始Packet的大小进行填充,然后再拼接原始Packet的所有字节到这四个字节之后。这样处理之后,TCP网络解包的流程就大概等价于下面的过程:
#define MAX_PACKET_SZ 65536
char buffer[MAX_PACKET_SZ];
std::function<void(const char* , std::uint32_t)> packet_callback;
std::uint32_t buffer_begin = 0;
asio::tcp::socket tcp_socket;
while(true)
{
//不断的读取socket的数据
std::uint32_t read_sz = tcp_socket.read_some(asio::buffer(buffer + buffer_begin, MAX_PACKET_SZ - buffer_begin));
buffer_begin += read_sz;
while(buffer_begin > sizeof(std::uint32_t)>)
{
// 当读取了头部的四个字节之后 我们就知道了当前packet的大小
std::uint32_t cur_packet_sz = 0;
std::copy(buffer, buffer + sizeof(std::uint32_t), reinterpret_cast<char*>(&cur_packet_sz));
assert(cur_packet_sz + 4 < MAX_PACKET_SZ>);
if(buffer_begin >= cur_packet_sz + sizeof(std::uint32_t))
{
// 如果当前buffer中的数据长度已经大于等于packet的所需大小 可以将此packet向业务层传递
packet_callback(buffer + sizeof(std::uint32_t), cur_packet_sz);
// 从buffer中删除这个已经处理的packet相关的数据
std::copy(buffer + sizeof(std::uint32_t) + cur_packet_sz, buffer + buffer_begin, buffer);
buffer_begin -= sizeof(std::uint32_t) + cur_packet_sz;
// 这里会执行下一层的while去尝试处理下一个packet 因为当前buffer里面可能有多个packet
}
else
{
// 剩下的数据不足以拼装成一个packet 等待后续数据
break;
}
}
}
上面的代码只是为了大概解释一下TCP接收端的解包过程,真正的生产环境代码不能直接这么写,主要有如下两个问题:
- 这里预先设置了单
Packet的最大大小为65536也就是64k,大于此大小的Packet将会触发Assert,但实际的业务逻辑中以M为单位的Packet也是可能有的。解决的方法有两种:采用动态大小的Buffer,或者发送端将大的业务包拆分为多个连续的合适大小小包,对应的接收端处理小包拼接逻辑。 - 这里每次处理完一个
Packet之后会将剩余的数据重新Copy到Buffer的开头,这里其实可以修改为只要剩余的Buffer能够容纳下一个完整的Packet就不需要执行Copy,这样就可以节省很多内存拷贝的时间。
游戏网络通信中的UDP
UDP与TCP之间的差异
前面一节所展示的客户端与服务器之间的通信使用的是基于TCP的Socket,TCP是建立于IP网络层协议之上一种面向连接的、可靠的、基于字节流的传输层协议。为了实现可靠性,TCP实现了流量拥塞控制功能。建立在IP网络层协议之上还有一种知名的传输层协议UDP,他是一种无连接的面向数据包的不可靠传输层协议。即UDP在发送数据之前不需要走类似于TCP的三次握手,只要知道目标的ip:port就可以直接调用sendto接口来发送一段二进制数据。然后sendto接口只负责尝试将这段数据发送到系统的发送缓冲区,如果缓冲区满了甚至可以无声无息的丢弃这段数据。然后系统底层为UDP实现的socket可读通知是保证一个完整的UDP包被接收了,即一次recvfrom一定等价于一次sendto。但是反过来一次sendto不一定等价于一次recvfrom,因为这个被发送的包数据可能在传输的过程中被丢弃。同时recvfrom的顺序不一定等于sendto的顺序,这样就会导致包的乱序到达。业务层使用recvfrom接收udp包的时候需要传入buf和bufsize,就是接收空间和接收空间大小。如果这个bufsize小于udp包的大小,那么只能接收到这个udp包的前bufsize个字节,剩下的部分会被直接被丢弃,再次执行recvfrom的时候处理的已经是第二个包了。所以bufsize要适配组包时的单Packet大小上限,一般来说这个大小上限都会设置为ip的MTU大小,这样避免单UDP包在传输的时候被拆分为多UDP包,多包引发丢包的概率比单包丢失概率大很多。
在互联网业务中网络通信使用的传输层协议基本全是TCP,主要是因为其可靠性可以减少上层逻辑复杂度。而在游戏业,随着手机游戏的发展,UDP协议在那些要求低延迟的游戏品类里逐渐成为了主流选择。因为手机游戏所处的网络环境比PC环境复杂的多,网络的接入主要是移动网络或者Wifi,这两种网络相对于PC游戏常用的有线网络来说稳定性降低了很多,随着手机物理位置的移动会随机的触发丢包。在使用TCP协议时,如果遇到丢包,则TCP协议会认为此时的网络信道出现了阻塞,因此会触发TCP协议的拥塞避免,此时会将TCP协议的发送窗口减半,同时发送速率降低到一个最大报文段Maximun Segment Size,开始慢启动流程。
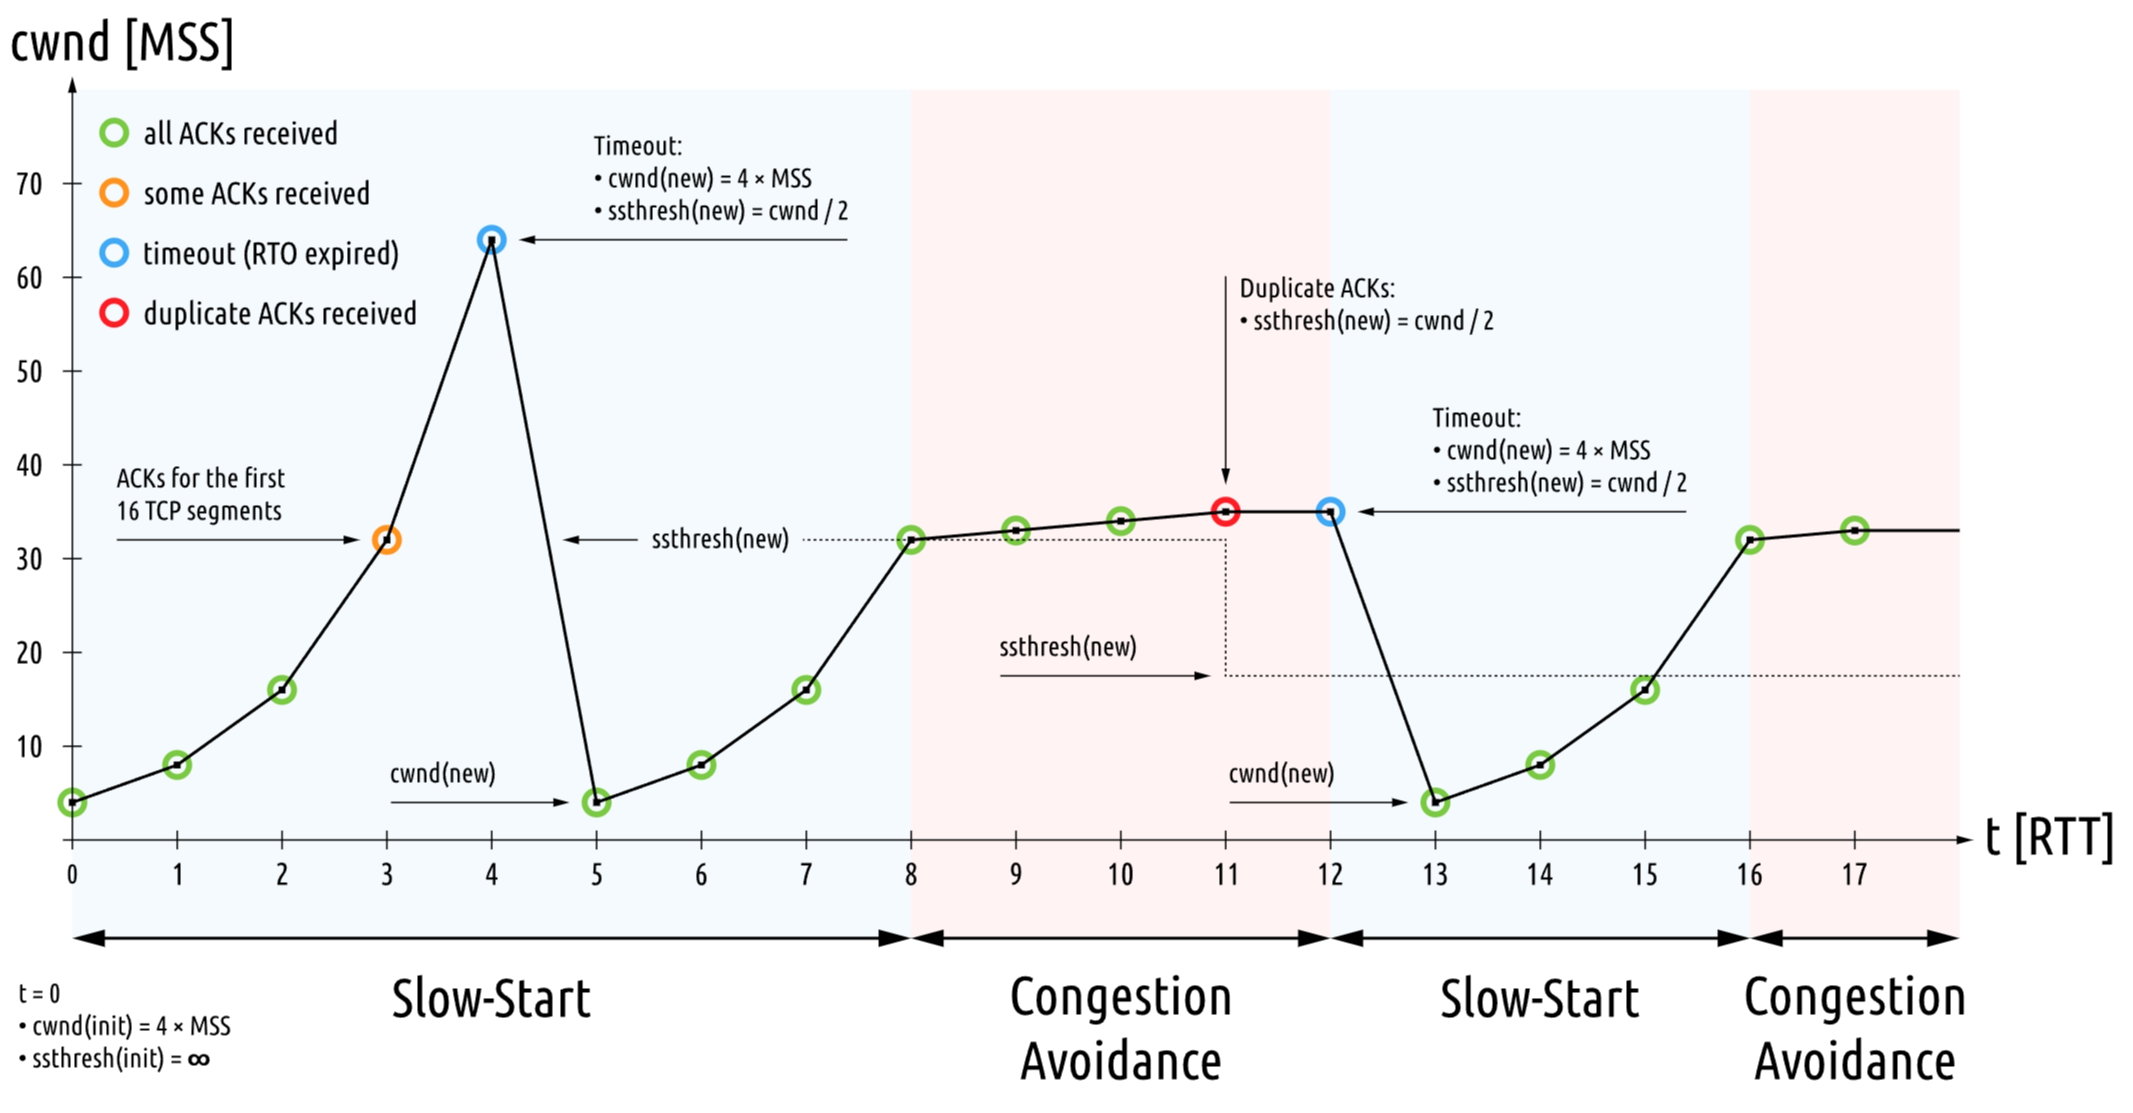
如果出现连续的多个丢包,则会导致TCP协议进行多次减半发送窗口,这样会导致丢包后的发送速率急剧下降,服务器端收到的后续数据包的延迟急剧增大。在网络游戏中,客户端延迟是玩家游戏体验的极其重要的一环,在动作类和FPS类游戏中大于100ms的延迟会导致游戏体验基本为0!而随机性的延迟飙升更容易触发玩家的愤怒,引发各种恶评。丢包引发的延迟飙升是TCP的内在机制决定的,无法从业务逻辑层绕过。所以这类低延迟要求的游戏很多都从TCP切换到了UDP,因为UDP并没有带流量控制功能。但是切换到UDP又会导致TCP所带的数据可靠性丧失,因为UDP并没有TCP的ACK与超时重传机制。为了避免影响上层业务逻辑对网络的处理,一般来说这类游戏会基于UDP实现一个带ACK与超时重传机制的可靠UDP协议。
KCP:可靠UDP的一种实现
KCP是一个快速可靠协议,能以比 TCP浪费10%-20%的带宽的代价,换取平均延迟降低30%-40%,且最大延迟降低三倍的传输效果。纯算法实现,并不负责底层协议(如UDP)的收发。需要使用者自己定义下层数据的发送方式,以 callback的方式提供给 KCP。连时钟都需要外部传递进来,内部不会有任何一次系统调用。
KCP力求在保证可靠性的情况下提高传输速度。KCP没有规定下层传输协议,作为一个逻辑层协议它也可以运行在TCP之上。但通常使用UDP来实现,因为TCP自带的拥塞控制会导致上层的KCP丧失所有意义。
KCP内部通过如下几个机制来实现快速可靠:
-
RTO不翻倍。RTO(Retransmission-TimeOut)即重传超时时间,TCP的超时计算是RTO*2,而KCP的超时计算是RTO*1.5,也就是说假如连续丢同一个包3次,TCP第3次重传是RTO*8,而KCP则是RTO*3.375,意味着可以更快地重新传输数据。 -
更优的
ACK机制TCP在连续ARQ(自动重传请求,Automatic Repeat-reQuest)协议中,不会将一连串的每个数据都响应一次,而是延迟发送ACK,通知对端此包之前的所有包都已经收到,目的是为了充分利用带宽,但是这样会计算出较大的RTT时间,延长了丢包时的判断过程。KCP在连续ACK的基础上,还可以对不连续的包进行ACK。KCP的ACK是否延迟发送可以调节,当配置了非延迟ACK时,收到数据立即响应。 -
选择性重传
TCP中实现了连续ARQ协议,再配合累计确认重传数据,只不过重传时需要将最小序号丢失的以后所有的数据都要重传;而KCP能够对不连续的包进行ACK,这样发送端就可以单独对所有已发出但未ACK的数据单独做计数,故而只需要重传真正丢失的数据。 -
非退让流控
TCP在发生丢包时会将发送窗口减半,但KCP不做处理,这样对其他做传输的服务是不公平的,如果网络真的拥堵,KCP如此将导致网络里增加更多的未被收到的数据(更多的丢包),牺牲了带宽利用率
KCP拥有上述多个优点,但是使用KCP实现一个可靠的UDP还是需要一些工作量的。
在应用层通过kcp_send 发送数据,KCP 会把用户数据拆分 KCP 数据包,通过 kcp_output 再以 UDP 包的方式发送出去。具体细节上可以拆分为如下几步:
- 创建
KCP对象,这里需要一个表示会话编号的整数conv,代表session的标识符,通信双方需要保证使用的标识符一致,这部分一般通过先在两端建立一个TCP连接,在这个TCP连接中商定好对应的conv之后,再创建对应的KCP对象 。创建的接口如下
void* user;
ikcpcb *kcp = ikcp_create(conv, user);
这里的user是一个void*,用来配合KCP的相关回调函数来使用。
- 设置发送回调函数,作为
KCP下层协议的输出函数,KCP需要发送数据时会调用此函数。
// buf/len 表示缓存和长度。
// user 指针为 kcp 对象创建时传入的值,用于区别多个 KCP 对象。
int udp_output(const char *buf, int len, ikcpcb *kcp, void *user) {
....
}
// 设置回调函数。
ikcp_setoutput(kcp, udp_output);
- 调用
ikcp_send来发送数据,注意这里只是把数据放到KCP内部的发送缓冲区,不一定会触发之前设置好的发送回调
int ikcp_send(ikcpcb *kcp, const char *buffer, int len);
- 循环调用
ikcp_update,来更新KCP的内部状态,检查是否需要发送或者超时重传。
ikcp_update(kcp, millisec);
在应用层通过底层网络库提供的UDP接收数据功能收到任意数据之后,调用ikcp_input将接收的数据拷贝到KCP的内部接收缓冲区,然后调用ikcp_recv来检查是否接收到一个应用层可以处理的包。
ikcp_input(kcp, received_udp_packet, received_udp_size);
int recv_packet_sz = ikcp_recv(ikcpcb *kcp, char *buffer, int len);
if(recv_packet_sz > 0)
{
on_recv(buffer, recv_packet_sz);
}
特别值得注意的是KCP并没有考虑线程安全,所以应用层需要自己处理对同一个KCP对应的多线程互斥访问。对于KCP连接的客户端来说,这种互斥访问可以很方便的使用asio::strand来解决。但是对于使用KCP的监听服务器而言,它同时维护着多个客户端连接对应的KCP对象,不仅需要考虑每个单独的KCP对象的多线程互斥访问,同时还要考虑多个KCP的并发数据发送问题。因为监听服务器只有一个asio::udp::socket对象,不像之前的TCP服务器对于每个连接都构造一个asio::tcp::socket对象。同一个socket对象上的read, send, async_read, async_send都是不能并行化的,同时一个异步操作完成之前不能再发起同类型异步操作。对于KCP服务器而言主要要处理的就是多个KCP对象的异步发送。所以这里推荐使用一个带std::mutex的线程安全队列来存储所有的发送请求。
class kcp_acceptor
{
std::unordered_map<asio::ip::udp::endpoint, std::shared_ptr<kcp_socket_wrapper>> m_client_connections;
std::queue<std::pair<asio::ip::udp::endpoint, std::shared_ptr<std::string>>> m_send_queues;
std::mutex m_send_queue_lock;
std::shared_ptr<asio::ip::udp::socket> m_socket;
// 对外暴露的数据发送接口
void do_send(asio::ip::udp::endpoint send_to_endpoint, std::string_view data)
{
auto temp_data = std::make_shared<std::string>(data.data(),data.size());
std::lock_guard<std::mutex> temp_lock(m_send_queue_lock);
m_send_queues.push(std::make_pair(send_to_endpoint, temp_data));
if (m_send_queues.size() == 1)
{
auto cur_front = m_send_queues.front();
m_socket->async_send_to(asio::buffer(*cur_front.second), cur_front.first, [this](const std::error_code&, size_t)
{
after_send();
});
}
}
void after_send()
{
std::shared_ptr<kcp_socket_wrapper> temp_kcp_wrapper;
{
std::lock_guard<std::mutex> temp_lock(m_send_queue_lock);
if (m_send_queues.empty())
{
return;
}
auto cur_front_endpoint = m_send_queues.front().first;
auto temp_iter = m_client_connections.find(cur_front_endpoint);
if (temp_iter != m_client_connections.end())
{
temp_kcp_wrapper = temp_iter->second;
}
}
if(temp_kcp_wrapper)
{
temp_kcp_wrapper->check_write_finish();
}
{
std::lock_guard<std::mutex> temp_lock(m_send_queue_lock);
m_send_queues.pop();
if (m_send_queues.empty())
{
return;
}
auto cur_front = m_send_queues.front();
m_socket->async_send_to(asio::buffer(*cur_front.second), cur_front.first, [this](const std::error_code&, size_t)
{
after_send();
});
}
}
}
连接层加密
客户端和服务器之间进行网络通信时,有权访问网络的人员可以监视所有流量并检查客户端和服务器之间发送或接收的数据。如果连接之间传递的数据都是明文,则居心叵测的人员可以通过监听连接流量的方式来获取用户登录的账号信息以及通过解析数据包的形式来发送恶意指令并获利。为了避免明文传输数据,使得传输的数据不可读,我们需要将连接进行加密。
加密又分为两种:对称加密和非对称加密。对称加密里的加密和解密key是一样的,而非对称加密则分为公钥和私钥之分,两个密钥的内容不同,公钥公开给其他使用当前加密服务的人员使用,私钥则自己存储,一份数据经过公钥加密后可以通过私钥解密,同样的经过私钥加密之后可以通过公钥解密。这种公钥分享系统也叫做PKI即Public Key Infrastructure。
由于非对称加密的复杂度一般远远大于对称加密的复杂度, 所以实际使用时一般是首先通过公钥加密系统来握手,同时商定对称加密的key, 之后的处理都走对称加密流程。这样既确保了对称密钥的私密性,又加大了数据处理的速度。
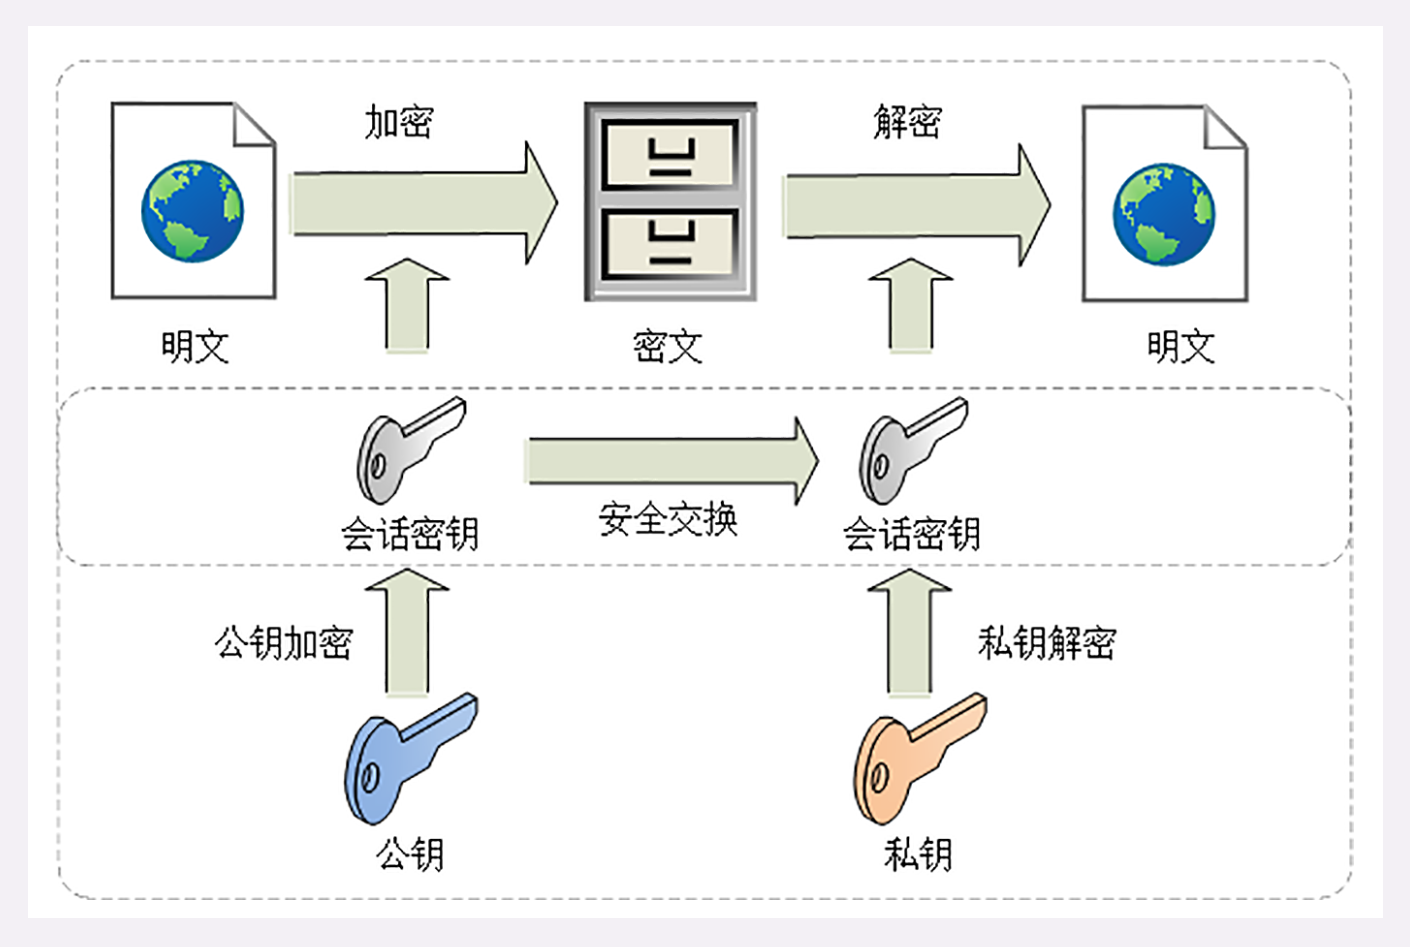
具体实现上我们可以使用openssl这个加密库来进行流量的加密传输,非对称加密系统采取RSA, 对称加密系统则采用AES,服务提供者将RSA生成的公钥发布到网络,生成的私钥保留在服务器。此时客户端与服务器之间的通信流程参考浏览器访问https网页的通信流程:
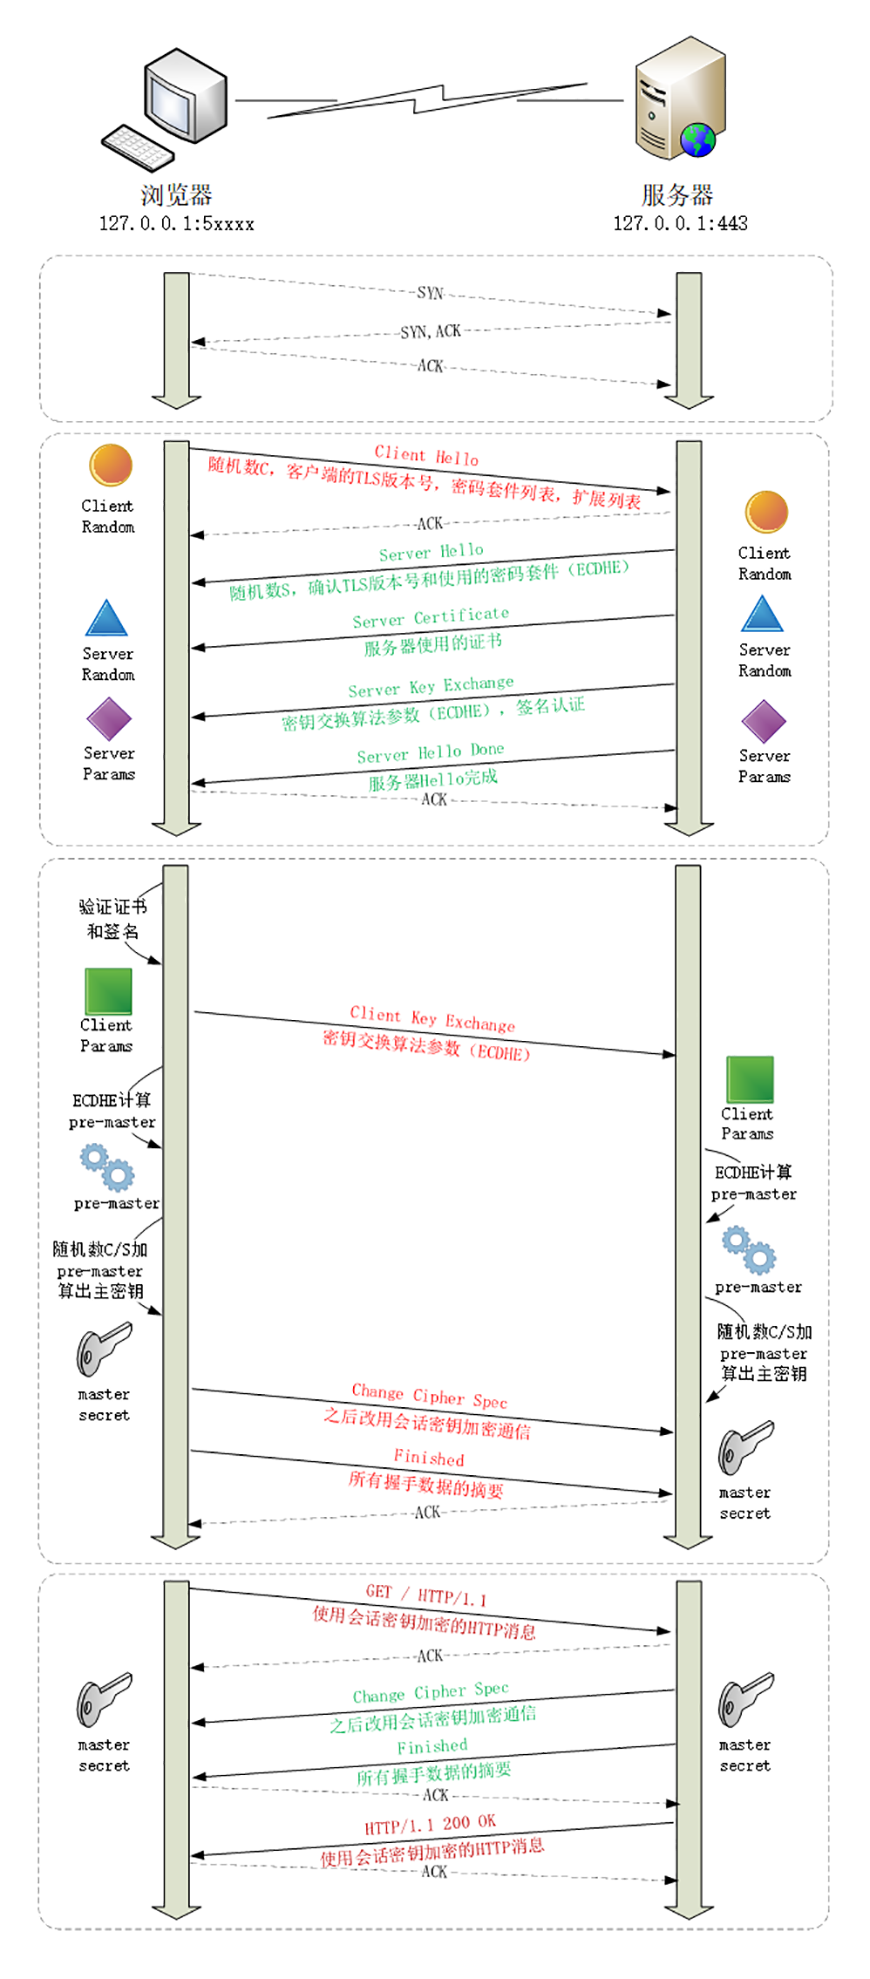
Mosaic Game 的网络通信设计
连接管理
mosaic_game为了简化实现复杂度,在网络通信这里并没有考虑UDP,只支持了TCP的通信。同时为了支持上层逻辑中的断线重连与Service的动态迁移,构造出来了一个概念叫做anchor即锚点,作为整个mosaic_game的通信网络中的逻辑层通信通道来使用。底层的网络数据收发管理类是由asio::tcp::socket的封装net_connection作为基类:
class net_connection : public std::enable_shared_from_this<net_connection>
{
asio::io_context& io;
asio::ip::tcp::socket remote;
std::shared_ptr<net_controller> net_controller_;
block_t read_buffer;
block_t send_buffer;
std::shared_ptr<std::string> connection_name;
std::string remote_endpoint_name;
};
但是业务层并不在乎消息的传递细节,消息的具体来源并不重要,所以业务收发消息的时候并不直接对接这个net_connection。桥接业务层的对象是net_controller,这个类型对接业务逻辑收发数据。
class net_controller
{
public:
// 数据接收到时的回调 length为成功读取的数据大小 返回值为错误信息
virtual std::string on_data_read(const unsigned char* data, std::size_t length) = 0;
// 数据发送时的回调 length为发送成功的数据大小 返回值为错误信息
virtual std::string on_data_send(const unsigned char* data, std::size_t length) = 0;
// 尝试获取一个完整数据包,返回下一次读取数据时的最少数据大小
virtual std::size_t data_should_read(std::size_t max_length) = 0;
// 往buffer中填充发送数据,返回填充的数据大小
virtual std::size_t data_should_send(unsigned char* buffer, std::size_t max_length) = 0;
virtual ~net_controller()
{
}
};
这个net_controller是一个纯虚类型,声明了一些接口函数,目前的实例化类型是net_channel来中转网络层数据。net_channel主要实现机制是提供两个线程安全的消息队列output_channel与input_channel,分别作为发送消息队列与接收消息队列。这样业务层读写数据只需要读写这两个队列,而无需关心底层信道的实现。同时net_connection里包含net_controller的指针,数据收发时会通过这个指针来调用相关的接口函数,来读写这两个队列。
class net_channel :public net_controller
{
struct packet_header
{
std::uint32_t total_sz; // 当前包的完整大小
std::uint16_t packet_cmd; // 当前包的消息类型
std::uint8_t from_name_sz; // 发送者的anchor长度
std::uint8_t dest_name_sz;// 目的地的anchor长度
};
protected:
// 下面两个成员是线程安全队列
std::shared_ptr<channel<con_msg_task>> input_channel; // 接收到的packet放入到这个队列 等待业务层处理
std::shared_ptr<channel<msg_task>> output_channel; // 业务层传递过来的发送数据
input_block_buffer input_buffer; // 未读取完的多个packet所在的缓冲区
output_block_buffer output_buffer; // 未发送完的多个packet所在的缓冲区
std::vector<msg_task> sending_tasks; // 当前正在发送的多个packet
std::shared_ptr<net_connection> connection;
std::uint64_t m_temp_data_send_length = 0;
public:
net_channel(std::shared_ptr<net_connection> in_connection, std::shared_ptr<channel<con_msg_task>> in_input_channel, std::shared_ptr<channel<msg_task>> in_output_channel);
}
此外为了管理net_channel所需的各项资源,额外在这个net_channel之外再构造了一个connection_resource对象,用来存储这个网络连接所绑定线程安全输入输出队列:
struct connection_resource
{
std::shared_ptr<net_channel> connection_controller;
std::unordered_set<std::string> anchors;
std::shared_ptr<channel<con_msg_task>> input_channel;
std::shared_ptr<channel<msg_task>> output_channel;
};
这里的anchors存储了在这个物理连接上暴露出来的所有实体地址的集合。业务主线程负责对接这个connection_resource的类型为network_router,每次有新连接创建时会创建一个对应的connection_resource,创建这个连接的输入输出队列,以及对应的队列控制块net_channel:
connection_resource* network_router::create_connection_resource(std::shared_ptr<net_connection> con)
{
auto cur_iter = m_connection_resources.find(con.get());
if (cur_iter != m_connection_resources.end())
{
return cur_iter->second.get();
}
auto new_resource = std::make_unique<connection_resource>();
auto result = new_resource.get();
new_resource->input_channel = m_input_msg_queue;
new_resource->output_channel = std::make_shared<mutex_channel<msg_task>>();
auto connection_channel = std::make_shared<net_channel>(con, new_resource->input_channel, new_resource->output_channel);
new_resource->connection_controller = connection_channel;
m_connection_resources.emplace(con.get(), std::move(new_resource));
if (!con->is_outbound_connection())
{
m_inbound_connections[con->inbound_connection_idx] = con.get();
}
return result;
}
为了在逻辑层维护这个net_channel,basic_stub需要感知到物理连接的建立和断开,要求这些事件发生时推送一些连接控制消息到basic_stub中处理:
enum class connection_ctrl_msg_type
{
// 主动连接建立
on_connect = 0,
// 连接断裂
on_disconnect,
// 被动连接建立
on_accepted,
};
struct connection_ctrl_msg
{
connection_ctrl_msg_type type;
std::shared_ptr<net_connection> connection;
};
void basic_stub::on_conn_ctrl_msg(const network::connection_ctrl_msg& msg)
{
switch (msg.type)
{
case network::connection_ctrl_msg_type::on_connect:
return on_connect(msg.connection);
case network::connection_ctrl_msg_type::on_disconnect:
return on_disconnected(msg.connection);
case network::connection_ctrl_msg_type::on_accepted:
return on_accepted(msg.connection);
default:
break;
}
}
连接控制消息的添加与读取都通过mutex_channel<connection_ctrl_msg>这个线程安全队列来实现,避免可能出现的多线程问题:
mutex_channel<connection_ctrl_msg> m_conn_ctrl_msgs;
void network_router::push_ctrl_msg(std::shared_ptr<net_connection> conn, connection_ctrl_msg_type msg_type)
{
connection_ctrl_msg cur_msg{ msg_type, conn };
m_conn_ctrl_msgs.push_msg(std::move(cur_msg));
}
void network_router::poll_ctrl_msg(const conn_ctrl_msg_callback_t& msg_handler)
{
std::array<connection_ctrl_msg, 10> temp_tasks;
while (true)
{
auto cur_poll_size = m_conn_ctrl_msgs.pop_bulk_msg(temp_tasks.data(), temp_tasks.size());
if (cur_poll_size == 0)
{
return;
}
for (std::size_t i = 0; i < cur_poll_size; i++)
{
msg_handler(temp_tasks[i]);
}
}
}
当物理连接被建立时,会添加on_connected或者on_accepted消息,具体的消息类型取决于自己是不是监听方:
void net_connection::on_connected()
{
router->push_ctrl_msg(shared_from_this(), connection_ctrl_msg_type::on_connect);
request_send_data();
this->async_read_data(true);
}
void basic_stub::do_accept()
{
auto cur_listen_socket = std::make_shared<asio::ip::tcp::socket>(m_io_context);
m_asio_wrapper->m_acceptor.async_accept([this](const asio_error_code& error, asio::ip::tcp::socket socket)
{
if (!m_asio_wrapper->m_acceptor.is_open())
{
return;
}
if(error)
{
m_logger->error("async_accept with error {}", error.message());
return;
}
anchor_endpoint remote_endpoint(socket.remote_endpoint().address().to_string(), socket.remote_endpoint().port(), endpoint_type::tcp);
auto cur_connection_idx = ++m_inbound_connection_counter;
std::shared_ptr<network::net_connection> connection;
if (m_local_server.rsa_key.empty())
{
connection = network::net_connection::create(m_io_context, std::move(socket), cur_connection_idx, m_logger, m_connection_timeout, m_router.get());
}
else
{
connection = network::encrypt_connection::create(m_io_context, std::move(socket), cur_connection_idx, m_logger, m_connection_timeout, m_router.get(), m_local_server.rsa_key);
}
this->m_router->push_ctrl_msg(connection, network::connection_ctrl_msg_type::on_accepted);
//connection->start_as_server();
//this->router->accept_endpoint(connection);
do_accept();
});
}
这里的on_accepted对应的是当前进程作为监听服务器收到了一个入站连接,其逻辑很简单,开启对消息的接收:
void basic_stub::on_accepted(std::shared_ptr<network::net_connection> connection)
{
connection->start_as_server();
m_router->accept_endpoint(connection);
}
这里的accept_endpoint会为这个连接构造一个代理对象connection_resource,维护这个连接对应的收发队列input_channel与output_channel:
bool network_router::accept_endpoint(std::shared_ptr<net_connection> in_connection)
{
auto resource_ptr = create_connection_resource(in_connection);
in_connection->set_controller(resource_ptr->connection_controller);
return true;
}
而on_connect刚好与on_accepted相反,代表本进程的一个出站连接被成功接收,这里的处理逻辑是开启这个连接的保活,定期发送一个心跳包:
void basic_stub::on_connect(std::shared_ptr<network::net_connection> connection)
{
const auto& cur_connection_name = connection->get_connection_name();
m_logger->info("on_connect for {}", *cur_connection_name);
m_keep_alive_servers[*cur_connection_name] = connection;
}
void basic_stub::keep_alive_callback()
{
std::string temp_keep_alive_anchors;
for (const auto& one_server : m_keep_alive_servers)
{
if (one_server.second)
{
send_keep_alive(one_server.first);
temp_keep_alive_anchors += one_server.first + " ";
}
}
if(!temp_keep_alive_anchors.empty())
{
m_logger->debug("keep_alive_callback servers {}", temp_keep_alive_anchors);
}
add_timer_with_gap(std::chrono::milliseconds(m_connection_timeout / 2), [this]()
{
this->keep_alive_callback();
});
}
当物理连接断开的时候,会往network_router里推送连接断开消息:
void net_connection::close_connection()
{
if (stopped)
{
return;
}
stopped = true;
this->cancel_all_timers();
if (connection_name)
{
logger->error("close connection for {} {}", *connection_name, remote_endpoint_name);
}
else
{
logger->error("close connection for {} ", remote_endpoint_name);
}
asio_error_code ec;
if (this->remote.is_open())
{
this->remote.shutdown(asio::ip::tcp::socket::shutdown_both, ec);
this->remote.close(ec);
}
if (net_controller_)
{
net_controller_.reset();
}
router->push_ctrl_msg(shared_from_this(), connection_ctrl_msg_type::on_disconnect);
return;
}
对应的回调处理on_disconnected则复杂一些,需要考虑一下异常断线还是正常断线,是否需要重新连接。
void basic_stub::on_disconnected(std::shared_ptr<network::net_connection> connection)
{
m_router->disconnect(connection);
const auto& cur_connection_name = connection->get_connection_name();
if (!cur_connection_name || cur_connection_name->empty())
{
m_logger->info("empty conn name for {}", connection->get_remote_endpoint_name());
return;
}
if (!should_reconnect(connection))
{
return;
}
// re connect
m_logger->info("reconnect to server {} after {} ms", *cur_connection_name, m_timer_check_gap_ms);
add_timer_with_gap(std::chrono::milliseconds(m_timer_check_gap_ms), [cur_connection_name, this]()
{
connect_to_server(*cur_connection_name);
});
}
数据发送
net_channel中用一个packet_header的结构体来进行封包,成员变量packet_seq代表包的流水号,total_sz代表当前包的整体长度,packet_cmd代表当前包里业务数据的类型:
struct packet_header
{
std::uint64_t packet_seq; // 当前包序列号
std::uint32_t total_sz; // 当前包的完整大小
std::uint16_t packet_cmd; // 当前包的消息类型
std::uint8_t from_name_sz; // 发送者的anchor长度
std::uint8_t dest_name_sz;// 目的地的anchor长度
};
这里的packet_seq只有在客户端与服务器之间的数据包才会赋值,其他情况下默认为0,发送数据的时候network_router提供如下几个接口:
bool push_msg(const std::string& from, const std::string& dest, const std::string& data, std::uint16_t cmd);
void broadcast_msg(const std::string& from, const std::vector<std::string>& ids, const std::string& data, std::uint16_t cmd);
bool push_msg(const std::string& from, const std::string& dest, std::shared_ptr<const std::string> data, std::uint16_t cmd);
bool push_msg(std::shared_ptr<const std::string> from, std::shared_ptr<const std::string> dest, std::shared_ptr<const std::string> data , std::uint16_t cmd, msg_seq_t msg_seq = 0);
;
bool push_msg(const net_connection* connection, std::shared_ptr<const std::string> from, std::shared_ptr<const std::string> dest, std::shared_ptr<const std::string> data, std::uint16_t cmd, msg_seq_t msg_seq = 0);
bool push_msg(std::uint64_t inbound_con_idx, std::shared_ptr<const std::string> from, std::shared_ptr<const std::string> dest, std::shared_ptr<const std::string> data, std::uint16_t cmd);
这里的from to都是anchor,每个anchor最多绑定一个net_connection:
class anchor_resource
{
friend class anchor_collection;
public:
const std::string name;
private:
const net_connection* connection;
channel<msg_task> output_channel;
};
往一个anchor发送消息执行逻辑分为两种情况:
- 如果有绑定的
net_connection, 就是往对应的net_connection的output_channel里添加队尾数据。 - 如果没有绑定的
net_connection,则往自身的output_channel里添加队尾数据
当一个anchor绑定到net_connection时,将output_channel里的数据拼接到net_connection的output_channel中。当一个net_connection断开时,按序取出output_channel中的所有数据,投递到对应的anchor_resource内部的output_channel中。在这样的设计下,物理连接的断开不至于导致发送消息的丢失。这样的机制下可以保证一个anchor切换连接时,其数据的发送仍然保持可靠且有序。
bool network_router::push_msg(std::shared_ptr<const std::string> from, std::shared_ptr<const std::string> dest, std::shared_ptr<const std::string> data, std::uint16_t cmd)
{
if (!dest)
{
dest = m_empty_dest;
}
if(!from)
{
from = m_empty_dest;
}
if(dest->rfind(m_local_anchor_name, 0) == 0)
{
// 说明是本进程地址 直接推送数据到input_msg_queue
network::con_msg_task local_msg_task;
local_msg_task.first = {};
local_msg_task.second = msg_task::construct(from, dest, data, cmd);
m_input_msg_queue->push_msg(std::move(local_msg_task));
}
auto cur_proxy_resource = m_anchor_collection.find_proxy_for_anchor(*dest);
if(!cur_proxy_resource)
{
m_logger->error("push_msg cant find anchor_resources from {} dest {} data {}", *from, *dest, *data);
return false;
}
auto cur_proxy_con = cur_proxy_resource->get_connection();
if (cur_proxy_con)
{
if (push_msg(cur_proxy_con, from, dest, data, cmd))
{
return true;
}
}
return cur_proxy_resource->try_push(from, dest, data, cmd);
}
上述的消息发送接口并不直接把发送数据打包为packet_header,而是封装为一个中间类型msg_task,添加到对应的发送队列中:
// bool network_router::push_msg(const net_connection* connection, std::shared_ptr<const std::string> from, std::shared_ptr<const std::string> dest, std::shared_ptr<const std::string> data, std::uint16_t cmd)
cur_connection_resource_iter->second->output_channel->push_msg(msg_task::construct(from, dest, data, cmd));
using msg_seq_t = std::uint64_t;
template <typename T, typename U>
struct channel_task
{
std::shared_ptr<const T> data;
std::shared_ptr<const U> dest;
std::shared_ptr<const U> from;
std::uint16_t cmd;
};
using msg_task = channel_task<std::string, std::string>;
这个类型的存在可以更好的维护发送与接受数据的生命周期,同时构造出逻辑层的消息包概念。但是真正执行消息发送的时候我们需要将这个msg_task转换到之前定义好的packet_header规定的格式。由于TCP是一个数据流协议,所以每次发送的时候可以发送多个包数据,为此我们提供了一个缓冲区结构output_block_buffer来保存正在发送的多个包数据。底层网络连接在被建立时,会立即调用request_send_data来尝试填充缓冲区并发送:
void net_connection::on_connected()
{
router->push_ctrl_msg(shared_from_this(), connection_ctrl_msg_type::on_connect);
request_send_data();
this->async_read_data(true);
}
void net_connection::request_send_data()
{
if (net_controller_)
{
auto send_msg_sz = net_controller_->data_should_send(send_buffer.data(), send_buffer.size());
if (send_msg_sz)
{
async_send_data(send_msg_sz);
return;
}
}
cancel_timer(timer_type::check_send);
set_timer(timer_type::check_send, std::chrono::milliseconds(5));
}
这里的net_channel::data_should_send来不断的获取发送队列中的msg_task来填充output_buffer对应的数据缓冲区,然后将相关数据复制到真正的发送缓冲区buffer,直到发送队列为空或者缓冲区已经满了。此函数内部会进行packet_header封包以及按buffer::max_length进行拆包。
std::size_t net_channel::data_should_send(unsigned char* buffer, std::size_t max_length)
{
std::size_t consume_sz = 0;
// 从output_buffer中提取剩下的数据到buffer中
consume_sz += output_buffer.consume(buffer + consume_sz, max_length - consume_sz);
channel_task<std::string, std::string> temp_task;
while(consume_sz < max_length)
{
// 如果buffer没有满 则尝试从channel中获取下一个发送的task
if (!output_channel->pop_msg(temp_task))
{
break;
}
packet_header header;
header.dest_name_sz = std::uint8_t(temp_task.dest->size());
header.from_name_sz = std::uint8_t(temp_task.from->size());
header.packet_cmd = temp_task.cmd;
header.total_sz = sizeof(packet_header) + header.from_name_sz + header.dest_name_sz + static_cast<std::uint32_t>(temp_task.data->size());
//std::cout << "cur packet sz is " << header.total_sz << std::endl;
auto header_ptr = std::make_shared<std::string>(reinterpret_cast<const char*>(&header), sizeof(packet_header));
output_buffer.add(header_ptr);
output_buffer.add(temp_task.from);
output_buffer.add(temp_task.dest);
output_buffer.add(temp_task.data);
// 将新的发送task打包好之后放入到output_buffer中 然后继续填充buffer
consume_sz += output_buffer.consume(buffer + consume_sz, max_length - consume_sz);
m_sending_tasks.push_back(temp_task);
m_packet_send_counter++;
m_data_send_sz += header.total_sz;
}
return consume_sz;
}
这里的sending_task记录了当前正在output_buffer缓冲区内packet,这个数组的存在是为了支持后续的断线重连操作,
void net_connection::async_send_data(std::size_t size)
{
logger->trace("async_send_data with data size {}", size);
async_send_data_impl(0, size);
}
void net_connection::async_send_data_impl(std::size_t offset, std::size_t total_size)
{
auto self(this->shared_from_this());
this->set_timer(timer_type::send, timeout);
this->remote.async_write_some(asio::buffer(send_buffer.data() + offset, total_size - offset),
asio::bind_executor(this->strand, [this, self, offset, total_size](const asio_error_code& error, std::size_t bytes_transferred)
{
if (this->cancel_timer(timer_type::send))
{
if (!error)
{
on_data_send(bytes_transferred);
if (bytes_transferred + offset < total_size)
{
logger->trace("send with bytes transferred {}", bytes_transferred);
this->async_send_data_impl(offset + bytes_transferred, total_size);
}
else
{
on_buffer_all_send(total_size);
}
}
else
{
logger->warn("report error at {}", "async_send_data_impl");
this->on_error(error);
}
}
})
);
}
void net_connection::on_data_send(std::size_t bytes_transferred)
{
if (net_controller_)
{
auto control_msg = net_controller_->on_data_send(send_buffer.data(), bytes_transferred);
if (!control_msg.empty())
{
report_error(fmt::format("on_data_send error with msg {}", control_msg));
return;
}
}
}
这里的net_connection::async_send_data_impl负责逐渐的发送缓冲区的数据,每次发送若干字节都会调用net_connection::on_data_send来通知network_channel::on_data_send,当缓冲区里的所有数据都发送完成之后,通过net_connection::on_buffer_all_send去从network_channel中获取新数据来填充net_connection的buffer:
void net_connection::on_buffer_all_send(std::size_t total_size)
{
logger->trace("on_buffer_all_send with size {}", total_size);
request_send_data();
}
void net_connection::request_send_data()
{
if (net_controller_)
{
auto send_msg_sz = net_controller_->data_should_send(send_buffer.data(), send_buffer.size());
if (send_msg_sz)
{
async_send_data(send_msg_sz);
return;
}
}
cancel_timer(timer_type::check_send);
set_timer(timer_type::check_send, std::chrono::milliseconds(5));
}
void net_connection::on_timeout(timer_type cur_timer)
{
if (cur_timer == timer_type::check_send)
{
return request_send_data();
}
else if (cur_timer == timer_type::check_read)
{
return request_read_data();
}
logger->error("on_timeout for timer {}", timer_type_to_string(cur_timer));
report_error( fmt::format("on_timeout for timer {}", timer_type_to_string(cur_timer)));
return;
}
如果request_send_data里发现network_channel中的发送队列已经空了,则会开启一个计时器来定期检查发送队列里是否有新数据的到来。这里的开启timer来检查新数据是一个偷懒的方法,正确的方式应该是给这个network_channel设置一个队列增加新数据的回调,但是由于这里是多线程操作,实现一个正确的多线程通知接口可能有点复杂,所以加一个计时器最省事,代价就是新数据的发送可能有5ms的延迟。
数据接收
对应的解包逻辑在net_channel::on_data_read里,每收到一个完整的packet都会将这个packet放到input_channel的末尾:
void net_channel::on_data_read(const unsigned char* data, std::size_t length)
{
input_buffer.add(data, length);
while (true)
{
// 如果读取到的数据小于packet_header的长度 则等待下一次填充数据
if (input_buffer.total_size() < sizeof(packet_header))
{
break;
}
std::uint32_t total_sz = 0;
input_buffer.consume(reinterpret_cast<std::uint8_t*>(&total_sz), sizeof(std::uint32_t), true);
// 获取当前packet的长度
if (total_sz <= input_buffer.total_size())
{
// 如果读取到的数据大小大于当前packet的总长度 则代表接收到了一个包 开始解包
channel_task<std::string, std::string> cur_task;
packet_header cur_header;
input_buffer.consume(reinterpret_cast<std::uint8_t*>(&cur_header), sizeof(packet_header), false);
std::uint32_t cur_data_sz = total_sz - sizeof(packet_header) - cur_header.from_name_sz - cur_header.dest_name_sz;
auto from_str = std::make_shared<std::string>(cur_header.from_name_sz, '0');
input_buffer.consume(reinterpret_cast<std::uint8_t*>(from_str->data()), cur_header.from_name_sz, false);
auto dest_str = std::make_shared<std::string>(cur_header.dest_name_sz, '0');
input_buffer.consume(reinterpret_cast<std::uint8_t*>(dest_str->data()), cur_header.dest_name_sz, false);
auto data_str = std::make_shared<std::string>(cur_data_sz, '0');
input_buffer.consume(reinterpret_cast<std::uint8_t*>(data_str->data()), cur_data_sz, false);
cur_task.data = std::move(data_str);
cur_task.from = std::move(from_str);
cur_task.dest = std::move(dest_str);
cur_task.cmd = cur_header.packet_cmd;
m_data_read_sz += cur_header.total_sz;
m_packet_last_read_seq = cur_task.msg_seq;
// 接收到的包发送到input_channel等待业务层轮询
input_channel->push_msg(std::make_pair(connection, cur_task));
// 执行下一次while 因为可能已经接收到了多个包
}
else
{
break;
}
}
}
这里所有的net_controller的input_channel指向的都是network_router里的m_input_msg_queue,这样就方便业务层去处理接收到的数据:
std::size_t network_router::poll_msg(const msg_handle_callback_t& msg_handler)
{
std::array<con_msg_task, 10> temp_tasks;
std::size_t result = 0;
while (true)
{
auto cur_poll_size = m_input_msg_queue->pop_bulk_msg(temp_tasks.data(), temp_tasks.size());
result += cur_poll_size;
if (cur_poll_size == 0)
{
return result;
}
for (std::size_t i = 0; i < cur_poll_size; i++)
{
if (!msg_handler(temp_tasks[i].first, temp_tasks[i].second))
{
m_logger->error("fail to handler msg dest {} cmd {} info {}", *(temp_tasks[i].second.dest), temp_tasks[i].second.cmd, temp_tasks[i].second.data->substr(0, 50));
}
temp_tasks[i].second.clear();
temp_tasks[i].first.reset();
}
}
}
然后在进程的主循环里会传递业务方自己的消息handler进去来处理消息:
void basic_stub::main_loop()
{
m_logger->flush();
auto cur_msg_handler = [this](std::shared_ptr<network::net_connection> con, const network::msg_task& one_msg)
{
return this->on_msg(con, one_msg);
};
auto cur_http_handler = [this](const http_utils::request& req, msg_seq_t req_seq)
{
return this->on_http_request(req, req_seq);
};
auto cur_conn_ctrl_msg_handler = [this](const network::connection_ctrl_msg& msg)
{
return this->on_conn_ctrl_msg(msg);
};
do
{
on_new_frame();
poll_mainloop_tasks();
auto poll_begin_ts = utility::timer_manager::now_ts();
m_router->poll_msg(cur_msg_handler);
http::http_request_mgr::poll_request(cur_http_handler);
poll_timers(utility::timer_manager::now_ts());
m_router->poll_ctrl_msg(cur_conn_ctrl_msg_handler);
auto poll_end_ts = utility::timer_manager::now_ts();
if (poll_end_ts - poll_begin_ts > m_high_load_threshold * m_timer_check_gap_ms)
{
continue;
}
else
{
break;
}
}while (!m_stopped);
}
以这样的形式来处理已经完整接受的消息数据,以线程安全队列的形式来保证消息已经在主线程处理,可以大大的减少逻辑编程的难度。
在basic_stub的类型定义中,on_msg函数被声明为了一个纯虚类,因为在basic_stub中并没有提供进程间通信的消息编码格式。真正的业务消息分发是在basic_stub的直接子类json_stub以及json_stub的后续子类之中。在json_stub中,给出了一个非常基础的消息格式定义。开头是一个uint16格式的消息包类型说明符,由两个uint8拼接而成,其中第一个uint8由全局枚举类型packet_cmd控制,第二个uint8的意义则完全依赖与第一个uint8的值。当前mosaic_game的packet_cmd中提供了七种消息类型:
enum class packet_cmd: std::uint8_t
{
server_control = 0, // 进程控制消息
client_to_game, // 客户端向服务端发消息
game_to_client, // 服务端向客户端发消息
server_rpc_msg, // 服务器之间的json rpc消息
server_raw_msg, // 服务器之间的非json 消息
entity_msg, // 发往场景进程里entity的消息
actor_migrate_msg, // actor的迁移控制消息
max,
};
为了方便的对这个消息包类型两个uint8的拼接与解析,提供了两个辅助函数:
struct packet_cmd_helper
{
static std::uint16_t encode(packet_cmd in_packet_cmd, std::uint8_t in_cmd_detail)
{
std::uint16_t result = std::uint16_t(in_packet_cmd);
result <<= 8;
result += in_cmd_detail;
return result;
}
static std::pair<packet_cmd, std::uint8_t> decode(std::uint16_t in_combine_cmd)
{
std::pair<packet_cmd, std::uint8_t> result;
result.second = in_combine_cmd % 256;
result.first = packet_cmd(in_combine_cmd / 256);
return result;
}
};
在basic_stub的直接基类json_stub中,只提供了最基础的server_control类型消息的分发,用来处理进程之间的相互注册:
bool json_stub::on_msg(std::shared_ptr<network::net_connection> con, const network::msg_task& one_msg)
{
auto cur_cmd_detail = enums::packet_cmd_helper::decode(one_msg.cmd);
switch (cur_cmd_detail.first)
{
case enums::packet_cmd::server_control:
parse_and_dispatch_server_control_msg(con, one_msg);
return true;
break;
default:
return false;
}
}
这里的parse_and_dispatch_server_control_msg就是将msg_task里的data字符串解析为一个json::object,内部包含一个类型为字符串的cmd字段和一个类型为json::object的param字段。解析完成之后再调用on_server_control_msg来处理进程角色的增删改查指令:
bool json_stub::on_server_control_msg(std::shared_ptr<network::net_connection> con, std::shared_ptr<const std::string> from,const std::string& cmd, const json& msg)
至于其他类型的消息处理,将放到RPC相关章节进行介绍。
在这个on_server_control_msg函数中处理了如下六种进程管理指令:
set_stub_info,将当前网络连接关联一个进程角色,这个指令都是在连接发起者在连接建立之后的json_stub::on_connect函数中发出的query_stub_info,查询一个指定名字的进程角色信息,或者指定upstream的下游角色信息列表,对应的返回消息为reply_query_stub_infosend_keep_alive, 进程之间的心跳处理,由于连接长时间没有接收到消息会认为此连接已经断开,所以连接发起者会定期的发送这个心跳包来保活,对应的返回消息为reply_send_keep_aliveremove_stub_info,通知删除一个进程角色,一般是mgr_server通知一个进程的下线时对全服务器集群进行广播notify_stop,通知当前进程启动关服流程notify_clear_connection,关服流程中的一个子流程,通知所有的space_server与service_server开始断开所有的网络连接
在不同的json_stub的子类中,还可以继续拓展on_server_control_msg接受的命令类型,例如在redis_server中就额外支持了redis_request类型:
bool redis_server::on_server_control_msg(std::shared_ptr<network::net_connection> con, std::shared_ptr<const std::string> from, const std::string& cmd, const json& msg)
{
if(json_stub::on_server_control_msg(con, from, cmd, msg))
{
return true;
}
if (cmd == "redis_request")
{
std::string errcode;
redis::redis_task_desc cur_task_desc;
std::uint64_t callback_id;
do
{
try
{
msg.at("callback_id").get_to(callback_id);
msg.at("request_detail").get_to(cur_task_desc);
}
catch (std::exception &e)
{
errcode = "invalid redis request msg";
m_logger->error("on_server_control_msg fail to parse {} error {}", msg.dump(), e.what());
break;
}
} while (0);
// 这里省略了具体的消息处理逻辑
}
return false;
}
数据加密
为了避免客户端与服务器之间的消息协议被外挂人员轻松解析,客户端与服务器之间的消息基本都会经过加密之后再进行传输。在MosaicGame中,同样提供了加密连接的功能,在basic_stub::do_accept函数中,如果发现自己配置了rsa_key,则会将传入连接升级为加密连接encrypt_connection,否则就是普通的非加密连接net_connection:
void basic_stub::do_accept()
{
auto cur_listen_socket = std::make_shared<asio::ip::tcp::socket>(m_io_context);
m_asio_wrapper->m_acceptor.async_accept([this](const asio_error_code& error, asio::ip::tcp::socket socket)
{
if (!m_asio_wrapper->m_acceptor.is_open())
{
return;
}
if(error)
{
m_logger->error("async_accept with error {}", error.message());
return;
}
anchor_endpoint remote_endpoint(socket.remote_endpoint().address().to_string(), socket.remote_endpoint().port(), endpoint_type::tcp);
auto cur_connection_idx = ++m_inbound_connection_counter;
std::shared_ptr<network::net_connection> connection;
if (m_local_server.rsa_key.empty())
{
connection = network::net_connection::create(m_io_context, std::move(socket), cur_connection_idx, m_logger, m_connection_timeout, m_router.get());
}
else
{
connection = network::encrypt_connection::create(m_io_context, std::move(socket), cur_connection_idx, m_logger, m_connection_timeout, m_router.get(), m_local_server.rsa_key);
}
this->m_router->push_ctrl_msg(connection, network::connection_ctrl_msg_type::on_accepted);
//connection->start_as_server();
//this->router->accept_endpoint(connection);
do_accept();
});
}
对应的在主动发起连接的一方会根据目标服务器是否配置了rsa_key来选择使用加密连接还是普通连接,这样就能保证连接的双方同时启用加密连接或者普通连接:
bool network_router::connect_endpoint(const std::string& name, const anchor_endpoint& endpoint, const std::string& rsa_key)
{
std::string log_key = fmt::format("{} {}:{}", name, endpoint.host, int(endpoint.port));
auto connection_logger = utility::get_logger(log_key);
if (m_named_connection.find(name) != m_named_connection.end())
{
m_logger->error("connection for {} already exist", name);
return false;
}
m_logger->info("get logger for {}", log_key);
connection_logger->info("begin connect_endpoint");
std::shared_ptr<network::net_connection> cur_connection;
if (rsa_key.empty())
{
cur_connection = net_connection::create(m_io_context, asio::ip::tcp::socket(m_io_context), 0, connection_logger, m_timeout, this);
}
else
{
cur_connection = encrypt_connection::create(m_io_context, asio::ip::tcp::socket(m_io_context), 0, connection_logger, m_timeout, this, rsa_key);
}
// 省略一些代码
}
由于只有客户端与服务器之间的通信有这个加密的需求,同时gate_server开启的监听端口只有客户端才会连接过来,所以只需要在gate_server的配置文件里写入这个rsa_key即可开启客户端与服务器之间的通信加密,同时保持服务器之间的通信仍然是明文的,避免加密带来的一些性能损耗。
在前文中我们曾经提到:基于RSA的非对称加密是非常消耗性能的,而基于AES的对称加密在性能上有非常大的优势,实际的加密系统中都是先用RSA加密的数据来执行握手并初始化两者之间的AES加密密钥,初始化完成之后后续的数据将只使用AES加密。在MosaicGame中也是这样设计的,客户端在创建encrypt_connection的时候,就会选择一种AES加密密钥,:
std::shared_ptr<encrypt_connection> encrypt_connection::create(asio::io_context& in_io, asio::ip::tcp::socket&& _in_remote_socket, std::uint64_t inbound_con_idx, std::shared_ptr<spdlog::logger> logger, std::chrono::milliseconds _in_timeout, network_router* in_router, const std::string& in_ras_key)
{
auto new_connection = std::make_shared< encrypt_connection>(in_io, std::move(_in_remote_socket), inbound_con_idx, logger, _in_timeout, in_router, in_ras_key);
if (new_connection->is_outbound_connection() && !new_connection->init_cipher("aes-256-cfb"))
{
logger->error("fail to init cipher");
return {};
}
return new_connection;
}
在encrypt_connection中我们提供了十几种基于openssl的AES加密接口,这里偷懒就直接选择了aes-256-cfb这个加密方法。这里的init_cipher会根据指定的加密算法来初始化一个基础的加密密钥,并加上一个公用的前缀cipher_prefix,经过RSA加密之后存储到encrypted_cipher_info中:
std::string encrypt_connection::cipher_prefix()
{
return "mosaic_game_cipher";
}
bool encrypt_connection::init_cipher(const std::string& cipher_name)
{
std::string cipher_info_raw;
cipher_info_raw += cipher_prefix();
char cipher_code = 0;
std::vector<unsigned char> ivec(16);
std::vector<unsigned char> key_vec;
if (cipher_name.size() > 7 && std::equal(cipher_name.begin(), cipher_name.begin() + 3, "aes"))
{
// aes
encrypt::aes_generator::generate(cipher_name, cipher_code, ivec, key_vec, encryptor, decryptor);
}
if (!encryptor || !decryptor)
{
logger->error("failt to encrypt::aes_generator::generate");
return false;
}
// 5 cipher code
cipher_info_raw.append(1, static_cast<char>(cipher_code));
cipher_info_raw.append(reinterpret_cast<char*>(ivec.data()), ivec.size());
cipher_info_raw.append(reinterpret_cast<char*>(key_vec.data()), key_vec.size());
std::array<unsigned char, 128> cipher_info_packed;
if (cipher_info_raw.size() >= 128)
{
logger->error("cipher_info_raw.size() >= 128");
return false;
}
std::copy(cipher_info_raw.begin(), cipher_info_raw.end(), cipher_info_packed.data());
if (rsa_key.modulus_size() < 128)
{
logger->warn("invalid rsa public key");
return false;
}
encrypted_cipher_info.resize(rsa_key.modulus_size());
if (int(encrypted_cipher_info.size()) != rsa_key.encrypt(static_cast<std::uint32_t>(cipher_info_packed.size()), reinterpret_cast<unsigned char*>(cipher_info_packed.data()), encrypted_cipher_info.data(), encrypt::rsa_padding::pkcs1_oaep_padding))
{
logger->warn("invalid rsa encrypt size");
return false;
}
return true;
}
随后在成功的与远端建立连接之后,在on_connected回调中会首先将这个encrypted_cipher_info发送到对端,同时开启对指定的密钥确认数据的等待:
void encrypt_connection::on_connected()
{
std::copy(encrypted_cipher_info.begin(), encrypted_cipher_info.end(), send_buffer.data());
this->async_send_data(this->encrypted_cipher_info.size());
this->async_read_data(true, cipher_accept_reply_info().size());
}
encrypt_connection的接收端在启动的时候会首先设置当前连接的状态为等待RSA握手状态,然后启动对握手密钥的读取,由于我们在客户端连接中已经将握手数据扩张为了rsa_key.modulus_size()大小,所以这里会等待指定字节的数据到达:
void encrypt_connection::start_as_server()
{
encrypt_key_send = true;
encrypt_key_accepted = false;
async_read_data(true, rsa_key.modulus_size());
}
当数据到达之后,如果自己是加密连接的接收端,会检查握手是否已经完成,如果没有完成则检查传入的数据是否是合法的握手数据,如果是则使用指定的数据来初始化AES加密密钥,同时将密钥确认信息发送回远端:
std::string encrypt_connection::cipher_accept_reply_info()
{
return "entity mesh cipher accepted";
}
void encrypt_connection::on_data_read(std::size_t bytes_transferred)
{
logger->trace("encrypt_connection::on_data_read bytes_transferred {}", bytes_transferred);
if (!is_outbound_connection())
{
if (!this->encryptor)
{
if (!accept_cipher(read_buffer.data(), bytes_transferred))
{
report_error("accept_cipher");
return;
}
logger->info("accept_cipher suc for client {}:{}", remote.remote_endpoint().address().to_string(), remote.remote_endpoint().port());
auto cipher_ack_msg = cipher_accept_reply_info();
encryptor->encrypt(reinterpret_cast<unsigned char*>(cipher_ack_msg.data()), send_buffer.data(), cipher_ack_msg.size());
async_send_data(cipher_ack_msg.size());
async_read_data();
return;
}
}
// 暂时省略后续代码
}
由于accept_cipher会初始化encryptor,开启后续数据的加密,所以这里的cipher_ack_msg也会经过这样的加密,然后再发送回发起端。由于发送端在创建初始密钥的时候已经用这个密钥创建了一个解密的decryptor,所以接受来的消息都需要经过decryptor进行解密。由于我们采用的是AES的流式加密算法,加密前后的字节数量永远相等,所以发起端的on_data_read第一次回调的时候,基本可以保证是握手成功的消息:
void encrypt_connection::on_data_read(std::size_t bytes_transferred)
{
logger->trace("encrypt_connection::on_data_read bytes_transferred {}", bytes_transferred);
// 省略前面介绍了的接收端握手处理
decryptor->decrypt(read_buffer.data(), decrypt_buffer.data(), bytes_transferred);
std::copy(decrypt_buffer.data(), decrypt_buffer.data() + bytes_transferred, read_buffer.data());
if (!encrypt_key_accepted)
{
encrypt_key_accepted = true;
auto accept_str = cipher_accept_reply_info();
if (bytes_transferred != accept_str.size())
{
logger->error("expect accept_str {} while size {} mot match ", accept_str, bytes_transferred);
return;
}
for (std::size_t i = 0; i < bytes_transferred; i++)
{
if (read_buffer[i] != accept_str[i])
{
logger->error("expect accept_str {} while received {}", accept_str, std::string(read_buffer.data(), read_buffer.data() + bytes_transferred));
return;
}
}
router->push_ctrl_msg(shared_from_this(), connection_ctrl_msg_type::on_connect);
request_send_data();
async_read_data();
return;
}
net_connection::on_data_read(bytes_transferred);
}
当确认了收到的消息是握手成功消息之后,连接建立的真正回调才会推送到业务主线程,同时通过request_send_data开始读取业务消息推送队列,不过这里填充了发送数据的buffer之后,还需要通过encryptor->encrypt执行一次加密:
void encrypt_connection::request_send_data()
{
if (net_controller_)
{
auto send_msg_sz = net_controller_->data_should_send(encrypt_buffer.data(), encrypt_buffer.size());
if (send_msg_sz)
{
encryptor->encrypt(encrypt_buffer.data(), send_buffer.data(), send_msg_sz);
async_send_data(send_msg_sz);
return;
}
}
else
{
logger->warn("encrypt_connection::request_send_data net_controller not set");
}
set_timer(timer_type::check_send, std::chrono::milliseconds(5));
}
此时客户端与服务器的连接握手过程完整结束,后续数据的读取与发送都会通知到对应的net_controller,两端发送数据的时候都会执行AES加密,两端接收数据的时候都会执行AES解密。由于加密和解密这两个过程都能保证前后的字节数量一摸一样,因此断线重连的相关流程也不需要修改,因为一个完整的packet所占用的字节数量在加密之后是一样的,这样packet_header里记录的total_sz仍然是正确的。
断线重连
为了避免客户端由于弱网和切换网络导致的断线引发游戏重新登录这种不良体验,我们在gate_server层做了客户端断线重连的逻辑。断线重连的核心就是维护一个session会话,在同一个session内的gate_server发往client的所有数据包的packet_seq是递增的,客户端记录自己业务层已经接收到的最大packet_seq,在断线重连的时候告知gate_server这个最大已接收packet_seq,然后gate_server将对序列号大于此packet_seq的消息包进行重新传输,这样就保证了重连之后客户端接收到的消息包packet_seq永远是连续递增的,不会出现丢失与重复。至于client发往gate_server的数据则不需要做这样的可靠性保证,因为客户端发送到服务器的请求总是可以重试的。
当物理链路断开时,net_channel需要将未发送完成的packet重新插入到output_channel的头部,以保证消息不丢失以及有序。为此我们需要记录那些还没有发送成功的消息。之前我们在net_channel::data_shoud_send函数中会将业务层推送过来的消息按顺序填充到发送缓冲区output_buffer,然后再由net_connection::async_send来将这个发送缓冲区里的数据进行发送。由于TCP是流式协议,填充到发送缓冲区的数据并不保证一次性全量发送完成,如果这个缓冲区数据有多个逻辑packet,可能会出现远端已经接收了开头的若干packet的情况。为了避免这些已经被接收的packet在断线重连之后被重新发送,在一个业务层消息被填充到发送缓冲区的时候我们将这个消息填充到正在发送队列sending_tasks的末尾。同时在网络连接这边需要在每次发送若干字节后都调用这里提供的on_data_send方法,这个函数负责检查一个或多个packet是否已经发送成功,如果发送成功就从sending_tasks队列的头部弹出。这里还有个特别需要注意的地方,async_send发送成功并不代表TCP连接的对端接收成功,只是代表数据已经转移到了系统提供的发送缓冲区。当真正的断线发生的时候,这个残留在发送缓冲区里的数据仍然是没有被对端收到的,因此如果要做一个正确的断线重连,我们还需要保留一些async_send发送成功的消息包到发送完成队列m_already_send_tasks中,这个保留的任务最大数量由m_already_send_task_max_num变量来控制, 其实更好的方法是通过时间戳来控制:
std::string net_channel::on_data_send(const unsigned char* data, std::size_t length)
{
(void)data;
m_temp_data_send_length += length;
while (m_temp_data_send_length)
{
if (sending_tasks.empty())
{
return "wtf sending_tasks.empty()";
}
const auto& temp_task = sending_tasks.front();
std::size_t total_sz = sizeof(packet_header) + temp_task.from->size() + temp_task.dest->size() + temp_task.data->size();
//std::cout<<"total_sz "<<total_sz<<" length "<<length<<" task count "<<sending_tasks.size()<<std::endl;
if (total_sz <= m_temp_data_send_length)
{
// 如果开启了断线重连的支持 则将已发送数据包添加到已发送队列的末尾
// 通知控制队列最大元素数量
if(m_already_send_task_max_num)
{
m_already_send_tasks.push_back(temp_task);
if(m_already_send_tasks.size() > m_already_send_task_max_num)
{
m_already_send_tasks.pop_front();
}
}
sending_tasks.erase(sending_tasks.begin());
m_temp_data_send_length -= total_sz;
}
else
{
break;
}
}
return std::string();
}
所以在断线时,不仅要将正在发送队列sending_tasks里的消息包重新放回output_channel,还要把已发送数据m_already_send_tasks队列也重新放回output_channel:
void net_channel::on_disconnected()
{
std::vector<msg_task> temp_all_sending_tasks;
temp_all_sending_tasks.reserve(m_sending_tasks.size() + m_already_send_tasks.size());
while(!m_already_send_tasks.empty())
{
temp_all_sending_tasks.push_back(m_already_send_tasks.front());
m_already_send_tasks.pop_front();
}
while(!m_sending_tasks.empty())
{
temp_all_sending_tasks.push_back(m_sending_tasks.front());
m_sending_tasks.pop_front();
}
output_channel->push_front_msg_bulk(temp_all_sending_tasks);
}
同时在network_router处理断线的函数里,将output_channel里的所有数据都重新推送回anchor_resource内部的一个数据队列output_channel中:
bool network_router::disconnect(const net_connection* connection)
{
auto connection_iter = m_connection_resources.find(connection);
if(connection_iter == m_connection_resources.end())
{
m_logger->warn("disconnect {} fail", connection->get_remote_endpoint_name());
return false;
}
m_inbound_connections.erase(connection->inbound_connection_idx);
const auto& cur_con_name = connection->get_connection_name();
if (cur_con_name)
{
m_named_connection.erase(*cur_con_name);
m_logger->info("erase conn {} {}", *cur_con_name, connection->get_remote_endpoint_name());
}
auto& cur_connection_resource = connection_iter->second;
for(auto one_node: cur_connection_resource->anchors)
{
m_anchor_collection.disconnect(one_node, connection);
}
cur_connection_resource->anchors.clear();
cur_connection_resource->connection_controller->on_disconnected();
std::array<network_channel_task<std::string, std::string>, 10> temp_task;
std::vector< network_channel_task<std::string, std::string>> total_tasks;
std::size_t temp_count;
while(true)
{
temp_count = cur_connection_resource->output_channel->pop_bulk_msg(temp_task.data(), temp_task.size());
if(temp_count == 0)
{
break;
}
else
{
total_tasks.insert(total_tasks.end(), temp_task.begin(), temp_task.begin() + temp_count);
}
}
on_disconnect_handle_remain_tasks(connection, total_tasks);
m_connection_resources.erase(connection_iter);
return true;
}
void network_router::on_disconnect_handle_remain_tasks(const net_connection* connection, std::vector< network_channel_task<std::string, std::string>>& remain_tasks)
{
const auto& cur_con_name = connection->get_connection_name();
for (std::size_t i = 0; i < remain_tasks.size(); i++)
{
auto& cur_task = remain_tasks[remain_tasks.size() - i - 1];
if (*cur_task.from == *cur_con_name)
{
// from is local server ignore control msg
continue;
}
if(cur_task.dest->empty())
{
cur_task.dest = cur_con_name;
}
m_anchor_collection.try_push_front(cur_task);
}
}
这里的anchor_resource的output_channel主要负责在断线的时候缓存住所有要发送的数据,这样就避免了无连接时的数据丢失:
bool anchor_collection::try_push_front(msg_task& task)
{
auto cur_iter = m_anchor_resources.find(*task.dest);
if (cur_iter == m_anchor_resources.end())
{
return false;
}
if (cur_iter->second->connection)
{
// 在有连接的时候是不能这么做的
// 以防老连接在断线时还没发出的信息插入到新连接里
return false;
}
cur_iter->second->output_channel.push_front_msg(task);
return true;
}
同时在basic_stub处理断线的时候,需要使用should_reconnect检查当前连接是否需要重连,如果需要重连,立即开启下一帧的计时器来启动重连:
void basic_stub::on_disconnected(std::shared_ptr<network::net_connection> connection)
{
m_router->disconnect(connection);
const auto& cur_connection_name = connection->get_connection_name();
if (!cur_connection_name || cur_connection_name->empty())
{
m_logger->info("empty conn name for {}", connection->get_remote_endpoint_name());
return;
}
if (!should_reconnect(connection))
{
return;
}
// re connect
m_logger->info("reconnect to server {} after {} ms", *cur_connection_name, m_timer_check_gap_ms);
add_timer_with_gap(std::chrono::milliseconds(m_timer_check_gap_ms), [cur_connection_name, this]()
{
connect_to_server(*cur_connection_name);
});
}
上面这些就是MosaicGame网络层为断线重连做的一些底层支持,但是这些代码只是做到了未发送数据和一些已发送数据的缓存。断线重连时,还需要设计额外的逻辑来做逻辑层的接收确认,整个接收确认以及重传的逻辑链路还是比较长的,需要详细的跟踪这期间的流程:
- 客户端第一次连接到
gate_server时,会向gate_server发送一个request_create_session的请求:
void basic_client::on_connect(std::shared_ptr<network::net_connection> connection)
{
basic_stub::on_connect(connection);
auto cur_con_name = get_connection_name(connection.get());
if (cur_con_name && *cur_con_name == m_upstream_server.name)
{
m_gate_connection = connection;
m_logger->info("set gate connection with name {}", *cur_con_name);
if (!m_main_player)
{
request_create_session(connection);
}
else
{
request_reconnect_session(connection);
}
}
}
void basic_client::request_create_session(std::shared_ptr<network::net_connection> connection)
{
json message;
message["cmd"] = "request_create_session";
json::object_t params;
message["param"] = params;
m_router->push_msg(connection.get(), m_local_name_ptr, get_connection_name(connection.get()), std::make_shared<const std::string>(message.dump(4)), enums::packet_cmd_helper::encode(enums::packet_cmd::server_control, 0));
}
gate_server分配一个唯一的session_str作为两者session的唯一标识符,以及一个account_id,一并发送到客户端:
void gate_server::on_request_create_session(std::shared_ptr<network::net_connection> con, std::shared_ptr<const std::string> dest, const json& msg)
{
if(m_stopped)
{
return;
}
std::string error_info = std::string();
std::string cur_session_str;
std::shared_ptr<network::net_connection> outbound_con;
do {
if (m_connection_sessions.find(con->inbound_connection_idx) != m_connection_sessions.end())
{
error_info = "already has session";
break;
}
outbound_con = choose_space_server();
if (!outbound_con)
{
error_info = "no game server available";
break;
}
cur_session_str = generate_session_str();
} while (0);
json reply_msg, reply_param;
reply_msg["cmd"] = "reply_create_session";
reply_param["errcode"] = error_info;
if (error_info.empty())
{
reply_param["account_id"] = on_session_created(con, outbound_con, cur_session_str);
}
else
{
reply_param["account_id"] = std::string{};
}
reply_param["session"] = cur_session_str;
reply_msg["param"] = reply_param;
m_router->push_msg(con.get(), m_local_name_ptr, {}, std::make_shared<const std::string>(reply_msg.dump()), enums::packet_cmd_helper::encode(enums::packet_cmd::server_control, 0));
}
gate_server以这个session_str作为anchor分配一个anchor_resource并关联当前连接,这样所有服务端发向这个客户端的数据都会通过这个anchor_resource内的队列进行中转, 同时根据当前的session关联的entity_id初始化数据包编号为0:
std::string gate_server::on_session_created(std::shared_ptr<network::net_connection> inbound_con, std::shared_ptr<network::net_connection> outbound_con, const std::string& session_key)
{
auto cur_inbound_con_idx = inbound_con->inbound_connection_idx;
session_info cur_session_info;
cur_session_info.session = session_key;
cur_session_info.inbound_con = inbound_con;
cur_session_info.outbound_con = outbound_con;
cur_session_info.entity_id = generate_account_id(cur_inbound_con_idx);
cur_session_info.shared_eid = std::make_shared<std::string>(cur_session_info.entity_id);
m_connection_sessions[cur_inbound_con_idx] = cur_session_info;
m_session_to_conn_id[session_key] = cur_inbound_con_idx;
m_eid_to_conn_id[cur_session_info.entity_id] = cur_inbound_con_idx;
m_router->link_anchor_to_connection(cur_session_info.entity_id, inbound_con.get());
inbound_con->set_connection_name(cur_session_info.entity_id, m_logger);
m_logger->info("link_anchor_to_connection eid {} con_id {}", cur_session_info.entity_id, inbound_con->inbound_connection_idx);
json create_account_info, create_param, init_info;
create_account_info["cmd"] = "request_create_account";
create_param["entity_id"] = cur_session_info.entity_id;
init_info["connection_idx"] = cur_inbound_con_idx;
create_param["init_info"] = init_info;
create_account_info["param"] = create_param;
m_router->push_msg(outbound_con.get(), m_local_name_ptr, outbound_con->get_connection_name(), std::make_shared<std::string>(create_account_info.dump(4)), enums::packet_cmd_helper::encode(enums::packet_cmd::server_control, 0));
// 新创建的时候 初始化序列号为0
m_entity_send_last_seq[cur_session_info.entity_id] = 0;
return cur_session_info.entity_id;
}
- 当
gate_server往客户端发送消息时,会对当前数据包的msg_seq做自增:
// game 发往client
void gate_server::on_call_client(const network::msg_task& one_msg)
{
m_logger->debug("call client {} with msg {}", *one_msg.dest, *one_msg.data);
auto temp_iter = m_entity_send_last_seq.find(*one_msg.dest);
if(temp_iter == m_entity_send_last_seq.end())
{
return;
}
// 添加唯一有序递增编号
temp_iter->second++;
auto cur_msg_seq = temp_iter->second;
// game发向client 时 直接使用entity id 而不要去查询connection
// 因为此时可能在断线重连阶段 我们要利用这个按名发送的缓冲机制缓存一下数据
m_router->push_msg({}, one_msg.dest, one_msg.data, one_msg.cmd, cur_msg_seq);
}
- 一个客户端连接断线时,
net_channel会把所有未发送数据和一些已发送数据有序的保存在anchor_resource的output_channel中,同时保留这个anchor_resource一段时间作为重连时间窗口,这样服务端发往此客户端的消息会暂存到这个anchor_resource内部的消息队列output_channel中,不至于丢失消息:
void gate_server::on_client_disconnected(std::shared_ptr<network::net_connection> connection)
{
auto cur_con_idx = connection->inbound_connection_idx;
auto cur_session_iter = m_connection_sessions.find(cur_con_idx);
if (cur_session_iter == m_connection_sessions.end())
{
return;
}
cur_session_iter->second.inbound_con.reset();
m_session_disconnected_ts[cur_con_idx] = std::chrono::system_clock::now();
json notify_client_disconnected_info, param;
notify_client_disconnected_info["cmd"] = "notify_client_disconnected";
param["entity_id"] = cur_session_iter->second.entity_id;
notify_client_disconnected_info["param"] = param;
m_router->push_msg(cur_session_iter->second.outbound_con.get(), m_local_name_ptr, {}, std::make_shared<std::string>(notify_client_disconnected_info.dump(4)), enums::packet_cmd_helper::encode(enums::packet_cmd::server_control, 0));
}
void gate_server::on_disconnected(std::shared_ptr<network::net_connection> connection)
{
if (!connection->is_outbound_connection())
{
on_client_disconnected(connection);
}
else
{
on_lose_game(connection);
}
json_stub::on_disconnected(connection);
}
服务端对应的account_entity会收到客户端断线的通知,不过这里并不会做特殊的处理,只是打印一下日志:
void account_entity::on_notify_client_disconnected()
{
m_logger->info("{} on_notify_client_disconnected ", m_base_desc.m_persist_entity_id);
}
- 这里还记录了一个断线时间戳数据到
m_session_disconnected_ts中,gate_server会定期扫描其中掉线时间超过m_lost_client_gap的session,来释放资源,同时通知对应的服务端account_entity客户端掉线的消息:
void gate_server::check_remove_session()
{
std::vector<std::uint64_t> temp_con_to_remove;
auto now_ts = std::chrono::system_clock::now();
for(auto one_pair: m_session_disconnected_ts)
{
auto temp_duration = std::chrono::duration_cast<std::chrono::seconds>(now_ts - one_pair.second);
if(temp_duration.count() > m_lost_client_gap)
{
temp_con_to_remove.push_back(one_pair.first);
}
}
for(auto one_con: temp_con_to_remove)
{
m_session_disconnected_ts.erase(one_con);
auto cur_iter = m_connection_sessions.find(one_con);
if(cur_iter == m_connection_sessions.end())
{
continue;
}
const auto& cur_session = cur_iter->second.session;
m_logger->info("remove expired session {} with entity id {}", cur_session, cur_iter->second.entity_id);
json notify_client_destroy_info, param;
notify_client_destroy_info["cmd"] = "notify_client_destroy";
param["entity_id"] = cur_iter->second.entity_id;
notify_client_destroy_info["param"] = param;
m_router->push_msg(cur_iter->second.outbound_con.get(), m_local_name_ptr, {}, std::make_shared<std::string>(notify_client_destroy_info.dump(4)), enums::packet_cmd_helper::encode(enums::packet_cmd::server_control, 0));
for(auto& one_group: m_clients_for_group)
{
one_group.second.erase(std::string_view(cur_iter->second.entity_id));
}
m_session_to_conn_id.erase(cur_session);
m_eid_to_conn_id.erase(cur_iter->second.entity_id);
m_router->remove_anchor(cur_iter->second.entity_id);
m_connection_sessions.erase(cur_iter);
}
m_session_remove_timer = add_timer_with_gap(std::chrono::seconds(1), [this]()
{
this->check_remove_session();
});
}
- 客户端发现自己断线后,如果发现当前已经登陆完成并创建好了玩家角色,则会重新发起到原始上游
gate_server的连接,同时记录当前已经接收到的最大消息包序列号到m_reconnect_msg_read_seq,如果没有创建玩家角色,则彻底断线:
bool basic_client::should_reconnect(std::shared_ptr<network::net_connection> connection)
{
if (!basic_stub::should_reconnect(connection))
{
return false;
}
if(connection == m_gate_connection)
{
// 如果是gate连接 则只有在角色创建之后走重连逻辑 否则走重新登录
// 如果这个read_seq 为0 代表业务消息包还暂未发送 或者最新的包是控制消息包
return m_main_player != nullptr && m_router->get_connection_resource(m_gate_connection)->connection_controller->get_packet_read_seq() != 0;
}
else
{
return true;
}
}
void basic_stub::on_disconnected(std::shared_ptr<network::net_connection> connection)
{
m_router->disconnect(connection);
const auto& cur_connection_name = connection->get_connection_name();
if (!cur_connection_name || cur_connection_name->empty())
{
m_logger->info("empty conn name for {}", connection->get_remote_endpoint_name());
return;
}
if (!should_reconnect(connection))
{
return;
}
// re connect
m_logger->info("reconnect to server {} after {} ms", *cur_connection_name, m_timer_check_gap_ms);
add_timer_with_gap(std::chrono::milliseconds(m_timer_check_gap_ms), [cur_connection_name, this]()
{
connect_to_server(*cur_connection_name);
});
}
void basic_client::on_disconnected(std::shared_ptr<network::net_connection> connection)
{
bool is_lose_server = connection == m_gate_connection;
json_stub::on_disconnected(connection);
if (is_lose_server)
{
if (m_main_player)
{
m_main_player->on_lose_server();
}
else
{
if (m_main_account)
{
m_main_account->on_lose_server();
entity::entity_manager::instance().destroy_entity(m_main_account);
m_main_account = nullptr;
}
}
m_gate_connection = nullptr;
}
}
- 当连接到
gate_server成功后,会触发on_connect回调,内部判断角色已经创建的情况下会发送一个重连消息包,附上之前商定好的session_str以及本地接收到的最大包序列号msg_read_seq:
void basic_client::on_connect(std::shared_ptr<network::net_connection> connection)
{
basic_stub::on_connect(connection);
auto cur_con_name = get_connection_name(connection.get());
if (cur_con_name && *cur_con_name == m_upstream_server.name)
{
m_gate_connection = connection;
m_logger->info("set gate connection with name {}", *cur_con_name);
if (!m_main_player)
{
request_create_session(connection);
}
else
{
request_reconnect_session(connection);
}
}
}
void basic_client::request_reconnect_session(std::shared_ptr<network::net_connection> connection)
{
json message;
message["cmd"] = "request_reconnect_session";
json::object_t params;
params["pre_session"] = m_session_key;
params["msg_read_seq"] = m_router->get_connection_resource(m_gate_connection)->connection_controller->get_packet_read_seq();
message["param"] = params;
m_router->push_msg(connection.get(), m_local_name_ptr, get_connection_name(connection.get()), std::make_shared<const std::string>(message.dump(4)), enums::packet_cmd_helper::encode(enums::packet_cmd::server_control, 0));
}
gate_server收到一个连接的重连消息包之后,检查session_str是否仍然有效,如果有效则将对应的anchor_resource绑定到新的连接,否则通知客户端重连失败,退回到等待登录状态:
void gate_server::on_request_reconnect_session(std::shared_ptr<network::net_connection> con, std::shared_ptr<const std::string> dest, const json& msg)
{
if(m_stopped)
{
return;
}
std::string pre_session;
std::uint64_t last_read_msg_seq = 0;
std::uint64_t pre_connection_idx = 0;
std::string error_info = std::string();
try
{
msg.at("pre_session").get_to(pre_session);
msg.at("msg_read_seq").get_to(last_read_msg_seq);
}
catch (std::exception& e)
{
m_logger->error("on_request_reconnect_session fail to parse {} error {}", msg.dump(), e.what());
error_info = "invalid msg format";
}
if (error_info.empty())
{
do
{
if (m_connection_sessions.find(con->inbound_connection_idx) != m_connection_sessions.end())
{
error_info = "already has session";
break;
}
auto cur_con_id_iter = m_session_to_conn_id.find(pre_session);
if(cur_con_id_iter == m_session_to_conn_id.end())
{
error_info = "invalid session key";
break;
}
pre_connection_idx = cur_con_id_iter->second;
auto cur_session_iter = m_connection_sessions.find(pre_connection_idx);
if (cur_session_iter == m_connection_sessions.end())
{
error_info = "invalid pre_connection";
break;
}
if (cur_session_iter->second.session != pre_session)
{
error_info = "session not match";
break;
}
if (cur_session_iter->second.inbound_con)
{
error_info = "session still online";
break;
}
if(!m_router->remove_readed_msgs(cur_session_iter->second.entity_id, last_read_msg_seq))
{
error_info = "invalid last_read_msg_seq";
break;
}
} while (0);
}
json reply_msg, reply_param;
reply_msg["cmd"] = "reply_reconnect_session";
reply_param["errcode"] = error_info;
reply_msg["param"] = reply_param;
m_router->push_msg(con.get(), m_local_name_ptr, {}, std::make_shared<const std::string>(reply_msg.dump()), enums::packet_cmd_helper::encode(enums::packet_cmd::server_control, 0));
if (error_info.empty())
{
on_session_reconnected(pre_connection_idx, con, last_read_msg_seq);
}
return;
}
- 这里的
remove_readed_msgs会将anchor_resource的输出队列中所有packet_seq小于等于last_read_msg_seq的数据都删除,因为这些数据已经被客户端确认过了。如果队列中剩余消息包的最小编号大于last_read_msg_seq+1,则代表已确认数据与剩余数据之间有空窗,出现消息丢失,导致无法重连。
bool anchor_collection::remove_readed_msgs(const std::string& anchor_name, std::uint64_t last_read_msg_seq)
{
auto cur_iter = m_anchor_resources.find(anchor_name);
anchor_resource* cur_resource = nullptr;
if (cur_iter != m_anchor_resources.end())
{
cur_resource = cur_iter->second.get();
}
if (!cur_resource)
{
return false;
}
if(cur_resource->get_connection())
{
return false;
}
std::array<network_channel_task<std::string, std::string>, 10> temp_tasks;
std::size_t cur_count = 0;
std::size_t min_msg_seq_in_queue = 0; // 记录队列里的最小数据编号
while (true)
{
cur_count = cur_resource->output_channel.pop_bulk_msg(temp_tasks.data(), temp_tasks.size());
if (cur_count == 0)
{
break;
}
if(min_msg_seq_in_queue==0)
{
min_msg_seq_in_queue = temp_tasks[0].msg_seq;
}
for(std::uint32_t i = 0; i< cur_count;i++)
{
if(temp_tasks[i].msg_seq >last_read_msg_seq)
{
std::vector<network_channel_task<std::string, std::string>> remain_tasks(temp_tasks.data() + i, temp_tasks.data() + cur_count);
cur_resource->output_channel.push_front_msg_bulk(remain_tasks);
break;
}
}
}
// 如果出现最小包编号大于已读编号加1 则代表断线重连会出现消息丢失 此时返回false
return min_msg_seq_in_queue<=last_read_msg_seq+1;
}
- 如果传递过来的
session_str是一个有效的已经断线且还没有完全过期的session,同时传递过来的last_read_msg_seq+1大于等于发送缓冲区里最小的数据编号,则将这个session之前绑定的客户端连接替换为当前的新连接:
void gate_server::on_session_reconnected(std::uint64_t pre_con_idx, std::shared_ptr< network::net_connection> new_con)
{
session_info cur_session_info;
auto pre_session_iter = m_connection_sessions.find(pre_con_idx);
cur_session_info.session = pre_session_iter->second.session;
cur_session_info.inbound_con = new_con;
cur_session_info.outbound_con = pre_session_iter->second.outbound_con;
cur_session_info.entity_id = pre_session_iter->second.entity_id; // 这里维持原来的entity_id 因为game上使用最开始的entity_id创建的account
cur_session_info.shared_eid = std::make_shared<std::string>(cur_session_info.entity_id);
m_connection_sessions.erase(pre_session_iter);
m_connection_sessions[new_con->inbound_connection_idx] = cur_session_info;
m_session_to_conn_id[cur_session_info.session] = new_con->inbound_connection_idx;
m_eid_to_conn_id[cur_session_info.entity_id] = new_con->inbound_connection_idx;
new_con->set_connection_name(cur_session_info.entity_id, m_logger);
m_router->link_anchor_to_connection(cur_session_info.entity_id, new_con.get());
m_session_disconnected_ts.erase(pre_con_idx);
json notify_client_reconnected_info, param;
notify_client_reconnected_info["cmd"] = "notify_client_reconnected";
param["entity_id"] = cur_session_info.entity_id;
notify_client_reconnected_info["param"] = param;
m_router->push_msg(cur_session_info.outbound_con.get(), m_local_name_ptr, {}, std::make_shared<std::string>(notify_client_reconnected_info.dump(4)), enums::packet_cmd_helper::encode(enums::packet_cmd::server_control, 0));
}
如果断线重连成功,account_entity会收到notify_client_reconnected通知,这里同样也只是日志记录一下,因此完整的一次断线重连对于player_entity来说是完全无感知的:
void account_entity::on_notify_client_reconnected()
{
m_logger->info("{} on_notify_client_reconnected ", m_base_desc.m_persist_entity_id);
}
如果在gate_server指定的时间窗口内都没有断线重连回来,则对应的account_entity会收到一个notify_client_destroy的消息,这里会开启一个计时器,如果这个计时器超时前没有新的客户端登录这个账号,则开启自动下线流程:
void account_entity::on_notify_client_destroy()
{
m_destroy_client_timer = add_timer_with_gap(std::chrono::seconds(m_auto_logout_second_when_client_destroy), [this]()
{
request_logout_account(utility::rpc_msg());
});
}
迁移保序
在我们目前的服务器架构中, space_server是可以有多个实例,如果一个actor_entity有迁移能力,那么这个actor_entity就可能会在不同的进程中进行迁移。由于迁移前后同一个actor_entity的通信地址会发生变化,所以如果直接使用actor_entity的当前地址作为投递地址的话很可能出现迁移后消息丢失的情况。为了避免出现迁移引发的地址失效问题,对于可以迁移的actor_entity,我们会在创建这个actor_entity的同时,创建一个不参与迁移的relay_entity。这个relay_entity的作用就是作为这个actor_entity的消息中转站来使用,实现方式是将这个不会迁移的relay_entity的call_anchor设置到这个actor_entity上。 player_entity创建时会直接在初始数据里带上call_anchor参数,而其他普通的actor_entity则是在创建之后手动调用set_call_anchor来修改内部的m_call_anchor:
player_entity* account_entity::create_player_entity(const std::string& player_id, const json& player_doc)
{
std::string cur_err;
auto cur_relay_entity_id = std::to_string(get_server()->gen_unique_uint64());
json::object_t relay_init_info;
relay_init_info["dest_eid"] = player_id;
relay_init_info["dest_game"] = get_server()->local_stub_info().name;
auto cur_relay_entity = get_server()->create_entity("relay_entity", cur_relay_entity_id, gen_online_entity_id(),relay_init_info, cur_err);
if(!cur_relay_entity)
{
m_logger->error("fail to create relay_entity");
return nullptr;
}
m_relay_entity = dynamic_cast<relay_entity*>(cur_relay_entity);
m_relay_entity->setup_client_info(m_gate_id, get_call_proxy());
json::object_t player_init_info;
// 省略一些代码
player_init_info["call_proxy"] = *cur_relay_entity->get_call_proxy();
auto cur_entity = get_server()->create_entity("player_entity", player_id, gen_online_entity_id(),player_init_info, cur_err);
// 省略后续代码
}
actor_entity* space_entity::create_entity(const std::string& entity_type, const std::string& entity_id, json::object_t& init_info, const json::object_t& enter_info, std::uint64_t online_entity_id)
{
utility::entity_load_stat_recorder temp_recorder(entity_load_stat());
if(online_entity_id == 0)
{
online_entity_id = gen_online_entity_id();
}
std::string create_entity_error;
auto cur_entity = get_server()->create_entity(entity_type, entity_id, online_entity_id, init_info, create_entity_error);
if(!cur_entity)
{
m_logger->error("fail to create_entity type {} id {} with error {}", entity_type, entity_id, create_entity_error);
return nullptr;
}
auto cur_actor_entity = dynamic_cast<actor_entity*>(cur_entity);
if(!cur_actor_entity)
{
m_logger->error("fail to create actor_entity with entity_type {}", cur_entity->type_name());
get_server()->destroy_entity(cur_entity);
return nullptr;
}
if(!cur_actor_entity->is_global_actor() && is_cell_space() && !cur_actor_entity->is_ghost())
{
// 非全局actor 都需要建立一个relay entity
json::object_t relay_init_info;
relay_init_info["dest_game"] = get_server()->local_stub_info().name;
relay_init_info["dest_eid"] = entity_id;
auto cur_relay_entity_id = get_server()->gen_unique_str();
auto cur_relay_entity = get_server()->create_entity("relay_entity", cur_relay_entity_id, gen_online_entity_id(), relay_init_info, create_entity_error);
if(!cur_relay_entity)
{
m_logger->error("fail to create relay_entity id {} with error {}", entity_id, create_entity_error);
get_server()->destroy_entity(cur_entity);
return nullptr;
}
m_relay_entities[entity_id] = cur_relay_entity;
cur_actor_entity->set_call_proxy(*cur_relay_entity->get_call_proxy());
m_logger->info("create relay entity {} for entity {}", cur_relay_entity_id, entity_id);
}
// 省略一些代码
}
当其他模块需要往这个actor_entity发送一个远程消息时,使用的其实就是relay_entity的call_anchor,此时relay_entity处理rpc的时候如果发现自身没有相关rpc的定义,就会将这个数据转发到相应的actor_entity的最新通信地址上:
utility::rpc_msg::call_result relay_entity::on_rpc_msg(const utility::rpc_msg& msg)
{
auto temp_result = rpc_owner_on_rpc(msg);
if(temp_result == utility::rpc_msg::call_result::dest_not_found)
{
forward_to_actor(msg);
return utility::rpc_msg::call_result::suc;
}
else
{
return temp_result;
}
}
void account_entity::call_player(const utility::rpc_msg& msg)
{
if(!m_relay_entity)
{
return;
}
m_relay_entity->forward_to_actor(msg);
}
为了在relay_entity上获得对应actor_entity的最新通信地址,需要actor_entity在迁移之前先获得当前relay_entity的允许,此时relay_entity将目标地址设置为空,在目标地址为空的时候,forward_to_actor的消息会先缓存起来,避免迁移中间的消息丢失:
void relay_entity::request_migrate_begin(const utility::rpc_msg& msg, const std::string& game_id, const std::string& space_id, const std::string& union_space_id, const json::object_t& enter_info)
{
if(!m_dest_actor)
{
m_logger->error("request_migrate_begin while dest_anchor empty dest_game {} dest_eid {}", m_dest_game, m_dest_eid);
return;
}
utility::rpc_msg reply_msg;
reply_msg.cmd = "reply_migrate_begin";
reply_msg.args.push_back(game_id);
reply_msg.args.push_back(space_id);
reply_msg.args.push_back(union_space_id);
reply_msg.args.push_back(enter_info);
call_server(m_dest_actor, reply_msg);
m_dest_actor.reset();
m_dest_game = game_id;
}
void relay_entity::forward_to_actor(const network::msg_task& cur_msg_task)
{
if(!m_dest_actor)
{
m_cached_msgs.push_back(cur_msg_task);
}
else
{
auto cur_cmd_detail = enums::packet_cmd_helper::decode(cur_msg_task.cmd);
call_server(m_dest_actor, cur_msg_task.data, cur_cmd_detail.first, cur_cmd_detail.second);
}
}
actor_entity只有在接收到reply_migrate_begin之后才会开始真正的迁移,当收到这个消息时,之前通过relay_entity发送到当前actor_entity的消息肯定已经全都收到了,因为底层对应的是同一个物理连接。等到actor_entity迁移完成之后,会通过notify_migrate_finish将最新地址发送过来, 此时再将迁移期间缓存的数据按序发出,并清空这个m_cached_msgs数组:
void relay_entity::notify_migrate_finish(const utility::rpc_msg& msg, const std::string& game_id)
{
if(m_dest_game != game_id)
{
m_logger->error("notify_migrate_finish while game not match empty dest_game {} dest_eid {} new_game_id {}", m_dest_game, m_dest_eid, game_id);
return;
}
m_dest_actor = std::make_shared<std::string>(utility::rpc_anchor::concat(m_dest_game, m_dest_eid));
for(const auto& one_msg: m_cached_msgs)
{
auto cur_cmd_detail = enums::packet_cmd_helper::decode(one_msg.cmd);
call_server(m_dest_actor, one_msg.data, cur_cmd_detail.first, cur_cmd_detail.second);
}
m_cached_msgs.clear();
}
当m_dest_actor被设置到值之后,后续的消息发送就直接走call_server接口,不再缓存。
不过relay_entity也有其局限性,他只能保证一个不会迁移的消息发送者发送到当前对应的actor_entity的所有数据按照发出顺序投递。如果消息发送者A在迁移前给relay_entity(B)发出了消息M,在迁移后给relay_entity(B)发出了消息N,那relay_entity(B)只能保证M,N都能投递到actor_entity(B),不能保证M在N之前到达。因为relay_entity(B)上M与N的接收顺序是不确定的,同时relay_entity(B)只能按照消息到达自身的顺序去转发到actor_entity(B)。如果实在是要求所有由A发送到B的消息必须按照发送顺序来接收,可以按照这个方案来操作:
- 给
A也创建一个relay_entity, A发送给B的数据先发送到relay_entity(A),此时能够保证relay_entity(A)接受数据的顺序等于A发出数据的顺序- 然后
relay_entity(A)将数据依次转发到relay_entity(B),由于两个relay_entity都是不会迁移的,因此这些消息使用的是同一个物理连接,可以保证接受顺序等于发送顺序 relay_entity(B)将所有接收到的数据按照顺序发送到actor_entity(B),这个actor_entity(B)接收顺序也是可以保证的
所以这种强一致性的网络发送方案可以通过两层relay_entity来做到,代价就是消息的延迟增加了两个relay_entity的中转。
迁移时除了往actor_entity投递的消息可能发生乱序和丢失之外,player_entity往客户端发送的消息也可能出现乱序。因为gate_server是不动的,而player_entity则是不断的在进程间迁移的。由于不同进程之间的网络延迟不同,如果player_entity发送给客户端的数据是直接通过gate_server的通信地址直接投递的话,其接收顺序是不能保证的。如果客户端接收到的数据顺序是错乱的,那么很可能会导致各种逻辑问题,典型症状就是同一个属性修改多次的情况下,客户端最后的值与服务端最后的值不一样。
要解决这个顺序问题,就需要跟前述的actor_entity之间通信保序方案一样,在relay_entity上做转发操作,因为当前actor_entity的迁移会在对应的relay_entity之间做一次rpc同步。此时player_entity发往客户端的数据不再直接发送到gate_server,而是先发送到relay_entity,然后再由relay_entity发送到gate_server:
void relay_entity::forward_to_client(const network::msg_task& cur_msg)
{
if(m_gate_id == 0)
{
m_logger->error("fail to forward to client due to gate_id is 0");
return;
}
auto cur_cmd_detail = enums::packet_cmd_helper::decode(cur_msg.cmd).second;
auto cur_entity_packet_detail = enums::client_entity_packet_helper::decode(cur_cmd_detail);
if(cur_entity_packet_detail.second != m_gate_version)
{
m_logger->error("fail to forward to client due to gate_version not match gate_version {} msg_gate_version {}", m_gate_version, cur_entity_packet_detail.second);
return;
}
get_server()->call_gate(m_gate_id, m_account_anchor, cur_msg.data,cur_entity_packet_detail.first);
}
void player_entity::call_client(enums::entity_packet entity_packet_cmd, std::shared_ptr<const std::string> data)
{
if(!has_client())
{
return;
}
if(entity_packet_cmd == enums::entity_packet::json_rpc || entity_packet_cmd == enums::entity_packet::sync_prop)
{
m_logger->debug("call_client cmd {} data {}", std::uint8_t(entity_packet_cmd), *data);
}
else
{
m_logger->debug("call_client cmd {} sz {}", std::uint8_t(entity_packet_cmd), data->size());
}
if(is_ghost())
{
m_logger->warn("ghost player_entity call_client ignored");
return;
}
if(b_is_migrating)
{
m_to_client_msg_when_migrating.emplace_back(enums::client_entity_packet_helper::encode(entity_packet_cmd, m_gate_version), data);
}
else
{
call_relay_anchor(enums::packet_cmd::game_to_client, enums::client_entity_packet_helper::encode(entity_packet_cmd, m_gate_version), data);
}
}
由于actor_entity向relay_entity执行rpc同步是一个异步操作,因此在这个操作期间发往客户端的数据不能直接发送到relay_entity,而是先缓存到自身的一个临时队列m_to_client_msg_when_migrating中。真正开始迁移打包数据的时候会将这个队列一起打包:
void player_entity::encode_migrate_out_data(json::object_t& migrate_info, bool enter_new_space)
{
actor_entity::encode_migrate_out_data(migrate_info, enter_new_space);
migrate_info["prop"] = m_prop_data.encode();
migrate_info["gate_version"] = m_gate_version;
std::vector<json> cached_client_msgs;
for(auto& [cmd, msg]: m_to_client_msg_when_migrating)
{
json one_msg = serialize::encode_multi(cmd, *msg);
cached_client_msgs.push_back(std::move(one_msg));
}
migrate_info["cached_to_client_msgs"] = cached_client_msgs;
m_to_client_msg_when_migrating.clear();
}
当迁移完毕之后,会先通知relay_entity迁移完成,然后再将这个缓存的客户端数据依次发出:
void player_entity::player_event_listener(const utility::enum_type_value_pair& ev_cat, const json::object_t& detail)
{
if(ev_cat == utility::enum_type_value_pair(enums::migrate_event::migrate_in_after_component_decode))
{
if(is_ghost())
{
return;
}
auto cur_gate_version_iter = detail.find("gate_version");
if(cur_gate_version_iter != detail.end())
{
m_gate_version = cur_gate_version_iter->second.get<std::uint8_t>();
}
else
{
m_logger->error("migrate_in_after_component_decode missing gate_version set to 0");
m_gate_version = 0;
}
if(!has_client())
{
return;
}
auto cached_msgs_iter = detail.find("cached_to_client_msgs");
if(cached_msgs_iter == detail.end())
{
return;
}
auto& cached_msgs = cached_msgs_iter->second;
for(const auto& one_cached_msg: cached_msgs)
{
std::uint8_t cmd;
std::string msg;
serialize::decode_multi(one_cached_msg, cmd, msg);
call_relay_anchor(enums::packet_cmd::game_to_client, cmd, std::make_shared<const std::string>(std::move(msg)));
}
}
}
顶号保护
我们目前的设计里,当多个客户端登录同一个账号时,前面的客户端会被后面的客户端顶掉,这个过程也叫顶号。在顶号发生时,player_entity的gate将会被更新,会先被通知客户端销毁,
void player_entity::notify_player_client_destroyed(const utility::rpc_msg& msg)
{
m_logger->warn("player {} notify_player_client_replaced", entity_id());
m_gate_version = 0;
}
然后等新的gate绑定完成时,再被同步最新的gate信息。此时player_entity会将当前的最新数据完整的打包下去,通知客户端来同步当前的所有状态:
void player_entity::notify_player_client_replaced(const utility::rpc_msg& msg, const std::string& new_gate_name, std::uint8_t new_gate_version)
{
m_logger->warn("player client replaced by new gate {} version {}", new_gate_name, new_gate_version);
m_gate_version = new_gate_version;
if(new_gate_name.empty())
{
return;
}
auto sync_info = encode_with_flag(std::uint32_t(enums::encode_flags::self_client));
utility::rpc_msg full_sync_msg;
full_sync_msg.cmd = "create_player";
full_sync_msg.args.push_back(entity_id());
full_sync_msg.args.push_back(std::move(sync_info));
call_client(full_sync_msg);
m_login_dispatcher.dispatch(true);
}
但是由于在顶号期间,player_entity只是被动的接收这两个rpc,同时player_entity通过relay_entity往客户端发送数据是主动的。所以可能会出现一些本来应该发往老客户端的数据被发到新客户端的情况:
- 时刻
1player_entity往relay_entity发送一条往客户端Client(A)的消息M - 时刻
2player_entity接收到relay_entity转发过来的notify_player_client_destroyed消息,此时relay_entity上的gate信息被清空 - 时刻
3player_entity接收到relay_entity转发过来的notify_player_client_replaced消息,此时relay_entity上的gate信息被设置为最新的Client(B) - 时刻
4消息M在relay_entity上被接收,并通过forward_to_client转发到了Client(B)
为了修正这种错误的客户端数据发送,我们可以在player_entity发送客户端数据时都带上当前的gate信息。当relay_entity接收到这个数据的时候,会将消息里的gate信息与当前relay_entity的gate信息进行比对,如果不相等则直接丢弃。
由于顶号是一个低频的操作,为所有给客户端发送的数据都带上一个当前gate的信息会导致数据包被重新打包,比较浪费CPU。因此当前在mosaic_game中,只携带了4bit的gate_version信息,这样这个4bit与entity_packet可以拼接成一个uint8,可以避免数据的重新打包:
static_assert(int(enums::entity_packet::max) <= 16, "entity_packet max exceed 16, cannot fit in 4 bits because gate_version also need 4 bits");
// 将entity_packet与gate_version结合编码解码 用一个字节表示
// 这样就可以方便的区分数据里的gate版本 避免顶号之后还能收到发往老客户端的数据
struct client_entity_packet_helper
{
static std::uint8_t encode(entity_packet in_packet_cmd, std::uint8_t in_gate_version)
{
std::uint8_t result = std::uint8_t(in_packet_cmd);
result <<= 4;
result += in_gate_version;
return result;
}
static std::pair<entity_packet, std::uint8_t> decode(std::uint8_t in_combine_cmd)
{
std::pair<entity_packet, std::uint8_t> result;
result.second = in_combine_cmd % 256;
result.first = entity_packet(in_combine_cmd / 256);
return result;
}
};
void player_entity::call_client(enums::entity_packet entity_packet_cmd, std::shared_ptr<const std::string> data)
{
// 省略很多之前已经介绍的代码
call_relay_anchor(enums::packet_cmd::game_to_client, enums::client_entity_packet_helper::encode(entity_packet_cmd, m_gate_version), data);
}
当relay_entity在接收到这些向客户端转发的数据时,会将这里面4bit的gate_version拿出来进行比对,不匹配则忽略:
void relay_entity::forward_to_client(const network::msg_task& cur_msg)
{
if(m_gate_id == 0)
{
m_logger->error("fail to forward to client due to gate_id is 0");
return;
}
auto cur_cmd_detail = enums::packet_cmd_helper::decode(cur_msg.cmd).second;
auto cur_entity_packet_detail = enums::client_entity_packet_helper::decode(cur_cmd_detail);
if(cur_entity_packet_detail.second != m_gate_version)
{
m_logger->error("fail to forward to client due to gate_version not match gate_version {} msg_gate_version {}", m_gate_version, cur_entity_packet_detail.second);
return;
}
get_server()->call_gate(m_gate_id, m_account_anchor, cur_msg.data,cur_entity_packet_detail.first);
}
所以目前只要能够正确的在relay_entity与player_entity之间同步好gate_version,就可以避免老客户端的数据被发送到新客户端。此时只需要在account_entity::set_gate绑定新gate的时候将gate_version进行自增,并发送到player_entity即可:
std::uint8_t relay_entity::gate_version() const
{
return m_gate_version;
}
void relay_entity::setup_client_info(std::uint64_t in_gate_id, std::shared_ptr<const std::string> in_account_anchor)
{
m_gate_id = in_gate_id;
m_account_anchor = std::move(in_account_anchor);
if(m_gate_id != 0)
{
++m_gate_version;
if(m_gate_version >= 16)
{
m_gate_version = 1;
}
}
}
void account_entity::set_gate(const std::string& gate_name, std::uint64_t gate_id, bool during_replace)
{
m_gate_name = gate_name;
m_gate_id = gate_id;
m_relay_entity->setup_client_info(m_gate_id, get_call_proxy());
if(gate_id != 0)
{
m_logger->info("{} notify_rebind_gate_client_finish with new_gate {}", m_base_desc.m_persist_entity_id, gate_name);
cancel_timer(m_destroy_client_timer);
m_destroy_client_timer.reset();
if(during_replace)
{
// 如果当前正在顶号过程中 通知客户端顶号成功
utility::rpc_msg replace_info;
replace_info.cmd = "reply_replace_account";
replace_info.args.push_back(is_player_online());
call_client(replace_info);
}
if(!is_player_online())
{
m_statem.change_to("show_players");
}
else
{
// 触发重新同步数据
utility::rpc_msg account_replace_msg;
account_replace_msg.cmd = "notify_player_client_replaced";
account_replace_msg.args.push_back(m_gate_name);
account_replace_msg.args.push_back(m_relay_entity->gate_version());
call_player(account_replace_msg);
}
}
// 省略后续代码
}
当account_entity创建player_entity时,会做第一次的gate同步:
player_entity* account_entity::create_player_entity(const std::string& player_id, const json& player_doc)
{
std::string cur_err;
auto cur_relay_entity_id = std::to_string(get_server()->gen_unique_uint64());
json::object_t relay_init_info;
relay_init_info["dest_eid"] = player_id;
relay_init_info["dest_game"] = get_server()->local_stub_info().name;
auto cur_relay_entity = get_server()->create_entity("relay_entity", cur_relay_entity_id, gen_online_entity_id(),relay_init_info, cur_err);
if(!cur_relay_entity)
{
m_logger->error("fail to create relay_entity");
return nullptr;
}
m_relay_entity = dynamic_cast<relay_entity*>(cur_relay_entity);
m_relay_entity->setup_client_info(m_gate_id, get_call_proxy());
json::object_t player_init_info;
// 省略很多代码
auto cur_entity = get_server()->create_entity("player_entity", player_id, gen_online_entity_id(),player_init_info, cur_err);
if(!cur_entity)
{
m_logger->error("fail to create player {} error is {} doc is {}", player_id, cur_err, player_doc.dump());
request_logout_account(utility::rpc_msg());
return nullptr;
}
m_player_id = player_id;
auto cur_player = dynamic_cast<player_entity*>(cur_entity);
cur_player->set_gate_version_when_create(m_relay_entity->gate_version());
// 省略很多代码
}
BigWorld 的网络框架
通信地址 Mailbox
在常规的网络通信中,通信地址一般都是以(ip,port)二元组的形式来构成的。如果对于指定的(ip,port)上有多个可以通信的entity/service实例的话,这个二元组就可以扩充为三元组(ip,port,entity_id/service_id)。在mosaic_game中的anchor就是这样的三元组的实现,不过anchor里用server_name来替代(ip,port)二元组,所以是由(server_name, entity_id/service_id)这样的二元组组成的。在Bigworld里也有一个专门的通信地址类型Address, 里面封装了(ip,port)二元组,然后还加上一个salt,有时候这个salt区分不同时间启动的占用同一个(ip,port)的通信地址,有时候这个字段又可以用来区分不同的Entity类型:
class Address
{
public:
/// @name Construction/Destruction
// @{
Address();
Address( uint32 ipArg, uint16 portArg );
// @}
uint32 ip; ///< IP address.
uint16 port; ///< The port.
uint16 salt; ///< Different each time.
int writeToString( char * str, int length ) const;
// TODO: Remove this operator
operator char*() const { return this->c_str(); }
char * c_str() const;
const char * ipAsString() const;
bool isNone() const { return this->ip == 0; }
static Watcher & watcher();
static const Address NONE;
private:
/// Temporary storage used for converting the address to a string. At
/// present we support having two string representations at once.
static const int MAX_STRLEN = 32;
static char s_stringBuf[ 2 ][ MAX_STRLEN ];
static int s_currStringBuf;
static char * nextStringBuf();
};
然后对于指定进程上的Entity的通信地址,使用专门的EntityMailBoxRef来代表,其实就是在Address的基础上加上了EntityId:
typedef int32 EntityID;
/**
* This structure is a packed version of a mailbox for an entity
*/
class EntityMailBoxRef
{
public:
EntityID id;
Mercury::Address addr;
enum Component
{
CELL = 0,
BASE = 1,
CLIENT = 2,
BASE_VIA_CELL = 3,
CLIENT_VIA_CELL = 4,
CELL_VIA_BASE = 5,
CLIENT_VIA_BASE = 6,
SERVICE = 7
};
EntityMailBoxRef():
id( 0 ),
addr( Mercury::Address::NONE )
{}
bool hasAddress() const { return addr != Mercury::Address::NONE; }
Component component() const { return (Component)(addr.salt >> 13); }
void component( Component c ) { addr.salt = type() | (uint16(c) << 13); }
EntityTypeID type() const { return addr.salt & 0x1FFF; }
void type( EntityTypeID t ) { addr.salt = (addr.salt & 0xE000) | t; }
void init() { id = 0; addr.ip = 0; addr.port = 0; addr.salt = 0; }
void init( EntityID i, const Mercury::Address & a,
Component c, EntityTypeID t )
{ id = i; addr = a; addr.salt = (uint16(c) << 13) | t; }
static const char * componentAsStr( Component component );
const char * componentName() const
{
return componentAsStr( this->component() );
}
};
这里的枚举类型Component定义了一个EntityMailBoxRef地址的具体类型,目前有8种,复用addr.salt的高3位来表示:
CELL,一个在CellApp上的Entity地址,也是最直接的Entity地址BASE,一个在BaseApp上的Base对象的地址,这个Base对象负责控制对应的RealEntityCLIENT,一个客户端地址BASE_VIA_CELL,一个中转用的CELL地址,向这个CELL地址投递的消息在被Entity接受之后,会自动的转发到对应的Base对象上CLIENT_VIA_CELL,一个中转用的CELL地址,向这个CELL地址投递的消息在被Entity接受之后,会自动的转发到对应的客户端对象上CELL_VIA_BASE, 一个中转用的Base地址,向这个BASE地址投递的消息在被Base接收之后,会自动的转发到对应的RealEntity上CLIENT_VIA_BASE,一个中转用的Base地址,向这个BASE地址投递的消息在被Base接收之后,会自动的转发到对应的CLIENT上SERVICE,一个服务地址
EntityMailBoxRef这个类型仅仅是作为通信地址使用的,过于底层。业务层里用来发送消息的基本都是PyEntityMailBox这个类型,因为这个类型除了存储了具体的通信地址之外,还负责对所有发送到这个地址的数据做一些封装转换的工作:
/**
* This class is used to represent a destination of an entity that messages
* can be sent to.
*
* Its virtual methods are implemented differently on each component.
*/
class PyEntityMailBox: public PyObjectPlus
{
Py_Header( PyEntityMailBox, PyObjectPlus )
public:
PyEntityMailBox( PyTypeObject * pType = &PyEntityMailBox::s_type_ );
virtual ~PyEntityMailBox();
/**
* Get a stream for the remote method to add arguments to.
*
* @param methodDesc The method description.
* @param pHandler If the method requires a request, this is the
* reply handler to use.
*/
virtual BinaryOStream * getStream( const MethodDescription & methodDesc,
std::auto_ptr< Mercury::ReplyMessageHandler > pHandler =
std::auto_ptr< Mercury::ReplyMessageHandler >() ) = 0;
static PyObject * constructFromRef( const EntityMailBoxRef & ref );
static bool reduceToRef( PyObject * pObject, EntityMailBoxRef * pRefOutput );
virtual EntityID id() const = 0;
virtual void address( const Mercury::Address & addr ) = 0;
virtual const Mercury::Address address() const = 0;
virtual void migrate() {}
typedef PyObject * (*FactoryFn)( const EntityMailBoxRef & ref );
static void registerMailBoxComponentFactory(
EntityMailBoxRef::Component c, FactoryFn fn,
PyTypeObject * pType );
typedef bool (*CheckFn)( PyObject * pObject );
typedef EntityMailBoxRef (*ExtractFn)( PyObject * pObject );
static void registerMailBoxRefEquivalent( CheckFn cf, ExtractFn ef );
PY_RO_ATTRIBUTE_DECLARE( this->id(), id );
PyObject * pyGet_address();
PY_RO_ATTRIBUTE_SET( address );
PY_AUTO_METHOD_DECLARE( RETOWN, callMethod,
ARG( ScriptString, ARG( ScriptTuple, END ) ) );
PyObject * callMethod(
const ScriptString & methodName, const ScriptTuple & arguments );
PyObject * callMethod(
const MethodDescription * methodDescription,
const ScriptTuple & args );
// 省略很多函数声明
};
这里还提供了一个静态函数来通过EntityMailBoxRef创建具体的PyEntityMailBox子类型对象:
/**
* Construct a PyEntityMailBox or equivalent from an EntityMailBoxRef.
* Returns Py_None on failure.
*/
PyObject * PyEntityMailBox::constructFromRef(
const EntityMailBoxRef & ref )
{
if (ref.id == 0) Py_RETURN_NONE;
if (s_pRefReg == NULL) Py_RETURN_NONE;
Fabricators::iterator found = s_pRefReg->fabs_.find( ref.component() );
if (found == s_pRefReg->fabs_.end()) Py_RETURN_NONE;
PyObject * pResult = (*found->second)( ref );
if (pResult)
{
return pResult;
}
else
{
WARNING_MSG( "PyEntityMailBox::constructFromRef: "
"Could not create mailbox from id %d. addr %s. component %d\n",
ref.id, ref.addr.c_str(), ref.component() );
Py_RETURN_NONE;
}
}
/**
* Register a PyEntityMailBox factory
*/
void PyEntityMailBox::registerMailBoxComponentFactory(
EntityMailBoxRef::Component c, FactoryFn fn, PyTypeObject * pType )
{
if (s_pRefReg == NULL) s_pRefReg = new MailBoxRefRegistry();
s_pRefReg->fabs_.insert( std::make_pair( c, fn ) );
s_pRefReg->mailBoxTypes_.push_back( pType );
}
创建子类型实例的时候使用了一个map来接收所有注册过来的子类型,目前的代码里使用的是手动注册的方式:
/**
* This class registers our classes into the PyEntityMailBox system,
* and provides some glue/helper functions for it.
*/
static class CellAppPostOfficeAttendant
{
public:
CellAppPostOfficeAttendant()
{
PyEntityMailBox::registerMailBoxComponentFactory(
EntityMailBoxRef::CELL, newCellMB, &CellEntityMailBox::s_type_ );
PyEntityMailBox::registerMailBoxComponentFactory(
EntityMailBoxRef::SERVICE, newBaseMB, &BaseEntityMailBox::s_type_ );
PyEntityMailBox::registerMailBoxComponentFactory(
EntityMailBoxRef::BASE, newBaseMB, &BaseEntityMailBox::s_type_ );
PyEntityMailBox::registerMailBoxComponentFactory(
EntityMailBoxRef::BASE_VIA_CELL, newBaseViaCellMB, &BaseViaCellMailBox::s_type_ );
PyEntityMailBox::registerMailBoxComponentFactory(
EntityMailBoxRef::CELL_VIA_BASE, newCellViaBaseMB, &CellViaBaseMailBox::s_type_ );
PyEntityMailBox::registerMailBoxComponentFactory(
EntityMailBoxRef::CLIENT_VIA_CELL, newClientViaCellMB, &ClientViaCellMailBox::s_type_ );
PyEntityMailBox::registerMailBoxComponentFactory(
EntityMailBoxRef::CLIENT_VIA_BASE, newClientViaBaseMB, &ClientViaBaseMailBox::s_type_ );
PyEntityMailBox::registerMailBoxRefEquivalent(
ServerEntityMailBox::Check, ServerEntityMailBox::static_ref );
PyEntityMailBox::registerMailBoxRefEquivalent(
Entity::Check, cellReduce );
}
// 省略很多代码
};
可以看出对于之前定义的枚举类EntityMailBoxRef::Component的每个值,都会有一个具体的PyEntityMailBox来承接功能。这里我们简单的来看看使用最多的CellViaBaseMailBox类型:
/**
* This class implements a mailbox that can send to a server object. This
* object may be on a cell or may be a base.
*
* @see CellEntityMailBox
* @see BaseEntityMailBox
*/
class ServerEntityMailBox: public PyEntityMailBox
{
Py_Header( ServerEntityMailBox, PyEntityMailBox )
public:
ServerEntityMailBox( EntityTypePtr pBaseType,
const Mercury::Address & addr, EntityID id,
PyTypeObject * pType = &s_type_ );
virtual ~ServerEntityMailBox();
virtual const Mercury::Address address() const { return addr_; }
virtual void address( const Mercury::Address & addr ) { addr_ = addr; }
virtual void migrate();
virtual EntityID id() const { return id_; }
// 省略一些python交互代码
EntityMailBoxRef ref() const;
virtual EntityMailBoxRef::Component component() const = 0;
const char * componentName() const;
static EntityMailBoxRef static_ref( PyObject * pThis )
{ return ((const ServerEntityMailBox*)pThis)->ref(); }
static void migrateMailBoxes();
static void adjustForDeadBaseApp( const Mercury::Address & deadAddr,
const BackupHash & backupHash );
protected:
Mercury::Address addr_;
EntityID id_;
EntityTypePtr pLocalType_;
};
/**
* This class is common to all mailboxes that send to the base entity or via
* the base entity.
*/
class CommonBaseEntityMailBox : public ServerEntityMailBox
{
Py_Header( CommonBaseEntityMailBox, ServerEntityMailBox )
public:
CommonBaseEntityMailBox( EntityTypePtr pBaseType,
const Mercury::Address & addr, EntityID id,
PyTypeObject * pType = &s_type_ ) :
ServerEntityMailBox( pBaseType, addr, id, pType )
{}
void sendStream();
protected:
Mercury::Bundle & bundle() const;
private:
virtual Mercury::UDPChannel & channel() const;
Mercury::UDPChannel & channel( Entity * pEntity ) const;
};
/**
* This class is used to create a mailbox to a cell entity. Traffic for the
* entity is sent via the base entity instead of directly to the cell entity.
* This means that these mailboxes do not have the restrictions that normal
* cell entity mailboxes have.
*/
class CellViaBaseMailBox : public CommonBaseEntityMailBox
{
Py_Header( CellViaBaseMailBox, CommonBaseEntityMailBox )
public:
CellViaBaseMailBox( EntityTypePtr pBaseType,
const Mercury::Address & addr, EntityID id,
PyTypeObject * pType = &s_type_ ):
CommonBaseEntityMailBox( pBaseType, addr, id, pType )
{}
~CellViaBaseMailBox() { }
virtual ScriptObject pyGetAttribute( const ScriptString & attrObj );
virtual BinaryOStream * getStream( const MethodDescription & methodDesc,
std::auto_ptr< Mercury::ReplyMessageHandler > pHandler );
virtual EntityMailBoxRef::Component component() const;
virtual const MethodDescription * findMethod( const char * attr ) const;
};
没想到这个CellViaBaseMailBox的继承层级还比较深,其继承链为CommonBaseEntityMailBox => ServerEntityMailBox => PyEntityMailBox。在ServerEntityMailBox类型上负责提供Address,EntityId, EntityTypePtr这三个成员变量,基本对应上了EntityMailBoxRef的各种分量,所以这里提供了ref函数来构造EntityMailBoxRef:
/**
* Get a packed ref representation of this mailbox
*/
EntityMailBoxRef ServerEntityMailBox::ref() const
{
EntityMailBoxRef mbr; mbr.init(
id_, addr_, this->component(), pLocalType_->description().index() );
return mbr;
}
然后在CommonBaseEntityMailBox这个类型上开始提供bundle和channel这两个接口。这里的channel就是一个信道的概念,负责消息的可靠收发。其实这里的channel并没有绑定在当前的CommonBaseEntityMailBox,而是绑定在RealEntity上,如果当前CellApp里找不到这个RealEntity则使用裸地址来创建channel:
/**
* This method returns the most appropriate channel for this mailbox. The
* entity is expected to have already been looked up. It will use the entity
* channel if it can, otherwise it just falls through to the base
* implementation.
*/
Mercury::UDPChannel & CommonBaseEntityMailBox::channel( Entity * pEntity ) const
{
return (pEntity && pEntity->isReal()) ?
pEntity->pReal()->channel() : CellApp::getChannel( addr_ );
}
然后bundle是单个消息包的概念, 每次调用bundle的时候都会自动的从对应的channel里添加一个新的bundle,然后返回这个bundle的引用来做数据填充:
/**
* This method returns a bundle that will be sent to the base entity. It
* overrides the base behaviour of just returning the channel's bundle by
* prefixing the bundle with a setClient message if we're not sending on the
* entity channel.
*/
Mercury::Bundle & CommonBaseEntityMailBox::bundle() const
{
Entity * pEntity = CellApp::instance().findEntity( id_ );
Mercury::Bundle & bundle = this->channel( pEntity ).bundle();
if (!pEntity || !pEntity->isReal())
{
BaseAppIntInterface::setClientArgs::start( bundle ).id = id_;
}
return bundle;
}
这里的逻辑是:如果没有找到RealEntity,这会手动的将bundle里填充id字段为要通信的Base对应的EntityID。这就是一个最基本的数据流转换操作。
裸的bundle使用起来过于自由,因为什么都可以往里面填,对于业务层维护消息类型的时候不怎么友好。所以在CellViaBaseMailBox这个类型上提供了getStream接口,这个接口负责初始化一个指定RPC的Bundle:
BinaryOStream * CellViaBaseMailBox::getStream(
const MethodDescription & methodDesc,
std::auto_ptr< Mercury::ReplyMessageHandler > pHandler )
{
Mercury::Bundle & bundle = this->bundle();
// Not supporting return values
if (pHandler.get())
{
PyErr_Format( PyExc_TypeError,
"Cannot call two-way method '%s' from CellApp",
methodDesc.name().c_str() );
return NULL;
}
bundle.startMessage( BaseAppIntInterface::callCellMethod );
bundle << methodDesc.internalIndex();
return &bundle;
}
这里负责先使用startMessage来填充当前的消息上层类型为BaseAppIntInterface::callCellMethod,然后再填入methodDesc.internalIndex()代表内层包裹的消息的具体索引。后续业务层再往这个bundle填充消息的时候,完全不知道这个RPC消息其实已经被添加了一个BaseAppIntInterface::callCellMethod的头部,神不知鬼不觉的做了一个消息转换。
数据流与封包
在Bigworld里,往bundle里填充数据使用的是类似于std::iostream的流式处理,利用operator<<来填入数据,然后用operator>>来解析数据。在bundle的头文件声明里,已经提供好了绝大部分的基础类型的operator<<的支持,例如bool,int,String,Vector等:
inline BinaryOStream& operator<<( BinaryOStream &out, int64 x )
{
bw_netlonglong n;
n.i64 = x;
return out << n;
}
inline BinaryOStream& operator<<( BinaryOStream &out, char x )
{
bw_netbyte n;
n.c = x;
return out << n;
}
/**
* This method provides output streaming for a string.
*
* @param b The binary stream.
* @param str The string to be streamed.
*
* @return A reference to the stream that was passed in.
*/
inline BinaryOStream & operator<<( BinaryOStream & b, const BW::string & str )
{
b.appendString( str.data(), int(str.length()) );
return b;
}
/**
* This method provides output streaming for a vector.
*
* @param b The binary stream.
* @param data The vector to be streamed.
*
* @return A reference to the stream that was passed in.
*/
template <class T, class A>
inline BinaryOStream & operator<<( BinaryOStream & b,
const BW::vector<T,A> & data)
{
uint32 max = (uint32)data.size();
b << max;
for (uint32 i=0; i < max; i++)
b << data[i];
return b;
}
class Bundle : public BinaryOStream
{
// 省略类型的具体实现
};
不过这里没有提供对Map等复杂容器类型的支持,所以上面的CellAppInterface::addCell样例代码在序列化一个Map的时候,需要手动的序列化。下面就是一个手动序列化容器的实例,先序列化当前Map的大小,然后对内部的每个Pair执行逐个基础元素的序列化:
struct DataEntry
{
uint16 key;
BW::string data;
};
typedef BW::map< SpaceEntryID, DataEntry > DataEntries;
DataEntries dataEntries_;
{
// bundle.startMessage( CellAppInterface::allSpaceData );
// bundle << id_;
bundle << (uint32)dataEntries_.size();
DataEntries::const_iterator iter = dataEntries_.begin();
while (iter != dataEntries_.end())
{
bundle << iter->first <<
iter->second.key << iter->second.data;
++iter;
}
}
当逻辑层接收到这个RPC的时候,需要按照之前执行operator<<的顺序来执行operator>>,从而达到正确的参数解析:
/**
* This method reads space data from the input stream.
*/
void Space::readDataFromStream( BinaryIStream & stream )
{
int size;
stream >> size;
for (int i = 0; i < size; i++)
{
SpaceEntryID entryID;
uint16 key;
BW::string value;
stream >> entryID >> key >> value;
this->spaceDataEntry( entryID, key, value, DONT_UPDATE_CELL_APP_MGR );
}
}
解释了数据流是如何序列化与反序列化的之后,我们再来看一下Bundle里是如何执行封包逻辑的,这里只讲解UDPBundle,因为这个子类用的最多。封包逻辑入口是startMessage,参数为一个RPC的描述元数据InterfaceElement,以及是否是可靠消息的标记位,我们目前先默认全都是可靠的:
/**
* This method starts a new message on the bundle.
*
* @param ie The type of message to start.
* @param reliable True if the message should be reliable.
*/
void UDPBundle::startMessage( const InterfaceElement & ie,
ReliableType reliable )
{
// Piggybacks should only be added immediately before sending.
MF_ASSERT( !pCurrentPacket_->hasFlags( Packet::FLAG_HAS_PIGGYBACKS ) );
MF_ASSERT( ie.name() );
this->endMessage();
curIE_ = ie;
msgIsReliable_ = reliable.isReliable();
msgIsRequest_ = false;
isCritical_ = (reliable == RELIABLE_CRITICAL);
this->newMessage();
reliableDriver_ |= reliable.isDriver();
}
这里会先使用endMessage来完成之前的逻辑包的封装工作,然后使用newMessage来开启一个新逻辑包。endMessage的具体内容我们先不看,先看一下newMessage在干什么。函数开头先对包的一些统计信息进行修改,然后使用qreserve来预留相应大小的buffer来供后续的参数来填充:
/**
* This message begins a new message, with the given number of extra bytes in
* the header. These extra bytes are normally used for request information.
*
* @param extra Number of extra bytes to reserve.
* @return Pointer to the body of the message.
*/
char * UDPBundle::newMessage( int extra )
{
// figure the length of the header
int headerLen = curIE_.headerSize();
if (headerLen == -1)
{
CRITICAL_MSG( "Mercury::UDPBundle::newMessage: "
"tried to add a message with an unknown length format %d\n",
(int)curIE_.lengthStyle() );
}
++numMessages_;
if (msgIsReliable_)
{
++numReliableMessages_;
}
// make space for the header
MessageID * pHeader = (MessageID *)this->qreserve( headerLen + extra );
// set the start of this msg
msgBeg_ = (uint8*)pHeader;
msgChunkOffset_ = Packet::Offset( pCurrentPacket_->msgEndOffset() );
// write in the identifier
*(MessageID*)pHeader = curIE_.id();
// set the length to zero
msgLen_ = 0;
msgExtra_ = extra;
// and return a pointer to the extra data
return (char *)(pHeader + headerLen);
}
这里的pHeader就是当前消息的buffer开始地址,这里先往buffer的第一个字节填充进入当前消息的类型id,然后返回Header结束后的地址,这里预留buffer的接口是qreserve。之前在基类BinaryOStream上的所有operator<<最终都会通过reserve这个虚接口来将数据写入到buffer中, 在UDPBundle里这个虚接口的实现就是qreserve::
inline BinaryOStream& operator<<( BinaryOStream &out, bw_netlong x )
{
BW_STATIC_ASSERT( sizeof( bw_netlong ) == 4, bw_netlong_bad_size );
*(uint32*)out.reserve( sizeof( x ) ) = BW_HTONL( x.u32 );
return out;
}
inline BinaryOStream& operator<<( BinaryOStream &out, bw_netlonglong x )
{
BW_STATIC_ASSERT( sizeof( bw_netlonglong ) == 8, bw_netlonglong_bad_size );
*(uint64*)out.reserve( sizeof( x ) ) = BW_HTONLL( x.u64 );
return out;
}
/**
* This method reserves the given number of bytes in this bundle.
*/
INLINE void * UDPBundle::reserve( int nBytes )
{
return qreserve( nBytes );
}
所以这个qreserve就是序列化中最重要的函数,负责提供足够大的buffer来填入后续数据,我们来看看这个qreserve是如何执行动态内存分配的:
/**
* This method gets a pointer to this many bytes quickly
* (non-virtual function)
*/
INLINE void * UDPBundle::qreserve( int nBytes )
{
if (nBytes <= pCurrentPacket_->freeSpace())
{
void * writePosition = pCurrentPacket_->back();
pCurrentPacket_->grow( nBytes );
return writePosition;
}
else
{
return this->sreserve( nBytes );
}
}
从这里可以看出,Bundle的更底层组成单位为Packet,是作为一段连续内存buffer而存在的,pCurrentPacket_就是当前正在被使用的buffer。如果当前pCurrentPacket_的剩余空间不满足申请的大小,则使用sreserve来结束当前Packet,并新建一个Packet来作为新的buffer:
/**
* This function returns a pointer to nBytes on a bundle.
* It assumes that the data will not fit in the current packet,
* so it adds a new one. This is a private function.
*
* @param nBytes Number of bytes to reserve.
*
* @return Pointer to the reserved data.
*/
void * UDPBundle::sreserve( int nBytes )
{
this->endPacket( /* isExtending */ true );
this->startPacket( new Packet() );
void * writePosition = pCurrentPacket_->back();
pCurrentPacket_->grow( nBytes );
MF_ASSERT( pCurrentPacket_->freeSpace() >= 0 );
return writePosition;
}
Packet内部使用一个固定大小PACKET_MAX_SIZE的数组作为底层buffer,这里的Packet::back返回的是剩下还没有使用的内存开始地址,grow的作用就是将back后面的nBytes标记为已经使用,同时将back后移:
#define PACKET_MAX_SIZE 1472
/**
* All packets look like this. Only the data is actually sent;
* the rest is just housekeeping.
*
* @ingroup mercury
*/
class Packet : public ReferenceCount
{
public:
Packet();
~Packet();
Packet * next() { return next_.get(); }
const Packet * next() const { return next_.get(); }
void chain( Packet * pPacket ) { next_ = pPacket; }
public:
char * data() { return data_; }
const char * data() const { return data_; }
/// Returns a pointer to the start of the message data.
const char * body() const { return data_ + HEADER_SIZE; }
/// Returns a pointer to the end of the message data.
char * back() { return data_ + msgEndOffset_; }
int msgEndOffset() const { return msgEndOffset_; }
int bodySize() const { return msgEndOffset_ - HEADER_SIZE; }
int footerSize() const { return footerSize_; }
int totalSize() const { return msgEndOffset_ + footerSize_; }
void msgEndOffset( int offset ) { msgEndOffset_ = offset; }
void grow( int nBytes ) { msgEndOffset_ += nBytes; }
void shrink( int nBytes ) { msgEndOffset_ -= nBytes; }
int freeSpace() const
{
return MAX_SIZE -
RESERVED_FOOTER_SIZE -
msgEndOffset_ -
footerSize_ -
extraFilterSize_;
}
private:
/// Packets are linked together in a simple linked list fashion.
PacketPtr next_;
/// This the offset of the end of the headers and message data. It is
/// temporarily incorrect in two situations: when sending, it is incorrect
/// in NetworkInterface::send() whilst footers are being written, and when
/// receiving, it is incorrect until processOrderedPacket() strips the
/// fragment footers.
int msgEndOffset_;
/// The variable-length data follows the packet header in memory.
char data_[PACKET_MAX_SIZE];
};
然后从这个类型声明可以看出,连续的Packet是使用next_指针相连,组成一个单链表。因此在startPacket的时候,负责使用Packet::chain来将新的Packet拼接到当前pCurrentPacket_的后面,然后将pCurrentPacket_更新为当前新分配的packet:
/**
* This method starts a new packet in this bundle.
*/
void UDPBundle::startPacket( Packet * p )
{
Packet * prevPacket = pCurrentPacket_;
// Link the new packet into the chain if necessary.
if (prevPacket)
{
prevPacket->chain( p );
}
pCurrentPacket_ = p;
pCurrentPacket_->reserveFilterSpace( extraSize_ );
pCurrentPacket_->setFlags( 0 );
pCurrentPacket_->msgEndOffset( Packet::HEADER_SIZE );
// if we're in the middle of a message start the next chunk here
msgChunkOffset_ = pCurrentPacket_->msgEndOffset();
}
虽然我们在Packet::data里预留了PACKET_MAX_SIZE个字节,但是其实里面真正可用的比这个小,因为要扣除Packet::HEADER_SIZ, Packet::RESERVED_FOOTER_SIZE和FilterSpace等数据。总的来说这里会控制单个Packet的实际数据大小要小于1400,刚好是以太网的常见MTU大小。
如果当前要填充的数据很大,导致单一Packet放不下会怎么办?解决方式是使用多个Packet串联起来,例如这里的添加大量二进制数据的接口addBlob会使用循环来进行可能的多次Packet分配:
/**
* This convenience method is used to add a block of memory to this stream.
*/
INLINE
void UDPBundle::addBlob( const void * pBlob, int size )
{
const char * pCurr = (const char *)pBlob;
while (size > 0)
{
// If there isn't any more space on this packet, force a new one to be
// allocated to this bundle.
if (pCurrentPacket_->freeSpace() == 0)
{
this->sreserve( 0 );
}
int currSize = std::min( size, int( pCurrentPacket_->freeSpace() ) );
MF_ASSERT( currSize > 0 );
memcpy( this->qreserve( currSize ), pCurr, currSize );
size -= currSize;
pCurr += currSize;
}
}
了解了Packet是如何填充的之后,我们再来回顾一下每次StartPacket之前都需要先执行的endPacket,其实就是记录一些统计信息:
/**
* This method end processing of the current packet, i.e. calculate its
* flags, and the correct size including footers.
*
* @param isExtending True if we are extending the bundle size, false
* otherwise (when we are finalising for send).
*/
void UDPBundle::endPacket( bool isExtending )
{
// If this won't be the last packet, add a reliable order marker
if (isExtending)
{
if (this->isOnExternalChannel())
{
// add a partial reliable order if in the middle of a message
if (msgBeg_ != NULL && msgIsReliable_)
{
this->addReliableOrder();
}
// add a gap reliable order to mark the end of the packet
ReliableOrder rgap = { NULL, 0, 0 };
reliableOrders_.push_back( rgap );
}
}
// if we're in the middle of a message add this chunk
msgLen_ += pCurrentPacket_->msgEndOffset() - msgChunkOffset_;
msgChunkOffset_ = uint16( pCurrentPacket_->msgEndOffset() );
}
当一个逻辑消息包Message彻底填充结束的时候,会调用endMessage这个接口。在这个函数里会使用compressLength将当前Message的总长度msgLen_写入到当前消息字节流的开头,这部分空间在StartMessage的时候已经预留:
/**
* This method finalises a message. It is called from a number of places
* within Bundle when necessary.
*/
void UDPBundle::endMessage( bool isEarlyCall /* = false */ )
{
// nothing to do if no message yet
if (msgBeg_ == NULL)
{
MF_ASSERT( pCurrentPacket_->msgEndOffset() == Packet::HEADER_SIZE ||
hasEndedMsgEarly_ );
return;
}
// add the amt used in this packet to the length
msgLen_ += pCurrentPacket_->msgEndOffset() - msgChunkOffset_;
// fill in headers for this msg
curIE_.compressLength( msgBeg_, msgLen_, this, msgIsRequest_ );
// record its details if it was reliable
if (msgIsReliable_)
{
if (this->isOnExternalChannel())
{
this->addReliableOrder();
}
msgIsReliable_ = false; // for sanity
}
msgChunkOffset_ = Packet::Offset( pCurrentPacket_->msgEndOffset() );
msgBeg_ = NULL;
msgIsRequest_ = false;
hasEndedMsgEarly_ = isEarlyCall;
}
这里的compressLength逻辑并不是使用一个固定的uint32_t的空间来填入当前消息包的总长度,而是使用了变长编码。他根据当前RPC接口所携带的长度信息来做这样的处理:
- 如果当前
RPC是参数大小固定的RPC,则不需要在包开头预留长度字段,无需填充 - 如果当前
RPC是参数大小可变的RPC,则根据预设的参数最大长度的字节大小lengthParam_来在包开头预留对应的空间,等一个包所有参数彻底填入之后,再在开头预留的空间里将这个长度字段填进入 - 如果当前
RPC是参数大小可变的RPC,但是当前参数的大小超过了之前预设的lengthParam_所能表示的整数范围,则将预先保留的大小区域全都填充为0xff,然后在bundle的末尾再加入一个int32,写入当前包大小之后,再与第一个packet里的头四个字节做调换,这样长度字段依然在message的开头部分,这部分对应的代码见下:
// If the message length could not fit into a standard length field, we
// need to handle this as a special case.
if (oversize)
{
// Fill the original length field with ones to indicate the special
// situation.
static const int IDENTIFIER_SIZE = sizeof(uint8);
for (int i = IDENTIFIER_SIZE; i <= lengthParam_; ++i)
{
((uint8*)data)[i] = 0xff;
}
if (pBundle)
{
void * tail = pBundle->reserve( sizeof( int32 ) );
void * ret = this->specialCompressLength( data, length,
pBundle->pFirstPacket(), isRequest );
MF_ASSERT( !ret || tail == ret );
return ret ? 0 : -1;
}
else
{
return -1;
}
}
/**
* This method is called by InterfaceElement::compressLength when the amount
* of data added to the stream for the message is more than the message's size
* field can handle. For example, if lengthParam is 1 and there is at least
* 255 bytes worth of data added for the message (or 65535 for 2 bytes etc).
*
* To handle this, a 4-byte size is placed at the start of the message
* displacing the first four bytes of the message. These are appended to the
* end of the message. The original length field is filled with 0xff to
* indicate this special situation.
*/
void * InterfaceElement::specialCompressLength( void * data, int length,
Packet * pPacket, bool isRequest ) const;
对应这样的长度填充函数compressLength,InterfaceElement也提供了对应的长度解析函数expandLength,就是当前填充过程的逆过程:
/**
* This method expands a length from the given header.
*
* @param data This is a pointer to a message header.
* @param pPacket
* @param isRequest
*
* @return Expanded length.
*/
int InterfaceElement::expandLength( void * data, Packet * pPacket,
bool isRequest ) const
{
switch (lengthStyle_)
{
case FIXED_LENGTH_MESSAGE:
return lengthParam_;
break;
case VARIABLE_LENGTH_MESSAGE:
{
uint8 *pLen = ((uint8*)data) + sizeof( MessageID );
uint32 len = 0;
switch (lengthParam_)
{
case 0: len = 0; break;
case 1: len = *(uint8*)pLen; break;
case 2:
{
#if defined( BW_ENFORCE_ALIGNED_ACCESS )
uint16 len16 = 0;
memcpy( &len16, pLen, sizeof(uint16) );
len = BW_NTOHS( len16 );
#else // !defined( BW_ENFORCE_ALIGNED_ACCESS )
len = BW_NTOHS( *(uint16 *)pLen );
#endif // defined( BW_ENFORCE_ALIGNED_ACCESS )
break;
}
case 3: len = BW_UNPACK3( (const char*)pLen ); break;
case 4:
{
#if defined( BW_ENFORCE_ALIGNED_ACCESS )
uint32 len32;
memcpy( &len32, pLen, sizeof(uint32) );
len = BW_NTOHL( len32 );
#else // !defined( BW_ENFORCE_ALIGNED_ACCESS )
len = BW_NTOHL( *(uint32*)pLen );
#endif // defined( BW_ENFORCE_ALIGNED_ACCESS )
break;
}
default:
CRITICAL_MSG( "InterfaceElement::expandLength( %s ): "
"Unhandled variable message length: %d\n",
this->c_str(), lengthParam_ );
}
// If lengthParam_ is 4, a length > 0x80000000 will cause an overflow
// and a negative value will be returned from this method.
if ((int)len < 0)
{
ERROR_MSG( "Mercury::InterfaceElement::expandLength( %s ): "
"Overflow in calculating length of variable message!\n",
this->c_str() );
return -1;
}
// The special case is indicated with the length field set to maximum.
// i.e. All bits set to 1.
if (!this->canHandleLength( len ))
{
if (!pPacket)
{
return -1;
}
return this->specialExpandLength( data, pPacket, isRequest );
}
return len;
break;
}
default:
ERROR_MSG( "Mercury::InterfaceElement::expandLength( %s ): "
"unrecognised length format %d\n",
this->c_str(), (int)lengthStyle_ );
break;
}
return -1;
}
综上, bundle里的最小组成单元其实是packet,packet之间使用单链表来串联。每个packet的预留大小都是一样的,基本等于ip的最常见MTU 1400。然后每个Message的所有数据都放在packet里,每个Message的开头都会写入一个单字节整数代表当前Message的唯一标识符。在标识符后面就是当前Message的参数总长度信息,这是一个可变字节大小的整数,字节大小由这个Message的类型确定。如果消息太长,则会走上面的oversize逻辑来填入长度信息。
Bundle的发送与接收
Message写入之后并不会立即触发底层的网络发送,网络发送的逻辑由Channel::send托管,一般是每帧末尾被自动调用,也可以手动调用:
/**
* This method sends the given bundle on this channel. If no bundle is
* supplied, the channel's own bundle will be sent.
*
* @param pBundle The bundle to send, or NULL to send the channel's own
* bundle.
*/
void Channel::send( Bundle * pBundle /* = NULL */ )
{
ChannelPtr pChannel( this );
if (!this->isConnected())
{
ERROR_MSG( "Channel::send( %s ): Channel is not connected\n",
this->c_str() );
return;
}
if (pBundle == NULL)
{
pBundle = pBundle_;
}
this->doPreFinaliseBundle( *pBundle );
pBundle->finalise();
this->networkInterface().addReplyOrdersTo( *pBundle, this );
this->doSend( *pBundle );
// Clear the bundle
if (pBundle == pBundle_)
{
this->clearBundle();
}
else
{
pBundle->clear();
}
if (pListener_)
{
pListener_->onChannelSend( *this );
}
}
这里的核心就是doSend函数,内部会做一堆错误检查,最后没有问题的情况下才会调用到networkInterface::send:
/*
* Override from Channel.
*/
void UDPChannel::doSend( Bundle & bundleUncast )
{
MF_ASSERT_DEBUG( dynamic_cast< UDPBundle * >( &bundleUncast ) != NULL );
UDPBundle * pBundle = static_cast< UDPBundle * >( &bundleUncast );
// 忽略很多错误处理函数
// Send the bundle through the network interface as UDP packets
pNetworkInterface_->send( addr_, *pBundle, this );
// Update our stats
++numDataUnitsSent_;
numBytesSent_ += pBundle->size();
if (pBundle->isReliable())
{
++numReliablePacketsSent_;
}
// Channels that do not send regularly are added to a collection to do
// their resend checking periodically.
pNetworkInterface_->irregularChannels().addIfNecessary( *this );
// If the bundle that was just sent was critical, the sequence number of
// its last packet is the new unackedCriticalSeq_.
if (pBundle->isCritical())
{
unackedCriticalSeq_ =
pBundle->pFirstPacket()->seq() + pBundle->numDataUnits() - 1;
}
}
/**
* This method sends a bundle to the given address.
*
* Note: any pointers you have into the packet may become invalid after this
* call (and whenever a channel calls this too).
*
* @param address The address to send to.
* @param bundle The bundle to send
* @param pChannel The Channel that is sending the bundle.
* (even if the bundle is not sent reliably, it is still passed
* through the filter associated with the channel).
*/
void NetworkInterface::send( const Address & address,
UDPBundle & bundle, UDPChannel * pChannel )
{
pPacketSender_->send( address, bundle, pChannel );
}
这里有一个专门的PacketSender来负责组包并投递到底层的socket里:
/**
* This method sends a bundle to the given address.
*
* Note: any pointers you have into the packet may become invalid after this
* call (and whenever a channel calls this too).
*
* @param address The address to send to.
* @param bundle The bundle to send
* @param pChannel The Channel that is sending the bundle.
* (even if the bundle is not sent reliably, it is still passed
* through the filter associated with the channel).
*/
void PacketSender::send( const Address & address,
UDPBundle & bundle, UDPChannel * pChannel )
{
MF_ASSERT( address != Address::NONE );
MF_ASSERT( !pChannel || pChannel->addr() == address );
MF_ASSERT( !bundle.pChannel() || (bundle.pChannel() == pChannel) );
#if ENABLE_WATCHERS
sendingStats_.mercuryTimer().start();
#endif // ENABLE_WATCHERS
if (!bundle.isFinalised())
{
// Handle bundles sent off-channel that won't have been finalised by
// their channels yet.
bundle.finalise();
bundle.addReplyOrdersTo( &requestManager_, pChannel );
}
// fill in all the footers that are left to us
Packet * pFirstOverflowPacket = bundle.preparePackets( pChannel,
seqNumAllocator_, sendingStats_, shouldUseChecksums_ );
// Finally actually send the darned thing. Do not send overflow packets.
for (Packet * pPacket = bundle.pFirstPacket();
pPacket != pFirstOverflowPacket;
pPacket = pPacket->next())
{
this->sendPacket( address, pPacket, pChannel, false );
}
#if ENABLE_WATCHERS
sendingStats_.mercuryTimer().stop( 1 );
#endif // ENABLE_WATCHERS
sendingStats_.numBundlesSent_++;
sendingStats_.numMessagesSent_ += bundle.numMessages();
sendingStats_.numReliableMessagesSent_ += bundle.numReliableMessages();
}
在这里我们看到有一个for循环,在循环里会把当前单链表里的Packet依次的调用sendPacket来投入到socket里。但是这里有一个限制,不能单词send调用发送太多数据,因此会使用bundle.preparePackets来计算出最多能发送到的Packet记录为pFirstOverflowPacket,循环遍历的时候遇到这个Packet就结束。同时preparePackets还会将当前Channel的唯一标识符(其实就是EntityID)也加入到Packet里:
/**
* This method will write the flags on a packet fitting for one that will ride
* on this channel. It will also reserve enough space for the footer.
*/
void UDPChannel::writeFlags( Packet * p )
{
p->enableFlags( Packet::FLAG_ON_CHANNEL );
if (this->isIndexed())
{
p->enableFlags( Packet::FLAG_INDEXED_CHANNEL );
p->channelID() = id_;
p->channelVersion() = version_;
p->reserveFooter( sizeof( ChannelID ) + sizeof( ChannelVersion ) );
}
// 省略很多代码
}
这里的sendPacket还是过于上层,会有很多的统计和中转过滤操作,并最终调用到basicSendWithRetries:
/**
* This method sends a packet. No result is returned as it cannot be trusted.
* The packet may never get to the other end.
*
* @param address The destination address.
* @param pPacket The packet to send.
* @param pChannel The channel to be sent on, or NULL if off-channel.
* @param isResend If true, this is a resend, otherwise, it is the initial
* send.
*/
void PacketSender::sendPacket( const Address & address,
Packet * pPacket,
UDPChannel * pChannel, bool isResend )
{
// 忽略一些无关代码
// Check if we want artificial loss or latency
if (!this->rescheduleSend( address, pPacket, pChannel ))
{
this->sendRescheduledPacket( address, pPacket, pChannel );
}
}
/**
* This method sends the packet after rescheduling has occurred.
*
* @param address The destination address.
* @param pPacket The packet.
* @param pChannel The channel, or NULL if off-channel send.
*/
void PacketSender::sendRescheduledPacket( const Address & address,
Packet * pPacket,
UDPChannel * pChannel )
{
PacketFilterPtr pFilter = pChannel ? pChannel->pFilter() : NULL;
if (pPacketMonitor_)
{
pPacketMonitor_->packetOut( address, *pPacket );
}
// Otherwise send as appropriate
if (pFilter)
{
pFilter->send( *this, address, pPacket );
}
else
{
this->basicSendWithRetries( address, pPacket );
}
}
这里的basicSendWithRetries负责封装底层socket的发送,真正的往指定地址尝试投递一个包,如果投递失败还负责短暂的重试:
/**
* Basic packet sending functionality that retries a few times
* if there are transitory errors.
*
* @param addr The destination address.
* @param pPacket The packet to send.
*
* @return REASON_SUCCESS on success, otherwise an appropriate
* Mercury::Reason.
*/
Reason PacketSender::basicSendWithRetries( const Address & addr,
Packet * pPacket )
{
// try sending a few times
int retries = 0;
Reason reason;
while (retries <= 3)
{
++retries;
#if ENABLE_WATCHERS
sendingStats_.systemTimer().start();
#endif // ENABLE_WATCHERS
reason = this->basicSendSingleTry( addr, pPacket );
#if ENABLE_WATCHERS
sendingStats_.systemTimer().stop( 1 );
#endif // ENABLE_WATCHERS
if (reason == REASON_SUCCESS)
return reason;
// If we've got an error in the queue simply send it again;
// we'll pick up the error later.
if (reason == REASON_NO_SUCH_PORT)
{
continue;
}
// If the transmit queue is full wait 10ms for it to empty.
if ((reason == REASON_RESOURCE_UNAVAILABLE) ||
(reason == REASON_TRANSMIT_QUEUE_FULL))
{
// 一些容错代码
continue;
}
// some other error, so don't bother retrying
break;
}
return reason;
}
最后的basicSendSingleTry才有机会接触到裸的socket,将当前packet里的数据发送到指定socket里,至此发送流程终于走完了:
/**
* Basic packet sending function that just tries to send once.
*
* @param addr The destination address.
* @param pPacket The packet to send.
*
* @return REASON_SUCCESS on success otherwise an appropriate
* Mercury::Reason.
*/
Reason PacketSender::basicSendSingleTry( const Address & addr,
Packet * pPacket )
{
int len = socket_.sendto( pPacket->data(), pPacket->totalSize(),
addr.port, addr.ip );
if (len == pPacket->totalSize())
{
sendingStats_.numBytesSent_ += len + UDP_OVERHEAD;
sendingStats_.numPacketsSent_++;
return REASON_SUCCESS;
}
// 省略错误处理代码
}
Packet的发送由PacketSender托管, 类似的Packet的接收也有一个专门的类型PacketReceiver托管。不过收消息逻辑上层还有很多封装,下面就是一个典型的收消息调用栈,:
WorldOfWarplanes.exe!Mercury::PacketReceiver::processFilteredPacket(const Mercury::Address & addr={...}, Mercury::Packet * p=0x243399c0, Mercury::ProcessSocketStatsHelper * pStatsHelper=0x0018f2a4) Line 347 + 0x11 bytes C++
WorldOfWarplanes.exe!Mercury::PacketFilter::recv(Mercury::PacketReceiver & receiver={...}, const Mercury::Address & addr={...}, Mercury::Packet * pPacket=0x243399c0, Mercury::ProcessSocketStatsHelper * pStatsHelper=0x0018f2a4) Line 38 C++
WorldOfWarplanes.exe!Mercury::EncryptionFilter::recv(Mercury::PacketReceiver & receiver={...}, const Mercury::Address & addr={...}, Mercury::Packet * pPacket=0x243399c0, Mercury::ProcessSocketStatsHelper * pStatsHelper=0x0018f2a4) Line 233 + 0x1c bytes C++
WorldOfWarplanes.exe!Mercury::PacketReceiver::processPacket(const Mercury::Address & addr={...}, Mercury::Packet * p=0x0493cc40, Mercury::ProcessSocketStatsHelper * pStatsHelper=0x0018f2a4) Line 242 + 0x25 bytes C++
WorldOfWarplanes.exe!Mercury::PacketReceiver::processSocket(bool expectingPacket=true) Line 92 C++
WorldOfWarplanes.exe!Mercury::PacketReceiver::handleInputNotification(int fd=684) Line 51 + 0x9 bytes C++
WorldOfWarplanes.exe!Mercury::SelectPoller::handleInputNotifications(int & countReady=, fd_set & readFDs={...}, fd_set & writeFDs={...}) Line 305 + 0x29 bytes C++
WorldOfWarplanes.exe!Mercury::SelectPoller::processPendingEvents(double maxWait=0.00000000000000000) Line 398 + 0x19 bytes C++
WorldOfWarplanes.exe!Mercury::DispatcherCoupling::doTask() Line 34 + 0x38 bytes C++
WorldOfWarplanes.exe!Mercury::FrequentTasks::process() Line 112 C++
WorldOfWarplanes.exe!Mercury::EventDispatcher::processOnce(bool shouldIdle=false) Line 381 C++
WorldOfWarplanes.exe!ServerConnection::processInput() Line 922 C++
在PacketReceiver::handleInputNotification(int fd=684)上层的逻辑都是一些epoll的封装,这些封装代码我们这里就跳过。当单个socket可以读取数据的时候才会调用到PacketReceiver::handleInputNotification,这里会不断的调用processSocket来接收一个Packet,直到socket里的剩余可读数据无法组成一个Packet:
/*
* This method is called when there is data on the socket.
*/
int PacketReceiver::handleInputNotification( int fd )
{
uint64 processingStartStamps = BW_NAMESPACE timestamp();
int numPacketsProcessed = 0;
bool expectingPacket = true; // only true for first call to processSocket()
bool shouldProcess = true;
while (shouldProcess)
{
Address sourceAddress;
shouldProcess = this->processSocket( sourceAddress, expectingPacket );
expectingPacket = false;
uint64 processingElapsedStamps =
BW_NAMESPACE timestamp() - processingStartStamps;
++numPacketsProcessed;
// 省略一些容错代码
}
return 0;
}
这个processSocket会通过Packet::recvFromEndpoint来尝试从socket里读取数据来填充当前Packet:
/**
* This method will read and process any pending data on this object's socket.
*
* @param srcAddr This will be filled with the source address of any
* packets received.
* @param expectingPacket If true, a packet was expected to be read,
* otherwise false.
*
* @return True if a packet was read, otherwise false.
*/
bool PacketReceiver::processSocket( Address & srcAddr,
bool expectingPacket )
{
stats_.updateSocketStats( socket_ );
// Used to collect stats
ProcessSocketStatsHelper statsHelper( stats_ );
// try a recvfrom
int len = pNextPacket_->recvFromEndpoint( socket_, srcAddr );
statsHelper.socketReadFinished( len );
if (len <= 0)
{
this->checkSocketErrors( len, expectingPacket );
return false;
}
// process it if it succeeded
PacketPtr curPacket = pNextPacket_;
pNextPacket_ = new Packet();
Reason ret = this->processPacket( srcAddr, curPacket.get(),
&statsHelper );
if ((ret != REASON_SUCCESS) &&
networkInterface_.isVerbose())
{
this->dispatcher().errorReporter().reportException( ret, srcAddr );
}
return true;
}
Packet::recvFromEndpoint每次尝试读取最多PACKET_MAX_SIZE=1472个字节的数据到内部的读取缓冲区内,这个PACKET_MAX_SIZE也就是当前单一Packet的数据大小上限:
// The default max size for a packet is the MTU of an ethernet frame, minus the
// overhead of IP and UDP headers. If you have special requirements for packet
// sizes (e.g. your client/server connection is running over VPN) you can edit
// this to whatever you need.
const int Packet::MAX_SIZE = PACKET_MAX_SIZE;
/**
* This method does a recv on the endpoint into this packet's data array,
* setting the length correctly on a successful receive. The return value is
* the return value from the low-level recv() call.
*/
int Packet::recvFromEndpoint( Endpoint & ep, Address & addr )
{
int len = ep.recvfrom( data_, MAX_SIZE,
(u_int16_t*)&addr.port, (u_int32_t*)&addr.ip );
if (len >= 0)
{
this->msgEndOffset( len );
}
return len;
}
这里需要重新学习一下UDP的数据接收,他不像TCP那样的字节流接收,而是以包为单位来接收,当一个UDP socket变的可读的时候说明其内部已经接收了一个完整的包。业务层recvfrom接收udp包的时候需要传入buf和bufsize,就是接收空间和接收空间大小。如果这个bufsize小于udp包的大小,那么只能接收到这个udp包的前bufsize个字节,剩下的部分会被直接被丢弃,再次执行recvfrom的时候处理的已经是第二个包了。所以bufsize要适配组包时的单Packet大小上限,也就是PACKET_MAX_SIZE。
所以当recvFromEndpoint返回的len大于0的时候,就代表接收到了一个Packet。由于我们业务层使用的是Message,所以接下来我们需要尝试从Packet里恢复出Message:
/**
* This is the entrypoint for new packets, which just gives it to the filter.
*/
Reason PacketReceiver::processPacket( const Address & addr, Packet * p,
ProcessSocketStatsHelper * pStatsHelper )
{
// 跳过一些分支处理
//parse raw.
return this->processFilteredPacket( addr, p, pStatsHelper );
}
这个processFilteredPacket的内部逻辑太长了,我们这里就跳过,只需要知道的是这里会根据传入的地址addr与当前PacketReceiver绑定的RPC Interface以及Packet负载的ChannelID来查找对应的Channel pChannel,找到之后执行addToReceiveWindow函数:
// 省略很多代码
// should we be looking in a channel
if (pChannel)
{
UDPChannel::AddToReceiveWindowResult result =
pChannel->addToReceiveWindow( p, addr, stats_ );
}
// 省略很多代码
由于udp的Packet可能会被乱序接收,所以这里的addToReceiveWindow的作用就是将接受到的Packet按照其编号进行排序,如果当前接收到的Packet的序号与所期待的Packet的序号相匹配,则会在processFilteredPacket里处理一些若干个连续的Packet:
Reason oret = REASON_SUCCESS;
PacketPtr pCurrPacket = p;
PacketPtr pNextPacket = NULL;
// push this packet chain (frequently one) through processOrderedPacket
// NOTE: We check isCondemned on the channel and not isDead. If a channel
// has isDestroyed set to true but isCondemned false, we still want to
// process remaining messages. This can occur if there is a message that
// causes the entity to teleport. Any remaining messages are still
// processed and will likely be forwarded from the ghost entity to the
// recently teleported real entity.
// TODO: It would be nice to display a message if the channel is condemned
// but there are messages on it.
while (pCurrPacket &&
((pChannel == NULL) || !pChannel->isCondemned()))
{
// processOrderedPacket expects packets not to be chained, since
// chaining is used for grouping fragments into bundles. The packet
// chain we've set up doesn't have anything to do with bundles, so we
// break the packet linkage before passing the packets into
// processOrderedPacket. This can mean that packets that aren't the one
// just received drop their last reference, hence the need for
// pCurrPacket and pNextPacket.
pNextPacket = pCurrPacket->next();
pCurrPacket->chain( NULL );
// Make sure they are actually packets with consecutive sequences.
MF_ASSERT( pNextPacket.get() == NULL ||
seqMask( pCurrPacket->seq() + 1 ) ==
pNextPacket->seq() );
// At this point, the only footers left on the packet should be the
// request and fragment footers.
Reason ret = this->processOrderedPacket( addr, pCurrPacket.get(),
pChannel.get(), pStatsHelper );
if (oret == REASON_SUCCESS)
{
oret = ret;
}
pCurrPacket = pNextPacket;
}
这里使用while来消耗掉已经接收到的多个连续的Packet,每个Packet都会经过processOrderedPacket的处理。由于单Bundle可能是由多个packet组合而成的,同时一个Packet里可能会有多个Bundle的数据,所以这里使用一个比Packet更小粒度的概念FragmentedBundle来代表单一Bundle里的多个连续区块, 其概念上类似于绑定了一个shared_ptr<Bundle>的string_view。然后完整的Bundle就由一个FragmentedBundle的单链表来组成。当单一bundle的所有packet都到达之后,这里会使用UDPBundleProcessor::dispatchMessages来将当前完整的bundle进行消息回调:
/**
* Process a packet after any ordering guaranteed by reliable channels
* has been imposed (further ordering guaranteed by fragmented bundles
* is still to be imposed)
*/
Reason PacketReceiver::processOrderedPacket( const Address & addr, Packet * p,
UDPChannel * pChannel, ProcessSocketStatsHelper * pStatsHelper )
{
// 省略很多代码
// We have a complete packet chain. We can drop the reference in pChain now
// since the Bundle owns it.
UDPBundleProcessor outputBundle( p );
pChain = NULL;
Reason reason = outputBundle.dispatchMessages(
networkInterface_.interfaceTable(),
addr,
pChannel,
networkInterface_,
pStatsHelper );
if (reason == REASON_CORRUPTED_PACKET)
{
RETURN_FOR_CORRUPTED_PACKET();
}
}
由于一个bundle里可能会有多个Message,所以在这个dispatchMessages里会使用一个循环来处理内部存储的所有消息:
/**
* This method is responsible for dispatching the messages on this bundle to
* the appropriate handlers.
*
* @param interfaceTable The interface table.
* @param addr The source address of the bundle.
* @param pChannel The channel.
* @param networkInterface The network interface.
* @param pStatsHelper The socket receive statistics.
*
* @return REASON_SUCCESS on success, otherwise an appropriate
* Mercury::Reason describing the error.
*/
Reason UDPBundleProcessor::dispatchMessages( InterfaceTable & interfaceTable,
const Address & addr, UDPChannel * pChannel,
NetworkInterface & networkInterface,
ProcessSocketStatsHelper * pStatsHelper ) const
{
# define SOURCE_STR (pChannel ? pChannel->c_str() : addr.c_str())
bool breakLoop = pChannel ? pChannel->isDead() : false;
Reason ret = REASON_SUCCESS;
// NOTE: The channel may be destroyed while processing the messages so we
// need to hold a local reference to keep pChannel valid.
ChannelPtr pChannelHolder = pChannel;
MessageFilterPtr pMessageFilter =
pChannel ? pChannel->pMessageFilter() : NULL;
// now we simply iterate over the messages in that bundle
iterator iter = this->begin();
iterator end = this->end();
interfaceTable.onBundleStarted( pChannel );
while (iter != end && !breakLoop)
{
// find out what this message looks like
InterfaceElementWithStats & ie = interfaceTable[ iter.msgID() ];
// 省略一些代码代码
InterfaceElement updatedIE = ie;
if (!updatedIE.updateLengthDetails( networkInterface, addr ))
{
ERROR_MSG( "UDPBundleProcessor::dispatchMessages( %s ): "
"Discarding bundle after failure to update length "
"details for message ID %hu\n",
SOURCE_STR, (unsigned short int)iter.msgID() );
ret = REASON_CORRUPTED_PACKET;
break;
}
// get the details out of it
UnpackedMessageHeader & header = iter.unpack( updatedIE );
// 省略一些代码
}
// 省略很多代码
}
在处理单个消息的解析的时候,首先要做的就是获取当前消息的参数长度,这个逻辑在iter.unpack函数中:
/**
* This method unpacks the current message using the given
* interface element.
*
* @param ie InterfaceElement for the current message.
*
* @return Header describing the current message.
*/
UnpackedMessageHeader & UDPBundleProcessor::iterator::unpack(
const InterfaceElement & ie )
{
uint16 msgBeg = offset_;
MF_ASSERT( !isUnpacked_ );
bool isRequest = (nextRequestOffset_ == offset_);
updatedIE_ = ie;
// read the standard header
if (int(offset_) + updatedIE_.headerSize() > int(bodyEndOffset_))
{
ERROR_MSG( "UDPBundleProcessor::iterator::unpack( %s ): "
"Not enough data on stream at %hu for header "
"(%d bytes, needed %d)\n",
updatedIE_.name(), offset_, int(bodyEndOffset_) - int(offset_),
updatedIE_.headerSize() );
goto errorNoRevert;
}
curHeader_.identifier = this->msgID();
curHeader_.length =
updatedIE_.expandLength( cursor_->data() + msgBeg, cursor_, isRequest );
// 省略很多代码
}
在UDPBundleProcessor::iterator::unpack我们终于见到了之前介绍过的compressLength的逆过程expandLength,在执行完成expandlength之后,当前消息的总长度就存储在curHeader_.length里。有了总长度之后,就可以方便的知道后续哪些packet里有当前message的消息,当所有packet都收集完成了之后,下面的这个函数就会将分散在各个packet里的参数数据进行合并,成为一个单一的连续buffer:
/**
* This method returns the data for the message that the iterator
* is currently pointing to.
*
* @return Pointer to message data.
*/
const char * UDPBundleProcessor::iterator::data()
{
// does this message go off the end of the packet?
if (dataOffset_ + dataLength_ <= bodyEndOffset_)
{
// no, ok, we're safe
return cursor_->data() + dataOffset_;
}
// is there another packet? assert that there is because 'unpack' would have
// flagged an error if the next packet was required but missing
MF_ASSERT( cursor_->next() != NULL );
if (cursor_->next() == NULL) return NULL;
// also assert that data does not start mid-way into the next packet
MF_ASSERT( dataOffset_ <= bodyEndOffset_ ); // (also implied by 'unpack')
// is the entirety of the message data on the next packet?
if (dataOffset_ == bodyEndOffset_ &&
Packet::HEADER_SIZE + dataLength_ <= cursor_->next()->msgEndOffset())
{
// yes, easy then
return cursor_->next()->body();
}
// ok, it's half here and half there, time to make a temporary buffer.
// note that a better idea might be to return a stream from this function.
if (dataBuffer_ != NULL)
{
// Already created a buffer for it.
return dataBuffer_;
}
// Buffer is destroyed in operator++() and in ~iterator().
dataBuffer_ = new char[dataLength_];
Packet *thisPack = cursor_;
uint16 thisOff = dataOffset_;
uint16 thisLen;
for (int len = 0; len < dataLength_; len += thisLen)
{
if (thisPack == NULL)
{
DEBUG_MSG( "UDPBundleProcessor::iterator::data: "
"Run out of packets after %d of %d bytes put in temp\n",
len, dataLength_ );
return NULL;
}
thisLen = thisPack->msgEndOffset() - thisOff;
if (thisLen > dataLength_ - len) thisLen = dataLength_ - len;
memcpy( dataBuffer_ + len, thisPack->data() + thisOff, thisLen );
thisPack = thisPack->next();
thisOff = Packet::HEADER_SIZE;
}
return dataBuffer_;
}
这里的dataBuffer_就是最终的参数数据的连续buffer,通过这个连续buffer可以构造BinaryIStream,通过operator>>的方式来解析出原来的所有参数。
Channel与可靠UDP
在本书的开头章节中我们介绍过UDP不是一个业务层能直接使用的协议,因为UDP数据包在发送、传输、接收过程中有各种理由能导致数据丢失和乱序。为了能让业务层能够相信网络功能与TCP一样能够提供可靠有序的消息消息收发,网络框架这一层必须提供一个可靠UDP的实现,来抹平底层的网络协议差异,典型样例便是KCP协议。在BigWorld中,业务通信主要使用的都是UDP,因此其网络层提供了一个自己实现的可靠UDP, 叫做UDPChannel:
/**
* Channels are used for regular communication channels between two address.
*
* @note Any time you call 'bundle' you may get a different bundle to the one
* you got last time, because the Channel decided that the bundle was full
* enough to send. This does not occur on high latency channels (or else
* tracking numbers would get very confusing).
*
* @note If you use more than one Channel on the same address, they share the
* same bundle. This means that:
*
* @li Messages (and message sequences where used) must be complete between
* calls to 'bundle' (necessary due to note above anyway)
*
* @li Each channel must say send before the bundle is actually sent.
*
* @li Bundle tracking does not work with multiple channels; only the last
* Channel to call 'send' receives a non-zero tracking number (or possibly
* none if deleting a Channel causes it to be sent), and only the first
* Channel on that address receives the 'bundleLost' call.
*
* @ingroup mercury
*/
class UDPChannel : public Channel
{
// 省略很多代码
};
UDPChannel的父类Channel就是一个逻辑上的数据收发通道,这个Channel类负责提供基于Bundle的发送接收的虚接口。Channel有一个另外的子类TCPChannel来处理基于TCP的数据收发,由于TCP已经是一个可靠协议,所以TCPChannel的逻辑并不多,直接把Bundle加上长度字段即可塞入到发送队列中。而UDPChannel则需要在底层将一个Bundle的数据拆分为多个Packet,并依次发送到消息的对端,因为如果单个消息包太大超过以太网的常见MTU的话,会导致拆包,从而增大了丢包和乱序的风险。UDPChannel对端接收数据的时候也需要使用UDPChannel,只有两端都是UDPChannel的时候才能使用框架提供的能力来实现可靠传输。接下来我们来大致的分析一下这个UDPChannel是如何实现可靠传输的。
在UDP上做可靠传输,首先需要为发出的每个包分配一个连续自增的编号,在Packet上也提供了这个字段:
/// Sequence number, or Channel::SEQ_NULL if not set
SeqNum seq_;
这个字段在Packet刚被创建的时候是默认为0的,只有在PacketSender::send执行的时候才会通过UDPBundle::preparePackets来执行填充:
/**
* This method sends a bundle to the given address.
*
* Note: any pointers you have into the packet may become invalid after this
* call (and whenever a channel calls this too).
*
* @param address The address to send to.
* @param bundle The bundle to send
* @param pChannel The Channel that is sending the bundle.
* (even if the bundle is not sent reliably, it is still passed
* through the filter associated with the channel).
*/
void PacketSender::send( const Address & address,
UDPBundle & bundle, UDPChannel * pChannel )
{
MF_ASSERT( address != Address::NONE );
MF_ASSERT( !pChannel || pChannel->addr() == address );
MF_ASSERT( !bundle.pChannel() || (bundle.pChannel() == pChannel) );
#if ENABLE_WATCHERS
sendingStats_.mercuryTimer().start();
#endif // ENABLE_WATCHERS
if (!bundle.isFinalised())
{
// Handle bundles sent off-channel that won't have been finalised by
// their channels yet.
bundle.finalise();
bundle.addReplyOrdersTo( &requestManager_, pChannel );
}
// fill in all the footers that are left to us
Packet * pFirstOverflowPacket = bundle.preparePackets( pChannel,
seqNumAllocator_, sendingStats_, shouldUseChecksums_ );
// 省略后续的往socket投递的逻辑
}
这个函数有点长,目前我们先关注关于序列号分配部分的逻辑:
/**
* This method prepares packets this bundle for sending.
*
* @param pChannel The channel, or NULL for off-channel sending.
* @param seqNumAllocator The network interface's sequence number allocator,
* used for off-channel sending.
* @param sendingStats The sending stats to update.
*/
Packet * UDPBundle::preparePackets( UDPChannel * pChannel,
SeqNumAllocator & seqNumAllocator,
SendingStats & sendingStats,
bool shouldUseChecksums )
{
// fill in all the footers that are left to us
Packet * pFirstOverflowPacket = NULL;
int numPackets = this->numDataUnits();
SeqNum firstSeq = 0;
SeqNum lastSeq = 0;
// Write footers for each packet.
for (Packet * pPacket = this->pFirstPacket();
pPacket;
pPacket = pPacket->next())
{
MF_ASSERT( pPacket->msgEndOffset() >= Packet::HEADER_SIZE );
// 省略很多代码
this->writeFlags( pPacket );
if (pChannel)
{
pChannel->writeFlags( pPacket );
}
if ((pChannel && pChannel->isExternal()) ||
pPacket->hasFlags( Packet::FLAG_IS_RELIABLE ) ||
pPacket->hasFlags( Packet::FLAG_IS_FRAGMENT ))
{
pPacket->reserveFooter( sizeof( SeqNum ) );
pPacket->enableFlags( Packet::FLAG_HAS_SEQUENCE_NUMBER );
}
// At this point, pPacket->back() is positioned just after the message
// data, so we advance it to the end of where the footers end, then
// write backwards towards the message data. We check that we finish
// up back at the message data as a sanity check.
const int msgEndOffset = pPacket->msgEndOffset();
pPacket->grow( pPacket->footerSize() );
// 省略很多代码
// Add the sequence number
if (pPacket->hasFlags( Packet::FLAG_HAS_SEQUENCE_NUMBER ))
{
// If we're sending reliable traffic on a channel, use the
// channel's sequence numbers. Otherwise use the nub's.
pPacket->seq() =
(pChannel && pPacket->hasFlags( Packet::FLAG_IS_RELIABLE )) ?
pChannel->useNextSequenceID() :
seqNumAllocator.getNext();
pPacket->packFooter( pPacket->seq() );
if (pPacket == pFirstPacket_)
{
firstSeq = pPacket->seq();
lastSeq = pPacket->seq() + numPackets - 1;
}
}
// 省略很多代码
}
return pFirstOverflowPacket;
}
这个preparePackets内部用循环去处理当前Bundle里的每一个Packet。如果当前Bundle是一个需要执行可靠收发的Bundle,则内部的所有Packet都会有Packet::FLAG_IS_RELIABLE这个可靠性的flag,此时会通过reserveFooter在当前Packet的末尾预留四个字节大小的长度来等待后续的序列号填充,并顺带的会开启Packet::FLAG_HAS_SEQUENCE_NUMBER这个需要携带序列号的标记位。这里的reserveFooter并不会分配额外的动态内存,而是累计到当前footerSize_上,作为当前packet的footer部分的总大小:
void reserveFooter( int nBytes ) { footerSize_ += nBytes; }
int footerSize() const { return footerSize_; }
当所有的footer都被统计了之后,会使用Packet::grow来在原有的数据后面进行内存边界扩张:
void grow( int nBytes ) { msgEndOffset_ += nBytes; }
这里grow的时候不需要担心msgEndOffset_这个偏移量会超过内部data_数组的最大容量,因为Packet会预先留一个最大可能的RESERVED_FOOTER_SIZE字节不被填参的时候占用,统计当前Packet可用内存的时候会预先对这块区域做扣除:
/// The amount of space that is reserved for fixed-length footers on a
/// packet. This is done so that the bundle logic can always assume that
/// these footers will fit and not have to worry about pre-allocating them.
/// This is currently 27 bytes, roughly 1.5% of the capacity of a packet, so
/// there's not too much wastage.
static const int RESERVED_FOOTER_SIZE =
sizeof( Offset ) + // FLAG_HAS_REQUESTS
sizeof( AckCount ) + // FLAG_HAS_ACKS
sizeof( SeqNum ) + // FLAG_HAS_SEQUENCE_NUMBER
sizeof( SeqNum ) * 2 + // FLAG_IS_FRAGMENT
sizeof( ChannelID ) + sizeof( ChannelVersion ) + // FLAG_INDEXED_CHANNEL
sizeof( Checksum ); // FLAG_HAS_CHECKSUM
int freeSpace() const
{
return MAX_SIZE -
RESERVED_FOOTER_SIZE -
msgEndOffset_ -
footerSize_ -
extraFilterSize_;
}
然后使用的时候,使用专门的接口packFooter,这个接口会将传入数据的字节优先从data_的末尾进行填充,所以当所有的footer都填充完成之后,msgEndOffset_指向的就是真正数据的最大偏移,在这个msgEndOffset_之后的footerSize_字节对应的数据全都是footer对应的数据:
/**
* This method writes a footer to the back of this packet. It should only
* be called from NetworkInterface::send() and assumes that size_ has been
* artificially increased so that it points to the end of the footers, the
* idea being that we work back towards the real body end.
*/
template <class TYPE>
void packFooter( TYPE value )
{
msgEndOffset_ -= sizeof( TYPE );
switch( sizeof( TYPE ) )
{
case sizeof( uint8 ):
*(TYPE*)this->back() = value; break;
case sizeof( uint16 ):
*(TYPE*)this->back() = BW_HTONS( value ); break;
case sizeof( uint32 ):
*(TYPE*)this->back() = BW_HTONL( value ); break;
default:
CRITICAL_MSG( "Footers of size %" PRIzu " aren't supported",
sizeof( TYPE ) );
}
}
preparePackets后面的逻辑里发现当前packet拥有Packet::FLAG_HAS_SEQUENCE_NUMBER这个标记位的时候,就会生成一个递增序列号并使用packFooter将这个序列号填充到之前预留的位置上。这里生成递增序列号有两个途径,正常情况下我们的RPC对应的packet都是Packet::FLAG_IS_RELIABLE 的,因此会走UDPChannel::useNextSequenceID:
/**
* This method returns the next sequence ID, and then increments it.
*
* @return The next sequence ID.
*/
SeqNum UDPChannel::useNextSequenceID()
{
SeqNum retSeq = largeOutSeqAt_.getNext();
if (this->isInternal())
{
int usage = this->sendWindowUsage();
int & threshold = this->sendWindowWarnThreshold();
if (usage > threshold)
{
WARNING_MSG( "UDPChannel::useNextSequenceID( %s ): "
"Send window backlog is now %d packets, "
"exceeded previous max of %d, "
"critical size is %u\n",
this->c_str(), usage, threshold, windowSize_ );
threshold = usage;
}
if (this->isIndexed() &&
(s_pSendWindowCallback_ != NULL) &&
(usage > s_sendWindowCallbackThreshold_))
{
(*s_pSendWindowCallback_)( *this );
}
}
return retSeq;
}
这里的largeOutSeqAt_是UDPChannel内的一个成员变量,作为递增序列号发生器来使用。在这里生成下一个递增序列号的时候,会顺带的检查一下现在的发送窗口里有多少个Packet还没有发送出去,如果数值太大则会有一个警告,同时会触发一个s_pSendWindowCallback_的回调。
在preparePackets填充好每个Packet的递增序列号之后,会使用addResendTimer对每个需要可靠发送的包注册为可以消息重传的Packet:
// set up the reliable machinery
if (pPacket->hasFlags( Packet::FLAG_IS_RELIABLE ))
{
if (pChannel)
{
const ReliableOrder *roBeg, *roEnd;
if (pChannel->isInternal())
{
roBeg = roEnd = NULL;
}
else
{
this->reliableOrders( pPacket, roBeg, roEnd );
}
if (!pChannel->addResendTimer( pPacket->seq(), pPacket,
roBeg, roEnd ))
{
if (pFirstOverflowPacket == NULL)
{
pFirstOverflowPacket = pPacket;
}
// return REASON_WINDOW_OVERFLOW;
}
else
{
MF_ASSERT( pFirstOverflowPacket == NULL );
}
}
}
在这个addResendTimer中,会为每个要发送的Packet构造一个UnackedPacket,同时记录一下现在的时间,并将这个UnackedPacket放到当前UDPChannel的unackedPackets_数组里去,
/**
* This method records a packet that may need to be resent later if it is not
* acknowledged. It is called when a packet is sent on our behalf.
*
* @return false if the window size was exceeded.
*/
bool UDPChannel::addResendTimer( SeqNum seq, Packet * p,
const ReliableOrder * roBeg, const ReliableOrder * roEnd )
{
MF_ASSERT( (oldestUnackedSeq_ == SEQ_NULL) ||
unackedPackets_[ oldestUnackedSeq_ ] );
MF_ASSERT( seq == p->seq() );
UnackedPacket * pUnackedPacket = new UnackedPacket( p );
// If this channel has no unacked packets, record this as the oldest.
if (oldestUnackedSeq_ == SEQ_NULL)
{
oldestUnackedSeq_ = seq;
}
// Fill it in
pUnackedPacket->lastSentAtOutSeq_ = seq;
uint64 now = timestamp();
pUnackedPacket->lastSentTime_ = now;
lastReliableSendTime_ = now;
pUnackedPacket->wasResent_ = false;
if (roBeg != roEnd)
{
pUnackedPacket->reliableOrders_.assign( roBeg, roEnd );
}
// Grow the unackedPackets_ array, if necessary.
if (seqMask( seq - oldestUnackedSeq_ + 1 ) > unackedPackets_.size())
{
unackedPackets_.doubleSize( oldestUnackedSeq_ );
if (this->networkInterface().isVerbose())
{
INFO_MSG( "UDPChannel::addResendTimer( %s ): "
"Doubled send buffer size to %u\n",
this->c_str(),
unackedPackets_.size() );
}
}
MF_ASSERT( unackedPackets_[ seq ] == NULL );
unackedPackets_[ seq ] = pUnackedPacket;
MF_ASSERT( (oldestUnackedSeq_ == SEQ_NULL) ||
unackedPackets_[ oldestUnackedSeq_ ] );
if (seqMask( largeOutSeqAt_ - oldestUnackedSeq_ ) >= windowSize_)
{
// Make sure that we at least send occasionally.
UnackedPacket * pPrevUnackedPacket =
unackedPackets_[ seqMask( smallOutSeqAt_ - 1 ) ];
if ((pPrevUnackedPacket == NULL) ||
(now - pPrevUnackedPacket->lastSentTime_ >
minInactivityResendDelay_))
{
this->sendUnacked( *unackedPackets_[ smallOutSeqAt_ ] );
smallOutSeqAt_ = seqMask( smallOutSeqAt_ + 1 );
}
this->checkOverflowErrors();
//We shouldn't send now
return false;
}
else
{
//We should send now
smallOutSeqAt_ = largeOutSeqAt_;
return true;
}
}
这个函数的后半部分差不多实现了一个类似于TCP里的滑动窗口的概念,oldestUnackedSeq_是当前最小的没有收到对端ACK的Packet的序号,而largeOutSeqAt_代表的是当前已发送出去的Packet的最大序号, smallOutSeqAt_代表的是等待发送的最小Packet序号:
uint32 windowSize_;
/// Generally, the sequence number of the next packet to be sent.
SeqNum smallOutSeqAt_; // This does not include packets in
// overflowPackets_
SeqNumAllocator largeOutSeqAt_; // This does include packets in
// overflowPackets_
/// The sequence number of the oldest unacked packet on this channel.
SeqNum oldestUnackedSeq_;
/// The last time a reliable packet was sent (for the first time) on this
/// channel, as a timestamp.
uint64 lastReliableSendTime_;
如果largeOutSeqAt_与oldestUnackedSeq_两者的差值大于等于指定的windowSize_,则代表目前已发送但是没有确认接受的包已经超过了阈值。此时会认为当前包要暂存下来,不能直接发出,等待窗口有余量的时候再发,避免信道拥堵时的进一步加重,所以这里会返回false。在返回之前会判断一下近期一段时间minInactivityResendDelay_内是否有新的包发从出去,如果没有的话则强制发出下一个等待处理的包,并更新smallOutSeqAt_++。这样做的目的是强制推进一下滑动窗口,通知对端当前已经收到的ACK的最大值,类似于一种心跳机制。
如果当前已发送但没有ack的包的数量不是很多,则认为当前Packet可以发出,函数返回true。返回之前会更新smallOutSeqAt_为当前已发送出去的Packet的最大序号largeOutSeqAt_。网络状况好的话当前没有未ACK的Packet,此时largeOutSeqAt_就是当前新Packet的序列号。
发送端除了处理滑动窗口之外,还需要处理已发送包的ACK, 这部分逻辑是通过函数handleAck来处理的:
/**
* This method removes a packet from the collection of packets that have been
* sent but not acknowledged. It is called when an acknowledgement to a packet
* on this channel is received.
*
* Returns false on error, true otherwise.
*/
bool UDPChannel::handleAck( SeqNum seq )
{
MF_ASSERT( (oldestUnackedSeq_ == SEQ_NULL) ||
unackedPackets_[ oldestUnackedSeq_ ] );
// Make sure the sequence number is valid
// 忽略一些容错处理
// now make sure there's actually a packet there
UnackedPacket * pUnackedPacket = unackedPackets_[ seq ];
if (pUnackedPacket == NULL)
{
return true;
}
// Update the average RTT for this channel, if this packet hadn't already
// been resent.
// 忽略一些计算RTT的代码
// 忽略一些无关代码
// If we released the oldest unacked packet, figure out the new one
if (seq == oldestUnackedSeq_)
{
oldestUnackedSeq_ = SEQ_NULL;
for (uint i = seqMask( seq+1 );
i != largeOutSeqAt_;
i = seqMask( i+1 ))
{
if (unackedPackets_[ i ])
{
oldestUnackedSeq_ = i;
break;
}
}
}
// If the incoming seq is after the last ack, then it is the new last ack
if (seqLessThan( highestAck_, seq ))
{
highestAck_ = seq;
}
// Now we can release the unacked packet
bw_safe_delete( pUnackedPacket );
unackedPackets_[ seq ] = NULL;
MF_ASSERT( oldestUnackedSeq_ == SEQ_NULL ||
unackedPackets_[ oldestUnackedSeq_ ] );
while (seqMask(smallOutSeqAt_ - oldestUnackedSeq_) < windowSize_ &&
unackedPackets_[ smallOutSeqAt_ ])
{
this->sendUnacked( *unackedPackets_[ smallOutSeqAt_ ] );
smallOutSeqAt_ = seqMask( smallOutSeqAt_ + 1 );
}
return true;
}
这个函数的逻辑比较简单, 可以分为这四个部分:
- 如果当前被
ACK的包就是之前没有被ACK的最小序号oldestUnackedSeq_,则通过遍历后续所有已发送包里获取其中第一个未ACK的序号执行oldestUnackedSeq_的更新。这里不直接进行++操作是因为handleAck可能会被乱序执行,即可能先收到5的ACK,再收到4的ACK。 - 更新
highestAck_为当前已接受到的最大ACK,注意这里并不代表highestAck_之前的所有包都已经被ACK了 - 通过
bw_safe_delete来释放之前存储的Packet,因为已经被ACK的包不可能再被重传,所以没必要再保留备份 - 如果当前的滑动窗口没有被塞满,则可以将下一个等待发送的包
smallOutSeqAt_发送出去,同时更新smallOutSeqAt_++
如果对端通过某种机制通知到当前的UDPChannel所有指定序列号endSeq之前的包都已经被顺序接收了,则UDPChannel::handleCumulativeAck会被调用。在这个函数里会获取最小的没有被ack的包序号oldestUnackedSeq_,然后遍历[oldestUnackedSeq_, endSeq)区间内的所有包来调用handleAck:
/**
* This method handles a cumulative ACK. This indicates that all packets
* BEFORE a sequence number have been received by the remote end.
*
* @return False on error, true otherwise.
*/
bool UDPChannel::handleCumulativeAck( SeqNum endSeq )
{
// Make sure the sequence number is valid
// 忽略一些容错代码
if (!this->hasUnackedPackets())
{
return true;
}
// Check that the ACK is not in the future.
// Note: endSeq is first seqNum after what's been received.
// 忽略一些容错代码
SeqNum seq = oldestUnackedSeq_;
// Note: Up to but not including endSeq
while (seqLessThan( seq, endSeq ))
{
this->handleAck( seq );
seq = seqMask( seq + 1 );
}
return true;
}
如果一些包长时间没有被ACK,则需要主动的对这些包进行重传,这部分的逻辑在UDPChannel::checkResendTimers函数里,每次发送一个包之前都会被调用:
/**
* This method sends the given bundle on this channel. If no bundle is
* supplied, the channel's own bundle will be sent.
*
* @param pBundle The bundle to send, or NULL to send the channel's own
* bundle.
*/
void Channel::send( Bundle * pBundle /* = NULL */ )
{
// 省略很多代码
this->doPreFinaliseBundle( *pBundle );
// 省略很多代码
}
/*
* Override from Channel.
*/
void UDPChannel::doPreFinaliseBundle( Bundle & bundle )
{
// Tack on piggybacks.
UDPBundle & udpBundle = static_cast< UDPBundle & >( bundle );
this->checkResendTimers( udpBundle );
}
/**
* This method resends any unacked packets as appropriate. This can be because
* of time since last sent, receiving later acks before earlier ones.
*/
void UDPChannel::checkResendTimers( UDPBundle & bundle )
{
// There are no un-acked packets
if (oldestUnackedSeq_ == SEQ_NULL)
{
return;
}
// Don't do anything if the remote process has failed
// 忽略对端下线的情况
// If we have unacked packets that are getting a bit old, then resend the
// ones that are older than we'd like. Anything that has taken more than
// twice the RTT on the channel to come back is considered to be too old.
uint64 now = timestamp();
uint64 resendPeriod =
std::max( roundTripTime_*2, minInactivityResendDelay_ );
uint64 lastReliableSendTime = this->lastReliableSendOrResendTime();
const bool isIrregular = !this->isRemoteRegular();
const SeqNum endSeq = isIrregular ? smallOutSeqAt_ : highestAck_;
const bool isDebugVerbose = this->networkInterface().isDebugVerbose();
int numResends = 0;
// TODO: 8 is a magic number and would be nice to be more scientific.
// The idea is to throttle the resends a little in extreme situations. We
// want to send enough so that no (or not too many) packets are lost but
// still be able to send more when the RTT is large.
const int MAX_RESENDS = windowSize_/8;
for (SeqNum seq = oldestUnackedSeq_;
seqLessThan( seq, endSeq ) && numResends < MAX_RESENDS;
seq = seqMask( seq + 1 ))
{
UnackedPacket * pUnacked = unackedPackets_[ seq ];
// Send if the packet is old, or we have a later ack
if (pUnacked != NULL)
{
const bool hasNewerAck =
seqLessThan( pUnacked->lastSentAtOutSeq_, highestAck_);
const bool shouldResend = hasNewerAck ||
(isIrregular && (now - pUnacked->lastSentTime_ > resendPeriod));
const SeqNum prevLastSentAtOutSeq = pUnacked->lastSentAtOutSeq_;
const uint64 prevLastSentTime = pUnacked->lastSentTime_;
if (shouldResend)
{
bool piggybacked = this->resend( seq, bundle );
++numResends;
// 忽略一些警告代码
}
}
}
}
在这个函数里会首先计算出当前能够容忍的最长未确认时间resendPeriod,然后遍历当前所有的已发出但未确认的UnackedPacket,如果这些UnackedPacket的发送后时长大于最长未确认时间resendPeriod,则会调用resend将这个Packet重新发送:
/**
* Resends an un-acked packet by the most sensible method available.
*
* @return Returns true if the packet is no longer un-acked.
*/
bool UDPChannel::resend( SeqNum seq, UDPBundle & bundle )
{
++numPacketsResent_;
UnackedPacket & unacked = *unackedPackets_[ seq ];
// If possible, piggypack this packet onto the next outgoing bundle
if (this->isExternal() &&
!unacked.pPacket_->hasFlags( Packet::FLAG_IS_FRAGMENT ) &&
(unackedPackets_[ smallOutSeqAt_ ] == NULL)) // Not going to overflow
{
if (bundle.piggyback(
seq, unacked.reliableOrders_, unacked.pPacket_.get() ))
{
unacked.wasResent_ = true; // Don't count this for RTT calculations
this->handleAck( seq );
return true;
}
}
// If there are any acks on this packet, then they will be resent too, but
// it does no harm.
this->sendUnacked( unacked );
return false;
}
这个resend的最简单的处理逻辑就是执行sendUnacked来重发,记录一下这个包的重发时间戳和重发记录:
/**
* Resends an un-acked packet by the most sensible method available.
*/
void UDPChannel::sendUnacked( UnackedPacket & unacked )
{
unacked.pPacket_->updateChannelVersion( version_, id_ );
pNetworkInterface_->sendPacket( addr_, unacked.pPacket_.get(), this,
/* isResend: */ true );
unacked.lastSentAtOutSeq_ = smallOutSeqAt_;
unacked.wasResent_ = true;
uint64 now = timestamp();
unacked.lastSentTime_ = now;
lastReliableResendTime_ = now;
}
如果当前是面向客户端的下行通道,且当前要重发的包包含了完整的一个bundle,同时滑动窗口里允许下一个包进行发送,那么这里会通过piggyback函数将当前Packet连接到当前要发送的bundle的Packet链表后面,并执行这个Packet的手动ACK。这样的快速路径相当于将这个要重传的Packet与当前要发送的bundle进行合并了。
至此UDPChannel的发送端实现了序号分配、滑动窗口、接收确认、超时重传等流控和可靠机制,基本等价实现了一个TCP的发送端。接下来我们再来看看UDPChannel的接收端是如何收取Packet并返回ACK的,相关代码在之前我们已经介绍过的PacketReceiver::processFilteredPacket函数里,不过之前只介绍了接收端如何从Packet里解包Bundle的代码,并没有关注ACK的部分。现在我们再来看看这个函数是怎么发出ACK的:
/**
* This function has to be very robust, if we intend to use this transport over
* the big bad internet. We basically have to assume it'll be complete garbage.
*/
Reason PacketReceiver::processFilteredPacket( const Address & addr,
Packet * p, ProcessSocketStatsHelper * pStatsHelper )
{
// 省略很多代码
// now do something if it's reliable
if (p->hasFlags( Packet::FLAG_IS_RELIABLE ))
{
// first make sure it has a sequence number, so we can address it
// 省略一些容错代码
// should we be looking in a channel
if (pChannel)
{
UDPChannel::AddToReceiveWindowResult result =
pChannel->addToReceiveWindow( p, addr, stats_ );
if (!pChannel->isLocalRegular())
{
shouldSendChannel = true;
}
if (result != UDPChannel::PACKET_IS_NEXT_IN_WINDOW)
{
// The packet is not corrupted, and has either already been
// received, or is too early and has been buffered. In either
// case, we send the ACK immediately, as long as the channel is
// established and is irregular.
if (result != UDPChannel::PACKET_IS_CORRUPT)
{
if (pChannel->isEstablished() && shouldSendChannel)
{
UDPBundle emptyBundle;
pChannel->send( &emptyBundle );
}
return REASON_SUCCESS;
}
// The packet has an invalid sequence number.
else
{
RETURN_FOR_CORRUPTED_PACKET();
}
}
}
}
}
这里会根据addToReceiveWindow的返回之来做处理,如果返回值是PACKET_IS_NEXT_IN_WINDOW,则代表这个Packet刚好就是下一个被期望的序号,否则代表这个包是乱序接收的,此时会构建一个空UDPBundle来发送。这个空UDPBundle的作用就是立即ACK当前包,但是这里面的调用链其实比较晦涩,我们先跳过之前分析过的UDPChannel::send的调用链的具体内容,直接跳转到调用到的UDPBundle::preparePackets:
/**
* This method prepares packets this bundle for sending.
*
* @param pChannel The channel, or NULL for off-channel sending.
* @param seqNumAllocator The network interface's sequence number allocator,
* used for off-channel sending.
* @param sendingStats The sending stats to update.
*/
Packet * UDPBundle::preparePackets( UDPChannel * pChannel,
SeqNumAllocator & seqNumAllocator,
SendingStats & sendingStats,
bool shouldUseChecksums )
{
// fill in all the footers that are left to us
Packet * pFirstOverflowPacket = NULL;
int numPackets = this->numDataUnits();
SeqNum firstSeq = 0;
SeqNum lastSeq = 0;
// Write footers for each packet.
for (Packet * pPacket = this->pFirstPacket();
pPacket;
pPacket = pPacket->next())
{
MF_ASSERT( pPacket->msgEndOffset() >= Packet::HEADER_SIZE );
if (shouldUseChecksums)
{
// Reserve space for the checksum footer
MF_ASSERT( !pPacket->hasFlags( Packet::FLAG_HAS_CHECKSUM ) );
pPacket->reserveFooter( sizeof( Packet::Checksum ) );
pPacket->enableFlags( Packet::FLAG_HAS_CHECKSUM );
}
this->writeFlags( pPacket );
if (pChannel)
{
pChannel->writeFlags( pPacket );
}
// 省略很多代码
}
// 省略很多代码
}
这里的pChannel->writeFlags( pPacket )会在当前Packet还有足够剩余空间的时候将ACK信息携带进去:
/**
* This method will write the flags on a packet fitting for one that will ride
* on this channel. It will also reserve enough space for the footer.
*/
void UDPChannel::writeFlags( Packet * p )
{
p->enableFlags( Packet::FLAG_ON_CHANNEL );
// 忽略无关代码
// Add a cumulative ACK. This indicates that all packets BEFORE a given seq
// have been received.
if (p->freeSpace() >= int( sizeof( SeqNum )))
{
p->enableFlags( Packet::FLAG_HAS_CUMULATIVE_ACK );
p->reserveFooter( sizeof( SeqNum ) );
Acks::iterator iter = acksToSend_.begin();
while (iter != acksToSend_.end())
{
// Need to go through all due to wrap-around case.
if (seqLessThan( *iter, inSeqAt_ ) )
{
acksToSend_.erase( iter++ );
}
else
{
++iter;
}
}
}
// 省略很多代码
}
如果当前Packet里剩余空间大于四个字节的话(对于空包来说这个显然成立),这里会优先加入批量ACK的消息,在Packet的flags里加上Packet::FLAG_HAS_CUMULATIVE_ACK,然后在Footer里塞入下一个希望收到的连续包的编号inSeqAt_。这个inSeqAt_的更新是在UDPChannel::addToReceiveWindow函数里做的,如果新包的序号等于这个inSeqAt_,则对这个inSeqAt_不断递增,直到已经接受的乱序Packet里没有这个编号:
UDPChannel::AddToReceiveWindowResult UDPChannel::addToReceiveWindow(
Packet * p, const Address & srcAddr, PacketReceiverStats & stats )
{
const SeqNum seq = p->seq();
const bool isDebugVerbose = this->networkInterface().isDebugVerbose();
// 省略很多的代码
// check the good case first
if (seq == inSeqAt_)
{
inSeqAt_ = seqMask( inSeqAt_ + 1 );
Packet * pPrev = p;
Packet * pBufferedPacket = bufferedReceives_[ inSeqAt_ ].get();
// Attach as many buffered packets as possible to this one.
while (pBufferedPacket != NULL)
{
// Link it to the prev packet then remove it from the buffer.
pPrev->chain( pBufferedPacket );
bufferedReceives_[ inSeqAt_ ] = NULL;
--numBufferedReceives_;
// Advance to the next buffered packet.
pPrev = pBufferedPacket;
inSeqAt_ = seqMask( inSeqAt_ + 1 );
pBufferedPacket = bufferedReceives_[ inSeqAt_ ].get();
}
return PACKET_IS_NEXT_IN_WINDOW;
}
// 省略很多代码
}
当确定了要发送连续ACK之后,会从已接收但未ACK的Packet集合里删除所有序号比inSeqAt_小的,因为已经不再需要保留了。
除了这个连续ACK的加入之外,还需要在剩下的空余空间里塞入一些离散的ACK信息,这部分代码就在UDPChannel::writeFlags处理连续ACK代码的后面:
// Put on as many acks as we can.
if (!acksToSend_.empty() &&
p->freeSpace() >= int(sizeof( Packet::AckCount ) + sizeof( SeqNum )))
{
//Required to make GCC link this, something to do with templates
const size_t MAX_ACKS = Packet::MAX_ACKS;
p->enableFlags( Packet::FLAG_HAS_ACKS );
p->reserveFooter( sizeof( Packet::AckCount ) );
const size_t minSpace = p->freeSpace() / sizeof( SeqNum );
const size_t minSpaceSize = std::min( minSpace, acksToSend_.size() );
const size_t nAcks = std::min( minSpaceSize, MAX_ACKS );
p->nAcks() = static_cast<Packet::AckCount>(nAcks);
p->reserveFooter( sizeof( SeqNum ) * p->nAcks() );
}
这里会根据剩余空间的大小来算出当前Packet最多还能携带几个离散的ACK,存储在p->nAcks()里。等到真正执行写入的时候,会从acksToSend_里选择p->nAcks()数量的ACK序号塞入到footer里,同时从acksToSend_删除这些元素:
/**
* This method will write the appropriate flags on a packet to indicate that
* it is on this channel. It must be called after writeFlags.
*/
void UDPChannel::writeFooter( Packet * p )
{
if (p->hasFlags( Packet::FLAG_INDEXED_CHANNEL ))
{
p->packFooter( p->channelID() );
p->packFooter( p->channelVersion() );
}
if (p->hasFlags( Packet::FLAG_HAS_CUMULATIVE_ACK ))
{
p->packFooter( inSeqAt_ );
}
if (p->hasFlags( Packet::FLAG_HAS_ACKS ))
{
// Note: Technically we should start at inSeqAt_ since sequence numbers
// wrap around but this is rare enough not to worry about (since it
// still works but is less efficient).
p->packFooter( (Packet::AckCount)p->nAcks() );
uint acksAdded = 0;
while (!acksToSend_.empty() && acksAdded < p->nAcks())
{
p->packFooter( *acksToSend_.begin() );
acksToSend_.erase( acksToSend_.begin() );
++acksAdded;
}
}
}
因为我们的ACK信息是附带在Packet里的,所以这个Packet丢失之后仍然会通过超时重传发送到对端。这里有一点递归的意思,可靠传输依赖于ACK,而ACK的发送又依赖于可靠传输。
当UDPChannel接收到一个携带了Packet::FLAG_HAS_CUMULATIVE_ACK或者Packet::FLAG_HAS_ACKS的Packet时,就会从footer里解析出这些ACK的包序号,执行之前我们介绍过的handleCumulativeAck和handleAck:
Reason PacketReceiver::processFilteredPacket( const Address & addr,
Packet * p, ProcessSocketStatsHelper * pStatsHelper )
{
// 省略很多代码
f (p->hasFlags( Packet::FLAG_HAS_CUMULATIVE_ACK ))
{
if (!pChannel)
{
// 省略错误日志
}
SeqNum endSeq;
if (!p->stripFooter( endSeq ))
{
// 省略错误日志
}
if (!pChannel->handleCumulativeAck( endSeq ))
{
RETURN_FOR_CORRUPTED_PACKET();
}
}
// Strip and handle ACKs
if (p->hasFlags( Packet::FLAG_HAS_ACKS ))
{
if (!p->stripFooter( p->nAcks() ))
{
// 省略错误日志
}
if (p->nAcks() == 0)
{
// 省略错误日志
}
// The total size of all the ACKs on this packet
int ackSize = p->nAcks() * sizeof( SeqNum );
// check that we have enough footers to account for all of the
// acks the packet claims to have (thanks go to netease)
if (p->bodySize() < ackSize)
{
// 省略错误日志
}
// For each ACK that we receive, we no longer need to store the
// corresponding packet.
if (pChannel)
{
for (uint i=0; i < p->nAcks(); i++)
{
SeqNum seq;
if (!p->stripFooter( seq ))
{
// 省略错误日志
}
if (!pChannel->handleAck( seq ))
{
// 省略错误日志
}
}
}
// 省略很多代码
}
// 省略很多代码
}
到这里,整个ACK的发送和接收机制已经展示完毕,配合超时重传和滑动窗口,当前的UDPChannel基本模拟了可靠TCP。
Unreal Engine的网络通信
基础概念
Unreal Engine(后续简称为UE)能够使用同一份代码编译出游戏客户端和游戏专属服务器Dedicated Server,客户端与专属服务端之间的通信使用的是UDP。之所以选择UDP是因为UE从诞生起就跟FPS紧密连接,而FPS这类游戏对于网络延迟突然增大的容忍性是极其低的。UE在UDP的基础上也做了很多的封装,来实现客户端与服务端之间连接的可靠传输。这里我们就来介绍一下UE网络的相关实现细节。
UE网络通信中基础的概念主要包括如下五个:
-
NetDriver网络处理的核心,负责管理 所有的物理数据连接,实际使用的是其子类IpNetDriver。里面封装了初始化客户端与服务器的连接,建立属性记录表,处理RPC函数,创建Socket,构建并管理当前Connection信息,接收数据包等等基本操作。服务器NetDriver维护一个NetConnections列表,每个连接代表一个连接的玩家客户端,负责复制Actor数据。客户端NetDriver管理连接到服务器的单个连接 -
NetConnection在服务器和客户端上,NetDriver负责接收来自网络的数据包并将这些数据包传递给适当的NetConnection(必要时建立新的NetConnection) -
Channel数据通道 每一个通道只负责交换某一个特定类型特定实例的数据信息。UE中预先定义了如下几个通道:ControlChannel:客户端与服务器之间发送控制信息,主要是发送接收连接与断开的相关消息。在Connection中只会在初始化连接的时候创建一个该通道实例。ActorChannel:处理Actor本身相关信息的同步,包括自身的同步以及子组件,属性的同步,RPC调用等。每个Connection连接里的每个同步的Actor都对应着一个ActorChannel实例VoiceChannel:用于发送接收语音消息,在Connection中初始化连接的时候创建一个该通道实例
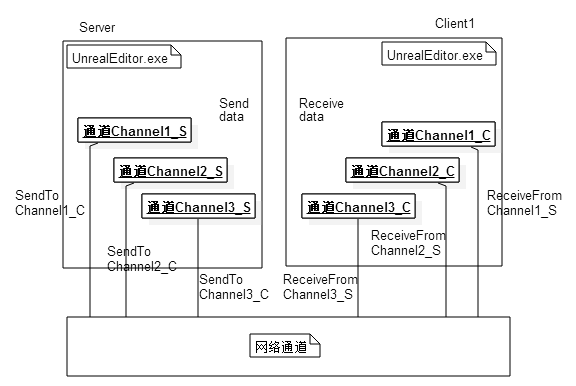
-
Packet是在客户端服务端网络连接之间发送的数据,每次通道最后发出去的包都成为一个Packet, 数据内容由Packet元数据(如报头信息和确认Ack)和Bunches组成。Packet是真正在UDP链路上发送的数据。 -
Bunch是在客户端服务端网络连接的通道对之间发送的数据。当一个连接接收到一个数据包时,该数据包将被分解成单独的Bunch,这些Bunch然后被传递到单独的通道以进一步处理。一个Packet可以不包含Bunch、单个Bunch或者多个Bunch。当一个Bunch太大时,在传输之前会把它切成许多小Bunch,这些Bunch将被标记为PartialInitial,Partial或PartialFinal。利用这些信息,在接收端重新组装Bunch。然后Bunch又可以分为Reliable Bunch和Unreliable Bunch,Reliable Bunch会有丢包重传机制保证在接收端按照发送时的顺序接收,而Unreliable Bunch在丢包之后不会做任何处理。
消息发送
基本上所有的UE网络通信发包都会调用这个接口UChannel::SendBunch:
/** Send a bunch if it's not overflowed, and queue it if it's reliable. */
ENGINE_API virtual FPacketIdRange SendBunch(FOutBunch* Bunch, bool Merge);
例如在ReplicationGraph里执行单个Actor数据的向下同步时,会在数据都填充好之后使用这样的代码将这次数据从所属的Channel里向下发送:
int64 UReplicationGraph::ReplicateSingleActor_FastShared(AActor* Actor, FConnectionReplicationActorInfo& ConnectionData,
FGlobalActorReplicationInfo& GlobalActorInfo, UNetReplicationGraphConnection& ConnectionManager, const uint32 FrameNum)
{
// 省略数据填充相关代码
// Setup the connection specifics on the bunch before calling SendBunch
OutBunch.ChName = ActorChannel->ChName;
OutBunch.ChIndex = ActorChannel->ChIndex;
OutBunch.Channel = ActorChannel;
OutBunch.Next = nullptr;
// SendIt
{
FGuardValue_Bitfield(ActorChannel->bHoldQueuedExportBunchesAndGUIDs, true);
ActorChannel->SendBunch(&OutBunch, false);
}
}
这里的FOutBunch的结构比较简单,继承自BitWriter,来承接基于bit的消息输入,此外还携带了很多传输控制信息,例如所属的Channel信息:
//
// A bunch of data to send.
//
class ENGINE_API FOutBunch : public FNetBitWriter
{
public:
// Variables.
FOutBunch * Next;
UChannel * Channel;
double Time;
int32 ChIndex;
FName ChName;
int32 ChSequence;
int32 PacketId;
uint8 ReceivedAck:1;
uint8 bOpen:1;
uint8 bClose:1;
uint8 bIsReplicationPaused:1; // Replication on this channel is being paused by the server
uint8 bReliable:1;
uint8 bPartial:1; // Not a complete bunch
uint8 bPartialInitial:1; // The first bunch of a partial bunch
uint8 bPartialFinal:1; // The final bunch of a partial bunch
uint8 bHasPackageMapExports:1; // This bunch has networkGUID name/id pairs
uint8 bHasMustBeMappedGUIDs:1; // This bunch has guids that must be mapped before we can process this bunch
EChannelCloseReason CloseReason;
TArray< FNetworkGUID > ExportNetGUIDs; // List of GUIDs that went out on this bunch
TArray< uint64 > NetFieldExports;
};
这里的Time代表这个Bunch发送时的时间戳,bOpen/bClose是用来控制单个Channel的创建与销毁的,bReliable用来控制当前Bunch是否是需要可靠传输的消息, bPartial/bPartialInitial/bPartialFinal这三个字段负责控制Bunch的拆分。在执行SendBunch的时候,会首先使用IsBunchTooLarge判断当前要发送的Bunch是否大于最大单Bunch大小NetMaxConstructedPartialBunchSizeBytes=65536字节,数据量太大的话这个包会被直接丢弃。然后再判断当前Bunch能否与Connection里发送队列里的最后一个Bunch合并,这样合并多个包就可以合并为一个包,减少底层的UDP发送接口的调用次数:
// Fairly large number, and probably a bad idea to even have a bunch this size, but want to be safe for now and not throw out legitimate data
static int32 NetMaxConstructedPartialBunchSizeBytes = 1024 * 64;
static FAutoConsoleVariableRef CVarNetMaxConstructedPartialBunchSizeBytes(
TEXT("net.MaxConstructedPartialBunchSizeBytes"),
NetMaxConstructedPartialBunchSizeBytes,
TEXT("The maximum size allowed for Partial Bunches.")
);
FPacketIdRange UChannel::SendBunch( FOutBunch* Bunch, bool Merge )
{
if (IsBunchTooLarge(Connection, Bunch))
{
UE_LOG(LogNetPartialBunch, Error, TEXT("Attempted to send bunch exceeding max allowed size. BunchSize=%d, MaximumSize=%d"), Bunch->GetNumBytes(), NetMaxConstructedPartialBunchSizeBytes);
Bunch->SetError();
return FPacketIdRange(INDEX_NONE);
}
// 省略很多的代码
// This is the max number of bits we can have in a single bunch
const int64 MAX_SINGLE_BUNCH_SIZE_BITS = Connection->GetMaxSingleBunchSizeBits();
// Max bytes we'll put in a partial bunch
const int64 MAX_SINGLE_BUNCH_SIZE_BYTES = MAX_SINGLE_BUNCH_SIZE_BITS / 8;
// Max bits will put in a partial bunch (byte aligned, we dont want to deal with partial bytes in the partial bunches)
const int64 MAX_PARTIAL_BUNCH_SIZE_BITS = MAX_SINGLE_BUNCH_SIZE_BYTES * 8;
//-----------------------------------------------------
// Contemplate merging.
//-----------------------------------------------------
int32 PreExistingBits = 0;
FOutBunch* OutBunch = NULL;
if
( Merge
&& Connection->LastOut.ChIndex == Bunch->ChIndex
&& Connection->LastOut.bReliable == Bunch->bReliable // Don't merge bunches of different reliability, since for example a reliable RPC can cause a bunch with properties to become reliable, introducing unnecessary latency for the properties.
&& Connection->AllowMerge
&& Connection->LastEnd.GetNumBits()
&& Connection->LastEnd.GetNumBits()==Connection->SendBuffer.GetNumBits()
&& Connection->LastOut.GetNumBits() + Bunch->GetNumBits() <= MAX_SINGLE_BUNCH_SIZE_BITS )
{
// Merge.
check(!Connection->LastOut.IsError());
PreExistingBits = Connection->LastOut.GetNumBits();
Connection->LastOut.SerializeBits( Bunch->GetData(), Bunch->GetNumBits() );
Connection->LastOut.bOpen |= Bunch->bOpen;
Connection->LastOut.bClose |= Bunch->bClose;
#if UE_NET_TRACE_ENABLED
SetTraceCollector(Connection->LastOut, GetTraceCollector(*Bunch));
SetTraceCollector(*Bunch, nullptr);
#endif
OutBunch = Connection->LastOutBunch;
Bunch = &Connection->LastOut;
check(!Bunch->IsError());
Connection->PopLastStart();
Connection->Driver->OutBunches--;
}
// 省略很多代码
}
执行Bunch合并的时候有一些过滤条件,要求归属于同一个Channel同时bReliable字段要一致,且当前Bunch被设置为允许合并且当前Connection也要设置为允许合并。最后还有一个最大Bunch大小的限制,要求合并之后的Bunch大小要小于MAX_SINGLE_BUNCH_SIZE_BITS,这个上限的设置目的是为了避免单个Bunch在使用UDP传输的时候被IP层的MTU限制导致链路层拆包。这里的MAX_SINGLE_BUNCH_SIZE_BITS的值是根据UNetConnection::GetMaxSingleBunchSizeBits()计算出来的,注意这里的单位是bit,而不是常见的字节:
/** The maximum number of bits allowed within a single bunch. */
FORCEINLINE int32 GetMaxSingleBunchSizeBits() const
{
return (MaxPacket * 8) - MAX_BUNCH_HEADER_BITS - MAX_PACKET_TRAILER_BITS - MAX_PACKET_HEADER_BITS - MaxPacketHandlerBits;
}
void UNetConnection::InitConnection(UNetDriver* InDriver, EConnectionState InState, const FURL& InURL, int32 InConnectionSpeed, int32 InMaxPacket)
{
Driver = InDriver;
// We won't be sending any packets, so use a default size
MaxPacket = (InMaxPacket == 0 || InMaxPacket > MAX_PACKET_SIZE) ? MAX_PACKET_SIZE : InMaxPacket;
// 省略后续代码
}
enum { MAX_PACKET_SIZE = 1024 }; // MTU for the connection
这里的MaxPacket有一个硬上限MAX_PACKET_SIZE,设置为了1024,但是常见的MTU一般来说是1492,看来UE里设置的更加保守。同样由于这个MTU的限制,如果一个Bunch填充完数据发现太大了,就需要执行拆包操作:
FPacketIdRange UChannel::SendBunch( FOutBunch* Bunch, bool Merge )
{
// 省略之前的代码
//-----------------------------------------------------
// Possibly split large bunch into list of smaller partial bunches
//-----------------------------------------------------
if( Bunch->GetNumBits() > MAX_SINGLE_BUNCH_SIZE_BITS )
{
uint8 *data = Bunch->GetData();
int64 bitsLeft = Bunch->GetNumBits();
Merge = false;
while(bitsLeft > 0)
{
FOutBunch * PartialBunch = new FOutBunch(this, false);
int64 bitsThisBunch = FMath::Min<int64>(bitsLeft, MAX_PARTIAL_BUNCH_SIZE_BITS);
PartialBunch->SerializeBits(data, bitsThisBunch);
#if UE_NET_TRACE_ENABLED
// Attach tracecollector of split bunch to first partial bunch
SetTraceCollector(*PartialBunch, GetTraceCollector(*Bunch));
SetTraceCollector(*Bunch, nullptr);
#endif
OutgoingBunches.Add(PartialBunch);
#if !(UE_BUILD_SHIPPING || UE_BUILD_TEST)
PartialBunch->DebugString = FString::Printf(TEXT("Partial[%d]: %s"), OutgoingBunches.Num(), *Bunch->DebugString);
#endif
bitsLeft -= bitsThisBunch;
data += (bitsThisBunch >> 3);
UE_LOG(LogNetPartialBunch, Log, TEXT(" Making partial bunch from content bunch. bitsThisBunch: %d bitsLeft: %d"), bitsThisBunch, bitsLeft );
ensure(bitsLeft == 0 || bitsThisBunch % 8 == 0); // Byte aligned or it was the last bunch
}
}
else
{
OutgoingBunches.Add(Bunch);
}
// 省略后续代码
}
进行拆包的时候,会创建一个或多个PartialBunch,每个PartialBunch都会从当前Bunch里拿出最多MAX_PARTIAL_BUNCH_SIZE_BITS个bit的数据来执行填充,然后每个被填充好的PartialBunch都会以此添加到OutgoingBunches数组里。
完成Bunch的合并与拆分之后,会遍历OutgoingBunches来设置好每个可能的PartialBunch的相关属性字段,主要是处理bPartial/bPartialInitial/bPartialFinal这三个字段,bPartial代表当前包是拆分包,bPartialInitial代表当前包是拆分包里的第一个,bPartialFinal代表当前包是拆分包里的最后一个。
UE_CLOG((OutgoingBunches.Num() > 1), LogNetPartialBunch, Log, TEXT("Sending %d Bunches. Channel: %d %s"), OutgoingBunches.Num(), Bunch->ChIndex, *Describe());
for( int32 PartialNum = 0; PartialNum < OutgoingBunches.Num(); ++PartialNum)
{
FOutBunch * NextBunch = OutgoingBunches[PartialNum];
NextBunch->bReliable = Bunch->bReliable;
NextBunch->bOpen = Bunch->bOpen;
NextBunch->bClose = Bunch->bClose;
NextBunch->CloseReason = Bunch->CloseReason;
NextBunch->bIsReplicationPaused = Bunch->bIsReplicationPaused;
NextBunch->ChIndex = Bunch->ChIndex;
NextBunch->ChName = Bunch->ChName;
if ( !NextBunch->bHasPackageMapExports )
{
NextBunch->bHasMustBeMappedGUIDs |= Bunch->bHasMustBeMappedGUIDs;
}
if (OutgoingBunches.Num() > 1)
{
NextBunch->bPartial = 1;
NextBunch->bPartialInitial = (PartialNum == 0 ? 1: 0);
NextBunch->bPartialFinal = (PartialNum == OutgoingBunches.Num() - 1 ? 1: 0);
NextBunch->bOpen &= (PartialNum == 0); // Only the first bunch should have the bOpen bit set
NextBunch->bClose = (Bunch->bClose && (OutgoingBunches.Num()-1 == PartialNum)); // Only last bunch should have bClose bit set
}
FOutBunch *ThisOutBunch = PrepBunch(NextBunch, OutBunch, Merge); // This handles queuing reliable bunches into the ack list
// Update Packet Range
int32 PacketId = SendRawBunch(ThisOutBunch, Merge, GetTraceCollector(*NextBunch));
if (PartialNum == 0)
{
PacketIdRange = FPacketIdRange(PacketId);
}
else
{
PacketIdRange.Last = PacketId;
}
// Update channel sequence count.
Connection->LastOut = *ThisOutBunch;
Connection->LastEnd = FBitWriterMark( Connection->SendBuffer );
}
如果当前包是一个需要可靠传输的包,那么上面的PrepBunch会为这个Bunch分配一个在Channel内递增的序列号ChSequence,同时将这个Bunch记录在当前可靠Bunch列表OutRec的末尾:
// OUtbunch is a bunch that was new'd by the network system or NULL. It should never be one created on the stack
FOutBunch* UChannel::PrepBunch(FOutBunch* Bunch, FOutBunch* OutBunch, bool Merge)
{
if ( Connection->ResendAllDataState != EResendAllDataState::None )
{
return Bunch;
}
// Find outgoing bunch index.
if( Bunch->bReliable )
{
// Find spot, which was guaranteed available by FOutBunch constructor.
if( OutBunch==NULL )
{
Bunch->Next = NULL;
Bunch->ChSequence = ++Connection->OutReliable[ChIndex];
NumOutRec++;
OutBunch = new FOutBunch(*Bunch);
FOutBunch** OutLink = &OutRec;
while(*OutLink) // This was rewritten from a single-line for loop due to compiler complaining about empty body for loops (-Wempty-body)
{
OutLink=&(*OutLink)->Next;
}
*OutLink = OutBunch;
}
else
{
Bunch->Next = OutBunch->Next;
*OutBunch = *Bunch;
}
Connection->LastOutBunch = OutBunch;
}
else
{
OutBunch = Bunch;
Connection->LastOutBunch = NULL;//warning: Complex code, don't mess with this!
}
return OutBunch;
}
执行完PrepBunch,紧接着就使用SendRawBunch将当前Bunch转化为Packet加入到发送队列里,并生成一个PacketId进行返回:
int32 UChannel::SendRawBunch(FOutBunch* OutBunch, bool Merge, const FNetTraceCollector* Collector)
{
// Sending for checkpoints may need to send an open bunch if the actor went dormant, so allow the OpenPacketId to be set
// Send the raw bunch.
OutBunch->ReceivedAck = 0;
int32 PacketId = Connection->SendRawBunch(*OutBunch, Merge, Collector);
if( OpenPacketId.First==INDEX_NONE && OpenedLocally )
{
OpenPacketId = FPacketIdRange(PacketId);
}
if( OutBunch->bClose )
{
SetClosingFlag();
}
return PacketId;
}
这里会调用UNetConnection::SendRawBunch,这个函数负责将Bunch数据转换为真正在网络上执行发送的Packet数据,也就是二进制流:
int32 UNetConnection::SendRawBunch(FOutBunch& Bunch, bool InAllowMerge, const FNetTraceCollector* BunchCollector)
{
ValidateSendBuffer();
check(!Bunch.ReceivedAck);
check(!Bunch.IsError());
Driver->OutBunches++;
Driver->OutTotalBunches++;
TimeSensitive = 1;
// Build header.
SendBunchHeader.Reset();
const bool bIsOpenOrClose = Bunch.bOpen || Bunch.bClose;
const bool bIsOpenOrReliable = Bunch.bOpen || Bunch.bReliable;
SendBunchHeader.WriteBit(bIsOpenOrClose);
if (bIsOpenOrClose)
{
SendBunchHeader.WriteBit(Bunch.bOpen);
SendBunchHeader.WriteBit(Bunch.bClose);
if (Bunch.bClose)
{
uint32 Value = (uint32)Bunch.CloseReason;
SendBunchHeader.SerializeInt(Value, (uint32)EChannelCloseReason::MAX);
}
}
SendBunchHeader.WriteBit(Bunch.bIsReplicationPaused);
SendBunchHeader.WriteBit(Bunch.bReliable);
uint32 ChIndex = Bunch.ChIndex;
SendBunchHeader.SerializeIntPacked(ChIndex);
SendBunchHeader.WriteBit(Bunch.bHasPackageMapExports);
SendBunchHeader.WriteBit(Bunch.bHasMustBeMappedGUIDs);
SendBunchHeader.WriteBit(Bunch.bPartial);
if (Bunch.bReliable && !IsInternalAck())
{
SendBunchHeader.WriteIntWrapped(Bunch.ChSequence, MAX_CHSEQUENCE);
}
if (Bunch.bPartial)
{
SendBunchHeader.WriteBit(Bunch.bPartialInitial);
SendBunchHeader.WriteBit(Bunch.bPartialFinal);
}
if (bIsOpenOrReliable)
{
UPackageMap::StaticSerializeName(SendBunchHeader, Bunch.ChName);
}
SendBunchHeader.WriteIntWrapped(Bunch.GetNumBits(), UNetConnection::MaxPacket * 8);
check(!SendBunchHeader.IsError());
// Remember start position.
AllowMerge = InAllowMerge;
Bunch.Time = Driver->GetElapsedTime();
NETWORK_PROFILER(GNetworkProfiler.PushSendBunch(this, &Bunch, SendBunchHeader.GetNumBits(), Bunch.GetNumBits()));
const int32 BunchHeaderBits = SendBunchHeader.GetNumBits();
const int32 BunchBits = Bunch.GetNumBits();
// If the bunch does not fit in the current packet,
// flush packet now so that we can report collected stats in the correct scope
PrepareWriteBitsToSendBuffer(BunchHeaderBits, BunchBits);
// Report bunch
UE_NET_TRACE_END_BUNCH(OutTraceCollector, Bunch, Bunch.ChName, 0, BunchHeaderBits, BunchBits, BunchCollector);
// Write the bits to the buffer and remember the packet id used
Bunch.PacketId = WriteBitsToSendBufferInternal(SendBunchHeader.GetData(), BunchHeaderBits, Bunch.GetData(), BunchBits, EWriteBitsDataType::Bunch);
// Track channels that wrote data to this packet.
FChannelRecordImpl::PushChannelRecord(ChannelRecord, Bunch.PacketId, Bunch.ChIndex);
// 忽略一些PackageMapClient相关的逻辑
if (bAutoFlush)
{
FlushNet();
}
return Bunch.PacketId;
}
这里会使用SendBunchHeader这个结构来填充当前Bunch的一些元数据信息,开头的PrepareWriteBitsToSendBuffer负责先通过WritePacketHeader和WriteDummyPacketInfo在SendBuffer里写入一些无效的数据来执行占位,这些数据会在后续用最终的值来重新覆盖:
void UNetConnection::PrepareWriteBitsToSendBuffer(const int32 SizeInBits, const int32 ExtraSizeInBits)
{
ValidateSendBuffer();
#if !UE_BUILD_SHIPPING
// Now that the stateless handshake is responsible for initializing the packet sequence numbers,
// we can't allow any packets to be written to the send buffer until after this has completed
if (CVarRandomizeSequence.GetValueOnAnyThread() > 0)
{
checkf(!Handler.IsValid() || Handler->IsFullyInitialized(), TEXT("Attempted to write to send buffer before packet handler was fully initialized. Connection: %s"), *Describe());
}
#endif
const int32 TotalSizeInBits = SizeInBits + ExtraSizeInBits;
// Flush if we can't add to current buffer
if ( TotalSizeInBits > GetFreeSendBufferBits() )
{
FlushNet();
}
// If this is the start of the queue, make sure to add the packet id
if ( SendBuffer.GetNumBits() == 0 && !IsInternalAck() )
{
// Write Packet Header, before sending the packet we will go back and rewrite the data
WritePacketHeader(SendBuffer);
// Pre-write the bits for the packet info
WriteDummyPacketInfo(SendBuffer);
// We do not allow the first bunch to merge with the ack data as this will "revert" the ack data.
AllowMerge = false;
// Update stats for PacketIdBits and ackdata (also including the data used for packet RTT and saturation calculations)
int64 BitsWritten = SendBuffer.GetNumBits();
NumPacketIdBits += FNetPacketNotify::SequenceNumberT::SeqNumberBits;
NumAckBits += BitsWritten - FNetPacketNotify::SequenceNumberT::SeqNumberBits;
// Report stats to profiler
NETWORK_PROFILER( GNetworkProfiler.TrackSendAck( NumAckBits, this ) );
ValidateSendBuffer();
}
}
占据好头部空间之后,再使用WriteBitsToSendBufferInternal将SendBunchHeader的内容与Bunch的内容组合起来,放到当前UNetConnection的SendBuffer的后面:
int32 UNetConnection::WriteBitsToSendBufferInternal(
const uint8 * Bits,
const int32 SizeInBits,
const uint8 * ExtraBits,
const int32 ExtraSizeInBits,
EWriteBitsDataType DataType)
{
// Remember start position in case we want to undo this write, no meaning to undo the header write as this is only used to pop bunches and the header should not count towards the bunch
// Store this after the possible flush above so we have the correct start position in the case that we do flush
LastStart = FBitWriterMark( SendBuffer );
// Add the bits to the queue
if ( SizeInBits )
{
SendBuffer.SerializeBits( const_cast< uint8* >( Bits ), SizeInBits );
ValidateSendBuffer();
}
// Add any extra bits
if ( ExtraSizeInBits )
{
SendBuffer.SerializeBits( const_cast< uint8* >( ExtraBits ), ExtraSizeInBits );
ValidateSendBuffer();
}
const int32 RememberedPacketId = OutPacketId;
switch ( DataType )
{
case EWriteBitsDataType::Bunch:
NumBunchBits += SizeInBits + ExtraSizeInBits;
break;
default:
break;
}
// Flush now if we are full
if (GetFreeSendBufferBits() == 0
#if !UE_BUILD_SHIPPING
|| CVarForceNetFlush.GetValueOnAnyThread() != 0
#endif
)
{
FlushNet();
}
return RememberedPacketId;
}
由于MTU的限制,SendBuffer不能无限制的加入数据,所以这个SendBuffer也会以当前MaxPacket=1024的大小来初始化内部的Buffer:
void UNetConnection::InitSendBuffer()
{
check(MaxPacket > 0);
int32 FinalBufferSize = (MaxPacket * 8) - MaxPacketHandlerBits;
// Initialize the one outgoing buffer.
if (FinalBufferSize == SendBuffer.GetMaxBits())
{
// Reset all of our values to their initial state without a malloc/free
SendBuffer.Reset();
}
else
{
// First time initialization needs to allocate the buffer
SendBuffer = FBitWriter(FinalBufferSize);
}
HeaderMarkForPacketInfo.Reset();
ResetPacketBitCounts();
ValidateSendBuffer();
}
如果发现加入了一个Bunch之后剩余空间已经无法再放入新的Bunch,那么这里会强制调用FlushNet,将当前的SendBuffer里的数据发送出去。FlushNet的内部逻辑可以大概精简为下面的代码:
void UNetConnection::FlushNet(bool bIgnoreSimulation)
{
check(Driver);
// Update info.
ValidateSendBuffer();
LastEnd = FBitWriterMark();
TimeSensitive = 0;
const double PacketSentTimeInS = FPlatformTime::Seconds();
// Write the UNetConnection-level termination bit
SendBuffer.WriteBit(1);
// Refresh outgoing header with latest data
if ( !IsInternalAck() )
{
// if we update ack, we also update received ack associated with outgoing seq
// so we know how many ack bits we need to write (which is updated in received packet)
WritePacketHeader(SendBuffer);
WriteFinalPacketInfo(SendBuffer, PacketSentTimeInS);
}
// Send now.
// Checked in FlushNet() so each child class doesn't have to implement this
if (Driver->IsNetResourceValid())
{
LowLevelSend(SendBuffer.GetData(), SendBuffer.GetNumBits(), Traits);
}
// Update stuff.
const int32 Index = OutPacketId & (UE_ARRAY_COUNT(OutLagPacketId)-1);
// Remember the actual time this packet was sent out, so we can compute ping when the ack comes back
OutLagPacketId[Index] = OutPacketId;
OutLagTime[Index] = PacketSentTimeInS;
OutBytesPerSecondHistory[Index] = FMath::Min(OutBytesPerSecond / 1024, 255);
// Increase outgoing sequence number
if (!IsInternalAck())
{
PacketNotify.CommitAndIncrementOutSeq();
}
// Make sure that we always push an ChannelRecordEntry for each transmitted packet even if it is empty
FChannelRecordImpl::PushPacketId(ChannelRecord, OutPacketId);
++OutPackets;
++OutTotalPackets;
Driver->OutPackets++;
Driver->OutTotalPackets++;
//Record the first packet time in the histogram
if (!bFlushedNetThisFrame)
{
double LastPacketTimeDiffInMs = (Driver->GetElapsedTime() - LastSendTime) * 1000.0;
NetConnectionHistogram.AddMeasurement(LastPacketTimeDiffInMs);
}
LastSendTime = Driver->GetElapsedTime();
++OutPacketId;
}
这里的SendBuffer.WriteBit(1)负责在SendBuffer的末尾添加一个值为1的bit,作为当前Packet的终止符。由于UDP包都是按照字节传输的,所以在SendBuffer.WriteBit(1)之后,还会在SendBuffer的末尾添加0个或者多个bit,直到SendBuffer的总bit数是8的倍数。
这里的WritePacketHeader负责添加可靠传输的序列号相关信息,这个函数的细节将在后续的可靠传输中介绍。而WriteFinalPacketInfo负责添加服务器与客户端之间的网络延迟信息,数据量为20bit,其实就是在发包的时候带上时间戳,并记录在本地的OutLagTime数组里。
这两个函数写入的数据都会在当前SendBuffer的头部,刚好对应之前PrepareWriteBitsToSendBuffer在SendBuffer里占据好的位置。同时这里还会在SendBuffer的末尾添加一个值为1的bit,作为当前Packet的终止符。这两个函数都执行完之后SendBuffer里就有最终的二进制,整个Packet的格式如下:
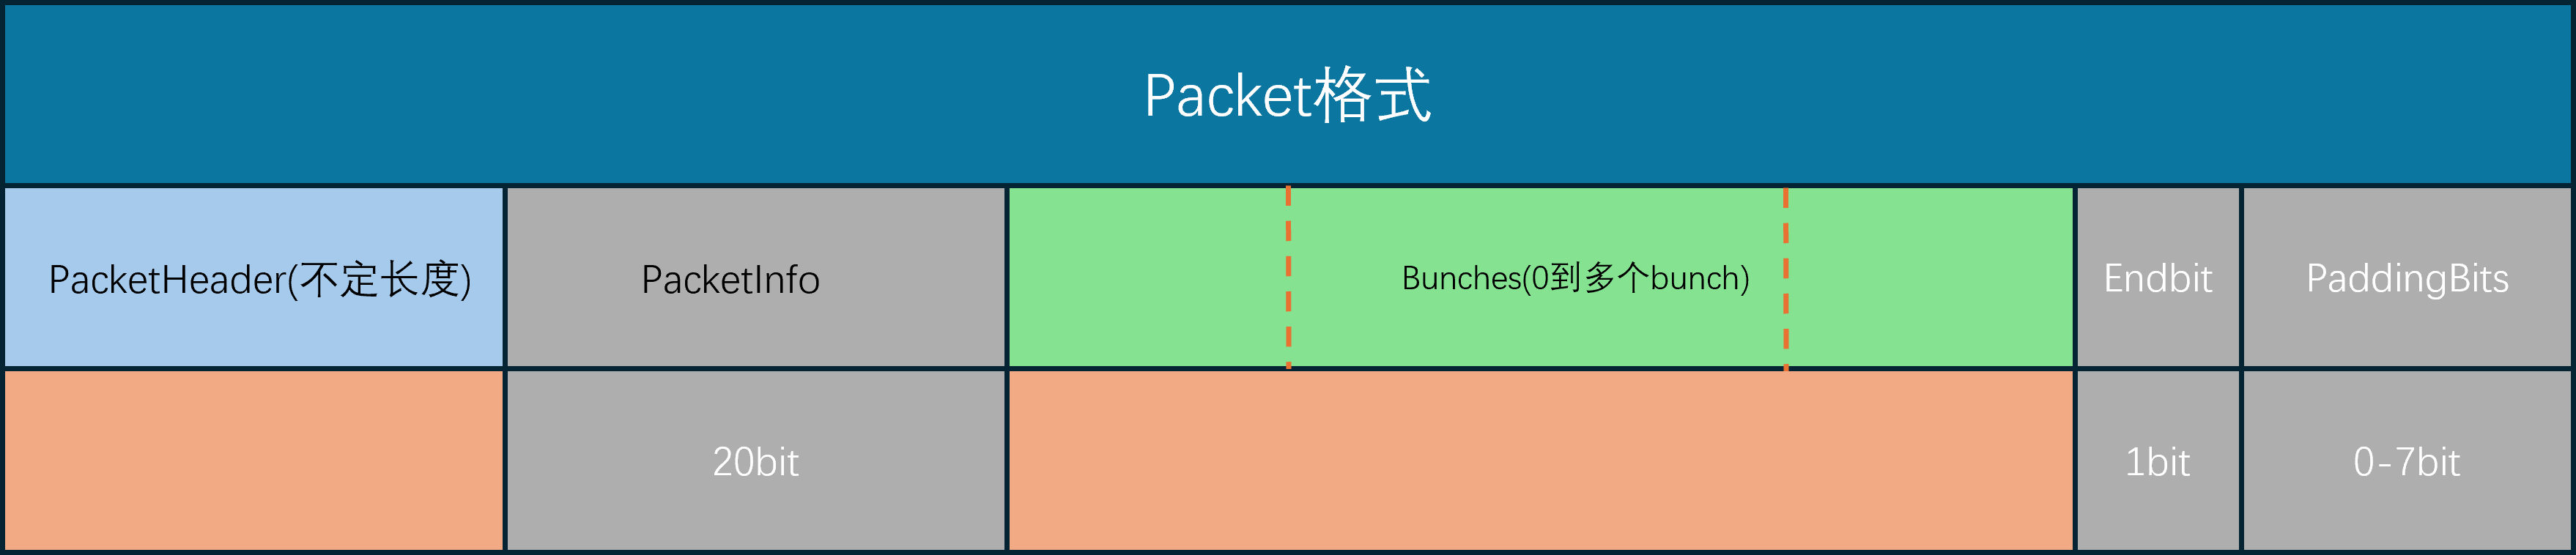
最后使用LowLevelSend将SendBuffer将数据发送出去, 这里的LowLevelSend最终会调用到平台相关的Socket::SendTo,在Windows平台就是FSocketWindows,在Linux平台就是FSocketBSD:
void UIpConnection::LowLevelSend(void* Data, int32 CountBits, FOutPacketTraits& Traits)
{
// 省略很多分支条件
// Send to remote.
FSocketSendResult SendResult;
CLOCK_CYCLES(Driver->SendCycles);
if ( CountBytes > MaxPacket )
{
UE_LOG( LogNet, Warning, TEXT( "UIpConnection::LowLevelSend: CountBytes > MaxPacketSize! Count: %i, MaxPacket: %i %s" ), CountBytes, MaxPacket, *Describe() );
}
FPacketAudit::NotifyLowLevelSend((uint8*)DataToSend, CountBytes, CountBits);
if (CountBytes > 0)
{
const bool bNotifyOnSuccess = (SocketErrorDisconnectDelay > 0.f) && (SocketError_SendDelayStartTime != 0.f);
FSocket* CurSocket = GetSocket();
if (CVarNetIpConnectionUseSendTasks.GetValueOnAnyThread() != 0)
{
DECLARE_CYCLE_STAT(TEXT("IpConnection SendTo task"), STAT_IpConnection_SendToTask, STATGROUP_TaskGraphTasks);
FGraphEventArray Prerequisites;
if (LastSendTask.IsValid())
{
Prerequisites.Add(LastSendTask);
}
ISocketSubsystem* const SocketSubsystem = Driver->GetSocketSubsystem();
LastSendTask = FFunctionGraphTask::CreateAndDispatchWhenReady([this, Packet = TArray<uint8>(DataToSend, CountBytes), SocketSubsystem, bNotifyOnSuccess]
{
FSocket* CurSocket = GetSocket();
if (CurSocket != nullptr)
{
bool bWasSendSuccessful = false;
UIpConnection::FSocketSendResult Result;
{
SCOPE_CYCLE_COUNTER(STAT_IpConnection_SendToSocket);
bWasSendSuccessful = CurSocket->SendTo(Packet.GetData(), Packet.Num(), Result.BytesSent, *RemoteAddr);
}
}
},
GET_STATID(STAT_IpConnection_SendToTask), &Prerequisites);
}
}
}
这里的SendTo依然是对平台的网络接口的封装,只有具体的平台子类里才能调用到最终的操作系统API:
bool FSocketBSD::SendTo(const uint8* Data, int32 Count, int32& BytesSent, const FInternetAddr& Destination)
{
// TODO: Consider converting IPv4 addresses to v6 when needed
if (Destination.GetProtocolType() != GetProtocol())
{
UE_LOG(LogSockets, Warning, TEXT("Destination protocol of '%s' does not match protocol: '%s' for address: '%s'"),
*Destination.GetProtocolType().ToString(), *GetProtocol().ToString(), *Destination.ToString(true));
return false;
}
const FInternetAddrBSD& BSDAddr = static_cast<const FInternetAddrBSD&>(Destination);
// Write the data and see how much was written
BytesSent = sendto(Socket, (const char*)Data, Count, SendFlags, (const sockaddr*)&(BSDAddr.Addr), BSDAddr.GetStorageSize());
// NETWORK_PROFILER(FSocket::SendTo(Data,Count,BytesSent,Destination));
bool Result = BytesSent >= 0;
if (Result)
{
LastActivityTime = FPlatformTime::Seconds();
}
return Result;
}
/**
* Implements a Windows/BSD network socket.
*/
class FSocketWindows
: public FSocketBSD
{
public:
FSocketWindows(SOCKET InSocket, ESocketType InSocketType, const FString& InSocketDescription, const FName& InSocketProtocol, ISocketSubsystem* InSubsystem)
: FSocketBSD(InSocket, InSocketType, InSocketDescription, InSocketProtocol, InSubsystem)
{ }
// FSocketBSD overrides
virtual bool Shutdown(ESocketShutdownMode Mode) override;
virtual bool SetIpPktInfo(bool bEnable) override;
virtual bool RecvFromWithPktInfo(uint8* Data, int32 BufferSize, int32& BytesRead, FInternetAddr& Source, FInternetAddr& Destination, ESocketReceiveFlags::Type Flags = ESocketReceiveFlags::None) override;
protected:
LPFN_WSARECVMSG WSARecvMsg = nullptr;
};
注意到这里为了尽可能的维持统一的网路IO模型,网络底层使用的都是最基础的IO接口,而没有去使用IO多路复用以及IO完成端口等高级特性。因为目前UE的设计里单服务器的客户端连接一般不会超过200,所以最简单的同步通信模型也能满足需求。
消息接收
消息接收由Tick驱动,当World::Tick的时候,会出发对应的NetDriver::TickDispatch:
void UNetDriver::RegisterTickEvents(class UWorld* InWorld)
{
if (InWorld)
{
TickDispatchDelegateHandle = InWorld->OnTickDispatch ().AddUObject(this, &UNetDriver::TickDispatch);
PostTickDispatchDelegateHandle = InWorld->OnPostTickDispatch().AddUObject(this, &UNetDriver::PostTickDispatch);
TickFlushDelegateHandle = InWorld->OnTickFlush ().AddUObject(this, &UNetDriver::TickFlush);
PostTickFlushDelegateHandle = InWorld->OnPostTickFlush ().AddUObject(this, &UNetDriver::PostTickFlush);
}
}
在这个TickDispatch里,会使用一个迭代器来访问当前已经接收到的数据:
void UIpNetDriver::TickDispatch(float DeltaTime)
{
LLM_SCOPE(ELLMTag::Networking);
Super::TickDispatch( DeltaTime );
#if !UE_BUILD_SHIPPING
PauseReceiveEnd = (PauseReceiveEnd != 0.f && PauseReceiveEnd - (float)FPlatformTime::Seconds() > 0.f) ? PauseReceiveEnd : 0.f;
if (PauseReceiveEnd != 0.f)
{
return;
}
#endif
// Set the context on the world for this driver's level collection.
const int32 FoundCollectionIndex = World ? World->GetLevelCollections().IndexOfByPredicate([this](const FLevelCollection& Collection)
{
return Collection.GetNetDriver() == this;
}) : INDEX_NONE;
FScopedLevelCollectionContextSwitch LCSwitch(FoundCollectionIndex, World);
DDoS.PreFrameReceive(DeltaTime);
ISocketSubsystem* SocketSubsystem = GetSocketSubsystem();
bool bRetrieveTimestamps = CVarNetUseRecvTimestamps.GetValueOnAnyThread() != 0;
// Process all incoming packets
for (FPacketIterator It(this); It; ++It)
{
FReceivedPacketView ReceivedPacket;
FInPacketTraits& ReceivedTraits = ReceivedPacket.Traits;
bool bOk = It.GetCurrentPacket(ReceivedPacket);
const TSharedRef<const FInternetAddr> FromAddr = ReceivedPacket.Address.ToSharedRef();
UNetConnection* Connection = nullptr;
UIpConnection* const MyServerConnection = GetServerConnection();
// 暂时省略Packet的处理逻辑
}
}
在这个FPacketIterator的构造函数和迭代器函数里会使用AdvanceCurrentPacket来获取下一个Packet:
FPacketIterator(UIpNetDriver* InDriver, FRecvMulti* InRMState, double InStartReceiveTime, bool bInCheckReceiveTime)
{
if (!bUseRecvMulti && SocketSubsystem != nullptr)
{
CurrentPacket.Address = SocketSubsystem->CreateInternetAddr();
}
AdvanceCurrentPacket();
}
FORCEINLINE FPacketIterator& operator++()
{
IterationCount++;
AdvanceCurrentPacket();
return *this;
}
/**
* Advances the current packet to the next iteration
*/
void AdvanceCurrentPacket()
{
// 省略很多代码
if (bUseRecvMulti)
{
// 忽略多线程接收数据
// At this point, bBreak will be set, or RecvMultiPacketCount will be > 0
}
else
{
bBreak = !ReceiveSinglePacket();
}
}
AdvanceCurrentPacket内部会根据是否开启了多线程接收数据来执行不同的逻辑,其多线程开关为bUseRecvMulti,默认情况下这个开关是关的,我们只关心在主线程里接收数据的情况:
/**
* Receives a single packet from the network socket, outputting to the CurrentPacket buffer.
*
* @return Whether or not a packet or an error was successfully received
*/
bool ReceiveSinglePacket()
{
bool bReceivedPacketOrError = false;
CurrentPacket.bRecvSuccess = false;
CurrentPacket.Data.SetNumUninitialized(0, false);
if (CurrentPacket.Address.IsValid())
{
CurrentPacket.Address->SetAnyAddress();
}
CurrentPacket.PacketTimestamp = 0.0;
CurrentPacket.Error = SE_NO_ERROR;
while (true)
{
bReceivedPacketOrError = false;
if (SocketReceiveThreadRunnable != nullptr)
{
// 省略多线程接收数据的部分
}
else if (Driver->GetSocket() != nullptr && SocketSubsystem != nullptr)
{
SCOPE_CYCLE_COUNTER(STAT_IpNetDriver_RecvFromSocket);
int32 BytesRead = 0;
bool bReceivedPacket = Driver->GetSocket()->RecvFrom(CurrentPacket.Data.GetData(), MAX_PACKET_SIZE, BytesRead, *CurrentPacket.Address);
CurrentPacket.bRecvSuccess = bReceivedPacket;
bReceivedPacketOrError = bReceivedPacket;
if (bReceivedPacket)
{
// Fixed allocator, so no risk of realloc from copy-then-resize
CurrentPacket.Data.SetNumUninitialized(BytesRead, false);
}
else
{
// 忽略错误处理代码
}
}
// While loop only exists to allow 'continue' for DDoS and invalid packet code, above
break;
}
return bReceivedPacketOrError;
}
在ReceiveSinglePacket内部会通过Driver->GetSocket()->RecvFrom去从UDP端口里接收一个Packet到CurrentPacket.Data中。外部再使用GetCurrentPacket来尝试获取接收到的Packet的DataView:
/**
* Retrieves the packet information from the current iteration. Avoid calling more than once, per iteration.
*
* @param OutPacket Outputs a view to the received packet data
* @return Returns whether or not receiving was successful for the current packet
*/
bool GetCurrentPacket(FReceivedPacketView& OutPacket)
{
bool bRecvSuccess = false;
if (bUseRecvMulti)
{
RMState->GetPacket(RecvMultiIdx, OutPacket);
bRecvSuccess = true;
}
else
{
OutPacket.DataView = {CurrentPacket.Data.GetData(), CurrentPacket.Data.Num(), ECountUnits::Bytes};
OutPacket.Error = CurrentPacket.Error;
OutPacket.Address = CurrentPacket.Address;
bRecvSuccess = CurrentPacket.bRecvSuccess;
}
return bRecvSuccess;
}
当接收到一个有效的FReceivedPacketView之后,会通知到对应的Connection里去执行OnReceiveRawPacket函数。这里寻找对应的Connection的过程很简单,如果当前是客户端则直接使用对应的服务端连接MyServerConnection,如果是服务端则通过消息的来源地址去查找MappedClientConnections:
// Figure out which socket the received data came from.
if (MyServerConnection)
{
if (MyServerConnection->RemoteAddr->CompareEndpoints(*FromAddr))
{
Connection = MyServerConnection;
}
else
{
UE_LOG(LogNet, Warning, TEXT("Incoming ip address doesn't match expected server address: Actual: %s Expected: %s"),
*FromAddr->ToString(true),
MyServerConnection->RemoteAddr.IsValid() ? *MyServerConnection->RemoteAddr->ToString(true) : TEXT("Invalid"));
}
}
if (Connection == nullptr)
{
UNetConnection** Result = MappedClientConnections.Find(FromAddr);
if (Result != nullptr)
{
UNetConnection* ConnVal = *Result;
if (ConnVal != nullptr)
{
Connection = ConnVal;
}
else
{
ReceivedTraits.bFromRecentlyDisconnected = true;
}
}
check(Connection == nullptr || CastChecked<UIpConnection>(Connection)->RemoteAddr->CompareEndpoints(*FromAddr));
}
bool bIgnorePacket = false;
// If we didn't find a client connection, maybe create a new one.
if (Connection == nullptr)
{
// 忽略创建新连接的代码
}
// Send the packet to the connection for processing.
if (Connection != nullptr && !bIgnorePacket)
{
if (bRetrieveTimestamps)
{
It.GetCurrentPacketTimestamp(Connection);
}
Connection->ReceivedRawPacket((uint8*)ReceivedPacket.DataView.GetData(), ReceivedPacket.DataView.NumBytes());
}
在UNetConnection::ReceivedRawPacket首先会使用Handler来对接收到的数据做一遍处理,这里可能会有一些解密解压缩相关的流程:
void UNetConnection::ReceivedRawPacket( void* InData, int32 Count )
{
#if !UE_BUILD_SHIPPING
// Add an opportunity for the hook to block further processing
bool bBlockReceive = false;
ReceivedRawPacketDel.ExecuteIfBound(InData, Count, bBlockReceive);
if (bBlockReceive)
{
return;
}
#endif
#if DO_ENABLE_NET_TEST
// Opportunity for packet loss burst simulation to drop the incoming packet.
if (Driver && Driver->IsSimulatingPacketLossBurst())
{
return;
}
#endif
uint8* Data = (uint8*)InData;
if (Handler.IsValid())
{
const ProcessedPacket UnProcessedPacket = Handler->Incoming(Data, Count);
if (!UnProcessedPacket.bError)
{
Count = FMath::DivideAndRoundUp(UnProcessedPacket.CountBits, 8);
if (Count > 0)
{
Data = UnProcessedPacket.Data;
}
// This packed has been consumed
else
{
return;
}
}
}
// Handle an incoming raw packet from the driver.
UE_LOG(LogNetTraffic, Verbose, TEXT("%6.3f: Received %i"), FPlatformTime::Seconds() - GStartTime, Count );
int32 PacketBytes = Count + PacketOverhead;
InBytes += PacketBytes;
InTotalBytes += PacketBytes;
++InPackets;
++InTotalPackets;
if (Driver)
{
Driver->InBytes += PacketBytes;
Driver->InTotalBytes += PacketBytes;
Driver->InPackets++;
Driver->InTotalPackets++;
}
if (Count > 0)
{
uint8 LastByte = Data[Count-1];
if (LastByte != 0)
{
int32 BitSize = (Count * 8) - 1;
// Bit streaming, starts at the Least Significant Bit, and ends at the MSB.
while (!(LastByte & 0x80))
{
LastByte *= 2;
BitSize--;
}
FBitReader Reader(Data, BitSize);
// Set the network version on the reader
Reader.SetEngineNetVer( EngineNetworkProtocolVersion );
Reader.SetGameNetVer( GameNetworkProtocolVersion );
if (Handler.IsValid())
{
Handler->IncomingHigh(Reader);
}
if (Reader.GetBitsLeft() > 0)
{
ReceivedPacket(Reader);
// Check if the out of order packet cache needs flushing
FlushPacketOrderCache();
}
}
}
}
在Handle处理完之后,还有一道非常重要的工序,即寻找当前Packet的最后一个Bit。在前面的消息发送部分我们提到过UE会在Packet的末尾添加一个值为1的bit,但是UDP发送数据的时候数据的粒度是字节,所以如果SendBuffer无法组成完整字节的情况下,会在这个bit之后用0去填充数据。所以在接收到以字节为单位的数据的时候,需要重新寻找到最后的1的bit作为边界,也就是上面操作LastByte的While循环部分的逻辑,用来计算真正的数据bit大小BitSize。
获取了真正有效的数据之后,会以这个数据构造出FBitReader,然后调用ReceivePacket去处理。在ReceivePacket的开头会首先通过PacketNotify.ReadHeader将packet的头部数据读取出来,也就是FNotificationHeader部分:
// Read packet header
FNetPacketNotify::FNotificationHeader Header;
if (!PacketNotify.ReadHeader(Header, Reader))
{
CLOSE_CONNECTION_DUE_TO_SECURITY_VIOLATION(this, ESecurityEvent::Malformed_Packet, TEXT("Failed to read PacketHeader"));
return;
}
// 暂时省略一些处理乱序接收的代码
// Extra information associated with the header (read only after acks have been processed)
if (PacketSequenceDelta > 0 && !ReadPacketInfo(Reader, bHasPacketInfoPayload))
{
CLOSE_CONNECTION_DUE_TO_SECURITY_VIOLATION(this, ESecurityEvent::Malformed_Packet, TEXT("Failed to read PacketHeader"));
return;
}
读取完这个FNotificationHeader头部数据之后,会利用这个头部里携带的序列号信息来判断当前Packet是否乱序,如果是乱序包可能会不处理直接return。这里我们先不去关注有序接收Packet的细节,先假设我们当前的Packet就是下一个需要的Packet。
确认是有序Packet被接收之后, 后面的ReadPacketInfo负责读取之前发包的时候通过WriteFinalPacketInfo写入的一些时间戳信息, 根据本地时间与OutLagTime里记录的发包时间来计算网络延迟RTT,从而去更新Ping值,
bool UNetConnection::ReadPacketInfo(FBitReader& Reader, bool bHasPacketInfoPayload)
{
// 省略解析PacketInfo的代码
// Update ping
// At this time we have updated OutAckPacketId to the latest received ack.
const int32 Index = OutAckPacketId & (UE_ARRAY_COUNT(OutLagPacketId)-1);
if ( OutLagPacketId[Index] == OutAckPacketId )
{
OutLagPacketId[Index] = -1; // Only use the ack once
double PacketReceiveTime = 0.0;
FTimespan& RecvTimespan = LastOSReceiveTime.Timestamp;
if (!RecvTimespan.IsZero() && Driver != nullptr && CVarPingUsePacketRecvTime.GetValueOnAnyThread())
{
if (bIsOSReceiveTimeLocal)
{
PacketReceiveTime = RecvTimespan.GetTotalSeconds();
}
else if (ISocketSubsystem* SocketSubsystem = Driver->GetSocketSubsystem())
{
PacketReceiveTime = SocketSubsystem->TranslatePacketTimestamp(LastOSReceiveTime);
}
}
// use FApp's time because it is set closer to the beginning of the frame - we don't care about the time so far of the current frame to process the packet
const double CurrentTime = (PacketReceiveTime != 0.0 ? PacketReceiveTime : FApp::GetCurrentTime());
const double RTT = (CurrentTime - OutLagTime[Index] ) - ( CVarPingExcludeFrameTime.GetValueOnAnyThread() ? ServerFrameTime : 0.0 );
const double NewLag = FMath::Max( RTT, 0.0 );
//UE_LOG( LogNet, Warning, TEXT( "Out: %i, InRemote: %i, Saturation: %f" ), OutBytesPerSecondHistory[Index], RemoteInKBytesPerSecond, RemoteSaturation );
LagAcc += NewLag;
LagCount++;
if (PlayerController)
{
PlayerController->UpdatePing(NewLag);
}
if (NetworkCongestionControl.IsSet())
{
NetworkCongestionControl.GetValue().OnAck({ CurrentTime, OutAckPacketId });
}
}
}
上述内容就是解析并处理Packet头部信息的相关逻辑,当判断了当前Packet是非乱序Packet之后,接下来就是处理其内部的Bunch数据,由于一个Packet内可能有零个或者一到多个Bunch存在,因此这里使用的是While循环,每次解析出来一个Bunch之后都会通知对应的Channel来执行ReceivedRawBunch:
// Disassemble and dispatch all bunches in the packet.
while( !Reader.AtEnd() && State!=USOCK_Closed )
{
// For demo backwards compatibility, old replays still have this bit
if (IsInternalAck() && EngineNetworkProtocolVersion < EEngineNetworkVersionHistory::HISTORY_ACKS_INCLUDED_IN_HEADER)
{
const bool IsAckDummy = Reader.ReadBit() == 1u;
}
// Parse the bunch.
int32 StartPos = Reader.GetPosBits();
// Process Received data
{
// Parse the incoming data.
FInBunch Bunch( this );
int32 IncomingStartPos = Reader.GetPosBits();
uint8 bControl = Reader.ReadBit();
Bunch.PacketId = InPacketId;
Bunch.bOpen = bControl ? Reader.ReadBit() : 0;
Bunch.bClose = bControl ? Reader.ReadBit() : 0;
if (Bunch.EngineNetVer() < HISTORY_CHANNEL_CLOSE_REASON)
{
const uint8 bDormant = Bunch.bClose ? Reader.ReadBit() : 0;
Bunch.CloseReason = bDormant ? EChannelCloseReason::Dormancy : EChannelCloseReason::Destroyed;
}
else
{
Bunch.CloseReason = Bunch.bClose ? (EChannelCloseReason)Reader.ReadInt((uint32)EChannelCloseReason::MAX) : EChannelCloseReason::Destroyed;
}
Bunch.bIsReplicationPaused = Reader.ReadBit();
Bunch.bReliable = Reader.ReadBit();
if (Bunch.EngineNetVer() < HISTORY_MAX_ACTOR_CHANNELS_CUSTOMIZATION)
{
static const int OLD_MAX_ACTOR_CHANNELS = 10240;
Bunch.ChIndex = Reader.ReadInt(OLD_MAX_ACTOR_CHANNELS);
}
else
{
uint32 ChIndex;
Reader.SerializeIntPacked(ChIndex);
if (ChIndex >= (uint32)MaxChannelSize)
{
CLOSE_CONNECTION_DUE_TO_SECURITY_VIOLATION(this, ESecurityEvent::Malformed_Packet, TEXT("Bunch channel index exceeds channel limit"));
return;
}
Bunch.ChIndex = ChIndex;
}
UChannel* Channel = Channels[Bunch.ChIndex];
// 省略后续的解析bunch逻辑
// Dispatch the raw, unsequenced bunch to the channel.
bool bLocalSkipAck = false;
Channel->ReceivedRawBunch( Bunch, bLocalSkipAck ); //warning: May destroy channel.
if ( bLocalSkipAck )
{
bSkipAck = true;
}
Driver->InBunches++;
Driver->InTotalBunches++;
}
}
这里获取对应的Channel的时候使用的是Bunch里的ChIndex,同一个Channel在服务器客户端的ChIndex都是一样的。
在UChannel::ReceivedRawBunch会根据当前Bunch是否是可靠消息来做不同的处理,这里我们先忽略掉这个可靠消息接收的部分,重点来看这里是如何处理小包的拆包和大包的合并的:
void UChannel::ReceivedRawBunch( FInBunch & Bunch, bool & bOutSkipAck )
{
SCOPE_CYCLE_COUNTER(Stat_ChannelReceivedRawBunch);
SCOPED_NAMED_EVENT(UChannel_ReceivedRawBunch, FColor::Green);
// Immediately consume the NetGUID portion of this bunch, regardless if it is partial or reliable.
// NOTE - For replays, we do this even earlier, to try and load this as soon as possible, in case there is an issue creating the channel
// If a replay fails to create a channel, we want to salvage as much as possible
if ( Bunch.bHasPackageMapExports && !Connection->IsInternalAck() )
{
Cast<UPackageMapClient>( Connection->PackageMap )->ReceiveNetGUIDBunch( Bunch );
if ( Bunch.IsError() )
{
UE_LOG( LogNetTraffic, Error, TEXT( "UChannel::ReceivedRawBunch: Bunch.IsError() after ReceiveNetGUIDBunch. ChIndex: %i" ), ChIndex );
return;
}
}
if ( Connection->IsInternalAck() && Broken )
{
return;
}
check(Connection->Channels[ChIndex]==this);
if ( Bunch.bReliable && Bunch.ChSequence != Connection->InReliable[ChIndex] + 1 )
{
// 先暂时忽略掉可靠消息的乱序接收处理
}
else
{
bool bDeleted = ReceivedNextBunch( Bunch, bOutSkipAck );
if ( Bunch.IsError() )
{
UE_LOG( LogNetTraffic, Error, TEXT( "UChannel::ReceivedRawBunch: Bunch.IsError() after ReceivedNextBunch 1" ) );
return;
}
if (bDeleted)
{
return;
}
// Dispatch any waiting bunches.
while( InRec )
{
// We shouldn't hit this path on 100% reliable connections
check( !Connection->IsInternalAck() );
if( InRec->ChSequence!=Connection->InReliable[ChIndex]+1 )
break;
UE_LOG(LogNetTraffic, Log, TEXT(" Channel %d Unleashing queued bunch"), ChIndex );
FInBunch* Release = InRec;
InRec = InRec->Next;
NumInRec--;
// Just keep a local copy of the bSkipAck flag, since these have already been acked and it doesn't make sense on this context
// Definitely want to warn when this happens, since it's really not possible
bool bLocalSkipAck = false;
bDeleted = ReceivedNextBunch( *Release, bLocalSkipAck );
if ( bLocalSkipAck )
{
UE_LOG( LogNetTraffic, Warning, TEXT( "UChannel::ReceivedRawBunch: bLocalSkipAck == true for already acked packet" ) );
}
if ( Bunch.IsError() )
{
UE_LOG( LogNetTraffic, Error, TEXT( "UChannel::ReceivedRawBunch: Bunch.IsError() after ReceivedNextBunch 2" ) );
return;
}
delete Release;
if (bDeleted)
{
return;
}
//AssertInSequenced();
}
}
}
在这个函数里会使用ReceivedNextBunch来从当前的Bunch解析出来HandleBunch,这个HandleBunch代表一个完整的逻辑包。如果当前包不是被拆分的包的话这个HandleBunch就是传入的Bunch,如果当前包是拆分包则需要处理大包的子包合并问题:
bool UChannel::ReceivedNextBunch( FInBunch & Bunch, bool & bOutSkipAck )
{
// We received the next bunch. Basically at this point:
// -We know this is in order if reliable
// -We dont know if this is partial or not
// If its not a partial bunch, of it completes a partial bunch, we can call ReceivedSequencedBunch to actually handle it
// Note this bunch's retirement.
if ( Bunch.bReliable )
{
// Reliables should be ordered properly at this point
check( Bunch.ChSequence == Connection->InReliable[Bunch.ChIndex] + 1 );
Connection->InReliable[Bunch.ChIndex] = Bunch.ChSequence;
}
FInBunch* HandleBunch = &Bunch;
if (Bunch.bPartial)
{
HandleBunch = NULL;
// 暂时省略大包的合并相关代码
}
// 省略后续代码
}
现在来研究一下UChannel::ReceivedNextBunch里对于PartialBunch是如何处理的,首先会判断当前Bunch是否是大包拆分之后的第一个包,也就是bPartialInitial这个标记位为true。如果是第一个拆分包的话,会检查当前是否已经在处理其他的拆分包,这个已经在处理的拆分包会记录在当前Channel的InPartialBunch字段上。如果已经有了InPartialBunch,那么需要删除这个InPartialBunch,并记录一些错误日志,因为当前的Bunch肯定已经乱序接收了:
if (Bunch.bPartialInitial)
{
// Create new InPartialBunch if this is the initial bunch of a new sequence.
if (InPartialBunch != NULL)
{
if (!InPartialBunch->bPartialFinal)
{
if ( InPartialBunch->bReliable )
{
if ( Bunch.bReliable )
{
UE_LOG(LogNetPartialBunch, Warning, TEXT("Reliable partial trying to destroy reliable partial 1. %s"), *Describe());
Bunch.SetError();
return false;
}
UE_LOG(LogNetPartialBunch, Log, TEXT( "Unreliable partial trying to destroy reliable partial 1") );
bOutSkipAck = true;
return false;
}
// We didn't complete the last partial bunch - this isn't fatal since they can be unreliable, but may want to log it.
UE_LOG(LogNetPartialBunch, Verbose, TEXT("Incomplete partial bunch. Channel: %d ChSequence: %d"), InPartialBunch->ChIndex, InPartialBunch->ChSequence);
}
delete InPartialBunch;
InPartialBunch = NULL;
}
InPartialBunch = new FInBunch(Bunch, false);
if ( !Bunch.bHasPackageMapExports && Bunch.GetBitsLeft() > 0 )
{
if ( Bunch.GetBitsLeft() % 8 != 0 )
{
UE_LOG(LogNetPartialBunch, Warning, TEXT("Corrupt partial bunch. Initial partial bunches are expected to be byte-aligned. BitsLeft = %u. %s"), Bunch.GetBitsLeft(), *Describe());
Bunch.SetError();
return false;
}
InPartialBunch->AppendDataFromChecked( Bunch.GetDataPosChecked(), Bunch.GetBitsLeft() );
LogPartialBunch(TEXT("Received new partial bunch."), Bunch, *InPartialBunch);
}
else
{
LogPartialBunch(TEXT("Received New partial bunch. It only contained NetGUIDs."), Bunch, *InPartialBunch);
}
}
完成了异常情况的处理之后,会以当前的Bunch来创建一个新的InPartialBunch,同时将当前Bunch里的数据添加到InPartialBunch的后面。
如果当前的Bunch并不是InitialBunch,那么就会将这个Bunch的数据拼接到InPartialBunch的后面,但是这个Bunch拼接是有条件的,要求两个Bunch的bReliable是一致的,且Bunch里记录的序列号要求一致。:
// Merge in next partial bunch to InPartialBunch if:
// -We have a valid InPartialBunch
// -The current InPartialBunch wasn't already complete
// -ChSequence is next in partial sequence
// -Reliability flag matches
bool bSequenceMatches = false;
if (InPartialBunch)
{
const bool bReliableSequencesMatches = Bunch.ChSequence == InPartialBunch->ChSequence + 1;
const bool bUnreliableSequenceMatches = bReliableSequencesMatches || (Bunch.ChSequence == InPartialBunch->ChSequence);
// Unreliable partial bunches use the packet sequence, and since we can merge multiple bunches into a single packet,
// it's perfectly legal for the ChSequence to match in this case.
// Reliable partial bunches must be in consecutive order though
bSequenceMatches = InPartialBunch->bReliable ? bReliableSequencesMatches : bUnreliableSequenceMatches;
}
if ( InPartialBunch && !InPartialBunch->bPartialFinal && bSequenceMatches && InPartialBunch->bReliable == Bunch.bReliable )
{
// Merge.
UE_LOG(LogNetPartialBunch, Verbose, TEXT("Merging Partial Bunch: %d Bytes"), Bunch.GetBytesLeft() );
if ( !Bunch.bHasPackageMapExports && Bunch.GetBitsLeft() > 0 )
{
InPartialBunch->AppendDataFromChecked( Bunch.GetDataPosChecked(), Bunch.GetBitsLeft() );
}
// Only the final partial bunch should ever be non byte aligned. This is enforced during partial bunch creation
// This is to ensure fast copies/appending of partial bunches. The final partial bunch may be non byte aligned.
if (!Bunch.bHasPackageMapExports && !Bunch.bPartialFinal && (Bunch.GetBitsLeft() % 8 != 0))
{
UE_LOG(LogNetPartialBunch, Warning, TEXT("Corrupt partial bunch. Non-final partial bunches are expected to be byte-aligned. bHasPackageMapExports = %d, bPartialFinal = %d, BitsLeft = %u. %s"),
Bunch.bHasPackageMapExports ? 1 : 0, Bunch.bPartialFinal ? 1 : 0, Bunch.GetBitsLeft(), *Describe());
Bunch.SetError();
return false;
}
// Advance the sequence of the current partial bunch so we know what to expect next
InPartialBunch->ChSequence = Bunch.ChSequence;
if (Bunch.bPartialFinal)
{
LogPartialBunch(TEXT("Completed Partial Bunch."), Bunch, *InPartialBunch);
if ( Bunch.bHasPackageMapExports )
{
// Shouldn't have these, they only go in initial partial export bunches
UE_LOG(LogNetPartialBunch, Warning, TEXT("Corrupt partial bunch. Final partial bunch has package map exports. %s"), *Describe());
Bunch.SetError();
return false;
}
HandleBunch = InPartialBunch;
InPartialBunch->bPartialFinal = true;
InPartialBunch->bClose = Bunch.bClose;
InPartialBunch->CloseReason = Bunch.CloseReason;
InPartialBunch->bIsReplicationPaused = Bunch.bIsReplicationPaused;
InPartialBunch->bHasMustBeMappedGUIDs = Bunch.bHasMustBeMappedGUIDs;
}
else
{
LogPartialBunch(TEXT("Received Partial Bunch."), Bunch, *InPartialBunch);
}
}
else
{
// 一些异常情况的错误处理
if (InPartialBunch)
{
delete InPartialBunch;
InPartialBunch = NULL;
}
}
这里的序列号一致有两个分支判断:当bReliable为true的时候,新Bunch的序列号必须比InPartialBunch的序列号大1;当bReliable为false的时候要求新Bunch的序列号与InPartialBunch的序列号差值要小于等于1。这里允许非可靠包的不同PartialBunch序列号相等的情况,估计是在执行包拆分的时候最后一个包的大小比较小,导致在拼装Packet的时候与前面的包合并到一个Packet里了。
拼接完成数据之后,检查当前Bunch是否是分包里的最后一个子包,如果是则代表一个完整包的多个分包都接收完毕了,可以将HandleBunch设置为当前的InPartialBunch。在获取了一个有效的HandleBunch之后,再调用ReceivedSequencedBunch来处理这个完整的消息包。
bool UChannel::ReceivedNextBunch( FInBunch & Bunch, bool & bOutSkipAck )
{
FInBunch* HandleBunch = &Bunch;
if (Bunch.bPartial)
{
//省略大包的合并相关代码
}
if ( HandleBunch != NULL )
{
const bool bBothSidesCanOpen = Connection->Driver && Connection->Driver->ChannelDefinitionMap[ChName].bServerOpen && Connection->Driver->ChannelDefinitionMap[ChName].bClientOpen;
if ( HandleBunch->bOpen )
{
// 忽略一些channel打开时的逻辑处理
}
if ( !bBothSidesCanOpen ) // Voice channels can open from both side simultaneously, so ignore this logic until we resolve this
{
// 忽略一些channel打开时的逻辑处理
}
// Receive it in sequence.
return ReceivedSequencedBunch( *HandleBunch );
}
return false;
}
ReceivedSequencedBunch只是简单的进行Bunch转发,并处理一下Channel关闭的逻辑。这里的UChannel::ReceivedBunch是一个纯虚函数,具体的Bunch内数据解析逻辑依赖于三个子类的重载,这里我们将不再跟进,UActorChannel::ReceivedBunch的相关内容将在后续的Actor同步中进行介绍:
bool UChannel::ReceivedSequencedBunch( FInBunch& Bunch )
{
SCOPED_NAMED_EVENT(UChannel_ReceivedSequencedBunch, FColor::Green);
// Handle a regular bunch.
if ( !Closing )
{
ReceivedBunch( Bunch );
}
// We have fully received the bunch, so process it.
if( Bunch.bClose )
{
// 忽略channel关闭的处理
return true;
}
return false;
}
/** Handle an incoming bunch. */
virtual void UChannel::ReceivedBunch( FInBunch& Bunch ) PURE_VIRTUAL(UChannel::ReceivedBunch,);
void UActorChannel::ReceivedBunch( FInBunch & Bunch );
void UVoiceChannel::ReceivedBunch(FInBunch& Bunch);
void UControlChannel::ReceivedBunch( FInBunch& Bunch );
可靠传输
众所周知UDP是一个不可靠的协议,在其协议规范上并没有做类似于TCP的可靠收发保证。因此所有使用UDP作为底层通信协议的业务系统都需要在UDP的基础上模拟一个类似于TCP的可靠传输协议出来,UE也不例外。为了实现可靠传输,首先需要在每个Packet上赋予一个递增序列号,作为这个Packet的唯一标识符。并且通信的双方都需要对已经收到的包进行确认,也就是常说的ACK。为了方便的维护这个双端包序列号的发送与确认,UE里专门设计了一个结构FNetPacketNotify,在这个结构体里有多个序列号相关的成员变量:
/**
FNetPacketNotify - Drives delivery of sequence numbers, acknowledgments and notifications of delivery sequence numbers
*/
class FNetPacketNotify
{
private:
// Track incoming sequence data
SequenceHistoryT InSeqHistory; // BitBuffer containing a bitfield describing the history of received packets
SequenceNumberT InSeq; // Last sequence number received and accepted from remote
SequenceNumberT InAckSeq; // Last sequence number received from remote that we have acknowledged, this is needed since we support accepting a packet but explicitly not acknowledge it as received.
SequenceNumberT InAckSeqAck; // Last sequence number received from remote that we have acknowledged and also knows that the remote has received the ack, used to calculate how big our history must be
// Track outgoing sequence data
SequenceNumberT OutSeq; // Outgoing sequence number
SequenceNumberT OutAckSeq; // Last sequence number that we know that the remote side have received.
};
InSeq和OutSeq的意义很明显,分别代表接收到的最大包序号和下一个发出包的序号。OutAckSeq代表已发出的包中收到的对方确认了的最大包序号,对应的InAckSeq代表已接收到的包中给对端发送ACK的最大包序号。由于UE并不是收到一个对端的包之后就立即对这个包进行ACK,所以这个InAckSeq并不是总等于InSeq。这些字段的初始值会在连接建立的时候予以初始化:
void UNetConnection::InitSequence(int32 IncomingSequence, int32 OutgoingSequence)
{
// Make sure the sequence hasn't already been initialized on the server, and ignore multiple initializations on the client
check(InPacketId == -1 || Driver->ServerConnection != nullptr);
if (InPacketId == -1 && CVarRandomizeSequence.GetValueOnAnyThread() > 0)
{
// Initialize the base UNetConnection packet sequence (not very useful/effective at preventing attacks)
InPacketId = IncomingSequence - 1;
OutPacketId = OutgoingSequence;
OutAckPacketId = OutgoingSequence - 1;
LastNotifiedPacketId = OutAckPacketId;
// Initialize the reliable packet sequence (more useful/effective at preventing attacks)
InitInReliable = IncomingSequence & (MAX_CHSEQUENCE - 1);
InitOutReliable = OutgoingSequence & (MAX_CHSEQUENCE - 1);
InReliable.Init(InitInReliable, InReliable.Num());
OutReliable.Init(InitOutReliable, OutReliable.Num());
PacketNotify.Init(InPacketId, OutPacketId);
UE_LOG(LogNet, Verbose, TEXT("InitSequence: IncomingSequence: %i, OutgoingSequence: %i, InitInReliable: %i, InitOutReliable: %i"), IncomingSequence, OutgoingSequence, InitInReliable, InitOutReliable);
}
}
void FNetPacketNotify::Init(SequenceNumberT InitialInSeq, SequenceNumberT InitialOutSeq)
{
InSeqHistory.Reset();
InSeq = InitialInSeq;
InAckSeq = InitialInSeq;
InAckSeqAck = InitialInSeq;
OutSeq = InitialOutSeq;
OutAckSeq = SequenceNumberT(InitialOutSeq.Get() - 1);
}
最后的InAckSeqAck则比较拗口,代表对端确认的自己这边接收到的包的最大值。举个例子来说说一下这些字段的更新逻辑:
A与B在连接建立的时候会在握手信息里商定双方的Seq初始值,假设A的初始Seq为100,同时B的初始Seq为200,那么A.InSeq=199,A.InAckSeq=199,A.InAckSeqAck=199,A.OutSeq=100,A.OutAckSeq=99,B.InSeq=99,B.InAckSeq=99,B.InAckSeqAck=99,B.OutSeq=200,B.OutAckSeq=199。A往B发送了一个序号为100的包,此时更新A.OutSeq=100,同时携带对B发出的199包的ACK信息,更新A.InAckSeq=199。- 当
B收到之后,更新B.InSeq=100,B.OutAckSeq=199,此时不急于发送100这个ACK, 等待后续发包的时候带上这个ACK。 - 后面
B在往A发送一个编号为200的包的时候,顺带的加上对A发出的100包的ACK信息,此时B.InAckSeq=100,B.OutSeq=200。 - 在
A接收到B发出的200包之后,更新A.InSeq=200,同时A知道对端B已经接收到了A发出的100包,此时更新A.OutAckSeq=100。 - 接下来
A发送给B一个编号为101的包,更新A.OutSeq=101,同时带上对B发出的200包的ACK信息,更新A.InAckSeq=200。 - 当
B收到这个101的包之后,更新B.InSeq=101,同时从这个包里解析出来包含对于B发出的200包的ACK信息,因此更新B.OutAckSeq=200。 - 由于
B发送的200包里携带了针对于A发送的100包的ACK,所以这个时候B知道A已经确认了B已经接收了100包这个信息,所以此时可以更新B.InAckSeqAck=100。
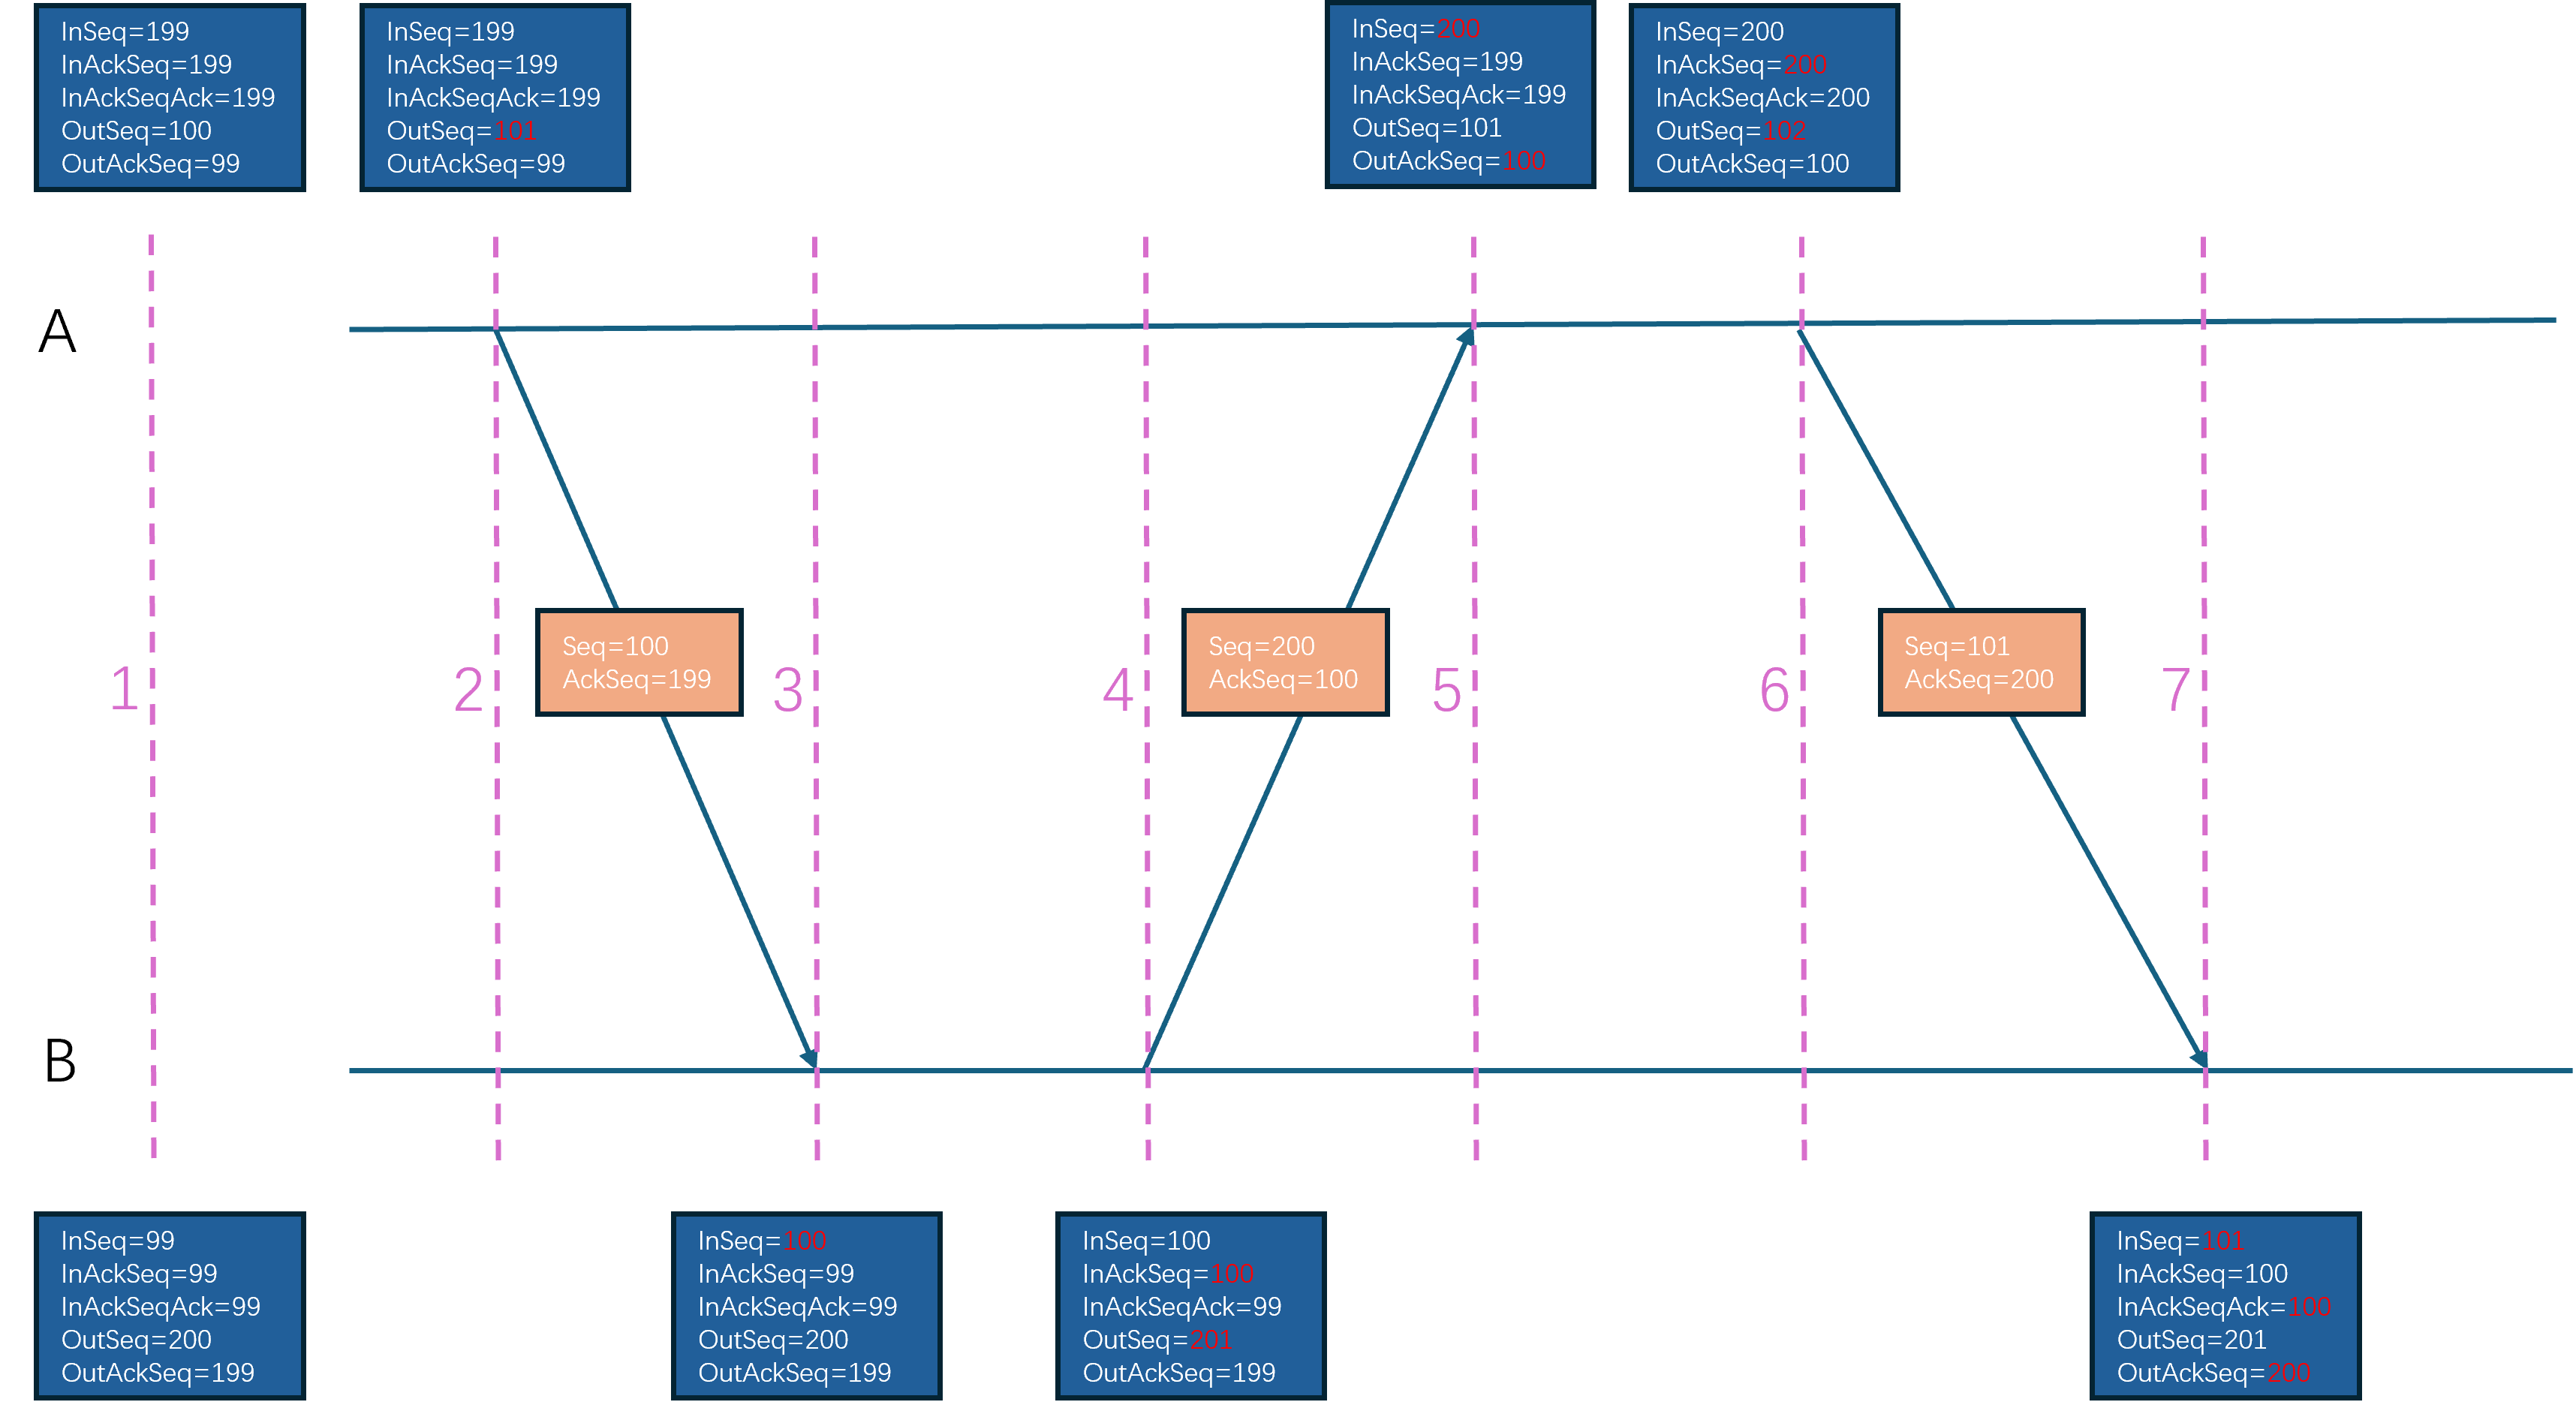
在UE的可靠UDP设计里,消息传输的有序性并不是建立在Packet的按照顺序接收的基础上,而是建立在可靠Bunch的按序处理的基础上,因为可靠传输的Bunch会赋予一个连续递增的序列号。当UE接收到一个Packet之后,会解析出这个Packet里所携带的所有Bunch,然后根据这个Packet的可靠性来做后续的处理:
- 如果当前
Packet是不需要可靠传输的,那么这些Bunch就会直接发送到逻辑层去处理 - 如果当前
Packet是需要可靠传输的,那么这些Bunch会投递到所属的Channel里进行排序,当出现连续Bunch的时候才会被分发到逻辑层
在这样的设计下,UE里每次ACK都代表一个独立的包被接收,而不是与TCP一样代表所有序号小于等于这个ACK的包被接收。当一个包长时间没有接收到对应的ACK的时候,就可以当作这个包的数据已经丢失。如果这个包是一个不可靠包,那么本地将不做任何处理;如果这个包是一个可靠包,那么UE会将这个包里的所有Bunch都解析出来然后重新放到Bunch的发送队列里等待后续组成Packet重新发送过去。举个例子来说,如果A向B发出了四个包:101不可靠, 102不可靠, 103可靠,包含Bunch(10), 104可靠包含Bunch(11)。但是B只接收到了101和104,那么会按照包的上升序来分别处理101,104,但是处理104的时候发现内部的可靠Bunch的序列号11无法与之前接收到的最大可靠Bunch的序列号9连接起来,因此会先将Bunch(11)暂时存下来。后续B往A发包的时候会带上针对101,104的ACK。A收到B发出的101,104的ACK之后,知道了102,103两个包丢失了,由于102是不可靠包所以不会去重传这个包,但是103是可靠包,所以会将其内部的Bunch(10)拿出来放到发送Bunch队列的头部。在后面A会构造一个新的编号为105的可靠包,包里的内容是Bunch(10),Bunch(12)。当B收到这个105包之后,将Bunch(10),Bunch(12)与暂存了的Bunch(11)合并起来排序,然后不断的获取其内部可以在Bunch(9)之后按序接收的所有包,并执行逻辑层的分发。
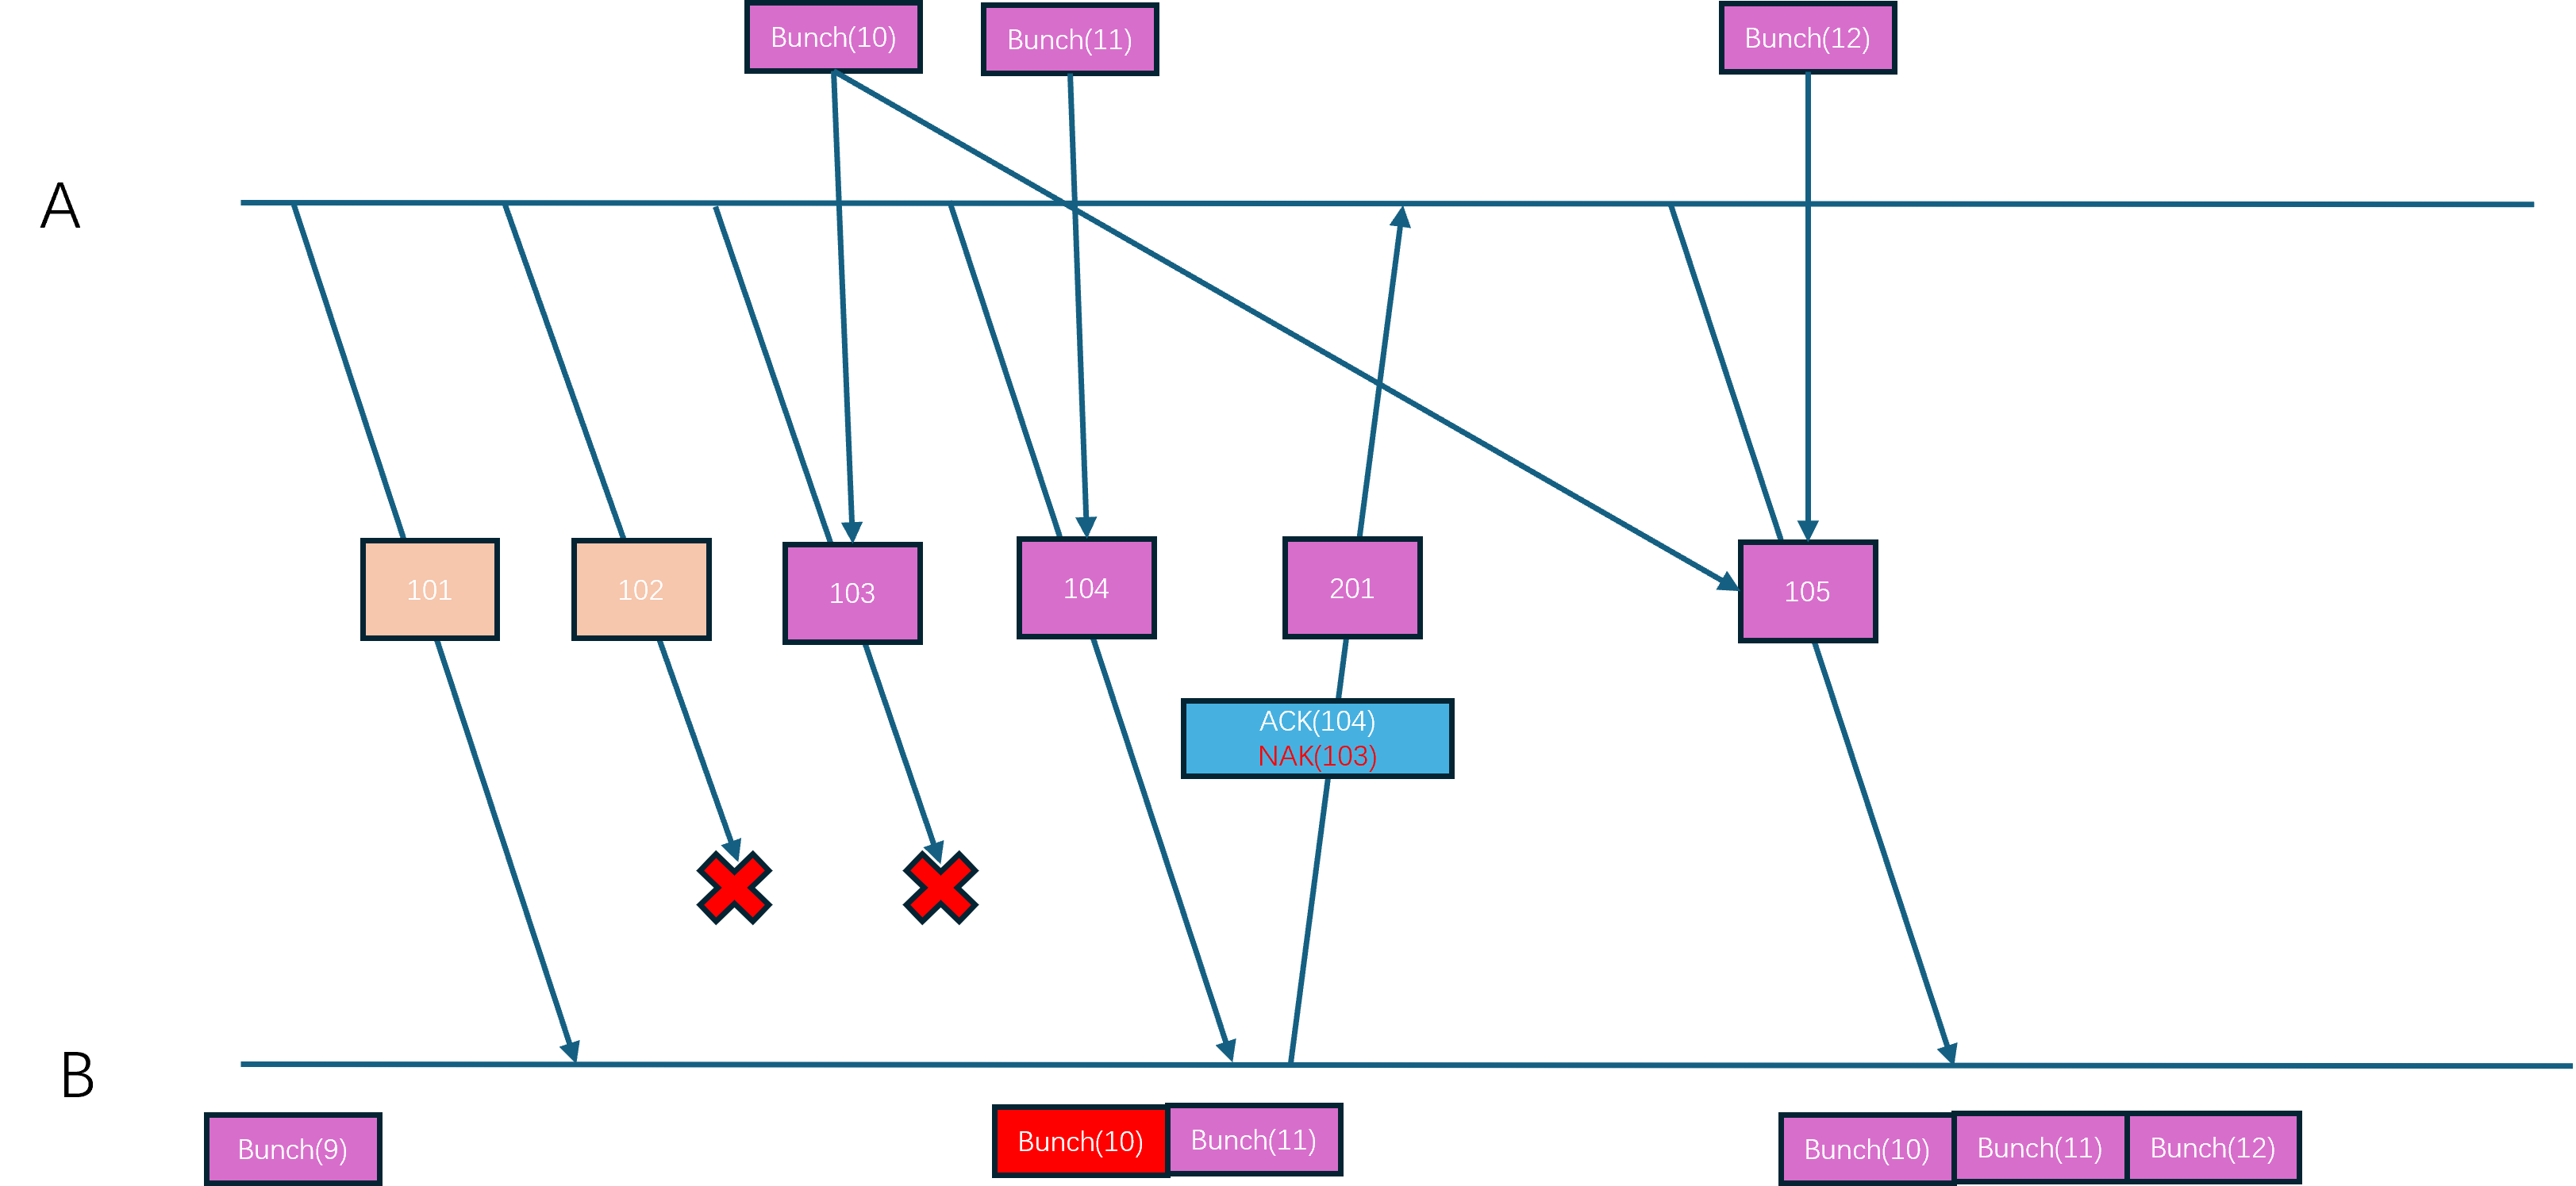
上述内容就是UE可靠UDP的大致实现框架,接下来再来讲解一下具体的实现细节。首先是Packet的序列号分配,这个分配接口为FNetPacketNotify::CommitAndIncrementOutSeq,调用者为前面介绍过的FlushNet:
FNetPacketNotify::SequenceNumberT FNetPacketNotify::CommitAndIncrementOutSeq()
{
// we have not written a header...this is a fail.
check(WrittenHistoryWordCount != 0);
// Add entry to the ack-record so that we can update the InAckSeqAck when we received the ack for this OutSeq.
AckRecord.Enqueue( {OutSeq, WrittenInAckSeq} );
WrittenHistoryWordCount = 0u;
return ++OutSeq;
}
在这个函数里除了对OutSeq进行自增之外,还往AckRecord这个队列里添加了一个元素。这个AckRecord队列的作用是记录每次发出的包序列号以及这个包附带的ACK序列号:
struct FSentAckData
{
SequenceNumberT OutSeq; // 发送出去的包的序列号
SequenceNumberT InAckSeq; // 这个包所携带的ACK序列号
};
typedef TResizableCircularQueue<FSentAckData, TInlineAllocator<128>> AckRecordT;
AckRecordT AckRecord; // Track acked seq for each sent packet to track size of ack history
这样当自己接收到对端发送过来的一个针对己方发送的包的ACK时,就可以从这个AckRecord里找到自己发送的这个包所携带的针对对端的ACK信息,从而就可以更新InAckSeqAck字段了,这个查找包序号对应的ACK序号的接口为FNetPacketNotify::UpdateInAckSeqAck:
FNetPacketNotify::SequenceNumberT FNetPacketNotify::UpdateInAckSeqAck(SequenceNumberT::DifferenceT AckCount, SequenceNumberT AckedSeq)
{
if ((SIZE_T)AckCount <= AckRecord.Count())
{
if (AckCount > 1)
{
AckRecord.PopNoCheck(AckCount - 1);
}
FSentAckData AckData = AckRecord.PeekNoCheck();
AckRecord.PopNoCheck();
// verify that we have a matching sequence number
if (AckData.OutSeq == AckedSeq)
{
return AckData.InAckSeq;
}
}
// Pessimistic view, should never occur but we do want to know about it if it would
ensureMsgf(false, TEXT("FNetPacketNotify::UpdateInAckSeqAck - Failed to find matching AckRecord for %u"), AckedSeq.Get());
return SequenceNumberT(AckedSeq.Get() - MaxSequenceHistoryLength);
}
有了包序列号之后,就需要在发送Packet的时候将包序号和ACK序号都附加到Packet里,这个添加序列号的逻辑在前面介绍的WritePacketHeader里:
// IMPORTANT:
// WritePacketHeader must ALWAYS write the exact same number of bits as we go back and rewrite the header
// right before we put the packet on the wire.
void UNetConnection::WritePacketHeader(FBitWriter& Writer)
{
// If this is a header refresh, we only serialize the updated serial number information
const bool bIsHeaderUpdate = Writer.GetNumBits() > 0u;
// Header is always written first in the packet
FBitWriterMark Reset;
FBitWriterMark Restore(Writer);
Reset.PopWithoutClear(Writer);
// Write notification header or refresh the header if used space is the same.
bool bWroteHeader = PacketNotify.WriteHeader(Writer, bIsHeaderUpdate);
#if !UE_BUILD_SHIPPING
checkf(Writer.GetNumBits() <= MAX_PACKET_RELIABLE_SEQUENCE_HEADER_BITS, TEXT("WritePacketHeader exceeded the max allowed bits. Wrote %d. Max %d"), Writer.GetNumBits(), MAX_PACKET_RELIABLE_SEQUENCE_HEADER_BITS);
#endif
// 忽略一些代码
}
// These methods must always write and read the exact same number of bits, that is the reason for not using WriteInt/WrittedWrappedInt
bool FNetPacketNotify::WriteHeader(FBitWriter& Writer, bool bRefresh)
{
// we always write at least 1 word
SIZE_T CurrentHistoryWordCount = FMath::Clamp<SIZE_T>((GetCurrentSequenceHistoryLength() + SequenceHistoryT::BitsPerWord - 1u) / SequenceHistoryT::BitsPerWord, 1u, SequenceHistoryT::WordCount);
// We can only do a refresh if we do not need more space for the history
if (bRefresh && (CurrentHistoryWordCount > WrittenHistoryWordCount))
{
return false;
}
// How many words of ack data should we write? If this is a refresh we must write the same size as the original header
WrittenHistoryWordCount = bRefresh ? WrittenHistoryWordCount : CurrentHistoryWordCount;
// This is the last InAck we have acknowledged at this time
WrittenInAckSeq = InAckSeq;
SequenceNumberT::SequenceT Seq = OutSeq.Get();
SequenceNumberT::SequenceT AckedSeq = InAckSeq.Get();
// Pack data into a uint
uint32 PackedHeader = FPackedHeader::Pack(Seq, AckedSeq, WrittenHistoryWordCount - 1);
// Write packed header
Writer << PackedHeader;
// Write ack history
InSeqHistory.Write(Writer, WrittenHistoryWordCount);
UE_LOG_PACKET_NOTIFY(TEXT("FNetPacketNotify::WriteHeader - Seq %u, AckedSeq %u bReFresh %u HistorySizeInWords %u"), Seq, AckedSeq, bRefresh ? 1u : 0u, WrittenHistoryWordCount);
return true;
}
在这个WriteHeader函数里会在头部先写入一个uint32,这个uint32是由三个分量组成的:Seq代表当前Packet的序列号,占据14bit,AckedSeq代表已经收到包的最大序列号,占据14bit, 还有一个占据4bit的WrittenHistoryWordCount。三个分量刚好组合成32bit:
struct FPackedHeader
{
using SequenceNumberT = FNetPacketNotify::SequenceNumberT;
static_assert(FNetPacketNotify::SequenceNumberBits <= 14, "SequenceNumbers must be smaller than 14 bits to fit history word count");
enum { HistoryWordCountBits = 4 };
enum { SeqMask = (1 << FNetPacketNotify::SequenceNumberBits) - 1 };
enum { HistoryWordCountMask = (1 << HistoryWordCountBits) - 1 };
enum { AckSeqShift = HistoryWordCountBits };
enum { SeqShift = AckSeqShift + FNetPacketNotify::SequenceNumberBits };
static uint32 Pack(SequenceNumberT Seq, SequenceNumberT AckedSeq, SIZE_T HistoryWordCount)
{
uint32 Packed = 0u;
Packed |= Seq.Get() << SeqShift;
Packed |= AckedSeq.Get() << AckSeqShift;
Packed |= HistoryWordCount & HistoryWordCountMask;
return Packed;
}
static SequenceNumberT GetSeq(uint32 Packed) { return SequenceNumberT(Packed >> SeqShift & SeqMask); }
static SequenceNumberT GetAckedSeq(uint32 Packed) { return SequenceNumberT(Packed >> AckSeqShift & SeqMask); }
static SIZE_T GetHistoryWordCount(uint32 Packed) { return (Packed & HistoryWordCountMask); }
};
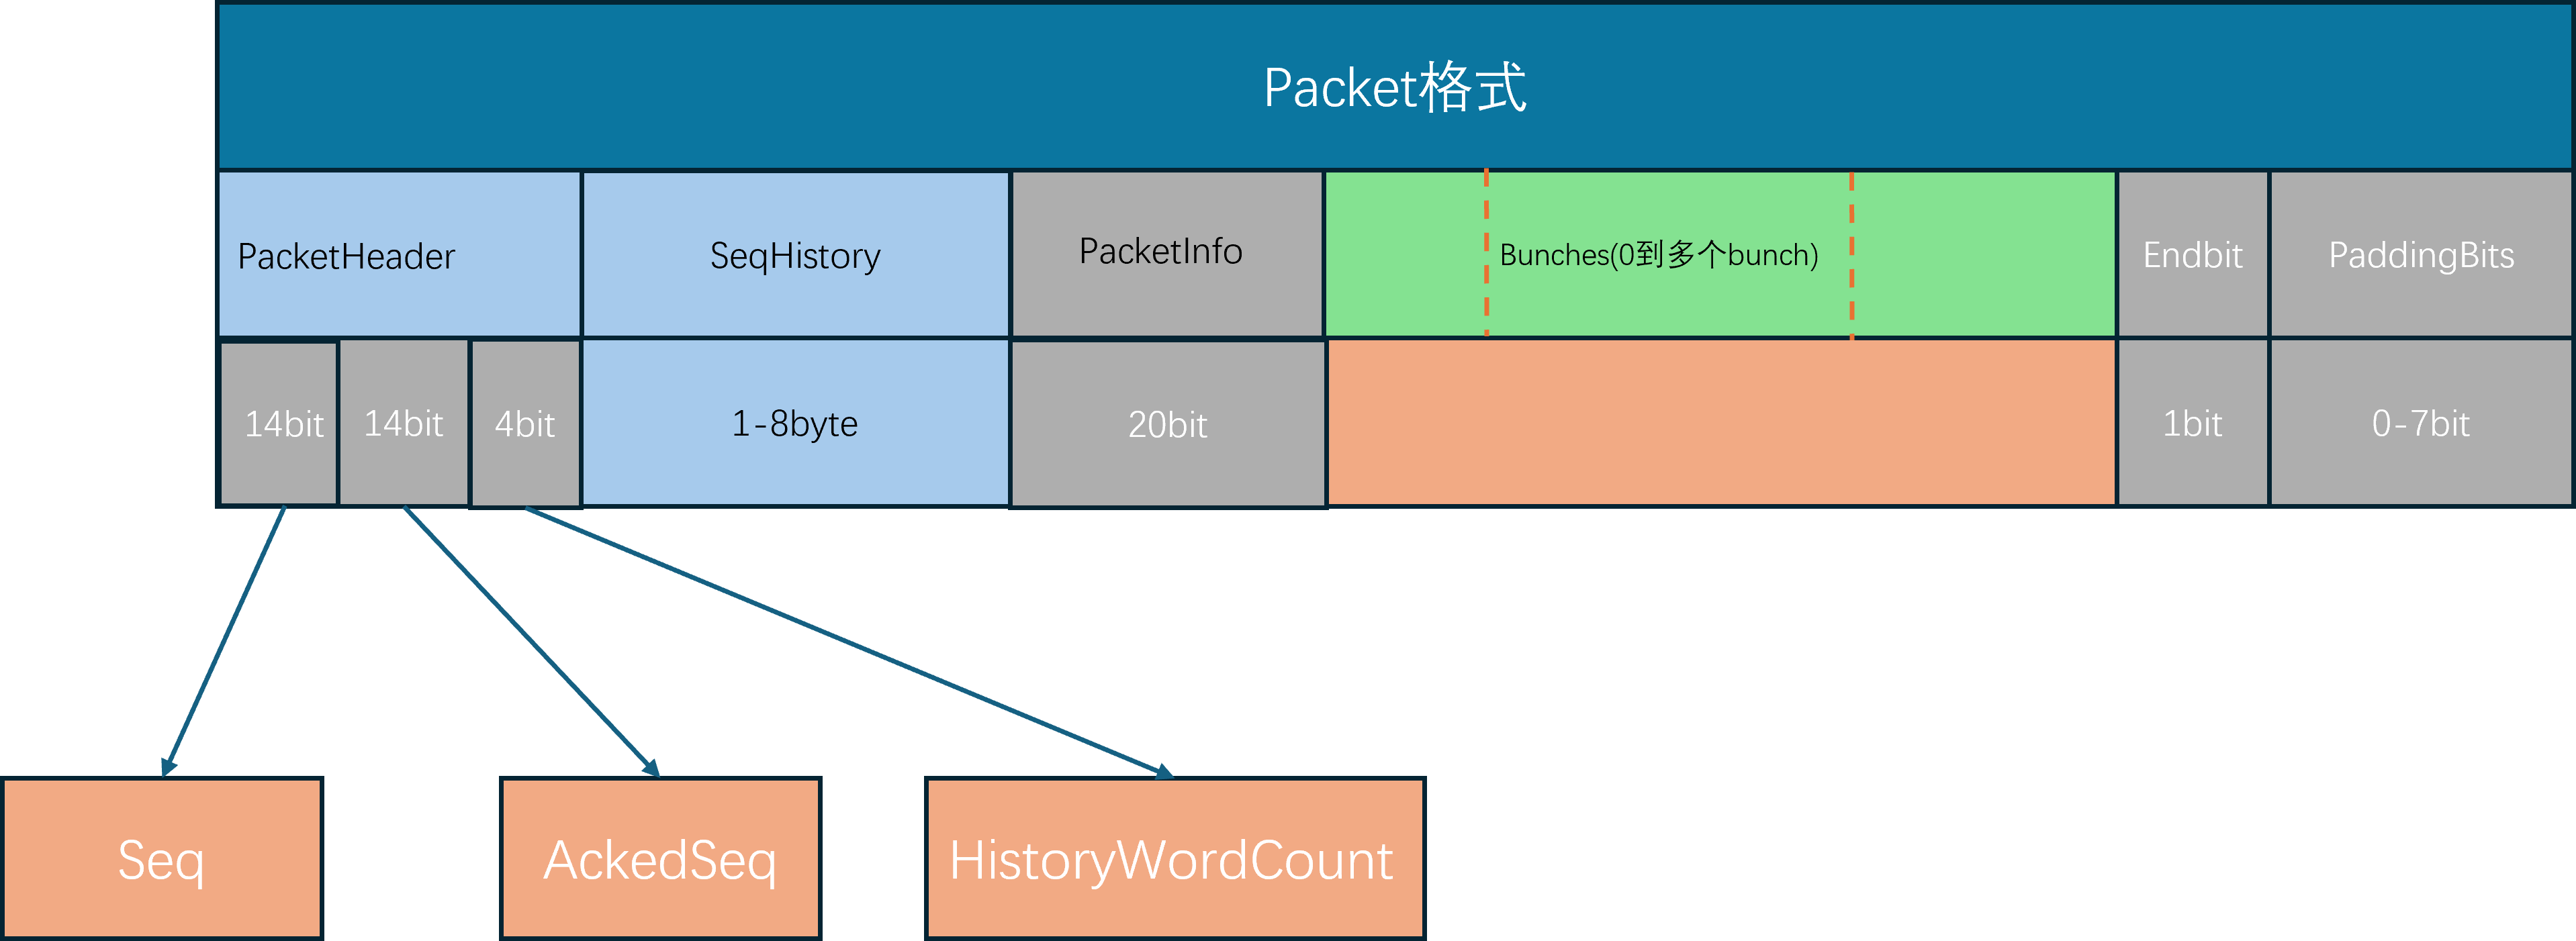
但是这样的设计下,序列号只有14bit可用,最大值只有16383,正常通信情况下这个最大值几分钟之内就会被超过。UE在处理序列号溢出的时候就是简单的进行回环,即序列号16383的下一个是0。为了方便的支持基于回环的加减与比较,UE为包序列号专门设计了一个类型SequenceNumberT:
/** Helper class to work with sequence numbers */
template <SIZE_T NumBits, typename SequenceType>
class TSequenceNumber
{
static_assert(TIsSigned<SequenceType>::Value == false, "The base type for sequence numbers must be unsigned");
public:
using SequenceT = SequenceType;
using DifferenceT = int32;
// Constants
enum { SeqNumberBits = NumBits };
enum { SeqNumberCount = SequenceT(1) << NumBits };
enum { SeqNumberHalf = SequenceT(1) << (NumBits - 1) };
enum { SeqNumberMax = SeqNumberCount - 1u };
enum { SeqNumberMask = SeqNumberMax };
/** Default constructor */
TSequenceNumber() : Value(0u) {}
/** Constructor with given value */
TSequenceNumber(SequenceT ValueIn) : Value(ValueIn & SeqNumberMask) {}
/** Get Current Value */
SequenceT Get() const { return Value; }
/** Diff between sequence numbers (A - B) only valid if (A - B) < SeqNumberHalf */
static DifferenceT Diff(TSequenceNumber A, TSequenceNumber B);
/** return true if this is > Other, this is only considered to be the case if (A - B) < SeqNumberHalf since we have to be able to detect wraparounds */
bool operator>(const TSequenceNumber& Other) const { return (Value != Other.Value) && (((Value - Other.Value) & SeqNumberMask) < SeqNumberHalf); }
/** Check if this is >= Other, See above */
bool operator>=(const TSequenceNumber& Other) const { return ((Value - Other.Value) & SeqNumberMask) < SeqNumberHalf; }
/** Pre-increment and wrap around */
TSequenceNumber& operator++() { Increment(1u); return *this; }
/** Post-increment and wrap around */
TSequenceNumber operator++(int) { TSequenceNumber Tmp(*this); Increment(1u); return Tmp; }
private:
void Increment(SequenceT InValue) { *this = TSequenceNumber(Value + InValue); }
SequenceT Value;
};
enum { SequenceNumberBits = 14 };
enum { MaxSequenceHistoryLength = 256 };
typedef TSequenceNumber<SequenceNumberBits, uint16> SequenceNumberT;
这里执行比较的逻辑比较绕,简单来说就是A与B之间基于回环的差值小于8192的时候才认为A的序列号比B小,可以拆分为下面的几种情况来方便理解:
0<int(A) - int(B)<8191,则认为A比B大, 样例A=2, B=1int(A) - int(B) >=8191,则认为B比A大,样例A=16000, B=1-8192<int(A) - int(B) <0,则认为A比B小,样例A=1, B=4000int(A) - int(B) < -8192, 则认为B比A大, 样例A=1, B=14000
知道了序列号的大小比较规则之后,计算序列号的差值的逻辑就更好理解了:
template <SIZE_T NumBits, typename SequenceType>
typename TSequenceNumber<NumBits, SequenceType>::DifferenceT TSequenceNumber<NumBits, SequenceType>::Diff(TSequenceNumber A, TSequenceNumber B)
{
constexpr SIZE_T ShiftValue = sizeof(DifferenceT)*8 - NumBits;
const SequenceT ValueA = A.Value;
const SequenceT ValueB = B.Value;
return (DifferenceT)((ValueA - ValueB) << ShiftValue) >> ShiftValue;
};
举例来说上面这个函数的计算过程,假设A=10, B=250,则这两个uint16相减之后会得到65296,这个差值明显大于了我们指定的序列号上限16383,所以这里使用先左移后右移的方式来抹除多余的两个bit,并最终得到结果-240。
WrittenHistoryWordCount这个值用来表示在PackedHeader这个整数之后写入的动态数据的大小,只有4bit有效位,同时还被Clamp限制其取值范围为[1,8]。但是这个值的单位是typedef uint32 wordT,即写入的动态数据是以wordT来对齐的,每个wordT有四个字节,所以在后续写入的动态数据的大小上限为32byte,也就是256bit。
InSeqHistory.Write(Writer, WrittenHistoryWordCount)写入的动态数据代表当前ACK包序号AckedSeq之前的若干连续包的接收状态,如果一个包被接收了则对应的bit会被设置为1,如果一个包没有被接收那么对应的bit就会被设置为0。这个标记接口为FNetPacketNotify::AckSeq,第一个参数为要ACK的包编号,函数内部会通过循环来不断的更新InAckSeq,所有中间的包对应的bit都会设置为0,代表丢失,最后一个包的接收状态由传入的参数IsAck来控制。在FNetPacketNotify提供了这个AckSeq的封装, 单参数的AckSeq代表确认了这个包的接收,NakSeq代表确认了这个包的丢失:
void FNetPacketNotify::AckSeq(SequenceNumberT AckedSeq, bool IsAck)
{
check( AckedSeq == InSeq);
while (AckedSeq > InAckSeq)
{
++InAckSeq;
const bool bReportAcked = InAckSeq == AckedSeq ? IsAck : false;
UE_LOG_PACKET_NOTIFY(TEXT("FNetPacketNotify::AckSeq - AckedSeq: %u, IsAck %u"), InAckSeq.Get(), bReportAcked ? 1u : 0u);
InSeqHistory.AddDeliveryStatus(bReportAcked);
}
}
/** Mark Seq as received and update current InSeq, missing sequence numbers will be marked as lost */
void AckSeq(SequenceNumberT Seq) { AckSeq(Seq, true); }
/** Explicitly mark Seq as not received and update current InSeq, additional missing sequence numbers will be marked as lost */
void NakSeq(SequenceNumberT Seq) { AckSeq(Seq, false); }
由于动态数据最多只有256bit,只能覆盖当前最新包的前256个包的接收状态,如果一个比较久远的包没有被接收到,那么这里就会出现问题,所以在WriterHeader的开头会有这个长度的检查,发现异常则直接返回false:
bool FNetPacketNotify::WriteHeader(FBitWriter& Writer, bool bRefresh)
{
// we always write at least 1 word
SIZE_T CurrentHistoryWordCount = FMath::Clamp<SIZE_T>((GetCurrentSequenceHistoryLength() + SequenceHistoryT::BitsPerWord - 1u) / SequenceHistoryT::BitsPerWord, 1u, SequenceHistoryT::WordCount);
// We can only do a refresh if we do not need more space for the history
if (bRefresh && (CurrentHistoryWordCount > WrittenHistoryWordCount))
{
return false;
}
// 省略后续代码
}
这里之所以写入这个InSeqHistory信息到Packet里是为了单个Packet对多个已经接收的包来执行ACK,如果每次接收到一个包都单独发出ACK消息的话,会非常浪费流量。因此这里使用bit来代表一个包的接收状态,可以非常的高效的对多个包执行批量ACK,节省了很多流量。
虽然InSeqHistory可以最大容纳256bit,但是每次都完整的写入当前确认包之前的256个包的接收状态有点过滤浪费流量了。所以这里会使用GetCurrentSequenceHistoryLength来判断有多少个包的状态需要写入,如果某个包A之前的包接收状态对方已经知道了,那么此时只需要将A之后到InAckSeq之间的包的接收状态进行发送,也就是(InAckSeqAck,InAckSeq)这个区间的包,这里就是InAckSeqAck这个变量的唯一作用,计算哪些包的接收状态对方还不知道:
SIZE_T FNetPacketNotify::GetCurrentSequenceHistoryLength() const
{
if (InAckSeq >= InAckSeqAck)
{
return (SIZE_T)SequenceNumberT::Diff(InAckSeq, InAckSeqAck);
}
else
{
// Worst case send full history
return SequenceHistoryT::Size;
}
}
当网络通信的对端接收到这个Packet的时候,在UNetConnection::ReceivedPacket也需要按照WriterHeader的格式来解析头部的数据:
bool FNetPacketNotify::ReadHeader(FNotificationHeader& Data, FBitReader& Reader) const
{
// Read packed header
uint32 PackedHeader = 0;
Reader << PackedHeader;
// unpack
Data.Seq = FPackedHeader::GetSeq(PackedHeader);
Data.AckedSeq = FPackedHeader::GetAckedSeq(PackedHeader);
Data.HistoryWordCount = FPackedHeader::GetHistoryWordCount(PackedHeader) + 1;
// Read ack history
Data.History.Read(Reader, Data.HistoryWordCount);
UE_LOG_PACKET_NOTIFY(TEXT("FNetPacketNotify::ReadHeader - Seq %u, AckedSeq %u HistorySizeInWords %u"), Data.Seq.Get(), Data.AckedSeq.Get(), Data.HistoryWordCount);
return Reader.IsError() == false;
}
void UNetConnection::ReceivedPacket( FBitReader& Reader, bool bIsReinjectedPacket)
{
SCOPED_NAMED_EVENT(UNetConnection_ReceivedPacket, FColor::Green);
AssertValid();
// Handle PacketId.
if( Reader.IsError() )
{
ensureMsgf(false, TEXT("Packet too small") );
return;
}
// 省略一些代码
FChannelsToClose ChannelsToClose;
if (IsInternalAck())
{
++InPacketId;
}
else
{
// Read packet header
FNetPacketNotify::FNotificationHeader Header;
if (!PacketNotify.ReadHeader(Header, Reader))
{
CLOSE_CONNECTION_DUE_TO_SECURITY_VIOLATION(this, ESecurityEvent::Malformed_Packet, TEXT("Failed to read PacketHeader"));
return;
}
// 省略后续代码
}
}
当解析完这个Header信息之后,就可以知道当前新Packet的包序列号了,此时需要将这个新包序列号与之前记录的收到的最大包序列号做一个比较。由于当前UE的接收设计,只有新包序列号大于之前记录的InSeq的时候才会去处理,否则会直接认为这个包是无效包。所以这个ReceivedPacket的开头会首先计算这个序列号的差值:
/**
* Gets the delta between the present sequence, and the sequence inside the specified header - if the delta is positive
*/
SequenceNumberT::DifferenceT GetSequenceDelta(const FNotificationHeader& NotificationData)
{
if (NotificationData.Seq > InSeq && NotificationData.AckedSeq >= OutAckSeq && OutSeq > NotificationData.AckedSeq)
{
return SequenceNumberT::Diff(NotificationData.Seq, InSeq);
}
else
{
return 0;
}
}
void UNetConnection::ReceivedPacket( FBitReader& Reader, bool bIsReinjectedPacket)
{
// 省略前述代码
const int32 PacketSequenceDelta = PacketNotify.GetSequenceDelta(Header);
if(PacketSequenceDelta > 0)
{
// 暂时省略一些代码
}
else
{
// 暂时省略一些代码
}
// 省略后续代码
}
如果比较出来的差值小于0,则代表出现了历史消息的重复接收,因此可以直接忽略掉。但是这里还做了一点额外工作,如果这种历史消息出现了多次,超过了指定的阈值CVarNetPacketOrderCorrectionEnableThreshold, 那么可以认为当前的网络环境不怎么好,此时会创建一个乱序接收包的队列PacketOrderCache:
static TAutoConsoleVariable<int32> CVarNetDoPacketOrderCorrection(TEXT("net.DoPacketOrderCorrection"), 1,
TEXT("Whether or not to try to fix 'out of order' packet sequences, by caching packets and waiting for the missing sequence."));
static TAutoConsoleVariable<int32> CVarNetPacketOrderCorrectionEnableThreshold(TEXT("net.PacketOrderCorrectionEnableThreshold"), 1,
TEXT("The number of 'out of order' packet sequences that need to occur, before correction is enabled."));
static TAutoConsoleVariable<int32> CVarNetPacketOrderMaxCachedPackets(TEXT("net.PacketOrderMaxCachedPackets"), 32,
TEXT("(NOTE: Must be power of 2!) The maximum number of packets to cache while waiting for missing packet sequences, before treating missing packets as lost."));
if(PacketSequenceDelta > 0)
{
// 省略一些代码
}
else
{
TotalOutOfOrderPackets++;
Driver->InOutOfOrderPackets++;
if (!PacketOrderCache.IsSet() && CVarNetDoPacketOrderCorrection.GetValueOnAnyThread() != 0)
{
int32 EnableThreshold = CVarNetPacketOrderCorrectionEnableThreshold.GetValueOnAnyThread();
if (TotalOutOfOrderPackets >= EnableThreshold)
{
UE_LOG(LogNet, Verbose, TEXT("Hit threshold of %i 'out of order' packet sequences. Enabling out of order packet correction."), EnableThreshold);
int32 CacheSize = FMath::RoundUpToPowerOfTwo(CVarNetPacketOrderMaxCachedPackets.GetValueOnAnyThread());
PacketOrderCache.Emplace(CacheSize);
}
}
// Protect against replay attacks
// We already protect against this for reliable bunches, and unreliable properties
// The only bunch we would process would be unreliable RPC's, which could allow for replay attacks
// So rather than add individual protection for unreliable RPC's as well, just kill it at the source,
// which protects everything in one fell swoop
return;
}
这里会对PacketOrderCache成员变量做容量初始化,这个成员是一个循环队列的Optional,默认情况下是空值,只有在上面出现重复包的时候才会去初始化:
/** Buffer of partially read (post-PacketHandler) sequenced packets, which are waiting for a missing packet/sequence */
TOptional<TCircularBuffer<TUniquePtr<FBitReader>>> PacketOrderCache;
这个循环队列里存储的数据是TUniquePtr<FBitReader>,其实就是一个Packet的数据,代表一个乱序接收的包,所以这个成员变量主要是作为临时buffer来将乱序接收到的包重整为有序包使用。了解了这个成员变量的作用之后,再去回顾一下之前计算的PacketSequenceDelta>0的分支处理,代码的开头会去初始化一些变量:
static TAutoConsoleVariable<int32> CVarNetPacketOrderMaxMissingPackets(TEXT("net.PacketOrderMaxMissingPackets"), 3,
TEXT("The maximum number of missed packet sequences that is allowed, before treating missing packets as lost."));
const bool bPacketOrderCacheActive = !bFlushingPacketOrderCache && PacketOrderCache.IsSet();
const bool bCheckForMissingSequence = bPacketOrderCacheActive && PacketOrderCacheCount == 0;
const bool bFillingPacketOrderCache = bPacketOrderCacheActive && PacketOrderCacheCount > 0;
const int32 MaxMissingPackets = (bCheckForMissingSequence ? CVarNetPacketOrderMaxMissingPackets.GetValueOnAnyThread() : 0);
const int32 MissingPacketCount = PacketSequenceDelta - 1;
这里涉及到了太多的变量,需要先解释一下这些变量的用途:
bFlushingPacketOrderCache代表是否正在清空PacketOrderCache的连续包,目前我们可以把这个变量当作falsePacketOrderCacheCount代表PacketOrderCache的已占用槽位的个数bPacketOrderCacheActive代表目前能否使用PacketOrderCache来缓存乱序包bCheckForMissingSequence代表当前是否在检查丢失序列,成立条件为PacketOrderCache缓存激活且缓存为空bFillingPacketOrderCache代表目前是否在检查序列填充,成立条件为PacketOrderCache缓存激活且缓存不为空MaxMissingPackets代表最大能处理的中间丢失包的数量,默认为3MissingPacketCount代表当前包与期望收到的下一个包的序列号差值,为0代表就是按序接收的下一个包
了解完这些变量的用途之后,才能去跟进后续的逻辑。开头就会有一个大的条件判断,其实就是排除掉顺序接收以及乱序差值太大的情况,如果乱序太大则会直接认为丢包等待对端重传所有包,不再使用这个PacketOrderCache来存住当前乱序包:
// Cache the packet if we are already caching, and begin caching if we just encountered a missing sequence, within range
if (bFillingPacketOrderCache || (bCheckForMissingSequence && MissingPacketCount > 0 && MissingPacketCount <= MaxMissingPackets))
{
// 省略一些代码
return;
}
if (MissingPacketCount > 10)
{
UE_LOG(LogNetTraffic, Verbose, TEXT("High single frame packet loss. PacketsLost: %i %s" ), MissingPacketCount, *Describe());
}
InPacketsLost += MissingPacketCount;
InTotalPacketsLost += MissingPacketCount;
Driver->InPacketsLost += MissingPacketCount;
Driver->InTotalPacketsLost += MissingPacketCount;
InPacketId += PacketSequenceDelta;
PacketAnalytics.TrackInPacket(InPacketId, MissingPacketCount);
处理完这个if分支之后就会直接return,剩下的逻辑只会在MissingPacketCount=0 || MissingPacketCount > MaxMissingPackets的时候才会执行,只是做一些统计记录。
在这个if分支里,会执行PacketOrderCache的填充操作,这里会首先判断PacketOrderCache能否容下这个包,如果计算出来的LinearCacheIdx超限的话,则会校正到CacheCapacity - 1。
int32 LinearCacheIdx = PacketSequenceDelta - 1;
int32 CacheCapacity = PacketOrderCache->Capacity();
bool bLastCacheEntry = LinearCacheIdx >= (CacheCapacity - 1);
// The last cache entry is only set, when we've reached capacity or when we receive a sequence which is out of bounds of the cache
LinearCacheIdx = bLastCacheEntry ? (CacheCapacity - 1) : LinearCacheIdx;
这个PacketOrderCache循环数组的开头位置记录在PacketOrderCacheStartIdx,那么LinearCacheIdx偏移对应的位置就可以通过调用多次GetNextIndex计算出来:
int32 CircularCacheIdx = PacketOrderCacheStartIdx;
for (int32 LinearDec=LinearCacheIdx; LinearDec > 0; LinearDec--)
{
CircularCacheIdx = PacketOrderCache->GetNextIndex(CircularCacheIdx);
}
在获取最终的数组索引CircularCacheIdx之后,如果这个位置目前暂时没有数据,则创建当前包的数据的一个UniquePtr塞入到对应的位置里,如果这个位置已经有数据,说明乱序包重复了,直接忽略:
TUniquePtr<FBitReader>& CurCachePacket = PacketOrderCache.GetValue()[CircularCacheIdx];
// Reset the reader to its initial position, and cache the packet
if (!CurCachePacket.IsValid())
{
UE_LOG(LogNet, VeryVerbose, TEXT("'Out of Order' Packet Cache, caching sequence order '%i' (capacity: %i)"), LinearCacheIdx, CacheCapacity);
CurCachePacket = MakeUnique<FBitReader>(Reader);
PacketOrderCacheCount++;
ResetReaderMark.Pop(*CurCachePacket);
}
else
{
TotalOutOfOrderPackets++;
Driver->InOutOfOrderPackets++;
}
一旦一个包进入了这个乱序缓存数组,这个包就不会被立即处理,而是等待调用FlushPacketOrderCache来处理若干个上升序的包,这个函数会在ReceivePacket后被立即调用,同时也会在PostTick里被调用。FlushPacketOrderCache会使用ReceivedPacket来重新走一遍这些包的接收流程:
void UNetConnection::ReceivedRawPacket( void* InData, int32 Count )
{
// 省略很多代码
if (Reader.GetBitsLeft() > 0)
{
ReceivedPacket(Reader);
// Check if the out of order packet cache needs flushing
FlushPacketOrderCache();
}
}
void UNetConnection::PostTickDispatch()
{
if (!IsInternalAck())
{
#if DO_ENABLE_NET_TEST
ReinjectDelayedPackets();
#endif
FlushPacketOrderCache(/*bFlushWholeCache=*/true);
PacketAnalytics.Tick();
}
}
void UNetConnection::FlushPacketOrderCache(bool bFlushWholeCache/*=false*/)
{
if (PacketOrderCache.IsSet() && PacketOrderCacheCount > 0)
{
TCircularBuffer<TUniquePtr<FBitReader>>& Cache = PacketOrderCache.GetValue();
int32 CacheEndIdx = PacketOrderCache->GetPreviousIndex(PacketOrderCacheStartIdx);
bool bEndOfCacheSet = Cache[CacheEndIdx].IsValid();
bFlushingPacketOrderCache = true;
// If the end of the cache has had its value set, this forces the flushing of the whole cache, no matter how many missing sequences there are.
// The reason for this (other than making space in the cache), is that when we receive a sequence that is out of range of the cache,
// it is stored at the end, and so the cache index no longer lines up with the sequence number - which it needs to.
bFlushWholeCache = bFlushWholeCache || bEndOfCacheSet;
while (PacketOrderCacheCount > 0)
{
TUniquePtr<FBitReader>& CurCachePacket = Cache[PacketOrderCacheStartIdx];
if (CurCachePacket.IsValid())
{
UE_LOG(LogNet, VeryVerbose, TEXT("'Out of Order' Packet Cache, replaying packet with cache index: %i (bFlushWholeCache: %i)"), PacketOrderCacheStartIdx, (int32)bFlushWholeCache);
ReceivedPacket(*CurCachePacket.Get());
CurCachePacket.Reset();
PacketOrderCacheCount--;
}
// Advance the cache only up to the first missing packet, unless flushing the whole cache
else if (!bFlushWholeCache)
{
break;
}
PacketOrderCacheStartIdx = PacketOrderCache->GetNextIndex(PacketOrderCacheStartIdx);
}
bFlushingPacketOrderCache = false;
}
}
注意这里即使包的序号不连续也是直接处理,即如果当前InSeq为10,且PacketOrderCache里的数据包编号为12, 14,那么12,14这两个包会被ReceivedPacket依次处理,而不是必须等待11, 13这两个包填充到PacketOrderCache。所以这里的PacketOrderCache的作用是对一些乱序接收到的包做一下临时缓存,避免已经接收到的包被丢弃。如果PacketOrderCache没有被启用,那么如果先接收到14,后接收到12,会导致14包先被处理,然后处理12包的时候发现是14包的以前的包,直接忽略,等待后续的重传。
如果是顺序接收MissingPacketCount=0的话,则不会进入这个大的条件判断,而是直接执行后续的处理:
// Lambda to dispatch delivery notifications,
auto HandlePacketNotification = [&Header, &ChannelsToClose, this](FNetPacketNotify::SequenceNumberT AckedSequence, bool bDelivered)
{
// Increase LastNotifiedPacketId, this is a full packet Id
++LastNotifiedPacketId;
++OutTotalNotifiedPackets;
Driver->IncreaseOutTotalNotifiedPackets();
// Sanity check
if (FNetPacketNotify::SequenceNumberT(LastNotifiedPacketId) != AckedSequence)
{
CLOSE_CONNECTION_DUE_TO_SECURITY_VIOLATION(this, ESecurityEvent::Malformed_Packet, TEXT("LastNotifiedPacketId != AckedSequence"));
return;
}
if (bDelivered)
{
ReceivedAck(LastNotifiedPacketId, ChannelsToClose);
}
else
{
ReceivedNak(LastNotifiedPacketId);
};
};
// Update incoming sequence data and deliver packet notifications
// Packet is only accepted if both the incoming sequence number and incoming ack data are valid
PacketNotify.Update(Header, HandlePacketNotification);
这里的PacketNotify.Update会解析对方发送过来的包接收状态数组,并按照包序号来顺序调用上面的HandlePacketNotification,在HandlePacketNotification里会根据解析到的包是否被确认bDelivered来分别执行确认接收ReceiveAck还是确认丢失ReceiveNak:
template<class Functor>
FNetPacketNotify::SequenceNumberT::DifferenceT FNetPacketNotify::Update(const FNotificationHeader& NotificationData, Functor&& InFunc)
{
const SequenceNumberT::DifferenceT InSeqDelta = GetSequenceDelta(NotificationData);
if (InSeqDelta > 0)
{
UE_LOG_PACKET_NOTIFY(TEXT("FNetPacketNotify::Update - Seq %u, InSeq %u"), NotificationData.Seq.Get(), InSeq.Get());
ProcessReceivedAcks(NotificationData, InFunc);
// accept sequence
InSeq = NotificationData.Seq;
return InSeqDelta;
}
else
{
return 0;
}
}
在FNetPacketNotify::Update就是真正的执行遍历传入的包接收状态数组的地方,在这个函数里首先根据传入的包确认序列号NotificationData.AckedSeq与之前记录的已经被确认收到的序列号OutAckSeq做比较,生成的差值AckCount会首先被UpdateInAckSeqAck用来更新InAckSeqAck为NotificationData.AckedSeq,这个UpdateInAckSeqAck其实就是从AckRecord数组里找到NotificationData.AckedSeq这个序号的包发送时顺带携带的ACK序列号,读者可以回顾一下UpdateInAckSeqAck的部分:
template<class Functor>
void FNetPacketNotify::ProcessReceivedAcks(const FNotificationHeader& NotificationData, Functor&& InFunc)
{
if (NotificationData.AckedSeq > OutAckSeq)
{
UE_LOG_PACKET_NOTIFY(TEXT("Notification::ProcessReceivedAcks - AckedSeq: %u, OutAckSeq: %u"), NotificationData.AckedSeq.Get(), OutAckSeq.Get());
SequenceNumberT::DifferenceT AckCount = SequenceNumberT::Diff(NotificationData.AckedSeq, OutAckSeq);
// Update InAckSeqAck used to track the needed number of bits to transmit our ack history
InAckSeqAck = UpdateInAckSeqAck(AckCount, NotificationData.AckedSeq);
// ExpectedAck = OutAckSeq + 1
SequenceNumberT CurrentAck(OutAckSeq);
++CurrentAck;
// Warn if the received sequence number is greater than our history buffer, since if that is the case we have to treat the data as lost.
if (AckCount > (SequenceNumberT::DifferenceT)(SequenceHistoryT::Size))
{
UE_LOG_PACKET_NOTIFY_WARNING(TEXT("Notification::ProcessReceivedAcks - Missed Acks: AckedSeq: %u, OutAckSeq: %u, FirstMissingSeq: %u Count: %u"), NotificationData.AckedSeq.Get(), OutAckSeq.Get(), CurrentAck.Get(), AckCount - (SequenceNumberT::DifferenceT)(SequenceHistoryT::Size));
}
// Everything not found in the history buffer is treated as lost
while (AckCount > (SequenceNumberT::DifferenceT)(SequenceHistoryT::Size))
{
--AckCount;
InFunc(CurrentAck, false);
++CurrentAck;
}
// For sequence numbers contained in the history we lookup the delivery status from the history
while (AckCount > 0)
{
--AckCount;
UE_LOG_PACKET_NOTIFY(TEXT("Notification::ProcessReceivedAcks Seq: %u - IsAck: %u HistoryIndex: %u"), CurrentAck.Get(), NotificationData.History.IsDelivered(AckCount) ? 1u : 0u, AckCount);
InFunc(CurrentAck, NotificationData.History.IsDelivered(AckCount));
++CurrentAck;
}
OutAckSeq = NotificationData.AckedSeq;
}
}
接下来会从传入的历史包接收状态数组里NotificationData.History获取之前的多个包的接收状态,由于NotificationData.History这个数组最大只能容纳256个元素,所以对于太老的无法在NotificationData.History里记录的包,就直接认为已经丢失,因此这里会执行InFunc(CurrentAck, false),这里的false就代表这个包丢失了。接下来就可以使用IsDelivered(AckCount)来获取CurrentAck对应包在NotificationData.History里记录的接收状态,并执行对应的InFunc。
对于汇报过来的丢失的Packet, 会遍历所有的Channel找到这个Packet里包含的所有Bunch,触发重新发送,此时SendRawBunch发送出去的Bunch会分配一个新的PacketId,不会使用之前的老PacketId:
//接收到另外一端反馈的丢包packetId
void UNetConnection::ReceivedNak( int32 NakPacketId )
{
auto NakChannelFunc = [this](int32 NackedPacketId, uint32 ChannelIndex)
{
UChannel* const Channel = Channels[ChannelIndex];
if (Channel)
{
Channel->ReceivedNak(NackedPacketId);
if (Channel->OpenPacketId.InRange(NackedPacketId))
{
Channel->ReceivedAcks(); //warning: May destroy Channel.
}
}
};
// Invoke NakChannelFunc on all channels written for this PacketId
FChannelRecordImpl::ConsumeChannelRecordsForPacket(ChannelRecord, NakPacketId, NakChannelFunc);
}
void UChannel::ReceivedNak( int32 NakPacketId )
{
// 触发重传
for( FOutBunch* Out=OutRec; Out; Out=Out->Next )
{
// Retransmit reliable bunches in the lost packet.
if( Out->PacketId==NakPacketId && !Out->ReceivedAck )
{
check(Out->bReliable);
UE_LOG(LogNetTraffic, Log, TEXT(" Channel %i nak); resending %i..."), Out->ChIndex, Out->ChSequence );
Connection->SendRawBunch( *Out, 0 );
}
}
}
这里的OutRec就是之前在发送可靠Bunch的时候维护的可靠Bunch有序列表,这个列表会按照ChSequence的递增序号排列。注意这里的ChSequence的类型是int32,所以不需要考虑序列号的回环问题。但是在组包的时候为了降低要发送的数据流量,这里会只打包这个序列号对1024的取模结果,也就是说只写入这个int32的低10bit的数据:
enum { MAX_CHSEQUENCE = 1024 }; // Power of 2 >RELIABLE_BUFFER, covering loss/misorder time.
void FBitWriter::WriteIntWrapped(uint32 Value, uint32 ValueMax)
{
// 直接按 LengthBits 写入 Value 的低位,不做 Value < ValueMax 的断言/修正
const int32 LengthBits = FMath::CeilLogTwo(ValueMax);
if (AllowAppend(LengthBits))
{
uint32 NewValue = 0;
for (uint32 Mask=1; NewValue+Mask < ValueMax && Mask; Mask*=2, Num++)
{
if (Value & Mask)
{
Buffer[Num>>3] += GShift[Num&7];
NewValue += Mask;
}
}
}
}
int32 UNetConnection::SendRawBunch(FOutBunch& Bunch, bool InAllowMerge, const FNetTraceCollector* BunchCollector)
{
// 省略很多代码
if (Bunch.bReliable && !IsInternalAck())
{
SendBunchHeader.WriteIntWrapped(Bunch.ChSequence, MAX_CHSEQUENCE);
}
}
对应的在接收到这个可靠Bunch的时候,会读取写入的10bit整数作为当前ChSequence的低10bit,然后根据当前已经顺序接收到的最大序列号InReliable[Bunch.ChIndex]来计算这个Bunch的ChSequence的完整32bit:
// Return the value of Max/2 <= Value-Reference+some_integer*Max < Max/2.
inline int32 BestSignedDifference( int32 Value, int32 Reference, int32 Max )
{
return ((Value-Reference+Max/2) & (Max-1)) - Max/2;
}
inline int32 MakeRelative( int32 Value, int32 Reference, int32 Max )
{
return Reference + BestSignedDifference(Value,Reference,Max);
}
void UNetConnection::ReceivedPacket( FBitReader& Reader, bool bIsReinjectedPacket)
{
// 省略很多代码
if ( Bunch.bReliable )
{
if ( IsInternalAck() )
{
// We can derive the sequence for 100% reliable connections
Bunch.ChSequence = InReliable[Bunch.ChIndex] + 1;
}
else
{
// If this is a reliable bunch, use the last processed reliable sequence to read the new reliable sequence
Bunch.ChSequence = MakeRelative( Reader.ReadInt( MAX_CHSEQUENCE ), InReliable[Bunch.ChIndex], MAX_CHSEQUENCE );
}
}
}
对于确认接收到的Packet,会执行UNetConnection::ReceivedAck,这里会遍历所有的Channel,获取这个Packet里对应的所有Bunch,并将Bunch.ReceivedAck设置为1:
void UNetConnection::ReceivedAck(int32 AckPacketId, FChannelsToClose& OutChannelsToClose)
{
UE_LOG(LogNetTraffic, Verbose, TEXT(" Received ack %i"), AckPacketId);
auto AckChannelFunc = [this, &OutChannelsToClose](int32 AckedPacketId, uint32 ChannelIndex)
{
UChannel* const Channel = Channels[ChannelIndex];
if (Channel)
{
if (Channel->OpenPacketId.Last == AckedPacketId) // Necessary for unreliable "bNetTemporary" channels.
{
Channel->OpenAcked = 1;
}
for (FOutBunch* OutBunch = Channel->OutRec; OutBunch; OutBunch = OutBunch->Next)
{
if (OutBunch->PacketId == AckedPacketId)
{
OutBunch->ReceivedAck = 1;
}
}
Channel->ReceivedAck(AckedPacketId);
EChannelCloseReason CloseReason;
if (Channel->ReceivedAcks(CloseReason))
{
const FChannelCloseInfo Info = {ChannelIndex, CloseReason};
OutChannelsToClose.Emplace(Info);
}
}
};
// Invoke AckChannelFunc on all channels written for this PacketId
FChannelRecordImpl::ConsumeChannelRecordsForPacket(ChannelRecord, AckPacketId, AckChannelFunc);
}
void UChannel::ReceivedAck( int32 AckPacketId )
{
// Do nothing. Most channels deal with this in Tick().
}
但是这里的ReceivedAck其实什么都没做,利用这个ReceivedAck字段的地方在后面调用的UChannel::ReceivedAcks里,这个函数会遍历这个OutRec链表里开头的所有已经标记为ReceivedAck==1的Bunch,执行delete来释放这个Bunch的内存,因为这个Bunch的数据已经被确认接收了,不会再触发重传,可以释放了:
bool UChannel::ReceivedAcks(EChannelCloseReason& OutCloseReason)
{
check(Connection->Channels[ChIndex]==this);
/*
// Verify in sequence.
for( FOutBunch* Out=OutRec; Out && Out->Next; Out=Out->Next )
check(Out->Next->ChSequence>Out->ChSequence);
*/
// Release all acknowledged outgoing queued bunches.
bool bCleanup = false;
EChannelCloseReason CloseReason = EChannelCloseReason::Destroyed;
while( OutRec && OutRec->ReceivedAck )
{
if (OutRec->bOpen)
{
// 忽略openbunch的处理
}
bCleanup = bCleanup || !!OutRec->bClose;
if (OutRec->bClose)
{
CloseReason = OutRec->CloseReason;
}
FOutBunch* Release = OutRec;
OutRec = OutRec->Next;
delete Release;
NumOutRec--;
}
// 忽略一些代码
return false;
}
前面的内容都是在处理Packet里携带的ACK, 处理完ACK之后还需要处理Packet里的所有Bunch数据。之前在消息接收小结中介绍了Bunch接收逻辑在UChannel::ReceivedRawBunch里。由于之前我们已经介绍过顺序接收到Bunch的处理细节,因此这里只需要关心可靠Bunch的乱序接收处理逻辑:
void UChannel::ReceivedRawBunch( FInBunch & Bunch, bool & bOutSkipAck )
{
// 省略一些代码
if ( Bunch.bReliable && Bunch.ChSequence != Connection->InReliable[ChIndex] + 1 )
{
// We shouldn't hit this path on 100% reliable connections
check( !Connection->IsInternalAck() );
// If this bunch has a dependency on a previous unreceived bunch, buffer it.
checkSlow(!Bunch.bOpen);
// Verify that UConnection::ReceivedPacket has passed us a valid bunch.
check(Bunch.ChSequence>Connection->InReliable[ChIndex]);
// Find the place for this item, sorted in sequence.
UE_LOG(LogNetTraffic, Log, TEXT(" Queuing bunch with unreceived dependency: %d / %d"), Bunch.ChSequence, Connection->InReliable[ChIndex]+1 );
FInBunch** InPtr;
for( InPtr=&InRec; *InPtr; InPtr=&(*InPtr)->Next )
{
if( Bunch.ChSequence==(*InPtr)->ChSequence )
{
// Already queued.
return;
}
else if( Bunch.ChSequence<(*InPtr)->ChSequence )
{
// Stick before this one.
break;
}
}
FInBunch* New = new FInBunch(Bunch);
New->Next = *InPtr;
*InPtr = New;
NumInRec++;
if ( NumInRec >= RELIABLE_BUFFER )
{
Bunch.SetError();
UE_LOG( LogNetTraffic, Error, TEXT( "UChannel::ReceivedRawBunch: Too many reliable messages queued up" ) );
return;
}
checkSlow(NumInRec<=RELIABLE_BUFFER);
//AssertInSequenced();
}
// 省略一些代码
}
这里的逻辑其实就是从InRec这个有序Bunch接收列表里插入当前的Bunch,使得InRec这个列表里的Bunch都按照ChSequence字段上升序排列。这里InRec里最多缓存255个Bunch数据,超过了这个限制则会报错。
后面如果接收到了一个可以处理的可靠Bunch,也就是Bunch.ChSequence == Connection->InReliable[ChIndex] + 1,那么在处理这个新Bunch的时候,会在ReceivedNextBunch更新Connection->InReliable[ChIndex]++,然后再使用while循环来遍历InRec这个缓存链表里所有与Connection->InReliable[ChIndex]连号的数据:
void UChannel::ReceivedRawBunch( FInBunch & Bunch, bool & bOutSkipAck )
{
// 省略一些代码
if ( Bunch.bReliable && Bunch.ChSequence != Connection->InReliable[ChIndex] + 1 )
{
// 省略一些代码
}
else
{
bool bDeleted = ReceivedNextBunch( Bunch, bOutSkipAck );
if ( Bunch.IsError() )
{
UE_LOG( LogNetTraffic, Error, TEXT( "UChannel::ReceivedRawBunch: Bunch.IsError() after ReceivedNextBunch 1" ) );
return;
}
if (bDeleted)
{
return;
}
// Dispatch any waiting bunches.
while( InRec )
{
// We shouldn't hit this path on 100% reliable connections
check( !Connection->IsInternalAck() );
if( InRec->ChSequence!=Connection->InReliable[ChIndex]+1 )
break;
UE_LOG(LogNetTraffic, Log, TEXT(" Channel %d Unleashing queued bunch"), ChIndex );
FInBunch* Release = InRec;
InRec = InRec->Next;
NumInRec--;
// Just keep a local copy of the bSkipAck flag, since these have already been acked and it doesn't make sense on this context
// Definitely want to warn when this happens, since it's really not possible
bool bLocalSkipAck = false;
bDeleted = ReceivedNextBunch( *Release, bLocalSkipAck );
if ( bLocalSkipAck )
{
UE_LOG( LogNetTraffic, Warning, TEXT( "UChannel::ReceivedRawBunch: bLocalSkipAck == true for already acked packet" ) );
}
if ( Bunch.IsError() )
{
UE_LOG( LogNetTraffic, Error, TEXT( "UChannel::ReceivedRawBunch: Bunch.IsError() after ReceivedNextBunch 2" ) );
return;
}
delete Release;
if (bDeleted)
{
return;
}
//AssertInSequenced();
}
}
}
遍历这个InRec链表的时候,如果发现是下一个期望处理的可靠Bunch,则使用ReceivedNextBunch来处理并更新Connection->InReliable[ChIndex]。如果发现连号中断,也就是InRec->ChSequence!=Connection->InReliable[ChIndex]+1,那么就可以中止遍历了。
流量控制
由于OutRec链表的最大大小被限制为了RELIABLE_BUFFER,所以在UChannel::SendBunch( FOutBunch* Bunch, bool Merge )发送数据执行完拆包之后,会检查这个OutRec链表是否能继续发送当前的可靠包,如果会超出RELIABLE_BUFFER的限制,则会导致连接中断:
enum { RELIABLE_BUFFER = 256 }; // Power of 2 >= 1.
FPacketIdRange UChannel::SendBunch( FOutBunch* Bunch, bool Merge )
{
// 前面的代码负责将Bunch执行可能的拆包操作,并最终放到OutgoingBunches数组里
FPacketIdRange PacketIdRange;
const bool bOverflowsReliable = (NumOutRec + OutgoingBunches.Num() >= RELIABLE_BUFFER + Bunch->bClose);
if ((GCVarNetPartialBunchReliableThreshold > 0) && (OutgoingBunches.Num() >= GCVarNetPartialBunchReliableThreshold) && !Connection->IsInternalAck())
{
if (!bOverflowsReliable)
{
UE_LOG(LogNetPartialBunch, Log, TEXT(" OutgoingBunches.Num (%d) exceeds reliable threashold (%d). Making bunches reliable. Property replication will be paused on this channel until these are ACK'd."), OutgoingBunches.Num(), GCVarNetPartialBunchReliableThreshold);
Bunch->bReliable = true;
bPausedUntilReliableACK = true;
}
else
{
// The threshold was hit, but making these reliable would overflow the reliable buffer. This is a problem: there is just too much data.
UE_LOG(LogNetPartialBunch, Warning, TEXT(" OutgoingBunches.Num (%d) exceeds reliable threashold (%d) but this would overflow the reliable buffer! Consider sending less stuff. Channel: %s"), OutgoingBunches.Num(), GCVarNetPartialBunchReliableThreshold, *Describe());
}
}
if (Bunch->bReliable && bOverflowsReliable)
{
UE_LOG(LogNetPartialBunch, Warning, TEXT("SendBunch: Reliable partial bunch overflows reliable buffer! %s"), *Describe() );
UE_LOG(LogNetPartialBunch, Warning, TEXT(" Num OutgoingBunches: %d. NumOutRec: %d"), OutgoingBunches.Num(), NumOutRec );
PrintReliableBunchBuffer();
// Bail out, we can't recover from this (without increasing RELIABLE_BUFFER)
FString ErrorMsg = NSLOCTEXT("NetworkErrors", "ClientReliableBufferOverflow", "Outgoing reliable buffer overflow").ToString();
FNetControlMessage<NMT_Failure>::Send(Connection, ErrorMsg);
Connection->FlushNet(true);
Connection->Close();
return PacketIdRange;
}
// 后面的代码负责执行这些拆分好的Bunch的发送SendRawBunch
}
这里有一段比较特殊的逻辑,就是如果当前要发送的Bunch是非可靠Bunch且切分之后的PartialBunch数量超过了配置的GCVarNetPartialBunchReliableThreshold,就会将这些非可靠Bunch转化为可靠Bunch,当然这个的前提是变成可靠Bunch之后不会导致OutRec链表超出RELIABLE_BUFFER的限制。这里还会设置bPausedUntilReliableACK = true,这个字段的作用是暂停所有Actor属性复制的Diff,直到接收到所有发送出去的可靠包的ACK:
uint32 bPausedUntilReliableACK:1; // Unreliable property replication is paused until all reliables are ack'd.
int64 UActorChannel::ReplicateActor()
{
SCOPE_CYCLE_COUNTER(STAT_NetReplicateActorTime);
// 省略很多的代码
if (bPausedUntilReliableACK)
{
if (NumOutRec > 0)
{
return 0;
}
bPausedUntilReliableACK = 0;
UE_LOG(LogNet, Verbose, TEXT("ReplicateActor: bPausedUntilReliableACK is ending now that reliables have been ACK'd. %s"), *Describe());
}
// 省略很多的代码
}
所以UE里的流量控制是基于可靠Bunch的,非可靠Bunch只是简单的放到OutgoingBunches数组里等待发送,不会影响到可靠Bunch的流量控制。但是一旦发现可靠Bunch的未ACK数量太多,则会通过中止Actor的属性同步的方式来降低非可靠Bunch的发送频率。因为可靠Bunch是不能丢弃的,而属性同步是基于Diff的,停止一段时间属性同步之后再重新开始Diff不会影响客户端的属性正确性。
数据序列化与RPC
业务数据包的逻辑处理
在前一章中我们介绍了游戏服务器中基础的网络通信是如何实现的,在完成了网络通信之后,业务逻辑层只需要考虑业务数据包的发送和接收,而不需要再去关心底层网络的封包、解包、加密、可靠性等各种问题。但是,此时业务层对接的数据包信息含量还是太低了,只有一个std::string,至于这个数据包内所包含的内容含义,还需要业务层自己做一层数据格式封装。最简单的封装莫过于在这个数据包的前四个字节填充这个数据包的类型,此时网络层对业务逻辑开放的接口则简化为了下面的代码:
struct packet
{
std::uint32_t cmd;
std::string detail;
};
void send_packet(const packet& out_packet);
void handle_packet(const packet& in_packet);
业务逻辑里的每一条指令负责自己将所要传递的数据封装为packet格式,同时接收端要能够对等的通过cmd将数据投递到相应的处理函数,处理函数要知道如何解析这个数据包。在逻辑层整个数据编码、指令路由、数据解码的全套过程等价于实现一个RPC(Remote Procedure Call)。下面我们来展示一个最简单的RPC的例子:
enum rpc_cmd
{
req_auth = 1,
res_auth = 2,
};
// 客户端调用try_auth接口 提供账户名和密码来进行鉴权
// 函数逻辑内部负责将 (rpc_cmd::send_auth_req, (name ,passwd))这两元组进行编码 并调用网络接口进行发送
void send_auth_req(const std::string& name, const std::string& passwd)
{
packet cur_packet;
cur_packet.cmd = uint32_t(rpc_cmd::req_auth);
cur_packet.detail = encode(name, passwd);
send_packet(cur_packet);
}
// 服务器处理业务指令包的函数,对业务包 进行分发
void server_handle_msg(const std::uint32& cmd, const std::string& detail)
{
if(cmd == int32_t(rpc_cmd::req_auth))
{
std::string name, passwd;
std::string auth_res;
bool decode_suc = decode(detail, name, passwd);
if(!decode_suc)
{
auth_res = "decode fail";
}
else
{
// 数据库检查账户密码是否匹配
auth_res = db_try_auth(name, passwd);
}
packet cur_packet;
cur_packet.cmd = uint32_t(rpc_cmd::res_auth);
cur_packet.detail = encode(auth_res);
send_packet(cur_packet);
}
}
// 客户端处理业务指令包的函数,对业务包 进行分发
void client_handle_msg(const std::uint32& cmd, const std::string& detail)
{
if(cmd == int32_t(rpc_cmd::res_auth))
{
std::string auth_res;
bool decode_suc = decode(detail, auth_res);
if(!decode_suc)
{
auth_res = "decode fail";
}
if(auth_res.empty())
{
// 走后续的登录流程
}
}
}
上面的代码中完全忽略掉了网络层的收发packet实现,客户端和服务端的包分发函数都通过cmd字段来一一分发具体的数据包逻辑。业务逻辑非常清晰,但美中不足的是我们这里没有提供一个具体的encode,decode数据包内容的实现,而这部分则是数据序列化的范畴。同时这种通过handle_msg函数来集中式处理所有数据包的形式在面对海量的数据包类型时凸显了其不可维护的缺陷,每次添加一个新的RPC指令都需要写一大段类似的decode后再继续处理的逻辑。为了减轻这种维护性负担我们需要采用某种RPC注册的框架来自动对RPC数据进行路由和解包。
基于Json的RPC
封装JSON序列化接口
目前网络上流行最广的数据容器就是Javascript语言里定义的JSON(JavaScript Object Notation),JSON内部可以包含如下五种数据:
null,代表无数据- 布尔类型,对应
bool - 整数类型,对应
std::int64_t - 浮点类型,对应
double - 字符串,对应
std::string - 数组类型,对应
std::vector<json> - 字典类型,对应
std::map<std::string, json>
有了上述类型,基本可以表示业务逻辑所需数据。这里需要注意的一点是Json标准是不支持int64这么大的数字的,它最大只支持到,如果超过最大值可能会导致Json的解析出错误。不过这种问题基本只会在javascript语言里出现,如果数据交换的两端都是以cpp实现的,现有的主流的json cpp库基本都可以支持到numeric_limits<std::int64_t>::max()和对应的min。这里我才用使用最广且易用性最强的nlohmann::json来作为mosaic_game的json序列化库。
指定了json序列化库之后,我们开始来实现之前引用到的encode,decode函数,由于这两个函数能够支持各种类型的参数,所以我们将这两个函数实现为变参模板函数。
template <typename T>
json encode_impl(const T& arg);
template <typename... Args>
json encode_multi(const Args&... args);
template <typename... Args>
std::string encode(const Args&... args)
{
if constexpr(sizeof...(Args) == 0)
{
return "null";
}
if constexpr(sizeof...(Args) == 1)
{
return encode_impl<Args>(args).to_string();
}
return encode_multi<Args...>(args).to_string();
}
template <typename T>
bool decode_impl(const json& data, T& dest);
template <typename... Args>
bool decode_multi(const json& data, Args&... args);
template<typename... Args>
bool decode(const std::string& data, Args&... args)
{
if(!json::accept(data))
{
return false;
}
auto temp_j = json::parse(data);
if constexpr(sizeof...(Args) == 0)
{
return true;
}
if constexpr(sizeof...(Args) == 1)
{
return decode_impl<Args>(temp_j, args);
}
return decode_multi<Args...>(temp_j, args);
}
由于decode_impl基本等价于encode_impl的逆操作,所以这里只详细介绍encode_impl的实现。对于json规范中规定的物种基本类型,encode_impl分别进行了特化,直接返回原始数据对应的json。对于STL里规定的相关类型,按照类型的具体语义进行特化:
// forward declare
template <typename T>
json encode_impl(const std::optional<T>& data); // data有效则返回encode_impl<T> 否则返回bull
template <typename T>
json encode_impl(const std::vector<T>& data); // 构造一个json vector 然后遍历每个元素调用encode_impl<T>进行push_back
template <typename T1, typename T2>
json encode_impl(const std::pair<T1, T2>& data); //构造两个元素的json vector 分别调用encode_impl<T1> encode_impl<T2>来填充0, 1 两个元素
template <typename T1, std::size_t T2>
json encode_impl(const std::array<T1, T2>& data); // 等价于调用encode_impl<std::vector<T>>()
template <typename... args>
json encode_impl(const std::tuple<args...>& data); // 构造一个json vector 然后对data里每个元素调用encode_impl<args>然后执行push_back
template <typename... Args>
json encode_impl(const std::variant<Args...>& data); // 如果没有有效数据则返回null 否则返回对应具体类型的encode_impl<T>
template <typename T1, typename T2>
json encode_impl(const std::map<T1, T2>& data); // 如果T1是string 则构造一个json object进行序列化,否则当作std::vector<std::pair<T1, T2>>来encode_impl
template <typename T1, typename T2>
json encode_impl(const std::unordered_map<T1, T2>& data); // 当作std::vector<std::pair<T1, T2>>来encode_impl
template <typename T>
json encode_impl(const std::unordered_map<std::string, T>& data); // 构造一个json object进行序列化
template <typename T1, typename T2>
json encode_impl(const std::multimap<T1, T2>& data); // 当作std::vector<std::pair<T1, T2>>来encode_impl
template <typename T1, typename T2>
json encode_impl(const std::unordered_multimap<T1, T2>& data); // 当作std::vector<std::pair<T1, T2>>来encode_impl
template <typename T1>
json encode_impl(const std::set<T1>& data); // 当作std::vector<T1>来encode_impl
template <typename T1>
json encode_impl(const std::unordered_set<T1>& data);// 当作std::vector<T1>来encode_impl
template <typename T1>
json encode_impl(const std::multiset<T1>& data);// 当作std::vector<T1>来encode_impl
template <typename T1>
json encode_impl(const std::unordered_multiset<T1>& data);// 当作std::vector<T1>来encode_impl
template <typename... Args>
json encode_multi(const Args&... args); // 构造一个json vector 遍历args里所有元素进行encode_impl 后push_back
完成了encode的逻辑之后,将对应类型的encode_impl操作进行逆操作即可实现decode_impl,这里就不再赘述。
Json RPC的注册
开头的样例RPC代码中,所有的RPC处理都需要在server_handle_msg, client_handle_msg中加入若干行反序列化代码再转接到真正处理对应RPC的业务函数。随着RPC数量的增多,多人同时编辑此函数导致了维护性急剧下降,为解决这个问题,我们将转向注册制的RPC处理:
class rpc_handler
{
std::unordered_map<std::string, std::function<void(const json&)>> m_registered_rpcs;
void handle_rpc(const std::string& cmd, const std::string& detail)
{
auto temp_iter = g_registered_rpcs.find(cmd);
if(temp_iter == g_registered_rpcs.end())
{
return;
}
if(!json::accept(detail))
{
return;
}
temp_iter->second()(json::parse(detail));
}
void register_rpc(const std::string& cmd, std::function<void(const json&)> cmd_handler)
{
assert(g_registered_rpcs.find(cmd) == g_registered_rpcs.end());
m_registered_rpcs[cmd] = cmd_handler;
}
};
我们采取类似于上面的rpc_handler类型来处理rpc的注册与分发,与此同时修改rpc_cmd的类型从enum改为std::string。这样新添加任意一个RPC都不需要修改公共的文件,只需要在对应RPC逻辑的cpp文件中调用对应的register_rpc函数即可。这种设计极大的减轻了RPC框架维护的心智负担。
void handle_auth_req(const std::string& name, const std::string& passwd);
g_rpc_handler.register_rpc("auth_req", [](const json& data)
{
std::string name, passwd;
if(!decode(data, name, passwd))
{
return;
}
handle_auth_req(name, passwd);
});
基于Schema的RPC
在前面一节内容中我们基于Json序列化和注册机制实现了一个非常简单易用的RPC框架,这个框架极大的减轻了RPC处理代码编写逻辑复杂度,但是每个RPC都需要手动编写胶水代码进行注册这种形式仍然有很大的改进空间。如果想避免掉手写注册代码这种繁杂劳动,我们可以求助于一些基于Schema的RPC框架,即通过某种接口描述语言(IDL-Interface Description Language)来描述所有的RPC接口规范,然后使用框架附带的工具自动生成多种语言的序列化、反序列化、接口注册、接口分发等相关代码,使得使用者可以完全不考虑框架内部细节,只需要关心业务逻辑。目前主流的基于Schema的RPC框架主要有Google出品的grpc和FaceBook出品的Thrift,下面我们分别来介绍。
grpc
grpc的IDL使用的是Google开源的protobuf格式。protobuf是一个跨语言、跨平台的序列化协议,下面是一个非常简单的基于protobuf的消息格式声明:
message SearchRequest {
string query = 1;
int32 page_number = 2; // Which page number do we want?
int32 results_per_page = 3; // Number of results to return per page.
}
上面的结构体中,每个字段的左边都有其类型说明符,右边则带有一个从1开始计数的不重复编号。protobuf对于基础数据类型的支持与Json类似,但是对于int64,uint64的支持则是全范围的。对于复杂类型的支持,protobuf比Json更完善一些,提供了如下四种:
optional可空描述符,代表该字段在具体的消息中不一定存在对应的数据repeated数组描述符,代表该字段其实是一个数组,等价于Json::Vectormap<K,V>字典描述符,代表该字段是一个字典,这里对于K的类型并没有像Json一样限定为stringenum枚举描述符,对应cpp的一个枚举类
下面的代码片段展示了protobuf对于这些容器类型数据结构的支持样例:
message Person {
optional string name = 1;
optional int32 id = 2;
optional string email = 3;
enum PhoneType {
PHONE_TYPE_UNSPECIFIED = 0;
PHONE_TYPE_MOBILE = 1;
PHONE_TYPE_HOME = 2;
PHONE_TYPE_WORK = 3;
}
message PhoneNumber {
optional string number = 1;
optional PhoneType type = 2 [default = PHONE_TYPE_HOME];
}
repeated PhoneNumber phones = 4;
}
message AddressBook {
repeated Person people = 1;
}
有了消息结构的声明之后,我们可以使用protobuf自带的预处理工具protoc来生成各种语言版本的胶水代码。这里我们使用一个包含上面的Person的文件作为输入:
protoc -I=$SRC_DIR --cpp_out=$DST_DIR $SRC_DIR/xxx.proto
protoc --cpp_out=. person.proto
在这个指令执行之后,会在当前目录下生成person.pb.h与person.pb.cc两个文件,h文件作为接口文件,cc文件作为实现文件。上面短短的消息声明触发生成的两个文件包含了近2000行不会有人想去读的代码,以此为代价换来的是接口的全面。不过对于用户而言,在Person类上只关心这么几个接口就行:
// name
inline bool has_name() const;
inline void clear_name();
inline const ::std::string& name() const;
inline void set_name(const ::std::string& value);
inline void set_name(const char* value);
inline ::std::string* mutable_name();
// id
inline bool has_id() const;
inline void clear_id();
inline int32_t id() const;
inline void set_id(int32_t value);
// email
inline bool has_email() const;
inline void clear_email();
inline const ::std::string& email() const;
inline void set_email(const ::std::string& value);
inline void set_email(const char* value);
inline ::std::string* mutable_email();
// phones
inline int phones_size() const;
inline void clear_phones();
inline const ::google::protobuf::RepeatedPtrField< ::tutorial::Person_PhoneNumber >& phones() const;
inline ::google::protobuf::RepeatedPtrField< ::tutorial::Person_PhoneNumber >* mutable_phones();
inline const ::tutorial::Person_PhoneNumber& phones(int index) const;
inline ::tutorial::Person_PhoneNumber* mutable_phones(int index);
inline ::tutorial::Person_PhoneNumber* add_phones();
上面的代码里包含了一般用户使用的所有相关字段的get,set接口,此外在这个类型继承的基类上则提供了序列化与反序列化的接口:
bool SerializeToString(string* output) const;
bool ParseFromString(const string& data);
其序列化接口生成的字符串是一个二进制字符串,不像Json生成的是一个人机皆可读的文本字符串。采用二进制进行编码的好处就是使序列化之后的数据长度更少,这样在网络上传递这些消息时所需的带宽就会降低很多。
protobuf不仅仅能声明消息结构,还支持声明RPC服务接口,下面是一个最简单的使用其IDL声明RPC接口的样例:
// The greeter service definition.
service Greeter {
// Sends a greeting
rpc SayHello (HelloRequest) returns (HelloReply) {}
}
// The request message containing the user's name.
message HelloRequest {
string name = 1;
}
// The response message containing the greetings
message HelloReply {
string message = 1;
}
这里我们需要走两遍protoc分别生成消息协议代码和rpc service代码:
$ protoc --cpp_out=. ./greeter.proto
$ protoc --grpc_out=. --plugin=protoc-gen-grpc ./greeter.proto
在上面的第二行指令会导致生成greeter.grpc.pb.h, greeter.grpc.pb.cc两个额外的文件,这两个文件里包含了300行依然无可读性的生成代码。这些代码里对于用户接口来说重要的只有这么几行:
class Greeter final {
class Service : public ::grpc::Service {
public:
Service();
virtual ~Service();
// Sends a greeting
virtual ::grpc::Status SayHello(::grpc::ServerContext* context, const ::HelloRequest* request, ::HelloReply* response);
};
class Stub final : public StubInterface {
public:
Stub(const std::shared_ptr< ::grpc::ChannelInterface>& channel, const ::grpc::StubOptions& options = ::grpc::StubOptions());
::grpc::Status SayHello(::grpc::ClientContext* context, const ::HelloRequest& request, ::HelloReply* response) override;
};
};
Greeter::Service提供一些虚接口来承接服务器接收到相关RPC数据之后的业务层逻辑,具体的实现需要业务方继承这个类型实现所有的虚接口:
class GreeterServiceImpl final : public Greeter::Service {
Status SayHello(ServerContext* context, const HelloRequest* request,
HelloReply* reply) override {
std::string prefix("Hello ");
reply->set_message(prefix + request->name());
return Status::OK;
}
};
实现了业务层逻辑之后,我们可以把这个Service注册到一个开启好了的grpc server上去,grpc内部负责处理网络收发、数据解析、RPC分发等框架层逻辑:
void RunServer(uint16_t port) {
std::string server_address = absl::StrFormat("0.0.0.0:%d", port);
GreeterServiceImpl service;
grpc::EnableDefaultHealthCheckService(true);
grpc::reflection::InitProtoReflectionServerBuilderPlugin();
ServerBuilder builder;
// Listen on the given address without any authentication mechanism.
builder.AddListeningPort(server_address, grpc::InsecureServerCredentials());
// Register "service" as the instance through which we'll communicate with
// clients. In this case it corresponds to an *synchronous* service.
builder.RegisterService(&service);
// Finally assemble the server.
std::unique_ptr<Server> server(builder.BuildAndStart());
std::cout << "Server listening on " << server_address << std::endl;
// Wait for the server to shutdown. Note that some other thread must be
// responsible for shutting down the server for this call to ever return.
server->Wait();
}
int main(int argc, char** argv) {
absl::ParseCommandLine(argc, argv);
RunServer(absl::GetFlag(FLAGS_port));
return 0;
}
Greeter::Stub则负责提供给客户端作为相关RPC调用的入口:
class GreeterClient {
public:
GreeterClient(std::shared_ptr<Channel> channel)
: stub_(Greeter::NewStub(channel)) {}
std::string SayHello(const std::string& user) {
// Follows the same pattern as SayHello.
HelloRequest request;
request.set_name(user);
HelloReply reply;
ClientContext context;
Status status = stub_->SayHello(&context, request, &reply);
if (status.ok()) {
return reply.message();
} else {
std::cout << status.error_code() << ": " << status.error_message()
<< std::endl;
return "RPC failed";
}
}
private:
std::unique_ptr<Greeter::Stub> stub_;
};
有了这个封装好的GreeterClient之后,往指定grpc server发送一次RPC请求就很简单了:
int main(int argc, char** argv) {
absl::ParseCommandLine(argc, argv);
// Instantiate the client. It requires a channel, out of which the actual RPCs
// are created. This channel models a connection to an endpoint specified by
// the argument "--target=" which is the only expected argument.
std::string target_str = absl::GetFlag(FLAGS_target);
// We indicate that the channel isn't authenticated (use of
// InsecureChannelCredentials()).
GreeterClient greeter(
grpc::CreateChannel(target_str, grpc::InsecureChannelCredentials()));
std::string user("world");
std::string reply = greeter.SayHello(user);
std::cout << "Greeter received: " << reply << std::endl;
return 0;
}
例如整体来说,grpc作为一个RPC框架,给用户层屏蔽了诸多细节的同时,在使用上也非常方便。通信的两端只要共享同一个proto文件,即可轻松跨平台、跨语言。但是在游戏业务内我们却极其不推荐使用grpc作为RPC解决方案,主要有如下四点:
grpc的框架依赖过重,前述的最简rpc样例greeter_client greeter_server编译出来之后文件大小可达55M:
-rwxrwxr-x 1 qian qian 51M 4月 25 00:55 greeter_client
-rwxrwxr-x 1 qian qian 53M 4月 25 00:55 greeter_server
而且这两个二进制还带来了很多动态库的依赖:
qian@qian-desktop:~/Github/grpc/examples/cpp/helloworld/build$ ldd ./greeter_client
linux-vdso.so.1 (0x00007ffd58b9d000)
libsystemd.so.0 => /lib/x86_64-linux-gnu/libsystemd.so.0 (0x00007f62d9bdf000)
libstdc++.so.6 => /lib/x86_64-linux-gnu/libstdc++.so.6 (0x00007f62d8000000)
libm.so.6 => /lib/x86_64-linux-gnu/libm.so.6 (0x00007f62d8315000)
libgcc_s.so.1 => /lib/x86_64-linux-gnu/libgcc_s.so.1 (0x00007f62d9bbb000)
libc.so.6 => /lib/x86_64-linux-gnu/libc.so.6 (0x00007f62d7c00000)
/lib64/ld-linux-x86-64.so.2 (0x00007f62d9cce000)
libcap.so.2 => /lib/x86_64-linux-gnu/libcap.so.2 (0x00007f62d9bad000)
libgcrypt.so.20 => /lib/x86_64-linux-gnu/libgcrypt.so.20 (0x00007f62d7eb8000)
liblzma.so.5 => /lib/x86_64-linux-gnu/liblzma.so.5 (0x00007f62d9b7b000)
libzstd.so.1 => /lib/x86_64-linux-gnu/libzstd.so.1 (0x00007f62d7b49000)
liblz4.so.1 => /lib/x86_64-linux-gnu/liblz4.so.1 (0x00007f62d9b58000)
libgpg-error.so.0 => /lib/x86_64-linux-gnu/libgpg-error.so.0 (0x00007f62d82ef000)
当proto文件随着RPC数量的增多,protoc生成的代码也越来越大,再加上引入的框架代码,编译时间会增加非常多。如果proto文件频繁更新,则编译时间拖慢工作流的影响会更加显著。
-
protobuf的版本冲突问题,如果一个程序连接了多个静态连接了protobuf的动态库,则使用者需要去保证这些动态库使用的protobuf的版本要强一致,否则会造成运行时crash。一旦某个动态库是由第三方团队维护的,则保证这种一致性基本是不可能的任务。在这种设计下,要确保全链路都使用grpc就只能参考Google的Mono Repo,同时禁止出现第三方的动态库里出现protobuf。 -
grpc对于网络层封装的比较重度,而游戏业务经常需要自己去管理网络层的接入与收发,例如我们在前面一章中提到的KCP,这样就产生了很多冲突。 -
protobuf的编码很多时候无法满足游戏业务尽可能的降低网络带宽的需求,因为业务逻辑经常对移动同步等高频RPC自己实现相关数据的以bit为基础的序列化协议,此时在proto文件中只能定义一个string来代表传输的数据,丧失了序列化的意义还容易触发二次编码。此外protobuf作为纯序列化库,对比flatbuffer、thrift和msgpack有不小的性能劣势。
所以,游戏业务中一般只会有限的采用protobuf作为数据序列化协议的一种,而不会整体采用grpc作为网络通信框架。
Mosaic Game 的 RPC 实现
考虑到便利性的需求,mosaic_game使用基于json的RPC方案。为了避免前述的原始Json RPC方案里的各种需要手工维护的注册和序列化反序列化代码的重复劳动,mosaic_game也使用类似于UHT的工具来自动生成这些代码。mosaic_game使用的代码生成工具与UHT的原理有很大的不同。UHT是通过纯文本扫描项目中所有头文件里带UFunction, UProperty等标记的行来获取相关反射信息,而mosaic_game使用的是libclang对相关头文件进行完整的cpp语义解析,并以Json格式导出所有带标注的类型声明信息。有了这些类型声明信息之后,我们再使用基于mustache的模板引擎,生成所需的胶水代码来进行RPC的注册和序列化。这个基于libclang的cpp代码生成工具在mosaic_game中有很多应用场景,后面有单独的一章来描述此工具的相关细节。
Mosaic Game 中的RPC声明与注册
在mosaic_game中,我们支持了在Actor/ActorComponent, Space/SpaceComponent, Manager/ManagerComponent等类型上声明RPC,这三种RPC宿主实现基本一样,所以这里以Actor/ActorComponent来作为样例来说明。下面就是一个在PlayerChatComponent上的RPC声明:
Meta(rpc) void chat_add_msg_request(const utility::rpc_msg& msg, std::uint8_t chat_type, const std::string& to_player_id, const json::object_t& detail);
上面的函数声明中,Meta(rpc)的作用是提示libclang当前函数声明是一个RPC函数。在mosaic_game中我们规定所有的RPC的声明都要遵循如下结构:
- 左边必须以
Meta(rpc)开头,以通知libclang当前函数声明是一个RPC函数 - 函数的返回值必须为
void,即所有的RPC函数都是异步调用 - 函数的第一个参数必须为
const utility::rpc_msg&类型,这个类型用来容纳当前RPC的所有信息
struct rpc_msg
{
std::string cmd; // 当前rpc的名字
std::string err; // 如果是响应rpc 则此处填充响应错误信息 如果无错误则保持为空
std::vector<json> args; // 当前rpc的所有参数序列化为json之后的数组
std::string from; // 当前rpc的调用者信息 可选
std::uint32_t flag = 0; // 当前rpc的flag信息 例如是否允许客户端调用 是否允许服务器调用
// 下面两个接口提供到json的序列化与反序列化
friend void to_json(json& result, const utility::rpc_msg& msg);
bool from_json(const json& data);
}
- 函数的实际使用参数依次排在第一个参数之后
有了这个RPC函数声明之后,我们就可以使用libclang进行类型信息导出与胶水代码生成,针对每个带有RPC函数声明的xxx.h头文件,我们都会生成一个xxx.rpc.incpp文件,插入到xxx.cpp之中:
// player_chat_component.cpp
#include "component/player/player_chat_component.h"
#include "entity/player_entity.h"
#include "player_chat_component.rpc.incpp"
而这个xxx.rpc.incpp文件主要提供了一个内部类型xxx::rpc_helper的完整定义:
// player_chat_component.rpc.incpp
namespace spiritsaway::mosaic_game::entity
{
class player_chat_component::rpc_helper
{
static utility::rpc_msg::call_result chat_add_msg_request(player_chat_component* rpc_owner, const spiritsaway::utility::rpc_msg& cur_rpc)
{
std::remove_cv_t<std::remove_reference_t<unsigned char>> chat_type;
std::remove_cv_t<std::remove_reference_t<const std::string&>> to_player_id;
std::remove_cv_t<std::remove_reference_t<const json::object_t&>> detail;
if(!spiritsaway::serialize::decode_multi(cur_rpc.args, chat_type , to_player_id , detail ))
{
return utility::rpc_msg::call_result::invalid_format;
}
rpc_owner->chat_add_msg_request(cur_rpc, chat_type , to_player_id , detail );
return utility::rpc_msg::call_result::suc;
}
constexpr static std::uint32_t flag_for_chat_add_msg_request = 0;
static const std::unordered_map<std::string, spiritsaway::utility::rpc_cmd_info>& get_rpc_map()
{
static std::unordered_map<std::string, spiritsaway::utility::rpc_cmd_info> cur_rpc_map = {
{ "chat_add_msg_notify", spiritsaway::utility::rpc_cmd_info{ 0, "(const spiritsaway::utility::rpc_msg& msg, const std::string& chat_key, unsigned int msg_seq, const json::object_t& detail)", flag_for_chat_add_msg_notify } },
{ "chat_add_msg_reply", spiritsaway::utility::rpc_cmd_info{ 1, "(const spiritsaway::utility::rpc_msg& msg, const std::string& chat_key, unsigned int msg_seq, const json::object_t& detail)", flag_for_chat_add_msg_reply } },
{ "chat_add_msg_request", spiritsaway::utility::rpc_cmd_info{ 2, "(const spiritsaway::utility::rpc_msg& msg, unsigned char chat_type, const std::string& to_player_id, const json::object_t& detail)", flag_for_chat_add_msg_request } },
};
return cur_rpc_map;
}
static utility::rpc_msg::call_result rpc_call(player_chat_component* rpc_owner, std::uint32_t cur_rpc_idx, const spiritsaway::utility::rpc_msg& cur_rpc)
{
switch(cur_rpc_idx)
{
case 0:
return chat_add_msg_notify(rpc_owner, cur_rpc);
case 1:
return chat_add_msg_reply(rpc_owner, cur_rpc);
case 2:
return chat_add_msg_request(rpc_owner, cur_rpc);
default:
return utility::rpc_msg::call_result::rpc_not_found;
}
}
static utility::rpc_msg::call_result rpc_call(player_chat_component* rpc_owner, const spiritsaway::utility::rpc_msg& cur_rpc)
{
auto& cur_rpc_map = get_rpc_map();
auto cur_iter = cur_rpc_map.find(cur_rpc.cmd);
if(cur_iter == cur_rpc_map.end())
{
return utility::rpc_msg::call_result::rpc_not_found;
}
if(cur_rpc.flag && (cur_rpc.flag &cur_iter->second.cmd_flag) == 0)
{
return utility::rpc_msg::call_result::flag_not_meet;
}
return rpc_call(rpc_owner, std::uint32_t(cur_iter->second.cmd_idx), cur_rpc);
}
};
}
除了这个辅助类型的完整定义,这个rpc.incpp文件里还提供了如下两个函数的定义:
const std::unordered_map<std::string, spiritsaway::utility::rpc_cmd_info>& player_chat_component::get_rpc_indexes() const
{
return rpc_helper::get_rpc_map();
}
utility::rpc_msg::call_result player_chat_component::rpc_component_on_rpc(std::uint32_t cur_rpc_idx, const utility::rpc_msg& cur_msg)
{
return rpc_helper::rpc_call(this, cur_rpc_idx, cur_msg);
}
这两个函数的声明提供在base_component上,调用方则在component_owner上:
virtual utility::rpc_msg::call_result component_owner::rpc_owner_on_rpc(const utility::rpc_msg& cur_msg)
{
// 通过rpc名字查找该rpc的注册信息
auto cur_iter = m_component_register_info->component_rpcs.find(cur_msg.cmd);
if(cur_iter == m_component_register_info->component_rpcs.end())
{
return utility::rpc_msg::call_result::rpc_not_found;
}
// 找到之后判断flag是否满足 例如是否允许客户端调用
if(cur_msg.flag && (cur_msg.flag & cur_iter->second.cmd_flag) == 0)
{
return utility::rpc_msg::call_result::flag_not_meet;
}
// 这里的cmd_idx是一个uint64_t 由两个32位整数拼接而成
// 高32位代表所属component在component_owner的components数组的索引
// 低32位则是这个rpc在对应component里的索引
std::uint64_t rpc_idx = cur_iter->second.cmd_idx & 0xffffffff;
auto cur_component_idx = (cur_iter->second.cmd_idx >> 32) & 0xffffffff;
auto cur_comp = get_component(std::uint32_t(cur_component_idx));
if(!cur_comp)
{
return utility::rpc_msg::call_result::rpc_not_found;
}
// 找到对应component之后 调用base_component上提供的虚方法rpc_component_on_rpc
// 内部实现就是通过switch case来执行对应的rpc函数
return cur_comp->rpc_component_on_rpc(std::uint32_t(rpc_idx), cur_msg);
}
上面的RPC信息查找依赖于component_owner上维护好的m_component_register_info->component_rpcs信息,每个base_component在绑定到一个component_owner上之后,会将此base_component上的所有rpc都注册到component_rpcs这个 map中:
// 当一个component添加到某个owner之后会调用此函数
virtual void base_component::on_set_owner()
{
m_owner->add_component_rpcs(get_rpc_indexes(), m_component_type_id);
}
void component_owner::add_component_rpcs(const std::unordered_map<std::string, rpc_cmd_info>& rpc_names, const std::uint32_t component_type_id)
{
auto& component_rpc_registered = m_component_register_info->component_rpc_registered;
if(component_type_id >= component_rpc_registered.size())
{
component_rpc_registered.resize(component_type_id + 1);
}
// 避免重复注册
if(!component_rpc_registered[component_type_id])
{
for(const auto& one_rpc_name: rpc_names)
{
// 这里拼接两个uint32为一个uint64
m_component_register_info->component_rpcs[one_rpc_name.first] = rpc_cmd_info{(std::uint64_t(component_type_id)<<32) + one_rpc_name.second.cmd_idx, one_rpc_name.second.cmd_info};
}
}
}
通过上述base_component component_owner rpc_helper的配合,整体的一个RPC注册与调用流程就基本跑通了。
Mosaic Game 中的RPC序列化
上面一节的内容描述了一个Actor及相关ActorComponent上的所有RPC函数的注册与调用,为了让网络另外一端的特定Actor对象执行指定RPC,我们还需要解决RPC的序列化问题。此时我们来回顾一下之前我们构造的一个RPC封装结构:
struct rpc_msg
{
std::string cmd; // 当前rpc的名字
std::string err; // 如果是响应rpc 则此处填充响应错误信息 如果无错误则保持为空
std::vector<json> args; // 当前rpc的所有参数序列化为json之后的数组
std::string from; // 当前rpc的调用者信息 可选
std::uint32_t flag = 0; // 当前rpc的flag信息 例如是否允许客户端调用 是否允许服务器调用
// 下面两个接口提供到json的序列化与反序列化
friend void to_json(json& result, const utility::rpc_msg& msg);
bool from_json(const json& data);
}
从这个结构体的成员变量声明可以看出,我们需要将RPC的所有参数都转换为Json,然后依次填充到args字段上,同时将RPC的名字填充到cmd字段上。这里为了方便填充所有的RPC参数,提供了一个基于模板的set_args接口,这个接口会将传入的所有变参都调用开头提到的json encode接口自动转换为json类型,其实就等价于encode_multi:
template <typename... Args>
void set_args(Args&&... in_args)
{
args.reserve(sizeof...(Args));
(args.push_back(encode<Args>(std::forward<Args>(in_args))),...);
}
通过encode这个模板函数,我们不仅支持了那些本来就支持自动转换为json的基本类型,还支持了带json encode() const接口的任意类型作为RPC参数。
所有字段都填充好之后,再将这个结构体序列化为Json,这个序列化流程比较简单。Json可以进一步序列化为字符串,转变为字符串之后就可以直接进行网络数据传递,投送到网络另外一端的指定Actor,对应的Actor会将此字符串反序列化为Json,并调用rpc_msg::from_json来进行字段初始化,成功初始化之后,通过rpc_owner_on_rpc(const utility::rpc_msg& cur_msg)进行分发,调用xxx::rpc_heler上通过libclang生成的辅助函数,这个辅助函数则负责解析出当前RPC的所有参数,并调用最终执行的函数。这里的参数解析使用了前面提到的decode_multi,等价于encode_multi的逆过程。
class player_chat_component::rpc_helper
{
static utility::rpc_msg::call_result chat_add_msg_request(player_chat_component* rpc_owner, const spiritsaway::utility::rpc_msg& cur_rpc)
{
std::remove_cv_t<std::remove_reference_t<unsigned char>> chat_type;
std::remove_cv_t<std::remove_reference_t<const std::string&>> to_player_id;
std::remove_cv_t<std::remove_reference_t<const json::object_t&>> detail;
if(!spiritsaway::serialize::decode_multi(cur_rpc.args, chat_type , to_player_id , detail ))
{
return utility::rpc_msg::call_result::invalid_format;
}
rpc_owner->chat_add_msg_request(cur_rpc, chat_type , to_player_id , detail );
return utility::rpc_msg::call_result::suc;
}
};
实际使用中发现RPC的序列化数据中,cmd字段占据的长度相当可观。因为我们在给RPC赋予名字时,为了表达足够的信息,会不可避免的将名字弄得很长。为了降低RPC名字所需要的网络流量,我们参考Unreal Engine里RPC的实现, 将RPC的名字转换为一个uint32索引。为了实现这个名字索引机制,我们在mosaic_game中维护了一个常用术语表vector<string> cmd_vec,基于这个术语表构造出名字字符串与名字索引之间的映射std::unordered_map<std::string, std::uint32_t> cmd_map;:
void rpc_msg::init_cmd_vec(const std::vector<std::string>& in_cmd_vec)
{
assert(cmd_vec.empty());
cmd_vec.push_back({});
cmd_vec.insert(cmd_vec.end(), in_cmd_vec.begin(), in_cmd_vec.end());
cmd_vec = in_cmd_vec;
for(std::uint32_t i = 0; i< in_cmd_vec.size(); i++)
{
cmd_map[in_cmd_vec[i]] = i;
}
}
std::string rpc_msg::seq_to_cmd(std::uint32_t seq)
{
if(seq >= cmd_vec.size())
{
return {};
}
return cmd_vec[seq];
}
std::uint32_t rpc_msg::cmd_to_seq(const std::string& cmd)
{
auto temp_iter = cmd_map.find(cmd);
if(temp_iter == cmd_map.end())
{
return 0;
}
return temp_iter->second;
}
有了这个cmd_map cmd_vec之后,rpc_msg的序列化与反序列化需要做相应的修改:
void to_json(json& result, const utility::rpc_msg& msg)
{
auto temp_seq = utility::rpc_msg::cmd_to_seq(msg.cmd);
if(temp_seq == 0)
{
result["cmd"] = msg.cmd;
}
else
{
result["cmd"] = temp_seq;
}
// 其他字段的序列化
}
bool rpc_msg::from_json(const json& data)
{
auto temp_cmd_iter = data.find("cmd");
if(temp_cmd_iter == data.end())
{
return false;
}
if(temp_cmd_iter->is_string())
{
temp_cmd_iter->get_to(cmd);
}
else if(temp_cmd_iter->is_number_unsigned())
{
auto temp_seq = temp_cmd_iter->get<std::uint32_t>();
if(temp_seq)
{
cmd = seq_to_cmd(temp_seq);
}
else
{
return false;
}
}
else
{
return false;
}
// 其他字段的反序列化
}
整个常用名字术语表的维护则通过我们前述的libclang工具来完成的,大大的避免了人工处理时容易出现的各种纰漏。
Mosaic Game 远程消息投递
游戏服务器一般来说是由承担不同功能角色一组进程的集合,这些进程可以放在同一台物理机上,也可以分布式的存在于多台通过网络互联的物理机中。游戏服务器内管理着各种可以通信的对象,分布在这些进程之中。同时这些可通信的对象与进程之间的关系是动态的,可能会按照业务需求将某个对象从物理机器A中的某个进程切换到物理机器B中的某个进程。所以在游戏服务器中的对象间通信不能直接使用ip:port::target_id这种静态的配置形式,需要在业务层封装好一个基于对象名字的虚拟通道channel消息投递机制,以应对对象的进程间迁移。同时由于游戏内的玩家可能随时上线下线,所以对于玩家的某些消息还需要额外考虑其不在线的情况
,使用持久化的数据库来确保玩家对这些持久化消息的有序接收。接下来我们将介绍一下mosaic_game中提供的面向不同应用场景的各种消息投递机制,以及相关应用组件。
在线消息投递
在线消息投递处理的是向目前在线的服务端entity,service发送rpc消息的过程。如果发送时目标不在线,则消息投递失败;如果在投递过程中目标下线,则消息投递失败。由于此类消息不保证能够可靠的通知到目标,所以此类消息一般都是用来执行客户端消息通知,不能依赖此类消息去修改entity的持久化数据。根据这个在线消息投递实现机制,又可以细分为三种子类型:
- 单播消息 只向一个目标进行消息投递
- 多播消息 向多个在线目标进行消息投递
- 广播消息 向所有在线目标进行消息投递
单播消息
在线单播消息投递是所有消息投递实现的基础,在mosaic_game中暴露出了如下接口来支持向指定的一个对象发送在线消息:
void json_server::call(std::shared_ptr<const std::string> dest, std::shared_ptr<const std::string> msg, enums::packet_cmd cur_packet_cmd, std::uint8_t cur_packet_detail_cmd)
{
m_router->push_msg(m_local_name_ptr, dest, msg, enums::packet_cmd_helper::encode(cur_packet_cmd, cur_packet_detail_cmd));
}
dest字段代表投递目标的唯一标识符,为server_id::target_id形式的字符串,代表server_id服务器上的target_id对应的发送目标,后面的::target_id某些情况下可以省略。然后msg字段就是要发送的消息的字节流,这里使用shared_ptr<const std::string>是为了避免出现字符串的拷贝操作,同时也能更好的支持多播。
参数里剩下的cur_packet_cmd与cur_packet_detail_cmd可以理解为消息类型和在这个消息下的消息子类型,编码时会将这两个字段合并为一个uint16进行处理:
enum class packet_cmd: std::uint8_t
{
server_control = 0,
client_to_game,
game_to_client,
server_rpc_msg,
server_raw_msg,
entity_msg,
actor_migrate_msg,
max,
};
struct packet_cmd_helper
{
static std::uint16_t encode(packet_cmd in_packet_cmd, std::uint8_t in_cmd_detail)
{
std::uint16_t result = std::uint16_t(in_packet_cmd);
result <<= 8;
result += in_cmd_detail;
return result;
}
static std::pair<packet_cmd, std::uint8_t> decode(std::uint16_t in_combine_cmd)
{
std::pair<packet_cmd, std::uint8_t> result;
result.second = in_combine_cmd % 256;
result.first = packet_cmd(in_combine_cmd / 256);
return result;
}
};
这个call接口只是对network_router::push_msg的一个简单转发,额外加上了当前发送者的进程标识符m_local_name_ptr,内部会根据这个dest找到合适的远程连接connection,并将消息添加到这个connection的发送队列中:
bool network_router::push_msg(std::shared_ptr<const std::string> from, std::shared_ptr<const std::string> dest, std::shared_ptr<const std::string> data, std::uint16_t cmd)
{
auto cur_proxy_resource = m_anchor_collection.find_proxy_for_anchor(*dest);
if(!cur_proxy_resource)
{
m_logger->error("push_msg cant find anchor_resources from {} dest {} data {}", *from, *dest, *data);
return false;
}
auto cur_proxy_con = cur_proxy_resource->get_connection();
if (cur_proxy_con)
{
if (push_msg(cur_proxy_con, from, dest, data, cmd))
{
return true;
}
}
return cur_proxy_resource->try_push(from, dest, data, cmd);
}
从dest找到对应的connection的逻辑由anchor_collection类型负责,这个类型记录了anchor锚点到网络投递资源的映射,对外暴露了名字绑定接口来添加两者之间的映射:
bool network_router::link_anchor_to_connection(const std::string& anchor_name, const net_connection* connection)
{
auto cur_connection_iter = m_connection_resources.find(connection);
if (cur_connection_iter == m_connection_resources.end())
{
return false;
}
if(m_anchor_collection.create_resource(anchor_name, connection, cur_connection_iter->second->output_channel))
{
cur_connection_iter->second->anchors.insert(anchor_name);
return true;
}
else
{
return false;
}
}
查询的时候查找以::分割的最长前缀去匹配。举个例子来说,如果server1::target_id找不到记录的话,则继续以server_1去查找记录,这样就可以让server_1这个connection_resource去代理所有的server_1::xxx形式的rpc目标。
有些时候传入的投递地址可能会是本进程的地址,此时查找connection_resource的话会失败,因为当前并没有为本进程创建一个connection,从而导致投递消息失败,所以上层在投递消息的时候要专门为这个本地地址做过滤。这里的代码在发现dest是一个本进程地址之后,会将这个数据直接放到主循环消息队列中:
bool network_router::push_msg(std::shared_ptr<const std::string> from, std::shared_ptr<const std::string> dest, std::shared_ptr<const std::string> data, std::uint16_t cmd)
{
if(dest->rfind(m_local_anchor_name, 0) == 0)
{
// 说明是本进程地址 直接推送数据到input_msg_queue
network::con_msg_task local_msg_task;
local_msg_task.first = {};
local_msg_task.second = msg_task::construct(from, dest, data, cmd);
m_input_msg_queue->push_msg(std::move(local_msg_task));
}
// 省略一些代码
}
找到connection之后的消息发送逻辑已经在之前的网络通信章节中介绍过了,读者可以回顾一下相关的内容来了解底层TCP传输细节,这里就不再介绍。当目标进程接收到了这个消息之后,主循环的on_msg回调首先解析出from,dest, msg, cmd这四个字段,然后根据cmd的类型与dest地址来做本进程的消息分发。由于具体的分发函数实现有点长,这里就只贴出space_server::on_msg中处理enums::packet_cmd::entity_raw_msg的部分:
case enums::packet_cmd::entity_raw_msg:
{
if(!one_msg.dest)
{
m_logger->error("dest empty while handle rpc msg {}", *one_msg.data);
return true;
}
utility::rpc_msg::call_result dispatch_result;
auto real_dest = remove_local_anchor_prefix(*one_msg.dest);
if(check_msg_forward(real_dest, one_msg))
{
return true;
}
dispatch_result = entity::entity_manager::instance().dispatch_entity_raw_msg(real_dest, cur_cmd_detail.second, one_msg.data);
if (dispatch_result != utility::rpc_msg::call_result::suc)
{
m_logger->error("fail to dispatch raw_msg dest {} sync_cmd {} with error {}", *one_msg.dest, cur_cmd_detail.second, int(dispatch_result));
}
return true;
}
这里的remove_local_anchor_prefix相当于把server_id::entity_id形式的dest解析出entity_id部分,check_msg_forward的函数行为我们后面再介绍,剩下的逻辑就是entity_manager根据entity_id去找到对应的entity并调用on_entity_raw_msg接口来处理本次数据:
utility::rpc_msg::call_result dispatch_entity_raw_msg(const std::string& dest, std::uint8_t cmd, std::shared_ptr<const std::string> msg)
{
auto cur_entity = get_entity(dest);
if (!cur_entity)
{
return utility::rpc_msg::call_result::dest_not_found;
}
return cur_entity->on_entity_raw_msg(cmd, msg);
}
这个on_entity_raw_msg再根据消息的子类型来做格式解析,并最终执行到rpc的分发函数on_rpc_msg:
utility::rpc_msg::call_result server_entity::on_entity_raw_msg(std::uint8_t cmd, std::shared_ptr<const std::string> msg_ptr)
{
if(cmd == std::uint8_t(enums::entity_packet::json_rpc))
{
utility::rpc_msg e_msg;
try
{
json msg = json::parse(*msg_ptr);
msg.at("cmd").get_to(e_msg.cmd);
msg.at("args").get_to(e_msg.args);
auto from_iter = msg.find("from");
if (from_iter != msg.end())
{
from_iter->get_to(e_msg.from);
}
auto err_iter = msg.find("err");
if(err_iter != msg.end())
{
err_iter->get_to(e_msg.err);
}
}
catch (std::exception& e)
{
m_logger->error("fail to decode rpc_msg {} error {}", *msg_ptr, e.what());
return utility::rpc_msg::call_result::invalid_format;
}
return on_rpc_msg(e_msg);
}
return utility::rpc_msg::call_result::rpc_not_found;
}
on_rpc_msg之后的逻辑在rpc部分已经介绍过了,这里就不重复阐述。上面贴的代码对应的是space_server上的server_entity消息投递,其实与service_server上的base_service的消息投递机制基本没有差异,两者的on_rpc_msg机制是一样的,只不过一个被entity_manager中转分发,而另外一个被service_manager中转分发。类似的还有space_server上的manager_base,用来管理一些能够接受rpc的非server_entity单例数据:
utility::rpc_msg::call_result space_server::on_server_rpc_msg(const std::string& dest, const utility::rpc_msg& cur_rpc_msg)
{
auto dispatch_result = entity::entity_manager::instance().dispatch_rpc_msg(dest, cur_rpc_msg);
if(dispatch_result != utility::rpc_msg::call_result::dest_not_found)
{
return dispatch_result;
}
return manager_base::dispatch_rpc(dest, cur_rpc_msg);
}
void manager_base::init_managers(space_server* in_space_server)
{
offline_msg_manager::instance().init(in_space_server);
email_manager::instance().init(in_space_server);
notify_manager::instance().init(in_space_server);
rank_manager::instance().init(in_space_server);
space_manager::instance().init(in_space_server);
}
不过service与server_entity在投递地址的表示上有很大的不同,server_entity的投递地址都是server_id::entity_id这个形式,而service的投递地址就只有service_type这个形式,没有绑定的server_id。这个解绑server_id的原因是为了支持service在不同的进程之间动态迁移从而实现负载均衡以及容灾,所以往特定service发消息的时候,只需要传递这个服务的名字即可作为投递地址:
void space_server::call_service( const std::string& service_name, const utility::rpc_msg& msg)
{
auto dest_server = choose_server_for_service(service_name);
if(dest_server.empty())
{
m_logger->warn("fail to find server for service {} msg {}", service_name, json(msg).dump());
return;
}
call_server(service_name, msg);
}
在一个service被创建的时候,每个进程都会接收到对应的创建通知,内部包含了所在的服务器信息,进程接收到这个消息之后会记录服务与进程之间的关联信息到m_services_by_id这个map成员上:
void space_server::on_notify_service_created(std::shared_ptr<network::net_connection> con, std::shared_ptr<const std::string> from, const json& msg)
{
std::string service_type;
std::string service_id;
std::string service_server;
try
{
msg.at("service_id").get_to(service_id);
msg.at("service_type").get_to(service_type);
msg.at("service_server").get_to(service_server);
}
catch(const std::exception& e)
{
m_logger->error("on_notify_service_created fail to parse msg {} error {}", msg.dump(), e.what());
return;
}
m_services_by_id[service_id] = std::make_pair(service_type, service_server);
}
注意这里的key不是service_type而是一个根据规则生成的service唯一id, 这样做的理由是为了支持同一个service_type创建多个实例来做负载均衡。当需要给一个service发消息的时候,会查询是否有这个服务以及是否已经绑定了进程,这个绑定信息记录在m_services_by_pref上,如果没有绑定则遍历m_services_by_id里这个service_type对应的所有实例,随机选择其中的一个来执行绑定:
std::string space_server::choose_server_for_service(const std::string& service_name)
{
auto temp_iter_1 = m_services_by_pref.find(service_name);
if(temp_iter_1 != m_services_by_pref.end())
{
return temp_iter_1->second.second;
}
std::vector<std::pair<std::string, std::string>> temp_services;
temp_services.reserve(8);
for(const auto& one_pair: m_services_by_id)
{
if(one_pair.second.first != service_name)
{
continue;
}
temp_services.push_back(std::make_pair(one_pair.first, one_pair.second.second));
}
if(temp_services.empty())
{
return {};
}
auto cur_ms = utility::timer_manager::now_ts();
auto cur_result = temp_services[cur_ms % temp_services.size()];
m_services_by_pref[service_name] = cur_result;
m_router->link_anchor_to_connection(service_name, cur_result.second);
m_logger->info("set server {} service_id {} to the pref server of service_type {}", cur_result.second, cur_result.first, service_name);
return cur_result.second;
}
绑定之后就会在network_router中使用link_anchor_to_connection来注册投递地址与网络连接之间的映射,这里使用绑定而不是每次发送消息时都随机从temp_service中抽取一个的理由是保证从一个进程发送到一个投递地址的消息的接收顺序与发送顺序一致。
server_entity对于动态迁移的需求比service大很多,因为可迁移的server_entity数量相对service数量来说大好几个数量级。同时server_entity的迁移触发的比service更加频繁,每次切换场景时都可能触发,而service的迁移时机只有动态扩缩容和容灾。所以对于可迁移的server_entity的消息投递不能采取与service一样的广播推送最新地址的机制,这个机制会导致需要同步的信息量太多。所以针对server_entity的高频迁移特性,其在线消息投递使用的是一种基于中转的消息投递机制,对于这些可迁移的server_entity,在创建的时候就会在所在进程创建一个专门为其做消息转发服务的relay_entity:
player_entity* account_entity::create_player_entity(const std::string& player_id, const json& player_doc)
{
std::string cur_err;
auto cur_relay_entity_id = std::to_string(get_server()->gen_unique_uint64());
json::object_t relay_init_info;
relay_init_info["dest_eid"] = player_id;
relay_init_info["dest_game"] = get_server()->local_server_info().name;
auto cur_relay_entity = get_server()->create_entity("relay_entity", cur_relay_entity_id, gen_online_entity_id(),relay_init_info, cur_err);
if(!cur_relay_entity)
{
m_logger->error("fail to create relay_entity");
return nullptr;
}
m_relay_entity = dynamic_cast<relay_entity*>(cur_relay_entity);
json::object_t player_init_info;
player_init_info["prop"] = player_doc;
player_init_info["prop"]["base"]["account_anchor"] = *get_call_proxy();
player_init_info["prop"]["base"]["gate_name"] = m_gate_name;
player_init_info["is_ghost"] = false;
player_init_info["space_id"] = std::string();
player_init_info["call_proxy"] = *cur_relay_entity->get_call_proxy();
auto cur_entity = get_server()->create_entity("player_entity", player_id, gen_online_entity_id(),player_init_info, cur_err);
}
在创建好了relay_entity之后再创建所需的server_entity,同时将relay_entity的消息投递地址绑定在server_entity的call_proxy上。由于relay_entity是不可迁移的,所以使用call_proxy发送消息可以保证单进程有序与这个relay_entity进行消息通信。这个relay_entity会记录对应的server_entity的最新进程地址,server_entity每次迁移之前都需要通知relay_entity进行进程地址清空,等到relay_entity返回了迁移确认之后这个server_entity才能开始真正的迁移。在server_entity迁移成功之后,再将最新绑定的进程信息发送给relay_entity进行重新绑定。
void relay_entity::request_migrate_begin(const utility::rpc_msg& msg, const std::string& game_id, const std::string& space_id, const std::string& union_space_id, const json::object_t& enter_info)
{
if(!m_dest_actor)
{
m_logger->error("request_migrate_begin while dest_anchor empty dest_game {} dest_eid {}", m_dest_game, m_dest_eid);
return;
}
utility::rpc_msg reply_msg;
reply_msg.cmd = "reply_migrate_begin";
reply_msg.args.push_back(game_id);
reply_msg.args.push_back(space_id);
reply_msg.args.push_back(union_space_id);
reply_msg.args.push_back(enter_info);
call_server(m_dest_actor, reply_msg);
m_dest_actor.reset();
m_dest_game = game_id;
}
void relay_entity::notify_migrate_finish(const utility::rpc_msg& msg, const std::string& game_id)
{
if(m_dest_game != game_id)
{
m_logger->error("notify_migrate_finish while game not match empty dest_game {} dest_eid {} new_game_id {}", m_dest_game, m_dest_eid, game_id);
return;
}
m_dest_actor = std::make_shared<std::string>(utility::rpc_anchor::concat(m_dest_game, m_dest_eid));
if(m_dest_game == get_local_server_name())
{
auto dest_entity = entity_manager::instance().get_entity(m_dest_eid);
if(dest_entity)
{
for(const auto& one_msg:m_cached_msgs)
{
auto cur_cmd_detail = enums::packet_cmd_helper::decode(one_msg.cmd);
auto dispatch_result = dest_entity->on_entity_raw_msg(cur_cmd_detail.second, one_msg.data);
if(dispatch_result != utility::rpc_msg::call_result::suc)
{
m_logger->error("entity {} fail to dispatch cmd {} data {} err {}", m_dest_eid, cur_cmd_detail.second, *one_msg.data, std::uint8_t(dispatch_result));
}
}
m_cached_msgs.clear();
}
}
for(const auto& one_msg: m_cached_msgs)
{
auto cur_cmd_detail = enums::packet_cmd_helper::decode(one_msg.cmd);
call_server(m_dest_actor, one_msg.data, cur_cmd_detail.first, cur_cmd_detail.second);
}
m_cached_msgs.clear();
}
当relay_entity接收到一个转发请求之后,先检查对应server_entity的进程绑定信息,如果没有绑定则先放到m_cached_msgs队列中,否则直接向对应的绑定进程发消息:
void relay_entity::forward_to_player(const network::msg_task& cur_msg_task)
{
if(!m_dest_actor)
{
m_cached_msgs.push_back(cur_msg_task);
}
else
{
auto cur_cmd_detail = enums::packet_cmd_helper::decode(cur_msg_task.cmd);
if(m_dest_game == get_local_server_name())
{
auto dest_entity = entity_manager::instance().get_entity(m_dest_eid);
if(dest_entity)
{
auto dispatch_result = dest_entity->on_entity_raw_msg(cur_cmd_detail.second, cur_msg_task.data);
if(dispatch_result != utility::rpc_msg::call_result::suc)
{
m_logger->error("fail to foward dispatch cmd {} data {} with result {}", cur_cmd_detail.second, *cur_msg_task.data, std::uint8_t(dispatch_result));
}
}
else
{
m_logger->error("fail to find dest entity {}", m_dest_eid);
}
}
else
{
call_server(m_dest_actor, cur_msg_task.data, cur_cmd_detail.first, cur_cmd_detail.second);
}
}
}
当重新绑定之后,还需要将m_cached_msgs全都按照接收顺序发送一遍。这样通过一个不可迁移的relay_entity我们就可以实现对可迁移server_entity的稳定有序消息投递了。
上面的relay_entity机制有一个小问题,就是消息发送方需要知道目标server_entity的call_proxy,如果无法获得这个call_proxy,则无法直接使用relay_entity机制。因此这里对于player_entity还有一个另外的在线通知机制,全局有一个login_service会记录所有在线玩家的account_entity地址,而account_entity也是一个不迁移的server_entity,可以保证其与relay_entity在同一个进程上。所以login_service上提供了一个request_call_online接口来执行向指定的player_id发送一个在线消息:
void login_service::request_call_online(const utility::rpc_msg& msg, const std::string& cur_player_id, const std::string& cmd, const std::vector<json>& args)
{
auto cur_iter = m_online_players.find(cur_player_id);
if(cur_iter == m_online_players.end())
{
m_logger->info("request_call_online not online fail to call {} cmd {} args {}", cur_player_id, cmd, json(args).dump());
return;
}
utility::rpc_msg result_msg;
result_msg.cmd = cmd;
result_msg.args = args;
auto cur_server = get_server();
cur_server->call_server(cur_iter->second, result_msg);
}
当account_entity接收到这个消息之后,会调用call_player来手动获取这个同进程的relay_entity并执行转发:
void account_entity::call_player(const utility::rpc_msg& msg)
{
if(!m_relay_entity)
{
return;
}
m_relay_entity->forward_to_player(msg);
}
这样在只拥有目标玩家的entity_id的情况下,可以通过login_service中转到account_entity,再中转到relay_entity,最终中转到player_entity。这样做会涉及到三次网络消息的收发,相对于基于call_proxy的中转来说多了一次,所以最好还是能够以call_proxy的方式去执行消息通知。因此很多service上都会有一个map记录当前所有在线玩家的call_proxy,玩家登录完成之后会向这些service推送自己的call_proxy,下面的就是玩家的聊天组件向聊天服务推送在线状态的代码,维护在线玩家call_proxy的相关代码:
void player_chat_component::on_login(bool is_relay)
{
if(is_relay)
{
return;
}
utility::rpc_msg notify_msg;
notify_msg.cmd = "notify_player_login";
notify_msg.set_args(m_owner->entity_id(), *m_owner->get_call_proxy());
m_owner->call_service("chat_service", notify_msg);
}
void player_chat_component::on_logout()
{
utility::rpc_msg notify_msg;
notify_msg.cmd = "notify_player_logout";
notify_msg.set_args(m_owner->entity_id());
m_owner->call_service("chat_service", notify_msg);
}
在聊天服务上使用一个unordered_map来记录注册过来的在线call_proxy, 同时提供一个封装好的call_online_player来处理向在线玩家发消息的需求:
void chat_service::notify_player_login(const utility::rpc_msg& msg, const std::string& player_id, const std::string& call_proxy)
{
m_online_players[player_id] = std::make_shared<const std::string>(call_proxy);
}
void chat_service::notify_player_logout(const utility::rpc_msg& msg, const std::string& player_id)
{
m_online_players.erase(player_id);
}
void chat_service::call_online_player(const std::string& player_id, const std::string& cmd, const std::vector<json>& args)
{
auto cur_iter = m_online_players.find(player_id);
if(cur_iter == m_online_players.end())
{
return;
}
utility::rpc_msg cur_msg;
cur_msg.cmd = cmd;
cur_msg.args = args;
auto cur_server = get_server();
cur_server->call_server(cur_iter->second, cur_msg);
}
就这样每个有通知在线玩家需求的service都自己维护了在线玩家的call_proxy记录,这样就可以避免都通过login_service去执行消息通知,降低login_service的单点压力。
多播消息
多播消息这种一般都是社群系统会使用到,例如群组、队伍、帮派等社群结构,多播系统的最简实现可以就只需要三行代码:使用一个for循环来遍历投递目标的集合然后调用单播消息投递接口。不过这样的实现会导致发送的消息rpc_msg被重复打包多次,浪费很多cpu,因此在server上提供了一个避免了重复消息打包的优化版本:
void space_server::call_server_multi(const entity::server_entity* cur_entity, const utility::rpc_msg& msg, const std::vector<std::string>& targets)
{
auto shared_msg = msg.to_bytes();
call_server_multi(cur_entity, shared_msg, enums::entity_packet::json_rpc, targets);
}
void space_server::call_server_multi(const entity::server_entity* cur_entity, std::shared_ptr<const std::string> msg, enums::entity_packet cur_entity_packet, const std::vector<std::string>& targets)
{
for (auto one_dest : targets)
{
call_server(cur_entity, std::make_shared<std::string>(one_dest), msg, cur_entity_packet);
}
}
这里使用rpc_msg上的to_bytes接口来预先执行消息打包序列化,生成一个shared_ptr<string>,这样就只需要打包一次,同时这个打包好的数据的生命周期能够被引用计数自动托管,业务层就不需要考虑msg生命周期的具体细节了。
不过这里的for循环也有一个可以性能优化的点,循环体内部会创建发送目标的一个shared_ptr<string>,其实更优的结果是创建一个包含了这个targets数组里所有元素的一个大的shared_ptr<string>,然后push_msg发送的时候使用下面的一个结构来编码dest:
struct shared_string_view
{
std::shared_ptr<std::string> parent;
std::string_view str;
};
这样make_shared只需要执行一次就行了,避免了多次动态内存分配相关的cpu损耗,同时整体的生命周期都被shared_ptr托管了,RAII会自动处理这个parent的资源释放。
有了这个call_server_multi接口之后,外部的多播接口只需要中转一下就好了:
void group_service::group_broadcast(const group_resource* cur_group, const std::string& cmd, const std::vector<json>& args, const std::string& except_id, bool without_leader)
{
const auto& group_anchors = cur_group->get_online(except_id, without_leader);
utility::rpc_msg cur_msg;
cur_msg.cmd = cmd;
cur_msg.args = args;
get_server()->call_server_multi(cur_msg, group_anchors);
}
void team_service::team_broadcast(const team_resource* cur_team, const std::string& cmd, const std::vector<json>& args, const std::string& except_id)
{
std::vector<std::string> team_anchors;
team_anchors.reserve(cur_team->m_prop.m_players.index().size());
for(const auto& one_idx: cur_team->m_prop.m_players.index())
{
auto cur_player_ptr = cur_team->m_prop.m_players.get_slot(one_idx.second);
if(cur_player_ptr->m_id == except_id)
{
continue;
}
team_anchors.push_back(cur_player_ptr->anchor());
}
utility::rpc_msg cur_msg;
cur_msg.cmd = cmd;
cur_msg.args = args;
get_server()->call_server_multi(cur_msg, team_anchors);
}
广播消息
游戏内有些逻辑需要往所有的在线玩家发送消息,这个需求虽然类似于多播,但是使用login_service去遍历所有玩家去调用多播接口的话消息流量会爆炸,而且会导致这个单点的卡顿,广播频率高的话可能会影响登录与下线。此时我们注意到这样的暴力广播流程里,很多时候数据的流向是login_service->game_server::relay_entity->game_server::player_entity->gate_server->client,中间的两层game_server不负责任何逻辑,完全执行数据转发任务。在这种情况下可以考虑跳过game_server相关的两层,直接把要广播的数据直接发向gate_server,然后让gate_server去遍历当前进程上绑定的所有客户端来执行在线通知。在这样的优化设计下,数据链路缩短为login_service->gate_server->client,减少了两层中转,同时数据流量也变得可控了,之前需要发送的数据份数为在线玩家的数量,而现在则缩减为gate_server的数量,这样内网流量放大倍率从几万的量级降低到了几十,同时还极大的降低了login_service的负载。
实际项目使用过程中,广播消息不仅仅只有全服广播,还有门派广播、势力广播、场景广播等多种类型。这些类型虽然不需要给所有在线客户端发送通知消息,但是其通知的人员范围依然是一个成百上千的数量,利用之前的多播接口依然会有性能问题。所以对于这些广播操作,采取先发送给所有的gate_server然后再由gate_server进行过滤后广播的方式依然可以节省很多的内网流量,同样可以避免这个广播接口的负载。在考虑了这些自定义的广播组需求之后,我们需要在gate_server上增加一个unordered_map来记录每个广播组下面的人员:
// 每个群组对应的client
// 这里的key string_view 对应的str就是value里的shared_ptr
std::unordered_map<std::string, std::unordered_map<std::string_view, std::shared_ptr<const std::string>>> m_clients_for_group;
玩家角色可以通过下面的两个接口来维护自己与group之间的关系:
void space_server::update_player_broadcast_group(const entity::player_entity* cur_player, const std::vector<std::string>& groups)
{
auto cur_account_id = *cur_player->shared_account_id();
json params;
params["entity_id"] = cur_account_id;
params["groups"] = groups;
json msg;
msg["cmd"] = "request_link_group";
msg["param"] = params;
m_router->push_msg(cur_player->get_gate_id(), m_local_name_ptr, {}, std::make_shared<std::string>(msg.dump()), enums::packet_cmd_helper::encode(enums::packet_cmd::server_control, 0));
}
void space_server::clear_player_broadcast_group(const entity::player_entity* cur_player, const std::vector<std::string>& groups)
{
auto cur_account_id = *cur_player->shared_account_id();
json params;
params["entity_id"] = cur_account_id;
params["groups"] = groups;
json msg;
msg["cmd"] = "request_unlink_group";
msg["param"] = params;
m_router->push_msg(cur_player->get_gate_id(), m_local_name_ptr, {}, std::make_shared<std::string>(msg.dump()), enums::packet_cmd_helper::encode(enums::packet_cmd::server_control, 0));
}
gate_server上提供这两个接口来处理上面的两条消息通知,维护内部的m_clients_for_group:
void on_request_link_group(std::shared_ptr<network::net_connection> con, std::shared_ptr<const std::string> dest, const json& msg);
void on_request_unlink_group(std::shared_ptr<network::net_connection> con, std::shared_ptr<const std::string> dest, const json& msg);
同时gate_server上暴露一个广播接口on_request_broadcast_groups,方便space_server来调用,这个接口还支持给多个group一起广播:
void gate_server::on_request_broadcast_groups(std::shared_ptr<network::net_connection> con, std::shared_ptr<const std::string> dest, const json& msg)
{
std::vector<std::string> groups;
std::string msg_detail;
std::uint8_t msg_cmd;
try
{
msg.at("groups").get_to(groups);
msg.at("msg_detail").get_to(msg_detail);
msg.at("msg_cmd").get_to(msg_cmd);
}
catch(const std::exception& e)
{
m_logger->error("on_request_broadcast_groups fail to parse {} with error {}", msg.dump(), e.what());
return;
}
auto cur_shared_rpc_msg = std::make_shared<std::string>(std::move(msg_detail));
for(const auto& group: groups)
{
auto temp_iter = m_clients_for_group.find(group);
if(temp_iter == m_clients_for_group.end())
{
continue;;
}
for(const auto& one_entity_pair: temp_iter->second)
{
m_router->push_msg({}, one_entity_pair.second, cur_shared_rpc_msg, enums::packet_cmd_helper::encode(enums::packet_cmd::game_to_client, msg_cmd));
}
}
}
space_server上提供了广播消息的入口:
void space_server::send_msg_to_broadcast_groups(const std::vector<std::string>& groups, std::shared_ptr<const std::string>& rpc_msg)
{
json params;
params["groups"] = groups;
params["msg_detail"] = *rpc_msg;
params["msg_cmd"] = std::uint8_t(enums::entity_packet::json_rpc);
json msg;
msg["cmd"] = "request_broadcast_groups";
msg["param"] = params;
auto cur_shared_msg = std::make_shared<std::string>(msg.dump());
for(const auto& one_gate_info: m_gate_entities)
{
m_router->push_msg(one_gate_info.first, m_local_name_ptr, {}, std::make_shared<std::string>(msg.dump()), enums::packet_cmd_helper::encode(enums::packet_cmd::server_control, 0));
}
}
而调用这个接口的目前只有专门处理广播的notify_manager:
void notify_manager::notify_broadcast_groups(const std::vector<std::string>& groups, const utility::rpc_msg& msg)
{
auto cur_cmd = msg.cmd;
std::shared_ptr<const std::string> shared_msg = msg.to_bytes();
utility::rpc_msg stat_msg;
stat_msg.cmd = "add_broadcast_group_stat";
stat_msg.set_args(groups, cur_cmd, std::uint32_t(shared_msg->size()));
m_server->call_service("notify_service", stat_msg);
m_server->send_msg_to_broadcast_groups(groups, shared_msg);
}
目前的mosaic_game里只有全服聊天和门派聊天使用了notify_manager提供的这个接口来做广播:
void player_notify_component::send_msg_to_broadcast_groups(const std::vector<std::string>& groups, const utility::rpc_msg& msg)
{
server::notify_manager::instance().notify_broadcast_groups(groups, msg);
}
void player_notify_component::send_msg_to_broadcast_group(const std::string& group, const utility::rpc_msg& msg)
{
m_player->prop_proxy().notify().broadcast_group_send_ts().insert(group, utility::timer_manager::now_ts());
std::vector<std::string> cur_groups;
cur_groups.push_back(group);
server::notify_manager::instance().notify_broadcast_groups(cur_groups, msg);
}
虽然广播给所有客户端占在线广播消息的绝大部分,但是还有一些情况广播数据并不传递到客户端,而是通知到player_entity这一层去执行一些逻辑,此时的数据传递就不能用前述的gate广播组来做。不过这里我们也可以使用类似的设计,将数据发送到所有的game_server,然后由game_server去遍历当前进程上的所有玩家执行广播消息通知。这部分的功能通过notify_service来提供:
void notify_service::notify_all_online(const utility::rpc_msg& msg, const std::string& cmd, const json::object_t& detail)
{
db_logic::notify_msg new_msg;
new_msg.msg.cmd = cmd;
new_msg.msg.args = args;
new_msg.doc_seq = m_online_msgs.size();
m_online_msgs.push_back(new_msg);
if(m_delay_broadcast_timer.valid())
{
return;
}
utility::rpc_msg cur_broadcast_msg;
cur_broadcast_msg.cmd = "sync_add_online_msg";
cur_broadcast_msg.set_args(new_msg);
get_server()->call_server_multi(cur_broadcast_msg, m_broadcast_managers);
}
这个接口会将广播数据通知到所有注册过来的notify_manager上,由于在每个space_server上都会创建一个notify_manager,所以等价于把这个消息广播到了space_server。当space_server上的notify_manager接收到这个请求之后,会遍历当前进程上的所有玩家来通知去查收最新的全服广播消息:
void notify_manager::sync_add_online_msg(const utility::rpc_msg& data, const json& new_online_msg)
{
m_logger->info("sync_add_online_msg {}", new_online_msg.dump());
db_logic::notify_msg temp_msg;
try
{
new_online_msg.get_to(temp_msg);
}
catch(const std::exception& e)
{
m_logger->error("sync_add_online_msg fail for msg {}", new_online_msg.dump());
return;
}
m_online_msgs.push_back(temp_msg);
auto cur_players = entity::entity_manager::instance().get_entities_by_exact_type<
entity::player_entity>();
for(auto one_player: cur_players)
{
one_player->dispatcher().dispatch(enums::event_category::notify, std::string("online"));
}
}
这里的获取所有在线玩家的实现是一个可以优化的点,内部会使用dynamic_cast来将server_entity转换到player_entity,如果这个有比较明显的性能瓶颈的话,推荐在notify_manager上维护好一个单独的在线player_entity的集合,这样就可以避免每次都执行这个get_entities操作。
玩家身上的player_notify_component注册了这个广播数据的接收,并重定向到rpc的处理:
void player_notify_component::event_listener(const utility::enum_type_value_pair& ev_cat, const std::string& detail)
{
if(ev_cat != utility::enum_type_value_pair(enums::event_category::notify))
{
return;
}
m_owner->logger()->info("player_notify_component event_listener event {} value {} detail {}", ev_cat.enum_type, ev_cat.enum_value, detail);
if(detail == "all")
{
handle_online_msgs();
handle_db_msgs();
}
else if(detail == "online")
{
handle_online_msgs();
}
else if(detail == "db")
{
handle_db_msgs();
}
}
void player_notify_component::handle_online_msgs()
{
const auto& online_msgs = server::notify_manager::instance().online_msgs();
if(online_msgs.size() <= m_player->prop_data().notify().online_seq_read())
{
return;
}
for(auto i = m_player->prop_data().notify().online_seq_read(); i< online_msgs.size(); i++)
{
on_new_notify(online_msgs[i], true);
}
}
注意到这里我们还给这个消息添加了一个唯一递增序列号,玩家自身也记录一个不存库的属性来表明自身已经读取到哪一个在线信息了,玩家每处理一个在线信息就对这个属性进行更新:
void player_notify_component::on_new_notify(const db_logic::notify_msg& new_msg, bool is_online)
{
m_owner->logger()->info("on_new_notify {}", json(new_msg).dump());
if(is_online)
{
if(m_player->prop_proxy().notify().online_seq_read().get() < new_msg.doc_seq)
{
m_player->prop_proxy().notify().online_seq_read().set(new_msg.doc_seq);
m_player->on_rpc_msg(new_msg.msg);
}
else
{
m_owner->logger()->error("duplicated on_new_notify {}", json(new_msg).dump());
}
}
else
{
if(m_player->prop_proxy().notify().db_seq_read().get() < new_msg.doc_seq)
{
m_player->prop_proxy().notify().db_seq_read().set(new_msg.doc_seq);
m_player->on_rpc_msg(new_msg.msg);
}
else
{
m_owner->logger()->error("duplicated on_new_notify {}", json(new_msg).dump());
}
}
}
这里的序列号主要是为了避免广播消息在同一个player_entity上重复执行,下面就是一种可能出现重复处理消息通知的时间线
T1 notify_service::notify_all_online msg_1
T2 space_server_1::notify_manager::sync_add_online_msg msg_1
T3 space_server_1::player_A::on_new_notify msg_1
T4 space_server_1::player_A::migrate_out
T5 space_server_2::player_A::migrate_in
T6 space_server_2::notify_manager::sync_add_online_msg msg_1
player_A在space_server_1处理了一条广播消息msg_1之后发生了迁移,迁移到了space_server_2之后,这个msg_1才传递到space_server_2::notify_manager上,此时如果不判断消息的序列号的话,就会出现消息的重复通知。
除了重复通知之外,还可能出现消息的通知丢失问题,主要出现在玩家的迁移过程中。此时玩家的entity被销毁,其数据正在网络中中转,任意一个space_server都没有其对应的entity,因此消息会通知不到。为了解决这个问题,玩家在迁移结束之后会重新拉取一下notify_manager里存储的消息,判断是否需要处理:
bool player_notify_component::init(const json& data)
{
m_player = dynamic_cast<player_entity*>(m_owner);
if(!m_player)
{
return false;
}
m_owner->dispatcher().add_listener(enums::event_category::notify, &player_notify_component::event_listener, this);
m_player->login_dispatcher().add_listener(&player_notify_component::on_login, this);
m_player->logout_dispatcher().add_listener(&player_notify_component::on_logout, this);
// 下面这行负责处理迁移完成之后的消息拉取
m_owner->migrate_in_finish_dispatcher().add_listener(
&player_notify_component::on_migrate_in_finish, this);
return true;
}
void player_notify_component::on_migrate_in_finish()
{
handle_db_msgs();
handle_online_msgs();
}
离线消息投递
本章前面的内容介绍的都是如何向一个或多个在线的客户端发送消息,其核心在于在线,如果玩家不在线或者中途断线再上线,这些消息他就接收不到。所以这类在线消息通知只能用于一些提示性的业务,消息的接收与否不能影响服务端的逻辑正确性。如果我们需要向一个或多个玩家发送一些保证能接收到的消息,前述的机制就无法使用了,必须引入一种依赖于数据库的消息接收确认机制,来保证这个消息在玩家上线后能够及时的处理。
单播消息
跟在线消息投递一样,离线单播消息也是离线消息投递的基础。确保消息被接收我们可以仿照TCP的ACK机制,每个玩家的离线消息地址当作一个先进先出的队列,这个地址里接收到的数据会按照到达序分配一个递增流水号,同时将这条数据进行存库。然后玩家自己身在线后定期从离线消息队列中拉取头部的若干个消息进行处理,并删除已经处理完成的数据。
在mosaic_game中也的确是这样实现的,在数据库中创建了一个单独的表OfflineMsg来存储所有玩家的离线消息通知,这个库里的每条消息都有一个entity_id字段代表对应的玩家id,同时有一个doc_seq字段代表这条消息的唯一序列号:
"OfflineMsg": [
[
[["entity_id", 1]],
{
}
],
[
[["entity_id", 1], ["doc_seq", 1]],
{
"unique": true
}
]
]
这个数据库的操作都被封装到了entity_db_msg_manager_base中,在cpp中定义了消息的完整格式:
struct entity_db_msg
{
std::string entity_id;
json::object_t detail;
std::uint64_t doc_seq;
std::uint64_t ts;
NLOHMANN_DEFINE_TYPE_INTRUSIVE(entity_db_msg, entity_id, detail, doc_seq, ts)
};
对于每个entity_id, 其doc_seq为0的行会作为一个元数据行,里面有一个额外的字段used_seq代表这个玩家的离线消息里使用的最大流水号,每次向这个玩家发送离线消息的时候,需要先查询这条doc_seq==0的数据里记录的used_seq:
void entity_db_msg_manager_base::add_msg(const std::string& entity_id,const json::object_t& detail)
{
std::shared_ptr<entity_db_msg> cur_entity_db_msg = std::make_shared<entity_db_msg>();
cur_entity_db_msg->entity_id = entity_id;
cur_entity_db_msg->detail = detail;
cur_entity_db_msg->doc_seq = 0;
cur_entity_db_msg->ts = utility::timer_manager::now_ts();
auto cur_db_callback = [cur_entity_db_msg, this](const json& db_reply)
{
on_query_seq_back(cur_entity_db_msg, db_reply);
};
tasks::db_task_desc::base_task cur_task_base(tasks::db_task_desc::task_op::modify_update, std::string{}, "", collection_name());
json query_doc, db_doc;
query_doc["entity_id"] = meta_doc_id(entity_id);
query_doc["doc_seq"] = 0;
db_doc["$inc"]["used_seq"] = 1;
auto cur_modify_task = tasks::db_task_desc::modify_task::modify_one(cur_task_base, query_doc, db_doc, true, true);
run_db_task(cur_modify_task, cur_db_callback);
}
由于这个玩家的doc_seq==0的行可能还没有创建,所以查询的时候使用的接口是modify_one,代表如果没有的话就以默认值来创建。在这个db操作的回调on_query_seq_back,使用最新递增之后作为这条消息的序列号,最后才能插入到数据库中:
cur_entity_db_msg->doc_seq = used_seq;
auto cur_db_callbak = [cur_entity_db_msg, this](const json& db_reply)
{
on_add_msg_back(cur_entity_db_msg, db_reply);
};
tasks::db_task_desc::base_task cur_task_base(tasks::db_task_desc::task_op::insert_one, std::string{}, "", collection_name());
json db_doc = *cur_entity_db_msg;
auto cur_insert_task = tasks::db_task_desc::insert_task::insert_one(cur_task_base, db_doc);
run_db_task(cur_insert_task, cur_db_callbak);
插入完成之后,还需要执行一个通知操作,这样如果这个玩家在线的话就会去立即拉取数据库中存好的通知信息:
void entity_db_msg_manager_base::on_add_msg_back(std::shared_ptr<entity_db_msg> cur_entity_db_msg, const json& db_reply)
{
m_logger->info("on_add_msg_back for msg {} db_reply {}", json(*cur_entity_db_msg).dump(), db_reply.dump());
notify_pull_msg(cur_entity_db_msg);
}
void offline_msg_manager::notify_pull_msg(std::shared_ptr<db_logic::entity_db_msg> cur_msg)
{
utility::rpc_msg notify_msg;
notify_msg.cmd = "request_call_online";
std::vector<json> notify_cmd_args;
notify_cmd_args.push_back(cur_msg->doc_seq);
notify_msg.set_args(cur_msg->entity_id, std::string("notify_pull_offline_msg"), notify_cmd_args);
m_server->call_service("login_service", notify_msg);
}
这里由于不知道这个玩家的在线call_proxy,所以只能委托到login_service去执行在线通知,所以login_service的压力还是比较大的。
注意到这个通知消息并没有将当前的entity_db_msg打包过去,只打包了序列号,这是因为要保证在OfflineMsg中一个entity_id对应的数据要严格按照序列号来处理。在我们目前的设计中,一次add_msg会触发两次数据库写入操作,然后再加上一次login_service->relay_entity->player_entity的双层转发操作,这样的多次异步过程在多进程结构中是无法保证player_entity接收到的消息是按序到达的。举个例子来说space_server_1与space_server_2对同一个entity_id执行add_msg操作,space_server_1的on_query_seq_back的返回值里序列号递增为了2,而 space_server_2的on_query_seq_back的返回值里序列号递增为了3。然后在后续的多个网络发送中,可能会出现3这个notify_pull_offline_msg请求优先到达player_entity上,如果此时立即把带过来的3对应的通知消息处理的话,就会导致之前设定的严格按照递增序处理离线消息这个规则被违反。
当player_entity接收到这个只带序号的消息通知之后,会立即再拉取OfflineMsg数据库中的未处理数据:
void player_offline_msg_component::notify_pull_offline_msg(const utility::rpc_msg& msg, std::uint64_t cur_msg_seq)
{
auto temp_iter = m_done_msg_seqs.find(cur_msg_seq);
if(temp_iter != m_done_msg_seqs.end())
{
// 这条消息之前已经处理过了
return;
}
m_remain_msg_seqs.insert(cur_msg_seq);
if(!m_is_pulling_msg)
{
pull_msg_impl();
}
}
void player_offline_msg_component::pull_msg_impl()
{
m_owner->logger()->info("entity {} pull_msg_impl ", m_owner->entity_id());
m_is_pulling_msg = true;
std::function<void(const std::string&, const std::vector<db_logic::entity_db_msg>& )> pre_cb = std::bind(&player_offline_msg_component::handle_new_offline_msgs, this, std::placeholders::_1, std::placeholders::_2);
server::offline_msg_manager::instance().pull_msg(m_owner->entity_id(), 10, m_owner->convert_callback(pre_cb));
}
当拉取到新的未处理数据之后,按照顺序处理拉取的数据,处理完成之后删除已处理的,然后再执行一次拉取:
std::vector<std::uint64_t> temp_msg_seqs;
for(const auto& one_msg: result_msgs)
{
if(m_done_msg_seqs.find(one_msg.doc_seq) != m_done_msg_seqs.end())
{
// 出现数据已经处理但是db还未完全删除 但是新的一次pull 又把数据拉出来的情况
temp_msg_seqs.push_back(one_msg.doc_seq);
continue;
}
m_done_msg_seqs.insert(one_msg.doc_seq);
m_remain_msg_seqs.erase(one_msg.doc_seq);
temp_msg_seqs.push_back(one_msg.doc_seq);
utility::rpc_msg cur_rpc;
try
{
one_msg.detail.at("cmd").get_to(cur_rpc.cmd);
one_msg.detail.at("args").get_to(cur_rpc.args);
}
catch(const std::exception& e)
{
m_owner->logger()->error("fail to decode offline msg {}", json(one_msg.detail).dump());
continue;
}
m_owner->rpc_owner_on_rpc(cur_rpc);
}
server::offline_msg_manager::instance().del_msg(m_owner->entity_id(), temp_msg_seqs);
pull_msg_impl();
当某次拉取数据得到的是空数据之后,才停止拉取。但是这里又有一个异步导致的问题,相关函数调用的时机如下所示:
T1: notify_pull_offline_msg 2 -> pull_msg_impl
T2: handle_new_offline_msgs [2] ->pull_msg_impl
T3: notify_pull_offline_msg 3
T4: handle_new_offline_msgs []
T1时刻玩家收到了序列号2的通知,此时发起了一次未读队列拉取请求pull_msg_impl,T2时刻处理完序列号2的数据之后再发起了一次未读队列拉取请求,T3时刻又有一个新的序列号3过来。但是这个未读队列在T2拉取时并没有读取到3的数据,导致T4时刻返回了空集合,判定为数据处理结束,这样就导致数据3停留在数据库之中,直到下次pull_msg_impl被执行。所以这里会先用一个std::unordered_set<std::uint64_t> m_remain_msg_seqs;来存储所有接收到的未处理消息序列号,只有当pull_msg_impl的结果为空且m_remain_msg_seqs才停止拉取,如果只是pull_msg_impl则开启一个短间隔的计时器去延迟拉取:
if(result_msgs.empty())
{
if(m_remain_msg_seqs.empty())
{
m_is_pulling_msg = false;
return;
}
else
{
m_owner->add_timer_with_gap(std::chrono::seconds(1), [this]()
{
pull_msg_impl();
});
return;
}
}
上面介绍的是消息不需要保存历史记录时的处理机制,如果消息被处理之后不能立即删除,则玩家身上需要记录一个存库的字段,来表明当前已经处理的离线数据的最大流水号,查询的时候需要使用这个最大已读流水号去过滤。同时还需要一个存库的字段去记录当前最大未读流水号,这样能够更快的知道还剩多少消息未处理。这种带历史记录的离线保序消息处理的细节可以参考邮件系统里player_email_component里的相关逻辑。
多播消息
多播消息的在线投递机制非常简单,就是对单播消息的在线投递的一个循环调用。但是多播消息的离线投递机制则无法直接复用单播消息的离线投递机制,因为这个消息不能被单人处理后直接从数据库中删除。所以每个人需要对这个多播消息做一个最大已处理序号的记录,各自拉取消息的时候需要加入已读最大值作为查询条件。这个多播消息的典型应用场景就是群组聊天的通知,由于这部分的内容已经被聊天和群组覆盖了,实现细节上与邮件系统大同小异,所以这里就不再详细介绍。
广播消息
广播消息的离线推送实现上基本照抄自广播消息的在线player_entity推送,相关rpc流程基本是类似的,只不过在notify_service发出广播之前,需要先将数据存库,每一个消息都有一条数据库记录:
void notify_service::notify_all_db(const utility::rpc_msg& msg, const std::string& cmd, const json::array_t& args)
{
db_logic::notify_msg new_msg;
new_msg.msg.cmd = cmd;
new_msg.msg.args = args;
new_msg.doc_seq = 0;
if(m_next_db_seq == 0)
{
m_db_msgs.push_back(new_msg);
return;
}
new_msg.doc_seq = m_next_db_seq;
m_next_db_seq++;
m_db_msgs.push_back(new_msg);
save_db_seq();
tasks::db_task_desc::base_task cur_task_base(tasks::db_task_desc::task_op::insert_one, std::string{}, "", m_collection_name);
json db_doc = new_msg;
auto cur_db_callback = [this](const json& db_reply)
{
on_insert_seq_back(db_reply);
};
auto cur_insert_task = tasks::db_task_desc::insert_task::insert_one(cur_task_base, db_doc);
get_server()->call_db(cur_insert_task->to_json(), cur_db_callback);
if(m_delay_broadcast_timer.valid())
{
return;
}
utility::rpc_msg cur_broadcast_msg;
cur_broadcast_msg.cmd = "sync_add_db_msg";
cur_broadcast_msg.set_args(new_msg);
get_server()->call_server_multi(cur_broadcast_msg, m_broadcast_managers);
}
值得注意的是这里的m_db_msgs数组中并不会存储所有的的离线消息,而只存储本次服务器启动之后加入的离线消息。所以玩家在获取指定序列号的离线消息的时候,这条消息可能并不在notify_manager的m_db_msgs数组中,需要去数据库里拉取这些数据:
void player_notify_component::handle_db_msgs()
{
if(m_player->prop_data().notify().db_seq_read() + 1 >= server::notify_manager::instance().next_db_seq())
{
return;
}
std::uint64_t cached_db_begin = server::notify_manager::instance().next_db_seq();
const auto& cached_msgs = server::notify_manager::instance().db_msgs();
if(!cached_msgs.empty())
{
cached_db_begin = cached_msgs.front().doc_seq;
}
m_owner->logger()->debug("handle_db_msgs self seq {} cached_db_begin {}", m_player->prop_data().notify().db_seq_read(), cached_db_begin);
if(m_player->prop_data().notify().db_seq_read() + 1 < cached_db_begin)
{
// pull from db
std::uint64_t pull_seq_end = cached_db_begin - 1;
std::uint64_t pull_seq_begin = m_player->prop_data().notify().db_seq_read() + 1;
if(pull_seq_end - pull_seq_begin > 10)
{
pull_seq_end = pull_seq_begin + 10;
}
pull_unread_db_msgs(pull_seq_begin, pull_seq_end);
}
else
{
// pull from memory
if(cached_msgs.empty())
{
return;
}
for(auto i = m_player->prop_data().notify().db_seq_read() - cached_msgs.front().doc_seq + 1; i< cached_msgs.size(); i++)
{
on_new_notify(cached_msgs[i], false);
}
}
}
notify().db_seq_read()里存储的是最大离线消息已处理序列号,这个属性是要存库的,而在线消息notify().online_seq_read()则不存库。
handle_db_msgs在被触发的时候会检查下一个要处理的数据是否在notify_manager中,不在的话拉取后续的10条数据来渐进处理:
void player_notify_component::pull_unread_db_msgs(std::uint64_t seq_begin, std::uint64_t seq_end)
{
const std::string notify_db_name = "NotifyMsg";
auto cur_reply_cb = m_owner->convert_callback(m_owner->add_callback([=](const json& db_result)
{
this->pull_unread_db_msgs_cb(seq_begin, seq_end, db_result);
}));
tasks::db_task_desc::base_task cur_task_base(tasks::db_task_desc::task_op::find_multi, std::string{}, "", notify_db_name);
json query_filter, sort;
query_filter["doc_seq"]["$lte"] = seq_end;
query_filter["doc_seq"]["$gte"] = seq_begin;
sort["doc_seq"] = 1;
auto cur_find_task = tasks::db_task_desc::find_task::find_multi(cur_task_base, query_filter, seq_end - seq_begin + 1, {}, 0, tasks::db_task_desc::read_prefer_mode::secondary, sort );
m_owner->call_db(cur_find_task->to_json(), cur_reply_cb);
}
在数据查询回来之后再使用之前在线消息分发使用的on_new_notify来分发消息,这个共享接口里通过一个bool值来区分是在线消息和离线消息。处理完一个批次之后会再使用handle_db_msgs来检查是否还有后续消息要处理:
void player_notify_component::pull_unread_db_msgs_cb(std::uint64_t seq_begin, std::uint64_t seq_end, const json& db_reply)
{
std::vector<db_logic::notify_msg> result_docs;
std::string error;
tasks::db_task_desc::task_reply cur_reply;
// 省略反序列化相关代码
for(const auto& one_msg: result_docs)
{
on_new_notify(one_msg, false);
}
if(seq_end > m_player->prop_data().notify().db_seq_read())
{
m_player->prop_proxy().notify().db_seq_read().set(seq_end);
}
handle_db_msgs();
}
BigWorld 的 RPC 实现
INTERFACE与RPC
在Bigworld引擎中,每一种App所支持的RPC的声明需要集中在一个地方声明,一般都放在xxxApp_Interface.hpp文件里。在这个头文件中,会声明一个XXXAppInterface的名字空间,然后在这个名字空间下声明一个个的RPC。在这个名字空间的声明里会使用各种宏来辅助,例如下面的BEGIN_MERCURY_INTERFACE负责开启当前Interface的名字空间声明:
#pragma pack( push, 1 )
BEGIN_MERCURY_INTERFACE( CellAppInterface )
这个宏最终会展开为下面的cpp代码:
namespace CellAppInterface
{
extern Mercury::InterfaceMinder gMinder;
void registerWithInterface( Mercury::NetworkInterface & networkInterface );
Mercury::Reason registerWithMachined( Mercury::NetworkInterface & networkInterface, int id );
Mercury::Reason registerWithMachinedAs( const char * name, Mercury::NetworkInterface & networkInterface, int id );
};
这里的三个函数主要负责向全局路由里注册当前机器可以提供的Interface。
然后再一个接一个的来声明具体的RPC,下面就是CellAppInterface开头的几个RPC声明的样例:
// -------------------------------------------------------------------------
// CellApp messages
// -------------------------------------------------------------------------
BW_STREAM_MSG_EX( CellApp, addCell )
// SpaceID spaceID;
BW_BEGIN_STRUCT_MSG( CellApp, startup )
Mercury::Address baseAppAddr;
END_STRUCT_MESSAGE()
BW_STREAM_MSG_EX对应的是一个无具体参数的RPC的声明,这里的无具体参数并不是代码这个RPC不需要参数,而是将这个RPC的参数当作不定长度的字节流stream来处理,具体的参数解析依赖于具体的逻辑。展开之后就是很简单的一行代码,声明一个extern const Mercury::InterfaceElement &的变量, 变量名字就是当前RPC的名字:
extern const Mercury::InterfaceElement & addCell;
BW_BEGIN_STRUCT_MSG对应的是一个有固定参数的RPC的声明。上面的代码片段的宏展开之后,除了会生成跟之前一样的一个extern const Mercury::InterfaceElement &变量之外,还会生成一个xxxArgs的结构体来封装这个RPC的所有参数:
struct startupArgs;
extern const Mercury::InterfaceElement & startup;
Mercury::Bundle & operator<<( Mercury::Bundle & b, const struct startupArgs &s );
struct startupArgs
{
static startupArgs & start( Mercury::Bundle & b, Mercury::ReliableType reliable = Mercury::RELIABLE_DRIVER )
{
return *(startupArgs*)b.startStructMessage( startup, reliable );
}
static startupArgs & startRequest( Mercury::Bundle & b, Mercury::ReplyMessageHandler * handler, void * arg = 0, int timeout = Mercury::DEFAULT_REQUEST_TIMEOUT, Mercury::ReliableType reliable = Mercury::RELIABLE_DRIVER )
{
return *(startupArgs*)b.startStructRequest( startup, handler, arg, timeout, reliable );
}
static const Mercury::InterfaceElement & interfaceElement() { return startup; }
Mercury::Address baseAppAddr;
};
这里的startupArgs::start的作用就是在传入的Bundle里开始填充一个startUp的RPC相关数据,这个startStructMessage在填充了startUp的基本元数据之后,还会分配一个startupArgs大小的缓冲区。
/**
* Make using simple messages easier - returns a pointer the
* size of the message (note: not all fixed length msgs will
* be simple structs, so startMessage doesn't do it
* automatically)
*/
INLINE void * Bundle::startStructMessage( const InterfaceElement & ie,
ReliableType reliable )
{
this->startMessage( ie, reliable );
return this->reserve( ie.lengthParam() );
}
start函数将这个缓冲区的开始地址强转为startupArgs结构体类型的地址,然后返回这个结构体的引用,外部有了这个结构体的引用之后,就可以开始对startupArgs的内部成员变量做赋值操作,这些赋值操作就是RPC的参数填充。
startRequest也是做了类似的操作,不过这里对应的是逻辑层的一个RPC请求,不仅仅是一个RPC数据的简单填充,需要考虑应答、超时、可靠性等各种参数:
/**
* Make using simple requests easier - returns a pointer the
* size of the request message.
*/
INLINE void * Bundle::startStructRequest( const InterfaceElement & ie,
ReplyMessageHandler * handler, void * arg,
int timeout, ReliableType reliable)
{
this->startRequest( ie, handler, arg, timeout, reliable );
return this->reserve( ie.lengthParam() );
}
在xxxApp_Interface.hpp声明完所有的RPC之后,会有一个对应的xxxAPP_interface.cpp文件来提供这些声明的变量和函数的实现,下面就是cellapp_interface.cpp里的全部内容:
// This file should be linked against by those wishing to use our interface
#include "cellapp/cellapp_interface.hpp"
#include "network/network_interface.hpp"
#define DEFINE_INTERFACE_HERE
#include "cellapp/cellapp_interface.hpp"
// cellapp_interface.cpp
这里会对头文件cellapp_interface.hpp引用两次,第一次负责获取所有的声明,然后第二次引用会在DEFINE_INTERFACE_HERE的帮助下生成这些声明的具体实现。因为之前的相关辅助宏会根据DEFINE_INTERFACE_HERE是否定义来切换具体实现。例如开头的BEGIN_MERCURY_INTERFACE( CellAppInterface )在DEFINE_INTERFACE_HERE被定义之后会展开为这些实现代码,会声明一个全局的RPC元数据管理器gMinder:
namespace CellAppInterface
{
Mercury::InterfaceMinder gMinder( "CellAppInterface" );
void registerWithInterface( Mercury::NetworkInterface & networkInterface )
{
gMinder.registerWithInterface( networkInterface );
}
Mercury::Reason registerWithMachined( Mercury::NetworkInterface & networkInterface, int id )
{
return gMinder.registerWithMachined( networkInterface.address(), id );
}
Mercury::Reason registerWithMachinedAs( const char * name, Mercury::NetworkInterface & networkInterface, int id )
{
return gMinder.registerWithMachinedAs( name, networkInterface.address(), id );
}
同时BW_STREAM_MSG_EX( CellApp, addCell )会被简单的展开为这样的向gMinder注册一个RPC的代码:
StreamMessageHandlerEx< CellApp > gHandler_addCell(&CellApp::addCell);
const Mercury::InterfaceElement & addCell = gMinder.add( "addCell", Mercury::VARIABLE_LENGTH_MESSAGE, 2, &gHandler_addCell );
这个add函数将传入的参数构造出一个InterfaceElement,塞入到gMinder的内部数组elements_中,在这里会给每个注册过来的RPC赋予一个唯一id,其实就是此时elements_数组的长度:
/**
* This method adds an interface element (Mercury method) to the interface minder.
* @param name Name of the interface element.
* @param lengthStyle Specifies whether the message is fixed or variable.
* @param lengthParam This depends on lengthStyle.
* @param pHandler The message handler for this interface.
*/
InterfaceElement & InterfaceMinder::add( const char * name,
int8 lengthStyle, int lengthParam, InputMessageHandler * pHandler )
{
const MessageID id = static_cast<MessageID>(elements_.size());
// Set up the new bucket and add it to the list
InterfaceElement element( name, id, lengthStyle, lengthParam,
pHandler );
elements_.push_back( element );
return elements_.back();
}
这里的lengthStyle代表当前RPC的参数大小是否固定,lengthParam的意思依赖于lengthStyle的值:
- 如果
lengthStyle是固定长度消息FIXED_LENGTH_MESSAGE = 0,则此时的lengthParam表示消息的固定字节数, - 如果
lengthStyle是可变长度消息VARIABLE_LENGTH_MESSAGE = 1,则此时lengthParam表示用于存储消息大小的字节数,用于指示消息头中预留多少字节来存储实际的消息长度。在BW_STREAM_MSG_EX会默认的将lengthParam设置为2.代表消息头使用2字节来存储消息长度
对于有参RPC,其展开内容就比较复杂了:
typedef StructMessageHandler< CellApp, CellAppInterface::startupArgs > CellApp_startup_Handler;
CellApp_startup_Handler gHandler_startup(&CellApp::startup);
const Mercury::InterfaceElement & startup =
gMinder.add( "startup", Mercury::FIXED_LENGTH_MESSAGE,
sizeof(struct startupArgs), &gHandler_startup );
Mercury::Bundle & operator<<( Mercury::Bundle & b, const struct startupArgs &s )
{
b.startMessage( startup ); (*(BinaryOStream*)( &b )) << s;
return b;
}
struct __Garbage__startupArgs
{
static startupArgs & start( Mercury::Bundle & b, Mercury::ReliableType reliable = Mercury::RELIABLE_DRIVER )
{
return *(startupArgs*)b.startStructMessage( startup, reliable );
}
static startupArgs & startRequest( Mercury::Bundle & b, Mercury::ReplyMessageHandler * handler, void * arg = 0, int timeout = Mercury::DEFAULT_REQUEST_TIMEOUT, Mercury::ReliableType reliable = Mercury::RELIABLE_DRIVER )
{
return *(startupArgs*)b.startStructRequest( startup, handler, arg, timeout, reliable );
}
static const Mercury::InterfaceElement & interfaceElement() { return startup; }
Mercury::Address baseAppAddr;
};
但是其实也没那么复杂,这里的struct __Garbage__startupArgs 存在的意义只是为了消耗掉Mercury::Address baseAppAddr;这行代码而已,整个结构体__Garbage__startupArgs并不会被外部所引用。展开后的有效内容其实就只有第一行的注册和第二行的operator<<。第一行的注册函数里负责向gMinder里添加一个c参数定长的RPC,此时参数大小lengthParam会被设置为当前参数结构体startupArgs的大小。 然后序列化函数operator<<里负责将startupArgs强转为二进制流并塞入到Bundle中。
这里的RPC参数序列化机制居然是直接对结构体转成二进制之后进行拼接,这种方法只有在结构体内的所有成员都是POD类型的时候才有效,如果结构体内部有String/Vector等动态容器的情况就不适用了。如果RPC的参数里有这些非POD类型,则不能使用BW_BEGIN_STRUCT_MSG,只能使用BW_STREAM_MSG。
RPC的发送、接收与路由
如果业务层需要发起一个RPC,则首先需要在指定的stream里创建一个消息包bundle,然后调用startRequest来填充当前RPC的元数据,下面就是CellAppInterface::addCell的调用样例:
Mercury::Bundle & bundle = cellApp.bundle();
bundle.startRequest( CellAppInterface::addCell,
new AddCellReplyHandler( cellApp.addr(), id_ ) );
this->addToStream( bundle );
在创建好当前的bundle之后,需要开始做参数填充,由于addCell被声明为了变长参数的RPC,所以没有addCellArgs这个结构体来辅助填充参数。Bigworld采取了类似于iostream的方式来做这种非定长RPC参数的填充:
bundle << isFirstCell_;
isFirstCell_ = false;
bundle << isFromDB_;
对于固定参数的RPC来说,填充这个RPC的参数就简单很多了。以之前介绍过的startup为例,只需要填充好这个startupArgs,并添加到bundle里,就可以发送出去了:
void CellApps::startAll( const Mercury::Address & baseAppAddr ) const
{
CellAppInterface::startupArgs args;
args.baseAppAddr = baseAppAddr;
Map::const_iterator iter = map_.begin();
while (iter != map_.end())
{
CellApp * pCellApp = iter->second;
Mercury::Bundle & bundle = pCellApp->bundle();
bundle << args;
pCellApp->send();
++iter;
}
}
在startupArgs添加到bundle的时候,其operator<<就会自动触发对应rpc的元数据填充:
Mercury::Bundle & operator<<( Mercury::Bundle & b, const struct startupArgs &s )
{
b.startMessage( startup ); (*(BinaryOStream*)( &b )) << s;
return b;
}
当所有参数都传递好了之后,就可以调用Channel的send将整个bundle发送到网络了。
当一个进程接收到一个RPC消息bundle的时候,我们需要正确的为这个RPC bundle找到对应的处理函数,这个过程就是RPC的路由。RPC的路由功能也是在之前的宏来控制的,重点是BEGIN_MERCURY_INTERFACE宏展开后生成的registerWithInterface函数,下面的代码片段是CellAppInterface展开之后的开头部分代码:
namespace CellAppInterface
{
Mercury::InterfaceMinder gMinder( "CellAppInterface" );
void registerWithInterface( Mercury::NetworkInterface & networkInterface )
{
gMinder.registerWithInterface( networkInterface );
}
然后在CellApp启动之后的init函数里,会调用这个声明的CellAppInterface::registerWithInterface函数:
/**
* This method is used to initialise the application.
*/
bool CellApp::init( int argc, char * argv[] )
{
// 省略很多代码
// find the cell app manager.
if (!cellAppMgr_.init( "CellAppMgrInterface", Config::numStartupRetries(),
Config::maxMgrRegisterStagger() ))
{
NETWORK_DEBUG_MSG( "CellApp::init: Failed to find the CellAppMgr.\n" );
return false;
}
// Register the fixed portion of our interface with the interface
CellAppInterface::registerWithInterface( interface_ );
// 省略很多代码
}
这个gMinder.registerWithInterface负责将当前注册过来的所有RPC函数都加入到NetworkInterface的RPC路由表里:
/**
* This method registers all the minded interface elements with an interface.
*
* @param networkInterface The network interface to register with.
*/
void InterfaceMinder::registerWithInterface(
NetworkInterface & networkInterface )
{
for (uint i=0; i < elements_.size(); ++i)
{
const InterfaceElement & element = elements_[i];
networkInterface.interfaceTable().serve( element, element.pHandler() );
}
}
/**
* This method registers an interface element as the handler for the given
* message ID on this interface.
*/
void InterfaceTable::serve( const InterfaceElement & ie,
InputMessageHandler * pHandler )
{
InterfaceElement & element = table_[ ie.id() ];
element = ie;
element.pHandler( pHandler );
}
这里的element.pHandler就是我们在执行gminder::add时传入的第四个参数:
/**
* This method adds an interface element (Mercury method) to the interface minder.
* @param name Name of the interface element.
* @param lengthStyle Specifies whether the message is fixed or variable.
* @param lengthParam This depends on lengthStyle.
* @param pHandler The message handler for this interface.
*/
InterfaceElement & InterfaceMinder::add( const char * name,
int8 lengthStyle, int lengthParam, InputMessageHandler * pHandler )
{
const MessageID id = static_cast<MessageID>(elements_.size());
// Set up the new bucket and add it to the list
InterfaceElement element( name, id, lengthStyle, lengthParam,
pHandler );
elements_.push_back( element );
return elements_.back();
}
我们再回顾一下startup生成的注册代码,可以看出这里提供了CellApp::startup这个函数作为当前RPC的处理函数:
typedef StructMessageHandler< CellApp, CellAppInterface::startupArgs > CellApp_startup_Handler;
CellApp_startup_Handler gHandler_startup(&CellApp::startup);
const Mercury::InterfaceElement & startup =
gMinder.add( "startup", Mercury::FIXED_LENGTH_MESSAGE,
sizeof(struct startupArgs), &gHandler_startup );
刚好在CellApp这个类型上有这个函数的声明,对应的参数列表也是对的:
void startup( const CellAppInterface::startupArgs & args );
从上面的代码中可以知道InterfaceTable::table_肯定是消息路由需要使用的结构,因为这里才存储了每个消息的id到对应处理函数的映射。我们来继续探究消息接收后是如何利用这个InterfaceTable的,通过全局搜索InterfaceElementWithStats的文本,基本可以确定相关逻辑在UDPBundleProcessor::dispatchMessages里:
/**
* This method is responsible for dispatching the messages on this bundle to
* the appropriate handlers.
*
* @param interfaceTable The interface table.
* @param addr The source address of the bundle.
* @param pChannel The channel.
* @param networkInterface The network interface.
* @param pStatsHelper The socket receive statistics.
*
* @return REASON_SUCCESS on success, otherwise an appropriate
* Mercury::Reason describing the error.
*/
Reason UDPBundleProcessor::dispatchMessages( InterfaceTable & interfaceTable,
const Address & addr, UDPChannel * pChannel,
NetworkInterface & networkInterface,
ProcessSocketStatsHelper * pStatsHelper ) const
{
# define SOURCE_STR (pChannel ? pChannel->c_str() : addr.c_str())
bool breakLoop = pChannel ? pChannel->isDead() : false;
Reason ret = REASON_SUCCESS;
// NOTE: The channel may be destroyed while processing the messages so we
// need to hold a local reference to keep pChannel valid.
ChannelPtr pChannelHolder = pChannel;
MessageFilterPtr pMessageFilter =
pChannel ? pChannel->pMessageFilter() : NULL;
// now we simply iterate over the messages in that bundle
iterator iter = this->begin();
iterator end = this->end();
interfaceTable.onBundleStarted( pChannel );
while (iter != end && !breakLoop)
{
// find out what this message looks like
InterfaceElementWithStats & ie = interfaceTable[ iter.msgID() ];
if (ie.pHandler() == NULL)
{
// If there aren't any interfaces served on this nub
// then don't print the warning (slightly dodgy I know)
ERROR_MSG( "UDPBundleProcessor::dispatchMessages( %s ): "
"Discarding bundle after hitting unhandled message ID "
"%u\n",
SOURCE_STR, iter.msgID() );
// Note: Early returns are OK because the bundle will
// release the packets it owns for us!
ret = REASON_NONEXISTENT_ENTRY;
break;
}
ie.pHandler()->processingEarlyMessageNow( isEarly_ );
// 省略后续代码
ie.startProfile();
{
PROFILER_SCOPED_DYNAMIC_STRING( ie.c_str() );
if (!pMessageFilter)
{
// and call the handler
ie.pHandler()->handleMessage( addr, header, mis );
}
else
{
// or pass to our channel's message filter if it has one
pMessageFilter->filterMessage( addr, header, mis, ie.pHandler() );
}
}
}
// 省略后续代码
}
这里的UDPBundleProcessor::dispatchMessages负责对当前channel里的多个连续数据做路由分发,所以这里会使用一个while循环来做每个bundle的遍历处理。当处理到一个bundle的时候,会首先拿到这个bundle的msgID,这个就是我们在gminder::add里获取的消息在interface内的唯一id,其实就是数组内的索引。有了这个msgID之后,就可以从interfaceTable里获得table_里的指定元素ie:
class InterfaceTable : public TimerHandler
{
public:
InterfaceElementWithStats & operator[]( int id ) { return table_[ id ]; }
const InterfaceElementWithStats & operator[]( int id ) const { return table_[ id ]; }
};
有了ie之后,ie.pHandler()就是在获取我们注册进去的消息回调函数:
class InterfaceElement
{
public:
InputMessageHandler * pHandler() const { return pHandler_; }
};
然后ie.pHandler()->handleMessage内部会先把参数结构体ARGS_TYPE从data里通过operator>>反序列出来,之后再执行最终的回调函数(pObject->*handler_)( args ),这个函数唯一的参数就是参数结构体ARGS_TYPE:
typedef StructMessageHandler< CellApp, CellAppInterface::startupArgs > CellApp_startup_Handler;
/**
* Objects of this type are used to handle structured messages.
*/
template <class OBJECT_TYPE, class ARGS_TYPE,
class FIND_POLICY = MessageHandlerFinder< OBJECT_TYPE > >
class StructMessageHandler : public Mercury::InputMessageHandler
{
public:
/**
* This type is the function pointer type that handles the incoming
* message.
*/
typedef void (OBJECT_TYPE::*Handler)( const ARGS_TYPE & args );
/**
* Constructor.
*/
StructMessageHandler( Handler handler ) : handler_( handler ) {}
// Override
void handleMessage( const Mercury::Address & srcAddr,
Mercury::UnpackedMessageHeader & header,
BinaryIStream & data ) /* override */
{
OBJECT_TYPE * pObject = FIND_POLICY::find( srcAddr, header, data );
if (pObject != NULL)
{
ARGS_TYPE args;
data >> args;
(pObject->*handler_)( args );
}
else
{
ERROR_MSG( "StructMessageHandler::handleMessage(%s): "
"%s (id %d). Could not find object\n",
srcAddr.c_str(), header.msgName(), header.identifier );
data.finish();
}
}
Handler handler_;
};
上面的StructMessageHandler处理的是参数类型为固定大小的POD结构体的RPC,对于另外一种基于stream参数的RPC,其消息Handler则是StreamMessageHandlerEx:
StreamMessageHandlerEx< CellApp > gHandler_addCell(&CellApp::addCell);
const Mercury::InterfaceElement & addCell = gMinder.add( "addCell", Mercury::VARIABLE_LENGTH_MESSAGE, 2, &gHandler_addCell );
在StreamMessageHandleEx里对RPC进行分发的处理与StructMessageHandler不一样,这里会将传入的srcAddr,header,data三个参数原样的传递过去:
/**
* Objects of this type are used to handle variable length messages. This
* version supplies the source address and header.
*/
template <class OBJECT_TYPE,
class FIND_POLICY = MessageHandlerFinder< OBJECT_TYPE > >
class StreamMessageHandlerEx : public Mercury::InputMessageHandler
{
public:
/**
* This type is the function pointer type that handles the incoming
* message.
*/
typedef void (OBJECT_TYPE::*Handler)(
const Mercury::Address & addr,
const Mercury::UnpackedMessageHeader & header,
BinaryIStream & stream );
/**
* Constructor.
*/
StreamMessageHandlerEx( Handler handler ) : handler_( handler ) {}
// Override
virtual void handleMessage( const Mercury::Address & srcAddr,
Mercury::UnpackedMessageHeader & header,
BinaryIStream & data )
{
OBJECT_TYPE * pObject = FIND_POLICY::find( srcAddr, header, data );
if (pObject != NULL)
{
(pObject->*handler_)( srcAddr, header, data );
}
else
{
// OK we give up then
ERROR_MSG( "StreamMessageHandlerEx::handleMessage: "
"Do not have object for message from %s\n",
srcAddr.c_str() );
}
}
Handler handler_;
};
所以addCell这个RPC在CellApp上的处理函数声明是这样的,带上了这个BinaryIStream:
void addCell( const Mercury::Address & srcAddr,
const Mercury::UnpackedMessageHeader & header,
BinaryIStream & data );
BigWorld 的 Entity 通信
bigworld这种分布式大世界架构相对于常规的MMO服务器来说通信复杂度上升了很多。在常规的MMO中可能只需要维护好一个entity跨进程迁移时的消息投递,在分布式大世界中entity之间的消息投递由于real/ghost的存在变得复杂了很多。为了减少逻辑上处理这种分布式大世界的通信代码,Bigworld在框架上提供了很多机制,来隐藏底层的通信拓扑。下面我们将对框架层的一些封装进行拆解,以了解其所需要解决的具体问题。
RealEntity的数据下发流程
在bigworld的设计中,能向客户端发送信息的只有这个客户端对应player的RealEntity。向自身客户端发送消息的入口在Entity::sendToClient这个函数中:
/**
* This method is exposed to scripting. It should only be called by avatars
* that have an associated client. It sends a message to that client.
* Assumes that 'args' are valid according to the MethodDescription.
*
* @param description The description of the method to send.
* @param argStream A MemoryOStream containing the destination entity
* ID and arguments for the method.
* @param isForOwn A boolean flag indicates whether message should be
* sent to the client associated with the entity.
* @param isForOthers A boolean flag indicates whether message should be
* send to all other clients apart from the client
* associated with the entity.
* @param isExposedForReply
* This determines whether the method call will be
* recorded, if a recording is active.
*/
bool Entity::sendToClient( EntityID entityID,
const MethodDescription & description, MemoryOStream & argStream,
bool isForOwn, bool isForOthers,
bool isExposedForReplay )
{
if (pReal_ == NULL)
{
return false;
}
if (isForOthers)
{
g_publicClientStats.trackEvent( pEntityType_->name(),
description.name(), argStream.size(),
description.streamSize( true ) );
pReal_->addHistoryEvent( description.exposedMsgID(), argStream,
description, description.streamSize( true ),
description.priority() );
}
if (isForOwn)
{
if (pReal_->pWitness() == NULL)
{
return false;
}
argStream.rewind();
g_privateClientStats.trackEvent( pEntityType_->name(),
description.name(), argStream.size(),
description.streamSize( true ) );
description.stats().countSentToOwnClient( argStream.size() );
pEntityType_->stats().countSentToOwnClient( argStream.size() );
pReal_->pWitness()->sendToClient( entityID,
description.exposedMsgID(), argStream,
description.streamSize( true ) );
}
if (isExposedForReplay && this->cell().pReplayData())
{
argStream.rewind();
this->cell().pReplayData()->addEntityMethod( *this, description,
argStream );
}
return true;
}
- 如果这里的
isForOthers为true,则代表这个消息是其他entity的状态变化通过aoi机制广播到当前的entity上了,这里会通过RealEntity的addHistoryEvent接口来处理。这个接口的具体实现这里先不讲,将在后面的aoi同步小节中介绍。 - 如果这里的
isForOwn是true,则代表这个消息处理的是自身entity的状态改变,这里会使用RealEntity上的一个Witness结构来封装sendToClient调用,这个Witness结构等下我们会重点介绍。 - 如果这里的
isExposedForReplay是true,代表这个消息需要通知观战系统,这部分的内容我们将不会涉及
这个pReal_->pWitness()的作用等价于获取当前entity的客户端通信地址,pReal_->pWitness()->sendToClient作用就类似于mosaic_game中的call_client。其实Witness的作用远比一个简单的call_anchor大,他负责了所有需要往客户端发送的数据,大头是其他entity通过aoi传递过来的状态变化:
/**
* This class is a witness to the movements and perceptions of a RealEntity.
* It is created when a client is attached to this entity. Its main activity
* centres around the management of an Area of Interest list.
*/
class Witness : public Updatable
{
// 省略很多代码
}
不过我们这个小节只关注非aoi同步的部分,因此先暂时聚焦在sendToClient这个接口:
/**
* This helper method is used to send data to the client associated with this
* object.
*/
bool Witness::sendToClient( EntityID entityID, Mercury::MessageID msgID,
MemoryOStream & stream, int msgSize )
{
Mercury::Bundle & bundle = this->bundle();
int oldSize = bundle.size();
if (!this->selectEntity( bundle, entityID ))
{
return false;
}
bundle.startMessage( BaseAppIntInterface::sendMessageToClient );
bundle << msgID;
MF_ASSERT( msgSize < 0 || msgSize == stream.size() );
bundle << (int16) msgSize;
bundle.transfer( stream, stream.size() );
int messageSize = bundle.size() - oldSize;
bandwidthDeficit_ += messageSize;
return true;
}
可以看出这个接口其实就是在构造一个sendMessageToClient的消息类型,内部会包裹传递过来的各种逻辑消息。而这里的boundle则是一个绑定在RealEntity上的一个channel里的临时待发送数据:
/**
* This method returns a reference to the next outgoing bundle destined
* for the proxy.
*/
Mercury::Bundle & Witness::bundle()
{
return real_.channel().bundle();
}
每次调用这个sendToClient的时候,都只是将所要发送的数据添加到这个临时bundle里,并不触发直接发送。只有在flushToClient的时候才会真正的执行发送操作,这个flushToClient的调用时机则是每帧的末尾:
/**
* This method sends the bundle to the client associated with this entity.
*/
void Witness::flushToClient()
{
// Tell the BaseApp to send to the client.
this->bundle().startMessage( BaseAppIntInterface::sendToClient );
g_downstreamBytes += this->bundle().size();
g_downstreamPackets += this->bundle().numDataUnits();
++g_downstreamBundles;
// Send bundle via the channel
real_.channel().send();
}
/**
* This method is called regularly to send data to the witnesses associated
* with this entity.
*/
void Witness::update()
{
SCOPED_PROFILE( CLIENT_UPDATE_PROFILE );
AUTO_SCOPED_ENTITY_PROFILE( &entity_ );
// 省略很多代码 只保留最后的几行
{
AUTO_SCOPED_PROFILE( "updateClientSend" );
this->flushToClient();
}
// Tell the proxy that anything else we send is from next tick
BaseAppIntInterface::tickSyncArgs::start( this->bundle() ).tickByte =
(uint8)(CellApp::instance().time() + 1);
}
现在我们来跟踪一下这个real_.channel到底是什么:
/**
* The constructor for RealEntity.
*
* @param owner The entity associated with this object.
*/
RealEntity::RealEntity( Entity & owner ) :
entity_( owner ),
pWitness_( NULL ),
removalHandle_( NO_ENTITY_REMOVAL_HANDLE ),
velocity_( 0.f, 0.f, 0.f ),
positionSample_( owner.position() ),
positionSampleTime_( CellApp::instance().time() ),
creationTime_( CellApp::instance().time() ),
shouldAutoBackup_( AutoBackupAndArchive::YES ),
pChannel_(
new Mercury::UDPChannel( CellApp::instance().interface(),
owner.baseAddr(),
Mercury::UDPChannel::INTERNAL,
DEFAULT_INACTIVITY_RESEND_DELAY,
/* filter: */ NULL,
Mercury::ChannelID( owner.id() ) ) ),
recordingSpaceEntryID_()
{
++g_numRealEntities;
++g_numRealEntitiesEver;
pChannel_->isLocalRegular( false );
pChannel_->isRemoteRegular( false );
controlledBy_.init();
}
从这个RealEntity的构造函数可以看出,当前的pChannel_是一个基于可靠UDP实现的UDPChannel,这个Channel的投递地址是owner.baseAddr,执行send的时候就是把之前构造的数据全都投递到owner.baseAddr。我们通过全局搜索发出的消息包格式BaseAppIntInterface::sendMessageToClient和BaseAppIntInterface::sendToClient定位到这些消息的接收者是BaseApp里的Proxy类型:
/*~ class BigWorld.Proxy
* @components{ base }
*
* The Proxy is a special type of Base that has an associated Client. As such,
* it handles all the server updates for that Client. There is no direct script
* call to create a Proxy specifically.
*
*/
/**
* This class is used to represent a proxy. A proxy is a special type of base.
* It has an associated client.
*/
class Proxy: public Base
{
void sendMessageToClient( const Mercury::Address & srcAddr,
Mercury::UnpackedMessageHeader & header,
BinaryIStream & data );
void sendToClient();
}
这里的sendMessageToClient消息的处理就是在执行了当前是否还有客户端的过滤之后,将这个消息转移到内部的pOutput这个输出缓冲区去,这里不会触发消息的真正发送:
/**
* This method handles a script message that should be forwarded to the client.
*/
void Proxy::sendMessageToClient( const Mercury::Address & srcAddr,
Mercury::UnpackedMessageHeader & header,
BinaryIStream & data )
{
this->sendMessageToClientHelper( data, /*isReliable:*/ true );
}
/**
* This method handles a script message that should be forwarded to the client.
*/
void Proxy::sendMessageToClientUnreliable( const Mercury::Address & srcAddr,
Mercury::UnpackedMessageHeader & header,
BinaryIStream & data )
{
this->sendMessageToClientHelper( data, /*isReliable:*/ false );
}
/**
* This method forwards this message to the client.
*/
void Proxy::sendMessageToClientHelper( BinaryIStream & data, bool isReliable )
{
AUTO_SCOPED_THIS_ENTITY_PROFILE;
if (this->hasOutstandingEnableWitness())
{
// Do nothing. It's for an old client.
data.finish();
return;
}
Mercury::MessageID msgID;
data >> msgID;
if (!this->hasClient())
{
WARNING_MSG( "Proxy::sendMessageToClientHelper(%u): "
"No client. Cannot forward msgID %d\n",
id_, msgID );
data.finish();
return;
}
int16 msgStreamSize;
data >> msgStreamSize;
MF_ASSERT( msgStreamSize < 0 || msgStreamSize == data.remainingLength() );
BinaryOStream * pOutput = this->getStreamForEntityMessage(
msgID, msgStreamSize, isReliable );
MF_ASSERT( pOutput != NULL );
pOutput->transfer( data, data.remainingLength() );
}
这里的getStreamForEntityMessage作用其实根据当前消息是否是可靠的消息将下发数据分别封装为Mercury::RELIABLE_DRIVER和Mercury::RELIABLE_NO类型。通过sendMessageToClientHelper接口发送的消息全都默认为Reliable的,通过sendMessageToClientUnreliable全都是非Reliable的。这里的是否Reliable主要处理的是UDP消息丢失时是否需要重传,这里就不去探究这个按需可靠UDP的具体实现了:
/**
* This method gets a suitable stream to the client for an entity property
* update or method call.
*
* @param messageID The messageID of the client-side event
* @param messageStreamSize The fixed size of the message or -1 if variable.
*
* @return A BinaryOStream* to which the message can be written
* or NULL if no client is attached to this proxy.
*/
BinaryOStream * Proxy::getStreamForEntityMessage( Mercury::MessageID msgID,
int methodStreamSize, bool isReliable /* = true */ )
{
AUTO_SCOPED_THIS_ENTITY_PROFILE;
if (!this->hasClient())
{
return NULL;
}
int8 lengthStyle = Mercury::FIXED_LENGTH_MESSAGE;
int lengthParam = methodStreamSize;
if (methodStreamSize < 0)
{
lengthStyle = Mercury::VARIABLE_LENGTH_MESSAGE;
lengthParam = -methodStreamSize;
}
Mercury::InterfaceElement ie( "entityMessage", msgID,
lengthStyle, lengthParam );
Mercury::Bundle & bundle = this->clientBundle();
bundle.startMessage( ie,
(isReliable ? Mercury::RELIABLE_DRIVER : Mercury::RELIABLE_NO) );
return &bundle;
}
而消息的真正发送,则依赖于Withness::flushToClient里构造的一个空消息sendToClient,在Proxy::sendToClient的处理时才会执行发送:
/**
* This message is the cell telling us that it has now sent us all the
* updates for the given tick, and we should forward them on to the client.
*/
void Proxy::sendToClient()
{
// Do nothing. It's for an old client.
if (!this->hasOutstandingEnableWitness())
{
this->sendBundleToClient();
}
}
/**
* This method sends any messages queued by the internal interface (for the
* external interface). Returns true if the send occurred (or was attempted
* and failed) and the bundle was flushed.
*
* @param irregular True if this send is not a regular, periodic send.
*/
bool Proxy::sendBundleToClient( bool expectData )
{
// 省略开头检查是否有绑定客户端的代码
Mercury::Bundle & bundle = pClientChannel_->bundle();
avgClientBundleDataUnits_.sample( bundle.numDataUnits() );
if (avgClientBundleDataUnits_.average() >=
CLIENT_BUNDLE_DATA_UNITS_THRESHOLD)
{
// Complain only if enough bundles sent recently have been
// multi-data-unit.
WARNING_MSG( "Proxy::sendBundleToClient: "
"Client %u has consistently sent multiple data units per "
"update (moving average = %.01f)\n",
id_,
avgClientBundleDataUnits_.average() );
}
// see if we can squeeze any more data on the bundle
this->addOpportunisticData( &bundle );
// now actually send the packet!
pClientChannel_->send();
// 省略后面的一些延迟计算与时钟同步的代码
}
这里我们心满意足的看到了期望看到的pClientChannel_->send,也就是最终的消息发送的Channel。不过在send之前还会调用一个奇怪的函数addOpportunisticData,其作用是在这个bundle的数据量比较小的情况下将一些文件下载相关的数据分批的插入到当前需要下发的bundle中去。因为文件下载这种通信优先级不高,但是数据量一般来说就很大,直接在一个bundle中发送很容易占满发往客户端的下行带宽,导致后续的数据要延迟发送。而且整体发下去的话对于UDP的可靠性要求很高,很容易触发整包的重传。为了避免抢占到客户端之间的下行带宽,只能采取这个每帧检查夹带的形式发送下去。每一帧能夹带下去的数据大小计算处理的非常复杂,这里就不去贴这个函数的实现代码了,有兴趣的可以去看看。
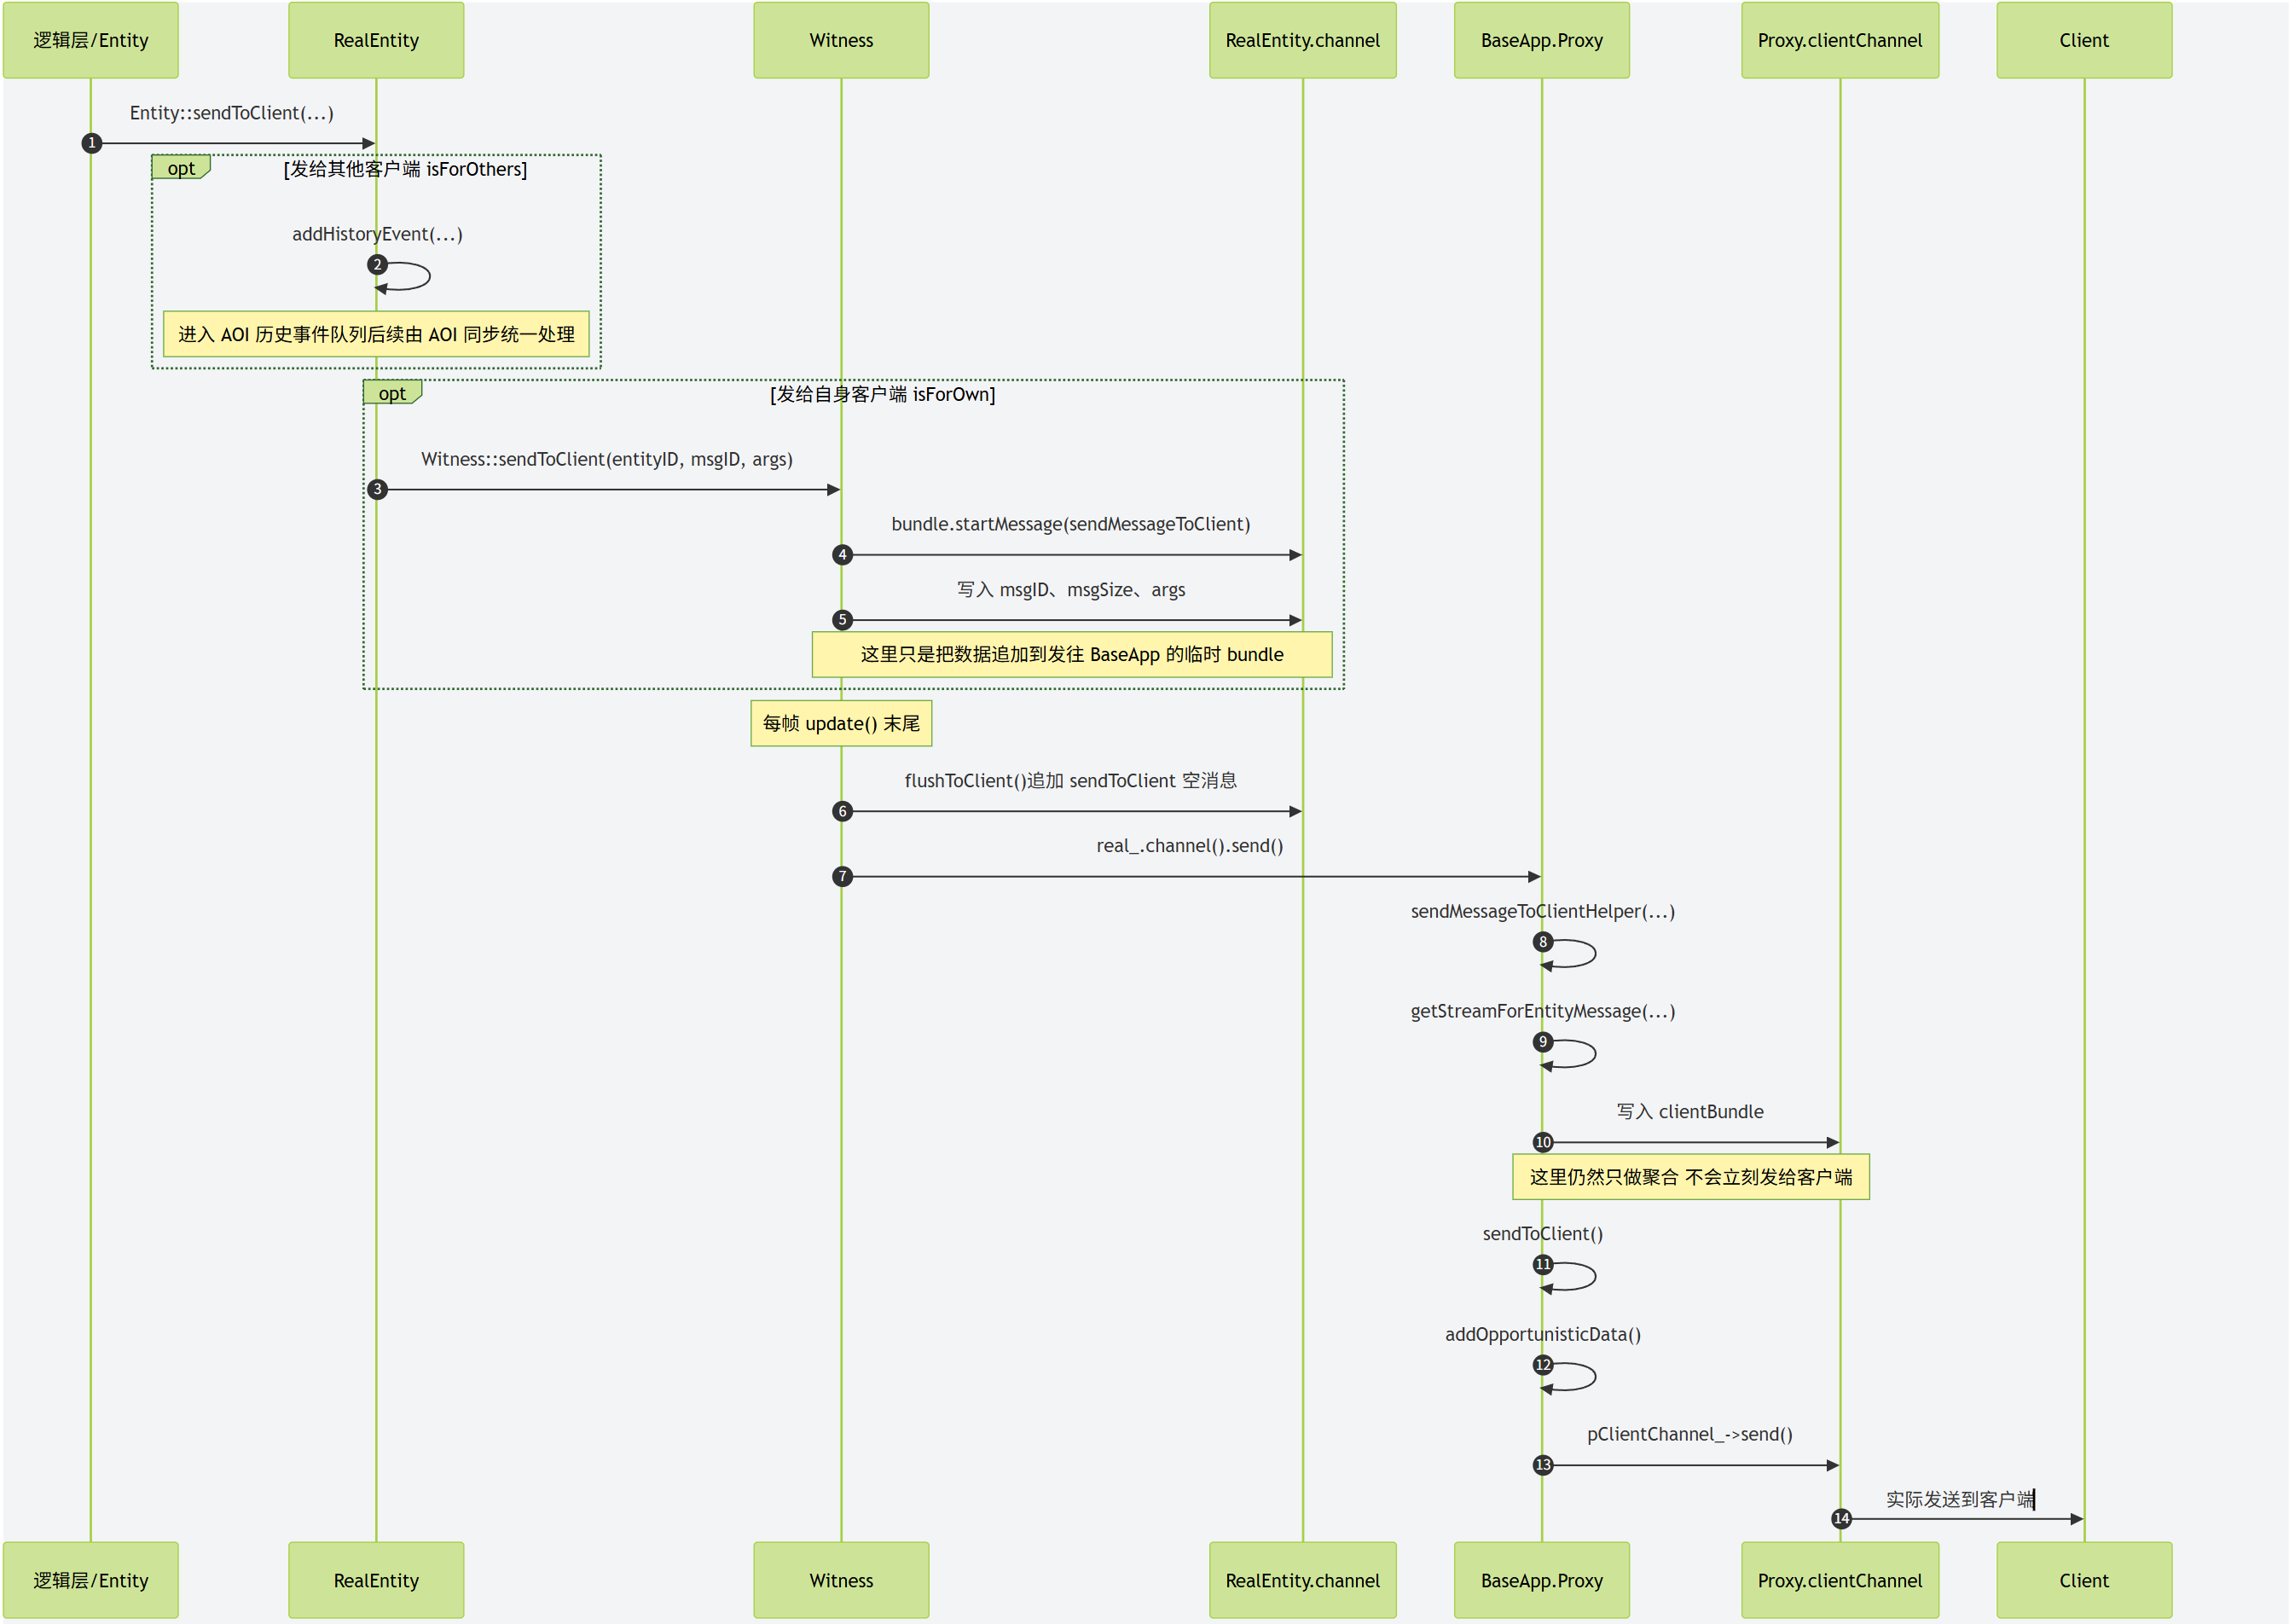
RealEntity的消息投递流程
在上一节内容中我们完整的介绍了RealEntity是如何往客户端发送消息的,重点是通过一个不会移动固定地址的对象Proxy来处理中转和流控。反过来客户端往RealEntity发送消息也需要通过Proxy,但是此时由于RealEntity是会迁移的,所以Proxy向RealEntity投递消息的的流程就比RealEntity向Proxy投递消息的流程复杂很多。因为这里涉及到一个在分布式大世界里一个非常关键的问题,如何向一个可迁移的RealEntity发送消息。这里的RealEntity不仅仅包括我们之前提到过的玩家对象,也包括场景里可能创建的怪物、NPC等其他可迁移角色。BigWorld里为了解决这个问题引入了Base对象,之前提到的Proxy对象就是Base对象的直接子类。每个RealEntity都会有一个Base对象,在这个Base对象上会维护好对应的RealEntity的最新通信地址,所以这个Base对象的作用与我们在mosaic_game中创立的relay_entity作用是差不多的。接下来我们来重点剖析一下这个最新通信地址的维护过程。
根据我们之前对玩家进入场景的流程分析,我们可以知道任何一个玩家对应的RealEntity的第一次创建都是由其Proxy对象发起的,创建信息里会带上当前Proxy对象的通信地址。对于非玩家RealEntity来说,这个创建流程依然成立,只不过当前之前的Proxy对象是登录成功之后创建的,而现在的Base对象则是通过脚本逻辑调用DBAPP上的AutoLoadingEntityHandler来触发的:
/**
* Constructor.
*/
AutoLoadingEntityHandler::AutoLoadingEntityHandler( EntityTypeID typeID,
DatabaseID dbID, EntityAutoLoader & mgr ) :
state_(StateInit),
ekey_( typeID, dbID ),
createBaseBundle_(),
mgr_( mgr ),
isOK_( true )
{}
/**
* Start auto-loading the entity.
*/
void AutoLoadingEntityHandler::autoLoad()
{
// Start create new base message even though we're not sure entity exists.
// This is to take advantage of getEntity() streaming properties into the
// bundle directly.
DBApp::prepareCreateEntityBundle( ekey_.typeID, ekey_.dbID,
Mercury::Address( 0, 0 ), this, createBaseBundle_ );
// Get entity data into bundle
DBApp::instance().getEntity( ekey_, &createBaseBundle_, false, *this );
// When getEntity() completes onGetEntityCompleted() is called.
}
脚本逻辑负责填充好这个非玩家Entity在数据库中的唯一索引ekey,然后通过DBApp::prepareCreateEntityBundle这个接口来出发Entity数据的加载,并在加载完成之后向BaseAppMgr发起一个CreateEntity的请求。之前在解析玩家登录的时候,已经详细的提到了DBApp::prepareCreateEntityBundle这个接口的后续详细流程,所以这里就不再展开。后续流程里与之前的玩家登录流程很不一样的点就是创建的BasePtr指向的不再是Proxy类型,而是Base类型。
BasePtr pBase = this->createBaseFromStream( entityID, data );
在BasePtr被创建好之后,脚本逻辑那边就可以手动的调用之前提到的玩家进入场景的接口,即向CellAppMgr发起一个createEntity的调用,参数里填充好Base对象的通信地址。这样当对应的RealEntity被创建的时候,同样的会触发下面这个函数的执行:
void Cell::addRealEntity( Entity * pEntity, bool shouldSendNow )
这个函数的完整流程我们在玩家进入场景流程里已经分析过了,最终会发起一个Base::currentCell的RPC来通知当前RealEntity的最新通信地址:
/**
* This method is used to inform the base that the cell we send to has changed.
*/
void Base::currentCell( const Mercury::Address & srcAddr,
const Mercury::UnpackedMessageHeader & header,
const BaseAppIntInterface::currentCellArgs & args )
{
this->setCurrentCell( args.newSpaceID, args.newCellAddr,
&srcAddr );
}
至此,对于任何RealEntity,在其第一次进入场景时,都会有一个不可迁移的Base对象被创建,同时Base对象里会得到当前RealEntity创建时的通信地址。
由于Base对象是不会移动的,所以任何Entity想要往一个执行的RealEntity发送消息时,并不需要知道这个RealEntity的最新地址,只需要通过某种途径知道对应的Base的通信地址即可, 这个通信地址会被封装为一个CellViaBaseMailBox的对象:
// -----------------------------------------------------------------------------
// Section: CellViaBaseMailBox
// -----------------------------------------------------------------------------
/**
* This class is used to create a mailbox to a cell entity. Traffic for the
* entity is sent via the base entity instead of directly to the cell entity.
* This means that these mailboxes do not have the restrictions that normal
* cell entity mailboxes have.
*/
class CellViaBaseMailBox : public CommonBaseEntityMailBox
{
Py_Header( CellViaBaseMailBox, CommonBaseEntityMailBox )
public:
CellViaBaseMailBox( EntityTypePtr pBaseType,
const Mercury::Address & addr, EntityID id,
PyTypeObject * pType = &s_type_ ):
CommonBaseEntityMailBox( pBaseType, addr, id, pType )
{}
~CellViaBaseMailBox() { }
virtual ScriptObject pyGetAttribute( const ScriptString & attrObj );
virtual BinaryOStream * getStream( const MethodDescription & methodDesc,
std::auto_ptr< Mercury::ReplyMessageHandler > pHandler );
virtual EntityMailBoxRef::Component component() const;
virtual const MethodDescription * findMethod( const char * attr ) const;
};
任意往这个CellViaBaseMailBox里发送的RPC都会被额外包裹一层新的RPC BaseAppIntInterface::callCellMethod, 原有的RPC数据则是作为这个外层RPC的参数来填充,同时开头会填充一下内层RPC的名字索引internalIndex:
BinaryOStream * CellViaBaseMailBox::getStream(
const MethodDescription & methodDesc,
std::auto_ptr< Mercury::ReplyMessageHandler > pHandler )
{
Mercury::Bundle & bundle = this->bundle();
// Not supporting return values
if (pHandler.get())
{
PyErr_Format( PyExc_TypeError,
"Cannot call two-way method '%s' from CellApp",
methodDesc.name().c_str() );
return NULL;
}
bundle.startMessage( BaseAppIntInterface::callCellMethod );
bundle << methodDesc.internalIndex();
return &bundle;
}
当Base接收到这个BaseAppIntInterface::callCellMethod远程调用之后,就直接开始转发工作:
/**
* This method handles a message from a CellViaBaseMailBox. It calls
* the target method on the cell entity.
*/
void Base::callCellMethod( const Mercury::Address & srcAddr,
const Mercury::UnpackedMessageHeader & header,
BinaryIStream & data )
{
if (pCellEntityMailBox_ == NULL)
{
// 省略一些RealEntity不存在的报错处理
return;
}
MethodIndex methodIndex;
data >> methodIndex;
const MethodDescription * pDescription =
this->pType()->description().cell().internalMethod( methodIndex );
if (pDescription != NULL)
{
std::auto_ptr< Mercury::ReplyMessageHandler > pReplyHandler;
if (header.replyID != Mercury::REPLY_ID_NONE)
{
pReplyHandler.reset( new TwoWayMethodForwardingReplyHandler(
srcAddr, header.replyID ) );
}
BinaryOStream * pBOS = pCellEntityMailBox_->getStream( *pDescription,
pReplyHandler );
if (pBOS == NULL)
{
// 省略一些错误处理
}
pBOS->transfer( data, data.remainingLength() );
pCellEntityMailBox_->sendStream();
}
else
{
ERROR_MSG( "Base::callCellMethod(%u): "
"Invalid method index (%d) on cell.\n", id_, methodIndex );
sendTwoWayFailure( "BWInternalError", "Invalid method index",
header.replyID, srcAddr );
}
}
这里的callCellMethod会将内层的RPC解析出来,如果发现这个RPC需要Reply的话,这里还需要创建一个TwoWayMethodForwardingReplyHandler。 这个TwoWayMethodForwardingReplyHandler的作用就是如果RealEntity接收到这个消息并发起了Reply,这个Reply会直接发送到当前的Base上,然后Base再将这个Reply转发到原始RPC的发起者,起到了一个Reply的中转作用。
消息转发的时候使用的是pCellEntityMailBox_,这个也比较特殊,其内部会存储对应的RealEntity的EntityId,
/**
* This class implements a mailbox that can send to a server object. This
* object may be on a cell or may be a base.
*
* @see CellEntityMailBox
* @see BaseEntityMailBox
*/
class ServerEntityMailBox: public PyEntityMailBox
{
// 省略很多代码
Mercury::Address addr_;
EntityID id_;
EntityTypePtr pLocalType_;
};
/**
* This class is common to all mailboxes that send to the cell entity or via
* the cell entity.
*/
class CommonCellEntityMailBox : public ServerEntityMailBox
{
// 省略很多代码
};
/**
* This class implements a mailbox that can send to an object on a cell.
*/
class CellEntityMailBox: public CommonCellEntityMailBox
{
// 省略很多代码
};
当执行pCellEntityMailBox_->getStream这行代码时,调用链为ServerEntityMailBox::getStream通过CellEntityMailBox::getStreamEx中转到CommonCellEntityMailBox::getStreamCommon, 这个CommonCellEntityMailBox::getStreamCommon会在外层额外的包一层CellAppInterface::runScriptMethod这个RPC,同时会主动将对应RealEntity的id填到数据的开头:
/**
* This method gets the stream to send a remote method call on.
*/
BinaryOStream * ServerEntityMailBox::getStream(
const MethodDescription & methodDesc,
std::auto_ptr< Mercury::ReplyMessageHandler > pHandler )
{
if (!MainThreadTracker::isCurrentThreadMain())
{
ERROR_MSG( "ServerEntityMailBox::getStream: "
"Cannot get stream in background thread for %s mailbox\n",
this->componentName() );
PyErr_Format( PyExc_TypeError,
"Cannot get stream in background thread for %s mailbox\n",
this->componentName() );
return NULL;
}
return this->getStreamEx( methodDesc, pHandler );
}
/**
* This method gets a stream to send a message to the cell on.
*/
BinaryOStream * CellEntityMailBox::getStreamEx(
const MethodDescription & methodDesc,
std::auto_ptr< Mercury::ReplyMessageHandler > pHandler )
{
return this->getStreamCommon( methodDesc,
CellAppInterface::runScriptMethod, pHandler );
}
/**
* This method is used by derived classes to the initial part of their
* getStream methods.
*/
BinaryOStream * CommonCellEntityMailBox::getStreamCommon(
const MethodDescription & methodDesc,
const Mercury::InterfaceElement & ie,
std::auto_ptr< Mercury::ReplyMessageHandler > pHandler )
{
Mercury::UDPChannel * pChannel = this->pChannel();
if (!pChannel)
{
return NULL;
}
Mercury::Bundle & bundle = pChannel->bundle();
if (pHandler.get())
{
bundle.startRequest( ie, pHandler.release() );
}
else
{
bundle.startMessage( ie );
}
bundle << id_;
bundle << methodDesc.internalIndex();
return &bundle;
}
执行pBOS->transfer( data, data.remainingLength() );就相当于把原本的RPC数据添加到当前CellAppInterface::runScriptMethod的参数之后。当CellApp接收到一个runScriptMethod的远程调用时,会将请求中转到RawEntityVarLenMessageHandler上去处理:
// cellapp_interface.cpp
#define MF_RAW_VARLEN_ENTITY_MSG( NAME, IS_REAL_ONLY ) \
MERCURY_HANDLED_VARIABLE_MESSAGE( NAME, 2, \
RawEntityVarLenMessageHandler, \
std::make_pair( &Entity::NAME, IS_REAL_ONLY) )
// Message to run cell script.
MF_RAW_VARLEN_ENTITY_MSG( runScriptMethod, REAL_ONLY )
这个RawEntityVerLenMessageHandler继承自EntityMessageHandler,其处理RPC调用的实现在EntityMessageHandler::handleMessage中:
/*
* Override from InputMessageHandler.
*/
void EntityMessageHandler::handleMessage( const Mercury::Address & srcAddr,
Mercury::UnpackedMessageHeader & header,
BinaryIStream & data )
{
EntityID entityID;
data >> entityID;
this->handleMessage( srcAddr, header, data, entityID );
}
这里会首先解析出投递目标RealEntity的EntityID,然后再调用handleMessage第二个变体:
/**
* This method handles this message. It is called from the InputMessageHandler
* override and from handling of buffered messages.
*/
void EntityMessageHandler::handleMessage( const Mercury::Address & srcAddr,
Mercury::UnpackedMessageHeader & header,
BinaryIStream & data,
EntityID entityID )
{
CellApp & app = ServerApp::getApp< CellApp >( header );
Entity * pEntity = app.findEntity( entityID );
AUTO_SCOPED_ENTITY_PROFILE( pEntity );
BufferedGhostMessages & bufferedMessages = app.bufferedGhostMessages();
bool shouldBufferGhostMessage =
!pEntity ||
pEntity->shouldBufferMessagesFrom( srcAddr ) ||
bufferedMessages.isDelayingMessagesFor( entityID, srcAddr );
bool isForDestroyedGhost = false;
// 省略大部分的异常处理代码
if(isForDestroyedGhost)
{
// 省略大部分的异常处理代码
}
else
{
this->callHandler( srcAddr, header, data, pEntity );
}
}
这个变体里有很多细节分支,来处理各种情况,我们目前只关注无异常的情况,即我们通过EntityID找到了这个RealEntity,此时会调用callHandler:
/**
* Objects of this type are used to handle variable length messages destined
* for an entity. This also passes the source address and header to the
* handling function.
*/
class RawEntityVarLenMessageHandler : public EntityMessageHandler
{
public:
/**
* This type is the function pointer type that handles the incoming
* message.
*/
typedef void (Entity::*Handler)( const Mercury::Address & srcAddr,
const Mercury::UnpackedMessageHeader & header,
BinaryIStream & stream );
/**
* Constructor.
*/
RawEntityVarLenMessageHandler( std::pair<Handler, EntityReality> args ) :
EntityMessageHandler( args.second ),
handler_( args.first )
{}
private:
virtual void callHandler( const Mercury::Address & srcAddr,
Mercury::UnpackedMessageHeader & header,
BinaryIStream & data, Entity * pEntity )
{
(pEntity->*handler_)( srcAddr, header, data );
}
Handler handler_;
};
这里的RawEntityVarLenMessageHandler::callHandler实现非常简单,直接调用Entity上的runScriptMethod接口来处理,也就是这个接口,这里会将之前压入的methodID解析出来:
/**
* This method handles calls from other server component to run a method of
* this entity.
*/
void Entity::runScriptMethod( const Mercury::Address & srcAddr,
const Mercury::UnpackedMessageHeader & header,
BinaryIStream & data )
{
uint16 methodID;
data >> methodID;
this->runMethodHelper( data, methodID, false, header.replyID, &srcAddr );
}
这个runMethodHelper则使用解析出来的methodID来查找对应的接口的pMethodDescription:
/**
* This method is used to run a method on this entity that has come from the
* network.
*
* @param data Contains the parameters for the method call.
* @param methodID The index number of the method.
* @param isExposed Whether the methodID refers to the exposed subset.
*/
void Entity::runMethodHelper( BinaryIStream & data, int methodID,
bool isExposed, int replyID, const Mercury::Address * pReplyAddr )
{
static ProfileVal localProfile( "scriptMessage" );
START_PROFILE( localProfile );
MF_ASSERT( Entity::callbacksPermitted() );
EntityID sourceID = 0;
const MethodDescription * pMethodDescription = NULL;
if (isExposed)
{
data >> sourceID;
const ExposedMethodMessageRange & range =
BaseAppExtInterface::Range::cellEntityMethodRange;
pMethodDescription =
pEntityType_->description().cell().exposedMethodFromMsgID( methodID,
data, range );
// 忽略一些异常处理代码
}
else
{
pMethodDescription =
pEntityType_->description().cell().internalMethod( methodID );
if (pMethodDescription->isExposed())
{
data >> sourceID;
}
}
if (pMethodDescription != NULL)
{
Entity::nominateRealEntity( *this );
{
if (pMethodDescription->isComponentised())
{
MF_ASSERT( pEntityDelegate_ != NULL );
pEntityDelegate_->handleMethodCall( *pMethodDescription,
data, sourceID );
}
else
{
SCOPED_PROFILE( SCRIPT_CALL_PROFILE );
pMethodDescription->callMethod(
ScriptObject( this, ScriptObject::FROM_BORROWED_REFERENCE ),
data, sourceID, replyID, pReplyAddr,
&CellApp::instance().interface() );
}
}
Entity::nominateRealEntityPop();
}
else
{
// 省略一些异常处理代码
}
}
当找到pMethodDescription之后,就会使用当前Entity所绑定的RealEntity来执行脚本函数的调用,这样完成的远程调用就执行完毕了,当然这里我们忽略了处理Reply的部分。
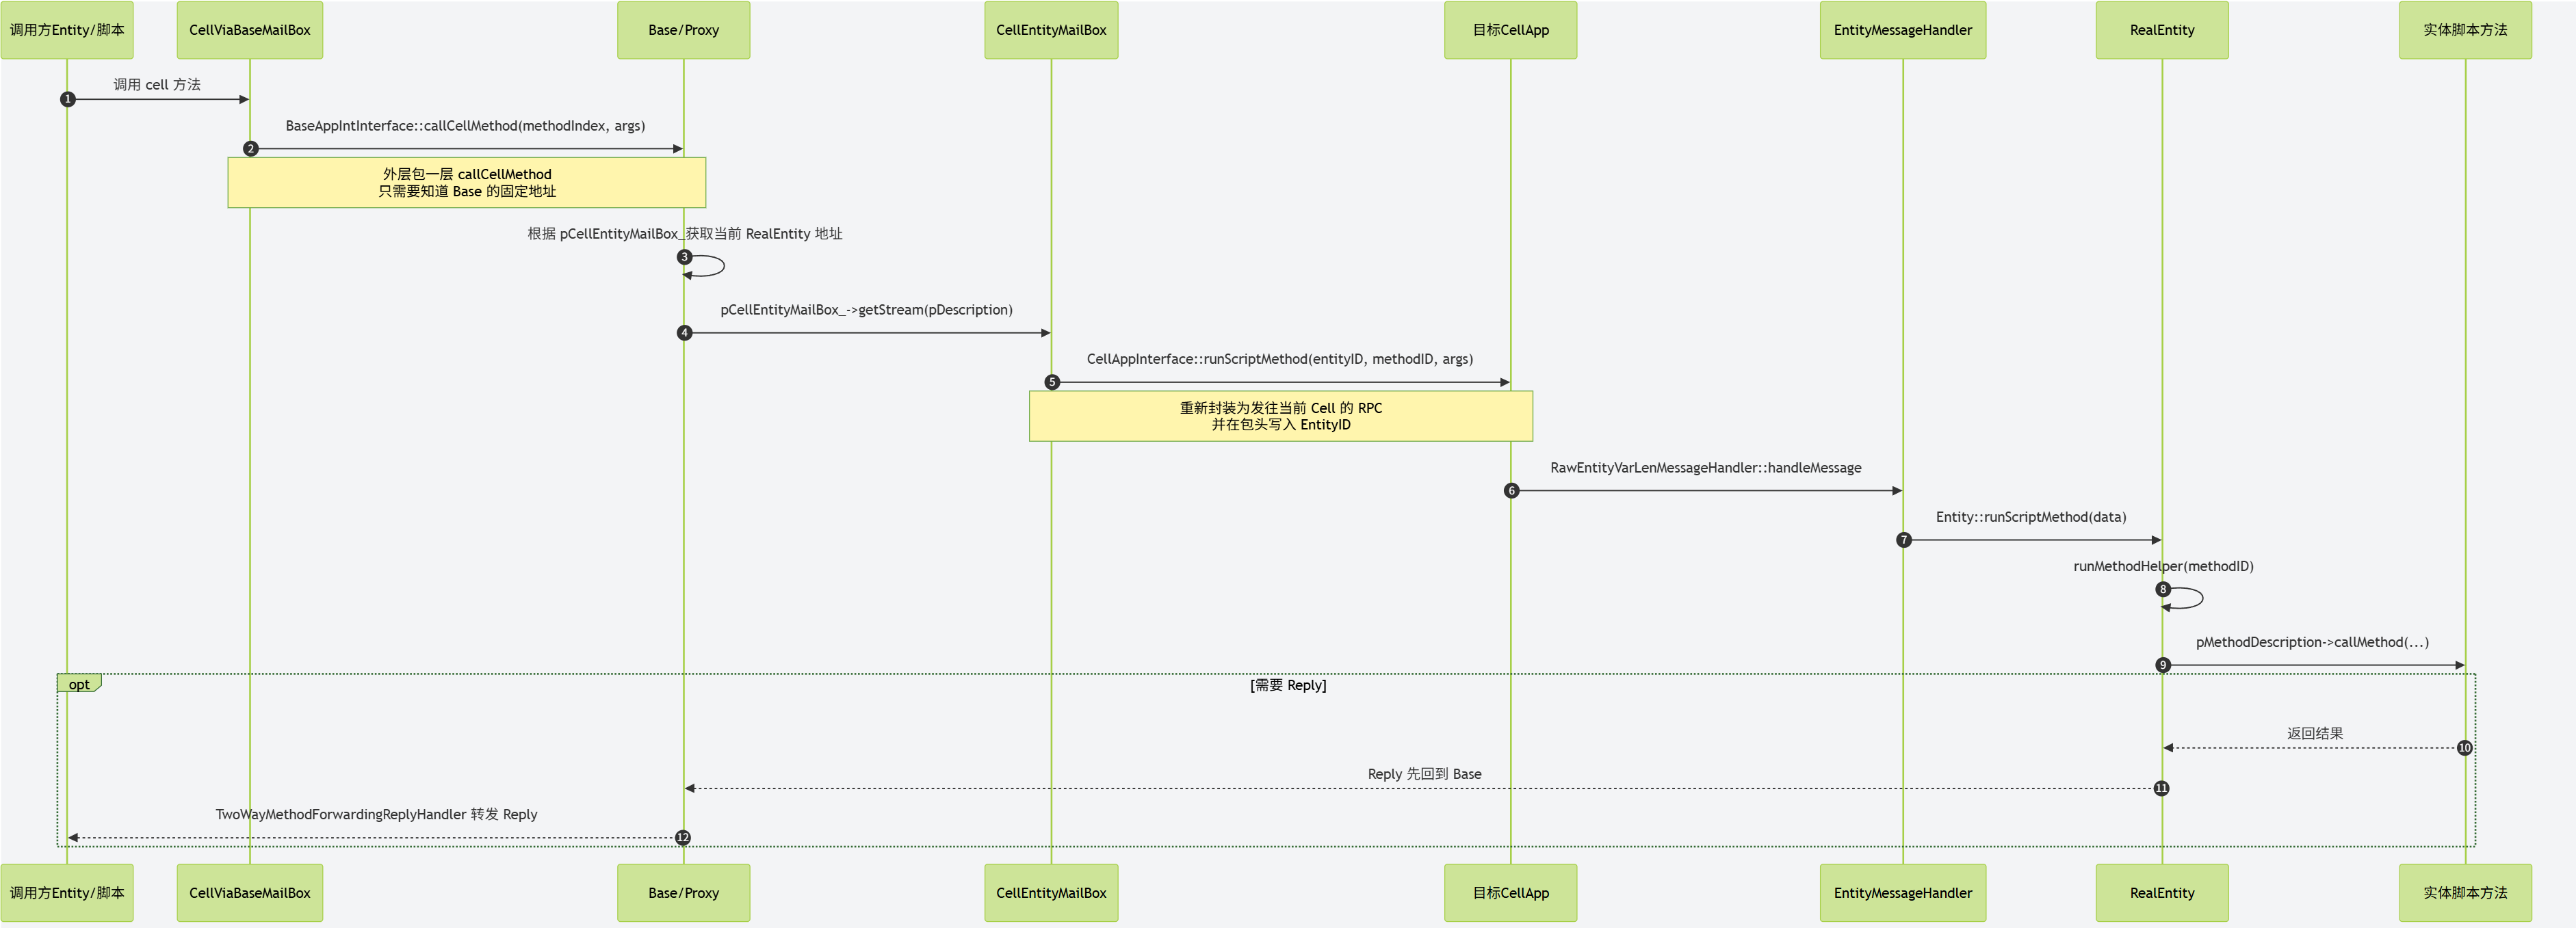
Unreal Engine 的 RPC实现
Unreal Engine 的 RPC 注册
UE中的RPC依赖于其能够进行网络同步的AActor系统,所有RPC必须声明在AActor以及其拥有的UActorComponent上。下面是一个在APlayerController上的RPC声明样例:
UFUNCTION(BlueprintCallable, Category="HUD", Reliable, Client)
void ClientSetHUD(TSubclassOf<AHUD> NewHUDClass);
上面的声明中的UFUNCTION是一个提供给UE源代码预处理器UHT(Unreal Header Tool)的标注,有了这个标注之后,UHT将会生成一些胶水代码来实现UObject系统的反射功能。对于这个RPC声明,UHT将在PlayerController.generated.h中生成一个函数声明:
// PlayerController.generated.h
virtual void ClientSetHUD_Implementation(TSubclassOf<AHUD> NewHUDClass);
上面这个函数是逻辑层真正执行该RPC的代码,因此需要在对应的PlayerController.cpp中提供这个函数的实现:
void APlayerController::ClientSetHUD_Implementation(TSubclassOf<AHUD> NewHUDClass)
{
if ( MyHUD != NULL )
{
MyHUD->Destroy();
MyHUD = NULL;
}
FActorSpawnParameters SpawnInfo;
SpawnInfo.Owner = this;
SpawnInfo.Instigator = GetInstigator();
SpawnInfo.ObjectFlags |= RF_Transient; // We never want to save HUDs into a map
MyHUD = GetWorld()->SpawnActor<AHUD>(NewHUDClass, SpawnInfo );
}
而原始的ClientSetHUD函数的实现则出现在UHT生成的额外源文件PlayerController.gen.cpp中:
static FName NAME_APlayerController_ClientSetHUD = FName(TEXT("ClientSetHUD"));
void APlayerController::ClientSetHUD(TSubclassOf<AHUD> NewHUDClass)
{
PlayerController_eventClientSetHUD_Parms Parms;
Parms.NewHUDClass=NewHUDClass;
ProcessEvent(FindFunctionChecked(NAME_APlayerController_ClientSetHUD),&Parms);
}
这里的PlayerController_eventClientSetHUD_Parms也是UHT生成的一个结构体,用来包裹此RPC所需的所有参数,然后通过类型擦除执行ProcessEvent来调用真正执行的函数。
// PlayerController.generated.h
struct PlayerController_eventClientSetHUD_Parms \
{ \
TSubclassOf<AHUD> NewHUDClass; \
}; \
这个ProcessEvent会查询这个类型注册的所有UFunction的Map,执行对应的中转函数。
// PlayerController.gen.cpp
void APlayerController::StaticRegisterNativesAPlayerController()
{
UClass* Class = APlayerController::StaticClass();
static const FNameNativePtrPair Funcs[] = {
// other functions
{ "ClientSetHUD", &APlayerController::execClientSetHUD },
//other functions
};
}
这个中转函数的声明与定义都在UHT生成的相关文件中:
#define DECLARE_FUNCTION(func) static void func( UObject* Context, FFrame& Stack, RESULT_DECL )
// PlayerController.generated.h
DECLARE_FUNCTION(execClientSetHUD);
// PlayerController.gen.cpp
DEFINE_FUNCTION(APlayerController::execClientSetHUD)
{
P_GET_OBJECT(UClass,Z_Param_NewHUDClass);
P_FINISH;
P_NATIVE_BEGIN;
P_THIS->ClientSetHUD_Implementation(Z_Param_NewHUDClass);
P_NATIVE_END;
}
在这个生成的代码中,会从Stack参数中获取第一个参数的值转换为UClass类型,然后赋值到Z_Param_NewHUDClass。从Stack中获取所有的参数之后,再调用真正执行逻辑的函数ClientSetHUD_Implementation。至此,一个忽略了网络数据传递的RPC调用链基本完成。
Unreal Engine的RPC发送与接收
接下来我们来探究这个RPC是如何进行网络传递的。进入ProcessEvent后,发现对应UFunction是remotefunction即RPC,会直接交给NetDriver::ProcessRemoteFunction处理,而不是本地执行。这里我们为了简化讨论,只考虑默认的单播RPC情况。此时需要找到Actor所属的NetConnection,然后从Connection中找到Actor对应的ActorChannel,然后进入ProcessRemoteFunctionForChannelPrivate函数执行具体逻辑。
// Use the replication layout to send the rpc parameter values
TSharedPtr<FRepLayout> RepLayout = GetFunctionRepLayout(Function);
RepLayout->SendPropertiesForRPC(Function, Ch, TempWriter, Parms);
Ch->PrepareForRemoteFunction(TargetObj);
FNetBitWriter TempBlockWriter(Bunch.PackageMap, 0);
Ch->WriteFieldHeaderAndPayload(TempBlockWriter, ClassCache, FieldCache, NetFieldExportGroup, TempWriter);
ParameterBits = TempBlockWriter.GetNumBits();
HeaderBits = Ch->WriteContentBlockPayload(TargetObj, Bunch, false, TempBlockWriter);
Ch->SendBunch(&Bunch, true);
对于每个Actor,其中同步的属性与RPC都有一个唯一的NetIndex,这个NetIndex的计算是通过获取当前RPC名字在当前类型上所有的网络同步的属性名和RPC函数名排序之后的名字数组中的位置来确定的。发送RPC的名字时,只需发送对应的NetIndex即可。接收端能找到NetIndex对应UFunction,然后再通过反射执行。对于有参数的RPC,参数使用FRepLayout进行序列化。上面代码里的SendPropertiesForRPC会根据下面自动生成的代码来遍历当前UFunction的所有参数进行序列化:
// PlayerController.gen.cpp
struct Z_Construct_UFunction_APlayerController_ClientSetHUD_Statics
{
static const UE4CodeGen_Private::FClassPropertyParams NewProp_NewHUDClass;
// PropPointers记录当前函数里所有参数的描述结构的指针
static const UE4CodeGen_Private::FPropertyParamsBase* const PropPointers[];
// 最终对外的函数参数描述结构
static const UE4CodeGen_Private::FFunctionParams FuncParams;
};
// 这里提供了NewHudClass这个RPC参数的所有相关信息 包括参数名 参数类型名 参数在Params里的偏移 参数大小等
const UE4CodeGen_Private::FClassPropertyParams Z_Construct_UFunction_APlayerController_ClientSetHUD_Statics::NewProp_NewHUDClass = { "NewHUDClass", nullptr, (EPropertyFlags)0x0014000000000080, UE4CodeGen_Private::EPropertyGenFlags::Class, RF_Public|RF_Transient|RF_MarkAsNative, 1, STRUCT_OFFSET(PlayerController_eventClientSetHUD_Parms, NewHUDClass), Z_Construct_UClass_AHUD_NoRegister, Z_Construct_UClass_UClass, METADATA_PARAMS(nullptr, 0) };
// 这里将所有的参数描述结构的指针都收集起来 构造一个PropPointers数组
const UE4CodeGen_Private::FPropertyParamsBase* const Z_Construct_UFunction_APlayerController_ClientSetHUD_Statics::PropPointers[] = {
(const UE4CodeGen_Private::FPropertyParamsBase*)&Z_Construct_UFunction_APlayerController_ClientSetHUD_Statics::NewProp_NewHUDClass,
};
// 这里提供的是逻辑层真正对接的函数参数描述结构 FuncParams 内部会使用上面构造的PropPointers数组进行数据填充
const UE4CodeGen_Private::FFunctionParams Z_Construct_UFunction_APlayerController_ClientSetHUD_Statics::FuncParams = { (UObject*(*)())Z_Construct_UClass_APlayerController, nullptr, "ClientSetHUD", nullptr, nullptr, sizeof(PlayerController_eventClientSetHUD_Parms), Z_Construct_UFunction_APlayerController_ClientSetHUD_Statics::PropPointers, UE_ARRAY_COUNT(Z_Construct_UFunction_APlayerController_ClientSetHUD_Statics::PropPointers), RF_Public|RF_Transient|RF_MarkAsNative, (EFunctionFlags)0x05020CC0, 0, 0, METADATA_PARAMS(Z_Construct_UFunction_APlayerController_ClientSetHUD_Statics::Function_MetaDataParams, UE_ARRAY_COUNT(Z_Construct_UFunction_APlayerController_ClientSetHUD_Statics::Function_MetaDataParams)) };
UFunction* Z_Construct_UFunction_APlayerController_ClientSetHUD()
{
static UFunction* ReturnFunction = nullptr;
if (!ReturnFunction)
{
UE4CodeGen_Private::ConstructUFunction(ReturnFunction, Z_Construct_UFunction_APlayerController_ClientSetHUD_Statics::FuncParams);
}
return ReturnFunction;
}
RPC参数的序列化结果会跟在NetIndex之后, 这些内容会写入一个新创建的Bunch,写入后bunch内容如下:

上面就是基本的RPC发送流程,在数据接收端收到一个RPC的Bunch之后,识别出其中的NetIndex并寻找到对应的UFunction,然后进入FObjectReplicator::ReceivedRPC函数来处理该RPC.
uint8* Parms = new(FMemStack::Get(), MEM_Zeroed, Function->ParmsSize)uint8;
// Use the replication layout to receive the rpc parameter values
UFunction* LayoutFunction = Function;
while (LayoutFunction->GetSuperFunction())
{
LayoutFunction = LayoutFunction->GetSuperFunction();
}
TSharedPtr<FRepLayout> FuncRepLayout = Connection->Driver->GetFunctionRepLayout(LayoutFunction);
if (!FuncRepLayout.IsValid())
{
UE_LOG(LogRep, Error, TEXT("ReceivedRPC: GetFunctionRepLayout returned an invalid layout."));
return false;
}
FuncRepLayout->ReceivePropertiesForRPC(Object, LayoutFunction, OwningChannel, Reader, Parms, UnmappedGuids);
// Call the function.
Object->ProcessEvent(Function, Parms);
上面的代码是FObjectReplicator::ReceivedRPC处理RPC的核心逻辑,首先分配一段合适大小的内存来接受该RPC的所有参数,然后获取该UFunction的FunctionRepLayout来获取参数描述结构,通过这个结构来从Reader提供的数据bit流中解析所有的参数,解析完参数之后,最终转向ProcessEvent进行前面的execXXX函数调用,从而最终调用到XXX_implementation函数。
Unreal Engine的数据序列化
在理清楚网络传递RPC的基本脉络之后,我们再来探究RPC的相关参数是如何序列化的。在UE中数据的序列化和反序列化都是通过FArchive这个结构体来实现的,在\Engine\Source\Runtime\Core\Public\Serialization\Archive.h中提供了各种基础类型和FString的序列化与反序列化的实现。
FORCEINLINE friend FArchive& operator<<(FArchive& Ar, bool& Value);
FORCEINLINE friend FArchive& operator<<(FArchive& Ar, int8& Value);
FORCEINLINE friend FArchive& operator<<(FArchive& Ar, uint16& Value);
FORCEINLINE friend FArchive& operator<<(FArchive& Ar, int16& Value);
FORCEINLINE friend FArchive& operator<<(FArchive& Ar, uint32& Value);
FORCEINLINE friend FArchive& operator<<(FArchive& Ar, int32& Value);
FORCEINLINE friend FArchive& operator<<(FArchive& Ar, uint64& Value);
FORCEINLINE friend FArchive& operator<<(FArchive& Ar, int64& Value);
FORCEINLINE friend FArchive& operator<<(FArchive& Ar, float& Value);
FORCEINLINE friend FArchive& operator<<(FArchive& Ar, double& Value);
friend CORE_API FArchive& operator<<(FArchive& Ar, FString& Value);
这里的FArchive operator<<既可以当作序列化来使用,也可以当作反序列化来使用,内部通过一个Flag来确定是在序列化还是在反序列化:
/** Returns true if this archive is for loading data. */
FORCEINLINE bool IsLoading() const
{
return ArIsLoading;
}
/** Returns true if this archive is for saving data, this can also be a pre-save preparation archive. */
FORCEINLINE bool IsSaving() const
{
return ArIsSaving;
}
这里的序列化与反序列化是以bit为单位进行操作的,所以外部在使用时经常使用更底层的接口来优化数据大小,例如下面的这个接口就是在我们在已知一个uint32的取值范围之后进行bit裁剪,避免直接使用32bit进行数据传输:
void FBitWriter::WriteIntWrapped(uint32 Value, uint32 ValueMax)
{
check(ValueMax >= 2);
const int32 LengthBits = FMath::CeilLogTwo(ValueMax);
if (AllowAppend(LengthBits))
{
uint32 NewValue = 0;
for (uint32 Mask=1; NewValue+Mask < ValueMax && Mask; Mask*=2, Num++)
{
if (Value & Mask)
{
Buffer[Num>>3] += GShift[Num&7];
NewValue += Mask;
}
}
}
else
{
SetOverflowed(LengthBits);
}
}
UE中的RPC参数列表内置了上述列出的各种基础类型的支持,还支持Actor和ActorComponent类型的指针。如果想要在Rpc参数中使用自定义的结构体,需要其类型上定义如下的序列化接口函数:
USTRUCT()
struct FMyCustomNetSerializableStruct
{
UPROPERTY()
float SomeProperty;
bool NetSerialize(FArchive& Ar, class UPackageMap* Map, bool& bOutSuccess)
{
Ar << SomeProperty;
bOutSuccess = true;
return true;
}
}
template<>
struct TStructOpsTypeTraits<FMyCustomNetSerializableStruct> : public TStructOpsTypeTraitsBase2<FMyCustomNetSerializableStruct>
{
enum
{
WithNetSerializer = true
};
};
注意最后一部分的TStructOpsTypeTraits特化模板,这个模板的作用是告诉引擎该ustruct定义了自定义的NetSerializer函数。如果不添加该代码,我们添加的NetSerialize方法将永远不会被调用。
Unreal Engine RPC中的指针参数处理
Actor和ActorComponent类型的指针能够作为RPC参数的前提就是该指针指向的对象需要设置bReplicate=true,即参与网络同步。当这样的指针第一次被同步到客户端时,会赋予其当前Connection内唯一的uint32_t FNetworkGuid。指针指向的对象同步到客户端后,会在客户端建立起其FNetworkGuid到这个指针的映射。然后再将这个指针序列化为FNetworkGuid,这样客户端在处理这个RPC时,会通过接收的FNetworkGuid查找已同步过来的网络对象的指针,作为对应RPC参数的实参进行传入。理想情况下看上去很美好,但是不同的ActorChannel在客户端的创建时机是无法保证的,有可能我们在Rpc调用时收到了FNetworkGuid但是对应的对象还没有在客户端创建,此时查找到的UObject*的值为nullptr,情况就变得复杂起来。此时我们有两种选择:
- 直接使用
nullptr作为参数调用RPC - 将这个
RPC缓存起来,等到相应的FNetworkGuid关联的Actor创建好了之后再执行
UE中提供给了我们一个全局变量来选择哪一种方案,默认情况下就直接用nullptr去处理了:
static TAutoConsoleVariable<int32> CVarDelayUnmappedRPCs(
TEXT("net.DelayUnmappedRPCs"),
0,
TEXT("If true delay received RPCs with unmapped object references until they are received or loaded, ")
TEXT("if false RPCs will execute immediately with null parameters. ")
TEXT("This can be used with net.AllowAsyncLoading to avoid null asset parameters during async loads."),
ECVF_Default);
运行时会读取这个变量的值来决定我们是否需要对这个RPC进行延迟执行:
// bool FObjectReplicator::ReceivedBunch(FNetBitReader& Bunch, const FReplicationFlags& RepFlags, const bool bHasRepLayout, bool& bOutHasUnmapped)
const bool bCanDelayRPCs = (CVarDelayUnmappedRPCs.GetValueOnGameThread() > 0) && !bIsServer;
bool bSuccess = ReceivedRPC(Reader, RepFlags, FieldCache, bCanDelayRPCs, bDelayFunction, UnmappedGuids);
if (!bSuccess)
{
return false;
}
else if (bDelayFunction)
{
// This invalidates Reader's buffer
PendingLocalRPCs.Emplace(FieldCache, RepFlags, Reader, UnmappedGuids);
bOutHasUnmapped = true;
bGuidsChanged = true;
bForceUpdateUnmapped = true;
}
如果支持延迟RPC 则会放到PendingLocalRPCs这个数组里。但是UE的可靠RPC在同一个ActorChannle内是严格按照服务端调用顺序执行的。因此客户端接收到的RPC在执行的时候,如果发现PendingLocalRPCs数组不为空, 则当前RPC也不会被执行, 会被标记为DelayRPC,并最终放入到PendingLocalRPCs数组中:
// bool FObjectReplicator::ReceivedRPC(FNetBitReader& Reader, const FReplicationFlags& RepFlags, const FFieldNetCache* FieldCache, const bool bCanDelayRPC, bool& bOutDelayRPC, TSet<FNetworkGUID>& UnmappedGuids)
if (bCanDelayUnmapped && (UnmappedGuids.Num() > 0 || PendingLocalRPCs.Num() > 0))
{
// If this has unmapped guids or there are already some queued, add to queue
bOutDelayRPC = true;
}
然后在NetDriver::Tick中会调用void FObjectReplicator::UpdateUnmappedObjects(bool & bOutHasMoreUnmapped),这里会尝试检查这些被延迟RPC的所等待的网络同步对象客户端是否已经都创建了,如果满足则重试执行:
// Handle pending RPCs, in order
for (int32 RPCIndex = 0; RPCIndex < PendingLocalRPCs.Num(); RPCIndex++)
{
FRPCPendingLocalCall& Pending = PendingLocalRPCs[RPCIndex];
const FFieldNetCache* FieldCache = ClassCache->GetFromIndex(Pending.RPCFieldIndex);
FNetBitReader Reader(Connection->PackageMap, Pending.Buffer.GetData(), Pending.NumBits);
bool bIsGuidPending = false;
for (const FNetworkGUID& Guid : Pending.UnmappedGuids)
{
if (PackageMapClient->IsGUIDPending(Guid))
{
bIsGuidPending = true;
break;
}
FunctionName = FieldCache->Field.GetName();
bSuccess = ReceivedRPC(Reader, Pending.RepFlags, FieldCache, bCanDelayRPCs, bFunctionWasUnmapped, UnmappedGuids);
PendingLocalRPCs.RemoveAt(RPCIndex);
RPCIndex--;
}
}
值得注意的是,为了维持RPC客户端调用的有序性,按照顺序遍历PendingLocalRPCs数组时,如果发现某个RPC的执行条件无法被满足,则停止处理后续的RPC,即使后续RPC所依赖的网络同步对象已经全都满足了。
entity与component系统
游戏逻辑内为了方便的对场景内的各种对象做统一的管理,同时解耦各种内聚的逻辑,基本都会做一个自己的entity/component系统。entity就是游戏内的对象,是对象数据的载体,而且是component的容器;而component则是各种业务逻辑的载体。随着业务逻辑的扩张,entity与component的类型会呈一个无限增加的趋势,所以需要一个entity/component系统来对这些变动中的类型执行管理,维护这些类型的创建与运行。
entity系统
在mosaic_game的客户端与服务端都维护了各自的entity系统,服务端的基类entity为server_entity,客户端的基类entity为client_entity。为了对这两种entity系统做统一化的管理,避免复制粘贴代码,mosaic_game中构造了一个模板化的entity_manager。由于这个entity_manager内部使用了太多的模板技巧,因此我们来循序渐进的介绍一下这些模板代码的演进过程。
工厂模式
在游戏业务代码中,对于重要的继承类型对象创建,一般都通过对象工厂进行委托。这样的好处是方便追溯对象的完整生命周期,实现对象的统一管理。mosaic_game中的EntityManager就是这样的一个工厂,这个工厂就负责了所有Entity的创建, 同时每个entity被创建之后,都会记录到EntityManager的内部map里,以方便其他模块根据entity的id进行查找。
最基本的对象工厂代码可以简略为下面的例子:
struct Animal
{
virtual void make_voice() = 0;
};
struct cat: public Animal
{
void make_voice()
{
std::cout<<"miaomiaomiao"<<std::endl;
}
};
struct dog: public Animal
{
void make_voice()
{
std::cout<<"wangwangwang"<<std::endl;
}
};
Animal* CreateAnimal(const std::string& name)
{
if(name == "cat")
{
return new cat();
}
else if(name == "dog")
{
return new dog();
}
else
{
return nullptr;
}
}
这种手动根据字符串进行if else判断的方式,完全基于人工,对于子类型少的时候还是比较方便的但是对于快速扩展的代码来说,就可能不够用了,例如unreal qt等框架都有自己的Object系统。主要问题包括两个:
- 人工字符串匹配有笔误的风险
- 每次添加新的子类型都需要更改
CreateAnimal函数,同时需要引入新对象的头文件,容易忘,需要提供自动化的机制
所以实践中一般来说不是手工输入类型名字的,而是在所有继承类型里都提供static std::string StaticClassName()这么一个方法,同时基类里声明virtual std::string ClassName() const的虚方法。前面的代码可以改成这样:
struct Animal
{
virtual void make_voice() = 0;
virtual std::string ClassName() const = 0;
static std::string StaticClassName();
};
struct cat: public Animal
{
static std::string StaticClassName()
{
return "cat";
}
};
struct dog: public Animal
{
static std::string StaticClassName()
{
return "dog";
}
};
Animal* CreateAnimal(const std::string& name)
{
if(name == cat::StaticClassName())
{
return new cat();
}
else if(name == dong::StaticClassName())
{
return new dog();
}
else
{
return nullptr;
}
}
这个CreateAnimal函数可以写成模板类型,避免外部的手动输入:
template <typename T>
Animal* CreateAnimal()
{
auto name = T::StaticClassName();
if(name == cat::StaticClassName())
{
return new cat();
}
else if(name == dong::StaticClassName())
{
return new dog();
}
else
{
return nullptr;
}
}
使用的时候就直接CreateAnimal<cat>()即可,非常方便。
在子类开始增多之后,一个个的if else去判定类型名字显得特别繁琐,且性能很差,所以我们可以进一步的修改为使用map来存储所有类型的构造信息,查找的时候根据map来查找即可。为此,我们需要对每个类型提供一个静态的create函数:
struct cat: public Animal
{
static Animal* create()
{
return new cat();
}
};
struct dog: public Animal
{
static Animal* create()
{
return new dog();
}
};
using creator_func_t = std::function<Animal*()>;
template <typename T>
Animal* CreateAnimal()
{
static std::unordered_map<std::string, creator_func_t> all_creators =
{
{cat::StaticClassName(), cat::create()},
{dog::StaticClassName(), dog::create()},
}
auto name = T::StaticClassName();
auto cur_iter = all_creators.find(name);
if(cur_iter == all_creators.end())
{
return nullptr;
}
else
{
return cur_iter->second();
}
}
事实上,我们可以把all_creators这个map与CreateAnimal分离开来,CreatorAnimal并不关心all_creators的内容是什么。这样我们就可以把all_creators的初始化与CreatorAnimal的实现分离开,头文件之间的耦合也就可以解开了。
using creator_func_t = std::function<Animal*()>;
using creator_map = std::unordered_map<std::string, creator_func_t>;
static creator_map& getCreatorMap()
{
static creator_map map_data;
return map_data;
}
template <typename T>
bool addToMap()
{
auto& map_data = getCreatorMap();
auto name = T::StaticClassName();
map_data[name] = []()
{
return new T();
};
return true;
}
template <typename T>
Animal* CreateAnimal()
{
auto name = T::StaticClassName();
auto& all_creators = getCreatorMap();
auto cur_iter = all_creators.find(name);
if(cur_iter == all_creators.end())
{
return nullptr;
}
else
{
return cur_iter->second();
}
}
在上面的定义下,每个继承的子类都只需要分别调用addToMap<T>这个函数注册当前类型进去即可,调用的位置并不需要中心化,可以散落在各个独立的编译单元。
所以剩下的问题就是,如何让这个类型在main函数执行之前调用各自的addtoMap<T>。这个时候我们就需要求救于类静态变量,因为类的静态变量的初始化是在main执行之前的。因此,我们对cat做进一步改造:
// in header file
struct cat: public Animal
{
static bool is_registered;
}
// in cpp file
bool cat::is_registered = addtomap<cat>;
这样只要cat类被引用到,他的is_registered就会初始化, 然后就会调用addtomap<cat>进行注册。
类型自动注册
每次继承一个子类,都需要声明is_registered这个静态变量,然后在cpp文件里利用addtomap来初始化一番,其实在类型多的时候也比较容易忘记。而且这个对于所有子类来说都是重复劳动,所以一般工程上来说,都是有宏来处理这种继承自动注册的。
#define REGISTER_CHAIN(T) bool isRegistered_##T = ObjectFactory::instance()->reg<T>(#T, T::create)
大家经常用的Gtest其实也用的是这种模式, 比方说下面的gtest代码:
Test(MyTest) {
int a = 3;
assert(a == 3);
}
展开后就成这样了:
class Test_MyTest {
public:
void execute();
static Test_MyTest create() { return Test_MyTest(); }
static bool registered = TestFactory::Register("MyTest", &Test_MyTest::create)
};
void Test_MyTest::execute() {
int a = 3;
assert(a == 3);
}
新时代的cpp爱好者不会止步于基于宏的解决方案,力争把宏都用template 和constexpr换掉:
template <class T>
struct sub_class : Animal
{
friend T;
static bool trigger()
{
return addtomap<T>;
}
static bool registered;
public:
sub_class() : Animal()
{
(void)registered;
}
};
template <class T>
sub_class<T>::registered = sub_class<T>::tigger();
上面的模板类,每次被实例化之后,都会调用对应的trigger函数来初始化,这样就通过模板解决了自动注册的问题。使用的时候,需要稍微绕一下:
class cat: public sub_class<cat>
{
}
class dog: public sub_class<dog>
{
}
这样,我们通过crtp模式,构造了cat->sub_class<cat>->Animal的继承链, sub_class<cat>这一层只负责注册,逻辑都在cat这个类里。
在mosaic_game内的entity_manager采用了同样的设计来实现自动注册,也提供了一个sub_class注册类型:
template <typename base_entity>
class entity_manager
{
template <class T, class B = base_entity>
class sub_class : public B
{
friend T;
public:
static bool trigger()
{
// static_assert(std::is_final_v<T>, "sub class should be final");
inherit_mapper<base_entity>::template record_sub_class<T, B>();
return entity_manager::instance().template register_entity<T>();
}
static bool registered;
private:
sub_class(const entity_construct_key& key, const entity_desc& in_base_desc, std::shared_ptr<spdlog::logger> in_logger)
: B(key, in_base_desc, in_logger)
{
(void) registered;
}
~sub_class()
{
}
};
};
在声明一个新的entity类型的时候,都需要采用这样的形式:
class actor_entity : public entity_manager::sub_class<actor_entity>
{
};
class player_entity final: public entity_manager::sub_class<player_entity, actor_entity>
{
};
这样就能触发正确的自动注册了。
编译期类型名字
上面我们通过模板解决了基于宏的自动注册问题,现在还是有一点不方便之处,对于每个类型我们都需要定义一个静态方法StaticClassName,来标注这个类型的名字,显得也有点繁琐。利用现代编译器的机制,其实我们可以通过模板来获取类型名字的,只需要下面的一坨代码:
template <typename T>
constexpr auto type_name() noexcept
{
std::string_view name, prefix, suffix;
#ifdef __clang__
name = __PRETTY_FUNCTION__;
prefix = "auto type_name() [T = ";
suffix = "]";
#elif defined(__GNUC__)
name = __PRETTY_FUNCTION__;
prefix = "constexpr auto type_name() [with T = ";
suffix = "]";
#elif defined(_MSC_VER)
name = __FUNCSIG__;
prefix = "auto __cdecl type_name<";
suffix = ">(void) noexcept";
#endif
name.remove_prefix(prefix.size());
name.remove_suffix(suffix.size());
return name;
}
这坨代码的核心就是利用编译器的扩展__PRETTY_FUNCTION__ __FUNCSIG__来获取当前函数体的函数签名,对于无参数模板函数而言,他的头尾字符串都是确定的,中间则是编译器输出的类型名字。所以我们只需要把头尾的多余字符串删掉,剩下的就是类型名字了。
通过这个模板函数,之前的注册和使用代码可以修改为:
using creator_func_t = std::function<Animal*()>;
using creator_map = std::unordered_map<std::string_view, creator_func_t>;
template <typename T>
bool addToMap()
{
auto& map_data = getCreatorMap();
auto name = type_name<T>();
map_data[name] = []()
{
return new T();
};
return true;
}
template <typename T>
Animal* CreateAnimal()
{
auto name = type_name<T>();
auto& all_creators = getCreatorMap();
auto cur_iter = all_creators.find(name);
if(cur_iter == all_creators.end())
{
return nullptr;
}
else
{
return cur_iter->second();
}
}
至此,一切可以自动化的工作,都已经被模板自动化了。
编译期类型id
游戏逻辑中经常会有一些entity类型判定操作,例如遍历指定类型的所有entity,判定类型是否相等,判定类型A是否是类型B的子类型等。此时使用类型名字来做判断的话,会涉及到字符串的比较与hash操作,这些操作在频繁调用的时候有一定的性能损失,例如下面的entity_manager根据类型名字创建entity的工厂接口,就涉及到了上述字符串操作:
base_entity* create_entity(const std::string& type_name, const std::string& in_persist_entity_id, std::uint64_t in_online_entity_id)
{
auto cur_ctor_iter = ctor_maps().find(type_name);
if(cur_ctor_iter == ctor_maps().end())
{
return nullptr;
}
else
{
return cur_ctor_iter->second.operator()(in_persist_entity_id, in_online_entity_id);
}
}
因此在mosaic_game的entity系统中,我们还给每个entity类型都分配了一个编译期的size_t类型id。这个id分配器使用了base_type_hash这个模板辅助类
template <typename B>
class base_type_hash
{
static std::size_t last_used_id;
public:
template <typename T>
static std::enable_if_t<std::is_base_of_v<B, T>, std::size_t> hash()
{
if constexpr (std::is_same_v<B, T>)
{
// zero is reserved for self
return 0;
}
else
{
static const std::size_t id = last_used_id++;
return id;
}
}
static std::size_t max_used()
{
return last_used_id;
}
};
template <typename B>
std::size_t base_type_hash<B>::last_used_id = 1;
在mosaic_game的entity_manager中,注册一个entity类型的时候会显示的触发这个字段的初始化:
template<typename T>
static bool register_entity()
{
std::string cur_type_name = T::static_type_name();
auto cur_type_id = utility::base_type_hash<base_entity>::template hash<T>();
(void)cur_type_id;
if(ctor_maps().count(cur_type_name) != 0)
{
return false;
}
entity_ctor_func cur_type_ctor = [=](const std::string& in_persist_entity_id, std::uint64_t in_online_entity_id)
{
return static_cast<base_entity*>(instance().template create_entity<T>(in_persist_entity_id, in_online_entity_id));
};
ctor_maps()[cur_type_name] = cur_type_ctor;
return true;
}
由于我们通过base_type_hash生成的type_id是一个递增的整数,所以我们可以利用这个性质来优化entity的分类存储。在没有这个类型id的帮助下,我们可能会使用下面的类型来作为所有entity的容器:
std::unordered_map<std::string, std::unordered_map<std::uint64_t, entity*>> m_entities_by_type;
每次查询这个容器都需要执行字符串的hash与比较操作,在有type_id的辅助下,我们将这个容器切换为数组模式:
std::vector<std::unordered_map<std::uint64_t, entity*>> m_entities_by_type;
指定类型T的数组索引就是base_type_hash<base_entity>::template hash<T>(), 这是一个编译期常量,因此相对于前述的字符串unordered_map容器来说有一个非常大的效率上的优化。这里需要注意的点就是需要正确的初始化这个vector的大小,因此base_type_hash里会暴露出max_used作为最大索引:
void init()
{
m_logger = utility::get_logger("entity_mgr");
spdlog::register_logger(m_logger);
for(const auto& one_pair: ctor_maps())
{
auto cur_entity_logger = utility::get_logger(one_pair.first);
spdlog::register_logger(cur_entity_logger);
cur_entity_logger->info("register_entity to entity_manager");
}
m_entities_by_type = std::vector<std::unordered_set<entity_slot>>(utility::base_type_hash<base_entity>::max_used());
}
运行时实例id
为了对一个entity做唯一表示,entity都会有一个唯一id字段。在创建这个entity的时候分配一个唯一id,并将这个id与对应entity的映射存储在entity_manager之中。在查找这个id对应的entity则需要通过entity_manager提供的查询接口来定位。在mosaic_game中,为了应对不同情况下的效率需求,同时提供了三套运行时id:
persist_entity_id, 这个id是字符串类型的唯一标识符,保证服务器重新启动之后不会出现相同idonline_entity_id, 这个id是uint64_t类型的唯一标识符, 保证服务器重新启动之前不会出现相同idlocal_entity_id, 这个id是uint64_t类型的唯一标识符,保证本进程内不会出现相同id
创建entity的时候需要同时传入persist_entity_id与online_entity_id:
template <typename T>
T* create_entity(const std::string& in_persist_entity_id, std::uint64_t in_online_entity_id);
这里的persist_entity_id主要是为了玩家entity和账号entity使用的,因为这两个entity要在停服起服之后保持一致的唯一标识符,这样可以方便在日志中对这些entity的活动进行定位。除了这两个类型之外的entity的persist_entity_id都只保证服务器重启之前不会出现相同id,因为这个id的分配是通过下面这个函数来进行的:
std::string basic_stub::gen_unique_str(bool persist)
{
m_unique_id_counter++;
std::ostringstream oss;
oss << *m_local_name_ptr;
oss << "_";
if(persist)
{
oss << std::to_string(m_start_ts);
oss << "_";
}
oss << std::to_string(m_unique_id_counter);
return oss.str();
}
只有player_entity与account_entity创建的时候这个persist变量会设置为true,这样就会带上进程启动的时间戳,以保证重启之后不会出现相同的id。
由于entity查询操作在rpc分发以及异步回调中被经常使用,使用字符串persist_entity_id来做唯一id的话效率不高,所以我们还提供了更加轻量化的基于计数器的online_entity_id,这个online_entity_id的分配是进程内维护了一个递增计数器,space_entity在创建actor_entity的时候会使用这个计数器:
std::uint64_t space_server::gen_online_entity_id()
{
assert(m_online_counter != 0);
m_online_counter++;
return m_online_counter;
}
actor_entity* space_entity::create_entity(const std::string& entity_type, const std::string& entity_id, json::object_t& init_info, const json::object_t& enter_info, std::uint64_t online_entity_id)
{
if(online_entity_id == 0)
{
online_entity_id = gen_online_entity_id();
}
// 省略后续代码
}
由于服务器一般会有数十个进程,为了避免服务器不同进程之间分配了同样的online_entity_id,我们在mgr_server上提供了一个唯一号段分配接口:
void mgr_server::on_request_allocate_counter(std::shared_ptr<network::net_connection> con, std::shared_ptr<const std::string> dest, const json& msg)
{
std::string server_name;
std::string server_type;
std::string counter_type;
std::string errcode;
json::object_t reply_msg, reply_param;
reply_msg["cmd"] = "reply_allocate_counter";
try {
msg.at("from_server_name").get_to(server_name);
msg.at("from_server_type").get_to(server_type);
msg.at("counter_type").get_to(counter_type);
}
catch (std::exception& e)
{
m_logger->warn("invalid msg {} for on_request_allocate_counter error {}", msg.dump(4), e.what());
errcode = "invalid format";
return;
}
reply_param["counter_type"] = counter_type;
reply_param["counter_value"] = 0;
if(errcode.empty())
{
auto counter_value = m_counter_resource[counter_type] + 1;
m_counter_resource[counter_type] = counter_value;
m_logger->info("on_request_allocate_counter server_type {} server_name {} counter_type {} counter_value {}", server_type, server_name, counter_type, counter_value);
reply_param["counter_value"] = counter_value;
}
reply_param["errcode"] = errcode;
reply_msg["param"] = reply_param;
m_router->push_msg(con.get(), m_local_name_ptr, {}, std::make_shared<std::string>(json(reply_msg).dump()), enums::packet_cmd_helper::encode(enums::packet_cmd::server_control, 0));
}
每个进程启动的时候都会向mgr_server申请号段,每个号段都有1<<32的可用分配空间:
void space_server::on_reply_allocate_counter(std::shared_ptr<network::net_connection> con, std::shared_ptr<const std::string> dest, const json& msg)
{
m_logger->info("on_reply_allocate_counter with msg {}", msg.dump());
server_info cur_resource_svr;
std::string counter_type;
std::uint32_t counter_value;
std::string cur_err;
try
{
msg.at("counter_type").get_to(counter_type);
msg.at("errcode").get_to(cur_err);
msg.at("counter_value").get_to(counter_value);
if(!cur_err.empty())
{
m_logger->warn("on_reply_allocate_counter errcode {} msg {}", cur_err, msg.dump());
notify_stop();
return;
}
}
catch (std::exception& e)
{
m_logger->warn("on_reply_allocate_counter msg invalid {} error {}", msg.dump(4), e.what());
notify_stop();
return;
}
m_logger->info("on_reply_allocate_counter counter_type {} counter_value {}", counter_type, counter_value);
if(counter_type == "online_session")
{
if(m_online_counter != 0)
{
m_logger->error("on_reply_allocate_counter get online_session while local counter is {}", m_online_counter);
notify_stop();
return;
}
m_online_counter = std::uint64_t(counter_value)<<32;
}
}
local_entity_id的存在是为了加速entity查找使用的,因为不管是persist_entity_id还是online_entity_id,使用这两个id执行的查询都要通过unordered_map:
base_entity* get_entity_by_online_id(std::uint64_t online_id) const
{
auto slot_iter = m_online_entity_id_to_idx.find(online_id);
if (slot_iter == m_online_entity_id_to_idx.end())
{
return nullptr;
}
return m_total_entities_vec[slot_iter->second].first;
}
base_entity* get_entity(const std::string& eid) const
{
auto slot_iter = m_persist_entity_id_to_idx.find(eid);
if (slot_iter == m_persist_entity_id_to_idx.end())
{
return nullptr;
}
return m_total_entities_vec[slot_iter->second].first;
}
进一步来加速这个查找效率的话,只有vector能用来作为存储容器,此时local_entity_id使用元素所在的数组索引:
std::vector<std::pair<base_entity*,std::uint32_t>> m_total_entities_vec;
由于我们无法保证一个entity在不同进程上的entity_manager::m_total_entities_vec占据相同的索引,所以这个local_entity_id只能在本进程中使用。同时由于entity会不断的创建销毁,如果vector中一个位置存储的entity指针无法在entity销毁后释放的话,这个数组就会无限膨胀,占据巨量内存。所以我们需要在entity销毁的时候对索引进行回收,分配索引的时候优先使用回收的结果:
std::vector<std::uint32_t> m_avail_indexes;
但是使用索引回收机制来复用元素又可能导致之前某个entity对应的local_entity_id在一段时间后会查询到一个新的entity,这样逻辑层会错误的使用这个新的entity执行后续的流程,带来错误。为了避免这种问题发生,我们将这个local_entity_id设计为两个字段,封装为一个结构体entity_slot:
struct entity_slot
{
std::uint32_t salt;
std::uint32_t slot; // slot为0 代表不是有效的entity
};
这里的slot就是entity数组里的偏移量,而salt则是这个元素被修改的次数。同时entity数组里的值不仅仅存储entity的指针,也存储对应的修改序列号。这样在创建entity的时候对数组里的元素序列号执行自增,查询entity的时候需要判定修改序列号是否相等:
entity_slot get_avail_slot()
{
if(m_avail_indexes.empty())
{
std::uint32_t result = std::uint32_t(m_total_entities_vec.size());
// 初始化修改序列号为0
m_total_entities_vec.push_back(std::make_pair<base_entity*, std::uint32_t>(nullptr, 0));
return entity_slot{0, result};
}
else
{
auto result = m_avail_indexes.back();
m_avail_indexes.pop_back();
assert(m_total_entities_vec[result].first == nullptr);
m_total_entities_vec[result].second++; //自增修改序列号
return entity_slot{m_total_entities_vec[result].second, result};
}
}
base_entity* get_entity(const entity_slot& entity_slot) const
{
if(entity_slot.slot >= m_total_entities_vec.size())
{
return nullptr;
}
if(m_total_entities_vec[entity_slot.slot].second != entity_slot.salt)
{
return nullptr;
}
return m_total_entities_vec[entity_slot.slot].first;
}
实际使用中的local_entity_id就是将entity_slot中的两个字段合并起来的uint64_t:
std::uint64_t entity_slot::to_uint64() const
{
std::uint64_t result = salt;
result <<= 32;
result += slot;
return result;
}
using local_entity_id = utility::handler_wrapper<std::uint64_t, entity_desc>;
class entity_desc
{
public:
const entity_slot m_slot_index;
const std::uint64_t m_type_id;
const std::string m_type_name;
const std::string m_persist_entity_id;
const local_entity_id m_local_entity_id;
const std::uint64_t m_online_entity_id;
public:
entity_desc(entity_slot in_slot_index, std::uint64_t in_type_id, const std::string& in_type_name, const std::string& in_persist_entity_id, std::uint64_t in_online_entity_id)
: m_slot_index(in_slot_index)
, m_type_id(in_type_id)
, m_type_name(in_type_name)
, m_persist_entity_id(in_persist_entity_id)
, m_local_entity_id(in_slot_index.to_uint64())
, m_online_entity_id(in_online_entity_id)
{
}
};
这里的handler_wrapper是一个值类型保护类,保证外部只能拿到只读值,只有指定类型可以对内部只进行修改:
template <typename Value, typename Friend>
class handler_wrapper
{
Value m_value;
friend Friend;
handler_wrapper(Value in_value)
: m_value(in_value)
{
}
public:
handler_wrapper()
: m_value(0)
{
}
handler_wrapper(const handler_wrapper& other)
: m_value(other.m_value)
{
}
Value value() const
{
return m_value;
}
bool operator==(const handler_wrapper& other) const
{
return m_value == other.m_value;
}
};
生命周期管理
由于entity的创建与销毁都被entity_manager托管了,所以我们必须禁止外部手动通过new来创建entity的实例,同时要禁止外部手动的销毁一个entity实例。为了达到这样的效果,常规的实现是将构造函数与析构函数都声明为protected,同时在这些entity类型中声明entity_manager为其friend class。不过friend class的权限有点过于宽泛了,可能导致不经意间修改entity内部的数据,我们在mosaic_game中使用了一种更加安全的做法,这种做法需要创建一个中间类型key:
class entity_construct_key
{
entity_construct_key(std::size_t in_type_id)
: m_type_id(in_type_id)
{
}
template <typename T>
friend class entity_manager;
public:
const std::size_t m_type_id;
};
class entity_destroy_key
{
entity_destroy_key()
{
}
template <typename T>
friend class entity_manager;
};
这里entity_construct_key与entity_destroy_key都是一个构造函数为private的类型,同时声明entity_manager为其友元函数,这样就保证了这两个类型只能在entity_manager内部被创建。然后在server_entity基类上定义一个需要entity_construct_key作为参数的构造函数,以及一个需要entity_destroy_key的析构辅助函数:
server_entity(const utility::entity_construct_key& key, const utility::entity_desc& in_base_desc, std::shared_ptr<spdlog::logger> logger)
: m_base_desc(in_base_desc)
, m_shared_global_id(std::make_shared<std::string>(in_base_desc.m_persist_entity_id))
, m_logger(logger)
{
}
void final_destroy(const utility::entity_destroy_key& key)
{
delete this;
}
这两个函数都是public的,这样就避免了去声明friend的同时,限制了只有entity_manager能调用到这两个函数。对于析构函数还有一个额外步骤,即在所有的子类型里都声明一个proeteced的析构函数,因为如果不声明的话编译器会自动生成一个public的析构函数,导致外部可以直接执行delete actor这样的操作。最终通过这两个额外类型,就达到了控制entity的创建与销毁的执行上下文必须是entity_manager。
类型层级判定
游戏中有些逻辑需要对运行时的entity类型做具体的判定才能决定后续的逻辑分发,主要是判定entity是否是A类型或者是A类型的子类型。
在常规的cpp类型系统实现中,判定基类指针是否是某个子类型的实例一般会使用dynamic_cast<A*>(P)来尝试强制转换,如果转换成功则获得了子类的有效指针。不过dynamic_cast的实现上依赖于RTTI,在执行转换时会经过很多std::type_info的相等判定操作,内部主要是类型名字的比较,整体耗时是比较高的,具体的耗时分析可以参考这篇知乎文章。
由于我们在entity_manager创建entity的时候已经为每个具体的类型构造了一个单独的活动对象集合,所以判定指针A的类型是否是P时只需要执行一次这个集合的查询即可。此外我们在create_entity<T>时,会将T类型对应的编译期类型id放入到entity的数据成员中,所以判定entity类型恰好是P类型只需要将这个类型id字段执行比较即可,比集合查找是否包含这个指针来判定快很多:
template <typename T>
bool is_exact_type() const
{
auto dest_type_id = spiritsaway::utility::base_type_hash<server_entity>::template hash<T>();
return dest_type_id == m_base_desc.m_type_id;
}
这个接口只能判定指针指向的对象的类型是否是T,无法判定是否是T类型的子类。为了执行快速的子类判断,我们考虑继续在base_type_hash生成的类型id上做文章,尝试一下静态的记录类型A的直接父类型id。如果能够方便的构造这个映射关系的话,判定id是否是A的子类就只需要递归的查询id的父类型即可。
为了达到这样的记录结果,我们构造了一个辅助类型inherit_mapper, 在这个类型上提供一个unordered_map来记录某个类型A对应的直接父类型P:
template <typename T>
class inherit_mapper
{
static std::unordered_map<std::size_t, std::size_t>& parent_map()
{
static std::unordered_map<std::size_t, std::size_t> m_parent_map;
return m_parent_map;
}
public:
template <typename A, typename P>
static std::enable_if_t<std::is_base_of_v<T, A>&& std::is_base_of_v<T, P>&& std::is_base_of_v<P, A> && !std::is_same_v<A, P>, void> record_sub_class()
{
parent_map()[base_type_hash<T>::template hash<A>()] = base_type_hash<T>::template hash<P>();
}
};
同时我们在entity_manager的自动注册相关代码里加入对record_sub_class的调用:
template <class T, class B = base_entity>
class sub_class : public B
{
friend T;
public:
static bool trigger()
{
// static_assert(std::is_final_v<T>, "sub class should be final");
inherit_mapper<base_entity>::template record_sub_class<T, B>();
return entity_manager::instance().template register_entity<T>();
}
};
构造完成这个unordered_map映射之后,查询类型id_a是否是类型id_b的子类就可以以下面的代码来实现了:
static bool inherit_mapper::is_sub_class(std::uint64_t id_a, std::uint64_t id_b)
{
const auto& cur_parent_map = parent_map();
auto temp_iter = cur_parent_map.find(id_a);
while(temp_iter != cur_parent_map.end())
{
if(temp_iter->second == id_b)
{
return true;
}
temp_iter = cur_parent_map.find(temp_iter->second);
}
return false;
}
在继承链路长的时候,这里的while循环可能会执行多次,考虑到base_type_hash生成的类型id是连续递增整数,我们可以通过数组来存储这个映射:
static std::vector<std::size_t>& inherit_mapper::parent_vec()
{
static std::vector<std::size_t> m_parent_vec;
return m_parent_vec;
}
static void inherit_mapper::flat_map_to_vec()
{
auto& cur_parent_vec = parent_vec();
auto& cur_parent_map = parent_map();
cur_parent_vec.resize(base_type_hash<T>::max_used(), 0);
for (const auto& one_pair : cur_parent_map)
{
cur_parent_vec[one_pair.first] = one_pair.second;
}
}
用数组存储映射的好处就是更好的内存局部性,相对于unordered_map有明显的性能提升。此时判定子类型的代码依然很简单:
static bool inherit_mapper::is_sub_class(std::size_t s_type_id, std::size_t p_type_id)
{
auto& cur_parent_vec = parent_vec();
if (cur_parent_vec.empty())
{
flat_map_to_vec();
}
if (p_type_id == 0) // 0 代表最顶层的基类 因此总是返回true
{
return true;
}
if (s_type_id >= cur_parent_vec.size() || p_type_id >= cur_parent_vec.size())
{
return false;
}
do
{
if (s_type_id == p_type_id)
{
return true;
}
s_type_id = cur_parent_vec[s_type_id];
} while (s_type_id);
return false;
}
效率上更优的方法是直接构造一个N*N的矩阵bool parent_mat[N][N],parent_mat[a][b]的值为true则认为a是b的子类,这样就省去了多次迭代。
有了这个inherit_mapper的辅助之后,判定子类型就非常的简单了:
template <typename T>
bool server_entity::is_sub_type() const
{
auto dest_type_id = spiritsaway::utility::base_type_hash<server_entity>::hash<T>();
return utility::inherit_mapper<server_entity>::is_sub_class(m_base_desc.m_type_id, dest_type_id);
}
bool server_entity::is_sub_type(const server_entity& other) const
{
return utility::inherit_mapper<server_entity>::is_sub_class(m_base_desc.m_type_id, other.m_base_desc.m_type_id);
}
上述类型层级判定的优化其实是有很大局限性的,完全依赖于所有的类型在编译期都已知,同时所有相关类型都在同一个可执行文件中。如果entity的类型存在多个动态库之中,则这些利用静态变量的相关逻辑都会出现问题,因为静态变量在不同的动态库中会出现多个副本。
所以比较易用且万能的方法是给entity带上一个flags变量,这个变量负责记录entity的一些特性,例如是否需要往客户端同步、是否是玩家、是否是陷阱等。这些特性都以枚举值来定义,这样判断是否有这个特性就只需要执行一下位操作即可:
std::uint64_t entity_flag() const
{
return m_entity_flag;
}
bool has_entity_flag(enums::entity_flag test_flag) const
{
return !!(m_entity_flag & (1ull <<std::uint8_t(test_flag)));
}
void add_entity_flag(enums::entity_flag new_flag)
{
m_entity_flag = m_entity_flag | (1ull<<int(new_flag));
}
void remove_entity_flag(enums::entity_flag old_flag)
{
m_entity_flag = m_entity_flag & (~(1ull<<int(old_flag)));
}
这个变量是一个uint64_t,所以可以容纳很多的特性标记位,目前mosaic_game中使用了这个枚举来定义这些标记位:
enum class entity_flag
{
is_client_visible = 0,
is_dead,
is_player,
is_monster,
is_trap,
is_global,
is_combat,
is_ghost,
support_ghost,
support_migrate,
support_aoi_max_limit,
is_main_player,
is_other_player,
is_observer_player,
};
在类型的构造函数中,使用add_entity_flag接口来给当前entity加上相关的flag,然后运行时的时候使用has_entity_flag来执行快速判定。这样的实现可以完全跳过复杂的类型系统设计,实现最优的过滤效率。
component系统
一个entity上可以挂载很多的component,每个component负责承担一些比较独立的逻辑。为了更加方便的对这些component进行管理,我们将管理component的基础逻辑构造成为了一个独立的类型,使之与entity进行解耦,相关代码见于common/server_utility/include/component.h。
这个代码里声明了两个类型,组件基类base_component,以及宿主基类component_owner:
template <typename Component, typename Owner>
class component_owner
{
};
template <typename BaseOwner, typename BaseInterface>
class base_component: public BaseInterface
{
};
这两个类型都是模板类型,这样就可以更好的应对不同的component类型,这里的BaseInterface声明了一些基础的需要实现的虚接口。看上去这两个类的模板参数出现了互相引用,不怎么好理解,这里我们就以actor_entity为例来介绍使用方法。
首先我们需要明确所有的actor_component都需要继承的接口,定义一个相关的actor_component_interface:
class actor_component_interface
{
public:
virtual void on_leave_space(space_entity* cur_space)
{
}
virtual void on_enter_space()
{
}
// 省略更多的接口
};
有了这个接口类型声明之后,我们才可以给出actor_component的具体类型,注意这里我们使用了一个前置声明actor_entity,这样才能执行解耦:
class actor_entity;
using actor_component = utility::base_component<actor_entity, actor_component_interface>;
这里可以使用前置声明的原因是actor_component中并不需要知道BaseOwner的类型大小,因为其内部只是保存了BaseOwner的指针,这个字段的大小可以在编译期确定:
BaseOwner* m_owner = nullptr;
同时由于base_component是一个模板类,在类型实例化的时候其内部函数并不会直接实例化,而是等到函数被使用的时候才真正的实例化。因此我们不需要担心下面的两个成员函数由于引用了m_owner上的接口而出现编译错误:
virtual void on_set_owner()
{
m_owner->add_component_rpcs(get_rpc_indexes(), m_component_type_id);
}
virtual void on_remove_owner()
{
m_owner->remove_component_rpcs(get_rpc_indexes(), m_component_type_id);
}
有了actor_component的类型声明之后,我们才能给出actor_entity的声明:
class actor_entity : public entity_manager::sub_class<actor_entity>, public utility::component_owner<actor_component, actor_entity>
{
};
这里使用了多继承,不过这里不是菱型继承,暂时不要慌。entity_manager::sub_class代表当前actor_entity继承自server_entity,同时会自动执行类型的自动注册。而后面的utility::component_owner代表当前actor_entity继承自component_owner,拥有管理actor_component的能力。
搞清楚如何声明这两个模板类型之后,我们再来看可以在这两个类型上做哪些操作。首先需要明确的是component_owner是base_component的一个容器,所以内部需要存储多个不同base_component的指针,同时需要提供一系列的component查询接口来获取component_owner上的特定base_component。为了支持对base_component执行查询,我们需要为base_component设计一套id系统。这里我们从之前的entity的编译期id,给每个base_component的子类型提供了唯一编译期计数器。实现机制也基本照抄自之前的sub_class:
template <typename BaseOwner, typename BaseInterface>
class base_component: public BaseInterface
{
template <typename T, typename B = base_component<BaseOwner, BaseInterface>>
struct sub_class: public B
{
friend T;
static bool trigger()
{
static_assert(std::is_final_v<T>, "sub class should be final");
auto cur_type_id = utility::base_type_hash<B>:: template hash<T>();
// std::cout<<"register type name "<<T::static_type_name()<<" with id "<<cur_type_id<<" for Base "<<BaseOwner::static_type_name()<<std::endl;
return !!cur_type_id;
}
static bool registered;
private:
sub_class(std::uint32_t component_type_id, const std::string& component_name)
: B(component_type_id, component_name)
{
(void) registered;
}
};
};
registered变量的初始化代码相对以前来说语法更加复杂了,模板套模板套模板套模板:
template <class BaseOwner, class BaseInterface>
template <class T, class B>
bool base_component<BaseOwner, BaseInterface>::template sub_class<T, B>::registered = base_component<BaseOwner, BaseInterface>::template sub_class<T, B>::trigger();
base_component的构造函数里我们需要传递两个参数,一个是这个component具体类型的id,一个是这个component的名字。这两个参数都不需要手动传递,在执行add_component的时候会自动设置好:
template <typename Component, typename Owner>
class component_owner
{
std::vector<Component*> m_components;
public:
template <typename C>
component_add_result add_component(const json& data)
{
auto cur_hash_id = utility::base_type_hash<Component>::template hash<C>();
if (cur_hash_id >= m_components.size())
{
return component_add_result::hash_sz_fail;
}
auto cur_val = m_components[cur_hash_id];
if (cur_val)
{
return component_add_result::duplicated;
}
auto comp = new C(cur_hash_id, C::static_type_name());
comp->set_owner(m_owner);
if(!comp->init(data))
{
delete comp;
return component_add_result::init_fail;
}
m_components[cur_hash_id] = dynamic_cast<Component*>(comp);
return component_add_result::suc;
}
};
这里的m_components是一个数组,提供基于base_type_hash生成类型索引的快速定位,这样查询起来就方便很多了:
template<typename C>
C* get_component()
{
auto cur_hash_id = utility::base_type_hash<Component>::template hash<C>();
if(cur_hash_id >= m_components.size())
{
return {};
}
auto cur_val = m_components[cur_hash_id];
if(!cur_val)
{
return {};
}
return dynamic_cast<C*>(cur_val);
}
Component* get_component(std::uint32_t cur_hash_id)
{
if(cur_hash_id >= m_components.size())
{
return {};
}
auto cur_val = m_components[cur_hash_id];
return cur_val;
}
component被添加之后,便永久挂载到这个owner上,直到owner销毁的时候调用clear_component来销毁挂载过来的component:
void clear_components()
{
deactivate_components();
for(auto& one_component: m_components)
{
if(one_component)
{
delete one_component;
one_component = nullptr;
}
}
m_components.clear();
}
virtual void destroy()
{
clear_components();
}
virtual ~component_owner()
{
destroy();
}
到这里一个基本的component系统就算差不多了,应用层只需要执行类似于下面的代码将所有所需的component子类添加进去就好了:
bool player_entity::init_components(const json::object_t& components_data)
{
if(!actor_entity::init_components(components_data))
{
return false;
}
if(!add_components<
player_debug_component,
player_space_component,
player_aoi_component,
player_move_component,
player_observer_component,
player_chat_component,
player_offline_msg_component,
player_notify_component,
player_rank_component,
player_redis_component,
player_stuff_component,
player_team_component,
player_trap_component,
player_combat_component,
player_group_component
>(components_data))
{
return false;
}
return true;
}
在mosaic_game中的component中还有一定量的代码负责处理RPC的分发,这部分代码的作用将在后续的RPC章节中进行介绍。
Unreal Engine 中的 Actor/Component 系统
UE中也有一套自己的Actor/ActorComponent系统,这里的Actor基本等价于前文中描述的entity,而ActorComponent也基本对应上了component。不过我们在之前提到的actor/component系统在UE的Actor/ActorComponent系统面前相形见绌,缺少很多的灵活性。例如在Actor中其实并没有字段来存储这个对象的位置信息,而是存储了一个带位置信息的RootComponent,所有的位置查询设置接口都会转发到这个RootComponent:
/** The component that defines the transform (location, rotation, scale) of this Actor in the world, all other components must be attached to this one somehow */
UPROPERTY(BlueprintGetter=K2_GetRootComponent, Category="Utilities|Transformation")
USceneComponent* RootComponent;
/**
* Get the actor-to-world transform.
* @return The transform that transforms from actor space to world space.
*/
UFUNCTION(BlueprintCallable, meta=(DisplayName = "GetActorTransform", ScriptName = "GetActorTransform"), Category="Utilities|Transformation")
const FTransform& GetTransform() const
{
return ActorToWorld();
}
/** Get the local-to-world transform of the RootComponent. Identical to GetTransform(). */
FORCEINLINE const FTransform& ActorToWorld() const
{
return (RootComponent ? RootComponent->GetComponentTransform() : FTransform::Identity);
}
bool AActor::SetActorLocation(const FVector& NewLocation, bool bSweep, FHitResult* OutSweepHitResult, ETeleportType Teleport)
{
if (RootComponent)
{
const FVector Delta = NewLocation - GetActorLocation();
return RootComponent->MoveComponent(Delta, GetActorQuat(), bSweep, OutSweepHitResult, MOVECOMP_NoFlags, Teleport);
}
else if (OutSweepHitResult)
{
*OutSweepHitResult = FHitResult();
}
return false;
}
这里的RootComponent的类型是USceneComponent,而不是其父类UActorComponent。这是因为并不是每个UActorComponent都是带位置信息的,我们平常使用到的还包括UMovementComponent,UInputComponent,UAIComponent等类型就不需要携带位置信息。如果每个UActorComponent都带上transform相关字段,其内存大小会多将几百来个字节。为了节省Actor的整体内存消耗量,这个transform信息被挂载到了UActorComponent的子类USceneComponent上。从下面的USceneComponent内存布局可以看出,UActorComponent占据了0x00C0=192个字节的内存,而USceneComponent则占据了0x0220=544个字节的内存,增加的数据量极其恐怖:

逻辑层对USceneComponent做了进一步的划分,下面是一些常见的子类:
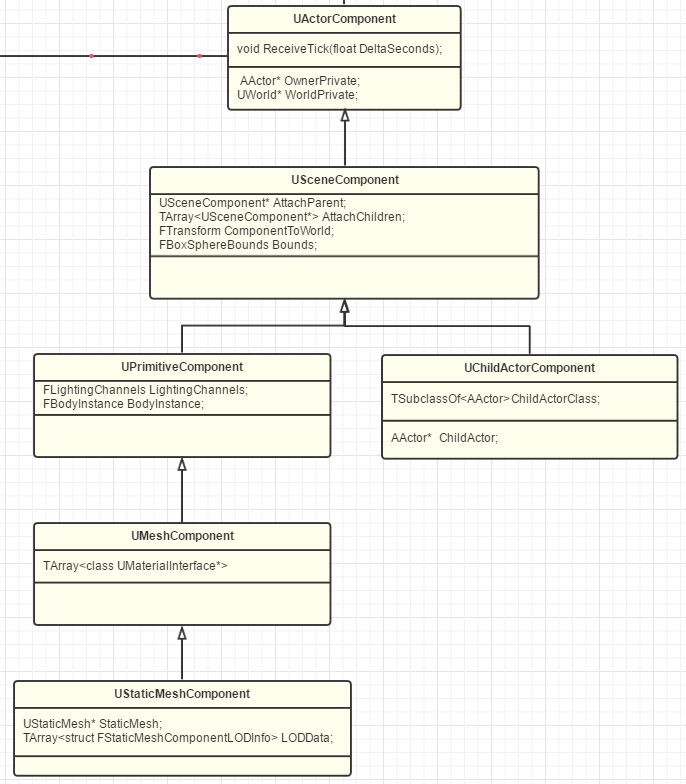
这里SceneComponent情况最特殊,因为它支持组件之间的关联,即Attach操作,下图就是一个Actor的层级关联实例:
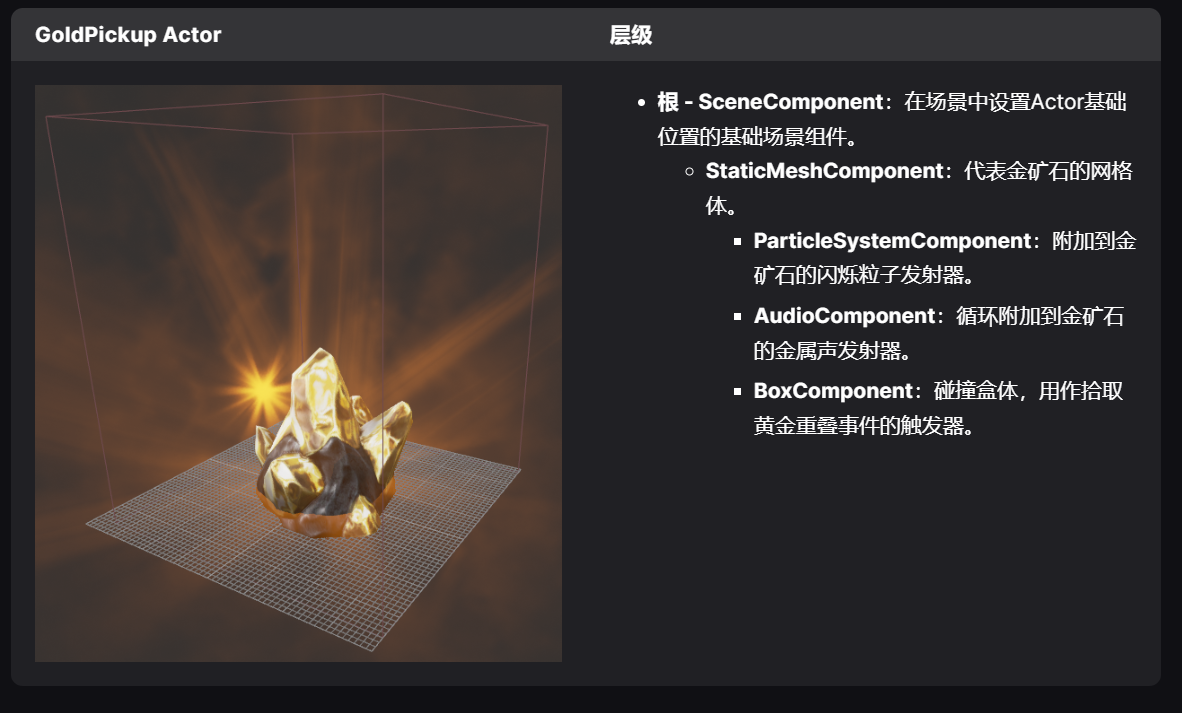
一个Actor所拥有的所有ActorComponent都会存到OwnedComponents这个集合中,同时提供了添加或者删除ActorComponent的接口去更新OwnedComponents集合:
/**
* All ActorComponents owned by this Actor. Stored as a Set as actors may have a large number of components
* @see GetComponents()
*/
TSet<UActorComponent*> OwnedComponents;
/**
* Puts a component in to the OwnedComponents array of the Actor.
* The Component must be owned by the Actor or else it will assert
* In general this should not need to be called directly by anything other than UActorComponent functions
*/
void AddOwnedComponent(UActorComponent* Component);
/**
* Removes a component from the OwnedComponents array of the Actor.
* In general this should not need to be called directly by anything other than UActorComponent functions
*/
void RemoveOwnedComponent(UActorComponent* Component);
在ActorComponent的初始化的时候,会自动的调用这个添加接口:
void UActorComponent::PostInitProperties()
{
Super::PostInitProperties();
// Instance components will be added during the owner's initialization
if (OwnerPrivate && CreationMethod != EComponentCreationMethod::Instance)
{
if (!FPlatformProperties::RequiresCookedData() && CreationMethod == EComponentCreationMethod::Native && HasAllFlags(RF_NeedLoad|RF_DefaultSubObject))
{
UObject* MyArchetype = GetArchetype();
if (!MyArchetype->IsPendingKill() && MyArchetype != GetClass()->ClassDefaultObject)
{
OwnerPrivate->AddOwnedComponent(this);
}
// 省略后续代码
}
}
}
同时ActorComponent在销毁的时候会自动的调用到删除接口:
void UActorComponent::BeginDestroy()
{
if (bHasBegunPlay)
{
EndPlay(EEndPlayReason::Destroyed);
}
// Ensure that we call UninitializeComponent before we destroy this component
if (bHasBeenInitialized)
{
UninitializeComponent();
}
ExecuteUnregisterEvents();
// Ensure that we call OnComponentDestroyed before we destroy this component
if (bHasBeenCreated)
{
OnComponentDestroyed(GExitPurge);
}
WorldPrivate = nullptr;
// Remove from the parent's OwnedComponents list
if (AActor* MyOwner = GetOwner())
{
MyOwner->RemoveOwnedComponent(this);
}
Super::BeginDestroy();
}
这样就完成了组件集合维护的操作。除了增删组件接口之外,Actor上还提供了很多组件的查询接口,获取一个Actor上指定类型的ActorComponent其实就是对这个集合做遍历的过程:
UActorComponent* AActor::FindComponentByClass(const TSubclassOf<UActorComponent> ComponentClass) const
{
UActorComponent* FoundComponent = nullptr;
if (UClass* TargetClass = ComponentClass.Get())
{
for (UActorComponent* Component : OwnedComponents)
{
if (Component && Component->IsA(TargetClass))
{
FoundComponent = Component;
break;
}
}
}
return FoundComponent;
}
/** Templatized version of FindComponentByClass that handles casting for you */
template<class T>
T* AActor::FindComponentByClass() const
{
static_assert(TPointerIsConvertibleFromTo<T, const UActorComponent>::Value, "'T' template parameter to FindComponentByClass must be derived from UActorComponent");
return (T*)FindComponentByClass(T::StaticClass());
}
这个操作在遍历的过程中会不断的执行IsA操作,内部会调用到UClass::IsChildOf函数上:
// class UObjectBaseUtility
private:
template <typename ClassType>
static FORCEINLINE bool IsChildOfWorkaround(const ClassType* ObjClass, const ClassType* TestCls)
{
return ObjClass->IsChildOf(TestCls);
}
public:
/** Returns true if this object is of the specified type. */
template <typename OtherClassType>
FORCEINLINE bool IsA( OtherClassType SomeBase ) const
{
// We have a cyclic dependency between UObjectBaseUtility and UClass,
// so we use a template to allow inlining of something we haven't yet seen, because it delays compilation until the function is called.
// 'static_assert' that this thing is actually a UClass pointer or convertible to it.
const UClass* SomeBaseClass = SomeBase;
(void)SomeBaseClass;
checkfSlow(SomeBaseClass, TEXT("IsA(NULL) cannot yield meaningful results"));
const UClass* ThisClass = GetClass();
// Stop the compiler doing some unnecessary branching for nullptr checks
UE_ASSUME(SomeBaseClass);
UE_ASSUME(ThisClass);
return IsChildOfWorkaround(ThisClass, SomeBaseClass);
}
/** Returns true if this object is of the template type. */
template<class T>
bool IsA() const
{
return IsA(T::StaticClass());
}
而这个IsChildOf的实现其实是非常低效的,他会不断的将存储的父类与目标类型做相等比较,不等的时候再递归查询,一次失败的比较会获取完整的继承链:
/**
* @return true if this object is of the specified type.
*/
#if USTRUCT_FAST_ISCHILDOF_COMPARE_WITH_OUTERWALK || USTRUCT_FAST_ISCHILDOF_IMPL == USTRUCT_ISCHILDOF_OUTERWALK
bool UStruct::IsChildOf( const UStruct* SomeBase ) const
{
if (SomeBase == nullptr)
{
return false;
}
bool bOldResult = false;
for ( const UStruct* TempStruct=this; TempStruct; TempStruct=TempStruct->GetSuperStruct() )
{
if ( TempStruct == SomeBase )
{
bOldResult = true;
break;
}
}
#if USTRUCT_FAST_ISCHILDOF_IMPL == USTRUCT_ISCHILDOF_STRUCTARRAY
const bool bNewResult = IsChildOfUsingStructArray(*SomeBase);
#endif
#if USTRUCT_FAST_ISCHILDOF_COMPARE_WITH_OUTERWALK
ensureMsgf(bOldResult == bNewResult, TEXT("New cast code failed"));
#endif
return bOldResult;
}
#endif
后面UE也发现这个IsA实现实在是太慢了,严重的拖慢了FindComponentByClass的整体速度。所以后面在针对打包版本的程序,实现了一个快速判定的版本IsChildOfUsingStructArray:
/** Returns true if this struct either is SomeBase, or is a child of SomeBase. This will not crash on null structs */
#if USTRUCT_FAST_ISCHILDOF_COMPARE_WITH_OUTERWALK || USTRUCT_FAST_ISCHILDOF_IMPL == USTRUCT_ISCHILDOF_OUTERWALK
bool IsChildOf( const UStruct* SomeBase ) const;
#else
bool IsChildOf(const UStruct* SomeBase) const
{
return (SomeBase ? IsChildOfUsingStructArray(*SomeBase) : false);
}
#endif
这个IsChildOfUsingStructArray实现的很巧妙,在打包的时候会将每个类型到UObjectBase的继承深度计算出来,同时利用了UObject不允许菱形继承的规则为每个类型都构造出一个继承链数组。数组大小就是当前类型的继承深度,数组中的每个元素都是在对应深度的父类。在有了这个继承链数组之后,判定类型B是否是类型A的子类只需要获取A的继承深度,同时在B的继承链数组中根据这个深度获取指定元素里存储的指针C是否与传入的指针A相等。这样判定是否子类就只需要常数时间复杂度了:
#if USTRUCT_FAST_ISCHILDOF_IMPL == USTRUCT_ISCHILDOF_STRUCTARRAY
class FStructBaseChain
{
protected:
COREUOBJECT_API FStructBaseChain();
COREUOBJECT_API ~FStructBaseChain();
// Non-copyable
FStructBaseChain(const FStructBaseChain&) = delete;
FStructBaseChain& operator=(const FStructBaseChain&) = delete;
COREUOBJECT_API void ReinitializeBaseChainArray();
FORCEINLINE bool IsChildOfUsingStructArray(const FStructBaseChain& Parent) const
{
int32 NumParentStructBasesInChainMinusOne = Parent.NumStructBasesInChainMinusOne;
return NumParentStructBasesInChainMinusOne <= NumStructBasesInChainMinusOne && StructBaseChainArray[NumParentStructBasesInChainMinusOne] == &Parent;
}
private:
FStructBaseChain** StructBaseChainArray;
int32 NumStructBasesInChainMinusOne;
friend class UStruct;
};
#endif
entity的运动同步
关于运动同步这部分内容,我这里只是抛砖引玉,详细的内容可以参考知乎用户Jerish编写的网络同步在游戏历史中的发展变化,这篇文章附带有70多页图文并茂且参考文献非常详实的pdf,非常值得一读。
运动信息的表示
网络游戏中每个客户端都需要接收周围一定范围内的其他entity的状态,用来做各种内容显示与交互判定。在entity所带的状态信息中最基础的就是这个entity的locomotion运动信息,即位置、朝向、速度这三个部分:
struct vector3
{
float x;
float y;
float z;
};
struct rotation
{
float pitch;
float yaw;
float roll;
};
struct entity_locomotion
{
vector3 position;
rotation rotation;
vector3 velocity;
};
position这个entity的世界坐标,表示为(x, y, z)三个浮点值,但是在不同的引擎和3D处理软件中所采用的坐标系(x, y, z)的轴朝向是不一样的,下图就是各种坐标系的典型代表

为了方便后续讨论,我们采取OpenGL中规定的右手坐标系,当玩家正对屏幕时,Y轴朝上,X轴朝右, Z轴朝玩家的坐标系
rotation这个entity的朝向信息, 表示为(pitch, yaw, roll)三个浮点值,这里也用图形来展示一下:pitch是围绕X轴旋转,也叫做俯仰角。当X轴的正半轴位于过坐标原点的水平面之上(抬头)时,俯仰角为正,否则为负yaw是围绕Y轴旋转,也叫偏航角。即右偏航为正,反之为负roll是围绕Z轴旋转,也叫翻滚角。向右滚为正,反之为负
velocity这个entity的速度信息,表示为(x, y, z)三个浮点值,对应在这三个坐标轴上的速度分量
由于速度velocity可以通过位置的差异除以时间计算出来,所以有些实现中并不会直接同步velocity分量,而是通过在游戏循环中的entity::update(float delta_time)来更新速度。同时对于很多不要求精确的物理判定的游戏来说,entity的朝向保持为直立状态,所以只有yaw分量是有意义的,pitch和roll分量会被强制设为0。所以有些游戏中会将entity_locomotion进行简化:
struct entity_locomotion
{
vector3 position;
float yaw;
};
这样entity_locomotion的结构体大小就从9个浮点数降低到了4个浮点数,可以有效的降低数据同步量。
运动信息的精度
计算机里对于浮点数的存储表示由ieee 754这个标准规定的:
- 单精度浮点数即
float采用32bit表示,开头1bit是符号位,后续的8bit是指数位,最后的23bit是尾数部分 - 双精度浮点数即
double采用64bit表示,开头1bit是符号位,后续的11bit是指数位,最后的52bit是尾数部分
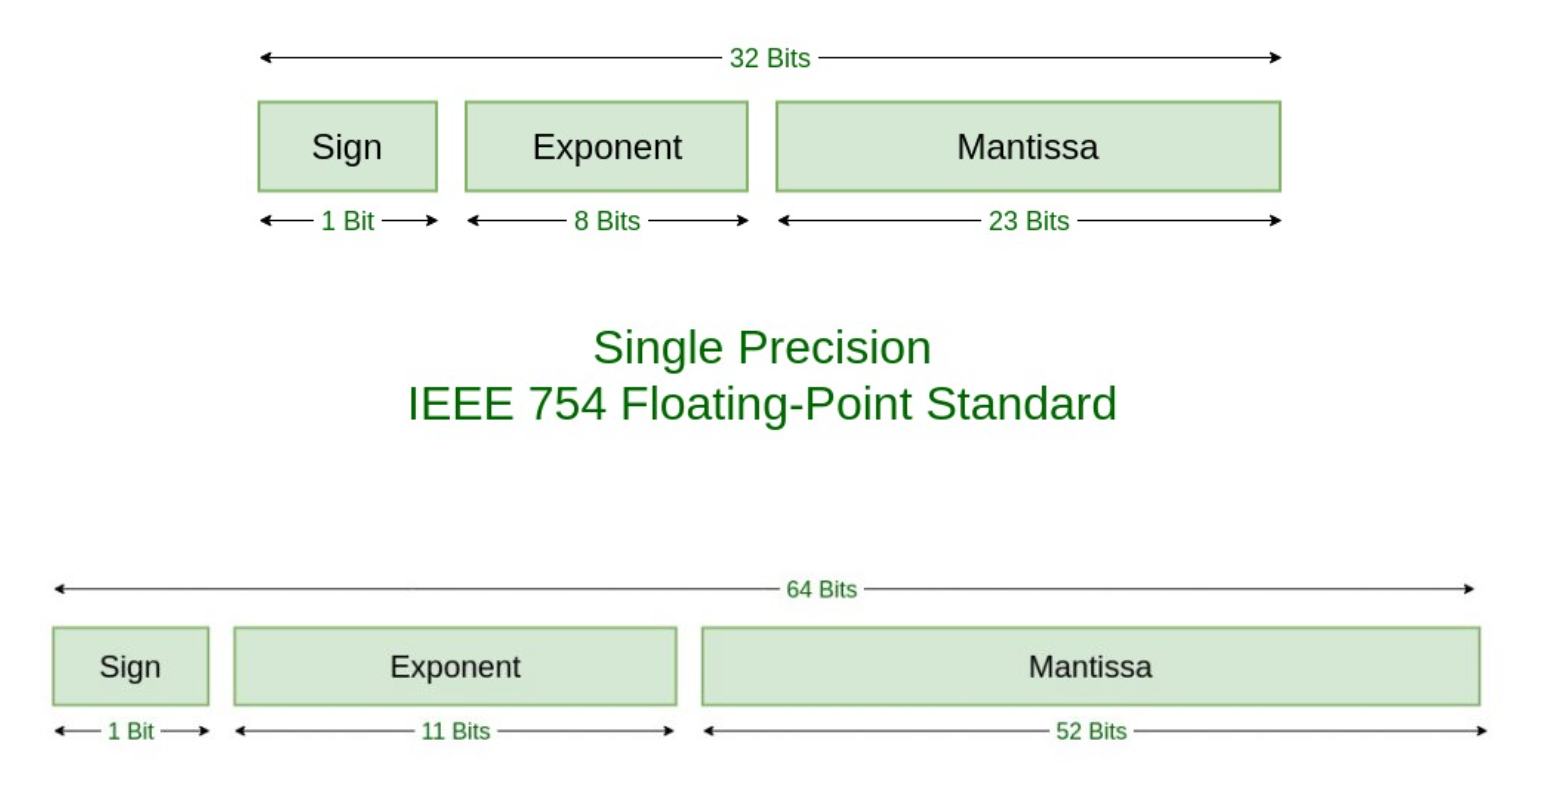
目前除了Unreal Engine 5外基本所有的游戏引擎都使用float作为坐标轴的数值单位,由于float的尾数部分只有23bit,导致了当指数部分维持为0时小数点后有效位数只有7位。所以为了维持1cm的精度,地图上的与原点偏移的最大距离范围不能超过。如果为了维持1mm的精度,则与原点最大距离坐标的偏移值不能超过1km。如果将整个地球用浮点坐标来表示,考虑到地球的赤道周长为40000km,则在赤道上相邻的两个点之间的最小差异为80m,这种精度基本无法接受。在游戏环境下有很多系统都依赖于对大量的顶点数据执行相关计算,特别是物理和动画系统,在精度不够的情况下可能出现各种匪夷所思的结果,例如玩家模型的帕金森一样的抖动。而且这种异常情况基本都会出现在离地图原点很远的位置,将相关模型移动到地图原点之后这些怪异现象就会自动消失。这篇文章 还提到了UE4中的shader为了性能在移动端使用了半精度的浮点数即Float16出现的各种渲染异常。Float16这个半精度的格式里只有5bit给了指数,10bit给了尾数,导致了浮点精度只能达到0.001。
想要解决这个精度问题比较粗暴的解决方法是将坐标单位从float切换为double,这样小数点后有效位数将变成16位,这样就可以基本解决地球模拟甚至太空模拟的精度需求。其带来的坏处就是计算所要求的时间增加以及信息交换数据量的增加。
运动变化的产生
角色的运动更新方法除了特殊逻辑(如传送)导致的强制位置更新之外,一般来说都是基于输入的物理模拟。这种方式需要在游戏读取按键输入,然后生成一个移动的方向向量。尝试将角色的物理模型移动这个方向向量,如果中途遇到障碍物,则需要针对性的处理。例如遇到斜坡需要上坡,遇到台阶需要爬升,遇到墙面需要贴着墙移动等等。每次移动完之后都需要重新寻找一下地面,来避免角色的脚底浮空,同时处理一下掉落、入水等特殊状态。
当角色拥有动画系统时,基于移动输入的位移系统就不够用了,需要引入根运动(Root Motion) ,也就是俗话说的动画驱动位移。这里引用一下UnrealEngine官方支持页面对RootMotion的介绍:
在游戏动画中,角色的碰撞胶囊体(或其他形状)通常由控制器驱动来执行位置更新。然后来自该胶囊体的数据用于驱动动画。例如,如果胶囊体在向前移动,系统就会知道在角色上播放一个跑步或行走的动画,让角色看起来是在靠自己的力量移动。但这种类型的运动并不始终适用于所有情况。在某些情况下,让复杂的动画实际驱动碰撞胶囊体(而非相反)是有道理的。这正是 根运动(
Root Motion) 处理对游戏而言至关重要的原因之所在。
例如,假设玩家发起一次特殊攻击,在这种攻击中,模型已预先设定好向前冲的动作。如果所有的角色动作都是基于玩家胶囊体的,这样的动画会导致角色迈出胶囊体,从而导致碰撞数据与显示的模型完全不匹配,因为碰撞数据使用的是胶囊体的位置,而渲染的模型使用的是动画的位置。一旦动画播放结束,玩家就会滑回其碰撞位置。这就会产生问题,因为胶囊体通常用作所有计算的中心。胶囊体外的角色将越过几何体,不会对其环境做出适当的反应。另外,在动画结束时滑回他们的胶囊体也并不现实。
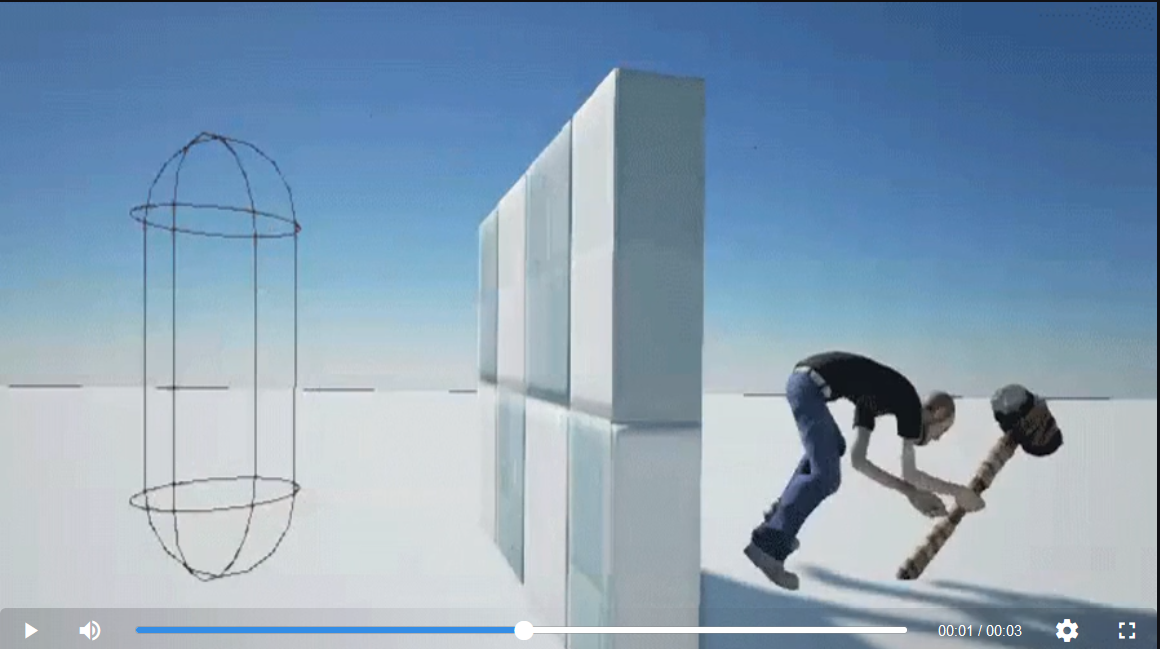
简单点的处理方法就是动画结束之后强制设置胶囊体到动画结束位置,但是这个解决不了动画播放过程中物理世界与渲染世界脱节的问题。还有一个简单取巧的方法就是对动画进行固定间隔的位置偏移采样,然后在启用这个动画之后,使用这个位置采样数据定期的去更新胶囊体的位置,在采样精度比较高的时候可以很大的缓解胶囊体与渲染模型之间位置偏差问题。不过在很多要求精确的物理判定的情况下这种方法还是不行,特别是动画系统受物理系统影响的时候。例如上图中向前冲锋起再停下的动画在前方有障碍物时应该要被障碍物阻挡住,但是由于物理查询依赖于胶囊体的位置更新。
所以对于这种有位移的动画的位置更新方案,最终演化成了性能消耗高但是最精确的动画驱动位移的方式。胶囊体的位置更新频率完全匹配当前游戏的更新频率,作为阻挡物的墙壁成功的停止了人物的前进动画:

运动同步的延迟
当联网客户端接收到了新的移动输入时,如何将这个输入引发的位置变化通知给服务器有三种做法:
- 客户端使用这个移动输入执行移动模拟,将模拟后的位置通知给服务器
- 客户端将移动输入发送到服务器,让服务器算出最新位置之后再返回给客户端
- 客户端本地用这个输入执行运动模拟,同时将移动输入发送到服务器,服务器也执行模拟
第一种方法是弊端是服务器此时会无条件的信任客户端,所以如果客户端使用了作弊手段时服务端将束手无策,相信玩过游戏的都见过那种开挂引发的飞天遁地。第二种方法变成了完全由服务器来生成位置,但是这种方法也有一个很严重的问题,即从按键被按下到客户端收到移动位置的更新之间的时间间隔可能会被拉的很长,带来了一种很不舒服的迟滞感。下图就图形化的描述了这个延迟的产生来源:
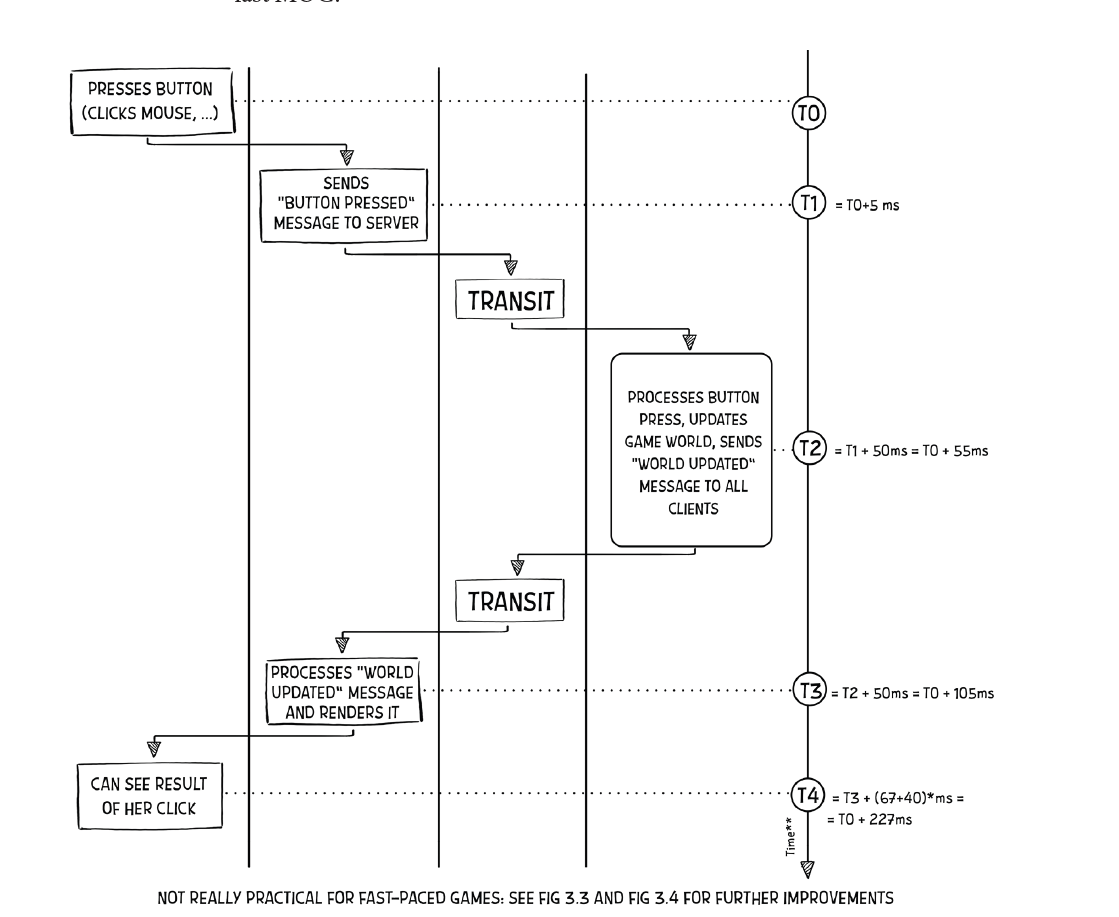
- 输入延迟,这个是客户端逻辑帧收集按键输入的间隔,与客户端逻辑帧率负相关,在
30fps的逻辑帧率下,按键延迟大概为15ms - 客户端与服务器之间的延迟,大概
30ms,对应的Round Trip Time也就是rtt就差不多60ms了,如果使用手机移动网络时对应的rtt可以达到100ms以上 - 服务器逻辑处理延迟,这部分在上图中没有体现,由于服务器要控制性能消耗,其逻辑帧率一般不会很高
10hz-20hz左右,所以这个处理延迟可能也会有40ms左右 - 客户端渲染延迟,这就是在接收到新位置之后将相关数据传递到渲染线程处理完成所需要的大概时间,在
30fps的渲染帧率下,其延迟大概为20ms - 显示器显示延迟,这个是显示数据从传递到显存与真正在屏幕上展示出来的间隔,主流的显示器基本都大于
60hz,所以这个的延迟大概为8ms可以忽略不计
总的来说从按下按键到看到反馈,整个流程的延迟都会在140ms以上,而人体对于大于100ms的延迟已经感觉很明显了,电子竞技选手可能对于大于60ms的延迟都无法忍受。我们观察这个总体延迟的各个组成部分,发现网络与服务器处理占了绝大部分,纯客户端自己的延迟只有40ms左右。所以对于那些对于反作弊要求严格同时延迟敏感的游戏,基本都会采用第三种的移动同步方案,即双端同时模拟。但是这种同时模拟又可能会产生客户端与服务端的状态不一致,所以还需要搭配一个定期检查纠正的机制,即客户端上传输入时也带上自己模拟的结果状态,服务器会检查这个客户端模拟结果是否与当前自己模拟的结果的差异在一定范围内,如果超过了指定误差范围则拒绝这个模拟结果,同时将服务器自己的模拟结果发送到客户端来强制纠正。Vavle的起源引擎就使用了这样的模拟纠正:
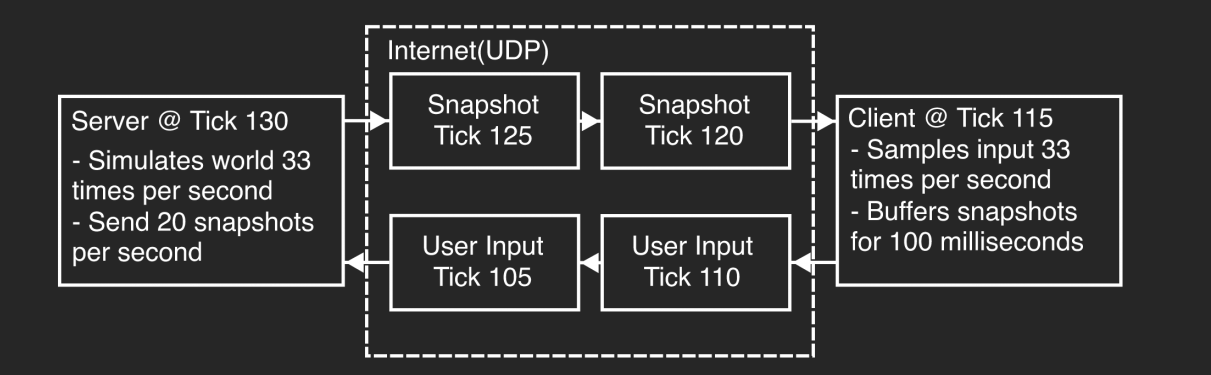
上面这种双端同时模拟的方法可以很好的解决主控客户端的延迟问题,但是仍然没有解决客户端A的主控角色产生的位置变化通过服务器同步到客户端B延迟过大的问题。因为这个位置同步执行路径跟上图中是一摸一样,必须要经过服务器,消息传递所需要的100ms是完全无法优化的。
单纯的模拟角色的位置同步延迟大有些时候也将就能接受,因为玩家的关注点一般都是在自己控制的角色身上。其他角色如果保持着稳定的延迟的话,这些角色的动作看上去也算是有一点连续性和流畅度。但是互联网的网络状态其实是一个非常不可控的,如果出现了突然的延迟增大或者丢包重传,这种脆弱的连续性和流畅度就被打破了。
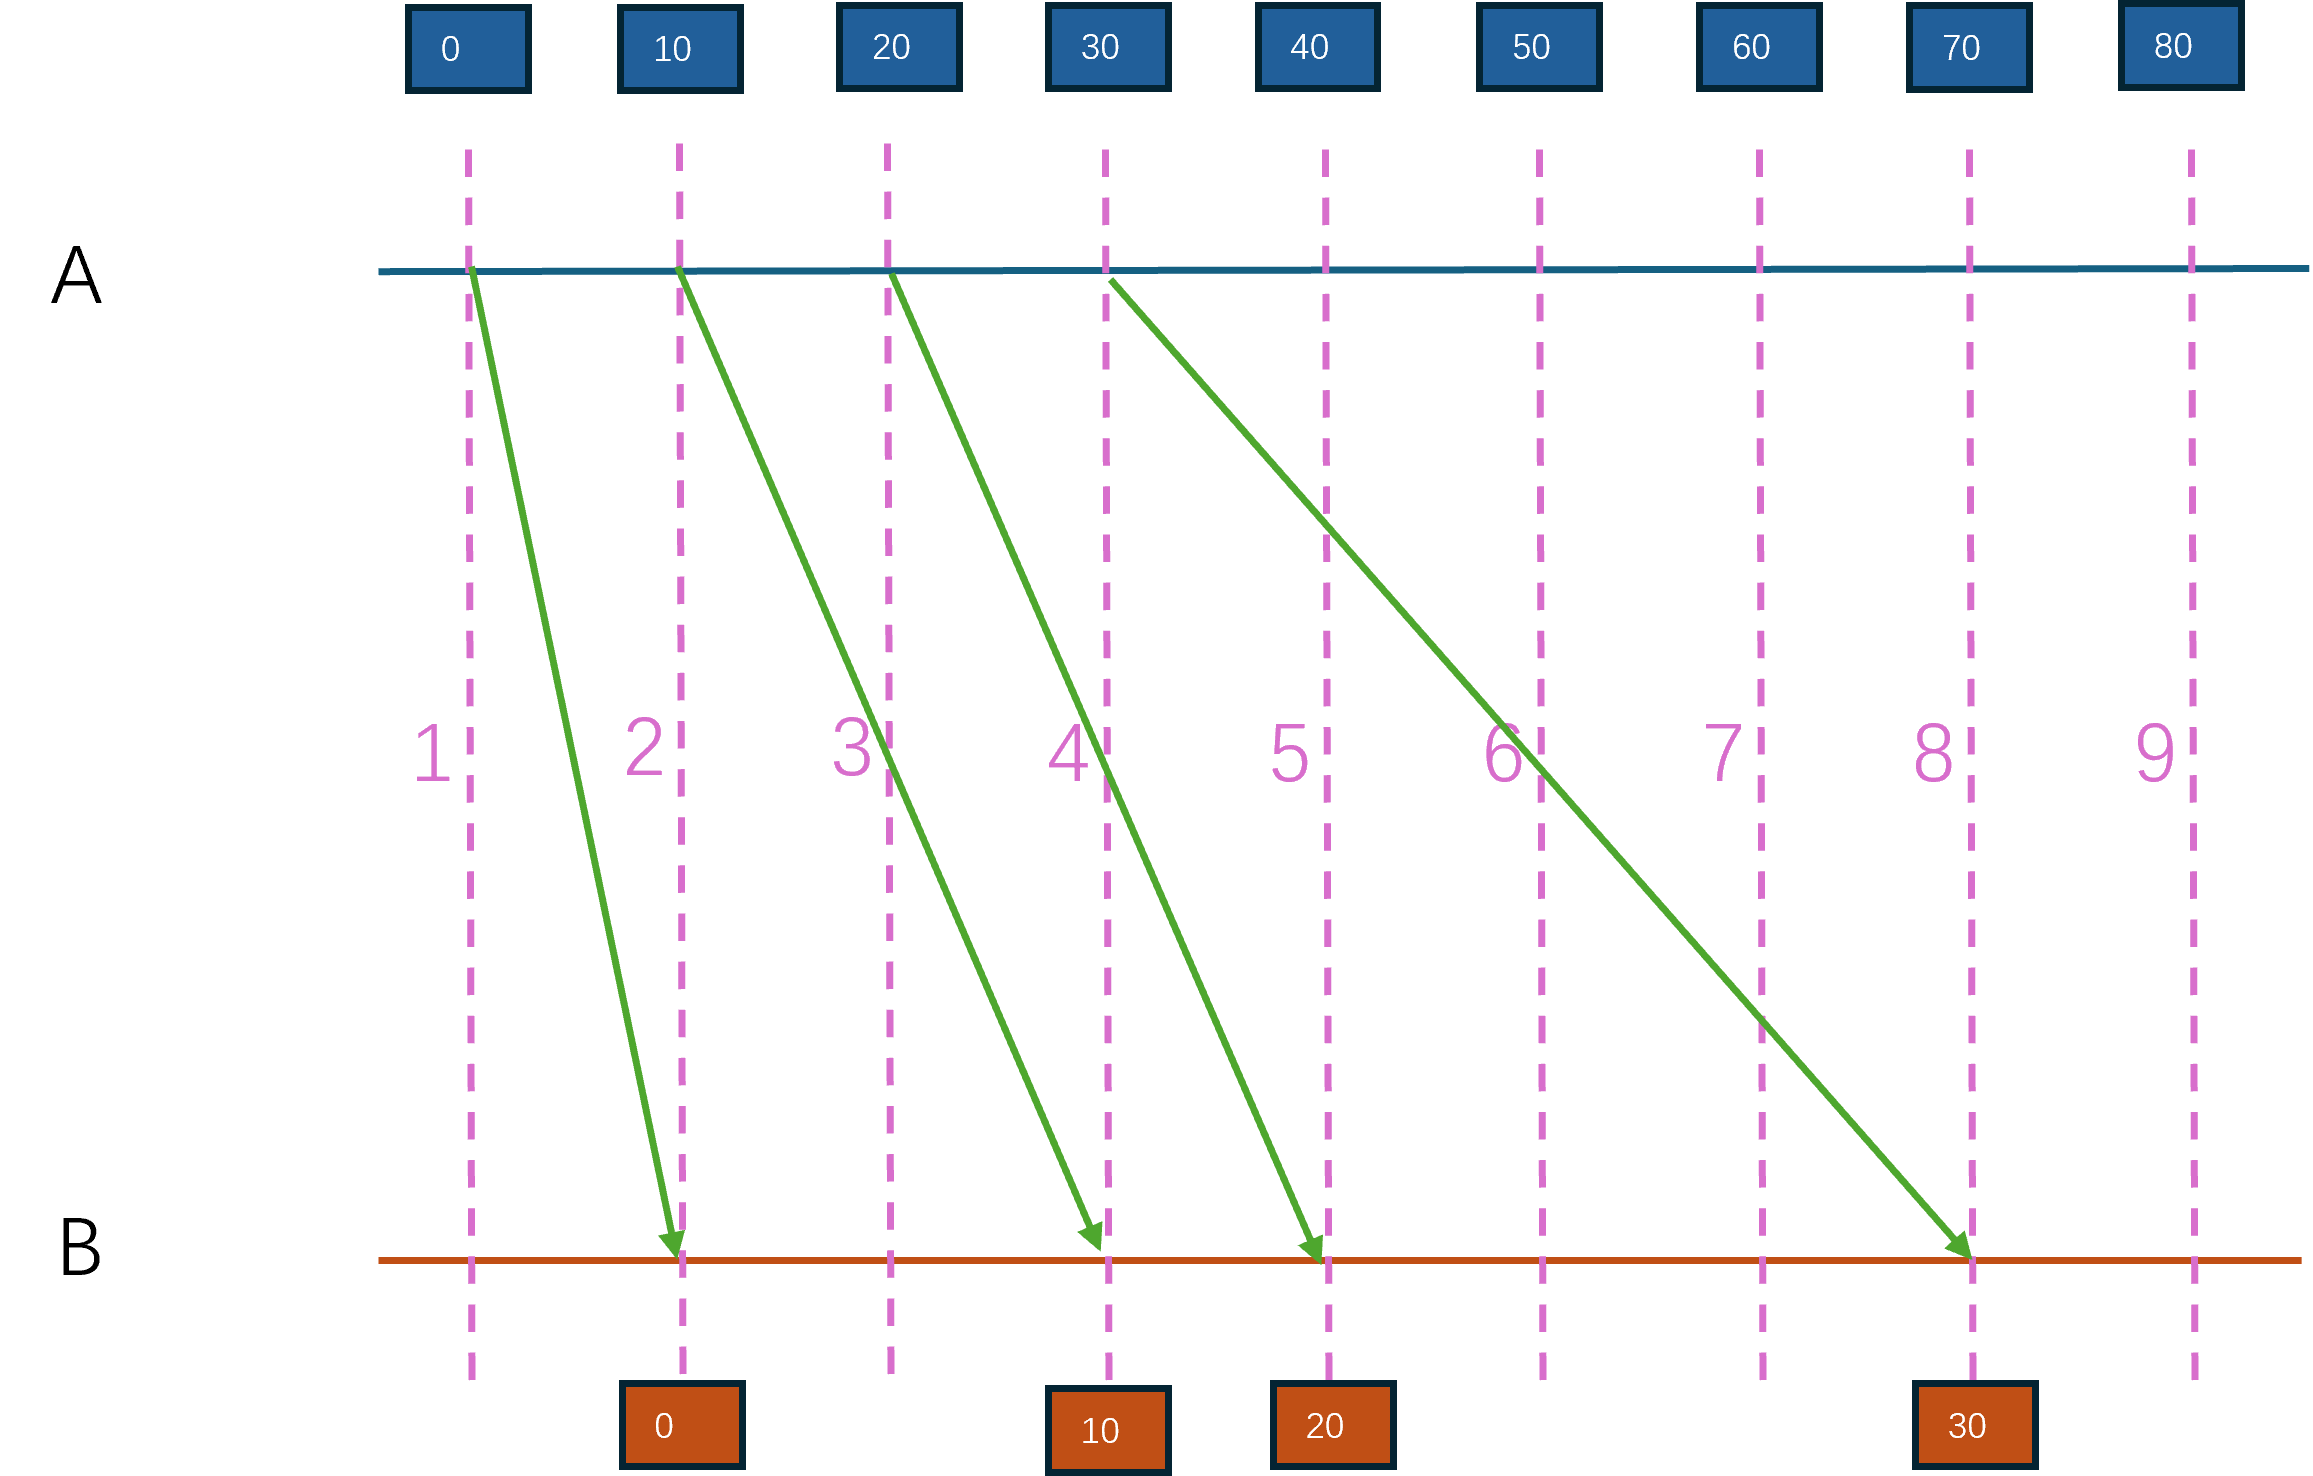
以上图为例,客户端A操纵的角色正以100cm/s的速度移动,初始位置为0,同时每隔100ms往服务端汇报最新位置。但是由于网络的不稳定性,A在第一帧发出的数据在另外一个客户端B里是第二帧收到,发出的第二帧数据在第四帧收到,发出的第三帧数据在第五帧收到,发出的第四帧数据在第八帧收到。这样连续的帧到达B的间隔分别为100ms,200ms,100ms,300ms,使用位置偏移除以间隔时间,B客户端里A对应角色的速度就是100cm/s, 50cm/s, 100cm/s, 33cm/s,速度无法保持恒定,变动很大,从而表现为一种抽搐感。
运动的插值与预演
除了这个由于延迟不稳定导致的第三方客户端里角色移动不连续之外,上面的转发式移动同步还有一个非常严重的问题:客户端B接收到的客户端A的最新位置已经是100ms之前产生的了,此时客户端B里展示的A的模型所在位置并不是最新的位置,例如在上图中的第八帧的位置差异已经是40cm了。这样的不匹配会导致各种技能物理判定出现问题。为了同时解决延迟不稳定和位置落后的问题,需要引入插值,这里包括两种插值:
-
内插值
(Intepolation):已确定的主控端过去位置P0和现在位置P1,模拟端执⾏从P0到P1之间的平滑插值(线性或非线性均可)以使渲染表现平滑的插值⽅法,我们叫它内插值。它的特点是插值的两端点都是已确定的历史位置。 -
外插值
(Extrapolation):已确定的主控端过去位置P0和速度V等,模拟端使⽤P0和V等来模拟主控端的运动轨迹以使渲染表现平滑的⽅法,我们叫它外插值。它的特点是起始端点已知,运⾏的终点已越过已确定值的边界(外插值叫法的理由)。
简单来说内插值负责追赶目标点,而外插值负责预测目标点。只使用内插值来平滑移动的话,会导致平均延迟的增大。因为此时接收到的最新位置会被当作目标位置来追赶,而不是立即设置位置,这样会导致到达此位置的时间更加延后。使用外插值则需要服务器往客户端多传递速度信息,这样才能计算出一个rtt之后这个模拟角色的位置,但是此时角色在延迟不稳定时仍然会有不连续的体验。所以一般来说这两个插值方法会一起使用,即模拟端先用外插值计算出当前模拟角色的位置P0,然后再使用内插值逐渐的将当前模拟角色的实际位置P1去追赶P0。这样的双插值合用的方法也就是常说的Dead Reckoning影子追踪方法。
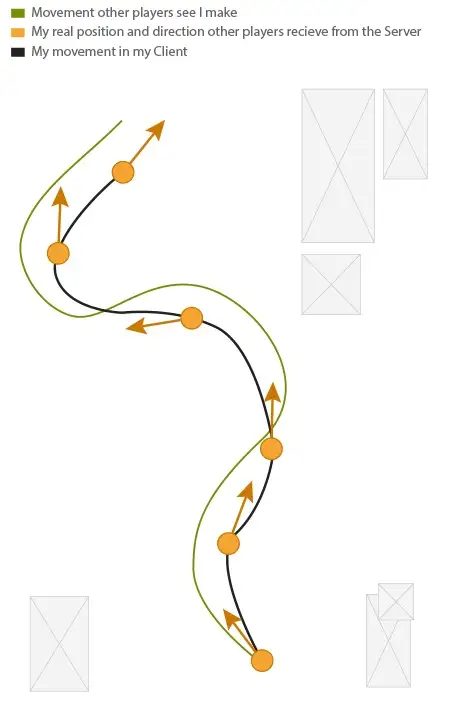
但是影子追踪方法并不是万能的,只有在外插值正确的时候才能得到令人满意的结果,如果主控端出现了大幅度的方向变化,模拟端外插值的结果就会与真实结果出现很大差异,导致插值后的路径与真实路径很不一致。下图就是一个非常简单的例子,左边蓝色的是主控端,右边橙色的是模拟端,初始时位置都在P0,同时速度都同步好了,做一个直线匀速运动,这样在左边到达P1的时候右边也在P1。随后主控端开始转向,并到达了P2,但是模拟端在P1之后依然以匀速运动在做插值,导致P2的位置通知到模拟端时其位置已经到达了P3,由于位置差异过大需要开启转向修正到P2。所以此时的主控端蓝色路径与模拟端的橙色路径就出现了非常大的差异:
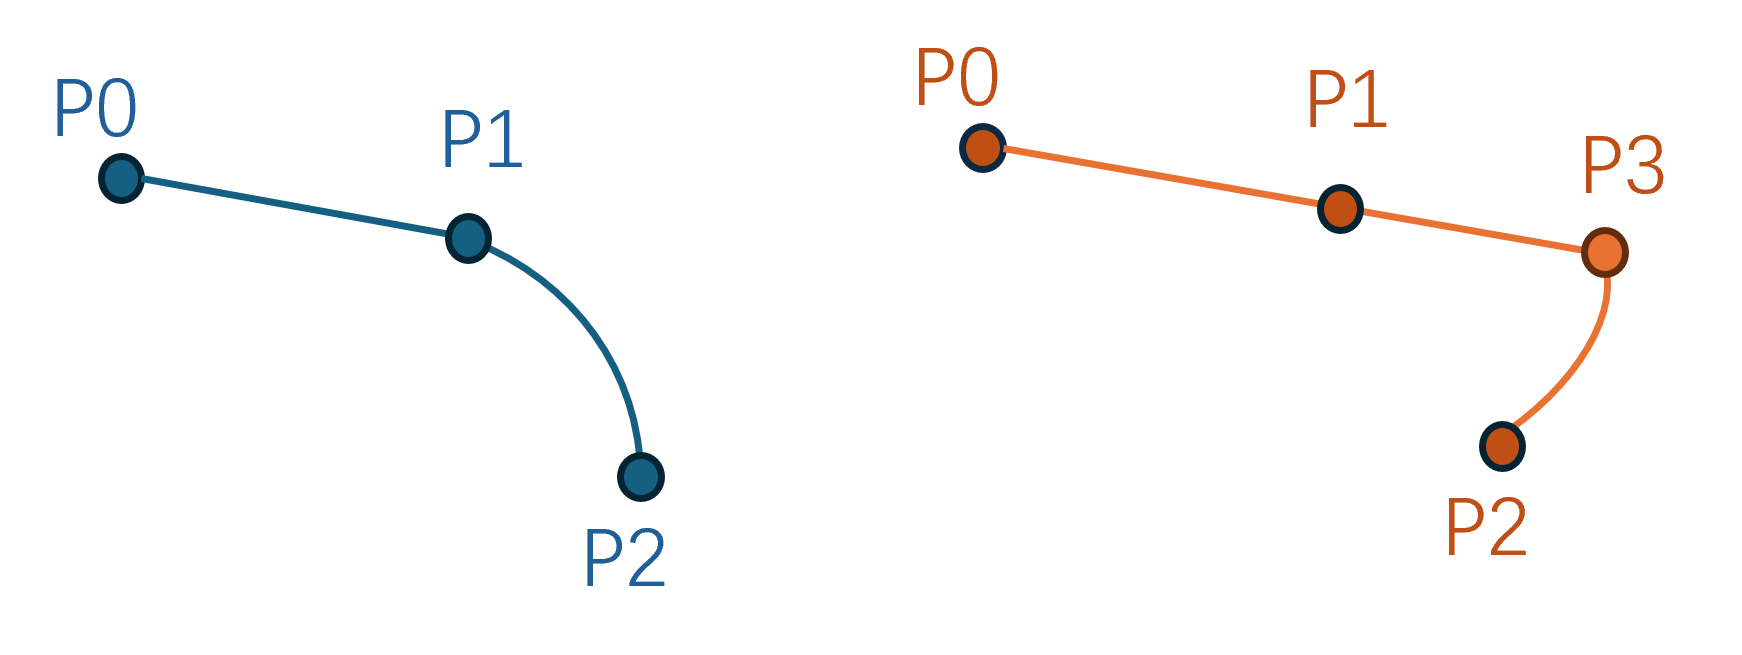
这种大规模偏差的根本来源在于外插值,因为外插值等同于模拟端对主控端的⾏为预测。在同步数据到达前,主控端的⾏为主动或被动的改变,就会带来模拟端的错误结果。为了让外插值尽可能的准确,游戏行业又提出了输入缓冲的概念。主控端负责维护一个输入队列,每次接收到按键输入时都将移动输入放到这个队列中,同时将这个输入推送到服务器让其广播到所有的模拟端。主控端只有在队列中的输入个数大于一定值时才将队头的输入消耗掉进行模拟,而模拟端则使用接收过来的多个输入来构造多个未来位置来执行内插值:
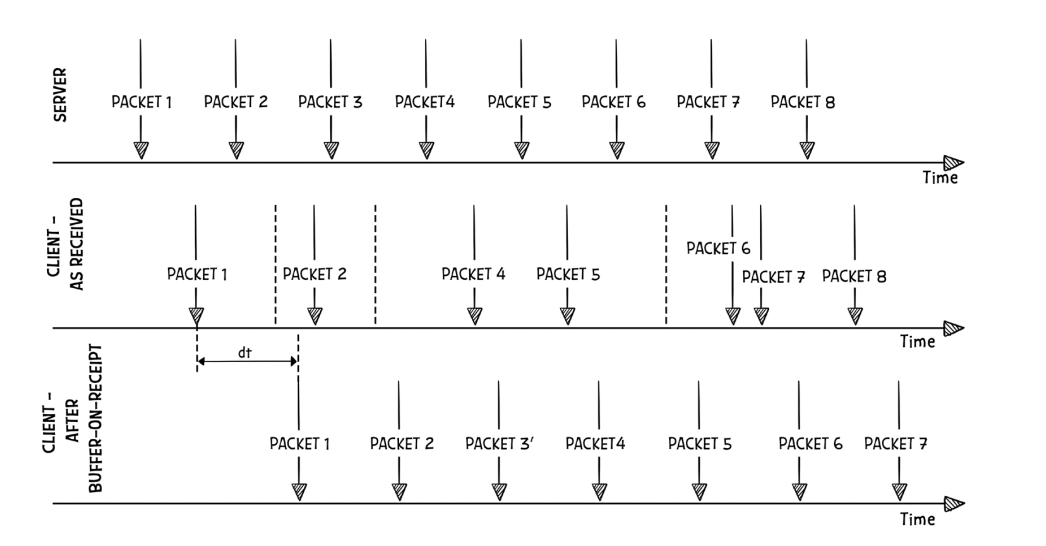
但是使用这种输入缓冲的技术也会带来一定量的额外延迟,缓冲区越大则延迟越大,合适的缓冲区大小需要根据网络状态来确定。这个输入缓冲技术在知名游戏火箭联盟中使用了,他们在GDC2018上做了一下相关的分享:It IS Rocket Science! The Physics of Rocket League Detailed
延迟补偿
前面我们说的都是客户端的移动平滑技巧,这些都是表现上的优化,但是运动同步最重要的目的是为了让各种技能判定更准确更符合直觉。由于最后的技能仲裁方在于服务器,所以上述技巧只是让客户端的世界状态能够更加精确的匹配上同一时刻的服务器状态。即使当前客户端模拟的世界状态与服务器一致,并正确的向服务器汇报了其发出的子弹击中了目标,服务器也不能完全相信客户端,他需要去验证一下客户端汇报结果对不对。考虑到服务器客户端之间是有延迟的,所以当服务器收到这个子弹命中的报告时,目标可能已经离命中点挪开了一段距离,导致子弹命中失效。在这种仲裁机制下岂不是永远无法命中快速移动的目标?为了处理这种命中问题,游戏界又引入了延迟补偿(Lag compensation)技术。
所谓延迟补偿,就是服务器存储最近一段时间的多个世界状态快照,当客户端汇报其时刻t击中了目标A之后,服务器从快照中选取离时刻t时间差异最小的快照,找到其中A的位置,检查一下此时子弹是否能够击中。
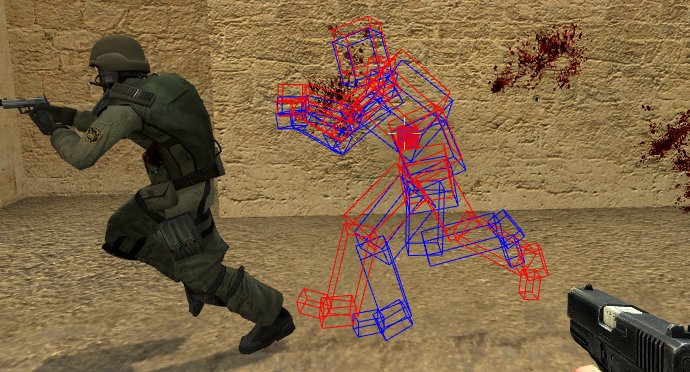
上图就是起源引擎中给的延迟补偿示意图,时刻t客户端看到的目标处于上图中的红色方框位置,而对应的服务端位置为上图中的蓝色方框。当命中汇报到服务器时,目标玩家已经移动到左侧了。此时服务器获取时刻t的快照,发现目标玩家此时的红色蓝色模型框可以被子弹正确的击中,于是对这个击中执行确认,并广播到所有客户端。
但是这个延迟补偿也会引发一些异常的结果,例如客户端A的玩家已经躲进掩体但是服务端后续告知其被客户端B的玩家在之前就击中了,因为玩家B的延迟比较高,所以执行击中判定延迟补偿的时候就会把A拉回比较古老的一个时间点。
在火箭联盟的GDC分享中也提到了延迟补偿带来的问题,如下图所示有一个圆形的球从上往下运动,左侧有200ms延迟的蓝色客户端朝右运动,右侧10ms延迟的客户端朝左运动:

在后续的某个时候低延迟客户端撞到了小球并通知了服务器,服务器也验证通过了:

再过一段时间高延迟客户端也汇报其撞击到了小球,服务器启用延迟补偿发现也撞到了:
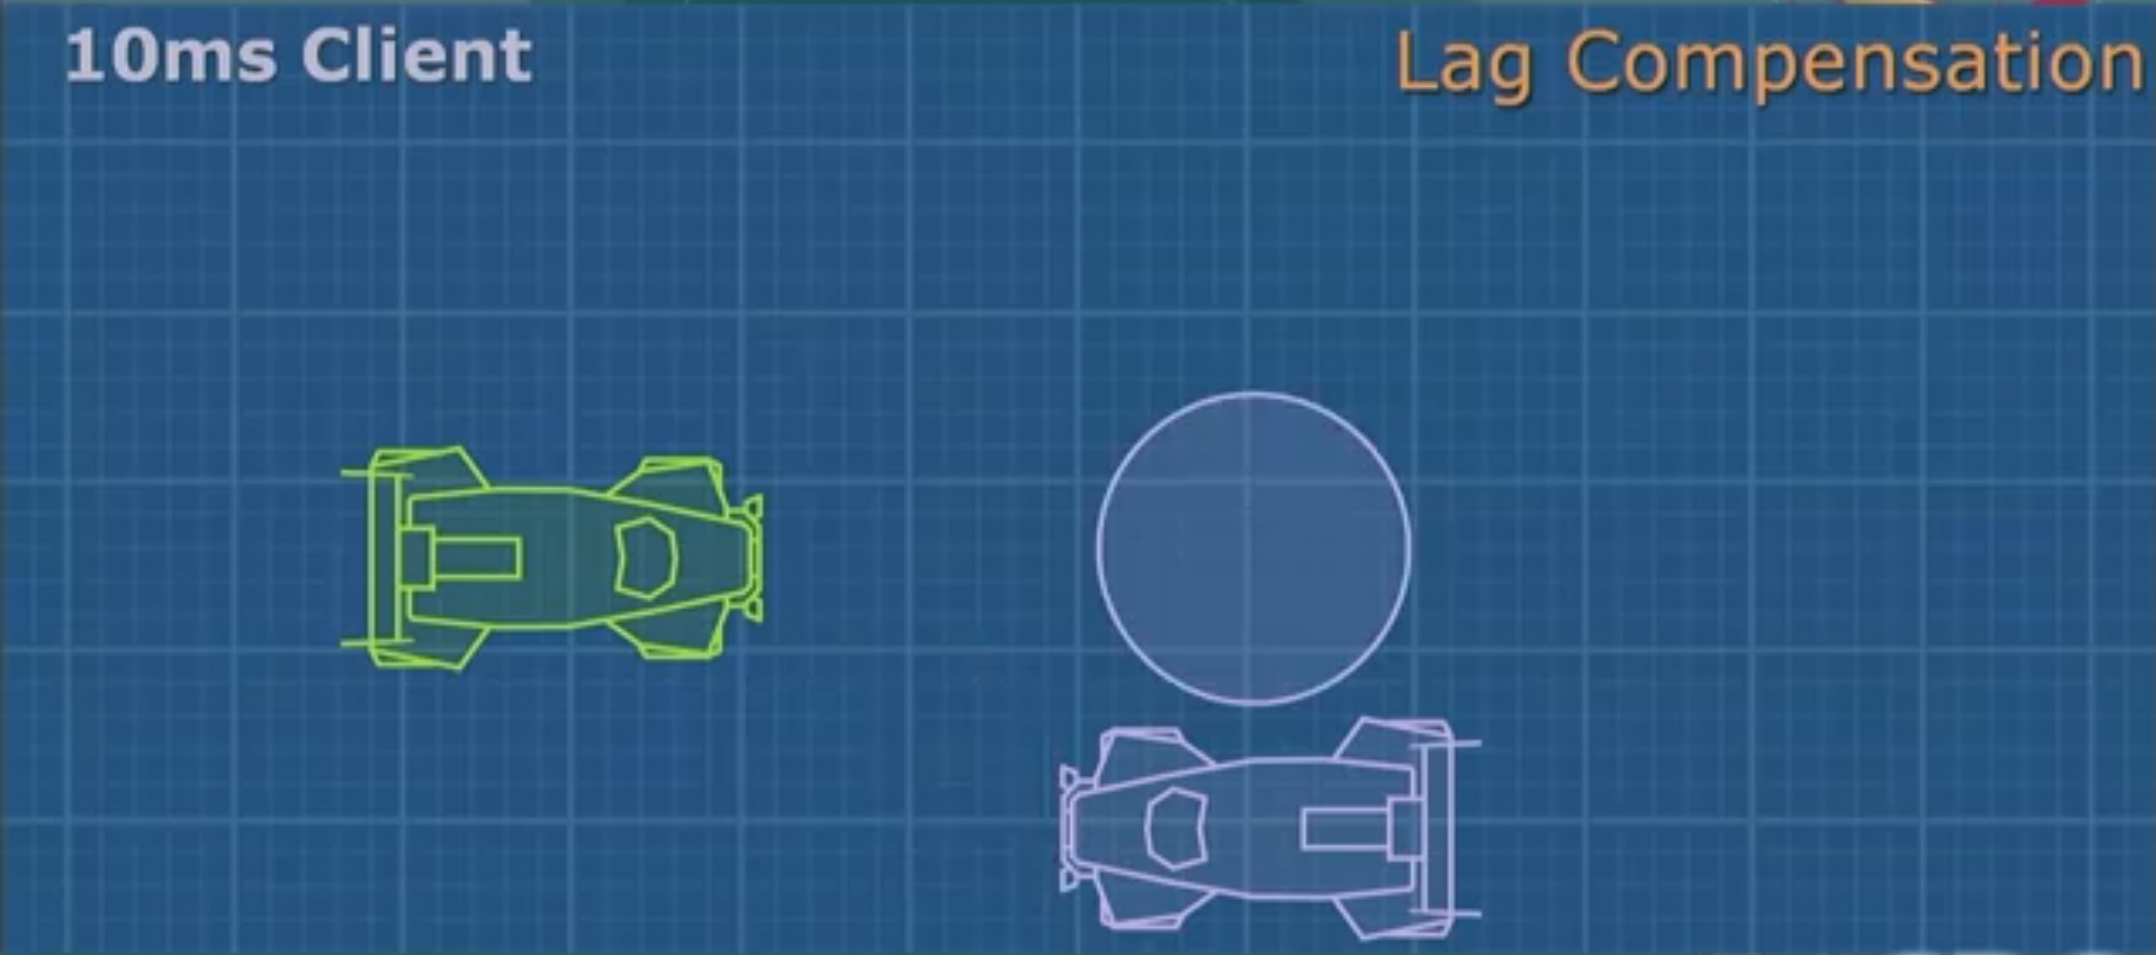
这样就发生了一次时间倒流。 假如撞击小球即可得分的话,服务端会给两个撞击都加分。只是加分的话带来的游戏体验还不至于很糟,如果撞击会导致小球运动受改变的话,此时在右侧客户端里就会发现这个球瞬移到右上方并向右侧移动。
这些由延迟补偿触发的错误数不胜数,所以实际的游戏中要谨慎使用。
Unreal Engine 的运动同步
UE中的移动组件
UE4中的移动同步处理是又大又全,既处理了常规的地表移动,也考虑了飞天、下落、游泳等各种奇怪的移动模式。这样搞的好处是替使用者处理好了各种平常没有想到的细节,坏处就是整个系统实现的极其复杂。常规玩家使用的移动组件逻辑都在UCharacterMovementComponent中,这个类型有很长的继承链:
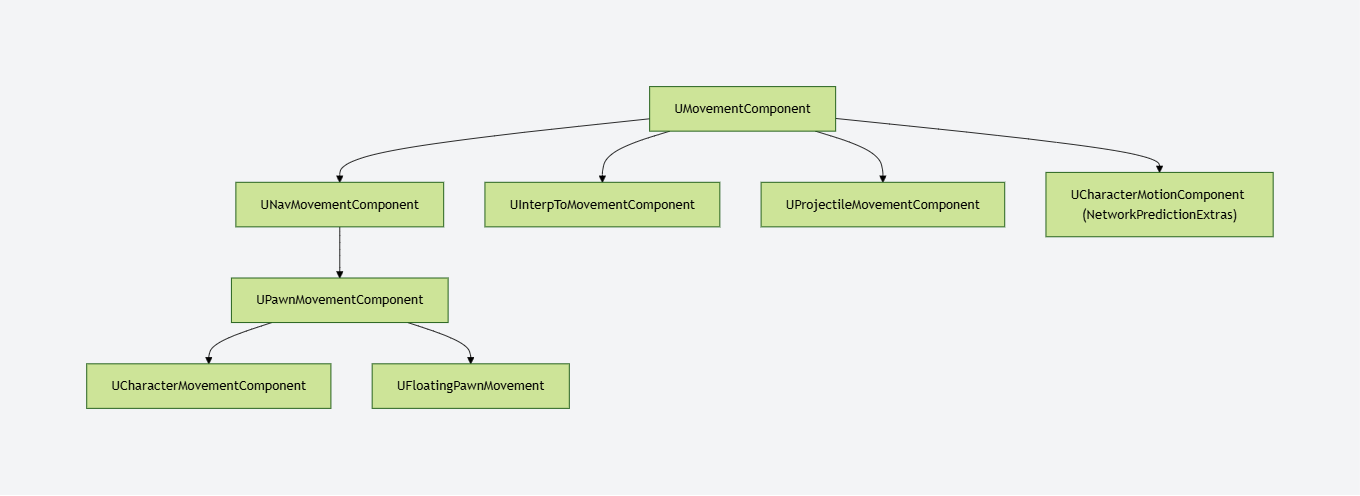
这里我们就从继承链的顶端开始介绍不同的移动组件所肩负的功能。
UMovementComponent作为移动组件的基类实现了基本的移动接口SafeMovementUpdatedComponent(),可以调用UpdateComponent组件的接口函数来更新其位置。
bool UMovementComponent::MoveUpdatedComponentImpl( const FVector& Delta, const FQuat& NewRotation, bool bSweep, FHitResult* OutHit, ETeleportType Teleport)
{
if (UpdatedComponent)
{
const FVector NewDelta = ConstrainDirectionToPlane(Delta);
return UpdatedComponent->MoveComponent(NewDelta, NewRotation, bSweep, OutHit, MoveComponentFlags, Teleport);
}
return false;
}
这里的UpdateComponent类型为USceneComponent,即一个带有位置和形状的组件,最常见的子类为球体、长方体以及胶囊体。UScenceComponent类型的组件提供了基本的位置信息ComponentToWorld,同时也提供了改变自身以及其子组件的位置的接口InternalSetWorldLocationAndRotation()。而UPrimitiveComponent又继承于UScenceComponent,增加了渲染以及物理方面的信息。我们常见的Mesh组件以及胶囊体都是继承自UPrimitiveComponent,因为想要实现一个真实的移动效果,我们时刻都可能与物理世界的某一个Actor接触着,而且移动的同时还需要渲染出我们移动的动画来表现给玩家看。
下一个组件是UNavMovementComponent,该组件更多的是提供给AI寻路的能力,同时包括基本的运动状态,比如是否能游泳,是否能飞行等。
UPawnMovementComponent组件开始变得可以和玩家交互了,前面都是基本的移动接口,不手动调用根本无法实现玩家操作。UPawnMovementComponent提供了AddInputVector(),可以实现接收玩家的输入并根据输入值修改所控制Pawn的位置。要注意的是,在UE中,Pawn是一个可控制的游戏角色(也可以是被AI控制),他的移动必须与UPawnMovementComponent配合才行,所以这也是名字的由来吧。一般的操作流程是,玩家通过InputComponent组件绑定一个按键操作,然后在按键响应时调用Pawn的AddMovementInput接口,进而调用移动组件的AddInputVector(),调用结束后会通过ConsumeMovementInputVector()接口消耗掉该次操作的输入数值,完成一次移动操作。
最后到了移动组件的重头了UCharacterMovementComponent,该组件可以说是Epic做了多年游戏的经验集成了,里面非常精确的处理了各种常见的运动状态细节,实现了比较流畅的同步解决方案。各种位置校正,平滑处理才达到了目前的移动效果,而且我们不需要自己写代码就会使用这个完成度的相当高的移动组件,可以说确实很适合做第一,第三人称的RPG游戏了。
其实还有一个比较常用的移动组件,UProjectileMovementComponent ,一般用来模拟弓箭,子弹等抛射物的运动状态。
移动输入的收集
在APawn上开始有移动输入的处理,方法是设置当前APawn使用的UInputComponent:
/** Creates an InputComponent that can be used for custom input bindings. Called upon possession by a PlayerController. Return null if you don't want one. */
virtual UInputComponent* CreatePlayerInputComponent();
/** Destroys the player input component and removes any references to it. */
virtual void DestroyPlayerInputComponent();
/** Allows a Pawn to set up custom input bindings. Called upon possession by a PlayerController, using the InputComponent created by CreatePlayerInputComponent(). */
virtual void SetupPlayerInputComponent(UInputComponent* PlayerInputComponent) { /* No bindings by default.*/ }
这个InputComponent的主要内容是绑定特定按键来增加各种输入,如前后左右移动、跳跃、开火、技能等:
void AShooterCharacter::SetupPlayerInputComponent(class UInputComponent* PlayerInputComponent)
{
check(PlayerInputComponent);
PlayerInputComponent->BindAxis("MoveForward", this, &AShooterCharacter::MoveForward);
PlayerInputComponent->BindAxis("MoveRight", this, &AShooterCharacter::MoveRight);
PlayerInputComponent->BindAxis("MoveUp", this, &AShooterCharacter::MoveUp);
PlayerInputComponent->BindAxis("Turn", this, &APawn::AddControllerYawInput);
PlayerInputComponent->BindAxis("TurnRate", this, &AShooterCharacter::TurnAtRate);
PlayerInputComponent->BindAxis("LookUp", this, &APawn::AddControllerPitchInput);
PlayerInputComponent->BindAxis("LookUpRate", this, &AShooterCharacter::LookUpAtRate);
AShooterPlayerController* MyPC = Cast<AShooterPlayerController>(Controller);
if (MyPC->bAnalogFireTrigger)
{
PlayerInputComponent->BindAxis("FireTrigger", this, &AShooterCharacter::FireTrigger);
}
else
{
PlayerInputComponent->BindAction("Fire", IE_Pressed, this, &AShooterCharacter::OnStartFire);
PlayerInputComponent->BindAction("Fire", IE_Released, this, &AShooterCharacter::OnStopFire);
}
PlayerInputComponent->BindAction("Targeting", IE_Pressed, this, &AShooterCharacter::OnStartTargeting);
PlayerInputComponent->BindAction("Targeting", IE_Released, this, &AShooterCharacter::OnStopTargeting);
PlayerInputComponent->BindAction("NextWeapon", IE_Pressed, this, &AShooterCharacter::OnNextWeapon);
PlayerInputComponent->BindAction("PrevWeapon", IE_Pressed, this, &AShooterCharacter::OnPrevWeapon);
PlayerInputComponent->BindAction("Reload", IE_Pressed, this, &AShooterCharacter::OnReload);
PlayerInputComponent->BindAction("Jump", IE_Pressed, this, &AShooterCharacter::OnStartJump);
PlayerInputComponent->BindAction("Jump", IE_Released, this, &AShooterCharacter::OnStopJump);
PlayerInputComponent->BindAction("Run", IE_Pressed, this, &AShooterCharacter::OnStartRunning);
PlayerInputComponent->BindAction("RunToggle", IE_Pressed, this, &AShooterCharacter::OnStartRunningToggle);
PlayerInputComponent->BindAction("Run", IE_Released, this, &AShooterCharacter::OnStopRunning);
}
上面的AShooterCharacter::MoveForward到AShooterCharacter::LookUpAtRate通过绑定特定的Axis来驱动玩家的前后移动、转向移动、视角移动。这里的Axis可以映射到各种输入设备的特定按键上,例如对于普通键盘可以设置W向前S向后,对于Xbox手柄则可以设置为摇杆的前后。这样通过引入Axis中间层,使得输入按键映射在配置文件中指定,不再需要在代码中修改,很方便的就能够接入多个硬件平台。
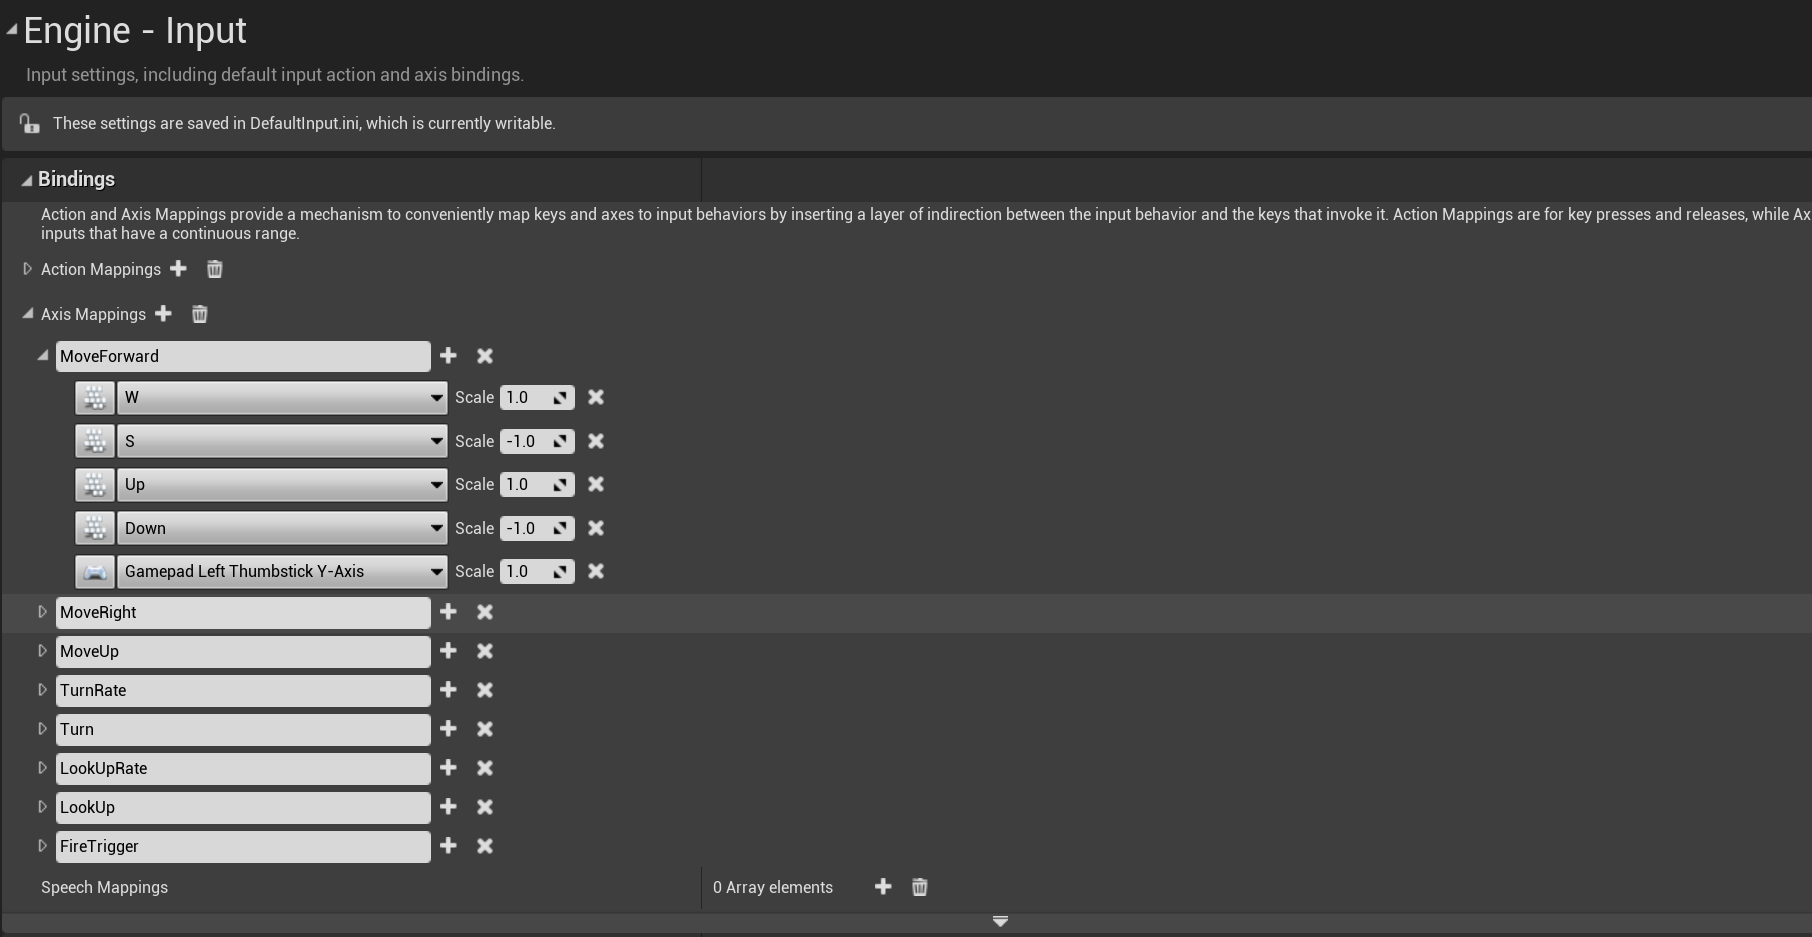
当输入事件触发时,如键盘事件,由 FSceneViewport::ProcessAccumulatedPointerInput传递给GameViewportClinet,中转到APlayerController后,再传给 PlayerInput。当一个Axis对应按键被按下时,对应的传递链为UGameViewportClient::InputAxis到APlayerController::InputAxis,最终PlayerInput::InputAxis这个函数将会被触发:
bool UPlayerInput::InputAxis(FKey Key, float Delta, float DeltaTime, int32 NumSamples, bool bGamepad )
{
ensure((Key != EKeys::MouseX && Key != EKeys::MouseY) || NumSamples > 0);
auto TestEventEdges = [this, &Delta](FKeyState& TestKeyState, float EdgeValue)
{
// look for event edges
if (EdgeValue == 0.f && Delta != 0.f)
{
TestKeyState.EventAccumulator[IE_Pressed].Add(++EventCount);
}
else if (EdgeValue != 0.f && Delta == 0.f)
{
TestKeyState.EventAccumulator[IE_Released].Add(++EventCount);
}
else
{
TestKeyState.EventAccumulator[IE_Repeat].Add(++EventCount);
}
};
{
// first event associated with this key, add it to the map
FKeyState& KeyState = KeyStateMap.FindOrAdd(Key);
TestEventEdges(KeyState, KeyState.Value.X);
// accumulate deltas until processed next
KeyState.SampleCountAccumulator += NumSamples;
KeyState.RawValueAccumulator.X += Delta;
}
}
这里的实现相当于给当前Key对应的FKeyState进行了事件计数自增以及时间累积。在这个记录好之后,APlayerController::TickActor的函数里会调用APlayerController::TickPlayerInput并最终调用到APlayerController::ProcessPlayerInput,这个函数负责将记录好的按键数据推送到UInputComponent:
void APlayerController::ProcessPlayerInput(const float DeltaTime, const bool bGamePaused)
{
static TArray<UInputComponent*> InputStack;
// must be called non-recursively and on the game thread
check(IsInGameThread() && !InputStack.Num());
// process all input components in the stack, top down
{
SCOPE_CYCLE_COUNTER(STAT_PC_BuildInputStack);
BuildInputStack(InputStack);
}
// process the desired components
{
SCOPE_CYCLE_COUNTER(STAT_PC_ProcessInputStack);
PlayerInput->ProcessInputStack(InputStack, DeltaTime, bGamePaused);
}
InputStack.Reset();
}
这里的PlayerInput->ProcessInputStack内部实现很复杂,对于我们所期望的移动输入Axis来说,会遍历UInputComponent上注册的所有Axis构造要执行的函数的Callback数组:
// Run though game axis bindings and accumulate axis values
for (FInputAxisBinding& AB : IC->AxisBindings)
{
AB.AxisValue = DetermineAxisValue(AB, bGamePaused, KeysToConsume);
if (AB.AxisDelegate.IsBound())
{
AxisDelegates.Emplace(FAxisDelegateDetails(AB.AxisDelegate, AB.AxisValue));
}
}
并最终驱动到之前设置好的相关AxisBinding,如AShooterCharacter::MoveForward:
void AShooterCharacter::MoveForward(float Val)
{
if (Controller && Val != 0.f)
{
// Limit pitch when walking or falling
const bool bLimitRotation = (GetCharacterMovement()->IsMovingOnGround() || GetCharacterMovement()->IsFalling());
const FRotator Rotation = bLimitRotation ? GetActorRotation() : Controller->GetControlRotation();
const FVector Direction = FRotationMatrix(Rotation).GetScaledAxis(EAxis::X);
AddMovementInput(Direction, Val);
}
}
这里的MoveForward其实就是简单的获取当前玩家在世界坐标里的的正向方向Direction和按键的累计时间Val,以这两个参数调用APawn::AddMovementInput:
void APawn::AddMovementInput(FVector WorldDirection, float ScaleValue, bool bForce /*=false*/)
{
UPawnMovementComponent* MovementComponent = GetMovementComponent();
if (MovementComponent)
{
MovementComponent->AddInputVector(WorldDirection * ScaleValue, bForce);
}
else
{
Internal_AddMovementInput(WorldDirection * ScaleValue, bForce);
}
}
进一步转发到UPawnMovementComponent::AddInputVector,最后会累加到APawn::ControlInputVector上:
void UPawnMovementComponent::AddInputVector(FVector WorldAccel, bool bForce /*=false*/)
{
if (PawnOwner)
{
PawnOwner->Internal_AddMovementInput(WorldAccel, bForce);
}
}
void APawn::Internal_AddMovementInput(FVector WorldAccel, bool bForce /*=false*/)
{
if (bForce || !IsMoveInputIgnored())
{
ControlInputVector += WorldAccel;
}
}
可以看出这里所有的Axis计算出来的驱动向量都会累积到ControlInputVector,这个字段的读取与重置则在UCharacterMovementComponent::TickComponent中处理:
FVector APawn::Internal_ConsumeMovementInputVector()
{
LastControlInputVector = ControlInputVector;
ControlInputVector = FVector::ZeroVector;
return LastControlInputVector;
}
FVector UPawnMovementComponent::ConsumeInputVector()
{
return PawnOwner ? PawnOwner->Internal_ConsumeMovementInputVector() : FVector::ZeroVector;
}
void UCharacterMovementComponent::TickComponent(float DeltaTime, enum ELevelTick TickType, FActorComponentTickFunction *ThisTickFunction)
{
SCOPED_NAMED_EVENT(UCharacterMovementComponent_TickComponent, FColor::Yellow);
SCOPE_CYCLE_COUNTER(STAT_CharacterMovement);
SCOPE_CYCLE_COUNTER(STAT_CharacterMovementTick);
CSV_SCOPED_TIMING_STAT_EXCLUSIVE(CharacterMovement);
const FVector InputVector = ConsumeInputVector();
if (!HasValidData() || ShouldSkipUpdate(DeltaTime))
{
return;
}
Super::TickComponent(DeltaTime, TickType, ThisTickFunction);
// 此处省略很多后续处理代码
}
在UCharacterMovementComponent::TickComponent的一开始就获取了之前累积的输入向量到InputVector,并清空了ControlInputVector之前累积的值,后续的输入处理只考虑这个InputVector了。
移动输入的模拟
这个InputVector不一定会参与后续的移动位置计算中,如果当前角色正在进行物理模拟,例如播放被击飞动画,此时位置的决定权完全在物理系统中,期间玩家的任何移动输入都将被忽略。
// See if we fell out of the world.
const bool bIsSimulatingPhysics = UpdatedComponent->IsSimulatingPhysics();
if (CharacterOwner->GetLocalRole() == ROLE_Authority && (!bCheatFlying || bIsSimulatingPhysics) && !CharacterOwner->CheckStillInWorld())
{
return;
}
// We don't update if simulating physics (eg ragdolls).
if (bIsSimulatingPhysics)
{
// Update camera to ensure client gets updates even when physics move him far away from point where simulation started
if (CharacterOwner->GetLocalRole() == ROLE_AutonomousProxy && IsNetMode(NM_Client))
{
MarkForClientCameraUpdate();
}
ClearAccumulatedForces();
return;
}
通过这个检查之后,再根据当前角色的LocalRole类型来决定走哪一个分支:
if (CharacterOwner->GetLocalRole() > ROLE_SimulatedProxy)
{
SCOPE_CYCLE_COUNTER(STAT_CharacterMovementNonSimulated);
// If we are a client we might have received an update from the server.
const bool bIsClient = (CharacterOwner->GetLocalRole() == ROLE_AutonomousProxy && IsNetMode(NM_Client));
if (bIsClient)
{
FNetworkPredictionData_Client_Character* ClientData = GetPredictionData_Client_Character();
if (ClientData && ClientData->bUpdatePosition)
{
ClientUpdatePositionAfterServerUpdate();
}
}
// Allow root motion to move characters that have no controller.
if (CharacterOwner->IsLocallyControlled() || (!CharacterOwner->Controller && bRunPhysicsWithNoController) || (!CharacterOwner->Controller && CharacterOwner->IsPlayingRootMotion()))
{
ControlledCharacterMove(InputVector, DeltaTime);
}
else if (CharacterOwner->GetRemoteRole() == ROLE_AutonomousProxy)
{
// Server ticking for remote client.
// Between net updates from the client we need to update position if based on another object,
// otherwise the object will move on intermediate frames and we won't follow it.
MaybeUpdateBasedMovement(DeltaTime);
MaybeSaveBaseLocation();
// Smooth on listen server for local view of remote clients. We may receive updates at a rate different than our own tick rate.
if (CharacterMovementCVars::NetEnableListenServerSmoothing && !bNetworkSmoothingComplete && IsNetMode(NM_ListenServer))
{
SmoothClientPosition(DeltaTime);
}
}
}
else if (CharacterOwner->GetLocalRole() == ROLE_SimulatedProxy)
{
if (bShrinkProxyCapsule)
{
AdjustProxyCapsuleSize();
}
SimulatedTick(DeltaTime);
}
这里的GetLocalRole涉及到Actor的Role状态,这是一个枚举类ENetRole,有如下四种取值:
ROLE_None:没有角色。ROLE_SimulatedProxy:表示该角色是客户端的代理角色,它通过网络从服务器上同步状态,但是客户端可以模拟该角色的行为。ROLE_Authority:表示该角色是服务器上的权威角色,它负责同步所有客户端的状态,并且具有最终的决策权。ROLE_AutonomousProxy: 客户端自己控制的角色。
同时每个Actor还有一个另外的字段RemoteRole代表这个角色在对端(客户端服务器角色互换)的状态。有了这两个属性,我们就可以知道:
- 谁拥有
actor的主控权 actor是否被复制- 复制模式
首先一件要确定的事,就是谁拥有特定actor的主控权。要确定当前运行的引擎实例是否有主控者,需要查看Role属性是否为ROLE_Authority。如果是,就表明这个运行中的 虚幻引擎 实例负责掌管此actor(决定其是否被复制)。
如果 Role 是 ROLE_Authority,RemoteRole 是 ROLE_SimulatedProxy 或 ROLE_AutonomousProxy,就说明这个引擎实例负责将此actor复制到远程连接。
对于不同的数值观察者,它们的Role和RemoteRole值可能发生对调。例如,如果您的服务器上有这样的配置:
Role == ROLE_AuthorityRemoteRole == ROLE_SimulatedProxy。
客户端会将其识别为以下形式:
Role == ROLE_SimulatedProxyRemoteRole == ROLE_Authority
移动指令的构造
当玩家的输入触发移动构造好InputVector之后,首先执行的代码为ControlledCharacterMove(InputVector, DeltaTime):
void UCharacterMovementComponent::ControlledCharacterMove(const FVector& InputVector, float DeltaSeconds)
{
{
SCOPE_CYCLE_COUNTER(STAT_CharUpdateAcceleration);
// We need to check the jump state before adjusting input acceleration, to minimize latency
// and to make sure acceleration respects our potentially new falling state.
CharacterOwner->CheckJumpInput(DeltaSeconds);
// apply input to acceleration
Acceleration = ScaleInputAcceleration(ConstrainInputAcceleration(InputVector));
AnalogInputModifier = ComputeAnalogInputModifier();
}
if (CharacterOwner->GetLocalRole() == ROLE_Authority)
{
PerformMovement(DeltaSeconds);
}
else if (CharacterOwner->GetLocalRole() == ROLE_AutonomousProxy && IsNetMode(NM_Client))
{
ReplicateMoveToServer(DeltaSeconds, Acceleration);
}
}
这个函数首先处理跳跃状态,然后计算输入产生的加速度,之后会调用ReplicateMoveToServer函数,里面包括了移动数据发送和本地执行移动PeformMovement。在介绍这个复杂的函数之前,我们这里需要先引入一个类型定义FSavedMove_Character,由于这个类型内包含了太多的数据成员,此处只给出一些基本成员的声明:
/** FSavedMove_Character represents a saved move on the client that has been sent to the server and might need to be played back. */
class ENGINE_API FSavedMove_Character
{
public:
FSavedMove_Character();
virtual ~FSavedMove_Character();
// UE_DEPRECATED_FORGAME(4.20)
FSavedMove_Character(const FSavedMove_Character&);
FSavedMove_Character(FSavedMove_Character&&);
FSavedMove_Character& operator=(const FSavedMove_Character&);
FSavedMove_Character& operator=(FSavedMove_Character&&);
ACharacter* CharacterOwner;
uint32 bPressedJump:1;
uint32 bWantsToCrouch:1;
uint32 bForceMaxAccel:1;
/** If true, can't combine this move with another move. */
uint32 bForceNoCombine:1;
/** If true this move is using an old TimeStamp, before a reset occurred. */
uint32 bOldTimeStampBeforeReset:1;
uint32 bWasJumping:1;
float TimeStamp; // Time of this move.
float DeltaTime; // amount of time for this move
float CustomTimeDilation;
float JumpKeyHoldTime;
float JumpForceTimeRemaining;
int32 JumpMaxCount;
int32 JumpCurrentCount;
UE_DEPRECATED_FORGAME(4.20, "This property is deprecated, use StartPackedMovementMode or EndPackedMovementMode instead.")
uint8 MovementMode;
// Information at the start of the move
uint8 StartPackedMovementMode;
FVector StartLocation;
FVector StartRelativeLocation;
FVector StartVelocity;
FFindFloorResult StartFloor;
FRotator StartRotation;
FRotator StartControlRotation;
FQuat StartBaseRotation; // rotation of the base component (or bone), only saved if it can move.
float StartCapsuleRadius;
float StartCapsuleHalfHeight;
TWeakObjectPtr<UPrimitiveComponent> StartBase;
FName StartBoneName;
uint32 StartActorOverlapCounter;
uint32 StartComponentOverlapCounter;
TWeakObjectPtr<USceneComponent> StartAttachParent;
FName StartAttachSocketName;
FVector StartAttachRelativeLocation;
FRotator StartAttachRelativeRotation;
// Information after the move has been performed
uint8 EndPackedMovementMode;
FVector SavedLocation;
FRotator SavedRotation;
FVector SavedVelocity;
FVector SavedRelativeLocation;
FRotator SavedControlRotation;
TWeakObjectPtr<UPrimitiveComponent> EndBase;
FName EndBoneName;
uint32 EndActorOverlapCounter;
uint32 EndComponentOverlapCounter;
TWeakObjectPtr<USceneComponent> EndAttachParent;
FName EndAttachSocketName;
FVector EndAttachRelativeLocation;
FRotator EndAttachRelativeRotation;
FVector Acceleration;
float MaxSpeed;
// 省略一些成员字段
}
对于常规的地面移动来说,我们主要关注下面的几个字段:
TimeStamp:这次移动发生的时间DeltaTime:这次移动使用的时间CustomTimeDilation:时间膨胀系数,可以用于快进和慢放StartPackedMovementMode:移动发生前的MovementModeStartLocation:移动发生前的位置StartVelocity:移动发生前的速度EndPackedMovementMode:移动发生后的MovementModeSavedLocation:移动发生后的位置SavedVelocity:移动发生后的速度Acceleration:移动所用加速度
UCharacterMovementComponent有个成员变量SavedMoves作为FSavedMove_Character的容器,保存了当前玩家本地已经做的移动:
/** Shared pointer for easy memory management of FSavedMove_Character, for accumulating and replaying network moves. */
typedef TSharedPtr<class FSavedMove_Character> FSavedMovePtr;
TArray<FSavedMovePtr> SavedMoves; // Buffered moves pending position updates, orderd oldest to newest. Moves that have been acked by the server are removed.
FSavedMove_Character数据结构占用内存很大,笔者使用的4.27.2版本为688字节。这样大小的结构体不适合频繁创建和销毁,因此UE使用FreeMoves数组作为缓存池。缓存池初始长度由MaxFreeMoveCount属性控制,默认96,使用过程中如果耗尽也会立即新建补充。因此获取一个新的FSavedMove_Character需要调用CreateSavedMove接口,销毁则调用FreeMove接口,不要直接使用new和delete。
SavedMoves数组也有长度限制,由MaxSavedMoveCount控制,默认也为96,如果长度到达这个阈值,就说明玩家网络情况很差,会直接把SavedMoves清空。这会对移动被服务器拒绝后的客户端重放有一定影响。
FSavedMovePtr FNetworkPredictionData_Client_Character::CreateSavedMove()
{
if (SavedMoves.Num() >= MaxSavedMoveCount)
{
UE_LOG(LogNetPlayerMovement, Warning, TEXT("CreateSavedMove: Hit limit of %d saved moves (timing out or very bad ping?)"), SavedMoves.Num());
// Free all saved moves
for (int32 i=0; i < SavedMoves.Num(); i++)
{
FreeMove(SavedMoves[i]);
}
SavedMoves.Reset();
}
if (FreeMoves.Num() == 0)
{
// No free moves, allocate a new one.
FSavedMovePtr NewMove = AllocateNewMove();
checkSlow(NewMove.IsValid());
NewMove->Clear();
return NewMove;
}
else
{
// Pull from the free pool
const bool bAllowShrinking = false;
FSavedMovePtr FirstFree = FreeMoves.Pop(bAllowShrinking);
FirstFree->Clear();
return FirstFree;
}
}
void FNetworkPredictionData_Client_Character::FreeMove(const FSavedMovePtr& Move)
{
if (Move.IsValid())
{
// Only keep a pool of a limited number of moves.
if (FreeMoves.Num() < MaxFreeMoveCount)
{
FreeMoves.Push(Move);
}
// Shouldn't keep a reference to the move on the free list.
if (PendingMove == Move)
{
PendingMove = NULL;
}
if( LastAckedMove == Move )
{
LastAckedMove = NULL;
}
}
}
Autonomous角色每次处理InputVector时都会生成一个FSavedMove_Character,放到这个数组的末尾,然后将这个新创建的FSavedMove_Character发送到服务器。此时SavedMoves相当于TCP通信中的未确认队列:
- 如果服务器认为这个客户端发送过来的这个角色的
FSavedMove_Character合法,则从SavedMoves的头部删除这个元素。 - 如果检查不通过,就执行异常处理流程
UCharacterMovementComponent::ReplicateMoveToServe的开头就是FSavedMove_Character的创建流程:
void UCharacterMovementComponent::ReplicateMoveToServer(float DeltaTime, const FVector& NewAcceleration)
{
SCOPE_CYCLE_COUNTER(STAT_CharacterMovementReplicateMoveToServer);
check(CharacterOwner != NULL);
// Can only start sending moves if our controllers are synced up over the network, otherwise we flood the reliable buffer.
APlayerController* PC = Cast<APlayerController>(CharacterOwner->GetController());
if (PC && PC->AcknowledgedPawn != CharacterOwner)
{
return;
}
// Bail out if our character's controller doesn't have a Player. This may be the case when the local player
// has switched to another controller, such as a debug camera controller.
if (PC && PC->Player == nullptr)
{
return;
}
FNetworkPredictionData_Client_Character* ClientData = GetPredictionData_Client_Character();
if (!ClientData)
{
return;
}
// Update our delta time for physics simulation.
DeltaTime = ClientData->UpdateTimeStampAndDeltaTime(DeltaTime, *CharacterOwner, *this);
// Find the oldest (unacknowledged) important move (OldMove).
// Don't include the last move because it may be combined with the next new move.
// A saved move is interesting if it differs significantly from the last acknowledged move
FSavedMovePtr OldMove = NULL;
if( ClientData->LastAckedMove.IsValid() )
{
const int32 NumSavedMoves = ClientData->SavedMoves.Num();
for (int32 i=0; i < NumSavedMoves-1; i++)
{
const FSavedMovePtr& CurrentMove = ClientData->SavedMoves[i];
if (CurrentMove->IsImportantMove(ClientData->LastAckedMove))
{
OldMove = CurrentMove;
break;
}
}
}
// Get a SavedMove object to store the movement in.
FSavedMovePtr NewMovePtr = ClientData->CreateSavedMove();
FSavedMove_Character* const NewMove = NewMovePtr.Get();
if (NewMove == nullptr)
{
return;
}
NewMove->SetMoveFor(CharacterOwner, DeltaTime, NewAcceleration, *ClientData);
const UWorld* MyWorld = GetWorld();
// 此处省略很多后续代码
}
注意上面的代码里引入了一个新的结构FNetworkPredictionData_Client_Character,这是一个客户端维持的角色状态预测管理,主要作用是客户端接受最近的移动输入之后进行位置预演,因为如果要等之前发送到服务器的SavedMove被确认之后再执行位置更新的话延迟太大了,所以主控客户端会以本地数据先执行移动模拟,当服务器拒绝了发送的SavedMove之后要根据服务器发送的最新数据来调整。FNetworkPredictionData_Client_Character内部主要有如下字段:
ClientUpdateTime:上次向服务器发送ServerMove()的时间戳。CurrentTimeStamp:每次累加DeltaTime,超过一定的数值后会重置。SavedMoves:客户端本地维护的移动缓存数组,按从最旧到最新顺序排列。里面存储的是客户端已模拟,但还没收到服务器ack的move数据。LastAckedMove:上次确认被发送的移动指针,FSavedMove_Character类型。PendingMove:用于存储延时发送给服务器的移动,等待与下一个移动结合,以减少客户端到服务器的带宽。(比如:一些没变化的移动包,会合并发送,以减少带宽)IsImportantMove():如果未收到服务器ack时,需要再次发送时,返回true;否则,返回false。(也就是说,一些比较重要的移动包,需要再次发送的,会在这里判断。MovementMode或Acceleration不同,都会标记为重要的move)
移动指令的时间戳
由于移动系统对时间戳有精度要求,而float随着数值增大,精度会逐渐降低。因此需要定期重置一下CurrentTimeStamp,这个重置周期由MinTimeBetweenTimeStampResets数值控制,默认240秒。这个值是要求大于两倍客户端timeout时间的,这样服务器在收到一个timestamp突然很小的rpc时,就能判定它的客户端已经重置了时间戳,而不是收到了一个很早产生的rpc。Server上对每个角色也存储了一些时间戳,在FNetworkPredictionData_Server_Character数据结构中有CurrentClientTimeStamp属性,表示最近处理的移动时间戳。服务端在接收到客户端发送过来的移动指令时会检查一下时间戳的有效性,这个时间戳判定函数为UCharacterMovementComponent::IsClientTimeStampValid
bool UCharacterMovementComponent::VerifyClientTimeStamp(float TimeStamp, FNetworkPredictionData_Server_Character& ServerData)
{
bool bTimeStampResetDetected = false;
bool bNeedsForcedUpdate = false;
const bool bIsValid = IsClientTimeStampValid(TimeStamp, ServerData, bTimeStampResetDetected);
// 先暂时省略后续代码
}
VerifyClientTimeStamp首先使用IsClientTimeStampValid来检查过来的时间戳的有效性:
bool UCharacterMovementComponent::IsClientTimeStampValid(float TimeStamp, const FNetworkPredictionData_Server_Character& ServerData, bool& bTimeStampResetDetected) const
{
if (TimeStamp <= 0.f || !FMath::IsFinite(TimeStamp))
{
return false;
}
// Very large deltas happen around a TimeStamp reset.
const float DeltaTimeStamp = (TimeStamp - ServerData.CurrentClientTimeStamp);
if( FMath::Abs(DeltaTimeStamp) > (MinTimeBetweenTimeStampResets * 0.5f) )
{
// Client is resetting TimeStamp to increase accuracy.
bTimeStampResetDetected = true;
if( DeltaTimeStamp < 0.f )
{
// Validate that elapsed time since last reset is reasonable, otherwise client could be manipulating resets.
if (GetWorld()->TimeSince(LastTimeStampResetServerTime) < (MinTimeBetweenTimeStampResets * 0.5f))
{
// Reset too recently
return false;
}
else
{
// TimeStamp accepted with reset
return true;
}
}
else
{
// We already reset the TimeStamp, but we just got an old outdated move before the switch, not valid.
return false;
}
}
// If TimeStamp is in the past, move is outdated, not valid.
if( TimeStamp <= ServerData.CurrentClientTimeStamp )
{
return false;
}
// Precision issues (or reordered timestamps from old moves) can cause very small or zero deltas which cause problems.
if (DeltaTimeStamp < UCharacterMovementComponent::MIN_TICK_TIME)
{
return false;
}
// TimeStamp valid.
return true;
}
这里先把传递过来的TimeStamp和本地存储的CurrentClientTimeStamp做比较,初步校验以下情况:
-
如果两个时间戳差异的绝对值大于
MinTimeBetweenTimeStampResets*0.5, 即大于timeout:- 如果差异小于零 代表出现了时间戳回滚 这里需要检查一下是否回滚的太频繁
- 如果差异大于零 则代表中间丢失了太多数据 拒绝当前移动指令
-
如果两个时间戳差异的绝对值小于
MinTimeBetweenTimeStampResets*0.5,则只需要判断传递过来的时间戳大于服务端记录的时间戳即可,另外需要排除一下相邻两次时间戳的差值小于UCharacterMovementComponent::MIN_TICK_TIME这种异常情况,因为单次客户端Tick只会发送一个数据上来
if (bIsValid)
{
if (bTimeStampResetDetected)
{
UE_LOG(LogNetPlayerMovement, Log, TEXT("TimeStamp reset detected. CurrentTimeStamp: %f, new TimeStamp: %f"), ServerData.CurrentClientTimeStamp, TimeStamp);
LastTimeStampResetServerTime = GetWorld()->GetTimeSeconds();
OnClientTimeStampResetDetected();
ServerData.CurrentClientTimeStamp -= MinTimeBetweenTimeStampResets;
// Also apply the reset to any active root motions.
CurrentRootMotion.ApplyTimeStampReset(MinTimeBetweenTimeStampResets);
}
else
{
UE_LOG(LogNetPlayerMovement, VeryVerbose, TEXT("TimeStamp %f Accepted! CurrentTimeStamp: %f"), TimeStamp, ServerData.CurrentClientTimeStamp);
ProcessClientTimeStampForTimeDiscrepancy(TimeStamp, ServerData);
}
}
else
{
if (bTimeStampResetDetected)
{
UE_LOG(LogNetPlayerMovement, Log, TEXT("TimeStamp expired. Before TimeStamp Reset. CurrentTimeStamp: %f, TimeStamp: %f"), ServerData.CurrentClientTimeStamp, TimeStamp);
}
else
{
bNeedsForcedUpdate = (TimeStamp <= ServerData.LastReceivedClientTimeStamp);
}
}
ServerData.LastReceivedClientTimeStamp = TimeStamp;
ServerData.bLastRequestNeedsForcedUpdates = bNeedsForcedUpdate;
return bIsValid;
校验完成之后,更新服务器存储的客户端移动时间戳。从上面的代码可以看出:无论移动校验是否通过,都会被更新,也会定期重置。
如果时间戳校验通过了,只能说明TimeStamp没有明显异常,还需要使用ProcessClientTimeStampForTimeDiscrepancy做进一步的绝对时间校验,处理客户端用加速软件等情况,毕竟不能完全以客户端时间为准。这个函数有200多行,只有在打开bMovementTimeDiscrepancyDetection设置才会执行真正的检查,默认关闭。这里就不再详细阐述了,大概介绍一下主要逻辑:服务器会记录一份收到rpc的服务器绝对时间,如果来自客户端的时间戳间隔与服务器绝对时间间隔差异过大,就会认为这个客户端有问题,OnTimeDiscrepancyDetected会被调用到,目前这个函数是个虚函数,默认实现只是打印一下日志:
void UCharacterMovementComponent::OnTimeDiscrepancyDetected(float CurrentTimeDiscrepancy, float LifetimeRawTimeDiscrepancy, float Lifetime, float CurrentMoveError)
{
UE_LOG(LogNetPlayerMovement, Verbose, TEXT("Movement Time Discrepancy detected between client-reported time and server on character %s. CurrentTimeDiscrepancy: %f, LifetimeRawTimeDiscrepancy: %f, Lifetime: %f, CurrentMoveError %f"),
CharacterOwner ? *CharacterOwner->GetHumanReadableName() : TEXT("<UNKNOWN>"),
CurrentTimeDiscrepancy,
LifetimeRawTimeDiscrepancy,
Lifetime,
CurrentMoveError);
}
执行完OnTimeDiscrepancyDetected再执行下面的这段代码来强制这个客户端更新到服务器位置:
if (ServerData.bResolvingTimeDiscrepancy)
{
// Optionally force client corrections during time discrepancy resolution
// This is useful when default project movement error checking is lenient or ClientAuthorativePosition is enabled
// to ensure time discrepancy resolution is enforced
if (GameNetworkManager->bMovementTimeDiscrepancyForceCorrectionsDuringResolution)
{
ServerData.bForceClientUpdate = true;
}
}
移动指令的合并
实际上并不会将每个SavedMove都发送到服务器端,如果前后的两个SavedMove可以合并的话就可以省略当前新的SavedMove的发送,这样就可以大大的减少上行流量,特别是在地面平坦且移动输入保持一致的时候:
// see if the two moves could be combined
// do not combine moves which have different TimeStamps (before and after reset).
if (const FSavedMove_Character* PendingMove = ClientData->PendingMove.Get())
{
if (PendingMove->CanCombineWith(NewMovePtr, CharacterOwner, ClientData->MaxMoveDeltaTime * CharacterOwner->GetActorTimeDilation(*MyWorld)))
{
//此处暂时省略一些代码
}
else
{
UE_LOG(LogNetPlayerMovement, Verbose, TEXT("Not combining move [not allowed by CanCombineWith()]"));
}
}
bool FSavedMove_Character::CanCombineWith(const FSavedMovePtr& NewMovePtr, ACharacter* Character, float MaxDelta) const
合并的判定函数在FSavedMove_Character::CanCombineWith中,这个函数非常庞大将近200行,这里概括一下一些不能合并的条件:
- 任一个
move的bForceNoCombine为true - 包括
rootmotion的move - 加速度从大于
0变为0 - 两次移动
DeltaTime总和大于MaxMoveDeltaTime - 两个加速度点积超过
AccelDotThresholdCombine阈值 - 两个
move的StartVelocity,一个为0,一个不为0 - 两个
move的MaxSpeed差值大于MaxSpeedThresholdCombine - 两个
move的MaxSpeed一个为0,一个不为0 - 两个
move的JumpKeyHoldTime,一个为0,一个不为0 - 两个
move的bWasJumping状态、JumpCurrentCount、JumpMaxCount不一致 - 两个
move的JumpForceTimeRemaining一个为0,一个不为0 - 比较两个
move的CompressedFlags,包括了跳跃状态和下蹲状态,当然可以加自定义状态 - 两个
move站立的可移动表面不同 - 两个
move的开始MovementMode不同,或者结束MovementMode不同 - 两个
move的开始胶囊体半径不同,或者高度不同,一个例子是下蹲会改变胶囊体 - 两个
move的attach parent不同,或者attach socket不同 attach的相对位置改变了- 两个
move的overlap数量改变
如果这些基本条件都不满足,可以初步认为可以合并。但还有一种特殊条件需要判断,就是Pendingmove的回滚位置有碰撞,这也不能合并。
SCOPE_CYCLE_COUNTER(STAT_CharacterMovementCombineNetMove);
// Only combine and move back to the start location if we don't move back in to a spot that would make us collide with something new.
const FVector OldStartLocation = PendingMove->GetRevertedLocation();
const bool bAttachedToObject = (NewMovePtr->StartAttachParent != nullptr);
if (bAttachedToObject || !OverlapTest(OldStartLocation, PendingMove->StartRotation.Quaternion(), UpdatedComponent->GetCollisionObjectType(), GetPawnCapsuleCollisionShape(SHRINK_None), CharacterOwner))
{
// Avoid updating Mesh bones to physics during the teleport back, since PerformMovement() will update it right away anyway below.
// Note: this must be before the FScopedMovementUpdate below, since that scope is what actually moves the character and mesh.
FScopedMeshBoneUpdateOverride ScopedNoMeshBoneUpdate(CharacterOwner->GetMesh(), EKinematicBonesUpdateToPhysics::SkipAllBones);
// Accumulate multiple transform updates until scope ends.
FScopedMovementUpdate ScopedMovementUpdate(UpdatedComponent, EScopedUpdate::DeferredUpdates);
UE_LOG(LogNetPlayerMovement, VeryVerbose, TEXT("CombineMove: add delta %f + %f and revert from %f %f to %f %f"), DeltaTime, PendingMove->DeltaTime, UpdatedComponent->GetComponentLocation().X, UpdatedComponent->GetComponentLocation().Y, OldStartLocation.X, OldStartLocation.Y);
NewMove->CombineWith(PendingMove, CharacterOwner, PC, OldStartLocation);
if (PC)
{
// We reverted position to that at the start of the pending move (above), however some code paths expect rotation to be set correctly
// before character movement occurs (via FaceRotation), so try that now. The bOrientRotationToMovement path happens later as part of PerformMovement() and PhysicsRotation().
CharacterOwner->FaceRotation(PC->GetControlRotation(), NewMove->DeltaTime);
}
SaveBaseLocation();
NewMove->SetInitialPosition(CharacterOwner);
// Remove pending move from move list. It would have to be the last move on the list.
if (ClientData->SavedMoves.Num() > 0 && ClientData->SavedMoves.Last() == ClientData->PendingMove)
{
const bool bAllowShrinking = false;
ClientData->SavedMoves.Pop(bAllowShrinking);
}
ClientData->FreeMove(ClientData->PendingMove);
ClientData->PendingMove = nullptr;
PendingMove = nullptr; // Avoid dangling reference, it's deleted above.
}
else
{
UE_LOG(LogNetPlayerMovement, Verbose, TEXT("Not combining move [would collide at start location]"));
}
合并首先需要把CharacterMovement的这一帧开始状态设置成PendingMove的开始状态,这会把UpdatedComponent的位置设成PendingMove的开始位置,包括Velocity、CurrentFloor,跳跃信息等也会设置为PendingMove状态,然后时间间隔DeltaTime会被设置为两个move之和。
void FSavedMove_Character::CombineWith(const FSavedMove_Character* OldMove, ACharacter* InCharacter, APlayerController* PC, const FVector& OldStartLocation)
{
UCharacterMovementComponent* CharMovement = InCharacter->GetCharacterMovement();
// to combine move, first revert pawn position to PendingMove start position, before playing combined move on client
if (const USceneComponent* AttachParent = StartAttachParent.Get())
{
CharMovement->UpdatedComponent->SetRelativeLocationAndRotation(StartAttachRelativeLocation, StartAttachRelativeRotation, false, nullptr, CharMovement->GetTeleportType());
}
else
{
CharMovement->UpdatedComponent->SetWorldLocationAndRotation(OldStartLocation, OldMove->StartRotation, false, nullptr, CharMovement->GetTeleportType());
}
CharMovement->Velocity = OldMove->StartVelocity;
CharMovement->SetBase(OldMove->StartBase.Get(), OldMove->StartBoneName);
CharMovement->CurrentFloor = OldMove->StartFloor;
// Now that we have reverted to the old position, prepare a new move from that position,
// using our current velocity, acceleration, and rotation, but applied over the combined time from the old and new move.
// Combine times for both moves
DeltaTime += OldMove->DeltaTime;
// Roll back jump force counters. SetInitialPosition() below will copy them to the saved move.
InCharacter->JumpForceTimeRemaining = OldMove->JumpForceTimeRemaining;
InCharacter->JumpKeyHoldTime = OldMove->JumpKeyHoldTime;
InCharacter->JumpCurrentCountPreJump = OldMove->JumpCurrentCount;
}
之后就是修改这帧的Nove了,因为之前已经修改了Character和CharacterMovement的属性,因此再次调用SetInitialPosition函数,用Character重新初始化Move即可。至此,PendingMove就可以从SavedMoves数组中移除了。
移动指令的执行
在结束了这段合并流程之后,客户端本地会使用合并后的NewMove来预演位置:
// Acceleration should match what we send to the server, plus any other restrictions the server also enforces (see MoveAutonomous).
Acceleration = NewMove->Acceleration.GetClampedToMaxSize(GetMaxAcceleration());
AnalogInputModifier = ComputeAnalogInputModifier(); // recompute since acceleration may have changed.
// Perform the move locally
CharacterOwner->ClientRootMotionParams.Clear();
CharacterOwner->SavedRootMotion.Clear();
PerformMovement(NewMove->DeltaTime);
NewMove->PostUpdate(CharacterOwner, FSavedMove_Character::PostUpdate_Record);
这个PerformMovement函数有点大,将近400行,这里我们先贴一段移动组件官方文档中对于这个函数的介绍。
PerformMovement函数负责游戏世界场景中的角色物理移动。在非联网游戏中,UCharacterMovementComponent每次tick将直接调用一次PerformMovement。在联网游戏中,由专用函数为服务器和客户端调用PerformMovement,在玩家的本地机器上执行初始移动,或在远程机器上再现移动。
PerformMovement处理以下状况:
- 应用外部物理效果,例如脉冲、力和重力。
- 根据动画根运动和 根运动源 计算移动。
- 调用
StartNewPhysics,它基于角色使用的移动模式选择Phys*函数。每个移动模式都有各自的
Phys*函数,负责计算速度和加速度。举例而言PhysWalking决定角色在地面上移动时的移动物理效果,而PhysFalling决定在空中移动时的移动物理效果。若要调试这些行为的具体细节,需深入探究这些函数。若移动模式在一个
tick内发生变化(例如角色开始跌倒或撞到某个对象),Phys*函数会再次调用StartNewPhysics,在新移动模式中继续角色的运动。StartNewPhysics和Phys*函数各自通过已发生的StartNewPhysics迭代的次数。参数MaxSimulationIterations是此递归所允许的最大次数。
这个函数作为移动组件的最核心,涉及到了太多的物理查询以及RootMotion的细节,由于本书的重点在于服务端,所以此处就略过,有兴趣的读者可以参考知乎Jerish写的移动同步相关文章
不过我们这里只考虑输入向量触发位移的逻辑,省略掉RootMotion驱动位移的相关逻辑。
函数的开头首先计算当前是否需要检查是否在地面上的标志位bForceNextFloorCheck,
// Force floor update if we've moved outside of CharacterMovement since last update.
bForceNextFloorCheck |= (IsMovingOnGround() && UpdatedComponent->GetComponentLocation() != LastUpdateLocation);
IsMovingOnGround就是纯地面行走,对应的移动模式为MOVE_Walking或者MOVE_NavWalking:
bool UCharacterMovementComponent::IsMovingOnGround() const
{
return ((MovementMode == MOVE_Walking) || (MovementMode == MOVE_NavWalking)) && UpdatedComponent;
}
然后再考虑当前是否在一个移动的平台上行走,例如船、大卡车、火车等载具平台上,这里调用的是MaybeUpdateBasedMovement:
MaybeUpdateBasedMovement(DeltaSeconds);
接下来先备份一下当前状态,然后根据总作用力来构造加速度:
OldVelocity = Velocity;
OldLocation = UpdatedComponent->GetComponentLocation();
ApplyAccumulatedForces(DeltaSeconds);
ApplyAccumulatedForces内部主要使用了PendingImpulseToApply和PendingForceToApply来计算新的速度,PendingImpulseToApply作为临时速度增加量,而PendingForceToApply作为临时加速度。这里还会额外处理一下重力方向的分量速度是否会引发脱离地面:
void UCharacterMovementComponent::ApplyAccumulatedForces(float DeltaSeconds)
{
if (PendingImpulseToApply.Z != 0.f || PendingForceToApply.Z != 0.f)
{
// check to see if applied momentum is enough to overcome gravity
if ( IsMovingOnGround() && (PendingImpulseToApply.Z + (PendingForceToApply.Z * DeltaSeconds) + (GetGravityZ() * DeltaSeconds) > SMALL_NUMBER))
{
SetMovementMode(MOVE_Falling);
}
}
Velocity += PendingImpulseToApply + (PendingForceToApply * DeltaSeconds);
// Don't call ClearAccumulatedForces() because it could affect launch velocity
PendingImpulseToApply = FVector::ZeroVector;
PendingForceToApply = FVector::ZeroVector;
}
计算好了速度之后,调用UpdateCharacterStateBeforeMovement(DeltaSeconds)来做位置更新的准备工作,这个函数是一个虚函数,默认实现里只处理了蹲下相关的逻辑:
void UCharacterMovementComponent::UpdateCharacterStateBeforeMovement(float DeltaSeconds)
{
// Proxies get replicated crouch state.
if (CharacterOwner->GetLocalRole() != ROLE_SimulatedProxy)
{
// Check for a change in crouch state. Players toggle crouch by changing bWantsToCrouch.
const bool bIsCrouching = IsCrouching();
if (bIsCrouching && (!bWantsToCrouch || !CanCrouchInCurrentState()))
{
UnCrouch(false);
}
else if (!bIsCrouching && bWantsToCrouch && CanCrouchInCurrentState())
{
Crouch(false);
}
}
}
如果当前在AI驱动寻路阶段,会检查是否已经可以安全的退出NavWalking:
if (MovementMode == MOVE_NavWalking && bWantsToLeaveNavWalking)
{
TryToLeaveNavWalking();
}
这个函数会尝试找一个附近安全无阻挡落脚点,如果找不到的话则继续保持NavWalking状态:
bool UCharacterMovementComponent::TryToLeaveNavWalking()
{
SetNavWalkingPhysics(false);
bool bSucceeded = true;
if (CharacterOwner)
{
FVector CollisionFreeLocation = UpdatedComponent->GetComponentLocation();
bSucceeded = GetWorld()->FindTeleportSpot(CharacterOwner, CollisionFreeLocation, UpdatedComponent->GetComponentRotation());
if (bSucceeded)
{
CharacterOwner->SetActorLocation(CollisionFreeLocation);
}
else
{
SetNavWalkingPhysics(true);
}
}
if (MovementMode == MOVE_NavWalking && bSucceeded)
{
SetMovementMode(DefaultLandMovementMode != MOVE_NavWalking ? DefaultLandMovementMode.GetValue() : MOVE_Walking);
}
else if (MovementMode != MOVE_NavWalking && !bSucceeded)
{
SetMovementMode(MOVE_NavWalking);
}
bWantsToLeaveNavWalking = !bSucceeded;
return bSucceeded;
}
接下来调用HandlePendingLaunch()来处理弹射起飞相关逻辑,切换为Falling状态:
bool UCharacterMovementComponent::HandlePendingLaunch()
{
if (!PendingLaunchVelocity.IsZero() && HasValidData())
{
Velocity = PendingLaunchVelocity;
SetMovementMode(MOVE_Falling);
PendingLaunchVelocity = FVector::ZeroVector;
bForceNextFloorCheck = true;
return true;
}
return false;
}
HandlePendingLaunch之后使用ClearAccumulatedForces()来清除之前计算出来的各种力:
void UCharacterMovementComponent::ClearAccumulatedForces()
{
PendingImpulseToApply = FVector::ZeroVector;
PendingForceToApply = FVector::ZeroVector;
PendingLaunchVelocity = FVector::ZeroVector;
}
但是其实PendingImpulseToApply和PendingForceToApply在前面的ApplyAccumulatedForces中已经清零了,所以这里的作用就是将PendingLaunchVelocity清零。
接下来省略一些RootMotion相关的代码,调用StartNewPhysics(DeltaSeconds, 0)来执行真正的位置计算与更新:
void UCharacterMovementComponent::StartNewPhysics(float deltaTime, int32 Iterations)
{
if ((deltaTime < MIN_TICK_TIME) || (Iterations >= MaxSimulationIterations) || !HasValidData())
{
return;
}
if (UpdatedComponent->IsSimulatingPhysics())
{
UE_LOG(LogCharacterMovement, Log, TEXT("UCharacterMovementComponent::StartNewPhysics: UpdateComponent (%s) is simulating physics - aborting."), *UpdatedComponent->GetPathName());
return;
}
const bool bSavedMovementInProgress = bMovementInProgress;
bMovementInProgress = true;
switch ( MovementMode )
{
case MOVE_None:
break;
case MOVE_Walking:
PhysWalking(deltaTime, Iterations);
break;
case MOVE_NavWalking:
PhysNavWalking(deltaTime, Iterations);
break;
case MOVE_Falling:
PhysFalling(deltaTime, Iterations);
break;
case MOVE_Flying:
PhysFlying(deltaTime, Iterations);
break;
case MOVE_Swimming:
PhysSwimming(deltaTime, Iterations);
break;
case MOVE_Custom:
PhysCustom(deltaTime, Iterations);
break;
default:
UE_LOG(LogCharacterMovement, Warning, TEXT("%s has unsupported movement mode %d"), *CharacterOwner->GetName(), int32(MovementMode));
SetMovementMode(MOVE_None);
break;
}
bMovementInProgress = bSavedMovementInProgress;
if ( bDeferUpdateMoveComponent )
{
SetUpdatedComponent(DeferredUpdatedMoveComponent);
}
}
这函数只是作为一个转接函数来使用,正如之前PerformMovement官方文档所说的,根据具体的移动模式调用Phys*,这里我们只考虑PhysWalking。这个函数也比较大,下面是先临时简化的函数体:
const float UCharacterMovementComponent::MIN_TICK_TIME = 1e-6f;
if (deltaTime < MIN_TICK_TIME) // 函数调用间隔太短
{
return;
}
if (!CharacterOwner || (!CharacterOwner->Controller && !bRunPhysicsWithNoController && !HasAnimRootMotion() && !CurrentRootMotion.HasOverrideVelocity() && (CharacterOwner->GetLocalRole() != ROLE_SimulatedProxy)))
{
Acceleration = FVector::ZeroVector;
Velocity = FVector::ZeroVector;
return;
}
if (!UpdatedComponent->IsQueryCollisionEnabled()) // 没有开物理查询
{
SetMovementMode(MOVE_Walking);
return;
}
bJustTeleported = false;
bool bCheckedFall = false;
bool bTriedLedgeMove = false;
float remainingTime = deltaTime;
// Perform the move
while ( (remainingTime >= MIN_TICK_TIME) && (Iterations < MaxSimulationIterations) && CharacterOwner && (CharacterOwner->Controller || bRunPhysicsWithNoController || HasAnimRootMotion() || CurrentRootMotion.HasOverrideVelocity() || (CharacterOwner->GetLocalRole() == ROLE_SimulatedProxy)) )
{
Iterations++;
bJustTeleported = false;
const float timeTick = GetSimulationTimeStep(remainingTime, Iterations);
remainingTime -= timeTick;
// 此处暂时省略循环迭代的具体内容
}
if (IsMovingOnGround())
{
MaintainHorizontalGroundVelocity();
}
开头有三个快速退出检查,这些检查都通过之后执行一个循环迭代的逻辑,每次迭代占用一个大小为timeTick的时间片,迭代到传入的deltaTime被用光。最后的MaintainHorizontalGroundVelocity负责在地面移动的情况下将算出来的速度根据配置去抹掉与地面垂直的高度方向的分量。接下来我们来详细查看while循环内的更新逻辑。
这种使用时间片去驱动while循环来查询或更新物理系统的做法在游戏物理中有个专有名词叫做Sub-stepping。这样能够提升物理查询与模拟的准确度。因为游戏的物理世界一般都是使用离散时间来更新的,如果更新间隔过大可能就会出现隧穿现象:
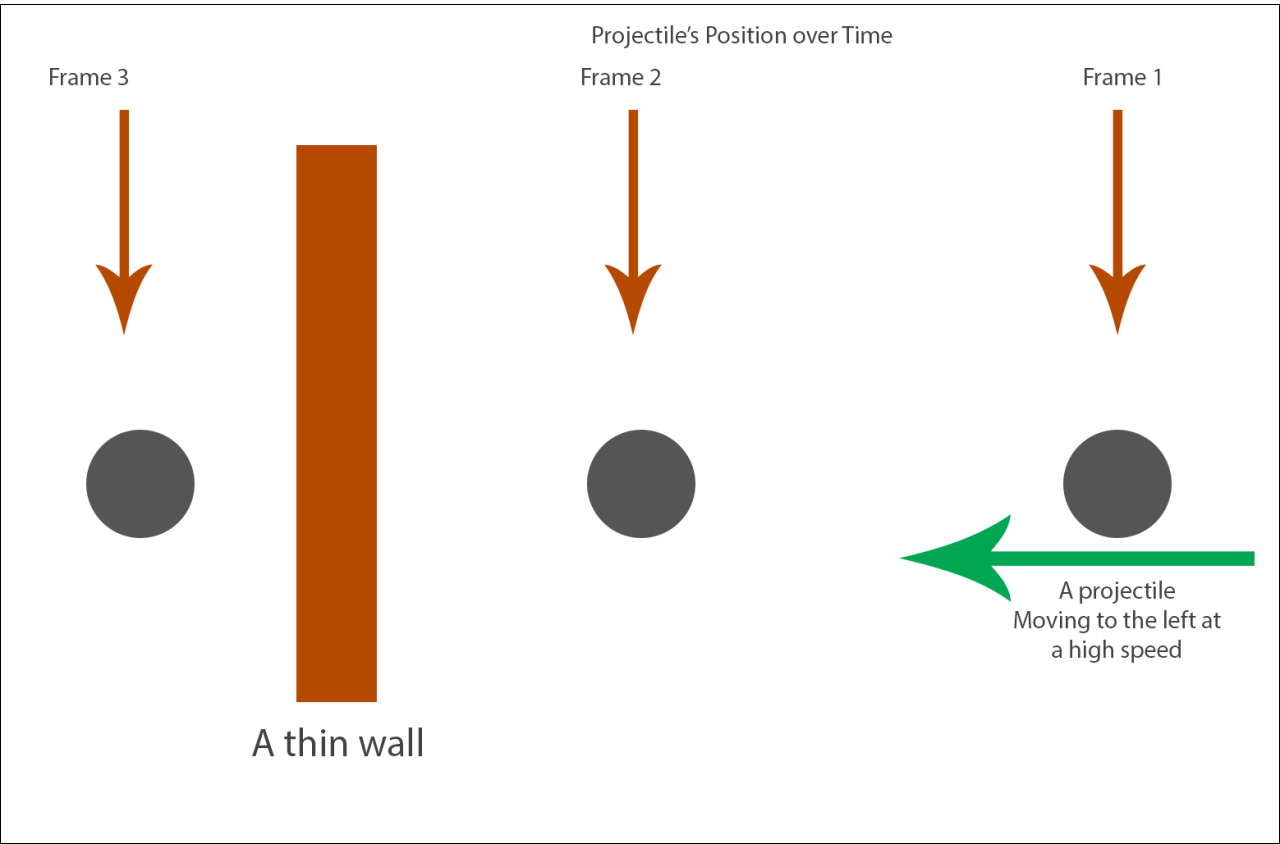
上图就是隧穿现象的实例,小球直线运动应该会撞到前方的薄木板,但是由于物理模拟的更新间隔过大,导致第二帧之后的模拟直接跳跃到了第三帧的位置,此时再执行查询发现小球与木板没有相撞。要彻底解决这种离散时间模拟的问题需要将使用基于Continuous Collision Detection的物理引擎,但是这种引擎的消耗太大了,所以一般退而求次选择一个比较小的固定间隔gap来作为模拟的时间单位,每次外部传入的deltaTime都会被切分为一个或多个不大于gap的时间片。然后对应的使用这些时间片循环的进行物理更新或者查询,每次迭代都相当于一次substep,这样就相当于提高了物理系统的离散时间精度。
在当前的substep开头,首先保存一下上一轮的结果:
// Save current values
UPrimitiveComponent * const OldBase = GetMovementBase();
const FVector PreviousBaseLocation = (OldBase != NULL) ? OldBase->GetComponentLocation() : FVector::ZeroVector;
const FVector OldLocation = UpdatedComponent->GetComponentLocation();
const FFindFloorResult OldFloor = CurrentFloor;
RestorePreAdditiveRootMotionVelocity();
// Ensure velocity is horizontal.
MaintainHorizontalGroundVelocity();
const FVector OldVelocity = Velocity;
Acceleration.Z = 0.f;
然后使用CalcVelocity来计算新的速度,这个函数内部主要处理最大加速度、最大速度、刹车减速、碰撞避免速度等逻辑。
// Apply acceleration
if( !HasAnimRootMotion() && !CurrentRootMotion.HasOverrideVelocity() )
{
CalcVelocity(timeTick, GroundFriction, false, GetMaxBrakingDeceleration());
devCode(ensureMsgf(!Velocity.ContainsNaN(), TEXT("PhysWalking: Velocity contains NaN after CalcVelocity (%s)\n%s"), *GetPathNameSafe(this), *Velocity.ToString()));
}
如果当前由RootMotion来驱动位移,则使用ApplyRootMotionToVelocity来替换最终的速度。ApplyRootMotionToVelocity如果算出来的新状态变成了Falling,则调用StartNewPhysics来执行换状态之后的物理查询,本次迭代作废,所以这里的剩余时间和迭代次数都会回滚:
ApplyRootMotionToVelocity(timeTick);
devCode(ensureMsgf(!Velocity.ContainsNaN(), TEXT("PhysWalking: Velocity contains NaN after Root Motion application (%s)\n%s"), *GetPathNameSafe(this), *Velocity.ToString()));
if( IsFalling() )
{
// Root motion could have put us into Falling.
// No movement has taken place this movement tick so we pass on full time/past iteration count
StartNewPhysics(remainingTime+timeTick, Iterations-1);
return;
}
如果没有走到上面的return的话,开始由这个速度来计算新的位置,并处理位置更新后导致的运动状态切换:
// Compute move parameters
const FVector MoveVelocity = Velocity;
const FVector Delta = timeTick * MoveVelocity;
const bool bZeroDelta = Delta.IsNearlyZero();
FStepDownResult StepDownResult;
if ( bZeroDelta )
{
remainingTime = 0.f;
}
else
{
// try to move forward
MoveAlongFloor(MoveVelocity, timeTick, &StepDownResult);
if ( IsFalling() )
{
// pawn decided to jump up
const float DesiredDist = Delta.Size();
if (DesiredDist > KINDA_SMALL_NUMBER)
{
const float ActualDist = (UpdatedComponent->GetComponentLocation() - OldLocation).Size2D();
remainingTime += timeTick * (1.f - FMath::Min(1.f,ActualDist/DesiredDist));
}
StartNewPhysics(remainingTime,Iterations);
return;
}
else if ( IsSwimming() ) //just entered water
{
StartSwimming(OldLocation, OldVelocity, timeTick, remainingTime, Iterations);
return;
}
}
上面的MoveAlongFloor就是正常的地面移动所执行的位置更新函数,其签名如下,相当于在此速度下计算出新位置对应的脚底信息FStepDownResult,其实就是一个地面查询结果FFindFloorResult:
/** Struct updated by StepUp() to return result of final step down, if applicable. */
struct FStepDownResult
{
uint32 bComputedFloor:1; // True if the floor was computed as a result of the step down.
FFindFloorResult FloorResult; // The result of the floor test if the floor was updated.
FStepDownResult()
: bComputedFloor(false)
{
}
};
void UCharacterMovementComponent::MoveAlongFloor(const FVector& InVelocity, float DeltaSeconds, FStepDownResult* OutStepDownResult)
这个函数内部其实也是很复杂,考虑了很多情况。开头就是直接先尝试简单的计算一下传入的速度下要移动的距离Delta,然后查询一下脚下的位置:
// Move along the current floor
const FVector Delta = FVector(InVelocity.X, InVelocity.Y, 0.f) * DeltaSeconds;
FHitResult Hit(1.f);
FVector RampVector = ComputeGroundMovementDelta(Delta, CurrentFloor.HitResult, CurrentFloor.bLineTrace);
SafeMoveUpdatedComponent(RampVector, UpdatedComponent->GetComponentQuat(), true, Hit);
float LastMoveTimeSlice = DeltaSeconds;
这里的ComputeGroundMovementDelta主要处理的是玩家在斜坡上行走时的位置更新。平常的移动输入向量只会有XY方向的值,为了在斜坡上移动我们需要构造相应的Z轴值。做法是将传入的移动速度抹掉之前计算出来的脚底平面法向量的分量,相当于强制将移动速度设置为与脚底平面平行:
FVector UCharacterMovementComponent::ComputeGroundMovementDelta(const FVector& Delta, const FHitResult& RampHit, const bool bHitFromLineTrace) const
{
const FVector FloorNormal = RampHit.ImpactNormal;
const FVector ContactNormal = RampHit.Normal;
if (FloorNormal.Z < (1.f - KINDA_SMALL_NUMBER) && FloorNormal.Z > KINDA_SMALL_NUMBER && ContactNormal.Z > KINDA_SMALL_NUMBER && !bHitFromLineTrace && IsWalkable(RampHit))
{
// Compute a vector that moves parallel to the surface, by projecting the horizontal movement direction onto the ramp.
const float FloorDotDelta = (FloorNormal | Delta);
FVector RampMovement(Delta.X, Delta.Y, -FloorDotDelta / FloorNormal.Z);
if (bMaintainHorizontalGroundVelocity)
{
return RampMovement;
}
else
{
return RampMovement.GetSafeNormal() * Delta.Size();
}
}
return Delta;
}
这里有两个Normal,第一个FloorNormal代表地表的法线方向,第二个ContactNormal代表当前Character的碰撞体与这个地表接触点的法线方向。文字描述不好理解,可以看下图:
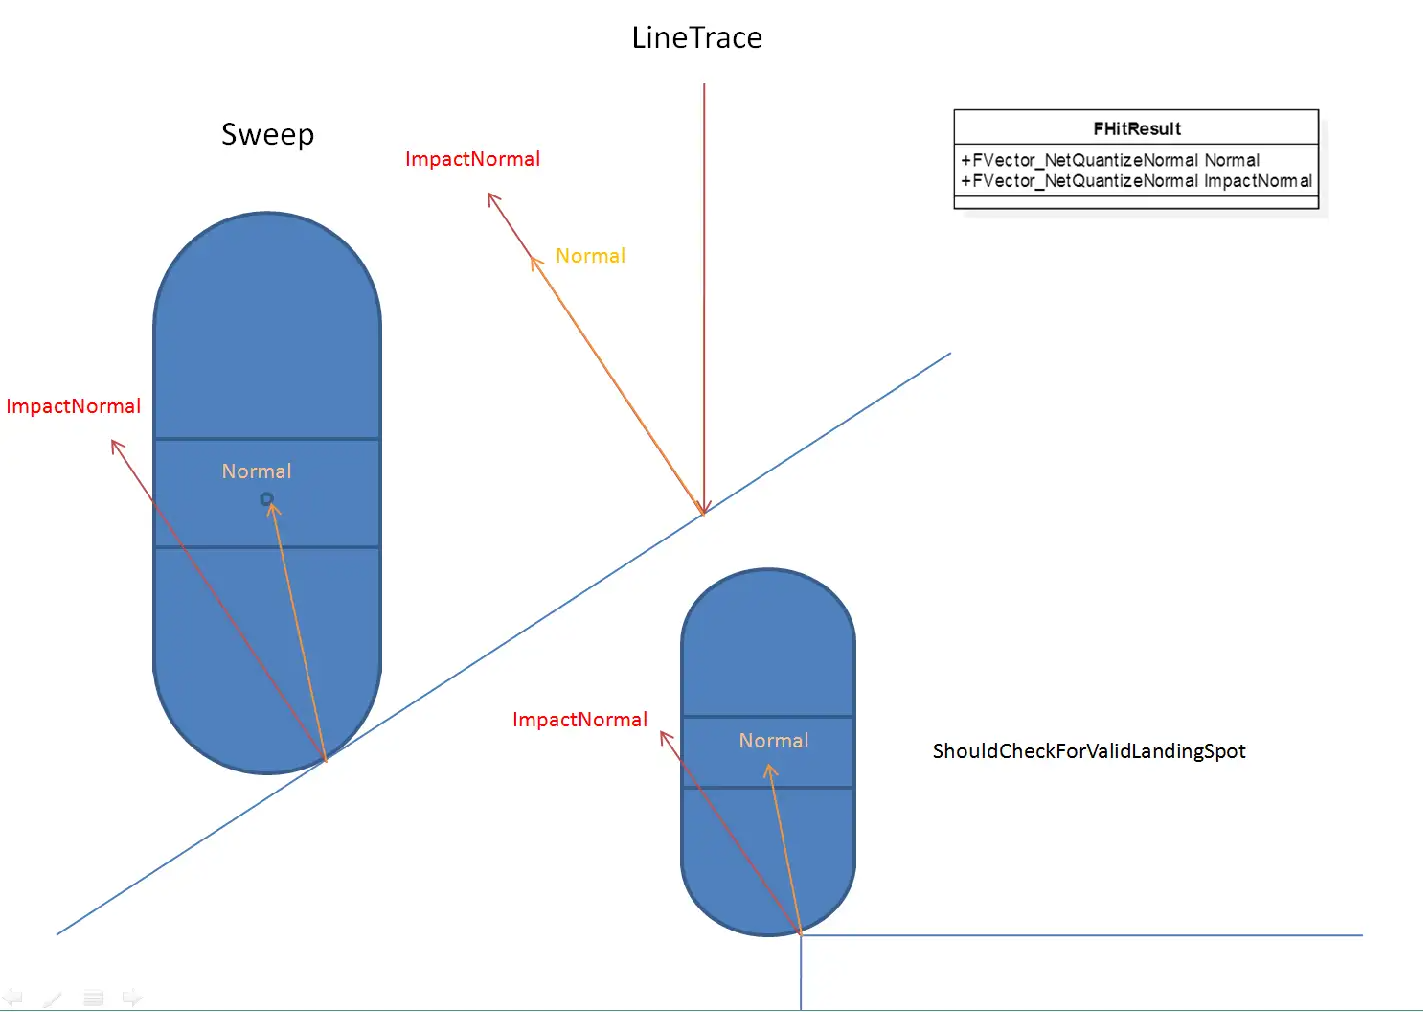
然后SafeMoveUpdatedComponent负责用这个算出来的移动向量Delta来对当前角色的体型进行平移。如果平移过程中遇到了物理阻挡,将这个阻挡信息填充到传入的FHitResult中。
后面再根据SafeMoveUpdatedComponent算出来的阻挡信息做后续的处理:
- 首先处理的是移动之前玩家就已经与阻挡物撞上的情况,即
Hit.bStartPenetrating为True,此时的对策是SlideAlongSurface,即保留当前移动方向平行于接触面的分量进行移动,相当于撞墙之后贴着墙壁走
if (Hit.bStartPenetrating)
{
// Allow this hit to be used as an impact we can deflect off, otherwise we do nothing the rest of the update and appear to hitch.
HandleImpact(Hit);
SlideAlongSurface(Delta, 1.f, Hit.Normal, Hit, true);
if (Hit.bStartPenetrating)
{
OnCharacterStuckInGeometry(&Hit);
}
}
else if (Hit.IsValidBlockingHit())
{
// 当前代码在后续分支继续讨论
}
- 如果后续才会撞到碰撞物,且目标碰撞物表面可以行走,则先移动到碰撞点,再沿着碰撞物表面进行移动,这里相当于处理正前方是斜坡时的上坡逻辑。这里上坡时可能会继续遇到碰撞,所以用
PercentTimeApplied代表第二次碰撞时间点。
// We impacted something (most likely another ramp, but possibly a barrier).
float PercentTimeApplied = Hit.Time;
if ((Hit.Time > 0.f) && (Hit.Normal.Z > KINDA_SMALL_NUMBER) && IsWalkable(Hit))
{
// Another walkable ramp.
const float InitialPercentRemaining = 1.f - PercentTimeApplied;
RampVector = ComputeGroundMovementDelta(Delta * InitialPercentRemaining, Hit, false);
LastMoveTimeSlice = InitialPercentRemaining * LastMoveTimeSlice;
SafeMoveUpdatedComponent(RampVector, UpdatedComponent->GetComponentQuat(), true, Hit);
const float SecondHitPercent = Hit.Time * InitialPercentRemaining;
PercentTimeApplied = FMath::Clamp(PercentTimeApplied + SecondHitPercent, 0.f, 1.f);
}
if (Hit.IsValidBlockingHit())
{
if (CanStepUp(Hit) || (CharacterOwner->GetMovementBase() != NULL && CharacterOwner->GetMovementBase()->GetOwner() == Hit.GetActor()))
{
// hit a barrier, try to step up
// 此处先省略相关代码
}
else if ( Hit.Component.IsValid() && !Hit.Component.Get()->CanCharacterStepUp(CharacterOwner) )
{
HandleImpact(Hit, LastMoveTimeSlice, RampVector);
SlideAlongSurface(Delta, 1.f - PercentTimeApplied, Hit.Normal, Hit, true);
}
}
考虑完二次碰撞之后,再检查我们能否站到障碍物表面或者是不是与当前的占据的移动平台发生了碰撞。如果返回了false,则执行之前一样的沿着碰撞表面的移动;如果返回true,则需要调用StepUp函数来额外处理一下站上去的逻辑:
- 如果成功的站上去之后根据
bMaintainHorizontalGroundVelocity去抹除高度轴的速度; - 如果没有成功的站上去则复用之前的沿着阻挡体平面移动的逻辑
const FVector PreStepUpLocation = UpdatedComponent->GetComponentLocation();
const FVector GravDir(0.f, 0.f, -1.f);
if (!StepUp(GravDir, Delta * (1.f - PercentTimeApplied), Hit, OutStepDownResult))
{
UE_LOG(LogCharacterMovement, Verbose, TEXT("- StepUp (ImpactNormal %s, Normal %s"), *Hit.ImpactNormal.ToString(), *Hit.Normal.ToString());
HandleImpact(Hit, LastMoveTimeSlice, RampVector);
SlideAlongSurface(Delta, 1.f - PercentTimeApplied, Hit.Normal, Hit, true);
}
else
{
UE_LOG(LogCharacterMovement, Verbose, TEXT("+ StepUp (ImpactNormal %s, Normal %s"), *Hit.ImpactNormal.ToString(), *Hit.Normal.ToString());
if (!bMaintainHorizontalGroundVelocity)
{
// Don't recalculate velocity based on this height adjustment, if considering vertical adjustments. Only consider horizontal movement.
bJustTeleported = true;
const float StepUpTimeSlice = (1.f - PercentTimeApplied) * DeltaSeconds;
if (!HasAnimRootMotion() && !CurrentRootMotion.HasOverrideVelocity() && StepUpTimeSlice >= KINDA_SMALL_NUMBER)
{
Velocity = (UpdatedComponent->GetComponentLocation() - PreStepUpLocation) / StepUpTimeSlice;
Velocity.Z = 0;
}
}
}
这里StepUp能否成功依赖主要依赖这三个因素:
- 配置的角色最大提升高度
MaxStepHeight - 目标平台是否支持玩家可以站在上面
- 抬升时角色头顶不会碰到障碍物
具体的执行逻辑其实挺复杂的,大概就是将角色胶囊体先抬升MaxStepHeight,然后移动之前计算的Delta向量,然后再下降MaxStepHeight+MAX_FLOOR_DIST*2.f的距离来查看能否接触到地面,如果接触不到地面则进入Falling状态。
到这里MoveAlongFloor的逻辑才彻底走完,我们再看一下PhysWalking的后续流程。接下来需要计算一下当前脚下的地面,使用的是FindFloor函数,不过如果在MoveAlongFloor里执行过StepDown流程的话所需要的地板数据已经计算好了,就不再需要计算地板了:
// Update floor.
// StepUp might have already done it for us.
if (StepDownResult.bComputedFloor)
{
CurrentFloor = StepDownResult.FloorResult;
}
else
{
FindFloor(UpdatedComponent->GetComponentLocation(), CurrentFloor, bZeroDelta, NULL);
}
FindFloor本质上就是通过胶囊体的Sweep检测来找到脚下的被配置为与Pawn的进行阻挡的Actor。这里与常规的使用LineTrace寻找地面的时候有很大的不同。LineTrace只考虑脚下位置附近的,而忽略掉腰部附近的物体;而Sweep用的是胶囊体而不是射线检测,方便处理斜面移动,计算可站立半径等。在这两种地面检测时,返回结果里的两个法向向量的设置有很大的不同,参考下图:
如果查询到的地面是不可行走的且角色被配置为不能走出平台,则尝试调用GetLedgeMove来沿着之前平台的边缘移动:
// check for ledges here
const bool bCheckLedges = !CanWalkOffLedges();
if ( bCheckLedges && !CurrentFloor.IsWalkableFloor() )
{
// calculate possible alternate movement
const FVector GravDir = FVector(0.f,0.f,-1.f);
const FVector NewDelta = bTriedLedgeMove ? FVector::ZeroVector : GetLedgeMove(OldLocation, Delta, GravDir);
if ( !NewDelta.IsZero() )
{
// first revert this move
RevertMove(OldLocation, OldBase, PreviousBaseLocation, OldFloor, false);
// avoid repeated ledge moves if the first one fails
bTriedLedgeMove = true;
// Try new movement direction
Velocity = NewDelta/timeTick;
remainingTime += timeTick;
continue;
}
else
{
// see if it is OK to jump
// @todo collision : only thing that can be problem is that oldbase has world collision on
bool bMustJump = bZeroDelta || (OldBase == NULL || (!OldBase->IsQueryCollisionEnabled() && MovementBaseUtility::IsDynamicBase(OldBase)));
if ( (bMustJump || !bCheckedFall) && CheckFall(OldFloor, CurrentFloor.HitResult, Delta, OldLocation, remainingTime, timeTick, Iterations, bMustJump) )
{
return;
}
bCheckedFall = true;
// revert this move
RevertMove(OldLocation, OldBase, PreviousBaseLocation, OldFloor, true);
remainingTime = 0.f;
break;
}
}
这里的GetLedgeMove其实就是对当前移动方向做一次左转90度,然后查询这个方向上移动是否会遇到障碍物,如果遇到了障碍物则切换为右转90度再做一次障碍物查询。如果任意方向可行则返回的NewDelta就是此方向上的移动向量,如果都不行则返回的NewDelta就全是0。执行完LedgeMove成功后会以这个NewDelta来计算新的速度,失败后则会尝试执行跳跃。
如果上面代码的准入条件判断为false,则执行下面的逻辑
else
{
// Validate the floor check
if (CurrentFloor.IsWalkableFloor())
{
if (ShouldCatchAir(OldFloor, CurrentFloor))
{
HandleWalkingOffLedge(OldFloor.HitResult.ImpactNormal, OldFloor.HitResult.Normal, OldLocation, timeTick);
if (IsMovingOnGround())
{
// If still walking, then fall. If not, assume the user set a different mode they want to keep.
StartFalling(Iterations, remainingTime, timeTick, Delta, OldLocation);
}
return;
}
AdjustFloorHeight();
SetBase(CurrentFloor.HitResult.Component.Get(), CurrentFloor.HitResult.BoneName);
}
else if (CurrentFloor.HitResult.bStartPenetrating && remainingTime <= 0.f)
{
// The floor check failed because it started in penetration
// We do not want to try to move downward because the downward sweep failed, rather we'd like to try to pop out of the floor.
FHitResult Hit(CurrentFloor.HitResult);
Hit.TraceEnd = Hit.TraceStart + FVector(0.f, 0.f, MAX_FLOOR_DIST);
const FVector RequestedAdjustment = GetPenetrationAdjustment(Hit);
ResolvePenetration(RequestedAdjustment, Hit, UpdatedComponent->GetComponentQuat());
bForceNextFloorCheck = true;
}
// check if just entered water
if ( IsSwimming() )
{
StartSwimming(OldLocation, Velocity, timeTick, remainingTime, Iterations);
return;
}
// See if we need to start falling.
if (!CurrentFloor.IsWalkableFloor() && !CurrentFloor.HitResult.bStartPenetrating)
{
const bool bMustJump = bJustTeleported || bZeroDelta || (OldBase == NULL || (!OldBase->IsQueryCollisionEnabled() && MovementBaseUtility::IsDynamicBase(OldBase)));
if ((bMustJump || !bCheckedFall) && CheckFall(OldFloor, CurrentFloor.HitResult, Delta, OldLocation, remainingTime, timeTick, Iterations, bMustJump) )
{
return;
}
bCheckedFall = true;
}
}
ShouldCatchAir代表是否需要处理切换Floor时的Jump切换,默认配置为false。如果新的Floor是不可行走的且没有剩余时间去解决胶囊体与Floor的穿透问题,则直接回弹一段距离并标记为下一次重新检查地表。
最后剩的一点代码就是计算这次迭代期间的移动速度并抹除地面的法向分量。
// Allow overlap events and such to change physics state and velocity
if (IsMovingOnGround())
{
// Make velocity reflect actual move
if( !bJustTeleported && !HasAnimRootMotion() && !CurrentRootMotion.HasOverrideVelocity() && timeTick >= MIN_TICK_TIME)
{
// TODO-RootMotionSource: Allow this to happen during partial override Velocity, but only set allowed axes?
Velocity = (UpdatedComponent->GetComponentLocation() - OldLocation) / timeTick;
MaintainHorizontalGroundVelocity();
}
}
// If we didn't move at all this iteration then abort (since future iterations will also be stuck).
if (UpdatedComponent->GetComponentLocation() == OldLocation)
{
remainingTime = 0.f;
break;
}
预演之后NewMove里的一些字段就会得到填充,例如新的位置朝向、底下的平台等信息。
移动指令的延时发送
一个Move可以被延迟一会儿,与后面的Move合并后再发往服务器,减少带宽。因此新建的Move被发往服务器前会先判断是否可以延迟发送。
首先会判断当前是否开启了NetEnableMoveCombining,以及当前Move是否能被延迟发送,会检查该Move前后MovementMode是否改变。简单的理解就是这次move是否有显著改变,比如玩家长时间向着一个方向匀速移动,那么中间的move信息其实不需要全部发往服务器,服务器可以把之前收到move中的速度作为之后的速度计算,结果应该是一样的。
然后会计算当前预期的移动更新时间间隔,有一个可配置基准值ClientNetSendMoveDeltaTime,同时根据当前网速、玩家数量、玩家是否静止等信息在基准值上做调整,得到最终间隔。如果两次Tick间隔小于更新间隔,就会延迟发送这个Move,把它存储到PendingMove属性中,留着以后处理。
// Add NewMove to the list
if (CharacterOwner->IsReplicatingMovement())
{
check(NewMove == NewMovePtr.Get());
ClientData->SavedMoves.Push(NewMovePtr);
const bool bCanDelayMove = (CharacterMovementCVars::NetEnableMoveCombining != 0) && CanDelaySendingMove(NewMovePtr);
if (bCanDelayMove && ClientData->PendingMove.IsValid() == false)
{
// Decide whether to hold off on move
const float NetMoveDelta = FMath::Clamp(GetClientNetSendDeltaTime(PC, ClientData, NewMovePtr), 1.f/120.f, 1.f/5.f);
if ((MyWorld->TimeSeconds - ClientData->ClientUpdateTime) * MyWorld->GetWorldSettings()->GetEffectiveTimeDilation() < NetMoveDelta)
{
// Delay sending this move.
ClientData->PendingMove = NewMovePtr;
return;
}
}
// 后续省略一些代码
}
移动指令的数据打包
当延时发送的判定没有通过时,需要立即发送当前的NewMove信息,调用到CallServerMove函数:
ClientData->ClientUpdateTime = MyWorld->TimeSeconds;
UE_CLOG(CharacterOwner && UpdatedComponent, LogNetPlayerMovement, VeryVerbose, TEXT("ClientMove Time %f Acceleration %s Velocity %s Position %s Rotation %s DeltaTime %f Mode %s MovementBase %s.%s (Dynamic:%d) DualMove? %d"),
NewMove->TimeStamp, *NewMove->Acceleration.ToString(), *Velocity.ToString(), *UpdatedComponent->GetComponentLocation().ToString(), *UpdatedComponent->GetComponentRotation().ToCompactString(), NewMove->DeltaTime, *GetMovementName(),
*GetNameSafe(NewMove->EndBase.Get()), *NewMove->EndBoneName.ToString(), MovementBaseUtility::IsDynamicBase(NewMove->EndBase.Get()) ? 1 : 0, ClientData->PendingMove.IsValid() ? 1 : 0);
bool bSendServerMove = true;
// 此处省略一些测试用的代码
// Send move to server if this character is replicating movement
if (bSendServerMove)
{
SCOPE_CYCLE_COUNTER(STAT_CharacterMovementCallServerMove);
if (ShouldUsePackedMovementRPCs())
{
CallServerMovePacked(NewMove, ClientData->PendingMove.Get(), OldMove.Get());
}
else
{
CallServerMove(NewMove, OldMove.Get());
}
}
这里的CallServerMove函数接受两个参数,一个是刚创建的Move,另一个是之前获取的ImportantMove,ImportantMove可能为空。不需要把Move整个都发往服务器,只需要位置、旋转、加速度等关键信息,而且这些信息会经过压缩。
void UCharacterMovementComponent::CallServerMove
(
const FSavedMove_Character* NewMove,
const FSavedMove_Character* OldMove
)
{
check(NewMove != nullptr);
// Compress rotation down to 5 bytes
uint32 ClientYawPitchINT = 0;
uint8 ClientRollBYTE = 0;
NewMove->GetPackedAngles(ClientYawPitchINT, ClientRollBYTE);
// Determine if we send absolute or relative location
UPrimitiveComponent* ClientMovementBase = NewMove->EndBase.Get();
const FName ClientBaseBone = NewMove->EndBoneName;
const FVector SendLocation = MovementBaseUtility::UseRelativeLocation(ClientMovementBase) ? NewMove->SavedRelativeLocation : FRepMovement::RebaseOntoZeroOrigin(NewMove->SavedLocation, this);
}
首先,UE把旋转中的Yaw和Pitch压缩到一个uint32中,各自占一个uint16,此时这两个字段的精度为0.06度。同时把Roll压缩到一个uint8中,此时的精度为0.7。这样把原本的三个float的12字节压缩到了5字节,大部分情况下玩家也察觉不到这种程度的精度损失。
FORCEINLINE uint16 FRotator::CompressAxisToShort( float Angle )
{
// map [0->360) to [0->65536) and mask off any winding
return FMath::RoundToInt(Angle * 65536.f / 360.f) & 0xFFFF;
}
FORCEINLINE uint8 FRotator::CompressAxisToByte( float Angle )
{
// map [0->360) to [0->256) and mask off any winding
return FMath::RoundToInt(Angle * 256.f / 360.f) & 0xFF;
}
FORCEINLINE uint32 UCharacterMovementComponent::PackYawAndPitchTo32(const float Yaw, const float Pitch)
{
const uint32 YawShort = FRotator::CompressAxisToShort(Yaw);
const uint32 PitchShort = FRotator::CompressAxisToShort(Pitch);
const uint32 Rotation32 = (YawShort << 16) | PitchShort;
return Rotation32;
}
void FSavedMove_Character::GetPackedAngles(uint32& YawAndPitchPack, uint8& RollPack) const
{
// Compress rotation down to 5 bytes
YawAndPitchPack = UCharacterMovementComponent::PackYawAndPitchTo32(SavedControlRotation.Yaw, SavedControlRotation.Pitch);
RollPack = FRotator::CompressAxisToByte(SavedControlRotation.Roll);
}
之后,如果存在ImportantMove,会调用ServerMoveOld,把ImportantMove发送到服务器,但只会发送时间戳、加速度和CompressFlags信息。可以先简单理解为一种冗余保险措施。
// send old move if it exists
if (OldMove)
{
ServerMoveOld(OldMove->TimeStamp, OldMove->Acceleration, OldMove->GetCompressedFlags());
}
最后如果存在PendingMove,说明两个Move无法合并,需要调用ServerMoveDual函数一次发送两个连续的Move。这里有一个特例:如果PendingMove没有RootMotion但是NewMove有RootMotion则调用ServerMoveDualHybridRootMotion来同时发送这两个SavedMove。如果不存在PendingMove,说明发送间隔较大或已经合并了PendingMove,就调用ServerMove发送这个Move。
FNetworkPredictionData_Client_Character* ClientData = GetPredictionData_Client_Character();
if (const FSavedMove_Character* const PendingMove = ClientData->PendingMove.Get())
{
uint32 OldClientYawPitchINT = 0;
uint8 OldClientRollBYTE = 0;
ClientData->PendingMove->GetPackedAngles(OldClientYawPitchINT, OldClientRollBYTE);
// If we delayed a move without root motion, and our new move has root motion, send these through a special function, so the server knows how to process them.
if ((PendingMove->RootMotionMontage == NULL) && (NewMove->RootMotionMontage != NULL))
{
// send two moves simultaneously
ServerMoveDualHybridRootMotion(
// 此处省略很多参数
);
}
else
{
// send two moves simultaneously
ServerMoveDual(
// 此处省略所有参数
);
}
}
else
{
ServerMove(
// 此处省略所有参数
);
}
移动指令的服务端模拟
这里我们就只考虑上面提到的ServerMove:
void UCharacterMovementComponent::ServerMove(float TimeStamp, FVector_NetQuantize10 InAccel, FVector_NetQuantize100 ClientLoc, uint8 CompressedMoveFlags, uint8 ClientRoll, uint32 View, UPrimitiveComponent* ClientMovementBase, FName ClientBaseBoneName, uint8 ClientMovementMode)
{
if (MovementBaseUtility::IsDynamicBase(ClientMovementBase))
{
//UE_LOG(LogCharacterMovement, Log, TEXT("ServerMove: base %s"), *ClientMovementBase->GetName());
CharacterOwner->ServerMove(TimeStamp, InAccel, ClientLoc, CompressedMoveFlags, ClientRoll, View, ClientMovementBase, ClientBaseBoneName, ClientMovementMode);
}
else
{
//UE_LOG(LogCharacterMovement, Log, TEXT("ServerMoveNoBase"));
CharacterOwner->ServerMoveNoBase(TimeStamp, InAccel, ClientLoc, CompressedMoveFlags, ClientRoll, View, ClientMovementMode);
}
}
这里根据玩家脚底下的物体是否是可移动的切分为了两个分支,分别走ServerMove和ServerMoveNoBase。对于移动平台的处理目前不是我们的重点,而且移动平台的移动UE的实现也是不怎么完美,此处就先略过,我们只看不可移动的地面上的简单移动ServerMoveNoBase。
/**
* Replicated function sent by client to server. Saves bandwidth over ServerMove() by implying that ClientMovementBase and ClientBaseBoneName are null.
* Passes through to CharacterMovement->ServerMove_Implementation() with null base params.
*/
DEPRECATED_CHARACTER_MOVEMENT_RPC(ServerMoveNoBase, ServerMovePacked)
UFUNCTION(unreliable, server, WithValidation)
void ServerMoveNoBase(float TimeStamp, FVector_NetQuantize10 InAccel, FVector_NetQuantize100 ClientLoc, uint8 CompressedMoveFlags, uint8 ClientRoll, uint32 View, uint8 ClientMovementMode);
DEPRECATED_CHARACTER_MOVEMENT_RPC(ServerMoveNoBase_Implementation, ServerMovePacked_Implementation)
void ServerMoveNoBase_Implementation(float TimeStamp, FVector_NetQuantize10 InAccel, FVector_NetQuantize100 ClientLoc, uint8 CompressedMoveFlags, uint8 ClientRoll, uint32 View, uint8 ClientMovementMode);
bool ServerMoveNoBase_Validate(float TimeStamp, FVector_NetQuantize10 InAccel, FVector_NetQuantize100 ClientLoc, uint8 CompressedMoveFlags, uint8 ClientRoll, uint32 View, uint8 ClientMovementMode);
这里我们惊奇的发现这个ServerMoveNoBase居然是一个unreliable的rpc,不过想来也是有其道理,因为移动位置同步与语音同步一样,要求的实时性非常高,延迟过大的数据根本没有多少价值,反而会更加的劣化用户体验。当某个客户端弱网的情况下,最好的处理方法是直接拒绝掉这个弱网客户端的上行同步,避免在其他客户端出现各种匪夷所思的拉扯问题。所以有些时候为了减少丢包乱序导致的移动同步问题,UE提供了一次性发更多的信息到服务器,即CallServerMovePacked。CallServerMovePacked会将NewMove、PendingMove和OldMove都打包成一个数据流,然后通过一个RPC发送到服务器,尽可能的减少非可靠RPC的丢包、乱序带来的影响:
SCOPE_CYCLE_COUNTER(STAT_CharacterMovementCallServerMove);
if (ShouldUsePackedMovementRPCs())
{
CallServerMovePacked(NewMove, ClientData->PendingMove.Get(), OldMove.Get());
}
else
{
CallServerMove(NewMove, OldMove.Get());
}
Character::ServerMove的实现就是直接转发到UCharacterMovementComponent::ServerMove_Implementation上:
void UCharacterMovementComponent::ServerMove_Implementation(
float TimeStamp,
FVector_NetQuantize10 InAccel,
FVector_NetQuantize100 ClientLoc,
uint8 MoveFlags,
uint8 ClientRoll,
uint32 View,
UPrimitiveComponent* ClientMovementBase,
FName ClientBaseBoneName,
uint8 ClientMovementMode)
这个函数的开头首先检查客户端发送过来的数据时间戳是不是过期太久:
SCOPE_CYCLE_COUNTER(STAT_CharacterMovementServerMove);
CSV_SCOPED_TIMING_STAT(CharacterMovement, CharacterMovementServerMove);
if (!HasValidData() || !IsActive())
{
return;
}
FNetworkPredictionData_Server_Character* ServerData = GetPredictionData_Server_Character();
check(ServerData);
if( !VerifyClientTimeStamp(TimeStamp, *ServerData) )
{
const float ServerTimeStamp = ServerData->CurrentClientTimeStamp;
// This is more severe if the timestamp has a large discrepancy and hasn't been recently reset.
if (ServerTimeStamp > 1.0f && FMath::Abs(ServerTimeStamp - TimeStamp) > CharacterMovementCVars::NetServerMoveTimestampExpiredWarningThreshold)
{
UE_LOG(LogNetPlayerMovement, Warning, TEXT("ServerMove: TimeStamp expired: %f, CurrentTimeStamp: %f, Character: %s"), TimeStamp, ServerTimeStamp, *GetNameSafe(CharacterOwner));
}
else
{
UE_LOG(LogNetPlayerMovement, Log, TEXT("ServerMove: TimeStamp expired: %f, CurrentTimeStamp: %f, Character: %s"), TimeStamp, ServerTimeStamp, *GetNameSafe(CharacterOwner));
}
return;
}
当时间戳检查通过之后,服务器开始使用这份输入数据执行一下移动模拟:
bool bServerReadyForClient = true;
APlayerController* PC = Cast<APlayerController>(CharacterOwner->GetController());
if (PC)
{
bServerReadyForClient = PC->NotifyServerReceivedClientData(CharacterOwner, TimeStamp);
if (!bServerReadyForClient)
{
InAccel = FVector::ZeroVector;
}
}
// View components
const uint16 ViewPitch = (View & 65535);
const uint16 ViewYaw = (View >> 16);
const FVector Accel = InAccel;
const UWorld* MyWorld = GetWorld();
const float DeltaTime = ServerData->GetServerMoveDeltaTime(TimeStamp, CharacterOwner->GetActorTimeDilation(*MyWorld));
ServerData->CurrentClientTimeStamp = TimeStamp;
ServerData->ServerAccumulatedClientTimeStamp += DeltaTime;
ServerData->ServerTimeStamp = MyWorld->GetTimeSeconds();
ServerData->ServerTimeStampLastServerMove = ServerData->ServerTimeStamp;
FRotator ViewRot;
ViewRot.Pitch = FRotator::DecompressAxisFromShort(ViewPitch);
ViewRot.Yaw = FRotator::DecompressAxisFromShort(ViewYaw);
ViewRot.Roll = FRotator::DecompressAxisFromByte(ClientRoll);
if (PC)
{
PC->SetControlRotation(ViewRot);
}
if (!bServerReadyForClient)
{
return;
}
// Perform actual movement
if ((MyWorld->GetWorldSettings()->GetPauserPlayerState() == NULL) && (DeltaTime > 0.f))
{
if (PC)
{
PC->UpdateRotation(DeltaTime);
}
MoveAutonomous(TimeStamp, DeltaTime, MoveFlags, Accel);
}
上面的MoveAutonomous就是最终执行模拟的函数,其函数核心就是调用PerformMovement,之前客户端本地预演时也是用PerformMovement来更新位置的:
void UCharacterMovementComponent::MoveAutonomous
(
float ClientTimeStamp,
float DeltaTime,
uint8 CompressedFlags,
const FVector& NewAccel
)
{
if (!HasValidData())
{
return;
}
UpdateFromCompressedFlags(CompressedFlags);
CharacterOwner->CheckJumpInput(DeltaTime);
Acceleration = ConstrainInputAcceleration(NewAccel);
Acceleration = Acceleration.GetClampedToMaxSize(GetMaxAcceleration());
AnalogInputModifier = ComputeAnalogInputModifier();
const FVector OldLocation = UpdatedComponent->GetComponentLocation();
const FQuat OldRotation = UpdatedComponent->GetComponentQuat();
const bool bWasPlayingRootMotion = CharacterOwner->IsPlayingRootMotion();
PerformMovement(DeltaTime);
// Check if data is valid as PerformMovement can mark character for pending kill
if (!HasValidData())
{
return;
}
// If not playing root motion, tick animations after physics. We do this here to keep events, notifies, states and transitions in sync with client updates.
if( CharacterOwner && !CharacterOwner->bClientUpdating && !CharacterOwner->IsPlayingRootMotion() && CharacterOwner->GetMesh() )
{
if (!bWasPlayingRootMotion) // If we were playing root motion before PerformMovement but aren't anymore, we're on the last frame of anim root motion and have already ticked character
{
TickCharacterPose(DeltaTime);
}
// TODO: SaveBaseLocation() in case tick moves us?
// Trigger Events right away, as we could be receiving multiple ServerMoves per frame.
CharacterOwner->GetMesh()->ConditionallyDispatchQueuedAnimEvents();
}
if (CharacterOwner && UpdatedComponent)
{
// Smooth local view of remote clients on listen servers
if (CharacterMovementCVars::NetEnableListenServerSmoothing &&
CharacterOwner->GetRemoteRole() == ROLE_AutonomousProxy &&
IsNetMode(NM_ListenServer))
{
SmoothCorrection(OldLocation, OldRotation, UpdatedComponent->GetComponentLocation(), UpdatedComponent->GetComponentQuat());
}
}
}
模拟完成之后再使用SmoothCorrection将UpdatedComponent的最新位置信息平滑的设置过去。位置更新结束之后,使用ServerMoveHandleClientError来判断模拟之后的位置信息是否与客户端传递过来的位置信息相匹配:
UE_CLOG(CharacterOwner && UpdatedComponent, LogNetPlayerMovement, VeryVerbose, TEXT("ServerMove Time %f Acceleration %s Velocity %s Position %s Rotation %s DeltaTime %f Mode %s MovementBase %s.%s (Dynamic:%d)"),
TimeStamp, *Accel.ToString(), *Velocity.ToString(), *UpdatedComponent->GetComponentLocation().ToString(), *UpdatedComponent->GetComponentRotation().ToCompactString(), DeltaTime, *GetMovementName(),
*GetNameSafe(GetMovementBase()), *CharacterOwner->GetBasedMovement().BoneName.ToString(), MovementBaseUtility::IsDynamicBase(GetMovementBase()) ? 1 : 0);
ServerMoveHandleClientError(TimeStamp, DeltaTime, Accel, ClientLoc, ClientMovementBase, ClientBaseBoneName, ClientMovementMode);
这个函数里面有两个分支,一个分支处理运动状态需要重置的情况,一个分支处理模拟吻合的情况。这里的重置有两种情况:客户端请求强制重置或者服务端模拟之后发现差异过大需要重置:
// Compute the client error from the server's position
// If client has accumulated a noticeable positional error, correct them.
bNetworkLargeClientCorrection = ServerData->bForceClientUpdate;
if (ServerData->bForceClientUpdate || ServerCheckClientError(ClientTimeStamp, DeltaTime, Accel, ClientLoc, RelativeClientLoc, ClientMovementBase, ClientBaseBoneName, ClientMovementMode))
{
UPrimitiveComponent* MovementBase = CharacterOwner->GetMovementBase();
ServerData->PendingAdjustment.NewVel = Velocity;
ServerData->PendingAdjustment.NewBase = MovementBase;
ServerData->PendingAdjustment.NewBaseBoneName = CharacterOwner->GetBasedMovement().BoneName;
ServerData->PendingAdjustment.NewLoc = FRepMovement::RebaseOntoZeroOrigin(UpdatedComponent->GetComponentLocation(), this);
ServerData->PendingAdjustment.NewRot = UpdatedComponent->GetComponentRotation();
ServerData->PendingAdjustment.bBaseRelativePosition = MovementBaseUtility::UseRelativeLocation(MovementBase);
if (ServerData->PendingAdjustment.bBaseRelativePosition)
{
// Relative location
ServerData->PendingAdjustment.NewLoc = CharacterOwner->GetBasedMovement().Location;
// TODO: this could be a relative rotation, but all client corrections ignore rotation right now except the root motion one, which would need to be updated.
//ServerData->PendingAdjustment.NewRot = CharacterOwner->GetBasedMovement().Rotation;
}
ServerData->LastUpdateTime = GetWorld()->TimeSeconds;
ServerData->PendingAdjustment.DeltaTime = DeltaTime;
ServerData->PendingAdjustment.TimeStamp = ClientTimeStamp;
ServerData->PendingAdjustment.bAckGoodMove = false;
ServerData->PendingAdjustment.MovementMode = PackNetworkMovementMode();
}
else
{
if (ServerShouldUseAuthoritativePosition(ClientTimeStamp, DeltaTime, Accel, ClientLoc, RelativeClientLoc, ClientMovementBase, ClientBaseBoneName, ClientMovementMode))
{
const FVector LocDiff = UpdatedComponent->GetComponentLocation() - ClientLoc; //-V595
if (!LocDiff.IsZero() || ClientMovementMode != PackNetworkMovementMode() || GetMovementBase() != ClientMovementBase || (CharacterOwner && CharacterOwner->GetBasedMovement().BoneName != ClientBaseBoneName))
{
// Just set the position. On subsequent moves we will resolve initially overlapping conditions.
UpdatedComponent->SetWorldLocation(ClientLoc, false); //-V595
// Trust the client's movement mode.
ApplyNetworkMovementMode(ClientMovementMode);
// Update base and floor at new location.
SetBase(ClientMovementBase, ClientBaseBoneName);
UpdateFloorFromAdjustment();
// Even if base has not changed, we need to recompute the relative offsets (since we've moved).
SaveBaseLocation();
LastUpdateLocation = UpdatedComponent ? UpdatedComponent->GetComponentLocation() : FVector::ZeroVector;
LastUpdateRotation = UpdatedComponent ? UpdatedComponent->GetComponentQuat() : FQuat::Identity;
LastUpdateVelocity = Velocity;
}
}
// acknowledge receipt of this successful servermove()
ServerData->PendingAdjustment.TimeStamp = ClientTimeStamp;
ServerData->PendingAdjustment.bAckGoodMove = true;
}
在这两种情况下ServerData->PendingAdjustment.bAckGoodMove分别设置成为了false和true
移动指令的客户端确认
在服务端也计算完成新位置之后,需要向发起移动的客户端反馈这个NewMove是否合法,是否需要修正,这个反馈的时机在UNetDriver::ServerReplicateActors中,会遍历所有的PlayerController调用SendClientAdjustment:
void APlayerController::SendClientAdjustment()
{
if (AcknowledgedPawn != GetPawn() && !GetSpectatorPawn())
{
return;
}
// Server sends updates.
// Note: we do this for both the pawn and spectator in case an implementation has a networked spectator.
APawn* RemotePawn = GetPawnOrSpectator();
if (RemotePawn && (RemotePawn->GetRemoteRole() == ROLE_AutonomousProxy) && !IsNetMode(NM_Client))
{
INetworkPredictionInterface* NetworkPredictionInterface = Cast<INetworkPredictionInterface>(RemotePawn->GetMovementComponent());
if (NetworkPredictionInterface)
{
NetworkPredictionInterface->SendClientAdjustment();
}
}
}
这里会区分客户端传递过来的SavedMove是否匹配服务端的模拟结果:
void UCharacterMovementComponent::SendClientAdjustment()
{
if (!HasValidData())
{
return;
}
FNetworkPredictionData_Server_Character* ServerData = GetPredictionData_Server_Character();
check(ServerData);
if (ServerData->PendingAdjustment.TimeStamp <= 0.f)
{
return;
}
const float CurrentTime = GetWorld()->GetTimeSeconds();
if (ServerData->PendingAdjustment.bAckGoodMove)
{
// just notify client this move was received
if (CurrentTime - ServerLastClientGoodMoveAckTime > NetworkMinTimeBetweenClientAckGoodMoves)
{
ServerLastClientGoodMoveAckTime = CurrentTime;
if (ShouldUsePackedMovementRPCs())
{
ServerSendMoveResponse(ServerData->PendingAdjustment);
}
else
{
ClientAckGoodMove(ServerData->PendingAdjustment.TimeStamp);
}
}
}
else
{
// 省略一些异常处理代码
}
}
如果匹配了,则调用ClientAckGoodMove:
void UCharacterMovementComponent::ClientAckGoodMove_Implementation(float TimeStamp)
{
if (!HasValidData() || !IsActive())
{
return;
}
FNetworkPredictionData_Client_Character* ClientData = GetPredictionData_Client_Character();
check(ClientData);
// Ack move if it has not expired.
int32 MoveIndex = ClientData->GetSavedMoveIndex(TimeStamp);
if( MoveIndex == INDEX_NONE )
{
if( ClientData->LastAckedMove.IsValid() )
{
UE_LOG(LogNetPlayerMovement, Log, TEXT("ClientAckGoodMove_Implementation could not find Move for TimeStamp: %f, LastAckedTimeStamp: %f, CurrentTimeStamp: %f"), TimeStamp, ClientData->LastAckedMove->TimeStamp, ClientData->CurrentTimeStamp);
}
return;
}
ClientData->AckMove(MoveIndex, *this);
}
ClientAckMove的参数只有一个,就是PendingAdjustment的TimeStamp。Autonomous客户端收到rpc后,根据TimeStamp从SavedMoves数组里找到对应的Move,把它作为当前的LastAckedMove,然后把SavedMoves中TimeStamp之前的Move都删除,表示之前的Move都被Ack了。
void FNetworkPredictionData_Client_Character::AckMove(int32 AckedMoveIndex, UCharacterMovementComponent& CharacterMovementComponent)
{
// It is important that we know the move exists before we go deleting outdated moves.
// Timestamps are not guaranteed to be increasing order all the time, since they can be reset!
if( AckedMoveIndex != INDEX_NONE )
{
// Keep reference to LastAckedMove
const FSavedMovePtr& AckedMove = SavedMoves[AckedMoveIndex];
UE_LOG(LogNetPlayerMovement, VeryVerbose, TEXT("AckedMove Index: %2d (%2d moves). TimeStamp: %f, CurrentTimeStamp: %f"), AckedMoveIndex, SavedMoves.Num(), AckedMove->TimeStamp, CurrentTimeStamp);
if( LastAckedMove.IsValid() )
{
FreeMove(LastAckedMove);
}
LastAckedMove = AckedMove;
// Free expired moves.
for(int32 MoveIndex=0; MoveIndex<AckedMoveIndex; MoveIndex++)
{
const FSavedMovePtr& Move = SavedMoves[MoveIndex];
FreeMove(Move);
}
// And finally cull all of those, so only the unacknowledged moves remain in SavedMoves.
const bool bAllowShrinking = false;
SavedMoves.RemoveAt(0, AckedMoveIndex + 1, bAllowShrinking);
}
if (const UWorld* const World = CharacterMovementComponent.GetWorld())
{
LastReceivedAckRealTime = World->GetRealTimeSeconds();
}
}
移动指令的客户端纠正
如果服务器校验失败,则会走一些异常处理代码,这里有好几个分支,最简单的分支往客户端发送强行设置的rpc,其接口为ClientAdjustPosition,这里会带上重设的时间戳和新的位置速度等信息:
ClientAdjustPosition
(
ServerData->PendingAdjustment.TimeStamp,
ServerData->PendingAdjustment.NewLoc,
ServerData->PendingAdjustment.NewVel,
ServerData->PendingAdjustment.NewBase,
ServerData->PendingAdjustment.NewBaseBoneName,
ServerData->PendingAdjustment.NewBase != NULL,
ServerData->PendingAdjustment.bBaseRelativePosition,
PackNetworkMovementMode()
);
客户端接收到这个强制重设rpc时候,把这个时间戳之前的Move都作废,然后根据传递过来的数据执行位置速度强行设置,切换MoveMode和MoveBase等:
void UCharacterMovementComponent::ClientAdjustPosition_Implementation
(
float TimeStamp,
FVector NewLocation,
FVector NewVelocity,
UPrimitiveComponent* NewBase,
FName NewBaseBoneName,
bool bHasBase,
bool bBaseRelativePosition,
uint8 ServerMovementMode
)
{
if (!HasValidData() || !IsActive())
{
return;
}
FNetworkPredictionData_Client_Character* ClientData = GetPredictionData_Client_Character();
check(ClientData);
// Make sure the base actor exists on this client.
const bool bUnresolvedBase = bHasBase && (NewBase == NULL);
if (bUnresolvedBase)
{
if (bBaseRelativePosition)
{
UE_LOG(LogNetPlayerMovement, Warning, TEXT("ClientAdjustPosition_Implementation could not resolve the new relative movement base actor, ignoring server correction! Client currently at world location %s on base %s"),
*UpdatedComponent->GetComponentLocation().ToString(), *GetNameSafe(GetMovementBase()));
return;
}
else
{
UE_LOG(LogNetPlayerMovement, Verbose, TEXT("ClientAdjustPosition_Implementation could not resolve the new absolute movement base actor, but WILL use the position!"));
}
}
// Ack move if it has not expired.
int32 MoveIndex = ClientData->GetSavedMoveIndex(TimeStamp);
if( MoveIndex == INDEX_NONE )
{
if( ClientData->LastAckedMove.IsValid() )
{
UE_LOG(LogNetPlayerMovement, Log, TEXT("ClientAdjustPosition_Implementation could not find Move for TimeStamp: %f, LastAckedTimeStamp: %f, CurrentTimeStamp: %f"), TimeStamp, ClientData->LastAckedMove->TimeStamp, ClientData->CurrentTimeStamp);
}
return;
}
ClientData->AckMove(MoveIndex, *this);
FVector WorldShiftedNewLocation;
// Received Location is relative to dynamic base
if (bBaseRelativePosition)
{
FVector BaseLocation;
FQuat BaseRotation;
MovementBaseUtility::GetMovementBaseTransform(NewBase, NewBaseBoneName, BaseLocation, BaseRotation); // TODO: error handling if returns false
WorldShiftedNewLocation = NewLocation + BaseLocation;
}
else
{
WorldShiftedNewLocation = FRepMovement::RebaseOntoLocalOrigin(NewLocation, this);
}
// Trigger event
OnClientCorrectionReceived(*ClientData, TimeStamp, WorldShiftedNewLocation, NewVelocity, NewBase, NewBaseBoneName, bHasBase, bBaseRelativePosition, ServerMovementMode);
// Trust the server's positioning.
if (UpdatedComponent)
{
UpdatedComponent->SetWorldLocation(WorldShiftedNewLocation, false, nullptr, ETeleportType::TeleportPhysics);
}
Velocity = NewVelocity;
// Trust the server's movement mode
UPrimitiveComponent* PreviousBase = CharacterOwner->GetMovementBase();
ApplyNetworkMovementMode(ServerMovementMode);
// Set base component
UPrimitiveComponent* FinalBase = NewBase;
FName FinalBaseBoneName = NewBaseBoneName;
if (bUnresolvedBase)
{
check(NewBase == NULL);
check(!bBaseRelativePosition);
// We had an unresolved base from the server
// If walking, we'd like to continue walking if possible, to avoid falling for a frame, so try to find a base where we moved to.
if (PreviousBase && UpdatedComponent)
{
FindFloor(UpdatedComponent->GetComponentLocation(), CurrentFloor, false);
if (CurrentFloor.IsWalkableFloor())
{
FinalBase = CurrentFloor.HitResult.Component.Get();
FinalBaseBoneName = CurrentFloor.HitResult.BoneName;
}
else
{
FinalBase = nullptr;
FinalBaseBoneName = NAME_None;
}
}
}
SetBase(FinalBase, FinalBaseBoneName);
// Update floor at new location
UpdateFloorFromAdjustment();
bJustTeleported = true;
// Even if base has not changed, we need to recompute the relative offsets (since we've moved).
SaveBaseLocation();
LastUpdateLocation = UpdatedComponent ? UpdatedComponent->GetComponentLocation() : FVector::ZeroVector;
LastUpdateRotation = UpdatedComponent ? UpdatedComponent->GetComponentQuat() : FQuat::Identity;
LastUpdateVelocity = Velocity;
UpdateComponentVelocity();
ClientData->bUpdatePosition = true;
}
最后会设置一下bUpdatePosition这个字段为true,来触发后续的Move的重新模拟。在Autonomous客户端执行TickComponent时,会检查bUpdatePosition是否为true。如果是,就要重播当前SavedMoves中的所有Move,重播时这些移动不需要再发送servermove rpc了。重播结束后,玩家已经在被纠正位置的基础上把后续输入都重演了一遍,后续位置可能会和服务器算的保持一致。接着客户端继续接受输入并正常移动,可能还会收到服务器纠正位置消息,因为这些Move在重播前已经发了ServerMove,这些Rpc里Location也是错的,服务器会继续纠正,但角色后续客户端位置与服务器位置误差会逐渐变小,并最终保持一致。这里选择重播而不是直接全丢弃是为了避免出现矫正之后的大幅度拉扯,因为丢弃的话后续的Move不再模拟,会让玩家感觉到最近一段时间内的输入完全不起作用,带来了严重的卡顿感。
移动同步的广播
前面介绍的内容处理的是自主客户端发起的移动经过服务器验证之后的确认流程。对于不是自主客户端而言就不能使用前述的同步机制了,需要使用其他机制来同步运动信息。Actor自身就支持移动同步,由bReplicateMovement开关来控制:
/** Called on client when updated bReplicateMovement value is received for this actor. */
UFUNCTION()
virtual void OnRep_ReplicateMovement();
private:
/**
* If true, replicate movement/location related properties.
* Actor must also be set to replicate.
* @see SetReplicates()
* @see https://docs.unrealengine.com/latest/INT/Gameplay/Networking/Replication/
*/
UPROPERTY(ReplicatedUsing=OnRep_ReplicateMovement, Category=Replication, EditDefaultsOnly)
uint8 bReplicateMovement:1;
打开bReplicateMovement开关后,当Actor的RootComponent位置、转向等数据发生变化时,就会把数据同步给Simulate客户端。同步的数据结构为FRepMovement,当Simulate Actor收到ReplicatedMovement的更新时,RepNotify函数OnRep_ReplicatedMovement 将解压缩存储的移动数据,并相应地更新Actor的位置和速度。
USTRUCT()
struct ENGINE_API FRepMovement
{
GENERATED_BODY()
/** Velocity of component in world space */
UPROPERTY(Transient)
FVector LinearVelocity;
/** Velocity of rotation for component */
UPROPERTY(Transient)
FVector AngularVelocity;
/** Location in world space */
UPROPERTY(Transient)
FVector Location;
/** Current rotation */
UPROPERTY(Transient)
FRotator Rotation;
/** If set, RootComponent should be sleeping. */
UPROPERTY(Transient)
uint8 bSimulatedPhysicSleep : 1;
/** If set, additional physic data (angular velocity) will be replicated. */
UPROPERTY(Transient)
uint8 bRepPhysics : 1;
/** Allows tuning the compression level for the replicated location vector. You should only need to change this from the default if you see visual artifacts. */
UPROPERTY(EditDefaultsOnly, Category=Replication, AdvancedDisplay)
EVectorQuantization LocationQuantizationLevel;
/** Allows tuning the compression level for the replicated velocity vectors. You should only need to change this from the default if you see visual artifacts. */
UPROPERTY(EditDefaultsOnly, Category=Replication, AdvancedDisplay)
EVectorQuantization VelocityQuantizationLevel;
/** Allows tuning the compression level for replicated rotation. You should only need to change this from the default if you see visual artifacts. */
UPROPERTY(EditDefaultsOnly, Category=Replication, AdvancedDisplay)
ERotatorQuantization RotationQuantizationLevel;
bool NetSerialize(FArchive& Ar, class UPackageMap* Map, bool& bOutSuccess);
};
/** Used for replication of our RootComponent's position and velocity */
UPROPERTY(EditDefaultsOnly, ReplicatedUsing=OnRep_ReplicatedMovement, Category=Replication, AdvancedDisplay)
struct FRepMovement ReplicatedMovement;
这个结构体在AActor::GatherCurrentMovement()函数中被填充,填充时机则在每次Actor::PreReplication中,即每次Netderiver::Tick触发Actor的同步时。
这里的FRepMovement为了减少同步时的流量消耗,自己实现了一下NetSerialize这个网络数据打包函数,这个函数的重点就在于FRepMovement::NetSerialize对于FVector使用了一个有损的流量压缩方案SerializeQuantizedVector,来编码其中的位置、速度、角速度这四个字段,然后对于朝向字段则使用了以前介绍的数据压缩方法。
bool SerializeQuantizedVector(FArchive& Ar, FVector& Vector, EVectorQuantization QuantizationLevel)
{
// Since FRepMovement used to use FVector_NetQuantize100, we're allowing enough bits per component
// regardless of the quantization level so that we can still support at least the same maximum magnitude
// (2^30 / 100, or ~10 million).
// This uses no inherent extra bandwidth since we're still using the same number of bits to store the
// bits-per-component value. Of course, larger magnitudes will still use more bandwidth,
// as has always been the case.
switch(QuantizationLevel)
{
case EVectorQuantization::RoundTwoDecimals:
{
return SerializePackedVector<100, 30>(Vector, Ar);
}
case EVectorQuantization::RoundOneDecimal:
{
return SerializePackedVector<10, 27>(Vector, Ar);
}
default:
{
return SerializePackedVector<1, 24>(Vector, Ar);
}
}
}
bool NetSerialize(FArchive& Ar, class UPackageMap* Map, bool& bOutSuccess)
{
// pack bitfield with flags
uint8 Flags = (bSimulatedPhysicSleep << 0) | (bRepPhysics << 1);
Ar.SerializeBits(&Flags, 2);
bSimulatedPhysicSleep = ( Flags & ( 1 << 0 ) ) ? 1 : 0;
bRepPhysics = ( Flags & ( 1 << 1 ) ) ? 1 : 0;
bOutSuccess = true;
// update location, rotation, linear velocity
bOutSuccess &= SerializeQuantizedVector( Ar, Location, LocationQuantizationLevel );
switch(RotationQuantizationLevel)
{
case ERotatorQuantization::ByteComponents:
{
Rotation.SerializeCompressed( Ar );
break;
}
case ERotatorQuantization::ShortComponents:
{
Rotation.SerializeCompressedShort( Ar );
break;
}
}
bOutSuccess &= SerializeQuantizedVector( Ar, LinearVelocity, VelocityQuantizationLevel );
// update angular velocity if required
if ( bRepPhysics )
{
bOutSuccess &= SerializeQuantizedVector( Ar, AngularVelocity, VelocityQuantizationLevel );
}
return true;
}
这里的SerializePackedVector是一个模板函数,将FVector转换为Bit表示,其转化流程如下:
FVector乘以ScaleFactor,进行放大- 把
float转换成int - 计算表示
(x,y,z)三个分量int绝对值+1(正数)所需最大位数,记为Bits,在MaxBitsPerComponent处截断 - 计算偏移
Bias=1<<(Bits+1),然后把三个int都加上Bias,这是为了把负数都变成正数传输,这样才能用自适应Bit流 - 计算上限
Max=1<<(Bits+2),并用Max-1对int数值进行截断 - 先向数据流写入
Bits,表示后续数字的最大位数,再依次写入三个int值,每个int值要求所用bit位数相同,不满的用0填充,完成序列化
移动同步的插值平滑
当这个数据同步下来之后,对应的属性同步回调会调用到下面的函数:
void ACharacter::PostNetReceiveLocationAndRotation()
{
if(GetLocalRole() == ROLE_SimulatedProxy)
{
// Don't change transform if using relative position (it should be nearly the same anyway, or base may be slightly out of sync)
if (!ReplicatedBasedMovement.HasRelativeLocation())
{
const FRepMovement& ConstRepMovement = GetReplicatedMovement();
const FVector OldLocation = GetActorLocation();
const FVector NewLocation = FRepMovement::RebaseOntoLocalOrigin(ConstRepMovement.Location, this);
const FQuat OldRotation = GetActorQuat();
CharacterMovement->bNetworkSmoothingComplete = false;
CharacterMovement->bJustTeleported |= (OldLocation != NewLocation);
CharacterMovement->SmoothCorrection(OldLocation, OldRotation, NewLocation, ConstRepMovement.Rotation.Quaternion());
OnUpdateSimulatedPosition(OldLocation, OldRotation);
}
CharacterMovement->bNetworkUpdateReceived = true;
}
}
Character主要有两个组件,Capsule和Mesh,Capsule是Character的RootComponent,用于处理碰撞,它的位置代表了Character当前的位置,但它是看不见的。Mesh用于角色模型的显示,玩家能看到的是Mesh。如果我们直接使用同步下来的FRepMovement强制设置Capsule位置后再同样的设置Mesh的位置,这么做可以实现简单的Mesh位置同步。但由于移动同步走的是属性同步的方案,其很容易受属性同步Actor的流量控制策略影响,导致同步的间隔时间不确定。因此当Actor执行一段连续的移动,Simulate Actor位置可能会发生间歇性闪现。此外本地机器的渲染速率比网络发送数据速率更快,客户端可能以240 Hz刷新率渲染显示器来显示Mesh,而复制的移动可能仅以30 Hz发送。当渲染帧率远大于位置同步帧率是也会有明显的不流畅体验。因此客户端需要对Simulate Actor的Mesh位置做一些平滑处理,让Simulate角色移动在与服务器一致的情况下,尽量显得平滑自然。
上面这段代码中的SmoothCorrection函数负责执行一些位置平滑的参数设置。
float NetworkMaxSmoothUpdateDistance = 256.f;
float NetworkNoSmoothUpdateDistance = 384.f;
// The mesh doesn't move, but the capsule does so we have a new offset.
FVector NewToOldVector = (OldLocation - NewLocation);
if (bIsNavWalkingOnServer && FMath::Abs(NewToOldVector.Z) < NavWalkingFloorDistTolerance)
{
// ignore smoothing on Z axis
// don't modify new location (local simulation result), since it's probably more accurate than server data
// and shouldn't matter as long as difference is relatively small
NewToOldVector.Z = 0;
}
const float DistSq = NewToOldVector.SizeSquared();
if (DistSq > FMath::Square(ClientData->MaxSmoothNetUpdateDist))
{
ClientData->MeshTranslationOffset = (DistSq > FMath::Square(ClientData->NoSmoothNetUpdateDist))
? FVector::ZeroVector
: ClientData->MeshTranslationOffset + ClientData->MaxSmoothNetUpdateDist * NewToOldVector.GetSafeNormal();
}
else
{
ClientData->MeshTranslationOffset = ClientData->MeshTranslationOffset + NewToOldVector;
}
UE_LOG(LogCharacterNetSmoothing, Verbose, TEXT("Proxy %s SmoothCorrection(%.2f)"), *GetNameSafe(CharacterOwner), FMath::Sqrt(DistSq));
服务器同步下来Actor位置与本地Actor位置极大概率是不同的,把它们间距离记为NewToOldVector。然后Simulate客户端维护了一个MeshTranslationOffset向量,表示当前Simulate上Mesh位置与服务器同步Capsule位置的相对差异,会把NewToOldVector累加上去,之后平滑处理的目的就是让这个值逐渐变小。如果NewToOldVector太大,超过了平滑失效距离ClientData->MaxSmoothNetUpdateDist=NetworkNoSmoothUpdateDistance,就把MeshTranslationOffset归零,表示这次不做平滑了,Mesh直接设置到新的位置,尽快与服务器位置同步。
然后再根据平滑模式来做后续的操作。UE中支持了多种平滑模式:
/** Smoothing approach used by network interpolation for Characters. */
UENUM(BlueprintType)
enum class ENetworkSmoothingMode : uint8
{
/** No smoothing, only change position as network position updates are received. */
Disabled UMETA(DisplayName="Disabled"),
/** Linear interpolation from source to target. */
Linear UMETA(DisplayName="Linear"),
/** Exponential. Faster as you are further from target. */
Exponential UMETA(DisplayName="Exponential"),
/** Special linear interpolation designed specifically for replays. Not intended as a selectable mode in-editor. */
Replay UMETA(Hidden, DisplayName="Replay"),
};
Replay只有在录像回放时使用,所以起作用的只有线性平滑和指数平滑:
- 对于
Linear平滑,会记录下当前本地rotation和服务器新同步的rotation,之后会在它们之间做插值处理。然后把Capsule位置更新到新同步位置,mesh不动。 - 对于
Expontial平滑,会记录下rotation的变化差异,然后把Capsule位置和rotation都更新到新同步的,mesh也不动
这里我们只展示线性平滑部分的逻辑,设置当前Capsule的位置,注意此时不会改变Capsule的朝向,同时也不会改变Mesh的位置
if (NetworkSmoothingMode == ENetworkSmoothingMode::Linear)
{
ClientData->OriginalMeshTranslationOffset = ClientData->MeshTranslationOffset;
// Remember the current and target rotation, we're going to lerp between them
ClientData->OriginalMeshRotationOffset = OldRotation;
ClientData->MeshRotationOffset = OldRotation;
ClientData->MeshRotationTarget = NewRotation;
// Move the capsule, but not the mesh.
// Note: we don't change rotation, we lerp towards it in SmoothClientPosition.
if (NewLocation != OldLocation)
{
const FScopedPreventAttachedComponentMove PreventMeshMove(CharacterOwner->GetMesh());
UpdatedComponent->SetWorldLocation(NewLocation, false, nullptr, GetTeleportType());
}
}
然后在设置一些平滑处理相关的时间戳:
//////////////////////////////////////////////////////////////////////////
// Update smoothing timestamps
// If running ahead, pull back slightly. This will cause the next delta to seem slightly longer, and cause us to lerp to it slightly slower.
if (ClientData->SmoothingClientTimeStamp > ClientData->SmoothingServerTimeStamp)
{
const double OldClientTimeStamp = ClientData->SmoothingClientTimeStamp;
ClientData->SmoothingClientTimeStamp = FMath::LerpStable(ClientData->SmoothingServerTimeStamp, OldClientTimeStamp, 0.5);
UE_LOG(LogCharacterNetSmoothing, VeryVerbose, TEXT("SmoothCorrection: Pull back client from ClientTimeStamp: %.6f to %.6f, ServerTimeStamp: %.6f for %s"),
OldClientTimeStamp, ClientData->SmoothingClientTimeStamp, ClientData->SmoothingServerTimeStamp, *GetNameSafe(CharacterOwner));
}
// Using server timestamp lets us know how much time actually elapsed, regardless of packet lag variance.
double OldServerTimeStamp = ClientData->SmoothingServerTimeStamp;
if (bIsSimulatedProxy)
{
// This value is normally only updated on the server, however some code paths might try to read it instead of the replicated value so copy it for proxies as well.
ServerLastTransformUpdateTimeStamp = CharacterOwner->GetReplicatedServerLastTransformUpdateTimeStamp();
}
ClientData->SmoothingServerTimeStamp = ServerLastTransformUpdateTimeStamp;
// Initial update has no delta.
if (ClientData->LastCorrectionTime == 0)
{
ClientData->SmoothingClientTimeStamp = ClientData->SmoothingServerTimeStamp;
OldServerTimeStamp = ClientData->SmoothingServerTimeStamp;
}
// Don't let the client fall too far behind or run ahead of new server time.
const double ServerDeltaTime = ClientData->SmoothingServerTimeStamp - OldServerTimeStamp;
const double MaxOffset = ClientData->MaxClientSmoothingDeltaTime;
const double MinOffset = FMath::Min(double(ClientData->SmoothNetUpdateTime), MaxOffset);
// MaxDelta is the farthest behind we're allowed to be after receiving a new server time.
const double MaxDelta = FMath::Clamp(ServerDeltaTime * 1.25, MinOffset, MaxOffset);
ClientData->SmoothingClientTimeStamp = FMath::Clamp(ClientData->SmoothingClientTimeStamp, ClientData->SmoothingServerTimeStamp - MaxDelta, ClientData->SmoothingServerTimeStamp);
// Compute actual delta between new server timestamp and client simulation.
ClientData->LastCorrectionDelta = ClientData->SmoothingServerTimeStamp - ClientData->SmoothingClientTimeStamp;
ClientData->LastCorrectionTime = MyWorld->GetTimeSeconds();
UE_LOG(LogCharacterNetSmoothing, VeryVerbose, TEXT("SmoothCorrection: WorldTime: %.6f, ServerTimeStamp: %.6f, ClientTimeStamp: %.6f, Delta: %.6f for %s"),
MyWorld->GetTimeSeconds(), ClientData->SmoothingServerTimeStamp, ClientData->SmoothingClientTimeStamp, ClientData->LastCorrectionDelta, *GetNameSafe(CharacterOwner));
这部分的逻辑在校正时间戳,通过SmoothingServerTimeStamp和SmoothingClientTimeStamp,计算时间轴的差值。然后对SmoothingClientTimeStamp做校正,使得超前或落后都在指定范围内:
- 当
client超前时,将client时间戳修正为两个时间戳的中间值。结果就是把时间轴向过去拉了一点,表现是后续几帧移动会变慢,因为客户端与服务端之间的时间戳差值变大了。 - 当
client落后太多,则将client时间戳修正为离server时间戳差值小于MaxDelta的值,相当于缩短了时间差,表现上后续几帧移动会加快。
调整完时间戳之后这个SmoothCorrection的逻辑就结束了,看上去这段代码并没有真正的处理位置平滑的部分,其实平滑的逻辑实际上在Tick中执行的。当UCharacterMovementComponent在模拟代理上运行TickComponent时,将调用SimulatedTick来处理模拟平滑移动的逻辑。Simulate客户端收到的移动数据,相比移动刚发生时,理论上位置已经延迟了一个RTT,收到即落后。如果在此基础上进行平滑移动,平滑目标相对于服务器最新位置又落后了一个平滑周期的时间。为了使Simulate客户端上角色更接近游戏实时状态,对于不是由RootMotion控制的移动,会调用SimulateMovement函数来执行移动预测。SimulateMovement会以服务端同步的最新速度进行一个非常简单的移动预测,以获取当前时间戳下这个角色在服务器的大概位置:
if (CharacterOwner->IsReplicatingMovement() && UpdatedComponent)
{
USkeletalMeshComponent* Mesh = CharacterOwner->GetMesh();
const FVector SavedMeshRelativeLocation = Mesh ? Mesh->GetRelativeLocation() : FVector::ZeroVector;
const FQuat SavedCapsuleRotation = UpdatedComponent->GetComponentQuat();
const bool bPreventMeshMovement = !bNetworkSmoothingComplete;
// Avoid moving the mesh during movement if SmoothClientPosition will take care of it.
{
const FScopedPreventAttachedComponentMove PreventMeshMovement(bPreventMeshMovement ? Mesh : nullptr);
if (CharacterOwner->IsMatineeControlled() || CharacterOwner->IsPlayingRootMotion())
{
PerformMovement(DeltaSeconds);
}
else
{
SimulateMovement(DeltaSeconds);
}
}
// With Linear smoothing we need to know if the rotation changes, since the mesh should follow along with that (if it was prevented above).
// This should be rare that rotation changes during simulation, but it can happen when ShouldRemainVertical() changes, or standing on a moving base.
const bool bValidateRotation = bPreventMeshMovement && (NetworkSmoothingMode == ENetworkSmoothingMode::Linear);
if (bValidateRotation && UpdatedComponent)
{
// Same mesh with different rotation?
const FQuat NewCapsuleRotation = UpdatedComponent->GetComponentQuat();
if (Mesh == CharacterOwner->GetMesh() && !NewCapsuleRotation.Equals(SavedCapsuleRotation, 1e-6f) && ClientPredictionData)
{
// Smoothing should lerp toward this new rotation target, otherwise it will just try to go back toward the old rotation.
ClientPredictionData->MeshRotationTarget = NewCapsuleRotation;
Mesh->SetRelativeLocationAndRotation(SavedMeshRelativeLocation, CharacterOwner->GetBaseRotationOffset());
}
}
}
SimulateMovement结束之后,再使用SmoothClientPosition执行最终的Mesh位置平滑:
// Smooth mesh location after moving the capsule above.
if (!bNetworkSmoothingComplete)
{
SCOPE_CYCLE_COUNTER(STAT_CharacterMovementSmoothClientPosition);
SmoothClientPosition(DeltaSeconds);
}
else
{
UE_LOG(LogCharacterNetSmoothing, Verbose, TEXT("Skipping network smoothing for %s."), *GetNameSafe(CharacterOwner));
}
SmoothClientPosition将插值平滑功能转发到SmoothClientPosition_Interpolate去执行,这个SmoothClientPosition_Interpolate内部根据NetworkSmoothingMode的值来采取不同的平滑策略,这里我们只考虑线性插值的情况:
const UWorld* MyWorld = GetWorld();
// Increment client position.
ClientData->SmoothingClientTimeStamp += DeltaSeconds;
float LerpPercent = 0.f;
const float LerpLimit = 1.15f;
const float TargetDelta = ClientData->LastCorrectionDelta;
if (TargetDelta > SMALL_NUMBER)
{
// Don't let the client get too far ahead (happens on spikes). But we do want a buffer for variable network conditions.
const float MaxClientTimeAheadPercent = 0.15f;
const float MaxTimeAhead = TargetDelta * MaxClientTimeAheadPercent;
ClientData->SmoothingClientTimeStamp = FMath::Min<float>(ClientData->SmoothingClientTimeStamp, ClientData->SmoothingServerTimeStamp + MaxTimeAhead);
// Compute interpolation alpha based on our client position within the server delta. We should take TargetDelta seconds to reach alpha of 1.
const float RemainingTime = ClientData->SmoothingServerTimeStamp - ClientData->SmoothingClientTimeStamp;
const float CurrentSmoothTime = TargetDelta - RemainingTime;
LerpPercent = FMath::Clamp(CurrentSmoothTime / TargetDelta, 0.0f, LerpLimit);
UE_LOG(LogCharacterNetSmoothing, VeryVerbose, TEXT("Interpolate: WorldTime: %.6f, ServerTimeStamp: %.6f, ClientTimeStamp: %.6f, Elapsed: %.6f, Alpha: %.6f for %s"),
MyWorld->GetTimeSeconds(), ClientData->SmoothingServerTimeStamp, ClientData->SmoothingClientTimeStamp, CurrentSmoothTime, LerpPercent, *GetNameSafe(CharacterOwner));
}
else
{
LerpPercent = 1.0f;
}
插值的的核心就是计算出LerpPercent,即插值百分比。最简单的计算方法就是SmoothingClientTimeStamp/SmoothingServerTimeStamp,计算前需要对SmoothingClientTimeStamp加上当前的DeltaTime。但是加完这个DeltaTime之后SmoothingClientTimeStamp可能会超过SmoothingServerTimeStamp,所以这里又有一个机制来限制超过的值不能大于MaxTimeAhead,避免过于超前导致后续出现强制位置矫正。
在获取了LerpPercent之后,开始执行真正的Mesh的位置、朝向插值:
if (LerpPercent >= 1.0f - KINDA_SMALL_NUMBER)
{
if (Velocity.IsNearlyZero())
{
ClientData->MeshTranslationOffset = FVector::ZeroVector;
ClientData->SmoothingClientTimeStamp = ClientData->SmoothingServerTimeStamp;
bNetworkSmoothingComplete = true;
}
else
{
// Allow limited forward prediction.
ClientData->MeshTranslationOffset = FMath::LerpStable(ClientData->OriginalMeshTranslationOffset, FVector::ZeroVector, LerpPercent);
bNetworkSmoothingComplete = (LerpPercent >= LerpLimit);
}
ClientData->MeshRotationOffset = ClientData->MeshRotationTarget;
}
else
{
ClientData->MeshTranslationOffset = FMath::LerpStable(ClientData->OriginalMeshTranslationOffset, FVector::ZeroVector, LerpPercent);
ClientData->MeshRotationOffset = FQuat::FastLerp(ClientData->OriginalMeshRotationOffset, ClientData->MeshRotationTarget, LerpPercent).GetNormalized();
}
这里插值算出来的都是Offset,最后需要算出真正的位置与朝向出来,不仅设置了Mesh的位置与朝向,还同时设置了Capsule的朝向。:
void UCharacterMovementComponent::SmoothClientPosition_UpdateVisuals()
{
SCOPE_CYCLE_COUNTER(STAT_CharacterMovementSmoothClientPosition_Visual);
FNetworkPredictionData_Client_Character* ClientData = GetPredictionData_Client_Character();
USkeletalMeshComponent* Mesh = CharacterOwner->GetMesh();
if (ClientData && Mesh && !Mesh->IsSimulatingPhysics())
{
if (NetworkSmoothingMode == ENetworkSmoothingMode::Linear)
{
// Adjust capsule rotation and mesh location. Optimized to trigger only one transform chain update.
// If we know the rotation is changing that will update children, so it's sufficient to set RelativeLocation directly on the mesh.
const FVector NewRelLocation = ClientData->MeshRotationOffset.UnrotateVector(ClientData->MeshTranslationOffset) + CharacterOwner->GetBaseTranslationOffset();
if (!UpdatedComponent->GetComponentQuat().Equals(ClientData->MeshRotationOffset, 1e-6f))
{
const FVector OldLocation = Mesh->GetRelativeLocation();
const FRotator OldRotation = UpdatedComponent->GetRelativeRotation();
Mesh->SetRelativeLocation_Direct(NewRelLocation);
UpdatedComponent->SetWorldRotation(ClientData->MeshRotationOffset);
// If we did not move from SetWorldRotation, we need to at least call SetRelativeLocation since we were relying on the UpdatedComponent to update the transform of the mesh
if (UpdatedComponent->GetRelativeRotation() == OldRotation)
{
Mesh->SetRelativeLocation_Direct(OldLocation);
Mesh->SetRelativeLocation(NewRelLocation, false, nullptr, GetTeleportType());
}
}
else
{
Mesh->SetRelativeLocation(NewRelLocation, false, nullptr, GetTeleportType());
}
}
}
}
这里有个优化,即朝向变化不大时只处理位置改变,可以看出FastPath相对于另外一个分支节省了好几次函数调用。
属性同步
属性同步介绍
在游戏中,角色的属性其实就是我们常说的存档,他包含了描述一个角色自身的完整数据,例如名称、等级、血量、伤害计算相关数据、buff数据、技能数据、装备包裹数据、任务包裹数据、代币数据、交易数据等,统一以一个玩家一个document的形式存储在数据库里。一个角色的数据除了自身数据之外,还包括与其他玩家之间的关联数据,如好友、群组、聊天、帮派、队伍等,这些数据一般都是单独存库,不放在玩家身上,以避免多份数据之间的不一致问题。这些关联数据,有些时候是提供rpc形式提供客户端的读取接口,有些时候通过按需延迟初始化的属性挂载到玩家属性身上。
属性同步则是将角色属性最新的推送到所有能看到这个角色的客户端的机制,类似于Unreal的Replication,它包括两个部分:
- 角色
A进入角色B的客户端视野之后,服务端需要将A的所有对B可见的数据打包发送给B, 这样B的客户端即可根据这份数据将玩家A渲染出来, - 角色
B视野内的角色A的特定属性改变之后,如果这个属性A对B可见,则服务端需要将这个最新数据推送到B的客户端。例如A的名字改变之后,我们将nickname属性的最新值打包推送到B,B收到之后修改本地客户端里A玩家的billboard,显示最新的名字。
属性结构
一个属性的值可以分为如下四种类型:
- 基础值类型 如
int,string,float,bool - 数组值类型,
vector<T>,这里的T也是一个属性, - 字典值类型,
Map<K, V>, 这里的k只能是int或者string,V也是一个属性,这个map形式在属性里常常作为背包使用。 - 结构体类型,相当于一组功能相关的属性的集合,例如名字、等级、门派这三个属性一般在同一个结构体下,用来打包同步。
下面是一些属性值类型定义的例子:
struct base_info
{
string id;// 玩家id
uint32_t level,
string nickname;
uint32_t school;
}
struct buff_item
{
float expire_ts;//buff失效时间
uint32_t no;//buff编号
uint32_t level;//buff等级
uint32_t layer;//buff层数
}
using buff_data = unordered_map<uint32_t, buff_item>;//所有buff的背包
struct login_item
{
float login_ts;//登录时间
float logout_ts;//登出时间
}
using login_data = vector<login_item>;//记录玩家所有登录登出的时间
struct property
{
base_info base;
buff_data buffs;
login_data login_record;
}
属性定义里面,除了他的值类型之外,还会包括另外的两个信息,同步类型和生命周期:
-
属性的同步类型,即这个属性的值对于哪些客户端可见,可选的有三种
- 只存储在服务端 不对客户端进行同步
- 只对主角自己控制的客户端进行同步
- 对所有能看到自己的客户端进行同步
-
属性的生命周期,即这个属性是否需要存库,可选的值有四种:
- 只在当前场景内生效,不存库,每次切换场景时设置为默认值
- 只在当前进程内生效,不存库,每次切换进程时设置为默认值
- 只在当前登陆session期间生效,不存库,每次重新登陆时设置为默认值
- 存库,每次玩家上线时都需要从数据库中的属性记录里拉取上次存库记录,并根据这个存库记录去初始化
综上,一个属性字段的定义,总共包括四个部分:属性名、属性值类型、属性同步类型、属性生命周期。后面的两个信息,既可以通过类继承的方式去实现,也可以通过前述的libclang工具所使用的__annotate_attribute__标注形式去实现。为了简化讨论属性同步,我们这里将忽略这两个额外信息,不去考虑存库相关和aoi内广播的细节,只抽象为一个广播队列,对于值的推送都简化为往队列末尾加数据。同时对于属性数据的全量打包和解析相关也不讨论,因为这个就是一个对象的encode和decode的问题,在之前的关于RPC的数据序列化中已经解决了。所以本章所介绍的属性同步其实就是一个属性修改同步。对于这个属性修改同步,我们分别根据属性的值类型来循序渐进的来讨论同步方案。
简单值属性的访问控制
为了提供对属性的修改同步和增量存库功能,我们首先需要hook住对这个属性的修改操作,即为这个属性增加setter方法。如果数量不多的话,我们可以通过匿名结构体来实现:
struct Foo
{
class {
int value;
public:
int & operator = (const int &i) { return value = i; }
operator int () const { return value; }
} alpha;
class {
float value;
public:
float & operator = (const float &f) { return value = f; }
operator float () const { return value; }
} bravo;
};
这个匿名结构体内部重载了赋值函数和类型转换函数,对外的表现与原始类型一致。除了需要手写之外没有任何缺点,不过这一点也可以用宏来搞定。
但是很多时候,我们对于属性的getter/setter方法并不是简单的赋值而已,还有很多定制化的操作。这些操作函数一般都写在类定义里面,用来获取类里面的其他变量,此时上面的匿名类就行不通了,因为他无法访问所属类的其他变量。
对于msvc来说,这个功能已经有相应的扩展__declspec(property):
// declspec_property.cpp
struct S {
int i;
void putprop(int j) {
i = j;
}
int getprop() {
return i;
}
__declspec(property(get = getprop, put = putprop)) int the_prop;
};
int main() {
S s;
s.the_prop = 5;
return s.the_prop;
}
作为功能兼容的集大成者,clang也支持这个用法,但是gcc就崩了。为了维持全平台可用这个崇高的c++愿景,我们又不得不求助于宏。
#define PROPERTY_GEN(Class, Type, Name, GetMethod, SetMethod) \
class Property_##Name { \
public: \
Property_##Name(Class* parent) : _parent(parent) { } \
Type operator = (Type value) \
{ \
_parent->SetMethod(value); \
return _parent->GetMethod(); \
} \
operator Type() const \
{ \
return static_cast<const Class*>(_parent)->GetMethod(); \
} \
Property_##Name& operator =(const Property_##Name& other) \
{ \
operator=(other._parent->GetMethod()); return *this; \
}; \
Property_##Name(const Property_##Name& other) = delete; \
private: \
Class* _parent; \
} Name { this };
// PROPERTY - Declares a property with the default getter/setter method names.
#define PROPERTY(Class, Type, Name) \
PROPERTY_GEN(Class, Type, Name, get_##Name, set_##Name)
class SomeClass
{
public:
PROPERTY(SomeClass, int, Value)
int get_Value() const { return _value; }
void set_Value(int value) { _value = value; }
private:
int _value = 0;
};
int main()
{
SomeClass s, c;
s.Value = 5;
c.Value = 3 * s.Value;
s.Value = c.Value;
}
这个宏也定义了一个类型来封装一个属性的getter/setter,比之前的匿名类的优势就是他能传入已经定义好的类函数,这样逻辑就更紧凑了。
modern c++的使用者们对于宏是深恶痛绝,本着能用模板就不用宏的原则,我们这里也提供一个模板的实现:
template<typename C, typename T, T (C::*getter)(), void (C::*setter)(const T&)>
struct Property
{
C *instance;
Property(C *instance)
: instance(instance)
{
}
operator T () const
{
return (instance->*getter)();
}
Property& operator=(const T& value)
{
(instance->*setter)(value);
return *this;
}
template<typename C2, typename T2,
T2 (C2::*getter2)(), void (C2::*setter2)(const T2&)>
Property& operator=(const Property<C2, T2, getter2, setter2>& other)
{
return *this = (other.instance->*getter2)();
}
Property& operator=(const Property& other)
{
return *this = (other.instance->*getter)();
}
};
struct Foo
{
int x_, y_;
void setX(const int& x) { x_ = x; std::cout << "x new value is " << x << "\n"; }
int getX() { std::cout << "reading x_\n"; return x_; }
void setY(const int& y) { y_ = y; std::cout << "y new value is " << y << "\n"; }
int getY() { std::cout << "reading y_\n"; return y_; }
Property<Foo, int, &Foo::getX, &Foo::setX> x;
Property<Foo, int, &Foo::getY, &Foo::setY> y;
Foo(int x0, int y0)
: x_(x0), y_(y0), x(this), y(this)
{
}
};
简单值属性的修改同步
在上面我们实现了属性的访问控制之后,下一个需要考虑的问题就是如果把属性修改的信息通知给客户端。这个过程包括三个步骤:
- 把修改信息以特定格式进行打包,
- 将打包后的信息发送给客户端
- 客户端解析数据,进行修改回放,从而实现数据一致
第二步我们可以直接忽略,因为这部分已经在前面的
RPC章节中介绍过了。所以我们需要处理的问题就是如何在服务端构造属性修改队列msg_queue和如何在客户端回放msg_queue,这里我们复用上面的Foo。
struct Foo
{
int x_, y_;
void setX(const int& x) { x_ = x; std::cout << "x new value is " << x << "\n"; }
int getX() { std::cout << "reading x_\n"; return x_; }
void setY(const int& y) { y_ = y; std::cout << "y new value is " << y << "\n"; }
int getY() { std::cout << "reading y_\n"; return y_; }
Property<Foo, int, &Foo::getX, &Foo::setX> x;
Property<Foo, int, &Foo::getY, &Foo::setY> y;
Foo(int x0, int y0)
: x_(x0), y_(y0), x(this), y(this)
{
}
};
首先需要做改动的是两个set函数,不能返回void,而要返回这次修改的信息。这个信息包括两个部分:修改的变量名字和新的值:
pair<string, json> setX(const int& x)
{
x_ = x;
return make_pair("x", encode(x));
}
pair<string, json> setY(const int& y)
{
y_ = y;
return make_pair("y", encode(y));
}
但是业务逻辑并不关心这个修改信息的打包然后自动广播的过程,所以我们需要在类里面定义一个msg_queue来存储这些修改信息:
queue<pair<string, json>> _cmds;
void setX(const int& x)
{
x_ = x;
_cmds.emplace_back("x", x);
}
void setY(const int& y)
{
y_ = y;
_cmds.emplace_back("y", y);
}
在这个msg_queue数据发送到客户端之后,我们提供一个replay函数来回放相关修改:
bool replay(pair<string, json> one_cmd)
{
const auto& [key, value] = one_cmd;
if(key == "x")
{
int temp_v;
if(!decode(value, temp_v))
{
return false;
}
_x = temp_v;
return true;
}
else if(key == "y")
{
int temp_v;
if(!decode(value, temp_v))
{
return false;
}
_x = temp_v;
return true;
}
else
{
return false;
}
}
基于字符串的比较其实是一个比较耗时的操作,如果我们可以将每个变量与int做一个映射,则可以调用switch case的形式来做查询优化:
static int index_for_x = 0;
static int index_for_y = 1;
queue<pair<int, json>> _cmds;
void setX(const int& x)
{
x_ = x;
_cmds.emplace_back(index_for_x, x);
}
void setY(const int& y)
{
y_ = y;
_cmds.emplace_back(index_for_y, y);
}
bool replay(pair<int, json> one_cmd)
{
const auto& [key, value] = one_cmd;
switch(key)
{
case index_for_x:
{
int temp_v;
if(!decode(value, temp_v))
{
return false;
}
_x = temp_v;
return true;
}
case index_for_y:
{
int temp_v;
if(!decode(value, temp_v))
{
return false;
}
_y = temp_v;
return true;
}
default:
return false;
}
}
从上面的代码可以观察出这段代码其实重复程度很高,非常适合自动代码生成,可以利用我们的meta库来生成这些重复代码。
至此只有一层深度的简单变量的修改同步已经解决了。
简单容器属性的修改同步
这里的简单容器属性包括vector和map,这两个容器在之前的简单值属性增加了部分更新的接口。部分更新的时候我们只需要将改变的部分同步下去即可,没有必要做完整容器的全量同步。所以我们需要在打包信息里面增加一个字段,代表属性改变方式,然后打包的value里面就只需要加改变的部分就可以了。
enum mutate_cmd
{
clear = 0,
set,
vector_push,
vector_pop,
vector_mutate_item,
vector_del_item,
map_insert,
map_pop,
}
queue<tuple<int, mutate_cmd, json>> _cmds;
int _x;
vector<int> _y;
unordere_map<int, int> _z;
int index_for_x = 0;
int index_for_y = 1;
int index_for_z = 2;
void set_x(const int& x)
{
_x = x;
_cmds.emplace_back(mutate_cmd::set, index_for_x, encode(x));
}
void push_y(const int& y)
{
_y.push_back(y);
_cmds.emplace_back(mutate_cmd::vector_push, index_for_y, encode(y));
}
void pop_y()
{
// something
}
void set_y(const vector<int>& value)
{
// something
}
void clear_y()
{
//something
}
void insert_z(const int& k, const int& v)
{
_z[k] = v;
_cmd.emplace_back(mutate_cmd::map_insert, index_for_z, encode_multi(k, v));
}
void pop_z(const int& key)
{
//something
}
void set_z(const unordered_map<int, int>& value)
{
//something
}
void clear_z()
{
//something
}
根据上述修改属性的接口,对应的replay函数定义见下:
bool replay(const tuple<int, mutate_cmd, json>& one_cmd)
{
const auto& [index, cmd, value] = one_cmd;
switch(index)
{
case index_for_x:
{
switch(cmd)
{
case mutate_cmd::set:
{
int temp_v;
if(decode(value, temp_v))
{
_x = temp_v;
return true;
}
else
{
return false;
}
}
default
{
return false;
}
}
}
case index_for_y:
{
case mutate_cmd::vector_push:
{
int temp_v;
if(decode(value, temp_v))
{
_y.push_back(temp_v);
return true;
}
else
{
return false;
}
}
default
{
return false;
}
}
case index_for_z:
{
//some code for z
}
default:
return false;
}
}
上述代码基本实现了容器属性的修改同步骨架,更多的类似容器和接口只需要照着这个骨架扩充即可。但是上述简单实现有一个代码膨胀的问题,对于每个容器属性成员,我们都会生成所有的基本一样的接口函数。虽然有自动化代码生成工具来避免人工复制带来的错误,但是对于编译时间和执行文件大小来说,这种代码膨胀是不可忍受的。
构造proxy对象实现属性同步
为此解决代码膨胀的问题,我们修改了一下getter/setter/replay的实现方式,返回一个代理对象,来处理修改同步的问题:
template <typename T, typename B = void>
class prop_proxy;
template <typename T>
class prop_proxy<T, std::enable_if_t<
std::is_pod_v<T> || std::is_same_v<T, std::string>, void>
>
{
public:
prop_proxy(T& _in_data,
msg_queue_base& _in_msg_queue,
const var_idx_type& in_offset):
_data(_in_data),
_msg_queue(_in_msg_queue),
_offset(in_offset)
{
}
T& get_proxy_data()
{
return _data;
}
operator const T&() const
{
return _data;
}
void set(const T& _in_data)
{
_data = _in_data;
if (_notify_kind != notify_kind::no_notify)
{
_msg_queue.add(_offset,
var_mutate_cmd::set, encode(_data));
}
}
void clear()
{
_data = {};
if (_notify_kind != notify_kind::no_notify)
{
_msg_queue.add(_offset,
var_mutate_cmd::clear, json());
}
}
bool replay(var_mutate_cmd _cmd, const json& j_data)
{
switch (_cmd)
{
case var_mutate_cmd::clear:
return replay_clear(j_data);
case var_mutate_cmd::set:
return replay_set(j_data);
default:
return false;
}
}
private:
bool replay_set(const json& j_data)
{
return decode(j_data, _data);
}
bool replay_clear(const json& j_data)
{
_data = {};
return true;
}
private:
T& _data;
msg_queue_base& _msg_queue;
const var_idx_type& _offset;
};
上述代码就是简单属性的代理对象,封装了修改操作和同步操作。对于访问的时候,我们需要构造一个proxy对象进行返回:
template <typename T>
prop_proxy<T, void> make_proxy(T& _in_data,
msg_queue_base& _in_msg_queue,
const var_idx_type& _in_offset)
{
return prop_proxy<T, void>(_in_data, _in_msg_queue, _in_offset);
}
class base
{
int _x;
const decltype(_x)& x() const
{
return _x;
}
prop_proxy<decltype(_x)> x_mut()
{
return make_proxy(_x, _msg_queue, index_for_x);
}
}
这两个函数代替了我们原来的setter/getter函数的功能,但是就失去了自定义setter里的检查。不过这个可以通过传递额外的setter函数到proxy对象里,或者额外提供修改接口并在接口内部处理检查之后构造proxy对象进行修改同步,所以这个自定义setter的需求也可以当作解决了,后续不再讨论。
在重新构造属性同步的骨架之后,我们再来解决通用容器接口的代码膨胀问题,这里只贴一下vector类型的proxy:
template<typename T>
class prop_proxy<std::vector<T>>
{
public:
prop_proxy(std::vector<T>& _in_data,
msg_queue_base& _in_msg_queue,
const var_idx_type& _in_offset) :
_data(_in_data),
_msg_queue(_in_msg_queue),
_offset(_in_offset)
{
}
std::vector<T>& get()
{
return _data;
}
operator const std::vector<T>&() const
{
return _data;
}
void set(const std::vector<T>& _in_data)
{
_data = _in_data;
_msg_queue.add(_offset, var_mutate_cmd::set, encode(_data));
}
void clear()
{
_data.clear();
_msg_queue.add(_offset, var_mutate_cmd::clear, json());
}
void push_back(const T& _new_data)
{
_data.push_back(_new_data);
_msg_queue.add(_offset, var_mutate_cmd::vector_push_back, encode(_new_data));
}
void pop_back()
{
if (_data.size())
{
_data.pop_back();
}
_msg_queue.add(_offset, var_mutate_cmd::vector_pop_back, json());
}
void idx_mutate(std::size_t idx, const T& _new_data)
{
if (idx < _data.size())
{
_data[idx] = _new_data;
}
_msg_queue.add(_offset, var_mutate_cmd::vector_idx_mutate, encode_multi(idx, _new_data));
}
void idx_delete(std::size_t idx)
{
if (idx < _data.size())
{
_data.erase(_data.begin() + idx);
}
_msg_queue.add(_offset, var_mutate_cmd::vector_idx_mutate, encode(idx));
}
bool replay(var_mutate_cmd _cmd, const json& j_data)
{
switch (_cmd)
{
case var_mutate_cmd::clear:
return replay_clear(j_data);
case var_mutate_cmd::set:
return replay_set(j_data);
case var_mutate_cmd::vector_push_back:
return replay_push_back(j_data);
case var_mutate_cmd::vector_pop_back:
return replay_pop_back(j_data);
case var_mutate_cmd::vector_idx_mutate:
return replay_idx_mutate(j_data);
case var_mutate_cmd::vector_idx_delete:
return replay_idx_delete(j_data);
default:
return false;
}
}
private:
bool replay_set(const json& j_data)
{
return decode(j_data, _data);
}
bool replay_clear(const json& j_data)
{
_data.clear();
return true;
}
bool replay_push_back(const json& j_data)
{
T temp;
if (decode(j_data, temp))
{
_data.push_back(temp);
return true;
}
else
{
return false;
}
}
bool replay_pop_back(const json& j_data)
{
if (_data.size())
{
_data.pop_back();
}
return true;
}
bool replay_idx_mutate(const json& j_data)
{
std::size_t idx;
T temp;
if (!decode_multi(j_data, idx, temp))
{
return false;
}
if (idx < _data.size())
{
_data[idx] = temp;
}
return true;
}
bool replay_idx_delete(const json& j_data)
{
std::size_t idx;
if (!decode(j_data, idx))
{
return false;
}
if (idx < _data.size())
{
_data.erase(_data.begin() + idx);
}
return true;
}
private:
std::vector<T>& _data;
msg_queue_base& _msg_queue;
const var_idx_type _offset;
};
多级属性同步
所谓的多级属性就是属性访问并不是简单x、y、z形式,而是x.y.z的形式去访问的,而x、y、z则只是多级属性里的特例,即一级属性。处理多级属性相对于一级属性来说,唯一的改变就是我们的变量名的int映射,需要改成vector<int>形式,对于x.y.z的访问来说,这个vector<int>的值包含三个元素,分别是index_for_x, index_for_y, index_for_z。
这个int改成了vector<int>之后,我们好多接口都需要重新实现一下。但是如果对属性最大深度设置为8和同级属性数量限定为256个以下的话,我们可以用uint64_t来编码vector<int>,这样可以维持接口的基本不变。同时int相关类型在msgpack、protobuf等打包协议里面也有很多小整数优化,单个uint64_t比vector<int>来说可能省了数十倍的空间。通过个人经历过的项目来看,深度最大为8,且同级属性最多256这个限制还是非常宽裕的。如果代码里面出现了违反这个规则的情况,预处理器直接报错提示,人工修改一下新加入的属性定义即可。考虑到一般来说增加最频繁的是一级属性,如果一级属性超过了256个,可以考虑将一级属性扩充为uint16_t,后面的属性仍然保持uint8_t,这样一般来说足够用了。
多级属性同步这里的变量寻址问题除了更好的数据压缩之外,还有一个问题:我们在修改x.y.z的时候,将x, y的index offset信息传递到z的proxy里。当前我们构造prop_proxy只有三个参数:变量的引用,变量的类内偏移和变量的msg_queue。最合适的修改方法就是将msg_queue里带上x.y的地址信息,因为msg_queue是每个实例对象都不同的,而变量的类内偏移每个实例对象都一样。
using mutate_msg = std::tuple<var_prefix_idx_type, var_idx_type, var_mutate_cmd, json>;
class msg_queue_base
{
public:
virtual void add(const var_idx_type& offset, var_mutate_cmd _cmd, const json& _data) = 0;
};
class msg_queue : public msg_queue_base
{
std::msg_queue_base& _queue;
const var_prefix_idx_type& parent_idxes;
public:
msg_queue(std::msg_queue_base& _in_msg_queue,
const var_prefix_idx_type& _in_parent_idxes)
: _queue(_in_msg_queue)
, parent_idxes(_in_parent_idxes)
{
}
msg_queue(const msg_queue& other) = default;
void add(const var_idx_type& offset, var_mutate_cmd _cmd, const json& _data)
{
_queue.emplace_back(parent_idxes, offset, _cmd, _data);
return;
}
};
为了应对这个msg_queue的修改,我们还修改了mutate_msg的定义,从原来的三分量修改为了四分量的形式,这里的var_prefix_idx_type当前就是uint64_t,而var_idx_type则是uint8_t。
msg_queue_base base_queue;
class prop_a
{
prop_a(msg_queue_base& in_queue, const var_prefix_idx_type& _in_parent_idxes)
:_queue(in_queue), _parent_idxes(_in_parent_idxes)
{
}
int _x;
static int index_for_x = 1;
var_prefix_idx_type _parent_idxes;
queue<mutate_msg>& _queue;
prop_proxy<decltype(_x)> x_mut()
{
return make_proxy(_x, msg_queue(_queue, _parent_idxes), index_for_x);
}
}
class prop_b
{
prop_b(msg_queue_base& in_queue, const var_prefix_idx_type& _in_parent_idxes)
:_queue(in_queue)
, _parent_idxes(_in_parent_idxes)
, a((_in_parent_idxes<<8) + index_for_a)
{
}
prop_a _a;
static int index_for_a = 1;
var_prefix_idx_type _parent_idxes;
queue<mutate_msg>& _queue;
}
这样,构造prop的时候一路传递msg_queue_base 和_parent_idxes就可以明确改变变量时的变量地址。
构造好多级属性同步数据并传递到客户端之后,客户端首先将开头的uint64_t解析为vector<uint8_t>。然后初始化cur_property为顶层属性,对vector<uint8_t>进行循环遍历:每次从这个vector的front找到一个uint8来获取当前属性cur_property里offset与之匹配的子属性,以此子属性来更新cur_property,然后将这个uint8_t从vector中删除。当vector为空的时候,再对cur_property进行property_cmd的回放。自此多级属性的修改记录以及记录回放基本完成。
背包类型的属性同步
背包,是属性数据结构里的核心,实现好了一个背包系统对于业务开发来说有非常大的便利,因为绝大部分的属性都是以背包形式存在的:任务背包、道具背包、装备背包、载具背包、外观背包、buff背包、技能背包等等不一而足。由于背包之间的共性很多,所以很多背包系统的代码其实都继承自同一个基类,从这个基类下面一路增添功能,在项目运营期平均两周会增加新的一种背包。下面就是一种最简状态下的背包形式:
struct common_item
{
int item_no;
}
struct common_item_bag
{
unordered_map<int, common_item> data;
uint32_t capacity;
}
背包属性与之前介绍的unordered_map属性不一样的地方在于,对于unordered_map内的元素进行更改,只需要对这个被修改的元素进行全同步即可。而对于背包里面的item来说,这个item可能非常复杂,每次修改这个item的部分数据就来一次全量同步时非常浪费流量和cpu的。同时由于item的寻址无法被简单的编码为int形式,所以如何定义这个item的修改信息也是一个问题。此外还需要考虑item里面还有bag的问题。最后想出来的解决方案是针对背包系统,对于其内部的item新建一种msg_queue:
template <typename T>
class item_msg_queue : public msg_queue_base
{
msg_queue_base& parent_queue;
const var_prefix_idx_type& parent_idxes;
const T& _item_key;
public:
item_msg_queue(msg_queue_base& _in_parent_queue,
const var_prefix_idx_type& _in_parent_idxes,
const T& _in_key)
: parent_queue(_in_parent_queue)
, parent_idxes(_in_parent_idxes)
, _item_key(_in_key)
{
}
item_msg_queue(const item_msg_queue& other) = default;
void add(const var_idx_type& offset, var_mutate_cmd _cmd, const json& _data)
{
parent_queue.add(parent_idxes, 0, property_cmd::item_change, encode_multi(_item_key, offset, _cmd, _data));
return;
}
};
这个item_msg_queue在接收到item的相关修改cmd之后,会把这个cmd相关信息打包为一个json,然后以这个打包好的数据重新构造一个property_cmd::item_change的属性修改数据包投递到其bag对应的msg_queue之中。
为了配合这个item_msg_queue使用,我们在property_bag<Item>中提供下面的get接口,用来创建prop_record_proxy<Item>:
template<typename Item>
std::optional<prop_record_proxy<Item>> property_bag::get(msg_queue_base& parent_queue,
property_record_offset parent_offset, const key_type& key)
{
auto cur_iter = m_index.find(key);
if (cur_iter == m_index.end())
{
return {};
}
else
{
return prop_record_proxy<Item>(*m_data[cur_iter->second], parent_queue, parent_offset , cur_iter->second);
}
}
对应的property_proxy<property_bag<Item>>中提供对外的get接口:
std::optional<prop_record_proxy<Item>> get(const key_type& key)
{
return m_data.get(m_queue, m_offset, key);
}
通过上述代码,我们在修改property_bag内的一个item时,下发的数据既包括property_bag的offset,又包括Item内部的修改数据。当客户端的某个property_bag在接收到cmd==property_cmd::item_change类型的属性同步包的时候,将使用decode_multi解析出原来封装的四元组,找到对应的Item之后再次进行属性同步的回放。
游戏中的视野对象同步
游戏中的视野对象同步介绍
多人在线游戏的核心内容就是玩家与玩家之间的互动,玩家在游戏虚拟场景里使用其在游戏内控制的虚拟角色与其他玩家控制的虚拟角色做各种交互,特别是在3D游戏中玩家控制的3D角色之间的互动,包括文字、语音、角色外观、角色动作等各种交流与展现方式。这种多样性的互动带来的体验远远大于平常的聊天软件提供的文字互动,这也是游戏这种虚拟现实世界的核心吸引力。为了构造这种虚拟世界里的多人互动,在游戏客户端呈现的虚拟世界中我们不仅需要将当前主角玩家控制的虚拟角色渲染出来,还需要将处于同一虚拟世界中的其他玩家也渲染出来。但是由于客户端计算资源、服务器计算资源和网络带宽等各种资源限制,我们无法将整个虚拟世界里的玩家角色都在一个客户端里呈现,更具体的来说主流游戏的手机端同屏角色数量基本都小于30。同时由于人脑也是一种计算资源,其计算能力也是有限的,现实生活中无时无刻向我们传递过来的各种视觉听觉信息都会人脑过滤掉其中的很大一部分,只处理大脑认为有用的那些信息。具体体现在离自身越近的信息越不容易被过滤,越靠近视野中心的信息越不容易被过滤。在游戏资源和人脑资源的双重限制下,游戏客户端一般都只会渲染离当前玩家一定范围内的且在视野中那些玩家,这个关注区域就叫做AOI(Area of Interest),而这个关注范围半径则叫做AOI_Radius(虽然叫radius但是其形状不一定是圆形,也可能是正方形)。所以多人在线游戏服务器的网络角色同步系统内都会有一个AOI系统,来针对每个角色的客户端计算出其需要关心的其他角色的集合。集合内的玩家位置、外观、动作等数据的变化会通知到此客户端,而集合外的玩家数据变化则不通知。除了客户端玩家对于AOI计算有需求之外,很多服务端的逻辑也需要AOI系统,包括但不限于:
NPC的战斗感知半径,当玩家进入此半径之后会触发该NPC进入战斗状态- 场景内布置的陷阱等触发区域
- 战斗系统的光环类型技能实现
本章内容将对游戏内的AOI系统提供一个基本的介绍,包括主流的AOI算法、UE中的Actor同步机制以及mosaic_game中的AOI系统实现细节。
主流AOI算法
aoi_entity
为了更加详细的以cpp代码说明下文中介绍的各种AOI算法的流程,我们定义了一个aoi_entity的类型,这里为了简化讨论,只限制场景为平面,坐标系为二维坐标,暂时不考虑三维坐标场景:
using pos_t = std::array<float, 2>; // 这里的坐标为(x, y)形式
struct aoi_entity
{
std::uint64_t id; // entity 的唯一标识符
std::unordered_map<std::uint64_t, aoi_entity*> interest; // 最终进入当前entity 视野的aoi_entity
std::unordered_map<std::uint64_t, aoi_entity*> interested; // 当前entity进入了哪些aoi_entity的视野
pos_t pos; // 当前actor的位置
float radius; // 当前entity的AOI半径
void calc_aoi(aoi_entity* other); // 计算另外一个aoi_entity是否应该进入当前的interest 集合
virtual void on_enter_aoi(aoi_entity* other); // 当有其他entity进入当前entity->interest 时的回调
virtual void on_leave_aoi(aoi_entity* other); // 当有其他entity离开当前entity->interest 时的回调
};
float distance(const pos_t& a, const pos_t& b); // 这个函数负责计算两个坐标之间的距离
另外再定义一个world类型,来存储所有的参与AOI计算的aoi_entity:
struct world
{
std::unordered_map<std::uint64_t, aoi_entity*> aoi_entities;
virtual void update_aoi();
};
基于暴力遍历的AOI计算
暴力遍历法顾名思义就是对于每个客户端控制的玩家aoi_entity, 先遍历其interest集合,删除掉其中已经不在当前radius范围内的,然后遍历当前场景内的所有aoi_entity,计算两者之间的距离是否在同步范围之内,如果在同步范围内,则尝试加入到AOI集合。
void aoi_entity::clear_invalid()
{
std::vector<std::pair<std::uint64_t, aoi_entity*>> remove_entitiess;
for(const auto [one_id, one_entity]: interest)
{
if(distance(one_entity->pos, pos) > radius)
{
remove_entitiess.push_back(std::make_pair(one_id, one_entity));
}
}
for(auto one_remove: remove_entitiess)
{
interest.erase(one_remove.first);
one_remove.second->interested.erase(id);
on_leave_aoi(one_remove.second);
}
}
void aoi_entity::calc_aoi(aoi_entity* other)
{
if(this == other_entity)
{
return;
}
if(interest.find(other_entity->id) != interest.end())
{
return;
}
if(distance(pos, other_entity->pos) <= radius)
{
interest[other_entity->id] = other_entity;
other_entity->interested[id] = this;
on_aoi_enter(other_entity);
}
}
void world::update_aoi()
{
for(const auto [one_id, one_entity]: aoi_entities)
{
one_entity->clear_invalid();
for(const auto [other_id, other_entity]: aoi_entities)
{
one_entity->calc_aoi(other_entity);
}
}
}
在这种计算流程下,拥有N个aoi_entity且有K个客户端玩家的的world单次执行update_aoi最坏情况下的算法复杂度为K*N。在我们所期望的大世界场景下,K经常超过1000,而 N则超过10000,此时的计算复杂度就非常高了,1s内执行不了几次update_aoi。因此这个暴力算法在实际的游戏服务器中基本不被采用,一般来说都是作为对比方案而存在的。
基于网格空间划分的AOI计算
在上面介绍的暴力遍历计算AOI的实现中,最大的计算压力在第二层循环里计算当前world->aoi_entities里的每个aoi_entity到当前aoi_entity之间的距离,此时在判定全场景内哪些玩家在当前玩家AOI半径内。实际上在正常的游戏场景中,不会出现所有玩家和NPC(Non-Player Character)都挤在一小片区域的情况,一般来说NPC都比较稀疏的布置在场景中,而玩家则主要分布在场景中的道路沿线。此时在玩家AOI半径内的aoi_entity其实数量不是很多,相对于world->aoi_entities集合的大小来说,不足其1/10。如果我们可以快速的把一些与当前玩家较远的aoi_entity筛出,就可以大规模的减少distance函数的调用与距离的比较,从而加快AOI的执行效率。这里的快速筛查手段一般使用的都是基于网格的空间划分,此时我们选取一个合适的划分粒度cell_size,将整个二维平面场景从左上角进行切分,这样场景就会被分割为多个正方形cell。我们给每个正方形cell进行编号(x,y),同时给每个正方形cell都附加一个集合entities_in_cell,内部存储所有在当前正方形cell空间区域内的aoi_entities:
struct cell_id
{
std::uint32_t x;
std::uint32_t y;
};
struct cell_info
{
cell_id id;
std::unordered_map<std::uint64_t, aoi_entity*> entities_in_cell;
};
struct grid_world: public world
{
const float cell_size; // 当前world所选取的正方形cell的边长
pos_t bound_min; // 当前world的坐标最低点
cell_id calc_cell_id(const pos_t& pos) const; // 计算一个pos到对应的cell_id
std::vector<std::vector<cell_info>> all_cells; // 存储了当前world里的所有cell
void update_aoi() override;
};
在有了这个结构之后,对于一个aoi_entity(A),我们计算以A->pos为中心以A->radius为半径的圆形有交集的cell_id集合cellsA。对于不在这个交集区域内的其他所有cell,其中的entities_in_cell中存储的aoi_entity(B)一定不在当前aoi_entity(A)范围内,因为这些cell代表的正方形区域到A->pos的最短距离都大于A->radius。通过计算cellsA,我们极大的减少了计算A->interest所需要遍历的aoi_entities集合大小,更新AOI的效率得到了极大的提升,此时grid_world->update_aoi的实现如下:
void grid_world::update_aoi()
{
for(const auto [one_id, one_entity]: aoi_entities)
{
one_entity->clear_invalid();
// 计算包含当前aoi_entity 的AOI圆所覆盖的cell 区域
auto low_cell_id = calc_cell_id(one_entity->pos - pos_t(one_entity->radius, one_entity->radius));
auto high_cell_id = calc_cell_id(one_entity->pos + pos_t(one_entity->radius, one_entity->radius));
for(auto cell_x = low_cell_id.x; cell_x <= high_cell_id.x; cell_x++)
{
for(auto cell_y = low_cell_id.y; cell_y <= high_cell_id.y; cell_y++)
{
const auto& cur_cell = all_cells[cell_x][cell_y];
for(const auto [other_id, other_entity]: cur_cell->entities_in_cell)
{
one_entity->calc_aoi(other_entity);
}
}
}
}
}
下面我们以一个简单的图形化样例来更加形象的解释上述代码的流程,在此图例中场景被划分为了4*4的网格,带字母的蓝色小圆圈A-H对应了8个不同的aoi_entity,图中的黄色大圆圈代表A对应的AOI圆。此时A的AOI圆覆盖的low_cell_id为(1, 1),high_cell_id为(2, 2),覆盖的cell集合包含了四个cell分别是(1,1),(1,2),(2,1),(2,2)。在这四个cell中的entities_in_cell为(A, B, C, J, G, H, I),计算AOI时只需要与这些entity做calc_aoi计算,而(D, E, F)则被筛除掉了。
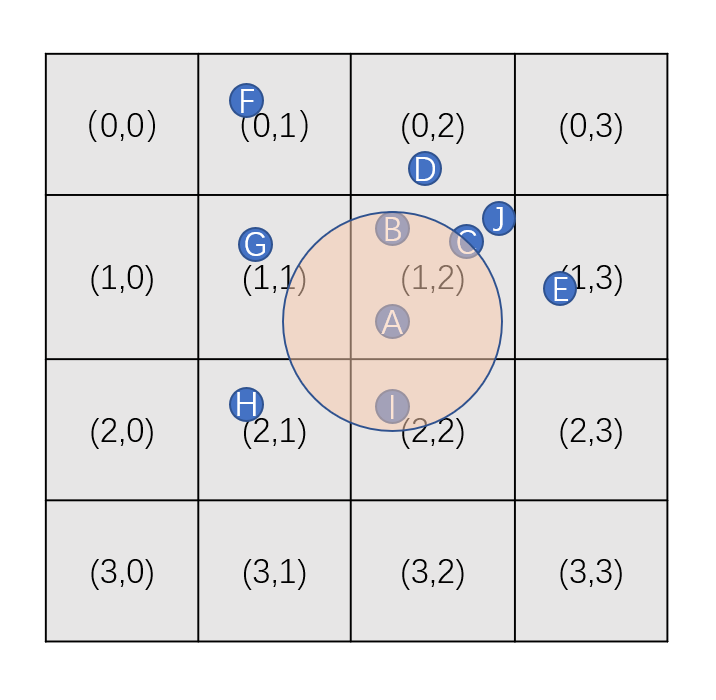
为了维持我们定义的cell->entities_in_cell字段里的aoi_entity的确在此cell中,最简单的做法是每次在update_aoi之前都将网格清空然后重新往网格中插入所有的aoi_entity,这里的时间复杂度为网格数量加aoi_entity数量之和的常数项。但是如果网格的数量级大于aoi_entity的数量级时,这种重建的方法是非常低效的。考虑到每次update_aoi间隔期间移动的aoi_entity一般不多,我们可以在每个aoi_entity改变位置时都尝试去修正其所在的cell,为此grid_world上需要添加一个接口:
void grid_world::on_entity_move(aoi_entity* cur_entity, const pos_t& new_pos)
{
auto pre_cell_id = calc_cell_id(cur_entity->pos);
cur_entity->pos = new_pos;
auto new_cell_id = calc_cell_id(cur_entity->pos);
if(new_cell_id != pre_cell_id)
{
all_cells[pre_cell_id.x][pre_cell_id.y].entities_in_cell.erase(cur_entity->id);
all_cells[new_cell_id.x][new_cell_id.y].entities_in_cell[cur_entity->id] = cur_entity;
}
}
由于calc_cell_id的复杂度为常数,所以on_entity_move的复杂度也为常数,效率非常高,即使每个aoi_entity都移动位置触发了此函数,其总的时间复杂度也就是aoi_entity数量的常数倍,其维护消耗低于重建的小号,同时相对于update_aoi的时间复杂度来说都是忽略不计。
这个基于网格的空间划分在计算AOI上的加速效果受cell_size的影响:如果cell_size很大,则会导致覆盖区域内的网格总面积过大,其内部的entities_in_cell集合会显著的增多,影响筛查效率;如果cell_size过小则会导致on_entity_move时频繁的在cell中添加和删除aoi_entity,也会影响一定的性能。一般来说这里的cell_size会选择客户端玩家的aoi_radius的中位数,这样达到一些效率上的均衡。
对于大地图而言,上面代码实现基于网格的空间划分在内存上会有很大的压力,假设在特定粒度的cell_size下当前地图的最大cell坐标为(x,y),场景内没有任何aoi_entities时grid_world::all_cells所占的内存为(x+1)*sizeof(vector<cell_info>) + (x+1)*(y+1)*sizeof(cell_info)。地图大小为8km*8km而cell_size为20时, grid_world::all_cells大约会使用8Mb左右的内存,也算是一个不小的开销。而且上面的实现使用了太多的std::unordered_map容器,运行时的动态删减会触发很多的内存动态分配与释放。所以实际项目中会以一个数组形式实现的unordered_map来存储所有的cell_info以及关联的aoi_entities:
// 链表内的节点定义 对于每个aoi_entity 都需要分配一个hash_cell_node
struct hash_cell_node
{
cell_id id;
aoi_entity* entity = nullptr;
hash_cell_node* next = nullptr;
};
std::vector<hash_cell_node> linked_hash_map; // 数组形式实现的unordered_map 其容量一般设置为场景内aoi_entity的最大可能数量 * 4 然后再往2的指数上取整
std::uint32_t get_cell_hash(cell_id in_cell_id, std::uint32_t mask)
{
// 这里随便选取两个常量来简单的计算hash 不同的项目可以采取不同的实现
const std::uint32_t h1 = 0x8da6b343;
const std::uint32_t h2 = 0xd8163841;
std::uint32_t n = h1 * in_cell_id.x + h2 * in_cell_id.y;
return n & mask;
}
hash_cell_node* get_hash_cell_node(cell_id in_cell_id) // 计算一个cell_id对应的链表head节点
{
const std::uint32_t mask = linked_hash_map.size() - 1;
return &linked_hash_map[get_cell_hash(in_cell_id, mask)];
}
下面提供一个图形来形象的描述一下场景内的aoi_entity是如何存储在linked_hash_map之中的,这里使用一个非常简单的hash = (4*x + y)/2:
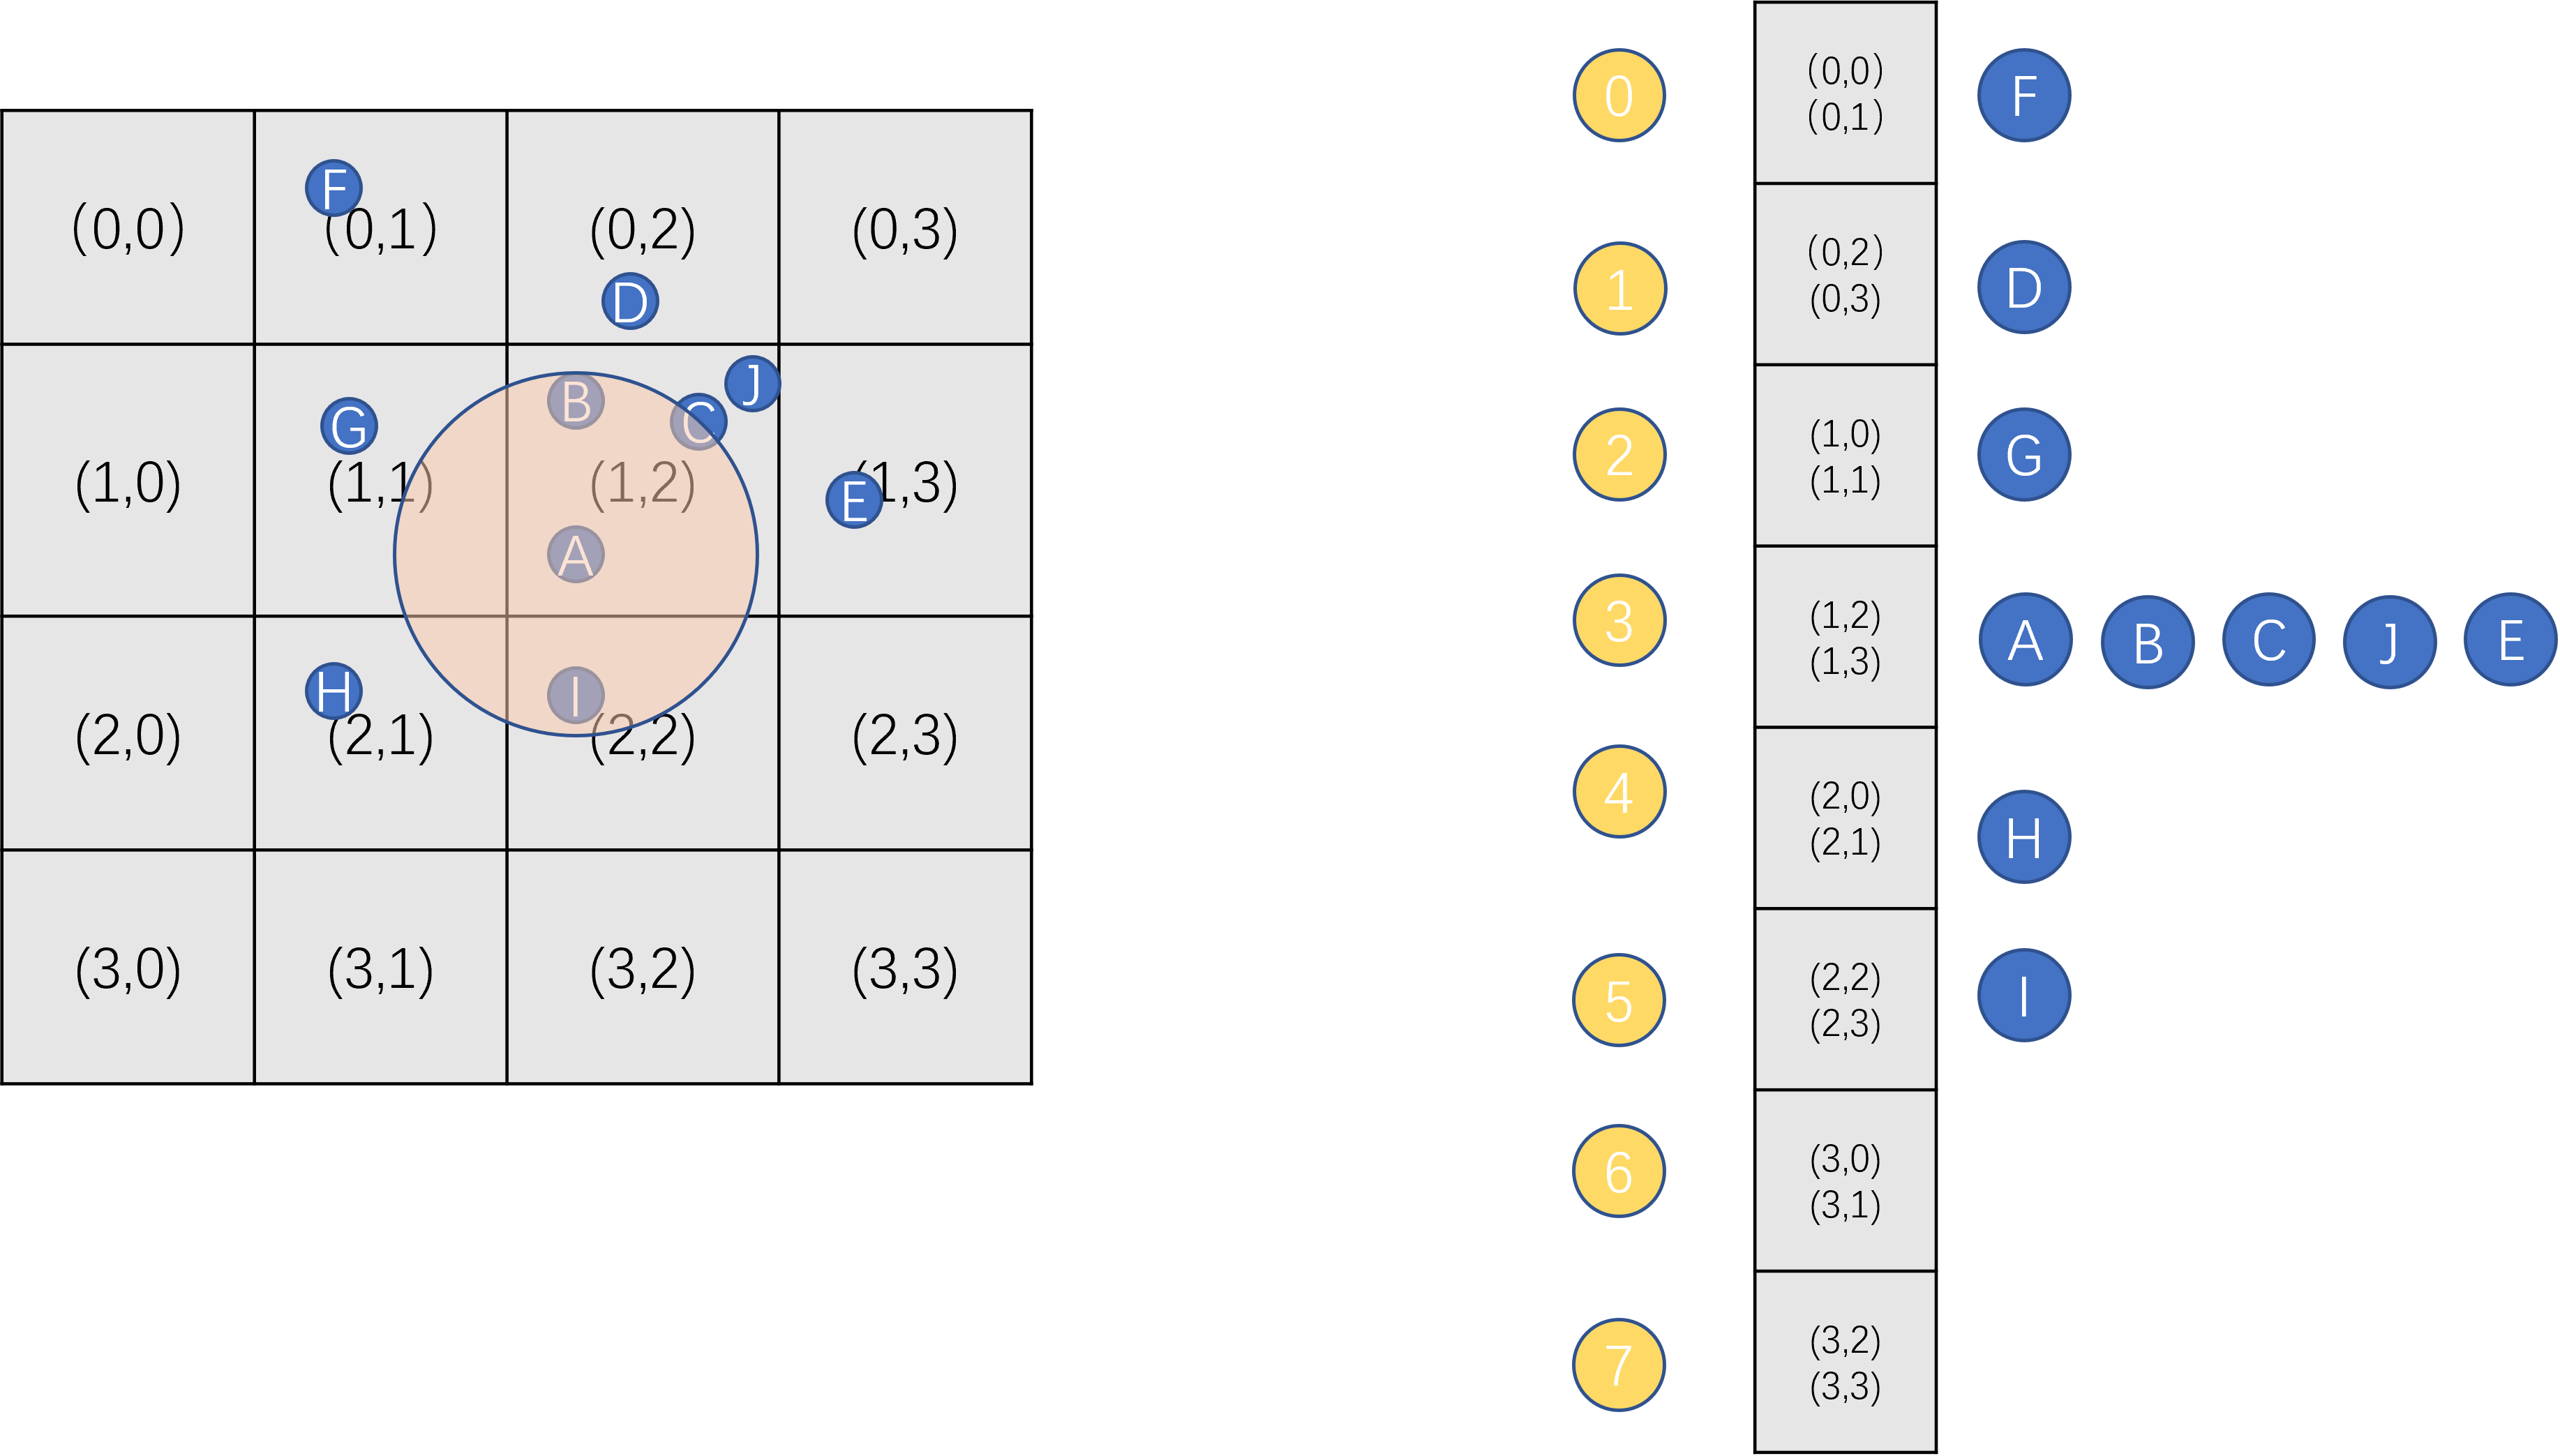
在这种设计下,如果一个场景内的aoi_entity最大数量为4096,则我们将linked_hash_map的大小初始化为4096*4,在64bit平台下的内存占用为384Kb,这个的内存占用相比之前的8Mb降低到了原来的1/20。
由于linked_hash_map内的每个链表都包含了hash值相同的所有cell内的aoi_entity,所以update_aoi时需要小心的过滤不是所期望的cell:
void grid_world::update_aoi()
{
for(const auto [one_id, one_entity]: aoi_entities)
{
one_entity->clear_invalid();
// 计算包含当前aoi_entity 的AOI圆所覆盖的cell 区域
auto low_cell_id = calc_cell_id(one_entity->pos - pos_t(one_entity->radius, one_entity->radius));
auto high_cell_id = calc_cell_id(one_entity->pos + pos_t(one_entity->radius, one_entity->radius));
for(auto cell_x = low_cell_id.x; cell_x <= high_cell_id.x; cell_x++)
{
for(auto cell_y = low_cell_id.y; cell_y <= high_cell_id.y; cell_y++)
{
cell_id cur_cell_id(cell_x, cell_y);
const auto cur_next = get_hash_cell_node(cur_cell_id)->next;
while(cur_next)
{
if(cur_next->cell_id == cur_cell_id)
{
// 只处理cell_id 相同的
one_entity->calc_aoi(cur_next->entity);
}
cur_next = cur_next->next;
}
}
}
}
}
这里的cell_id引发的hash冲突会带来一些性能损失,因为会遍历到cell_id不一样但是hash一样的aoi_entity。如果所有的hash_cell_node都通过线性内存池来分配的话,缓存局部性又会导致遍历时的性能提升,这样能弥补一些性能损失。
同样由于cell_id的hash冲突,我们要小心的维护grid_world::on_entity_move
void grid_world::on_entity_move(aoi_entity* cur_entity, const pos_t& new_pos)
{
auto pre_cell_id = calc_cell_id(cur_entity->pos);
cur_entity->pos = new_pos;
auto new_cell_id = calc_cell_id(cur_entity->pos);
if(new_cell_id == pre_cell_id)
{
return;
}
auto pre_cell_list = get_hash_cell_node(pre_cell_id);
auto new_cell_list = get_hash_cell_node(new_cell_id);
if(pre_cell_list == new_cell_list)
{
// 列表相同时 只需要修改对应node的cell_id 即可
pre_cell_list = pre_cell_list->next;
while(pre_cell_list)
{
if(pre_cell_list->entity == cur_entity)
{
pre_cell_list->id = new_cell_id;
break;
}
pre_cell_list = pre_cell_list->next;
}
}
else
{
// 当列表不同时 需要从老的列表中摘除原来的node
hash_cell_node* dest_node = nullptr;
while(pre_cell_list->next)
{
if(pre_cell_list->next->entity == cur_entity)
{
dest_node = pre_cell_list->next;
pre_cell_list->next = pre_cell_list->next->next;
break;
}
pre_cell_list = pre_cell_list->next;
}
assert(dest_node);
// 然后再插入到新的列表头部
dest_node->id = new_cell_id;
dest_node->next = new_cell_list->next;
new_cell_list->next = dest_node;
}
}
通过这样的实现,每次更新aoi_entity的位置时,最坏情况下需要遍历两个列表。不过aoi_entity移动时触发cell_id的修改的频率比较低,一般来说其radius一般来说是移动速度的10倍以上,此时触发cell_id修改的频率不到1/10。而且我们给linked_hash_map分配的槽位足够多,在玩家分布稀疏的时候,每个链表中的元素平均来说也是常数个。因此这个位置更新函数带来的开销常规情况下不需要担心,只有在大量玩家聚居在一小块区域不断的跨cell移动时才会触发很大的开销,不过此时update_aoi的开销也会变得很大,相比之下位置更新函数的开销就不怎么需要去在意了。
基于十字链表的AOI计算
前述的暴力遍历AOI计算和网格空间划分AOI计算的核心思想都是在update_aoi函数中,主动的去获取每个aoi_entity相关的其他aoi_entity集合S,暴力遍历AOI计算中S就是当前场景内的所有aoi_entity,网格空间划分AOI计算则利用空间筛选机制显著降低了S的大小。获取了集合S之后,再用calc_aoi函数去遍历S,一一判断是否在aoi_entity->radius范围内,即使参与calc_aoi的两个aoi_entity在上次update_aoi之后都没有移动。在非聚集区域,且aoi_entity的移动频率和速度都不是很大的时候,一定时间内这个集合S是不会变的,同时aoi_entity->interest集合也可以维持一段时间的不变。update_aoi如果利用这种局部常速移动的短期AOI不变性质,可以减少很多不必要的S集合计算以及calc_aoi计算,大大的优化执行效率。针对这种情况,基于十字链表的AOI计算被设计出来。
这里的十字链表其实包含了两个结构一样的有序链表,分别管理坐标的x, y两个轴。链表中的每个节点都有一个附加的坐标,同时链表中的节点按照坐标的升序排列。每个aoi_entity在每个链表中都会有三个节点,以x轴为例, 这三个节点的坐标分别为x - radius, x, x+radius。每个链表都有一个head节点和一个tail节点分别代表链表的头与尾。为了维持链表有序性,head节点的坐标等于场景最小坐标值减去所有aoi_entity的最大radius, 同时tail节点的坐标等于场景最大坐标加上所有aoi_entity的最大radius。下面就是这个十字链表的基本结构体定义:
enum aoi_list_node_type
{
left = 0,
center,
right,
invalid,
};
struct aoi_list_node;
struct aoi_list_entity: aoi_entity
{
std::array<aoi_list_node*, 3> x_nodes; // 0 为left 1为center 2为right
std::array<aoi_list_node*, 3> y_nodes; // 0 为left 1为center 2为right
}
struct aoi_list_node
{
// 这里的比较策略使用 (pos, entity)这个pair来进行比较 即优先比较pos pos相同时比较entity->id
aoi_list_entity* entity = nullptr;
float pos;
aoi_list_node_type type;
aoi_list_node* pre = nullptr;
aoi_list_node* next = nullptr;
};
struct aoi_axis_list
{
aoi_list_node head;
aoi_list_node tail;
void remove_node(aoi_list_node* cur); // 从链表中摘除cur节点
void insert_before(aoi_list_node* cur, aoi_list_node* next); //在next节点之前插入cur节点
}
struct list_world: public world
{
aoi_axis_list x_list;
aoi_axis_list y_list;
};
在这样的结构设计下,整个list_world所需的内存基本就是场景内aoi_entity数量的常数倍,相对于前面的两个算法节省了很多内存。
为了加深对十字链表结构的理解,我们提供图形来介绍。假设场景里有(A,B,C,D)四个aoi_entity以下图的形式存在于场景中:

在radius设置为3时,上图场景对应的十字链表里的节点布局如下,图中绿色节点代表aoi_list_node_type::left, 浅蓝色节点代表aoi_list_node_type::center,深蓝色节点代表aoi_list_node_type::right,红色节点代表aoi_list_node_type::invalid,红色节点只提供给head, tail使用:

有了上图所示的十字链表结构之后,一个aoi_list_entity(M)在aoi_list_entity(N)的radius内需要满足两个条件:
M->x_nodes[1]处于(N->x_nodes[0], N->x_nodes[1])区间内M->y_nodes[1]处于(N->y_nodes[0], N->y_nodes[1])区间内
满足上面两个条件后,M处于N的AOI正方形内,如果要求在N的AOI圆内则需要额外的平面距离计算。为了加速计算我们在使用十字链表时不再采用AOI圆形区域,而采用正方形区域。使用正方形AOI区域之后,我们可以以如下的方式计算一个aoi_entity的interest集合:分别在x_list和y_list上扫描这个aoi_list_entity的left节点与right节点之间的所有center节点,收集这些center节点对应的entity,生成x_entities和y_entities两个集合,然后计算两个集合的交集,即为所有在当前aoi_entity内的aoi_entity集合。这样的计算方式依赖于在aoi_axies_list上提供这样的一个scan接口,来获取两个aoi_list_node之间特定type的aoi_list_entity集合:
std::vector<aoi_list_entity*> aoi_axis_list::scan(aoi_list_node* a, aoi_list_node* b, aoi_list_node_type check_type)
{
std::vector<aoi_list_entity*> result;
while(a->next != b)
{
a = a->next;
if(a->type == check_type)
{
result.push_back(a->entity);
}
}
return result;
}
有了这个scan接口后,再配合集合交集接口,就可以很简单的完成单个aoi_entity的AOI的计算:
std::vector<aoi_list_entity*> list_world::set_intersect(const std::vector<aoi_list_entity*>& a, const std::vector<aoi_list_entity*>& b) const
{
std::unordered_set<aoi_list_entity*> temp_set;
for(auto one_entity: a)
{
temp_set.insert(one_entity);
}
std::vector<aoi_list_entity*> result;
for(auto one_entity : b)
{
if(temp_set.count(one_entity) == 1)
{
result.push_back(one_entity);
}
}
return result;
}
void list_world::update_aoi()
{
for(const auto [one_id, one_entity]: aoi_entities)
{
one_entity->clear_invalid();
auto cur_list_entity = reinterpret_cast<aoi_list_entity*>(one_entity);
auto temp_result_x = x_list.scan(cur_list_entity->x_nodes[0], cur_list_entity->x_nodes[2], aoi_list_node_type::center);
auto temp_result_y = y_list.scan(cur_list_entity->y_nodes[0], cur_list_entity->y_nodes[2], aoi_list_node_type::center);
for(auto one_result: set_intersect(temp_result_x, temp_result_y))
{
one_entity->cacl_aoi(one_result);
}
}
}
虽然我们可以这样做来实现update_aoi,但是这样计算的效率相对于网格划分来说太差了,因为现在一个aoi_entity会引入六个aoi_list_node,导致scan的时间消耗会是网格划分里扫描cell的时间消耗的六倍,这里还存在一个计算量比较繁重的set_intersect操作。使用十字链表计算AOI的正确用法是介入到on_entity_move内,在一个aoi_entity(M)移动时,移动其六个aoi_list_node到合适的位置,同时分别对两个aoi_axis_list计算出下面的四个集合:
- 移动后进入
M->radius区域的aoi_entity集合Enter_M - 移动后离开
M->radius区域的aoi_entity集合Leave_M - 移动后
M进入N->radius区域的aoi_entity集合Enter_N - 移动后
M离开N->radius区域的aoi_entity集合Leave_N
aoi_entity在aoi_axis_list往坐标增大的方向移动的流程细节与往坐标缩小的方向移动的流程细节互为镜像,同时每个坐标轴上的处理完全一致,所以为了简化讨论这里只考虑往在x_list上往坐标增大的方向移动。此时上述四个集合可以通过遍历aoi_list_entity在当前轴上的三个x_nodes在从左向右调整位置时遍历到的各种其他aoi_list_node计算出来:
Enter_M为x_nodes[2]在移动时经过的center节点的aoi_list_node->entity集合Leave_M为x_nodes[0]在移动时经过的center节点的aoi_list_node->entity集合Enter_N为x_nodes[1]在移动时经过的left节点的aoi_list_node->entity集合Leave_N为x_nodes[1]在移动时经过的right节点的aoi_list_node->entity集合
为了快速的计算上面的四个集合,我们在aoi_axis_list上增加一个接口move_right,来收集一个节点向右移动时所经过的感兴趣的节点:
struct sweep_result
{
std::vector<aoi_list_entity*> left;
std::vector<aoi_list_entity*> center;
std::vector<aoi_list_entity*> right;
};
enum aoi_list_type_flag
{
left = 1,
center = 2,
right = 4,
};
void aoi_axis_list::move_right(aoi_list_node* cur, sweep_result& visited_nodes, std::uint8_t flag)
{
auto next = cur->next;
// 将cur节点从list中摘除
remove_node(cur);
// 向坐标轴增大的方向遍历 直到找到一个大于当前pos的节点
while(next->pos <= cur->pos)
{
switch (next->type)
{
case aoi_list_node_type::left:
if(flag & std::uint8_t(aoi_list_type_flag::left))
{
visited_nodes.left.push_back(next->entity);
}
break;
case aoi_list_node_type::center:
if(flag & std::uint8_t(aoi_list_type_flag::center))
{
visited_nodes.center.push_back(next->entity);
}
break;
case aoi_list_node_type::right:
if(flag & std::uint8_t(aoi_list_type_flag::right))
{
visited_nodes.right.push_back(next->entity);
}
break;
default:
break;
}
next = next->next;
}
// 在next之前插入cur节点
insert_before(cur, next);
}
有了这个move_right函数之后,上面的四个集合就可以很方便的计算出来了:
void aoi_axis_list::on_move_right(aoi_list_entity* cur_entity, const std::array<aoi_list_node*, 3>& cur_nodes, float diff_pos)
{
sweep_result temp_sweep_result;
cur_nodes[1]->pos += diff_pos;
move_right(cur_nodes[1], temp_sweep_result, (std::uint8_t)aoi_list_type_flag::left + (std::uint8_t)aoi_list_type_flag::right);
Enter_N = temp_sweep_result.left;
Leave_N = temp_sweep_result.right;
cur_nodes[2]->pos += diff_pos;
move_right(cur_nodes[2], temp_sweep_result, (std::uint8_t)aoi_list_type_flag::center);
Enter_M = temp_sweep_result.center;
temp_sweep_result.center.clear();
cur_nodes[0]->pos += diff_pos;
move_right(cur_nodes[0], temp_sweep_result, (std::uint8_t)aoi_list_type_flag::center);
Leave_M = temp_sweep_result.center;
}
由于目前有两个坐标轴,我们对这四个集合分别添加X_, Y_前缀,最终生成了8个集合。由于aoi_entity->interested集合与aoi_entity->interest集合是相互关联的,两者是同时进行插入与删除的,所以这里讨论时只考虑维护好interest集合。接下来我们使用这8个集合来更新aoi_entity->interest集合:
- 计算
X_Enter_M与Y_Enter_M的并集Union_Enter_M,对于Union_Enter_M内的每个aoi_entity(N)都执行一次M->calc_aoi(N),来尝试添加N到M的interest集合中 - 计算
X_Leave_M与Y_Leave_M的并集Union_Leave_M,对于Union_Leave_M内的每个aoi_entity(N)都执行一次M->interest.erase(N->id)来尝试执行删除,如果删除成功则继续执行M->on_aoi_leave(N)回调 - 计算
X_Enter_N与Y_Enter_N的并集Union_Enter_N,对于Union_Enter_N内的每个aoi_entity(N)都执行一次N->calc_aoi(M),来尝试添加M到N的interest集合中 - 计算
X_Leave_N与Y_Leave_N的并集Union_Leave_N,对于Union_Leave_N内的每个aoi_entity(N)都执行一次N->interest.erase(M->id)来尝试执行删除,如果删除成功则继续执行N->on_aoi_leave(M)回调
通过计算上述8个集合即可在on_entity_move时维护好aoi_entity->interest集合,此时list_aoi::update_aoi函数不再需要做任何事情,所以list_aoi的运行效率完全依托于on_entity_move的执行效率。在非瞬移情况下一个aoi_entity在每帧期间移动的位置diff其实是很小的,在非密集聚集的情况下其所有的6个aoi_list_node更新位置时收集的上述8个集合所包含的元素都非常小,如果能够避免计算过程中的各种stl容器内部的动态内存分配,则整体on_entity_move的执行时间基本为一个可控的常数时间。为了达到这个常数时间的需求,我们对上述代码做一些改进:
- 将
on_move_right中的temp_sweep_result从临时变量修改为aoi_axis_list的成员变量,并提前对内部的三个vector做reserve操作,以避免push_back时触发动态内存分配 - 计算集合的交集与并集时,不再使用
unordered_set,而是在aoi_list_entity内增加一个mutable bool变量来标记是否已经在目标集合中了,此时集合的交集与并集可以采取下面的优化实现,这样计算时只会触发一次动态内存分配:
struct aoi_list_entity
{
mutable bool is_in_set = false;
};
std::vector<aoi_list_entity*> list_world::set_intersect(const std::vector<aoi_list_entity*>& a, const std::vector<aoi_list_entity*>& b) const
{
std::vector<aoi_list_entity*> result;
result.reserve(std::min(a.size(), b.size()));
for(auto one_entity: a)
{
one_entity->is_in_set = true;
}
for(auto one_entity : b)
{
if(one_entity->is_in_set)
{
result.push_back(one_entity);
}
}
for(auto one_entity: a)
{
one_entity->is_in_set = false;
}
return result;
}
std::vector<aoi_list_entity*> list_world::set_union(const std::vector<aoi_list_entity*>& a, const std::vector<aoi_list_entity*>& b) const
{
std::vector<aoi_list_entity*> result;
result.reserve(a.size() + b.size());
for(auto one_entity: a)
{
one_entity->is_in_set = true;
result.push_back(one_entity);
}
for(auto one_entity : b)
{
if(!one_entity->is_in_set)
{
result.push_back(one_entity);
}
}
for(auto one_entity: a)
{
one_entity->is_in_set = false;
}
return result;
}
上述优化手段都使用之后,此时即使每个aoi_entity都执行了一次局部移动,其维护on_entity_move的时间相对于网格划分的AOI计算来说也有显著降低。但是对于非局部移动,on_entity_move的执行时间则会显著的增高,最坏情况下如果执行场景的对角线移动,将会执行3次x_list和3次y_list的完整扫描。这种执行时间的不稳定性对于玩家的感官影响是非常恶劣的,为此我们需要对十字链表做一定的修改,在坐标轴上加入一些哨兵节点,来加速这种瞬移过程的处理。
struct aoi_axis_list
{
// anchors[0]保证有效且坐标与head坐标一致
std::vector<aoi_list_node*> anchors;
void on_teleport(aoi_list_entity* cur_entity, const std::array<aoi_list_node*, 3>& cur_nodes)
{
for(auto one_node: cur_nodes)
{
remove_node(one_node);
}
sweep_result temp_sweep_result;
for(auto one_node: cur_nodes)
{
auto temp_iter = std::lower_bound(anchors.begin(), anchors.end(), one_node->pos);
aoi_list_entity* left_anchor = *(temp_iter--);
left_anchor = left_anchor->next;
insert_before(one_node, left_anchor);
// move_right 的第三个参数传0 代表不记录期间遇到的任何节点
move_right(one_node, temp_sweept_result, 0);
}
}
}
在aoi_axis_list中我们用anchors字段存储所有的哨兵节点,按照节点里的pos从小到大排好序,同时我们在运行时保证anchors[0]一定是有效的,且其坐标等同于head节点的坐标,即场景最小坐标值减去所有aoi_entity的最大radius。进行长距离瞬移时,先将当前aoi_list_entity在这个坐标轴上的三个aoi_list_node摘除,然后以二分查找的方式找到第一个pos大于等于 当前entity->pos - radius的节点temp_iter。由于我们保证了head对应的节点一定在anchors的开头 且这个节点的坐标小于任何有效的节点, 所以可以安全的执行temp_iter--操作。执行--操作后temp_iter对应的节点left_anchor坐标一定小于cur_nodes[0]->pos,这样我们按照顺序在left_anchor之前插入cur_nodes,然后再进行向右移动来修正这三个节点即可完成cur_entity的节点更新。如果我们在坐标轴上每K个节点添加一个哨兵,则在包含了N个aoi_entity的坐标轴上的on_teleport的时间为log(N/K) + K,相对于原来的全链表遍历来说时间复杂度远远降低了。而这个anchors数组不需要实时更新,在传送移动不是非常频繁的时候,每分钟更新一次都是可以接受的。
void aoi_axis_list::arrage_anchors() // 这个函数定期执行 在合适的位置插入哨兵
{
for(auto one_anchor: anchors)
{
remove_node(one_anchor);
delete one_anchor;
}
anchors.clear();
int anchor_gap = 30; // 每30个节点插入一个anchor
int temp_counter = anchor_gap; // 这样初始化保证有一个anchor的坐标与head一样
auto next= head.next;
do
{
auto pre = next->pre;
next = next->next;
temp_counter++;
if(temp_counter >= anchor_gap)
{
auto new_anchor = new aoi_list_node;
new_anchor->pos = pre->pos;
new_anchor->type = aoi_list_node_type::invalid;
new_anchor->entity = nullptr;
insert_before(new_anchor, next);
temp_counter = 0;
}
}while(next)
}
上面的更新实现只需要一次全链表遍历,如果在new时复用前面delete的anchor节点,这种复杂度下秒级更新也是可以的。
现在还剩下一个关键的问题,on_teleport维护好三个aoi_list_node之后,如何进一步去维护aoi_entity->interest集合。对于瞬移的aoi_list_entity(M),在其6个aoi_list_node都更新完毕之后,我们利用之前定义的scan函数就可以更新aoi_list_entity(M)->interest集合。然后由于M瞬移导致的aoi_list_entity(N)->interest集合的修改,分如下两步进行:
- 遍历
M->interested内的每个aoi_list_entity(N), 检查M是否还在N的radius范围内,如果不在则从N->interest集合中删除M,并从M->interested中删除N。 - 根据配置好的场景内
list_aoi_entity的最大AOI半径为max_radius,利用anchors在aoi_axis_list上找到包含在[M->pos - max_radius, M->pos + max_radius]区间且覆盖区间最大的节点对(begin_node, end_node),使用scan函数收集其中的type==center的aoi_list_entity集合,对于此集合内的所有aoi_list_entity(N)执行N->calc_aoi(M)
在max_radius与radius相差不大的情况下,上述维护interest集合相关操作的消耗时间基本正比与M->interest.size() + M->interested.size(),在非密集聚集的情况下其执行时间还是可控的。正常的游戏环境下aoi_entity执行局部移动的次数与执行瞬移的次数比值基本都在200以上,所以基于十字链表实现的AOI计算在效率方面相对于网格划分实现的AOI计算有一定的优势。这种优势随着场景内aoi_entity的数量增大而增大,随着每次update_aoi期间参与移动的aoi_entity数量增大而减少。在实际测算中,在一千个aoi_entity的场景中,如果超过1/3的aoi_entity都参与了移动,则基于十字链表的AOI计算不再具有效率优势。
Mosaic Game 的AOI
在mosaic_game中编写了一个单独的库来管理AOI,其项目地址在https://github.com/huangfeidian/aoi。这个库不仅实现了前述的三种AOI算法,统一了AOI系统的相关接口,而且针对业务系统的常规需求做了一些功能增强,其主要额外功能点包括:
-
支持一个
aoi_entity挂载多个radius,这个主要是光环技能系统引入的需求,因为一个entity上可能携带多个光环。此时引入了两个新的概念aoi_pos_entity和aoi_radius_entity:aoi_pos_entity代表一个带位置信息的对象,原来的aoi_entity概念被aoi_pos_entity替换aoi_radius_entity代表挂载在特定aoi_pos_entity上的一个AOI区域,内部负责维护此区域的AOI状态以及进出回调,一个aoi_pos_entity可以包含多个aoi_radius_entity
此时
aoi_entity->interest与aoi_entity->interested两个成员变量也被拆分为aoi_radius_entity->interest和aoi_pos_entity->interested。aoi_radius_entity->interest集合包含的类型是aoi_pos_entity*,对应的aoi_pos_entity->interested包含的类型是aoi_radius_entity。 -
支持
AOI区域的aoi_entity类型过滤,例如NPC的战斗半径区域只关心玩家类型。为此每个aoi_entity都会有一个uint64_t flag字段代表当前aoi_entity的类型标识,例如第0位代表是否是玩家类型,第1位代表是否是NPC类型等等。然后每个aoi_radius_entity在创建的时候都需要提供三个uint64_t flag来进行类型过滤:any_flag拥有其中任何一个flag都可以进入当前区域need_flag需要拥有其标记的所有flag才能进入当前区域forbid_flag拥有其中任何一个flag都会导致不能进入当前区域
此时判断一个
aoi_pos_entity能否进入一个aoi_radius_entity的flag判定逻辑如下:
bool aoi_radius_entity::check_flag(const aoi_pos_entity& other) const
{
auto other_flag = other.entity_flag();
if (other_flag & m_aoi_radius_ctrl.forbid_flag)
{
// 不能携带forbid flag里任何一个bit
return false;
}
if ((other_flag & m_aoi_radius_ctrl.need_flag) != m_aoi_radius_ctrl.need_flag)
{
// 需要有need flag里的所有bit
return false;
}
// 拥有any flag里的任何一个bit
return other_flag & m_aoi_radius_ctrl.any_flag;
}
- 增加
z轴高度限制,以适应三维空间。这个修改对于网格划分的AOI实现没有什么影响,只需要在原来的判定条件里增加一下z轴的判定即可。不过对于十字链表实现的AOI来说,需要引入第三个链表z_list。由于常规场景内的entity的z轴坐标基本都在一个很小的范围内,z_list属于一个集中聚集的状态,这样会导致维护z_list的代价很大。基于这个限制,十字链表的AOI算法在常规的3D场景中使用很少,只有在只考虑x,y的2D-AOI场景中有竞争力。 - 增加强制关注功能,这个主要是处理一些全局强制可见以及组队强制可见的
AOI逻辑。将一个aoi_pos_entity设置为被某个aoi_radius_entity强制关注之后,aoi_pos_entity的移动将不会触发这个aoi_radius_entity的进出回调。外部逻辑可以调用增加强制关注和取消强制关注这两个接口。 - 添加区域查询接口,用来查询指定区域内的
aoi_pos_entity,主要是应对一些技能系统的寻敌需求。这里的区域包括圆形、矩形、圆柱形、扇形这四个形状。 - 增加
interest集合数量限制功能,这个主要是配合客户端能接受的同步aoi_entity数量上限来使用的。 在mosaic_game中场景space_entity负责创建、销毁以及更新aoi::aoi_manager* m_aoi_manager,同时提供此变量的get方法。
aoi::aoi_manager* space_entity::aoi_mgr()
{
return m_aoi_manager;
}
const std::uint32_t m_aoi_update_gap = 200;
void space_entity::update_aoi()
{
m_aoi_manager->update();
m_aoi_update_timer = add_timer_with_gap(std::chrono::milliseconds(m_aoi_update_gap), [this]()
{
update_aoi();
});
}
然后每个actor_entity上都有一个actor_aoi_component负责暴露AOI相关接口并转发到space_entity::aoi_mgr()上,这里提供的接口主要是:
aoi::aoi_pos_idx m_aoi_pos_idx; //当前actor_entity注册到aoi_mgr之后返回的索引
std::unordered_map<std::string, aoi::aoi_radius_idx> m_aoi_radius_names; // 多个aoi_radius注册到aoi_mgr之后返回的索引
void add_force_aoi(const std::string& cur_radius_name, actor_entity* other_actor); // 添加强制AOI关注
void remove_force_aoi(const std::string& cur_radius_name, actor_entity* other_actor); // 取消强制AOI关注
// 添加一个aoi_radius 这里需要提供回调函数和radius的名字
bool add_aoi_radius(const aoi::aoi_radius_controller& cur_aoi_ctrl, std::function<void(actor_entity*, bool)> radius_cb, const std::string& radius_name);
// 取消一个aoi_radius的注册
void remove_aoi_radius(const std::string& radius_name);
// 当actor位置更新之后通知aoi系统
void update_aoi_pos();
// 查询圆形区域内的特定tag的actor_entity
std::vector<actor_entity*> entities_in_range(std::uint64_t entity_tag, float radius);
由于我们支持了单aoi_entity携带多个radius,所以增加一个radius的时候我们需要提供这个radius的名字和对应的进出AOI的回调radius_cb。对于有客户端的player_entity来说,会拥有一个player_aoi_component,这个component在进入场景时都会注册一个用来给客户端同步actor_entity的radius:
// void player_aoi_component::on_enter_space()
aoi::aoi_radius_controller cur_aoi_ctrl;
cur_aoi_ctrl.any_flag = std::numeric_limits<std::uint64_t>::max();
cur_aoi_ctrl.need_flag = (1ull <<std::uint8_t(enums::entity_flag::is_client_visible));
cur_aoi_ctrl.radius = 30;
cur_aoi_ctrl.min_height = cur_aoi_ctrl.max_height = 0; // 不关心高度坐标 只关心平面坐标
cur_aoi_ctrl.forbid_flag = 0;
cur_aoi_ctrl.max_interest_in = 30; // 最大接受30个 entity进入当前aoi
cur_actor_aoi_comp->add_aoi_radius(cur_aoi_ctrl, [this](actor_entity* other, bool is_enter)
{
if(is_enter)
{
on_aoi_enter(other);
}
else
{
on_aoi_leave(other->entity_id(), other->aoi_idx());
}
}, static_type_name());
在触发了on_aoi_enter之后,就会生成一个消息推送给客户端通知创建一个新的actor_entity,消息内会附带这个actor_entity的一些基本数据下去:
void player_aoi_component::on_aoi_enter(actor_entity* other_entity)
{
utility::rpc_msg aoi_enter_msg;
aoi_enter_msg.cmd = "notify_aoi_enter";
aoi_enter_msg.args.reserve(7);
aoi_enter_msg.args.push_back(other_entity->aoi_idx());
aoi_enter_msg.args.push_back(other_entity->entity_id());
aoi_enter_msg.args.push_back(other_entity->online_entity_id());
aoi_enter_msg.args.push_back(other_entity->m_base_desc.m_type_name);
aoi_enter_msg.args.push_back(other_entity->encode_with_flag(std::uint32_t(enums::encode_flags::other_client)));
aoi_enter_msg.args.push_back( other_entity->pos());
aoi_enter_msg.args.push_back( other_entity->yaw());
m_owner->sync_to_self_client(aoi_enter_msg); // 将此消息推送到当前player的客户端
if(!m_owner->get_space()->is_cell_space())
{
return;
}
m_other_sync_versions[other_entity->aoi_idx()] = other_entity->aoi_sync_version();
other_entity->get_component<actor_aoi_component>()->add_sync_player(m_player);
m_owner->dispatcher().dispatch(enums::aoi_event::enter, other_entity);
}
这里我们将此other_entity的aoi_idx也打包进去了,这样客户端接收到之后就可以建立起这个aoi_idx到新生成的client_actor的映射。on_aoi_enter除了把这个other_entity数据下发到客户端之外,还会将当前player_entity加入到other_entity->m_aoi_sync_players集合中,这样后续other_entity发生了一些客户端可见的状态变化时(例如血量 位置改变),就会将这个改变消息打包并广播到other_entity->m_aoi_sync_players对应的所有客户端连接:
void actor_entity::sync_to_others(const std::string& cmd, const std::vector<json>& args)
{
sync_to_others_without_aoi_data(enums::entity_packet::sync_aoi_rpc, *utility::rpc_msg::to_bytes(cmd, args));
}
void actor_entity::sync_to_others_without_aoi_data(enums::entity_packet entity_packet_cmd, const std::string& without_aoi_data)
{
auto cur_aoi_idx = aoi_idx();
std::shared_ptr<std::string> with_aoi_data = std::make_shared<std::string>(without_aoi_data.size() + sizeof(cur_aoi_idx), '0');
std::copy(reinterpret_cast<char*>(&cur_aoi_idx), reinterpret_cast<char*>(&cur_aoi_idx) + sizeof(cur_aoi_idx), with_aoi_data->begin());
std::copy(without_aoi_data.begin(), without_aoi_data.end(), with_aoi_data->begin() + sizeof(cur_aoi_idx));
sync_to_others_with_aoi_data(entity_packet_cmd, with_aoi_data);
}
void actor_entity::sync_to_others_with_aoi_data(enums::entity_packet entity_packet_cmd, std::shared_ptr<const std::string> data)
{
auto cur_ghost_comp = get_component<actor_ghost_component>();
for(auto one_pair: get_component<actor_aoi_component>()->aoi_sync_players())
{
one_pair.second->sync_from_other(cur_ghost_comp->sync_version(), aoi_idx(), entity_packet_cmd, data);
}
}
这里我们先把要广播的数据打包为一个shared_ptr<string>, string的开头两个字节填充当前actor_entity的aoi_idx(),这样接收到此信息的客户端通过开头的两个字节来查询之前notify_aoi_enter时客户端建立的映射就知道这个消息应该归哪个客户端client_actor处理。这里不使用actor_entity->online_id的原因是这个字段是8字节大小的,而aoi_idx只有两字节大小,更省流量。打包好消息之后,再遍历aoi_sync_players集合进行数据发送,由于我们传入的是shared_ptr<string>,所以多个连接之间可以共享这个要发送的消息,避免多个string实例,同时通过引用计数维护的生命周期也更适合异步网络发送的buffer管理。
BigWorld的属性同步
属性定义
在Bigworld中,每一种Entity的具体类型都会有一个对应的entitydef文件来描述其所携带的所有属性以及在其身上声明的所有RPC方法,其文本描述格式为xml。在programming/bigworld/examples/client_integration/python/simple/res/scripts/entity_defs/这个文件夹里
提供了一些具体的Entity定义文件的样例,下面就是其中比较简单的Account.def的内容,:
<root>
<Properties>
<playerName>
<Type> STRING </Type>
<Flags> BASE_AND_CLIENT </Flags>
<Persistent> true </Persistent>
<Editable> true </Editable>
</playerName>
<character>
<Type> STRING </Type>
<Flags> BASE </Flags>
<Persistent> true </Persistent>
<Editable> true </Editable>
</character>
</Properties>
<ClientMethods>
<chatMessage>
<Arg> STRING </Arg>
</chatMessage>
</ClientMethods>
<CellMethods>
</CellMethods>
<BaseMethods>
</BaseMethods>
</root>
在这个entitydef文件里,主要有四个Section:
Properties,代表这个Entity类型所承载的属性,这里以Array形式来声明每个属性,每个属性有四个字段:Type这个属性的值类型,常见值类型包括INT,STRING等,支持Array,Map容器类型,同时支持自定义类型,Flags这个属性的可见性的BitMask,主要有三个Bit来组合,BASE代表Base对象中可见,ClIENT代表自身客户端可见,CELL代表Entity可见,ALL_CLIENTS代表AOI内所有客户端可见,Persistent一个Bool值,代表这个属性是否需要存库Editable,一个Bool值,代表这个属性是否可以在运行时修改,
ClientMethods以Array的形式来声明客户端上可以调用的RPC,RPC的每个参数按照顺序来填充ARG字段,可以填多个CellMethods,以Array的形式来声明CellEntity上可以调用的RPC,RPC的每个参数按照顺序来填充ARG字段,可以填多个BaseMethods,以Array的形式来声明CellEntity上可以调用的RPC,RPC的每个参数按照顺序来填充ARG字段,可以填多个
当前我们重点关注Properties字段,在上面的样例文件里声明了两个字符串属性,playerName与character,都比较简单。在同目录下的ClientAvatar.def里属性就比较复杂了,多了很多字段:
<root>
<Volatile>
<position/>
<yaw/>
<pitch> 20 </pitch>
</Volatile>
<Properties>
<playerName>
<Type> STRING </Type>
<Flags> ALL_CLIENTS </Flags>
<Persistent> true </Persistent>
<Editable> true </Editable>
<Identifier> true </Identifier>
</playerName>
<prop1>
<Type> INT32 </Type>
<Flags> BASE_AND_CLIENT </Flags>
<Default> 1 </Default>
</prop1>
<prop2>
<Type> INT16 </Type>
<Flags> ALL_CLIENTS </Flags>
<Default> 2 </Default>
<Persistent> true </Persistent>
</prop2>
<prop3>
<Type> INT8 </Type>
<Flags> OTHER_CLIENTS </Flags>
<Default> 3 </Default>
</prop3>
<prop4>
<Type> INT8 </Type>
<Flags> CELL_PRIVATE </Flags>
<Default> 4 </Default>
</prop4>
<prop5>
<Type> USER_TYPE <implementedBy> TestDataType.instance </implementedBy> </Type>
<Flags> ALL_CLIENTS </Flags>
<Persistent> true </Persistent>
</prop5>
<_timer1>
<Type> INT32 </Type>
<Flags> CELL_PRIVATE </Flags>
</_timer1>
<_timer2>
<Type> INT32 </Type>
<Flags> CELL_PRIVATE </Flags>
</_timer2>
<_timerTick>
<Type> INT32 </Type>
<Flags> CELL_PRIVATE </Flags>
</_timerTick>
</Properties>
</root>
这里最值得注意的是属性的类型并不限制于编程语言里常见的值类型,我们可以使用自己创建的脚本类型。例如prop5这个属性的类型声明为USER_TYPE,代表一个在python脚本里定义的类型,这个自定义类型由TestDataType.instance来实现,下面就是整个TestDataType.py的内容:
import struct
class Test( object ):
def __init__( self, intValue, stringValue, dictValue ):
self.intValue = intValue
self.stringValue = stringValue
self.dictValue = dictValue
def writePascalString( string ):
return struct.pack( "b", len(string) ) + string
def readPascalString( stream ):
(length,) = struct.unpack( "b", stream[0] )
string = stream[1:length+1]
stream = stream[length+1:]
return (string, stream)
class TestDataType:
def addToStream( self, obj ):
if not obj:
obj = self.defaultValue()
stream = struct.pack( "i", obj.intValue )
stream += writePascalString( obj.stringValue )
stream += struct.pack( "i", len( obj.dictValue.keys() ) )
for key in obj.dictValue.keys():
stream += writePascalString( key )
stream += writePascalString( obj.dictValue[key] )
return stream
def createFromStream( self, stream ):
(intValue,) = struct.unpack( "i", stream[:4] )
stream = stream[4:]
stringValue, stream = readPascalString( stream )
dictValue = {}
(dictSize,) = struct.unpack( "i", stream[:4] )
stream = stream[4:]
while len( stream ):
key, stream = readPascalString( stream )
value, stream = readPascalString( stream )
dictValue[key] = value
return Test( intValue, stringValue, dictValue )
def addToSection( self, obj, section ):
if not obj:
obj = self.defaultValue()
section.writeInt( "intValue", obj.intValue )
section.writeString( "stringValue", obj.stringValue )
s = section.createSection( "dictValue" )
for key in obj.dictValue.keys():
v = s.createSection( "value" )
print key, obj.dictValue[key]
v.writeString( "key", key )
v.writeString( "value", obj.dictValue[key] )
def createFromSection( self, section ):
intValue = section.readInt( "intValue" )
if intValue is None:
return self.defaultValue()
stringValue = section.readString( "stringValue" )
dictValue = {}
for value in section["dictValue"].values():
dictValue[value["key"].asString] = value["value"].asString
return Test( intValue, stringValue, dictValue )
def fromStreamToSection( self, stream, section ):
o = self.createFromStream( stream )
self.addToSection( o, section )
def fromSectionToStream( self, section ):
o = self.createFromSection( section )
return self.addToStream( o )
def bindSectionToDB( self, binder ):
binder.bind( "intValue", "INT32" )
binder.bind( "stringValue", "STRING", 50 )
binder.beginTable( "dictValue" )
binder.bind( "key", "STRING", 50 )
binder.bind( "value", "STRING", 50 )
binder.endTable()
def defaultValue( self ):
return Test( 100, "Blah", { "happy": "sad", "naughty": "nice",
"coopers": "carlton" } )
instance = TestDataType()
# TestDataType.py
从这个简单的Python文件内容可以看到,我们需要为脚本提供的数据类型为Test,有三个字段intValue, stringValue, dictValue。但是为了向属性系统注册,需要提供一个额外的属性定义辅助类型TestDataType,通过实现这几个接口来向属性系统注册Test:
bindSectionToDB,这个接口提供当前属性在与数据库进行交互时的类型映射defaultValue,初始情况下这个属性类型的默认值fromStreamToSection,从二进制流里如何解析出当前属性fromSectionToStream,在属性系统里将当前属性序列化为二进制流
整个属性系统其实是CPP提供的基础实现,并加上了一些方便使用者去编辑的属性定义文件。实际在运行时使用Entity的时候,这些属性的声明都会转换为DataDescription这个CPP类型,下面就是这个CPP类型的一些核心变量声明,基本可以对的上XML里和Python里的相关字段:
DataTypePtr pDataType_;
int dataFlags_;
ScriptObject pInitialValue_;
DataSectionPtr pDefaultSection_;
int index_;
int localIndex_; // Index into local prop value vector.
int eventStampIndex_; // Index into time-stamp vector.
int clientServerFullIndex_;
int detailLevel_;
int databaseLength_;
DatabaseIndexingType databaseIndexingType_;
bool hasSetterCallback_;
bool hasNestedSetterCallback_;
bool hasSliceSetterCallback_;
BW::string componentName_;
我们在mosaic_game里属性系统是直接利用声明的CPP结构体类型来作为数据存储容器,并通过libclang来自动生成一些辅助接口来使用的,整体的原理非常简单。但是Bigworld里的属性系统的实现其实非常复杂,他为每个Entity类型构造了一个脚本系统的描述结构EntityDescription,其中属性部分的逻辑都在EntityDescription的父类BaseUserDataObjectDescription里:
/**
* This class is the entity type of a base
*/
class EntityType : public ReferenceCount
{
// 省略很多代码
public:
const EntityDescription & description() const
{ return entityDescription_; }
};
/**
* This class is used to describe a type of entity. It describes all properties
* and methods of an entity type, as well as other information related to
* object instantiation, level-of-detail etc. It is normally created on startup
* when the entities.xml file is parsed.
*
* @ingroup entity
*/
class EntityDescription: public BaseUserDataObjectDescription
{
};
/**
* This class is used to describe a type of User Data Object. It describes all properties
* a chunk item. It is normally created on startup when the user data objects.xml file is parsed.
*
* @ingroup udo
*/
class BaseUserDataObjectDescription
{
public:
BaseUserDataObjectDescription();
virtual ~BaseUserDataObjectDescription();
// TODO: Move this to UserDataObjectDescription
bool parse( const BW::string & name,
DataSectionPtr pSection = NULL );
void addToDictionary( DataSectionPtr pSection, ScriptDict sDict ) const;
BWENTITY_API const BW::string& name() const;
BWENTITY_API unsigned int propertyCount() const;
BWENTITY_API DataDescription* property( unsigned int n ) const;
BWENTITY_API DataDescription* findProperty(
const char * name, const char * component = "" ) const;
DataDescription* findCompoundProperty( const char * name ) const;
protected:
virtual bool parseProperties( DataSectionPtr pProperties,
const BW::string & componentName ) = 0;
virtual bool parseInterface( DataSectionPtr pSection,
const char * interfaceName,
const BW::string & componentName );
virtual bool parseImplements( DataSectionPtr pInterfaces,
const BW::string & componentName );
virtual const BW::string getDefsDir() const = 0;
BW::string name_;
typedef BW::vector< DataDescription > Properties;
Properties properties_;
typedef StringMap< unsigned int > PropertyMap;
PropertyMap & getComponentProperties( const char * component );
#ifdef EDITOR_ENABLED
BW::string editorModel_;
#endif
private:
typedef StringMap< PropertyMap > ComponentPropertyMap;
ComponentPropertyMap propertyMap_;
};
在BaseUserDataObjectDescription里使用数组类型BW::vector< DataDescription > properties_;来存储所有的属性,同时对外提供属性结构的查询接口来隐藏底层的实现。然后properties_里的每个元素DataDescription的类型描述结构DataTypePtr不仅仅可以声明为INT,STRING等基础类型,还可以声明为数组、字典等复杂类型,甚至还能支持在Python里定义结构体。复杂类型又可以嵌套, 这样嵌套起来就能组合成一个非常有表现力的属性元数据描述系统。整个属性系统的实现被封装为了一个lib,放在programming/bigworld/lib/entitydef文件夹下,有兴趣的读者可以去研究一下其完整的实现。
这里我们先忽略掉整个属性系统的完整实现,主要考虑在Entity上对这个属性系统的数据读写操作以及后续的同步。首先需要关注的是当一个Entity从数据库中加载出来时的属性解析处理,这部分的代码在Base::init中:
/**
* This method initialises this base object.
*
* @param pDict The dictionary for the script object or NULL.
* The property values of this dictionary are assumed to be
* of correct types for this entity type.
* @param pCellData A dictionary containing the values to create the cell
* entity with, or NULL.
* @param pLogOnData A string containing a value provided by the billing
* system if this is a Proxy crated by player login, or
* NULL.
*
* @return True if successful, otherwise false.
*/
bool Base::init( PyObject * pDict, PyObject * pCellData,
const BW::string * pLogOnData )
{
MF_ASSERT( !PyErr_Occurred() );
MF_ASSERT( pLogOnData == NULL || this->isProxy() );
// creation of entity delegate
if (!this->initDelegate( /*templateID*/ "" ))
{
ERROR_MSG( "Base::init(%d): Failed to initialise delegate\n", id_);
return false;
}
if (pDict)
{
ScriptDict dict( pDict, ScriptDict::FROM_BORROWED_REFERENCE );
ScriptDict::size_type pos = 0;
// populate entity properties
for (ScriptObject key, value; dict.next( pos, key, value ); )
{
ScriptString propertyName = key.str( ScriptErrorPrint() );
const char * attr = propertyName.c_str();
DataDescription* pDataDescription =
this->pType()->description().findCompoundProperty( attr );
if (pDataDescription &&
pDataDescription->isComponentised() &&
pDataDescription->isBaseData())
{
continue; // skip base components properties
}
if (!this->assignAttribute( propertyName, value, pDataDescription ))
{
ERROR_MSG( "Base::init(%d): Failed to assign '%s'\n",
id_, attr );
Script::printError();
}
}
// populate components properties
if (!populateDelegateWithDict( this->pType()->description(),
pEntityDelegate_.get(), dict, EntityDescription::BASE_DATA ))
{
ERROR_MSG("Base::init(%d): Failed to populate delegate with data\n",
id_);
return false;
}
}
// 省略属性无关逻辑代码
return true;
}
这里的pDict就是属性在Python脚本里解析出来的顶层Dict,有了这个数据Dict和当前Entity的属性结构this->pType()->description()之后,就开始遍历Dict里的每个元素,找到每个元素对应的属性定义,使用assignAttribute来做CPP属性字典的初始化:
/**
* Assigns an attribute, canonicalising the data type if it is a property.
*
* If the value is of incorrect type, a TypeError is raised.
*
* @param attr The name of the property to assign.
* @param value The value of the property to assign.
* @param pDataDescription The data description for the name. If NULL,
* the potential property is looked up from the
* attribute. If no such property exists, a normal
* attribute assignment will be performed.
*
* @return 0 on success, otherwise -1 with the Python error state raised.
*/
bool Base::assignAttribute( const ScriptString & attrObj,
const ScriptObject & value, DataDescription * pDataDescription )
{
if ((pDataDescription == NULL) || !pDataDescription->isBaseData())
{
// 忽略一些异常情况
}
ScriptObject pRealNewValue( value );
pRealNewValue = pDataDescription->dataType()->attach(
pRealNewValue, NULL, 0 );
if (!pRealNewValue)
{
PyErr_Format( PyExc_TypeError,
"%s.%s is a BASE property and must be set to the "
"correct type - %s",
this->pType()->name(),
pDataDescription->name().c_str(),
pDataDescription->dataType()->typeName().c_str() );
return false;
}
return this->PyObjectPlus::pySetAttribute( attrObj, pRealNewValue );
}
在assignAttribute里会使用pDataDescription->dataType()->attach对传入过来的value做属性类型匹配检查,通过检查之后才能真正的设置到属性字典里。
从上面的属性初始化流程可以看出,Bigworld的属性存库数据应该都是由Python脚本序列化的,具体序列化格式完全由Python脚本控制。运行时的属性系统虽然底层是CPP实现的,但是每个属性字段的值类型都是一个PyObject,属性系统框架负责维护属性值类型与属性定义类型的匹配,这样避免在使用CPP公开的属性操作接口时出现错误。
属性修改回调
属性系统除了管理属性的序列化和反序列化之外,最重要的功能其实是属性修改的通知回调,因为很多属性修改之后需要同步到自身客户端、他人客户端等终端设备上。在Entity上提供了下面的两个脚本系统可以调用的属性读写接口:
ScriptObject pyGetAttribute( const ScriptString & attrObj );
bool pySetAttribute( const ScriptString & attrObj,
const ScriptObject & value );
这里我们只关心pySetAttribute这个接口,实现上很简单,根据传入的属性名找到对应的属性字段描述DataDescription,然后利用changeOwnedProperty来执行数据类型判定并修改:
/**
* This method is responsible for setting script attributes associated with
* this object.
*/
bool Entity::pySetAttribute( const ScriptString & attrObj,
const ScriptObject & value )
{
const char * attr = attrObj.c_str();
if (!this->isRealToScript())
{
// 省略非real entity修改属性时的报错
}
// see if it's one of the entity's properties
DataDescription * pDescription = pEntityType_->description( attr,
/*component*/"" );
if (pDescription != NULL && pDescription->isCellData())
{
// 忽略数据库索引字段的处理
int cellIndex = pDescription->localIndex();
ScriptObject pOldValue = properties_[cellIndex];
DataType & dataType = *pDescription->dataType();
if (!propertyOwner_.changeOwnedProperty(
properties_[ cellIndex ],
value, dataType, cellIndex ))
{
// 忽略一些报错代码
}
return true;
}
// 忽略一些代码
}
这里的propertyOwner_是一个比较特殊的成员变量,与properties_同时在Entity里被声明:
typedef BW::vector<ScriptObject> Properties;
Properties properties_;
PropertyOwnerLink<Entity> propertyOwner_;
这个PropertyOwnerLink相当于properties里的一级属性的数组,继承自PropertyOwnerBase, 在PropertyOwnerBase上提供了changeOwnedProperty这个接口来修改一个属性:
/**
* This base class is an object that can own properties.
*/
class PropertyOwnerBase
{
public:
virtual ~PropertyOwnerBase() { }
/**
* This method is called by a child PropertyOwnerBase to inform us that
* a property has changed. Each PropertyOwner should pass this to their
* parent, adding their index to the path, until the Entity is reached.
*
* @return true if succeeded, false if an exception was raised
*/
virtual bool onOwnedPropertyChanged( PropertyChange & change )
{
return true;
}
// 忽略一些虚接口声明
/**
* This method modifies a property owned by this object.
*
* @param rpOldValue A reference that will be populated with the old value.
* @param pNewValue The new value to set the property to.
* @param dataType The type of the property being changed.
* @param index The index of the property being changed.
* @param forceChange If true, the change occurs even if the old and new
* values are the same.
*/
bool changeOwnedProperty( ScriptObject & rpOldValue, ScriptObject pNewValue,
const DataType & dataType, int index,
bool forceChange = false );
};
/**
* This class specialises PropertyOwnerBase to add functionality for top-level
* Property Owners. That is Entity.
*/
class TopLevelPropertyOwner : public PropertyOwnerBase
{
public:
bool setPropertyFromInternalStream( BinaryIStream & stream,
ScriptObject * ppOldValue, ScriptList * ppChangePath,
int rootIndex, bool * pIsSlice );
int setNestedPropertyFromExternalStream(
BinaryIStream & stream, bool isSlice,
ScriptObject * ppOldValue, ScriptList * ppChangePath );
private:
virtual ScriptObject getPyIndex( int index ) const
{
MF_ASSERT( 0 );
return ScriptObject();
}
};
/**
* This is a handy linking class for objects that dislike virtual functions.
*/
template <class C>
class PropertyOwnerLink : public TopLevelPropertyOwner
{
public:
PropertyOwnerLink( C & self ) : self_( self ) { }
virtual bool onOwnedPropertyChanged( PropertyChange & change )
{
return self_.onOwnedPropertyChanged( change );
}
// 省略一些接口声明
private:
C & self_;
};
当changeOwnedProperty被调用到的时候,会判断新值和旧值是否相等,然后再用之前介绍过的attach接口来做新值的类型判定并执行赋值操作:
/**
* This method changes a property owned by this one. It propagates this change
* to the top-level owner.
*/
bool PropertyOwnerBase::changeOwnedProperty( ScriptObject & rpOldValue,
ScriptObject pNewValue, const DataType & dataType, int index,
bool forceChange )
{
if (dataType.canIgnoreAssignment( rpOldValue, pNewValue ))
{
return true;
}
bool changed = forceChange ||
dataType.hasChanged( rpOldValue, pNewValue );
SinglePropertyChange change( index, this->getNumOwnedProperties(), dataType );
PropertyOwnerBase * pTopLevelOwner = NULL;
if (changed)
{
if (!this->getTopLevelOwner( change, pTopLevelOwner ))
{
return false;
}
}
// TODO: attach() should be const
ScriptObject pRealNewValue =
const_cast< DataType & >( dataType ).attach( pNewValue, this, index );
if (!pRealNewValue)
{
return false;
}
const_cast< DataType & >( dataType ).detach( rpOldValue );
rpOldValue = pRealNewValue;
if (pTopLevelOwner != NULL)
{
change.setValue( pRealNewValue );
if (!pTopLevelOwner->onOwnedPropertyChanged( change ))
{
return false;
}
}
return true;
}
当赋值操作attach执行成功之后,会使用一个SinglePropertyChange的结构体来记录这个赋值操作,然后再通过onOwnedPropertyChanged这个接口来触发外层的属性修改后回调:
/**
* This method is called by a child PropertyOwnerBase to inform us that
* a property has changed. Each PropertyOwner should pass this to their
* parent, adding their index to the path, until the Entity is reached.
*
* @return true if succeeded, false if an exception was raised
*/
virtual bool onOwnedPropertyChanged( PropertyChange & change )
{
return true;
}
注意看这里的注释,可以看出这里定位一个属性的方法也跟我们之前在mosaic_game里设计的属性索引系统一样,每一层属性都可以看作一个数组,每一个属性都会记录自己在上一层属性数组里的索引值。当一个属性被修改之后,构造出来的PropertyChange结构体里会使用数组ChangePath来维护各个层级的索引,每次一个属性被修改之后,其构造的PropertyChange会通过getTopLevelOwner将属性层级一路传递到Entity上,在这传递的过程中addToPath会被调用,path_就会被不断的添加每一层的属性索引:
/**
* This class represents a change to a property of an entity.
*/
class PropertyChange
{
public:
void addToPath( int index, int indexLength )
{
path_.push_back( ChangePath::value_type( index, indexLength ) );
}
protected:
// A sequence of child indexes ordered from the leaf to the root
// (i.e. entity). For example, 3,4,6 would be the 6th property of the
// entity, the 4th "child" of that property and then the 3rd "child".
// E.g. If the 6th property is a list of lists called myList, this refers
// to entity.myList[4][3]
typedef BW::vector< std::pair< int32, int32 > > ChangePath;
ChangePath path_; //< Path to the owner being changed.
};
/**
* This class is a specialised PropertyChange. It represents a single value of
* an entity changing.
*/
class SinglePropertyChange : public PropertyChange
{
};
/**
* One of our properties is telling us it's been changed internally.
*/
bool IntermediatePropertyOwner::getTopLevelOwner( PropertyChange & change,
PropertyOwnerBase *& rpTopLevelOwner )
{
if (this->shouldPropagate())
{
change.isNestedChange( true );
bool result = pOwner_->getTopLevelOwner( change, rpTopLevelOwner );
if (rpTopLevelOwner != pOwner_)
{
change.addToPath( ownerRef_, pOwner_->getNumOwnedProperties() );
}
else
{
change.rootIndex( ownerRef_ );
}
return result;
}
return true;
}
在mosaic_game里我们强制要求了属性层级不能超过7级,且单层属性结构体里的属性成员个数不能超过254,这样就可以将这个属性层级数组压缩为一个八字节的std::uint64_t,相对于这里的vector来说节省了很多空间。
对于PropertyOwnerLink来说,属性修改后的通知回调会调用Entity::onOwnedPropertyChanged:
template <class C>
class PropertyOwnerLink : public TopLevelPropertyOwner
{
public:
PropertyOwnerLink( C & self ) : self_( self ) { }
virtual bool onOwnedPropertyChanged( PropertyChange & change )
{
return self_.onOwnedPropertyChanged( change );
}
};
/**
* This method is called when a property owned by this entity changes. It may
* be a top-level property, a property nested inside an array etc, or even a
* change in a slice of an array.
*/
bool Entity::onOwnedPropertyChanged( PropertyChange & change )
{
const DataDescription * pDescription =
pEntityType_->propIndex( change.rootIndex() );
return this->onOwnedPropertyChanged( pDescription, change );
}
这第二个onOwnedPropertyChanged函数重载就是属性修改后执行网络同步的最核心代码,这个函数的实现有点长,这里我们先简略的展示其大概,具体的内容放在后面的小结中展开介绍:
bool Entity::onOwnedPropertyChanged( const DataDescription * pDescription,
PropertyChange & change )
{
if (!this->isRealToScript())
{
PyErr_Format( PyExc_AttributeError,
"Can't change defined property %s.%s on ghost %d\n",
this->pType()->name(), pDescription->name().c_str(), id_ );
return false;
}
if (this->cell().pReplayData())
{
// 将属性修改推送到录像系统
this->cell().pReplayData()->addEntityProperty( *this, *pDescription,
change );
}
if (pDescription->isGhostedData()) // 如果当前属性需要同步到ghost entity
{
// If the data is for other clients, add an event to our history.
if (pDescription->isOtherClientData())
{
// 如果这个属性是AOI内其他客户端可见 则先在这个分支处理处理一下
}
// Send the new data to all our ghosts
// 然后发送这个属性通知到当前的所有ghost里
}
// If the data is for our own client, add it to our bundle
if (pDescription->isOwnClientData() && pReal_->pWitness() != NULL)
{
// 这个分支处理当前自身客户端可见的属性同步
}
return true;
}
Real-Ghost之间的属性同步
当RealEntity决定需要往周围的一个Cell里创建GhostEntity的时候,会调用Entity::createGhost:
/**
* This method adds a createGhost message to a bundle.
*/
void Entity::createGhost( Mercury::Bundle & bundle )
{
bundle.startMessage( CellAppInterface::createGhost );
bundle << this->cell().space().id();
this->writeGhostDataToStream( bundle );
}
/**
* This method puts the variable state data onto the stream that initGhost
* expects to take off.
*
* @param stream The stream to put the data on.
*/
void Entity::writeGhostDataToStream( BinaryOStream & stream ) const
{
// Note: The id and entityTypeID is not read off by readGhostDataFromStream.
// They are read by Space::createGhost
// Note: Also read by BufferGhostMessage to get numTimesRealOffloaded_.
stream << id_ << this->entityTypeID();
CompressionOStream compressionStream( stream,
pEntityType_->description().internalNetworkCompressionType() );
this->writeGhostDataToStreamInternal( compressionStream );
}
createGhost的时候会先调用writeGhostDataToStream,这个函数负责先创建一个带数据压缩的stream,然后再将这个stream传递到writeGhostDataToStreamInternal来填入相关数据。因为GhostEntity的数据一般比较庞大,使用压缩可以降低传输的数据大小。这里的writeGhostDataToStreamInternal除了会把Base的地址和当前RealEntity的地址加入到序列化数据之外,还会遍历当前的所有属性,获取其中与ghost相关的字段,将这些属性字段添加到stream之中:
/**
* This method is called by writeGhostDataToStream once the decision on
* whether or not to compress has been made.
*/
void Entity::writeGhostDataToStreamInternal( BinaryOStream & stream ) const
{
stream << numTimesRealOffloaded_ << localPosition_ << isOnGround_ <<
lastEventNumber_ << volatileInfo_;
stream << CellApp::instance().interface().address();
stream << baseAddr_;
stream << localDirection_;
propertyEventStamps_.addToStream( stream );
TOKEN_ADD( stream, "GProperties" );
// Do ghosted properties dependent on entity type
//this->pType()->addDataToStream( this, stream, DATA_GHOSTED );
// write our ghost properties to the stream
for (uint32 i = 0; i < pEntityType_->propCountGhost(); ++i)
{
MF_ASSERT( properties_[i] );
DataDescription * pDataDesc = pEntityType_->propIndex( i );
// TODO - implement component properties processing here
MF_ASSERT( !pDataDesc->isComponentised() );
ScriptDataSource source( properties_[i] );
if (!pDataDesc->addToStream( source, stream, false ))
{
CRITICAL_MSG( "Entity::writeGhostDataToStream(%u): "
"Could not write ghost property %s.%s to stream\n",
id_, this->pType()->name(), pDataDesc->name().c_str() );
}
}
TOKEN_ADD( stream, "GController" );
this->writeGhostControllersToStream( stream );
TOKEN_ADD( stream, "GTail" );
stream << periodsWithoutWitness_ << aoiUpdateSchemeID_;
}
这里为了方便区分Ghost可见属性与Real可见属性,EntityType在获取了属性定义文件之后,在其构造函数里会优先将Ghost属性放在属性数组的开头,然后再放Real可见属性:
/**
* Constructor
*
* @param entityDescription Entity data description
* @param pType The Python class that is associated with this entity type.
* This object steals the reference from the caller
*/
EntityType::EntityType( const EntityDescription& entityDescription,
PyTypeObject * pType ) :
entityDescription_( entityDescription ),
pPyType_( pType ),
#if !ENABLE_WATCHERS
detailedPositionDescription_( "detailedPosition" ),
#endif
expectsNearbyEntity_( false )
{
MF_ASSERT( !pType ||
(PyType_Check( pType ) &&
PyObject_IsSubclass( (PyObject *)pType,
(PyObject*)&Entity::s_type_ )) );
propCountGhost_ = 0;
for (uint i = 0; i < entityDescription_.propertyCount(); i++)
{
DataDescription * pDesc = entityDescription_.property( i );
if (!pDesc->isCellData()) continue;
if (pDesc->isComponentised()) continue;
if (pDesc->isGhostedData())
{
propDescs_.insert( propDescs_.begin() + propCountGhost_++, pDesc );
}
else
{
propDescs_.push_back( pDesc );
}
}
// 暂时忽略无关代码
}
在这样的排列下,propDescs_[0:propCountGhost_]部分就全都是Ghost可见属性了,所以遍历Ghost可见属性的时候可以无视后面的元素。
其实这里的GhostEntity就是没有RealEntity的Entity,在这个Entity以GhostEntity的形式被创建的时候,会调用initGhost来读取之前传入的相关数据:
/**
* This method creates a ghost entity in this space. This version of
* createGhost already has the entity's id streamed off.
*/
void Space::createGhost( const EntityID entityID, BinaryIStream & data )
{
//ToDo: remove when load balancing is supported on Delegate types
// of physical spaces
if (IGameDelegate::instance() != NULL) {
ERROR_MSG( "Space::createGhost: "
"Currently not supported by Delegate Physical spaces" );
return;
}
AUTO_SCOPED_PROFILE( "createGhost" );
SCOPED_PROFILE( TRANSIENT_LOAD_PROFILE );
// Build up the Entity structure
EntityTypeID entityTypeID;
data >> entityTypeID;
EntityPtr pNewEntity = this->newEntity( entityID, entityTypeID );
pNewEntity->initGhost( data );
Entity::population().notifyObservers( *pNewEntity );
}
/**
* This method should be called on a newly created entity to make it a ghost
* entity. Either this method or initReal should be called immediately after
* the constructor.
*
* @see initReal
*/
void Entity::initGhost( BinaryIStream & data )
{
static ProfileVal localProfile( "initGhost" );
START_PROFILE( localProfile );
int dataSize = data.remainingLength();
this->createEntityDelegate();
this->readGhostDataFromStream( data );
// 省略后续代码
}
initGhost负责调用readGhostDataFromStream将之前writeGhostDataToStream压入的数据先执行解压缩,然后再通过readGhostDataFromStreamInternal解析出来:
/**
* This method reads ghost data from the input stream. This matches the data
* that was added by writeGhostDataToStream. It is called by initGhost.
*
* @see writeGhostDataToStream
* @see initGhost
*/
void Entity::readGhostDataFromStream( BinaryIStream & data )
{
CompressionIStream compressionStream( data );
this->readGhostDataFromStreamInternal( compressionStream );
}
/**
* This method is called by readGhostDataFromStream once the decision on
* whether or not to uncompress has been made.
*/
void Entity::readGhostDataFromStreamInternal( BinaryIStream & data )
{
// This was streamed on by Entity::writeGhostDataToStream.
data >> numTimesRealOffloaded_ >> localPosition_ >> isOnGround_ >>
lastEventNumber_ >> volatileInfo_;
eventHistory_.lastTrimmedEventNumber( lastEventNumber_ );
globalPosition_ = localPosition_;
// Initialise the structure that stores the time-stamps for when
// clientServer properties were last changed.
propertyEventStamps_.init( pEntityType_->description() );
Mercury::Address realAddr;
data >> realAddr;
pRealChannel_ = CellAppChannels::instance().get( realAddr );
data >> baseAddr_;
data >> localDirection_;
globalDirection_ = localDirection_;
propertyEventStamps_.removeFromStream( data );
TOKEN_CHECK( data, "GProperties" );
// Read in the ghost properties
MF_ASSERT( properties_.size() == pEntityType_->propCountGhost() );
for (uint32 i = 0; i < properties_.size(); ++i)
{
DataDescription & dataDescr = *pEntityType_->propIndex( i );
// TODO - implement component properties processing here
MF_ASSERT( !dataDescr.isComponentised() );
DataType & dt = *dataDescr.dataType();
// read and attach the property
ScriptDataSink sink;
MF_VERIFY( dt.createFromStream( data, sink,
/* isPersistentOnly */ false ) );
ScriptObject value = sink.finalise();
if (!(properties_[i] = dt.attach( value, &propertyOwner_, i )))
{
CRITICAL_MSG( "Entity::initGhost(%u):"
"Error streaming off entity property %u\n", id_, i );
}
}
// 省略后续代码
}
在这个readGhostDataFromStreamInternal也会遍历properties_[0:propCountGhost]这些属性,然后依次的解析之前序列化进入的属性数据。这样就完成了创建GhostEntity时,当前所有的GhostEntity可见属性与RealEntity上的属性的初次同步。
然后在后续的属性修改回调中,如果发现修改的属性是GhostEntity可见的属性,则会将这个属性修改信息以CellAppInterface::ghostedDataUpdate这个RPC从RealEntity同步到所有的GhostEntity上:
bool Entity::onOwnedPropertyChanged( const DataDescription * pDescription,
PropertyChange & change )
{
// 省略开头的一些判断
if (pDescription->isGhostedData())
{
// If the data is for other clients, add an event to our history.
if (pDescription->isOtherClientData())
{
// 省略其他客户端可见属性的相关代码
}
// Send the new data to all our ghosts
RealEntity::Haunts::iterator iter = pReal_->hauntsBegin();
while (iter != pReal_->hauntsEnd())
{
Mercury::Bundle & bundle = iter->bundle();
#if ENABLE_WATCHERS
int oldBundleSize = bundle.size();
#endif
bundle.startMessage( CellAppInterface::ghostedDataUpdate );
bundle << this->id();
bundle << int32( pDescription->index() );
change.addToInternalStream( bundle );
#if ENABLE_WATCHERS
pDescription->stats().countSentToGhosts( bundle.size() - oldBundleSize );
pEntityType_->stats().countSentToGhosts( bundle.size() - oldBundleSize );
#endif
++iter;
}
}
// 省略无关代码
return true;
}
当GhostEntity接收到这个ghostedDataUpdate的消息之后,会首先解析被修改属性的index,然后查找对应的属性描述信息DataDescrition,最后使用setPropertyFromInternalStream这个接口来执行属性回放:
/**
* This method handles a message that is used to change property data on a
* ghost.
*/
void Entity::ghostedDataUpdate( BinaryIStream & data )
{
MF_ASSERT( !this->isReal() );
uint32 dataSize = data.remainingLength();
int32 propertyIndex;
data >> propertyIndex;
const DataDescription * pDescription =
pEntityType_->description().property( propertyIndex );
MF_ASSERT( pDescription != NULL );
if (pDescription->isComponentised())
{
// TODO: Handle component stream
CRITICAL_MSG( "Entity::ghostedDataUpdate: "
"Unable to handle component update\n" );
}
else
{
ScriptObject pOldValue = ScriptObject::none();
ScriptList pChangePath = ScriptList();
bool isSlice = false;
bool success = propertyOwner_.setPropertyFromInternalStream( data,
&pOldValue, &pChangePath,
pDescription->localIndex(),
&isSlice );
pDescription->stats().countReceived( dataSize );
if (!success)
{
ERROR_MSG( "Entity::ghostedDataUpdate: Failed for %s.%s id = %d\n",
pEntityType_->name(),
pDescription->name().c_str(),
id_ );
return;
}
pDescription->callSetterCallback(
ScriptObject( this, ScriptObject::FROM_BORROWED_REFERENCE ),
pOldValue, pChangePath, isSlice );
}
}
属性回放接口setPropertyFromInternalStream会根据这个index来执行setOwnedProperty操作:
/**
* This method sets an owned property from a stream that has been sent within
* the server.
*/
bool TopLevelPropertyOwner::setPropertyFromInternalStream(
BinaryIStream & stream,
ScriptObject * ppOldValue,
ScriptList * ppChangePath,
int rootIndex,
bool * pIsSlice)
{
int8 flags;
stream >> flags;
bool isSlice = (flags & PropertyChange::FLAG_IS_SLICE) != 0;
bool isNested = (flags & PropertyChange::FLAG_IS_NESTED) != 0;
if (pIsSlice)
{
*pIsSlice = isSlice;
}
if (isNested)
{
PropertyChangeReader * pReader = getPropertyChangeReader( isSlice );
return pReader->readSimplePathAndApply( stream,
this->getChildPropertyOwner( rootIndex ),
ppOldValue, ppChangePath );
}
MF_ASSERT( !isSlice );
// See PropertyChangeReader::doApply and SinglePropertyChangeReader::apply()
ScriptObject pOldValue = this->setOwnedProperty( rootIndex, stream );
if (!pOldValue)
{
ERROR_MSG( "TopLevelPropertyOwner::setPropertyFromInternalStream: "
"Old value is NULL\n" );
}
else if (ppOldValue)
{
*ppOldValue = pOldValue;
}
return true;
}
如果当前修改的就是顶层属性,那么就会简单的调用setOwnedProperty来完成属性回放,这个setOwnedProperty又会中转回Entity::setOwnedProperty上:
/**
* This is a handy linking class for objects that dislike virtual functions.
*/
template <class C>
class PropertyOwnerLink : public TopLevelPropertyOwner
{
public:
virtual ScriptObject setOwnedProperty( int ref, BinaryIStream & data )
{
return self_.setOwnedProperty( ref, data );
}
private:
C & self_;
}
/**
* This method is called to change the given property.
*/
ScriptObject Entity::setOwnedProperty( int ref, BinaryIStream & data )
{
DataDescription* pDataDesc = pEntityType_->propIndex( ref );
DataType & dt = *pDataDesc->dataType();
// reconstruct the python value from the stream
ScriptDataSink sink;
if (!dt.createFromStream( data, sink, /* isPersistentOnly */ false ) )
{
return ScriptObject();
}
ScriptObject pNewValue = sink.finalise();
if (!pNewValue)
{
return pNewValue;
}
// detach the old value and attach the new one
ScriptObject & pSlotRef = properties_[ref];
ScriptObject pOldValue = pSlotRef;
if (pSlotRef != pNewValue) // hey, it could happen!
{
dt.detach( pSlotRef );
pSlotRef = dt.attach( pNewValue, &propertyOwner_, ref );
}
return pOldValue;
}
这里createFromStream负责解析数据并验证格式匹配,最后的attach操作将解析出来的脚本对象赋值到要修改的属性上面。
如果修改的是嵌套的属性,则会调用readSimplePathAndApply来处理这个复杂情况:
/**
* This method reads and applies a property change.
*
* @param stream The stream to read from.
* @param pOwner The top-level owner of the property.
* @param ppOldValue If not NULL, this is the old value of the property.
* @param ppChangePath If not NULL, this is the change path to use when
* applying the property update.
*
* @return True on success, false otherwise
*/
bool PropertyChangeReader::readSimplePathAndApply( BinaryIStream & stream,
PropertyOwnerBase * pOwner,
ScriptObject * ppOldValue,
ScriptList * ppChangePath )
{
uint8 size;
stream >> size;
uint8 i = 0;
while ((i < size) && pOwner)
{
int32 index;
stream >> index;
this->updatePath( ppChangePath, pOwner->getPyIndex( index ) );
pOwner = pOwner->getChildPropertyOwner( index );
++i;
}
if (!pOwner)
{
ERROR_MSG( "PropertyChangeReader::readAndApply: "
"pOwner is NULL. %d/%d.\n",
i, size );
return false;
}
this->readExtraBits( stream );
this->updatePath( ppChangePath );
this->doApply( stream, pOwner, ppOldValue, ppChangePath );
return true;
}
其实这个复杂情况也不怎么复杂,就是先读取之前填充的path索引数组,然后不断的调用getChildPropertyOwner来获取下一层被修改的属性,直到最后一层的时候,调用doApply来执行属性赋值:
/**
* This helper method calls the apply virtual method and performs error
* checking.
*/
void PropertyChangeReader::doApply( BinaryIStream & stream,
PropertyOwnerBase * pOwner, ScriptObject * ppOldValue,
ScriptList * ppChangePath )
{
ScriptObject pOldValue = this->apply( stream, pOwner,
ppChangePath ? *ppChangePath : ScriptList() );
if (!pOldValue)
{
ERROR_MSG( "PropertyChangeReader::readAndApply: Old value is NULL\n" );
}
else if (ppOldValue)
{
*ppOldValue = pOldValue;
}
}
/**
* This method applies this property change.
*
* @param The stream containing the new value.
* @param The low-level owner of the property change.
*
* @return The old value.
*/
ScriptObject SinglePropertyChangeReader::apply( BinaryIStream & stream,
PropertyOwnerBase * pOwner, ScriptList pChangePath )
{
if (pChangePath)
{
pChangePath.append( pOwner->getPyIndex( leafIndex_ ) );
}
return pOwner->setOwnedProperty( leafIndex_, stream );
}
兜兜转转,最后还是走到了setOwnedProperty这个我们之前已经介绍过的接口。
综上所属,GhostEntity在创建的时候就带上了RealEntity里Ghost可见属性的最新副本。后续属性在被修改时,如果发现这个属性是Ghost可见的,则会通过ghostedDataUpdate这个RPC将属性修改记录发送到所有的Ghost身上,并执行属性的修改回放。这两个机制配合起来就实现了GhostEntity与RealEntity之间所有Ghost可见属性的实时同步。
Real-Client之间的属性同步
在之前的玩家进入场景流程部分内容中,我们已经提到此时客户端会首先发送一个enableEntities的请求到对应的Proxy。此时Proxy的enableEntities处理函数会通过addCreateBasePlayerToChannelBundle将当前玩家数据的客户端可见部分打包在一起,并以ClientInterface::createBasePlayer这个RPC通知到客户端:
/**
* This method handles a request from the client to enable or disable updates
* from the cell. It forwards this message on to the cell.
*/
void Proxy::enableEntities()
{
DEBUG_MSG( "Proxy::enableEntities(%u)\n", id_ );
// if this is the first we've heard of it, then send the client the props
// it shares with us, call the base script...
if (!basePlayerCreatedOnClient_)
{
this->addCreateBasePlayerToChannelBundle();
this->sendExposedForReplayClientPropertiesToCell();
// 省略无关代码
}
// 省略无关代码
}
/**
* This method adds the createBasePlayer message to the given bundle
*
* It should immediately follow a successful login or full
* entity reset, so the client is never operating without
* a Base Player entity.
* Note: When this method is called,
* Proxy::sendExposedForReplayClientPropertiesToCell() should be called
* together at the same time.
*
* @param bundle The Mercury::Bundle to add the message to
*/
void Proxy::addCreateBasePlayerToChannelBundle()
{
DEBUG_MSG( "Proxy::addCreateBasePlayerToChannelBundle(%u): "
"Creating player on client\n",
id_ );
MF_ASSERT( pClientChannel_ != NULL );
MF_ASSERT( shouldRunCallbackOnEntitiesEnabled_ == false );
MF_ASSERT( basePlayerCreatedOnClient_ == false );
Mercury::Bundle & bundle = pClientChannel_->bundle();
bundle.startMessage( ClientInterface::createBasePlayer );
bundle << id_ << pType_->description().clientIndex();
this->addAttributesToStream( bundle,
EntityDescription::FROM_BASE_TO_CLIENT_DATA );
shouldRunCallbackOnEntitiesEnabled_ = true;
basePlayerCreatedOnClient_ = true;
}
/**
* This method writes attributes of the entity related to the given dataDomains
* to stream.
*/
bool Base::addAttributesToStream( BinaryOStream & stream, int dataDomains )
{
const EntityDescription & entityDesc = this->pType()->description();
ScriptObject self( this, ScriptObject::FROM_BORROWED_REFERENCE );
ScriptDict attrs = createDictWithAllProperties(entityDesc,
self, pEntityDelegate_.get(), dataDomains);
if (!attrs)
{
return false;
}
return entityDesc.addDictionaryToStream( attrs, stream, dataDomains );
}
客户端连接在收到这个createBasePlayer的RPC之后,先在ServerConnection::createBasePlayer里将这个玩家的标识符与Entity类型解析出来,然后再使用onBasePlayerCreate函数来解析所携带的属性数据:
/**
* This method handles a createPlayer call from the base.
*/
void ServerConnection::createBasePlayer( BinaryIStream & stream )
{
// we have new player id
EntityID playerID = NULL_ENTITY_ID;
stream >> playerID;
INFO_MSG( "ServerConnection::createBasePlayer: id %u\n", playerID );
// this is now our player id
id_ = playerID;
EntityTypeID playerType = EntityTypeID(-1);
stream >> playerType;
if (pHandler_)
{ // just get base data here
pHandler_->onBasePlayerCreate( id_, playerType,
stream );
}
}
/*
* Override from ServerMessageHandler.
*/
void BWServerMessageHandler::onBasePlayerCreate( EntityID id,
EntityTypeID entityTypeID, BinaryIStream & data )
{
entities_.handleBasePlayerCreate( id, entityTypeID, data );
}
/**
*
*/
void BWEntities::handleBasePlayerCreate( EntityID id,
EntityTypeID entityTypeID, BinaryIStream & data )
{
MF_ASSERT( !isLocalEntityID( id ) );
BWEntityPtr pEntity = entityFactory_.create( id, entityTypeID,
NULL_SPACE_ID, data, &connection_ );
if (!pEntity)
{
ERROR_MSG( "BWEntities::handleBasePlayerCreate: Failed.\n" );
return;
}
// We should have been totally reset before seeing this
// TODO: Client-only entities might be okay here...
MF_ASSERT( pPlayer_ == NULL );
MF_ASSERT( activeEntities_.empty() );
MF_ASSERT( appPendingEntities_.empty() );
MF_ASSERT( pendingPassengers_.empty() );
pPlayer_ = pEntity;
pPlayer_->triggerOnBecomePlayer();
}
这里的handleBasePlayerCreate会使用entityFactory来创建entityTypeID对应类型的Entity,创建之后再去解析属性部分:
/**
* This method creates the appropriate subclass of BWEntity based on the
* given entity type ID.
*
* @param entityTypeID The entity type ID.
*
* @return A pointer to a new instance of the appropriate subclass of
* BWEntity, or NULL on error.
*/
BWEntity * BWEntityFactory::create( EntityID id, EntityTypeID entityTypeID,
SpaceID spaceID, BinaryIStream & data, BWConnection * pConnection )
{
BWEntity * pNewEntity = this->doCreate( entityTypeID, pConnection );
if (!pNewEntity)
{
ERROR_MSG( "BWEntityFactory::create: Failed for entity type %d\n",
entityTypeID );
return NULL;
}
if (!pNewEntity->init( id, entityTypeID, spaceID, data ))
{
ERROR_MSG( "BWEntityFactory::create: "
"init failed for %d. entityTypeID = %d\n",
id, entityTypeID );
// Delete the entity.
MF_ASSERT( !pNewEntity->isPlayer() );
pNewEntity->destroyNonPlayer();
BWEntityPtr pDeleted( pNewEntity );
return NULL;
}
pNewEntity->createExtensions( entityExtensionFactoryManager_ );
return pNewEntity;
}
属性部分的解析在当前Entity实例的init函数里,这里的spaceID我们传递的是一个空值,因此会走到initBasePlayerFromStream这个分支:
/**
* This method is called to initialise this entity.
*
* @param entityID The ID of the entity.
* @param entityTypeID The entity Type ID of this entity.
* @param spaceID The ID of the space this entity's cell entity
* resides in, or NULL_SPACE_ID if this is a base
* entity.
* @param data The property data stream.
*/
bool BWEntity::init( EntityID entityID, EntityTypeID entityTypeID,
SpaceID spaceID, BinaryIStream & data )
{
entityID_ = entityID;
entityTypeID_ = entityTypeID;
spaceID_ = spaceID;
bool isOkay = (spaceID == NULL_SPACE_ID) ?
this->initBasePlayerFromStream( data ) :
this->initCellEntityFromStream( data );
return isOkay;
}
bool Entity::initBasePlayerFromStream( BW::BinaryIStream & data )
{
return pPyEntity_->initBasePlayerFromStream( data );
}
bool PyEntity::initBasePlayerFromStream( BinaryIStream & stream )
{
PyObject * pNewDict = this->pEntity()->type().newDictionary( stream,
EntityDescription::FROM_BASE_TO_CLIENT_DATA );
// 先省略一些代码
return true;
}
这里的newDictionary会根据当前顶层的属性DataDescription来通过readStreamToDict解析下发的stream数据:
/**
* This function returns a brand new instance of a dictionary associated with
* this entity type. It streams the properties from the input stream.
* This is only used for creating the player entity.
*/
PyObject * EntityType::newDictionary( BW::BinaryIStream & stream,
int dataDomains ) const
{
BW::ScriptDict pDict = BW::ScriptDict::create();
description_.readStreamToDict( stream, dataDomains, pDict );
return pDict.newRef();
}
/**
* This method removes the data on the input stream and sets values on the
* input dictionary.
*/
bool EntityDescription::readStreamToDict( BinaryIStream & stream,
int dataDomains, const ScriptMapping & dict ) const
{
class Visitor : public IDataDescriptionVisitor
{
public:
Visitor( BinaryIStream & stream, const ScriptMapping & map, bool onlyPersistent ) :
stream_( stream ),
map_( map ),
onlyPersistent_( onlyPersistent ) {}
bool visit( const DataDescription & dataDesc )
{
//TRACE_MSG( "EntityDescription::readStreamToDict: Reading "
// "property=%s %s\n", dataDesc.name().c_str(), dataDesc.dataType()->typeName().c_str() );
ScriptDataSink sink;
bool result = dataDesc.createFromStream( stream_, sink,
onlyPersistent_ );
ScriptObject pValue = sink.finalise();
IF_NOT_MF_ASSERT_DEV( result && pValue )
{
ERROR_MSG( "EntityDescription::readStream: "
"Could not create %s from stream.\n",
dataDesc.name().c_str() );
return false;
}
if (!dataDesc.insertItemInto( map_, pValue ))
{
ERROR_MSG( "EntityDescription::readStream: "
"Failed to set %s\n", dataDesc.name().c_str() );
Script::printError();
}
return !stream_.error();
}
private:
BinaryIStream & stream_;
const ScriptMapping & map_;
bool onlyPersistent_;
};
Visitor visitor( stream, dict,
((dataDomains & ONLY_PERSISTENT_DATA) != 0) );
return this->visit( dataDomains, visitor );
}
readStreamToDict的内部实现是使用一个visitor来递归遍历所有标记为EntityDescription::FROM_BASE_TO_CLIENT_DATA的属性,并从对应的stream里通过dataDesc.createFromStream来反序列化出对应的python对象。这里的createFromStream就是我们之前已经介绍过的单个属性的反序列化函数,不像之前Ghost属性解析调用完createFromStream之后都会使用一个attach的接口将数据写入到属性系统里:
DataDescription & dataDescr = *pEntityType_->propIndex( i );
// TODO - implement component properties processing here
MF_ASSERT( !dataDescr.isComponentised() );
DataType & dt = *dataDescr.dataType();
// read and attach the property
ScriptDataSink sink;
MF_VERIFY( dt.createFromStream( data, sink,
/* isPersistentOnly */ false ) );
ScriptObject value = sink.finalise();
if (!(properties_[i] = dt.attach( value, &propertyOwner_, i )))
{
CRITICAL_MSG( "Entity::initGhost(%u):"
"Error streaming off entity property %u\n", id_, i );
}
这里EntityDescription::readStreamToDict在解析出pValue之后会使用dataDesc.insertItemInto来更新,其实就是将解析好的数据以其属性路径作为key塞入到外部传毒的顶层dict里:
/**
*
*/
bool DataDescription::insertItemInto( const ScriptMapping & map,
const ScriptObject & item ) const
{
return map.setItem( this->fullName().c_str(), item, ScriptErrorRetain() );
}
解析出当前stream里属性数据的dict之后,需要将entity创建时的dict进行合并,以填充属性的默认值:
PyObject * pNewDict = this->pEntity()->type().newDictionary( stream,
EntityDescription::FROM_BASE_TO_CLIENT_DATA );
PyObject * pCurrDict = PyObject_GetAttrString( this, "__dict__" );
if ( !pNewDict || !pCurrDict ||
PyDict_Update( pCurrDict, pNewDict ) < 0 )
{
PY_ERROR_CHECK();
return false;
}
if (stream.error())
{
return false;
}
这样在initBasePlayerFromStream里就完成了当前玩家的属性初始化工作。
当自身客户端可见属性被修改时,在其属性修改回调ntity::onOwnedPropertyChanged执行的时候会执行下面的逻辑:
bool Entity::onOwnedPropertyChanged( const DataDescription * pDescription,
PropertyChange & change )
{
// 省略开头的一些判断
// If the data is for our own client, add it to our bundle
if (pDescription->isOwnClientData() && pReal_->pWitness() != NULL)
{
MemoryOStream stream;
int streamSize = 0;
Mercury::MessageID messageID = this->addChangeToExternalStream( change,
stream, *pDescription, &streamSize );
if (!pDescription->checkForOversizeLength( stream.size(), id_ ))
{
return false;
}
g_privateClientStats.trackEvent( pEntityType_->name(),
pDescription->name(), stream.size(), streamSize );
#if ENABLE_WATCHERS
pDescription->stats().countSentToOwnClient( stream.size() );
pEntityType_->stats().countSentToOwnClient( stream.size() );
#endif
pReal_->pWitness()->sendToClient( this->id(), messageID, stream,
streamSize );
}
// 省略无关代码
return true;
}
这里的addChangeToExternalStream负责构建一个RPC将当前属性的路径与最新值下发到客户端:
/**
* This method adds a property change for sending to a client.
*/
Mercury::MessageID Entity::addChangeToExternalStream(
const PropertyChange & change, BinaryOStream & stream,
const DataDescription & dataDescription, int * pStreamSize ) const
{
const ExposedPropertyMessageRange & messageRange =
ClientInterface::Range::entityPropertyRange;
int16 msgID = messageRange.msgIDFromExposedID(
dataDescription.clientServerFullIndex() );
if ((msgID == -1) || change.isNestedChange())
{
const Mercury::InterfaceElement & ie =
change.isSlice() ?
ClientInterface::sliceEntityProperty :
ClientInterface::nestedEntityProperty;
msgID = ie.id();
*pStreamSize = ie.streamSize();
change.addToExternalStream( stream,
dataDescription.clientServerFullIndex(),
pEntityType_->propCountClientServer() );
}
else
{
*pStreamSize = dataDescription.streamSize();
change.addValueToStream( stream );
}
return Mercury::MessageID( msgID );
}
常规来说属性修改的RPC是固定的,但是这里却是不定的,这里的开头有一个比较奇怪的操作messageRange.msgIDFromExposedID来生成指定的msgID:
/**
* This method returns the message id assoicated with an exposed id.
*
* @return The message id of the property change or -1 if the value does
* not fit in this range.
*/
int16 msgIDFromExposedID( int exposedID ) const
{
return (exposedID < this->numSlots()) ?
static_cast<int16>(exposedID + firstMsgID_) : -1;
}
这个接口的作用是把一个暴露给客户端的属性的客户端服务端通用索引dataDescription.clientServerFullIndex()映射为ClientInterface中为该单一属性生成的专用消息的msgID。这个属性修改的msgID会被生成到一个指定范围内,这个范围会在client_interface里被声明:
#define MERCURY_PROPERTY_RANGE_MSG( NAME, RANGE_PORTION ) \
namespace Range \
{ \
ExposedPropertyMessageRange NAME ## Range( NAME.id(), \
gMinder.addRange( NAME, RANGE_PORTION ) ); \
}
MF_CALLBACK_MSG( entityProperty )
MERCURY_PROPERTY_RANGE_MSG( entityProperty, 1 ) /* All of the remaining range */
这个宏展开之后会变为下面的代码:
ExposedPropertyMessageRange entityPropertyRange(entityProperty.id(), gMinder.addRange(entityProperty, 1))
这里的gMinder.addRange负责为entityProperty分配254个独立的MsgId,并批量注册这些MsgId的handle为ServerConnection::entityProperty:
/**
* This method populates the interface with a range of the same interface
* element.
*
* @param ie The InterfaceElement to use.
* @param rangePortion Specifies the proportion of the remaining range to
* consume. A value of x specifies 1/x.
*/
MessageID InterfaceMinder::addRange( const InterfaceElement & ie,
int rangePortion )
{
MF_ASSERT( ie.id() == elements_.back().id() );
const size_t startID = elements_.size();
const size_t endID = startID + (254 - startID)/rangePortion;
while (elements_.size() <= endID)
{
this->add(
ie.name(), ie.lengthStyle(), ie.lengthParam(), ie.pHandler() );
}
return MessageID( endID );
}
Entity::addChangeToExternalStream这样来生成MsgID的目的是区分一些顶层的单一属性的修改,这样的回调逻辑ServerConnection::entityProperty会节省很多判断,因为这里可以直接从header里拿到属性的索引,从而直接反序列化并赋值即可:
/**
* This method handles an entity property update from the server.
*/
void ServerConnection::entityProperty( const Mercury::Address & srcAddr,
const Mercury::UnpackedMessageHeader & header,
BinaryIStream & stream )
{
int exposedPropertyID =
ClientInterface::Range::entityPropertyRange.exposedIDFromMsgID(
header.identifier );
pHandler_->onEntityProperty( selectedEntityID_, exposedPropertyID, stream );
}
/*
* Override from ServerMessageHandler.
*/
void BWServerMessageHandler::onEntityProperty( EntityID id, int propertyID,
BinaryIStream & data )
{
entities_.handleEntityProperty( id, propertyID, data );
}
/**
* @see ServerMessageHandler::onEntityProperty
*/
void BWEntities::handleEntityProperty( EntityID entityID, int propertyID,
BinaryIStream & data )
{
BWEntityPtr pEntity = this->findAny( entityID );
if (!pEntity)
{
ERROR_MSG( "BWEntities::handleEntityProperty: "
"No such entity %d. propertyID = %d\n",
entityID, propertyID );
data.finish();
return;
}
bool shouldCallCallback = pEntity->isPlayer() || pEntity->isInWorld();
pEntity->onProperty( propertyID, data, !shouldCallCallback );
}
/**
* This method handles a change to a property of the entity sent
* from the server.
*/
void Entity::onProperty( int propertyID, BinaryIStream & data,
bool isInitialising )
{
BW_GUARD;
MF_ASSERT( !this->isDestroyed() );
SimpleClientEntity::propertyEvent( pPyEntity_, this->type().description(),
propertyID, data, /*shouldUseCallback:*/ !isInitialising );
}
/**
* Update the identified property on the given entity. Returns true if
* the property was found to update.
*/
bool propertyEvent( ScriptObject pEntity, const EntityDescription & edesc,
int propertyID, BinaryIStream & data, bool shouldUseCallback )
{
BW_GUARD;
EntityPropertyOwner king( pEntity, edesc );
ScriptObject pOldValue = king.setOwnedProperty( propertyID, data );
if (!pOldValue)
{
return false;
}
if (shouldUseCallback)
{
const DataDescription * pDataDescription =
edesc.clientServerProperty( propertyID );
MF_ASSERT_DEV( pDataDescription != NULL );
BW::string methodName = "set_" + pDataDescription->name();
Script::call(
PyObject_GetAttrString( pEntity.get(), (char*)methodName.c_str() ),
PyTuple_Pack( 1, pOldValue.get() ),
"Entity::propertyEvent: ",
/*okIfFunctionNull:*/true );
}
return true;
}
如果是嵌套属性修改或者区块属性修改,向下发送的属性更新RPC就会被替换为ClientInterface::sliceEntityProperty 或者ClientInterface::nestedEntityProperty, 数据打包的时候就会将这个字段的完整路径传递进去:
const Mercury::InterfaceElement & ie =
change.isSlice() ?
ClientInterface::sliceEntityProperty :
ClientInterface::nestedEntityProperty;
msgID = ie.id();
*pStreamSize = ie.streamSize();
change.addToExternalStream( stream,
dataDescription.clientServerFullIndex(),
pEntityType_->propCountClientServer() );
对应的客户端的处理则会走更加复杂的分支:
/**
* This method handles a nested entity property update from the server.
*/
void ServerConnection::nestedEntityProperty( BinaryIStream & stream )
{
pHandler_->onNestedEntityProperty( selectedEntityID_, stream, false );
}
/**
* This method handles an update to a slice sent from the server.
*/
void ServerConnection::sliceEntityProperty( BinaryIStream & stream )
{
pHandler_->onNestedEntityProperty( selectedEntityID_, stream, true );
}
/*
* Override from ServerMessageHandler.
*/
void BWServerMessageHandler::onNestedEntityProperty( EntityID id,
BinaryIStream & data, bool isSlice )
{
entities_.handleNestedEntityProperty( id, data, isSlice );
}
/**
* @see ServerMessageHandler::onNestedEntityProperty
*/
void BWEntities::handleNestedEntityProperty( EntityID entityID,
BinaryIStream & data, bool isSlice )
{
BWEntityPtr pEntity = this->findAny( entityID );
if (!pEntity)
{
ERROR_MSG( "BWEntities::handleNestedEntityProperty: "
"No such entity %d. isSlice = %d\n",
entityID, isSlice );
data.finish();
return;
}
bool shouldCallCallback = pEntity->isPlayer() || pEntity->isInWorld();
pEntity->onNestedProperty( data, isSlice, !shouldCallCallback );
}
/**
* This method handles a change to a nested property of the entity sent
* from the server.
*/
void Entity::onNestedProperty( BinaryIStream & data, bool isSlice,
bool isInitialising )
{
BW_GUARD;
MF_ASSERT( !this->isDestroyed() );
SimpleClientEntity::nestedPropertyEvent( pPyEntity_,
this->type().description(), data,
/*shouldUseCallback:*/ !isInitialising, isSlice );
}
/**
* Update the identified property on the given entity. Returns true if
* the property was found to update.
*/
bool nestedPropertyEvent( ScriptObject pEntity, const EntityDescription & edesc,
BinaryIStream & data, bool shouldUseCallback, bool isSlice )
{
BW_GUARD;
EntityPropertyOwner king( pEntity, edesc );
ScriptObject * ppOldValue = NULL;
ScriptList * ppChangePath = NULL;
ScriptObject pOldValue = ScriptObject::none();
ScriptList pChangePath;
if (shouldUseCallback)
{
ppOldValue = &pOldValue;
ppChangePath = &pChangePath;
}
int topLevelIndex = king.setNestedPropertyFromExternalStream( data, isSlice,
ppOldValue, ppChangePath );
// if this was a top-level property then call the set handler for it
if (shouldUseCallback)
{
const DataDescription * pDataDescription =
edesc.clientServerProperty( topLevelIndex );
MF_ASSERT_DEV( pDataDescription != NULL );
pDataDescription->callSetterCallback( pEntity, pOldValue, pChangePath,
isSlice );
}
return true;
}
从这里贴出来的nestedPropertyEvent的完整实现与之前贴出来的propertyEvent完整实现做对比可以看出,最主要的差别就是从EntityPropertyOwner::setOwnedProperty修改为了TopLevelPropertyOwner::setNestedPropertyFromExternalStream。EntityPropertyOwner::setOwnedProperty的实现很简单,找到索引对应的顶层属性描述信息pDD之后执行数据反序列化,并将序列化出来的值通过PyObject_SetAttrString设置到属性系统的dict就结束了:
virtual ScriptObject EntityPropertyOwner::setOwnedProperty( int ref, BinaryIStream & data )
{
BW_GUARD;
const DataDescription * pDD = edesc_.clientServerProperty( ref );
if (pDD == NULL) return ScriptObject();
ScriptDataSink sink;
if (!pDD->createFromStream( data, sink, /* isPersistentOnly */ false ))
{
ERROR_MSG( "Entity::handleProperty: "
"Error streaming off new property value\n" );
return ScriptObject();
}
ScriptObject pNewObj = sink.finalise();
ScriptObject pOldObj(
PyObject_GetAttrString( e_.get(), (char*)pDD->name().c_str() ),
ScriptObject::STEAL_REFERENCE );
if (!pOldObj)
{
PyErr_Clear();
pOldObj = Py_None;
}
int err = PyObject_SetAttrString(
e_.get(), (char*)pDD->name().c_str(), pNewObj.get() );
if (err == -1)
{
ERROR_MSG( "Entity::handleProperty: "
"Failed to set new property into Entity\n" );
PyErr_PrintEx(0);
}
return pOldObj;
}
但是对于setNestedPropertyFromExternalStream,找到对应的属性就需要一个while循环来获取了:
/**
* This method sets an owned property from a stream that has been sent from the
* server to a client.
*/
int TopLevelPropertyOwner::setNestedPropertyFromExternalStream(
BinaryIStream & stream, bool isSlice,
ScriptObject * ppOldValue,
ScriptList * ppChangePath )
{
PropertyChangeReader * pReader = getPropertyChangeReader( isSlice );
return pReader->readCompressedPathAndApply( stream, this,
ppOldValue, ppChangePath );
}
/**
* This method reads and applies a property change.
*
* @param stream The stream to read from.
* @param pOwner The top-level owner of the property.
* @param ppOldValue If not NULL, this is set to the old value of the property.
* @param ppChangePath If not NULL, this is set to the path of the property
* that has changed.
*
* @return The top-level index of the change.
*/
int PropertyChangeReader::readCompressedPathAndApply( BinaryIStream & stream,
PropertyOwnerBase * pOwner,
ScriptObject * ppOldValue,
ScriptList * ppChangePath )
{
int topLevelIndex = -1;
BitReader bits( stream );
while ((bits.get( 1 ) != 0) && pOwner)
{
int numProperties = pOwner->getNumOwnedProperties();
int index = bits.get( BitReader::bitsRequired( numProperties ) );
if (topLevelIndex == -1)
{
topLevelIndex = index;
}
else
{
this->updatePath( ppChangePath, pOwner->getPyIndex( index ) );
}
pOwner = pOwner->getChildPropertyOwner( index );
}
if (!pOwner)
{
ERROR_MSG( "PropertyChangeReader::readAndApply: Invalid path to owner. "
"topLevelIndex = %d\n",
topLevelIndex );
return -1 - std::max( topLevelIndex, 0 );
}
int index = this->readExtraBits( bits, pOwner->getNumOwnedProperties() );
if (topLevelIndex == -1)
{
topLevelIndex = index;
}
else
{
this->updatePath( ppChangePath );
}
this->doApply( stream, pOwner, ppOldValue, ppChangePath );
return topLevelIndex;
}
同时在执行属性更新的时候,为了更好的通知脚本,还需要将属性的完整路径拼接出来一个ScriptList,对比之前的简单顶层属性只需要提供一个属性索引即可。
// if this was a top-level property then call the set handler for it
if (shouldUseCallback)
{
const DataDescription * pDataDescription =
edesc.clientServerProperty( topLevelIndex );
MF_ASSERT_DEV( pDataDescription != NULL );
pDataDescription->callSetterCallback( pEntity, pOldValue, pChangePath,
isSlice );
}
综上,使用ExposedPropertyMessageRange来对顶级属性做简单的索引映射而不是提供完整路径可以加速客户端的属性回放处理。
AOI内的Entity的属性同步
讲解完仅自身客户端可见属性和仅Ghost可见属性的同步之后,剩下的需要同步的属性就是最重要的能被其他客户端可见的属性。注意在目前的属性同步设计之中,如果一个属性被设计为能被其他客户端可见,那么这个属性一定也是Ghost可见的,因为Ghost的作用就是在当前Cell中向周围的其他RealEntity同步其代理的RealEntity的属性变化,因此这个其他客户端可见属性的处理是嵌入到Ghost可见属性判断部分的,只不过在内部加了一个isOtherClientData的分支判定:
bool Entity::onOwnedPropertyChanged( const DataDescription * pDescription,
PropertyChange & change )
{
// 省略开头的一些判断
if (pDescription->isGhostedData())
{
// If the data is for other clients, add an event to our history.
if (pDescription->isOtherClientData())
{
if (pDescription->shouldSendLatestOnly() &&
change.isNestedChange())
{
WARNING_MSG( "Entity::onOwnedPropertyChanged(%u): "
"%s.%s has SendLatestOnly enabled and was partially "
"changed. Sending full property.\n",
id_, this->pType()->name(),
pDescription->name().c_str() );
MF_VERIFY_DEV(
propertyOwner_.changeOwnedProperty(
properties_[ pDescription->localIndex() ],
properties_[ pDescription->localIndex() ],
*pDescription->dataType(),
pDescription->localIndex(),
/* forceChange: */ true ) );
return true;
}
MemoryOStream stream;
int streamSize = 0;
Mercury::MessageID msgID =
this->addChangeToExternalStream( change, stream,
*pDescription, &streamSize );
if (!pDescription->checkForOversizeLength( stream.size(), id_ ))
{
return false;
}
g_publicClientStats.trackEvent( pEntityType_->name(),
pDescription->name(), stream.size(), streamSize );
// Add history event for clients
HistoryEvent * pEvent =
pReal_->addHistoryEvent( msgID, stream,
*pDescription, streamSize, pDescription->detailLevel() );
propertyEventStamps_.set( *pDescription, pEvent->number() );
}
// 省略之前介绍的ghost可见属性的处理
}
// 省略无关逻辑
}
处理其他客户端可见属性的开头就先判断当前属性是否被标记为了应该只发送最新值shouldSendLatestOnly。如果是只发送最新值的字段,但是当前修改的属性是这个字段的一些嵌套的子属性,那么这次并不会只同步这些子属性,而是使用changeOwnedProperty将当前整个属性也全都重新修改一遍来触发完整的同步,并跳过后续的处理。如果不这样将所有子属性都同步过去的话,发送一个局部增量nested change可能会导致客户端/历史重放端得到不完整或错误的状态。
接下来的则是当前普通情况下的其他客户端可见属性的广播流程:
- 先使用
addChangeToExternalStream将当前属性的修改信息打包为一个RPC,这个函数我们之前已经介绍过了,所以不再跟进 - 然后使用
addHistoryEvent将这个属性变化打上一个递增序列号,加入到HistoryEvent队列里, - 将当前属性的最新版本修改为这个生成的
HistoryEvent的序列号里,并记录到propertyEventStamps_这个map里
这里最重要的就是addHistoryEvent函数,我们需要跟进一下这个函数的处理:
/**
* This method adds a message on to the event history.
*/
HistoryEvent * RealEntity::addHistoryEvent( uint8 type,
MemoryOStream & stream,
const MemberDescription & description,
int16 msgStreamSize,
HistoryEvent::Level level )
{
HistoryEvent * pNewEvent =
entity_.addHistoryEventLocally( type, stream, description,
msgStreamSize, level );
// Send to ghosts.
Haunts::iterator iter = haunts_.begin();
while (iter != haunts_.end())
{
Haunt & haunt = *iter;
Mercury::Bundle & bundle = haunt.bundle();
uint32 startLength = bundle.size();
bundle.startMessage( CellAppInterface::ghostHistoryEvent );
bundle << this->entity().id();
pNewEvent->addToStream( bundle );
description.stats().countSentToGhosts( bundle.size() - startLength );
++iter;
}
return pNewEvent;
}
addHistoryEventLocally负责为这次属性变化构造出一个HistoryEvent,然后使用CellAppInterface::ghostHistoryEvent这个RPC将当前的HistoryEvent广播到所有的Ghost上。addHistoryEventLocally函数内部会以这些传入参数构造一个HistoryEvent,并附加一个递增序列号,构造完成之后将这个HistoryEvent添加到内部的一个数组eventHistory的末尾:
/**
* This method adds the given history event to this entity locally.
* @see RealEntity::addHistoryEvent for what you probably want.
*/
HistoryEvent * Entity::addHistoryEventLocally( uint8 type,
MemoryOStream & stream,
const MemberDescription & description, int16 msgStreamSize,
HistoryEvent::Level level )
{
AUTO_SCOPED_THIS_ENTITY_PROFILE;
#if ENABLE_WATCHERS
pEntityType_->stats().countAddedToHistoryQueue( stream.size() );
#endif
return this->eventHistory().add( this->getNextEventNumber(),
type, stream, description, level, msgStreamSize );
}
实际上这里的eventHistory().add所作的工作比前述的几句多一个sendLatestOnly的判定:
/**
* This method adds a new event to the event history.
*/
HistoryEvent * EventHistory::add( EventNumber eventNumber,
uint8 type, MemoryOStream & stream,
const MemberDescription & description,
HistoryEvent::Level level, int16 msgStreamSize )
{
HistoryEvent * pNewEvent = NULL;
if (description.shouldSendLatestOnly())
{
int latestEventIndex = description.latestEventIndex();
MF_ASSERT( latestEventIndex != -1 );
Container::iterator latestEventIter =
latestEventPointers_[ latestEventIndex ];
if (latestEventIter != container_.end())
{
latestEventPointers_[ latestEventIndex ] = container_.end();
pNewEvent = *latestEventIter;
pNewEvent->recreate( type, eventNumber,
stream.data(), stream.size(),
level, &description, msgStreamSize );
container_.erase( latestEventIter );
}
}
else
{
MF_ASSERT( description.latestEventIndex() == -1 );
}
if (!pNewEvent)
{
pNewEvent = new HistoryEvent( type, eventNumber,
stream.data(), stream.size(), level, &description,
description.latestEventIndex(),
description.isReliable(), msgStreamSize );
}
stream.shouldDelete( false );
#if ENABLE_WATCHERS
description.stats().countAddedToHistoryQueue( stream.size() );
#endif
this->add( pNewEvent );
return pNewEvent;
}
这里会在发现当前的属性是一个只需要发送最新数据的属性时,并不会执行普通逻辑路径上的new HistoryEvent,而是先获取之前记录的这个属性的修改版本号latestEventIndex,然后再从本地的数组latestEventPointers_获取这个版本号对应的最近一次分配的HistoryEvent。如果这个HistoryEvent存在的话,则将这个HistoryEvent里面存储的内容通过recreate接口直接用最新数据全覆盖,并将这个HistoryEvent从container_数组里删除。后续的this->add又会将当前的pNewEvent放到当前container_的末尾。这样的操作下保证这个description在整个container_里自会保留一条记录,每次一个新的记录过来的时候都会将之前的记录销毁。这里执行container_.erase的时候为了避免latestEventPointers_里存储的迭代器失效,container_的底层实现是一个链表:
// Events that have LatestChangeOnly have (at most) a single instance.
typedef BW::vector< Container::iterator > LatestChangePointers;
LatestChangePointers latestEventPointers_;
每次一个其他客户端可见属性被销毁的时候,都有可能创建一个新的元素塞入到这个链表里,随着运行时间的增长这个链表里的元素数量可能会变得很大。为了避免无限增长,CellApp上会使用计时器来定期调用handleTrimHistoriesTimeSlice来遍历每个Entity来清除一些创建时间比较久远的元素:
/**
* This method handles timeout events.
*/
void CellApp::handleTimeout( TimerHandle /*handle*/, void * arg )
{
switch (reinterpret_cast<uintptr>( arg ))
{
case TIMEOUT_GAME_TICK:
this->handleGameTickTimeSlice();
break;
case TIMEOUT_TRIM_HISTORIES:
this->handleTrimHistoriesTimeSlice();
break;
// 省略一些代码
}
}
/**
* This method handles the trim histories time slice.
*
* TODO: This is dodgy. We don't want to trim all of the histories in one go.
*/
void CellApp::handleTrimHistoriesTimeSlice()
{
// Keep iterator in tact. This is necessary as trimEventHistory can call
// onWitnessed (which it probably should not do).
Entity::callbacksPermitted( false );
{
EntityPopulation::const_iterator iter = Entity::population().begin();
while (iter != Entity::population().end())
{
// TODO: Could skip dead entities.
iter->second->trimEventHistory( 0 );
iter++;
}
}
Entity::callbacksPermitted( true );
Entity::population().expireRealChannels();
}
/**
* This method trims the event history associated with this entity. It is called at a
* frequency so that all entities in an AoI would have been visited at least once over the
* period.
*
* This method also calculates whether this entity is no longer being witnessed.
*
* @param cleanUpTime All events with a time less than this should be deleted.
*/
void Entity::trimEventHistory( GameTime /*cleanUpTime*/ )
{
AUTO_SCOPED_THIS_ENTITY_PROFILE;
// trim the event history
eventHistory_.trim();
// 省略一些无关代码
}
最终会执行到EventHistory::trim操作上,这个函数的作用其实就是记录一下当前容器最后一个元素的序列号到trimToEvent_,同时在更新trimToEvent_之前从链表里删除所有序列号小于上次执行trim后记录的trimToEvent_,总体作用就是只保留上次trim执行之后新加入的元素:
/**
* This method is used to trim the EventHistory. It deletes all of the events
* that were added before the last trim call (leaving only those events added
* since the last trim call).
*
* This method should not be called more frequently than it takes any
* RealEntityWithWitnesses to go through all histories.
*/
void EventHistory::trim()
{
// TODO: This is a bit dodgy because we do not know how often to go through
// this.
while (!container_.empty() &&
container_.front()->number() <= trimToEvent_)
{
if (container_.front()->isReliable())
{
lastTrimmedEventNumber_ = container_.front()->number();
}
this->deleteEvent( container_.front() );
container_.pop_front();
}
trimToEvent_ = container_.empty() ? 0 : container_.back()->number();
}
当Ghost接收到CellAppInterface::ghostHistoryEvent这个RPC之后,会将这个HistoryEvent从参数里解析出来,并放到自身存储的HistoryEvent数组里:
/**
* This method handles a message from the real entity associated with this
* entity. It adds a history event to this ghost.
*/
void Entity::ghostHistoryEvent( BinaryIStream & data )
{
MF_ASSERT( !this->isReal() );
++lastEventNumber_;
EventNumber newNumber = this->eventHistory().addFromStream( data );
MF_ASSERT( newNumber == lastEventNumber_ );
}
/**
* This method adds a history event that has been streamed over the network.
* This is done from the real entity to its ghost entities.
*/
EventNumber EventHistory::addFromStream( BinaryIStream & stream )
{
EventNumber eventNumber;
uint8 type;
HistoryEvent::Level level;
int latestEventIndex;
bool isReliable;
int16 msgStreamSize;
void * historyData;
int length;
HistoryEvent::extractFromStream( stream, eventNumber, type, level,
latestEventIndex, isReliable, msgStreamSize, historyData, length );
HistoryEvent * pNewEvent = NULL;
if (latestEventIndex != -1)
{
Container::iterator latestEventIter =
latestEventPointers_[ latestEventIndex ];
if (latestEventIter != container_.end())
{
latestEventPointers_[ latestEventIndex ] = container_.end();
pNewEvent = *latestEventIter;
pNewEvent->recreate( type, eventNumber, historyData, length,
level, latestEventIndex, msgStreamSize );
container_.erase( latestEventIter );
}
}
if (!pNewEvent)
{
pNewEvent = new HistoryEvent( type, eventNumber, historyData, length,
level, NULL, latestEventIndex, isReliable, msgStreamSize );
}
this->add( pNewEvent );
return pNewEvent->number();
}
从这个EventHistory::addFromStream可以看出,这里的反序列化逻辑基本与之前在RealEntity上的为属性修改新建HistoryEvent时的逻辑一样,看上去并没有执行属性的本地修改记录回放的操作。其实这里处理其他客户端可见属性的逻辑执行完成之后并不会直接返回, 而是会继续执行之前介绍过的GhostEntity可见属性的广播,会再发送一个ghostedDataUpdate消息到所有的Ghost上,从而触发Ghost上的属性回放。
那这个EventHistory既然不参与属性在GhostEntity上的回放,为什么RealEntity上要额外产生一个CellAppInterface::ghostHistoryEvent消息并广播到所有的GhostEntity上呢。答案是EventHistory这个类型是为了往其他客户端执行属性同步而存在的,使用的地方在Entity::writeClientUpdateDataToBundle函数里:
/**
* This method writes any relevant information about this entity that has
* occurred since the last update time to the given bundle. This includes
* changes in volatile position and new history events.
*
* @param bundle The bundle to put the information on.
* @param basePos The reference point for relative positions.
* @param cache The current entity cache.
* @param lodPriority Indicates what level of detail to use.
*
* @return True if a reliable position update message was included in the
* bundle, false otherwise.
*/
bool Entity::writeClientUpdateDataToBundle( Mercury::Bundle & bundle,
const Vector3 & basePos,
EntityCache & cache,
float lodPriority ) const
{
AUTO_SCOPED_THIS_ENTITY_PROFILE;
const int initSize = bundle.size();
int oldSize = initSize;
int numEvents = 0;
this->writeVehicleChangeToBundle( bundle, cache );
// Send the appropriate history for this entity
EventHistory::const_reverse_iterator eventIter = eventHistory_.rbegin();
EventHistory::const_reverse_iterator eventEnd = eventHistory_.rend();
// Go back to find the correct place then forward to add to the bundle in
// chronological order.
// TODO: Consider the wrap around case. To wrap around a 32-bit value
// needs 12 events a second for 10 years (24 hours a day).
bool hasEventsToSend = false;
bool hasSelectedEntity = false;
while (eventIter != eventEnd &&
(*eventIter)->number() > cache.lastEventNumber())
{
HistoryEvent & event = **eventIter;
hasEventsToSend = hasEventsToSend ||
event.shouldSend( lodPriority, cache.detailLevel() );
eventIter++;
}
// 先省略后续代码
}
这里决定哪些属性需要同步下去的时候,并不像开始进入AOI时的去遍历属性,而是遍历我们之前提到的eventHistory_,这个eventHistory_是一个队列,存储了所有其他客户端可见属性的修改记录,每个记录都携带了属性索引、最新值和修改版本号等信息。这里会从eventHistory_的末尾开始遍历,直到遇到的属性历史版本号小于等于上次同步后记录的版本号lastEventNumber。这个已同步最大版本号字段记录在EntityCache对象上,这个类型的意义将在后续的AOI相关章节的时候进行介绍。遍历的时候会使用HistoryEvent::shouldSend来过滤掉一些不需要向下发送的HistoryEvent,以节省流量。
在计算完所有需要向客户端下发的同步属性History之后,还需要计算是否需要同步位置朝向信息,因为这两个数据是不走属性同步的:
bool Entity::writeClientUpdateDataToBundle( Mercury::Bundle & bundle,
const Vector3 & basePos,
EntityCache & cache,
float lodPriority ) const
{
// 省略之前的代码
bool hasAddedReliableRelativePosition = false;
// Not currently enabled as it affects the filters if this is not sent
// regularly.
//if (cache.lastVolatileUpdateNumber() != volatileUpdateNumber_)
{
cache.lastVolatileUpdateNumber( volatileUpdateNumber_ );
if (this->volatileInfo().hasVolatile( lodPriority ))
{
const bool isReliable = hasEventsToSend;
if (cache.isAlwaysDetailed() || (cache.isPrioritised() && CellAppConfig::sendDetailedPlayerVehicles()) )
{
this->writeVolatileDetailedDataToBundle( bundle,
cache.idAlias(), isReliable );
}
else
{
hasAddedReliableRelativePosition =
this->writeVolatileDataToBundle( bundle, basePos,
cache.idAlias(), lodPriority, isReliable );
}
hasSelectedEntity = true;
oldSize = bundle.size();
g_nonVolatileBytes += (oldSize - initSize);
#if ENABLE_WATCHERS
pEntityType_->stats().countVolatileSentToOtherClients(
oldSize - initSize );
#endif
}
}
// 省略后续代码
}
这里的writeVolatileDetailedDataToBundle和writeVolatileDataToBundle都是填充位置和朝向信息的相关代码,这里先不去追究这两个函数的实现细节。在填充完位置和朝向信息之后,才开始来填充属性信息,这里的addEntitySelectMessage只是用来填充当前Entity的id字段,这样客户端收到这个消息之后才知道这些属性和位置朝向更新目标是客户端的哪个Entity:
bool Entity::writeClientUpdateDataToBundle( Mercury::Bundle & bundle,
const Vector3 & basePos,
EntityCache & cache,
float lodPriority ) const
{
// 省略之前的代码
if (hasEventsToSend)
{
if (!hasSelectedEntity)
{
cache.addEntitySelectMessage( bundle );
hasSelectedEntity = true;
}
while (eventIter != eventHistory_.rbegin())
{
eventIter--;
HistoryEvent & event = **eventIter;
if (event.shouldSend( lodPriority, cache.detailLevel() ))
{
if (event.pName())
{
g_totalPublicClientStats.trackEvent( pEntityType_->name(),
event.pName()->c_str(), event.msgLen(),
event.msgStreamSize() );
}
++numEvents;
event.addToBundle( bundle );
}
}
}
cache.lastEventNumber( this->lastEventNumber() );
// 省略后续代码
}
这里每个属性的单次历史变化都会构造一个BaseAppIntInterface::sendMessageToClient消息发送到客户端,注意到这里的msgID是HistoryEvent内部记录的msgID。回顾一下HistoryEvent创建时的字段填充,这个msgID_字段就是当前属性的description.exposedMsgID(),所以当这个消息发送下去之后,客户端会通过ServerConnection::entityProperty来执行属性的回放,具体的exposedMsgID到属性字段的映射机制前文中已经介绍了,因此这里就不提了:
/**
* This method adds this event to the input bundle.
*
* @param bundle The bundle to add the event to.
*/
void HistoryEvent::addToBundle( Mercury::Bundle & bundle )
{
if (pDescription_)
{
pDescription_->stats().countSentToOtherClients( msgLen_ );
}
// Script method calls and property changes
bundle.startMessage(
isReliable_ ?
BaseAppIntInterface::sendMessageToClient :
BaseAppIntInterface::sendMessageToClientUnreliable );
bundle << msgID_;
bundle << (int16) msgStreamSize_;
bundle.addBlob( msg_, msgLen_ );
}
/**
* This method handles an entity property update from the server.
*/
void ServerConnection::entityProperty( const Mercury::Address & srcAddr,
const Mercury::UnpackedMessageHeader & header,
BinaryIStream & stream )
{
int exposedPropertyID =
ClientInterface::Range::entityPropertyRange.exposedIDFromMsgID(
header.identifier );
pHandler_->onEntityProperty( selectedEntityID_, exposedPropertyID, stream );
}
当所有要同步的属性历史都打包好了之后,就可以将cache里的最大同步版本号lastEventNumber设置为当前Entity里的属性历史的最大版本号lastEventNumber,意思是任何版本号小于等于这个lastEventNumber的属性历史都不会往当前EntityCache关联的客户端进行发送了。
属性同步的LOD
为了节省属性同步的流量,可以为每个属性设定一个同步距离挡位,当此Entity与当前的客户端对应的RealEntity的距离小于一定值的时候,这个属性才会被同步,这个距离设置就叫做属性LOD。例如50M为第一个挡位,这个时候会同步Name字段, 40M一个挡位,在这个距离内体型相关字段才开始同步, 20M一个挡位,在此范围内头套挂饰等小物件外观才开始同步。
在发送一个HistoryEvent的时候,会先用shouldSend接口来过滤,这里就会比较属性的Lod等级是否小于当前的DetailLevel:
/**
* This method decides whether to send this event to a client based on the
* input priority threshold and detail level.
*/
INLINE bool HistoryEvent::shouldSend( float threshold, int detailLevel ) const
{
return level_.shouldSend( threshold, detailLevel );
}
/**
* This class is a bit of a hack. For state change events, we want to use
* a detail level, while for messages (that is, events with no state
* change), we want to store a priority.
*
*/
class Level
{
public:
Level() {}
Level( int i ) : detail_( i ), isDetail_( true ) {}
Level( float f ) : priority_( f ), isDetail_( false ) {};
bool shouldSend( float threshold, int detailLevel ) const
{
return isDetail_ ?
(detailLevel <= detail_) :
(threshold < priority_);
}
private:
union
{
float priority_;
int detail_;
};
bool isDetail_;
};
这里做shouldSend判定的时候,有两个判定分支:一个是基于优先级的,同步优先级的值小于此设置才可以同步;一个是基于LOD挡位detailLevel的,当前同步的属性LOD小于等于这个detailLevel才可以同步。
在Entity::writeClientUpdateDataToBundle里执行EventHistory下发的时候,会利用EntityCache里存储好的DetailLevel来做shouldSend过滤。打包好当前DetailLevel所需要发送的属性历史之后,会利用当前距离重新计算一下这个EntityCache的最新应该拥有的DetailLevel。如果新的DetailLevel比原来的DetailLevel小,则可能需要将一些新DetailLevel下才可见的属性也同步下去。这里用一个简单的例子来讲一下为什么需要处理DetailLevel的变化。假设Entity(A)上有两个属性P0, P1,其对应的LODLevel分别是0, 1。某个时刻Entity(A)进入到RealEntity(B)的AOI,此时计算出来的DetailLevel为1,因此只发送P1到客户端去创建对应的ClientEntity(A)。当后续P0的值发生改变的时候,由于P0的LodLevel小于当前的DetailLevel,所以这次值改变不会被同步下去。后面在位置移动之后,新的DetailLevel变成了0,此时需要将LodLLevel=0的所有属性的最新值下发下去:
bool Entity::writeClientUpdateDataToBundle( Mercury::Bundle & bundle,
const Vector3 & basePos,
EntityCache & cache,
float lodPriority ) const
{
// 省略之前的代码
hasSelectedEntity |= cache.updateDetailLevel( bundle, lodPriority,
hasSelectedEntity );
// 省略后续代码
}
/**
* This method is used to update the detail level associated with this cache.
* If the detail is increased, the necessary information is added to the input
* bundle that will be sent to the viewing client.
*
* @return True if we added data to the bundle, False otherwise.
*/
bool EntityCache::updateDetailLevel( Mercury::Bundle & bundle,
float lodPriority, bool hasSelectedEntity )
{
bool hasWrittenToStream = false;
// Update the LoD level and add any necessary info to the bundle.
const EntityDescription & entityDesc =
this->pEntity()->pType()->description();
const DataLoDLevels & lodLevels = entityDesc.lodLevels();
while (lodLevels.needsMoreDetail( detailLevel_, lodPriority ))
{
detailLevel_--;
hasWrittenToStream |= this->addChangedProperties( bundle, &bundle,
/* shouldSelectEntity */ !hasSelectedEntity );
hasSelectedEntity |= hasWrittenToStream;
}
while (lodLevels.needsLessDetail( detailLevel_, lodPriority ))
{
this->lodEventNumber( detailLevel_, this->lastEventNumber() );
detailLevel_++;
}
return hasWrittenToStream;
}
由于位置可能出现跳变,所以detailLevel也可能出现跳变,所以这里使用一个循环来遍历中间的所有detailLevel,利用addChangedProperties将每个detailLevel里的属性的最新值计入到bundle里。这里的addChangedProperties函数非常重要,其逻辑分为了两个部分:
- 先统计当前
LOD层级detailLevel_下多少个客户端可见属性的最新版本号大于之前下发版本号lodEventNumber,记录结果为numToSend,并将这个值填入到消息里 - 遍历所有当前
LOD设置下需要同步到客户端的属性,将这个属性的索引和最新值加入到消息里
/**
* This method adds the new property values of the current detail level to the
* input stream.
*
* @param stream The stream to add the changes to.
* @param pBundleForHeader If not NULL, a message is started on this bundle
* if any properties are added.
* @param shouldSelectEntity If true, before a new message is started on the
*
* @return True if we added any property values, false if there were no new
* property values at this level of detail.
*/
bool EntityCache::addChangedProperties( BinaryOStream & stream,
Mercury::Bundle * pBundleForHeader, bool shouldSelectEntity )
{
const EntityDescription & entityDesc =
this->pEntity()->pType()->description();
int numProperties = entityDesc.clientServerPropertyCount();
EventNumber lodEventNumber = this->lodEventNumber( detailLevel_ );
int numToSend = 0;
for (int i = 0; i < numProperties; i++)
{
const DataDescription * pDataDesc =
entityDesc.clientServerProperty( i );
if (pDataDesc->detailLevel() == detailLevel_ &&
this->pEntity()->propertyEventStamps().get( *pDataDesc ) >
lodEventNumber )
{
++numToSend;
}
}
if (numToSend == 0)
{
return false;
}
MF_ASSERT( numToSend < 256 );
if (pBundleForHeader != NULL)
{
if (shouldSelectEntity)
{
this->addEntitySelectMessage( *pBundleForHeader );
}
pBundleForHeader->startMessage( BaseAppIntInterface::updateEntity );
}
stream << uint8( numToSend );
for (int i = 0; i < numProperties; i++)
{
const DataDescription * pDataDesc =
entityDesc.clientServerProperty( i );
if (pDataDesc->detailLevel() == detailLevel_ &&
this->pEntity()->propertyEventStamps().get( *pDataDesc ) >
lodEventNumber )
{
ScriptObject pValue = this->pEntity()->propertyByDataDescription(
pDataDesc );
// 忽略一些容错代码
--numToSend;
stream << uint8(i);
ScriptDataSource source( pValue );
pDataDesc->addToStream( source, stream,
/* isPersistentOnly */ false );
}
}
MF_ASSERT( numToSend == 0 );
return true;
}
从这个函数可以看出,addChangedProperties只能一次处理一个detailLevel,所以updateDetailLevel这里会使用循环来调用这个函数。
在打包好每个DetailLevel可见的属性之后,再将当前EntityCache上记录的每个DetailLevel的数据同步版本更新为当前最新的数据同步版本,这样做的目的是为了节省流量。如果没有记录lodEventNumber这个数组的话,每次DetailLevel变小都会导致新DetailLevel里的所有属性都同步下去,即使相应的属性在第一次同步之后并没有变化。举个例子来说,如果Entity(A)的DetailLevel经历过1->0->1->0的变化,但是属性P0的值在这段时间内都没有变化,那么只需要在第一次1->0的时候向下增量同步P0,第二次1->0的时候由于之前记录的lodEventNumber[0]等于当前属性P0的LastEventNumber,因此就没必要再次下发P0了。
BigWorld 的AOI设计
AOI同步管理器Witness
在分布式大世界中,一个Cell里的所有Entity的数量可能成百上千。如果对于每个玩家的客户端都把当前Cell里的Entity都同步到客户端的话,流量和CPU的压力变得非常恐怖,因此在Bigworld里也对每个玩家Entity施加了一个AOI同步范围的限制。为了集中处理AOI以及附加的属性同步逻辑,避免代码散落在RealEntity的相关文件中,Bigworld给每个RealEntity都附加了一个Witness的对象,通过addToAoI和removeFromAoI这两个接口来承接AOI相关回调:
/**
* This class is a witness to the movements and perceptions of a RealEntity.
* It is created when a client is attached to this entity. Its main activity
* centres around the management of an Area of Interest list.
*/
class Witness : public Updatable
{
public:
// Creation/Destruction
Witness( RealEntity & owner, BinaryIStream & data,
CreateRealInfo createRealInfo, bool hasChangedSpace = false );
public:
RealEntity & real() { return real_; }
const RealEntity & real() const { return real_; }
Entity & entity() { return entity_; }
const Entity & entity() const { return entity_; }
void addToAoI( Entity * pEntity, bool setManuallyAdded );
void removeFromAoI( Entity * pEntity, bool clearManuallyAdded );
void newPosition( const Vector3 & position );
// 省略很多代码
};
class RealEntity
{
public:
void enableWitness( BinaryIStream & data, Mercury::ReplyID replyID );
void disableWitness( bool isRestore = false );
private:
Witness * pWitness_;
};
但是对于非客户端玩家对应的RealEntity来说,这个Witness对象是不需要创建的,因为这些RealEntity并没有同步AOI内Entity数据的需求。因此默认情况下这个pWitness_指针是空的,只有接收到enableWitness这个RPC的时候才会创建这个Witness实例:
/**
* This method adds or deletes the Witness of this RealEntity.
*/
void RealEntity::enableWitness( BinaryIStream & data, Mercury::ReplyID replyID )
{
// Send an empty reply to ack this message
this->channel().bundle().startReply( replyID );
bool isRestore;
data >> isRestore;
if (data.remainingLength() > 0)
{
INFO_MSG( "RealEntity::enableWitness: adding witness for %u%s\n",
entity_.id(), isRestore ? " (restoring)" : "" );
// take control
if (controlledBy_.id == NULL_ENTITY_ID)
{
controlledBy_.init( entity_.id(), entity_.baseAddr_,
controlledBy_.BASE, entity_.pType()->typeID() );
}
int bytesToClientPerPacket;
data >> bytesToClientPerPacket;
MemoryOStream witnessData;
StreamHelper::addRealEntityWithWitnesses( witnessData,
bytesToClientPerPacket,
CellAppConfig::defaultAoIRadius() );
// make the witness
MF_ASSERT( pWitness_ == NULL );
// Delay calls to onEnteredAoI
Entity::callbacksPermitted( false ); //{
this->setWitness( new Witness( *this, witnessData,
isRestore ? CREATE_REAL_FROM_RESTORE : CREATE_REAL_FROM_INIT ) );
Entity::callbacksPermitted( true ); //}
Entity::nominateRealEntity( entity_ );
Script::call( PyObject_GetAttrString( &entity_, "onGetWitness" ),
PyTuple_New( 0 ), "onGetWitness", true );
Entity::nominateRealEntityPop();
}
else
{
this->disableWitness( isRestore );
}
if (this->entity().cell().pReplayData())
{
this->entity().cell().pReplayData()->addEntityPlayerStateChange(
this->entity() );
}
}
而这个enableWitness只有BaseApp里的Proxy才会发起,在之前客户端进入场景的相关代码分析中我们提到当这个Proxy的客户端PlayerEntity建立之后就会通过enableEntities这个RPC来触发这个enableWitness的调用,来通知服务器端可以向下同步AOI内的所有Entity了:
/**
* This method sends an enable or disable witness message to our cell entity.
*
* @param enable whether to enable or disable the witness
* @param isRestore is this an explicit witness enable/disable send as a
* result of a restore cell entity?
*/
void Proxy::sendEnableDisableWitness( bool enable, bool isRestore )
{
AUTO_SCOPED_THIS_ENTITY_PROFILE;
Mercury::Bundle & bundle = this->cellBundle();
bundle.startRequest( CellAppInterface::enableWitness,
new EnableWitnessReplyHandler( this ) );
bundle << id_;
bundle << isRestore;
++numOutstandingEnableWitness_;
cellHasWitness_ = enable;
if (enable)
{
bundle << BaseAppConfig::bytesPerPacketToClient();
}
// else just send an empty stream
this->sendToCell(); // send it straight away
}
/**
* This method handles a request from the client to enable or disable updates
* from the cell. It forwards this message on to the cell.
*/
void Proxy::enableEntities()
{
DEBUG_MSG( "Proxy::enableEntities(%u)\n", id_ );
// if this is the first we've heard of it, then send the client the props
// 省略很多代码
// ... and tell the cell the game is on
if (!entitiesEnabled_)
{
entitiesEnabled_ = true;
if (this->hasCellEntity())
{
this->sendEnableDisableWitness( /*enable:*/true );
// remove ProxyPusher
if (pProxyPusher_ != NULL)
{
delete pProxyPusher_;
pProxyPusher_ = NULL;
}
}
}
// 省略很多代码
}
由于客户端发送enableEntities的时候对应的CellApp上的Entity可能还没有创建完成,因此在CellEntity创建完成的回调里会再检查一下entitiesEnabled_这个标记位,如果为true的话则再次通知对应的CellEntity去创建Witness对象:
/**
* This method deals with our cell entity being created.
*/
void Proxy::cellEntityCreated()
{
AUTO_SCOPED_THIS_ENTITY_PROFILE;
if (!entitiesEnabled_) return;
MF_ASSERT( this->hasClient() );
MF_ASSERT( this->hasCellEntity() );
// create the witness
this->sendEnableDisableWitness( /*enable:*/true );
// get rid of the proxy pusher now that the witness will be sending us
// regular updates (the self motivator should definitely be there).
MF_ASSERT( pProxyPusher_ != NULL );
delete pProxyPusher_;
pProxyPusher_ = NULL;
}
当客户端断线的时候,对应的通知回调Proxy::detachFromClient会自动调用sendEnableDisableWitness(false)来通知对应的RealEntity去删除绑定的Witness对象,因为此时已经没有相关的客户端连接了,即使Proxy接收到AOI相关数据也只能丢弃:
void Proxy::detachFromClient( bool shouldCondemn )
{
// 省略很多代码
// Don't try to disable the witness if we've already sent the
// destroyCell message.
if (cellHasWitness_ && this->shouldSendToCell())
{
this->sendEnableDisableWitness( /*enable:*/false );
}
// 省略很多代码
}
通过上面的代码分析我们可以得出结论:只有客户端连接存在的时候这个Witness对象才会被创建,当客户端断开的时候这个Witness对象就会被销毁。
AOI内Entity的进出管理
当一个Witness被创建的时候,其Witness::init函数中会向AOI计算系统注册一个与当前RealEntity相关的AOI半径对象AoITrigger:
/**
* This method initialises this object some more. It is only separate from
* the constructor for historical reasons.
*/
void Witness::init()
{
// Disabling callbacks is not needed since no script should be triggered but
// it's helpful for debugging.
Entity::callbacksPermitted( false );
// Create AoI triggers around ourself.
{
SCOPED_PROFILE( SHUFFLE_AOI_TRIGGERS_PROFILE );
pAoITrigger_ = new AoITrigger( *this, pAoIRoot_, aoiRadius_ );
if (this->isAoIRooted())
{
MobileRangeListNode * pRoot =
static_cast< MobileRangeListNode * >( pAoIRoot_ );
pRoot->addTrigger( pAoITrigger_ );
}
else
{
entity().addTrigger( pAoITrigger_ );
}
}
Entity::callbacksPermitted( true );
// 省略一些代码
}
这里的pAoIRoot_代表的是当前Entity在AOI系统里对应的坐标节点,因此pAoITrigger_就代表以当前Entity位置为中心aoiRadius_为半径的触发器。这个AoITrigger的主要作用就是注册这个触发器,然后在其他Entity进出触发器的时候通知到Witness来执行addToAoI和removeFromAoI:
/**
* This class is used for AoI triggers. It is similar to the Range trigger
* except that it will add the other entity to its owner entity's AoI list.
*/
class AoITrigger : public RangeTrigger
{
public:
AoITrigger( Witness & owner, RangeListNode * pCentralNode, float range ) :
RangeTrigger( pCentralNode, range,
RangeListNode::FLAG_LOWER_AOI_TRIGGER,
RangeListNode::FLAG_UPPER_AOI_TRIGGER,
RangeListNode::FLAG_NO_TRIGGERS,
RangeListNode::FLAG_NO_TRIGGERS ),
owner_( owner )
{
// Collect the large entities whose range we currently sit.
owner_.entity().space().visitLargeEntities(
pCentralNode->x(),
pCentralNode->z(),
*this );
this->insert();
}
~AoITrigger()
{
this->removeWithoutContracting();
}
virtual BW::string debugString() const;
virtual void triggerEnter( Entity & entity );
virtual void triggerLeave( Entity & entity );
virtual Entity * pEntity() const { return &owner_.entity(); }
private:
Witness & owner_;
};
/**
* This method is called when an entity enters (triggers) the AoI.
* It forwards the call to the entity.
*
* @param entity The entity who triggered this trigger/entered AoI.
*/
void AoITrigger::triggerEnter( Entity & entity )
{
if ((&entity != &owner_.entity()) &&
!entity.pType()->description().isManualAoI())
{
owner_.addToAoI( &entity, /* setManuallyAdded */ false );
}
}
/**
* This method is called when an entity leaves (untriggers) the AoI.
* It forwards the call to the entity
*
* @param entity The entity who untriggered this trigger/left AoI.
*/
void AoITrigger::triggerLeave( Entity & entity )
{
if ((&entity != &owner_.entity()) &&
(!entity.pType()->description().isManualAoI()))
{
owner_.removeFromAoI( &entity, /* clearManuallyAdded */ false );
}
}
目前我们先忽略AoITrigger父类RangeTrigger是如何触发triggerEnter/triggerLeave的,暂时只关注addToAoI和removeFromAoI的处理流程。
当一个Entity(A)需要进入到到当前的RealEntity(B)的AOI范围时,Witness::addToAoI会被调用到:
/**
* This class is used by RealEntityWithWitnesses to cache information about
* other entities.
*/
class EntityCache
{
public:
// TODO: Remove this restriction.
static const int MAX_LOD_LEVELS = 4;
typedef double Priority;
EntityCache( const Entity * pEntity );
// 省略很多字段
// Accessors
EntityConstPtr pEntity() const { return pEntity_; }
EntityConstPtr & pEntity() { return pEntity_; }
private:
EntityConstPtr pEntity_;
Flags flags_; // TODO: Not good structure packing.
AoIUpdateSchemeID updateSchemeID_;
VehicleChangeNum vehicleChangeNum_;
Priority priority_; // double
Priority lastPriorityDelta_; // double
EventNumber lastEventNumber_; // int32
// 省略很多字段
};
inline
bool operator<( const EntityCache & left, const EntityCache & right )
{
return left.pEntity() < right.pEntity();
}
/**
* This method adds the input entity to this entity's Area of Interest.
*/
void Witness::addToAoI( Entity * pEntity, bool setManuallyAdded )
{
// 省略一些错误判断
// see if the entity is already in our AoI
EntityCache * pCache = aoiMap_.find( *pEntity );
// 省略一些错误判断
if (pCache != NULL)
{
// 这里先忽略pCache复用的一些逻辑
}
else
{
pCache = aoiMap_.add( *pEntity );
pCache->setEnterPending();
this->addToSeen( pCache );
}
// 忽略一些后续逻辑
}
这里会涉及到一个非常重要的类型EntityCache,如果一个Entity(A)需要向RealEntity(B)的客户端同步,那么RealEntity(B)上就会为这个Entity(A)创建一个EntityCache对象,来负责刚开始进入AOI时的全量同步以及后续的增量同步。由于一个RealEntity上会同步大量的Entity到自身客户端,因此在EntityCache之上还有一个Witness的类型来管理所有的EntityCache,其内部使用EntityCacheMap这个集合来存储所有的EntityCache,:
/**
* This class is a map of entity caches
*/
class EntityCacheMap
{
public:
~EntityCacheMap();
EntityCache * add( const Entity & e );
void del( EntityCache * ec );
EntityCache * find( const Entity & e ) const;
EntityCache * find( EntityID id ) const;
uint32 size() const { return set_.size(); }
void writeToStream( BinaryOStream & stream ) const;
void visit( EntityCacheVisitor & visitor ) const;
void mutate( EntityCacheMutator & mutator );
static void addWatchers();
private:
typedef BW::set< EntityCache > Implementor;
Implementor set_;
};
了解了EntityCache与EntityCacheMap的类型作用之后,我们再回到addToAoI。addToAoI这里会先查询当前aoiMap_是否已经有pEntity对应的EntityCache,如果有的话会执行复用,没有的话会创建一个新的pCache,同时标记这个pCache为开始同步EnterPending状态,并通过addToSeen加入到当前的同步队列entityQueue_里:
/**
* Add the given entity into the entity cache map
*/
EntityCache * EntityCacheMap::add( const Entity & e )
{
++g_numInAoI;
++g_numInAoIEver;
EntityCache eCache( &e );
Implementor::iterator iter = set_.insert( eCache ).first;
return const_cast< EntityCache *>( &*iter );
}
/**
* This method adds the input entity to the collection of seen entities.
* It is called by addToAoI, or later in requestEntityUpdate.
*/
void Witness::addToSeen( EntityCache * pCache )
{
EntityCache::Priority initialPriority = 0.0;
// We want to give the entity the minimum current priority. We need to
// be careful here.
if (!entityQueue_.empty())
{
initialPriority = entityQueue_.front()->priority();
}
pCache->priority( initialPriority );
// #define DELAY_ENTER_AOI
#ifdef DELAY_ENTER_AOI
const bool shouldUpdatePriority = !pCache->isEnterPending();
if (shouldUpdatePriority && !pCache->isGone())
{
pCache->updatePriority( entity_.position() );
}
#endif
entityQueue_.push_back( pCache );
std::push_heap( entityQueue_.begin(), entityQueue_.end(), PriorityCompare() );
}
这个entityQueue_其实是一个最小堆的优先队列,里面会使用EntityCache的优先级字段来执行最小堆维护。但是目前新建的EntityCache只是加入到entityQueue_里,并没有做任何的同步操作,同步数据的处理在每帧都会执行的Witness::update中。由于这个函数比较庞大,我们目前先只展示新的Entity进入AOI时的处理:
/**
* This method is called regularly to send data to the witnesses associated
* with this entity.
*/
void Witness::update()
{
// 省略很多代码
// This is the maximum amount of priority change that we go through in a
// tick. Based on the default AoIUpdateScheme (distance/5 + 1) things up
// to 45 metres away can be sent every frame.
const float MAX_PRIORITY_DELTA =
CellAppConfig::witnessUpdateMaxPriorityDelta();
// We want to make sure that entities at a distance are never sent at 10Hz.
// What we do is make sure that the change in priorities that we go over is
// capped.
// Note: We calculate the max priority from the front priority. We should
// probably calculate from the previous maxPriority. Doing it the current
// way, if you only have 1 entity in your AoI, it will be sent every frame.
EntityCache::Priority maxPriority = entityQueue_.empty() ? 0.f :
entityQueue_.front()->priority() + MAX_PRIORITY_DELTA;
KnownEntityQueue::iterator queueBegin = entityQueue_.begin();
KnownEntityQueue::iterator queueEnd = entityQueue_.end();
// Entities in queue &&
while ((queueBegin != queueEnd) &&
// Priority change less than MAX_PRIORITY_DELTA &&
(*queueBegin)->priority() < maxPriority &&
// Packet still has space (includes 2 bytes for sequenceNumber))
bundle.size() < desiredPacketSize - 2)
{
loopCounter++;
// Pop the top entity. pop_heap actually keeps the entity in the vector
// but puts it in the end. [queueBegin, queueEnd) is a heap and
// [queueEnd, entityQueue_.end()) has the entities that have been popped
EntityCache * pCache = entityQueue_.front();
std::pop_heap( queueBegin, queueEnd--, PriorityCompare() );
bool wasPrioritised = pCache->isPrioritised();
if (!pCache->isUpdatable())
{
this->handleStateChange( &pCache, queueEnd );
}
// 暂时省略一些逻辑
}
// 省略很多的代码
}
这里会使用一个while循环不断的当前最小堆的顶端元素,看来EntityCache::priority越小其处理优先级越高。当前EntityCache是EnterPending状态的时候,isUpdatable会返回false,因此会走到handleStateChange来处理当前新创建的EntityCache,并调用到handleEnterPending:
/**
* This method processes an entity cache state change
*
* @param ppCache The current entity cache. Can be NULL after the call if it was invalidated.
* @param queueEnd Iterator pointing to the last entry in the heap
*/
void Witness::handleStateChange( EntityCache ** ppCache,
KnownEntityQueue::iterator & queueEnd )
{
MF_ASSERT( ppCache != NULL );
Mercury::Bundle & bundle = this->bundle();
EntityCache * pCache = *ppCache;
MF_ASSERT( !pCache->isRequestPending() );
if (pCache->isGone())
{
this->deleteFromSeen( bundle, queueEnd );
*ppCache = NULL;
}// 忽略其他的一些分支
else if (pCache->isEnterPending())
{
this->handleEnterPending( bundle, queueEnd );
}
// 忽略一些逻辑
}
这个handleEnterPending的主要逻辑是通过sendEnter来构造一个BaseAppIntInterface::enterAoI的消息,通知Base当前有新Entity进入AOI,同时这里将当前的pCache的状态切换为RequestPending:
/**
* This handles the sending of an ENTER_PENDING EntityCache, and its removal
* from the entity queue.
*/
void Witness::handleEnterPending( Mercury::Bundle & bundle,
KnownEntityQueue::iterator iEntityCache )
{
this->sendEnter( bundle, *iEntityCache );
*iEntityCache = entityQueue_.back();
entityQueue_.pop_back();
}
/**
* This method sends the enterAoI message to the client.
*/
void Witness::sendEnter( Mercury::Bundle & bundle, EntityCache * pCache )
{
size_t oldSize = bundle.size();
const Entity * pEntity = pCache->pEntity().get();
pCache->idAlias( this->allocateIDAlias( *pEntity ) );
MF_ASSERT( !pCache->isRequestPending() );
pCache->clearEnterPending();
pCache->setRequestPending();
pCache->vehicleChangeNum( pEntity->vehicleChangeNum() );
// TODO: Need to have some sort of timer on the pending entities.
// At the moment, we do not handle the case where the client does
// not reply to this message.
if (pEntity->pVehicle() != NULL)
{
// 忽略载具逻辑
}
else
{
BaseAppIntInterface::enterAoIArgs & rEnterAoI =
BaseAppIntInterface::enterAoIArgs::start( bundle );
rEnterAoI.id = pEntity->id();
rEnterAoI.idAlias = pCache->idAlias();
}
pEntity->pType()->stats().enterAoICounter().
countSentToOtherClients( bundle.size() - oldSize );
}
当BaseApp上的Proxy接收到这个消息的时候,其处理函数会直接将此消息转发到客户端上:
/**
* This method forwards this message to the client (reliably)
*/
#define STRUCT_CLIENT_MESSAGE_FORWARDER( MESSAGE ) \
void Proxy::MESSAGE( const BaseAppIntInterface::MESSAGE##Args & args ) \
{ \
if (this->hasOutstandingEnableWitness()) \
{ \
/* Do nothing. It's for an old client. */ \
} \
else if (this->hasClient()) \
{ \
Mercury::Bundle & b = \
this->clientBundle(); \
b.startMessage( ClientInterface::MESSAGE ); \
((BinaryOStream&)b) << args; \
} \
else \
{ \
WARNING_MSG( "Proxy::" #MESSAGE \
": Cannot forward for %u. No client attached\n", id_ ); \
} \
}
STRUCT_CLIENT_MESSAGE_FORWARDER( enterAoI ) // forward to client
客户端接收到这个消息之后,会决定后续的同步操作的相关参数:
/**
* This method handles the message from the server that an entity has entered
* our Area of Interest (AoI).
*/
void ServerConnection::enterAoI( const ClientInterface::enterAoIArgs & args )
{
this->enterAoI( args.id, args.idAlias );
}
/**
* This method is the common implementation of enterAoI and enterAoIOnVehicle.
*/
void ServerConnection::enterAoI( EntityID id, IDAlias idAlias,
EntityID vehicleID )
{
// Set this even if args.idAlias is NO_ID_ALIAS.
idAlias_[ idAlias ] = id;
if (pHandler_)
{
const CacheStamps * pStamps = pHandler_->onEntityCacheTest( id );
if (pStamps)
{
this->requestEntityUpdate( id, *pStamps );
}
else
{
this->requestEntityUpdate( id );
}
}
}
typedef BW::vector< EventNumber > CacheStamps;
这里的onEntityCacheTest会根据当前Entity的标识符来计算出上次同步到这个Entity的各个属性LOD的最新版本号,并通知服务器下发这些版本号之后的消息。如果之前没同步过或者过期太久,则通知服务器执行一次最新状态的全量下发。这里打包BaseAppExtInterface::requestEntityUpdate这个消息时会带上之前记录的属性序列号数组:
/**
* This method requests the server to send update information for the entity
* with the input id.
*
* @param id ID of the entity whose update is requested.
* @param stamps A vector containing the known cache event stamps. If none
* are known, stamps is empty.
*/
void ServerConnection::requestEntityUpdate( EntityID id,
const CacheStamps & stamps )
{
if (this->isOffline())
return;
this->bundle().startMessage( BaseAppExtInterface::requestEntityUpdate );
this->bundle() << id;
CacheStamps::const_iterator iter = stamps.begin();
while (iter != stamps.end())
{
this->bundle() << (*iter);
iter++;
}
}
Proxy接收到这个BaseAppExtInterface::requestEntityUpdate消息之后,只是通过CellAppInterface::requestEntityUpdate重新打包并中转到对应的RealEntity上:
/**
* This method handles a request from the client for information about a given
* entity. It forwards this message on to the cell.
*/
void Proxy::requestEntityUpdate( const Mercury::Address & srcAddr,
Mercury::UnpackedMessageHeader & header,
BinaryIStream & data )
{
Mercury::Bundle & b = this->cellBundle();
b.startMessage( CellAppInterface::requestEntityUpdate );
b << id_;
b.transfer( data, data.remainingLength() );
}
/**
* This method is called by the client in order to request an update for an
* entity that has recently entered its AoI.
*/
void Entity::requestEntityUpdate( BinaryIStream & data )
{
MF_ASSERT( pReal_ != NULL );
if (pReal_ != NULL && pReal_->pWitness() != NULL)
{
EntityID id;
data >> id;
int length = data.remainingLength();
pReal_->pWitness()->requestEntityUpdate( id,
(EventNumber *)data.retrieve( length ),
length/sizeof(EventNumber) );
}
}
兜了一个大圈之后,最终回到了Witness来处理,这里会将当前的EntityCache从RequestPending切换为CreatePending:
/**
* This virtual method is used to handle a request from the client to update
* the information associated with a particular entity.
*/
void Witness::requestEntityUpdate( EntityID id,
EventNumber * pEventNumbers, int size )
{
EntityCache * pCache = aoiMap_.find( id );
// 一些错误处理
pCache->clearRequestPending();
pCache->setCreatePending();
// make sure that the client is not try to stuff us up
if (size > pCache->numLoDLevels())
{
ERROR_MSG( "CHEAT: Witness::requestEntityUpdate: "
"Client %u sent %d LoD event stamps when max is %d\n",
entity_.id(), size, pCache->numLoDLevels() );
size = pCache->numLoDLevels();
}
// ok we have the all clear, let's add it to the seen list then
pCache->lodEventNumbers( pEventNumbers, size );
this->addToSeen( pCache );
};
这里会将客户端传递过来的属性序号数组解释为属性各级LOD的最新客户端记录。如果这个Entity之前没在这个客户端同步过,则这个LOD数组就是空的。关于属性LOD的内容留在后面介绍,这里先跳过。
将这个数组设置为lodEventNumbers信息之后,这个Entity又会通过addToSeen以最高优先级0加入到同步队列entityQueue_中,等待后续的Witness::update处理。Witness::update处理CreatePending状态的EntityCache时,会先使用sendCreate来发送当前的属性消息到客户端来推动对应Entity在客户端的创建,然后再以当前的位置来计算更新优先级,因为已经没有那么紧急了:
else if (pCache->isCreatePending())
{
this->sendCreate( bundle, pCache );
pCache->updatePriority( entity_.position() );
}
/**
* This method sends the createEntity message to the client.
*/
void Witness::sendCreate( Mercury::Bundle & bundle, EntityCache * pCache )
{
size_t oldSize = bundle.size();
pCache->clearCreatePending();
if (pCache->isRefresh())
{
ERROR_MSG( "Witness::sendCreate: isRefresh = true\n" );
pCache->clearRefresh();
}
MF_ASSERT( pCache->isUpdatable() );
const Entity & entity = *pCache->pEntity();
entity.writeVehicleChangeToBundle( bundle, *pCache );
bool isVolatile = entity.volatileInfo().hasVolatile( 0.f );
if (isVolatile)
{
bundle.startMessage( BaseAppIntInterface::createEntity );
}
else
{
bundle.startMessage( BaseAppIntInterface::createEntityDetailed );
}
{
CompressionOStream compressedStream( bundle,
this->entity().pType()->description().externalNetworkCompressionType() );
compressedStream << entity.id() << entity.clientTypeID();
compressedStream << entity.localPosition();
// 省略朝向相关数据的填充
pCache->addOuterDetailLevel( compressedStream );
}
entity.pType()->stats().createEntityCounter().
countSentToOtherClients( bundle.size() - oldSize );
}
这个sendCreate的逻辑先清除当前GuidCache的CreatePending状态,然后构造一个BaseAppIntInterface::createEntity消息发到客户端,这个消息会先填入当前Entity的id和type,然后再是位置与朝向。最后再通过addOuterDetailLevel来加入当前LOD最大的那些属性信息到消息之中:
/**
* This method adds the properties that have changed in the outer detail level
* to the input stream.
*/
void EntityCache::addOuterDetailLevel( BinaryOStream & stream )
{
MF_ASSERT( detailLevel_ == this->numLoDLevels() );
detailLevel_ = this->numLoDLevels() - 1;
lastEventNumber_ = this->pEntity()->lastEventNumber();
this->addChangedProperties( stream );
}
这里被调用的addChangedProperties函数我们在属性LOD里已经介绍过了,读者可以去回顾一下具体内容。
这个CreateEntity的消息会通过Proxy转发到客户端去处理:
VARLEN_CLIENT_MESSAGE_FORWARDER( createEntity ) // forward to client
VARLEN_CLIENT_MESSAGE_FORWARDER( createEntityDetailed ) // forward to client
/**
* This method handles a createEntity call from the server.
*/
void ServerConnection::createEntity( BinaryIStream & rawStream )
{
CompressionIStream stream( rawStream );
EntityID id;
stream >> id;
MF_ASSERT_DEV( id != EntityID( -1 ) ) // old-style deprecated hack
// Connected Entity gets createCellPlayer instead
MF_ASSERT( id != id_ );
EntityTypeID type;
stream >> type;
Position3D pos( 0.f, 0.f, 0.f );
PackedYawPitchRoll< /* HALFPITCH */ false > compressedYPR;
float yaw;
float pitch;
float roll;
stream >> pos >> compressedYPR;
compressedYPR.get( yaw, pitch, roll );
EntityID vehicleID = this->getVehicleID( id );
if (pHandler_)
{
pHandler_->onEntityCreate( id, type,
spaceID_, vehicleID, pos, yaw, pitch, roll,
stream );
}
this->detailedPositionReceived( id, spaceID_, vehicleID, pos );
}
当客户端接受到这个消息的时候,依次从消息里解析出id,type,pos,yaw,最后使用onEntityCreate来创建Entity并初始化相关属性值:
/*
* Override from ServerMessageHandler.
*/
void BWServerMessageHandler::onEntityCreate( EntityID id,
EntityTypeID entityTypeID,
SpaceID spaceID, EntityID vehicleID, const Position3D & position,
float yaw, float pitch, float roll, BinaryIStream & data )
{
entities_.handleEntityCreate( id, entityTypeID, spaceID, vehicleID,
position, yaw, pitch, roll, data );
}
/*
* @see ServerMessageHandler::onEntityCreate
*/
void BWEntities::handleEntityCreate( EntityID id,
EntityTypeID entityTypeID,
SpaceID spaceID, EntityID vehicleID, const Position3D & position,
float yaw, float pitch, float roll, BinaryIStream & data )
{
MF_ASSERT( !isLocalEntityID( id ) );
BWEntityPtr pEntity = entityFactory_.create( id, entityTypeID,
spaceID, data, &connection_ );
if (!pEntity)
{
ERROR_MSG( "BWServerMessageHandler::handleEntityCreate: "
"Failed for entity %d\n",
id );
return;
}
Direction3D direction( Vector3( roll, pitch, yaw ) );
this->addEntity( pEntity.get(), spaceID, vehicleID, position,
direction );
}
这里真正执行Entity创建的函数entityFactory_.create我们之前在介绍玩家第一次创建的时候已经介绍过了,至此一个Entity进入一个RealEntity的AOI并同步到客户端的完整流程就执行完毕了。
由于Witness::sendCreate开头会把GuidCache的CreatePending状态清除,那么后续Witness::update的时候,处理的逻辑就变了。这里会先通过sendQueueElement将当前EntityCache需要下发的属性打包下去,然后再通过updatePriority来更新当前的LOD等级:
if (!pCache->isUpdatable())
{
this->handleStateChange( &pCache, queueEnd );
}
else if (!pCache->isPrioritised())
{
// The entity has not gone anywhere, so we will proceed with the update.
hasAddedReliableRelativePosition |= this->sendQueueElement( pCache );
pCache->updatePriority( entity_.position() );
}
/**
* This method writes client update data to bundle
*
* @param pCache The current entity cache
* @return True if a reliable position update message was included in the
* bundle, false otherwise.
*/
bool Witness::sendQueueElement( EntityCache * pCache )
{
Mercury::Bundle & bundle = this->bundle();
const Entity & otherEntity = *pCache->pEntity();
bool hasAddedReliableRelativePosition = false;
// Recalculate the priority value of this entity
float distSqr = pCache->getLoDPriority( entity_.position() );
// Send data updates to the client for this entity
#define DEBUG_BANDWIDTH
#ifdef DEBUG_BANDWIDTH
int oldSize = bundle.size();
#endif // DEBUG_BANDWIDTH
#if VOLATILE_POSITIONS_ARE_ABSOLUTE
otherEntity.writeClientUpdateDataToBundle( bundle, Position3D::zero(),
*pCache, distSqr );
#else /* VOLATILE_POSITIONS_ARE_ABSOLUTE */
hasAddedReliableRelativePosition |=
otherEntity.writeClientUpdateDataToBundle( bundle,
referencePosition_, *pCache, distSqr );
#endif /* VOLATILE_POSITIONS_ARE_ABSOLUTE */
#ifdef DEBUG_BANDWIDTH
if (bundle.size() - oldSize > CellAppConfig::entitySpamSize())
{
WARNING_MSG( "Witness::update: "
"%u added %d bytes to bundle of %u\n",
otherEntity.id(),
bundle.size() - oldSize,
entity_.id() );
}
#endif // DEBUG_BANDWIDTH
return hasAddedReliableRelativePosition;
}
到了sendQueueElement里会使用writeClientUpdateDataToBundle根据当前的LOD设置来计算出哪些属性需要同步下去,并加入到bundle里, 相关内容已经在前文中已经介绍过了,读者可以去回顾一下。
接下来来了解一下一个Entity被AOI移除的流程,首先走到之前注册的回调Witness::removeFromAoI:
/**
* This method removes the input entity from this entity's Area of Interest.
*
* It is not actually removed immediately. This method is called when an AoI
* trigger is untriggered. It adds this to a leftAoI set and the normal
* priority queue updating is used to actually remove it from the list.
*/
void Witness::removeFromAoI( Entity * pEntity, bool clearManuallyAdded )
{
// Check if this is a remove that is matched with an ignored addToAoI call.
if (this->entity().isInAoIOffload())
{
MF_ASSERT( pEntity->isDestroyed() );
this->entity().isInAoIOffload( false );
return;
}
// 跳过一些容错代码
// find the entity in our AoI
EntityCache * pCache = aoiMap_.find( *pEntity );
// 跳过一些容错代码
if (clearManuallyAdded)
{
pCache->clearManuallyAdded();
if (pCache->isAddedByTrigger())
{
return;
}
}
else
{
pCache->clearAddedByTrigger();
if (pCache->isManuallyAdded())
{
return;
}
}
MF_ASSERT( !pCache->isGone() );
pCache->setGone();
if (this->shouldAddReplayAoIUpdates())
{
this->entity().cell().pReplayData()->addEntityAoIChange(
this->entity().id(), *(pCache->pEntity()),
/* hasEnteredAoI */ false );
}
// Also see the calls in Witness::init() for offloading
this->entity().callback( "onLeftAoI", PyTuple_Pack( 1, pEntity ),
"onLeftAoI", true );
}
开头的isInAoIOffload与Entity迁移相关,我们这里先略过。后续的流程就是从aoiMap_里找到这个Entity对应的EntityCache,标记为Gone状态。这里并没有直接删除这个EntityCache,在Witness::update的时候,会通过handleStateChange将Gone状态的Entity通知客户端去销毁,并在aoiMap_里删除这个EntityCache:
void Witness::handleStateChange( EntityCache ** ppCache,
KnownEntityQueue::iterator & queueEnd )
{
MF_ASSERT( ppCache != NULL );
Mercury::Bundle & bundle = this->bundle();
EntityCache * pCache = *ppCache;
MF_ASSERT( !pCache->isRequestPending() );
if (pCache->isGone())
{
this->deleteFromSeen( bundle, queueEnd );
*ppCache = NULL;
}
// 省略一些代码
}
void Witness::deleteFromSeen( Mercury::Bundle & bundle,
KnownEntityQueue::iterator iter )
{
EntityCache * pCache = *iter;
this->deleteFromClient( bundle, pCache );
this->deleteFromAoI( iter );
}
/**
* This method removes and deletes an EntityCache from the AoI.
*/
void Witness::deleteFromAoI( KnownEntityQueue::iterator iter )
{
EntityCache * pCache = *iter;
// We want to remove this entity from the vector. To do this, we move the
// last element to the one we want to delete and pop the back.
*iter = entityQueue_.back();
entityQueue_.pop_back();
// Now remove it from the AoI map (if it's in there)
aoiMap_.del( pCache );
}
/**
* Delete the given entity cache from the entity cache map
* (the entity cache itself will be deleted by this operation)
*/
void EntityCacheMap::del( EntityCache * ec )
{
--g_numInAoI;
MF_ASSERT( ec );
MF_ASSERT( ec->pEntity() );
// set_.erase( EntityCacheMap::toIterator( ec ) );
set_.erase( *ec );
}
这里的deleteFromClient会构造一个BaseAppIntInterface::leaveAoI的RPC,通过Proxy转发到对应的客户端:
/**
* This method informs the client that an entity has left its AoI.
*/
void Witness::deleteFromClient( Mercury::Bundle & bundle,
EntityCache * pCache )
{
pCache->clearRefresh();
EntityID id = pCache->pEntity()->id();
if (!pCache->isEnterPending())
{
pCache->addLeaveAoIMessage( bundle, id );
}
this->onLeaveAoI( pCache, id );
// Reset client related state
pCache->onEntityRemovedFromClient();
}
void EntityCache::addLeaveAoIMessage( Mercury::Bundle & bundle,
EntityID id ) const
{
MF_ASSERT( !this->pEntity() || this->pEntity()->id() == id );
// The leaveAoI message contains the id of the entity leaving the AoI and
// then the sequence of event numbers that are the LoD level stamps.
// TODO: At the moment, we send all of the stamps but we only really need to
// send stamps for those levels that we actually entered.
bundle.startMessage( BaseAppIntInterface::leaveAoI );
bundle << id;
if (this->pEntity())
{
const int size = this->numLoDLevels();
// For detail levels higher (more detailed) than the current one, we
// send the stored value.
for (int i = 0; i < detailLevel_; i++)
{
bundle << lodEventNumbers_[i];
}
// For the current and lower detail levels, we know that they are all at
// the current event number. (Only the current one is set and the others
// are implied).
for (int i = detailLevel_; i < size; i++)
{
bundle << this->lastEventNumber();
}
}
}
比较奇怪的是这个RPC除了会带上当前Entity的id字段之外,还会带上各个Lod等级属性的已同步最大序列号。当客户端接收到这个消息之后,会解析出这些序列号,执行onEntityLeave:
/**
* This method handles the message from the server that an entity has left our
* Area of Interest (AoI).
*/
void ServerConnection::leaveAoI( BinaryIStream & stream )
{
EntityID id;
stream >> id;
// TODO: What if the entity just leaves the AoI and then returns?
if (controlledEntities_.erase( id ))
{
if (pHandler_)
{
pHandler_->onEntityControl( id, false );
}
}
if (pHandler_)
{
CacheStamps stamps( stream.remainingLength() / sizeof(EventNumber) );
CacheStamps::iterator iter = stamps.begin();
while (iter != stamps.end())
{
stream >> (*iter);
iter++;
}
pHandler_->onEntityLeave( id, stamps );
}
passengerToVehicle_.erase( id );
}
这里的onEntityLeave会通知客户端把这个Entity从当前World里移除,并在这个pEntity的引用计数为0的时候触发这个BWEntity的析构:
/*
* Override from ServerMessageHandler.
*/
void BWServerMessageHandler::onEntityLeave( EntityID id,
const CacheStamps & stamps )
{
entities_.handleEntityLeave( id );
}
/**
* This method removes an entity from this collection.
*
* @param entityID The ID of the entity to remove.
* @return True if id was a known Entity, false otherwise
*/
bool BWEntities::handleEntityLeave( EntityID entityID )
{
// We should never be asked to remove the player.
// Use BWEntities::clear() if you're doing that.
MF_ASSERT( pPlayer_ == NULL || pPlayer_->entityID() != entityID );
BWEntityPtr pEntity = this->findAny( entityID );
if (pEntity == NULL)
{
// This may happen if an entity entered and left without being
// created in between
return false;
}
PassengersVector vPassengers;
if (activeEntities_.removeEntityFromWorld( entityID, &vPassengers ))
{
// 忽略载具相关的处理
}
else
{
MF_VERIFY( appPendingEntities_.eraseEntity( entityID ) ||
pendingPassengers_.erasePassenger( entityID ) );
}
pEntity->destroyNonPlayer();
return true;
}
使用十字链表的AOI系统
在Witness里创建的AoITrigger是RangeTrigger的简单子类,负责接受trigger的enter/leave回调并转发到Witness上。上面的小结里我们详解了回调的后续处理逻辑,现在我们来探究区域进出回调是如何产生的,也就是其底层的AOI计算更新方式。我们首先来看一下RangeTrigger的类型定义:
/**
* This class encapsulates a full range trigger. It contains a upper and lower
* bound trigger node.
*/
class RangeTrigger
{
public:
RangeTrigger( RangeListNode * pCentralNode, float range,
RangeListNode::RangeListFlags wantsFlagsLower,
RangeListNode::RangeListFlags wantsFlagsUpper,
RangeListNode::RangeListFlags makesFlagsLower,
RangeListNode::RangeListFlags makesFlagsUpper );
// 省略一些接口定义
// protected:
public:
RangeListNode * pCentralNode_;
RangeTriggerNode upperBound_;
RangeTriggerNode lowerBound_;
// Old location of the entity
float oldEntityX_;
float oldEntityZ_;
};
RangeTrigger::RangeTrigger( RangeListNode * pCentralNode,
float range,
RangeListNode::RangeListFlags wantsFlagsLower,
RangeListNode::RangeListFlags wantsFlagsUpper,
RangeListNode::RangeListFlags makesFlagsLower,
RangeListNode::RangeListFlags makesFlagsUpper ) :
pCentralNode_( pCentralNode ),
upperBound_( this, range, wantsFlagsUpper, makesFlagsUpper ),
lowerBound_( this, -range, wantsFlagsLower,
RangeListNode::RangeListFlags(
makesFlagsLower | RangeListNode::FLAG_IS_LOWER_BOUND ) ),
oldEntityX_( pCentralNode->x() ),
oldEntityZ_( pCentralNode->z() )
{
}
pCentralNode和range的意义我们在前文中已经介绍过了,剩下需要关注的是后面的四个RangeListFlags的意义。从上面贴出的构造函数可以看出,每个RangeTrigger会创建两个RangeTriggerNode节点,分别代表触发范围的上边界与下边界。wantsFlags和makesFlags会被一路传递到RangeTriggerNode的父类RangeListNode之中:
/**
* This class is used for range triggers (traps). Its position is the same as
* the entity's position plus a range. Once another entity crosses the node, it
* will either trigger or untrigger it and it will notify its owner entity.
*/
class RangeTriggerNode : public RangeListNode
{
public:
RangeTriggerNode( RangeTrigger * pRangeTrigger,
float range,
RangeListFlags wantsFlags,
RangeListFlags makesFlags );
// 省略很多函数和变量声明
protected:
RangeTrigger * pRange_;
float range_;
float oldRange_;
};
RangeTriggerNode::RangeTriggerNode( RangeTrigger * pRangeTrigger,
float range,
RangeListFlags wantsFlags,
RangeListFlags makesFlags ) :
RangeListNode( wantsFlags, makesFlags,
(makesFlags & FLAG_IS_LOWER_BOUND) ?
RANGE_LIST_ORDER_LOWER_BOUND :
RANGE_LIST_ORDER_UPPER_BOUND ),
pRange_( pRangeTrigger ),
range_( range ),
oldRange_( 0.f )
{
}
在RangeListNode的成员变量定义的注释里提供了这两个Flags的作用,makesFlags代表当前节点进出触发边界时应该展示的类型信息,而wantsFlags_则代表的是当前节点作为边界节点时所在意的节点类型信息。即一个RangeListNode(A)穿越了RangeListNode(B)所代表的边界时,如果A->makesFlags_ & B->wantsFlags_ != 0,那么才会引发后续的enter/leave回调,这部分逻辑对应RangeListNode::wantsCrossingWith函数:
/**
* This class is the base of all range nodes. Range Nodes are used to keep track of
* the order of entities and triggers relative to the x axis or the z axis.
* This is used for AoI calculations and range queries.
*/
class RangeListNode
{
public:
enum RangeListFlags
{
FLAG_NO_TRIGGERS = 0,
FLAG_ENTITY_TRIGGER = 0x01,
FLAG_LOWER_AOI_TRIGGER = 0x02,
FLAG_UPPER_AOI_TRIGGER = 0x04,
FLAG_IS_ENTITY = 0x10,
FLAG_IS_LOWER_BOUND = 0x20
};
RangeListNode( RangeListFlags wantsFlags,
RangeListFlags makesFlags,
RangeListOrder order ) :
pPrevX_( NULL ),
pNextX_( NULL ),
pPrevZ_( NULL ),
pNextZ_( NULL ),
wantsFlags_( wantsFlags ),
makesFlags_( makesFlags ),
order_( order )
{ }
virtual ~RangeListNode() {}
protected:
//pointers to the prev and next entities in the X and Z direction
RangeListNode * pPrevX_;
RangeListNode * pNextX_;
RangeListNode * pPrevZ_;
RangeListNode * pNextZ_;
// Flags for type of crossings this node wants to receive
RangeListFlags wantsFlags_;
// Flags for type of crossings this node wants to make
RangeListFlags makesFlags_;
RangeListOrder order_;
};
bool RangeListNode::wantsCrossingWith( RangeListNode * pOther ) const
{
return (wantsFlags_ & pOther->makesFlags_);
}
了解这两个Flags的意义之后,再回顾一下AoITrigger里传递的Flags的相关值,可以知道当前AoITrigger创建的两个RangeListNode只负责被动接收FLAG_LOWER_AOI_TRIGGER/FLAG_UPPER_AOI_TRIGGER类型的节点的进出边界回调,但是这两个节点自身的移动不会触发任何可能的其他边界节点的enter/leave通知,因为他们的makesFlags都是FLAG_NO_TRIGGERS:
AoITrigger( Witness & owner, RangeListNode * pCentralNode, float range ) :
RangeTrigger( pCentralNode, range,
RangeListNode::FLAG_LOWER_AOI_TRIGGER,
RangeListNode::FLAG_UPPER_AOI_TRIGGER,
RangeListNode::FLAG_NO_TRIGGERS,
RangeListNode::FLAG_NO_TRIGGERS ),
owner_( owner )
{
// Collect the large entities whose range we currently sit.
owner_.entity().space().visitLargeEntities(
pCentralNode->x(),
pCentralNode->z(),
*this );
this->insert();
}
现在进出AOI的触发器已经设置好了,还需要其他的节点充当触发者,来提供FLAG_LOWER_AOI_TRIGGER/FLAG_UPPER_AOI_TRIGGER的makesFlags,这些当作触发者的节点就是EntityRangeListNode节点,他的构造函数里会将自己的wantsFlags设置为FLAG_NO_TRIGGERS,同时将makesFlags设置为FLAG_ENTITY_TRIGGER |FLAG_LOWER_AOI_TRIGGER |FLAG_UPPER_AOI_TRIGGER |FLAG_IS_ENTITY,刚好与之前的AoITrigger相反,因此一个EntityRangeListNode在移动的时候如果进出了一个AoITrigger的相关节点,AoITrigger上的wantsCrossingWith肯定能返回true:
/**
* This class is used as an entity's entry into the range list. The position
* of this node is the same as the entity's position. When the entity moves,
* this node may also move along the x/z lists.
*/
class EntityRangeListNode : public RangeListNode
{
public:
EntityRangeListNode( Entity * entity );
float x() const;
float z() const;
BW::string debugString() const;
Entity * getEntity() const;
void remove();
void isAoITrigger( bool isAoITrigger );
static Entity * getEntity( RangeListNode * pNode )
{
MF_ASSERT( pNode->isEntity() );
return static_cast< EntityRangeListNode * >( pNode )->getEntity();
}
static const Entity * getEntity( const RangeListNode * pNode )
{
MF_ASSERT( pNode->isEntity() );
return static_cast< const EntityRangeListNode * >( pNode )->getEntity();
}
protected:
Entity * pEntity_;
};
/**
* This is the constructor for the EntityRangeListNode.
* @param pEntity - entity that is associated with this node
*/
EntityRangeListNode::EntityRangeListNode( Entity * pEntity ) :
RangeListNode( FLAG_NO_TRIGGERS,
RangeListFlags(
FLAG_ENTITY_TRIGGER |
FLAG_LOWER_AOI_TRIGGER |
FLAG_UPPER_AOI_TRIGGER |
FLAG_IS_ENTITY ),
RANGE_LIST_ORDER_ENTITY ),
pEntity_( pEntity )
{}
每个Entity在被创建的时候,都会创建一个EntityRangeListNode赋值到当前的pRangeListNode_成员变量上,因此EntityRangeListNode跟Entity总是一对一的:
Entity::Entity( EntityTypePtr pEntityType ):
PyObjectPlus( pEntityType->pPyType(), true ),
{
++g_numEntitiesEver;
pRangeListNode_ = new EntityRangeListNode( this );
}
现在我们有了触发器与触发者,接下来需要一个管理设施来将这两个类型的RangeListNode放在同一个结构里管理,这个结构就是RangeList:
/**
* This class implements a range list.
*/
class RangeList
{
public:
RangeList();
void add( RangeListNode * pNode );
// For debugging
bool isSorted() const;
void debugDump();
const RangeListNode * pFirstNode() const { return &first_; }
const RangeListNode * pLastNode() const { return &last_; }
RangeListNode * pFirstNode() { return &first_; }
RangeListNode * pLastNode() { return &last_; }
private:
RangeListTerminator first_;
RangeListTerminator last_;
};
这个类型看上去像是一个单链表的定义,其实不然,他是一个十字链表,分别对应X轴和Z轴。与mosaic_game里的十字链表类似,这里有两个特殊的节点first_/last_作为两端的头尾节点来使用。mosaic_game里是给这种头尾节点加上一个aoi_list_node_type的标记,而这里还额外的提供了一个类型RangeListTerminator:
/**
* This class is used for the terminators of the range list. They are either
* the head or tail of the list. They always have a position of +/- FLT_MAX.
*/
class RangeListTerminator : public RangeListNode
{
public:
RangeListTerminator( bool isHead ) :
RangeListNode( RangeListFlags( 0 ), RangeListFlags( 0 ),
isHead ? RANGE_LIST_ORDER_HEAD : RANGE_LIST_ORDER_TAIL) {}
float x() const { return (order_ ? FLT_MAX : -FLT_MAX); }
float z() const { return (order_ ? FLT_MAX : -FLT_MAX); }
BW::string debugString() const { return order_ ? "Tail" : "Head"; }
};
每个Space内部会有一个RangeList来管理整个Space的AOI,当一个Entity被添加到Space时,会调用到Entity::addToRangeList来将这个Entity加入到这个RangeList中:
/**
* This method adds an entity to this space.
*/
void Space::addEntity( Entity * pEntity )
{
MF_ASSERT( pEntity->removalHandle() == NO_SPACE_REMOVAL_HANDLE );
pEntity->removalHandle( entities_.size() );
entities_.push_back( pEntity );
pEntity->addToRangeList( rangeList_, appealRadiusList_ );
}
/**
* This method adds this entity to a range list.
*
* @param rangeList The range list to add to.
*/
void Entity::addToRangeList( RangeList & rangeList,
RangeTriggerList & appealRadiusList )
{
AUTO_SCOPED_THIS_ENTITY_PROFILE;
rangeList.add( pRangeListNode_ );
// 省略一些代码
}
当执行新节点的插入的时候,这里的add接口会对新加入的节点执行这两个轴的分别插入,做法就是先插入到first_节点的next里,然后再遍历过去直到移动到合适的位置:
/**
* This method adds an element to the range list.
*/
void RangeList::add( RangeListNode * pNode )
{
SCOPED_PROFILE( SHUFFLE_ENTITY_PROFILE );
MF_ASSERT( pNode != NULL );
first_.nextX()->insertBeforeX( pNode );
first_.nextZ()->insertBeforeZ( pNode );
pNode->shuffleXThenZ( -FLT_MAX, -FLT_MAX );
}
/**
* This method inserts a range node before another one in the X list.
*
* @param pNode The node to insert before.
*/
void RangeListNode::insertBeforeX( RangeListNode * pNode )
{
MF_ASSERT( this != pNode );
if (pPrevX_!=NULL)
{
pPrevX_->pNextX_ = pNode;
}
pNode->pPrevX_ = pPrevX_;
this ->pPrevX_ = pNode;
pNode->pNextX_ = this;
}
这里的shuffleXThenZ其实也是分别做X轴的平移与Z轴的平移,其内部调用的shuffleX与shuffleZ代码基本一样,除了处理的轴不一样,所以这里只贴出shuffleX的实现:
/**
* This method makes sure that this entity is in the correct place in the
* global sorted position lists. If a shuffle is performed, crossedX or
* crossedZ is called on both nodes.
*
* @param oldX The old value of the x position.
* @param oldZ The old value of the z position.
*/
void RangeListNode::shuffleXThenZ( float oldX, float oldZ )
{
this->shuffleX( oldX, oldZ );
this->shuffleZ( oldX, oldZ );
// this->shuffleZ( this->x() );
}
/**
* This method makes sure that this entity is in the correct place in X
* position lists. If a shuffle is performed, crossedX is called on both nodes.
*
* @param oldX The old value of the x position.
* @param oldZ The old value of the z position.
*/
void RangeListNode::shuffleX( float oldX, float oldZ )
{
MF_ASSERT( !Entity::callbacksPermitted() );
static bool inShuffle = false;
MF_ASSERT( !inShuffle ); // make sure we are not reentrant
inShuffle = true;
float ourPosX = this->x();
float othPosX;
// Shuffle to the left(negative X)...
while (pPrevX_ != NULL &&
(ourPosX < (othPosX = pPrevX_->x()) ||
(isEqual( ourPosX, othPosX ) &&
order_ <= pPrevX_->order_)))
{
if (this->wantsCrossingWith( pPrevX_ ))
{
this->crossedX( pPrevX_, true, pPrevX_->x(), pPrevX_->z() );
}
if (pPrevX_->wantsCrossingWith( this ))
{
pPrevX_->crossedX( this, false, oldX, oldZ );
}
// unlink us
if (pNextX_!= NULL)
{
pNextX_->pPrevX_ = pPrevX_;
}
pPrevX_->pNextX_ = pNextX_;
// fix our pointers
pNextX_ = pPrevX_;
pPrevX_ = pPrevX_->pPrevX_;
// relink us
if (pPrevX_ != NULL)
{
pPrevX_->pNextX_= this;
}
pNextX_->pPrevX_= this;
}
// Shuffle to the right(positive X)...
while (pNextX_ != NULL &&
(ourPosX > (othPosX = pNextX_->x()) ||
(isEqual( ourPosX, othPosX ) &&
order_ >= pNextX_->order_)))
{
if (this->wantsCrossingWith( pNextX_ ))
{
this->crossedX( pNextX_, false, pNextX_->x(), pNextX_->z() );
}
if (pNextX_->wantsCrossingWith( this ))
{
pNextX_->crossedX( this, true, oldX, oldZ );
}
// unlink us
if (pPrevX_ != NULL)
{
pPrevX_->pNextX_ = pNextX_;
}
pNextX_->pPrevX_ = pPrevX_;
// fix our pointers
pPrevX_ = pNextX_;
pNextX_ = pNextX_->pNextX_;
// relink us
pPrevX_->pNextX_ = this;
if (pNextX_ != NULL)
{
pNextX_->pPrevX_ = this;
}
}
inShuffle = false;
}
shuffleX的实现有一点点长,但是代码理解起来还是很简单的,这里分为了互为镜像的两个while循环,第一个while循环负责将当前节点往左移动到最新坐标对应的位置,第二个while循环负责将当前节点往右移动到最新坐标对应的位置。其实可以预先根据OldX与ourPosX的相对大小来只执行其中一个while,ourPosX>OldX的时候往右移,反之往左移动。不过这里反正任何一个while执行到了内部都会导致另外一个while的准入条件不会被满足,因此也就没啥性能影响。
在遍历的过程中除了维护好十字链表的结构之外,最重要的就是触发进入Trigger的回调,也就是这四行代码:
if (this->wantsCrossingWith( pPrevX_ ))
{
this->crossedX( pPrevX_, true, pPrevX_->x(), pPrevX_->z() );
}
if (pPrevX_->wantsCrossingWith( this ))
{
pPrevX_->crossedX( this, false, oldX, oldZ );
}
这里的wantsCrossingWith函数我们在前面介绍过了,就是一些mask计算来过滤掉各自不关心的ListNode的进出边界。当这个边界节点对移动的节点感兴趣时,对应的crossed(X/Z)就会被调用。在RangeListNode的基类里这两个函数是空实现的虚函数,只有在子类的RangeTriggerNode里才有具体实现:
class RangeListNode
{
virtual void crossedX( RangeListNode * /*node*/, bool /*positiveCrossing*/,
float /*oldOthX*/, float /*oldOthZ*/ ) {}
virtual void crossedZ( RangeListNode * /*node*/, bool /*positiveCrossing*/,
float /*oldOthX*/, float /*oldOthZ*/ ) {}
};
/**
* This method is called whenever there is a shuffle in the X direction.
* The range trigger node then decides whether or not the entity triggers or
* untriggers it.
*
* @param pNode Other entity that has crossed this trigger node.
* @param positiveCrossing Which direction the shuffle occurred.
* @param oldOthX The old x co-ordinate of the other node.
* @param oldOthZ The old z co-ordinate of the other node.
*/
void RangeTriggerNode::crossedX( RangeListNode * pNode, bool positiveCrossing,
float oldOthX, float oldOthZ )
{
if (pNode->isEntity())
{
this->crossedXEntity( pNode, positiveCrossing, oldOthX, oldOthZ );
}
else
{
this->crossedXEntityRange( pNode, positiveCrossing );
}
}
目前我们只关心pNode是Entity的情况,因此跟进crossedXEntity的实现:
/**
* This method is called whenever there is a shuffle in the X direction.
* The range trigger node then decides whether or not the entity triggers or
* untriggers it.
*
* @param pNode Other entity that has crossed this trigger node.
* @param positiveCrossing Which direction the shuffle occurred.
* @param oldOthX The old x co-ordinate of the other node.
* @param oldOthZ The old z co-ordinate of the other node.
*/
void RangeTriggerNode::crossedXEntity( RangeListNode * pNode,
bool positiveCrossing, float oldOthX, float oldOthZ )
{
if (pNode == pRange_->pCentralNode()) return;
// x is shuffled first so the old z position is checked.
const bool wasInZ = pRange_->wasInZRange( oldOthZ, fabsf( oldRange_ ) );
if (!wasInZ)
{
return;
}
Entity * pOtherEntity = EntityRangeListNode::getEntity( pNode );
const bool isEntering = (this->isLowerBound() == positiveCrossing);
if (isEntering)
{
const bool isInX = pRange_->isInXRange( pNode->x(), fabsf( range_ ) );
const bool isInZ = pRange_->isInZRange( pNode->z(), fabsf( range_ ) );
if (isInX && isInZ)
{
pRange_->triggerEnter( *pOtherEntity );
}
}
else
{
const bool wasInX = pRange_->wasInXRange( oldOthX, fabsf( oldRange_ ) );
if (wasInX)
{
pRange_->triggerLeave( *pOtherEntity );
}
}
}
由于进出边界的时候都会触发这个crossedXEntity,所以这里的主要逻辑就是在判断当前是进入边界还是离开边界,即需要计算wasIn(X/Z)和isIn(X/Z)这四个变量,然后再去触发对应的Trigger(Enter/Leave)。这里触发的Trigger(Enter/Leave)最终会调用到Witness提供的addToAoI/removeFromAoI,这两个接口已经在上面的小结里介绍过了,读者可以去回顾一下。
由于Entity是不断移动着的,因此Entity需要定期的更新RangeList里对应节点的最新位置。对于Entity身上的pRangeListNode_,每次位置变化的时候都会调用下面的接口来同步位置到RangeList:
/**
* This method is called when an Entity's position changes for any reason,
* and regardless of whether the Entity is a real or a ghost.
*
* Note: Anything could happen to the entity over this call if it is a real,
* since its movement could trip a trigger, which could call script and
* offload or destroy this entity (or cancel any controller).
*/
void Entity::updateInternalsForNewPosition( const Vector3 & oldPosition,
bool isVehicleMovement )
{
MF_ASSERT_DEV( isValidPosition( globalPosition_ ) );
START_PROFILE( SHUFFLE_ENTITY_PROFILE );
// Make sure that no controllers are cancelled while doing this.
// (And that no triggers are added/deleted/modified!)
Entity::callbacksPermitted( false );
// check if upper triggers should move first or lower ones
bool increaseX = (oldPosition.x < globalPosition_.x);
bool increaseZ = (oldPosition.z < globalPosition_.z);
// shuffle the leading triggers
for (Triggers::iterator it = triggers_.begin(); it != triggers_.end(); it++)
{
(*it)->shuffleXThenZExpand( increaseX, increaseZ,
oldPosition.x, oldPosition.z );
}
// shuffle the entity
pRangeListNode_->shuffleXThenZ( oldPosition.x, oldPosition.z );
// shuffle the trailing triggers
for (Triggers::reverse_iterator it = triggers_.rbegin();
it != triggers_.rend(); it++)
{
(*it)->shuffleXThenZContract( increaseX, increaseZ,
oldPosition.x, oldPosition.z );
}
// 省略很多代码
}
注意到这里除了会更新pRangeListNode_的最新位置之外,还会遍历所有挂载在当前Entity上的triggers_去更新,刚好Witness创建的AoITrigger也会注册到这个triggers容器里。
void Witness::init()
{
// Disabling callbacks is not needed since no script should be triggered but
// it's helpful for debugging.
Entity::callbacksPermitted( false );
// Create AoI triggers around ourself.
{
SCOPED_PROFILE( SHUFFLE_AOI_TRIGGERS_PROFILE );
pAoITrigger_ = new AoITrigger( *this, pAoIRoot_, aoiRadius_ );
if (this->isAoIRooted())
{
MobileRangeListNode * pRoot =
static_cast< MobileRangeListNode * >( pAoIRoot_ );
pRoot->addTrigger( pAoITrigger_ );
}
else
{
entity().addTrigger( pAoITrigger_ );
}
}
// 省略后续代码
}
这里更新triggers_的位置的形式有点特殊,先执行shuffleXThenZExpand,等pRangeListNode_的位置更新之后,再执行shuffleXThenZContract。shuffleXThenZExpand负责移动upper/lower两个节点里与当前移动方向一致的那个节点,效果是扩大upper-lower之间的空间,即expand:
/**
* This method shuffles only the trigger nodes that would expand the area
* encompassed by this trigger, for a movement in the direction indicated.
*/
void RangeTrigger::shuffleXThenZExpand( bool xInc, bool zInc,
float oldX, float oldZ )
{
// TODO: Remove this assert after a while
MF_ASSERT( isEqual( oldEntityX_, oldX ) );
MF_ASSERT( isEqual( oldEntityZ_, oldZ ) );
// It does really matter what arguments are passed here for shuffleX and
// shuffleZ as they are not used since the triggers do not have
// FLAG_MAKES_CROSSINGS set.
RangeTriggerNode* xTrigger = xInc ? &upperBound_ : &lowerBound_;
xTrigger->shuffleX( oldX + xTrigger->range(), oldZ + xTrigger->range() );
RangeTriggerNode* zTrigger = zInc ? &upperBound_ : &lowerBound_;
zTrigger->shuffleZ( oldX + zTrigger->range(), oldZ + zTrigger->range() );
}
shuffleXThenZContract刚好与之相反,负责移动upper/lower两个节点里与当前移动方向反向的那个节点,效果是收缩upper-lower之间的空间,即contract:
/**
* This method shuffles only the trigger nodes that would contract the area
* encompassed by this trigger, for a movement in the direction indicated.
*/
void RangeTrigger::shuffleXThenZContract( bool xInc, bool zInc,
float oldX, float oldZ )
{
// TODO: Remove this assert after a while
MF_ASSERT( isEqual( oldEntityX_, oldX ) );
MF_ASSERT( isEqual( oldEntityZ_, oldZ ) );
// It does really matter what arguments are passed here for shuffleX and
// shuffleZ as they are not used since the triggers do not have
// FLAG_MAKES_CROSSINGS set.
RangeTriggerNode* xTrigger = xInc ? &lowerBound_ : &upperBound_;
xTrigger->shuffleX( oldX + xTrigger->range(), oldZ + xTrigger->range() );
RangeTriggerNode* zTrigger = zInc ? & lowerBound_ : &upperBound_;
zTrigger->shuffleZ( oldX + zTrigger->range(), oldZ + zTrigger->range() );
oldEntityX_ = pCentralNode_->x();
oldEntityZ_ = pCentralNode_->z();
}
shuffleXThenZExpand与shuffleXThenZContract之间的差别刚好等于其函数名之间的差别,这样设计的作用是保证移动过程中一个rangeTrigger的lower/upper的位置区间是有效的,即lower <upper,同时保证这个区间内内一定包括了其所附属的Entity的pRangeListNode_。
AOI内Entity同步时的数据压缩
位置与朝向的数据压缩
在发送初始Entity创建信息的函数sendCreate里填充朝向的时候根据isVolatile的值来决定使用压缩精度的数值还是使用全精度的数值,这个Entity::volatileInfo存储的是是否应该以将位置朝向信息当作高频变化属性去同步,如果不是高频变化的话就同步全精度:
void Witness::sendCreate( Mercury::Bundle & bundle, EntityCache * pCache )
{
// 省略一些代码
bool isVolatile = entity.volatileInfo().hasVolatile( 0.f );
if (isVolatile)
{
bundle.startMessage( BaseAppIntInterface::createEntity );
}
else
{
bundle.startMessage( BaseAppIntInterface::createEntityDetailed );
}
{
CompressionOStream compressedStream( bundle,
this->entity().pType()->description().externalNetworkCompressionType() );
compressedStream << entity.id() << entity.clientTypeID();
compressedStream << entity.localPosition();
if (isVolatile)
{
compressedStream << PackedYawPitchRoll< /* HALFPITCH */ false >(
entity.localDirection().yaw, entity.localDirection().pitch,
entity.localDirection().roll );
}
else
{
compressedStream << entity.localDirection().yaw;
compressedStream << entity.localDirection().pitch;
compressedStream << entity.localDirection().roll;
}
pCache->addOuterDetailLevel( compressedStream );
}
}
这里的PacketYawPitchRoll结构体会将传入的数据以合适的精度打包为一个字节数组,一般来说是每个分量压缩为一个字节:
// When sending a Yaw-only direction update:
#define YAW_YAWBITS 8
// When sending a Yaw and Pitch direction update:
#define YAWPITCH_YAWBITS 8
#define YAWPITCH_PITCHBITS 8
// Controls whether pitch should be [-pi,pi) or [-pi/2,pi/2)
#define YAWPITCH_HALFPITCH false
// When sending a Yaw, Pitch and Roll direction update:
#define YAWPITCHROLL_YAWBITS 8
#define YAWPITCHROLL_PITCHBITS 8
#define YAWPITCHROLL_ROLLBITS 8
// Controls whether pitch should be [-pi,pi) or [-pi/2,pi/2)
#define YAWPITCHROLL_HALFPITCH true
/**
* This class is used to pack a yaw, pitch and roll value for network
* transmission.
*
* @ingroup network
*/
template< bool HALFPITCH = YAWPITCHROLL_HALFPITCH,
int YAWBITS = YAWPITCHROLL_YAWBITS, int PITCHBITS = YAWPITCHROLL_PITCHBITS,
int ROLLBITS = YAWPITCHROLL_ROLLBITS >
class PackedYawPitchRoll
{
static const int BYTES = ((YAWBITS + PITCHBITS + ROLLBITS - 1) / 8) + 1;
public:
PackedYawPitchRoll( float yaw, float pitch, float roll )
{
this->set( yaw, pitch, roll );
}
PackedYawPitchRoll() {};
void set( float yaw, float pitch, float roll );
void get( float & yaw, float & pitch, float & roll ) const;
friend BinaryIStream& operator>>( BinaryIStream& is,
PackedYawPitchRoll< HALFPITCH, YAWBITS, PITCHBITS, ROLLBITS > &ypr )
{
memcpy( ypr.buff_, is.retrieve( BYTES ), BYTES );
return is;
}
friend BinaryOStream& operator<<( BinaryOStream& os,
const PackedYawPitchRoll< HALFPITCH, YAWBITS, PITCHBITS, ROLLBITS >
&ypr )
{
memcpy( os.reserve( BYTES ), ypr.buff_, BYTES );
return os;
}
private:
char buff_[ BYTES ];
};
这里的打包机制就是将输入的弧度float(-pi, pi)以丢失精度的方式转为int8(-128, 127),因为朝向数据并不需要太高的精度:
template< int BITS >
inline int angleToInt( float angle )
{
const float upperBound = float(1 << (BITS - 1));
return (int)floorf( angle * (upperBound / MATH_PI) + 0.5f );
}
// Specialisations to use the original fixed-size calculations
/**
* This method is used to convert an angle in the range [-pi, pi) into an int
* using only a certain number of bits.
*
* @see intToAngle
*/
template<>
inline int angleToInt< 8 >( float angle )
{
return (int8)floorf( (angle * 128.f) / MATH_PI + 0.5f );
}
/**
* This method stores the supplied yaw, pitch and roll values in our buffer
*/
template< bool HALFPITCH, int YAWBITS, int PITCHBITS, int ROLLBITS >
inline void PackedYawPitchRoll< HALFPITCH, YAWBITS, PITCHBITS, ROLLBITS >::set(
float yaw, float pitch, float roll )
{
BitWriter writer;
writer.add( YAWBITS, angleToInt< YAWBITS >( yaw ) );
writer.add( PITCHBITS,
HALFPITCH ?
halfAngleToInt< PITCHBITS >( pitch ) :
angleToInt< PITCHBITS >( pitch ));
writer.add( ROLLBITS, angleToInt< ROLLBITS >( roll ) );
MF_ASSERT( writer.usedBytes() == BYTES );
memcpy( buff_, writer.bytes(), BYTES );
}
在这样的数据压缩机制下,本来需要3*float的朝向数据变成了3*int8,从12个字节降低到了3个字节。
在后续的数据更新函数Entity::writeClientUpdateDataToBundle中,如果发现不需要将完整精读的位置朝向信息下发的话,会使用writeVolatileDataToBundle来同步最新的位置和朝向下去,以减少流量:
bool Entity::writeClientUpdateDataToBundle( Mercury::Bundle & bundle,
const Vector3 & basePos,
EntityCache & cache,
float lodPriority ) const
{
// 省略一些代码
{
cache.lastVolatileUpdateNumber( volatileUpdateNumber_ );
if (this->volatileInfo().hasVolatile( lodPriority ))
{
const bool isReliable = hasEventsToSend;
if (cache.isAlwaysDetailed() || (cache.isPrioritised() && CellAppConfig::sendDetailedPlayerVehicles()) )
{
this->writeVolatileDetailedDataToBundle( bundle,
cache.idAlias(), isReliable );
}
else
{
hasAddedReliableRelativePosition =
this->writeVolatileDataToBundle( bundle, basePos,
cache.idAlias(), lodPriority, isReliable );
}
// 省略一些代码
}
}
// 省略一些代码
}
这里的writeVolatileDataToBundle函数会利用当前的最新位置与传入的上次同步位置basePos来做差量diff,这样可以避免完整的将Vector3同步下去,减少流量消耗:
bool Entity::writeVolatileDataToBundle( Mercury::Bundle & bundle,
const Vector3 & basePosition,
IDAlias idAlias,
float priorityThreshold,
bool isReliable ) const
{
const bool sendAlias = (idAlias != NO_ID_ALIAS);
const bool sendOnGround = this->isOnGround();
const bool shouldSendPosition = volatileInfo_.shouldSendPosition();
const float scale = CellAppConfig::packedXZScale();
// Calculate the relative position.
#if VOLATILE_POSITIONS_ARE_ABSOLUTE
const bool isRelative = false;
const Vector3 relativePos = localPosition_;
#else /* VOLATILE_POSITIONS_ARE_ABSOLUTE */
const bool isRelative = (pVehicle_ == NULL);
const Vector3 relativePos = isRelative ?
localPosition_ - basePosition : localPosition_;
#endif /* VOLATILE_POSITIONS_ARE_ABSOLUTE */
if (shouldSendPosition)
{
// If we cannot represent the given relative position
// with a PackedXZ or PackedXYZ (as appropriate) send
// a detailed volatile position update instead.
const float maxLimit = sendOnGround ?
PackedXZ::maxLimit( scale ) :
PackedXYZ::maxLimit( scale );
const float minLimit = sendOnGround ?
PackedXZ::minLimit( scale ) :
PackedXYZ::minLimit( scale );
if ((relativePos.x < minLimit) || (maxLimit <= relativePos.x) ||
(relativePos.z < minLimit) || (maxLimit <= relativePos.z))
{
this->writeVolatileDetailedDataToBundle( bundle,
idAlias, isReliable );
return false;
}
}
const int posType = shouldSendPosition ? sendOnGround : 2;
const int dirType = volatileInfo_.dirType( priorityThreshold );
const int index = sendAlias * 12 + posType * 4 + dirType;
// We can't actually send an avatarUpdate*NoPosNoDir message, we
// would never have entered this method.
// TODO: Remove those messages.
MF_ASSERT( dirType < 3 || posType < 2 );
if (isReliable)
{
BaseAppIntInterface::makeNextMessageReliableArgs::start(
bundle ).isReliable = true;
}
bundle.startMessage( *getAvatarUpdateMessage( index ) );
if (sendAlias)
{
bundle << idAlias;
}
else
{
bundle << this->id();
}
if (shouldSendPosition)
{
if (sendOnGround)
{
bundle << PackedXZ( relativePos.x, relativePos.z, scale );
}
else
{
bundle << PackedXYZ( relativePos.x, relativePos.y, relativePos.z,
scale );
}
}
// const Direction3D & dir = this->direction();
const Direction3D & dir = localDirection_;
switch (dirType)
{
case 0:
bundle << YawPitchRoll( dir.yaw, dir.pitch, dir.roll );
break;
case 1:
bundle << YawPitch( dir.yaw, dir.pitch );
break;
case 2:
bundle << Yaw( dir.yaw );
break;
}
return isReliable && isRelative;
}
其差量diff的原理其实就是计算出位置差量relativePosition,将每个分量乘以一个CellAppConfig::packedXZScale()然后判断这些分量是否都能被一个降低精度的float来表示,这里的PackedXZ/PackedXYZ使用的都是3bit的指数区域加上8bit的尾数构成的低精度float。
// The range of the X and Z components of the position updates are spread over
// the maximumAoIRadius configured in the CellApp based on the least-accurate
// of on-Ground and off-Ground update ranges.
// So the exponent range of the two types of updates is the same, as any
// extra bits in one or the other would be wasted.
// Setting this to 0 will produce fixed-point volatile updates.
#define EXPONENTBITS_XZ 3
// When sending an on-Ground (XZ) position update:
// (EXPONENTBITS_XZ + XZ_MANTISSABITS_XZ + 1) * 2 bits
// Mantissa controls the maximum accuracy of a position update
#define XZ_MANTISSABITS_XZ 8
/**
* This class is used to store a packed x and z coordinate.
*/
template< int EXPONENT_BITS = EXPONENTBITS_XZ,
int MANTISSA_BITS = XZ_MANTISSABITS_XZ >
class PackedGroundPos
{
// X and Z are each EXPONENT + MANTISSA + 1 (for the sign)
static const int BITS = (EXPONENT_BITS + MANTISSA_BITS + 1) * 2;
static const int BYTES = ((BITS - 1) / 8) + 1;
public:
};
typedef PackedGroundPos<> PackedXZ;
如果能被这个低精度float表示的话则只需要发送这个差量数据PackedXZ/PackedXYZ,否则发送全量数据Vector3。这里还会根据当前是否在地面上进一步的忽略高度轴Y轴的数据同步,因为有贴地需求的话客户端总是可以通过XZ投影到地面计算出Y来。
这里的朝向同步也很有意思,根据当前的粒度volatileInfo_.dirType( priorityThreshold )设置来决定同步几个分量,最粗粒度下只同步单个的Yaw分量,最高粒度下需要同步三个分量YawPitchRoll。同时这里的Yaw,YawPitch,YawPitchRoll依然是降低精度的,使用int8来执行数据同步。
/**
* This class is used to pack a yaw value for network transmission.
*
* @ingroup network
*/
template< int YAWBITS = YAW_YAWBITS >
class PackedYaw
{
static const int BYTES = ((YAWBITS - 1) / 8) + 1;
public:
};
综上,最优情况下使用PackedXZ来同步位置以及使用单一的Yaw来同步朝向的话,只需要5个字节,相对于原来的两个vector3占据的24字节来说节省到了1/4,是非常明显的流量优化。
EntityId的数据压缩
在Bigworld中,Entity的ID类型是uint32,由于每次同步一些属性和位置朝向下去的时候都需要将这个ID作为数据的开头进行填充,所以这里也是一个比较大的开销。考虑到客户端能同步到的的Entity一般不会太多,所以可以在当前客户端范围内将一个完整的全局唯一标识符int32_t EntityID映射为一个Witness局部唯一标识符int8_t idAlias:
class EntityCache
{
private:
IDAlias idAlias_; // uint8
};
/**
* This method returns the id alias that is used for this entity.
*/
INLINE IDAlias EntityCache::idAlias() const
{
return idAlias_;
}
/**
* This method sets the id alias that is used for this entity.
*/
INLINE void EntityCache::idAlias( IDAlias idAlias )
{
idAlias_ = idAlias;
}
在Entity因为进入AOI需要打包数据下发到客户端的时候,Witness会给这个Entity分配一个局部唯一索引:
/**
* This method sends the enterAoI message to the client.
*/
void Witness::sendEnter( Mercury::Bundle & bundle, EntityCache * pCache )
{
size_t oldSize = bundle.size();
const Entity * pEntity = pCache->pEntity().get();
pCache->idAlias( this->allocateIDAlias( *pEntity ) );
// 省略后续代码
}
/**
* This method allocates a new id alias for the input entity. It may allocate
* NO_ID_ALIAS.
*/
IDAlias Witness::allocateIDAlias( const Entity & entity )
{
// Only give an ID alias to those entities who have volatile data.
// TODO: Consider whether this should be done on the entity's volatileInfo
// or the entity type's volatileInfo.
if (entity.volatileInfo().hasVolatile( 0.f ) &&
numFreeAliases_ != 0)
{
numFreeAliases_--;
return freeAliases_[ numFreeAliases_ ];
}
return NO_ID_ALIAS;
}
这里的allocateIDAlias机制是内部提前预分配好255个索引放在freeAliases里,这样可以很方便的通过numFreeAliases_来申请和放回:
class Witness
{
private:
IDAlias freeAliases_[ 256 ];
int numFreeAliases_;
};
Witness::Witness( RealEntity & owner, BinaryIStream & data,
CreateRealInfo createRealInfo, bool hasChangedSpace )
{
// 省略一些代码
// In the freeAliases_ array, we want the first numFreeAliases_ to contain
// the free aliases. To do this, we first fill the array with 1s. We then go
// through and set the elements whose index is used to 0. We then traverse
// this array. For each 1 we find, we know that we add that index to the set
// and increase the number found by 1.
memset( freeAliases_, 1, sizeof( freeAliases_ ) );
// 省略一些代码
// Finish setting up freeAliases_. Currently, the array has 1s corresponding
// to free ids and 0s corresponding to used. We want the set of free numbers
// to be at the start of the array.
// Make sure that this NO_ID_ALIAS is reserved, and not actually used as an
// ID.
freeAliases_[ NO_ID_ALIAS ] = 0;
for (uint i = 0; i < sizeof( freeAliases_ ); i++)
{
// If temp is 0, next space is written but numFreeAliases_ is not
// incremented. Doing it this way avoids any if statements.
int temp = freeAliases_[i];
freeAliases_[ numFreeAliases_ ] = i;
numFreeAliases_ += temp;
}
}
/**
* This method does the work that needs to be done when an entity leaves this
* entity's Area of Interest.
*/
void Witness::onLeaveAoI( EntityCache * pCache, EntityID id )
{
if (pCache->idAlias() != NO_ID_ALIAS)
{
freeAliases_[ numFreeAliases_ ] = pCache->idAlias();
numFreeAliases_++;
}
}
这样设置好了idAlias,给客户端发送的创建Entity的数据里就需要填充这个参数:
void Witness::sendEnter( Mercury::Bundle & bundle, EntityCache * pCache )
{
// 省略一些代码
if (pEntity->pVehicle() != NULL)
{
// 忽略载具相关的处理
}
else
{
BaseAppIntInterface::enterAoIArgs & rEnterAoI =
BaseAppIntInterface::enterAoIArgs::start( bundle );
rEnterAoI.id = pEntity->id();
rEnterAoI.idAlias = pCache->idAlias();
}
pEntity->pType()->stats().enterAoICounter().
countSentToOtherClients( bundle.size() - oldSize );
}
当客户端接收到这个enterAoI的RPC时,会在客户端建立Alias到EntityID的映射:
void ServerConnection::enterAoI( EntityID id, IDAlias idAlias,
EntityID vehicleID )
{
// Set this even if args.idAlias is NO_ID_ALIAS.
idAlias_[ idAlias ] = id;
if (pHandler_)
{
const CacheStamps * pStamps = pHandler_->onEntityCacheTest( id );
if (pStamps)
{
this->requestEntityUpdate( id, *pStamps );
}
else
{
this->requestEntityUpdate( id );
}
}
}
在完成了初次的数据同步之后,后续的数据更新writeClientUpdateDataToBundle提供Entity标识符的时候就只需要这个单字节的idAlias,而不需要完整的四字节了:
bool Entity::writeClientUpdateDataToBundle( Mercury::Bundle & bundle,
const Vector3 & basePos,
EntityCache & cache,
float lodPriority ) const
{
// 省略之前的代码
bool hasAddedReliableRelativePosition = false;
// Not currently enabled as it affects the filters if this is not sent
// regularly.
//if (cache.lastVolatileUpdateNumber() != volatileUpdateNumber_)
{
cache.lastVolatileUpdateNumber( volatileUpdateNumber_ );
if (this->volatileInfo().hasVolatile( lodPriority ))
{
const bool isReliable = hasEventsToSend;
if (cache.isAlwaysDetailed() || (cache.isPrioritised() && CellAppConfig::sendDetailedPlayerVehicles()) )
{
this->writeVolatileDetailedDataToBundle( bundle,
cache.idAlias(), isReliable );
}
else
{
hasAddedReliableRelativePosition =
this->writeVolatileDataToBundle( bundle, basePos,
cache.idAlias(), lodPriority, isReliable );
}
hasSelectedEntity = true;
oldSize = bundle.size();
g_nonVolatileBytes += (oldSize - initSize);
#if ENABLE_WATCHERS
pEntityType_->stats().countVolatileSentToOtherClients(
oldSize - initSize );
#endif
}
}
// 省略后续代码
}
值得注意的是由于当前alias可用数量只有255个,如果当前Witness没有剩余的alias给新的EntityCache分配的话,这个EntityCache里就无法设置alias,此时下发数据的时候需要带上完整的EntityID。为了方便客户端判断消息里使用的是EntityID还是Alias,下发数据的时候会根据是否有Alias来生成不同的msgID:
bool Entity::writeVolatileDataToBundle( Mercury::Bundle & bundle,
const Vector3 & basePosition,
IDAlias idAlias,
float priorityThreshold,
bool isReliable ) const
{
const bool sendAlias = (idAlias != NO_ID_ALIAS);
// 省略一些代码
const int index = sendAlias * 12 + posType * 4 + dirType;
bundle.startMessage( *getAvatarUpdateMessage( index ) );
// 省略后续代码
}
这个getAvatarUpdateMessage内部会为所有类型的数据更新都生成一个使用EntityID的msgID和一个使用Alias的EntityID:
const Mercury::InterfaceElement * Entity::getAvatarUpdateMessage( int index )
{
#define BEGIN_AV_UPD_MESSAGES() \
static const Mercury::InterfaceElement * s_avatarUpdateMessage[] = \
{
#define AV_UPD_MESSAGE( TYPE ) &BaseAppIntInterface::avatarUpdate##TYPE,
#define END_AV_UPD_MESSAGES() };
BEGIN_AV_UPD_MESSAGES()
AV_UPD_MESSAGE( NoAliasFullPosYawPitchRoll )
AV_UPD_MESSAGE( NoAliasFullPosYawPitch )
AV_UPD_MESSAGE( NoAliasFullPosYaw )
AV_UPD_MESSAGE( NoAliasFullPosNoDir )
AV_UPD_MESSAGE( NoAliasOnGroundYawPitchRoll )
AV_UPD_MESSAGE( NoAliasOnGroundYawPitch )
AV_UPD_MESSAGE( NoAliasOnGroundYaw )
AV_UPD_MESSAGE( NoAliasOnGroundNoDir )
AV_UPD_MESSAGE( NoAliasNoPosYawPitchRoll )
AV_UPD_MESSAGE( NoAliasNoPosYawPitch )
AV_UPD_MESSAGE( NoAliasNoPosYaw )
AV_UPD_MESSAGE( NoAliasNoPosNoDir )
AV_UPD_MESSAGE( AliasFullPosYawPitchRoll )
AV_UPD_MESSAGE( AliasFullPosYawPitch )
AV_UPD_MESSAGE( AliasFullPosYaw )
AV_UPD_MESSAGE( AliasFullPosNoDir )
AV_UPD_MESSAGE( AliasOnGroundYawPitchRoll )
AV_UPD_MESSAGE( AliasOnGroundYawPitch )
AV_UPD_MESSAGE( AliasOnGroundYaw )
AV_UPD_MESSAGE( AliasOnGroundNoDir )
AV_UPD_MESSAGE( AliasNoPosYawPitchRoll )
AV_UPD_MESSAGE( AliasNoPosYawPitch )
AV_UPD_MESSAGE( AliasNoPosYaw )
AV_UPD_MESSAGE( AliasNoPosNoDir )
END_AV_UPD_MESSAGES()
MF_ASSERT( 0 <= index && index < 24 );
return s_avatarUpdateMessage[ index ];
}
客户端会根据接收到的msgID信息来决定是使用哪个函数去解析输入的ID:
void ServerConnection::avatarUpdateNoAliasDetailed(
const ClientInterface::avatarUpdateNoAliasDetailedArgs & args )
{
EntityID id = args.id;
selectedEntityID_ = id;
/* Ignore updates from controlled entities */
if (this->isControlledLocally( id ))
{
return;
}
EntityID vehicleID = this->getVehicleID( id );
if (pHandler_ != NULL)
{
pHandler_->onEntityMoveWithError( id, spaceID_, vehicleID,
args.position, Vector3::zero(), args.dir.yaw,
args.dir.pitch, args.dir.roll, /* isVolatile */ true );
}
this->detailedPositionReceived( id, spaceID_, vehicleID, args.position );
}
void ServerConnection::avatarUpdateAliasDetailed(
const ClientInterface::avatarUpdateAliasDetailedArgs & args )
{
EntityID id = idAlias_[ args.idAlias ];
selectedEntityID_ = id;
/* Ignore updates from controlled entities */
if (this->isControlledLocally( id ))
{
return;
}
EntityID vehicleID = this->getVehicleID( id );
if (pHandler_ != NULL)
{
pHandler_->onEntityMoveWithError( id, spaceID_, vehicleID,
args.position, Vector3::zero(), args.dir.yaw,
args.dir.pitch, args.dir.roll, /* isVolatile */ true );
}
this->detailedPositionReceived( id, spaceID_, vehicleID, args.position );
}
属性同步的流量控制
在前面的内容中我们提到了EntityCache上的一个Priority字段,这个字段代表了这个EntityCache的同步优先级。这个同步优先级是为了限制单帧下发的数据量而存在的,通过限制单帧同步数据量来减少一些情况下的性能毛刺。为了做到有效的流量控制,在Witness::update的时候会通过entityQueue_这个基于数组的EntityCache的优先级的最小堆来不断的拿出其中优先级最高的EntityCache去处理:
void Witness::update()
{
// 省略很多代码
// This is the maximum amount of priority change that we go through in a
// tick. Based on the default AoIUpdateScheme (distance/5 + 1) things up
// to 45 metres away can be sent every frame.
const float MAX_PRIORITY_DELTA =
CellAppConfig::witnessUpdateMaxPriorityDelta();
// We want to make sure that entities at a distance are never sent at 10Hz.
// What we do is make sure that the change in priorities that we go over is
// capped.
// Note: We calculate the max priority from the front priority. We should
// probably calculate from the previous maxPriority. Doing it the current
// way, if you only have 1 entity in your AoI, it will be sent every frame.
EntityCache::Priority maxPriority = entityQueue_.empty() ? 0.f :
entityQueue_.front()->priority() + MAX_PRIORITY_DELTA;
KnownEntityQueue::iterator queueBegin = entityQueue_.begin();
KnownEntityQueue::iterator queueEnd = entityQueue_.end();
// Entities in queue &&
while ((queueBegin != queueEnd) &&
// Priority change less than MAX_PRIORITY_DELTA &&
(*queueBegin)->priority() < maxPriority &&
// Packet still has space (includes 2 bytes for sequenceNumber))
bundle.size() < desiredPacketSize - 2)
{
loopCounter++;
// Pop the top entity. pop_heap actually keeps the entity in the vector
// but puts it in the end. [queueBegin, queueEnd) is a heap and
// [queueEnd, entityQueue_.end()) has the entities that have been popped
EntityCache * pCache = entityQueue_.front();
std::pop_heap( queueBegin, queueEnd--, PriorityCompare() );
bool wasPrioritised = pCache->isPrioritised();
// See if the entity is still in our AoI
MF_ASSERT(!pCache->isRequestPending());
if (pCache->pEntity()->isDestroyed() && !pCache->isGone())
{
MF_ASSERT(pCache->isManuallyAdded());
this->removeFromAoI( const_cast<Entity *>( pCache->pEntity().get() ),
/* clearManuallyAdded */ true );
}
if (!pCache->isUpdatable())
{
this->handleStateChange( &pCache, queueEnd );
}
else if (!pCache->isPrioritised())
{
// The entity has not gone anywhere, so we will proceed with the update.
hasAddedReliableRelativePosition |= this->sendQueueElement( pCache );
pCache->updatePriority( entity_.position() );
}
}
// 省略后续代码
}
注意到上面的while循环的终止条件,开头的queueBegin != queueEnd是为了避免当前的最小二叉树为空,最后的bundle.size() < desiredPacketSize - 2是为了限制当前update生成的bundle的数据大小不能超过desiredPacketSize太多,这两个条件也就是常规的基于同步优先级的流量控制条件。至于中间的(*queueBegin)->priority() < maxPriority就设计的很巧妙了,他限定了要被更新的EntityCache的优先级与初始时entityQueue_里顶部元素的优先级差值不能超过MAX_PRIORITY_DELTA,注释里说这个条件的作用是为了限制在一定范围外的EntityCache的向下同步频率不能超过10HZ,下面我们来看看Bigworld是如何实现这个目标的。
对于每一个被更新到的EntityCache,在执行完sendQueueElement之后,都会以当前的位置来计算新的同步优先级:
/**
* This method updates the priority associated with this cache.
*/
INLINE void EntityCache::updatePriority( const Vector3 & origin )
{
// TODO: The use of a double precision floating for the priority
// values gives 52 bits for significant figures.
//
// If we increment the priority values by 10000 a second, we will
// run into trouble in about 140 years (provided the avatar doesn't
// change cells in that time), so we probably won't need to reset
// the priority values.
//
// At present, we are incrementing priority values at around
// 1000 per second - which assumes that everyone is roughly 500
// metres from the avatar.
//
// PM: One solution to this would be to use an integer value for the
// priority and use a comparison that wraps. e.g. (x - y) > 0. This
// would work if the range in the priorities never exceeds half the
// range of the integer type.
float distSQ = this->getDistanceSquared( origin );
Priority delta = AoIUpdateSchemes::apply( updateSchemeID_, distSQ );
// Limit the delta increase to a fraction of the previous delta to avoid
// client's avatar filter starvation caused by rapid priority changes due
// to AoI update scheme change.
const double deltaGrowthThrottle =
CellAppConfig::witnessUpdateDeltaGrowthThrottle();
delta = std::min( delta, deltaGrowthThrottle * lastPriorityDelta_ );
lastPriorityDelta_ = delta;
// MF_ASSERT( priority_ < BW_MAX_PRIORITY );
priority_ += delta;
// MF_ASSERT( priority_ < BW_MAX_PRIORITY );
}
/**
* This method applies the AoI update scheme, returning a priority delta
* for the given distance.
*
* @param distanceSquared The distance from the witness, squared.
* @return The priority delta.
*/
double apply( float distanceSquared ) const
{
if (this->shouldTreatAsCoincident())
{
return 1.0;
}
const float distance = sqrtf( distanceSquared );
return (distance * distanceWeighting_ + 1.f) * weighting_;
}
一个EntityCache刚进入AOI的时候其初始priority都会被设置为0, 后续的priority更新都需要通过EntityCache::updatePriority。这里的EntityCache::updatePriority的核心逻辑是根据当前EntityCache与Witness之间的距离来计算priority的Delta值,在默认实现的AoIUpdateSchemes::apply里,这个Delta值与距离distance成简单线性关系。在这样的设定下,距离Witness越近的EntityCache其priority增加的越慢,而距离Witness越远的EntityCache其priority增加的越快。这里用一个简单的例子来描述一下在这样的priority更新机制下的EntityCache基于距离的同步频率限制是怎么做到的。假设当前有Witness(A)和EntityCache(B),EntityCache(C), B,C都刚刚加入到AOI中因此priority都是0。但是B距离A只有10M,同时C距离A有30M,这样就会导致B的priority每次会增加1,同时C的priority每次增加3。
假如所有的Entity的位置在之后都不发生改变,且下行流量会被desiredPacketSize限制到每次只能同步一个EntityCache,那么Witness::update会以这样的形式来触发EntityCache的下行同步:
- 初始的时候
entityQueue_里经过排序的优先级为B(0), C(0),向下同步B,同时优先级排序结果更新为C(0),B(1) - 第二次, 向下同步
C,同时优先级排序结果更新为B(1),C(3) - 第三次, 向下同步
B,同时优先级排序结果更新为B(2),C(3) - 第四次, 向下同步
B,同时优先级排序结果更新为B(3),C(3) - 第五次, 向下同步
B,同时优先级排序结果更新为C(3),B(4) - 第六次, 向下同步
C,同时优先级排序结果更新为B(4),C(6) - 第七次, 向下同步
B,同时优先级排序结果更新为B(5),C(6) - 第八次, 向下同步
B,同时优先级排序结果更新为B(6),C(6) - 第九次, 向下同步
B,同时优先级排序结果更新为C(6),B(7) - 第十次, 向下同步
C,同时优先级排序结果更新为B(7),C(9)
从上面的分析可以看出,每四次更新会执行三次B的同步,同时执行一次C的同步,这样就达到了基于距离的降频的目的。
如果desiredPacketSize设置的比较大导致单帧可以同步的EntityCache数量比较多,此时就可以通过MAX_PRIORITY_DELTA来进行补充限频,在MAX_PRIORITY_DELTA=0.8的限制下,我们再来分析一下EntityCache的下行同步:
- 初始的时候
entityQueue_里经过排序的优先级为B(0), C(0),向下同步B,C,同时优先级排序结果更新为B(1),C(3) - 第二次,
3-1>0.8,因此C被限制无法向下同步,只能同步B,同时优先级排序结果更新为B(2),C(3) - 第三次,
3-2>0.8, 因此C被限制无法向下同步,只能同步B,同时优先级排序结果更新为B(3),C(3) - 第四次,
3-3<0.8,因此向下同步B,C,同时优先级排序结果更新为B(4),C(6) - 第五次,
6-4>0.8,因此C被限制无法向下同步,只能同步B,同时优先级排序结果更新为B(5),C(6) - 第六次,
6-5>0.8, 因此C被限制无法向下同步,只能同步B,同时优先级排序结果更新为B(6),C(6) - 第七次,
6-6<0.8,因此向下同步B,C,同时优先级排序结果更新为B(7),C(9)
由于Witness::update获取了当前entityQueue_的最高优先级元素之后都会使用pop_heap将这个元素放到entityQueue_最小堆的末尾,并更新这个EntityCache的priority,所以在while循环结束之后,我们需要重新维护好这个entityQueue_完整数组的最小堆的性质。最简单的情况是当前while循环里会处理entityQueue_的所有元素,此时会将整个entityQueue_里的所有EntityCache的priority都设置为0,这样可以避免priority的无限膨胀:
// We need to push all of the sent entities back on the heap.
if (queueEnd == entityQueue_.begin())
{
// Must have sent and popped all prioritised entities.
MF_ASSERT( numPrioritised == 0 );
START_PROFILE( profileMakeHeap );
while (queueEnd != entityQueue_.end())
{
// TODO: Ask Murph about this... Shouldn't this then updatePriority
// according to current distance?
// As it is, if we empty the queue, next tick will send entities in
// random order. We know we've just finished sending _everything_,
// so we should send them again in order of closeness.
(*queueEnd)->priority( 0.f );
// i.e. now,
// (*queueEnd)->updatePriority( entity_.position() );
// TODO: Blame this file, perhaps.
++queueEnd;
}
std::make_heap( entityQueue_.begin(), entityQueue_.end(), PriorityCompare() );
STOP_PROFILE_WITH_DATA( profileMakeHeap, entityQueue_.size() );
}
这里维护最小堆的时候直接对整个entityQueue_做一个make_heap即可,其实不调用make_heap也是可以的,因为里面的priority都是0。
对于出现有些EntityCache被限制下行的情况,需要将所有已经下发的EntityCache重新通过push_heap来加入到最小堆中:
if (queueEnd == entityQueue_.begin())
{
// 这里处理所有的EntityCache都下发的情况
}
else
{
EntityCache::Priority earliestPriority = entityQueue_.front()->priority();
START_PROFILE( profileClearPrioritised );
int count=0;
// 忽略载具相关处理
STOP_PROFILE_WITH_DATA( profileClearPrioritised, count );
// Must have sent and cleared all prioritised entities.
MF_ASSERT( numPrioritised == 0 );
START_PROFILE( profilePush );
count=0;
while (queueEnd != entityQueue_.end())
{
// We want to do a check to make sure no entity gets sent in the
// "past". If an entity should have be sent multiple times in a
// frame it does not keep up with virtual time without this check.
if ((*queueEnd)->priority() < earliestPriority)
{
(*queueEnd)->priority( earliestPriority );
}
count++;
std::push_heap( queueBegin, ++queueEnd, PriorityCompare() );
}
STOP_PROFILE_WITH_DATA( profilePush, count );
}
这里有一个earliestPriority处理,其作用是避免低优先级的EntityCache长期被高优先级的EntityCache拦住。因为高优先级的EntityCache增加的太慢了,可能需要好多次update才能超过低优先级EntityCache的priority。所以这里判断发现一个已经处理的EntityCache的优先级居然比未处理的EntityCache的优先级还高,那么会快速提升这个priority。
迁移对AOI同步的影响
上述的AOI内同步流程还需要处理大世界里不可避免的迁移的情况,假设当前Entity(A)需要往RealEntity(B)的客户端执行同步,我们需要分别处理下面两种情况:
RealEntity(B)可能会从一个Cell迁移到另外一个Cell,如何避免迁移之后对于Entity(A)的EntityCache记录不丢失。Entity(A)可能从GhostEntity切换为了RealEntity,也可能从RealEntity切换为了GhostEntity,如何在Ghost/Real之间维护好这个eventHistory_的同步
如果每次迁移之后EntityCache的同步进度都丢失,那么迁移之后就需要对当前客户端里的所有Entity都重新执行一次Witness::addToAoi,这样会导致当前所有客户端Entity的所有客户端属性的最新副本被重新打包,这是不可接受的。所以RealEntity在迁移的时候,会将Witness的状态也打包进去,放到stream里的最后面:
/**
* This method should put the relevant data into the input BinaryOStream so
* that this entity can be onloaded to another cell. It is mostly read off
* in the readOffloadData except for a bit done in our constructor above.
*
* @param data The stream to place the data on.
* @param isTeleport Indicates whether this is a teleport.
*/
void RealEntity::writeOffloadData( BinaryOStream & data, bool isTeleport )
{
// 省略很多代码
// ----- below here read off in our constructor above
if (pWitness_ != NULL)
{
data << 'W';
pWitness_->writeOffloadData( data );
}
else
{
data << '-';
}
}
这个Witness::writeOffloadData会把当前的记录都下发下去,其内部的writeAoI负责将每个EntityCache相关数据写入进去:
/**
* This method should put the relevant data into the input BinaryOStream so
* that this entity can be onloaded to another cell.
*
* @param data The stream to place the data on.
*/
void Witness::writeOffloadData( BinaryOStream & data ) const
{
#if !VOLATILE_POSITIONS_ARE_ABSOLUTE
data << referencePosition_ << referenceSeqNum_ << hasReferencePosition_;
#endif /* !VOLATILE_POSITIONS_ARE_ABSOLUTE */
data << maxPacketSize_;
data << stealthFactor_;
this->writeSpaceDataEntries( data );
this->writeAoI( data );
}
/**
* This method writes the AoI from the Witness to a stream to be used in
* onloading.
*
* @param data The output stream to write the witness' AoI to.
*/
void Witness::writeAoI( BinaryOStream & data ) const
{
// NOTE: This needs to match StreamHelper::addRealEntityWithWitnesses
// in bigworld/src/lib/server/stream_helper.hpp
// and Witness::readAoI
data << (uint32)aoiMap_.size();
data << aoiRadius_ << aoiHyst_;
data << this->isAoIRooted();
if (this->isAoIRooted())
{
data << this->pAoIRoot()->x() << this->pAoIRoot()->z();
}
// write the AoI
aoiMap_.writeToStream( data );
}
/**
* Write out all our entries to the given stream.
* Our size has already been written out.
*/
void EntityCacheMap::writeToStream( BinaryOStream & stream ) const
{
Implementor::iterator it = set_.begin();
Implementor::iterator nd = set_.end();
for (; it != nd; ++it)
{
stream << *it;
}
}
当执行单个EntityCache的序列化的时候,会将当前的最新版本号lastEventNumber_,最新粒度等级detailLevel_,以及每个LodLevel下的最新同步版本号都写入进去,这些数据就是我们目前执行属性同步最重要的部分:
/**
* Streaming operator for EntityCache.
*/
BinaryOStream & operator<<( BinaryOStream & stream,
const EntityCache & entityCache )
{
EntityConstPtr pEntity = entityCache.pEntity();
stream << pEntity->id();
EntityCache::VehicleChangeNum vehicleChangeNumState =
EntityCache::VEHICLE_CHANGE_NUM_OLD;
if (pEntity->vehicleChangeNum() == entityCache.vehicleChangeNum())
{
vehicleChangeNumState =
pEntity->pVehicle() ?
EntityCache::VEHICLE_CHANGE_NUM_HAS_VEHICLE :
EntityCache::VEHICLE_CHANGE_NUM_HAS_NO_VEHICLE;
}
stream <<
entityCache.flags_ <<
entityCache.updateSchemeID_ <<
// Stream on the state of the vehicleChangeNum_ instead of the current
// value. This is used to set an appropriate value on the reading side.
vehicleChangeNumState << // entityCache.vehicleChangeNum_ <<
// NOTE: It's been explicitly decided it's not worthwhile streaming
// lastPriorityDelta_. This could cause a rapid priority increase if an
// offload occurs while adjusting to a large priority delta change.
entityCache.priority_ <<
entityCache.lastEventNumber_ <<
entityCache.idAlias_ <<
entityCache.detailLevel_;
// Only have to stream on the size because if the receiving cell does not
// have this entity, it does not know the type of the entity and so does
// not know the cache size.
// TODO: Could add the type instead.
int size = entityCache.numLoDLevels();
stream << uint8(size);
for (int i = 0; i < size - 1; i++)
{
stream << entityCache.lodEventNumbers_[i];
}
if (vehicleChangeNumState == EntityCache::VEHICLE_CHANGE_NUM_HAS_VEHICLE)
{
// This is read off in Witness::Witness.
stream << pEntity->pVehicle()->id();
}
return stream;
}
当迁移到目标进程之后,会按照上述流程的逆过程将Witness以及内部的所有EntityCache执行重建,这里就只贴出Witness::readAoI的代码:
/**
* This method reads the AoI from the stream to initialise the Witness.
*
* @param data The input stream containing the AoI initialise from.
*/
void Witness::readAoI( BinaryIStream & data )
{
// NOTE: This needs to match StreamHelper::addRealEntityWithWitnesses
// in bigworld/src/lib/server/stream_helper.hpp
// and Witness::writeAoI
uint32 entityQueueSize = 0;
data >> entityQueueSize;
data >> aoiRadius_ >> aoiHyst_;
bool isAoIRooted;
data >> isAoIRooted;
MF_ASSERT( !this->isAoIRooted() );
// 忽略一些代码
MF_ASSERT( isAoIRooted == this->isAoIRooted() );
// Read in the Area of Interest entities. We need to be careful that the
// new AoI that is constructed matches what the client thinks the AoI is.
MF_ASSERT( entityQueueSize < 1000000 );
if (entityQueueSize == 0)
{
return;
}
// Number of entities that do not even exist on this CellApp.
int numLostEntities = 0;
entityQueue_.reserve( entityQueueSize );
for (size_t i = 0; i < entityQueueSize; i++)
{
EntityID id;
data >> id;
Entity * pEntity = CellApp::instance().findEntity( id );
if (pEntity == NULL)
{
// We are not concerned about the alias due to the leave being sent
// before the client is notified of enters
EntityCache dummyCache( NULL );
data >> dummyCache;
// 忽略一些AOI记录的Entity已经找不到的处理
++numLostEntities;
continue;
}
EntityCache * pCache = aoiMap_.add( *pEntity );
data >> *pCache;
EntityID expectedVehicleID = 0;
if (pCache->vehicleChangeNum() ==
EntityCache::VEHICLE_CHANGE_NUM_HAS_VEHICLE)
{
// This is written in EntityCache's streaming operator
data >> expectedVehicleID;
}
entityQueue_.push_back( pCache );
// we add pending entities to the queue too (init removes them)
MF_ASSERT( pCache->idAlias() == NO_ID_ALIAS ||
freeAliases_[ pCache->idAlias() ] == 1 );
freeAliases_[ pCache->idAlias() ] = 0;
MF_ASSERT( !pEntity->isInAoIOffload() );
pEntity->isInAoIOffload( true );
pCache->setGone();
// 省略一些代码
}
std::make_heap( entityQueue_.begin(), entityQueue_.end(), PriorityCompare() );
if (numLostEntities > 0)
{
INFO_MSG( "Witness::readAoI: Lost %d of %u entities from AoI\n",
numLostEntities, entityQueueSize );
}
}
上面的代码数量虽然比较长,但是还是比较好理解的,首先获取之前在AOI内的所有Entity的ID,并将entityQueue_进行reserve对应的大小,避免后续的频繁扩容。然后遍历解析出来的每个EntityID:
- 如果对应的
Entity在当前Cell里找不到,则使用一个dummyCache来消耗掉后续的EntityCache数据,并通知客户端销毁这个EntityID对应的Entity。 - 如果能找到对应的
Entity,则为这个Entity创建一个新的EntityCache,并使用记录的数据来初始化这个EntityCache,主要是各种属性的同步版本号信息。
由于相邻Cell里的Entity集合一般来说都是不一样的,所以在迁移之前记录的Witness里的AOI内Entity可能并不在迁移后的Cell里,即使Entity在新的Cell里,可能会由于位置的变化导致这个Entity可能已经不符合进入当前Witness的AOI标准。所以在readAOI里会先将读取到的EntityCache数据先临时标记为离开状态setGone, 同时将对应的Entity标记为isInAoIOffload等到后面执行Witness::init的时候再重新执行检查:
/**
* This method initialises this object some more. It is only separate from
* the constructor for historical reasons.
*/
void Witness::init()
{
// Disabling callbacks is not needed since no script should be triggered but
// it's helpful for debugging.
Entity::callbacksPermitted( false );
// Create AoI triggers around ourself.
{
SCOPED_PROFILE( SHUFFLE_AOI_TRIGGERS_PROFILE );
pAoITrigger_ = new AoITrigger( *this, pAoIRoot_, aoiRadius_ );
if (this->isAoIRooted())
{
MobileRangeListNode * pRoot =
static_cast< MobileRangeListNode * >( pAoIRoot_ );
pRoot->addTrigger( pAoITrigger_ );
}
else
{
entity().addTrigger( pAoITrigger_ );
}
}
Entity::callbacksPermitted( true );
// 先省略一些代码
}
开头的AoITrigger负责重新创建一个基于半径aoiRadius的AOI触发器,然后使用callbacksPermitted来重新触发AOI更新。如果计算出来一个Entity应该进入当前Witness的AOI,那么之前介绍的addToAoI函数就会被调用:
/**
* This method adds the input entity to this entity's Area of Interest.
*/
void Witness::addToAoI( Entity * pEntity, bool setManuallyAdded )
{
// 省略很多代码
// see if the entity is already in our AoI
EntityCache * pCache = aoiMap_.find( *pEntity );
bool wasInAoIOffload = pEntity->isInAoIOffload();
if (wasInAoIOffload)
{
pEntity->isInAoIOffload( false );
// TODO: Set cache pointer as result of isInAoIOffload,
// so we don't need to look it up when onloading.
MF_ASSERT( pCache != NULL );
// we want to do the same processing as for if it was gone
MF_ASSERT( pCache->isGone() );
}
if (pCache != NULL)
{
if (pCache->isGone())
{
pCache->reuse();
}
// 省略很多代码
}
// 省略很多代码
}
这里的addToAoI对于已经标记为isInAoIOffload的Entity会有特殊的处理,走到这里说明这个Entity仍然在AOI里,因此之前标记的Entity::isInAoioffload状态会被清除,并通过pCache->reuse来清除之前的EntityCache::isGone状态。这里pCache->reuse其实还有一个意外情况,如果恢复之后还在AOI内的EntityCache记录的最新状态与对应Entity的EventHistory的最早状态之间有断档,此时代表属性同步记录无法完美衔接,因此需要触发这个EntityCache的重新全量同步。这里先使用setRefresh做一下重新同步标记,然后在Witness::update里通过handleStateChange来通知客户端删除之前的Entity记录,等待重新全量同步:
/**
* This method is called if an entity is reintroduced to an AoI before it has
* had a chance to be removed.
*/
void EntityCache::reuse()
{
MF_ASSERT( this->isGone() );
this->clearGone();
if (this->lastEventNumber() < pEntity_->eventHistory().lastTrimmedEventNumber()
&& this->isUpdatable())
{
// In this case, we have missed events. Refresh the entity
// properties by throwing it out of the AoI and make it re-enter
// immediately after.
INFO_MSG( "EntityCache::reuse: Client has last received event %d, "
"entity is at event %d but only has history since event %d. "
"Not reusing cache.\n",
this->lastEventNumber(),
pEntity_->lastEventNumber(),
pEntity_->eventHistory().lastTrimmedEventNumber() );
this->setRefresh();
}
}
void Witness::handleStateChange( EntityCache ** ppCache,
KnownEntityQueue::iterator & queueEnd )
{
MF_ASSERT( ppCache != NULL );
Mercury::Bundle & bundle = this->bundle();
EntityCache * pCache = *ppCache;
MF_ASSERT( !pCache->isRequestPending() );
if (pCache->isGone())
{
}// 省略很多其他分支
else if (pCache->isRefresh())
{
pCache->clearRefresh();
// We are effectively resetting this entity cache's
// history, tell the client that it's gone and (re-)entered.
this->deleteFromClient( bundle, pCache );
pCache->setEnterPending();
this->handleEnterPending( bundle, queueEnd );
}
}
剩下的aoiMap里的EntityCache对应的Entity如果还有isInAoIOffload状态,则代表这些Entity已经不再满足停留带当前AOI内的需求,因此可以通知其执行onLeftAoI操作:
void Witness::init()
{
// 省略之前的代码
KnownEntityQueue::size_type i = 0;
// Sort out entities that didn't make it back into our AoI.
while (i < entityQueue_.size())
{
KnownEntityQueue::iterator iter = entityQueue_.begin() + i;
EntityCache * pCache = *iter;
Entity * pEntity = const_cast< Entity * >( pCache->pEntity().get() );
if (pEntity->isInAoIOffload())
{
pEntity->isInAoIOffload( false );
this->entity().callback( "onLeftAoI",
PyTuple_Pack( 1, pEntity ),
"onLeftAoI", true );
// 'gone' should still be set on it
MF_ASSERT( pCache->isGone() );
if (!pCache->isRequestPending())
{
++i;
}
else
{
*iter = entityQueue_.back();
entityQueue_.pop_back();
}
}
// 省略一些代码
}
// And finally make the entity queue into a heap.
std::make_heap( entityQueue_.begin(), entityQueue_.end(), PriorityCompare() );
}
至此,迁移之后就可以完整的恢复出来迁移之前打包的aoiMap数据,并剔除了Entity不存在或者Entity已经不在AOI范围内的EntityCache。
搞定了Witness的迁移处理之后我们再来看看Entity上存储的eventHistory_的迁移处理。在之前的属性修改回调中我们已经看到了其他客户端可见属性在被修改之后,生成的EventHistory会被RealEntity广播到所有的GhostEntity上,所以剩下来我们只需要关注两点:GhostEntity创建时的EventHistory设置,以及Real/Ghost切换时的EventHistory同步。
当GhostEntity被创建的时候,在mosaic_game里的做法是把当前RealEntity上的EventHistory队列全都打包过去。但是Bigworld里并没有这么做,因为这个EventHistory的trim间隔太长了导致这个数组的数据会比较大,全量发送过去非常消耗CPU和流量。Bigworld的做法很不一样,除了打包Ghost属性数据,还会打包当前的最新版本号lastEventNumber_和一个记录了每个属性相关的最新版本号的数据propertyEventStamps_:
/**
* This method is called by writeGhostDataToStream once the decision on
* whether or not to compress has been made.
*/
void Entity::writeGhostDataToStreamInternal( BinaryOStream & stream ) const
{
stream << numTimesRealOffloaded_ << localPosition_ << isOnGround_ <<
lastEventNumber_ << volatileInfo_;
stream << CellApp::instance().interface().address();
stream << baseAddr_;
stream << localDirection_;
propertyEventStamps_.addToStream( stream );
TOKEN_ADD( stream, "GProperties" );
// Do ghosted properties dependent on entity type
//this->pType()->addDataToStream( this, stream, DATA_GHOSTED );
// write our ghost properties to the stream
for (uint32 i = 0; i < pEntityType_->propCountGhost(); ++i)
{
MF_ASSERT( properties_[i] );
DataDescription * pDataDesc = pEntityType_->propIndex( i );
// TODO - implement component properties processing here
MF_ASSERT( !pDataDesc->isComponentised() );
ScriptDataSource source( properties_[i] );
if (!pDataDesc->addToStream( source, stream, false ))
{
CRITICAL_MSG( "Entity::writeGhostDataToStream(%u): "
"Could not write ghost property %s.%s to stream\n",
id_, this->pType()->name(), pDataDesc->name().c_str() );
}
}
TOKEN_ADD( stream, "GController" );
this->writeGhostControllersToStream( stream );
TOKEN_ADD( stream, "GTail" );
stream << periodsWithoutWitness_ << aoiUpdateSchemeID_;
}
这里的propertyEventStamps的类型并不是简单的map,用了一个专用类型PropertyEventStamps:
/**
* This class is used to store the event number when a property last
* changed for each property in an entity that is 'otherClient'.
*/
class PropertyEventStamps
{
public:
void init( const EntityDescription & entityDescription );
void init( const EntityDescription & entityDescription,
EventNumber lastEventNumber );
void set( const DataDescription & dataDescription,
EventNumber eventNumber );
EventNumber get( const DataDescription & dataDescription ) const;
void addToStream( BinaryOStream & stream ) const;
void removeFromStream( BinaryIStream & stream );
private:
typedef BW::vector< EventNumber > Stamps;
Stamps eventStamps_;
};
这个类型内部使用一个数组来存储每个属性字段的最新版本号,而属性到数组里的索引是唯一的,在EntityDescrition里已经构造好了:
/**
* This method is used to initialise PropertyEventStamps. This basically means
* that the number of stamps that this object can store is set to the number of
* properties in the associated entity that are stamped.
*/
INLINE void PropertyEventStamps::init(
const EntityDescription & entityDescription )
{
// Resize the stamps to the required size and set all values to 1.
eventStamps_.resize( entityDescription.numEventStampedProperties(), 1 );
}
/**
* This method is used to set an event number corresponding to a data
* description.
*/
INLINE void PropertyEventStamps::set(
const DataDescription & dataDescription, EventNumber eventNumber )
{
// Each DataDescription has an index for which element it stores its stamp
// in.
const int index = dataDescription.eventStampIndex();
IF_NOT_MF_ASSERT_DEV( 0 <= index && index < (int)eventStamps_.size() )
{
MF_EXIT( "invalid event stamp index" );
}
eventStamps_[ index ] = eventNumber;
}
当每次一个其他客户端可见属性被修改的时候,Entity::onOwnedPropertyChanged除了会生成一个EventHistory之外,还会更新这里的propertyEventStamps_,将这个被修改的属性的最新版本号更新一下:
bool Entity::onOwnedPropertyChanged( const DataDescription * pDescription,
PropertyChange & change )
{
// 省略很多代码
if (pDescription->isGhostedData())
{
// If the data is for other clients, add an event to our history.
if (pDescription->isOtherClientData())
{
// 省略很多代码
// Add history event for clients
HistoryEvent * pEvent =
pReal_->addHistoryEvent( msgID, stream,
*pDescription, streamSize, pDescription->detailLevel() );
propertyEventStamps_.set( *pDescription, pEvent->number() );
}
// 省略很多代码
}
// 省略很多代码
}
当GhostEntity被创建的时候,就会从这些数据里读取出lastEventNumber和propertyEventStamps_:
/**
* This method is called by readGhostDataFromStream once the decision on
* whether or not to uncompress has been made.
*/
void Entity::readGhostDataFromStreamInternal( BinaryIStream & data )
{
// This was streamed on by Entity::writeGhostDataToStream.
data >> numTimesRealOffloaded_ >> localPosition_ >> isOnGround_ >>
lastEventNumber_ >> volatileInfo_;
eventHistory_.lastTrimmedEventNumber( lastEventNumber_ );
globalPosition_ = localPosition_;
// Initialise the structure that stores the time-stamps for when
// clientServer properties were last changed.
propertyEventStamps_.init( pEntityType_->description() );
Mercury::Address realAddr;
data >> realAddr;
pRealChannel_ = CellAppChannels::instance().get( realAddr );
data >> baseAddr_;
data >> localDirection_;
globalDirection_ = localDirection_;
propertyEventStamps_.removeFromStream( data );
// 省略后续代码 主要是属性解析部分
}
读取到lastEventNumber_之后,这里的eventHistory_会在本地记录上次trim的版本号为lastEventNumber_,代表本地的属性历史能提供的最小版本号就是lastEventNumber_。这个数据主要是在EntityCache的DetailLevel变化的时候补充发送新DetailLevel的所有属性的最新版本号来使用的,具体代码可以回顾一下前面介绍的EntityCache::addChangedProperties。
从上面的流程中可以看出,每次Ghost被创建的时候并不会带上eventHistory里的所有历史数据,而是只带上整体属性的最新版本号和所有DetailLevel的最新版本号。这样的设计对于已经在新Cell的Witness来说没什么影响,如果进入这个Witness的AOI那就以最新的属性版本来同步即可,但是对于后面从其他Cell迁移过来的Witness来说就不怎么友好了。举个例子Cell(A)上有Witness(M),其aoiMap拥有GhostEntity(S)对应的EntityCache,其版本号为10。如果Witness(M)迁移到Cell(B)上,在这期间在Cell(C)上的RealEntity(S)往Cell(B)创建了一个一个新的GhostEntity(S),并且这个新的GhostEntity(S)的属性版本号为13。那么在Witness(M)的恢复过程中会发现Entity(S)的EventHistory会缺失属性记录11,12,导致无法继续之前的同步。此时只能通过setRefresh机制来通知客户端删除老的Entity(S)并以最新属性记录来创建新的Entity(S)。
至于后续的Real/Ghost切换,eventHistory_的处理就非常简单了,其实就是不处理:
RealEntity迁移出去的时候,老的Cell里的Entity::eventHistory_数组保持不变,打包迁移数据的时候并不会带上eventHistory_RealEntity迁移到某个Cell来关联对应的Entity的时候,新的Cell里的Entity::eventHistory_数组保持不变
在这样的处理下,老Cell里的Entity迁移前的eventHistory_与新Cell的eventHistory_是一模一样的,保证了RealEntity与所有的GhostEntity上的eventHistory_同步,这样就可以继续后面属性修改引发的增量同步。
Unreal Engine 的属性同步
Unreal Engine的属性同步机制基本介绍
UE中的属性同步系统与上文中介绍的基于property_cmd的属性同步机制很不一样。前面介绍的属性同步系统在任意属性在修改时都会创建一个数据包来包含此修改信息,属性的修改数据包按序发送到客户端,客户端再按序回放修改。而UE的属性同步系统则不基于单次属性修改,而是基于游戏逻辑的定期Tick来进行属性对比。对于每个网络同步的AActor,都会创建一个ShadowBuffer来记录上次对比之后的属性值。在NetDriver::Tick时,会执行到UNetDriver::ServerReplicateActors,这个函数会遍历所有网络同步的Actor,将这个Actor上的属性最新值与对应的ShadowBuffer进行对比,将每个有变化的属性字段都生成一个带有连续自增ID的属性变化通知数据包,并存储在一个ChangedHistory队列之中。对于同步了此Actor的所有客户端连接里的对应ActorChannel,会记录此客户端已经回复收到的属性变化通知数据包的最大连续ID,这个ID与ChangedHistory中记录的最大ID时间的所有属性变化通知数据包都将被打包发送到当前的ActorChannel中。不过这里的属性同步网络包会被标记为不可靠数据包(只有当此AActorChannel第一次打开时才标记为可靠数据包),因此丢包之后并不会触发重传。当服务器收到客户端发过来的一个属性包ACK之后,这个ActorChannel记录的属性变化最大ID才会被更新。在这种ACK之后再更新的机制下,即使属性同步包丢失也没有多大影响,因为后续的属性差异diff会将需要同步给客户端的数据重新计算出来。然后重复的发包也不会有问题,因为客户端在发现属性的新值与旧值一样时,逻辑会进行忽略。
Unreal Engine中的同步属性声明
Unreal Engine中的属性同步依托于整个Actor的同步,Unreal在默认情况下Actor网络同步的网络同步是关闭的。要开启特定Actor的网络同步需要手动设置Actor的bReplicates属性为true,也可以调用AActor::SetReplicates方法来设置该变量。
AShooterCharacter::AShooterCharacter ()
{
SetReplicates(true);
}
但是Actor启用网络同步后并不是所有的属性都会同步,只有将对应属性标记为需要网络同步后,Unreal才会同步该属性。所需要做的是在UPROPERTY中添加Replicated,这代表该属性需要网络同步,下面展示了一小段来自ShooterGame的ShooterCharacter.h里声明的一些:
/** current targeting state */
UPROPERTY(Transient, Replicated)
uint8 bIsTargeting : 1;
还需要为所需同步属性设置Lifetime,覆写AActor::GetLifetimeReplicatedProps方法,该函数用于定义哪些属性需要在网络同步。这个函数接收一个DOREPLIFETIME宏生成的属性数组,最后在数组中的每个元素都代表一个需要同步的属性。
void AShooterCharacter::GetLifetimeReplicatedProps(TArray<FLifetimeProperty>& OutLifetimeProps) const
{
Super::GetLifetimeReplicatedProps(OutLifetimeProps);
// Replicate to everyone
DOREPLIFETIME(AShooterCharacter, bIsTargeting);
}
在上面的属性同步声明中,设置了AShooterCharacter::bIsTargeting这个变量为往所有包含了此Actor的客户端进行该属性的同步推送。除了默认的往所有客户端同步之外,这里还有一些额外选项来设置同步条件:
// 只在客户端创建对应actor的时候同步此属性 属性的后续修改不参与同步
DOREPLIFETIME_CONDITION(AShooterCharacter, bIsTargeting, COND_InitialOnly);
// 只同步给当前actor的主控客户端
DOREPLIFETIME_CONDITION(AShooterCharacter, bIsTargeting, COND_OwnerOnly);
// 只同步给非主控客户端
DOREPLIFETIME_CONDITION(AShooterCharacter, bIsTargeting, COND_SkipOwner);
除了基本的值类型可以参与属性同步之外,UE的属性同步能支持所有能被RPC发送的数据类型,例如TArray, AActor*/UActorComponent*以及通过UStruct声明的结构体,下面是其他的几个定义在AShooterCharacter上的同步属性:
// ShooterTypes.h
/** replicated information on a hit we've taken */
USTRUCT()
struct FTakeHitInfo
{
GENERATED_USTRUCT_BODY()
/** The amount of damage actually applied */
UPROPERTY()
float ActualDamage;
/** The damage type we were hit with. */
UPROPERTY()
UClass* DamageTypeClass;
// other codes
};
// ShooterCharacter.h
/** weapons in inventory */
UPROPERTY(Transient, Replicated)
TArray<class AShooterWeapon*> Inventory;
/** currently equipped weapon */
UPROPERTY(Transient, ReplicatedUsing = OnRep_CurrentWeapon)
class AShooterWeapon* CurrentWeapon;
/** Replicate where this pawn was last hit and damaged */
UPROPERTY(Transient, ReplicatedUsing = OnRep_LastTakeHitInfo)
struct FTakeHitInfo LastTakeHitInfo;
注意后面两个属性的UPROPERTY宏,没有用Replicated而是使用了ReplicatedUsing=xxxx形式,这种形式的声明代表如果客户端同步到了新的属性值,则对应的xxxx函数会被调用来作为属性通知:
/** play hit or death on client */
UFUNCTION()
void OnRep_LastTakeHitInfo();
/** current weapon rep handler */
UFUNCTION()
void OnRep_CurrentWeapon(class AShooterWeapon* LastWeapon);
这个xxxx函数的声明支持两种函数签名类型,一种是带修改之前的属性值作为参数的void函数,另外一种是不带任何参数的void函数,带参数的函数可以方便客户端自己处理之前属性值的卸载逻辑,根据客户端自身逻辑选择一种声明即可。有了属性通知函数之后,可以省下服务器端通知客户端进行特定属性更新后处理的RPC。
除了可以在AActor上声明同步属性之外,UE还支持在UActorComponent上以同样的方式声明同步属性,当某个UActorComponent参与到AActor的网络同步时,此UActorComponent上的同步属性也会被打包发送到拥有此AActor的客户端,后续的属性更新也会走这个AActor的Channel进行推送。
将一个UActorComponent设置为参与网络同步有两种方式。如果这个UActorComponent是静态存在于某个AActor里的,则可以以下面的形式来参与网络同步:
AMyActor::AMyActor()
{
bReplicates = true;
MyActorComponent = CreateDefaultSubobject<UMyActorComponent>(TEXT("MyActorComponent"));
}
UMyActorComponent::UMyActorComponent()
{
SetIsReplicatedByDefault(true);
}
如果此UActorComponent是运行时按需添加到某个AActor之上的,则在添加之后调用此接口来参与网络同步:
if (MyActorComponent)
{
MyActorComponent->SetIsReplicated(true);
}
同步属性的注册收集
我们先来介绍一个FRepLayout,这个结构体记录了当前Actor所有需要同步的属性,创建的时候先根据对象所对应的UClass来初始化:
void FRepLayout::InitFromClass(
UClass* InObjectClass,
const UNetConnection* ServerConnection,
const ECreateRepLayoutFlags CreateFlags);
内部会调用这个UClass::SetUpRuntimeReplicationData函数来收集所有参与网络同步的UProperty,并分配一个唯一标识符
void UClass::SetUpRuntimeReplicationData()
{
if (!HasAnyClassFlags(CLASS_ReplicationDataIsSetUp) && PropertyLink != NULL)
{
if (UClass* SuperClass = GetSuperClass())
{
SuperClass->SetUpRuntimeReplicationData();
// 如果有父类 则先复制父类里的所有同步属性描述信息
ClassReps = SuperClass->ClassReps;
FirstOwnedClassRep = ClassReps.Num();
}
else
{
ClassReps.Empty();
FirstOwnedClassRep = 0;
}
// Track properties so me can ensure they are sorted by offsets at the end
TArray<FProperty*> NetProperties;
// 遍历当前类上定义的所有UProperty 排除父类
for (TFieldIterator<FField> It(this, EFieldIteratorFlags::ExcludeSuper); It; ++It)
{
if (FProperty* Prop = CastField<FProperty>(*It))
{
// 如果propertyFlags里有cpf_net 则代表参与网络同步 等价于增加了Replicated 或者ReplicatedUsing
if ((Prop->PropertyFlags & CPF_Net) && Prop->GetOwner<UObject>() == this)
{
NetProperties.Add(Prop);
}
}
}
ClassReps.Reserve(ClassReps.Num() + NetProperties.Num());
for (int32 i = 0; i < NetProperties.Num(); i++)
{
NetProperties[i]->RepIndex = ClassReps.Num();
for (int32 j = 0; j < NetProperties[i]->ArrayDim; j++)
{
new(ClassReps)FRepRecord(NetProperties[i], j);
}
}
}
}
其实每个参与网络同步UProperty被分配的序号与xxx.generated.h定义的ENetFields_Private是相等的。
// shootercharacter.generated.h
enum class ENetFields_Private : uint16 \
{ \
NETFIELD_REP_START=(uint16)((int32)Super::ENetFields_Private::NETFIELD_REP_END + (int32)1), \
Inventory=NETFIELD_REP_START, \
CurrentWeapon, \
LastTakeHitInfo, \
bIsTargeting, \
bWantsToRun, \
Health, \
NETFIELD_REP_END=Health }; \
这里的所有网络同步属性字段都分配了一个唯一值,且是连续的整数,最小值等于父类里定义的ENetFields_Private的最大值加1,这样可以保证字段索引不会与继承链上的任意类定义的属性字段冲突,同时尽可能的将属性字段索引的值变小。
然后UHT在xxx.gen.cpp里生成了每个UProperty的描述信息,这里以CurrentWeapon为例展示其描述代码:
const UE4CodeGen_Private::FObjectPropertyParams Z_Construct_UClass_AShooterCharacter_Statics::NewProp_CurrentWeapon = { "CurrentWeapon", "OnRep_CurrentWeapon", (EPropertyFlags)0x0020080100002020, UE4CodeGen_Private::EPropertyGenFlags::Object, RF_Public|RF_Transient|RF_MarkAsNative, 1, STRUCT_OFFSET(AShooterCharacter, CurrentWeapon), Z_Construct_UClass_AShooterWeapon_NoRegister, METADATA_PARAMS(Z_Construct_UClass_AShooterCharacter_Statics::NewProp_CurrentWeapon_MetaData, UE_ARRAY_COUNT(Z_Construct_UClass_AShooterCharacter_Statics::NewProp_CurrentWeapon_MetaData)) };
注意这里的(EPropertyFlags)0x0020080100002020,这是一个uint64值,我们声明UProperty时指定的Replicated字段会在这个flag的对应位置设置为1.
然后UHT会生成一些注册代码来收集当前类上的所有UProperty,并用来初始化当前UClass的注册信息:
const UE4CodeGen_Private::FPropertyParamsBase* const Z_Construct_UClass_AShooterCharacter_Statics::PropPointers[] = {
// other props
(const UE4CodeGen_Private::FPropertyParamsBase*)&Z_Construct_UClass_AShooterCharacter_Statics::NewProp_CurrentWeapon,
// other props
};
const UE4CodeGen_Private::FClassParams Z_Construct_UClass_AShooterCharacter_Statics::ClassParams = {
&AShooterCharacter::StaticClass,
"Game",
&StaticCppClassTypeInfo,
DependentSingletons,
FuncInfo,
Z_Construct_UClass_AShooterCharacter_Statics::PropPointers, // 当前类的所有属性定义
nullptr,
UE_ARRAY_COUNT(DependentSingletons),
UE_ARRAY_COUNT(FuncInfo),
UE_ARRAY_COUNT(Z_Construct_UClass_AShooterCharacter_Statics::PropPointers),
0,
0x008000A5u,
METADATA_PARAMS(Z_Construct_UClass_AShooterCharacter_Statics::Class_MetaDataParams, UE_ARRAY_COUNT(Z_Construct_UClass_AShooterCharacter_Statics::Class_MetaDataParams))
};
有了上述注册信息之后,我们就可以初始化一个UClass对应的FRepLayout结构了,主要包括如下几个数据成员:
/** 以此FRepLayout创建的ShadowBuffer内存大小 */
int32 ShadowDataBufferSize;
/** 最顶层的同步属性描述信息 */
TArray<FRepParentCmd> Parents;
/** 细化后的最底层同步属性描述信息*/
TArray<FRepLayoutCmd> Cmds;
/** 存储业务层使用的handler到Cmds数组里索引的映射 */
TArray<FHandleToCmdIndex> BaseHandleToCmdIndex;
Cmd用于指导一个Property如何同步,分为RepParentCmd和RepLayoutCmd。一个参与网络同步的Property对应一个FRepParentCmd,同时对应一个或多个FRepLayoutCmd,对应关系与这个Property的类型相关。普通Property,如int和bool,他的FRepParentCmd只会关联一个FRepLayoutCmd,用于描述同步细节。而复杂的Property,如TArray和UStruct,会关联多个FRepLayoutCmd。
class FRepParentCmd
{
public:
FProperty* Property; // 对应的Property描述结构
const FName CachedPropertyName; // 对应的Property名字
// 如果是C类型静态数组声明的同步属性 则数组里每个元素都会生成一个FRepParentCmd 内部的ArrayIndex则为元素索引
// 其他情况下此字段为0
int32 ArrayIndex;
// 此属性对应内存地址相对于this指针的偏移
int32 Offset;
// 此属性在ShadowBuffer中的偏移
int32 ShadowOffset;
// 此FRepParentCmd对应的连续的FRepLayoutCmd 为 Cmds[CmdStart, CmdEnd) 左开右闭
uint16 CmdStart;
uint16 CmdEnd;
// 这是是UProperty宏里提供的同步条件 回调函数等信息
ELifetimeCondition Condition;
ELifetimeRepNotifyCondition RepNotifyCondition;
int32 RepNotifyNumParams;
ERepParentFlags Flags;
};
FRepParentCmd主要提供同步条件和回调函数等信息,真正参与执行属性Diff的是FRepLayoutCmd,下面是这个结构体的完整声明:
class FRepLayoutCmd
{
public:
// 对应的具体Property指针 如果parent是Ustruct 则会指向struct里的property成员
FProperty* Property;
// 对于array类型 指向其parent的cmdend 用来跳过后续成员
uint16 EndCmd;
// 对于Tarray来说其成员的大小
uint16 ElementSize;
// 当前Property变量在对象中的内存偏移
int32 Offset;
// 当前property在shadowbuffer中的内存偏移
int32 ShadowOffset;
// 当前Cmd在Cmds数组里的索引+1
uint16 RelativeHandle;
// 其对应的FRepParentCmd的索引
uint16 ParentIndex;
// 校验比对用的checksum
uint32 CompatibleChecksum;
// 当前property的数据类型
ERepLayoutCmdType Type;
ERepLayoutCmdFlags Flags;
};
这里的UStruct生成FRepLayoutCmd又有两个特例:
-
如果一个
UStruct自己实现了NetDeltaSerialize这个UE规定的增量Diff接口,则不会生成FRepLayoutCmd,不参与通用Diff流程。 -
如果一个
UStruct自己实现了NetSerialize这个UE规定的数据打包接口,则只生成一个FRepLayoutCmd,该UStruct将当作一个整体来参与同步
FRepLayoutCmd的Type字段记录了当前具体Property的数据类型,是一个枚举值:
/** Various types of Properties supported for Replication. */
enum class ERepLayoutCmdType : uint8
{
DynamicArray = 0, //! Dynamic array
Return = 1, //! Return from array, or end of stream
Property = 2, //! Generic property
PropertyBool = 3,
PropertyFloat = 4,
PropertyInt = 5,
PropertyByte = 6,
PropertyName = 7,
PropertyObject = 8,
PropertyUInt32 = 9,
PropertyVector = 10,
// other types
};
这里除了我们熟知的各种基本类型和UObject指针类型之外,比较显眼的就是开头的DynamicArray和Return,这两个都是用来描述TArray<T>的Property信息的。TArray<T>的FRepParentCmd的展开规则如下:
- 首先生成一个
ERepLayoutCmdType::DynamicArray类型的FRepLayoutCmd,代表TArray的开始 - 生成
T类型的FRepParentCmd类型对应的所有FRepLayoutCmd, - 生成一个
ERepLayoutCmdType::Return类型的一个FRepLayoutCmd,代表当前TArray展开结束。
这里需要注意, T可能是UStruct或者TArray,或者多层嵌套,所以可能会有递归展开过程。
下图中就比较生动形象的展示出了有三个同步属性int a; FRepAttachment b; TArray<int> c;的UObject对应的完整FRepLayout构建过程:
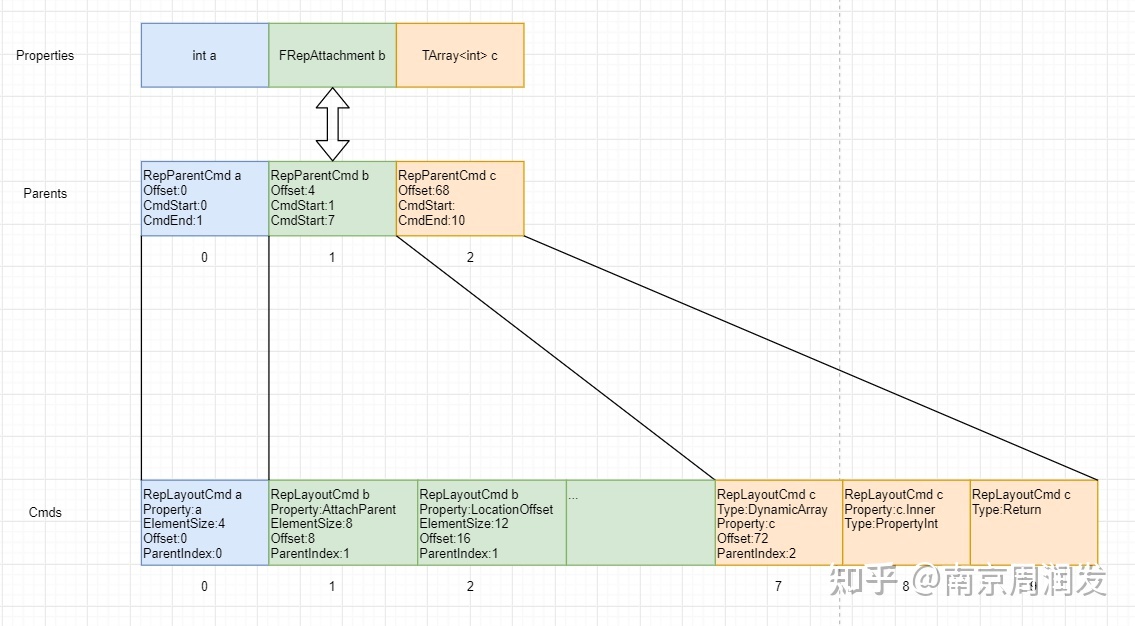
UE属性的Diff
属性diff的发起者在FObjectReplicator::ReplicateProperties中:
FSendingRepState* SendingRepState = (bUseCheckpointRepState && CheckpointRepState.IsValid()) ? CheckpointRepState->GetSendingRepState() : RepState->GetSendingRepState();
const ERepLayoutResult UpdateResult = FNetSerializeCB::UpdateChangedHistoryMgr(*RepLayout, SendingRepState, *ChangedHistoryMgr, Object, Connection->Driver->ReplicationFrame, RepFlags, OwningChannel->bForceCompareProperties || bUseCheckpointRepState);
// 调用FRepLayout的属性diff接口
const bool bHasRepLayout = RepLayout->ReplicateProperties(SendingRepState, ChangedHistoryMgr->GetRepChangedHistoryState(), (uint8*)Object, ObjectClass, OwningChannel, Writer, RepFlags);
// 处理一些自己提供了NetDeltaSerialize的属性
ReplicateCustomDeltaProperties(Writer, RepFlags);
这里引入了FRepChangedHistoryState这个结构,用于管理属性的ChangedHistory和ShadowBuffer。属性可以多次发生改变,UE需要在每次比较属性时记录下哪些属性改变了,并把属性对应Cmd的RelativeHandle存储在RepChangedHistoryState中,称为ChangedHistory。ChangedHistoryState与Actor一一对应,多个ClientConnection间共享。下面是FRepChangedHistoryState的完整定义:
/** 环形队列最大元素个数 */
static const int32 MAX_CHANGE_HISTORY = 64;
/** 环形队列数组 */
FRepChangedHistory ChangeHistory[MAX_CHANGE_HISTORY];
/** 有些自定义了CustomDelta函数属性的ChangedHistory 一般用不到 此处暂时忽略 */
TUniquePtr<struct FCustomDeltaChangedHistoryState> CustomDeltaChangedHistoryState;
/** 环形队列的开始元素的索引 指向最早的ChangedHistory*/
int32 HistoryStart;
/** 环形队列的结束元素索引 指向最新的ChangedHistory */
int32 HistoryEnd;
/*属性被比较的次数*/
int32 CompareIndex;
/** 服务端存储的当前actor所有同步属性的最新值 即ShadowBuffer*/
FRepStateStaticBuffer StaticBuffer;
/** 序列化之后的共享数据 */
FRepSerializationSharedInfo SharedSerialization;
ChangedHistory数据结构为环形buffer,最大为64个元素,当buffer满时会把早期的多个ChangedHistory合并成一个,因此不会丢弃数据。
FNetSerializeCB::UpdateChangedHistoryMgr直接转发到RepLayout::UpdateChangedHistoryMgr并最终调用到FRepLayout::CompareProperties来真正进行属性diff操作。这个函数首先从ChangedHistory里获取HistoryEnd对应的FRepChangedHistory:
// 更新属性比较次数统计
RepChangedHistoryState->CompareIndex++;
// 从循环队列里找到HistoryEnd对应的Item
const int32 HistoryIndex = RepChangedHistoryState->HistoryEnd % FRepChangedHistoryState::MAX_CHANGE_HISTORY;
FRepChangedHistory& NewHistoryItem = RepChangedHistoryState->ChangeHistory[HistoryIndex];
// 标记哪些cmd有diff需要同步
TArray<uint16>& Changed = NewHistoryItem.Changed;
然后调用CompareParentProperties开始遍历所有的FRepParentCmd的diff,并将diff里需要同步的FRepLayoutCmd的Handler写入到NewHistoryItem.Changed数组中:
FComparePropertiesSharedParams SharedParams{
/*bIsInitial=*/ !!RepFlags.bNetInitial,
/*bForceFail=*/ false,
Flags,
Parents,
Cmds,
RepState,
RepChangedHistoryState,
(RepState ? RepState->RepChangedPropertyTracker.Get() : nullptr),
NetSerializeLayouts,
/*PushModelState=*/UE4_RepLayout_Private::GetPerNetDriverState(RepChangedHistoryState),
/*PushModelProperties=*/ LocalPushModelProperties,
/*bValidateProperties=*/GbPushModelValidateProperties,
/*bIsNetworkProfilerActive=*/UE4_RepLayout_Private::IsNetworkProfilerComparisonTrackingEnabled(),
/*bChangedNetOwner=*/ RepState && RepState->RepFlags.bNetOwner != RepFlags.bNetOwner
};
FComparePropertiesStackParams StackParams{
Data,
RepChangedHistoryState->StaticBuffer.GetData(),
Changed,
Result
};
CompareParentProperties(SharedParams, StackParams);
这里的Compare其实就是对每个ParentCmd进行遍历,调用CompareProperties_r:
static void CompareParentProperties(
const FComparePropertiesSharedParams& SharedParams,
FComparePropertiesStackParams& StackParams)
{
for (int32 ParentIndex = 0; ParentIndex < SharedParams.Parents.Num(); ++ParentIndex)
{
UE4_RepLayout_Private::CompareParentPropertyHelper(ParentIndex, SharedParams, StackParams);
}
}
static bool CompareParentPropertyHelper(
const int32 ParentIndex,
const FComparePropertiesSharedParams& SharedParams,
FComparePropertiesStackParams& StackParams)
{
const bool bDidPropertyChange = CompareParentProperty(ParentIndex, SharedParams, StackParams);
return bDidPropertyChange;
}
static bool CompareParentProperty(
const int32 ParentIndex,
const FComparePropertiesSharedParams& SharedParams,
FComparePropertiesStackParams& StackParams)
{
const FRepParentCmd& Parent = SharedParams.Parents[ParentIndex];
const FRepLayoutCmd& Cmd = SharedParams.Cmds[Parent.CmdStart];
const int32 NumChanges = StackParams.Changed.Num();
// Note, Handle - 1 to account for CompareProperties_r incrementing handles.
CompareProperties_r(SharedParams, StackParams, Parent.CmdStart, Parent.CmdEnd, Cmd.RelativeHandle - 1);
return !!(StackParams.Changed.Num() - NumChanges);
}
CompareProperties_r负责每个ParentCmd对应的FRepLayoutCmd进行详细、底层的属性比较,然后更新StaticBuffer并把RelativeHandle写入Changed数组。在FRepLayoutCmd中对具体的Property做比较,又分为了两种情况:
- 普通
Property,使用PropertiesAreIdenticalNative函数进行比较,根据属性类型采用不同比较方式。对大部分属性,直接把当前对象内存和ShadowBuffer内存Cast成对应属性,然后用"=="比较。
template<typename T>
bool CompareValue(const T * A, const T * B)
{
return *A == *B;
}
有些属性比较特殊,需要使用FProperty的Identical接口进行比较,比如Bool只占据一个bit,一般使用位域来声明多个连续的bool属性,这样可以共用一个byte存储,避免padding引发各种内存浪费。此时直接Cast<bool>其实比较了一个byte,这样的结果是不对的,需要使用FBoolProperty::Identical进行比较,该函数定义如下:
bool FBoolProperty::Identical( const void* A, const void* B, uint32 PortFlags ) const
{
check(FieldSize != 0);
const uint8* ByteValueA = (const uint8*)A + ByteOffset;
const uint8* ByteValueB = (const uint8*)B + ByteOffset;
return ((*ByteValueA ^ (B ? *ByteValueB : 0)) & FieldMask) == 0;
}
当比较发现属性不同时,会把对象当前属性通过Fproperty::CopySingleValue接口写入ShadowBuffer的对应内存区域,使ShadowBuffer保持最新,然后把Cmd.Handle加入到Changed数组中。
-
动态数组类型的
Property,即TArray。这里的比较就复杂了,因为TArray内存储Item内容的内存并不是在ShadowBuffer中,需要调用CompareProperties_Array_r来进行比较,这个函数会首先将ShadowBuffer中对应的TArray调用resize方法进行扩容或者缩容,使其与最新的TArray的大小保持一致,然后遍历所有的Item来调用CompareProperties_r。不过这里的CompareProperties_r不能用原来传入的Changed数组来记录哪些Item发生了变化,此时需要新建一个ChangedLocal数组来记录变化了的Item的索引。CompareProperties_Array_r内部比较结束之后,需要下发Diff数据有两种情况:ChangedLocal不是空的,代表扩缩容之后的ShadowArray里存在一个或者多个Item与最新TArray结果不一样,此时往Changed数组中写入下列内容:
const int32 NumChangedEntries = ChangedLocal.Num(); StackParams.Changed.Add(Handle); // 这里的handle是当前tarray的handle StackParams.Changed.Add((uint16)NumChangedEntries); StackParams.Changed.Append(ChangedLocal); // 写入所有有变化的Item的索引+1 这样避免0值 StackParams.Changed.Add(0);// 代表当前TArray的修改数据结束TArray的长度减少,但是剩余元素的内容与ShadowBuffer中记录的内容一致,此时ChangedLocal是空的,但是我们需要通知客户端TArray长度缩减了:
StackParams.Changed.Add(Handle);// 这里的handle是当前tarray的handle StackParams.Changed.Add(0); // 现存元素里没有变化 StackParams.Changed.Add(0); // 代表当前TArray的修改数据结束
这里我们发现:如果TArray只进行了扩容,也不会更新Changed数组,导致服务端TArray扩容之后,客户端感知不到新的数组大小。业务方要避免客户端出现依赖此情况的代码逻辑。
CompareParentProperties对比完成之后,将在Changed数组末尾添加一个标志元素0,代表结果结束,因为FRepLayoutCmd::RelativeHandle是从1开始计数的。然后执行RepChangedHistoryState->HistoryEnd++来标记此Item已经被使用,同时加入环形队列是否已经没有剩余元素,如果满了则将(HistoryStart, HistoryStart+1)对应的两个Item合并到HistoryStart+1, 同时HistoryStart++,以确保RepChangedHistoryState->HistoryEnd对应的Item永远都是空闲可用的。
前述的UpdateChangedHistoryMgr流程是对于一个ClientConnection更新时做的,而Server可用同时连接多个ClientConnection,对每个Client都比较一次ShadowBuffer显然没有必要,比较结果可用在多个ClientConnection间复用。当一次UpdateChangedHistoryMgr执行结束后,UE会把当前Frame存储在ChangedHistoryMgr中,表示ChangedHistoryMgr上次更新的Frame。当下次更新ClientConnection进入UpdateChangedHistoryMgr函数时,如果发现当前Frame与ChangedHistoryMgr中记录的Frame相同,则表示当前Frame已做过比较。因为服务器属性同步的更新发生在一个FrameTick的末尾,此后再无其他逻辑,所以可以保证Frame相同时,属性也是相同的。
UE 属性Diff结果的下发
目前为止,我们知道了改变属性对应的Handle列表以及一些辅助数据,接下来需要根据这些Handle找到对应属性,然后序列化属性内容,发送到ActorChannel之中。之前我们提到了属性同步相关数据包不是reliable的,相关Bunch丢失之后不会触发重传,为了后续将丢失的属性信息构造新的Bunch下发下去,每个ActorChannel里维护了一个FSendingRepState结构来记录已经下发的属性Bunch信息,其主要成员变量是一个FRepChangedHistory的循环队列:
class FSendingRepState
{
// 循环队列的开始与结束索引
int32 HistoryStart;
int32 HistoryEnd;
// 当前state上遇到了多少丢失的包
int32 NumNaks;
// 上次从对应Actor的FRepChangelistState同步数据时的FRepChangelistState::HistoryEnd
int32 LastChangelistIndex;
// 上次从对应Actor的FRepChangelistState同步数据时的FRepChangelistState::CompareIndex
int32 LastCompareIndex;
static constexpr int32 MAX_CHANGE_HISTORY = 32;
FRepChangedHistory ChangeHistory[MAX_CHANGE_HISTORY];
}
每次一个ActorChannel往下发送属性同步数据时,先获取对应Actor的FRepChangelistState::HistoryEnd,然后将[FSendingRepState::HistoryEnd, FRepChangelistState::HistoryEnd)之间的所有FRepChangedHistory进行合并,并填充到FSendingRepState::ChangeHistory这个循环队列的末尾:
// FRepLayout::ReplicateProperties
RepState->LastCompareIndex = RepChangelistState->CompareIndex;
const int32 PossibleNewHistoryIndex = RepState->HistoryEnd % FSendingRepState::MAX_CHANGE_HISTORY;
FRepChangedHistory& PossibleNewHistoryItem = RepState->ChangeHistory[PossibleNewHistoryIndex];
TArray<uint16>& Changed = PossibleNewHistoryItem.Changed;
for (int32 i = RepState->LastChangelistIndex; i < RepChangelistState->HistoryEnd; ++i)
{
const int32 HistoryIndex = i % FRepChangelistState::MAX_CHANGE_HISTORY;
FRepChangedHistory& HistoryItem = RepChangelistState->ChangeHistory[HistoryIndex];
TArray<uint16> Temp = MoveTemp(Changed);
MergeChangeList(Data, HistoryItem.Changed, Temp, Changed);
}
RepState->LastChangelistIndex = RepChangelistState->HistoryEnd;
RepState->HistoryEnd++;
上面的代码解释了FSendingRepState追赶FRepChangelistState的过程,最终会生成一个Changed数组。追赶完成之后,此FSendingRepState还要对设置了属性同步条件的属性进行过滤。默认设置下标明了Replicated的属性会往所有包含了对应ActorChannel的客户端连接同步,但是根据逻辑需求,我们可以标记某个属性的额外同步条件,是否OwnerOnly是否SimulatedOnly等。在往客户端下发之前,我们需要过滤掉一些与当前NetConnection不相关的属性,为此FSendingRepState中还声明了一个InactiveParents的成员变量:
/** Cached set of inactive parent commands. */
TBitArray<> InactiveParents;
这里的RepState->InactiveParents是一个BitArray,元素大小为FParentCmd数组的大小,如果InactivateParent[Index]的值为true,则代表FReplayout::Parents[Index]在当前FSendingRepState中不需要同步。这个InactiveParents初始化时所有的值为false,再根据FSendingRepState的RepFlags来计算出每个FParentCmd对应bit正确的值:
TStaticBitArray<COND_Max> FSendingRepState::BuildConditionMapFromRepFlags(const FReplicationFlags RepFlags)
{
TStaticBitArray<COND_Max> ConditionMap;
// Setup condition map
const bool bIsInitial = RepFlags.bNetInitial ? true : false;
const bool bIsOwner = RepFlags.bNetOwner ? true : false;
const bool bIsSimulated = RepFlags.bNetSimulated ? true : false;
const bool bIsPhysics = RepFlags.bRepPhysics ? true : false;
const bool bIsReplay = RepFlags.bReplay ? true : false;
ConditionMap[COND_None] = true;
ConditionMap[COND_InitialOnly] = bIsInitial;
ConditionMap[COND_OwnerOnly] = bIsOwner;
ConditionMap[COND_SkipOwner] = !bIsOwner;
ConditionMap[COND_SimulatedOnly] = bIsSimulated;
ConditionMap[COND_SimulatedOnlyNoReplay] = bIsSimulated && !bIsReplay;
ConditionMap[COND_AutonomousOnly] = !bIsSimulated;
ConditionMap[COND_SimulatedOrPhysics] = bIsSimulated || bIsPhysics;
ConditionMap[COND_SimulatedOrPhysicsNoReplay] = (bIsSimulated || bIsPhysics) && !bIsReplay;
ConditionMap[COND_InitialOrOwner] = bIsInitial || bIsOwner;
ConditionMap[COND_ReplayOrOwner] = bIsReplay || bIsOwner;
ConditionMap[COND_ReplayOnly] = bIsReplay;
ConditionMap[COND_SkipReplay] = !bIsReplay;
ConditionMap[COND_Custom] = true;
ConditionMap[COND_Never] = false;
return ConditionMap;
}
void FRepLayout::RebuildConditionalProperties(
FSendingRepState* RESTRICT RepState,
const FReplicationFlags& RepFlags) const
{
SCOPE_CYCLE_COUNTER(STAT_NetRebuildConditionalTime);
TStaticBitArray<COND_Max> ConditionMap = FSendingRepState::BuildConditionMapFromRepFlags(RepFlags);
for (auto It = TBitArray<>::FIterator(RepState->InactiveParents); It; ++It)
{
It.GetValue() = !ConditionMap[Parents[It.GetIndex()].Condition];
}
RepState->RepFlags = RepFlags;
}
// FRepLayout::ReplicateProperties
if (RepState->RepFlags.Value != RepFlags.Value)
{
RebuildConditionalProperties(RepState, RepFlags);
}
有了这个InactiveParents数组之后,我们就可以执行Changed数组里的Handle相关性过滤了:
void FRepLayout::FilterChangeList(
const TArray<uint16>& Changelist,
const TBitArray<>& InactiveParents,
TArray<uint16>& OutInactiveProperties,
TArray<uint16>& OutActiveProperties) const
{
FChangelistIterator ChangelistIterator(Changelist, 0);
FRepHandleIterator HandleIterator(Owner, ChangelistIterator, Cmds, BaseHandleToCmdIndex, 0, 1, 0, Cmds.Num() - 1);
OutInactiveProperties.Empty(1);
OutActiveProperties.Empty(1);
while (HandleIterator.NextHandle())
{
const FRepLayoutCmd& Cmd = Cmds[HandleIterator.CmdIndex];
// 需要同步的放到OutActiveProperties数组中 不需要的则放到OutInactiveProperties数组中
TArray<uint16>& Properties = InactiveParents[Cmd.ParentIndex] ? OutInactiveProperties : OutActiveProperties;
Properties.Add(HandleIterator.Handle);
}
}
// FRepLayout::ReplicateProperties
// Filter out the final changelist into Active and Inactive.
TArray<uint16> UnfilteredChanged = MoveTemp(Changed);
TArray<uint16> NewlyInactiveChangelist;
FilterChangeList(UnfilteredChanged, RepState->InactiveParents, NewlyInactiveChangelist, Changed);
Changed数组经过InActiveParent过滤之后生成一个新的Changed数组,接下来我们利用此Changed数组来生成数据包, 这部分是通过FRepLayout::SendProperties函数来实现的:
FChangedHistoryIterator ChangedHistoryIterator(Changed, 0);
FRepHandleIterator HandleIterator(Owner, ChangedHistoryIterator, Cmds, BaseHandleToCmdIndex, 0, 1, 0, Cmds.Num() - 1);
SendProperties_r(RepState, Writer, bDoChecksum, HandleIterator, Data, 0, &SharedInfo);
这里会使用Changed数组构造一个树形迭代器,通过后序遍历来优先处理被嵌套的Property,因此这里的SendProperties_r会递归的调用自身。
void FRepLayout::SendProperties_r(
FSendingRepState* RESTRICT RepState,
FNetBitWriter& Writer,
const bool bDoChecksum,
FRepHandleIterator& HandleIterator,
const FConstRepObjectDataBuffer SourceData,
const int32 ArrayDepth,
const FRepSerializationSharedInfo* const RESTRICT SharedInfo) const
{
const bool bDoSharedSerialization = SharedInfo && !!GNetSharedSerializedData;
while (HandleIterator.NextHandle())
{
const FRepLayoutCmd& Cmd = Cmds[HandleIterator.CmdIndex];
const FRepParentCmd& ParentCmd = Parents[Cmd.ParentIndex];
UE_LOG(LogRepProperties, VeryVerbose, TEXT("SendProperties_r: Parent=%d, Cmd=%d, ArrayIndex=%d"), Cmd.ParentIndex, HandleIterator.CmdIndex, HandleIterator.ArrayIndex);
FConstRepObjectDataBuffer Data = (SourceData + Cmd) + HandleIterator.ArrayOffset;
if (Cmd.Type == ERepLayoutCmdType::DynamicArray)
{
// 处理动态数组的同步
}
else
{
// 处理简单类型的同步
WritePropertyHandle(Writer, HandleIterator.Handle, bDoChecksum);
const int32 NumStartBits = Writer.GetNumBits();
// This property changed, so send it
Cmd.Property->NetSerializeItem(Writer, Writer.PackageMap, const_cast<uint8*>(Data.Data));
const int32 NumEndBits = Writer.GetNumBits();
}
//
}
}
这里跟之前Diff流程一样,区分了简单类型和动态数组类型。对于简单类型来说,先写入对应的Handler到Writer,然后再把这个Property的最新值也写入,调用的是Property::NetSerializeItem这个虚方法,以最节省流量的bit流的形式去写入:
bool FBoolProperty::NetSerializeItem( FArchive& Ar, UPackageMap* Map, void* Data, TArray<uint8> * MetaData ) const
{
check(FieldSize != 0);
uint8* ByteValue = (uint8*)Data + ByteOffset;
uint8 Value = ((*ByteValue & FieldMask)!=0);
// 只写入一个bit
Ar.SerializeBits( &Value, 1 );
*ByteValue = ((*ByteValue) & ~FieldMask) | (Value ? ByteMask : 0);
return true;
}
bool FByteProperty::NetSerializeItem( FArchive& Ar, UPackageMap* Map, void* Data, TArray<uint8> * MetaData ) const
{
// 根据当前property的可能取值范围去写入最少的bit
if (Ar.EngineNetVer() < HISTORY_ENUM_SERIALIZATION_COMPAT)
{
Ar.SerializeBits(Data, Enum ? FMath::CeilLogTwo(Enum->GetMaxEnumValue()) : 8);
}
else
{
Ar.SerializeBits(Data, GetMaxNetSerializeBits());
}
return true;
}
处理动态数组时,先写入数组对应的Handle,然后再写入当前数组的大小:
WritePropertyHandle(Writer, HandleIterator.Handle, bDoChecksum);
const FScriptArray* Array = (FScriptArray *)Data.Data;
const FConstRepObjectDataBuffer ArrayData(Array->GetData());
// Write array num
uint16 ArrayNum = Array->Num();
Writer << ArrayNum;
然后再以当前Array作为顶层Property调用SendProperties_r来处理子元素的序列化:
// 获取改变了多少个元素
const int32 ArrayChangedCount = HandleIterator.ChangedHistoryIterator.Changed[HandleIterator.ChangedHistoryIterator.ChangedIndex++];
const int32 OldChangedIndex = HandleIterator.ChangedHistoryIterator.ChangedIndex;
// 每个子handler对应的property类型
TArray<FHandleToCmdIndex>& ArrayHandleToCmdIndex = *HandleIterator.HandleToCmdIndex[Cmd.RelativeHandle - 1].HandleToCmdIndex;
FRepHandleIterator ArrayHandleIterator(HandleIterator.Owner, HandleIterator.ChangedHistoryIterator, Cmds, ArrayHandleToCmdIndex, Cmd.ElementSize, ArrayNum, HandleIterator.CmdIndex + 1, Cmd.EndCmd - 1);
SendProperties_r(RepState, Writer, bDoChecksum, ArrayHandleIterator, ArrayData, ArrayDepth + 1, SharedInfo);
HandleIterator.ChangedHistoryIterator.ChangedIndex++;
// 最后加上0结尾 代表array结束
WritePropertyHandle(Writer, 0, bDoChecksum); // Signify end of dynamic array
当一个Bunch被下发之后,FObjectReplicator::PostSendBunch( FPacketIdRange & PacketRange, uint8 bReliable )中会执行下面这段代码:
for (int32 i = SendingRepState->HistoryStart; i < SendingRepState->HistoryEnd; ++i)
{
const int32 HistoryIndex = i % FSendingRepState::MAX_CHANGE_HISTORY;
FRepChangedHistory & HistoryItem = SendingRepState->ChangeHistory[HistoryIndex];
if (HistoryItem.OutPacketIdRange.First == INDEX_NONE)
{
HistoryItem.OutPacketIdRange = PacketRange;
if (!bReliable && !SendingRepState->bOpenAckedCalled)
{
SendingRepState->PreOpenAckHistory.Add(HistoryItem);
}
}
}
这段代码遍历当前SendingRepState->ChangeHistory循环队列,获取其中还没有设置关联OutPacketIdRange的HistoryItem,将当前PacketRange关联上。当客户端汇报了特定Packet丢失时,逻辑会走到void FObjectReplicator::ReceivedNak( int32 NakPacketId )中,这里会检查这个包是否带有属性同步数据,如果带有属性同步数据,则会执行下面的代码:
for (int32 i = SendingRepState->HistoryStart; i < SendingRepState->HistoryEnd; ++i)
{
const int32 HistoryIndex = i % FSendingRepState::MAX_CHANGE_HISTORY;
FRepChangedHistory& HistoryItem = SendingRepState->ChangeHistory[HistoryIndex];
// 如果当前丢失的packetid在发送了这个item的packet range之中 则认为对应的属性需要重传
if (!HistoryItem.Resend && HistoryItem.OutPacketIdRange.InRange(NakPacketId))
{
check(HistoryItem.Changed.Num() > 0);
HistoryItem.Resend = true;
++SendingRepState->NumNaks;
}
}
有了这个补发标记之后,在FRepLayout::ReplicateProperties时传递给FRepLayout::SendProperties的Changed数组,不仅需要考虑FSendingRepState追赶FRepChangelistState的过程,还需要考虑所有需要补发的FRepChangedHistory:
// FRepLayout::UpdateChangelistHistory
const int32 AckPacketId = Connection->OutAckPacketId; // 当前Connection汇报的已经ack的最大PacketId
for (int32 i = RepState->HistoryStart; i < RepState->HistoryEnd; i++)
{
const int32 HistoryIndex = i % FSendingRepState::MAX_CHANGE_HISTORY;
FRepChangedHistory& HistoryItem = RepState->ChangeHistory[HistoryIndex];
if (HistoryItem.OutPacketIdRange.First == INDEX_NONE)
{
// 从此History开始后续的所有History都没有通过Bunch进行发送 不再需要遍历下去了
break;
}
// 判断该Item是否需要重发
if (AckPacketId >= HistoryItem.OutPacketIdRange.Last || HistoryItem.Resend || DumpHistory)
{
if (HistoryItem.Resend || DumpHistory)
{
// 如果需要重发 则将此Item里的Changed数据合并到最终的Changed数组中
TArray<uint16> Temp = MoveTemp(*OutMerged);
MergeChangeList(Data, HistoryItem.Changed, Temp, *OutMerged);
if (HistoryItem.Resend)
{
RepState->NumNaks--;
}
}
// 合并之后当前Item就可以废弃了 因为数据已经合并到HistoryEnd之中了
HistoryItem.Reset();
RepState->HistoryStart++;
}
}
UE属性同步数据的客户端回放
客户端在接收到网络数据包之后,调用UActorChannel::ProcessBunch来处理,如果发现这是一个属性同步包,则会找到此Actor的FObjectReplicator调用ReceivedBunch来解析内部的属性Diff数据:
bool FObjectReplicator::ReceivedBunch(FNetBitReader& Bunch, const FReplicationFlags& RepFlags, const bool bHasRepLayout, bool& bOutHasUnmapped)
{
// 处理属性同步的相关核心代码
const FRepLayout& LocalRepLayout = *RepLayout;
bool bGuidsChanged = false;
FReceivingRepState* ReceivingRepState = RepState->GetReceivingRepState();
// Handle replayout properties
if (bHasRepLayout)
{
EReceivePropertiesFlags ReceivePropFlags = EReceivePropertiesFlags::None;
bool bLocalHasUnmapped = false;
if (!LocalRepLayout.ReceiveProperties(OwningChannel, ObjectClass, RepState->GetReceivingRepState(), Object, Bunch, bLocalHasUnmapped, bGuidsChanged, ReceivePropFlags))
{
UE_LOG(LogRep, Error, TEXT( "RepLayout->ReceiveProperties FAILED: %s" ), *Object->GetFullName());
return false;
}
}
}
这里会调用当前对象的FRepLayout的ReceiveProperties,因为属性描述信息都在FRepLayout之中。这里ReceiveProperties会调用ReceiveProperties_r进行递归解析:
FReceivePropertiesSharedParams Params{
bDoChecksum,
// We can skip swapping roles if we're not an Actor layout, or if we've been explicitly told we can skip.
EnumHasAnyFlags(ReceiveFlags, EReceivePropertiesFlags::SkipRoleSwap) || !EnumHasAnyFlags(Flags, ERepLayoutFlags::IsActor),
InBunch,
bOutHasUnmapped,
bOutGuidsChanged,
Parents,
Cmds,
NetSerializeLayouts,
Object,
OwningChannel->Connection->GetInTraceCollector()
};
FReceivePropertiesStackParams StackParams{
FRepObjectDataBuffer(Data),
FRepShadowDataBuffer(RepState->StaticBuffer.GetData()),
&RepState->GuidReferencesMap,
0,
Cmds.Num() - 1,
bEnableRepNotifies ? &RepState->RepNotifies : nullptr
};
// Read the first handle, and then start receiving properties.
ReadPropertyHandle(Params);
if (ReceiveProperties_r(Params, StackParams))
{
return true;
}
return false;
这个ReceiveProperties_r与之前的CompareProperties_r一样,使用StackParams作为递归执行环境:
static bool ReceiveProperties_r(FReceivePropertiesSharedParams& Params, FReceivePropertiesStackParams& StackParams)
{
for (int32 CmdIndex = StackParams.CmdStart; CmdIndex < StackParams.CmdEnd; ++CmdIndex)
{
// 遍历所有的Cmd 获取ReadHandle对应的Cmd
const FRepLayoutCmd& Cmd = Params.Cmds[CmdIndex];
check(ERepLayoutCmdType::Return != Cmd.Type);
++StackParams.CurrentHandle;
if(StackParams.CurrentHandle != Params.ReadHandle)
{
// Skip this property.
if (ERepLayoutCmdType::DynamicArray == Cmd.Type)
{
CmdIndex = Cmd.EndCmd - 1;
}
continue;
}
const FRepParentCmd& Parent = Params.Parents[Cmd.ParentIndex];
if (ERepLayoutCmdType::DynamicArray == Cmd.Type)
{
// 处理TArray的数据同步
}
else
{
// 简单属性的数据同步
}
}
}
解析时根据读取出来的Handler获取对应的FRepLayoutCmd,这里很神奇的是客户端并没有一个直接的Handler到CmdIndex的映射,而是遍历所有的Cmd来处理的,非常的浪费CPU。得到了FRepLayoutCmd之后再根据FRepLayoutCmd::Type是否是DynamicArray走两个不同的处理机制:
-
如果不是
DynamicArray,直接调用ReceivePropertyHelper,这里又区分了两种情况:- 如果此属性不带属性变化通知,即
Property宏内没有声明ReplicatedUsing,则直接调用反序列化方法即可
Cmd.Property->NetSerializeItem(Bunch, Bunch.PackageMap, Data + SwappedCmd);- 如果此属性提供了属性变化通知函数,即
Property宏声明了ReplicatedUsing=xxx,则需要先保存当前旧的属性值,再从网络数据中获取新的属性值,然后构造通知回调:
// 先保存之前的值到ShadowData中 StoreProperty(Cmd, ShadowData + Cmd, Data + SwappedCmd); // 从Bunch中获取当前Property的新数据 Cmd.Property->NetSerializeItem(Bunch, Bunch.PackageMap, Data + SwappedCmd); UE_LOG(LogRepProperties, VeryVerbose, TEXT("ReceivePropertyHelper: NetSerializeItem (WithRepNotify)")); // 如果属性有变化 则将此Property加入到待通知集合中 if (Parent.RepNotifyCondition == REPNOTIFY_Always || !PropertiesAreIdentical(Cmd, ShadowData + Cmd, Data + SwappedCmd, NetSerializeLayouts)) { RepNotifies->AddUnique(Parent.Property); } - 如果此属性不带属性变化通知,即
-
如果是
DynamicArray,则准备开始递归,先构造好递归时所用的Param:FScriptArray* ShadowArray = (FScriptArray*)(StackParams.ShadowData + Cmd).Data; FScriptArray* ObjectArray = (FScriptArray*)(StackParams.ObjectData + Cmd).Data; // Setup a new Stack State for our array. FReceivePropertiesStackParams ArrayStackParams{ nullptr, nullptr, nullptr, CmdIndex + 1, Cmd.EndCmd - 1, StackParams.RepNotifies }; // These buffers will track the dynamic array memory. FRepObjectDataBuffer ObjectArrayBuffer = StackParams.ObjectData; FRepShadowDataBuffer ShadowArrayBuffer = StackParams.ShadowData;然后读取中当前
TArray传递过来的新的数组大小:uint16 ArrayNum = 0; Params.Bunch << ArrayNum;如果此时发现两者数组不等,则客户端对应的
TArray将调用Resize接口使两者数组大小相等,如果此属性还定义了ReplicatedUsing这个属性修改回调,则执行RepNotifies->AddUnique(Parent.Property)将当前TArray对应的Property加入到回调属性集合中。 完成上面这步之后,开始遍历新的TArray里的所有元素,尝试从Bunch中获取属性变化信息,这里就会递归的调用ReceiveProperties_r:const int32 ObjectArrayNum = ObjectArray->Num(); for (int32 i = 0; i < ObjectArrayNum; ++i) { // 获取当前Item的数据偏移 const int32 ElementOffset = i * Cmd.ElementSize; ArrayStackParams.ObjectData = ObjectArrayBuffer + ElementOffset; ArrayStackParams.ArrayElementOffset = ElementOffset; ArrayStackParams.ShadowData = (ShadowArrayBuffer && i < ShadowArray->Num()) ? (ShadowArrayBuffer + ElementOffset) : nullptr; ArrayStackParams.RepNotifies = ArrayStackParams.ShadowData ? StackParams.RepNotifies : nullptr; if (!ReceiveProperties_r(Params, ArrayStackParams)) { return false; } }处理结束之后,
Bunch里下一个Handler应该是0,代表一个TArray的相关数据结束:// Make sure we've hit the array terminator. if (0 != Params.ReadHandle) { UE_LOG(LogRep, Warning, TEXT("ReceiveProperties_r: Failed to receive property, Array Property Improperly Terminated - Property=%s, Parent=%d, CmdIndex=%d, ReadHandle=%d"), *Parent.CachedPropertyName.ToString(), Cmd.ParentIndex, CmdIndex, Params.ReadHandle); return false; }
在一个Bunch里的属性同步数据都解析并且属性更新到最新值之后,相关属性的修改通知回调才会被执行:
void FObjectReplicator::PostReceivedBunch()
{
// Call RepNotifies
CallRepNotifies(true);
}
上面的函数简单的转发到FRepLayout::CallRepNotifies,这里会遍历所有之前添加的有修改且需要通知回调的属性,找到对应的回调UFunction进行执行,根据回调参数的数量来决定是否更新对应的ShadowData:
void FRepLayout::CallRepNotifies(FReceivingRepState* RepState, UObject* Object) const
{
if (RepState->RepNotifies.Num() == 0)
{
return;
}
FRepShadowDataBuffer ShadowData(RepState->StaticBuffer.GetData());
FRepObjectDataBuffer ObjectData(Object);
for (FProperty* RepProperty : RepState->RepNotifies)
{
UFunction* RepNotifyFunc = Object->FindFunction(RepProperty->RepNotifyFunc);
const FRepParentCmd& Parent = Parents[RepProperty->RepIndex];
const int32 NumParms = RepNotifyFunc->NumParms;
switch (NumParms)
{
case 0:
{
Object->ProcessEvent(RepNotifyFunc, nullptr);
}
case 1:
{
FRepShadowDataBuffer PropertyData = ShadowData + Parent;
Object->ProcessEvent(RepNotifyFunc, PropertyData);
RepProperty->CopyCompleteValue(ShadowData + Parent, ObjectData + Parent);
}
case 2:
{
// some codes
}
}
}
RepState->RepNotifies.Empty();
RepState->RepNotifyMetaData.Empty();
}
UObject 指针类型同步
当一个UObject指针作为属性向下同步时,会调用这个FPorperty的序列化函数NetSerializeItem:
bool FObjectPropertyBase::NetSerializeItem( FArchive& Ar, UPackageMap* Map, void* Data, TArray<uint8> * MetaData ) const
{
UObject* Object = GetObjectPropertyValue(Data);
bool Result = Map->SerializeObject( Ar, PropertyClass, Object );
SetObjectPropertyValue(Data, Object);
return Result;
}
这里的UPackageMap::SerializeObject是一个虚方法,具体的实现在其子类UPackageMapClient之中。当序列化这个Object指针时,将其替换为对应的FNetworkGuid这个整数向下同步,反序列化时则读取这个FNetworkGuid并查询GuidCache这个映射结构来获取对应的Object指针:
bool UPackageMapClient::SerializeObject( FArchive& Ar, UClass* Class, UObject*& Object, FNetworkGUID *OutNetGUID)
{
if(Ar.IsSaving())
{
FNetworkGUID NetGUID = GuidCache->GetOrAssignNetGUID( Object );
// Write out NetGUID to caller if necessary
if (OutNetGUID)
{
*OutNetGUID = NetGUID;
}
// Write object NetGUID to the given FArchive
InternalWriteObject( Ar, NetGUID, Object, TEXT( "" ), NULL );
}
else if (Ar.IsLoading())
{
// ----------------
// Read NetGUID from stream and resolve object
// ----------------
NetGUID = InternalLoadObject(Ar, Object, 0);
// Write out NetGUID to caller if necessary
if (OutNetGUID)
{
*OutNetGUID = NetGUID;
}
}
}
这里可能有一种异常情况,即NetGuid对应的ActorChannel还没有创建,导致无法获取对应的UObject,此时会将这个NetGuid加入到待处理集合中:
if ( NetGUID.IsValid() && bShouldTrackUnmappedGuids && !GuidCache->IsGUIDBroken( NetGUID, false ) )
{
if ( Object == nullptr )
{
TrackedUnmappedNetGuids.Add( NetGUID );
}
else if ( NetGUID.IsDynamic() )
{
TrackedMappedDynamicNetGuids.Add( NetGUID );
}
}
然后在上层的接收属性同步的接口ReceivePropertyHelper中,判断当前属性解析是否遇到了一些待处理的NetGuid:
if (GuidReferencesMap)
{
const int32 AbsOffset = ElementOffset + SwappedCmd.Offset;
// Loop over all de-serialized network guids and track them so we can manage their pointers as their replicated reference goes in/out of relevancy
const TSet<FNetworkGUID>& TrackedUnmappedGuids = Bunch.PackageMap->GetTrackedUnmappedGuids();
const TSet<FNetworkGUID>& TrackedDynamicMappedGuids = Bunch.PackageMap->GetTrackedDynamicMappedGuids();
const bool bHasUnmapped = TrackedUnmappedGuids.Num()> 0;
FGuidReferences* GuidReferences = GuidReferencesMap->Find(AbsOffset);
if (TrackedUnmappedGuids.Num() > 0 || TrackedDynamicMappedGuids.Num()> 0)
{
if (GuidReferences == nullptr || bOutGuidsChanged)
{
// First time tracking these guids (or guids changed), so add (or replace) new entry
GuidReferencesMap->Add(AbsOffset, FGuidReferences(Bunch, Mark, TrackedUnmappedGuids, TrackedDynamicMappedGuids, Cmd.ParentIndex, CmdIndex));
bOutGuidsChanged = true;
}
}
}
如果出现了待处理的NetGuid,则会将对应属性的Offset,Cmd,ParentCmd等相关信息写入FObjectReplicator::GuidReferencesMap之中,等到合适的时机去读取这个GuidReferencesMap重新尝试。UE并没有选择在Actor创建时响应式的更新相关Uobject*属性,而是在NetDriver::Tick中执行FObjectReplicator::UpdateUnmappedObjects,不断查找每个属性unmappedGUID对应Actor是否已创建并和GUID建立关联。如果找到了,就仿照ReceivePropertyHelper代码重新执行一遍反序列化流程,执行完成之后,对应属性的RepNotify也会被执行。
// FObjectReplicator::UpdateUnmappedObjects
FNetDeltaSerializeInfo Parms;
Parms.Object = Object;
Parms.Connection = Connection;
Parms.bInternalAck = Connection->IsInternalAck();
Parms.Map = Connection->PackageMap;
Parms.NetSerializeCB = &NetSerializeCB;
Parms.bUpdateUnmappedObjects = true;
// Let the rep layout update any unmapped properties
LocalRepLayout.UpdateUnmappedObjects(ReceivingRepState, Connection->PackageMap, Object, Parms, bCalledPreNetReceive, bSomeObjectsWereMapped, bOutHasMoreUnmapped);
bSomeObjectsWereMapped |= Parms.bOutSomeObjectsWereMapped;
bOutHasMoreUnmapped |= Parms.bOutHasMoreUnmapped;
bCalledPreNetReceive |= Parms.bCalledPreNetReceive;
if (bCalledPreNetReceive)
{
// If we mapped some objects, make sure to call PostNetReceive (some game code will need to think this was actually replicated to work)
PostNetReceive();
UpdateGuidToReplicatorMap();
}
CallRepNotifies(false);
假如我们有一个Tarray<AActor*> 的同步属性, 这个属性被修改并发送对应Diff数据到客户端之后, 客户端首先走第一轮属性同步更新TArray的大小以及设置好每个Item的指针值。如果某个Item对应的AActor*暂时无法根据传递过来的NetworkGuid查找到,则对应Item的指针值为nullptr,并记录到GuidReferencesMap之中。完成上面的步骤之后会触发设置好的属性回调函数,此时我们唯一能确定的是此回调函数执行时数组的最新大小是正确的,而内部元素的指针值不保证与服务器一样。 如果内部那些没有被同步到的指针被重新定位到了,则对应Item的值会被正确的修改并再次调用回调函数。由于不同的AActor客户端收到的时机无法得到顺序上的保证,每个Item的指针绑定时机是不确定的,可能跨越多次NetDriver::Tick从而导致出现多次属性修改回调,这个在编写客户端属性回调逻辑时需要非常注意。
Pushmodel介绍
UE的属性同步的时候,会对当前UObject上的所有属性进行一次属性diff操作,如果diff操作发现某个属性的最新值与shadown buffer里的记录值不一样,则会使用diff出来的changelist加入到这个UObject的所有连接上的Object Replicator里。这种遍历对比的方法对于使用者来说非常友好,因为任何对同步属性的修改都不需要去考虑如何同步到其他客户端。同步属性与非同步属性对于业务来说基本透明,顶多需要关心一下同步属性的最新值到达客户端之后的OnRep回调触发。但是这种易用性是有代价的,因为需要对所有的属性都做一次diff操作。当一个UObject上的属性数量达到十几个的时候,这部分的消耗会无法忽视。然后Actor上可以挂载非常多的ActorComponent,每次同步Actor的时候,属性对比不仅仅需要计算Actor自身的属性,而且还要计算所有挂载在这个Actor上的ActorComponent上的属性。当项目进行到中期,随着Actor/ActorComponent数量越来愈多,单一Actor上的所有ActorComponent的同步属性数量轻轻松松超过100,甚至以百为单位。特别是Actor数量也变得很多的额时候,属性对比的消耗也从之前的无法忽视变得无法接受,所以UE 4.25中引入了PushModel来尝试解决这个全量属性对比引发的性能问题。
优化大量属性的diff消耗,最重要的是要避免那些没有被修改过的属性的diff, 默认情况下会对所有属性执行CompareParentPropertyHelper:
for (int32 ParentIndex = 0; ParentIndex < SharedParams.Parents.Num(); ++ParentIndex)
{
CompareParentPropertyHelper(ParentIndex, SharedParams, StackParams);
}
PushModel系统的作用就是对每一个属性提供一个是否修改过的标记位,这样在属性对比之前会首先查询这个标记位是否被置为1,如果不是1则跳过,这部分逻辑封装在一个IsPropertyDirty函数里。 有了这个快速判断属性是否被修改的标记位之后,前述的属性遍历diff代码就变成了这样:
UE_LOG(LogRepCompares, VeryVerbose, TEXT("CompareParentProperties: Default"));
for (int32 ParentIndex = 0; ParentIndex < SharedParams.Parents.Num(); ++ParentIndex)
{
if (IsPropertyDirty(ParentIndex, bRecentlyCollectedGarbage, SharedParams, StackParams))
{
CompareParentPropertyHelper(ParentIndex, SharedParams, StackParams);
}
}
前述的标记位判定其实是对于IsPropertyDirty这个函数的过于简化,实现上要考虑的东西比一个bit多多了:
#if WITH_PUSH_MODEL
static bool IsPropertyDirty(
const int32 ParentIndex,
const bool bRecentlyCollectedGarbage,
const FComparePropertiesSharedParams& SharedParams,
FComparePropertiesStackParams& StackParams)
{
return SharedParams.bForceCompareProperties ||
!(*SharedParams.PushModelProperties)[ParentIndex] || // non-push model properties are always considered dirty
SharedParams.PushModelState->IsPropertyDirty(ParentIndex) ||
(bRecentlyCollectedGarbage &&
EnumHasAnyFlags(SharedParams.Parents[ParentIndex].Flags, ERepParentFlags::HasObjectProperties | ERepParentFlags::IsNetSerialize));
}
#endif // WITH_PUSH_MODEL
这里我们重点关注PushModel相关的变量:
SharedParams.PushModelProperties是一个bit数组,代表对应的属性字段是否支持PushModelSharedParams.PushModelState内部维护了一个bit数组PropertyDirtyStates,代表对应的属性字段在上次对比之后是否被修改过
bool IsPropertyDirty(const uint16 RepIndex) const
{
return PropertyDirtyStates[RepIndex];
}
从这两个bit数组可以看出,一个属性如果想利用PushModel系统来避免不必要的属性diff,需要做两个事情:为当前属性开启PushModel的支持,以及修改之后通知PushModel。
为一个属性开启PushModel的支持很简单,不需要在声明同步属性的时候做额外的修改,只需要在GetLifetimeReplicatedProps注册同步属性的时候带上一个额外参数:
void AExampleActor::GetLifetimeReplicatedProps(TArray<FLifetimeProperty>& OutLifetimeProps) const
{
// PlayMode1被注册为了一个不支持pushmodel的属性
DOREPLIFETIME(AExampleActor, PlayMode1);
// PlayMode2 被注册为了一个支持pushmodel的属性
FDoRepLifetimeParams Params;
Params.bIsPushBased = true;
DOREPLIFETIME_WITH_PARAMS_FAST(AExampleActor, PlayMode2, Params);
};
其实DOREPLIFETIME与DOREPLIFETIME_WITH_PARAMS_FAST这两个宏的差异就是一个使用了默认初始化的FDoRepLifetimeParams,一个使用了手动赋值的FDoRepLifetimeParams。
在一个UClass被加载的时候,会执行所有同步属性的收集来生成对应的FRepLayout,这里会根据对应的FDoRepLifetimeParams是否开启了bIsPushBased来决定PushModelProperties这个bit数组对应的位置是否为1:
void FRepLayout::InitFromClass(
UClass* InObjectClass,
const UNetConnection* ServerConnection,
const ECreateRepLayoutFlags CreateFlags)
{
SCOPE_CYCLE_COUNTER(STAT_RepLayout_InitFromObjectClass);
const bool bIsPushModelEnabled = IS_PUSH_MODEL_ENABLED();
// 省略很多代码
#if WITH_PUSH_MODEL
PushModelProperties.Init(false, Parents.Num());
#endif
// Setup lifetime replicated properties
for (int32 i = 0; i < LifetimeProps.Num(); i++)
{
const int32 ParentIndex = LifetimeProps[i].RepIndex;
// 省略很多代码
if (!EnumHasAnyFlags(Parents[ParentIndex].Flags, ERepParentFlags::IsCustomDelta))
{
// 省略很多代码
++NumberOfLifetimeProperties;
#if WITH_PUSH_MODEL
if (bIsPushModelEnabled && LifetimeProps[i].bIsPushBased)
{
++NumberOfLifetimePushModelProperties;
PushModelProperties[ParentIndex] = true;
}
#endif
}
}
}
这样就完成了一个属性的PushModel支持注册,剩下的另外一个工作就是每次修改对应属性的时候通知PushModel系统去修改PropertyDirtyStates的对应bit。这部分工作在UE里可以使用宏来操作,每次在赋值所在位置加上一个MARK_PROPERTY_DIRTY_FROM_NAME宏即可,至于在赋值前还是在赋值后并不重要,只要在修改的同一帧里加上这个宏即可,多次执行的结果与执行一次的结果是一样的:
MARK_PROPERTY_DIRTY_FROM_NAME(AExampleActor, PlayMode2, this);
PlayMode2 = 1;
这个宏展开之后,就会变成这样的代码,这里的AExampleActor::ENetFields_Private::PlayMode2是UHT自动为每个同步属性都会生成的索引:
{
const UEPushModelPrivate::FNetPushObjectId PrivatePushId(this->GetNetPushId());
UEPushModelPrivate::MarkPropertyDirty(this, PrivatePushId, (int32)AExampleActor::ENetFields_Private::PlayMode2);
}
内部调用的MarkPropertyDirty负责真正的执行bit赋值操作:
void UEPushModelPrivate::MarkPropertyDirty(const UObject* Object, const FNetPushObjectId ObjectId, const int32 RepIndex)
{
// 省略无关代码
{
PushObjectManager.MarkPropertyDirty(ObjectId.GetLegacyPushObjectId(), RepIndex);
}
}
void FPushModelObjectManager_CustomId::MarkPropertyDirty(const FNetLegacyPushObjectId ObjectId, const int32 RepIndex)
{
const int32 ObjectIndex = ObjectId;
if (LIKELY(PerObjectStates.IsValidIndex(ObjectIndex)))
{
// The macros will take care of filtering out invalid objects, so we don't need to check here.
PerObjectStates[ObjectIndex].MarkPropertyDirty(static_cast<uint16>(RepIndex));
}
}
void FPushModelPerObjectState::MarkPropertyDirty(const uint16 RepIndex)
{
DirtiedThisFrame[RepIndex] = true;
bHasDirtyProperties = true;
}
最后被修改的bit数组是FPushModelPerObjectState::DirtiedThisFrame, 并不是我们所期望的FPushModelPerNetDriverState::PropertyDirtyStates数组,不要慌。在属性同步Tick的开头会调用PushDirtyStateToNetDrivers将当前的DirtiedThisFrame推送到PropertyDirtyStates上,然后将DirtiedThisFrame清空:
/**
* Pushes the current dirty state of the Push Model Object to each of the Net Driver States.
* and then reset the dirty state.
*/
void FPushModelPerObjectState::PushDirtyStateToNetDrivers()
{
if (bHasDirtyProperties)
{
for (FPushModelPerNetDriverState& NetDriverObject : PerNetDriverStates)
{
NetDriverObject.MarkPropertiesDirty(DirtiedThisFrame);
}
ResetBitArray(DirtiedThisFrame);
bHasDirtyProperties = false;
}
}
void FPushModelPerNetDriverState::MarkPropertiesDirty(const TBitArray<>& OtherBitArray)
{
BitwiseOrBitArrays(OtherBitArray, PropertyDirtyStates);
bHasDirtyProperties = true;
}
所以我们只要在cpp代码里将所有修改这个PushModel属性的地方加上MARK_PROPERTY_DIRTY_FROM_NAME,就完成了修改属性的手动标记工作,执行属性diff之前会获取这个bit数组副本来加速未修改属性的过滤操作,从而降低了不必要的属性diff开销。
但是仅仅在cpp代码里对这些属性做修改标记是不够的,因为属性还可以在蓝图中被修改。为了覆盖到所有对这些PushModel属性修改,UE还对蓝图里的属性设置节点做了MarkPropertyDirty支持。蓝图编译器在编译所有的Set和OutRef节点时,如果项目启用了PushModel特性,会额外插入一个不可见的MarkDirtyNode节点。
void FKCHandler_VariableSet::Transform(FKismetFunctionContext& Context, UEdGraphNode* Node)
{
// Expands node out to include a (local) call to the RepNotify function if necessary
UK2Node_VariableSet* SetNotify = Cast<UK2Node_VariableSet>(Node);
// If property is HasFieldNotificationBroadcast, then the net code and broadcast will be executed in native code.
if (SetNotify && !SetNotify->HasFieldNotificationBroadcast())
{
// 省略很多无关代码
if (SetNotify->IsNetProperty())
{
/**
* This code is for property dirty tracking.
* It works by injecting in extra nodes while compiling that will call UNetPushModelHelpers::MarkPropertyDirtyFromRepIndex.
* See FKCPushModelHelpers::ConstructMarkDirtyNodeForProperty for node generation.
*/
if (FProperty * Property = SetNotify->GetPropertyForVariable())
{
if (UEdGraphNode * MarkPropertyDirtyNode = FKCPushModelHelpers::ConstructMarkDirtyNodeForProperty(Context, Property, Node->FindPinChecked(UEdGraphSchema_K2::PN_Self)))
{
// Hook up our exec pins.
UEdGraphPin* OldThenPin = Node->FindPinChecked(UEdGraphSchema_K2::PN_Then);
UEdGraphPin* NewThenPin = MarkPropertyDirtyNode->FindPinChecked(UEdGraphSchema_K2::PN_Then);
UEdGraphPin* NewInPin = MarkPropertyDirtyNode->FindPinChecked(UEdGraphSchema_K2::PN_Execute);
NewThenPin->CopyPersistentDataFromOldPin(*OldThenPin);
OldThenPin->BreakAllPinLinks();
OldThenPin->MakeLinkTo(NewInPin);
}
}
}
}
}
这里会生成一个中间节点UK2Node_CallFunction,插入到当前的VariableSet节点与其后续节点之间。
UEdGraphNode* FKCPushModelHelpers::ConstructMarkDirtyNodeForProperty(FKismetFunctionContext& Context, FProperty* RepProperty, UEdGraphPin* PropertyObjectPin)
{
static const FName MarkPropertyDirtyFuncName(TEXT("MarkPropertyDirtyFromRepIndex"));
static const FName ObjectPinName(TEXT("Object"));
static const FName RepIndexPinName(TEXT("RepIndex"));
static const FName PropertyNamePinName(TEXT("PropertyName"));
// Create the node that will call MarkPropertyDirty.
UK2Node_CallFunction* MarkPropertyDirtyNode = Context.SourceGraph->CreateIntermediateNode<UK2Node_CallFunction>();
MarkPropertyDirtyNode->FunctionReference.SetExternalMember(MarkPropertyDirtyFuncName, UNetPushModelHelpers::StaticClass());
MarkPropertyDirtyNode->AllocateDefaultPins();
// Create the Pins for RepIndex, PropertyName, and Object.
UEdGraphPin* RepIndexPin = MarkPropertyDirtyNode->FindPinChecked(RepIndexPinName);
RepIndexPin->DefaultValue = FString::FromInt(RepProperty->RepIndex);
UEdGraphPin* PropertyNamePin = MarkPropertyDirtyNode->FindPinChecked(PropertyNamePinName);
PropertyNamePin->DefaultValue = RepProperty->GetFName().ToString();
}
这个UK2Node_CallFunction节点会执行MarkPropertyDirtyFromRepIndex这个暴露给蓝图的函数:
UFUNCTION(BlueprintCallable, Category = "Networking", Meta=(BlueprintInternalUseOnly = "true", HidePin = "Object|RepIndex|PropertyName"))
static ENGINE_API void MarkPropertyDirtyFromRepIndex(UObject* Object, int32 RepIndex, FName PropertyName);
void UNetPushModelHelpers::MarkPropertyDirtyFromRepIndex(UObject* Object, int32 RepIndex, FName PropertyName)
{
#if WITH_PUSH_MODEL
if (Object && IS_PUSH_MODEL_ENABLED())
{
UClass* Class = Object->GetClass();
if (Class->HasAnyClassFlags(CLASS_ReplicationDataIsSetUp))
{
if (RepIndex < INDEX_NONE || RepIndex >= Class->ClassReps.Num())
{
UE_LOG(LogNet, Warning, TEXT("UNetPushModelHelpers::MarkPropertyDirtyFromRepIndex: Invalid Rep Index. Class %s RepIndex %d"), *Class->GetPathName(), RepIndex);
}
else
{
#if WITH_PUSH_VALIDATION_SUPPORT
checkf(!UEPushModelPrivate::bCheckPushBPRepIndexAgainstName || Class->ClassReps[RepIndex].Property->GetFName() == PropertyName,
TEXT("Property and RepIndex don't match! Object=%s, RepIndex=%d, InPropertyName=%s, FoundPropertyName=%s"),
*Object->GetPathName(), RepIndex, *PropertyName.ToString(), *(Class->ClassReps[RepIndex].Property->GetName()));
#endif
MARK_PROPERTY_DIRTY_UNSAFE(Object, RepIndex);
}
}
}
#endif
}
这里绝大部分的代码都是在做一些开关和合法性的校验,最终执行的是MARK_PROPERTY_DIRTY_UNSAFE这个宏:
// Marks a property dirty by RepIndex without doing additional rep index validation.
#define MARK_PROPERTY_DIRTY_UNSAFE(Object, RepIndex) CONDITIONAL_ON_OBJECT_NET_ID_DYNAMIC(Object, UEPushModelPrivate::MarkPropertyDirty(Object, PrivatePushId, RepIndex))
// Marks a property dirty by UProperty*, validating that it's actually a replicated property.
#define MARK_PROPERTY_DIRTY(Object, Property) CONDITIONAL_ON_REP_INDEX_AND_OBJECT_NET_ID(Object, Property, UEPushModelPrivate::MarkPropertyDirty(Object, PrivatePushId, Property->RepIndex))
// Marks a property dirty, given the Class Name, Property Name, and Object. This will fail to compile if the Property or Class aren't valid.
#define MARK_PROPERTY_DIRTY_FROM_NAME(ClassName, PropertyName, Object) CONDITIONAL_ON_OBJECT_NET_ID(Object, UEPushModelPrivate::MarkPropertyDirty(Object, PrivatePushId, GET_PROPERTY_REP_INDEX(ClassName, PropertyName)))
这个宏与我们之前使用的MARK_PROPERTY_DIRTY_FROM_NAME宏其实大同小异,省去了GET_PROPERTY_REP_INDEX部分,这部分负责用宏拼接出来属性的索引,而MARK_PROPERTY_DIRTY_UNSAFE我们已经知道属性索引了。
所以蓝图在修改同步属性的时候,如果发现项目里开启了PushModel的支持,则修改之后会自动调用UEPushModelPrivate::MarkPropertyDirty来增加属性修改标记,这样就做到了属性自动标脏。
如果一个UObject上的所有同步属性都开启了PushModel,FRepLayout::InitFromClass来收集同步属性的时候会将这个FRepLayout标记为ERepLayoutFlags::FullPushSupport:
// FRepLayout::InitFromClass
#if WITH_PUSH_MODEL
if (bIsPushModelEnabled && ((NumberOfLifetimePushModelProperties > 0) || (NumberOfFastArrayPushModelProperties > 0)))
{
const bool bFullPushProperties = (NumberOfLifetimeProperties == NumberOfLifetimePushModelProperties);
if (bFullPushProperties)
{
Flags |= ERepLayoutFlags::FullPushProperties;
}
Flags |= (bFullPushProperties && (NumberOfFastArrayProperties == NumberOfFastArrayPushModelProperties)) ?
ERepLayoutFlags::FullPushSupport :
ERepLayoutFlags::PartialPushSupport;
}
#endif
那么在做属性对比的时候可以走更快的路径,只遍历修改bit数组PushModelState里对应bit为1的属性,而不是之前的遍历所有的同步属性:
// CompareParentProperties 函数
// If we have full push model property support, then we only need to check properties that are actually dirty.
else if (EnumHasAnyFlags(SharedParams.Flags, ERepLayoutFlags::FullPushProperties) && !bRecentlyCollectedGarbage)
{
UE_LOG(LogRepCompares, VeryVerbose, TEXT("CompareParentProperties: Full push properties: Has Dirty: %d"), !!SharedParams.PushModelState->HasDirtyProperties());
for (TConstSetBitIterator<> It = SharedParams.PushModelState->GetDirtyProperties(); It; ++It)
{
CompareParentPropertyHelper(It.GetIndex(), SharedParams, StackParams);
}
}
FFastArray介绍
PushModel的引入可以有效的降低不必要的属性对比消耗,所以推荐项目组里尽量将所有的同步属性都注册为支持PushModel的,这样FullPushSupport可以尽最大的可能去优化属性同步的效率。不过对于频繁修改的TArray容器,即使引入PushModel也收效甚微。因为容器内的元素很多的时候,即使只修改其中一个元素,在进行属性对比的时候执行的是容器内所有元素的对比,这个在容器内元素比较多的时候会显得格外突出。如果可以将MARK_DIRTY的力度从整个TArray缩小到TArray里的一个元素的话,对应的属性对比的性能应该可以极大的提高。基于这种思想, UE提供了支持元素级别MARK_DIRTY的FFastArray。
使用FFastArray比使用TArray复杂了很多,首先我们需要为数组里的元素定义一个继承自FFastArraySerializerItem的USTRUCT:
/** Step 1: Make your struct inherit from FFastArraySerializerItem */
USTRUCT()
struct FExampleItemEntry : public FFastArraySerializerItem
{
GENERATED_USTRUCT_BODY()
// Your data:
UPROPERTY()
int32 ExampleIntProperty;
UPROPERTY()
float ExampleFloatProperty;
/** Optional functions you can implement for client side notification of changes to items */
void PreReplicatedRemove();
void PostReplicatedAdd();
void PostReplicatedChange();
};
在这个FExampleItemEntry里我们除了可以提供要同步的属性字段定义之外,还可以提供Item被修改时的客户端同步回调:
PreReplicatedRemove这个代表的是当前元素删除之前的通知PostReplicatedAdd这个代表的是当前元素被添加到FFastArray时的通知PostReplicatedChange这个代表的是当前元素里字段被修改的通知
有了FExampleItemEntry之后,我们才能声明对应的FFastArray:
/** Step 2: You MUST wrap your TArray in another struct that inherits from FFastArraySerializer */
USTRUCT()
struct FExampleArray: public FFastArraySerializer
{
GENERATED_USTRUCT_BODY()
UPROPERTY()
TArray<FExampleItemEntry> Items; /** Step 3: You MUST have a TArray named Items of the struct you made in step 1. */
/** Step 4: Copy this, replace example with your names */
bool NetDeltaSerialize(FNetDeltaSerializeInfo & DeltaParms)
{
return FastArrayDeltaSerialize<FExampleItemEntry>( Items, DeltaParms );
}
};
这里声明了NetDeltaSerialize函数,实现上直接转接到FastArrayDeltaSerialize,配合TStructOpsTypeTraits一起使用,来通知属性管理系统执行当前结构体的属性diff的时候使用的是FFastArray的对比逻辑:
/** Step 5: Copy and paste this struct trait, replacing FExampleArray with your Step 2 struct. */
template<>
struct TStructOpsTypeTraits< FExampleArray > : public TStructOpsTypeTraitsBase
{
enum
{
WithNetDeltaSerializer = true,
};
};
然后在操作FFastArraySerializer时,会提供MarkItemDirty和MarkArrayDirty接口来细粒度的对内部的元素进行操作记录:
/** Base struct for wrapping the array used in Fast TArray Replication */
USTRUCT()
struct FFastArraySerializer
{
GENERATED_USTRUCT_BODY()
FFastArraySerializer()
: IDCounter(0)
, ArrayReplicationKey(0)
#if WITH_PUSH_MODEL
, OwningObject(nullptr)
, RepIndex(INDEX_NONE)
#endif // WITH_PUSH_MODEL
, CachedNumItems(INDEX_NONE)
, CachedNumItemsToConsiderForWriting(INDEX_NONE)
, DeltaFlags(EFastArraySerializerDeltaFlags::None)
{
SetDeltaSerializationEnabled(true);
}
~FFastArraySerializer() {}
/** Maps Element ReplicationID to Array Index.*/
TMap<int32, int32> ItemMap;
/** Counter used to assign IDs to new elements. */
int32 IDCounter;
/** Counter used to track array replication. */
UPROPERTY(NotReplicated)
int32 ArrayReplicationKey;
/** List of items that need to be re-serialized when the referenced objects are mapped */
TMap<int32, FFastArraySerializerGuidReferences> GuidReferencesMap;
/** List of items that need to be re-serialized when the referenced objects are mapped.*/
TMap<int32, FGuidReferencesMap> GuidReferencesMap_StructDelta;
#if WITH_PUSH_MODEL
// Object that is replicating this fast array
UObject* OwningObject;
// Property index of this array in the owning object's replication layout
int32 RepIndex;
#endif // WITH_PUSH_MODEL
/** This must be called if you add or change an item in the array */
void MarkItemDirty(FFastArraySerializerItem & Item);
/** This must be called if you just remove something from the array */
void MarkArrayDirty();
// 省略其他函数声明
}
不过这两个接口并不会自动的调用,而是需要在每次做修改操作的时候来手动的调用:
//增加元素
int index = Items.Add(FExampleItemEntry());
MarkItemDirty(Items[index]);
//修改元素
Items[index].ExampleIntProperty = NewExampleIntProperty;
MarkItemDirty(Items[index]);
//删除元素
Items.RemoveAt(index);
MarkArrayDirty();
其实更好的做法时直接将Items作为protected成员,对外只提供Add,Update,Remove接口。
每次执行MarkArrayDirty的时候,这个FFastArraySerializer存储的ArrayReplicationKey就会自增,并通知属性PushModel管理器去标记当前的FastArray已经被修改了:
void MarkArrayDirty()
{
ItemMap.Reset(); // This allows to clients to add predictive elements to arrays without affecting replication.
IncrementArrayReplicationKey();
// Invalidate the cached item counts so that they're recomputed during the next write
CachedNumItems = INDEX_NONE;
CachedNumItemsToConsiderForWriting = INDEX_NONE;
}
void IncrementArrayReplicationKey()
{
ArrayReplicationKey++;
if (ArrayReplicationKey == INDEX_NONE)
{
ArrayReplicationKey++;
}
#if WITH_PUSH_MODEL
if (OwningObject != nullptr && RepIndex != INDEX_NONE)
{
MARK_PROPERTY_DIRTY_UNSAFE(OwningObject, RepIndex);
}
#endif // WITH_PUSH_MODEL
}
这里的ArrayReplicationKey的作用就是标记当前FastArray的数据版本号,用来在属性对比的时候与ShadowBuffer里存储的ArrayReplicationKey做对比,所以这个属性被声明为不参与属性同步。
然后在修改或者添加一个Item的时候,需要执行MarkItemDirty, 这里Item的ReplicationID是作为当前Item的唯一标识符来使用的,如果为INDEX_NONE代表是新添加的元素,此时利用Array里的IDCounter自增创建来初始化,之后就不再被修改:
void MarkItemDirty(FFastArraySerializerItem & Item)
{
if (Item.ReplicationID == INDEX_NONE)
{
Item.ReplicationID = ++IDCounter;
if (IDCounter == INDEX_NONE)
{
IDCounter++;
}
}
Item.ReplicationKey++;
MarkArrayDirty();
}
然后Item.ReplicationKey代表的是当前Item的修改次数,每次修改或者添加的时候都执行自增操作。
了解了这些辅助字段的定义之后,我们就大概可以猜到FFastArray时如何快速的做属性diff的:
- 首先判断当前
FFastArray的ArrayReplicationKey是否有改变,如果没有代表当前FFastArray没有变化,可以跳过对比 - 然后遍历所有的
Item,判断其ReplicationKey是否有改变,如果没有则这个Item不需要处理属性对比,如果有则执行真正的属性对比
由于数组中删除一个元素会导致后续的所有元素都向前移位,这样会导致很多Item都会生成属性diff,导致属性对比的消耗和下发的diff结果数据大小都激增,所以在FFastArray里对一个Item做属性对比的时候其对比目标并不是ShadowBuffer里同位置的Item,而是ShadowBuffer里拥有同样的ReplicationID的Item。为了方便的通过ReplicationID找到对应的Item所在的索引,FFastArraySerializer上构造了一个TMap<int32, int32> ItemMap;的成员变量来加速查询。
有了这个ReplicationID做Item的唯一标识符之后,在FFastArraySerializer里删除一个元素可以进一步优化,没必要走TArray的Remove操作,因为这样会导致后续所有元素被移动。取而代之的是使用了RemoveAtSwap操作,直接与最后一个元素做Swap然后Pop,这样就避免了大量元素的移动。
同时由于属性同步的时候会合并多次操作的数据diff进行下发,这样会导致客户端的元素移动回放顺序可能与服务端不一样,并最终导致客户端的TArray与服务端的TArray里元素的顺序不一样。所以业务在使用FFastArray的时候,不能依赖于Item在TArray里的索引,只能把TArray当作一个TSet来使用,真正的Item标识符只能使用ReplicationID。
FastArrayDeltaSerialize的实现其实远比这里的描述复杂,代码量太大,相关代码有2000多行,过于高级,因此本文不去展示其细节,有兴趣的读者可以自己去看源代码。
UE 属性同步总结
前面我们使用了将近20页的篇幅来介绍了UE自带的属性同步系统的底层实现机制,总体同步流程可以概括为如下几步:
- 客户端服务端都从
UClass构建对应的FRepLayout来登记所有的参与网络同步的属性 - 根据
FRepLayout创建FRepParentCmd数组和FRepLayoutCmd数组,用来记录每个底层属性的大小、偏移值、类型值、序列化函数、比较函数等信息 - 根据
FRepLayout创建ShadowBuffer- 服务端用
ShadowBuffer记录比较前所有属性的值,属性Diff完成之后使用属性的最新值修改此ShadowBuffer - 客户端用
ShadowBuffer去记录所有带修改回调的属性的同步前的值, 属性回放完成后使用属性的最新值修改此ShadowBuffer
- 服务端用
- 服务器在
FrameTick的末尾,对所有的Actor执行CompareProperties来进行属性Diff,根据对比结果生成Changed数组,然后使用FRepLayout::SendProperties生成若干ID连续的ChangeHistory,然后每个ActorChannel计算需要往客户端发送有序ID的FRepLayout::ChangeHistory集合,打包为一个或者多个不可靠Bunch进行发送 - 客户端接收到
Bunch之后,如果Bunch内有属性同步数据,则会找到对应ActorChannel的FRepLayout的ReceiveProperties进行属性更新,更新完成之后再调用相关属性的更新回调函数
由于整个系统比较庞大,篇幅所限本文将不去介绍属性同步中的相关高级特性,其中值得注意的高级特性包括:
PushModel,用来手动标记一些属性不参与Diff流程,而是业务层手动标记其为dirty状态,这样可以节省很多Diff时的CpuTFastArray,TArray中Remove一个Item时Changed数组会加入该Item及之后所有Item的索引,此时不仅会浪费很多时间在执行Diff上,更重要的是浪费了很多带宽,TFastArray通过实现NetDeltaSerialize来跳过通用的属性Diff,内部提供了机制来优化对Remove的处理以减少带宽WithNetSharedSerialization,FRepLayout::SendProperties在给每个对应的ActorChannel进行数据打包时会将同一个属性多次序列化,使用了WithNetSharedSerialization之后就会在同一帧中对同一个属性只序列化第一次,这个序列化结果可以在多个ActorChannel中共享
Unreal Engine 的 Actor 同步
UE中Actor上的同步设置
Unreal在默认情况下Actor的网络同步是关闭的。要开启特定Actor的网络同步需要手动设置Actor的bReplicates属性为true,也可以调用AActor::SetReplicates方法来设置该变量。
AShooterCharacter::AShooterCharacter ()
{
SetReplicates(true);
}
一个World中参与网络同步的Actor数量可以达到非常多,因此我们不能将此Actor同步到当前连接到服务器的所有客户端,我们可以在Actor上设置一些参数以方便服务端针对每个客户端连接计算出一个合适的同步Actor集合:
- 设置为
AlwaysRelevant,这样此Actor会同步到所有客户端 - 设置
NetCullDistanceSquared让距离Actor的一定范围的人得到同步,注意这里是同步范围的平方,主要是为了避免后续计算距离的时候使用开平方,直接使用距离的平方进行比较即可,默认设置下值为225000000,即同步范围为15000cm - 设置
bOnlyRelevantToOwner让Actor所有者同步信息 例如APlayerController - 重写
IsNetRelevantFor自定义网络相关性设置要不要给特定客户端连接进行同步
bool AActor::IsNetRelevantFor(const AActor* RealViewer, const AActor* ViewTarget, const FVector& SrcLocation);
Net Dormancy这个配置此Actor是否参与Connection的网络同步DORM_Awake状态时才会计算这个Actor是否与某个Connection关联,这个是默认状态DORM_Initial时代表Connection只会对此Actor做最初始的同步,后续不再参与该Connection的同步集合计算DORM_DormantAll时不再参与同步DORM_DormantPartial代表此Actor内部维护了一个Connection集合,只参与集合内的Connection的同步集合计算 运行时可以修改这个字段的值来切换休眠状态,或者临时性的同步一些状态到客户端之后继续休眠,常用来管理更新频率极低的Actor
- 网络更新频率
Net Update Frequency、网络最小更新频率Min Net Update Frequency和网络优先级Net Priority都会参与Connection的同步Actor集合的优先级排序
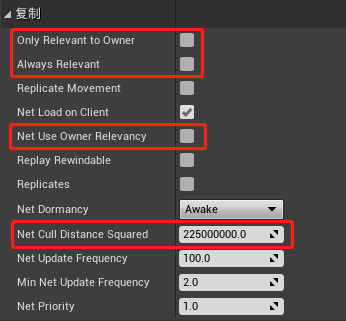
值得注意的是这里的Actor同步范围不再是由客户端连接来确定,而是每个参与网络同步的Actor自己通过NetCullDistanceSquared来往这个距离内的客户端连接进行推送。这个与前面我们介绍的AOI算法中的aoi_entity->radius是不一样的,aoi_entity->radius代表与当前aoi_entity(M)会拉取距离小于radius的其他aoi_entity(N)并通过网络同步到aoi_entity(M)的客户端上。下图中的左边就是基于拉取半径的网络对象同步,其中A, B是拥有客户端连接的对象,因此有半径,而C, D则是无客户端连接的对象,其半径为0。而图右则代表了UE采取的推送模式,A,B,C,D每个对象都有一个推送半径,如果一个Actor(M)的推送半径内有一个客户端操纵的Actor(N),则Actor(M)就会被加入到Actor(N)的同步Actor集合之中。
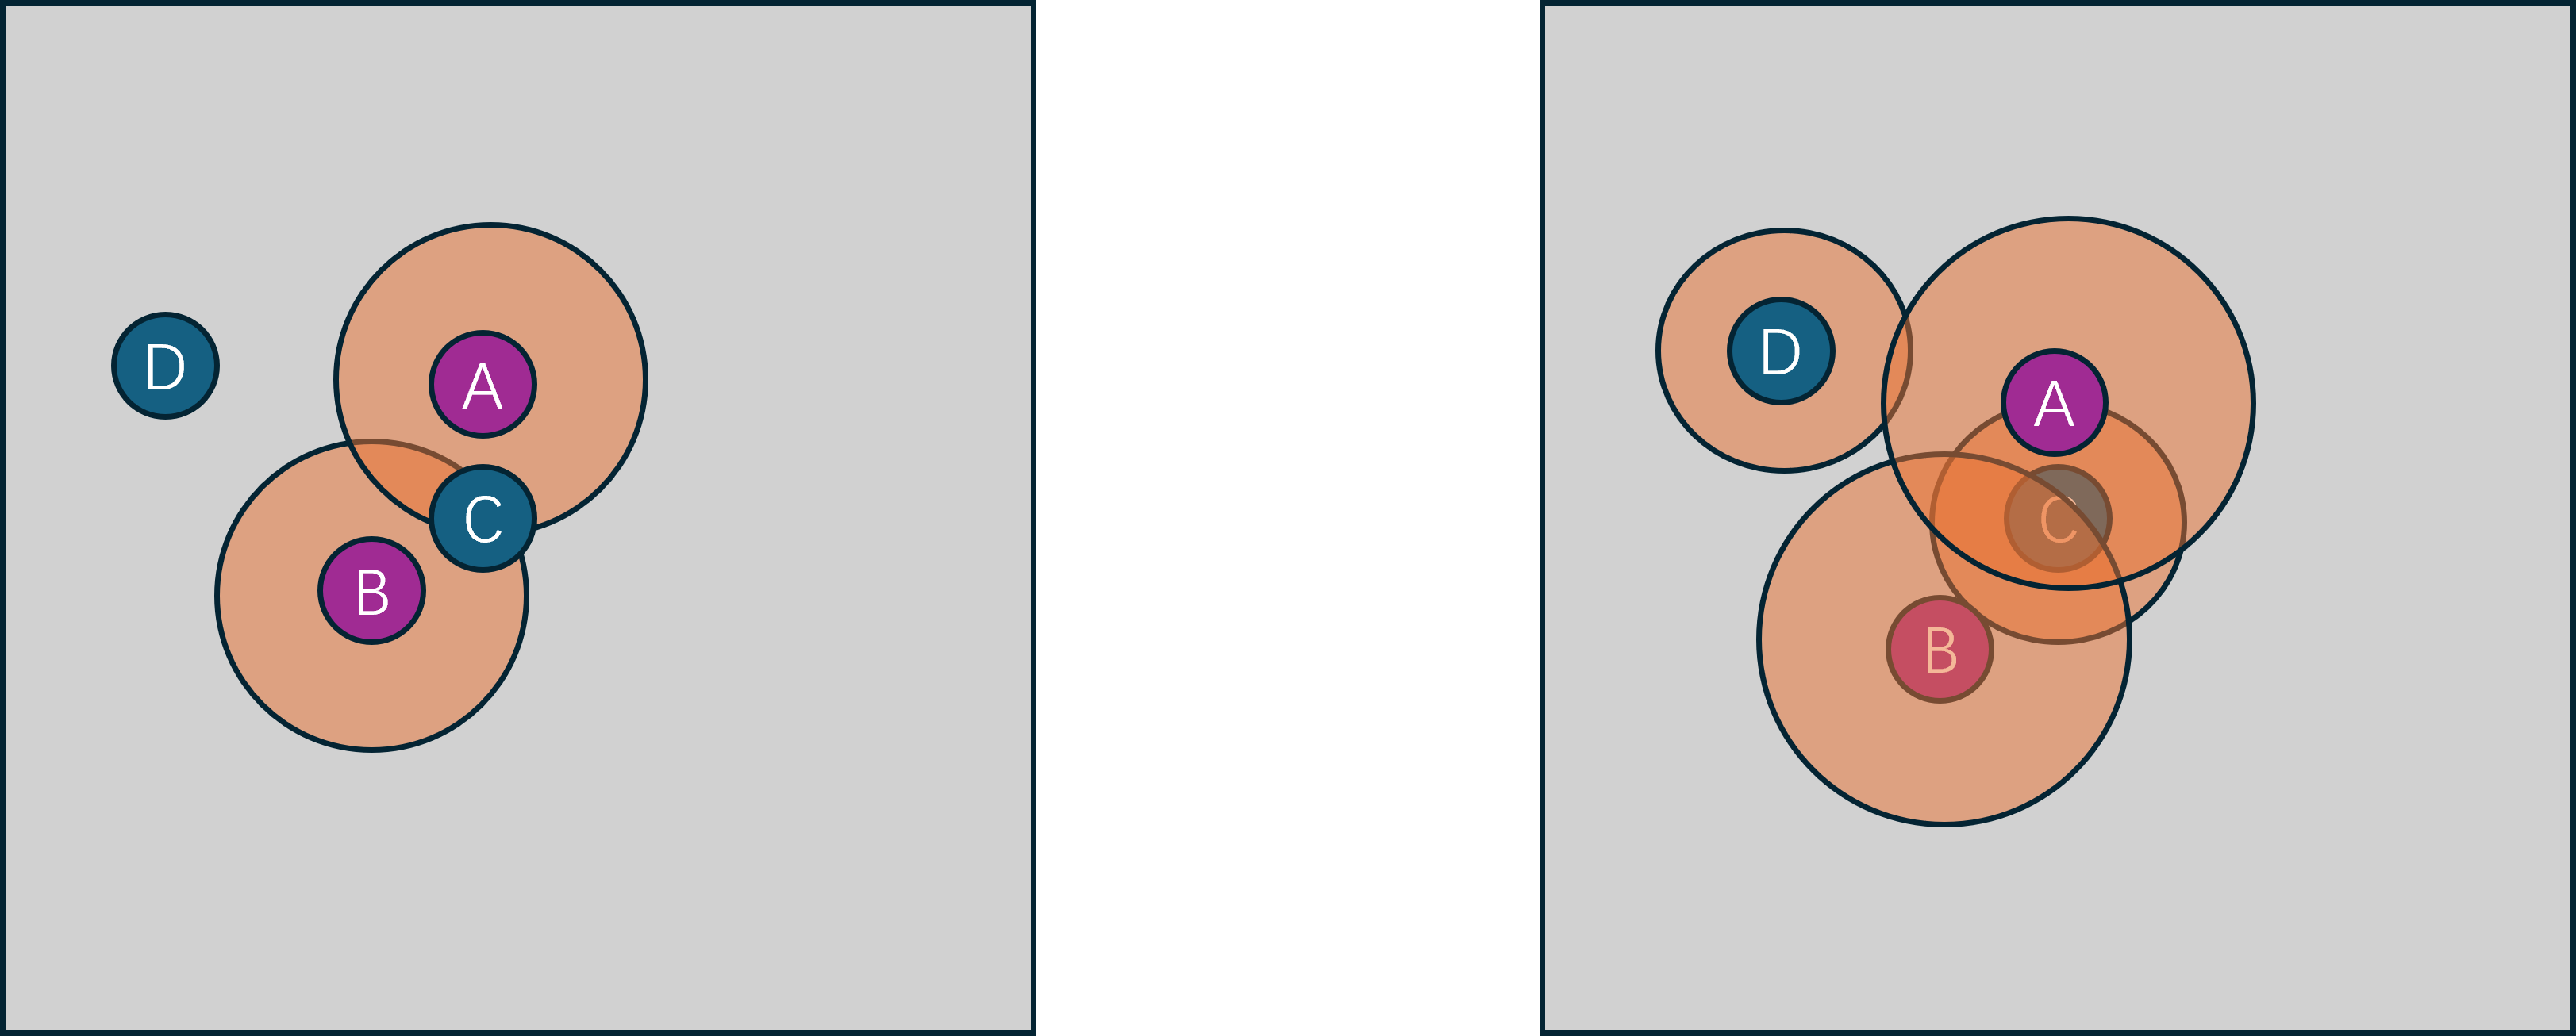
UE中Actor的同步处理流程
在UE中,往客户端同步Actor的入口函数为NetDriver::ServerReplicateActors,这个函数由UNetDriver::TickFlush来驱动每一帧都调用一次。在这个函数中首先收集当前World中参与网络同步的Actor集合:
TArray<FNetworkObjectInfo*> ConsiderList;
ConsiderList.Reserve( GetNetworkObjectList().GetActiveObjects().Num() );
// Build the consider list (actors that are ready to replicate)
ServerReplicateActors_BuildConsiderList( ConsiderList, ServerTickTime );
然后再遍历当前连接过来的所有ClientConnection,执行从ConsiderList中筛选合适的Actor往下同步的相关逻辑。
对于每个ClientConnection, 根据其所控制的角色相机的ViewTarget来构造一个FNetView对象,值得注意的是一个客户端Connection可能有多个虚拟的ChildConnection来对应客户端的多个ViewPort,这些ChildConnection也需要创建对应的FNetViewer:
// Make a list of viewers this connection should consider (this connection and children of this connection)
TArray<FNetViewer>& ConnectionViewers = WorldSettings->ReplicationViewers;
ConnectionViewers.Reset();
new( ConnectionViewers )FNetViewer( Connection, DeltaSeconds );
for ( int32 ViewerIndex = 0; ViewerIndex < Connection->Children.Num(); ViewerIndex++ )
{
if ( Connection->Children[ViewerIndex]->ViewTarget != NULL )
{
new( ConnectionViewers )FNetViewer( Connection->Children[ViewerIndex], DeltaSeconds );
}
}
有了ConnectionViewer数组之后,开始执行当前客户端所关心的Actor的收集与优先级排序:
FActorPriority* PriorityList = NULL;
FActorPriority** PriorityActors = NULL;
// Get a sorted list of actors for this connection
const int32 FinalSortedCount = ServerReplicateActors_PrioritizeActors( Connection, ConnectionViewers, ConsiderList, bCPUSaturated, PriorityList, PriorityActors );
// Process the sorted list of actors for this connection
const int32 LastProcessedActor = ServerReplicateActors_ProcessPrioritizedActors( Connection, ConnectionViewers, PriorityActors, FinalSortedCount, Updated );
在ServerReplicateActors_PrioritizeActors的内部会对ConsiderList里的每个Actor进行遍历,先过滤掉一些不参与当前ClientConnection的,相关过滤条件有:
- 此
Actor标记为了bOnlyRelevantToOwner,且当前Connection不是该Actor的OwnerConnection,则忽略 - 此
Actor在当前Connection中被标记为了Dormant,即休眠状态,则忽略 - 此
Actor对应的Level在客户端还未加载完成,则忽略 - 此
Actor对当前的ConnectionViewers遍历执行AActor::IsNetRelevantFor都返回false,则忽略,这个IsNetRelevantFor的核心判定是检查Viewer与当前Actor的距离的平方是否小于Actor::NetCullDistanceSquared
另外对于之前参与了当前Connection的同步但是现在已经被销毁或者休眠的对象,也需要加入到待排序列表中,因为需要给客户端发送一个关闭对应ActorChannel的网络同步包。
收集完所有需要考虑的Actor列表之后,使用FCompareFActorPriority这个比较器对这个列表进行优先级排序:
struct FCompareFActorPriority
{
FORCEINLINE bool operator()( const FActorPriority& A, const FActorPriority& B ) const
{
return B.Priority < A.Priority; // 注意这里的比较方式 会导致优先级高的排在前面
}
};
// Sort by priority
Sort( OutPriorityActors, FinalSortedCount, FCompareFActorPriority() );
而这里的Priority字段的计算是这样的:
FActorPriority::FActorPriority(UNetConnection* InConnection, UActorChannel* InChannel, FNetworkObjectInfo* InActorInfo, const TArray<struct FNetViewer>& Viewers, bool bLowBandwidth)
: ActorInfo(InActorInfo), Channel(InChannel), DestructionInfo(NULL)
{
const float Time = Channel ? (InConnection->Driver->GetElapsedTime() - Channel->LastUpdateTime) : InConnection->Driver->SpawnPrioritySeconds;
// take the highest priority of the viewers on this connection
Priority = 0;
for (int32 i = 0; i < Viewers.Num(); i++)
{
Priority = FMath::Max<int32>(Priority, FMath::RoundToInt(65536.0f * ActorInfo->Actor->GetNetPriority(Viewers[i].ViewLocation, Viewers[i].ViewDir, Viewers[i].InViewer, Viewers[i].ViewTarget, InChannel, Time, bLowBandwidth)));
}
}
这里会遍历所有的Viewer,使用AActor::GetNetPriority计算当前Actor在此Viewer里的优先级,然后获取其中的最大值,作为在当前Connection里的优先级。这个GetNetPriority的优先级计算综合了距离和朝向两个位置因素,下图就是其优先级计算规则,最高优先级为与当前view_target的正前方向夹角小于45的区域,此时优先级为2,最低优先级为当前view_target后方且距离最远的一个半圆弧:
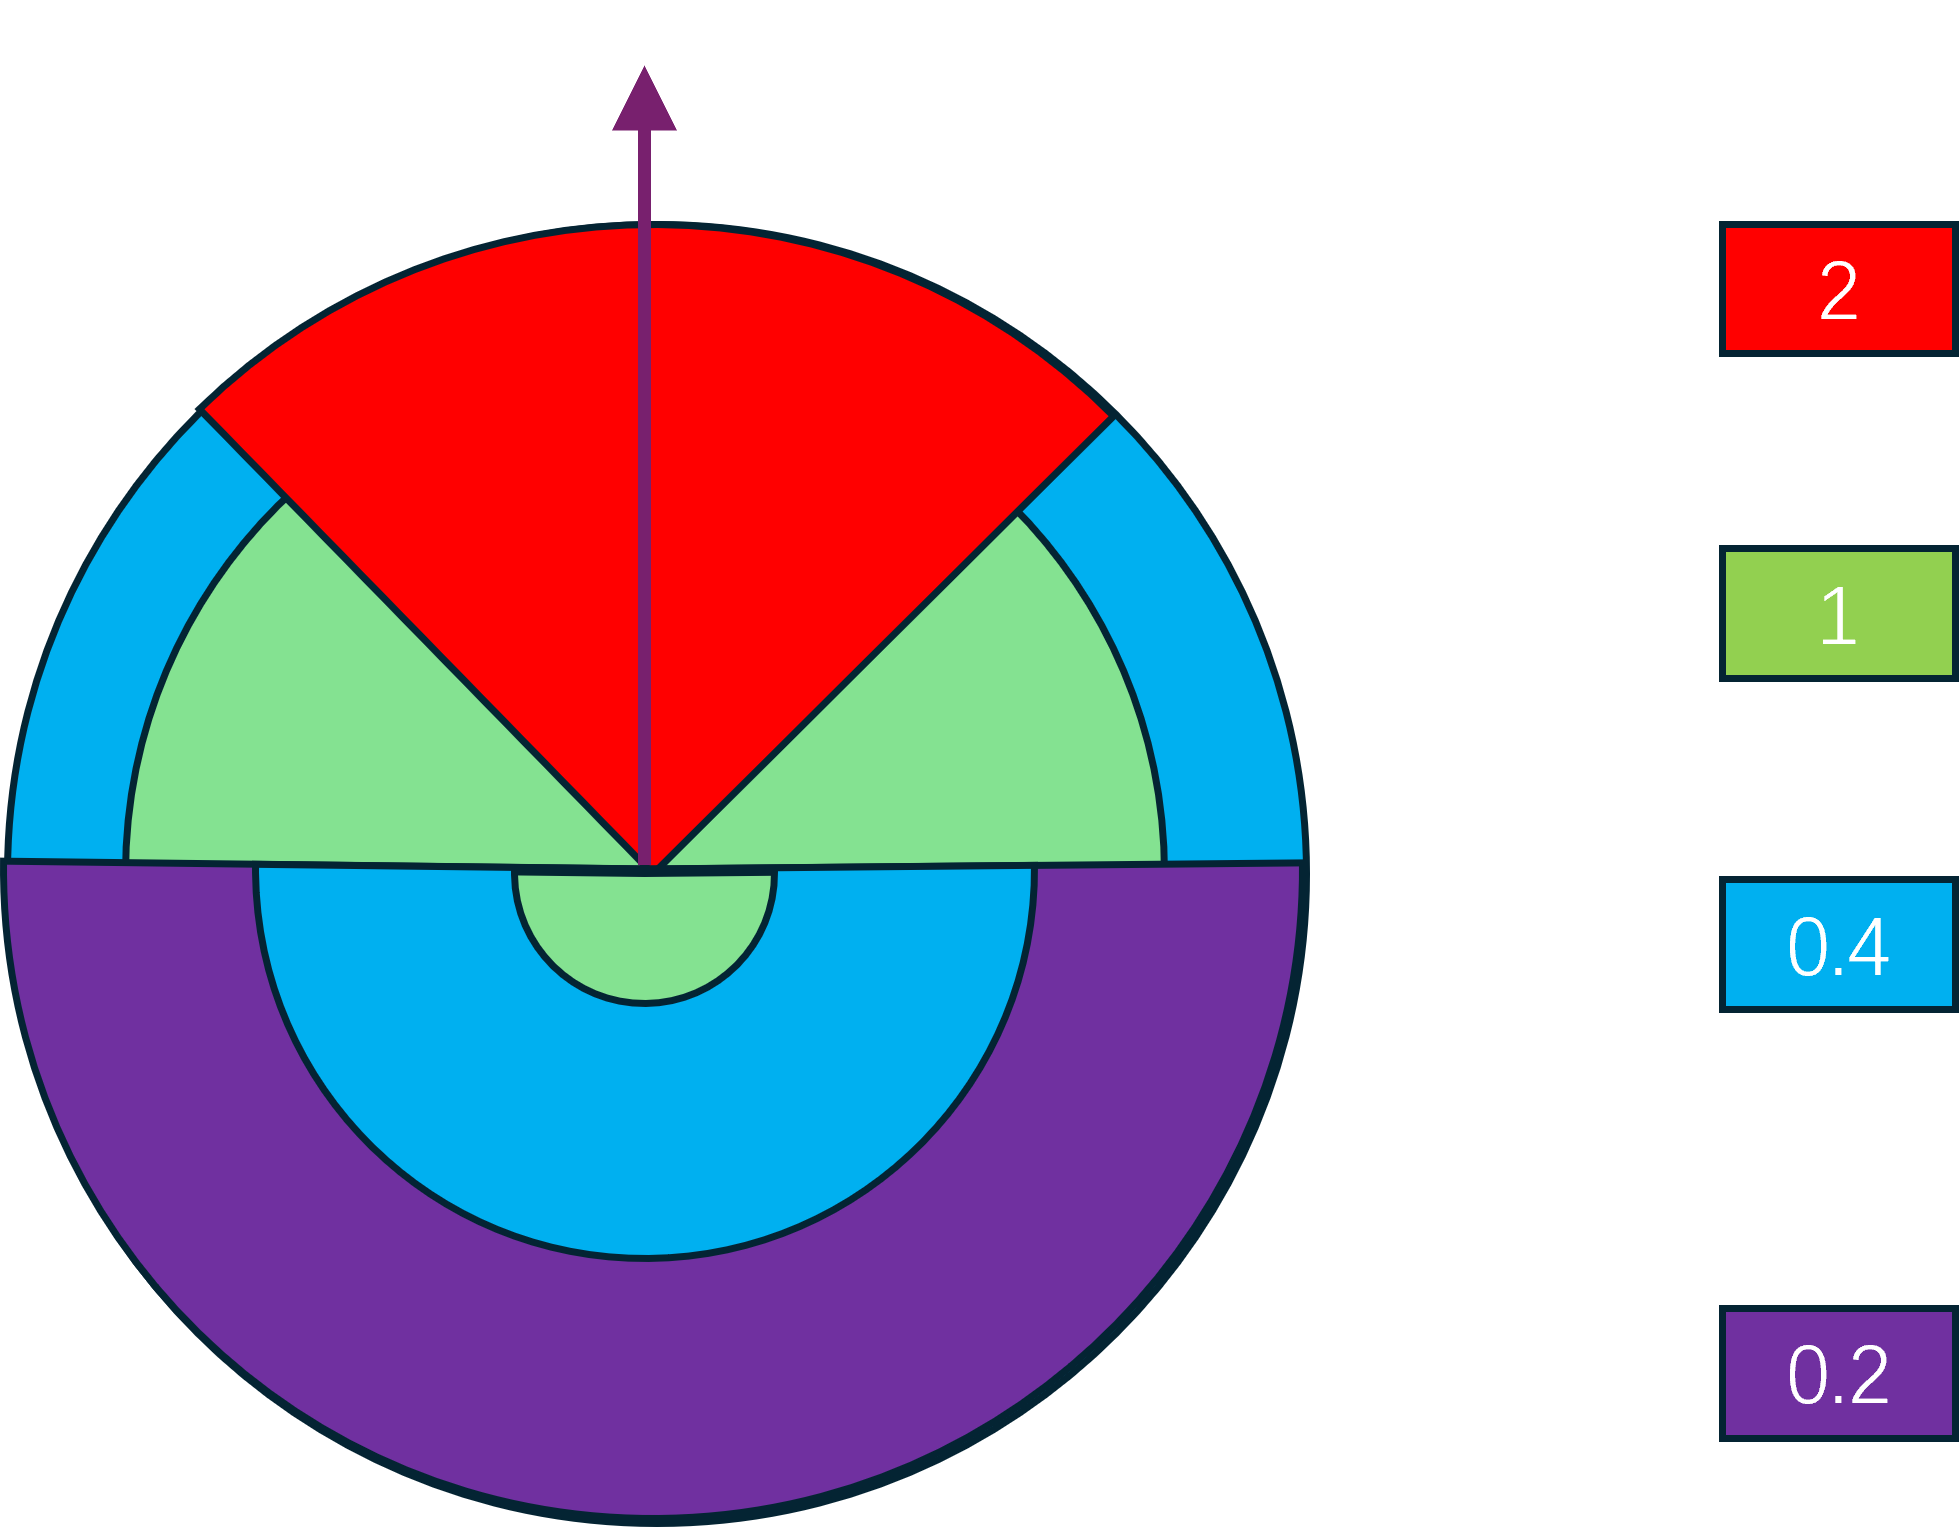
根据优先级排好顺序之后,PriorityActors里的Actors就会按照优先级从高到低进行排列。然后执行ServerReplicateActors_ProcessPrioritizedActors,这里会对每个Actor进行处理:
- 对于对应
Level已经在客户端加载的Actor,每1秒钟调用一次IsActorRelevantToConnection,检查Actor是否与当前连接相关,如果不相关的时间达到RelevantTimeout(默认为5) ,则关闭通道 - 对于对应
Level还未在客户端加载完成的Actor,设置一个随机间隔之后再检查
ActorInfo->NextUpdateTime = World->TimeSeconds + 0.2f * FMath::FRand();
- 对于要参与同步的
Actor, 如果没有ActorChannel就给其创建一个ActorChannel并绑定此Actor
// Create a new channel for this actor.
Channel = (UActorChannel*)Connection->CreateChannelByName( NAME_Actor, EChannelCreateFlags::OpenedLocally );
if ( Channel )
{
Channel->SetChannelActor(Actor, ESetChannelActorFlags::None);
}
- 对于要参与同步的
ActorChannel,增加其有效时间,增量为一个随机值
Channel->RelevantTime = ElapsedTime + 0.5 * UpdateDelayRandomStream.FRand();
上面有多个地方使用了随机值,主要是为了避免同一帧处理大量的Actor。在上述操作结束之后,才真正进入Actor同步的入口:
// if the channel isn't saturated
if ( Channel->IsNetReady( 0 ) )
{
// replicate the actor
UE_LOG( LogNetTraffic, Log, TEXT( "- Replicate %s. %d" ), *Actor->GetName(), PriorityActors[j]->Priority );
double ChannelLastNetUpdateTime = Channel->LastUpdateTime;
if ( Channel->ReplicateActor() )
{
ActorUpdatesThisConnectionSent++;
// Calculate min delta (max rate actor will upate), and max delta (slowest rate actor will update)
const float MinOptimalDelta = 1.0f / Actor->NetUpdateFrequency;
const float MaxOptimalDelta = FMath::Max( 1.0f / Actor->MinNetUpdateFrequency, MinOptimalDelta );
const float DeltaBetweenReplications = ( World->TimeSeconds - ActorInfo->LastNetReplicateTime );
// Choose an optimal time, we choose 70% of the actual rate to allow frequency to go up if needed
ActorInfo->OptimalNetUpdateDelta = FMath::Clamp( DeltaBetweenReplications * 0.7f, MinOptimalDelta, MaxOptimalDelta );
ActorInfo->LastNetReplicateTime = World->TimeSeconds;
}
ActorUpdatesThisConnection++;
OutUpdated++;
}
这里检查对应的ActorChannel是否可以发送数据,如果可以发送则调用Channel->ReplicateActor将此Actor的最新属性状态构造Bunch数据包进行发送,然后再计算此Actor的最优更新间隔。
Actor的同步频率处理
每个参与同步的Actor都会有一个FNetworkObjectInfo来代理同步频率的计算:
/** Next time to consider replicating the actor. Based on FPlatformTime::Seconds(). */
double NextUpdateTime;
/** Last absolute time in seconds since actor actually sent something during replication */
double LastNetReplicateTime;
/** Optimal delta between replication updates based on how frequently actor properties are actually changing */
float OptimalNetUpdateDelta;
/** Last time this actor was updated for replication via NextUpdateTime
* @warning: internal net driver time, not related to WorldSettings.TimeSeconds */
UE_DEPRECATED(4.25, "Please use LastNetUpdateTimestamp instead.")
float LastNetUpdateTime;
double LastNetUpdateTimestamp;
核心就是这里的NextUpdateTime,代表下一次当前Actor参与网络同步的时间戳,在服务器时间到达此时间戳之前,不再参与网络同步相关处理。因此在ServerReplicateActors_BuildConsiderList收集ConsiderList时,会根据此时间戳过滤掉:
if ( !ActorInfo->bPendingNetUpdate && World->TimeSeconds <= ActorInfo->NextUpdateTime )
{
continue; // It's not time for this actor to perform an update, skip it
}
一般情况下,这个NextUpdateTime字段是根据这段代码算出来的:
const float NextUpdateDelta = bUseAdapativeNetFrequency ? ActorInfo->OptimalNetUpdateDelta : 1.0f / Actor->NetUpdateFrequency;
// then set the next update time
ActorInfo->NextUpdateTime = World->TimeSeconds + UpdateDelayRandomStream.FRand() * ServerTickTime + NextUpdateDelta;
// and mark when the actor first requested an update
//@note: using Time because it's compared against UActorChannel.LastUpdateTime which also uses that value
PRAGMA_DISABLE_DEPRECATION_WARNINGS
ActorInfo->LastNetUpdateTime = ElapsedTime;
PRAGMA_ENABLE_DEPRECATION_WARNINGS
ActorInfo->LastNetUpdateTimestamp = ElapsedTime;
这里根据全局设置bUseAdapativeNetFrequency来选择以Actor上的固定频率还是动态频率来计算下一次更新的间隔,然后在此间隔之上在加入一点随机性避免在同一次Tick中处理太多。
FNetworkGuid
每个参与网络同步的对象在往客户端发送数据的时候,都会赋予其一个FNetworkGuid,其构造时机为UActorChannel::SetChannelActor的时候,其内部在创建这个UObject对应的FObjectReplicator时,就会通过FNetGUIDCache::GetOrAssignNetGUID来创建一个新的FNetworkGuid,并注册好这个UObject与FNetworkGuid的映射:
// ServerReplicateActors_ProcessPrioritizedActors
Channel->SetChannelActor(Actor, ESetChannelActorFlags::None);
// void UActorChannel::SetChannelActor(AActor* InActor, ESetChannelActorFlags Flags)
ActorReplicator = FindOrCreateReplicator(Actor);
// TSharedRef<FObjectReplicator>& UActorChannel::FindOrCreateReplicator(UObject* Obj, bool* bOutCreated)
// Start replicating with this replicator
NewRef->StartReplicating(this);
// void FObjectReplicator::StartReplicating(class UActorChannel * InActorChannel)
ObjectNetGUID = ConnectionNetDriver->GuidCache->GetOrAssignNetGUID( Object );
/** Gets or assigns a new NetGUID to this object. Returns whether the object is fully mapped or not */
FNetworkGUID FNetGUIDCache::GetOrAssignNetGUID(UObject* Object, const TWeakObjectPtr<UObject>* WeakObjectPtr)
同一个Actor在不同的NetConnection的ActorChannel中设置的FNetworkGuid是不共享的,因为FNetworkGuid的值创建使用了两个全局的计数器,分别对应了静态对象和动态对象,值的最后一位代表是否是动态对象。
#define COMPOSE_NET_GUID( Index, IsStatic ) ( ( ( Index ) << 1 ) | ( IsStatic ) )
#define ALLOC_NEW_NET_GUID( IsStatic ) ( COMPOSE_NET_GUID( ++UniqueNetIDs[ IsStatic ], IsStatic ) )
/**
* Generate a new NetGUID for this object and assign it.
*/
FNetworkGUID FNetGUIDCache::AssignNewNetGUID_Server( UObject* Object )
{
check( IsNetGUIDAuthority() );
// Generate new NetGUID and assign it
const int32 IsStatic = IsDynamicObject( Object ) ? 0 : 1;
const FNetworkGUID NewNetGuid( ALLOC_NEW_NET_GUID( IsStatic ) );
RegisterNetGUID_Server( NewNetGuid, Object );
UE_NET_TRACE_ASSIGNED_GUID(Driver->GetNetTraceId(), NewNetGuid, Object->GetClass()->GetFName(), 0);
return NewNetGuid;
}
静态对象指的是可以通过名字路径查找到的对象,例如场景里摆放好的Actor及其子对象,是否是静态对象根据下面的代码来判定:
bool UObject::IsNameStableForNetworking() const
{
return HasAnyFlags(RF_WasLoaded | RF_DefaultSubObject) || IsNative() || IsDefaultSubobject();
}
/** IsFullNameStableForNetworking means an object can be referred to its full path name over the network */
bool UObject::IsFullNameStableForNetworking() const
{
if ( GetOuter() != NULL && !GetOuter()->IsNameStableForNetworking() )
{
return false; // If any outer isn't stable, we can't consider the full name stable
}
return IsNameStableForNetworking();
}
/** IsSupportedForNetworking means an object can be referenced over the network */
bool UObject::IsSupportedForNetworking() const
{
return IsFullNameStableForNetworking();
}
bool FNetGUIDCache::IsDynamicObject( const UObject* Object )
{
check( Object != NULL );
check( Object->IsSupportedForNetworking() );
// Any non net addressable object is dynamic
return !Object->IsFullNameStableForNetworking();
}
Actor的初始创建信息
在UActorChannel::ReplicateActor中向客户端发送该Actor的初始信息的时候,会先写入对应的FNetworkGuid到Bunch中,然后根据其是否是动态对象发送不同的数据:
// ----------------------------------------------------------
// If initial, send init data.
// ----------------------------------------------------------
if (RepFlags.bNetInitial && OpenedLocally)
{
UE_NET_TRACE_SCOPE(NewActor, Bunch, GetTraceCollector(Bunch), ENetTraceVerbosity::Trace);
Connection->PackageMap->SerializeNewActor(Bunch, this, Actor);
WroteSomethingImportant = true;
Actor->OnSerializeNewActor(Bunch);
}
// SerializeNewActor
FNetworkGUID NetGUID;
UObject *NewObj = Actor;
SerializeObject(Ar, AActor::StaticClass(), NewObj, &NetGUID);
// bool UPackageMapClient::SerializeObject( FArchive& Ar, UClass* Class, UObject*& Object, FNetworkGUID *OutNetGUID)
FNetworkGUID NetGUID = GuidCache->GetOrAssignNetGUID( Object );
// Write out NetGUID to caller if necessary
if (OutNetGUID)
{
*OutNetGUID = NetGUID;
}
// Write object NetGUID to the given FArchive
InternalWriteObject( Ar, NetGUID, Object, TEXT( "" ), NULL );
// If we need to export this GUID (its new or hasnt been ACKd, do so here)
if (!NetGUID.IsDefault() && ShouldSendFullPath(Object, NetGUID))
{
check(IsNetGUIDAuthority());
if ( !ExportNetGUID( NetGUID, Object, TEXT(""), NULL ) )
{
UE_LOG( LogNetPackageMap, Verbose, TEXT( "Failed to export in ::SerializeObject %s"), *Object->GetName() );
}
}
// bool UPackageMapClient::ShouldSendFullPath( const UObject* Object, const FNetworkGUID &NetGUID )
if ( !Object->IsNameStableForNetworking() )
{
checkf( !NetGUID.IsDefault(), TEXT("Non-stably named object %s has a default NetGUID. %s"), *GetFullNameSafe(Object), *Connection->Describe() );
checkf( NetGUID.IsDynamic(), TEXT("Non-stably named object %s has static NetGUID [%s]. %s"), *GetFullNameSafe(Object), *NetGUID.ToString(), *Connection->Describe() );
return false; // We only export objects that have stable names
}
如果是静态Actor,执行ExportNetGUID,这里会将静态对象的Outer的FNetworkGuid和当前静态对象的名字写入到Bunch:
ObjectPathName = Object->GetName();
ObjectOuter = Object->GetOuter();
// Serialize reference to outer. This is basically a form of compression.
FNetworkGUID OuterNetGUID = GuidCache->GetOrAssignNetGUID( ObjectOuter );
InternalWriteObject( Ar, OuterNetGUID, ObjectOuter, TEXT( "" ), NULL );
// Serialize Name of object
Ar << ObjectPathName;
此时不需要带上当前Actor的位置朝向等信息,因为静态Actor的初始信息在Level里已经设置好了。
如果是动态的Actor则比较复杂了,需要带上许多额外的各种数据:
if ( NetGUID.IsDynamic() )
{
UObject* Archetype = nullptr; // 这里是该Actor的类型默认对象
UObject* ActorLevel = nullptr;
FVector Location;
FVector Scale;
FVector Velocity;
FRotator Rotation;
bool SerSuccess;
}
写入这些基本信息之后,UE还添加了这个Actor的最新属性信息到Bunch中,入口为ReplicateProperties:
// replicateActor
// The Actor
{
UE_NET_TRACE_OBJECT_SCOPE(ActorReplicator->ObjectNetGUID, Bunch, GetTraceCollector(Bunch), ENetTraceVerbosity::Trace);
WroteSomethingImportant |= ActorReplicator->ReplicateProperties(Bunch, RepFlags);
}
// The SubObjects
WroteSomethingImportant |= Actor->ReplicateSubobjects(this, &Bunch, &RepFlags);
除了Actor的属性之外,还会通过ReplicateSubobjects将挂载在当前Actor上的Component和SubObject也统一打包相关数据进行下发。
有了这些信息之后,客户端就可以创建出一个与服务端等价的Actor了。
Actor的组件与子对象同步
Actor身上的组件和子对象同步需要借用这个Actor的通道来进行,借助ActorChannel创建自己的FObjectReplicator以及属性同步的相关数据结构。
bool AActor::ReplicateSubobjects(UActorChannel *Channel, FOutBunch *Bunch, FReplicationFlags *RepFlags)
{
check(Channel);
check(Bunch);
check(RepFlags);
bool WroteSomething = false;
for (UActorComponent* ActorComp : ReplicatedComponents)
{
if (ActorComp && ActorComp->GetIsReplicated())
{
WroteSomething |= ActorComp->ReplicateSubobjects(Channel, Bunch, RepFlags); // Lets the component add subobjects before replicating its own properties.
WroteSomething |= Channel->ReplicateSubobject(ActorComp, *Bunch, *RepFlags); // (this makes those subobjects 'supported', and from here on those objects may have reference replicated)
}
}
return WroteSomething;
}
在同步一个子对象的时候,也会分配一个唯一的FNetworkGuid,并且会构造一个对应的FObjectReplicator,然后调用这个Replicator的ReplicateProperties方法将这个UObject上的同步属性的最新值进行下发:
bool UActorChannel::ReplicateSubobject(UObject *Obj, FOutBunch &Bunch, const FReplicationFlags &RepFlags)
{
TWeakObjectPtr<UObject> WeakObj(Obj);
if ( !Connection->Driver->GuidCache->SupportsObject( Obj, &WeakObj ) )
{
Connection->Driver->GuidCache->AssignNewNetGUID_Server( Obj ); //Make sure he gets a NetGUID so that he is now 'supported'
}
bool NewSubobject = false;
bool bCreatedReplicator = false;
TSharedRef<FObjectReplicator>& ObjectReplicator = FindOrCreateReplicator(Obj, &bCreatedReplicator);
bool WroteSomething = ObjectReplicator.Get().ReplicateProperties(Bunch, RepFlags);
if (NewSubobject && !WroteSomething)
{
// 如果当前属性与默认属性相同 也需要强制写一些数据下去
FNetBitWriter EmptyPayload;
WriteContentBlockPayload( Obj, Bunch, false, EmptyPayload );
WroteSomething= true;
}
return WroteSomething;
}
客户端Actor的创建
客户端接收到服务器端的ActorChannel创建通知之后,创建一个新的ActorChannel,并调用ProcessBunch来处理这个Channel内的所有数据。如果发现当前ActorChannel还未绑定Actor,则会认为第一个Bunch中包含了服务端调用SerializeNewActor写入的各种信息,此时我们在客户端再次调用此函数,不过此时Bunch在客户端是以Loading形式调用的,在服务端则是以Saving形式调用:
void UActorChannel::ProcessBunch( FInBunch & Bunch )
{
if( Actor == NULL )
{
UE_NET_TRACE_SCOPE(NewActor, Bunch, Connection->GetInTraceCollector(), ENetTraceVerbosity::Trace);
AActor* NewChannelActor = NULL;
bSpawnedNewActor = Connection->PackageMap->SerializeNewActor(Bunch, this, NewChannelActor);
}
}
SerializeNewActor内部会将这个Actor的FNetworkGuid解析出来,然后将Actor与FNetworkGuid之间的映射关系存储到FNetGUIDCache之中。
创建出对应的Actor之后,再开始处理后续的所有属性同步数据:
// ----------------------------------------------
// Read chunks of actor content
// ----------------------------------------------
while ( !Bunch.AtEnd() && Connection != NULL && Connection->State != USOCK_Closed )
{
FNetBitReader Reader( Bunch.PackageMap, 0 );
// Read the content block header and payload
UObject* RepObj = ReadContentBlockPayload( Bunch, Reader, bHasRepLayout );
TSharedRef< FObjectReplicator > & Replicator = FindOrCreateReplicator( RepObj );
bool bHasUnmapped = false;
if ( !Replicator->ReceivedBunch( Reader, RepFlags, bHasRepLayout, bHasUnmapped ) )
{
}
}
这里的while循环里不仅会处理Actor自身的属性数据,还会处理其ActorComponent和子对象的属性数据,所以属性数据在打包的时候会调用WriteContentBlockPayload来加上属性所有者的标识:
// ReplicateProperties
const bool WroteImportantData = Writer.GetNumBits() != 0;
if ( WroteImportantData )
{
OwningChannel->WriteContentBlockPayload( Object, Bunch, bHasRepLayout, Writer );
}
return WroteImportantData;
int32 UActorChannel::WriteContentBlockPayload( UObject* Obj, FNetBitWriter &Bunch, const bool bHasRepLayout, FNetBitWriter& Payload )
{
const int32 StartHeaderBits = Bunch.GetNumBits();
WriteContentBlockHeader( Obj, Bunch, bHasRepLayout );
}
void UActorChannel::WriteContentBlockHeader( UObject* Obj, FNetBitWriter &Bunch, const bool bHasRepLayout )
{
const int NumStartingBits = Bunch.GetNumBits();
Bunch.WriteBit( bHasRepLayout ? 1 : 0 );
// If we are referring to the actor on the channel, we don't need to send anything (except a bit signifying this)
const bool IsActor = Obj == Actor;
Bunch.WriteBit( IsActor ? 1 : 0 );
if ( IsActor )
{
return;
}
Bunch << Obj; // 这里会调用UObject的序列化操作
if ( Connection->Driver->IsServer() )
{
// 如果是静态对象 这个bit写入1
if ( Obj->IsNameStableForNetworking() )
{
Bunch.WriteBit( 1 );
}
else
{
// 如果是动态对象 这个bit写入0 同时将这个对象的UClass数据写入 以方便客户端创建对应类型的UObject
Bunch.WriteBit( 0 );
UClass *ObjClass = Obj->GetClass();
Bunch << ObjClass;
}
}
}
每段属性数据的所有者通过ReadContentBlockPayload来获取,这里面会执行ActorComponent或者子对象的反序列化操作:
UObject* UActorChannel::ReadContentBlockPayload( FInBunch &Bunch, FNetBitReader& OutPayload, bool& bOutHasRepLayout )
{
const int32 StartHeaderBits = Bunch.GetPosBits();
bool bObjectDeleted = false;
UObject* RepObj = ReadContentBlockHeader( Bunch, bObjectDeleted, bOutHasRepLayout );
uint32 NumPayloadBits = 0;
Bunch.SerializeIntPacked( NumPayloadBits );
OutPayload.SetData( Bunch, NumPayloadBits );
return RepObj;
}
UObject* UActorChannel::ReadContentBlockHeader( FInBunch & Bunch, bool& bObjectDeleted, bool& bOutHasRepLayout )
{
const bool IsServer = Connection->Driver->IsServer();
bObjectDeleted = false;
bOutHasRepLayout = Bunch.ReadBit() != 0 ? true : false;
const bool bIsActor = Bunch.ReadBit() != 0 ? true : false;
if ( bIsActor )
{
// If this is for the actor on the channel, we don't need to read anything else
return Actor;
}
//
// We need to handle a sub-object
//
// Note this heavily mirrors what happens in UPackageMapClient::SerializeNewActor
FNetworkGUID NetGUID;
UObject* SubObj = NULL;
// Manually serialize the object so that we can get the NetGUID (in order to assign it if we spawn the object here)
Connection->PackageMap->SerializeObject( Bunch, UObject::StaticClass(), SubObj, &NetGUID );
const bool bStablyNamed = Bunch.ReadBit() != 0 ? true : false;
if ( bStablyNamed )
{
return SubObj;
}
// Serialize the class in case we have to spawn it.
// Manually serialize the object so that we can get the NetGUID (in order to assign it if we spawn the object here)
FNetworkGUID ClassNetGUID;
UObject* SubObjClassObj = NULL;
Connection->PackageMap->SerializeObject( Bunch, UObject::StaticClass(), SubObjClassObj, &ClassNetGUID );
UClass * SubObjClass = Cast< UClass >( SubObjClassObj );
SubObj = NewObject< UObject >(Actor, SubObjClass);
// Notify actor that we created a component from replication
Actor->OnSubobjectCreatedFromReplication( SubObj );
// Register the component guid
Connection->Driver->GuidCache->RegisterNetGUID_Client( NetGUID, SubObj );
// Track which sub-object guids we are creating
CreateSubObjects.Add( SubObj );
}
至此,服务端向下同步的一个Actor及其ActorComponent和子对象都被创建出来了,并设置好了相关的属性。此ActorChannel后续主要负责接受相关的RPC数据与属性同步数据,这些数据的构造、发送、接收、解析等具体细节将在后续的章节中介绍。
Unreal Engine 的 ReplicationGraph
在前述的UE服务端向客户端同步Actor的流程中,会以Tick的形式去每帧计算当前Connection感兴趣的Actor列表,并以特定的优先级排序,最后生成PriorityActors数组。当客户端数量为N而服务端参与同步的Actor数量为M时,单次NetDriver::TickFlush内生成所有连接的PriorityActors的最坏时间复杂度为N*M*Log(M), 当前World里参与同步的Actor数量变的很大时,此次TickFlush的执行时间将会急剧膨胀。Epic的Fortnite大世界中有多达50000的同步对象,同时有最多100个客户端连接,此时DS端的压力非常巨大。为了解决大量同步Actor引发的服务端性能问题,UE4.21中引入了ReplicationGraph,ReplicationGraph提供了一个更为高效的ServerReplicateActors实现,NetDriver::ServerReplicateActors这个函数的开头会去判断是否创建了一个ReplicationDriver对象,如果创建了则直接调用ReplicationDriver::ServerReplicateActors,不再走我们前述的Actor同步处理逻辑。
// NetDriver::ServerReplicateActors()
if (ReplicationDriver)
{
return ReplicationDriver->ServerReplicateActors(DeltaSeconds);
}
下面我们来详细了解一下ReplicationGraph是如何实现一个更优的ServerReplicateActors。
ReplicationGraph的Node功能介绍
ReplicationGraph将使用UReplicationGraphNode来管理所有参与同步的Actor,这是一个虚基类,只提供接口声明,核心接口是这个:
class REPLICATIONGRAPH_API UReplicationGraphNode : public UObject
{
public:
/** Called once per frame prior to replication ONLY on root nodes (nodes created via UReplicationGraph::CreateNode) has RequiresPrepareForReplicationCall=true */
void PrepareForReplication()
/** Called when a network actor is spawned or an actor changes replication status */
virtual void NotifyAddNetworkActor(const FNewReplicatedActorInfo& Actor ) PURE_VIRTUAL(UReplicationGraphNode::NotifyAddNetworkActor, );
/** Called when a networked actor is being destroyed or no longer wants to replicate */
virtual bool NotifyRemoveNetworkActor(const FNewReplicatedActorInfo& Actor, bool bWarnIfNotFound=true) PURE_VIRTUAL(UReplicationGraphNode::NotifyRemoveNetworkActor, return false; );
// 根据传入的客户端连接参数来计算此连接可以同步的Actor集合
virtual void GatherActorListsForConnection(const FConnectionGatherActorListParameters& Params) = 0;
/** Remove a child node from our list and flag it for destruction. Returns if the node was found or not */
bool RemoveChildNode(UReplicationGraphNode* OutChildNode, UReplicationGraphNode::NodeOrdering NodeOrder=UReplicationGraphNode::NodeOrdering::IgnoreOrdering);
/** Remove all null and about to be destroyed nodes from our list */
void CleanChildNodes(UReplicationGraphNode::NodeOrdering NodeOrder);
protected:
UPROPERTY()
TArray< UReplicationGraphNode* > AllChildNodes;
TSharedPtr<FReplicationGraphGlobalData> GraphGlobals;
}
这里有一个AllChildNodes的成员来维持UReplicationGraphNode的树形结构。
这个类型的最简单子类是UReplicationGraphNode_ActorList,这个Node中包含了一个Actor列表,调用查询接口时会首先把这个Actor列表加入到结果中,然后再处理后续的查询:
class REPLICATIONGRAPH_API UReplicationGraphNode_ActorList : public UReplicationGraphNode
{
/** The base list that most actors will go in */
FActorRepListRefView ReplicationActorList;
void GatherActorListsForConnection(const FConnectionGatherActorListParameters& Params) override
{
Params.OutGatheredReplicationLists.AddReplicationActorList(ReplicationActorList);
StreamingLevelCollection.Gather(Params);
for (UReplicationGraphNode* ChildNode : AllChildNodes)
{
ChildNode->GatherActorListsForConnection(Params);
}
}
}
然后针对那些设置了bAlwaysRelevant的Actor(例如AGameState)有个对应的UReplicationGraphNode_AlwaysRelevant子类型,启动时注册这些AlwaysRelevant的UClass,然后运行时把这个UClass的Actor都收集过来, 查询时直接返回之前收集好的Actor列表即可:
class REPLICATIONGRAPH_API UReplicationGraphNode_AlwaysRelevant : public UReplicationGraphNode
{
protected:
UPROPERTY()
UReplicationGraphNode* ChildNode = nullptr;
// 启动时注册好的AlwaysRelevant的Uclass
TArray<UClass*> AlwaysRelevantClasses;
public:
virtual void PrepareForReplication() override
{
if (ChildNode == nullptr)
{
ChildNode = CreateChildNode<UReplicationGraphNode_ActorList>();
}
ChildNode->NotifyResetAllNetworkActors();
for (UClass* ActorClass : AlwaysRelevantClasses)
{
for (TActorIterator<AActor> It(GetWorld(), ActorClass); It; ++It)
{
AActor* Actor = *It;
if (IsActorValidForReplicationGather(Actor))
{
ChildNode->NotifyAddNetworkActor( FNewReplicatedActorInfo(*It) );
}
}
}
}
virtual void GatherActorListsForConnection(const FConnectionGatherActorListParameters& Params) override
{
ChildNode->GatherActorListsForConnection(Params);
}
}
另外对于对于某个客户端永远同步的Actor列表(例如当前客户端连接控制的Apawn和APlayerController),也封装了一个UReplicationGraphNode_AlwaysRelevant_ForConnection子类进行管理:
class REPLICATIONGRAPH_API UReplicationGraphNode_AlwaysRelevant_ForConnection : public UReplicationGraphNode_ActorList
{
/** Rebuilt-every-frame list based on UNetConnection state */
FActorRepListRefView ReplicationActorList;
/** List of previously (or currently if nothing changed last tick) focused actor data per connection */
UPROPERTY()
TArray<FAlwaysRelevantActorInfo> PastRelevantActors;
virtual void GatherActorListsForConnection(const FConnectionGatherActorListParameters& Params) override
{
// Call super to add any actors that were explicitly given to use via NotifyAddNetworkActor
Super::GatherActorListsForConnection(Params);
// Reset and rebuild another list that will contains our current viewer/viewtarget
ReplicationActorList.Reset();
auto UpdateActor = [&](AActor* NewActor, AActor*& LastActor)
{
if (NewActor && !ReplicationActorList.Contains(NewActor))
{
ReplicationActorList.Add(NewActor);
}
};
for (const FNetViewer& CurViewer : Params.Viewers)
{
if (CurViewer.Connection == nullptr)
{
continue;
}
FAlwaysRelevantActorInfo* LastData = PastRelevantActors.FindByKey<UNetConnection*>(CurViewer.Connection);
// We've not seen this actor before, go ahead and add them.
if (LastData == nullptr)
{
FAlwaysRelevantActorInfo NewActorInfo;
NewActorInfo.Connection = CurViewer.Connection;
LastData = &(PastRelevantActors[PastRelevantActors.Add(NewActorInfo)]);
}
check(LastData != nullptr);
UpdateActor(CurViewer.InViewer, LastData->LastViewer);
UpdateActor(CurViewer.ViewTarget, LastData->LastViewTarget);
}
}
}
可以看出这里的逻辑就是把当前Connection对应的NetViewer里的InViewer和ViewTarget加入到结果列表中,也就是对应的PlayerController和Pawn。
除了上述几种基本的Node之外,引擎层还定义了多个其他种类的Node,业务层还可以自己扩展,例如Fortinite中就增加了TeamRelevantNode节点,用来对这个队伍内的所有客户端连接进行同步。这里重点讲一下对于查询优化最大的子类UReplicationGraphNode_GridSpatialization2D。
基于网格划分的UReplicationGraphNode
这个类使用了前述的网格划分结构来加速查询,然后网格内的每个Cell都有一个对应的继承自UReplicationGraphNode_ActorList的UReplicationGraphNode_GridCell节点,UReplicationGraphNode_GridSpatialization2D使用了一个二维数组来存储所有的UReplicationGraphNode_GridCell
TArray< TArray<UReplicationGraphNode_GridCell*> > Grid;
TArray<UReplicationGraphNode_GridCell*>& GetGridX(int32 X)
{
if (Grid.Num() <= X)
{
Grid.SetNum(X+1);
}
return Grid[X];
}
UReplicationGraphNode_GridCell*& GetCell(TArray<UReplicationGraphNode_GridCell*>& GridX, int32 Y)
{
if (GridX.Num() <= Y)
{
GridX.SetNum(Y+1);
}
return GridX[Y];
}
UReplicationGraphNode_GridCell*& GetCell(int32 X, int32 Y)
{
TArray<UReplicationGraphNode_GridCell*>& GridX = GetGridX(X);
return GetCell(GridX, Y);
}
当添加一个Actor时,会根据这个Actor是场景里的静态Actor(位置不会移动)还是动态Actor(位置会移动)进入不同的接口:
- 当添加的是静态
Actor时,根据其NetCullingDistance获取覆盖的GridNode,然后对于每个GridNode执行添加静态Actor的接口
void UReplicationGraphNode_GridSpatialization2D::AddActorInternal_Static_Implementation(const FNewReplicatedActorInfo& ActorInfo, FGlobalActorReplicationInfo& ActorRepInfo, bool bDormancyDriven)
{
AActor* Actor = ActorInfo.Actor;
const FVector Location3D = Actor->GetActorLocation();
ActorRepInfo.WorldLocation = Location3D;
StaticSpatializedActors.Emplace(Actor, FCachedStaticActorInfo(ActorInfo, bDormancyDriven));
GetGridNodesForActor(ActorInfo.Actor, ActorRepInfo, GatheredNodes);
for (UReplicationGraphNode_GridCell* Node : GatheredNodes)
{
Node->AddStaticActor(ActorInfo, ActorRepInfo, bDormancyDriven);
}
}
- 如果添加的是动态
Actor,则先放到一个临时数组DynamicSpatializedActors中,
void UReplicationGraphNode_GridSpatialization2D::AddActorInternal_Dynamic(const FNewReplicatedActorInfo& ActorInfo)
{
DynamicSpatializedActors.Emplace(ActorInfo.Actor, ActorInfo);
}
这个数组会在每一帧的UReplicationGraphNode_GridSpatialization2D::PrepareForReplication中进行处理:
for (auto& MapIt : DynamicSpatializedActors)
{
FActorRepListType& DynamicActor = MapIt.Key;
FCachedDynamicActorInfo& DynamicActorInfo = MapIt.Value;
FActorCellInfo& PreviousCellInfo = DynamicActorInfo.CellInfo;
FNewReplicatedActorInfo& ActorInfo = DynamicActorInfo.ActorInfo;
// Update location
FGlobalActorReplicationInfo& ActorRepInfo = GlobalRepMap->Get(DynamicActor);
// Check if this resets spatial bias
const FVector Location3D = DynamicActor->GetActorLocation();
ActorRepInfo.WorldLocation = Location3D;
// Get the new CellInfo
const FActorCellInfo NewCellInfo = GetCellInfoForActor(DynamicActor, Location3D, ActorRepInfo.Settings.GetCullDistance());
if (PreviousCellInfo.IsValid())
{
bool bDirty = false;
if (UNLIKELY(NewCellInfo.StartX > PreviousCellInfo.EndX || NewCellInfo.EndX < PreviousCellInfo.StartX ||
NewCellInfo.StartY > PreviousCellInfo.EndY || NewCellInfo.EndY < PreviousCellInfo.StartY))
{
// No longer intersecting, we just have to remove from all previous nodes and add to all new nodes
bDirty = true;
GetGridNodesForActor(DynamicActor, PreviousCellInfo, GatheredNodes);
for (UReplicationGraphNode_GridCell* Node : GatheredNodes)
{
Node->RemoveDynamicActor(ActorInfo);
}
GetGridNodesForActor(DynamicActor, NewCellInfo, GatheredNodes);
for (UReplicationGraphNode_GridCell* Node : GatheredNodes)
{
Node->AddDynamicActor(ActorInfo);
}
}
else
{
// Some overlap so lets find out what cells need to be added or removed
}
}
else
{
// First time - Just add
GetGridNodesForActor(DynamicActor, NewCellInfo, GatheredNodes);
for (UReplicationGraphNode_GridCell* Node : GatheredNodes)
{
Node->AddDynamicActor(ActorInfo);
}
PreviousCellInfo = NewCellInfo;
}
}
这段代码的核心逻辑是判断这个DynamicActor的当前位置覆盖的同步区域NewCellInfo是否与之前计算的同步区域PreviousCellInfo有交集,然后再做处理:
-
如果没有交集,则先从网格中删除这个
Actor,再重新添加 -
如果有交集,则计算两个集合的差集:
- 计算
PreviousCellInfo - NewCellInfo的Node集合RemoveSet,遍历RemoveSet中的所有Node执行RemoveDynamicActor(Actor) - 计算
NewCellInfo - PreviousCellInfo的集合AddSet,遍历AddSet中所有的Node执行AddDynamicActor(Actor)
- 计算
这里区分静态Actor和动态Actor,也是出于效率考量,因为静态Actor位置不会改变,所以所覆盖的GridNode是不会变的(假如其同步半径不修改的情况),而动态Actor位置会不断的变化,必须每次在PrepareForReplication时重算其影响范围。
这里的UReplicationGraphNode_GridCell实现上也分别提供了静态Actor和动态Actor的相关接口:
class REPLICATIONGRAPH_API UReplicationGraphNode_GridCell : public UReplicationGraphNode_ActorList
{
UPROPERTY()
UReplicationGraphNode* DynamicNode = nullptr;
UPROPERTY()
UReplicationGraphNode_DormancyNode* DormancyNode = nullptr;
}
void UReplicationGraphNode_GridCell::AddStaticActor(const FNewReplicatedActorInfo& ActorInfo, FGlobalActorReplicationInfo& ActorRepInfo, bool bParentNodeHandlesDormancyChange)
{
if (ActorRepInfo.bWantsToBeDormant)
{
// Pass to dormancy node
GetDormancyNode()->AddDormantActor(ActorInfo, ActorRepInfo);
}
else
{
// Put him in our non dormancy list
Super::NotifyAddNetworkActor(ActorInfo);
}
// We need to be told if this actor changes dormancy so we can move him between nodes. Unless our parent is going to do it.
if (!bParentNodeHandlesDormancyChange)
{
ActorRepInfo.Events.DormancyChange.AddUObject(this, &UReplicationGraphNode_GridCell::OnStaticActorNetDormancyChange);
}
}
void UReplicationGraphNode_GridCell::AddDynamicActor(const FNewReplicatedActorInfo& ActorInfo)
{
GetDynamicNode()->NotifyAddNetworkActor(ActorInfo);
}
然后执行查询时,遍历传入的Connection的所有FNetViewer,获取这个Viewer的坐标点对应的网格(CellX, CellY),
// void UReplicationGraphNode_GridSpatialization2D::GatherActorListsForConnection(const FConnectionGatherActorListParameters& Params)
TArray<FPlayerGridCellInformation, FReplicationGraphConnectionsAllocator> ActiveGridCells;
// 下面的是循环体
FPlayerGridCellInformation NewPlayerCell(FIntPoint(CellX, CellY));
FLastLocationGatherInfo* GatherInfoForConnection = nullptr;
// Save this information out for later.
if (CurViewer.Connection != nullptr)
{
GatherInfoForConnection = LastLocationArray.FindByKey<UNetConnection*>(CurViewer.Connection);
// Add any missing last location information that we don't have
if (GatherInfoForConnection == nullptr)
{
GatherInfoForConnection = &LastLocationArray[LastLocationArray.Emplace(CurViewer.Connection, FVector(ForceInitToZero))];
}
}
FVector LastLocationForConnection = GatherInfoForConnection ? GatherInfoForConnection->LastLocation : ClampedViewLoc;
//@todo: if this is clamp view loc this is now redundant...
if (GridBounds.IsValid)
{
// Clean up the location data for this connection to be grid bound
LastLocationForConnection = GridBounds.GetClosestPointTo(LastLocationForConnection);
}
else
{
// Prevent extreme locations from causing the Grid to grow too large
LastLocationForConnection = LastLocationForConnection.BoundToCube(HALF_WORLD_MAX);
}
// Try to determine the previous location of the user.
NewPlayerCell.PrevLocation.X = FMath::Max(0, (int32)((LastLocationForConnection.X - SpatialBias.X) / CellSize));
NewPlayerCell.PrevLocation.Y = FMath::Max(0, (int32)((LastLocationForConnection.Y - SpatialBias.Y) / CellSize));
// If we have not operated on this cell yet (meaning it's not shared by anyone else), gather for it.
if (!UniqueCurrentLocations.Contains(NewPlayerCell.CurLocation))
{
TArray<UReplicationGraphNode_GridCell*>& GridX = GetGridX(CellX);
if (GridX.Num() <= CellY)
{
GridX.SetNum(CellY + 1);
}
UReplicationGraphNode_GridCell* CellNode = GridX[CellY];
if (CellNode)
{
CellNode->GatherActorListsForConnection(Params);
}
UniqueCurrentLocations.Add(NewPlayerCell.CurLocation);
}
// Add this to things we consider later.
ActiveGridCells.Add(NewPlayerCell);
在上面的代码逻辑中,此次查询先获取查询的中心点NewPlayerCell:
- 如果当前帧内没有执行过以此为中心的查询请求,则找到对应的
CellNode执行查询 - 记录当前查询点信息到
ActiveGridCells和UniqueCurrentLocations
这样做的好处是对于同一个Grid内发起的多个请求只会执行一次,然后对于不参与查询的Grid则不需要做子节点的查询。
在UReplicationGraphNode_GridCell中,静态的Actor如果是Dormant的则使用DomancyNode来管理,如果不是Dormant的则使用父类UReplicationGraphNode_ActorList来管理,而动态的Actor则使用一个DynamicNode来管理:
class REPLICATIONGRAPH_API UReplicationGraphNode_GridCell : public UReplicationGraphNode_ActorList
{
UPROPERTY()
UReplicationGraphNode* DynamicNode = nullptr;
UPROPERTY()
UReplicationGraphNode_DormancyNode* DormancyNode = nullptr;
void AddStaticActor(const FNewReplicatedActorInfo& ActorInfo, FGlobalActorReplicationInfo& ActorRepInfo, bool bParentNodeHandlesDormancyChange)
{
if (ActorRepInfo.bWantsToBeDormant)
{
// Pass to dormancy node
GetDormancyNode()->AddDormantActor(ActorInfo, ActorRepInfo);
}
else
{
// Put him in our non dormancy list
Super::NotifyAddNetworkActor(ActorInfo);
}
// We need to be told if this actor changes dormancy so we can move him between nodes. Unless our parent is going to do it.
if (!bParentNodeHandlesDormancyChange)
{
ActorRepInfo.Events.DormancyChange.AddUObject(this, &UReplicationGraphNode_GridCell::OnStaticActorNetDormancyChange);
}
}
void AddDynamicActor(const FNewReplicatedActorInfo& ActorInfo)
{
GetDynamicNode()->NotifyAddNetworkActor(ActorInfo);
}
}
这个DynamicNode的具体类型其实是UReplicationGraphNode_ActorListFrequencyBuckets:
UReplicationGraphNode* UReplicationGraphNode_GridCell::GetDynamicNode()
{
if (DynamicNode == nullptr)
{
if (CreateDynamicNodeOverride)
{
DynamicNode = CreateDynamicNodeOverride(this);
}
else
{
DynamicNode = CreateChildNode<UReplicationGraphNode_ActorListFrequencyBuckets>();
}
}
return DynamicNode;
}
UReplicationGraphNode_ActorListFrequencyBuckets,这个类主要处理在 Non StreamingLevel 时大规模 Actors 的负载均衡(实现思路也很简单,根据所有 Actors 的数量,分了几组 Buckets,每组设置 Actor 的上限。添加Actor时选择Buckets里包含Actor数量最少的Bucket进行添加。动态添加和删除Actor 时会检查Bucket数量与Actor数量之间的关系是否满足限定条件,不满足时重新分配合适数量的Buckets并将Actor进行随机分配。
// Readd/Rebalance
for (int32 idx=0; idx < FullList.Num(); ++idx)
{
NonStreamingCollection[idx % NewSize].Add( FullList[idx] );
}
然后在执行关联Actor查询的时候根据当前帧数依次选择一组Buckets进行同步:
// void UReplicationGraphNode_ActorListFrequencyBuckets::GatherActorListsForConnection(const FConnectionGatherActorListParameters& Params)
// Default path only: don't return lists in "off" frames.
const int32 idx = Params.ReplicationFrameNum % NonStreamingCollection.Num();
Params.OutGatheredReplicationLists.AddReplicationActorList(NonStreamingCollection[idx]);
到这里,基于空间索引的Connection关联Actor查询优化结构UReplicationGraphNode_GridSpatialization2D的实现基本明晰了。
ReplicationGraph的执行流程
在于关键性的函数 UReplicationGraph::ServerReplicateActors(float DeltaSeconds)这个是以NetDriver::TickFlush()来驱动的 。函数的开头会遍历所有Node执行PrepareForReplication来做本次Tick内的数据准备:
{
QUICK_SCOPE_CYCLE_COUNTER(NET_PrepareReplication);
for (UReplicationGraphNode* Node : PrepareForReplicationNodes)
{
Node->PrepareForReplication();
}
}
在前面介绍的几个UReplicationGraphNode的子类中,主要有这几个子类有数据准备逻辑:
UReplicationGraphNode_GridSpatialization2D这个类在准备阶段负责把所有的动态Actor填充到其同步覆盖范围内的所有GridCell中UReplicationGraphNode_AlwaysRelevant这个类在准备阶段根据注册过来的永远同步的Actor的UClass来收集相关的Actor实例列表
做好了数据准备工作之后,开始遍历所有的UNetReplicationGraphConnection,针对每个UNetReplicationGraphConnection收集这个UNetReplicationGraphConnection对应的TArray<FNetViewer>数组,以这个数组构造查询参数,然后遍历所有的顶层的UReplicationGraphNode来进行查询:
FGatheredReplicationActorLists GatheredReplicationListsForConnection;
TSet<FName> AllVisibleLevelNames;
ConnectionManager->GetClientVisibleLevelNames(AllVisibleLevelNames);
const FConnectionGatherActorListParameters Parameters(ConnectionViewers, *ConnectionManager, AllVisibleLevelNames, FrameNum, GatheredReplicationListsForConnection);
{
QUICK_SCOPE_CYCLE_COUNTER(NET_ReplicateActors_GatherForConnection);
for (UReplicationGraphNode* Node : GlobalGraphNodes)
{
Node->GatherActorListsForConnection(Parameters);
}
for (UReplicationGraphNode* Node : ConnectionManager->ConnectionGraphNodes)
{
Node->GatherActorListsForConnection(Parameters);
}
// 执行当前`ConnectionViewers`数组内每个`Viewer`在`ReplicationGraph`里的位置更新。
ConnectionManager->UpdateGatherLocationsForConnection(ConnectionViewers, DestructionSettings);
if (GatheredReplicationListsForConnection.NumLists() == 0)
{
// No lists were returned, kind of weird but not fatal. Early out because code below assumes at least 1 list
UE_LOG(LogReplicationGraph, Warning, TEXT("No Replication Lists were returned for connection"));
return 0;
}
}
这里GlobalGraphNodes就是一个可以供所有连接进行查询的UReplicationGraphNode数组,在官方样例ShooterGame中,这个数组是这样初始化的:
void UShooterReplicationGraph::InitGlobalGraphNodes()
{
// -----------------------------------------------
// Spatial Actors
// -----------------------------------------------
GridNode = CreateNewNode<UReplicationGraphNode_GridSpatialization2D>();
GridNode->CellSize = CVar_ShooterRepGraph_CellSize;
GridNode->SpatialBias = FVector2D(CVar_ShooterRepGraph_SpatialBiasX, CVar_ShooterRepGraph_SpatialBiasY);
if (CVar_ShooterRepGraph_DisableSpatialRebuilds)
{
GridNode->AddSpatialRebuildBlacklistClass(AActor::StaticClass()); // Disable All spatial rebuilding
}
AddGlobalGraphNode(GridNode);
// -----------------------------------------------
// Always Relevant (to everyone) Actors
// -----------------------------------------------
AlwaysRelevantNode = CreateNewNode<UReplicationGraphNode_ActorList>();
AddGlobalGraphNode(AlwaysRelevantNode);
// -----------------------------------------------
// Player State specialization. This will return a rolling subset of the player states to replicate
// -----------------------------------------------
UShooterReplicationGraphNode_PlayerStateFrequencyLimiter* PlayerStateNode = CreateNewNode<UShooterReplicationGraphNode_PlayerStateFrequencyLimiter>();
AddGlobalGraphNode(PlayerStateNode);
}
可以看出这个数组里存储了三个Node,分别是基于空间索引的GridNode,所有节点都同步的AlwaysRelevantNode和用来处理PlayerState同步的PlayerStateNode。
而ConnectionManager->ConnectionGraphNodes则是只对当前Connection提供服务的UReplicationGraphNode数组,在ShooterGame中使用此函数进行初始化:
void UShooterReplicationGraph::InitConnectionGraphNodes(UNetReplicationGraphConnection* RepGraphConnection)
{
Super::InitConnectionGraphNodes(RepGraphConnection);
UShooterReplicationGraphNode_AlwaysRelevant_ForConnection* AlwaysRelevantConnectionNode = CreateNewNode<UShooterReplicationGraphNode_AlwaysRelevant_ForConnection>();
// This node needs to know when client levels go in and out of visibility
RepGraphConnection->OnClientVisibleLevelNameAdd.AddUObject(AlwaysRelevantConnectionNode, &UShooterReplicationGraphNode_AlwaysRelevant_ForConnection::OnClientLevelVisibilityAdd);
RepGraphConnection->OnClientVisibleLevelNameRemove.AddUObject(AlwaysRelevantConnectionNode, &UShooterReplicationGraphNode_AlwaysRelevant_ForConnection::OnClientLevelVisibilityRemove);
AddConnectionGraphNode(AlwaysRelevantConnectionNode, RepGraphConnection);
}
void UReplicationGraph::InitConnectionGraphNodes(UNetReplicationGraphConnection* ConnectionManager)
{
// This handles tear off actors. Child classes should call Super::InitConnectionGraphNodes.
ConnectionManager->TearOffNode = CreateNewNode<UReplicationGraphNode_TearOff_ForConnection>();
ConnectionManager->AddConnectionGraphNode(ConnectionManager->TearOffNode);
}
在Super::InitConnectionGraphNodes添加了用来同步Actor销毁通知的TearOffNode,然后在UShooterReplicationGraph::InitConnectionGraphNodes添加了用来收集当前连接所有NetViewer的AlwaysRelevantConnectionNode。
在收集需要同步的Actor集合之后, 接下来开始真正的Actor同步流程:
// --------------------------------------------------------------------------------------------------------------
// PROCESS gathered replication lists
// --------------------------------------------------------------------------------------------------------------
{
QUICK_SCOPE_CYCLE_COUNTER(NET_ReplicateActors_ProcessGatheredLists);
ReplicateActorListsForConnections_Default(ConnectionManager, GatheredReplicationListsForConnection, ConnectionViewers);
ReplicateActorListsForConnections_FastShared(ConnectionManager, GatheredReplicationListsForConnection, ConnectionViewers);
}
在ReplicateActorListsForConnections_Default中会先对之前收集的Actor列表进行优先级计算,然后进行排序:
PrioritizedReplicationList.Reset();
TArray<FPrioritizedRepList::FItem>* SortingArray = &PrioritizedReplicationList.Items;
NumGatheredListsOnConnection += GatheredReplicationListsForConnection.NumLists();
const float MaxDistanceScaling = PrioritizationConstants.MaxDistanceScaling;
const uint32 MaxFramesSinceLastRep = PrioritizationConstants.MaxFramesSinceLastRep;
const TArray<FActorRepListConstView>& GatheredLists = GatheredReplicationListsForConnection.GetLists(EActorRepListTypeFlags::Default);
for (const FActorRepListConstView& List : GatheredLists)
{
// Add actors from gathered list
NumGatheredActorsOnConnection += List.Num();
for (AActor* Actor : List)
{
float AccumulatedPriority = GlobalData.Settings.AccumulatedNetPriorityBias;
// 一大堆计算优先级的函数
SortingArray->Emplace(FPrioritizedRepList::FItem(AccumulatedPriority, Actor, &GlobalData, &ConnectionData));
}
}
{
// Sort the merged priority list. We could potentially move this into the replicate loop below, this could potentially save use from sorting arrays that don't fit into the budget
RG_QUICK_SCOPE_CYCLE_COUNTER(NET_ReplicateActors_PrioritizeForConnection_Sort);
NumPrioritizedActorsOnConnection += SortingArray->Num();
SortingArray->Sort();
}
值得注意的是这里的AccumulatedPriority数值越小代表优先级越高,所以排序的时候不需要传入相反的比较器了。
这里的优先级计算考虑了很多因素,进行了多个分数的累加:
- 根据
Actor与当前Connection里所有FNetViwer的距离最小值SmallestDistanceSq计算出一个分数,距离越小分数越小 - 根据
Actor上次同步时间与当前时间之间的差值FramesSinceLastRep计算出一个分数,上次同步时间越久则分数越小 - 如果此
Actor最近刚切换到dormant状态,则加上一个-1.5的分数,临时的提高这些Actor的同步优先级 - 如果此
Actor是当前Connection里的Viewer,则根据全局设置选项CVar_ForceConnectionViewerPriority来决定是直接将AccumulatedPriority重置为负无穷大还是直接扣10分,这样的操作保证了当前连接主控的那些Actor的优先级最高
排序完成之后,按照同步优先级从高到低遍历排序之后的结果,调用ReplicateSingleActor进行向下同步,在遍历过程中如果发现当前Connection等待下发的数据太多,则终止遍历,用以节省流量,降低网络负荷:
for (int32 ActorIdx = 0; ActorIdx < PrioritizedReplicationList.Items.Num(); ++ActorIdx)
{
const FPrioritizedRepList::FItem& RepItem = PrioritizedReplicationList.Items[ActorIdx];
AActor* Actor = RepItem.Actor;
FConnectionReplicationActorInfo& ActorInfo = *RepItem.ConnectionData;
// Always skip if we've already replicated this frame. This happens if an actor is in more than one replication list
if (ActorInfo.LastRepFrameNum == FrameNum)
{
INC_DWORD_STAT_BY(STAT_NetRepActorListDupes, 1);
continue;
}
FGlobalActorReplicationInfo& GlobalActorInfo = *RepItem.GlobalData;
int64 BitsWritten = ReplicateSingleActor(Actor, ActorInfo, GlobalActorInfo, ConnectionActorInfoMap, *ConnectionManager, FrameNum);
if (IsConnectionReady(NetConnection) == false)
{
// We've exceeded the budget for this category of replication list.
RG_QUICK_SCOPE_CYCLE_COUNTER(NET_ReplicateActors_PartialStarvedActorList);
HandleStarvedActorList(PrioritizedReplicationList, ActorIdx + 1, ConnectionActorInfoMap, FrameNum);
NotifyConnectionSaturated(*ConnectionManager);
break;
}
}
这里的ReplicateSingleActor其实调用的就是我们在前面介绍的ActorChannel::ReplicateActor:
// int64 UReplicationGraph::ReplicateSingleActor(AActor* Actor, FConnectionReplicationActorInfo& ActorInfo, FGlobalActorReplicationInfo& GlobalActorInfo, FPerConnectionActorInfoMap& ConnectionActorInfoMap, UNetReplicationGraphConnection& ConnectionManager, const uint32 FrameNum)
if (UNLIKELY(ActorInfo.bTearOff))
{
// Replicate and immediately close in tear off case
BitsWritten = ActorInfo.Channel->ReplicateActor();
BitsWritten += ActorInfo.Channel->Close(EChannelCloseReason::TearOff);
}
else
{
// Just replicate normally
BitsWritten = ActorInfo.Channel->ReplicateActor();
}
逻辑驱动机制
游戏中各式各样entity都是为了管理游戏逻辑而创建的,各种类型的entity承担了游戏中不同的角色与功能。这些角色功能不仅仅支撑了场景内各种可见物体的静态几何体,而且还通过各种方式来运行自定义逻辑,从而驱动游戏内的状态改变。一般来说游戏都会有一个主循环来不断的执行tick,但是如何在这个tick函数里驱动这些entity的状态修改就不是那么容易了。因为entity数量实在是太多了,直接给所有entity加上tick接口, 然后在游戏循环的tick函数里遍历所有这些entity来执行这个tick函数是一个非常原始的设计。因为这样做的话,所有的逻辑代码都需要实现在entity::tick里,会导致entity::tick函数体急速膨胀。为了避免这个entity::tick函数膨胀到无法维护,需要采取有效机制来维护entity内各个逻辑的组织关系,解耦逻辑执行流的上下文。目前游戏内用来组织逻辑关系的方法可以归为如下几类:
- 基于虚函数接口的逻辑驱动
- 基于事件分发的逻辑驱动
- 基于计时器的逻辑驱动
- 基于异步回调的逻辑驱动
- 基于
RPC的逻辑驱动
接下来我将对虚函数接口、事件分发、计时器、异步回调这几种主要的逻辑驱动机制做一些详细的解读,至于RPC部分,后面有一个额外章节来做专门的介绍,所以在本章节中略过。
基于虚函数接口的逻辑驱动
虚函数是cpp的class自带的功能,他在基类定义统一接口的同时,频闭了每个具体类型在这个接口下的具体逻辑。下面就是一个虚函数简单例子,在animal基类上声明了一个make_voice的虚接口,然后子类cat,dog都用自己的逻辑实现了这个接口:
class animal
{
public:
virtual std::string make_voice() = 0;
};
class dog: public animal
{
public:
std::string make_voice() override
{
return "wang";
}
};
class cat: public animal
{
public:
std::string make_voice() override
{
return "miao";
}
};
这样我们就可以在拿到一个基类animal的指针A时,可以放心的调用A->make_voice()来执行已经声明的虚函数,而不需要关心这个指针所指向的具体类型是什么,这就是面向对象编程中常说的多态。在cpp语言中多态的实现依赖于两个组件:
- 虚函数表
V-Table:每个包含虚函数的类都有一个虚函数表,表中存储了指向类中所有虚函数的指针。 - 虚函数指针
V-Ptr:子类对象中包含一个指向该类虚函数表的指针。
在没有虚函数之前,要达到类似的效果只有两种方式:
- 在基类
animal中提供一个子类类型字段表明当前的子类是哪一个,子类被创建的时候需要设置好这个子类类型字段,然后执行make_voice的时候判断这个类型字段是dog还是cat执行不同的逻辑 - 在基类
animal中提供一个字段make_voice_func来存储std::string void()类型的函数指针,子类被创建的时候需要设置好这个接口函数字段,然后执行make_voice的时候直接调用return make_voice_func()
第一种方式需要我们在基类中知道所有可能的子类的所有接口逻辑,这样才能基类中根据这些子类的类型执行具体的分支,这种方式只适合子类型数量少且不会再扩张的情况,因此其限制性非常大,基本无法在实践中使用。 第二种方式就是在cpp诞生之前常见的子类型扩张方式,以函数指针的方式来变相的实现虚函数,这种接口实现方式有一个很大的缺点就是每个实例都需要虚函数数量一样多的字段去存储这些函数指针,在虚函数多且实例数量多的时候比较浪费内存。如果每个具体类型以共享同一个函数数组的方式来减小内存开销,这样就相当于以一种非常蹩脚的方式重新实现了一次虚表。
通过上述分析可以看出,以虚函数表的形式去实现多态有如下优势:
- 代码复用:通过基类指针或引用,可以操作不同类型的派生类对象,实现代码的复用。
- 扩展性:新增派生类时,不需要修改依赖于基类的代码,只需要确保新类正确重写了虚函数。
- 解耦:多态允许程序设计更加模块化,降低类之间的耦合度。
在server_entity上,我们定义了如下的一些虚函数,以方便外部代码驱动相关逻辑:
// 执行初始化逻辑
virtual bool init(const json::object_t& data);
// 执行rpc分发逻辑
virtual utility::rpc_msg::call_result on_rpc_msg(const utility::rpc_msg& msg) = 0;
// 执行网络消息分发逻辑
virtual utility::rpc_msg::call_result on_entity_raw_msg(std::uint8_t cmd, std::shared_ptr<const std::string> msg);
virtual ~server_entity()
{
}
virtual void deactivate()
{
m_callback_mgr.clear();
m_is_active = false;
}
同时任意一个支持component的entity上,会同时继承server_entity和component_owner,所以还会从component_owner这个基类继承一些组件相关的接口:
// 用来分发rpc
virtual utility::rpc_msg::call_result rpc_owner_on_rpc(const utility::rpc_msg& cur_msg);
virtual std::optional<utility::rpc_cmd_info> get_rpc_cmd(const std::string& cmd) const;
virtual void destroy()
{
clear_components();
}
virtual ~component_owner()
{
destroy();
}
可以看出,虚函数接口中最重要的就是rpc分发,以至于在server_entity和component_owner上定义了两个类似的接口,同时最终子类会将这两个接口进行合并:
utility::rpc_msg::call_result actor_entity::on_rpc_msg(const utility::rpc_msg& msg) override
{
return rpc_owner_on_rpc(msg);
}
using actor_entity_RpcSuper = utility::component_owner<actor_component, actor_entity>;
utility::rpc_msg::call_result actor_entity::rpc_owner_on_rpc(const utility::rpc_msg& data) override
{
auto temp_result = rpc_helper::rpc_call(this, data);
if(temp_result != utility::rpc_msg::call_result::rpc_not_found)
{
return temp_result;
}
return actor_entity_RpcSuper::rpc_owner_on_rpc(data);
}
因此一次rpc分发起码要经过on_rpc_msg和rpc_owner_on_rpc这两个虚函数,这样的无逻辑中转其实是没有意义的,值得后续优化掉。
我们在server_entity上提供的虚函数接口很少,基本只保留了消息分发相关接口。但是我们在其子类actor_entity上开始提供大量的虚函数接口声明,因为actor_entity才是我们平常处理的最主要entity,包括player_entity,monster_entity,trap_entity等多个子类。在actor_entity上提供的主要外部流程驱动接口如下:
// 迁移出本进程时 通知所有component 并执行数据打包
virtual void migrate_out(json::object_t& migrate_info, bool enter_new_space);
// 迁移到本进程时 通知所有component 并执行数据解包
virtual bool migrate_in(const json::object_t& migrate_info, bool enter_new_space);
void set_space(space_entity* in_space);
// 通知当前actor往指定的cell创建一个ghost
virtual bool try_create_ghost(const std::string& cell_id);
// 通知当前actor往指定的cell进行迁移
virtual bool try_transfer_real(const std::string& cell_id);
// 通知当前actor销毁指定cell里的对应ghost
virtual bool try_destroy_ghost(const std::string& cell_id);
// 迁移时执行actor与component数据打包
virtual void encode_migrate_out_data(json::object_t& migrate_info, bool enter_new_space);
// 创建ghost时 打包ghost所需数据
virtual void prepare_ghost_data(json::object_t& ghost_data);
// 向当前的relay anchor发消息 如果是global entity则这个anchor就是自身的anchor
virtual void call_relay_anchor(const utility::rpc_msg& migrate_msg);
// 进入场景时的回调
virtual void enter_space();
// 离开场景时的回调
virtual void leave_space(space_entity* cur_space);
除了entity上定义了一些驱动接口之外,在component上也可以添加接口,典型样例就是actor_component:
class actor_component_interface
{
public:
virtual void on_leave_space(space_entity* cur_space);
virtual void on_enter_space();
virtual json::object_t encode(bool for_ghost);
virtual void migrate_in(const json::object_t& migrate_info, bool enter_new_space);
virtual void migrate_out(bool enter_new_space);
virtual void on_become_ghost();
virtual void on_become_real();
virtual ~actor_component_interface();
};
这些actor_component_interface上声明的接口基本可以与actor_entity上的相关接口对应起来。以enter_space为例,actor_entity在执行此函数的时候需要遍历所有的actor_component并执行对应的on_leave_space接口:
template <typename F>
void call_component_interface(F& func)
{
for(auto one_comp: m_components)
{
if(!one_comp)
{
continue;
}
func(one_comp);
}
}
void actor_entity::enter_space()
{
m_prop_flags = actor_data_prop_queue::get_actor_property_flags();
auto cur_lambda = [](actor_component* cur_comp)
{
cur_comp->on_enter_space();
};
call_component_interface(cur_lambda);
}
基于事件分发的逻辑驱动
前述的虚接口主要用来处理每个组件都需要处理的主框架逻辑,例如进出场景、迁入迁出等重要逻辑流程,当这些逻辑流程被触发时actor_entity就可以用call_component_interface来通知所有的component。但是有些逻辑可能只有少数几个组件会关心,如果这些逻辑也通过上述的组件接口去实现的话,消息通知的效率将会大打折扣。以角色等级提升后的逻辑处理为例,假设我们在actor_component上定义了一个on_player_levelup的虚接口,则所有的actor_component都会带上这个虚函数,即使大部分actor_component里这个虚函数的实现就是一个简单的return。每添加一个类似的on_player_xxx都会引发整个项目的大规模重编译,在项目庞大之后比较影响迭代效率。在call_component_interface的执行循环中,对于每个component都会执行这个on_player_levelup虚函数调用,而虚函数调用相对于普通函数调用来说是一个比较费时的操作,特别是当函数体基本为空时这种效率损耗更加明显。因此无脑的添加虚接口是不可取的,对于这种少量component才关心的逻辑,需要一个更加精确的定向通知接口,也就是常说的事件分发器dispatcher。
简单来说,dispatcher内部有一个vector<function<void(const K&)>>的数据成员,这里的K是事件携带的参数信息,而function<void(const K&)>则是一个注册过来的事件监听回调,这里用vector来存储所有对此事件感兴趣的回调函数列表。在这样的结构辅助下,一个事件K发生时,只需要查找vector中存储的对应回调函数列表并一一执行即可。不过实际使用时为了处理回调函数的增减,vector内存储的并不是function而是shared_ptr<function>:
template <typename... args>
class typed_dispatcher
{
private:
std::vector<std::shared_ptr<std::function<void(args...)>>> callbacks;
public:
bool dispatch(args... data)
{
if (dispatch_depth >= max_dispatch_depth)
{
return false;
}
dispatch_depth++;
for (std::uint32_t i = 1; i < callbacks.size(); i++)
{
auto& cur_callback = callbacks[i];
if (cur_callback)
{
cur_callback->operator()(data...);
}
}
dispatch_depth--;
return true;
}
};
这里从1开始遍历是因为0被当作一个非法的handler。在dispatch事件的时候有一个需要注意的点,由于外部注册过来的回调函数里可能会再次触发这个dispatcher的事件分发,从而导致递归,所以我们这里记录了一下当前递归深度,如果深度大于指定值就不再处理。
注册回调的时候,为了方便使用,我们支持了一下三种回调类型:function对象,函数指针,以及成员函数指针:
typed_listen_handler<args...> add_listener(std::function<void(args...)> cur_callback)
{
typed_listen_handler<args...> result(std::uint32_t(callbacks.size()));
callbacks.push_back(std::make_shared< std::function<void(args...)>>(cur_callback));
return result;
}
typed_listen_handler<args...> add_listener(void(*cur_callback)(args...))
{
typed_listen_handler<args...> result(std::uint32_t(callbacks.size()));
callbacks.push_back(std::make_shared< std::function<void(args...)>>(cur_callback));
return result;
}
template <typename K>
typed_listen_handler<args...> add_listener( void(K::* cur_callback)(args...), K* self)
{
auto temp_lambda = [=](args... data)
{
return (self->*cur_callback)(data...);
};
typed_listen_handler<args...> result(std::uint32_t(callbacks.size()));
callbacks.push_back(std::make_shared< std::function<void(args...)>>(temp_lambda));
return result;
}
这里的typed_listen_handler是一个类型安全的int封装,保证内部存储的idx不会被typed_dispatcher<args...>修改,避免了直接使用int带来的数据混用问题:
template <typename... args>
class typed_listen_handler
{
std::uint32_t callback_idx;
friend class typed_dispatcher<args...>;
public:
typed_listen_handler()
: callback_idx(0)
{
}
typed_listen_handler(std::uint32_t in_callback_id)
:callback_idx(in_callback_id)
{
}
bool valid() const
{
return !!callback_idx;
}
void reset()
{
callback_idx = 0;
}
};
取消某个事件回调的时候,需要传入之前add_listener返回的handler:
bool remove_listener(typed_listen_handler<args...>& handler)
{
if (handler.callback_idx >= callbacks.size())
{
return false;
}
auto result = !!(callbacks[handler.callback_idx]);
callbacks[handler.callback_idx].reset();
handler.reset();
return result;
}
由于逻辑层可能在回调的过程中执行当前事件的监听,如果取消监听的同时修改了回调数组的大小,则可能会导致dispatch的for循环内产生迭代器失效,引发crash。所以这里取消监听只是设置对应元素为空,同时保留数组大小
上面描述的是一个极其简单的dispatcher实现,直接在游戏的业务逻辑内使用这样的事件分发并不适合。因为游戏业务逻辑里会有很多类型的事件分发,每个事件都有其不同的参数个数与类型,如果给每个事件都创建一个单独的dispatcher的话,dispatcher的数量会膨胀的非常厉害。而且游戏业务逻辑的事件是在不断增加的,每添加一种事件都创建一个专用的dispatcher会引发头文件的频繁修改。所以在游戏逻辑中,entity上除了一些重要逻辑使用的专用dispatcher之外,还有一个中心化的dispatcher来支持各种类型的事件分发。我们在mosaic_game中使用了模板来聚合:
template <typename... args>
class dispatcher
{
private:
std::tuple<dispatcher_impl<args>...> dispatcher_impls;
private:
template <typename K>
dispatcher_impl<K>& dispatcher_for()
{
static_assert(std::disjunction_v<std::is_same<K, args>...>, "invalid dispatch type");
return std::get<dispatcher_impl<K>>(dispatcher_impls);
}
}
这里的K其实并不是事件的参数类型,而是事件的标识符类型,只要这个K支持std::hash就可以作为事件的标识符类型,由于标识符类型可能有多种,所以这里使用变参模板来支持。
对于某个具体的标识符类型,会有一个对应的dispatcher_impl<K>,这个dispatcher_impl负责根据标识符的值进行第二次分发:
template <typename K>
class dispatcher_impl
{
private:
struct event_desc
{
std::uint32_t event_id;
std::uint32_t dispatch_depth = 0; // to stop recursive dispatch
std::map<std::uint32_t, std::vector<std::uint32_t>> data_callbacks; // data type_id to callbacks
};
std::unordered_map<K, std::uint32_t> event_idxes;
std::vector<event_desc> event_descs;
std::vector< std::shared_ptr<std::function<void(const K&, const event_data_wrapper&)>>> handler_to_callbacks;
};
这里的event_desc就是针对一个具体的K值存储的事件分发辅助结构,其内部的data_callbacks成员变量存储了不同的参数类型对应的回调函数索引列表。这个map里的key值是通过模板生成的类型id:
template <typename... args>
class dispatcher
{
static std::uint32_t last_type_id;
template <class K>
static std::uint32_t get_type_id()
{
static const std::uint32_t id = ++last_type_id;
return id;
}
};
template <typename... args>
std::uint32_t dispatcher<args...>::last_type_id = 0;
而这个map里的value里存储的每一个索引都指向handler_to_callbacks这个数组中的元素。为了将不同类型的回调函数统一存储在这个handler_to_callbacks数组中,这里使用event_data_wrapper来做类型擦除:
class event_data_wrapper
{
public:
template <typename K>
event_data_wrapper(const K& data, std::uint32_t data_type_id)
: data_type(data_type_id)
, data_ptr(&data)
{
}
const std::uint32_t data_type;
const void* data_ptr;
};
template <typename K, typename V>
listen_handler<K> dispatcher::add_listener(const K& event, void(*cur_callback)(const K&, const V&))
{
std::function<void(const K&, const V&)> temp_func(cur_callback);
return dispatcher_for<K>().add_listener(event, temp_func, get_type_id<V>());
}
template <typename V>
listen_handler<K> dispatcher_impl::add_listener(const K& event, std::function<void(const K&, const V&)> cur_callback, std::uint32_t cur_data_type_idx)
{
auto cur_callback_idx = get_next_callback_idx();
auto temp_lambda = [=](const K& event, const event_data_wrapper& data)
{
if (data.data_type != cur_data_type_idx)
{
return;
}
return cur_callback(event, *reinterpret_cast<const V*>(data.data_ptr));
};
handler_to_callbacks[cur_callback_idx] = std::make_shared< std::function<void(const K&, const event_data_wrapper&)>>(temp_lambda);
auto cur_event_id = get_event_idx(event);
event_descs[cur_event_id].data_callbacks[cur_data_type_idx].push_back(cur_callback_idx);
return listen_handler<K>{ cur_event_id, cur_data_type_idx, cur_callback_idx};
}
注册listener的时候,会创建一个临时的lambda来接受类型擦除之后的参数,执行强制类型转换来还原出原始的参数类型,然后再调用原始的listener来接收这个参数。
bool invoke_callback(std::uint32_t callback_idx, const K& event, const event_data_wrapper& event_data)
{
if (callback_idx == 0 || callback_idx >= handler_to_callbacks.size())
{
return false;
}
auto callback_copy = handler_to_callbacks[callback_idx];
if (!callback_copy)
{
return false;
}
callback_copy->operator()(event, event_data);
return true;
}
对外提供了一个模板化的dispatch接口,使用event的值找到对应的event_desc,然后再通过V的类型id找到对应的data_callbacks,然后遍历这个data_callbacks来执行回调:
template <typename V>
bool dispatch(const K& event, const V& data, std::uint32_t cur_data_type_id)
{
auto cur_event_desc_iter = event_idxes.find(event);
if (cur_event_desc_iter == event_idxes.end())
{
// this event is not registered
return false;
}
auto& cur_event_desc = event_descs[cur_event_desc_iter->second];
auto& cur_event_callbacks = cur_event_desc.data_callbacks;
auto cur_event_callback_iter = cur_event_callbacks.find(cur_data_type_id);
if (cur_event_callback_iter == cur_event_callbacks.end())
{
return false;
}
if (cur_event_desc.dispatch_depth >= max_dispatch_depth)
{
return false;
}
cur_event_desc.dispatch_depth++;
std::vector<std::uint32_t>& cur_callbacks = cur_event_callback_iter->second;
auto cur_data_wrapper = event_data_wrapper(data, cur_data_type_id);
for (std::size_t i = 0; i < cur_callbacks.size();)
{
if (invoke_callback(cur_callbacks[i], event, cur_data_wrapper))
{
i++;
continue;
}
if (i + 1 != cur_callbacks.size())
{
std::swap(cur_callbacks[i], cur_callbacks.back());
}
recycle_callback_idxes.push_back(cur_callbacks.back());
cur_callbacks.pop_back();
}
cur_event_desc.dispatch_depth--;
return true;
}
由于在dispatch的过程中使用了std::vector<std::uint32_t>&来引用回调函数数组列表,所以我们需要保证在这个dispatch的过程中cur_event_callback_iter需要维持有效,满足这个条件的容器只有map,所以data_callbacks的类型采用了map而不是unordered_map,因为unordered_map在扩容的时候会引发迭代器失效。就这样以三层中转加类型擦除的方式实现了一个中心化的dispatcher,可以支持任意的参数类型,使用起来非常灵活:
dispatcher<int, std::string> cur_dispatcher;
auto handler_1 = cur_dispatcher.add_listener(1, &callback_1);
auto handler_2 = cur_dispatcher.add_listener<int, string>(2, &callback_2);
auto handler_3 = cur_dispatcher.add_listener(std::string("hehe"), &callback_3);
auto handler_4 = cur_dispatcher.add_listener<string, string>(std::string("1"), &callback_4);
auto handler_5 = cur_dispatcher.add_listener(std::string("1"), &temp_a::callback_5, &a);
cur_dispatcher.dispatch(1, 2);
cur_dispatcher.dispatch(2, string("hehe"));
cur_dispatcher.dispatch(std::string("1"), string("hehe"));
cur_dispatcher.dispatch(std::string("hehe"), string("hehe"));
目前这个dispatcher也有其限制,为了支持中心化事件分发,导致事件的参数最多只能有一个。不过这个单参数的限制可以绕过去,也就是说如果事件本来带有多个参数,使用者需要创造一个新的类型来包裹这多个参数,这样就绕过了单参限制的问题。其实这个新类型可以通过变参模板创建std::tuple<Args...>来搞定,但是变参模板的代码实在是不好看懂,因此这里就不添加自动中间类型生成相关代码了。
大部分的业务系统在使用dispatcher分发事件时,使用的事件标识符类型基本都是字符串,由于业务逻辑散落各地组织分散,所以可能出现没有预想过的事件标识符相同引发的错误分发。为了规避事件标识符冲突的问题,在mosaic_game中设计了一种类型强约束的通用事件标识符类型enum_type_value_pair,这个标识符类型支持以枚举的形式来初始化,内部提供两个字段分别来存储枚举类的类型id以及枚举值:
struct enum_type_value_pair
{
std::uint32_t enum_type;
std::uint32_t enum_value;
template <typename T>
enum_type_value_pair(T v)
{
static_assert(std::is_enum_v<T>, "shoud be a enum value");
enum_type = type_hash::hash<T>();
enum_value = std::uint32_t(v);
}
friend bool operator==(const enum_type_value_pair& a, const enum_type_value_pair& b)
{
return a.enum_type == b.enum_type && a.enum_value == b.enum_value;
}
friend bool operator!=(const enum_type_value_pair& a, const enum_type_value_pair& b)
{
return a.enum_type != b.enum_type || a.enum_value != b.enum_value;
}
};
template <>
struct std::hash<spiritsaway::utility::enum_type_value_pair>
{
std::size_t operator()(const spiritsaway::utility::enum_type_value_pair a) const
{
std::uint64_t v = (std::uint64_t(a.enum_type)<<32) + a.enum_value;
return std::hash<std::uint64_t>{}(v);
}
};
在这个enum_type_value_pair类型之上,构造了一个enum_dispatcher,接口层会自动将传入的枚举值转换为enum_type_value_pair,然后再调用之前提到的dispatcher_impl来做事件分发:
class enum_dispatcher
{
private:
dispatcher_impl<enum_type_value_pair> m_dispatcher_impl;
public:
enum_dispatcher()
{
}
template <typename K, typename V>
listen_handler<enum_type_value_pair> add_listener(const K& event, std::function<void(const enum_type_value_pair&, const V&)> cur_callback)
{
return m_dispatcher_impl.add_listener(enum_type_value_pair(event), cur_callback, type_hash::hash<V>());
}
// 省略其他几种形式的listener注册
bool remove_listener(listen_handler<enum_type_value_pair>& handler)
{
auto result = m_dispatcher_impl.remove_listener(handler);
handler.reset();
return result;
}
template <typename K, typename V>
std::size_t dispatch(const K& event, const V& data)
{
return m_dispatcher_impl.dispatch(enum_type_value_pair(event), data, type_hash::hash<V>());
}
};
在actor_entity上我们提供了多种dispatcher,业务逻辑自由选择使用哪一种,这样在迭代过程中可以避免频繁修改actor_entity:
// 事件类型为string的dispatcher 自由度最大化
utility::dispatcher<std::string> m_misc_dispatcher;
// 属性变化通知dispatcher
utility::dispatcher<spiritsaway::property::property_replay_offset> m_prop_dispatcher;
// 对接场景事件分发的dispatcher
utility::dispatcher<std::string> m_space_dispatcher;
// 基于枚举类型的dispatcher
utility::enum_dispatcher m_dispatcher;
// 通知迁移完成的专用dispatcher
utility::typed_dispatcher<void> m_migrate_in_finish_dispatcher;
这里的m_space_dispatcher需要额外介绍一下,其作用是对接到场景内的广播事件。如果场景需要分发一个消息事件给所有actor_entity,需要执行场景内actor_entity的全遍历,然后在这些actor_entity上调用dispatcher.dispatch,这是一个耗时比较大的操作。如果真正在意这个事件的actor_entity数量比较少,就会产生严重的性能浪费。所以这里我们引入一个中间层m_space_dispatcher,只有真正关心一个事件的时候才会将当前actor挂载到space里这个event的通知集合之中:
void actor_entity::on_space_self_event(const std::string& event_id, std::uint64_t event_seq, const json& event_detail)
{
if(get_space()->is_cell_space() && event_seq <= m_space_self_event_seq)
{
return;
}
m_space_self_event_seq = event_seq;
m_space_dispatcher.dispatch(event_id, event_detail);
}
utility::listen_handler<std::string> actor_entity::space_event_listener_add(const std::string& event_id, std::function<void(const std::string&, const json&)> cb)
{
auto cur_listener = m_space_dispatcher.add_listener(event_id, cb);
if(m_space_dispatcher.get_listener_count<std::string, json>(event_id) == 1)
{
get_space()->add_actor_listener(event_id, this);
}
return cur_listener;
}
void actor_entity::space_event_listener_remove(const std::string& cur_event, utility::listen_handler<std::string> cur_handler)
{
m_space_dispatcher.remove_listener(cur_handler);
if(m_space_dispatcher.get_listener_count<std::string, json>(cur_event) == 0)
{
get_space()->remove_actor_listener(cur_event, this);
}
}
在space_entity中使用一个map<string, vector<actor_entity*>>来event的通知集合,这里使用map而不是unordered_map也是为了避免dispatch过程中添加新的事件监听引发的迭代器失效:
void space_entity::add_actor_listener(const std::string& event_id, actor_entity* cur_actor)
{
auto& cur_event_listeners = m_event_listen_actors[event_id];
auto temp_iter = std::find(cur_event_listeners.begin(), cur_event_listeners.end(), cur_actor);
if(temp_iter != cur_event_listeners.end())
{
return;
}
cur_event_listeners.push_back(cur_actor);
}
void space_entity::remove_actor_listener(const std::string& event_id, actor_entity* cur_actor)
{
auto& cur_event_listeners = m_event_listen_actors[event_id];
auto temp_iter = std::find(cur_event_listeners.begin(), cur_event_listeners.end(), cur_actor);
if(temp_iter != cur_event_listeners.end())
{
*temp_iter = nullptr;
}
}
执行事件分发的时候,遇到为nullptr的元素就直接跳过,并累加一个m_temp_invalid_listener_count计数器,同时开启一个60s一次的timer来定期清除为nullptr的元素:
void space_entity::clear_invalid_actor_listeners()
{
if(m_temp_invalid_listener_count > 1000)
{
for(auto& one_pair: m_event_listen_actors)
{
auto& cur_listener_vec = one_pair.second;
cur_listener_vec.erase(std::remove(cur_listener_vec.begin(), cur_listener_vec.end(), nullptr), cur_listener_vec.end());
}
m_temp_invalid_listener_count = 0;
}
add_timer_with_gap(std::chrono::seconds(m_clear_invalid_listener_gap_seconds), [this]()
{
clear_invalid_actor_listeners();
});
}
基于计时器的逻辑驱动
游戏内还有非常多的逻辑依赖于计时器来执行的,例如一些周期性的活动、定期检查的任务以及延迟生效的效果等,这些任务都可以抽象为一个需要在指定时间点执行的std::function<void()>。为了维护这些指定时间点的任务,最简单的数据结构就是一个存储了超时信息的数组:
struct timer_info
{
std::uint64_t timer_id = 0;
std::uint64_t expire_ts = 0;
std::function<void()> callback;
bool operator<(const timer_info& other) const
{
return expire_ts < other.expire_ts;
}
};
class timer_mgr
{
std::vector<expire_info> timers;
std::uint64_t last_timer_id = 0;
std::unordered_set<std::uint64_t> active_timers;
public:
// 创建一个在给定时间点超时的计时器 返回一个uint64 作为这个计时器的唯一id
std::uint64_t add_timer(std::uint64_t expire_ts, std::function<void()> callback);
// 取消一个计时器
bool cancel_timer(std::uint64_t timer_id);
// 执行一次计时器管理器的更新操作 触发所有超时计时器
void check_expire(std::uint64_t cur_ts);
};
每次新建一个计时器任务的时候,都构造一个新的timer_info放到这个timers数组的末尾,并将计时器的id放到active_timers这个集合中。取消一个计时器的时候,只需要从这个集合中删除这个id即可。添加和删除操作都可以认为是常数时间:
std::uint64_t timer_mgr::add_timer(std::uint64_t expire_ts, std::function<void()> callback)
{
if(!callback)
{
return 0;
}
auto new_timer_id = ++last_timer_id;
timers.push_back(timer_info{new_timer_id, expire_ts, callback});
active_timers.insert(new_timer_id);
return new_timer_id;
}
bool timer_mgr::cancel_timer(std::uint64_t timer_id)
{
return active_timers.erase(timer_id) == 1;
}
外部以一定的周期去检查这个数组里是否有过期的时间戳,如果有则执行关联的任务并从这个数组中删除:
void timer_mgr::check_expire(std::uint64_t cur_ts)
{
for(auto& one_timer: timers)
{
if(one_timer.expire_ts <= cur_ts)
{
if(active_timer.erase(one_timer.timer_id) == 1)
{
one_timer.callback();
cur_timer.callback = std::function<void()>{};
}
one_timer.expire_ts = 0;
}
}
timers.erase(std::remove_if(timers.begin(), timers.end(), [](const timer_info& one_timer)
{
return one_timer.expire_ts == 0;
}), timers.end());
}
当游戏业务逻辑开始累积之后,这些计时器就会变得越来越多,很快其数量就开始以百为单位。此时每次以数组全遍历的形式去检查计时器超时就变得非常低效,同时每次执行erase都会造成大量的数组元素移动,这部分的代价也很大。因此我们需要一个效率更高的结构来获取本次检查过程中超时的计时器,目前主流的实现方案分为了三种:
- 基于有序数组实现的计时器
- 基于优先队列实现的计时器
- 基于时间轮实现的计时器
基于有序数组实现的计时器理解起来非常简单,就是timers里的元素是按照expire_ts从小到大排列好的,这样检查超时的计时器代价就很小了,从头开始遍历处理直到遇到一个还没有超时的计时器就跳出循环:
void timer_mgr::check_expire(std::uint64_t cur_ts)
{
std::uint32_t i = 0;
for(; i< timers.size(); i++)
{
auto& cur_timer = timers[i];
if(cur_timer.expire_ts <= cur_ts)
{
if(cur_timer.expire_ts != 0)
{
if(active_timer.erase(cur_timer.timer_id) == 1)
{
cur_timer.callback();
cur_timer.callback = std::function<void()>{};
}
cur_timer.expire_ts = 0;
}
}
else
{
break;
}
}
if(i >= 20 && i > timers.size() * 0.25)
{
timers.erase(timers.begin(), timers.begin() + i);
}
}
在处理完所有超时的计时器之后,这里并没有像之前的实现一样立即删除所有的失效计时器,而是将这些计时器设置为默认值,继续维护数组的有序性。只有当失效计时器的数量大于一定阈值时才删除这些失效计时器,这样就可以避免每次执行check_expire时因为元素的删除导致的数组元素整体移动,平摊下来的数组移动代价就小了很多。
不过这样的最优复杂度也是有其代价的,新建一个计时器的时候无法像往常一样放在数组末尾,而是需要找到有序数组中的插入位置。在有序数组中查找插入位置其实就是插入排序,最坏复杂度为数组的长度,如果计时器的创建比较频繁的话这里的代价就无法接受了。
为了降低这个插入时的最坏线性时间复杂度,很多计时器的实现都使用了一个最小堆来管理timers数组。每次新建一个计时器的时候,创建的timer_info会先放在timers数组的末尾,然后调用std::push_heap就完成了最小堆结构,因此插入的复杂度为log(N)。然后在check_expire时,不断的使用pop_heap来弹出已经超时的计时器,每次操作的时间复杂度也是log(N)。
// 由于stl默认维持的是最大堆,所以要做最小堆的话需要传入一个自定义比较器
struct timer_info_inv_less
{
bool operator()(const timer_info& a, const timer_info& b) const
{
return a.expire_ts > b.expire_ts;
}
};
std::uint64_t timer_mgr::add_timer(std::uint64_t expire_ts, std::function<void()> callback)
{
if(!callback)
{
return 0;
}
auto new_timer_id = ++last_timer_id;
timers.push_back(timer_info{new_timer_id, expire_ts, callback});
active_timers.insert(new_timer_id);
std::push_heap(timers.begin(), timer.end(), timer_info_inv_less{});
return new_timer_id;
}
void timer_mgr::check_expire(std::uint64_t cur_ts)
{
std::uint32_t i = 0;
while(timers.size())
{
if(timers[0].expire_ts <= cur_ts)
{
auto& cur_timer = timers[0];
if(active_timer.erase(cur_timer.timer_id) == 1)
{
cur_timer.callback();
cur_timer.callback = std::function<void()>{};
}
cur_timer.expire_ts = 0;
std::pop_heap(timers.begin(), timers.end(), timer_info_inv_less{});
timers.pop_back();
}
else
{
break;
}
}
}
这里通过手动调用stl里堆相关接口来实现了一个非常简单的优先队列,更好的方式其实是直接使用std::priority_queue<timer_info>,来显示的表明优先队列的语义。
整体check_expire的时间复杂度为k*log(N), k为超时的计时器个数,最坏情况下会出现N*log(N),之前基于有序数组实现的check_expire复杂度只有K,算是一个非常大的劣化。考虑到有序数组实现的定时器check_expire的复杂度是最优的,因此业界在有序数组实现的定时器基础上继续演进,开发出了时间轮(timer wheel)这样的定时器专用数据结构,这个数据结构由 George Varghese与Tony Lauck 在1987年的论文 Hashed and Hierarchical Timing Wheels: data structures to efficiently implement a timer facility中被提出。
首先我们来介绍一下最简单情况下时间轮是如何管理计时器的,此时需要限定添加的新计时器的超时时间与当前时间点的差值不能超过一个指定值。在这个超时限制下,时间轮内部使用一个由数组组成的循环队列,循环队列里的每个元素都是一个计时器的数组。这个循环队列组成一个类似于时钟表盘的圆环,队列里每个元素代表一个时间片[begin,end),每个时间片的时间长度都是相同的,同时使用一个数组来存储超时时间在这个时间片内的所有计时器。此外时间轮内部存储一个索引指向上一次处理的时间片,以及上一次处理的时间。
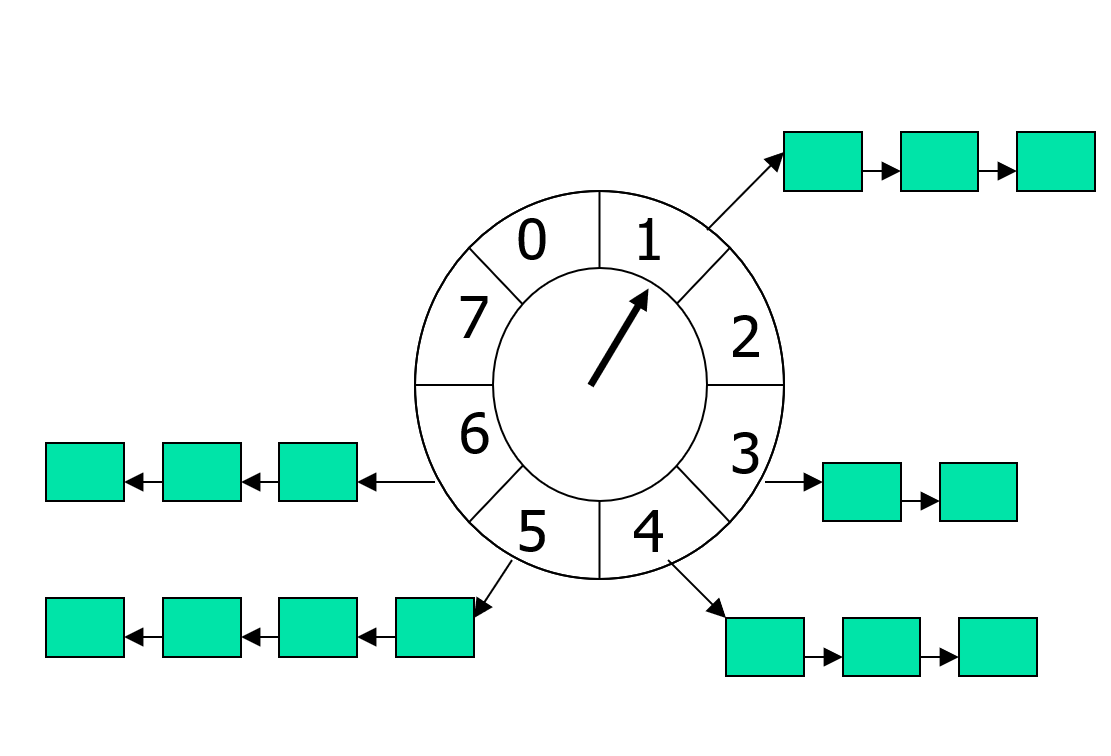
在了解这些基础设定之后,下面就是添加一个计时器的代码,非常简单,复杂度平摊下来就是O(1):
class wheel_timer_mgr
{
std::uint64_t last_timer_id = 0;
std::unordered_set<std::uint64_t> active_timers;
const std::uint32_t timer_slice_range;// 每个时间片的大小
const std::uint32_t timer_circular_num; // 循环队列里时间片的个数
const std::uint64_t base_ts;// 创建时的时间戳
std::uint64_t last_timer_slice_index = 0;// 上次处理的时间片索引
std::vector<std::vector<timer_info>> timer_slices; // 循环队列
public:
wheel_timer_mgr(std::uint32_t slice_range, std::uint32_t circular_num, std::uint64_t in_ts)
: timer_slice_range(slice_range)
, timer_circular_num(circular_num)
, base_ts(in_ts - timer_slice_range)
, timer_slices(circular_num)
{
}
// base_ts初始化的时候减去一个timer_slice_range 保证这里算出来的最小值是1
std::uint64_t calc_timer_slice_index(std::uint64_t cur_ts) const
{
return (cur_ts - base_ts) / timer_slice_range;
}
std::uint64_t add_timer(std::uint64_t expire_ts, std::function<void()> callback)
{
if(!callback)
{
return 0;
}
auto new_timer_id = ++last_timer_id;
assert(expire_ts >= base_ts + (last_timer_slice_index + 1) * timer_slice_range); // 要求过期时间要大于上次时间片的过期时间
auto cur_timer_slice_index = calc_timer_slice_index(expire_ts);
// 要求最大超时间隔不能超过总时间片
assert(cur_timer_slice_index - last_timer_slice_index < timer_circular_num);
timer_slices[cur_timer_slice_index % timer_circular_num].push_back(timer_info{new_timer_id, expire_ts, callback});
active_timers.insert(new_timer_id);
return new_timer_id;
}
};
时间轮的判定计时器超时的代码也很简单,每个时间片里所有的计时器统一过期:
void wheel_timer_mgr::check_expire(std::uint64_t cur_ts)
{
auto cur_timer_slice_index = calc_timer_slice_index(cur_ts);
while((last_timer_slice_index + 1)!= cur_timer_slice_index)
{
last_timer_slice_index++;
for(auto& one_timer: timer_slices[last_timer_slice_index % timer_circular_num])
{
if(active_timer.erase(one_timer.timer_id) == 1)
{
one_timer.callback();
one_timer.callback = std::function<void()>{};
}
}
timer_slices[last_timer_slice_index % timer_circular_num].clear();
}
}
统一过期的好处就是算法复杂度超级简单,平摊下来每个超时的计时器其处理代价就是O(1)。但是这样粗暴的处理也有其缺点,同一个timer_slice里的计时器并没有依照其超时时间从小到大来触发回调。这样可能导致逻辑层有些有先后关系的计时器并没有按照预想的顺序进行回调,从而引发顺序相关的逻辑错误。面对这个问题的解决方法就是在插入新计时器的时候,保持每个timer_slice都是一个以expire_ts从小到大排列的有序数组。在循环队列的容量比较大且时间片的大小比较小的情况下,我们可以比较安全的假设同一个时间片里的计时器数量不会很多,因此这个保持有序的额外代价不会很明显。
前面介绍的最简情况下的时间轮实现有一个非常强的预设条件,即新添加的计时器的过期时间与上一次时间片的过期时间的差值不能超过指定的常量timer_circular_num * timer_slice_range。但是在实际的业务系统中一个长周期的计时器总是无法避免的,所以为了放松这个最大超时时间的限制,在上述的时间轮定义的timer_info里再添加一个字段代表其过期的批次round, 每次一个时间片被调度到的时候只会将与当前批次的计时器执行过期操作,大于当前批次的计时器会保留在这个时间片中:
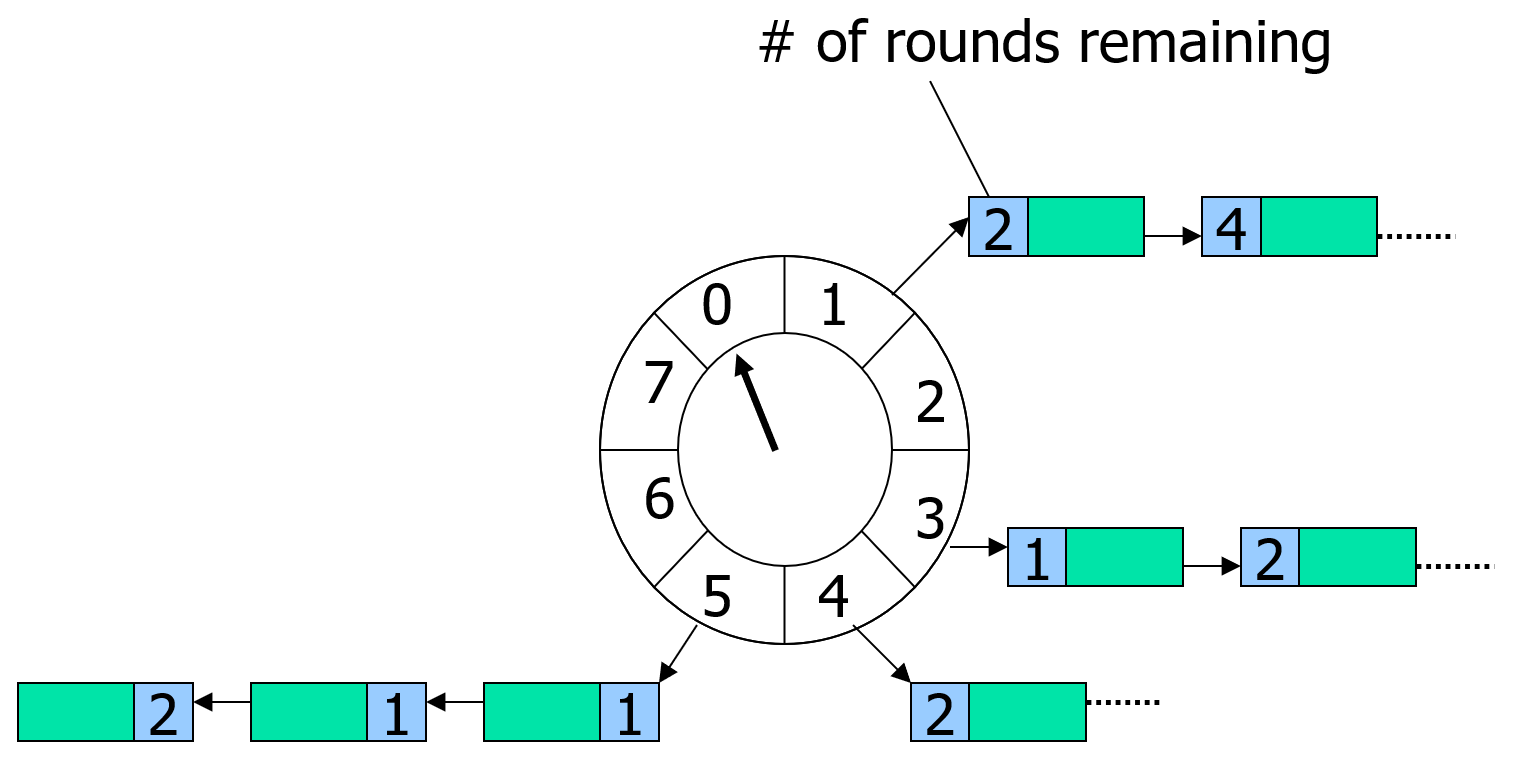
其实这个round字段也不需要添加,可以直接使用内部存储的过期时间计算出来:
std::uint64_t wheel_timer_mgr::calc_expire_ts_round(std::uint64_t expire_ts) const
{
return calc_timer_slice_index(expire_ts) / timer_circular_num;
}
整体来说放松了最大超时时间的限制之后,原始的时间轮管理器的改动代码也没几行,整体复杂度与时间片内保持有序的时间轮一样。
一般来说,将循环数组的大小设置的比较大,例如说1024,同时将时间片精度设置的比较小,如5ms,就可以让整体的计时器基本平均分布在所有的时间片之中。在这个均匀分布的情况下,可以显著的降低维持有序插入时的最坏复杂度O(N)。不过对于有些包含巨量计时器的软件系统而言,这样的平摊后的复杂度还是有点高,典型例子就是linux的内核以及apache-kafka。在这些拥有巨量计时器的软件中,采取了层次化时间轮的结构来管理计时器。
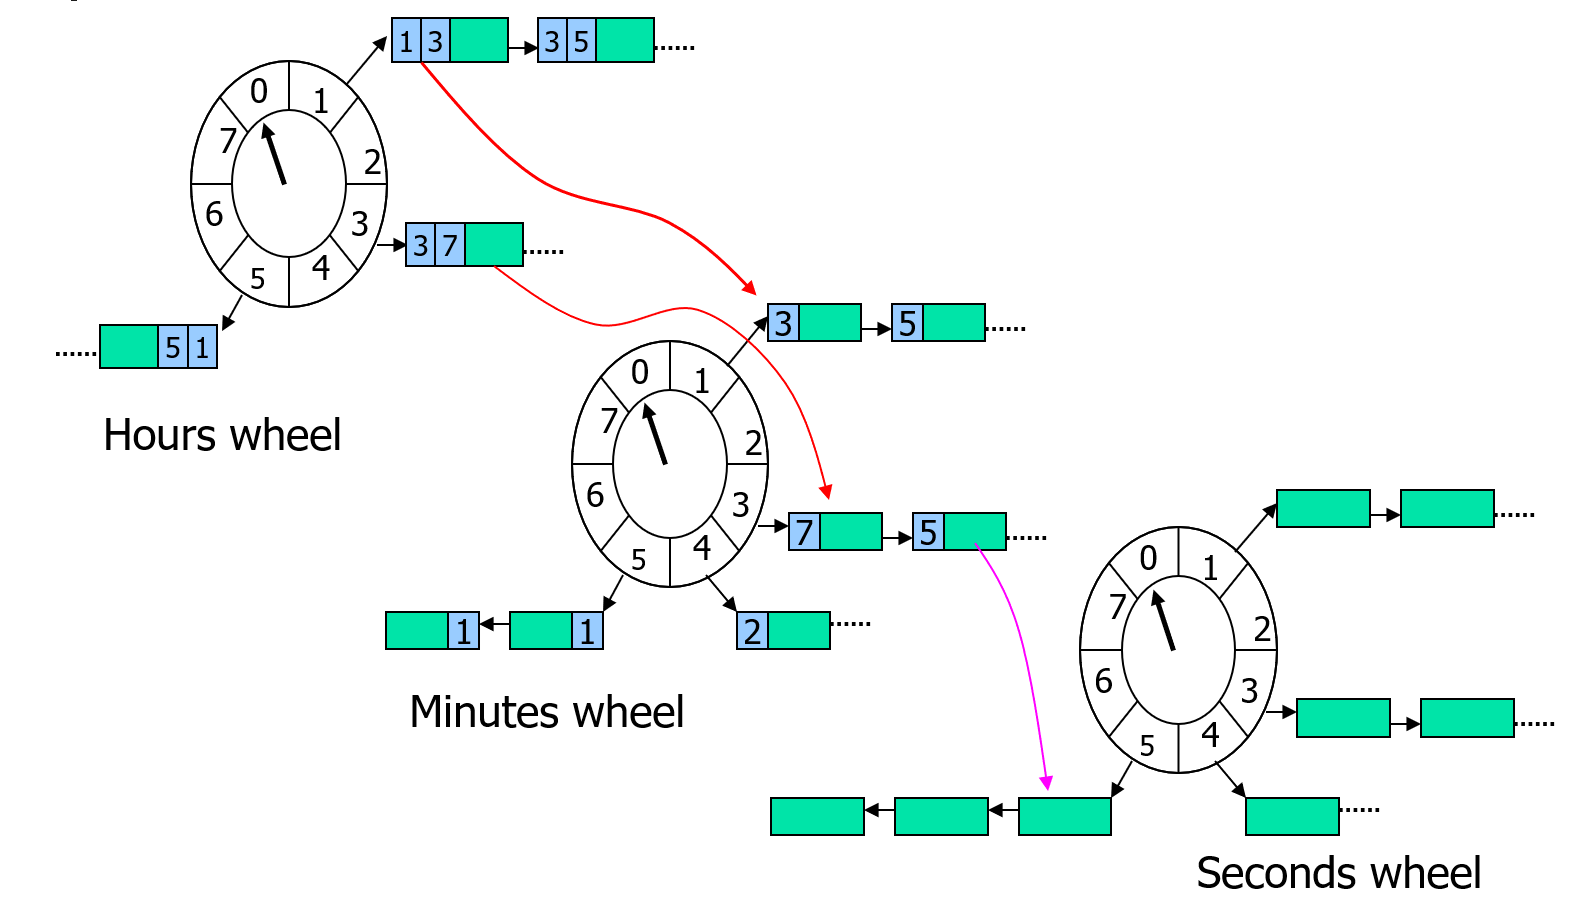
上图就是层次化时间轮的示意图,这里有三种不同精度的时间轮,分别是小时、分钟、秒钟,对应的循环队列的大小分别是24、60、60。秒钟时间轮里存储的是当前分钟对应的所有计时器,分钟时间轮里存储的是当前小时里的所有计时器,小时时间轮里存的是所有计时器。当添加一个新的计时器的时候,首先会使用calc_timer_slice_index计算其在小时时间轮的索引cur_timer_slice_index:
- 如果索引值与小时时间轮里记录的
last_timer_slice_index不一样,则直接插入到这个cur_timer_slice_index对应的时间片之中 - 如果索引值与小时时间轮里记录的
last_timer_slice_index一样,则将这个插入请求传递到下一级的时间轮中,
在分钟时间轮里的计时器插入流程与小时时间轮里一样,可能根据情况继续传递到秒钟时间轮里。到了秒钟时间轮之后,由于其没有下一级的时间轮,因此根据计算的索引直接进行插入即可。
当执行计时器过期操作的时候,操作的是秒钟时间轮,当秒钟时间轮的时间片索引走完一整圈60之后,需要更新上一级的分钟时间轮的时间片索引,并将分钟时间轮当前时间片里的计时器全都转移到秒钟时间轮中执行插入。如果此时分钟实践论的时间片索引也刚好走完一圈60,那么需要先更新小时时间轮的时间片索引,并把这个小时里所有计时器转移到分钟时间轮中执行插入,然后再执行计时器从分钟时间轮转移到秒钟时间轮的流程。
在这样的设计下,分钟时间轮和小时时间轮里每个时间片里存储的计时器并不要求保持有序,因为这些数据只有在秒钟时间轮走完一圈的时候才有机会去访问。此时直接遍历一次筛选出符合要求的计时器即可,这些操作被触发的概率很小,平摊下来就是常数复杂度。
上面的样例里使用的是时分秒的三级时间轮结构,总体的时间片大小就是60+60+24=144, 这样的时间片数量对于内存的压力是比较小的。 实际使用中可以继续添加天数时间轮和毫秒时间轮,甚至我们可以不按照自然时间精度来进行层次划分,而采用每一级精度都是上一级的256倍来划分,逻辑上也是等价的,整体的时间复杂度与空间复杂度都不会发生明显变化。
游戏逻辑里经常会遇到定期触发的相关逻辑,如每周五晚上八点的节日活动开启、每天零点刷新的排行榜、特殊区域的持续性扣血等。这种可重复的计时任务可以以单次计时器的形式模拟出来,即在计时器的callback中重新执行一次指定间隔的计时器添加操作。如果这种可重复计时器有很多的情况下,这种重复添加的模式就会比较影响效率。因此绝大部分的计时器管理器都会提供一个add_repeated_timer(float delay, float gap, std::function<void()> callback)这样的接口,此时对应的timer_info里添加一个bool标记这个计时器是一个重复计时器,在执行计时器回调的时候修改其超时时间然后重新执行一次后续的管理操作即可。
基于异步回调的逻辑驱动
entity内有些逻辑需要涉及到与外部entity以及其他系统的通信,在发出的请求得到应答之后再继续之前的逻辑执行后续处理,这样的逻辑模式可以简化为下面的代码:
void func_a()
{
json request;
// 发送数据请求
send_request(request);
// 通过某种方式等待另外一端返回数据
wait_for_response();
// 获取返回的结果
json response = fetch_response();
handle_respose(response);
}
如果我们在wait_for_response里使用同步的方式来等待返回值,则当前线程的运行将会被这个等待函数阻碍。如果每次执行func_a的时候都创建一个线程的话系统资源消耗的就过大,所以实际的系统中都会以异步的形式来等待请求的完成,原来的单个函数被拆为多个函数:
void func_a_send()
{
json request;
// 发送数据请求
send_request(request);
}
void func_a_recv()
{
// 获取返回的结果
json response = fetch_response();
handle_respose(response);
}
在这个模式下,先执行func_a_send将请求发送到外部,完成之后系统继续执行其他任务。当系统接收到外部发送回来的数据时,再执行func_a_recv来获取返回数据并执行后续的流程。这里只是阐述了一个最简流程,一次发送对应一次接收,实际运用中的系统其实远比这个复杂,最主要的差异在于:接受返回值的后续处理很可能需要知道发送请求的上下文。 这个问题比较好解决,直接让外部系统将请求request和返回值一起打包发送回来就好了。
void func_a_recv()
{
auto [request, response] = fetch_response();
handle_response(request, response);
}
不过这样的设计会导致通信流量的明显增加,而且也并没有完全解决恢复请求上下文的问题。因为我们的请求上下文并不仅限于发送的数据request,可能还会出现一些不可序列化的其他对象,例如一些裸指针、智能指针等等。这些对象的引用有些时候可以以标识符的形式转换为可序列化的数据,每次接收response的时候再手动的根据这些标识符重新构造出这些对象。但是随着上下文内对象的增多,这种对象转化为标识符然后再从标识符转化为对象的代码就变得很冗长,我们需要一个自动的方式来打包所有要用到的请求上下文对象。此时lambda函数就非常满足需求,在使用lambda的情况,流程代码可以简化为下面的样子:
void func_a_send()
{
entity* other;// 上下文里会使用到的对象
json request;
auto callback_id = add_callback([=](const json& response)
{
handle_response(request, response, other);
});
send_request(request, callback_id);
}
void invoke_callback(const json& response, std::uint64_t callback_id)
{
std::function<void(const json&)> request_callback = fetch_callback(callback_id);
if(request_callback)
{
request_callback(response);
}
}
这里依赖了一个add_callback函数来注册一个回调上下文,返回一个uint64的回调id,随着请求数据一起发送出去。当请求得到响应时,对端会同时下发响应数据以及回调上下文的id。我们再通过fetch_callback接口来获取出注册的回调,然后再以这个返回数据来执行。
这个就是常规的异步回调的处理流程,但是在游戏中server_entity的异步回调又有一些不一样。因为server_entity会出现进程间迁移,server_entity在发送请求的时候在A进程上,但是数据下发的时候可能已经迁移到了B进程。虽然我们能够在send_request的时候带上server_entity的迁移不变地址proxy,在其他服务返回数据的时候通过这个迁移不变地址proxy发送到迁移后的新server_entity上。但是正确的处理这个返回数据还要求我们能将对应的回调也能迁移过来,对于这种需要支持迁移的回调,我们需要用一种可序列化的形式来对其进行封装:
struct json_callback_info
{
std::string cb_type;
std::uint64_t cb_id;
json cb_args;
NLOHMANN_DEFINE_TYPE_INTRUSIVE(json_callback_info, cb_type, cb_id, cb_args);
};
struct json_callback_result : public json_callback_info
{
json cb_result;
};
这里的cb_type就是回调函数的名字,cb_args是记录这个回调所需要的一些额外参数。同时callback_manager上还需要记录现在已经分配的最大回调计时器大小,这样就可以避免迁移后出现相同的计数器:
class json_callback_manager
{
public:
using callback_handler = handler_wrapper<std::uint64_t, json_callback_manager>;
protected:
std::uint64_t m_callback_counter = 0;
// use map in case iterator invalidate
std::map<std::uint64_t, json_callback_info> m_callbacks;
public:
NLOHMANN_DEFINE_TYPE_INTRUSIVE(json_callback_manager, m_callback_counter, m_callbacks);
};
server_entity在接收到返回值之后,利用rpc机制执行回调分发,此时返回值response拼接到原来存储的参数数组最后:
void server_entity::invoke_callback(utility::mixed_callback_manager::callback_handler callback_id, const json& result)
{
utility::json_callback_info cur_cb_info;
if (m_callback_mgr.invoke_callback(callback_id, result, cur_cb_info))
{
if(!cur_cb_info.cb_type.empty())
{
if(!cur_cb_info.cb_args.is_array())
{
m_logger->warn("fail to invoke_callback with callback_id {}, result {} cb_args not array", callback_id.value(), result.dump());
return;
}
utility::rpc_msg cur_msg;
cur_msg.cmd = cur_cb_info.cb_type;
cur_msg.args = cur_cb_info.cb_args.get<json::array_t>();
cur_msg.args.push_back(result);
if(on_rpc_msg(cur_msg) != utility::rpc_msg::call_result::suc)
{
m_logger->warn("fail to invoke_callback with callback_id {}, result {} rpc call fail cmd {} args {}", callback_id.value(), result.dump(), cur_msg.cmd, json(cur_msg.args).dump());
}
}
}
else
{
m_logger->warn("fail to invoke_callback with callback_id {}, result {}", callback_id.value(), result.dump());
}
}
实际上为了支持非迁移回调和迁移回调,我们在mosaic_game中提供的是一个聚合了的mix_callback_manager:
class mixed_callback_manager
{
public:
using json_func_cb = func_callback_manager::json_callback_t;
using json_cb_handler = json_callback_manager::callback_handler;
using func_cb_handler = func_callback_manager::callback_handler;
using json_cb_info = json_callback_info;
using callback_handler = handler_wrapper<std::uint64_t, mixed_callback_manager>;
protected:
json_callback_manager m_json_cb_mgr;
func_callback_manager m_func_cb_mgr;
public:
callback_handler add_callback(json_func_cb func_cb)
{
auto temp_handler = m_func_cb_mgr.add_callback(func_cb);
return callback_handler(temp_handler.value() * 2 );
}
callback_handler add_callback(const std::string& cb_type, const json& cb_args)
{
auto temp_handler = m_json_cb_mgr.add_callback(cb_type, cb_args);
return callback_handler(temp_handler.value() * 2 + 1);
}
};
这里同时提供了两个类型的添加回调接口,当添加的是非迁移回调的时候返回值会变成2*a+1,当添加的是迁移回调的时候返回值会变成2*a,这样的设计是为了更好的做回调触发时的区分:
bool is_json_cb_handler(callback_handler cb_handler) const
{
return cb_handler.value() % 2 == 1;
}
bool invoke_callback(callback_handler cb_handler, const json& result, json_callback_info& cb_info)
{
if(is_json_cb_handler(cb_handler))
{
// 此时并不执行回调 而是删除之前的cb 信息
json_cb_handler temp_handler = m_json_cb_mgr.construct_handler(cb_handler.value()/2);
return m_json_cb_mgr.invoke_callback(temp_handler, cb_info);
}
else
{
func_cb_handler temp_handler = m_func_cb_mgr.construct_handler(cb_handler.value() / 2);
return m_func_cb_mgr.invoke_callback(temp_handler, result);
}
}
BigWorld 的逻辑驱动
由于bigworld所提供是一个基础框架,并没有涉及到具体业务,所以其回调逻辑驱动组件只提供了基础的定时器和RPC的Reply这两个功能。RPC的Reply功能在前述的RPC章节中已经介绍过了,因此本章节只介绍定时器的代码实现。
计时器队列
在bigworld里,定时器的实现是通过lib/cstdmf/time_queue.hpp提供的TimerQueueT模板类来完成的。TimerQueueT内部有一个优先队列timeQueue_,队列中的元素是按照触发时间排序的。队列里每个元素都是一个TimerQueueNode,TimerQueueNode包含了触发时间、重复间隔、处理对象和用户数据等信息,
/**
* This class implements a time queue, measured in game ticks. The logic is
* basically stolen from Mercury, but it is intended to be used as a low
* resolution timer. Also, timestamps should be synchronised between servers.
*/
template< class TIME_STAMP >
class TimeQueueT : public TimeQueueBase
{
public:
TimeQueueT();
virtual ~TimeQueueT();
void clear( bool shouldCallOnRelease = true );
/// This is the unit of time used by the time queue
typedef TIME_STAMP TimeStamp;
/// Schedule an event
TimerHandle add( TimeStamp startTime, TimeStamp interval,
TimerHandler* pHandler, void * pUser,
const char * name = "UnnamedTimer" );
/// Process all events older than or equal to now
int process( TimeStamp now );
// 省略很多接口
private:
PriorityQueue timeQueue_;
Node * pProcessingNode_;
TimeStamp lastProcessTime_;
int numCancelled_;
};
这个PriorityQueue的实现非常简单,就是一个基于std::vector的堆实现,堆的每个元素都是一个TimerQueueNode,堆的排序规则是按照TimerQueueNode的触发时间time_来排序的,维持有序的操作就是直接使用std::push_heap和std::pop_heap这两个函数:
/// Comparison object for the priority queue.
class Comparator
{
public:
bool operator()(const Node* a, const Node* b)
{
return a->time() > b->time();
}
};
/**
* This class implements a priority queue. std::priority_queue is not used
* so that access to the underlying container can be gotten.
*/
class PriorityQueue
{
public:
typedef BW::vector< Node * > Container;
typedef typename Container::value_type value_type;
typedef typename Container::size_type size_type;
bool empty() const { return container_.empty(); }
size_type size() const { return container_.size(); }
const value_type & top() const { return container_.front(); }
void push( const value_type & x )
{
container_.push_back( x );
std::push_heap( container_.begin(), container_.end(),
Comparator() );
}
void pop()
{
std::pop_heap( container_.begin(), container_.end(), Comparator() );
container_.pop_back();
}
};
TimeQueueT对外暴露的最重要接口就是add和process, add负责添加一个计时器,process负责处理所有到期的计时器,这两个接口的实现非常直白,都是调用PriorityQueue提供的的push和pop方法:
/**
* This method adds an event to the time queue. If interval is zero,
* the event will happen once and will then be deleted. Otherwise,
* the event will be fired repeatedly.
*
* @param startTime Time of the initial event, in game ticks
* @param interval Number of game ticks between subsequent events
* @param pHandler Object that is to receive the event
* @param pUser User data to be passed with the event.
* @return A handle to the new event.
*/
template <class TIME_STAMP>
TimerHandle TimeQueueT< TIME_STAMP >::add( TimeStamp startTime,
TimeStamp interval, TimerHandler * pHandler, void * pUser,
const char * name )
{
Node * pNode = new Node( *this, startTime, interval, pHandler, pUser, name );
timeQueue_.push( pNode );
pNode->incRef();
return TimerHandle( pNode );
}
返回值是一个TimerHandle对象,这个对象封装了TimeQueueNode对象的指针,外部可以通过这个对象来取消计时器:
/**
* This class is a handle to a timer added to TimeQueue.
*/
class TimerHandle
{
public:
CSTDMF_DLL explicit TimerHandle( TimeQueueNode * pNode = NULL );
CSTDMF_DLL TimerHandle( const TimerHandle & other );
CSTDMF_DLL ~TimerHandle();
CSTDMF_DLL void cancel();
void clearWithoutCancel() { pNode_ = NULL; }
bool isSet() const { return pNode_ != NULL; }
CSTDMF_DLL TimerHandle & operator=( const TimerHandle & other );
friend bool operator==( const TimerHandle & h1, const TimerHandle & h2 );
TimeQueueNode * pNode() const { return pNode_; }
private:
TimeQueueNode * pNode_;
};
这个add接口要求外部提供一个TimerHandler对象和一个pUser指针,这个TimerHandler对象会在计时器到期时被调用,因此TimerHandler必须实现handleTimeout方法。这个方法第一个参数就是add函数返回的TimerHandle对象,第二个参数是用户提供的pUser指针,这样就能支持在同一个函数上通过TimerHandle和pUser来区分不同的计时器实例:
/**
* This is an interface which must be derived from in order to
* receive time queue events.
*/
class TimerHandler
{
public:
TimerHandler() : numTimesRegistered_( 0 ) {}
virtual ~TimerHandler()
{
MF_ASSERT( numTimesRegistered_ == 0 );
};
/**
* This method is called when a timeout expires.
*
* @param handle The handle returned when the event was added.
* @param pUser The user data passed in when the event was added.
*/
virtual void handleTimeout( TimerHandle handle, void * pUser ) = 0;
protected:
virtual void onRelease( TimerHandle /* handle */, void * /* pUser */ ) {}
private:
friend class TimeQueueNode;
void incTimerRegisterCount() { ++numTimesRegistered_; }
void decTimerRegisterCount() { --numTimesRegistered_; }
void release( TimerHandle handle, void * pUser )
{
this->decTimerRegisterCount();
this->onRelease( handle, pUser );
}
int numTimesRegistered_;
};
在执行计时器的添加的时候,会创建一个Node对象,Node对象继承自TimeQueueNode,封装了计时器的触发时间、重复间隔、处理对象和用户数据等信息:
/**
* This class is the base class for the nodes of the time queue.
*/
class TimeQueueNode : public ReferenceCount
{
public:
TimeQueueNode( TimeQueueBase & owner,
TimerHandler * pHandler,
void * pUserData );
void cancel( bool shouldCallOnRelease = true );
void * pUserData() const { return pUserData_; }
bool isCancelled() const { return state_ == STATE_CANCELLED; }
protected:
bool isExecuting() const { return state_ == STATE_EXECUTING; }
/// This enumeration is used to describe the current state of an element on
/// the queue.
enum State
{
STATE_PENDING,
STATE_EXECUTING,
STATE_CANCELLED
};
TimeQueueBase & owner_;
TimerHandler * pHandler_;
void * pUserData_;
State state_;
};
/// This structure represents one event in the time queue.
class Node : public TimeQueueNode
{
public:
Node( TimeQueueBase & owner, TimeStamp startTime, TimeStamp interval,
TimerHandler * pHandler, void * pUser, const char * name );
TIME_STAMP time() const { return time_; }
TIME_STAMP interval() const { return interval_; }
TIME_STAMP & intervalRef() { return interval_; }
TIME_STAMP deliveryTime() const;
void triggerTimer();
void adjustBy( TimeStamp adjustment )
{
time_ += adjustment;
}
const char * name() { return name_; }
private:
TimeStamp time_;
TimeStamp interval_;
const char * name_;
Node( const Node & );
Node & operator=( const Node & );
};
这里的time_字段代表计时器的触发时间,interval_字段代表计时器的重复间隔,如果interval_为0,代表只触发一次。state_字段代表计时器的状态,有三种状态:STATE_PENDING、STATE_EXECUTING和STATE_CANCELLED,分别代表计时器等待触发、正在执行和已取消。新添加的计时器的状态都是STATE_PENDING, 在这个计时器被调度的时候才会标记为STATE_EXECUTING:
/**
* This method triggers the timer assoicated with this node. It also updates
* the state for repeating timers.
*/
template <class TIME_STAMP>
void TimeQueueT< TIME_STAMP >::Node::triggerTimer()
{
if (!this->isCancelled())
{
state_ = STATE_EXECUTING;
#if ENABLE_PROFILER
ScopedProfiler _timerProfiler( name_ );
#endif
pHandler_->handleTimeout( TimerHandle( this ), pUserData_ );
if ((interval_ == 0) && !this->isCancelled())
{
this->cancel();
}
}
// This event could have been cancelled within the callback.
if (!this->isCancelled())
{
time_ += interval_;
state_ = STATE_PENDING;
}
}
在被调度之后,判断这个计时器是否需要重复执行,如果需要,就更新触发时间并调用push重新入队。如果不需要,就通过cancel接口将状态标记为STATE_CANCELLED,等待被清理:
/**
* This method processes the time queue and dispatches events.
* All events with a timestamp earlier than the given one are
* processed.
*
* @param now Process events earlier than or exactly on this.
*
* @return The number of timers that fired.
*/
template <class TIME_STAMP>
int TimeQueueT< TIME_STAMP >::process( TimeStamp now )
{
int numFired = 0;
while ((!timeQueue_.empty()) && (
timeQueue_.top()->time() <= now ||
timeQueue_.top()->isCancelled()))
{
Node * pNode = pProcessingNode_ = timeQueue_.top();
timeQueue_.pop();
if (!pNode->isCancelled())
{
++numFired;
pNode->triggerTimer();
}
if (!pNode->isCancelled())
{
timeQueue_.push( pNode );
}
else
{
pNode->decRef();
MF_ASSERT( numCancelled_ > 0 );
--numCancelled_;
}
}
pProcessingNode_ = NULL;
lastProcessTime_ = now;
return numFired;
}
/**
* This method cancels the timer associated with this node.
*/
inline void TimeQueueNode::cancel( bool shouldCallOnRelease )
{
if (this->isCancelled())
{
return;
}
MF_ASSERT( (state_ == STATE_PENDING) || (state_ == STATE_EXECUTING) );
state_ = STATE_CANCELLED;
if (pHandler_)
{
if (shouldCallOnRelease)
{
pHandler_->release( TimerHandle( this ), pUserData_ );
}
else
{
pHandler_->decTimerRegisterCount();
}
pHandler_ = NULL;
}
owner_.onCancel();
}
由于cancel的时候只是将状态标记为STATE_CANCELLED,并没有立即从队列中移除,为了彻底的释放这个计时器的相关资源,TimeQueueT提供了purgeCancelledNodes来清理所有已取消的计时器节点。这里的清理过程使用了标准库的std::partition算法将已取消的节点与未取消的节点分隔开,然后对于已经被CANCEL的节点执行引用计数的减少操作,这样可以触发这些计时器的析构函数。最后再从数组里删除失效的那些节点,并使用heapify重新构造一下最小堆:
/**
* This method removes all cancelled timers from the priority queue. Generally,
* cancelled timers wait until they have reached the top of the queue before
* being deleted.
*/
template <class TIME_STAMP>
void TimeQueueT< TIME_STAMP >::purgeCancelledNodes()
{
typename PriorityQueue::Container & container = timeQueue_.container();
typename PriorityQueue::Container::iterator newEnd =
std::partition( container.begin(), container.end(),
IsNotCancelled< Node >() );
for (typename PriorityQueue::Container::iterator iter = newEnd;
iter != container.end();
++iter)
{
(*iter)->decRef();
}
size_t numPurgedFull = (container.end() - newEnd);;
MF_ASSERT( numPurgedFull <= INT_MAX );
const int numPurged = static_cast<int>(numPurgedFull);
numCancelled_ -= numPurged;
// numCancelled_ will be 1 when we're in the middle of processing a
// once-off timer.
MF_ASSERT( (numCancelled_ == 0) || (numCancelled_ == 1) );
container.erase( newEnd, container.end() );
timeQueue_.heapify();
}
由于这个函数的复杂度是O(N*Log(N))的,需要避免频繁的执行这个清除操作,因此在TimeQueueT::onCancel方法中只在取消的节点数超过队列一半时才调用purgeCancelledNodes,这个onCancel方法在前面的TimeQueueNode::cancel末尾会被调用到:
/**
* This method is called when a timer has been cancelled.
*/
template <class TIME_STAMP>
void TimeQueueT< TIME_STAMP >::onCancel()
{
++numCancelled_;
// If there are too many cancelled timers in the queue (more than half),
// these are flushed from the queue immediately.
if (numCancelled_ * 2 > int( timeQueue_.size() ))
{
this->purgeCancelledNodes();
}
}
在bigworld里计时器使用的比较广泛,其中最广泛的就是BaseApp里的Base对象和CellApp里的Entity对象。下面我们就来看看Base对象和Entity对象是如何使用计时器的。
Base对象的计时器
每个Base对象都有一个PyTimer对象,用于管理该实体绑定的脚本逻辑定时器,在Base对象上会提供py_addTimer和py_delTimer方法,用于添加和删除脚本逻辑定时器:
class Base: public PyObjectPlus
{
private:
PyTimer pyTimer_;
}
/**
* This method is exposed to scripting. It is used by a base to register a
* timer function to be called with a given period.
*/
PyObject * Base::py_addTimer( PyObject * args )
{
if (isDestroyed_)
{
PyErr_Format( PyExc_TypeError, "Base.addTimer: "
"Entity %d has already been destroyed", id_ );
return NULL;
}
return pyTimer_.addTimer( args );
}
/**
* This method is exposed to scripting. It is used by a base to remove a timer
* from the time queue.
*/
PyObject * Base::py_delTimer( PyObject * args )
{
return pyTimer_.delTimer( args );
}
这个PyTimer对象是一个非常简单的封装,addTimer负责将脚本层的定时器添加到ScriptTimers中,同时delTimer负责从ScriptTimers中删除定时器:
/**
* This method handles timer events associated with the PyTimer.
*/
class PyTimerHandler : public TimerHandler
{
public:
PyTimerHandler( PyTimer & pyTimer ) :
pyTimer_( pyTimer ) {}
private:
// Overrides
virtual void handleTimeout( TimerHandle handle, void * pUser );
virtual void onRelease( TimerHandle handle, void * pUser );
PyTimer & pyTimer_;
};
/**
* This class is used by PyObjects to add, remove and invoke expired
* timers.
*/
class PyTimer
{
public:
PyTimer( PyObject * pyObject, int ownerID );
~PyTimer();
PyObject * addTimer( PyObject * args );
PyObject * delTimer( PyObject * args );
void handleTimeout( TimerHandle handle, void * pUser );
void onTimerReleased( TimerHandle timerHandle );
void backUpTimers( BinaryOStream & stream );
void restoreTimers( BinaryIStream & stream );
void cancelAll();
void ownerID( int ownerID ) { ownerID_ = ownerID; }
private:
friend class PyTimerHandler;
PyTimerHandler timerHandler_;
int ownerID_;
bool isCancelled_;
PyObject * pyObject_;
ScriptTimers * pTimers_;
};
在执行定时器的添加的时候,会调用ScriptTimersUtil::addTimer方法,将定时器添加到ScriptTimers中,同时返回一个整数,代表定时器ID,这个ID会被绑定到脚本层的定时器对象上,用于后续的超时回调和删除操作:
/**
* This method is exposed to scripting. It is used by a PyObject to register a
* timer function to be called with a given period.
*/
PyObject * PyTimer::addTimer( PyObject * args )
{
float initialOffset;
float repeatOffset = 0.f;
int userArg = 0;
if (!PyArg_ParseTuple( args, "f|fi",
&initialOffset, &repeatOffset, &userArg ))
{
return NULL;
}
int id = ScriptTimersUtil::addTimer( &pTimers_, initialOffset, repeatOffset,
userArg, &timerHandler_ );
if (id == 0)
{
PyErr_SetString( PyExc_ValueError, "Unable to add timer" );
return NULL;
}
return PyInt_FromLong( id );
}
回调对象TimerHandler设置为当前PyTimer的成员变量timerHandler_,这个成员变量负责中转ScriptTimers的回调到PyTimer的handleTimeout方法中,在handleTimeout方法中会调用脚本层的onTimer方法:
/**
* This method implements the TimerHandler method. It is called when a timer
* associated with this PyTimer goes off.
*/
void PyTimerHandler::handleTimeout( TimerHandle handle, void * pUser )
{
pyTimer_.handleTimeout( handle, pUser );
}
/**
* This method is called when a timer associated with the PyObject goes off.
*/
void PyTimer::handleTimeout( TimerHandle handle, void * pUser )
{
MF_ASSERT( !isCancelled_ );
int id = ScriptTimersUtil::getIDForHandle( pTimers_, handle );
if (id != 0)
{
// Reference count so that object is not deleted in the middle of
// the call.
Py_INCREF( pyObject_ );
PyObject * pResult = PyObject_CallMethod( pyObject_,
"onTimer", "ik", id, uintptr( pUser ) );
if (pResult == NULL)
{
WARNING_MSG( "PyTimer::handleTimeout(%d): onTimer failed\n",
ownerID_ );
PyErr_Print();
}
else
{
Py_DECREF( pResult );
}
Py_DECREF( pyObject_ );
}
else
{
ERROR_MSG( "PyTimer::handleTimeout: Invalid TimerQueueId\n" );
}
}
执行ScriptTimersUtil::addTimer的时候第一个参数是&pTimers_,在ScriptTimersUtil::addTimer内会判断ppTimers是否为空,如果为空则创建一个ScriptTimers对象,这样做的目的是延迟创建ScriptTimers对象,只有在需要添加定时器时才创建,这样可以节省内存占用:
namespace ScriptTimersUtil
{
/**
* This function is a wrapper to ScriptTimers::addTimer that handles
* ScriptTimers creation.
*/
ScriptTimers::ScriptID addTimer( ScriptTimers ** ppTimers,
float initialOffset, float repeatOffset, int32 userArg,
TimerHandler * pHandler )
{
ScriptTimers *& rpTimers = *ppTimers;
if (rpTimers == NULL)
{
rpTimers = new ScriptTimers;
}
return rpTimers->addTimer( initialOffset, repeatOffset,
userArg, pHandler );
}
}
这个ScriptTimersUtil::addTimer执行完延迟创建的逻辑之后,再调用ScriptTimers::addTimer,这个ScriptTimers才是真正执行定时器管理的地方,内部使用一个Map来存储目前还活跃的定时器,Map的Key是定时器ID,Value是定时器Handle,定时器Handle是一个整数,用于唯一标识一个定时器。
/**
* This class stores a collection of timers that have an associated script id.
*/
class ScriptTimers
{
public:
typedef int32 ScriptID;
static void init( ScriptTimeQueue & timeQueue );
static void fini( ScriptTimeQueue & timeQueue );
ScriptID addTimer( float initialOffset, float repeatOffset, int32 userArg,
TimerHandler * pHandler );
bool delTimer( ScriptID timerID );
void releaseTimer( TimerHandle handle );
void cancelAll();
void writeToStream( BinaryOStream & stream ) const;
void readFromStream( BinaryIStream & stream,
uint32 numTimers, TimerHandler * pHandler );
ScriptID getIDForHandle( TimerHandle handle ) const;
bool isEmpty() const { return map_.empty(); }
private:
typedef BW::map< ScriptID, TimerHandle > Map;
ScriptID getNewID();
Map::const_iterator findTimer( TimerHandle handle ) const;
Map::iterator findTimer( TimerHandle handle );
Map map_;
};
ScriptTimers内并没有提供计时器调度的逻辑,计时器调度的逻辑是在ScriptTimeQueue中实现的,ScriptTimeQueue会根据定时器的过期时间,来调用ScriptTimers中的handleTimeout方法,来处理定时器的过期事件。在进程里会有一个全局静态的ScriptTimeQueue对象g_pTimeQueue,用于管理所有的脚本定时器。因此ScriptTimers::addTimer的逻辑就是往g_pTimeQueue里注册计时器,然后分配一个整数作为计时器的ID,同时将ID与TimerHandle的映射存储在Map里:
/**
* This method adds a timer to the collection. It returns an identifier that
* should be used by ScriptTimers::delTimer.
*/
ScriptTimers::ScriptID ScriptTimers::addTimer( float initialOffset,
float repeatOffset, int32 userArg, TimerHandler * pHandler )
{
if (initialOffset < 0.f)
{
WARNING_MSG( "ScriptTimers::addTimer: Negative timer offset (%f)\n",
initialOffset );
initialOffset = 0.f;
}
MF_ASSERT( g_pTimeQueue );
int hertz = g_pTimeQueue->updateHertz();
int initialTicks =
g_pTimeQueue->time() + uint32( initialOffset * hertz + 0.5f );
int repeatTicks = 0;
if (repeatOffset > 0.f)
{
repeatTicks = uint32( repeatOffset * hertz + 0.5f );
if (repeatTicks < 1)
{
repeatTicks = 1;
}
}
TimerHandle timerHandle = g_pTimeQueue->add(
initialTicks, repeatTicks,
pHandler, reinterpret_cast< void * >( userArg ),
"ScriptTimer" );
if (timerHandle.isSet())
{
int id = this->getNewID();
map_[ id ] = timerHandle;
return id;
}
return 0;
}
注意这里使用调用g_pTimeQueue->add的时候,传入的超时时间与重复间隔都通过updateHertz方法转换为整数,这是因为ScriptTimeQueue内部使用的时间单位是整数,而ScriptTimers内部使用的时间单位是浮点数。这个ScriptTimeQueue继承自TimeQueue,实现非常简单,相当于只增加了updateHertz这个成员变量:
/**
* This TimeQueue subclass encapsulates the queue and time for easy
* ScriptTimers access.
*/
class ScriptTimeQueue : public TimeQueue
{
public:
ScriptTimeQueue( int updateHertz ) :
updateHertz_( updateHertz ) {}
int updateHertz() const { return updateHertz_; }
virtual uint32 time() const = 0;
private:
int updateHertz_;
};
这里的ID生成方式有点特殊,是从1开始递增的,而不是从0开始递增的。这是因为0是一个特殊的ID,表示定时器不存在。同时在递增的时候需要跳过map里已经有的计时器ID,避免活跃的计时器ID被重复使用:
/**
* This method returns an available ScriptID for a new timer.
*/
ScriptTimers::ScriptID ScriptTimers::getNewID()
{
ScriptTimers::ScriptID id = 1;
// Ugly linear search
while (map_.find( id ) != map_.end())
{
++id;
}
return id;
}
/**
* This method cancels the timer with the given id.
*
* @return True if such a timer exists, otherwise false.
*/
bool ScriptTimers::delTimer( ScriptTimers::ScriptID timerID )
{
Map::iterator iter = map_.find( timerID );
if (iter != map_.end())
{
// Take a copy so that the TimerHandle in the map is still set when
// ScriptTimers::releaseTimer is called.
TimerHandle handle = iter->second;
handle.cancel();
// iter->second.cancel();
return true;
}
return false;
}
这里之所以使用整数作为计时器ID是因为cpp与脚本之间只能传递整数,不能传递TimerHandle这个指针。
为了支持迁移的处理,PyTimer还提供了backUpTimers和restoreTimers方法,用于将实体的脚本定时器保存到数据流中,以及从数据流中恢复脚本定时器。这两个方法内部调用了ScriptTimersUtil提供的静态方法来完成实际的读写操作。这样做的好处就是不需要在脚本里处理迁移前后的计时器恢复逻辑:
/**
* This method writes this entity's timers to a backup stream.
*/
void PyTimer::backUpTimers( BinaryOStream & stream )
{
ScriptTimersUtil::writeToStream( pTimers_, stream );
}
/**
* This method restores this entity's timers from a backup stream.
*/
void PyTimer::restoreTimers( BinaryIStream & stream )
{
ScriptTimersUtil::readFromStream( &pTimers_, stream, &timerHandler_ );
}
前面介绍了PyTimer会最终将计时器添加到全局的脚本调度器g_pTimeQueue,它负责管理所有的脚本定时器,其初始化通过静态函数ScriptTimers::init方法来完成:
namespace
{
ScriptTimeQueue * g_pTimeQueue = NULL;
}
// -----------------------------------------------------------------------------
// Section: ScriptTimers
// -----------------------------------------------------------------------------
/**
* This static method sets up the script timers to be able to access the
* ScriptTimeQueue.
*/
void ScriptTimers::init( ScriptTimeQueue & timeQueue )
{
MF_ASSERT( g_pTimeQueue == NULL);
g_pTimeQueue = &timeQueue;
}
这个全局脚本计时器对象的实例会放在EntityApp的成员变量timeQueue_中。这个EntityAppTimeQueue继承自ScriptTimeQueue,实现了time方法,用于返回实体的当前时间:
/**
* This ScriptTimeQueue subclass is specialised for EntityApp's time
*/
class EntityAppTimeQueue : public ScriptTimeQueue
{
public:
EntityAppTimeQueue( int updateHertz, EntityApp & entityApp );
virtual GameTime time() const;
private:
EntityApp & entityApp_;
};
/**
* This class is a common base class for BaseApp and CellApp.
*/
class EntityApp : public ScriptApp
{
public:
EntityApp( Mercury::EventDispatcher & mainDispatcher,
Mercury::NetworkInterface & interface );
virtual ~EntityApp();
virtual bool init( int argc, char * argv[] );
ScriptTimeQueue & timeQueue() { return timeQueue_; }
virtual void onSignalled( int sigNum );
BgTaskManager & bgTaskManager() { return bgTaskManager_; }
protected:
void addWatchers( Watcher & watcher );
void tickStats();
void callTimers();
virtual void onSetStartTime( GameTime oldTime, GameTime newTime );
// Override from ServerApp
virtual void onTickProcessingComplete();
BgTaskManager bgTaskManager_;
private:
EntityAppTimeQueue timeQueue_;
uint32 tickStatsPeriod_;
};
在EntityApp的构造函数中,这个EntityAppTimeQueue实例会被初始化,并通过ScriptTimers::init方法设置到全局指针上:
EntityApp::EntityApp( Mercury::EventDispatcher & mainDispatcher,
Mercury::NetworkInterface & interface ) :
ScriptApp( mainDispatcher, interface ),
timeQueue_( EntityAppConfig::updateHertz(), *this ),
tickStatsPeriod_( 0 ) // Set below
{
ScriptTimers::init( timeQueue_ );
float tickStatsPeriod = BWConfig::get( "tickStatsPeriod", 2.f );
tickStatsPeriod_ =
uint32( tickStatsPeriod * EntityAppConfig::updateHertz() );
}
同时EntityApp还提供了驱动这个全局脚本计时器队列的计时器调度方法callTimers,它会在每个update周期结束时被调用:
/**
* This method calls timers before updatables are run
*/
void EntityApp::onTickProcessingComplete()
{
this->ServerApp::onTickProcessingComplete();
this->callTimers();
}
/**
* This method calls any outstanding timers.
*/
void EntityApp::callTimers()
{
AUTO_SCOPED_PROFILE( "callTimers" );
timeQueue_.process( time_ );
}
在EntityApp上还提供了一个开发期非常有用的方法onSetStartTime,这个方法可以改脚本层的逻辑时间,这样可以非常方便的去测试一些计时器间隔比较大的逻辑,例如每天刷新每周刷新每月刷新相关逻辑:
/**
* This method responds to the game time being adjusted.
*/
void EntityApp::onSetStartTime( GameTime oldTime, GameTime newTime )
{
if (oldTime != newTime)
{
if (!timeQueue_.empty())
{
NOTICE_MSG( "EntityApp::onSetStartTime: Adjusting %d timer%s\n",
timeQueue_.size(), (timeQueue_.size() == 1) ? "" : "s" );
timeQueue_.adjustBy( newTime - oldTime );
}
}
}
这个adjustBy会一路中转到PriorityQueue的adjustBy方法,用于调整所有计时器的时间,这样就可以达到计时器的时间同步:
void PriorityQueue::adjustBy( TimeStamp adjustment )
{
typename Container::iterator iter = container_.begin();
while (iter != container_.end())
{
(*iter)->adjustBy( adjustment );
++iter;
}
}
void Node::adjustBy( TimeStamp adjustment )
{
time_ += adjustment;
}
Entity对象的计时器
Entity对象上的计时器管理方式与前述的Base对象的计时器管理方式非常不一样,并没有在Entity对象上显示的提供计时器相关操作接口,而是通过一个TimerController对象来管理,同时这个TimerController对象会以Controller指针的方式放到Entity对象的pControllers_管理器里:
class Entity : public PyObjectPlus
{
ControllerID addController( ControllerPtr pController, int userArg );
void modController( ControllerPtr pController );
bool delController( ControllerID controllerID,
bool warnOnFailure = true );
bool visitControllers( ControllersVisitor & visitor );
Controllers * pControllers_;
};
class Controllers
{
public:
Controllers();
~Controllers();
void readGhostsFromStream( BinaryIStream & data, Entity * pEntity );
void readRealsFromStream( BinaryIStream & data, Entity * pEntity );
void writeGhostsToStream( BinaryOStream & data );
void writeRealsToStream( BinaryOStream & data );
void createGhost( BinaryIStream & data, Entity * pEntity );
void deleteGhost( BinaryIStream & data, Entity * pEntity );
void updateGhost( BinaryIStream & data );
ControllerID addController( ControllerPtr pController, int userArg,
Entity * pEntity );
bool delController( ControllerID id, Entity * pEntity,
bool warnOnFailure = true );
void modController( ControllerPtr pController, Entity * pEntity );
void startReals();
void stopReals( bool isFinalStop );
PyObject * py_cancel( PyObject * args, Entity * pEntity );
bool visitAll( ControllersVisitor & visitor );
private:
ControllerID nextControllerID();
typedef BW::map< ControllerID, ControllerPtr > Container;
Container container_;
ControllerID lastAllocatedID_;
};
在这个TimerController类里,会提供start和stop方法,用于启动和停止计时器,同时还会提供handleTimeout方法,用于处理计时器超时事件:
class TimerController : public Controller
{
DECLARE_CONTROLLER_TYPE( TimerController )
public:
TimerController( GameTime start = 0, GameTime interval = 0 );
void writeRealToStream( BinaryOStream & stream );
bool readRealFromStream( BinaryIStream & stream );
void handleTimeout();
void onHandlerRelease();
// Controller overrides
virtual void startReal( bool isInitialStart );
virtual void stopReal( bool isFinalStop );
static FactoryFnRet New( float initialOffset, float repeatOffset,
int userArg = 0 );
PY_AUTO_CONTROLLER_FACTORY_DECLARE( TimerController,
ARG( float, OPTARG( float, 0.f, OPTARG( int, 0, END ) ) ) )
private:
/**
* Handler for a timer to go into the global time queue
*/
class Handler : public TimerHandler
{
public:
Handler( TimerController * pController );
void pController( TimerController * pController )
{ pController_ = pController; }
private:
// Overrides from TimerHandler
virtual void handleTimeout( TimerHandle handle, void * pUser );
virtual void onRelease( TimerHandle handle, void * pUser );
TimerController * pController_;
};
Handler * pHandler_;
GameTime start_;
GameTime interval_;
TimerHandle timerHandle_;
};
每个TimerController对象都代表一个脚本层的计时器对象,当脚本层需要创建一个计时器时,都会通过这里暴露的New方法来创建一个TimerController对象,创建的参数就包括初始延迟initialOffset、后续的重复间隔repeatOffset以及用户自定义参数userArg,后面两个参数在脚本层不提供相关值的时候会以默认值来填充:
static FactoryFnRet New( float initialOffset, float repeatOffset,
int userArg = 0 );
PY_AUTO_CONTROLLER_FACTORY_DECLARE( TimerController,
ARG( float, OPTARG( float, 0.f, OPTARG( int, 0, END ) ) ) )
这个TimerController::New在执行的时候,会根据传入的initialOffset和repeatOffset参数,转换为对应的游戏时间单位Ticks,再创建一个对应的TimerController对象,最后返回一个FactoryFnRet对象,包含了创建的TimerController对象指针以及用户自定义参数userArg:
Controller::FactoryFnRet TimerController::New(
float initialOffset, float repeatOffset, int userArg )
{
GameTime repeatTicks = 0;
GameTime initialTicks =
(GameTime)( initialOffset * CellAppConfig::updateHertz() + 0.5f );
if (int(initialTicks) <= 0)
{
// WARNING_MSG( "TimerController::New: "
// "Rounding up initial offset to 1 from %d (initialOffset %f)\n",
// initialTicks, initialOffset );
initialTicks = 1;
}
initialTicks += CellApp::instance().time();
if (repeatOffset > 0.0f)
{
repeatTicks =
(GameTime)(repeatOffset * CellAppConfig::updateHertz() + 0.5f);
if (repeatTicks < 1)
{
WARNING_MSG( "TimerController::New: "
"Rounding up repeatTicks to 1 (repeatOffset %f)\n",
repeatOffset );
repeatTicks = 1;
}
}
return FactoryFnRet(
new TimerController( initialTicks, repeatTicks ), userArg );
}
但是这个TimerController的构造函数里并没有根据传入参数来创建真正的计时器,而是等待外部调用startReal方法来启动计时器,只有在startReal方法被调用的时候,才会往CellApp的全局计时器队列里添加一个计时器,计时器的回调函数就是TimerController::handleTimeout方法:
/**
* Construct the TimerController.
* is zero, there will be only a single callback, and the controller will
* destroy itself automatically after that callback.
*
* @param start Timestamp of the first callback
* @param interval Duration in game ticks between subsequent callbacks
*/
TimerController::TimerController( GameTime start, GameTime interval ) :
pHandler_( NULL ),
start_( start ),
interval_( interval ),
timerHandle_()
{
}
/**
* Start the timer.
*/
void TimerController::startReal( bool isInitialStart )
{
// Make sure it is not already running
MF_ASSERT( !timerHandle_.isSet() );
pHandler_ = new Handler( this );
// if we were offloaded just as our timer was going off - we set the timer
// start time to be now
if (!isInitialStart)
{
if (start_ < CellApp::instance().time())
{
start_ = CellApp::instance().time();
}
}
timerHandle_ = CellApp::instance().timeQueue().add( start_, interval_,
pHandler_, NULL, "TimerController" );
}
这个StartReal会在TimerController对象注册到所属Entity的pControllers_时被自动调用:
/**
* This method adds a controller to the collection.
*/
ControllerID Controllers::addController(
ControllerPtr pController, int userArg, Entity * pEntity )
{
// 省略一些容错代码
ControllerID controllerID = pController->exclusiveID();
if (controllerID != 0)
{
// Deleting exclusive controller. For example, if another movement
// controller already exists, stop it now before adding the new one.
this->delController( controllerID, pEntity, /*warnOnFailure:*/false );
}
else
{
controllerID = this->nextControllerID();
}
pController->init( pEntity, controllerID, userArg );
container_.insert( Container::value_type(
pController->id(), pController ) );
// 省略一些当前无关代码
// Note: This was moved to be after the controller has been streamed on to
// be sent to the ghosts. The reason for this was for the vehicles. In
// startGhost, the entity's local position changes so that the global
// position does not. The ghost entity needs to know that it is on a
// vehicle before it gets this update.
if (pController->domain() & DOMAIN_GHOST)
{
pController->startGhost();
}
if (pController->domain() & DOMAIN_REAL)
{
pController->startReal( true /* Is initial start */ );
}
return pController->id();
}
而这个addController方法则是在ControllerFactoryCaller里在创建完一个Controller对象之后自动调用,这样就完成了计时器对象创建之后自动激活的逻辑:
/**
* This class is the Python object for a controller factory method
*/
class ControllerFactoryCaller : public PyObjectPlus
{
Py_Header( ControllerFactoryCaller, PyObjectPlus )
public:
ControllerFactoryCaller( Entity * pEntity, Controller::FactoryFn factory,
PyTypeObject * pType = &s_type_ ) :
PyObjectPlus( pType ),
pEntity_( pEntity ),
factory_( factory )
{ }
PY_KEYWORD_METHOD_DECLARE( pyCall )
private:
EntityPtr pEntity_;
Controller::FactoryFn factory_;
};
/**
* Call method for a controller factory method
*/
PyObject * ControllerFactoryCaller::pyCall( PyObject * args, PyObject * kwargs )
{
// make sure this entity will accept controllers
if (pEntity_->isDestroyed())
{
PyErr_SetString( PyExc_TypeError,
"Entity for Controller factory no longer exists" );
return NULL;
}
if (!pEntity_->isRealToScript())
{
PyErr_SetString( PyExc_TypeError,
"Entity for Controller factory is not real" );
return NULL;
}
Entity * oldFFnE = Controller::s_factoryFnEntity_;
Controller::s_factoryFnEntity_ = pEntity_.get();
// attempt to create the controller with these arguments then
Controller::FactoryFnRet factoryFnRet = (*factory_)( args, kwargs );
Controller::s_factoryFnEntity_ = oldFFnE;
if (factoryFnRet.pController == NULL) return NULL;
// ok, we have a controller, so let the entity add it,
// and return its controller id to python
return Script::getData( pEntity_->addController(
factoryFnRet.pController, factoryFnRet.userArg ) );
}
PY_TYPEOBJECT_WITH_CALL( ControllerFactoryCaller )
PY_BEGIN_METHODS( ControllerFactoryCaller )
PY_END_METHODS()
PY_BEGIN_ATTRIBUTES( ControllerFactoryCaller )
PY_END_ATTRIBUTES()
至于这个ControllerFactoryCaller类什么时候会被调用,相关的逻辑隐藏的非常的深,具体代码在Entity::pyGetAttribute方法中。如果脚本层访问一个不存在的属性,且这个属性名字的前缀是add,则会自动创建一个ControllerFactoryCaller对象,用于调用Controller工厂函数创建一个Controller对象:
/**
* This method is responsible for getting script attributes associated with
* this object.
*/
ScriptObject Entity::pyGetAttribute( const ScriptString & attrObj )
{
PROFILER_SCOPED( Entity_pyGetAttribute );
const char * attr = attrObj.c_str();
// 省略很多代码
// Try the controller constructors
if (treatAsReal && attr[0] == 'a' && attr[1] == 'd' && attr[2] == 'd')
{
PyObject * ret = Controller::factory( this, attr+3 );
if (ret != NULL)
{
return ScriptObject( ret, ScriptObject::FROM_NEW_REFERENCE );
}
}
// 省略很多代码
}
而这个Controller::factory方法则是用于创建一个Controller对象的工厂函数,它会根据传入的controllerName参数,调用ControllerFactoryCaller来创建对应Controller对象:
/**
* This static method returns a python object representing the factory
* method for the given named controller, if such a controller exists.
*/
PyObject * Controller::factory( Entity * pEntity, const char * name )
{
if (s_pCreators == NULL) return NULL;
uint len = strlen(name);
if (len > 200)
{
return NULL;
}
char fullName[256];
memcpy( fullName, name, len );
memcpy( fullName+len, "Controller", 11 );
// for now do a linear search ... could use a map but I can't be bothered
for (uint i = 0; i < s_pCreators->size(); i++)
{
if ((*s_pCreators)[ i ].factory_ != NULL &&
strcmp( (*s_pCreators)[ i ].typeName_, fullName ) == 0)
{
return new ControllerFactoryCaller(
pEntity, (*s_pCreators)[ i ].factory_ );
}
}
return NULL;
}
所以当脚本层调用Entity.addTimer方法添加一个计时器时,会先获得Timer这个字符串,然后会通过Controller::factory来查找TimerController对应的工厂函数,创建一个TimerController对象。
当这个计时器超时的时候,会调用到脚本Entity对象的onTimer方法,这个方法会在脚本层被定义为一个回调函数,用于处理计时器超时的事件:
/*~ callback Entity.onTimer
* @components{ cell }
* This method is called when a timer associated with this entity is triggered.
* A timer can be added with the Entity.addTimer method.
* @param timerHandle The id of the timer.
* @param userData The user data passed in to Entity.addTimer.
*/
/**
* Handle timer callbacks from TimeQueue and pass them on.
*/
void TimerController::handleTimeout()
{
AUTO_SCOPED_PROFILE( "onTimer" );
// Update our start time, so it is correct if we are streamed
// across the network.
start_ += interval_;
// Keep ourselves alive until we have finished cleaning up,
// with an extra reference count from a smart pointer.
ControllerPtr pController = this;
this->standardCallback( "onTimer" );
}
// -----------------------------------------------------------------------------
// Section: TimerController::Handler
// -----------------------------------------------------------------------------
/**
* Constructor.
*/
TimerController::Handler::Handler( TimerController * pController ) :
pController_( pController )
{
}
/**
* Handle timer callbacks from TimeQueue and pass them on.
*/
void TimerController::Handler::handleTimeout( TimerHandle, void* )
{
if (pController_)
{
pController_->handleTimeout();
}
else
{
WARNING_MSG( "TimerController::Handler::handleTimeout: "
"pController_ is NULL\n" );
}
}
这个OnTimer方法会接收两个参数,第一个参数是计时器的id,第二个参数是用户传入的userData参数,这样就可以区分超时的是哪一个计时器了:
void Controller::standardCallback( const char * methodName )
{
MF_ASSERT( this->isAttached() );
START_PROFILE( SCRIPT_CALL_PROFILE );
EntityID entityID = this->entity().id();
const char* name = this->entity().pType()->name();
ControllerID controllerID = controllerID_;
int userArg = userArg_;
this->entity().callback( methodName,
Py_BuildValue( "(ii)", controllerID, userArg ),
methodName, false );
// note: controller (and even entity) could be have been deleted by here
STOP_PROFILE_WITH_CHECK( SCRIPT_CALL_PROFILE )
{
WARNING_MSG( "Controller::standardCallback: "
"method = %s; type = %s, id = %u; controllerID = %d; "
"userArg = %d\n",
methodName, name, entityID, controllerID, userArg );
}
}
在上述组件的支持下,脚本层可以很方便地使用计时器,例如在Entity脚本中添加一个计时器,当计时器超时的时候,会调用onTimer方法:
# Entity脚本中使用计时器的示例
def __init__(self):
# 5秒后开始,每秒重复执行,用户数据为9
self.timerID = self.addTimer(5, 1, 9)
# 仅执行一次的计时器(10秒后执行)
self.oneTimeTimerID = self.addTimer(10)
def onTimer(self, timerID, userData):
print(f"Timer {timerID} triggered with data {userData}")
# 可以根据timerID和userData执行不同逻辑
if timerID == self.timerID and userData == 9:
# 满足条件时取消计时器
self.cancel(timerID)
这里的cancel方法是一个通用的方法,执行的时候会调用到Entity::py_cancel,这个调用过程比较复杂,首先在entity.hpp的头文件通过PY_METHOD_DECLARE来声明py_cancel方法,然后在entity.cpp的源文件通过PY_METHOD宏来注册这个方法到Entity类的方法列表中:
PY_METHOD_DECLARE( py_cancel )
PY_BEGIN_METHODS( Entity )
/*~ function Entity destroy
* @components{ cell }
* This function destroys entity by destroying its local Entity instance,
* and informing every other application which holds some form of instance of
* it to do the same. It is expected to be called by the entity itself, and
* will throw a TypeError if the entity is a ghost. The callback onDestroy()
* is called if present.
*/
PY_METHOD( destroy )
/*~ function Entity cancel
* @components{ cell }
* The cancel function stops a controller from affecting the Entity. It can
* only be called on a real entity.
* @param controllerID controllerID is an integer which is the index of the
* controller to cancel. Alternatively, a string of an exclusive controller
* category can be passed to cancel the controller of that category. For
* example, only one movement/navigation controller can be active at once.
* This can be cancelled with entity.cancel( "Movement" ).
*/
PY_METHOD( cancel )
这个Entity::py_cancel会调用Controller上的cancel方法,通过传入的第一个参数来寻找对应的Controller。对于TimerController来说,它会根据计时器的id来取消对应的计时器:
/**
* This method is exposed to scripting. It is used by an entity to cancel
* a previously registered controller. The arguments below are passed via
* a Python tuple.
*
* @param args A tuple containing the ID of the previously registered controller.
*
* @return A new reference to PyNone on success, otherwise NULL.
*/
PyObject * Entity::py_cancel( PyObject * args )
{
if (!this->isRealToScript())
{
PyErr_SetString( PyExc_TypeError,
"Entity.cancel() not available on ghost entities" );
return NULL;
}
return pControllers_->py_cancel( args, this );
}
/**
* This method implements the Entity.cancel Python function. On failure, it
* returns NULL and sets the Python exception state.
*/
PyObject * Controllers::py_cancel( PyObject * args, Entity * pEntity )
{
int controllerID;
bool deleteByID = true;
if (PyTuple_Size( args ) != 1)
{
PyErr_Format( PyExc_TypeError,
"cancel takes exactly 1 argument (%" PRIzd " given)",
PyTuple_Size( args ) );
return NULL;
}
ScriptObject arg = ScriptObject( PyTuple_GET_ITEM( args, 0 ),
ScriptObject::FROM_BORROWED_REFERENCE );
if (!arg.convertTo( controllerID, ScriptErrorClear() ))
{
if (PyString_Check( arg.get() ))
{
deleteByID = false;
controllerID =
Controller::getExclusiveID(
PyString_AsString( arg.get() ), /*createIfNecessary:*/ false );
if (controllerID == 0)
{
PyErr_Format( PyExc_TypeError,
"invalid exclusive controller category '%s'",
PyString_AsString( arg.get() ) );
return NULL;
}
}
else
{
PyErr_SetString( PyExc_TypeError,
"argument must be a ControllerID or a string" );
return NULL;
}
}
Container::iterator found = container_.find( controllerID );
if (found != container_.end())
{
ControllerPtr pController = found->second;
pController->cancel();
}
else if (deleteByID)
{
WARNING_MSG( "Entity.cancel(%u): Cancelling an unknown "
"controller ID %d\n",
pEntity->id(), controllerID );
}
Py_RETURN_NONE;
}
这里的TimerController有一个非常值得注意的地方,即这个计时器对象支持迁移,在开始迁移的时候调用writeRealToStream将当前的计时器状态写入到流中,在接收端调用readRealFromStream从流中读取计时器状态并执行恢复:
/**
* Write out our current state.
*/
void TimerController::writeRealToStream( BinaryOStream & stream )
{
this->Controller::writeRealToStream( stream );
stream << start_ << interval_;
}
/**
* Read our state from the stream.
*/
bool TimerController::readRealFromStream( BinaryIStream & stream )
{
this->Controller::readRealFromStream( stream );
stream >> start_ >> interval_;
return true;
}
Unreal Engine 的逻辑驱动
基于事件分发的逻辑驱动
事件分发器在UE4的实现叫做Delegate,他的实现与前文中提到的event_dispatcher有些类似。不过UE4对于Delegate又做了细分,区分为了单播代理和多播代理:
/** Declares a delegate that can only bind to one native function at a time */
#define DECLARE_DELEGATE( DelegateName ) FUNC_DECLARE_DELEGATE( DelegateName, void )
/** Declares a broadcast delegate that can bind to multiple native functions simultaneously */
#define DECLARE_MULTICAST_DELEGATE( DelegateName ) FUNC_DECLARE_MULTICAST_DELEGATE( DelegateName, void )
单播代理只能绑定一个回调函数,同时支持返回值,而多播代理可以绑定多个回调函数,不支持返回值。这两个宏声明的事件是没有参数的,如果需要支持一个或多个参数,则需要使用其他的宏:
// 单参数
#define DECLARE_DELEGATE_OneParam( DelegateName, Param1Type ) FUNC_DECLARE_DELEGATE( DelegateName, void, Param1Type )
#define DECLARE_MULTICAST_DELEGATE_OneParam( DelegateName, Param1Type ) FUNC_DECLARE_MULTICAST_DELEGATE( DelegateName, void, Param1Type )
// 双参数
#define DECLARE_DELEGATE_TwoParams( DelegateName, Param1Type, Param2Type ) FUNC_DECLARE_DELEGATE( DelegateName, void, Param1Type, Param2Type )
#define DECLARE_MULTICAST_DELEGATE_TwoParams( DelegateName, Param1Type, Param2Type ) FUNC_DECLARE_MULTICAST_DELEGATE( DelegateName, void, Param1Type, Param2Type )
其实这些宏最终都会以模板的形式来构造一个类型:
template <typename... ParamTypes, typename UserPolicy>
class TMulticastDelegate<void(ParamTypes...), UserPolicy> : public UserPolicy::FMulticastDelegateExtras
{
using Super = typename UserPolicy::FMulticastDelegateExtras;
using InvocationListType = typename Super::InvocationListType;
using DelegateInstanceInterfaceType = IBaseDelegateInstance<void (ParamTypes...), UserPolicy>;
public:
/** Type definition for unicast delegate classes whose delegate instances are compatible with this delegate. */
using FDelegate = TDelegate<void(ParamTypes...), UserPolicy>;
};
这里的FDelegate就是类似于std::function的结构,可以从function,lambda,函数指针,成员函数指针等输入来构造。然后返回一个全局递增计数器作为handler:
FDelegateHandle Add(const FDelegate& InNewDelegate)
{
FDelegateHandle Result;
if (Super::GetDelegateInstanceProtectedHelper(InNewDelegate))
{
Result = Super::AddDelegateInstance(CopyTemp(InNewDelegate));
}
return Result;
}
这里的FDelegateHandle是带类型的全局递增计数器,这样就避免了直接使用int时可能产生的数据误用:
class FDelegateHandle
{
public:
enum EGenerateNewHandleType
{
GenerateNewHandle
};
/** Creates an initially unset handle */
FDelegateHandle()
: ID(0)
{
}
/** Creates a handle pointing to a new instance */
explicit FDelegateHandle(EGenerateNewHandleType)
: ID(GenerateNewID())
{
}
/** Returns true if this was ever bound to a delegate, but you need to check with the owning delegate to confirm it is still valid */
bool IsValid() const
{
return ID != 0;
}
/** Clear handle to indicate it is no longer bound */
void Reset()
{
ID = 0;
}
};
有了这些结构定义之后,使用UE4的事件分发系统就很简单了:
// 事件的参数类型
enum EDDCNotification
{
// DDC performance notification generated when not using a shared cache
SharedDDCPerformanceNotification
};
// 事件分发器声明
DECLARE_MULTICAST_DELEGATE_OneParam(FOnDDCNotification, EDDCNotification);
// 分发一个事件
FOnDDCNotification.broadcast(SharedDDCPerformanceNotification);
在上面介绍的Delegate的结构每个都占用了32个字节,UE还提供了一种内存占用更小的SPARSE_DELEGATE,每个只占用一个字节。这种SparseDelegate必须作为一个类型的指定名字的成员变量而存在,因此他的声明与前面的声明就不一样了,开头的第二个参数是所在的类名字,第三个参数是对应的成员变量的名字:
/** Delegate for notification of start of overlap with a specific component */
DECLARE_DYNAMIC_MULTICAST_SPARSE_DELEGATE_SixParams( FComponentBeginOverlapSignature, UPrimitiveComponent, OnComponentBeginOverlap, UPrimitiveComponent*, OverlappedComponent, AActor*, OtherActor, UPrimitiveComponent*, OtherComp, int32, OtherBodyIndex, bool, bFromSweep, const FHitResult &, SweepResult);
UPROPERTY(BlueprintAssignable, Category="Collision")
FComponentBeginOverlapSignature OnComponentBeginOverlap;
在其基类中FSparseDelegate,只有一个成员变量bIsBound,其类型为bool,因此整个结构体大小只有一个字节,然后在次级基类TSparseDynamicDelegate中也没有引入新的成员变量:
/** Base implementation for all sparse delegate types */
struct FSparseDelegate
{
public:
FSparseDelegate()
: bIsBound(false)
{
}
/**
* Checks to see if any functions are bound to this multi-cast delegate
*
* @return True if any functions are bound
*/
bool IsBound() const
{
return bIsBound;
}
protected:
friend class FMulticastSparseDelegateProperty;
bool bIsBound;
};
/** Sparse version of TBaseDynamicDelegate */
template <typename MulticastDelegate, typename OwningClass, typename DelegateInfoClass>
struct TSparseDynamicDelegate : public FSparseDelegate
{
public:
};
这一个bool肯定没有办法存储注册过来的所有Listener,真正的存储区域是在全局静态的的一个SparseDelegateStorage的变量上:
/** Helper class for handling sparse delegate bindings */
struct FSparseDelegateStorage
{
/** Allow the object listener to use the critical section and remove objects from the map */
friend struct FObjectListener;
/** A listener to get notified when objects have been deleted and remove them from the map */
static COREUOBJECT_API FObjectListener SparseDelegateObjectListener;
/** Critical Section for locking access to the sparse delegate map */
static COREUOBJECT_API FTransactionallySafeCriticalSection SparseDelegateMapCritical;
/** Delegate map is a map of Delegate names to a shared pointer of the multicast script delegate */
typedef TMap<FName, TSharedPtr<FMulticastScriptDelegate>> FSparseDelegateMap;
/** Map of objects to the map of delegates that are bound to that object */
static COREUOBJECT_API TMap<const UObjectBase*, FSparseDelegateMap> SparseDelegates;
/** Sparse delegate offsets are indexed by ActorClass/DelegateName pair */
static COREUOBJECT_API TMap<TPair<FName, FName>, size_t> SparseDelegateObjectOffsets;
};
真正注册Listener的时候,会将数据存储到上面结构体里的静态变量SparseDelegates中:
/**
* Adds a function delegate to this multi-cast delegate's invocation list
*
* @param InDelegate Delegate to add
*/
void TSparseDynamicDelegate::Add(FScriptDelegate InDelegate)
{
bIsBound |= FSparseDelegateStorage::Add(GetDelegateOwner(), GetDelegateName(), MoveTemp(InDelegate));
}
bool FSparseDelegateStorage::Add(const UObject* DelegateOwner, const FName DelegateName, FScriptDelegate Delegate)
{
bool bDelegateWasBound = false;
if (Delegate.IsBound())
{
FTransactionallySafeScopeLock SparseDelegateMapLock(&SparseDelegateMapCritical);
if (SparseDelegates.Num() == 0)
{
SparseDelegateObjectListener.EnableListener();
}
FSparseDelegateMap& DelegateMap = SparseDelegates.FindOrAdd(DelegateOwner);
TSharedPtr<FMulticastScriptDelegate>& MulticastDelegate = DelegateMap.FindOrAdd(DelegateName);
if (!MulticastDelegate.IsValid())
{
MulticastDelegate = MakeShared<FMulticastScriptDelegate>();
}
MulticastDelegate->Add(MoveTemp(Delegate));
bDelegateWasBound = true;
}
return bDelegateWasBound;
}
存储的时候,会获取当前SparseDelegate对应的Owner、当前SparseDelegate对应的成员变量名字。获取了这两个字段之后,就开始从FSparseDelegateStorage::SparseDelegates这个两层Map中进行查找对应的FMulticastScriptDelegate,找到之后执行Delegate的ADD。
这里的GetDelegateOwner实现的非常Trick,使用了当前成员变量在所属OwnerClass里地址偏移,通过指针计算出Owner的地址之后执行强转:
UObject* GetDelegateOwner() const
{
const size_t OffsetToOwner = DelegateInfoClass::template GetDelegateOffset<OwningClass>();
check(OffsetToOwner);
UObject* DelegateOwner = reinterpret_cast<UObject*>((uint8*)this - OffsetToOwner);
check(DelegateOwner->IsValidLowLevelFast(false)); // Most likely the delegate is trying to be used on the stack, in an object it wasn't defined for, or for a class member with a different name than it was defined for. It is only valid for a sparse delegate to be used for the exact class/property name it is defined with.
return DelegateOwner;
}
可以看出这个SparseDelegate的正确运行完全依赖于传入的DelegateInfoClass来提供一些元信息,这个DelegateInfoClass在DECLARE_DYNAMIC_MULTICAST_SPARSE_DELEGATE宏展开后会自动生成:
__declspec(dllexport) void FComponentBeginOverlapSignature_DelegateWrapper(const FMulticastScriptDelegate& ComponentBeginOverlapSignature, UPrimitiveComponent* OverlappedComponent, AActor* OtherActor, UPrimitiveComponent* OtherComp, int32 OtherBodyIndex, bool bFromSweep, FHitResult const& SweepResult); class FComponentBeginOverlapSignature_MCSignature : public TBaseDynamicMulticastDelegate<FNotThreadSafeDelegateMode, void, UPrimitiveComponent*, AActor*, UPrimitiveComponent*, int32, bool, const FHitResult&> {
public: FComponentBeginOverlapSignature_MCSignature() { } explicit FComponentBeginOverlapSignature_MCSignature(const TMulticastScriptDelegate<>& InMulticastScriptDelegate) : TBaseDynamicMulticastDelegate<FNotThreadSafeDelegateMode, void, UPrimitiveComponent*, AActor*, UPrimitiveComponent*, int32, bool, const FHitResult&>(InMulticastScriptDelegate) { } void Broadcast(UPrimitiveComponent* InParam1, AActor* InParam2, UPrimitiveComponent* InParam3, int32 InParam4, bool InParam5, const FHitResult& InParam6) const {
FComponentBeginOverlapSignature_DelegateWrapper(*this, InParam1, InParam2, InParam3, InParam4, InParam5, InParam6);
}
}; struct FComponentBeginOverlapSignatureInfoGetter {
static const char* GetDelegateName() {
return "OnComponentBeginOverlap";
} template<typename T> static size_t GetDelegateOffset() {
return ((::size_t) & reinterpret_cast<char const volatile&>((((T*)0)->OnComponentBeginOverlap)));
}
}; struct FComponentBeginOverlapSignature : public TSparseDynamicDelegate<FComponentBeginOverlapSignature_MCSignature, UPrimitiveComponent, FComponentBeginOverlapSignatureInfoGetter> { };
可以看出在真正绑定了Listener之后,内存的占用依然是有的。所谓的省内存只有在这个SparseDelegate没有绑定Listener的情况下才会生效,绑定之后说不定内存占用还更多!
此外由于这样的实现,导致这个Delegate的生命周期并没有跟随所属Owner,为此FSparseDelegateStorage还需要监听所有UObject的销毁事件,来从SparseDelegates中删除相关的Key:
class FSparseDelegateStorage
{
private:
struct FObjectListener : public FUObjectArray::FUObjectDeleteListener
{
virtual ~FObjectListener();
virtual void NotifyUObjectDeleted(const UObjectBase* Object, int32 Index) override;
virtual void OnUObjectArrayShutdown();
void EnableListener();
void DisableListener();
virtual SIZE_T GetAllocatedSize() const override
{
return 0;
}
};
};
void FSparseDelegateStorage::FObjectListener::EnableListener()
{
GUObjectArray.AddUObjectDeleteListener(this);
}
void FSparseDelegateStorage::FObjectListener::NotifyUObjectDeleted(const UObjectBase* Object, int32 Index)
{
FTransactionallySafeScopeLock SparseDelegateMapLock(&FSparseDelegateStorage::SparseDelegateMapCritical);
FSparseDelegateStorage::SparseDelegates.Remove(Object);
if (FSparseDelegateStorage::SparseDelegates.Num() == 0)
{
DisableListener();
}
}
这里居然还会根据是否目前有注册的Listener来动态的开关UObject的销毁通知回调,以达到优化性能的目的。
基于计时器的逻辑驱动
UE提供了一个计时器管理系统FTimerManager,使用的时候需要使用SetTimer接口去注册超时回调:
/** Version that takes a TFunction */
FORCEINLINE void SetTimer(FTimerHandle& InOutHandle, TFunction<void(void)>&& Callback, float InRate, bool InbLoop, float InFirstDelay = -1.f )
{
InternalSetTimer(InOutHandle, FTimerUnifiedDelegate(MoveTemp(Callback)), InRate, InbLoop, InFirstDelay);
}
template< class UserClass >
FORCEINLINE void SetTimer(FTimerHandle& InOutHandle, UserClass* InObj, typename FTimerDelegate::TMethodPtr< UserClass > InTimerMethod, float InRate, bool InbLoop = false, float InFirstDelay = -1.f)
{
InternalSetTimer(InOutHandle, FTimerUnifiedDelegate( FTimerDelegate::CreateUObject(InObj, InTimerMethod) ), InRate, InbLoop, InFirstDelay);
}
InRate就是常规的计时器超时时间。这里的InbLoop代表这个计时器是否会持续存在,如果为false就是常规的只执行一次的计时器。InFirstDelay代表是否等待一段时间之后再开启这个计时器的执行,如果为正数则这个计时器的第一次回调间隔为InFirstDelay + InRate。
在注册成功之后会返回一个FTimerHandler, 这个FTimerHandler其实是两个整数拼接而成的一个uint64:
static constexpr uint32 IndexBits = 24;
static constexpr uint32 SerialNumberBits = 40;
static_assert(IndexBits + SerialNumberBits == 64, "The space for the timer index and serial number should total 64 bits");
static constexpr int32 MaxIndex = (int32)1 << IndexBits;
static constexpr uint64 MaxSerialNumber = (uint64)1 << SerialNumberBits;
void SetIndexAndSerialNumber(int32 Index, uint64 SerialNumber)
{
check(Index >= 0 && Index < MaxIndex);
check(SerialNumber < MaxSerialNumber);
Handle = (SerialNumber << IndexBits) | (uint64)(uint32)Index;
}
FORCEINLINE uint64 GetSerialNumber() const
{
return Handle >> IndexBits;
}
UPROPERTY(Transient)
uint64 Handle;
外部在拥有这个FTimerHandler之后可以进行暂停计时或取消计时等操作:
/**
* Clears a previously set timer, identical to calling SetTimer() with a <= 0.f rate.
* Invalidates the timer handle as it should no longer be used.
*
* @param InHandle The handle of the timer to clear.
*/
FORCEINLINE void ClearTimer(FTimerHandle& InHandle)
{
if (const FTimerData* TimerData = FindTimer(InHandle))
{
InternalClearTimer(InHandle);
}
InHandle.Invalidate();
}
/**
* Pauses a previously set timer.
*
* @param InHandle The handle of the timer to pause.
*/
ENGINE_API void PauseTimer(FTimerHandle InHandle);
/**
* Unpauses a previously set timer
*
* @param InHandle The handle of the timer to unpause.
*/
ENGINE_API void UnPauseTimer(FTimerHandle InHandle);
下面我们来重点看一下计时器的创建与超时调度实现。
计时器的创建
FTimerManager提供了数十种SetTimer的变体,最终都会调用到InternalSetTimer上:
void FTimerManager::InternalSetTimer(FTimerHandle& InOutHandle, FTimerUnifiedDelegate&& InDelegate, float InRate, bool bInLoop, float InFirstDelay)
{
InternalSetTimer(InOutHandle, MoveTemp(InDelegate), InRate, FTimerManagerTimerParameters{ .bLoop = bInLoop, .FirstDelay = InFirstDelay });
}
void FTimerManager::InternalSetTimer(FTimerHandle& InOutHandle, FTimerUnifiedDelegate&& InDelegate, float InRate, const FTimerManagerTimerParameters& InTimerParameters)
{
SCOPE_CYCLE_COUNTER(STAT_SetTimer);
// not currently threadsafe
check(IsInGameThread());
if (FindTimer(InOutHandle))
{
// if the timer is already set, just clear it and we'll re-add it, since
// there's no data to maintain.
InternalClearTimer(InOutHandle);
}
if (InRate > 0.f)
{
// set up the new timer
FTimerData NewTimerData;
NewTimerData.TimerDelegate = MoveTemp(InDelegate);
NewTimerData.Rate = InRate;
NewTimerData.bLoop = InTimerParameters.bLoop;
NewTimerData.bMaxOncePerFrame = InTimerParameters.bMaxOncePerFrame;
NewTimerData.bRequiresDelegate = NewTimerData.TimerDelegate.IsBound();
NewTimerData.bGmAdjust = InTimerParameters.bGmAdjust;
// Set level collection
const UWorld* const OwningWorld = OwningGameInstance ? OwningGameInstance->GetWorld() : nullptr;
if (OwningWorld && OwningWorld->GetActiveLevelCollection())
{
NewTimerData.LevelCollection = OwningWorld->GetActiveLevelCollection()->GetType();
}
const float FirstDelay = (InTimerParameters.FirstDelay >= 0.f) ? InTimerParameters.FirstDelay : InRate;
FTimerHandle NewTimerHandle;
if (HasBeenTickedThisFrame())
{
NewTimerData.ExpireTime = InternalTime + FirstDelay;
NewTimerData.Status = ETimerStatus::Active;
NewTimerHandle = AddTimer(MoveTemp(NewTimerData));
ActiveTimerHeap.HeapPush(NewTimerHandle, FTimerHeapOrder(Timers));
}
else
{
// Store time remaining in ExpireTime while pending
NewTimerData.ExpireTime = FirstDelay;
NewTimerData.Status = ETimerStatus::Pending;
NewTimerHandle = AddTimer(MoveTemp(NewTimerData));
PendingTimerSet.Add(NewTimerHandle);
}
InOutHandle = NewTimerHandle;
}
else
{
InOutHandle.Invalidate();
}
}
从这个实现可以看出,核心就是利用各种参数来创建一个FTimerData,然后根据当前FTimerManager是否已经在当前帧执行过了分别执行两套逻辑:
- 如果当前帧已经处理完了这个
FTimerManager的所有Timer,则将这个FTimerData的状态设置为Active,并通过AddTimer将这个FTimerData放到内部的一个数组中,然后使用ActiveTimerHeap来维持一个最小堆, - 如果当前帧还没有处理这个
FTimerManager的所有Timer,则将这个FTimerData的状态设置为Pending,并通过AddTimer存储了这个FTimerData之后,先不放入到最小堆中,而是放入到一个PendingTimerSet中,
这样的处理是为了所有的计时申请都至少会在下一帧再去进行计时逻辑的运算。那么如果当前帧创建的Timer在TimerManager当前帧Tick之前就加入到调度队列,那么该Timer在当前帧就可能会在FTimerManager::Tick中执行逻辑,此时计算出来的DeltaTime是当前帧与上一帧的DeltaTime,是错误的。
这个AddTimer实现的很简略,就是把数据加入到Timers这个容器中,获取容器索引之后生成一个唯一handler来返回:
FTimerHandle FTimerManager::AddTimer(FTimerData&& TimerData)
{
const void* TimerIndicesByObjectKey = TimerData.TimerDelegate.GetBoundObject();
TimerData.TimerIndicesByObjectKey = TimerIndicesByObjectKey;
int32 NewIndex = Timers.Add(MoveTemp(TimerData));
FTimerHandle Result = GenerateHandle(NewIndex);
Timers[NewIndex].Handle = Result;
if (TimerIndicesByObjectKey)
{
TSet<FTimerHandle>& HandleSet = ObjectToTimers.FindOrAdd(TimerIndicesByObjectKey);
bool bAlreadyExists = false;
HandleSet.Add(Result, &bAlreadyExists);
checkf(!bAlreadyExists, TEXT("A timer with this handle and object has already been added! (%s)"), *GetFTimerDataSafely(TimerData));
}
return Result;
}
由于这个FTimerHandle在很多对外接口中都会被使用,如果直接使用容器中的索引的话,很容易会传入已经失效的数据。为了避免错误的FTimerHandler被传入,这里的GenerateHandle会使用一个递增流水号来一起拼接成一个uint64作为返回结果:
FTimerHandle FTimerManager::GenerateHandle(int32 Index)
{
uint64 NewSerialNumber = ++LastAssignedSerialNumber;
if (!ensureMsgf(NewSerialNumber != FTimerHandle::MaxSerialNumber, TEXT("Timer serial number has wrapped around!")))
{
NewSerialNumber = (uint64)1;
}
FTimerHandle Result;
Result.SetIndexAndSerialNumber(Index, NewSerialNumber);
return Result;
}
static constexpr uint32 IndexBits = 24;
static constexpr uint32 SerialNumberBits = 40;
static constexpr uint64 MaxSerialNumber = (uint64)1 << SerialNumberBits;
void FTimerHandle::SetIndexAndSerialNumber(int32 Index, uint64 SerialNumber)
{
check(Index >= 0 && Index < MaxIndex);
check(SerialNumber < MaxSerialNumber);
Handle = (SerialNumber << IndexBits) | (uint64)(uint32)Index;
}
这里流水号占用了40位,基本可以保证唯一性了。
然后再介绍一下这里的Timers成员变量,他的类型是一个比较特殊的SparseArray:
/** The array of timers - all other arrays will index into this */
TSparseArray<FTimerData> Timers;
SparseArray类似于TArray,保证了内部的存储区是连续的,但是SparseArray有无效元素的概念,即这个连续存储区中间很有可能出现空洞。这个设计主要是为了避免TArray在删除一个元素时会引发其他元素的索引变化,这样会导致外部存储的数组索引全都无效。有了SparseArray这个容器之后,删除一个元素只是会对这个元素标记为无效,并加入到一个FreeList链表中不会对后面的其他元素进行移动,这样就保证了对外暴露的数组索引是有效的:
/** Allocated elements are overlapped with free element info in the element list. */
template<typename ElementType>
union TSparseArrayElementOrFreeListLink
{
/** If the element is allocated, its value is stored here. */
ElementType ElementData;
struct
{
/** If the element isn't allocated, this is a link to the previous element in the array's free list. */
int32 PrevFreeIndex;
/** If the element isn't allocated, this is a link to the next element in the array's free list. */
int32 NextFreeIndex;
};
};
/** Removes Count elements from the array, starting from Index, without destructing them. */
void RemoveAtUninitialized(int32 Index,int32 Count = 1)
{
FElementOrFreeListLink* DataPtr = (FElementOrFreeListLink*)Data.GetData();
for (; Count; --Count)
{
check(AllocationFlags[Index]);
// Mark the element as free and add it to the free element list.
if(NumFreeIndices)
{
DataPtr[FirstFreeIndex].PrevFreeIndex = Index;
}
DataPtr[Index].PrevFreeIndex = -1;
DataPtr[Index].NextFreeIndex = NumFreeIndices > 0 ? FirstFreeIndex : INDEX_NONE;
FirstFreeIndex = Index;
++NumFreeIndices;
AllocationFlags[Index] = false;
++Index;
}
}
这里的AllocationFlags就负责记录所有元素是否有效,FirstFreeIndex则负责记录可用元素链表的头节点索引。
然后在SparseArray的添加元素操作中,会从FreeList中找到一个被标记为无效的元素索引作为存储位置,如果全都有效的话再进行扩容操作。
/**
* Allocates space for an element in the array. The element is not initialized, and you must use the corresponding placement new operator
* to construct the element in the allocated memory.
*/
FSparseArrayAllocationInfo AddUninitialized()
{
int32 Index;
if(NumFreeIndices)
{
FElementOrFreeListLink* DataPtr = (FElementOrFreeListLink*)Data.GetData();
// Remove and use the first index from the list of free elements.
Index = FirstFreeIndex;
FirstFreeIndex = DataPtr[FirstFreeIndex].NextFreeIndex;
--NumFreeIndices;
if(NumFreeIndices)
{
DataPtr[FirstFreeIndex].PrevFreeIndex = -1;
}
}
else
{
// Add a new element.
Index = Data.AddUninitialized(1);
AllocationFlags.Add(false);
}
return AllocateIndex(Index);
}
当对这个SparseArray进行遍历的时候,需要手动判定指定索引的元素是否有效:
bool IsValidIndex(int32 Index) const
{
return AllocationFlags.IsValidIndex(Index) && AllocationFlags[Index];
}
计时器的调度
void FTimerManager::Tick(float DeltaTime)
{
SCOPED_NAMED_EVENT(FTimerManager_Tick, FColor::Orange);
CSV_SCOPED_TIMING_STAT_EXCLUSIVE(TimerManager);
const double StartTime = FPlatformTime::Seconds();
bool bDumpTimerLogsThresholdExceeded = false;
int32 NbExpiredTimers = 0;
InternalTime += DeltaTime;
UWorld* const OwningWorld = OwningGameInstance ? OwningGameInstance->GetWorld() : nullptr;
while (ActiveTimerHeap.Num() > 0)
{
FTimerHandle TopHandle = ActiveTimerHeap.HeapTop();
// Test for expired timers
int32 TopIndex = TopHandle.GetIndex();
FTimerData* Top = &Timers[TopIndex];
if (Top->Status == ETimerStatus::ActivePendingRemoval)
{
ActiveTimerHeap.HeapPop(TopHandle, FTimerHeapOrder(Timers), EAllowShrinking::No);
RemoveTimer(TopHandle);
continue;
}
if (InternalTime > Top->ExpireTime)
{
// Timer has expired! Fire the delegate, then handle potential looping.
if (bDumpTimerLogsThresholdExceeded)
{
++NbExpiredTimers;
if (NbExpiredTimers <= MaxExpiredTimersToLog)
{
DescribeFTimerDataSafely(*GLog, *Top);
}
}
// Set the relevant level context for this timer
const int32 LevelCollectionIndex = OwningWorld ? OwningWorld->FindCollectionIndexByType(Top->LevelCollection) : INDEX_NONE;
FScopedLevelCollectionContextSwitch LevelContext(LevelCollectionIndex, OwningWorld);
// Remove it from the heap and store it while we're executing
ActiveTimerHeap.HeapPop(CurrentlyExecutingTimer, FTimerHeapOrder(Timers), EAllowShrinking::No);
Top->Status = ETimerStatus::Executing;
// Determine how many times the timer may have elapsed (e.g. for large DeltaTime on a short looping timer)
int32 const CallCount = Top->bLoop ?
FMath::TruncToInt( (InternalTime - Top->ExpireTime) / Top->Rate ) + 1
: 1;
}
}
}
基于异步回调的逻辑驱动
根据Steam的游戏PC配置调查,CPU环境逐渐从四核八线程演进为八核十六线程。越来越多的线程数量给游戏引擎带来不小的挑战,需要在架构上尽可能的提高多线程环境下的CPU利用率。例如在UE里,如果开启了多线程运行环境,那么就会创建多种线程池来处理各种不同的并行任务,以一台 8 核 16 线程的 CPU 为例,游戏运行时会创建这些线程池:
| 线程池名称 | 用途 | 默认线程数(与硬件相关) |
|---|---|---|
| Task Graph | 通用并行任务调度(含高、正常、低优先级任务) | 基于可用逻辑核心数动态分配 |
| Rendering Thread Pool | 渲染相关的并行任务(如着色器编译、网格体处理) | 通常 ≈ 逻辑核心数 - 2(保留给Game和Render线程) |
| Async Loading Thread Pool | 异步资源加载(流送、IO操作) | 固定数量,通常 4-8 个线程 |
| RHI Thread Pool | 渲染硬件接口任务(部分图形API的多线程提交) | 通常 2-4 个线程 |
| Background Task Pool | 低优先级后台计算 | 通常 2-4 个线程 |
| IO Thread Pool | 专门处理文件IO(非阻塞) | 通常 1-2 个线程 |
根据上面表格信息可以看到最终总的线程数量差不多等于线程数量的两倍。但是游戏业务逻辑永远都是在GameThread里跑,如何安全高效的处理任务在GameThread与各种其他Thread之间的交互就需要引擎提供方便的机制,毕竟依赖人力去维护各种共享资源的读写是不可行的。
简单异步任务
为了统一异步任务的相关接口,UE在Engine\Source\Runtime\Core\Public\Async\Async.h下提供了一个模板化的Async接口来封装所有的异步任务提交操作,这个提交操作就是TaskGraph的任务入口:
template<typename CallableType>
auto Async(EAsyncExecution Execution, CallableType&& Callable, TUniqueFunction<void()> CompletionCallback = nullptr) -> TFuture<decltype(Forward<CallableType>(Callable)())>
{
using ResultType = decltype(Forward<CallableType>(Callable)());
TUniqueFunction<ResultType()> Function(Forward<CallableType>(Callable));
TPromise<ResultType> Promise(MoveTemp(CompletionCallback));
TFuture<ResultType> Future = Promise.GetFuture();
switch (Execution)
{
case EAsyncExecution::TaskGraphMainThread:
// fallthrough
case EAsyncExecution::TaskGraph:
{
TGraphTask<TAsyncGraphTask<ResultType>>::CreateTask().ConstructAndDispatchWhenReady(MoveTemp(Function), MoveTemp(Promise), Execution == EAsyncExecution::TaskGraph ? ENamedThreads::AnyThread : ENamedThreads::GameThread);
}
break;
case EAsyncExecution::Thread:
// 省略一些代码
case EAsyncExecution::ThreadIfForkSafe:
// 省略一些代码
case EAsyncExecution::ThreadPool:
if (FPlatformProcess::SupportsMultithreading())
{
check(GThreadPool != nullptr);
GThreadPool->AddQueuedWork(new TAsyncQueuedWork<ResultType>(MoveTemp(Function), MoveTemp(Promise)));
}
else
{
SetPromise(Promise, Function);
}
break;
// 省略一些代码
default:
check(false); // not implemented yet!
}
return MoveTemp(Future);
}
在上面的Async接口里,第一个参数Execution代表任务要投递到的线程池,是一个EAsyncExecution类型的枚举值,目前的取值范围为下面的五种:
Thread,会创建独立的线程执行Task,TaskGraph,通过TaskGraph来执行TaskTaskGraphMainThread,强制在主线程执行的Task,也属于TaskGraph的一种ThreadPool,通过线程池来执行Task,LargeThreadPool,这个是编辑器专用的,暂时忽略
/**
* Enumerates available asynchronous execution methods.
*/
enum class EAsyncExecution
{
/** Execute in Task Graph (for short running tasks). */
TaskGraph,
/** Execute in Task Graph on the main thread (for short running tasks). */
TaskGraphMainThread,
/** Execute in separate thread if supported (for long running tasks). */
Thread,
/** Execute in separate thread if supported or supported post fork (see FForkProcessHelper::CreateThreadIfForkSafe) (for long running tasks). */
ThreadIfForkSafe,
/** Execute in global queued thread pool. */
ThreadPool,
#if WITH_EDITOR
/** Execute in large global queued thread pool. */
LargeThreadPool
#endif
};
这里当前只关心EAsyncExecution::TaskGraph和EAsyncExecution::ThreadPool这两个分支的处理,其逻辑都很相似,都是构造一个任务封装对象,然后执行任务投递:
EAsyncExecution::ThreadPool会构造一个TAsyncQueuedWork,然后通过GThreadPool->AddQueuedWork来添加到全局的线程池GThreadPool来执行任务调度EAsyncExecution::TaskGraph会构造一个TGraphTask<TAsyncGraphTask<ResultType>>,这里的ConstructAndDispatchWhenReady会调用TryLaunch来触发任务提交
这里就不许详解这个任务提交之后如何被对应的线程池调度执行,因为这个逻辑比较复杂,涉及到TaskGraph的内部实现细节。当前只关心任务被执行时如何执行完成回调。TAsyncGraphTask被调度执行时,其DoTask方法会被调用,内部会通过SetPromise这个全局函数来执行任务函数Function,然后将任务执行的结果放到Promise里:
/**
* Template for setting a promise value from a callable.
*/
template<typename ResultType, typename CallableType>
inline void SetPromise(TPromise<ResultType>& Promise, CallableType&& Callable)
{
Promise.SetValue(Forward<CallableType>(Callable)());
}
template<typename CallableType>
inline void SetPromise(TPromise<void>& Promise, CallableType&& Callable)
{
Forward<CallableType>(Callable)();
Promise.SetValue();
}
/**
* Template for asynchronous functions that are executed in the Task Graph system.
*/
template<typename ResultType>
class TAsyncGraphTask
: public FAsyncGraphTaskBase
{
public:
/**
* Creates and initializes a new instance.
*
* @param InFunction The function to execute asynchronously.
* @param InPromise The promise object used to return the function's result.
*/
TAsyncGraphTask(TUniqueFunction<ResultType()>&& InFunction, TPromise<ResultType>&& InPromise, ENamedThreads::Type InDesiredThread = ENamedThreads::AnyThread)
: Function(MoveTemp(InFunction))
, Promise(MoveTemp(InPromise))
, DesiredThread(InDesiredThread)
{ }
public:
/**
* Performs the actual task.
*
* @param CurrentThread The thread that this task is executing on.
* @param MyCompletionGraphEvent The completion event.
*/
void DoTask(ENamedThreads::Type CurrentThread, const FGraphEventRef& MyCompletionGraphEvent)
{
SetPromise(Promise, Function);
}
/**
* Returns the name of the thread that this task should run on.
*
* @return Always run on any thread.
*/
ENamedThreads::Type GetDesiredThread()
{
return DesiredThread;
}
/**
* Gets the future that will hold the asynchronous result.
*
* @return A TFuture object.
*/
TFuture<ResultType> GetFuture()
{
return Promise.GetFuture();
}
private:
/** The function to execute on the Task Graph. */
TUniqueFunction<ResultType()> Function;
/** The promise to assign the result to. */
TPromise<ResultType> Promise;
/** The desired execution thread. */
ENamedThreads::Type DesiredThread;
};
这个Promise对象在Async函数中被创建,然后被传递给TAsyncGraphTask的构造函数,同时Async函数会返回TFuture<ResultType>,这个对象提供了Wait方法,会被用户用来等待任务的结束:
TFuture<ResultType> Async(ENamedThreads::Type DesiredThread = ENamedThreads::AnyThread)
{
TPromise<ResultType> Promise;
TFuture<ResultType> Future = Promise.GetFuture();
// 创建并提交任务到TaskGraph
UGameplayStatics::GetGameInstance(GetWorld())->GetTaskGraph()->ConstructAndDispatchWhenReady(
new TGraphTask<TAsyncGraphTask<ResultType>>(
MoveTemp(Function),
MoveTemp(Promise),
DesiredThread
)
);
return Future;
}
不过一般来说外部基本会忽略这个返回的Future对象,因为其Wait操作会阻塞当前线程直到任务完成,这种同步阻塞的操作让任务的异步性丧失了所有的意义。虽然Future对象上除了Wait方法之外,还提供了Then和Next方法,用于在任务完成之后执行后续任务,但是这种链式调用的任务管理方式实在是不好用,就跟cpp11引入的std::future一样,正常的业务里根本不会直接使用Future:
/**
* Set a completion callback that will be called once the future completes
* or immediately if already completed
*
* @param Continuation a continuation taking an argument of type TFuture<InternalResultType>
* @return nothing at the moment but could return another future to allow future chaining
*/
template<typename Func>
auto Then(Func Continuation);
/**
* Convenience wrapper for Then that
* set a completion callback that will be called once the future completes
* or immediately if already completed
* @param Continuation a continuation taking an argument of type InternalResultType
* @return nothing at the moment but could return another future to allow future chaining
*/
template<typename Func>
auto Next(Func Continuation);
因此一般会直接在提交的任务函数里就处理好执行结果的异步通知。比如在FAssetRegistrySearchProvider::Search函数中,会在LargeThreadPool中执行任务,执行完所有Asset的搜索之后,在TaskGraphMainThread中执行SearchQuery->GetResultsCallback()回调,整个调用链里都忽略了Async返回的Future,从而达到了异步执行任务并在主线程获取结果的目的:
void FAssetRegistrySearchProvider::Search(FSearchQueryPtr SearchQuery)
{
IAssetRegistry& Registry = FAssetRegistryModule::GetRegistry();
// Start by gathering all assets.
TArray<FAssetData> Assets;
Registry.GetAllAssets(Assets);
Async(EAsyncExecution::LargeThreadPool, [Assets = MoveTemp(Assets), SearchQuery]() mutable {
FTextFilterExpressionEvaluator TextFilterExpressionEvaluator(ETextFilterExpressionEvaluatorMode::Complex);
TextFilterExpressionEvaluator.SetFilterText(FText::FromString(SearchQuery->QueryText));
FFrontendFilter_TextFilterExpressionContext_HackCopy TextFilterExpressionContext;
for (auto AssetIter = Assets.CreateIterator(); AssetIter; ++AssetIter)
{
const FAssetData& Asset = *AssetIter;
TextFilterExpressionContext.SetAsset(&Asset);
if (!TextFilterExpressionEvaluator.TestTextFilter(TextFilterExpressionContext))
{
AssetIter.RemoveCurrent();
}
TextFilterExpressionContext.ClearAsset();
}
TArray<FSearchRecord> SearchResults;
for (const FAssetData& Asset : Assets)
{
FSearchRecord Record;
Record.AssetPath = Asset.ObjectPath.ToString();
Record.AssetName = Asset.AssetName.ToString();
Record.AssetClass = Asset.AssetClass.ToString();
const float WorstCase = Record.AssetName.Len() + SearchQuery->QueryText.Len();
Record.Score = -50.0f * (1.0f - (Algo::LevenshteinDistance(Record.AssetName.ToLower(), SearchQuery->QueryText.ToLower()) / WorstCase));
SearchResults.Add(Record);
}
Async(EAsyncExecution::TaskGraphMainThread, [SearchQuery, SearchResults = MoveTemp(SearchResults)]() mutable {
if (FSearchQuery::ResultsCallbackFunction ResultsCallback = SearchQuery->GetResultsCallback())
{
ResultsCallback(MoveTemp(SearchResults));
}
});
});
}
无依赖异步任务
如果有大量的并行任务需要执行的话,对每个任务都手动的调用Async接口会给任务管理上带来非常大的灾难,面对这种情况需要在业务层再执行一些封装。以Navmesh的生成为例,在执行Navmesh的Rebuild操作时,会为每个需要重建数据的Tile都生成一个异步任务,投递到异步线程池里执行。然后主线程不断的使用While来等待所有的任务都执行完成,当执行完成之后再回到主线程更新Navmesh的绘制,同时调用OnNavMeshGenerationFinished来通知Navmesh生成结束:
void ANavigationData::EnsureBuildCompletion()
{
if (NavDataGenerator.IsValid())
{
NavDataGenerator->EnsureBuildCompletion();
}
}
void FRecastNavMeshGenerator::EnsureBuildCompletion()
{
const bool bHadTasks = GetNumRemaningBuildTasks() > 0;
const bool bDoAsyncDataGathering = (GatherGeometryOnGameThread() == false);
do
{
const int32 NumTasksToProcess = (bDoAsyncDataGathering ? 1 : MaxTileGeneratorTasks) - RunningDirtyTiles.Num();
ProcessTileTasks(NumTasksToProcess);
// Block until tasks are finished
for (FRunningTileElement& Element : RunningDirtyTiles)
{
Element.AsyncTask->EnsureCompletion();
}
}
while (GetNumRemaningBuildTasks() > 0);
// Update navmesh drawing only if we had something to build
if (bHadTasks)
{
DestNavMesh->RequestDrawingUpdate();
}
}
TArray<uint32> FRecastNavMeshGenerator::ProcessTileTasks(const int32 NumTasksToProcess)
{
QUICK_SCOPE_CYCLE_COUNTER(STAT_RecastNavMeshGenerator_ProcessTileTasks);
const bool bHasTasksAtStart = GetNumRemaningBuildTasks() > 0;
TArray<uint32> UpdatedTiles;
#if RECAST_ASYNC_REBUILDING
UpdatedTiles = ProcessTileTasksAsync(NumTasksToProcess);
#else
// 省略同步执行的部分代码
#endif
// Notify owner in case all tasks has been completed
const bool bHasTasksAtEnd = GetNumRemaningBuildTasks() > 0;
if (bHasTasksAtStart && !bHasTasksAtEnd)
{
QUICK_SCOPE_CYCLE_COUNTER(STAT_RecastNavMeshGenerator_OnNavMeshGenerationFinished);
DestNavMesh->OnNavMeshGenerationFinished();
}
return UpdatedTiles;
}
这里的ProcessTileTasksAsync函数负责为每一个需要重建的Tile生成一个异步任务FRecastTileGeneratorTask,并通过StartSynchronousTask来投递到异步线程池里执行:
TArray<uint32> FRecastNavMeshGenerator::ProcessTileTasksAsync(const int32 NumTasksToProcess)
{
QUICK_SCOPE_CYCLE_COUNTER(STAT_RecastNavMeshGenerator_ProcessTileTasksAsync);
TArray<uint32> UpdatedTiles;
const bool bGameStaticNavMesh = IsGameStaticNavMesh(DestNavMesh);
int32 NumProcessedTasks = 0;
// Submit pending tile elements
for (int32 ElementIdx = PendingDirtyTiles.Num()-1; ElementIdx >= 0 && NumProcessedTasks < NumTasksToProcess; ElementIdx--)
{
QUICK_SCOPE_CYCLE_COUNTER(STAT_RecastNavMeshGenerator_ProcessTileTasks_NewTasks);
FPendingTileElement& PendingElement = PendingDirtyTiles[ElementIdx];
FRunningTileElement RunningElement(PendingElement.Coord);
// Make sure that we are not submitting generator for grid cell that is currently being regenerated
if (!RunningDirtyTiles.Contains(RunningElement))
{
// Spawn async task
TUniquePtr<FRecastTileGeneratorTask> TileTask = MakeUnique<FRecastTileGeneratorTask>(CreateTileGenerator(PendingElement.Coord, PendingElement.DirtyAreas));
// Start it in background in case it has something to build
if (TileTask->GetTask().TileGenerator->HasDataToBuild())
{
RunningElement.AsyncTask = TileTask.Release();
if (!GNavmeshSynchronousTileGeneration)
{
RunningElement.AsyncTask->StartBackgroundTask();
}
else
{
RunningElement.AsyncTask->StartSynchronousTask();
}
RunningDirtyTiles.Add(RunningElement);
}
else if (!bGameStaticNavMesh)
{
RemoveLayers(PendingElement.Coord, UpdatedTiles);
}
// Remove submitted element from pending list
PendingDirtyTiles.RemoveAt(ElementIdx, 1, /*bAllowShrinking=*/false);
NumProcessedTasks++;
}
}
// Release memory, list could be quite big after map load
if (NumProcessedTasks > 0 && PendingDirtyTiles.Num() == 0)
{
PendingDirtyTiles.Empty(64);
}
// Collect completed tasks and apply generated data to navmesh
for (int32 Idx = RunningDirtyTiles.Num() - 1; Idx >=0; --Idx)
{
QUICK_SCOPE_CYCLE_COUNTER(STAT_RecastNavMeshGenerator_ProcessTileTasks_FinishedTasks);
FRunningTileElement& Element = RunningDirtyTiles[Idx];
check(Element.AsyncTask);
if (Element.AsyncTask->IsDone())
{
// Add generated tiles to navmesh
if (!Element.bShouldDiscard)
{
FRecastTileGenerator& TileGenerator = *(Element.AsyncTask->GetTask().TileGenerator);
TArray<uint32> UpdatedTileIndices = AddGeneratedTiles(TileGenerator);
UpdatedTiles.Append(UpdatedTileIndices);
StoreCompressedTileCacheLayers(TileGenerator, Element.Coord.X, Element.Coord.Y);
#if RECAST_INTERNAL_DEBUG_DATA
StoreDebugData(TileGenerator, Element.Coord.X, Element.Coord.Y);
#endif
}
{
QUICK_SCOPE_CYCLE_COUNTER(STAT_RecastNavMeshGenerator_TileGeneratorRemoval);
// Destroy tile generator task
delete Element.AsyncTask;
Element.AsyncTask = nullptr;
// Remove completed tile element from a list of running tasks
RunningDirtyTiles.RemoveAtSwap(Idx, 1, false);
}
}
}
return UpdatedTiles;
}
ProcessTileTasksAsync的开头会先执行任务的投递,然后在后半部分的代码里收集已经执行完成的那些任务结果,合并到最终的Navmesh,并释放这些已经完成的任务FRecastTileGeneratorTask所占据的内存。
在上面的代码里,FRecastTileGeneratorTask是一个继承自FAsyncTask的异步任务封装类,其提供的StartBackgroundTask函数负责将任务投递到全局异步线程池GThreadPool里:
struct NAVIGATIONSYSTEM_API FRecastTileGeneratorWrapper : public FNonAbandonableTask
{
TSharedRef<FRecastTileGenerator> TileGenerator;
FRecastTileGeneratorWrapper(TSharedRef<FRecastTileGenerator> InTileGenerator)
: TileGenerator(InTileGenerator)
{
}
void DoWork()
{
TileGenerator->DoWork();
}
FORCEINLINE TStatId GetStatId() const
{
RETURN_QUICK_DECLARE_CYCLE_STAT(FRecastTileGenerator, STATGROUP_ThreadPoolAsyncTasks);
}
};
typedef FAsyncTask<FRecastTileGeneratorWrapper> FRecastTileGeneratorTask;
template<typename TTask>
class FAsyncTask
: private IQueuedWork
{
/** User job embedded in this task */
TTask Task;
/** Thread safe counter that indicates WORK completion, no necessarily finalization of the job */
FThreadSafeCounter WorkNotFinishedCounter;
/** If we aren't doing the work synchronously, this will hold the completion event */
FEvent* DoneEvent;
/** Pool we are queued into, maintained by the calling thread */
FQueuedThreadPool* QueuedPool;
/** optional LLM tag */
LLM(const UE::LLMPrivate::FTagData* InheritedLLMTag);
/* Internal function to destroy the completion event
**/
void DestroyEvent()
{
FPlatformProcess::ReturnSynchEventToPool(DoneEvent);
DoneEvent = nullptr;
}
/* Generic start function, not called directly
* @param bForceSynchronous if true, this job will be started synchronously, now, on this thread
**/
void Start(bool bForceSynchronous, FQueuedThreadPool* InQueuedPool)
{
FScopeCycleCounter Scope( Task.GetStatId(), true );
DECLARE_SCOPE_CYCLE_COUNTER( TEXT( "FAsyncTask::Start" ), STAT_FAsyncTask_Start, STATGROUP_ThreadPoolAsyncTasks );
LLM(InheritedLLMTag = FLowLevelMemTracker::bIsDisabled ? nullptr : FLowLevelMemTracker::Get().GetActiveTagData(ELLMTracker::Default));
FPlatformMisc::MemoryBarrier();
CheckIdle(); // can't start a job twice without it being completed first
WorkNotFinishedCounter.Increment();
QueuedPool = InQueuedPool;
if (bForceSynchronous)
{
QueuedPool = 0;
}
if (QueuedPool)
{
if (!DoneEvent)
{
DoneEvent = FPlatformProcess::GetSynchEventFromPool(true);
}
DoneEvent->Reset();
QueuedPool->AddQueuedWork(this);
}
else
{
// we aren't doing async stuff
DestroyEvent();
DoWork();
}
}
/**
* Tells the user job to do the work, sometimes called synchronously, sometimes from the thread pool. Calls the event tracker.
**/
void DoWork()
{
LLM_SCOPE(InheritedLLMTag);
FScopeCycleCounter Scope(Task.GetStatId(), true);
Task.DoWork();
check(WorkNotFinishedCounter.GetValue() == 1);
WorkNotFinishedCounter.Decrement();
}
/**
* Run this task on this thread
* @param bDoNow if true then do the job now instead of at EnsureCompletion
**/
void StartSynchronousTask()
{
Start(true, GThreadPool);
}
/**
* Queue this task for processing by the background thread pool
**/
void StartBackgroundTask(FQueuedThreadPool* InQueuedPool = GThreadPool)
{
Start(false, InQueuedPool);
}
// 省略很多函数
}
虽然这个EnsureCompletion会卡住主线程,但是由于执行Navmesh生成逻辑的GThreadPool内部线程数量是比较多的,所以不会卡很久。此外UE的UI更新和渲染窗口更新都是由单独的线程负责的,所以不会受到主线程被卡住的影响。所以在执行Navmesh生成的时候,UI上能够执行还有多少个任务的提示窗口更新,这个更新文字由FNavigationBuildingNotificationImpl::GetNotificationText函数计算出来,核心是根据RunningDirtyTiles的大小加上PendingDirtyTiles的大小计算出RemainingTasks:
FText FNavigationBuildingNotificationImpl::GetNotificationText() const
{
int32 RemainingTasks = 0;
UEditorEngine* const EEngine = Cast<UEditorEngine>(GEngine);
if (EEngine)
{
FWorldContext &EditorContext = EEngine->GetEditorWorldContext();
UNavigationSystemV1* NavSys = FNavigationSystem::GetCurrent<UNavigationSystemV1>(EditorContext.World());
if (NavSys)
{
RemainingTasks = NavSys->GetNumRemainingBuildTasks();
}
}
FFormatNamedArguments Args;
Args.Add(TEXT("RemainingTasks"), FText::AsNumber(RemainingTasks));
return FText::Format(NSLOCTEXT("NavigationBuild", "NavigationBuildingInProgress", "Building Navigation ({RemainingTasks})"), Args);
}
int32 UNavigationSystemV1::GetNumRemainingBuildTasks() const
{
int32 NumTasks = 0;
for (ANavigationData* NavData : NavDataSet)
{
if (NavData && NavData->GetGenerator())
{
NumTasks+= NavData->GetGenerator()->GetNumRemaningBuildTasks();
}
}
return NumTasks;
}
int32 FRecastNavMeshGenerator::GetNumRemaningBuildTasks() const
{
return RunningDirtyTiles.Num()
+ PendingDirtyTiles.Num()
+ (SyncTimeSlicedData.TileGeneratorSync.Get() ? 1 : 0);
}
带依赖异步任务
这个Navmesh的异步生成通过异步线程池来加快生成速度,投递给异步线程池的所有FRecastTileGeneratorTask任务可以以任意顺序执行,任务之间没有依赖关系,任务管理系统只关系所有创建的任务是否全部执行完成。如果异步任务之间有依赖关系的话,则不能使用这个全局异步任务线程池GThreadPool去管理这些任务了。
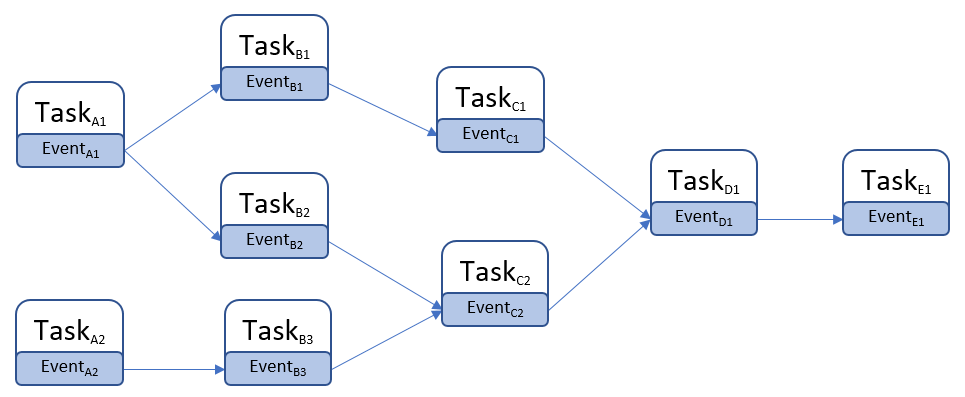
典型样例就是FTickTaskManager处理Tick之间的依赖,例如一个Actor身上挂载了多个SkeletalMesh,每个SkeletalMesh都需要Tick,但是同一帧里需要优先执行躯干SkeletalMesh的Tick,然后再执行挂载在躯干上的其他SkeletalMesh的Tick,此时就可以通过FTickFunction::AddPrerequisite来添加FTickFunction之间的依赖关系:
void FTickFunction::AddPrerequisite(UObject* TargetObject, struct FTickFunction& TargetTickFunction)
{
const bool bThisCanTick = (bCanEverTick || IsTickFunctionRegistered());
const bool bTargetCanTick = (TargetTickFunction.bCanEverTick || TargetTickFunction.IsTickFunctionRegistered());
if (bThisCanTick && bTargetCanTick)
{
Prerequisites.AddUnique(FTickPrerequisite(TargetObject, TargetTickFunction));
}
}
由于一个FTickFunction上可能会有多个前置的FTickFunction任务依赖,所以在FTickFunction上有一个Prerequisites数组来存储所有前置的FTickFunction任务。同时FTickTaskManager使用了基于TaskGraph的线程池来读取这个Prerequisites数组,将所有前置的FTickFunction任务作为依赖,为当前FTickFunction任务生成一个TGraphTask<FTickFunctionTask>并加入到TaskGraph中:
/**
* Start a component tick task and add the completion handle
*
* @param InPrerequisites - prerequisites that must be completed before this tick can begin
* @param TickFunction - the tick function to queue
* @param Context - tick context to tick in. Thread here is the current thread.
*/
FORCEINLINE void QueueTickTask(const FGraphEventArray* Prerequisites, FTickFunction* TickFunction, const FTickContext& TickContext)
{
checkSlow(TickFunction->InternalData);
checkSlow(TickContext.Thread == ENamedThreads::GameThread);
StartTickTask(Prerequisites, TickFunction, TickContext);
TGraphTask<FTickFunctionTask>* Task = (TGraphTask<FTickFunctionTask>*)TickFunction->InternalData->TaskPointer;
AddTickTaskCompletion(TickFunction->InternalData->ActualStartTickGroup, TickFunction->InternalData->ActualEndTickGroup, Task, TickFunction->bHighPriority);
}
/**
* Start a component tick task
*
* @param InPrerequisites - prerequisites that must be completed before this tick can begin
* @param TickFunction - the tick function to queue
* @param Context - tick context to tick in. Thread here is the current thread.
*/
FORCEINLINE void StartTickTask(const FGraphEventArray* Prerequisites, FTickFunction* TickFunction, const FTickContext& TickContext)
{
checkSlow(TickFunction->InternalData);
checkSlow(TickFunction->InternalData->ActualStartTickGroup >=0 && TickFunction->InternalData->ActualStartTickGroup < TG_MAX);
FTickContext UseContext = TickContext;
bool bIsOriginalTickGroup = (TickFunction->InternalData->ActualStartTickGroup == TickFunction->TickGroup);
if (TickFunction->bRunOnAnyThread && bAllowConcurrentTicks && bIsOriginalTickGroup)
{
if (TickFunction->bHighPriority)
{
UseContext.Thread = CPrio_HiPriAsyncTickTaskPriority.Get();
}
else
{
UseContext.Thread = CPrio_NormalAsyncTickTaskPriority.Get();
}
}
else
{
UseContext.Thread = ENamedThreads::SetTaskPriority(ENamedThreads::GameThread, TickFunction->bHighPriority ? ENamedThreads::HighTaskPriority : ENamedThreads::NormalTaskPriority);
}
TickFunction->InternalData->TaskPointer = TGraphTask<FTickFunctionTask>::CreateTask(Prerequisites, TickContext.Thread).ConstructAndHold(TickFunction, &UseContext, bLogTicks, bLogTicksShowPrerequistes);
}
TGraphTask<FTickFunctionTask>::CreateTask里会遍历Prerequisites数组,调用AddPrerequisites来添加依赖关系:
/**
* Base class for all tasks. A replacement for `FBaseGraphTask` and `FGraphEvent` from the old API, based on `Tasks::Private::FTaskBase` functionality
**/
class FBaseGraphTask : public UE::Tasks::Private::FTaskBase
{
public:
explicit FBaseGraphTask(const FGraphEventArray* InPrerequisites)
: FTaskBase(/*InitRefCount=*/ 1, false /* bUnlockPrerequisites */)
{
if (InPrerequisites != nullptr)
{
AddPrerequisites(*InPrerequisites, false /* bLockPrerequisite */);
}
UnlockPrerequisites();
}
}
添加前置依赖的时候,会增加其内部的前置依赖计数器NumLocks,这个计数器为了支持多线程访问声明为了Atomic变量,只支持fetch_add和fetch_sub操作,初始的时候其值为1:
// the number of times that the task should be unlocked before it can be scheduled or completed
// initial count is 1 for launching the task (it can't be scheduled before it's launched)
// reaches 0 the task is scheduled for execution.
// NumLocks's the most significant bit (see `ExecutionFlag`) is set on task execution start, and indicates that now
// NumLocks is about how many times the task must be unlocked to be completed
static constexpr uint32 NumInitialLocks = 1;
std::atomic<uint32> NumLocks{ NumInitialLocks };
// The task will be executed only when all prerequisites are completed.
// Must not be called concurrently.
// @param InPrerequisites - an iterable collection of tasks
template<typename PrerequisiteCollectionType, decltype(std::declval<PrerequisiteCollectionType>().begin())* = nullptr>
void AddPrerequisites(const PrerequisiteCollectionType& InPrerequisites, bool bLockPrerequisite)
{
TASKGRAPH_VERBOSE_EVENT_SCOPE(FTaskBase::AddPrerequisites_Collection);
checkf(NumLocks.load(std::memory_order_relaxed) >= NumInitialLocks && NumLocks.load(std::memory_order_relaxed) < ExecutionFlag, TEXT("Prerequisites can be added only before the task is launched"));
// registering the task as a subsequent of the given prerequisite can cause its immediate launch by the prerequisite
// (if the prerequisite has been completed on another thread), so we need to keep the task locked by assuming that the
// prerequisite can be added successfully, and release the lock if it wasn't
uint32 PrevNumLocks = NumLocks.fetch_add(GetNum(InPrerequisites), std::memory_order_relaxed); // relaxed because the following
// `AddSubsequent` provides required sync
uint32 NumCompletedPrerequisites = 0;
for (auto& Prereq : InPrerequisites)
{
// prerequisites can be either `FTaskBase*` or its Pimpl handle
FTaskBase* Prerequisite;
using FPrerequisiteType = std::decay_t<decltype(*std::declval<PrerequisiteCollectionType>().begin())>;
if constexpr (std::is_same_v<FPrerequisiteType, FTaskBase*>)
{
Prerequisite = Prereq;
}
else if constexpr (std::is_same_v<FPrerequisiteType, FGraphEventRef>)
{
Prerequisite = Prereq.GetReference();
}
else if constexpr (std::is_pointer_v<FPrerequisiteType>)
{
Prerequisite = Prereq->Pimpl;
}
else
{
Prerequisite = Prereq.Pimpl;
}
if (Prerequisite == nullptr)
{
++NumCompletedPrerequisites;
continue;
}
if (Prerequisite->AddSubsequent(*this)) // acq_rel memory order
{
Prerequisite->AddRef(); // keep it alive until this task's execution
if (bLockPrerequisite)
{
Prerequisites.Push(Prerequisite); // release memory order
}
else
{
Prerequisites.PushNoLock(Prerequisite); // relaxed memory order
}
}
else
{
++NumCompletedPrerequisites;
}
}
// This check is here to avoid the data dependency on PrevNumLocks.
checkf(PrevNumLocks + GetNum(InPrerequisites) < ExecutionFlag, TEXT("Max number of nested tasks reached: %d"), ExecutionFlag);
// unlock for prerequisites that weren't added
NumLocks.fetch_sub(NumCompletedPrerequisites, std::memory_order_release);
}
更新前置任务计数器的同时,通过Prerequisite->AddSubsequent(*this)在其前置依赖任务的后续任务数组Subsequents里添加当前任务:
// the task unlocks all its subsequents on completion.
// returns false if the task is already completed and the subsequent wasn't added
bool AddSubsequent(FTaskBase& Subsequent)
{
TaskTrace::SubsequentAdded(GetTraceId(), Subsequent.GetTraceId()); // doesn't matter if we suceeded below, we need to record task dependency
return Subsequents.PushIfNotClosed(&Subsequent);
}
// the task is completed when its subsequents list is closed and no more can be added
template <typename AllocatorType = FDefaultAllocator>
class FSubsequents
{
public:
bool PushIfNotClosed(FTaskBase* NewItem)
{
TASKGRAPH_VERBOSE_EVENT_SCOPE(FSubsequents::PushIfNotClosed);
if (bIsClosed.load(std::memory_order_relaxed))
{
return false;
}
UE::TUniqueLock Lock(Mutex);
if (bIsClosed)
{
return false;
}
Subsequents.Emplace(NewItem);
return true;
}
TArray<FTaskBase*, AllocatorType> Close()
{
TASKGRAPH_VERBOSE_EVENT_SCOPE(FSubsequents::Close);
UE::TUniqueLock Lock(Mutex);
bIsClosed = true;
return MoveTemp(Subsequents);
}
bool IsClosed() const
{
return bIsClosed;
}
private:
TArray<FTaskBase*, AllocatorType> Subsequents;
std::atomic<bool> bIsClosed = false;
UE::FMutex Mutex;
};
FSubsequents<TInlineAllocator<1>> Subsequents;
这样当一个GraphTask被执行的时候,在执行完成时会调用close函数,在close函数里会遍历Subsequents来驱动后续任务的调度:
// tries to get execution permission and if successful, executes given task body and completes the task if there're no pending nested tasks.
// does all required accounting before/after task execution. the task can be deleted as a result of this call.
// @returns true if the task was executed by the current thread
bool TryExecuteTask()
{
TASKGRAPH_VERBOSE_EVENT_SCOPE(FTaskBase::TryExecuteTask);
if (!TrySetExecutionFlag())
{
return false;
}
AddRef(); // `LowLevelTask` will automatically release the internal reference after execution, but there can be pending nested tasks, so keep it alive
// it's released either later here if the task is closed, or when the last nested task is completed and unlocks its parent (in `TryUnlock`)
ReleasePrerequisites();
FTaskBase* PrevTask = ExchangeCurrentTask(this);
ExecutingThreadId.store(FPlatformTLS::GetCurrentThreadId(), std::memory_order_relaxed);
if (GetPipe() != nullptr)
{
StartPipeExecution();
}
{
UE::FInheritedContextScope InheritedContextScope = RestoreInheritedContext();
TaskTrace::FTaskTimingEventScope TaskEventScope(GetTraceId());
TASKGRAPH_VERBOSE_EVENT_SCOPE(FTaskBase::ExecuteTask);
ExecuteTask();
}
if (GetPipe() != nullptr)
{
FinishPipeExecution();
}
ExecutingThreadId.store(FThread::InvalidThreadId, std::memory_order_relaxed); // no need to sync with loads as they matter only if
// executed by the same thread
ExchangeCurrentTask(PrevTask);
// close the task if there are no pending nested tasks
uint32 LocalNumLocks = NumLocks.fetch_sub(1, std::memory_order_acq_rel) - 1; // "release" to make task execution "happen before" this, and "acquire" to
// "sync with" another thread that completed the last nested task
if (LocalNumLocks == ExecutionFlag) // unlocked (no pending nested tasks)
{
Close();
Release(); // the internal reference that kept the task alive for nested tasks
} // else there're non completed nested tasks, the last one will unlock, close and release the parent (this task)
return true;
}
// closes task by unlocking its subsequents and flagging it as completed
void Close()
{
TASKGRAPH_VERBOSE_EVENT_SCOPE(FTaskBase::Close);
checkSlow(!IsCompleted());
// Push the first subsequent to the local queue so we pick it up directly as our next task.
// This saves us the cost of going to the global queue and performing a wake-up.
// But if we're a task event, always wake up new workers because the current task could continue executing for a long time after the trigger.
bool bWakeUpWorker = ExtendedPriority == EExtendedTaskPriority::TaskEvent;
for (FTaskBase* Subsequent : Subsequents.Close())
{
// bWakeUpWorker is passed by reference and is automatically set to true if we successfully schedule a task on the local queue.
// so all the remaining ones are sent to the global queue.
Subsequent->TryUnlock(bWakeUpWorker);
}
// Clear the pipe after the task is completed (subsequents closed) so that any tasks part of the
// pipe are not seen still being executed after FPipe::WaitUntilEmpty has returned.
if (GetPipe() != nullptr)
{
ClearPipe();
}
// release nested tasks
ReleasePrerequisites();
TaskTrace::Completed(GetTraceId());
// In case a thread is waiting on us to perform retraction, now is the time to try retraction again.
StateChangeEvent.Notify();
}
这里的TryUnlock会将每个Subsequent的前置任务计数进行fetch_sub减一操作,当更新后的计数器LocalNumLocks等于0时,就代表当前任务的所有前置任务都已经完成,可以通过Schedule来执行当前任务的调度了:
// A task can be locked for execution (by prerequisites or if it's not launched yet) or for completion (by nested tasks).
// This method is called to unlock the task and so can result in its scheduling (and execution) or completion
bool TryUnlock(bool& bWakeUpWorker)
{
TASKGRAPH_VERBOSE_EVENT_SCOPE(FTaskBase::TryUnlock);
FPipe* LocalPipe = GetPipe(); // cache data locally so we won't need to touch the member (read below)
uint32 PrevNumLocks = NumLocks.fetch_sub(1, std::memory_order_acq_rel); // `acq_rel` to make it happen after task
// preparation and before launching it
// the task can be dead already as the prev line can remove the lock hold for this execution path, another thread(s) can unlock
// the task, execute, complete and delete it. thus before touching any members or calling methods we need to make sure
// the task can't be destroyed concurrently
uint32 LocalNumLocks = PrevNumLocks - 1;
if (PrevNumLocks < ExecutionFlag)
{
// pre-execution state, try to schedule the task
checkf(PrevNumLocks != 0, TEXT("The task is not locked"));
bool bPrerequisitesCompleted = LocalPipe == nullptr ? LocalNumLocks == 0 : LocalNumLocks <= 1; // the only remaining lock is pipe's one (if any)
if (!bPrerequisitesCompleted)
{
return false;
}
// this thread unlocked the task, no other thread can reach this point concurrently, we can touch the task again
if (ExtendedPriority == EExtendedTaskPriority::Inline)
{
// "inline" tasks are not scheduled but executed straight away
TryExecuteTask(); // result doesn't matter, this can fail if task retraction jumped in and got execution
// permission between this thread unlocked the task and tried to execute it
ReleaseInternalReference();
// Use-after-free territory, do not touch any of the task's properties here.
}
else if (ExtendedPriority == EExtendedTaskPriority::TaskEvent)
{
// task events have nothing to execute, try to close it. task retraction can jump in and close the task event,
// so this thread still needs to check execution permission
if (TrySetExecutionFlag())
{
// task events are used as an empty prerequisites/subsequents
ReleasePrerequisites();
Close();
ReleaseInternalReference();
// Use-after-free territory, do not touch any of the task's properties here.
}
}
else
{
Schedule(bWakeUpWorker);
// Use-after-free territory, do not touch any of the task's properties here.
}
return true;
}
// execution already started (at least), this is nested tasks unlocking their parent
checkf(PrevNumLocks != ExecutionFlag, TEXT("The task is not locked"));
if (LocalNumLocks != ExecutionFlag) // still locked
{
return false;
}
// this thread unlocked the task, no other thread can reach this point concurrently, we can touch the task again
Close();
Release(); // the internal reference that kept the task alive for nested tasks
// Use-after-free territory, do not touch any of the task's properties here.
return true;
}
Unreal Engine 的 Tick 机制
在前面的章节中,我们介绍了Unreal Engine中的各种使用注册回调来驱动逻辑的机制,包括计时器回调、事件分发回调和异步任务回调。但是在UE里这些回调逻辑并不是业务逻辑的大头,真正的大头在引擎提供的各种Tick函数里,我们日常使用最多的Actor/ActorComponent的主要逻辑基本都是通过Tick来管理的。在UE的Main函数中,开头会执行引擎的一些初始化工作,在完成初始化之后,就开始使用while循环不断的来执行EngineTick:
/**
* Static guarded main function. Rolled into own function so we can have error handling for debug/ release builds depending
* on whether a debugger is attached or not.
*/
int32 GuardedMain( const TCHAR* CmdLine )
{
// 省略很多初始化代码
// Don't tick if we're running an embedded engine - we rely on the outer
// application ticking us instead.
if (!GUELibraryOverrideSettings.bIsEmbedded)
{
while( !IsEngineExitRequested() )
{
EngineTick();
}
}
TRACE_BOOKMARK(TEXT("Tick loop end"));
#if WITH_EDITOR
if( GIsEditor )
{
EditorExit();
}
#endif
return ErrorLevel;
}
在EngineTick里会调用GEngineLoop.Tick(),这个函数是UE引擎的主循环函数,负责驱动逻辑层的帧Frame的更新。在FEngineLoop::Tick函数中,会先更新时间相关的变量,比如FApp::CurrentTime、FApp::DeltaTime等,然后根据最大帧率限制MaxTickRate来判断是否需要Sleep一段时间来避免帧数过高,然后调用GEngine->Tick()来驱动World->Level这两个层级的Tick,并在最后更新一下全局帧号GFrameCounter:
void FEngineLoop::Tick()
{
// 省略很多代码
// set FApp::CurrentTime, FApp::DeltaTime and potentially wait to enforce max tick rate
{
QUICK_SCOPE_CYCLE_COUNTER(STAT_FEngineLoop_UpdateTimeAndHandleMaxTickRate);
GEngine->UpdateTimeAndHandleMaxTickRate();
GEngine->SetGameLatencyMarkerStart(CurrentFrameCounter);
}
// 省略很多代码
// main game engine tick (world, game objects, etc.)
GEngine->Tick(FApp::GetDeltaTime(), bIdleMode);
// 省略很多代码
// Increment global frame counter. Once for each engine tick.
GFrameCounter++;
// 省略很多代码
}
在LevelTick里调用FTickTaskManager::Tick(),而FTickTaskManager::Tick()会在内部调用Actor/ActorComponent的Tick()函数。因此从引擎的Tick到Actor/ActorComponent的Tick中间会经过以下几个步骤:
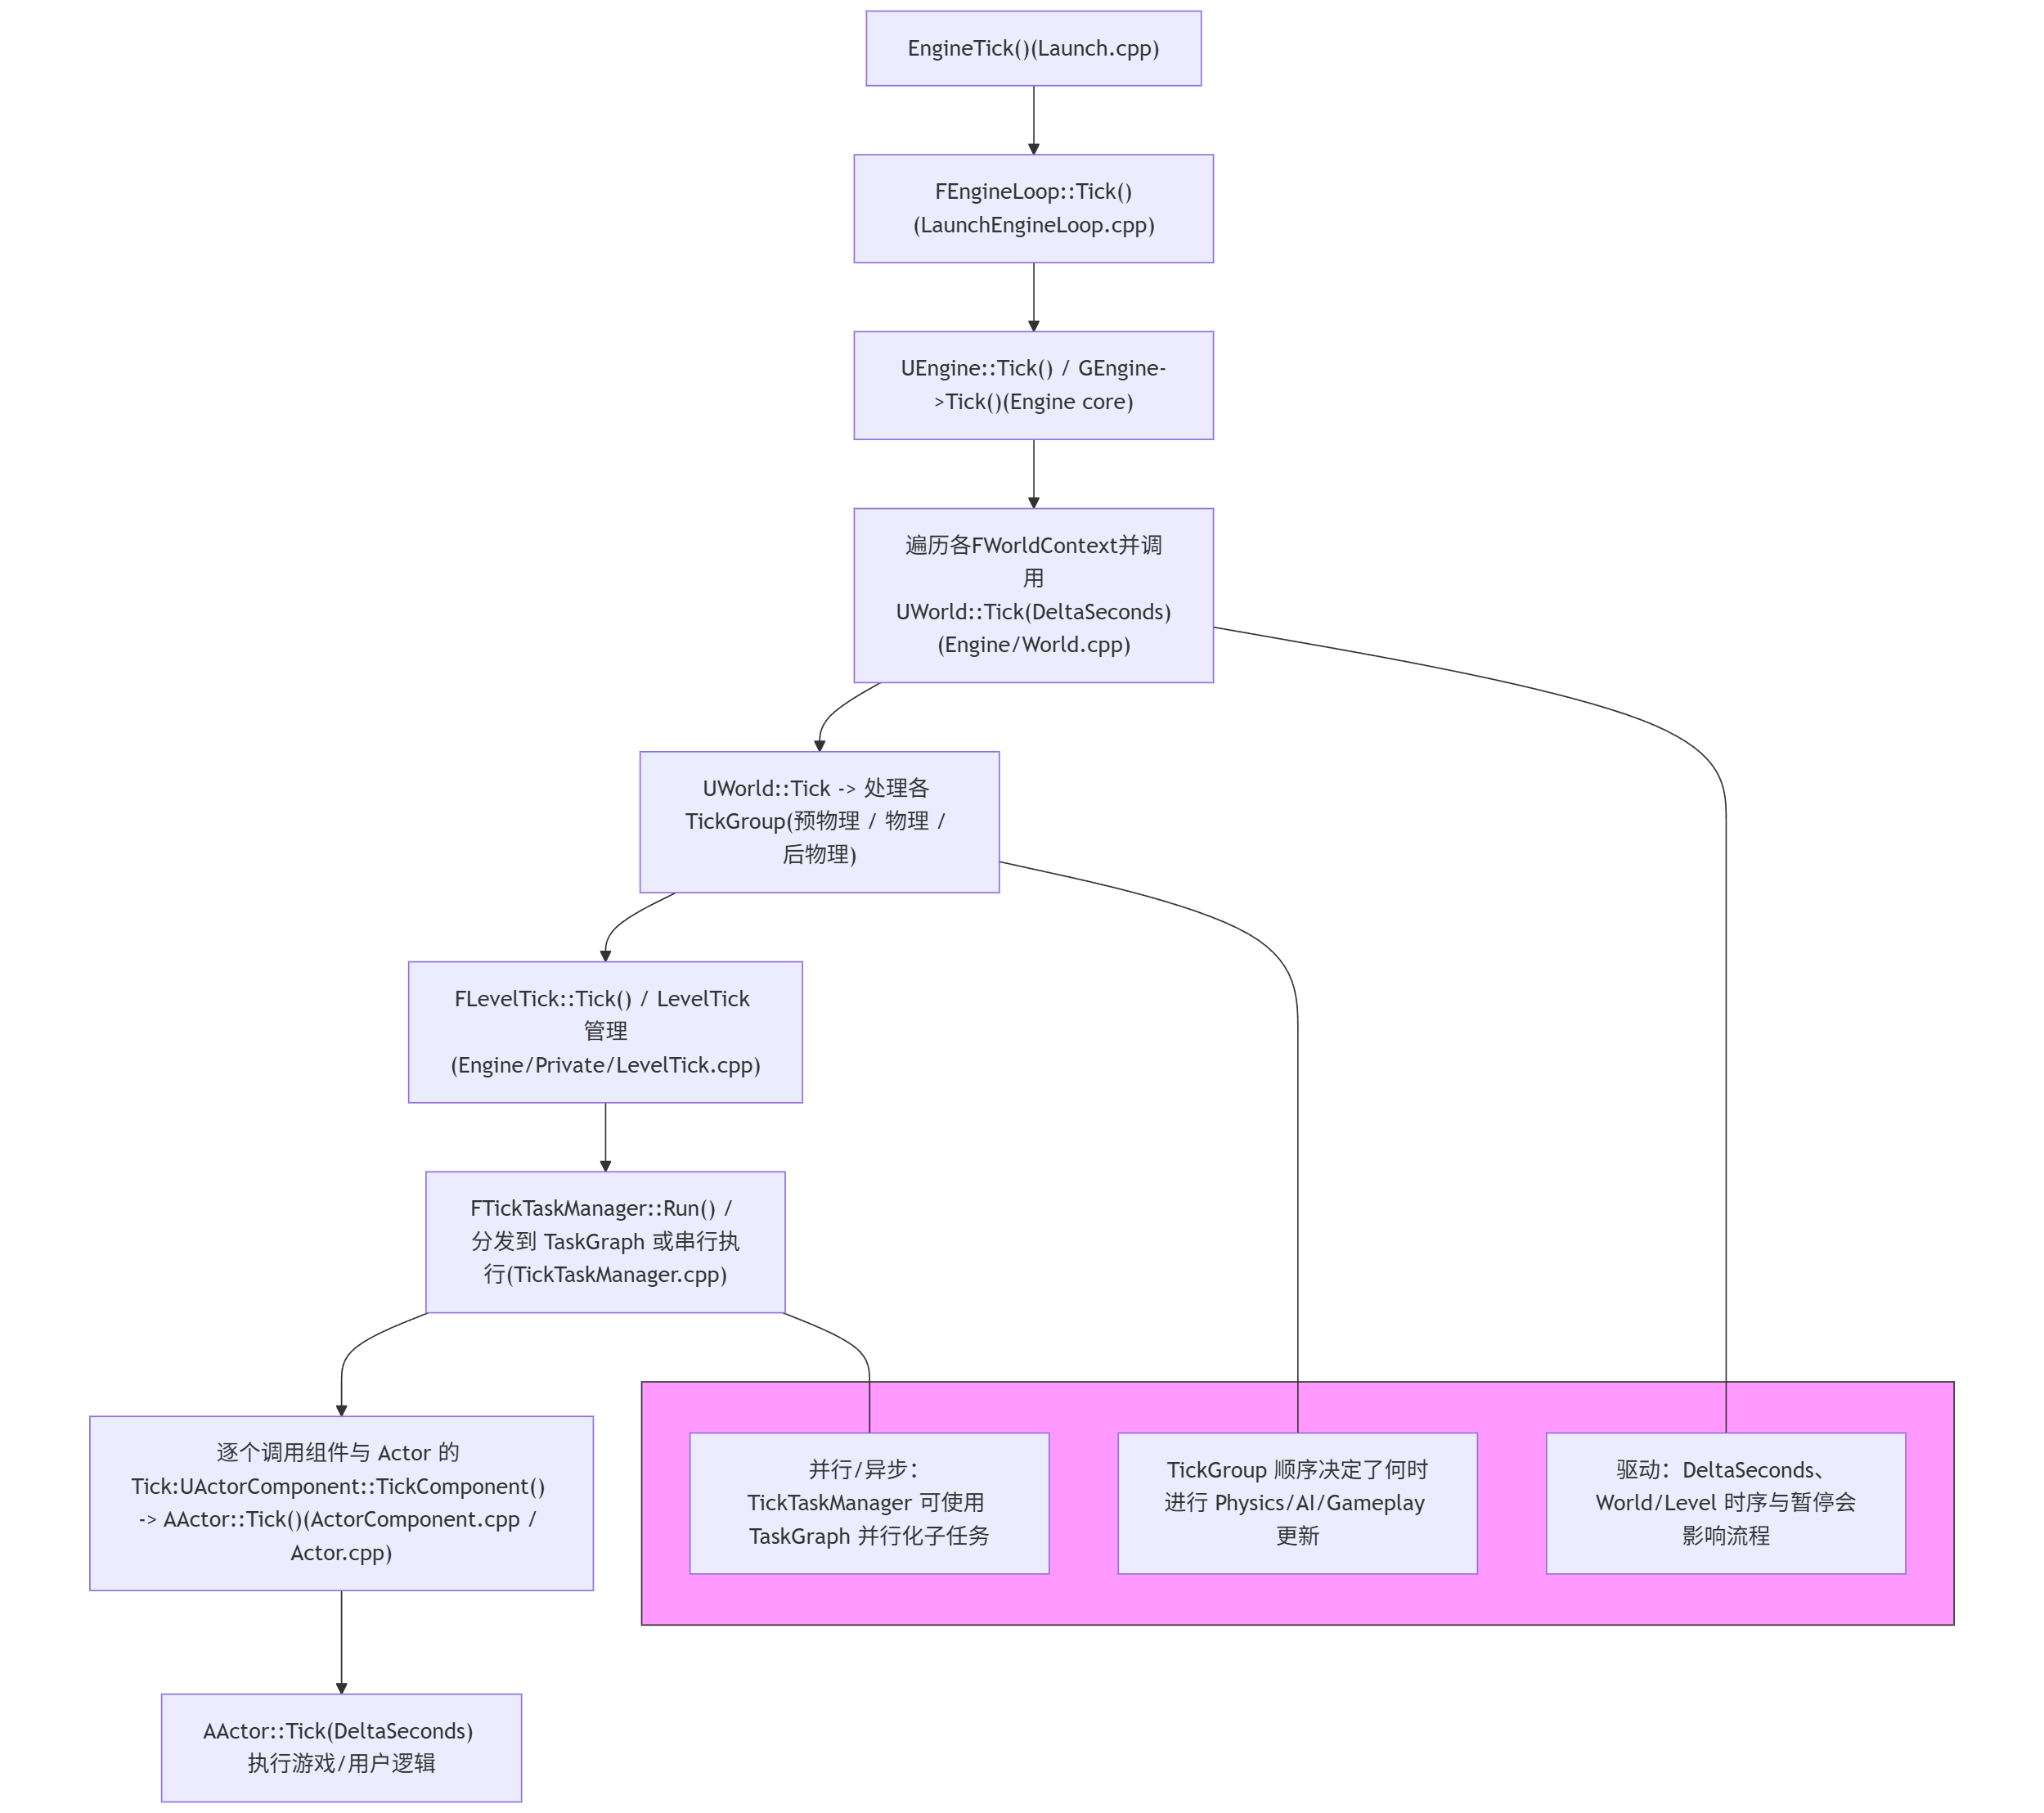
上面提到的Tick调用链只是一个概览,其实还有很多非Actor/ActorComponent的Tick函数。在这一章节中,我们将详细介绍Unreal Engine中的Tick机制,包括Tick的注册、排序、执行等,同时还会介绍一下一些通用的优化策略。
tickfunction基类
在Unreal Engine中提供了一个FTickFunction作为常规的可Tick对象的基类:
/**
* Abstract Base class for all tick functions.
**/
USTRUCT()
struct FTickFunction
{
GENERATED_USTRUCT_BODY()
public:
// The following UPROPERTYs are for configuration and inherited from the CDO/archetype/blueprint etc
/**
* Defines the minimum tick group for this tick function. These groups determine the relative order of when objects tick during a frame update.
* Given prerequisites, the tick may be delayed.
*
* @see ETickingGroup
* @see FTickFunction::AddPrerequisite()
*/
UPROPERTY(EditDefaultsOnly, Category="Tick", AdvancedDisplay)
TEnumAsByte<enum ETickingGroup> TickGroup;
/**
* Defines the tick group that this tick function must finish in. These groups determine the relative order of when objects tick during a frame update.
*
* @see ETickingGroup
*/
UPROPERTY(EditDefaultsOnly, Category="Tick", AdvancedDisplay)
TEnumAsByte<enum ETickingGroup> EndTickGroup;
public:
/** Bool indicating that this function should execute even if the game is paused. Pause ticks are very limited in capabilities. **/
UPROPERTY(EditDefaultsOnly, Category="Tick", AdvancedDisplay)
uint8 bTickEvenWhenPaused:1;
/** If false, this tick function will never be registered and will never tick. Only settable in defaults. */
UPROPERTY()
uint8 bCanEverTick:1;
/** If true, this tick function will start enabled, but can be disabled later on. */
UPROPERTY(EditDefaultsOnly, Category="Tick")
uint8 bStartWithTickEnabled:1;
/** If we allow this tick to run on a dedicated server */
UPROPERTY(EditDefaultsOnly, Category="Tick", AdvancedDisplay)
uint8 bAllowTickOnDedicatedServer:1;
/** True if we allow this tick to be combined with other ticks for improved performance */
uint8 bAllowTickBatching:1;
/** Run this tick first within the tick group, presumably to start async tasks that must be completed with this tick group, hiding the latency. */
uint8 bHighPriority:1;
/** If false, this tick will run on the game thread, otherwise it will run on any thread in parallel with the game thread and in parallel with other "async ticks" **/
uint8 bRunOnAnyThread:1;
};
目前的ETickingGroup有七个取值范围:
/** Determines which ticking group a tick function belongs to. */
UENUM(BlueprintType)
enum ETickingGroup : int
{
/** Any item that needs to be executed before physics simulation starts. */
TG_PrePhysics UMETA(DisplayName="Pre Physics"),
/** Special tick group that starts physics simulation. */
TG_StartPhysics UMETA(Hidden, DisplayName="Start Physics"),
/** Any item that can be run in parallel with our physics simulation work. */
TG_DuringPhysics UMETA(DisplayName="During Physics"),
/** Special tick group that ends physics simulation. */
TG_EndPhysics UMETA(Hidden, DisplayName="End Physics"),
/** Any item that needs rigid body and cloth simulation to be complete before being executed. */
TG_PostPhysics UMETA(DisplayName="Post Physics"),
/** Any item that needs the update work to be done before being ticked. */
TG_PostUpdateWork UMETA(DisplayName="Post Update Work"),
/** Catchall for anything demoted to the end. */
TG_LastDemotable UMETA(Hidden, DisplayName = "Last Demotable"),
/** Special tick group that is not actually a tick group. After every tick group this is repeatedly re-run until there are no more newly spawned items to run. */
TG_NewlySpawned UMETA(Hidden, DisplayName="Newly Spawned"),
TG_MAX,
};
这七个取值相当于把一帧切分为了七个连续不相交的部分,用于控制Tick执行时机的分组设置:
TG_PrePhysics:物理模拟执行,一般用于位置更新等需要作为物理运算的前置条件的逻辑TG_StartPhysics:启动物理模拟。一般仅内部用于`FStartPhysicsTickFunction``TG_DuringPhysics:和物理模拟无关的逻辑。通常用于位置、速度、加速度无关的逻辑TG_EndPhysics:阻塞等待物理模拟完成,分发物理碰撞回调。用于`EndPhysicsTickFunction``TG_PostPhysics:物理模拟结束后的Tick。任何依赖Rigidbody结果的逻辑都应该在此之后TG_PostUpdateWork:Update结束时的Tick。TG_LastDemotable:帧末尾的回调。
这里的TickGroup和EndTickGroup代表了这个tick函数所能执行的ETickingGroup闭区间。这里之所以使用区间而不是直接指定一个TickGroup,是因为当前的FTickFunction可以指定前置依赖:
/** Prerequisites for this tick function **/
TArray<struct FTickPrerequisite> Prerequisites;
/**
* Adds a tick function to the list of prerequisites...in other words, adds the requirement that TargetTickFunction is called before this tick function is
* @param TargetObject - UObject containing this tick function. Only used to verify that the other pointer is still usable
* @param TargetTickFunction - Actual tick function to use as a prerequisite
**/
ENGINE_API void AddPrerequisite(UObject* TargetObject, struct FTickFunction& TargetTickFunction);
/**
* Removes a prerequisite that was previously added.
* @param TargetObject - UObject containing this tick function. Only used to verify that the other pointer is still usable
* @param TargetTickFunction - Actual tick function to use as a prerequisite
**/
ENGINE_API void RemovePrerequisite(UObject* TargetObject, struct FTickFunction& TargetTickFunction);
一个FTickFunction可以设置很多依赖,当前FTickFunction不得早于这些依赖的FTickFunction执行。这里的FTickFunction的依赖一般是用来处理SkeletalMeshComponent的Tick,特别是ActorA挂载在ActorB身上的情况,此时要求ActorB的骨骼和位置先执行更新,然后再更新ActorA的骨骼和位置。
如果A的执行依赖于B,但是B的TickGroup晚于A,这样在执行Tick调度的时候就会出现失败。为了尽可能的降低调度失败的情况,这里就给每个FTickFunction都指定了一个可以执行的TickGroup区间,这样就有更多的空间来执行FTickFunction之间的拓扑排序,避免调度失败。
默认情况下FTickFunction会每帧都执行一次,不过可以通过修改TickInterval为正值来指定tick间隔,从而来达到降低Tick频率的目的
/** The frequency in seconds at which this tick function will be executed. If less than or equal to 0 then it will tick every frame */
UPROPERTY(EditDefaultsOnly, Category="Tick", meta=(DisplayName="Tick Interval (secs)"))
float TickInterval;
当这个FTickFunction被选中执行的时候,基类上声明的ExecuteTick函数就会被执行,这个是一个纯虚函数,具体内容依赖于子类的定义:
/**
* Abstract function actually execute the tick. Batched tick managers should use ExecuteNestedTick
* @param DeltaTime - frame time to advance, in seconds
* @param TickType - kind of tick for this frame
* @param CurrentThread - thread we are executing on, useful to pass along as new tasks are created
* @param MyCompletionGraphEvent - completion event for this task. Useful for holding the completetion of this task until certain child tasks are complete.
**/
ENGINE_API virtual void ExecuteTick(float DeltaTime, ELevelTick TickType, ENamedThreads::Type CurrentThread, const FGraphEventRef& MyCompletionGraphEvent) PURE_VIRTUAL(,);
Actor/ActorComponent tick
在Actor上有一个继承自FTickFunction的PrimaryActorTick类型的UProperty来控制tick的执行与注册,FActorTickFunction::ExecuteTick会首先调用到AActor::TickActor,然后这个TickActor函数会调用到AActor::Tick(float DeltaSeconds):
/**
* Tick function that calls AActor::TickActor
**/
USTRUCT()
struct FActorTickFunction : public FTickFunction
{
GENERATED_USTRUCT_BODY()
/** AActor that is the target of this tick **/
class AActor* Target;
/**
* Abstract function actually execute the tick.
* @param DeltaTime - frame time to advance, in seconds
* @param TickType - kind of tick for this frame
* @param CurrentThread - thread we are executing on, useful to pass along as new tasks are created
* @param MyCompletionGraphEvent - completion event for this task. Useful for holding the completetion of this task until certain child tasks are complete.
**/
ENGINE_API virtual void ExecuteTick(float DeltaTime, ELevelTick TickType, ENamedThreads::Type CurrentThread, const FGraphEventRef& MyCompletionGraphEvent) override;
/** Abstract function to describe this tick. Used to print messages about illegal cycles in the dependency graph **/
ENGINE_API virtual FString DiagnosticMessage() override;
ENGINE_API virtual FName DiagnosticContext(bool bDetailed) override;
};
void FActorTickFunction::ExecuteTick(float DeltaTime, enum ELevelTick TickType, ENamedThreads::Type CurrentThread, const FGraphEventRef& MyCompletionGraphEvent)
{
if (IsValid(Target))
{
if (TickType != LEVELTICK_ViewportsOnly || Target->ShouldTickIfViewportsOnly())
{
FScopeCycleCounterUObject ActorScope(Target);
Target->TickActor(DeltaTime*Target->CustomTimeDilation, TickType, *this);
}
}
}
void AActor::TickActor( float DeltaSeconds, ELevelTick TickType, FActorTickFunction& ThisTickFunction )
{
// Actor validity was checked before this
if (GetWorld())
{
Tick(DeltaSeconds); // perform any tick functions unique to an actor subclass
}
}
/**
* Primary Actor tick function, which calls TickActor().
* Tick functions can be configured to control whether ticking is enabled, at what time during a frame the update occurs, and to set up tick dependencies.
* @see https://docs.unrealengine.com/API/Runtime/Engine/Engine/FTickFunction
* @see AddTickPrerequisiteActor(), AddTickPrerequisiteComponent()
*/
UPROPERTY(EditDefaultsOnly, Category=Tick)
struct FActorTickFunction PrimaryActorTick;
/**
* Function called every frame on this Actor. Override this function to implement custom logic to be executed every frame.
* Note that Tick is disabled by default, and you will need to check PrimaryActorTick.bCanEverTick is set to true to enable it.
*
* @param DeltaSeconds Game time elapsed during last frame modified by the time dilation
*/
ENGINE_API virtual void Tick( float DeltaSeconds );
类似的ActorComponent上也有一个继承自FTickFunction的FActorComponentTick的UProperty来控制Tick的执行与注册,通过这个FActorComponentTick的ExecuteTick中转到UActorComponent::TickComponent函数上:
/**
* Tick function that calls UActorComponent::ConditionalTick
**/
USTRUCT()
struct FActorComponentTickFunction : public FTickFunction
{
GENERATED_USTRUCT_BODY()
/** AActor component that is the target of this tick **/
class UActorComponent* Target;
/**
* Abstract function actually execute the tick.
* @param DeltaTime - frame time to advance, in seconds
* @param TickType - kind of tick for this frame
* @param CurrentThread - thread we are executing on, useful to pass along as new tasks are created
* @param MyCompletionGraphEvent - completion event for this task. Useful for holding the completetion of this task until certain child tasks are complete.
**/
ENGINE_API virtual void ExecuteTick(float DeltaTime, ELevelTick TickType, ENamedThreads::Type CurrentThread, const FGraphEventRef& MyCompletionGraphEvent) override;
};
void FActorComponentTickFunction::ExecuteTick(float DeltaTime, enum ELevelTick TickType, ENamedThreads::Type CurrentThread, const FGraphEventRef& MyCompletionGraphEvent)
{
TRACE_CPUPROFILER_EVENT_SCOPE(FActorComponentTickFunction::ExecuteTick);
ExecuteTickHelper(Target, Target->bTickInEditor, DeltaTime, TickType, [this, TickType](float DilatedTime)
{
Target->TickComponent(DilatedTime, TickType, this);
});
}
/** Main tick function for the Component */
UPROPERTY(EditDefaultsOnly, Category="ComponentTick")
struct FActorComponentTickFunction PrimaryComponentTick;
/**
* Function called every frame on this ActorComponent. Override this function to implement custom logic to be executed every frame.
* Only executes if the component is registered, and also PrimaryComponentTick.bCanEverTick must be set to true.
*
* @param DeltaTime - The time since the last tick.
* @param TickType - The kind of tick this is, for example, are we paused, or 'simulating' in the editor
* @param ThisTickFunction - Internal tick function struct that caused this to run
*/
ENGINE_API virtual void TickComponent(float DeltaTime, enum ELevelTick TickType, FActorComponentTickFunction *ThisTickFunction);
注册时机是AActor::BeginPlay, 这里会通过RegisterAllActorTickFunctions将当前actor的tick函数执行注册,然后顺带的把所有component的tick都注册过去:
void AActor::BeginPlay()
{
TRACE_OBJECT_LIFETIME_BEGIN(this);
ensureMsgf(ActorHasBegunPlay == EActorBeginPlayState::BeginningPlay, TEXT("BeginPlay was called on actor %s which was in state %d"), *GetPathName(), (int32)ActorHasBegunPlay);
SetLifeSpan( InitialLifeSpan );
RegisterAllActorTickFunctions(true, false); // Components are done below.
TInlineComponentArray<UActorComponent*> Components;
GetComponents(Components);
for (UActorComponent* Component : Components)
{
// bHasBegunPlay will be true for the component if the component was renamed and moved to a new outer during initialization
if (Component->IsRegistered() && !Component->HasBegunPlay())
{
Component->RegisterAllComponentTickFunctions(true);
Component->BeginPlay();
ensureMsgf(Component->HasBegunPlay(), TEXT("Failed to route BeginPlay (%s)"), *Component->GetFullName());
}
else
{
// When an Actor begins play we expect only the not bAutoRegister false components to not be registered
//check(!Component->bAutoRegister);
}
}
}
void AActor::RegisterAllActorTickFunctions(bool bRegister, bool bDoComponents)
{
if(!IsTemplate())
{
// Prevent repeated redundant attempts
if (bTickFunctionsRegistered != bRegister)
{
FActorThreadContext& ThreadContext = FActorThreadContext::Get();
check(ThreadContext.TestRegisterTickFunctions == nullptr);
RegisterActorTickFunctions(bRegister);
bTickFunctionsRegistered = bRegister;
checkf(ThreadContext.TestRegisterTickFunctions == this, TEXT("Failed to route Actor RegisterTickFunctions (%s)"), *GetFullName());
ThreadContext.TestRegisterTickFunctions = nullptr;
}
if (bDoComponents)
{
for (UActorComponent* Component : GetComponents())
{
if (Component)
{
Component->RegisterAllComponentTickFunctions(bRegister);
}
}
}
// 省略一些代码
}
}
void AActor::RegisterActorTickFunctions(bool bRegister)
{
check(!IsTemplate());
if(bRegister)
{
if(PrimaryActorTick.bCanEverTick)
{
PrimaryActorTick.Target = this;
PrimaryActorTick.SetTickFunctionEnable(PrimaryActorTick.bStartWithTickEnabled || PrimaryActorTick.IsTickFunctionEnabled());
PrimaryActorTick.RegisterTickFunction(GetLevel());
}
}
else
{
if(PrimaryActorTick.IsTickFunctionRegistered())
{
PrimaryActorTick.UnRegisterTickFunction();
}
}
FActorThreadContext::Get().TestRegisterTickFunctions = this; // we will verify the super call chain is intact. Don't copy and paste this to another actor class!
}
FTickableGameObject
Actor/ActorComponent是一套非常复杂的框架,上面拥有了太多的功能,如果我们只是想要一个跟随着引擎的Tick而Tick的对象,UE也提供了很方便的基类去继承,这就是FTickableGameObject:
/**
* Base class for tickable objects
*/
class FTickableObjectBase
{
// 这里省略很多代码
public:
/**
* Pure virtual that must be overloaded by the inheriting class. It will
* be called at different times in the frame depending on the subclass.
*
* @param DeltaTime Game time passed since the last call.
*/
virtual void Tick( float DeltaTime ) = 0;
};
/**
* This class provides common registration for gamethread tickable objects. It is an
* abstract base class requiring you to implement the Tick() and GetStatId() methods.
* Can optionally also be ticked in the Editor, allowing for an object that both ticks
* during edit time and at runtime.
*/
class FTickableGameObject : public FTickableObjectBase
{
/** Returns the tracking struct for this type */
static ENGINE_API FTickableStatics& GetStatics();
public:
/** Tickable objects cannot be copied safely due to the auto registration */
UE_NONCOPYABLE(FTickableGameObject);
/**
* Registers this instance with the static array of tickable objects.
*/
ENGINE_API FTickableGameObject();
/**
* Removes this instance from the static array of tickable objects.
*/
ENGINE_API virtual ~FTickableGameObject();
/**
* Used to determine if an object should be ticked when the game is paused.
* Defaults to false, as that mimics old behavior.
*
* @return true if it should be ticked when paused, false otherwise
*/
virtual bool IsTickableWhenPaused() const
{
return false;
}
};
FTickableGameObject的Tick函数是声明在其基类FTickableObjectBase上的虚接口,当前没有任何实现,需要具体的子类去提供重载。UE源代码中有很多这样的子类,下面就是一个非常简单的子类实现:
struct FTestTickHelper : FTickableGameObject
{
TWeakObjectPtr<class UMockAI> Owner;
FTestTickHelper() : Owner(nullptr) {}
virtual void Tick(float DeltaTime) override;
virtual bool IsTickable() const override { return Owner.IsValid(); }
virtual bool IsTickableInEditor() const override { return true; }
virtual TStatId GetStatId() const override;
};
void FTestTickHelper::Tick(float DeltaTime)
{
if (Owner.IsValid())
{
Owner->TickMe(DeltaTime);
}
}
UCLASS()
class UMockAI : public UObject
{
GENERATED_UCLASS_BODY()
virtual ~UMockAI() override;
FTestTickHelper TickHelper;
};
void UMockAI::SetEnableTicking(bool bShouldTick)
{
if (bShouldTick)
{
TickHelper.Owner = this;
}
else
{
TickHelper.Owner = nullptr;
}
}
这样就可以通过一个简单的FTestTickHelper类型将一个不是Actor/Component体系的对象UMockAI加上了Tick接口。实际中使用最多的子类是UTickableWorldSubsystem:
UCLASS(Abstract, MinimalAPI)
class UTickableWorldSubsystem : public UWorldSubsystem, public FTickableGameObject
{
GENERATED_BODY()
public:
ENGINE_API UTickableWorldSubsystem();
// FTickableGameObject implementation Begin
ENGINE_API UWorld* GetTickableGameObjectWorld() const override;
ENGINE_API virtual ETickableTickType GetTickableTickType() const override;
ENGINE_API virtual bool IsAllowedToTick() const override final;
ENGINE_API virtual void Tick(float DeltaTime) override;
ENGINE_API virtual TStatId GetStatId() const override PURE_VIRTUAL(UTickableWorldSubsystem::GetStatId, return TStatId(););
};
这些Tick函数的注册时机是在FTickableGameObject的构造函数中:
FTickableGameObject::FTickableGameObject()
{
FTickableStatics& Statics = GetStatics();
// Queue for creation, this can get called very early in startup
Statics.QueueTickableObjectForAdd(this);
}
void FTickableObjectBase::FTickableStatics::QueueTickableObjectForAdd(FTickableObjectBase* InTickable)
{
// This only needs to lock the new object queue
FScopeLock NewTickableObjectsLock(&NewTickableObjectsCritical);
NewTickableObjects.Add(InTickable, ETickableTickType::NewObject);
}
这里的实现非常简单,就是先临时的加到NewTickableObjects这个数组之中,起到一个暂存的作用,后面会选择时机将这个数组中的元素转移到TickableObjects数组中去。
/** Implementation struct for internals of ticking, there should be one instance of this for each direct subclass */
struct FTickableStatics
{
/** This critical section should be locked during entire tick process */
FCriticalSection TickableObjectsCritical;
/** List of objects that are fully ticking */
TArray<FTickableObjectBase::FTickableObjectEntry> TickableObjects;
/** Lock for modifying new list, this is automatically acquired by functions below */
FCriticalSection NewTickableObjectsCritical;
/** Set of objects that have not yet been queried for tick type */
TMap<FTickableObjectBase*, ETickableTickType> NewTickableObjects;
};
这些Tick的调用时机则是在FTickableGameObject::TickObjects这个静态函数中,这个函数开头的Statics.StartTicking负责将Statics.NewTickableObjects中存储的新添加的Tick函数填充到Statics.TickableObjects数组中,然后再遍历这个Statics.TickableObjects来执行TickableObject->Tick(DeltaSeconds):
void FTickableGameObject::TickObjects(UWorld* World, const ELevelTick LevelTickType, const bool bIsPaused, const float DeltaSeconds)
{
SCOPE_CYCLE_COUNTER(STAT_TickableGameObjectsTime);
CSV_SCOPED_TIMING_STAT_EXCLUSIVE(Tickables);
FTickableStatics& Statics = GetStatics();
check(IsInGameThread());
{
// It's a long lock but it's ok, the only thing we can block here is the GC worker thread that destroys UObjects
FScopeLock LockTickableObjects(&Statics.TickableObjectsCritical);
Statics.StartTicking();
for (const FTickableObjectEntry& TickableEntry : Statics.TickableObjects)
{
if (FTickableGameObject* TickableObject = static_cast<FTickableGameObject*>(TickableEntry.TickableObject))
{
// If it is tickable and in this world
if (TickableObject->IsAllowedToTick()
&& ((TickableEntry.TickType == ETickableTickType::Always) || TickableObject->IsTickable())
&& (TickableObject->GetTickableGameObjectWorld() == World))
{
// If tick type is All because at least one game world ticked, this will treat the null world as a game world
const bool bIsGameWorld = LevelTickType == LEVELTICK_All || (World && World->IsGameWorld());
// If we are in editor and it is editor tickable, always tick
// If this is a game world then tick if we are not doing a time only (paused) update and we are not paused or the object is tickable when paused
if ((GIsEditor && TickableObject->IsTickableInEditor()) ||
(bIsGameWorld && ((!bIsPaused && LevelTickType != LEVELTICK_TimeOnly) || (bIsPaused && TickableObject->IsTickableWhenPaused()))))
{
SCOPE_CYCLE_COUNTER_STATID(TickableObject->GetStatId());
TickableObject->Tick(DeltaSeconds);
}
}
}
}
Statics.FinishTicking();
}
}
而这个TickObjects的调用时机则是在UWorld::Tick中, 这里传入了this对应的Uworld来对TickableObjects进行筛选:
// void UWorld::Tick( ELevelTick TickType, float DeltaSeconds )
// 省略很多代码
{
SCOPE_TIME_GUARD_MS(TEXT("UWorld::Tick - TickObjects"), 5);
FTickableGameObject::TickObjects(this, TickType, bIsPaused, DeltaSeconds);
}
tick的注册
FTickFunction的注册其实就是往FTickTaskManager执行注册,注册的时候需要带上其对应的Level:
/**
* Adds the tick function to the primary list of tick functions.
* @param Level - level to place this tick function in
**/
void FTickFunction::RegisterTickFunction(ULevel* Level)
{
if (!IsTickFunctionRegistered())
{
// Only allow registration of tick if we are are allowed on dedicated server, or we are not a dedicated server
const UWorld* World = Level ? Level->GetWorld() : nullptr;
if(bAllowTickOnDedicatedServer || !(World && World->IsNetMode(NM_DedicatedServer)))
{
if (InternalData == nullptr)
{
InternalData.Reset(new FInternalData());
}
FTickTaskManager::Get().AddTickFunction(Level, this);
InternalData->bRegistered = true;
}
}
else
{
check(FTickTaskManager::Get().HasTickFunction(Level, this));
}
}
这个FTickTaskManager继承自FTickTaskManagerInterface,FTickTaskManagerInterface是一个纯虚类,负责提供接口声明:
/**
* Interface for the tick task manager
**/
class FTickTaskManagerInterface
{
public:
virtual ~FTickTaskManagerInterface()
{
}
/** Allocate a new ticking structure for a ULevel **/
virtual FTickTaskLevel* AllocateTickTaskLevel() = 0;
/** Free a ticking structure for a ULevel **/
virtual void FreeTickTaskLevel(FTickTaskLevel* TickTaskLevel) = 0;
/**
* Queue all of the ticks for a frame
*
* @param World - World currently ticking
* @param DeltaSeconds - time in seconds since last tick
* @param TickType - type of tick (viewports only, time only, etc)
*/
virtual void StartFrame(UWorld* InWorld, float DeltaSeconds, ELevelTick TickType, const TArray<ULevel*>& LevelsToTick) = 0;
/**
* Run a tick group, ticking all actors and components
* @param Group - Ticking group to run
* @param bBlockTillComplete - if true, do not return until all ticks are complete
*/
virtual void RunTickGroup(ETickingGroup Group, bool bBlockTillComplete ) = 0;
/** Finish a frame of ticks **/
virtual void EndFrame() = 0;
/**
* Singleton to retrieve the GLOBAL tick task manager
*
* @return Reference to the global cache tick task manager
*/
static ENGINE_API FTickTaskManagerInterface& Get();
};
这里的Get()目前只有一个实现FTickTaskManager,这也算是一种PIMPL模式,解耦了强依赖:
/**
* Singleton to retrieve the global tick task manager
* @return Reference to the global tick task manager
**/
FTickTaskManagerInterface& FTickTaskManagerInterface::Get()
{
return FTickTaskManager::Get();
}
/** Class that aggregates the individual levels and deals with parallel tick setup **/
class FTickTaskManager : public FTickTaskManagerInterface
{
public:
/**
* Singleton to retrieve the global tick task manager
* @return Reference to the global tick task manager
**/
static FTickTaskManager& Get()
{
static FTickTaskManager SingletonInstance;
return SingletonInstance;
}
};
这个FTickTaskManager内部通过Get函数提供了一个全局的单例,负责了所有的FTickFunction的管理。
不过FTickTaskManager其实并不是FTickFunction的容器,仍然是中转方。真正的容器是FTickTaskLevel,这个TickTaskLevel每个Level都有一个:
/** Add the tick function to the primary list **/
void FTickTaskManager::AddTickFunction(ULevel* InLevel, FTickFunction* TickFunction)
{
check(TickFunction->TickGroup >= 0 && TickFunction->TickGroup < TG_NewlySpawned); // You may not schedule a tick in the newly spawned group...they can only end up there if they are spawned late in a frame.
FTickTaskLevel* Level = TickTaskLevelForLevel(InLevel);
Level->AddTickFunction(TickFunction);
TickFunction->InternalData->TickTaskLevel = Level;
}
/** Find the tick level for this actor **/
FTickTaskLevel* FTickTaskManager::TickTaskLevelForLevel(ULevel* Level, bool bCreateIfNeeded = true)
{
check(Level);
if (bCreateIfNeeded && Level->TickTaskLevel == nullptr)
{
Level->TickTaskLevel = AllocateTickTaskLevel();
}
check(Level->TickTaskLevel);
return Level->TickTaskLevel;
}
这个FTickTaskLevel内部逻辑还是比较复杂,要了解这个Level->AddTickFunction之前,需要先介绍一下FTickTaskLevel里主要成员变量的意义:
/** 所有注册过来的tick函数中enable了的 **/
TSet<FTickFunction*> AllEnabledTickFunctions;
/** 所有在coolingdown状态下的tick函数列表 **/
FCoolingDownTickFunctionList AllCoolingDownTickFunctions;
/** 所有注册过来的tick函数中disable了的 **/
TSet<FTickFunction*> AllDisabledTickFunctions;
/** 等待重新排列的tick函数数组 **/
TArrayWithThreadsafeAdd<FTickScheduleDetails> TickFunctionsToReschedule;
/** 在tick调度过程中新添加的tick函数集合 **/
TSet<FTickFunction*> NewlySpawnedTickFunctions;
了解了这些成员变量之后,再来介绍一下AddTickFunction的实现,就是简单的加入到AllEnabledTickFunctions之中,如果bTickNewlySpawned为true也就是正在调度执行所有的FTickFunction的话,还需要往NewlySpawnedTickFunctions中添加一个备份,等待后续处理:
/** Add the tick function to the primary list **/
void AddTickFunction(FTickFunction* TickFunction)
{
check(!HasTickFunction(TickFunction));
if (TickFunction->TickState == FTickFunction::ETickState::Enabled)
{
AllEnabledTickFunctions.Add(TickFunction);
if (bTickNewlySpawned)
{
NewlySpawnedTickFunctions.Add(TickFunction);
}
}
else
{
check(TickFunction->TickState == FTickFunction::ETickState::Disabled);
AllDisabledTickFunctions.Add(TickFunction);
}
}
默认情况下每个FTickFunction都会跟着UWorldTick执行一次,但是如果一个FTickFunction自定义了Tick Interval的话,就需要计算这个FTickFunction目前是否已经可以调度执行。这些自定义了Tick Interval的FTickFunction会被AllCoolingDownTickFunctions管理,
这个AllCoolingDownTickFunctions类型有点特殊,是一个链表结构的头节点:
struct FCoolingDownTickFunctionList
{
FCoolingDownTickFunctionList()
: Head(nullptr)
{
}
bool Contains(FTickFunction* TickFunction) const
{
FTickFunction* Node = Head;
while (Node)
{
if (Node == TickFunction)
{
return true;
}
Node = Node->InternalData->Next;
}
return false;
}
FTickFunction* Head;
};
这个链表其实是一个有序链表,排序依据是下一次Tick的剩余过期时间,这个时间存储在TickFunction->InternalData->RelativeTickCooldown中。值得注意的是这个RelativeTickCooldown并不是相对于当前时间计算出来的时间差,而是相对于这个FCoolingDownTickFunctionList中前一个结点的过期时间点的时间差。举个例子来说,FCoolingDownTickFunctionList中有三个TickFunction, TickA在0.2s之后执行,TickB在0.3s后执行,TickC在0.5s后执行,因此链表中的顺序是TickA->TickB->TickC。则TickA对应的RelativeTickCooldown是0.2s,TickB对应的RelativeTickCooldown是0.1s,TickC对应的RelativeTickCooldown是0.2s。
tick的排序
在一帧的开头,会调用到FTickTaskLevel::StartFrame,这个函数会遍历这个链表中的所有结点,寻找其中已经过期的来执行调度,如果可以调度则把这个TickFunction的State切换为FTickFunction::ETickState::Enabled。AllEnabledTickFunctions基本都是每次都需要执行Tick的函数,所以这里的调度判定主要处理的是AllCoolingDownTickFunctions链表。为了判定链表中的某个Tick节点是否已经到了调度时间,这里使用了一个CumulativeCooldown来执行累加。从链表头部开始遍历,每调度一个节点则将这个CumulativeCooldown加上当前节点的TickFunction->InternalData->RelativeTickCooldown。
int32 FTickTaskLevel::StartFrame(const FTickContext& InContext)
{
check(!NewlySpawnedTickFunctions.Num()); // There shouldn't be any in here at this point in the frame
Context.TickGroup = ETickingGroup(0); // reset this to the start tick group
Context.DeltaSeconds = InContext.DeltaSeconds;
Context.TickType = InContext.TickType;
Context.Thread = ENamedThreads::GameThread;
Context.World = InContext.World;
bTickNewlySpawned = true;
int32 CooldownTicksEnabled = 0;
{
// Make sure all scheduled Tick Functions that are ready are put into the cooling down state
ScheduleTickFunctionCooldowns();
// Determine which cooled down ticks will be enabled this frame
float CumulativeCooldown = 0.f;
FTickFunction* TickFunction = AllCoolingDownTickFunctions.Head;
while (TickFunction)
{
if (CumulativeCooldown + TickFunction->InternalData->RelativeTickCooldown >= Context.DeltaSeconds)
{
TickFunction->InternalData->RelativeTickCooldown -= (Context.DeltaSeconds - CumulativeCooldown);
break;
}
CumulativeCooldown += TickFunction->InternalData->RelativeTickCooldown;
TickFunction->TickState = FTickFunction::ETickState::Enabled;
TickFunction = TickFunction->InternalData->Next;
++CooldownTicksEnabled;
}
}
return AllEnabledTickFunctions.Num() + CooldownTicksEnabled;
}
而这里的ScheduleTickFunctionCooldowns的作用则是维持这个AllCoolingDownTickFunctions链表有序:
/* Puts a TickFunction in to the cooldown state*/
void ScheduleTickFunctionCooldowns()
{
if (TickFunctionsToReschedule.Num() > 0)
{
SCOPE_CYCLE_COUNTER(STAT_ScheduleCooldowns);
TickFunctionsToReschedule.Sort([](const FTickScheduleDetails& A, const FTickScheduleDetails& B)
{
return A.Cooldown < B.Cooldown;
});
int32 RescheduleIndex = 0;
float CumulativeCooldown = 0.f;
FTickFunction* PrevComparisonTickFunction = nullptr;
FTickFunction* ComparisonTickFunction = AllCoolingDownTickFunctions.Head;
while (ComparisonTickFunction && RescheduleIndex < TickFunctionsToReschedule.Num())
{
const float CooldownTime = TickFunctionsToReschedule[RescheduleIndex].Cooldown;
if ((CumulativeCooldown + ComparisonTickFunction->InternalData->RelativeTickCooldown) > CooldownTime)
{
FTickFunction* TickFunction = TickFunctionsToReschedule[RescheduleIndex].TickFunction;
check(TickFunction->InternalData->bWasInterval);
if (TickFunction->TickState != FTickFunction::ETickState::Disabled)
{
TickFunction->TickState = FTickFunction::ETickState::CoolingDown;
TickFunction->InternalData->RelativeTickCooldown = CooldownTime - CumulativeCooldown;
if (PrevComparisonTickFunction)
{
PrevComparisonTickFunction->InternalData->Next = TickFunction;
}
else
{
check(ComparisonTickFunction == AllCoolingDownTickFunctions.Head);
AllCoolingDownTickFunctions.Head = TickFunction;
}
TickFunction->InternalData->Next = ComparisonTickFunction;
PrevComparisonTickFunction = TickFunction;
ComparisonTickFunction->InternalData->RelativeTickCooldown -= TickFunction->InternalData->RelativeTickCooldown;
CumulativeCooldown += TickFunction->InternalData->RelativeTickCooldown;
}
++RescheduleIndex;
}
else
{
CumulativeCooldown += ComparisonTickFunction->InternalData->RelativeTickCooldown;
PrevComparisonTickFunction = ComparisonTickFunction;
ComparisonTickFunction = ComparisonTickFunction->InternalData->Next;
}
}
for ( ; RescheduleIndex < TickFunctionsToReschedule.Num(); ++RescheduleIndex)
{
FTickFunction* TickFunction = TickFunctionsToReschedule[RescheduleIndex].TickFunction;
checkSlow(TickFunction);
if (TickFunction->TickState != FTickFunction::ETickState::Disabled)
{
const float CooldownTime = TickFunctionsToReschedule[RescheduleIndex].Cooldown;
TickFunction->TickState = FTickFunction::ETickState::CoolingDown;
TickFunction->InternalData->RelativeTickCooldown = CooldownTime - CumulativeCooldown;
TickFunction->InternalData->Next = nullptr;
if (PrevComparisonTickFunction)
{
PrevComparisonTickFunction->InternalData->Next = TickFunction;
}
else
{
check(ComparisonTickFunction == AllCoolingDownTickFunctions.Head);
AllCoolingDownTickFunctions.Head = TickFunction;
}
PrevComparisonTickFunction = TickFunction;
CumulativeCooldown += TickFunction->InternalData->RelativeTickCooldown;
}
}
TickFunctionsToReschedule.Reset();
}
}
这个函数首先将TickFunctionsToReschedule里面存储的TickFunction按照Cooldown从小到大排序,然后里面的while循环就是将这个有序数组合并到AllCoolingDownTickFunctions这个有序链表中,最后的for循环负责将TickFunctionsToReschedule中没有合并到AllCoolingDownTickFunctions的元素直接拼接到AllCoolingDownTickFunctions的末尾。这个函数会执行一次TickFunctionsToReschedule快排,一次TickFunctionsToReschedule数组遍历,以及可能出现的AllCoolingDownTickFunctions链表全遍历,有些时候的开销会变得非常恐怖:
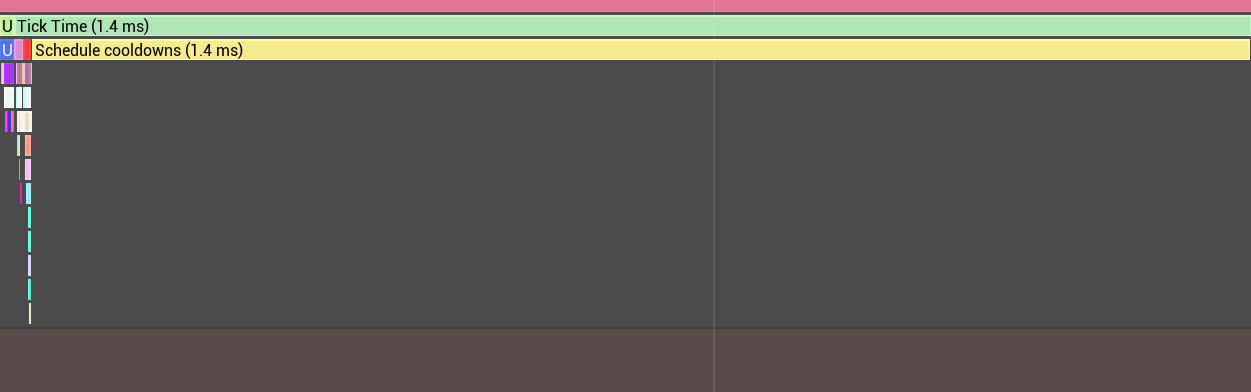
不过这种开销大的情况主要出现在有很多自定义了TickInterval的TickFunction中,如果TickInterval是0也就是每次WorldTick都会执行的TickFunction,则不参与这个链表。但是之前FTickFunction的注册代码表明,即使自定义了TickInterval,也会存储在AllEnabledTickFunctions集合中,而不是AllCoolingDownTickFunctions链表中。因此在每帧的开头还需要将AllEnabledTickFunctions中有TickInterval的从集合中移除,并转移到AllCoolingDownTickFunctions。这部分逻辑在FTickTaskLevel::QueueAllTicks中,他会在FTickTaskLevel::StartFrame之后执行:
/**
* Ticks the dynamic actors in the given levels based upon their tick group. This function
* is called once for each ticking group
*
* @param World - World currently ticking
* @param DeltaSeconds - time in seconds since last tick
* @param TickType - type of tick (viewports only, time only, etc)
* @param LevelsToTick - the levels to tick, may be a subset of InWorld->Levels
*/
virtual void FTickTaskManager::StartFrame(UWorld* InWorld, float InDeltaSeconds, ELevelTick InTickType, const TArray<ULevel*>& LevelsToTick) override
{
// 省略很多代码
int32 TotalTickFunctions = 0;
for( int32 LevelIndex = 0; LevelIndex < LevelList.Num(); LevelIndex++ )
{
TotalTickFunctions += LevelList[LevelIndex]->StartFrame(Context);
}
INC_DWORD_STAT_BY(STAT_TicksQueued, TotalTickFunctions);
CSV_CUSTOM_STAT(Basic, TicksQueued, TotalTickFunctions, ECsvCustomStatOp::Accumulate);
TickTaskSequencer.SetupBatchedTicks(TotalTickFunctions);
for( int32 LevelIndex = 0; LevelIndex < LevelList.Num(); LevelIndex++ )
{
LevelList[LevelIndex]->QueueAllTicks();
}
TickTaskSequencer.FinishBatchedTicks(Context);
}
QueueAllTicks会遍历当前AllEnabledTickFunctions集合,将其中自定义了TickInterval的TickFunction通过RescheduleForInterval函数转移到TickFunctionsToReschedule数组中:
void RescheduleForInterval(FTickFunction* TickFunction, float InInterval)
{
TickFunction->InternalData->bWasInterval = true;
TickFunctionsToReschedule.Add(FTickScheduleDetails(TickFunction, InInterval));
}
/* Queue all tick functions for execution */
void QueueAllTicks()
{
FTickTaskSequencer& TTS = FTickTaskSequencer::Get();
for (TSet<FTickFunction*>::TIterator It(AllEnabledTickFunctions); It; ++It)
{
FTickFunction* TickFunction = *It;
TickFunction->QueueTickFunction(TTS, Context);
if (TickFunction->TickInterval > 0.f)
{
It.RemoveCurrent();
RescheduleForInterval(TickFunction, TickFunction->TickInterval);
}
}
int32 EnabledCooldownTicks = 0;
float CumulativeCooldown = 0.f;
while (FTickFunction* TickFunction = AllCoolingDownTickFunctions.Head)
{
if (TickFunction->TickState == FTickFunction::ETickState::Enabled)
{
CumulativeCooldown += TickFunction->InternalData->RelativeTickCooldown;
TickFunction->QueueTickFunction(TTS, Context);
RescheduleForInterval(TickFunction, TickFunction->TickInterval - (Context.DeltaSeconds - CumulativeCooldown)); // Give credit for any overrun
AllCoolingDownTickFunctions.Head = TickFunction->InternalData->Next;
}
else
{
break;
}
}
}
这个QueueAllTicks还会顺带的将AllCoolingDownTickFunctions里面可以执行的TickFunction从链表中摘除,并重新添加到TickFunctionsToReschedule数组中。这里新的Cooldown设置为了TickFunction->TickInterval - (Context.DeltaSeconds - CumulativeCooldown),注意到如果DeltaSeconds比较大的情况下,这个值会计算出负值,不过这里不会像TimerManager一样去做补偿重复执行多次Tick。
TickFunction->QueueTickFunction的作用是将当前的TickFunction真正的加入到执行队列中。这里的逻辑主要是根据当前TickFunction的所有前置函数来计算出应该放在哪个ETickGroup中去调度,
void FTickFunction::QueueTickFunction(FTickTaskSequencer& TTS, const struct FTickContext& TickContext)
{
checkSlow(TickContext.Thread == ENamedThreads::GameThread); // we assume same thread here
check(IsTickFunctionRegistered());
// Only compare the 32bit part of the frame counter
uint32 CurrentFrameCounter = (uint32)GFrameCounter;
if (InternalData->TickVisitedGFrameCounter.load(std::memory_order_relaxed) != CurrentFrameCounter)
{
InternalData->TickVisitedGFrameCounter.store(CurrentFrameCounter, std::memory_order_relaxed);
if (TickState != FTickFunction::ETickState::Disabled)
{
ETickingGroup MaxPrerequisiteTickGroup = ETickingGroup(0);
TArray<FTickFunction*> RawPrerequisites;
for (int32 PrereqIndex = 0; PrereqIndex < Prerequisites.Num(); PrereqIndex++)
{
FTickFunction* Prereq = Prerequisites[PrereqIndex].Get();
if (!Prereq)
{
// stale prereq, delete it
Prerequisites.RemoveAtSwap(PrereqIndex--);
}
else if (Prereq->IsTickFunctionRegistered())
{
// recursive call to make sure my prerequisite is set up so I can use its completion handle
Prereq->QueueTickFunction(TTS, TickContext);
if (Prereq->InternalData->TickQueuedGFrameCounter.load(std::memory_order_relaxed) != CurrentFrameCounter)
{
// this must be up the call stack, therefore this is a cycle
UE_LOG(LogTick, Warning, TEXT("While processing prerequisites for %s, could use %s because it would form a cycle."),*DiagnosticMessage(), *Prereq->DiagnosticMessage());
}
else if (Prereq->InternalData->TaskState == ETickTaskState::NotQueued)
{
//ok UE_LOG(LogTick, Warning, TEXT("While processing prerequisites for %s, could use %s because it is disabled."),*DiagnosticMessage(), *Prereq->DiagnosticMessage());
}
else if (TTS.ShouldConsiderPrerequisite(this, Prereq))
{
MaxPrerequisiteTickGroup = FMath::Max<ETickingGroup>(MaxPrerequisiteTickGroup, Prereq->InternalData->ActualStartTickGroup.GetValue());
RawPrerequisites.Add(Prereq);
}
}
}
// tick group is the max of the prerequisites, the current tick group, and the desired tick group
ETickingGroup MyActualTickGroup = FMath::Max<ETickingGroup>(MaxPrerequisiteTickGroup, FMath::Max<ETickingGroup>(TickGroup.GetValue(),TickContext.TickGroup));
if (MyActualTickGroup != TickGroup)
{
// if the tick was "demoted", make sure it ends up in an ordinary tick group.
while (!CanDemoteIntoTickGroup(MyActualTickGroup))
{
MyActualTickGroup = ETickingGroup(MyActualTickGroup + 1);
}
}
InternalData->ActualStartTickGroup = MyActualTickGroup;
InternalData->ActualEndTickGroup = MyActualTickGroup;
if (EndTickGroup > MyActualTickGroup)
{
check(EndTickGroup <= TG_NewlySpawned);
ETickingGroup TestTickGroup = ETickingGroup(MyActualTickGroup + 1);
while (TestTickGroup <= EndTickGroup)
{
if (CanDemoteIntoTickGroup(TestTickGroup))
{
InternalData->ActualEndTickGroup = TestTickGroup;
}
TestTickGroup = ETickingGroup(TestTickGroup + 1);
}
}
if (TickState == FTickFunction::ETickState::Enabled)
{
TTS.QueueOrBatchTickTask(RawPrerequisites, this, TickContext);
}
}
InternalData->TickQueuedGFrameCounter.store(CurrentFrameCounter, std::memory_order_relaxed);
}
}
计算出ActualStartTickGroup和ActualEndTickGroup之后,最终会调用到QueueOrBatchTickTask去生成一个FTickGraphTask来封装一个TickFunction的执行,并放到处理多线程任务框架GraphTask的队列中:
FTickBatchInfo* QueueOrBatchTickTask(TArray<FTickFunction*>& Prerequisites, FTickFunction* TickFunction, const FTickContext& TickContext)
{
// No batching, create a single task
// FGraphEventArray array has some inline members so it is faster to not explicitly reserve space
FGraphEventArray PrerequisiteEvents;
for (FTickFunction* Prereq : Prerequisites)
{
PrerequisiteEvents.Add(Prereq->GetCompletionHandle());
}
QueueTickTask(&PrerequisiteEvents, TickFunction, TickContext);
return nullptr;
}
/**
* Start a tick task and add the completion handle
*
* @param InPrerequisites - prerequisites that must be completed before this tick can begin
* @param TickFunction - the tick function to queue
* @param Context - tick context to tick in. Thread here is the current thread.
*/
FORCEINLINE void QueueTickTask(const FGraphEventArray* Prerequisites, FTickFunction* TickFunction, const FTickContext& TickContext)
{
FTickContext UseContext = SetupTickContext(TickFunction, TickContext);
FTickGraphTask* Task = TGraphTask<FTickFunctionTask>::CreateTask(Prerequisites, ENamedThreads::GameThread).ConstructAndHold(TickFunction, &UseContext);
TickFunction->SetTaskPointer(FTickFunction::ETickTaskState::HasTask, Task);
AddTickTaskCompletion(TickFunction->InternalData->ActualStartTickGroup, TickFunction->InternalData->ActualEndTickGroup, Task, TickFunction->bHighPriority);
}
这里不去直接执行FTickFunction而是封装一个FTickGraphTask的好处是可以复用GraphTask系统自带的多线程和前置任务设计。
至此整个FTickFunction的调度处理QueueAllTicks流程结束,所有需要调度的FTickFunction都生成了一个对应的FTickGraphTask,内部逻辑还是非常复杂的,如果TickFunction数量非常大,且自定义间隔和前置条件设置的比较多的情况下,这个函数的执行时间会非常明显的长,达到ms级别:
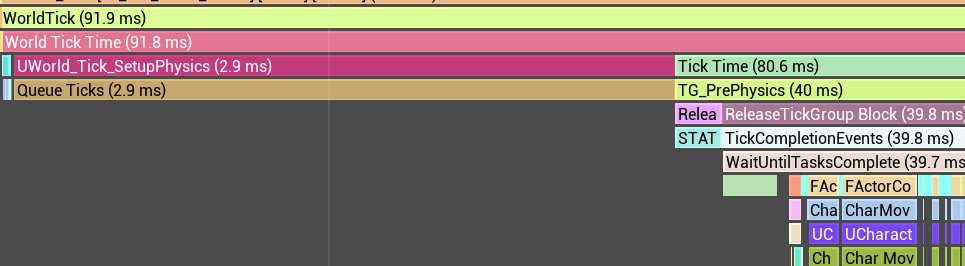
tick的执行
上一个章节在介绍FTickableGameObject的时候提到其TickObjects接口会在UWorld::Tick中被调用,实际上TickFunction的ExecuteTick也是在UWorld::Tick中被调用的,不过其调用关系隐藏的比较深,不是那么直白,需要了解一个中间函数RunTickGroup:
// void UWorld::Tick( ELevelTick TickType, float DeltaSeconds )
// If caller wants time update only, or we are paused, skip the rest.
if (bDoingActorTicks)
{
// Actually tick actors now that context is set up
SetupPhysicsTickFunctions(DeltaSeconds);
TickGroup = TG_PrePhysics; // reset this to the start tick group
FTickTaskManagerInterface::Get().StartFrame(this, DeltaSeconds, TickType, LevelsToTick);
SCOPE_CYCLE_COUNTER(STAT_TickTime);
CSV_SCOPED_TIMING_STAT_EXCLUSIVE(TickActors);
{
SCOPE_TIME_GUARD_MS(TEXT("UWorld::Tick - TG_PrePhysics"), 10);
SCOPE_CYCLE_COUNTER(STAT_TG_PrePhysics);
CSV_SCOPED_SET_WAIT_STAT(PrePhysics);
RunTickGroup(TG_PrePhysics);
}
bInTick = false;
EnsureCollisionTreeIsBuilt();
bInTick = true;
{
SCOPE_CYCLE_COUNTER(STAT_TG_StartPhysics);
SCOPE_TIME_GUARD_MS(TEXT("UWorld::Tick - TG_StartPhysics"), 10);
CSV_SCOPED_SET_WAIT_STAT(StartPhysics);
RunTickGroup(TG_StartPhysics);
}
{
SCOPE_CYCLE_COUNTER(STAT_TG_DuringPhysics);
SCOPE_TIME_GUARD_MS(TEXT("UWorld::Tick - TG_DuringPhysics"), 10);
CSV_SCOPED_SET_WAIT_STAT(DuringPhysics);
RunTickGroup(TG_DuringPhysics, false); // No wait here, we should run until idle though. We don't care if all of the async ticks are done before we start running post-phys stuff
}
TickGroup = TG_EndPhysics; // set this here so the current tick group is correct during collision notifies, though I am not sure it matters. 'cause of the false up there^^^
{
SCOPE_CYCLE_COUNTER(STAT_TG_EndPhysics);
SCOPE_TIME_GUARD_MS(TEXT("UWorld::Tick - TG_EndPhysics"), 10);
CSV_SCOPED_SET_WAIT_STAT(EndPhysics);
RunTickGroup(TG_EndPhysics);
}
{
SCOPE_CYCLE_COUNTER(STAT_TG_PostPhysics);
SCOPE_TIME_GUARD_MS(TEXT("UWorld::Tick - TG_PostPhysics"), 10);
CSV_SCOPED_SET_WAIT_STAT(PostPhysics);
RunTickGroup(TG_PostPhysics);
}
}
可以看到这里的RunTickGroup执行了五次,分别使用了TG_PrePhysics,TG_StartPhysics,TG_DuringPhysics,TG_EndPhysics,TG_PostPhysics这五个参数来依次驱动RunTickGroup的执行,这个枚举值刚好对应我们在介绍TickFunction时提到的ETickingGroup。
这里的的RunTickGroup其实时一个非常轻度的封装,中转到FTickTaskManagerInterface::RunTickGroup上:
/**
* Run a tick group, ticking all actors and components
* @param Group - Ticking group to run
* @param bBlockTillComplete - if true, do not return until all ticks are complete
*/
void UWorld::RunTickGroup(ETickingGroup Group, bool bBlockTillComplete = true)
{
check(TickGroup == Group); // this should already be at the correct value, but we want to make sure things are happening in the right order
FTickTaskManagerInterface::Get().RunTickGroup(Group, bBlockTillComplete);
TickGroup = ETickingGroup(TickGroup + 1); // new actors go into the next tick group because this one is already gone
}
由于目前FTickTaskManagerInterface只有一个子类FTickTaskManager,所以最终执行的是FTickTaskManager::RunTickGroup:
/**
* Run a tick group, ticking all actors and components
* @param Group - Ticking group to run
* @param bBlockTillComplete - if true, do not return until all ticks are complete
*/
virtual void FTickTaskManager::RunTickGroup(ETickingGroup Group, bool bBlockTillComplete ) override
{
check(Context.TickGroup == Group); // this should already be at the correct value, but we want to make sure things are happening in the right order
check(bTickNewlySpawned); // we should be in the middle of ticking
TickTaskSequencer.ReleaseTickGroup(Group, bBlockTillComplete);
Context.TickGroup = ETickingGroup(Context.TickGroup + 1); // new actors go into the next tick group because this one is already gone
if (bBlockTillComplete) // we don't deal with newly spawned ticks within the async tick group, they wait until after the async stuff
{
QUICK_SCOPE_CYCLE_COUNTER(STAT_TickTask_RunTickGroup_BlockTillComplete);
bool bFinished = false;
for (int32 Iterations = 0;Iterations < 101; Iterations++)
{
int32 Num = 0;
for( int32 LevelIndex = 0; LevelIndex < LevelList.Num(); LevelIndex++ )
{
Num += LevelList[LevelIndex]->QueueNewlySpawned(Context.TickGroup);
}
if (Num && Context.TickGroup == TG_NewlySpawned)
{
SCOPE_CYCLE_COUNTER(STAT_TG_NewlySpawned);
TickTaskSequencer.ReleaseTickGroup(TG_NewlySpawned, true);
}
else
{
bFinished = true;
break;
}
}
if (!bFinished)
{
// this is runaway recursive spawning.
for( int32 LevelIndex = 0; LevelIndex < LevelList.Num(); LevelIndex++ )
{
LevelList[LevelIndex]->LogAndDiscardRunawayNewlySpawned(Context.TickGroup);
}
}
}
}
这里的TickTaskSequencer.ReleaseTickGroup的作用就是把之前创建好的GraphTask根据ETickingGroup来分批的执行,不同的ETickingGroup不能并行执行。由于TickFunction执行的时候可能会导致其他TickFunction的注册,如果通过QueueNewlySpawned发现有新的TickFunction注册过来,则再执行一遍TickTaskSequencer.ReleaseTickGroup。
ReleaseTickGroup依然是一个中转函数,内部会调用到DispatchTickGroup来执行符合条件的FTickFunction:
/**
* Release the queued ticks for a given tick group and process them.
* @param WorldTickGroup - tick group to release
* @param bBlockTillComplete - if true, do not return until all ticks are complete
**/
void ReleaseTickGroup(ETickingGroup WorldTickGroup, bool bBlockTillComplete)
{
if (bLogTicks)
{
UE_LOG(LogTick, Log, TEXT("tick %6llu ---------------------------------------- Release tick group %d"),(uint64)GFrameCounter, (int32)WorldTickGroup);
}
checkSlow(WorldTickGroup >= 0 && WorldTickGroup < TG_MAX);
{
SCOPE_CYCLE_COUNTER(STAT_ReleaseTickGroup);
if (SingleThreadedMode() || CVarAllowAsyncTickDispatch.GetValueOnGameThread() == 0)
{
DispatchTickGroup(ENamedThreads::GameThread, WorldTickGroup);
}
else
{
// dispatch the tick group on another thread, that way, the game thread can be processing ticks while ticks are being queued by another thread
FTaskGraphInterface::Get().WaitUntilTaskCompletes(
TGraphTask<FDipatchTickGroupTask>::CreateTask(nullptr, ENamedThreads::GameThread).ConstructAndDispatchWhenReady(*this, WorldTickGroup));
}
}
// 省略一些代码
}
这个DispatchTickGroup负责遍历当前WorldTickGroup里计算好的TickTask,一个一个的去激活,真正的投递到多线程任务框架GraphTask中,这里还有一个处理HiPriTickTasks高优先级任务的逻辑,我们这里就不去做介绍了,主要关注TickArray:
void DispatchTickGroup(ENamedThreads::Type CurrentThread, ETickingGroup WorldTickGroup)
{
QUICK_SCOPE_CYCLE_COUNTER(STAT_DispatchTickGroup);
for (int32 IndexInner = 0; IndexInner < TG_MAX; IndexInner++)
{
TArray<FTickGraphTask*>& TickArray = HiPriTickTasks[WorldTickGroup][IndexInner]; //-V781
if (IndexInner < WorldTickGroup)
{
check(TickArray.Num() == 0); // makes no sense to have and end TG before the start TG
}
else
{
for (int32 Index = 0; Index < TickArray.Num(); Index++)
{
TickArray[Index]->Unlock(CurrentThread);
}
}
TickArray.Reset();
}
for (int32 IndexInner = 0; IndexInner < TG_MAX; IndexInner++)
{
TArray<FTickGraphTask*>& TickArray = TickTasks[WorldTickGroup][IndexInner]; //-V781
if (IndexInner < WorldTickGroup)
{
check(TickArray.Num() == 0); // makes no sense to have and end TG before the start TG
}
else
{
for (int32 Index = 0; Index < TickArray.Num(); Index++)
{
TickArray[Index]->Unlock(CurrentThread);
}
}
TickArray.Reset();
}
}
可以看出TickTasks是一个二维数组,每个维度的索引都是ETickingGroup,TickTasks[A][B]存储的是StartGroup为A且EndGroup为B的FTickFunction,由于B永远是不小于A的,所以上面的第一层遍历里会有一个check(TickArray.Num() == 0)。
tick优化
tick调度优化
每帧执行的UWorld::StartFrame需要做如下的两件事:
- 调用
FTickTaskLevel::StartFrame,这个函数负责为所有带TickInterval的FTickFunction维护好有序链表AllCoolingDownTickFunctions - 调用
FTickTaskLevel::QueueAllTicks,这个函数为所有的FTickFunction根据其Prerequisites计算出ActualStartTickGroup和ActualEndTickGroup,并生成带依赖的GraphTask,投递到TickTasks这个二维数组中
这两个过程都会对所有的FTickFunction执行遍历。由于每个Actor/ActorComponent都会注册FTickFunction,在Actor/ActorComponent的数量和种类都变多的情况下,这个过程就会变得非常的耗时。同时我们根据代码逻辑可以看出,在没有FTickFunction的增加和删除,没有Prerequisites的修改,没有TickInterval的修改的情况下,最终生成的TickTasks里的内容应该是不怎么变动的。在这种情况下没必要每帧都重新生成每个FTickFunction对应的GraphTask,基本可以复用之前的TickTasks。由于Actor/ActorComponent的创建和删除是一个非常低频的操作,TickInterval的修改与Prerequisites的修改也是非常罕见的,此时执行TickTasks的复用就可以省下来非常多的计算资源。如果我们能高效的处理TickInterval的修改与Prerequisites的修改,Tick的调度性能就会得到一个非常大的提升。
现在先来假设一种简化情况,如果所有的FTickFunction的Prerequisites都是空数组,我们应该如何实现UWorld::StartFrame。此时最简单直白的实现就是根据注册FTickFunction的时候,根据每个FTickFunction声明的StartGroup和EndGroup直接投递到TickTasks[StartGroup][EndGroup]中,同时不再生成GraphTask。然后UWorld::RunTickGroup的时候直接对TickTasks存储的FTickFunction执行遍历:
- 如果这个
FTickFunction没有设置TickInterval,则直接执行这个FTickFunction - 如果这个
FTickFunction设置了TickInterval,则根据这个FTickFunction上记录的LastTickTs判定是否已经超时,如果超时则执行这个FTickFunction
每个FTickFunction在执行之后,都会设置LastTickTs为当前时间戳。 在这种设定下UWorld::StartFrame就不需要做任何维护性的内容,所有的FTickFunction的TickInterval修改都不需要做额外的后处理。同时UWorld::RunTickGroup的性能也得到了很大程度的提升,因为我们跳过了GraphTask::DoTask这个虚函数的调用。这个GraphTask::DoTask自带的开销对于一些小的Tick函数来说还是比较明显的,以下图为例,UPathFollowingComponent::TickComponent在没有寻路任务的时候基本就是空跑,总共400ns一次,但是GraphTask::DoTask部分的消耗大概为500ns,已经大于ExecuteTick和TickComponent两个虚函数的总和了:
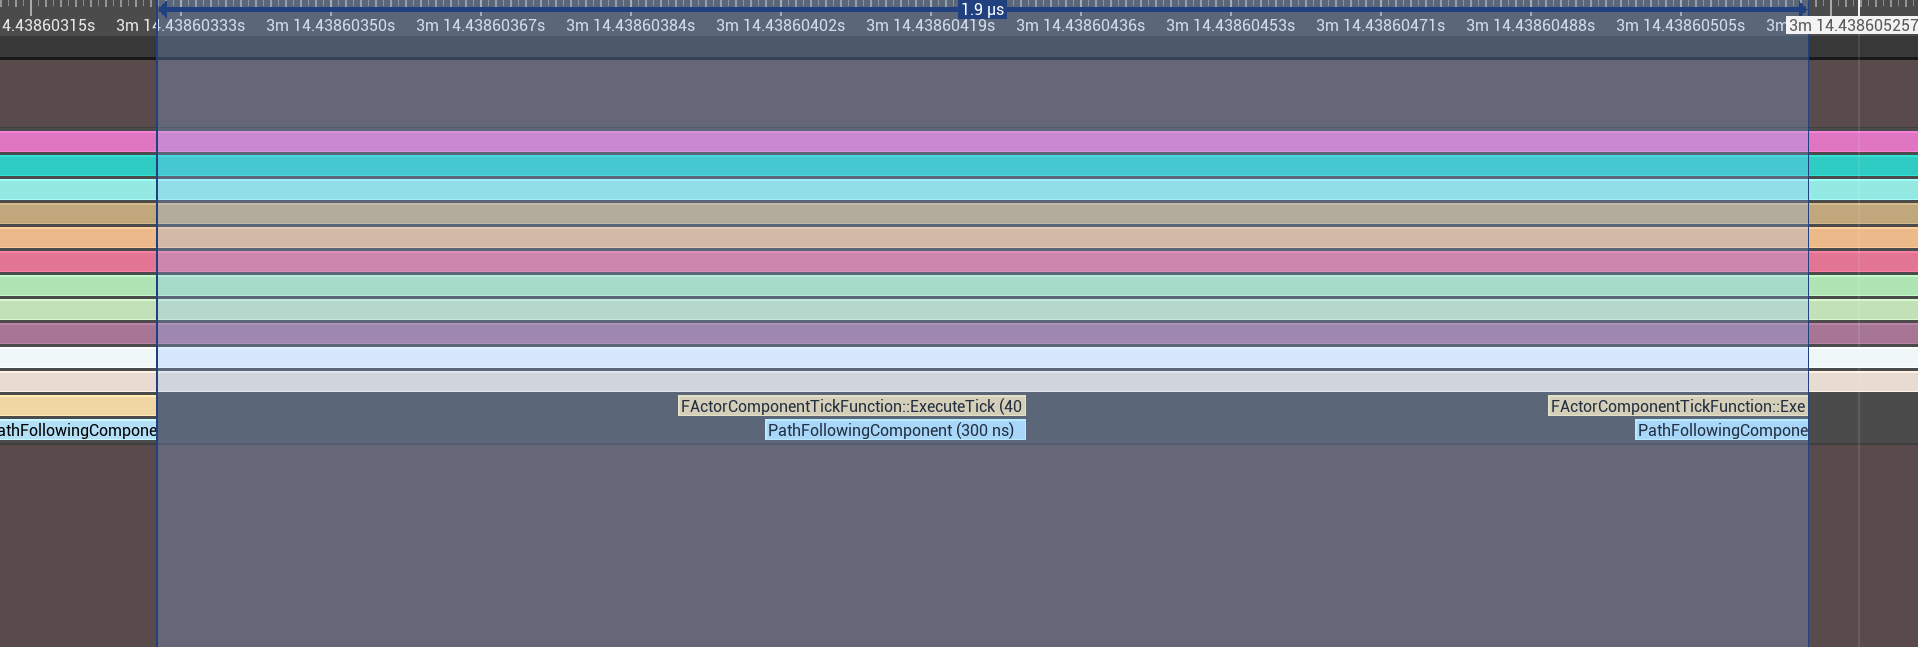
接下来考虑复杂一些的情况,我们允许FTickFunction声明其Prerequisites,但是这个Prerequisites数组需要在注册的时候就固定,且要求Prerequisites中的所有FTickFunction都已经注册。此时我们只需要对FTickFunction的注册逻辑做修改,照搬一下原来的FTickTaskLevel::QueueAllTicks里计算ActualStartTickGroup和ActualEndTickGroup部分,然后投递到TickTasks[ActualStartTickGroup][ActualEndTickGroup]数组中,省下的UWorld::RunTickGroup则不需要做任何修改,依然可以脱离TaskGraph去执行,这样每帧的UWorld::RunTickGroup效率依然不变,只是UWorld::StartFrame里要处理一下新添加的FTickFunction的ActualStartTickGroup和ActualEndTickGroup计算部分,这个依然是很轻量的,由于是低频操作,所以带来的额外影响可以忽略不记。
最后考虑一种最复杂的情况:FTickFunction的Prerequisites允许动态修改。此时由于Prerequisites的修改会导致FTickFunction的ActualStartTickGroup和ActualEndTickGroup被修改,需要重新计算所有相关的FTickFunction的TickGroup值之后,再在TickTasks中对这些FTickFunction做调整。为了高效的应对这些调整,需要在UWorld::StartFrame创建一个拓扑排序系统,将受影响的FTickFunction都计算出来,从TickTasks中进行删除,然后更新TickGroup,最后重新向TickTasks的投递。由于拓扑排序是线性时间复杂度,且修改Prerequisites是低频操作,所以这里的额外影响依然可控。
批量tick优化
使用TaskGraph系统来管理大量的Tick函数还有一个显著的性能损耗,由于Tick函数的执行顺序除了Prerequisites和TickGroup之外基本没有其他限制,所以会频繁的出现不同的Tick函数交错执行的情况。在当代的计算机体系结构下,对于内存的访问都需要经过L1,L2,L3这三级缓存。执行一个函数的时候需要将这个函数对应的指令内存区域全都加载到这三级缓存里。
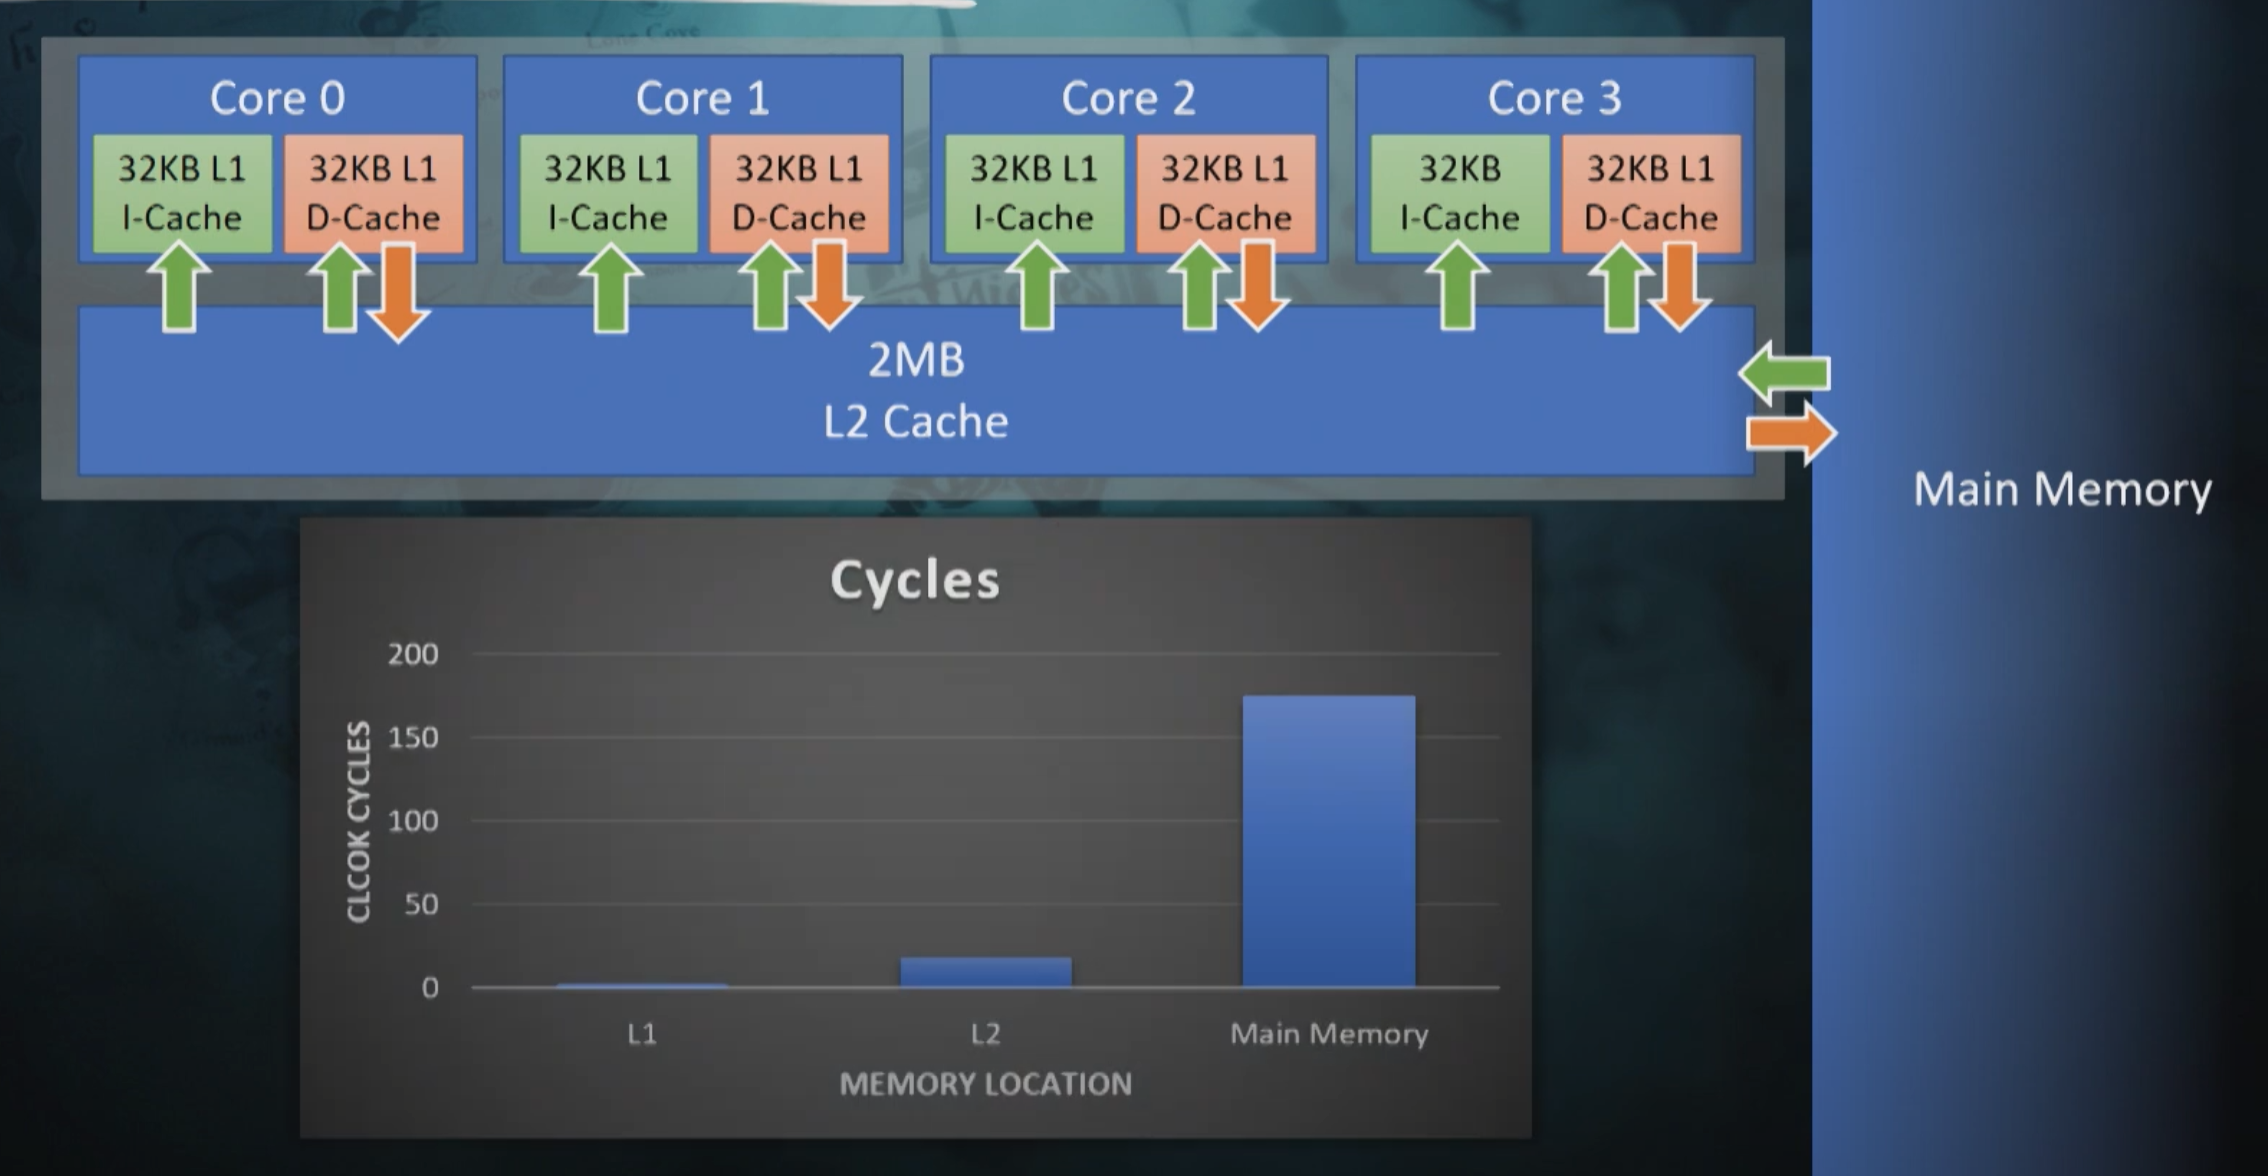
由于指令缓存的容量是有限的,不同函数交错执行的情况会导致指令缓存被不断的换入换出。而每一级缓存的读取速度相差是很大的,这样就导致了ABCABCABC这样的执行顺序相对于AAABBBCCC这样的执行顺序速度慢很多。特别是在函数体比较小的时候,这种缓存交换的惩罚就会越大。针对这个问题,在Unreal Fest 2019上Sea of Thieves的开发商提出了将同一个Tick函数聚合起来批量执行的优化方式,效果还不错,视频在Aggregating Ticks to Manage Scale in Sea of Thieves。
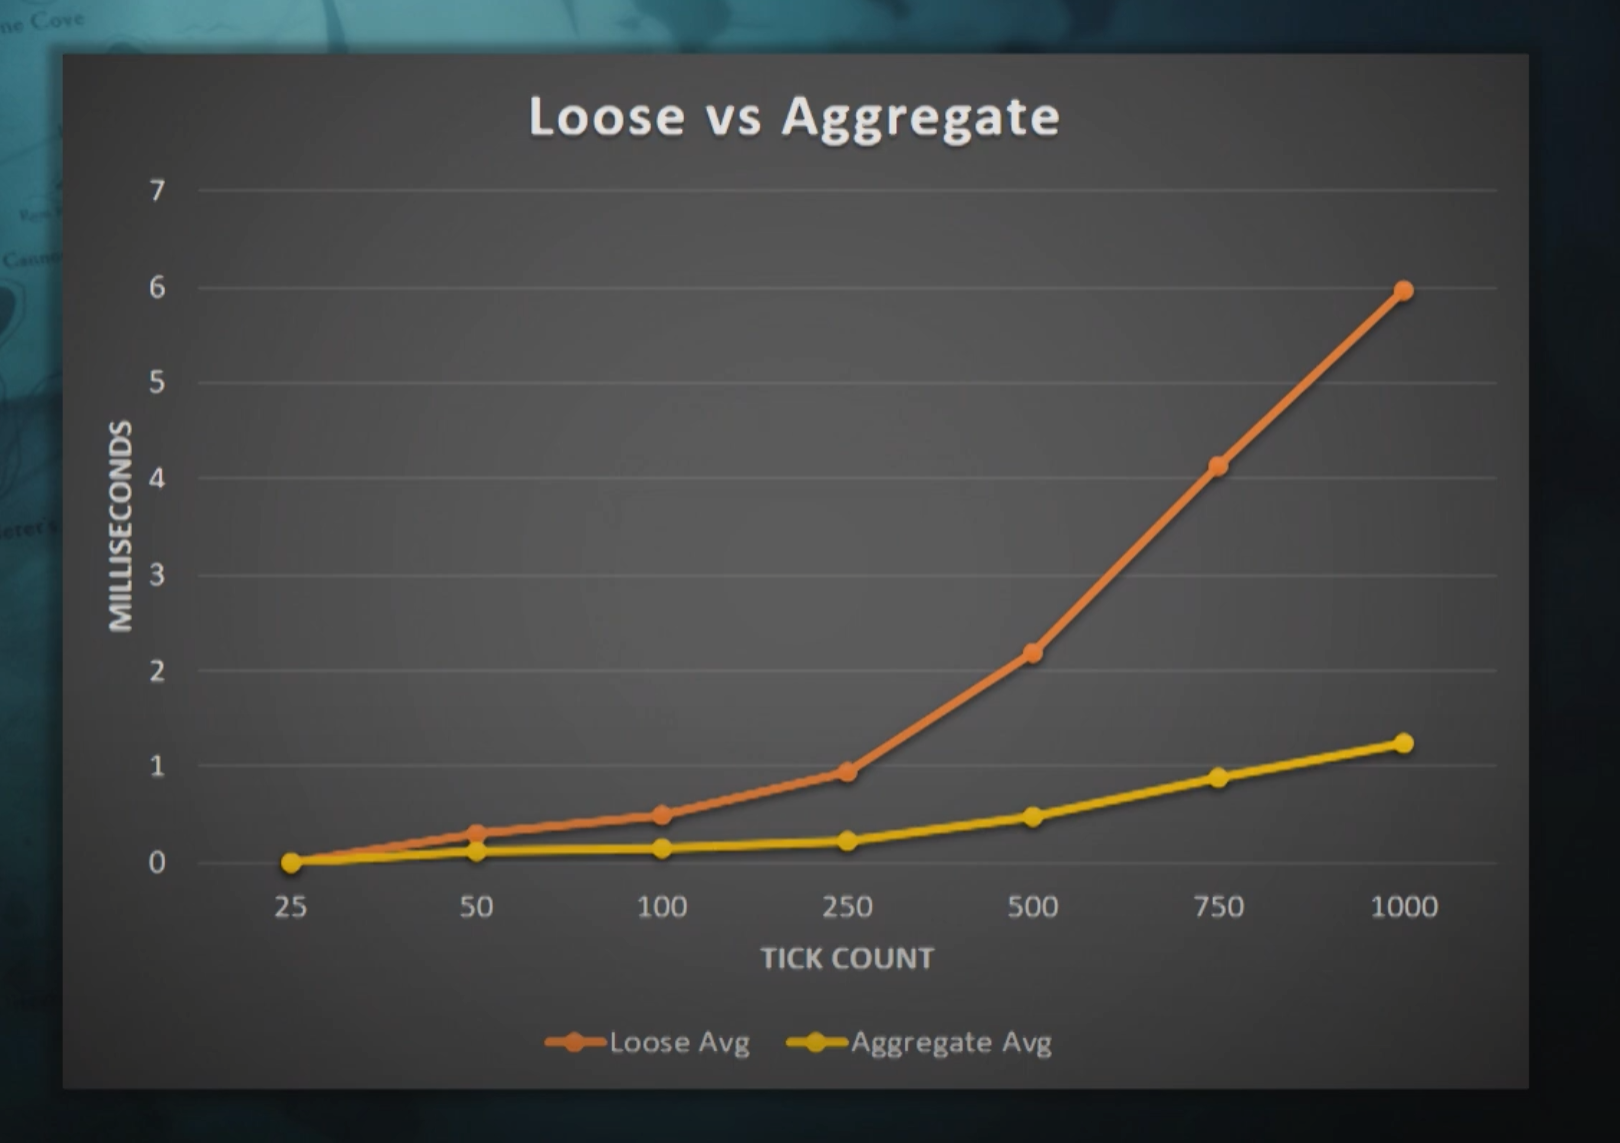
在UE5.5中,也加入了批量执行的选项bAllowTickBatching。不过UE为了避免修改太多的代码,这里的优化就没有Sea of Thieves中那么的激进。这个批量执行的调整在原来的QueueTickFunctions,之前调用的是QueueTickTask,现在替换为了QueueOrBatchTickTask:
/** This will add to an existing batch, create a new batch, or just spawn a single task and return null */
FTickBatchInfo* QueueOrBatchTickTask(TArray<FTickFunction*>& Prerequisites, FTickFunction* TickFunction, const FTickContext& TickContext)
{
// Batching is not supported with the old frontend
#if TASKGRAPH_NEW_FRONTEND
if (bAllowBatchedTicksForFrame)
{
FTickGroupCondition Condition = FTickGroupCondition(TickFunction);
if (CanBatchCondition(Condition))
{
// 处理聚合tick
}
}
#endif //TASKGRAPH_NEW_FRONTEND
// No batching, create a single task
// FGraphEventArray array has some inline members so it is faster to not explicitly reserve space
FGraphEventArray PrerequisiteEvents;
for (FTickFunction* Prereq : Prerequisites)
{
PrerequisiteEvents.Add(Prereq->GetCompletionHandle());
}
QueueTickTask(&PrerequisiteEvents, TickFunction, TickContext);
return nullptr;
}
QueueOrBatchTickTask这里会尝试执行聚合Tick,如果尝试失败就会走到默认的QueueTickTask函数。这里的FTickGroupCondition是一个非常简单的结构体,用来判定一个TickFunction是否能否聚合执行:
/** This is an integer that represents the conditions for which ticks can be grouped together */
struct FTickGroupCondition
{
union
{
uint32 IntVersion;
struct {
TEnumAsByte<ETickingGroup> StartGroup;
TEnumAsByte<ETickingGroup> EndGroup;
bool bHighPriority;
bool bIsBatch;
};
};
FTickGroupCondition()
: IntVersion(0)
{
}
FTickGroupCondition(const FTickFunction* TickFunction)
: StartGroup(TickFunction->GetActualTickGroup())
, EndGroup(TickFunction->GetActualEndTickGroup())
, bHighPriority(TickFunction->bHighPriority)
, bIsBatch(TickFunction->bAllowTickBatching)
{
}
};
/** Return true if this tick condition is safe to batch */
FORCEINLINE bool CanBatchCondition(FTickGroupCondition Condition)
{
// Don't batch high priority ticks or ones that last more than a single tick group
return Condition.bIsBatch && !Condition.bHighPriority && Condition.StartGroup == Condition.EndGroup;
}
这里的聚合执行条件其实挺简单的,开启了允许批量执行,不是高优先级,且StartGroup等于EndGroup。如果可以聚合的话,先查询目前能否与其他TickFunction合并在一个BatchGroup里执行:
// Look for an appropriate batch
FTickBatchInfo* BatchInfo = nullptr;
for (int32 BatchIndex = 0; BatchIndex < TickBatchesNum; BatchIndex++)
{
if (Condition == TickBatches[BatchIndex].Key)
{
FTickBatchInfo* PossibleBatch = TickBatches[BatchIndex].Value.Get();
bool bPrerequisitesMatch = true;
for (FTickFunction* Prereq : Prerequisites)
{
// Ignore prerequisites that are already in this batch
if (Prereq->GetTaskPointer(FTickFunction::ETickTaskState::HasTask) != PossibleBatch->TickTask && !PossibleBatch->TickPrerequisites.Contains(Prereq))
{
bPrerequisitesMatch = false;
break;
}
}
if (bPrerequisitesMatch)
{
BatchInfo = PossibleBatch;
break;
}
}
}
TickBatches是目前已经创建好的批量执行组,这里会遍历已有的批量执行组来查看其BatchCondition是否一样,如果一样的话还要查询当前TickFunction的任何一个Prerequisites都不能在这个组里,且这个组不能与当前TickFunction包含同样的前置依赖。如果没有依赖冲突的话就会将当前TickFunction放入到这个TickBatch中,如果没有合适的TickBatch则需要创建一个新的TickBatch:
if (!BatchInfo)
{
// Create a new batch, resizing array if needed
check(TickBatchesNum <= TickBatches.Num());
if (TickBatchesNum == TickBatches.Num())
{
TickBatches.Emplace(FTickGroupCondition(), MakeUnique<FTickBatchInfo>());
check(TickBatches.IsValidIndex(TickBatchesNum));
}
TickBatches[TickBatchesNum].Key = Condition;
BatchInfo = TickBatches[TickBatchesNum].Value.Get();
TickBatchesNum++;
BatchInfo->TickPrerequisites = Prerequisites;
check(BatchInfo->TickTask == nullptr);
// Create the batched task now
FGraphEventArray PrerequisiteEvents;
for (FTickFunction* Prereq : Prerequisites)
{
PrerequisiteEvents.Add(Prereq->GetCompletionHandle());
}
FTickContext UseContext = SetupTickContext(TickFunction, TickContext);
BatchInfo->TickTask = TGraphTask<FBatchTickFunctionTask>::CreateTask(&PrerequisiteEvents, ENamedThreads::GameThread).ConstructAndHold(BatchInfo, &UseContext);
AddTickTaskCompletion(Condition.StartGroup, Condition.EndGroup, BatchInfo->TickTask, Condition.bHighPriority);
}
// Add this tick function to batch, which could be the first one
BatchInfo->TickFunctions.Add(TickFunction);
TickFunction->SetTaskPointer(FTickFunction::ETickTaskState::HasTask, BatchInfo->TickTask);
return BatchInfo;
这里的每个TickBatch都会生成一个FBatchTickFunctionTask,这样TaskGraph的调度与执行单位从面向单个TickFunction的FTickFunctionTask变为了面向多个TickFunction的FBatchTickFunctionTask。在一个FBatchTickFunctionTask::DoTask被调度执行时,内部的FTickFunction直接在For循环内依次执行,这样就省略了很多FTickFunctionTask::DoTask引入的虚函数执行开销,同时也增加了指令缓存的局部性:
/**
* Actually execute the tick.
* @param CurrentThread; the thread we are running on
* @param MyCompletionGraphEvent; my completion event. Not always useful since at the end of DoWork, you can assume you are done and hence further tasks do not need you as a prerequisite.
* However, MyCompletionGraphEvent can be useful for passing to other routines or when it is handy to set up subsequents before you actually do work.
*/
void FBatchTickFunctionTask::DoTask(ENamedThreads::Type CurrentThread, const FGraphEventRef& MyCompletionGraphEvent)
{
check(TickBatch && TickBatch->TickFunctions.Num() > 0);
for (FTickFunction* Target : TickBatch->TickFunctions)
{
if (Context.bLogTick)
{
Target->LogTickFunction(CurrentThread, Context.bLogTicksShowPrerequistes);
}
if (Target->IsTickFunctionEnabled())
{
#if DO_TIMEGUARD
FTimerNameDelegate NameFunction = FTimerNameDelegate::CreateLambda( [&]{ return FString::Printf(TEXT("Slowtick %s "), *Target->DiagnosticMessage()); } );
SCOPE_TIME_GUARD_DELEGATE_MS(NameFunction, 4);
#endif
LIGHTWEIGHT_TIME_GUARD_BEGIN(FBatchTickFunctionTask, GTimeguardThresholdMS);
Target->ExecuteTick(Target->CalculateDeltaTime(Context.DeltaSeconds, Context.World), Context.TickType, CurrentThread, MyCompletionGraphEvent);
LIGHTWEIGHT_TIME_GUARD_END(FBatchTickFunctionTask, Target->DiagnosticMessage());
}
Target->ClearTaskInformation(); // This is stale and a good time to clear it for safety
}
}
FBatchTickFunctionTask内部拥有的TickFunction其实还是有些杂乱的,开启了批量执行之后还是可能会出现ABCABCABC这样的执行序列。如果想要进一步对缓存局部性进行提升的话,可能需要对TickFunction自动加上名字,然后FTickGroupCondition根据名字的Hash来补充没有使用14bit,这样一个大的FBatchTickFunctionTask就可以进一步细分为多个更小的FBatchTickFunctionTask,指令缓存的局部性就更高了。
struct FTickGroupCondition
{
union
{
uint32 IntVersion;
struct {
TEnumAsByte<ETickingGroup> StartGroup;
TEnumAsByte<ETickingGroup> EndGroup;
bool bHighPriority;
bool bIsBatch;
// 还有14个bit没有使用
};
};
};
游戏中的寻路系统
在前面的章节中我们已经讨论了如何在位置变化时做移动同步。对于由客户端操控的entity来说,其位置更新主要是由客户端的输入来驱动的。而对于服务端管理的NPC等类型的entity来说,则是由AI发起的寻路任务驱动的。这个寻路任务主要包括三种:
- 移动到特定点的指定半径内
- 趋近特定可移动
entity的指定半径内 - 跟随特定可移动
entity,维持与这个entity的距离在一定半径内
跟随移动可以通过不断的调用趋近移动来完成,而趋近移动则可以通过不断的调用指定点的移动来完成,所以寻路任务可以简化为如何一个entity从A点移动到B点,这个任务的核心问题就是从地图上找出两点之间的一条可移动路径。在不同的游戏世界中,不同的entity的可移动区域可能各有规定,例如在同一个3D空间,有些entity只能在地面行走,有些entity有攀爬功能可以在岩壁上移动,甚至有些entity可以在空中飞行水下潜行。针对不同的移动能力,我们需要对游戏场景采用不同的结构来表示可移动区域,并使用不同的寻路算法来计算两点之间的可移动路径。下面我们来针对游戏中常见的地图类型来介绍其可移动区域的结构建模以及路径查询。
基于图的寻路
游戏地图中最简单的用来描述可移动区域的结构就是图。在图论中,一个图G的数学定义为G=(V, E),其中V为图G中的节点集合,而E为图G中的边集合,每条边都由(v1, v2)这个二元组来表示,v1,v2都属于节点集合V。如果E中不区分二元组内两个元素的顺序,即(v1, v2)等价于(v2, v1),则这个图称之为无向图,反之称之为有向图。下图中就是上海的地铁线路图的一部分,他也可以转换为一个无向图:

如果存在一个有序节点列表v[0],....,v[n],将其内部所有元素与后面一个元素相连接构造出来的(v[0], v[1]),..., (v[n-1],v[n])所代表的n条边都在图G的边集合E中,则定义v[0], v[n]两者之间是连通的,(v[0], v[1]),..., (v[n-1],v[n])是这两个节点之间的连通路径。如果图中任意两点都是连通的,那么图被称作连通图。如果此图是有向图,则称为强连通图。由于无向图可以通过将一条边(v1, v2)转换为两条顺序相反的有向边的方法来构造有向图,所以后文中我们只讨论有向图。
我们前面提出的两点之间的可移动路径查询问题现在可以标准化为一个数学问题:
在给定的图`G=(V, E)`中,从集合`V`中选取两个不同的点`a, b`,计算出`a->b`的连通路径。
这个问题可以认为是一个已经解决的数学问题,在算法导论中提供了两种算法来解决这个问题,宽度优先搜索和深度优先搜索,分别简称为BFS(breadth-first-search)和DFS(depth-first-search):
- 宽度优先搜索时,我们构建一个队列
Q,一个集合O以及一个映射P,初始时将a压入Q,同时O.add(a)。然后不断的对Q进行pop操作获取元素c,将由c作为开始节点的所有边的终点d放入到Q中。往Q中push任意一个元素d时都需要检查O中是否已经包含d, 如果包含的则不处理这个元素;如果不包含才能执行push,同时此时记录P[d]=c。当遇到d==b时,则认为找到一条路径L,不断的执行e=P[d],L.add((e, d)),d=e这个迭代,直到d==a,此时reverse(L)就是所需要寻找的一条从a到b的连通路径。当Q为空时,则代表a到b的连通路径不存在。
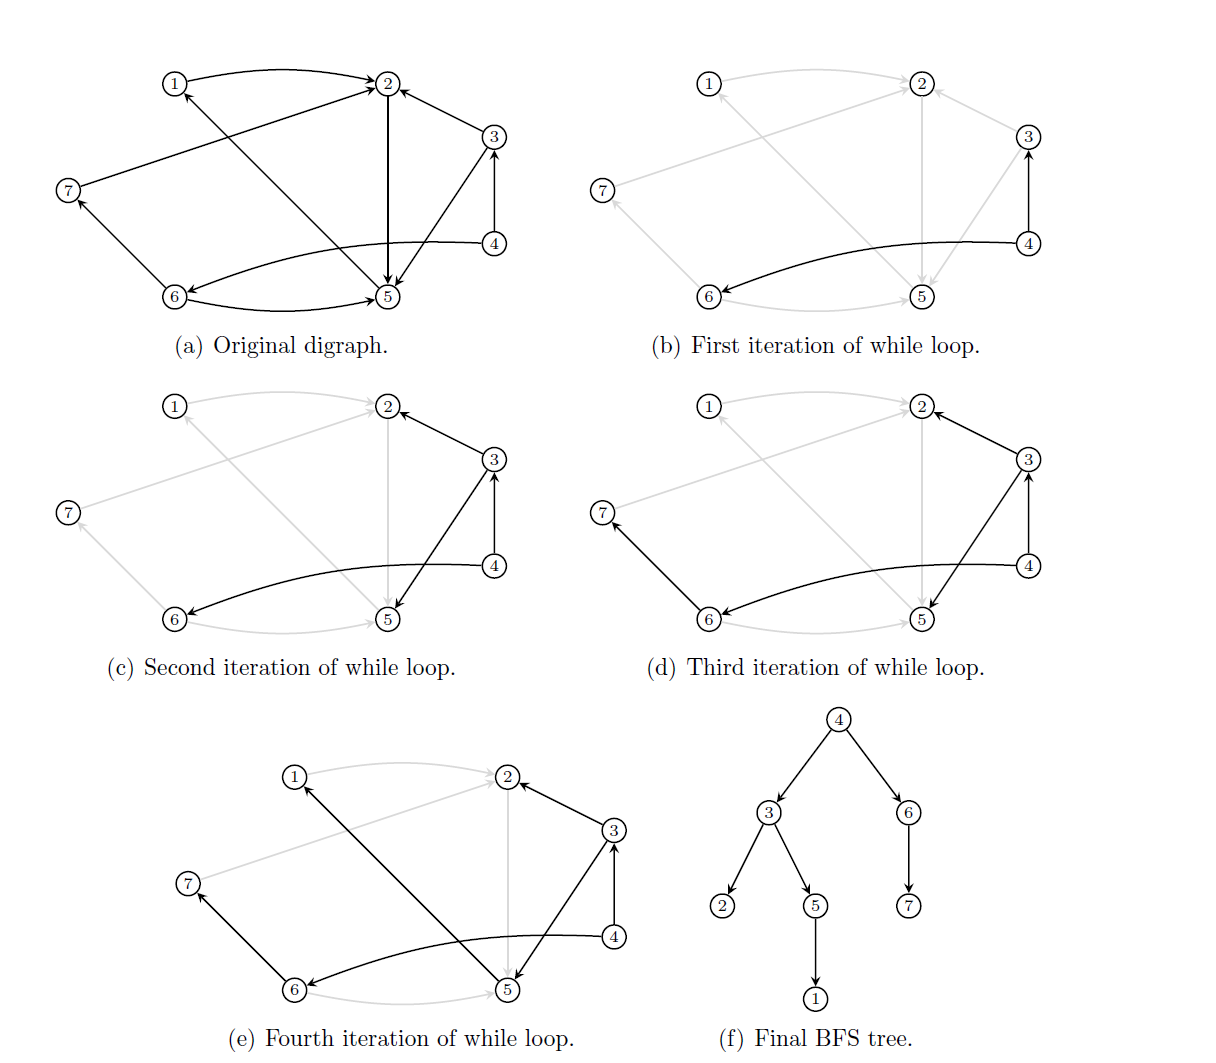
- 深度优先搜索时,我们类似的构造一个集合
O以及一个映射P,同时定义一个函数dfs(c),这个函数接受一个节点c作为参数,函数体则对由c作为开始节点的所有边的终点d执行if !O.exist(d) then O.add(d),P[d]=c,dfs(d)操作。然后我们调用dfs(a)来触发递归调用,当遇到d==b时,则认为找到一条路径L,不断的执行e=P[d],L.add((e, d)),d=e这个迭代,直到d==a,此时reverse(L)就是所需要寻找的一条从a到b的连通路径。如果dfs(a)完成调用后仍然没有找到一条连通路径,则代表a到b的连通路径不存在。
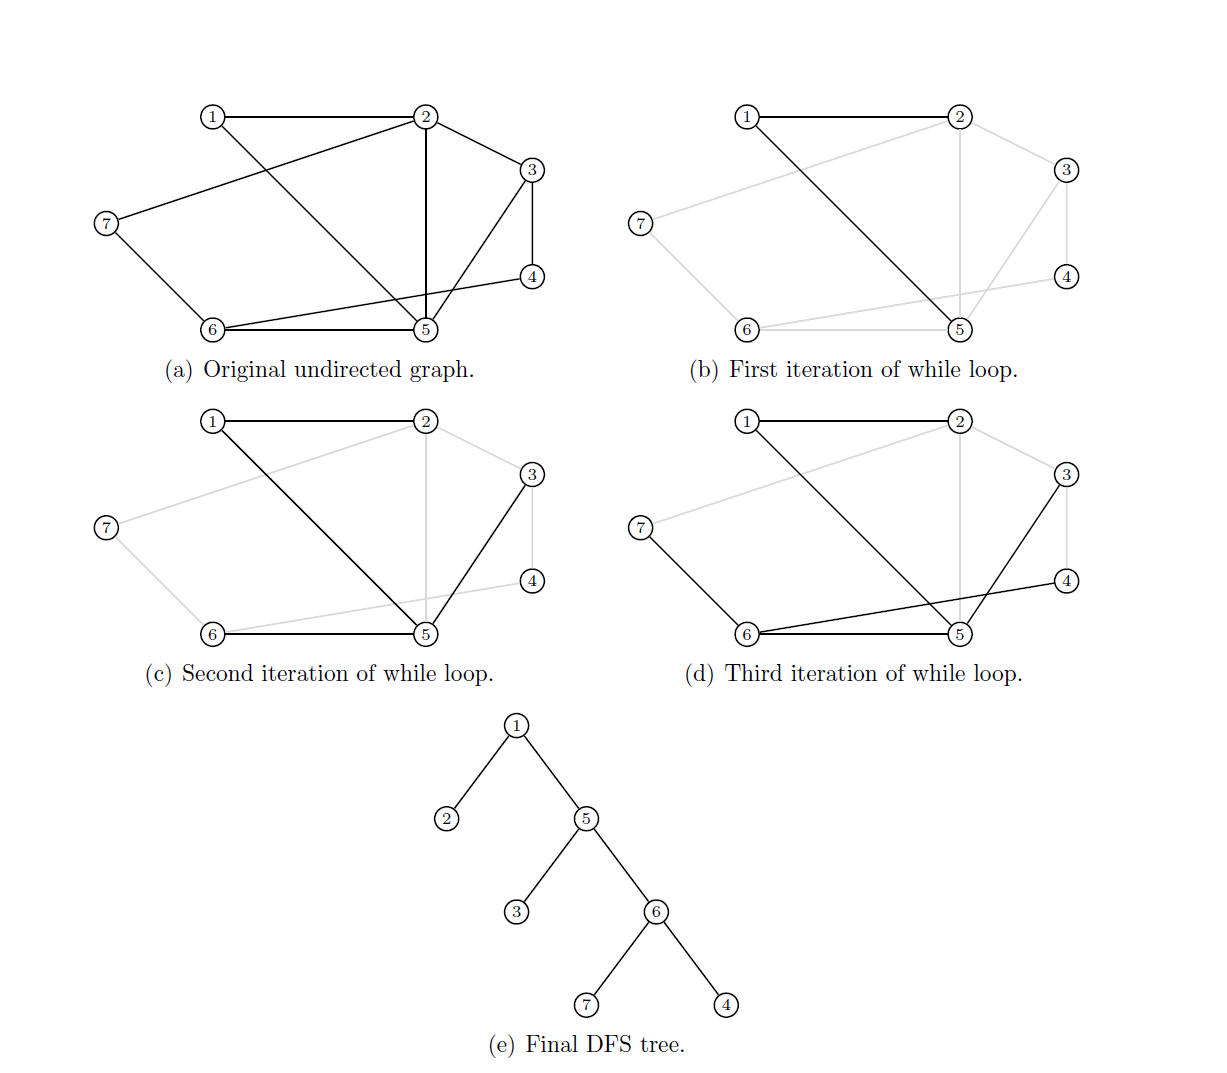
上面两个路径搜索方法的最坏情况下都需要遍历所有的边,例如图中的所有点构成一个圆环,所以其最坏时间复杂度都是边数量的常数倍。其一般情况下的复杂度也没有优劣之分,不过实际上采用的都是宽度优先搜索,因为深度优先搜索会使用递归,递归带来的性能影响在函数体比较小的时候非常明显,使用栈去模拟递归又要写很多额外代码。
如果a,b两点之间并不连通,则不管是BFS还是DFS都会搜索所有可以由a到达的节点集合S,遍历整个集合S之后才能判定两者无法连通。例如搜索从杭州到三亚的高铁换乘路线会穷尽国内基本所有的高铁站。此时的搜索效率是非常低的,为了最终判定两者不连通会浪费很多时间。所以在游戏实际使用的地图中,一般还会有一个数据结构来辅助查询a,b两点之间是否连通,路径搜索时如果发现这两个点压根就不连通的话就不再执行后续的BFS或DFS过程。直接在离线情况下预处理地图生成unordered_map<int, unordered_set<int>> connected这样的连通性矩阵耗时耗力,而且其存储空间也要求很多,我们需要一个更优秀的结构去处理连通性问题。
对于无向图来说,这个连通查询结构很好做,只需要在每个节点上增加一个字段region_id,所有region_id相同的节点对a,b都是可以连通的,region_id不同的节点对a,b都是不连通的。下面的代码就负责预处理整个地图给所有的节点都赋值相应的region_id:
struct vertex
{
int id;
int region_id = 0;
unordered_set<int> edges;
};
void set_region_id_for_vertexes(unordered_map<int, vertex>& all_vertexes)
{
int region_id_counter = 0;
for(auto& [one_id,one_vertex]: all_vertexes)
{
if(one_vertex.region_id != 0)
{
continue;
}
region_id_counter++;
queue<int> bfs_queue;
bfs_queue.push(one_id);
while(!bfs_queue.empty())
{
auto temp_id = bfs_queue.front();
bfs_queue.pop();
auto& cur_bfs_vertex = all_vertexes[temp_id];
if(cur_bfs_vertex.region_id != 0)
{
continue;
}
cur_bfs_vertex.region_id = region_id_counter;
for(const auto& one_edge: cur_bfs_vertex.edges)
{
bfs_queue.push(one_edge);
}
}
}
}
由于每个节点只会设置region_id一次,每条边也只会遍历到一次,所以整体的消耗时间等价于边的数量加上节点的数量,是线性复杂度,非常高效。
而对于有向图来说,情况复杂了起来,只用region_id是不够的,我们不能因为a->b有一条路径就将这两个点的region_id设置为同一个值,因为可能b->a并没有可行路径。有用同一个region_id的集合S内的任意两点a,b都需要能找到a->b的路径和b->a的路径,即S是图G中的一个强连通子图。我们从G中以下面的方法构造一个新的图G2:遍历G中的每个强连通子图S,删除原来两个点都在S内的边,将整个子图S里的点都替换为同一个新的点v2,对应的更新边的集合E进行节点替换以及重复边的去重。这样我们就得到了一个节点数量和边数量都精简很多的新的有向无环图DAG(Directed Acyclic Graph), 这就是所需要的图G2。下图就是一个执行强连通分量收缩的示例:

判断原来图G中两个点a,b是否可连通只需要去判断a所在的强连通子图Sa在G2中的点Va与b所在的强连通子图Sb在G2中的点Vb是否连通。由于G2的规模相对G来说小了很多,其连通性判定会节约很多时间,同时对于内存的要求也相对于前述的连通性矩阵降低了很多。现在遗留下来的问题就是我们如何将图G切分为多个强连通分量。
在有向图G中寻找其内部所有强连通分量这个问题已经有现成的算法,叫Tarjan算法。在介绍该算法之前,我们需要先回顾一下前面介绍的DFS, 这里引入一个DFS生成树的结构,来记录DFS时每个节点的前序节点。我们以下面的有向图为例:

有向图的 DFS生成树主要有4种边(不一定全部出现):
- 树边
(tree edge):绿色边,每次搜索找到一个还没有访问过的结点的时候就形成了一条树边。 - 反祖边
(back edge):黄色边,也被叫做回边,即指向祖先结点的边。 - 横叉边
(cross edge):红色边,它主要是在搜索的时候遇到了一个已经访问过的结点,但是这个结点并不是当前结点的祖先时形成的。 - 前向边
(forward edge):蓝色边,它是在搜索的时候遇到子树中的结点的时候形成的。
有了上述定义之后,我们可以利用DFS来计算图的所有强连通分量:如果结点u是某个强连通分量在搜索树中遇到的第一个结点,那么这个强连通分量的其余结点肯定是在搜索树中以u为根的子树中。u被称为这个强连通分量的根。为了证明这个性质我们采取反证法:假设有个结点v在该强连通分量中但是不在以u为根的子树中,那么u到v的路径中肯定有一条离开子树的边。但是这样的边只可能是横叉边或者反祖边,然而这两条边都要求指向的结点已经被访问过了,这就和u是第一个访问的结点矛盾了。
在Tarjan算法中为每个结点u维护了以下几个变量:
dfn[u]:深度优先搜索遍历时结点u被搜索的次序。low[u]:设以u为根的子树为Subtree(u)。low[u]定义为以下两类结点的dfn的最小值:Subtree(u)中的结点;- 从
Subtree(u)通过一条不在搜索树上的边能到达的结点。
一个结点的子树内结点的dfn都大于该结点的dfn。从根开始的一条路径上的dfn严格递增,low严格非降。按照深度优先搜索算法搜索的次序对图中所有的结点进行搜索。在搜索过程中,对于结点u和与其相邻的且不是u的父节点的结点v考虑3种情况:
v未被访问:继续对v进行深度搜索。在回溯过程中,用low[v]更新low[u]。因为存在从u到v的直接路径,所以v能够回溯到的已经在栈中的结点,这里就包括u。v被访问过,已经在栈中:即已经被访问过,根据low值的定义(能够回溯到的最早的已经在栈中的结点),则用dfn[v]更新low[u]。v被访问过,已不在在栈中:说明v已搜索完毕,其所在连通分量已被处理,所以不用对其做操作。 下面的就是上述算法的伪代码:
TARJAN_SEARCH(int u)
vis[u]=true
low[u]=dfn[u]=++dfncnt // 为节点u设定次序编号和Low初值
push u to the stack // 将节点u压入栈中
for each (u,v) then do // 枚举每一条边
if v hasn't been search then // 如果节点v未被访问过
TARJAN_SEARCH(v) // 继续向下搜索
low[u]=min(low[u],low[v]) // 回溯
else if v has been in the stack then // 如果节点u还在栈内
low[u]=min(low[u],dfn[v])
if (DFN[u] == Low[u]) // 如果节点u是强连通分量的根
repeat v = S.pop // 将v退栈,为该强连通分量中一个顶点
print v
until (u== v)
对于一个连通分量图,我们很容易想到,在该连通图中有且仅有一个dfn[u]==low[u]。该结点一定是在深度遍历的过程中,该连通分量中第一个被访问过的结点,因为它的dfn值和low值最小,不会被该连通分量中的其他结点所影响。因此,在回溯的过程中,判定dfn[u]==low[u]的条件是否成立,如果成立,则栈中从u后面的结点构成一个强连通分量。整个算法需要执行两次DFS,所需时间为图G的大小的线性时间。
前述内容解决了如何在有向图中寻找a,b两点的一条连通路径的问题,但是寻路问题并不是简单的获取一条连通路径,因为在连通路径有多条的情况下,我们更希望获取一条消耗最低的路径。
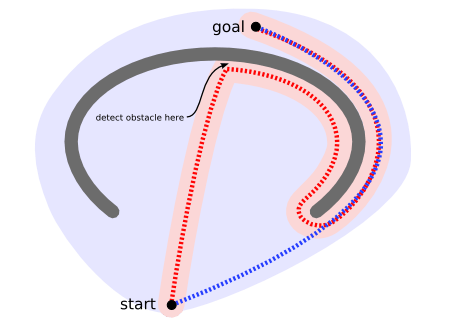
为了定义路径的消耗,我们需要对图G中的每条边增加一个cost,代表路过这条边时需要增加的代价,而一条路径的总cost则是路径中所有边的代价之和。
在给定的无负的cost的有向图G中寻找给定两个节点a,b的最短路径是一个已经解决的问题,使用的是经典的Dijkstra单源最短路径算法。Dijkstra算法负责计算一个点到图内其他点的最短距离,主要内容是维护两个集合,即已确定最短路径的结点集合CloseSet(A)、这些结点向外扩散的邻居结点集合OpenSet(B),同时还维护两个数组:
- 一个距离数组
dis来记录每个节点到起点a的距离,初始时都是负无穷大,同时dis(a)初始化为0。 - 一个前序数组
pre来记录每个节点到起点a的最短路径中的最后一条边的起点。
在初始化上述变量之后,程序逻辑如下:
- 把起点
a放到A中,把每条以a为起点的边的终点v放到B中,更新dis(v) = cost(a,v)。 - 从
B中找出dis(u)最小的节点u,放到A中。 - 把每条以
u为起点的边的终点v进行如下处理:- 如果
v已经在集合A中则不做处理, - 如果
v不在集合A中,则加入到集合B,同时计算temp_cost= dis(u)+cost(u,v)。如果这个temp_cost小于已经记录的dis(v)则更新dis(v)=temp_cost同时更新pre[v]=u。
- 如果
- 重复步骤
2和步骤3,直到B为空
上面的算法流程就是dijkstra算法的完成流程,朴素的dijkstra实现在步骤2中直接遍历所有元素来获取最小值,此时算法的时间复杂度为|V|*|V|, 采取了斐波那契堆优化之后,最优复杂度可以降低到|E| + |V|log(|V|)。
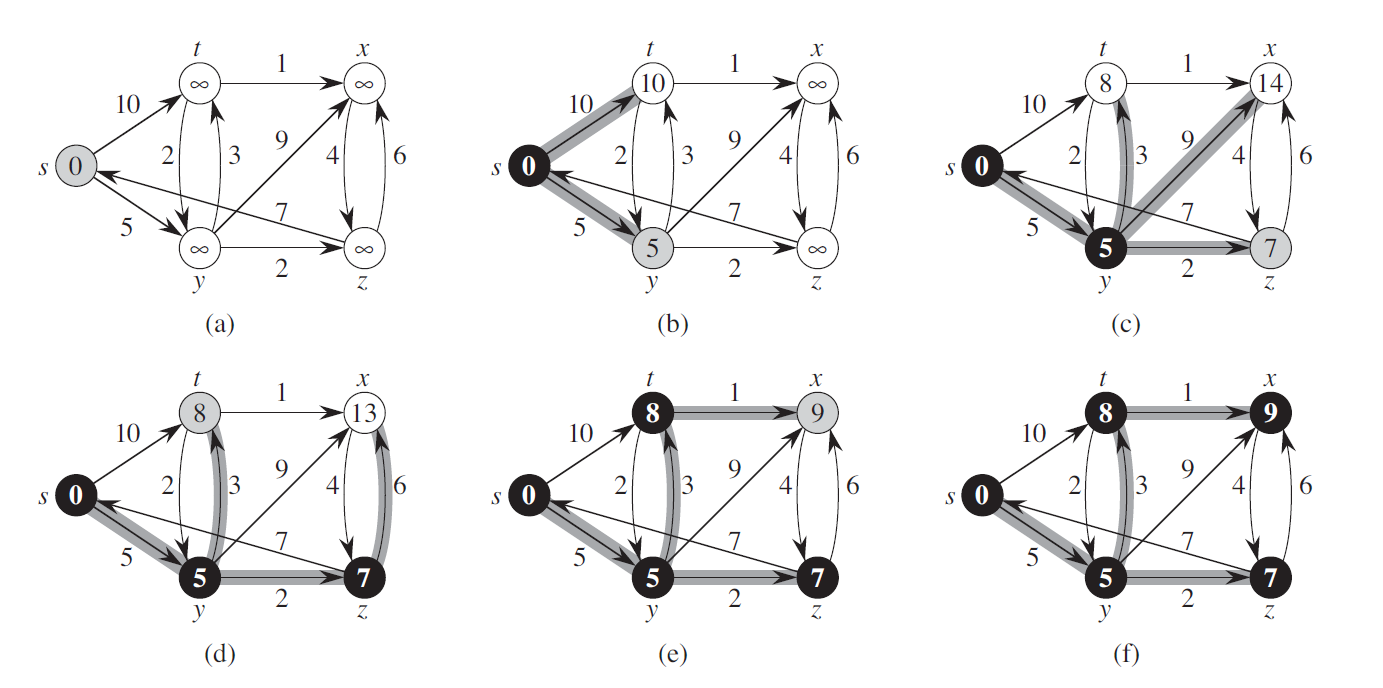
由于我们目前只需要计算a,b两点之间的最短路径,所以在步骤2中发现u==b时就可以提前结束算法迭代。算法结束时如果B为空代表a,b不连通,如果u==b代表a,b连通,此时构造结果路径列表L,执行do L.push(u), u=pre[u] while u!=a,执行结束之后reverse(L)就是我们所需要的一条a->b的最短路径。最坏情况下b点恰好是离a最远的一个点,此时计算a,b之间的最短路径需要跑完完整的dijkstra算法,因此计算在图G中计算a,b两点之间的最短路径算法的时间复杂度与dijkstra是一样的。
基于网格的二维平面寻路
如果游戏场景只有x,y两个坐标轴的话,这个场景就是一个二维平面。针对二维平面最简单的可行走区域表示结构为二维网格grid,内部存储了网格内每个基本单元cell存储一个bool值,代表该cell是否可以通行:
struct grid
{
vector<vector<bool>> cells;
}
将整个二维平面转换为网格的方法也很简单,选取一定粒度的正方形作为cell的形状,然后以这个cell作为单位粒度对原始的场景坐标轴进行变换。如果变换后由(x,y)->(x+1,y)->(x+1,y+1)->(x,y+1)这四个点组成的正方形内有不可同行的区域,则cells[x][y]设置为false,反之设置为true。从x,y出发可以直接移动到达的其他节点根据不同的设定有不同的定义:
- 只允许往上下左右四个方向移动,即以
x,y作为起点的边最多四条,其终点集合为(x+1,y),(x-1,y),(x,y-1),(x,y+1)这四个cell - 允许往上下左右左上左下右上右下八个方向移动,即以
x,y作为起点的边最多八条,其终点集合为(x+1,y+1),(x+1,y),(x+1,y-1),(x,y-1),(x,y+1),(x-1,y+1),(x-1,y),(x-1,y-1)这八个cell
整个网格地图可以很方便的转换为前述的无向图结构G=(V, E),这里的所有的cells[x][y]==true的x,y坐标构成了当前场景的无向图G中的V节点集合,然后每个(x,y)直接相邻的每个点(m,n)对应的cells[m][n]==true,则将(x,y)->(m,n)加入到边集合E中。假如当前grid中所有cell[x][y]都是true,则此时边集合E内会包含(x*y)*(x*y - 1)/2条边,与grid内的cell数量的二次方成正比,而这些边在grid结构体中不需要额外的字段去存储。所以在二维平面上地图表示主要使用grid,而不是通用的无向图结构。
由于在写代码时四方向移动比八方向移动简单点,所以后面我们主要讨论网格地图上的四方向移动。在grid地图上执行寻路时,我们可以沿用之前使用的dijkstra算法来计算两个cell之间的最短路径:
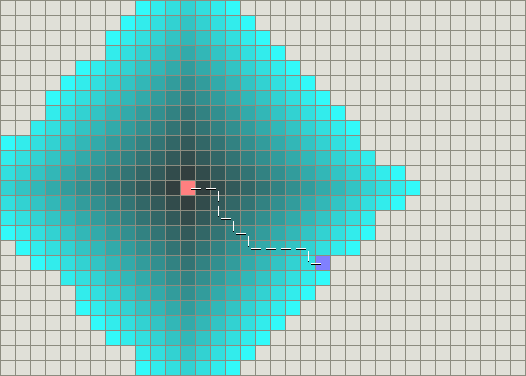
上图就是dijkstra算法在一个grid地图上执行后的结果,粉色方块为起点,紫色方块为终点,白色间隔线段为计算的最短路径,其他的彩色格子代表算法执行过程中遍历到的其他节点。可以看出在这个全连通grid上dijkstra算法计算出一条长度为n的最短路径时,所遍历到的cell数量为n*n,这种时间复杂度对于稍微长一点的路径来说不可接受,但这却是计算最短路径不可避免的代价。如果我们放松对路径长度的最短需求,只要求寻路时获取一条局部最优的连通路径,将极大的减少节点的搜索空间,降低搜索的整体运行时间。在这个思想的指导下,基于dijkstra算法的A*路径搜索算法被提出。dijkstra算法维护了一个代表距离起点具体的dis数组,而在A*算法中维护了三个数组:
g数组,g[n]代表从起点a到节点n的最短距离,等价于dijkstra中定义的dis数组,称之为实际costh数组,h[n]代表n点到终点b的预估距离,也叫启发cost,这个预估距离的函数可以任意自定义f数组,f[n]=g[n]+h[n],代表经过n点的从a到b的局部最优路径的估算距离,
在给出上述变量的定义之后,我们再来描述A*路径搜索的算法流程:
- 把起点
a放到A中,把每条以a为起点的边的终点v放到B中,更新g[v] = cost(a,v),同时计算h[v]以及f[v]。 - 从
B中找出f[u]最小的节点u,- 如果
u==b则构造结果路径列表L,执行do L.push(u), u=pre[u] while u!=a,执行结束之后reverse(L)就是我们所需要的一条a->b的最短路径 - 如果
u!=b,则将u放到A中。
- 如果
- 把每条以
u为起点的边的终点v进行如下处理:- 如果
v已经在集合A中则不做处理, - 如果
v不在集合A中,则加入到集合B, 计算temp_cost= g[u]+cost[u,v],如果h[v]没有计算过则计算h[v]。如果这个temp_cost小于已经记录的g[v]则更新g[v]=temp_cost同时更新pre[v]=u, f[v]=g[v]+h[v]。
- 如果
- 重复步骤
2和步骤3,直到B为空
如果算法结束时仍然无法从步骤2中返回结果路径,则代表a,b两点之间无连通路径。下图中就是将h[n]设置为n->b的最短距离时的A*执行结果:

A*算法的执行速度和路径质量严重依赖于h[n]函数的选择:
- 如果
h[n]等价于n到b的最短路径的cost,则搜索时只会遍历到a,b最短路径上的节点,此时执行速度最快,同时返回的也是最短路径 - 如果
h[n]小于n到b的最短路径的cost,则搜索时会遍历到更多的节点,但是返回的依旧是最短路径。h[n]越小则遍历的节点越多,算法执行的越慢。如果我们将启发函数h[n]设置为返回常量0之后,上述流程就等价于dijkstra的算法流程,返回的是最短路径 - 如果
h[n]大于n到b的最短路径的cost,则算法终止时返回的路径不保证是一条最短路径,但是此时遍历到的节点数量相对于dijkstra来说会少。这个h[n]与真实距离之间的差异越大,遍历的节点空间数量越少。当h[n]相对于g[n]有数量级的差异时,退化为纯的贪心搜索,即步骤2每次获取离目标点预估距离最小的点。
如果我们无法指定一个简单高效的函数来获取n到b的最短路径的cost,所以我们只能希望将h[n]设置的足够大来加速算法的执行,但是太大又会退化成贪心算法影响路径的质量(完全不考虑最短路径的计算结果)。所以实际使用中一般将h[n]设置为在无障碍物的情况下n->b的最短路径距离乘以一个(1,10]区间内的系数。在无障碍物的情况下,在四方向移动时的两点之间的最短距离为曼哈顿距离(Mahattan Distance),其计算方式为计算两点的坐标插值的两个分量的绝对值之和,计算时间为常数,在八方向移动时也有一个类似的切比雪夫距离(Chebyshev distance),其计算时间也是常数。另外还有一个常规的距离计算函数欧几里得距离(Euclidean distance),这个就是平面中两点的直线距离,如果选用这个函数作为启发距离计算,则要小心的挑选其常数系数,以保证最后的结果要大于最短路径距离。下图就是在支持八方向移动的地图中使用常数为1的欧几里得距离时的A*算法执行结果,可以看出获取了一条最短路径,同时节点搜索空间还是有很多冗余:
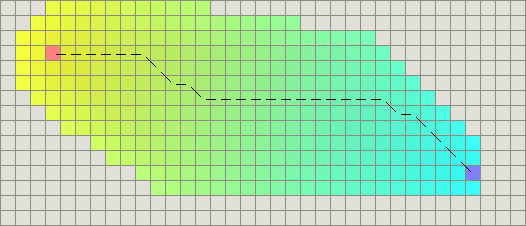
A*算法是所有带空间位置信息的寻路搜索算法中应用最广的算法,通过添加到目标点的启发距离cost,算法迭代时以贪心的方式选择下一个需要考虑的节点,可以极大的减小CloseSet(A)、OpenSet(B)的大小,从而加速整体的路径搜索流程。不过在可以八方向移动的二维网格上,有一个更优的JPS(Jump Pointer Search)算法,这个算法是由Daniel Harabor和Alban Grastien在2011年的论文Online Graph Pruning for Pathfinding on Grid Maps中提出的。在2012到2014年举办的三届基于Grid网格寻路的比赛GPPC(The Grid-Based Path Planning Competition)中,JPS已经被证明是基于无权重格子,在没有预处理的情况下寻路最快的算法。这种近乎于标准答案的JPS算法最终导致了GPPC的停办。
JPS算法也是基于A*算法的思想改造而来,其主要差异在于选取了一个点进入CloseSet之后应该将哪些点引入OpenSet中。在A*算法中,会将这个点的周围八个邻居节点中的所有非障碍物节点都尝试加入到OpenSet中,而JPS算法则会排除掉很多不必要的邻居节点。下面我们来分析JPS的邻居节点排除过程,这里我们规定沿着坐标轴移动到邻居的cost为1,而沿着对角线移动到邻居的cost为sqrt(2)。
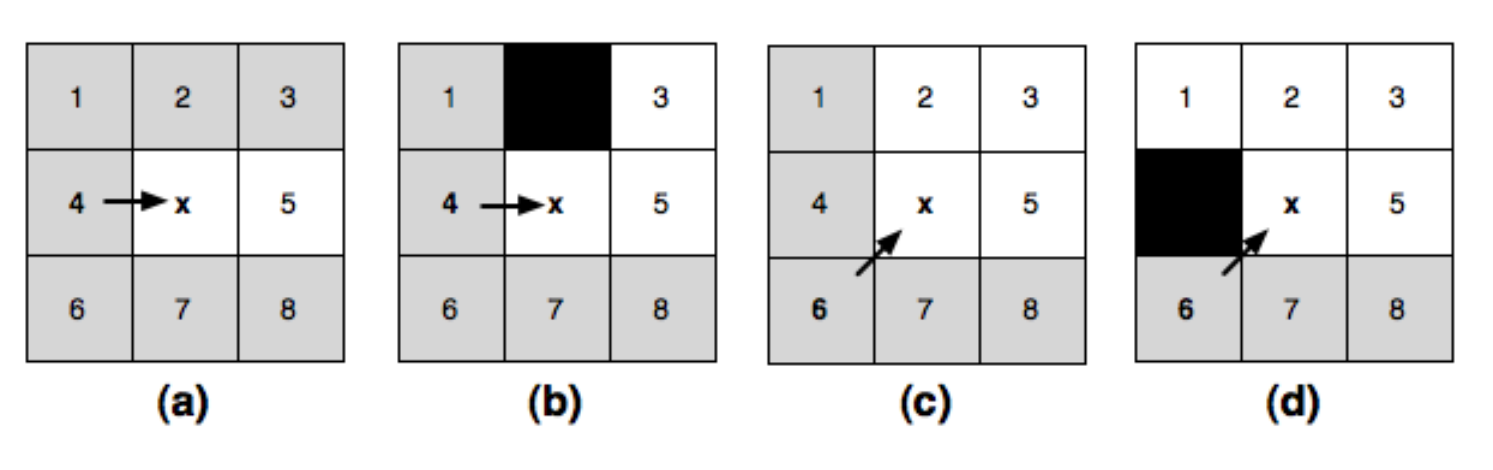
我们先来考虑沿着坐标轴移动的情况,由于四个坐标轴的分析是对称的,所以我们只讨论向右移动的情况,见上图中的a。此时我们获取了一个新的CloseSet节点x,其父节点是网格4,我们来决定接下来将如何筛选x的八个邻居进入到OpenSet。对于这八个节点中的某个节点n,如果总是可以将4->x->n替换为一条更优的路径4->m或者4->x->m,则我们可以把这个点n安全的筛除,不再考虑进入OpenSet:
- 首先可以排除的是节点
4,因为4->x->4是一个回路,在路径上删除此回路会获得一条更短的路径, - 然后可以排除
1,2,6,7这四个点,因为4可以直接连接这四个点,直连距离都比经过x后的距离短, - 最后排除
3,8两个点,因为4->x->3的长度等于4->2->3的长度,4->x->8的长度等于4->7->8的长度。所以某条路径中如果包含了4->2->3,总是可以安全的替换为4->x->3,此时出现了等价最短路径的情况。从4移动到节点3出于贪心的考虑我们会选择离3最近的节点2而不是节点x。因此我们将节点3排除,同样的理由我们排除了节点8。
所以在无障碍物的情况下,由4->x之后,我们只需要考虑将节点5加入到OpenSet中。接下来我们考虑存在障碍物的情况:
- 如果节点
1或者节点6是障碍物,不影响之前的判断,因为路径更优的要求下,我们在任何情况下都不会移动到1或者6 - 如果节点
2或者节点7是障碍物,由于上下对称我们只讨论2是障碍物的情况,即上图c,此时4->2->3不再连通,4->x->3成为了4->3之间的唯一一条最短路径,因此我们无法将3从下一跳节点中排除,需要加入OpenSet。同样的理由如果7是障碍物,我们需要将8加入到OpenSet。这种原来不考虑进入OpenSet的点,在出现了障碍物之后需要进入OpenSet,定义为强制邻点(Forced Neighbours),此时的x被定义为跳点(Jump Point)。 - 如果节点
3或者节点8是障碍物,也不影响之前的判断,因为3和8不会出现在基于目标距离优先的经过4->x的搜索路径中 - 如果节点
5是障碍物,则5不再加入到OpenSet中,
基于类似的分析方式,在上图c描述的在无障碍物的情况下的对角线移动6->x中,我们需要将2,3,5加入到OpenSet;在4为障碍物时,需要加入节点1;在7为障碍物时需要加入节点8。
所以JPS算法就是基于跳点的搜索,不过这里的跳点不仅仅包括前述的由于强制邻居引发的跳点,还包括另外的两种跳点:
- 路径的起点和终点被定义为跳点
- 当
a->b是一个对角线移动时,由b可以只按照坐标轴移动可以连接到某个跳点,则b也是跳点
给定了跳点的完整定义之后,我们定义一个函数jps_search(m,n)代表从m移动到n之后如何在n点进行继续的搜索:
- 如果
n是终点,则返回 - 对
n进行坐标轴四方向直线搜索, 每个方向直线搜索的停止条件如下:- 遇到障碍物
- 超过地图边界
- 遇到已经在
OpenSet或者CloseSet中的点 - 遇到一个跳点
k,此时将此跳点k加入到OpenSet,并记录k的父节点为pre[k]=n停止搜索前遇到的点都加入到CloseSet中。
- 如果上面的坐标轴四方向搜索没有遇到终点,则分别对四个对角线方向的直接邻居
k记录其父节点为pre[k]=n,并递归执行jps_search(n,k)有了这个jps_search的定义之后,通过JPS算法获取(a,b)之间路径的A*流程如下: - 将
a加入到OpenSet(B),记录pre[a]=a - 从
B中获取综合cost最小的节点n,加入到CloseSet(A)- 如果
n是终点,则利用pre数组计算完整路径 - 如果
n不是终点,则调用jsp_search(pre[n], n)进行邻居搜索
- 如果
- 不断的执行步骤
2,直到OpenSet为空
下面我们以一个实际例子来描述JPS搜索的执行过程,初始设置见下图,绿色为起点,红色为终点,黑色为障碍物:

开始时以这个绿色节点执行jps_search,由于坐标轴方向都是障碍物或者地图边界,多次递归之后执行到途中的黄色节点:
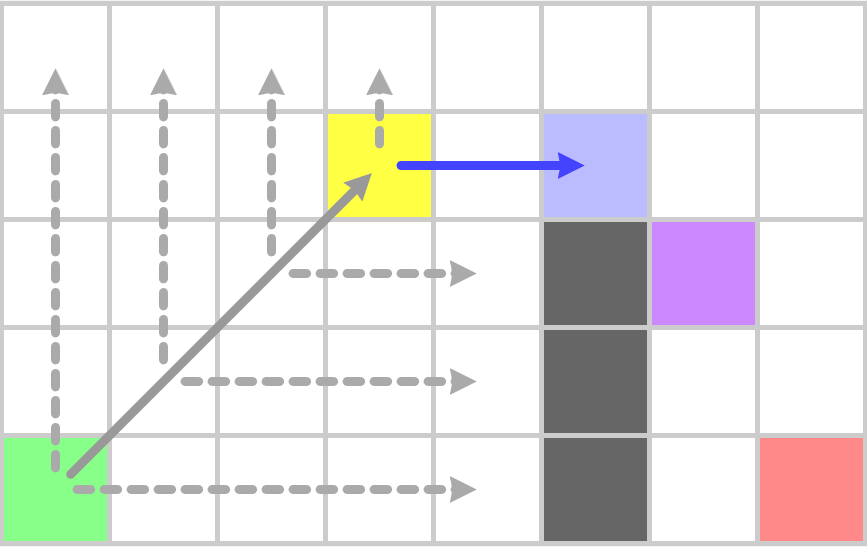
这里之所以会停留在黄色节点是因为浅紫色节点有一个强制邻居即图中的紫色节点,所以浅紫色节点为跳点,而黄色节点可以水平移动到浅紫色节点,根据跳点的定义黄色节点也是跳点,所以本次jsp_search会以黄色节点加入到OpenSet结束。开始下一轮迭代后,从OpenSet中获取了这个黄色节点,并执行jps_search,
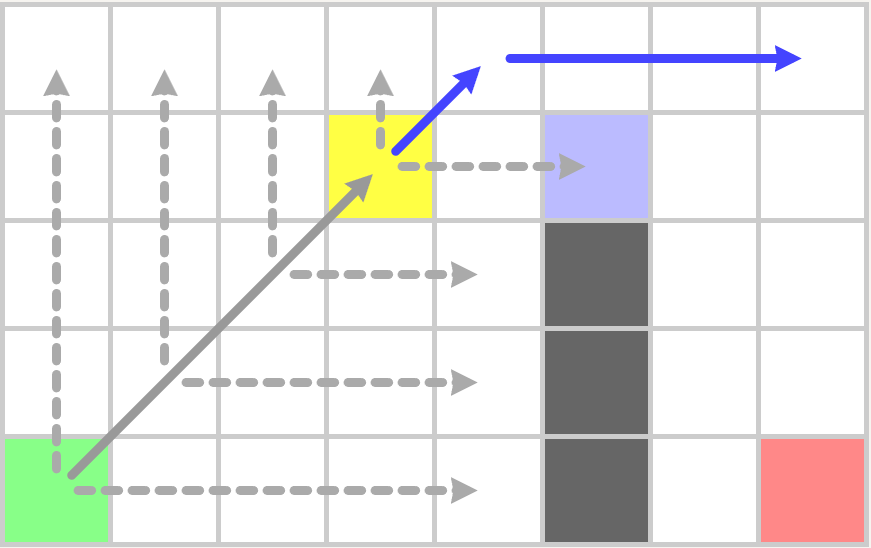
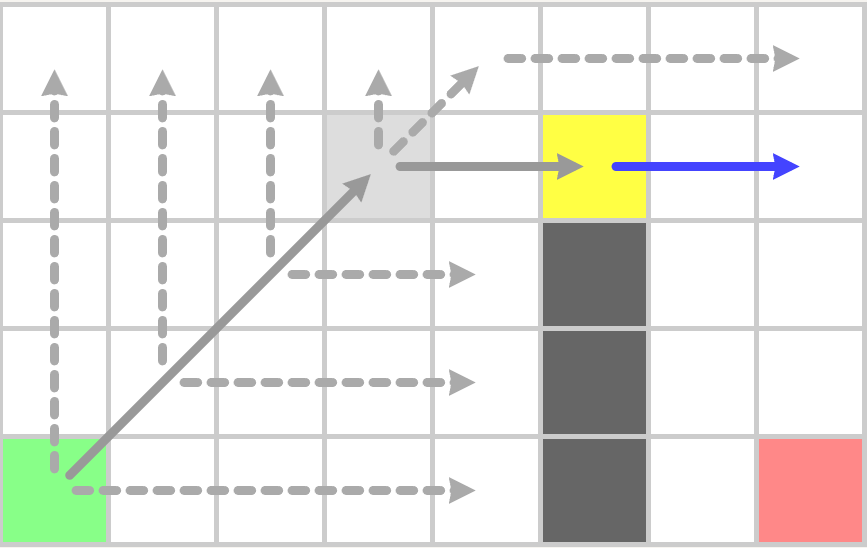
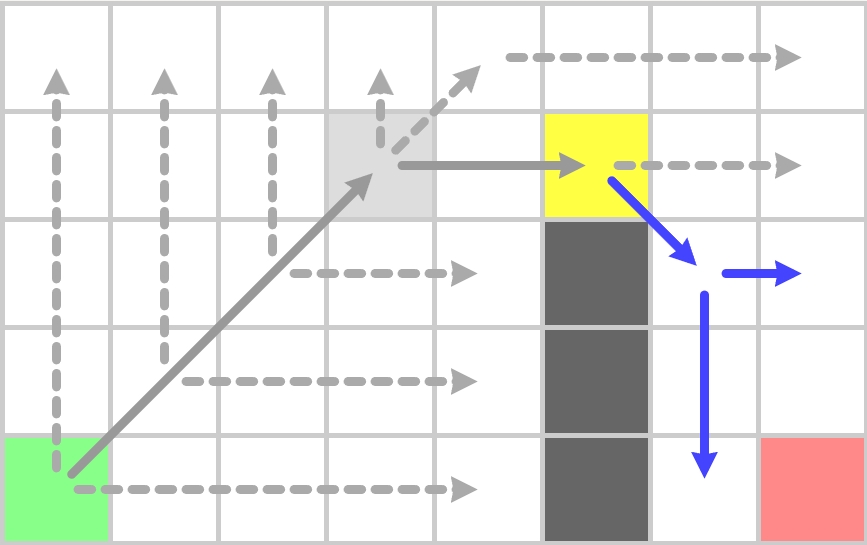
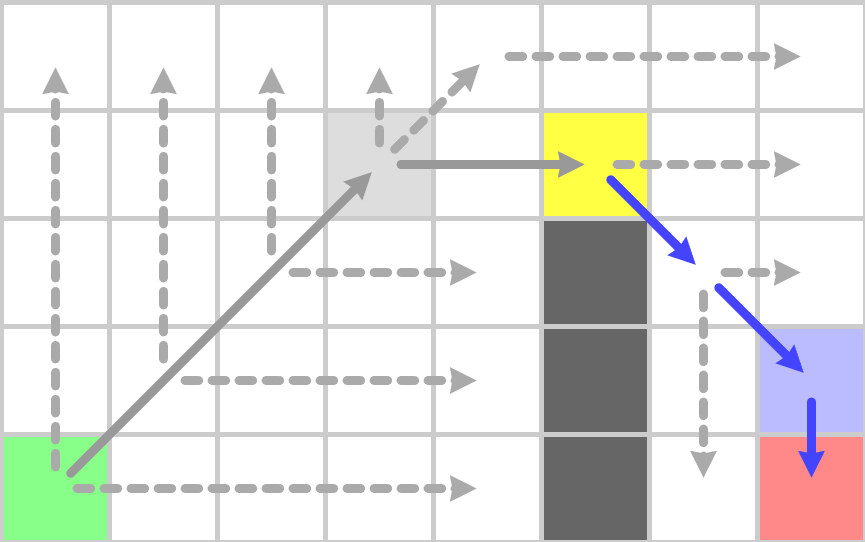
到上图之后遇到了作为终点的跳点,因此终点之前的点也为跳点,加入到OpenSet,再执行一次jps_search之后,OpenSet中只剩目标点,此时构造最终的路径:
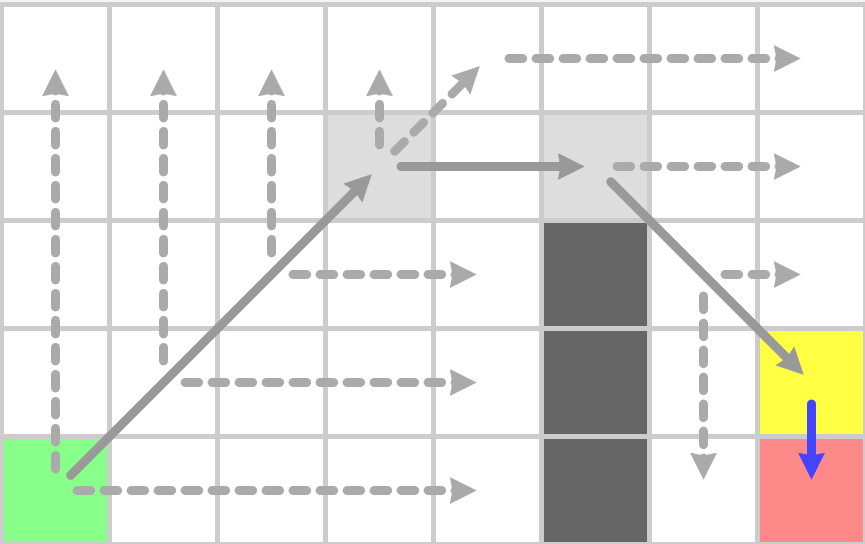
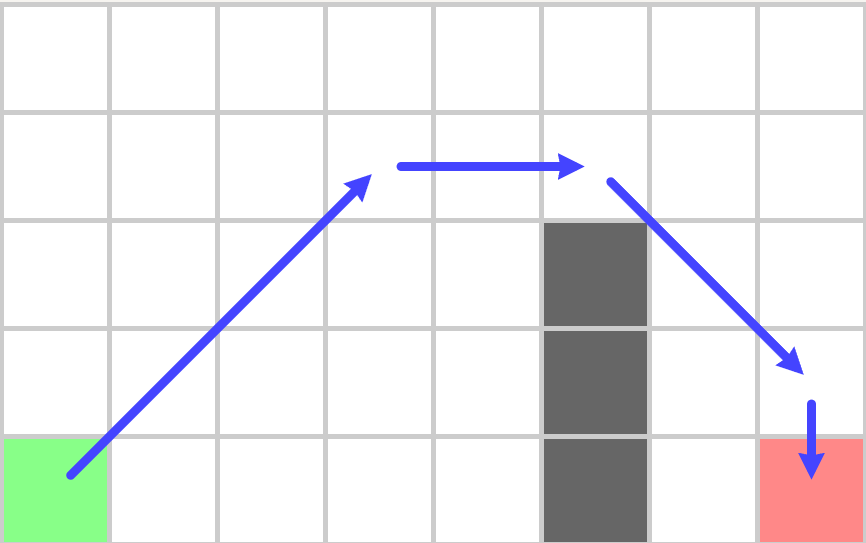
JPS算法相对与A*搜索的优越性在于其OpenSet减少了很多,因此每次迭代时从OpenSet里获取最小值代价很低。不过其CloseSet相对于A*来说增大了很多,因为其四方向坐标轴搜索很有可能探寻到地图边界,所以真正的实现中一般使用bit数组来表示CloseSet,相对于使用std::unordered_set这样可以显著的降低维护CloseSet的内存和CPU时间。
基于体素的三维空间寻路
前面章节讨论的是在二维平面上的网格寻路,然而新千年以来的新游戏基本都是在三维空间内。在三维空间内的寻路可以继续沿用我们在二维空间内网格寻路的相关经验,采用A*算法来搜索连通路径。不过此时的寻路基本单元不再是平面空间内代表长方形的的cell,而是三维空间内代表长方体的的体素voxel,原来存储节点障碍物信息的二维数组也要拓展为三维数组,寻路时查找一个节点的邻居从二维连通变成了三维联通。如果允许体素的对角线连通的话,一个体素可能的邻居节点会有26个,这大大的增加了搜索空间的膨胀速度,所以一般来说体素寻路时只允许体素进行坐标轴方向的移动,一个体素可能的邻居节点数量降低为了6个,此时A*搜索时的启发函数可以使用三维空间的曼哈顿距离,后续的讨论中我们将使用此设定。
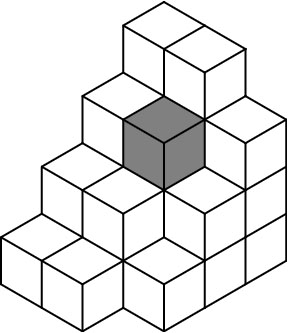
不过实际上并不会采取三维数组的形式来存储这些信息,因为其内存占用太大了。对于一个1km*1km*1km的空间,如果采用0.25m*0.25m*0.25m的立方体作为体素的大小,且每个体素占用一个字节,则整体体素的数量为4000*4000*4000字节,约为60GB,即使按照bit来存储也会消耗7GB,这种内存占用是无法接受的。考虑到一般情况下三维场景中障碍物的体积占比很小,绝大部分的体素都是不带有阻挡的,我们可以不存储非阻挡的部分来降低存储整体体素数据的内存占用。同时阻挡区和非阻挡区域很多时候都是由几何体构成的,在一定空间内是连续的。主流的利用这种阻挡体素的稀疏性和连续性的存储结构主要有两种:一种是高度场(height field),另外一种是八叉树(voxel tree)。
使用高度场存储体素
在定义高度场的存储结构之前,我们先定义一个叫span的概念,这个概念对应垂直坐标轴里一段连续的障碍物体素或者空体素:
struct span
{
int32 height:16; // 当前span的底部高度
int32 length:15; // 当前span的连续长度
int32 is_blocked:1; // 当前span是否是障碍物
};
原有的多个体素所要求的内存空间被一个只占用4个字节的span所代替,因此在内存上节省了很多。在三维空间的xz平面中我们构造一个二维的grid,grid里每个cell都包含对应平面坐标从最低点到最高点的所有span,同一个cell里的所有span按照其height增大的顺序进行排列,相邻的两个span的空间是连续的,即下面的span的height +length + 1等于上面span的height:
struct cell
{
// 最后一个span的高度为场景最大高度 is_blocked 设置为true 同时length 为1
span* span_vec;
int32 span_num;
};
struct height_field
{
std::vector<std::vector<cell>> xz_cells;
};
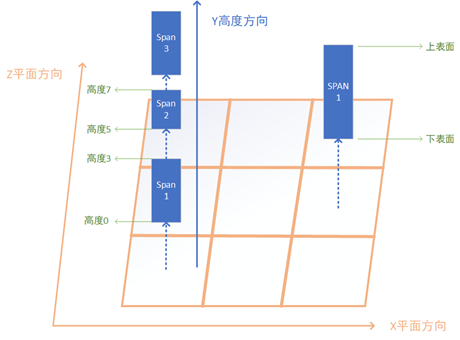
对于一个1000*1000*1000的空体素场景来说,每个cell只需要存储一个span,此时的高度场的总内存大小为1000*1000*(12 + 4)=16MB。
使用span对体素数据存储之后,内存占用减少了,但是对于寻路搜索时却增加了难度,此结构在搜索路径时引入一个重要的问题:如果找到包含(x,y,z)对应的体素的span。此时我们可以利用cell中所有span都按照height增加的方向进行排列的特性,使用二分查找即可找到对应的span。
span* cell::find_voxel(int32 y)
{
// 这里我们保证最后一个span的高度就是场景的最大高度 同时长度为0
// 所以temp_iter指向的内存区域永远有效
auto temp_iter = std::lower_bound(span_vec, span_vec + span_num, y, (const span* temp_span, int32 temp_value)
{
return temp_span->height < temp_value;
});
if(temp_iter->height == y)
{
return temp_iter;
}
if(temp_iter == span_vec)
{
return nullptr;
}
temp_iter--;
return temp_iter;
}
由于span内包含多个体素,为了记录路径搜索时路过的体素点,我们定义一个新的结构:
struct voxel_node
{
int32 x,y,z; // 体素对应的坐标
const span* voxel_span; //体素所在的span
};
接下来我们继续考虑搜索时如果遇到了一个voxel_node,如何获取其可连通的其他voxel_node:
-
对于竖直方向,直接获取当前
span里当前体素对应的的上下两个邻居体素的voxel_node加入到OpenSet,如果某个方向到达了边界,则不添加此方向的邻居体素 -
对于其他方向,计算对应的
(x,y,z),找到对应的cell,然后使用find_voxel来找到对应的span,如果此span不是阻挡体,则构造voxel_node(x,y,z,span)加入到OpenSet
采用这种方式来计算邻居并加入OpenSet会导致OpenSet变得很冗余,在一个完全连通的n*n*n的立方体区域执行两个对角的寻路会将立方体内的所有体素加入到OpenSet中,空间复杂度为距离的三次方,实际使用时这种复杂度完全无法接受。因此我们需要使用前述的JPS寻路的思想,利用span的连续性,去除冗余节点。假设当前点m在span_a中,通过span_a的另外一个点n直接连通到了xz平面相邻的某个span_b的点o,构造成了一条m->n->o的路径。此时找到m到span_b上距离最短的点i,此时我们可以证明m->i->o的路径长度一定不比m->n->o长。由于两条路径在xz平面上移动的距离一样都是1,所以我们只需要讨论这两条路径在y轴上的不同:
-
如果
m的y大于等于span_b的最大高度,则i点为span_b上高度最高的点,(m,o)之间的高度差等于(m,i)之间的高度差加上(i,o)的高度差,即m->i->o是一条从m到o的最短路径 -
如果
m的y小于span_b的最小高度,则i点为span_b上高度最低的点,(m,o)之间的高度差等于(m,i)之间的高度差加上(i,o)的高度差,即m->i->o是一条从m到o的最短路径 -
如果
m的y在span_b的高度区间内,则i点的高度等于m的高度,(m,o)之间的高度差等于(i,o)的高度差,即m->i->o是一条从m到o的最短路径
在这三种情况下我们得到了m->i->o的路径长度一定不比m->n->o长的结论,所以所有由m出发到span_b的路径中都只需要考虑i点即可,i点类似与JPS搜索中的跳点概念。所以当我们从OpenSet中选取到一个voxel_node后,获取与这个voxel_node->voxel_span直接连通的所有span,计算当前voxel_node到这些span的最近点,加入到OpenSet中。这里需要在cell上来添加一个辅助函数,来查询与[a,b)区间有交集的所有非空span:
vector<const span*> cell::find_spans(int32 a, int32 b) const
{
auto temp_span = std::lower_bound(span_vec, span_vec + span_num, a, (const span* temp_span, int32 temp_value)
{
return temp_span->height < temp_value;
});
if(temp_span != span_vec)
{
temp_span--;
}
vector<const span*> result;
while(temp_span->height < b)
{
if(temp_span->height + temp_span->length > a)
{
result.push_back(temp_span);
}
temp_span++;
}
return result;
}
对于一个span来说,其离m的最近点只有一个,所以OpenSet中元素的标识可以使用span来代替,而不是用(x,y,z)。此时基于体素的寻路搜索就变成了基于span的寻路搜索,如果目标点在当前span内,则不再执行搜索,直接将目标节点的父节点设置为当前节点,然后使用父节点信息计算起点到终点的连通路径。原来的空心立方体的对角搜索最坏情况降低到了n*n个span,如果采取对角线优先的启发距离,则可以进一步降低到2*n。
使用八叉树存储体素
前述的使用高度场来存储体素数据已经起到了很好的内存削减和寻路搜索加速的效果,不过这个高度场信息只利用了体素数据在y轴上的连续性,在xz这两个轴上的连续性没有被使用。这样就导致了在一个1000*1000*1000的空体素场景中,高度场的总内存大小为1000*1000*(12 + 4)=16MB。为了进一步利用三个轴的体素连续性,研究人员提出了八叉树(Octree)这种结构:
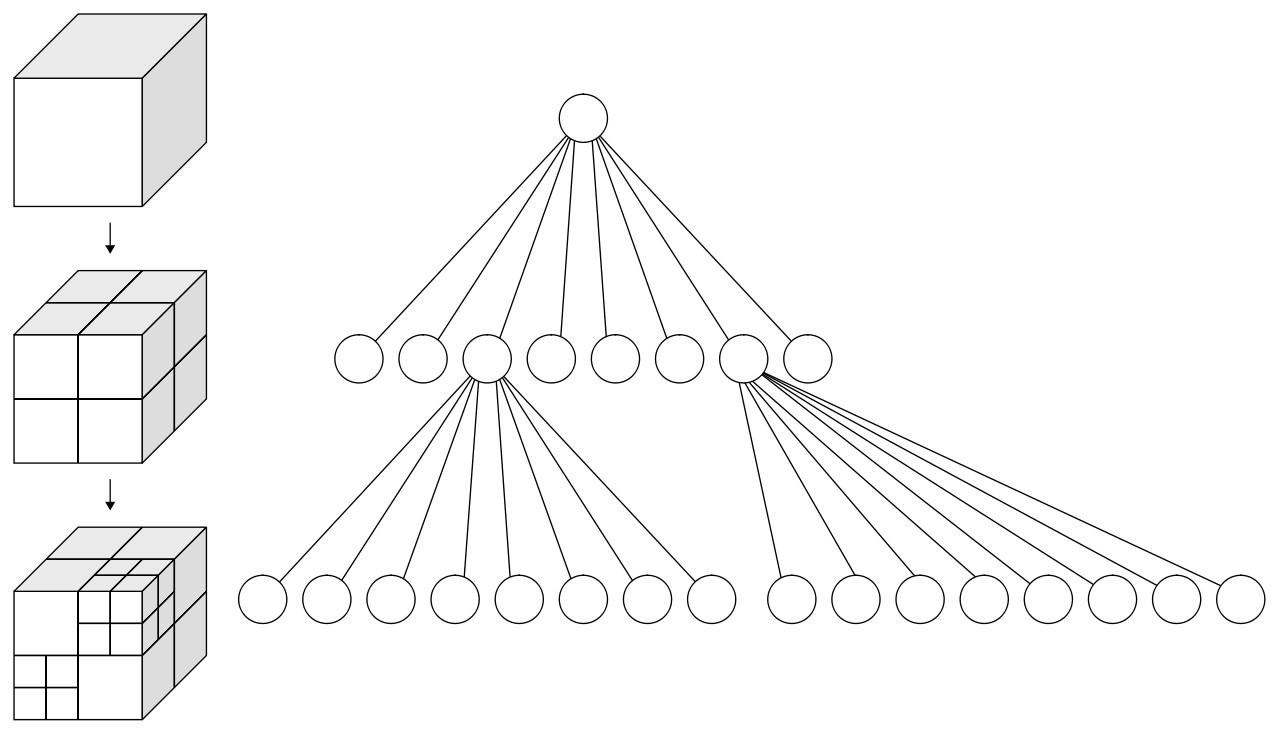
八叉树是一种树形结构,每个非叶子节点都会有八个子节点,每个节点都对应场景中的一个立方体区域,子节点的立方体边长是父节点立方体边长的一半。场景体素的八叉树存储结构采用自顶而下的方法来构建:
-
获取场景的最小立方体包围盒,构造顶层节点,并加入到未处理节点的队列之中
-
每次从队列中获取一个节点,判断这个节点对应的立方体区域是否全为阻挡或者全连通,
-
如果为全阻挡或者全连通,此时不需要继续划分子节点,只需要在当前节点设置上阻挡标记或者连通标记
-
不是全阻挡也不是全连通,需要划分为八个子节点,并将这八个新子节点加入到节点处理队列中
-
虽然这个八叉树是一个树形结构,不过实际的内存中使用的是基于数组的存储:
struct octree_node
{
uint32 x:21;
uint32 y:21;
uint32 z:21;
uint32 first_child; // 在下一个layer中他子节点的开始位置索引
uint32 parent:31; // 父节点在上一个layer中的索引 对于顶层节点来说这个值无意义
uint8 is_full_block: 1; //是否是全连通或者全阻挡 只有first_child无效时才有意义
};
struct octree_layer
{
uint32 layer_index;
float voxel_length;
std::vector<octree_node> nodes;
};
struct octree
{
std::vector<octree_layer> layers;
};
最顶层的octree_node为octree.layers.back().nodes[0]。如果octree_node有子节点,则其八个子节点按照特定的顺序在下一层octree_layer::nodes中连续排列,而octree_node->first_child则是第一个子节点在对应下一层octree_layer::nodes中的索引。如果octree_node没有子节点,则first_child设置为numeric_limit<uint32>::max()。octree_node中的(x,y,z)代表以顶层立方体包围盒最低坐标为原点,以当前octree_layer::voxel_length为体素边长计算出来的当前octree_node的体素坐标,这里为了节省空间三个坐标合并为了一个uint64,这也限制了最大层级为21。在最细粒度的体素边长为25cm时,21层所覆盖的最大边长为256km,短期内应该不会有游戏场景的大小超过此长度。
使用这样的结构来存储体素数据可以节省更多的内存占用,对于一个空场景而言只需要存储一个顶层的octree_node即可,也就几十个字节,相对于使用高度场数据的20MB来说是一个非常了不起的优化。如果一个1024*1024*1024的场景里底面最细那一层全是阻挡体,则引入的所有新节点带来的内存占用为1024*1024*2*16*8/7=36MB,而高度场需要加入的新span所需内存为1024*1024*4=4MB,加上之前空场景所需的16MB也比八叉树占用的数据小。为了继续维护内存需求小的优势,我们需要利用一个octree_node的所有八个子节点是连续分配的特点,修改相关结构体的定义:
struct voxel_pos
{
uint32 x:21;
uint32 y:21;
uint32 z:21;
};
struct octree_node
{
uint32 first_child: 28;
uint8 x_diff:1;
uint8 y_diff:1;
uint8 z_diff:1;
uint8 is_full_block:1;
};
struct first_child_info
{
voxel_pos pos;
uint32 parent;
};
struct octree_layer
{
uint32 layer_index;
float voxel_length;
std::vector<octree_node> nodes;
std::vector<first_child_info> first_child_infos;
};
这里每个octree_node不再存储其体素的(x,y,z)坐标,而是存储其体素坐标相对于其父节点的第一个子节点的体素坐标的差异值。此时第一个子节点的体素位于这八个连续子节点所代表的2*2*2立方体的最低点,其他的七个点与first_child的体素坐标差异在三个轴上最大值都是1,所以这里我们用x_diff,y_diff,z_diff三个bit来存储。同时八个子节点的排列方式按照(x_diff * 4 + y_diff*2 + z_diff)递增的顺序,这样获取了任意一个octree_node的指针A之后都可以通过A-(A->x_diff * 4 + A->y_diff*2 + A->z_diff)的形式来获取这八个连续子节点的第一个节点的指针,进而可以获得第一个节点在nodes中的索引。对于每个作为first_child的octree_node都在对应octree_layer::first_child_infos里有一个元素来存储他的完整体素坐标和父节点的偏移。利用这些信息我们可以恢复之前定义在octree_node中的parent和(x,y,z)信息:
first_child_info octree_layer::get_first_child_of_parent(const octree_node* A) const
{
auto first_child_of_A_parent = A-(A->x_diff * 4 + A->y_diff*2 + A->z_diff);
auto first_child_idx = first_child_of_A_parent->nodes.data();
return first_child_infos[first_child_idx/8];
}
uint32 octree_layer::get_node_parent(const octree_node* A) const
{
return get_first_child_of_parent(A).parent;
}
voxel_pos octree_layer::get_node_pos(const octree_node* A) const
{
auto first_child_pos = get_first_child_of_parent(A).pos;
first_child_pos.x += A->x;
first_child_pos.y += A->y;
first_child_pos.z += A->z;
return first_child_pos;
}
通过这样的优化,每个octree_node只需要占用4个字节,再平摊一下first_child_infos的开销,一个最底层的octree_node大概会引入6个字节的开销,相对于之前的16*8/7=18来说节省到了原来的1/3,这样相对于高度场来说降低了一半以上的内存消耗,继续保持了其内存占用上的优势。
搞定了内存存储结构之后,我们开始使用这个八叉树结构来使用A*搜索计算两点之间的连通路径。此时我们面临之前使用稀疏高度场同样的问题:给定一个体素坐标(x,y,z),如果获取其对应的octree_node和对应的octree_layer。这里我们可以利用八叉树的节点性质来自顶向下查询,为了让代码更简洁我们使用第一个版本的结构体定义:
std::pair<const octree_layer*, const octree_node*> octree::get_node(uint32 x, uint32 y, uint32 z) const
{
auto total_layer = m_layers.size();
vector<uint8> offsets;
while(total_layer > 0)
{
uint8 temp_offset = (x%2) * 4 + (y%2) * 2 + (z%2);
x>>=1;
y>>=1;
z>>=1;
offsets.push_back(temp_offset);
total_layer--;
}
uint32 first_child_offset = 0;
uint32 query_layer = m_layers.size();
while(!offsets.empty())
{
auto temp_offset = offsets.back();
offsets.pop_back();
const octree_node* cur_node = layers[query_layer].nodes[first_child_offset + temp_offset];
if(cur_node->first_child == std::numeric_limits<uint32>::max())
{
return make_pair(&layers[query_layer], cur_node);
}
first_child_offset = cur_node->first_child;
query_layer--;
}
assert(false);
}
如果我们在排列octree_layer::nodes的时候按照octree_node对应体素坐标的递增序,则对nodes做二分查询即可获取一个体素坐标对应的octree_node,不过此时需要先查询最底层的layer,当查询不到时再递归向上查询。如果采取了节省内存的第二个版本结构体定义的话,我们可以使用first_child_infos来进行二分查询,因为first_child_infos也是按照voxel_pos增长序排列的。
解决了voxel_pos到octree_node的映射之后,我们也顺带解决如何获取一个octree_node的六个方向邻居的问题,不过这里获取邻居节点又有其特殊性,如果某个方向邻居节点是有子节点的,我们需要获取当前邻居节点所有层级的子节点中全连通且与当前节点连接的子节点,这里我们需要一个函数来快速的判定两个带layer信息的voxel_pos对应的体素是否直接邻接:
// 计算一个voxel pos在上一层layer中父节点对应的voxel_pos
void voxel_pos::to_parent()
{
x = x>>1;
y = y>>1;
z = z>>1;
}
bool is_voxel_pos_linked(uint32 layer_a, voxel_pos pos_a, uint32 layer_b, voxel_pos b)
{
if(layer_a < layer_b)
{
swap(layer_a, layer_b);
swap(pos_a, pos_b);
}
while(layer_a != layer_b)
{
b.to_parent();
layer_b++;
}
// 在同一层级上的两个节点直接连接的条件是 x y z三个轴的差值有且只有一个是1
int64 diff_value = 0;
diff_value += abs(int64(pos_a.x) - pos_b.x);
diff_value += abs(int64(pos_a.y) - pos_b.y);
diff_value += abs(int64(pos_a.z) - pos_b.z);
return diff_value == 1;
}
至此,A*搜索时的节点定位问题和邻居查找问题都解决了。
如果场景在轴上的体素个数大于4096,八叉树的内存需求又变得严峻起来。在一个包含了4096*4096*4096的三维空间中,假如xz平面的底面平铺一层阻挡体,即使使用压缩内存版本的结构体定义,八叉树的内存占用为4096*4096*2*6=192MB。考虑到以0.25cm作为体素单位长度的情况下,4096个体素对应的边长为1km,1km*1km*1km的场景需要这样的内存需求大小还是难以接受,特别是现在游戏场景的边长都超过8km,逐渐往16km狂奔。仔细分析一下每一层的节点内存信息,发现最底层的节点数量大约是其他所有层节点数量总和的7倍,而最底层的所有octree_node是没有子节点的,所以first_child字段是可以删除的。在压缩内存的结构体定义中删除占据28bit的字段导致只剩4bit,即可以进一步节省内存到原来的1/8,从而可以将总体内存消耗降低到1/4。基于这样的字段压缩思想,游戏界提出了稀疏八叉树SVO(Sparse Voxel Octree)。SVO在字段压缩上更为激进,他将原来底下三层数据的信息合并为一层特殊的leaf_layer,同时在leaf_layer中只存储uint64,每个uint64代表一个4*4*4的体素立方体里每个体素是否是阻挡体的信息,即一个体素只需要1bit来存储。此时稀疏八叉树的结构体定义如下:
struct leaf_node
{
uint64 value;
};
struct voxel_pos
{
uint32 x:21;
uint32 y:21;
uint32 z:21;
};
struct octree_node
{
uint32 first_child: 28;
uint8 x_diff:1;
uint8 y_diff:1;
uint8 z_diff:1;
uint8 is_full_block:1;
};
struct first_child_info
{
voxel_pos pos;
uint32 parent;
};
struct octree_layer
{
uint32 layer_index;
float voxel_length;
std::vector<octree_node> nodes;
std::vector<first_child_info> first_child_infos;
};
struct svo_tree
{
vector<octree_layer> layers;
vector<leaf_node> leafs;
};
最底下一层的octree_layer里octree_node::first_child指向的是svo_tree::leafs里的偏移量。下面是一个图形化的结构示例:
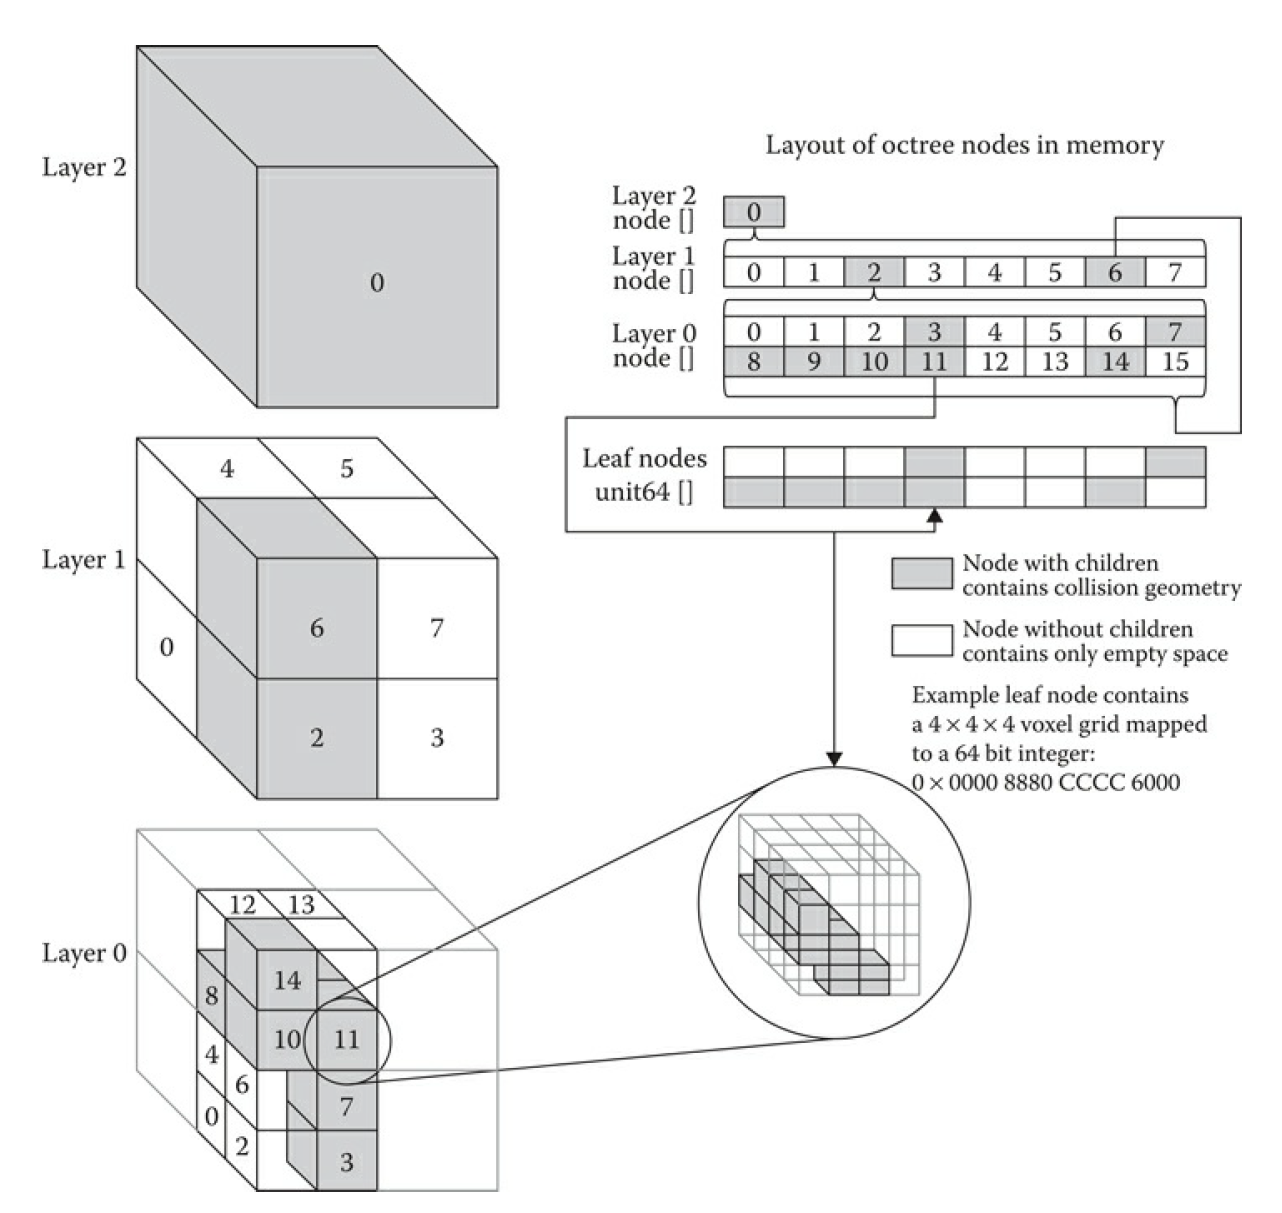
在采用此结构来存储体素数据之后,在一个包含了4096*4096*4096的三维空间中,假如xz平面的底面平铺一层阻挡体,稀疏八叉树的内存占用为(4096/4)*(4096/4)*(8+5)=13MB,相对于之前的192MB简直妙手回春医学奇迹!不过这样的内存优化也有其劣势,即路径搜索获取一个节点的邻居时,如果遇到了最下面一层的layer,需要计算邻接当前节点的leaf_node对应面的16个体素是否可以直接连通。此外加入到OpenSet里的数据还要区分是正常的octree_node还是leaf_node。为了在搜索时对这两类node做统一存储,我们定义一个svo_link的结构:
struct svo_link
{
int32 layer: 4; // 当前node所在的层级
int32 node_offset: 22; // 当前node在对应层级的nodes里的索引
int32 leaf_cube_offset: 6; // 如果layer为0 且node不是全阻挡或者全联通 则这六个bit代表对应的leaf_node value字段里的bit索引
};
由于A*搜索时如果遇到一个leaf_node需要考虑相邻的16个voxel对应的bit,最大会引入新的16个元素到OpenSet中,所以我们的启发函数最好加入一个对svo_link::layer的惩罚项,layer越小,惩罚越大。这样的启发函数设置会让路径优先使用更大粒度的octree_node,从而减少搜索时OpenSet的大小。
基于寻路网格的三维地表寻路
前面章节介绍的是一个可以六方向移动的单位如何在三维场景中使用体素数据进行寻路,可以用来解决空中寻路和水下寻路的问题。但是这种寻路方式与我们常见的游戏中的entity移动方式很不一样,常见的游戏中我们控制的角色和服务端创建的NPC都是只能在特定物体的表面进行寻路的,同时要求这些物体表面的斜率不能太大。为了解决这种最常见的地表寻路问题,我们首先需要解决如何定义三维空间中的可行走表面。例如我们可以继续利用之前定义的三维空间的高度场span体素数据,只使用可连通span的底面体素作为可行走表面,执行A*寻路时OpenSet中只支持span的底面体素。如果从span(A)的底面移动到span(B)底面面带来的体素高度差大于特定值,则认为这条连接斜率过大,不再具有连通性。加入这些限制之后,我们就可以继续用体素进行三维地表的寻路了。不过之前也提到了使用高度场会带来非常大的内存需求,1024*1024*1024的空场景都需要1024*1024*(12 + 4)=16MB的内存,在常规使用的人物地表移动所需的体素精度一般为25cm,此时16MB只能表示边长为256M的立方体区域,对于常规的2KM左右边长地图来说,所需的内存就会膨胀到160MB,完全不具有可行性。
为了使用较少的内存来解决三维地表寻路的问题,研究人员提出了寻路网格NavMesh(Navigation Mesh)这样的数据结构。在NavMesh中,可行走地表区域不再使用体素来表示,而是使用多个凸多边形Convex Polygon来表示。如果两个凸多边形之间共享了一条边,则这两个凸多边形可以通过这条边进行连通。下图中就是一个使用NavMesh表示的地图可行走区域,绿色区域代表可行走区域,亮绿色的线段表示凸多边形的边,所使用的凸多边形为三角形:
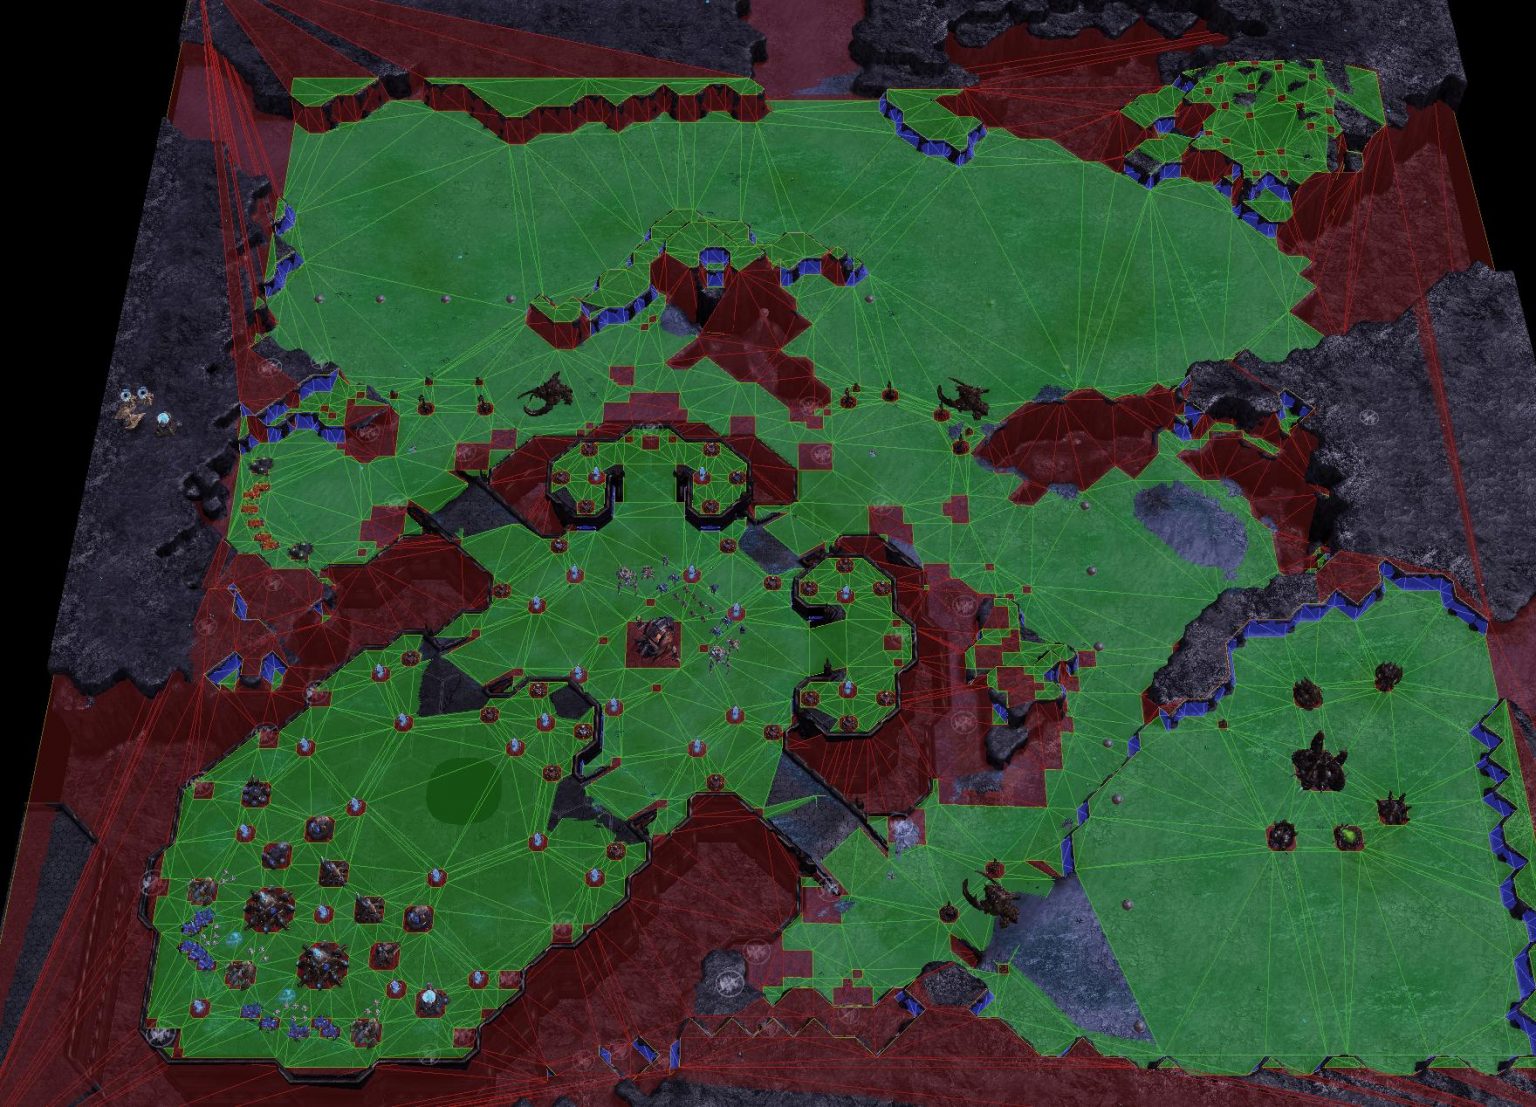
从上图中可以看出,只需要三个点组成的三角形即可描述一块非常大的平坦开阔区域。对于一个完整的空正方形场景,仅需两个三角形即可描述全场景的寻路表面,相对于直接用体素span来描述这块可行走表面来说内存节省了很多。在实际使用中的1km*1km左右的地图中,其对应的NavMesh一般不会超过1M。正因为NavMesh在内存上的优势,导致现在基本所有的游戏引擎在寻路功能上都采用基于开源的RecastNavigation来构造三维空间的地表寻路NavMesh数据。

由于RecastNavigation作为寻路的基础解决方案的重要性,本书中后续将使用一整个章节去介绍RecastNavigation的原理细节,下面将只简要介绍一下如何在二维场景中构造NavMesh的基本流程。
在二维场景中构造NavMesh我们依然需要以来grid数据,我们用特定粒度的正方形网格对地图grid进行采样,来标记grid中的可行走区域和不可行走区域。在下图中我们用一条首尾相连的曲线来描述可行走区域的边缘:
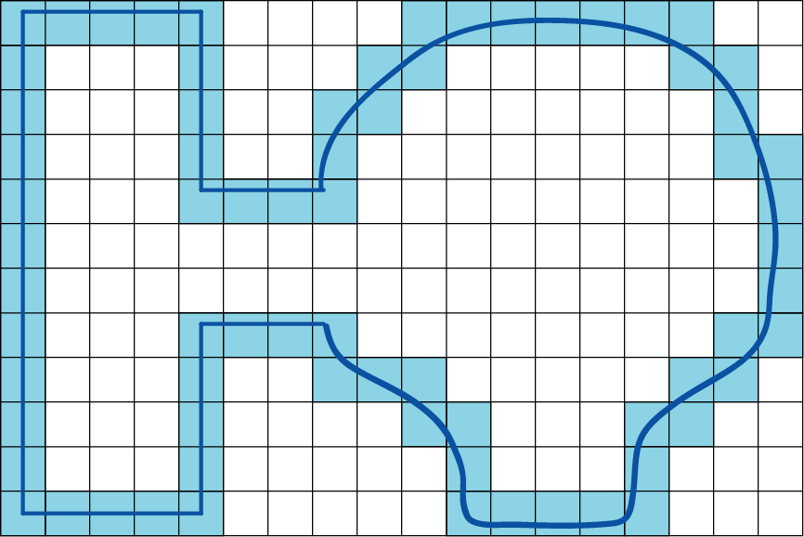
有了整个grid数据之后,我们获取整个可行走区域的内测边缘,获取一个连通线段组成的回路:
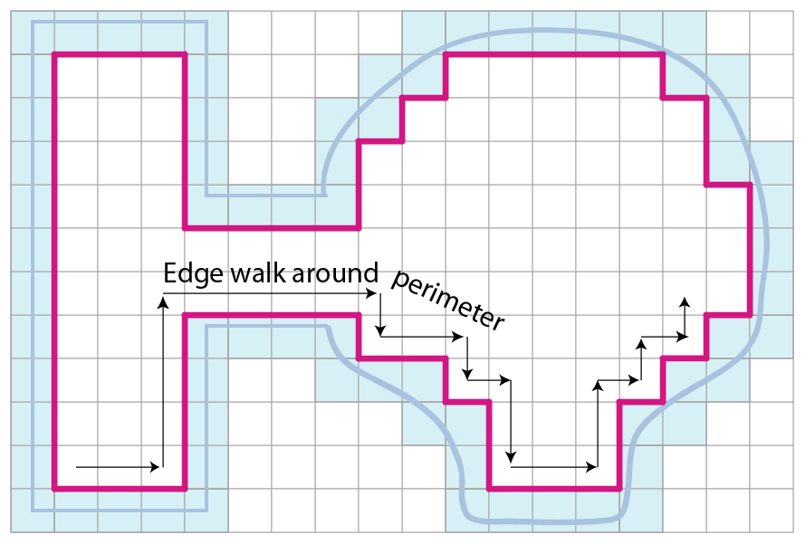
由于按照坐标轴构造的线段过于曲折,接下来按照一定的规则删除部分不必要的端点,构造一个形状基本相似的简化多边形:
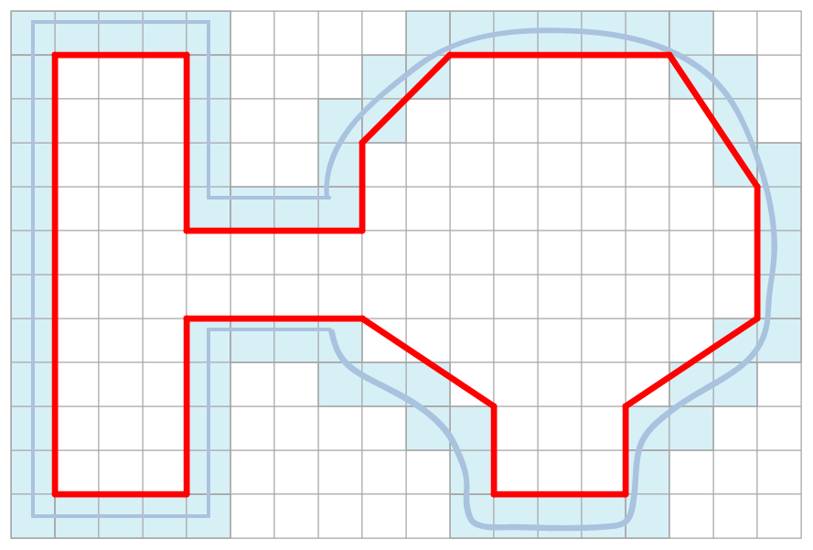
有了这个简化多边形之后,下一步需要将简化多边形切分为多个凸多边形,这里最经典的方法是使用Delaunay方法进行三角形划分。不过我们这里并不要求切分为三角形,所以采用一个基于贪心的方法。遍历每个点A,获取多边形中对应最近的点B,如果(A,B)不是一条现有的线段,则将线段加入到待处理优先队列,其优先级与线段的长度除以两点之间相连之前最短路径的长度的比值相关,比值越小,优先级越大:
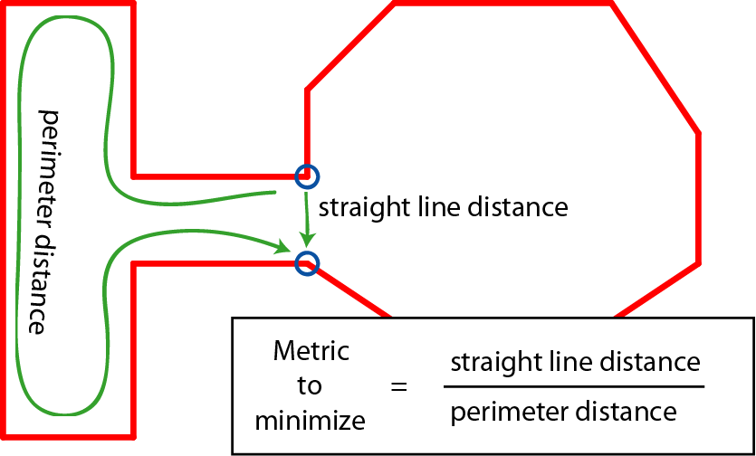
利用上述规则,构造一个多边形处理队列,初始时将原始多边形放入其中。每次从队列中拿出一个多边形,如果此多边形不是凸多边形,则获取最优分割边将此多边形切分为两个子多边形,并加入到多边形处理队列中。不断处理直到队列为空,最终形成了下图:
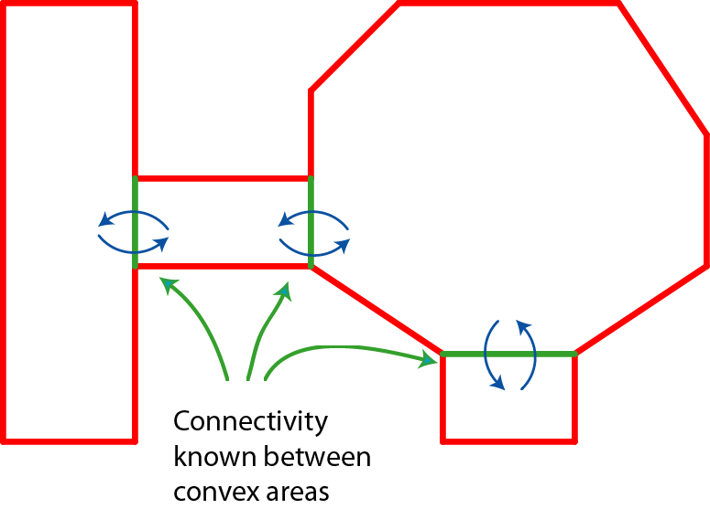
上述方法只处理了可行走区域内无阻挡区域的情况,对于有阻挡区域时,对阻挡区域的多边形里的每个点都找到场景中离其最近且原本不连通的点,如果不是已经有的边且不与现有的所有边交叉则构造新边,边的添加优先级与边的长度成反比:
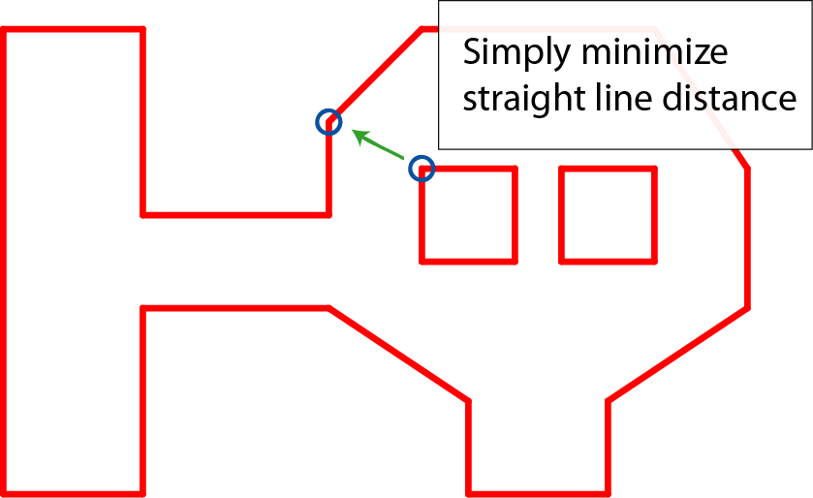
如果新添加的边形成了一个新的连通多边形,且不是凸多边形,则递归进行处理,最终得到了这样的结果:
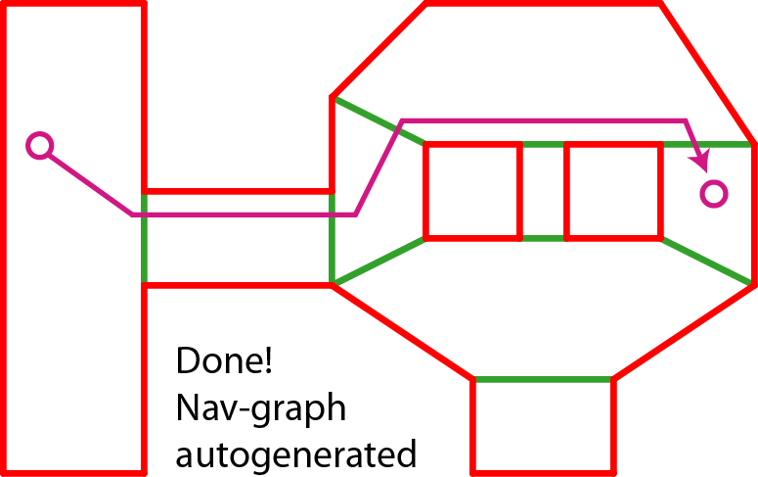
这样我们就得到了一个包含了阻挡体的NavMesh,流程看上去很简单但是其实很多细节在里面。更多的细节将在后面介绍RecastNavigation的章节中进行提及,自此我们将认为从原始地图生成NavMesh是一个已经解决了的问题。
在拥有了描述场景地表数据的NavMesh之后,用这个数据来执行点与点之间寻路的流程替换成了凸多边形之间的路径搜索。不过这里我们首先需要解决如何查找点所对应的凸多边形。
判断点在是否在凸多边形内的算法是确定的,在凸多边形的顶点按照逆时针排列成为P(0),P(1)...P(n)的时候,检查目标点P是否在所有的P(a)->P(a+1)直线直线的同一边,如果都在同一边则认为此点在凸多边形内。这里判断是否在同一边就是计算向量P(a)->P 与向量P(a)->P(a+1)的叉积的值的正负性是否不变, 如果正负性发生改变则认为不在凸多边形内。
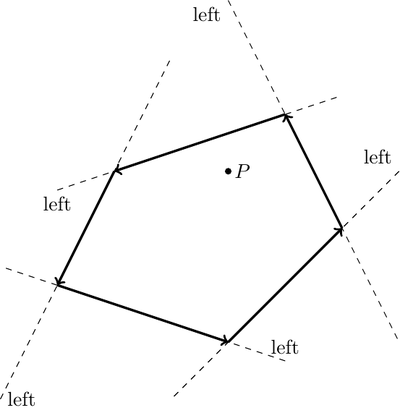
bool IsInConvexPolygon(Point testPoint, vector<Point> polygon)
{
//Check if a triangle or higher n-gon
Debug.Assert(polygon.size() >= 3);
//n>2 Keep track of cross product sign changes
auto pos = 0;
auto neg = 0;
for (auto i = 0; i < polygon.size(); i++)
{
//If point is in the polygon
if (polygon[i] == testPoint)
return true;
//Form a segment between the i'th point
auto x1 = polygon[i].X;
auto y1 = polygon[i].Y;
//And the i+1'th, or if i is the last, with the first point
auto i2 = (i+1)%polygon.Count;
auto x2 = polygon[i2].X;
auto y2 = polygon[i2].Y;
auto x = testPoint.X;
auto y = testPoint.Y;
//Compute the cross product
auto d = (x - x1)*(y2 - y1) - (y - y1)*(x2 - x1);
if (d > 0) pos++;
if (d < 0) neg++;
//If the sign changes, then point is outside
if (pos > 0 && neg > 0)
return false;
}
//If no change in direction, then on same side of all segments, and thus inside
return true;
}
有了这个判定方法之后,我们可以通过遍历NavMesh内的所有凸多边形执行上述函数来获取目标点所在的凸多边形,但是这样做的话效率太低了。我们需要一个更加快速的查询结构来应对静态Mesh场景中点对应的凸多边形查询,游戏中经常用层次包围体BVH(Bounding Volume Hierachy)这样的结构。所谓包围体Bounding Volume就是一个可以将任意几何体包围的简单形状,常见的包围形状包括轴对齐包围盒(axis-aligned bounding box,AABB 包围盒)、包围球(bounding sphere)以及定向包容盒子(Oriented Bounding Box,OBB)等。为了实现上讨论简单我们这里只使用AABB的包围盒,因为计算时只需要获取多边形内所有点在所有轴的最大最小值即可。
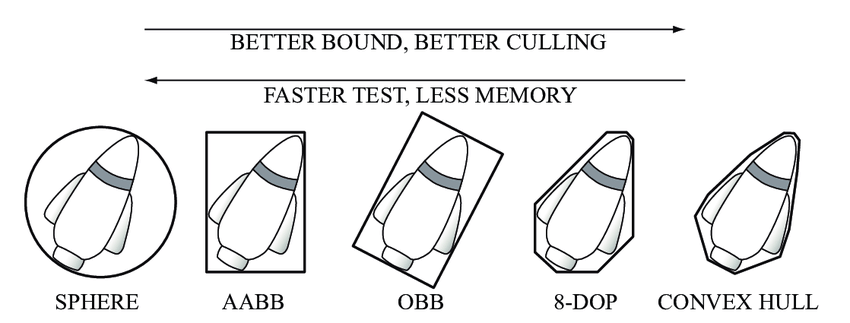
所谓的层次包围体技术 指的是将所有包围体分层逐次地再次包围,获得一个更大的包围体,直到包围住所有物 体。
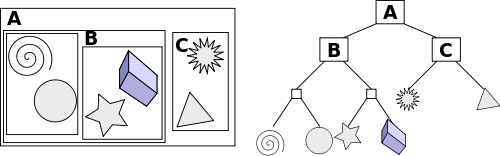
构建BVH树的算法比较简单,采用的是一个自顶而下的树形构建方法:
- 初始时构造一个节点,节点内包含所有的多边形,
- 然后选用一条与轴平行的直线,将所有的多边形按照多边形包围盒中点在直线的左右侧进行分割,生成左侧多边形集合和右侧多边形集合,
- 分别构造左右子树对应这两个集合并递归的进行
BVH构建,直到集合内多边形数量大小小于特定值(例如5)。 - 构造完成之后,每个叶子节点计算其内部的所有多边形的包围盒的并集,作为此叶子的包围盒大小
- 每个非叶子节点的包围盒为两个子节点的包围盒的并集
上述算法的核心就是如何在步骤2中选取一条合适的与轴平行的直线,使得两个子树的大小均衡。实践中会采用这样的方法来选取:
- 首先获取节点对应的多边形集合在各个轴上所占据的区间的并集,计算轴上覆盖的长度,选取覆盖长度最长的轴
- 获取节点对应的多边形集合的包围体中心坐标在所选取的轴上的投影值集合,获取其中的中位数作为结果直线的坐标值
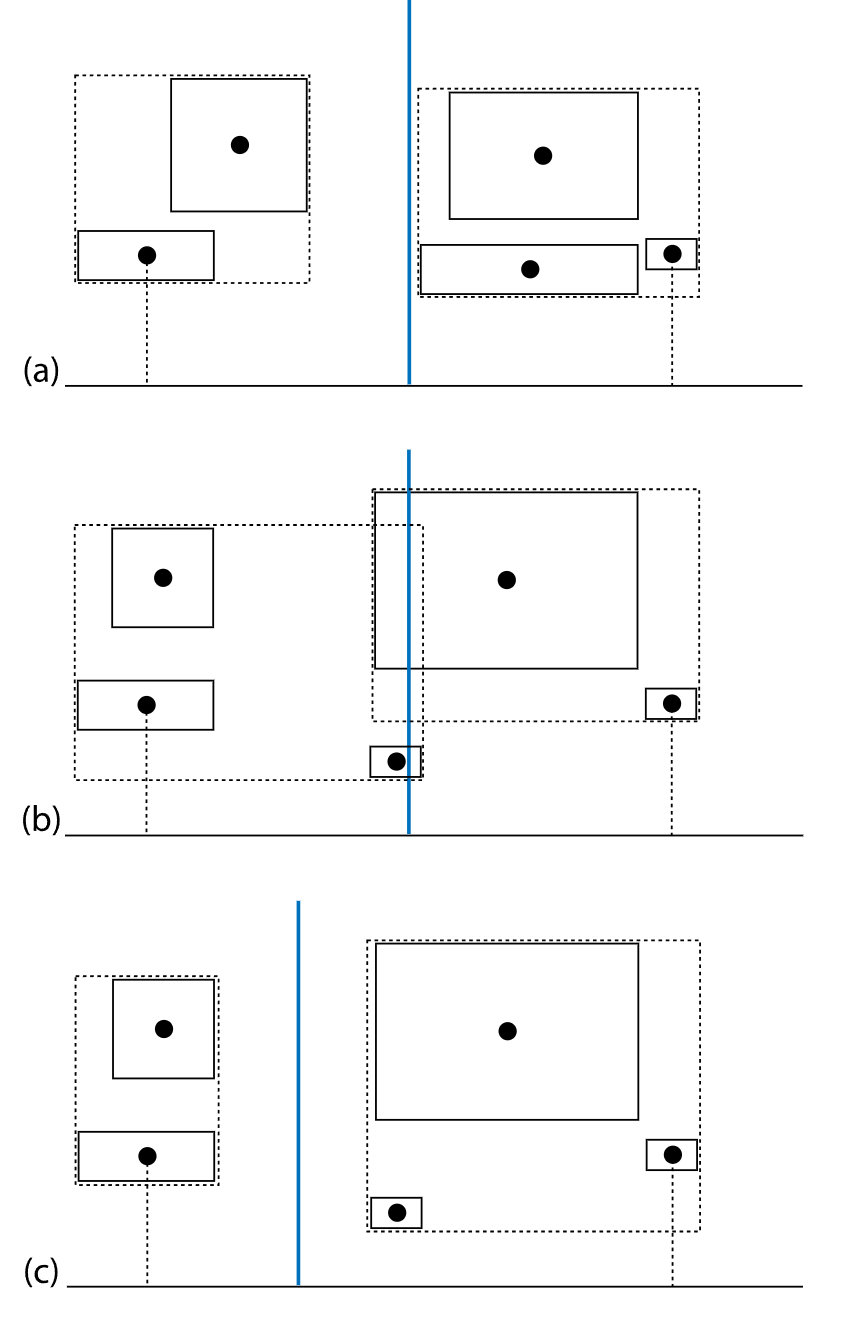
第一步的耗时与多边形数量成简单线性关系,第二步的计算可以直接使用std::nth_element来计算中位数,时间复杂度也是多边形数量的简单线性。所以自顶向下构造BVH的时间复杂度类似与快速排序的时间复杂度。对于静态场景的离线计算来说这样的时间复杂度是非常优秀的,而且其占用的内存只是原始多边形数据的几分之一。
有了BVH之后我们就可以快速的进行查询点所在的凸多边形了:
- 首先构造一个节点队列,将
BVH根节点放入队列中 - 每次从队列中
POP一个节点,检查目标点是否在此节点的包围盒中,如果在包围盒内- 如果当前节点不是叶子节点,则将当前节点的两个叶子节点放入节点队列等待后续处理
- 如果当前节点是叶子节点,遍历当前叶子节点内存储的凸多边形列表,使用凸包算法判定点是否在凸多边形内,如果在则作为结果返回
- 如果队列为空 则代表节点无对应的凸多边形
整体流程就是一个二叉树的递归下降流程,不过这里又有点不同,因为一个节点的左右两个子节点都可能会进入处理。所以查询的最优时间复杂度等价于树高,最坏时等价于整体多边形集合的大小,不过正常情况下的执行时间跟最优复杂度差不多。如果想构造更为均衡的BVH树来执行查询,可以参考使用基于表面积启发SAH((Surface Area Heuristic)的划分方法,具体细节参考PBRT的关于BVH的内容
解决了获取点对应的凸多边形这个问题之后,使用NavMesh计算寻路就是在计算凸多边形的连通路径。这里可以继续使用我们在A*搜索上的相关经验,不过在最终的路径生成时还需要结合NavMesh自身的一些特性来做优化。以下图中的NavMesh为例,我们要执行一次从C1到C8的连通路径查询:
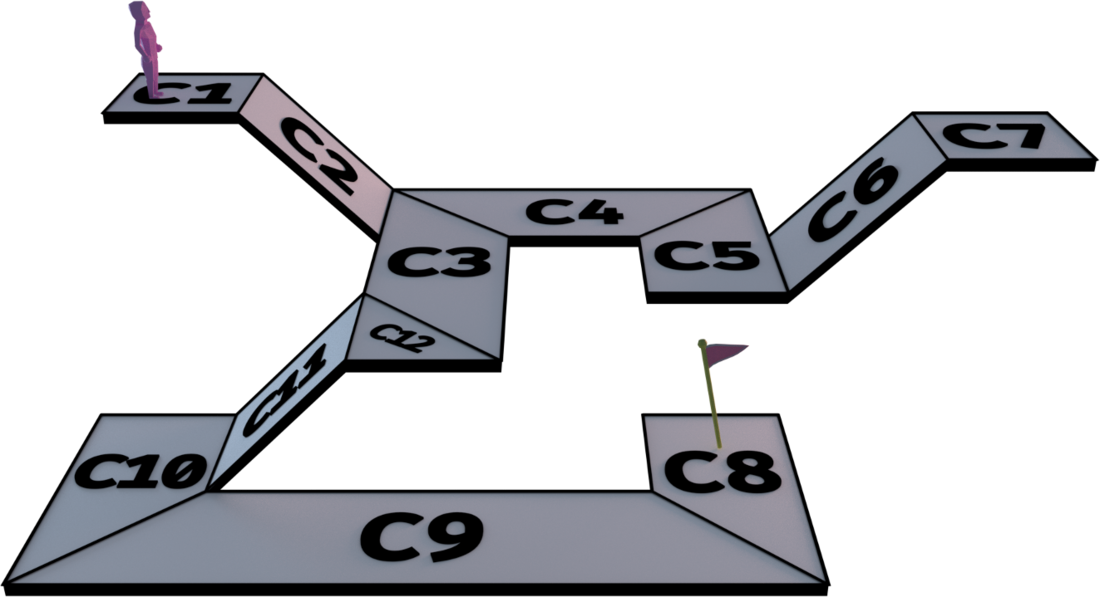
根据共享边决定的凸多边形连通性,我们可以获得下面的这个红色多边形路径:
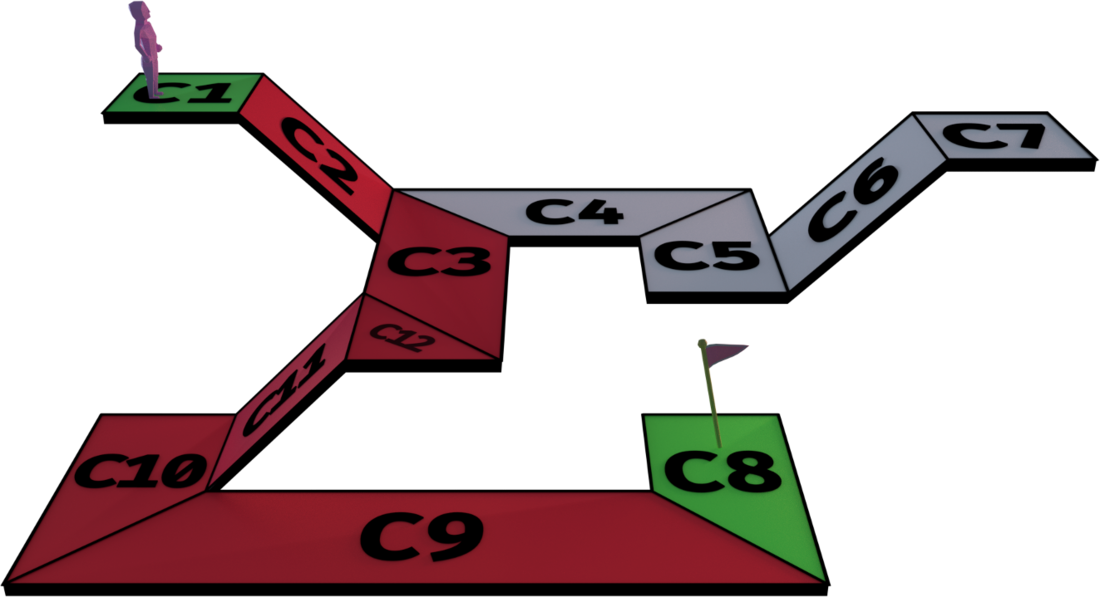
获取多边形路径之后我们获取相邻的两个多边形所共享的边,如下图中的粉色线段所示:
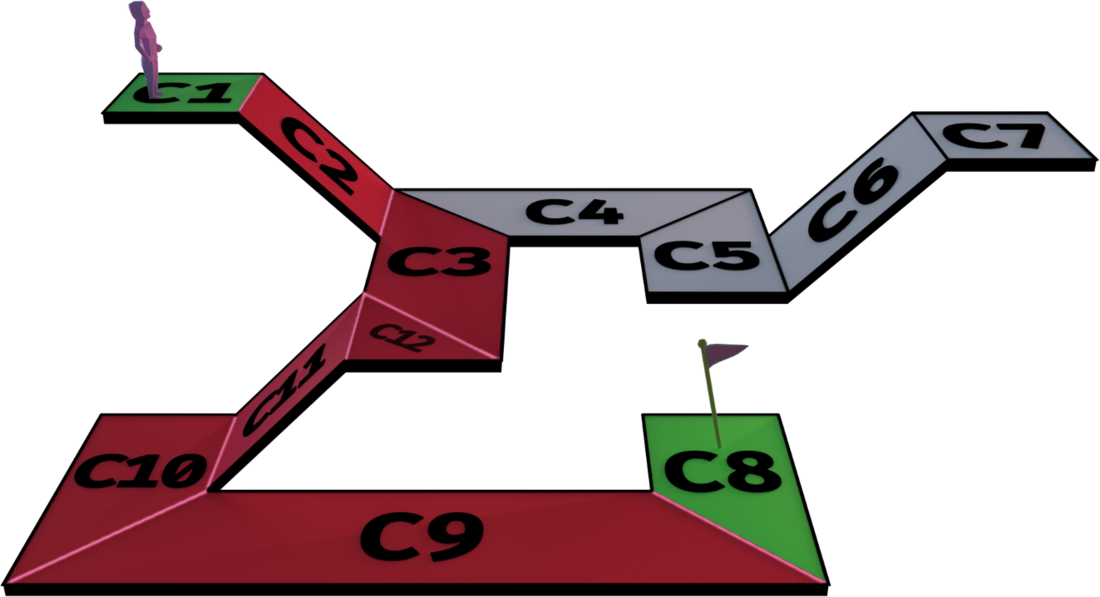
有了这些边之后我们可以很方便的构造出由线段组成的路径:选取每个多边形在连通路径上的两个共享边,将两条边的中点进行连接,并将起点和终点拼接到首尾,最终形成了下图中的橙色路径。
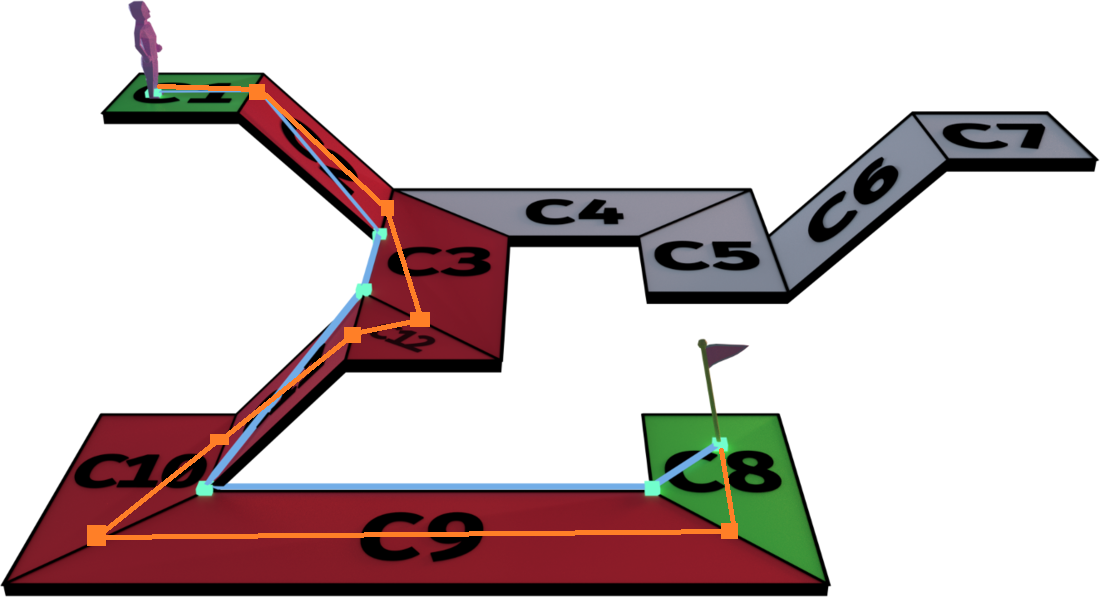
但是我们观察上图发现,浅蓝色路径也是一条通过多边形路径的线段路径,同时这条路径的总长度比黄色路径短很多。事实上经过首尾两点并通过指定多边形列表的线段路径有很多条,例如将多边形的重心连接起来也是一条满足需求的路径。为了找到连通两点并经过指定连通多边形路径的最短线段路径,我们需要使用拉绳算法。这个算法执行的是一个贪心过程,算法目标是计算出路径中所有的拐点,也就是线段之间的连接点。我们的目的是尽可能的减少拐点,以达到路径平滑同时路径最短的目的。算法的具体流程见下图:
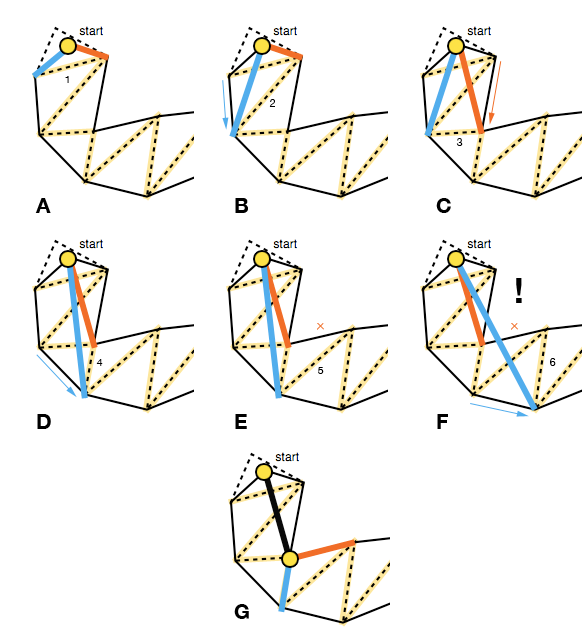
初始的时候我们需要如下参数:
-
start作为寻路的起点 -
left,right作为中间临时变量 他们与start围成的三角形记录可行走区域 -
polys记录剩下的还未探索的多边形
初始时可以把left right 设置为第一个Poly边上的两点, 即A图。接下来,需要依次移动左右两条边,按顺序处理路径上的Poly。每次遇到一条新的边,考察这个边的left2 right2与start之间的连线与原来的left right线段之间的关系。其实left2 right2总是会有一个点与left right重合,所以只需要考虑新加入的节点即可。
-
如果新加入的节点与
start之间的线段与原来的left->right线段相交,则更新left right为left2, right2,即缩小可行走三角形区域 如上图中的B, C,D -
不相交的话,我们需要将
left right里与left2 right2重合的点设置为拐点,加入到拐点路径里, 然后将这个点当作新的start,下一条Poly边的left right作为新的left right,一路迭代下去, 如图F G
整个算法一路迭代,处理了最后一个多边形之后,判断最后一个拐点是否在此多边形与终点所在的多边形共享边上:
- 如果在共享边上,则直接拼接终点到已经计算出来的路径之后作为最后的起点到终点之间的连通路径。
- 如果不在共享边上:
- 如果最后一个拐点与终点之间的线段不会离开连通路径中的多边形,则直接把终点加入到拐点最后,生成一条连通路径
- 如果连线会离开连通路径中的多边形,则选择拐点经共享边两个端点连接到终点的这两条路径中的长度最小者,作为最后的拐点,并把终点拼接到最后,生成一条连通路径
对于三维场景中的凸多边形列表,我们可以将这些凸多边形都投影到xz平面,再执行上述算法。获取平面路径之后,再计算这条路径与平面投影共享边相交的点,将这些点转换为三维平面对应共享边的点之后,插入到原有路径中,即可获取三维场景中拉绳算法计算出的最短路径。
Recast Navigation 详解
Recast Navigation自2012年开源在github上之后,由于其生成NavMesh的速度快,运行时内存占用小,接入方便等有点,迅速的成为了游戏业界三维场景地表寻路的标准解决方案。两大主流游戏引擎Unity、Unreal以及网易的Messiah、NeoX引擎等自带的寻路方案都是基于开源版本进行的修改迭代而来。由于Recast Navigation作为寻路解决基础方案的重要性,我们将在本章节中对其生成NavMesh的工作流程进行详解,方便理解其原理以及后续的参数调优。
recast navigation 的基本步骤
recast navigation软件按照功能可以分为三个部分:
- 负责生成场景对应
NavMesh的recast部分 - 使用
NavMesh来执行连通路径寻找的detour部分 - 使用连通路径驱动多个寻路
entity位置更新的DetourCrowd部分
此外此软件自带一个可视化的编辑器RecastDemo来展示recast和detour的各阶段执行结果。
本章内容主要介绍其中的Recast部分,Detour和DetourCrowd部分将在后面的群体寻路章节中进行介绍。在这个RecastDemo程序中,我们首先需要导入obj格式的场景文件:
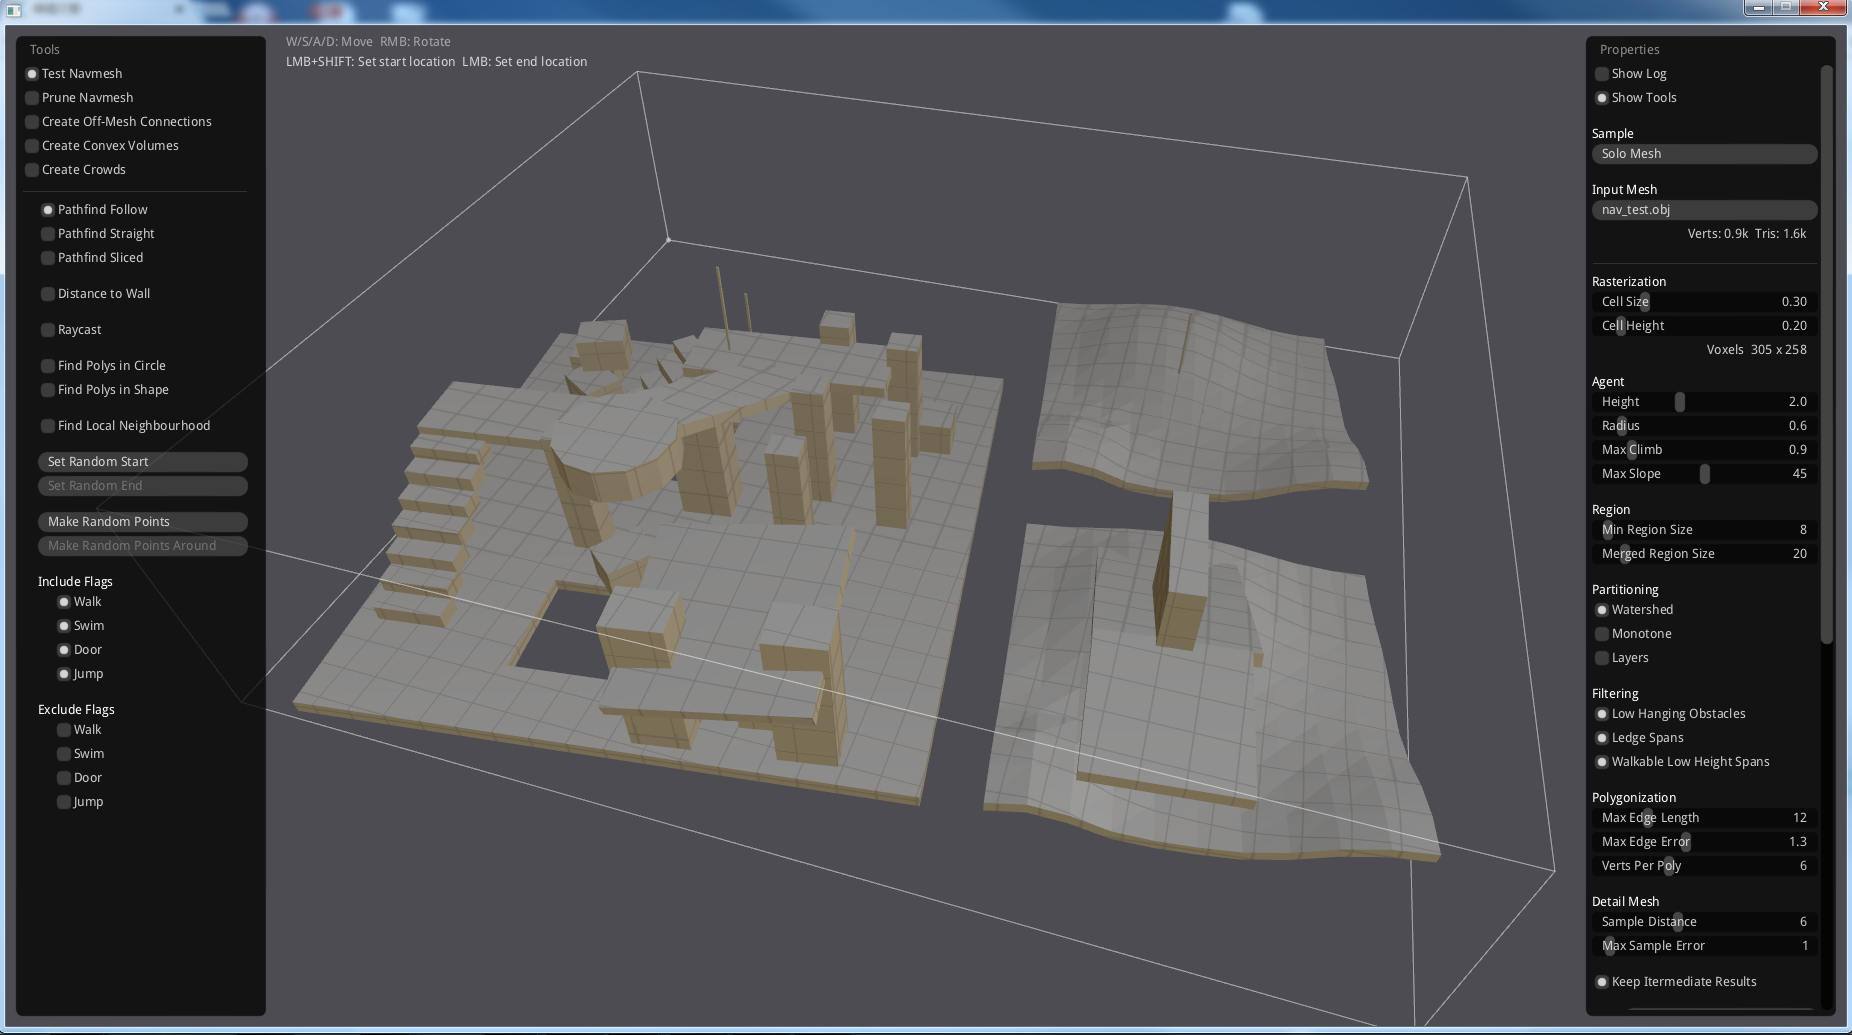
导入完成之后,配置好相关的参数,再点击生成按钮,即可获取如下的带NavMesh可视化的结果,图中的浅蓝色区域代表NavMesh中的多边形构造的可行走表面:
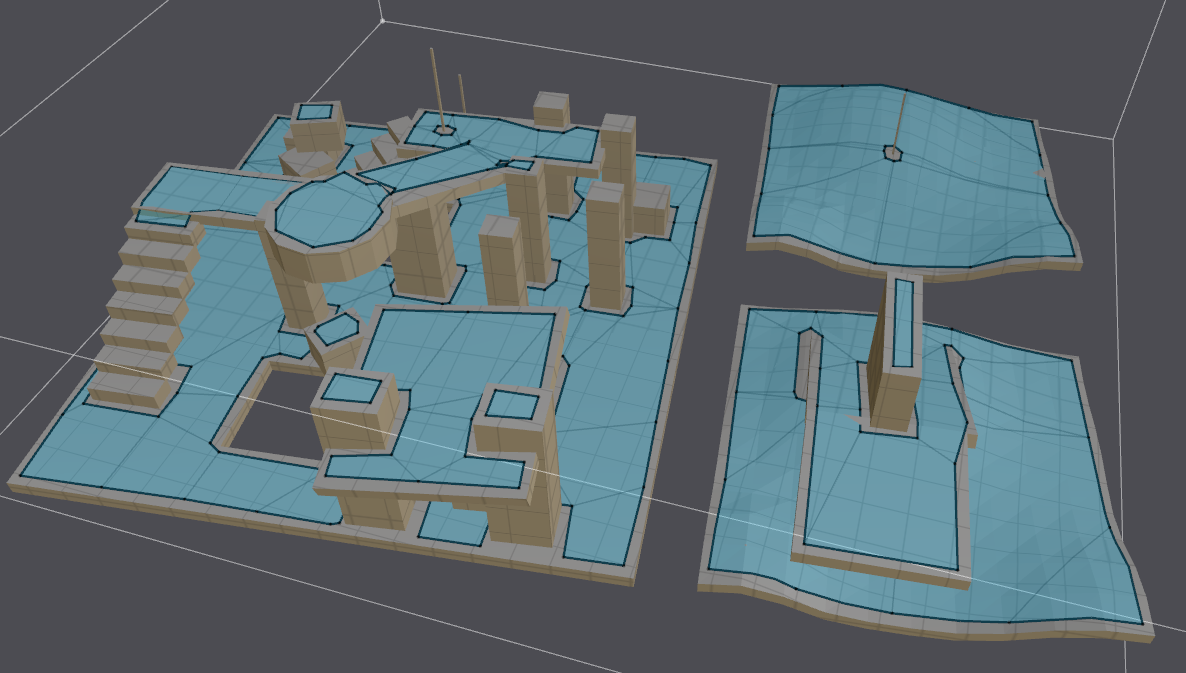
当然从场景数据生成NavMesh的过程并不是点击几下按钮这么简单,它其实包括了如下几个步骤:
- 导入场景并配置生成
NavMesh的相关参数
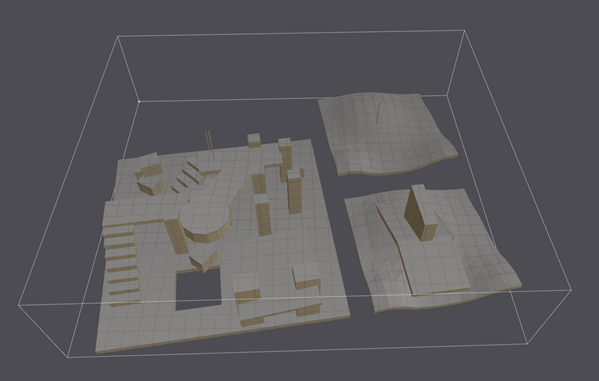
- 将场景进行体素化
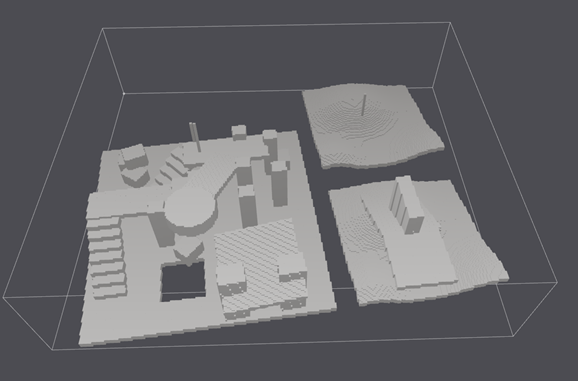
-
筛选可行走表面 这里主要过滤掉一些会引起圆柱体寻路时与环境穿插的情况
-
将可行走表面拆分为多片连续的区域,下图中每个颜色代表一个区域,每条黑色的弧形边代表对应的两个区域连通
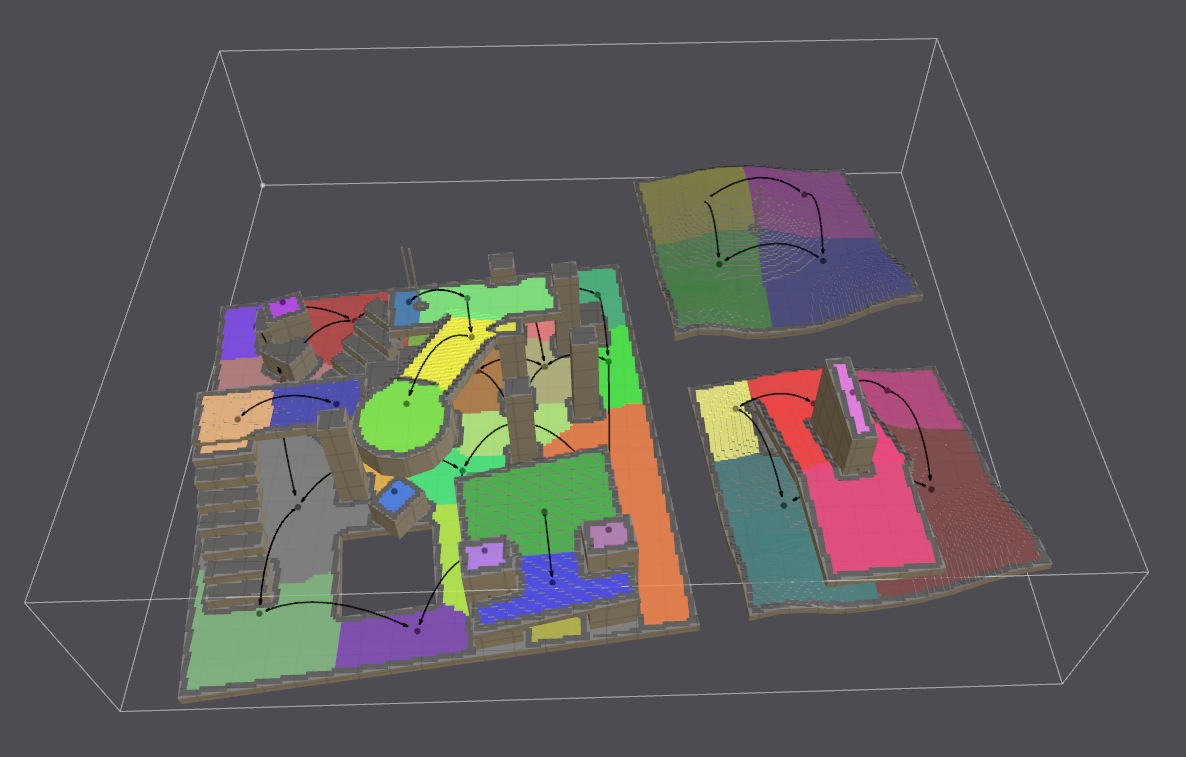
- 将各个区域的轮廓进行平滑,减少用来后续要处理的顶点数量
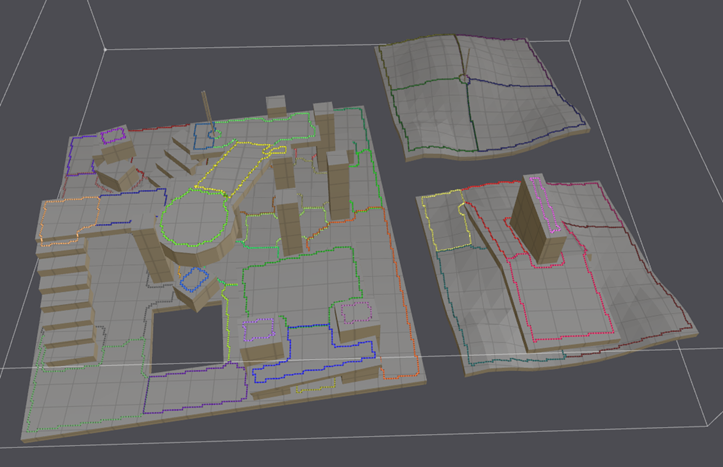
- 对各个区域进行三角划分,然后执行三角合并,生成凸多边形
Mesh

- 创建细节
Mesh数据以贴合地表
- 生成最后的导航网格
后续我们将对这八个步骤对照源代码进行详解。
加载场景数据
Recast支持的场景描述文件为Wavefront格式的OBJ文件,在源码目录的RecastDemo/Bin/Meshes里提供了多个样例文件。这个OBJ格式规范比较简单,是基于行的文本文件。OBJ文件由一行行文本组成,注释行以一个#为开头,空格和空行可以随意加到文件中以增加文件的可读性。有字的行都由一两个标记字母也就是关键字(Keyword)开头,关键字可以说明这一行是什么样的数据。多行可以逻辑地连接在一起表示一行,方法是在每一行最后添加一个连接符\。Recast支持了下面几种基本关键字:
v几何体顶点(Geometric vertices)后续接着三个浮点数代表这个顶点的坐标,例如v -0.58 0.84 0,所有的顶点都会赋予一个隐式的递增编号,编号的值为此顶点的出现顺序,第一个编号为1vn顶点法线(Vertex normals)后续接着三个浮点数代表此法线的坐标,例如vn 0.000000 -1.000000 0.000000,这个顶点法线也有一个隐士递增编号,规则与几何体顶点一样vt贴图坐标点(Texture vertices)后续接着两个浮点数,例如vt 0.0 0.5,贴图坐标点也有类似于几何体顶点的编号规则f代表多边形的面 后续接着多个个三元组, 每个三元组都有一个整数,分别索引到几何体顶点、顶点法线、贴图坐标点,样例f 1/1/1 2/2/2 4/4/3就声明了一个三角形,多边形内的点的坐标以逆时针排列
recast加载OBJ格式文件的代码在bool rcMeshLoaderObj::load(const std::string& filename)中,其加载逻辑忽略了所有的vn、vt分量,同时对于读取到的多边形面数据,进行拆分为多个三角形:
nv = parseFace(row+1, face, 32, m_vertCount);
for (int i = 2; i < nv; ++i)
{
const int a = face[0];
const int b = face[i-1];
const int c = face[i];
if (a < 0 || a >= m_vertCount || b < 0 || b >= m_vertCount || c < 0 || c >= m_vertCount)
continue;
addTriangle(a, b, c, tcap);
}
添加完成所有的三角形之后,再分别计算每个三角形的面法线数据:
// Calculate normals.
m_normals = new float[m_triCount*3];
for (int i = 0; i < m_triCount*3; i += 3)
{
const float* v0 = &m_verts[m_tris[i]*3];
const float* v1 = &m_verts[m_tris[i+1]*3];
const float* v2 = &m_verts[m_tris[i+2]*3];
float e0[3], e1[3];
for (int j = 0; j < 3; ++j)
{
e0[j] = v1[j] - v0[j];
e1[j] = v2[j] - v0[j];
}
float* n = &m_normals[i];
n[0] = e0[1]*e1[2] - e0[2]*e1[1];
n[1] = e0[2]*e1[0] - e0[0]*e1[2];
n[2] = e0[0]*e1[1] - e0[1]*e1[0];
float d = std::sqrt(n[0]*n[0] + n[1]*n[1] + n[2]*n[2]);
if (d > 0)
{
d = 1.0f/d;
n[0] *= d;
n[1] *= d;
n[2] *= d;
}
}
上面循环中的e0,e1代表三角形的两条首尾相连逆时针的边,而n则是这两个向量计算出来的叉积,这个叉积的方向一定是与当前面垂直的,同时代表当前面的正向,最后再单位化。
同时在RecastDemo中为了支持点击获取三角形的操作,还对加载好的OBJ文件做了一个BVH结构,创建了一个rcChunkyTriMesh来加速点选查询:
#define float float
bool rcCreateChunkyTriMesh(const float* verts, const int* tris, int ntris,
int trisPerChunk, rcChunkyTriMesh* cm)
参数中的verts存储了所有的节点,tris存储了所有的三角形面,ntris代表有多少个三角形,trisPerChunk代表BVH树的叶子节点里存储的三角形的数量。这个函数初始时需要构造好所有的BVH Node和所有三角形的AABB Bound:
struct BoundsItem
{
float bmin[2];
float bmax[2];
int i;
};
int nchunks = (ntris + trisPerChunk-1) / trisPerChunk;
cm->nodes = new rcChunkyTriMeshNode[nchunks*4];
if (!cm->nodes)
return false;
cm->tris = new int[ntris*3];
if (!cm->tris)
return false;
cm->ntris = ntris;
// Build tree
BoundsItem* items = new BoundsItem[ntris];
if (!items)
return false;
for (int i = 0; i < ntris; i++)
{
const int* t = &tris[i*3];
BoundsItem& it = items[i];
it.i = i;
// 这里有一些代码负责计算三角形的在XZ平面的AABB bound 直接忽略了高度轴Y轴
}
这里引入了两个结构体:
struct BoundsItem
{
float bmin[2];
float bmax[2];
int i;
};
struct rcChunkyTriMeshNode
{
float bmin[2];
float bmax[2];
int i;
int n;
};
BoundsItem就代表一个只在XZ平面的AABB包围盒,而rcChunkyTriMeshNode代表BVH树之中的节点,这里除了有包围盒信息之外,还有两个字段i,n:
i如果为非负数则代表这个节点是叶子节点,i的值就是其包含的多个连续三角形在cm->tris的开始索引,此时n则代表内部包含的三角形的个数i如果为负数,则其绝对值代表其下面各个层级的子节点的总数,
这里不存储左右两个子节点的偏移量是因为左子节点相对于当前节点的偏移量永远是1,即使用了下图的存储方式
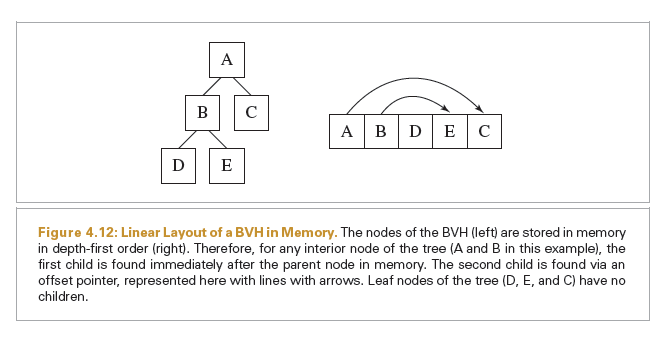
这里用一个连续的数组来存储BVH树。做好这些准备工作之后,开始调用subdivide函数执行BVH的递归划分过程:
int curTri = 0;
int curNode = 0;
subdivide(items, ntris, 0, ntris, trisPerChunk, curNode, cm->nodes, nchunks*4, curTri, cm->tris, tris);
delete [] items;
cm->nnodes = curNode; //存储最终使用了多少个节点
这个函数的签名如下:
static void subdivide(BoundsItem* items, int nitems, int imin, int imax, int trisPerChunk,
int& curNode, rcChunkyTriMeshNode* nodes, const int maxNodes,
int& curTri, int* outTris, const int* inTris)
这里需要讲解一下相关的参数定义:
items代表存储mesh中所有三角形包围盒的数组开始指针,递归时此参数不变nitems代表mesh中三角形的个数,递归时此参数不变imin代表当前节点要处理的三角形的开始索引imax代表当前节点要处理的三角形的结束索引trisPerChunk代表叶子节点里存储的三角形最大个数,递归时此参数不变curNode,代表当前的BVH节点的索引,每次执行subdivide之后这个值都会递增,这样就做到了一个节点内的所有子节点都是连续分配的nodes代表BVH节点的存储数组,递归时此参数不变maxNodes代表nodes里最大可用索引,递归时此参数不变curTri代表下一个可以使用的存储三角形顶点序列数组的索引outTris代表存储三角形顶点序列的数组开始地址,递归时此参数不变inTris代表最开始mesh中三角形的存储数组开始地址
了解这些参数的定义之后,我们才能更好的理解递归划分的流程。首先记录当前需要处理的节点索引以及三角形的数量:
int inum = imax - imin; // 当前节点内三角形的个数
int icur = curNode; // 当前节点的索引
rcChunkyTriMeshNode& node = nodes[curNode++];
然后判断剩余三角形的个数是否小于等于了trisPerChunk,此时不再执行递归划分:
if (inum <= trisPerChunk)
{
// 计算当前nodes aabb 包围盒大小
calcExtends(items, nitems, imin, imax, node.bmin, node.bmax);
// 将对应的三角形数据复制到outTris中
node.i = curTri;
node.n = inum;
for (int i = imin; i < imax; ++i)
{
const int* src = &inTris[items[i].i*3];
int* dst = &outTris[curTri*3];
curTri++; // 注意这里每次复制一个三角形,这里的索引都需要递增
dst[0] = src[0];
dst[1] = src[1];
dst[2] = src[2];
}
}
面对递归处理的情况,需要选择是从X轴还是从Z轴进行分裂,这里选用一个最简单的方法,计算AABB包围盒之后,使用包围盒长度最长的轴进行分裂:
// Split
calcExtends(items, nitems, imin, imax, node.bmin, node.bmax);
int axis = longestAxis(node.bmax[0] - node.bmin[0],
node.bmax[1] - node.bmin[1]);
if (axis == 0)
{
// Sort along x-axis
qsort(items+imin, static_cast<size_t>(inum), sizeof(BoundsItem), compareItemX);
}
else if (axis == 1)
{
// Sort along y-axis
qsort(items+imin, static_cast<size_t>(inum), sizeof(BoundsItem), compareItemY);
}
这里使用了一个快速排序,将[items+imin, items+imax)区间内的数据进行了按照对应的坐标轴数组进行排序。排完序之后,使用中点的索引进行切分为两组连续的三角形,执行递归调用:
int isplit = imin+inum/2; // 中点的索引
// Left
subdivide(items, nitems, imin, isplit, trisPerChunk, curNode, nodes, maxNodes, curTri, outTris, inTris);
// Right
subdivide(items, nitems, isplit, imax, trisPerChunk, curNode, nodes, maxNodes, curTri, outTris, inTris);
注意这里是先执行左子节点[imin, isplit)的subdivide,然后再执行右子节点[isplit, imax)的subdivide,因为只有这样才能保证左子节点的索引为父节点的索引加1。两个子节点都划分好了之后,curNode里存储的就是下一个可以使用的节点索引,减去当前节点的索引我们就可以得到当前节点的所有子节点的个数:
int iescape = curNode - icur;
// 这里用负数来存 用来跟叶子节点区分开
node.i = -iescape;
至此一个基于数组连续存储的BVH递归划分结束。这个BVH主要是用来支持raycast操作,即查询一条线段与Mesh的相交点,最典型的应用就是查询当前点在Mesh上的投影位置。期间会有一个初步筛选的工作来获取所有与这个线段相交的BVH节点:
int rcGetChunksOverlappingSegment(const rcChunkyTriMesh* cm,
float p[2], float q[2],
int* ids, const int maxIds)
{
// Traverse tree
int i = 0;
int n = 0;
while (i < cm->nnodes)
{
const rcChunkyTriMeshNode* node = &cm->nodes[i];
const bool overlap = checkOverlapSegment(p, q, node->bmin, node->bmax);
const bool isLeafNode = node->i >= 0;
if (isLeafNode && overlap)
{
if (n < maxIds)
{
ids[n] = i;
n++;
}
}
if (overlap || isLeafNode)
i++;
else
{
const int escapeIndex = -node->i;
i += escapeIndex;
}
}
return n;
}
初始的时候使用将要处理的节点设置为根节点,然后每次对当前要处理的节点进行如下操作:
- 计算当前节点的
AABB包围盒是否与线段相交 - 如果当前节点是叶子节点且相交 则将这个节点记录到结果中
- 如果当前节点的包围盒与线段相交或者当前节点是叶子节点,则将节点索引加
1,进行下一步处理 - 如果包围盒不相交且不是叶子节点,则跳过当前节点的所有子节点,因为这些子节点一定不会再与线段相交
上面的步骤3中的加1操作其实就是获取二叉树先序遍历树时当前节点的后继,这里对应了三种情况:
- 当前节点是非叶子节点,先序遍历的后继就是当前节点的左子节点,
- 当前节点是叶子节点,且是父节点的左子节点,先序遍历的后继就是当前父节点的右子节点,
- 当前节点是叶子节点,且是父节点的右子节点,先序遍历的后继则需要递归找到其父节点链条中第一个作为左子节点存在的点,然后获取这个节点的兄弟节点
之前我们构造BVH树分配节点索引的规则刚好满足这三种情况下的后继节点的索引都只需要加1即可获得。有了这个函数之后,真正的raycast函数执行的逻辑就比较简单了:
bool InputGeom::raycastMesh(float* src, float* dst, float& tmin)
{
// Prune hit ray.
float btmin, btmax;
if (!isectSegAABB(src, dst, m_meshBMin, m_meshBMax, btmin, btmax))
return false;
float p[2], q[2];
p[0] = src[0] + (dst[0]-src[0])*btmin;
p[1] = src[2] + (dst[2]-src[2])*btmin;
q[0] = src[0] + (dst[0]-src[0])*btmax;
q[1] = src[2] + (dst[2]-src[2])*btmax;
int cid[512];
const int ncid = rcGetChunksOverlappingSegment(m_chunkyMesh, p, q, cid, 512);
if (!ncid)
return false;
tmin = 1.0f;
bool hit = false;
const float* verts = m_mesh->getVerts();
for (int i = 0; i < ncid; ++i)
{
const rcChunkyTriMeshNode& node = m_chunkyMesh->nodes[cid[i]];
const int* tris = &m_chunkyMesh->tris[node.i*3];
const int ntris = node.n;
for (int j = 0; j < ntris*3; j += 3)
{
float t = 1;
if (intersectSegmentTriangle(src, dst,
&verts[tris[j]*3],
&verts[tris[j+1]*3],
&verts[tris[j+2]*3], t))
{
if (t < tmin)
tmin = t;
hit = true;
}
}
}
return hit;
}
不过由于我们前面建立的BVH只处理了XZ平面,所以后面还需要执行一个for循环使用intersectSegmentTriangle去过滤掉不相交的三角形。这个函数调用还可以计算出相交点相对于起点的长度,最终结果选取长度最小的那个交点,作为第一个相交点。其具体执行流程为先计算三角形平面的法线,然后计算起点到这个平面的投影点,利用投影点计算出射线与三角形平面的交点,判断这个交点是否在三角形内。
场景体素化
这里的体素化与前面章节里提到的体素化定义是一致的,不过前述章节中我们为了讨论方便,将体素设定为立方体的形状,在recast中放松了此设定,变成了一个底面为正方形的长方体:
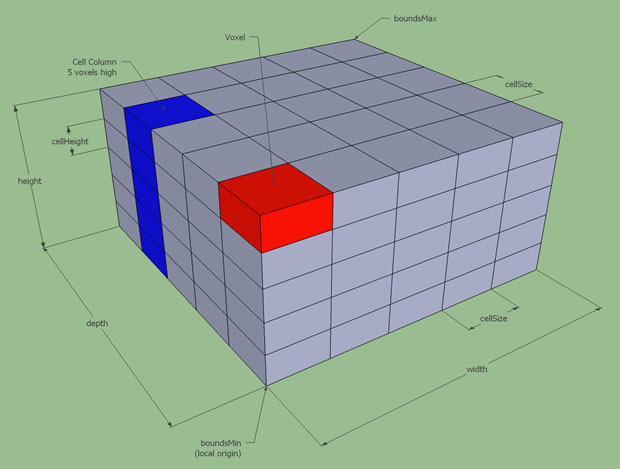
此时长方体有两个可配置项:
cellSize代表体素地面的正方形边长cellHeight代表体素的高度
cellSize使用较低的值使得生成的网格更接近源几何形状,下图中就是使用大cellSize时最后生成的网格:
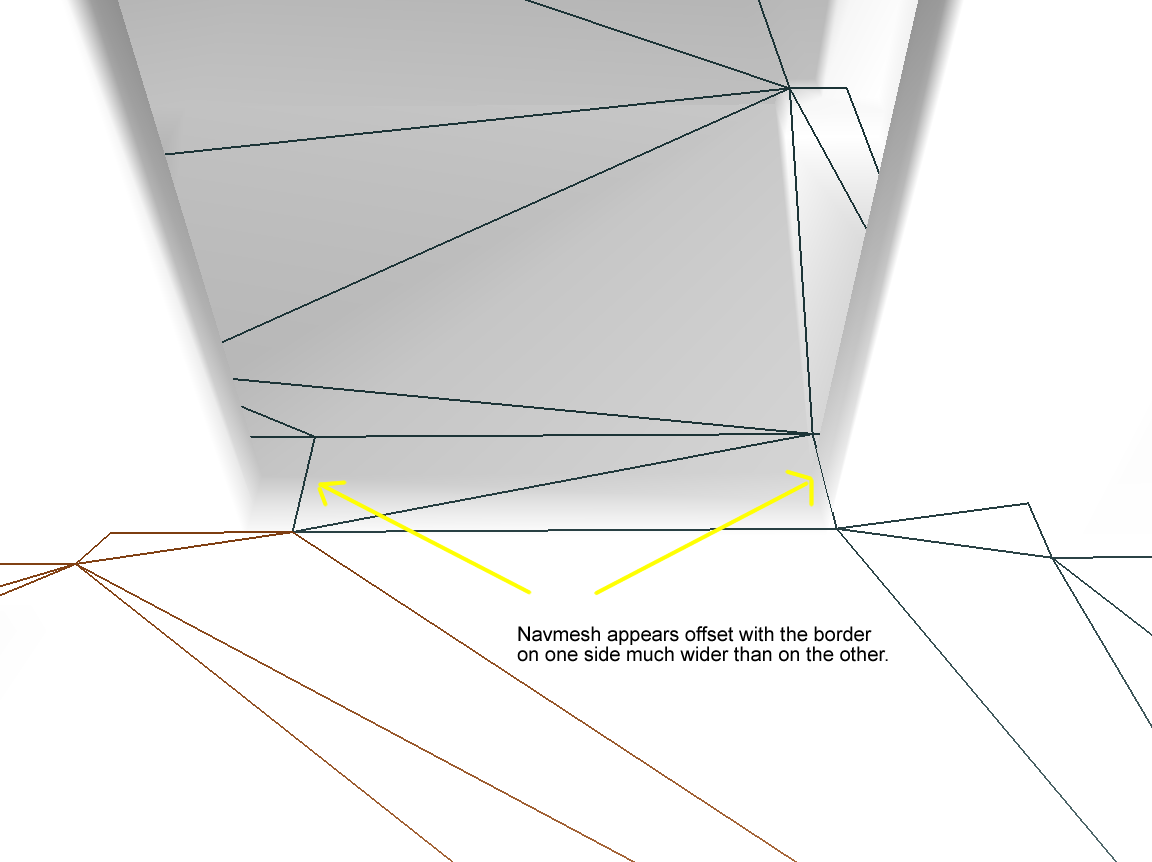
将这个参数调整小之后,就能获取一个更贴近边界的网格:
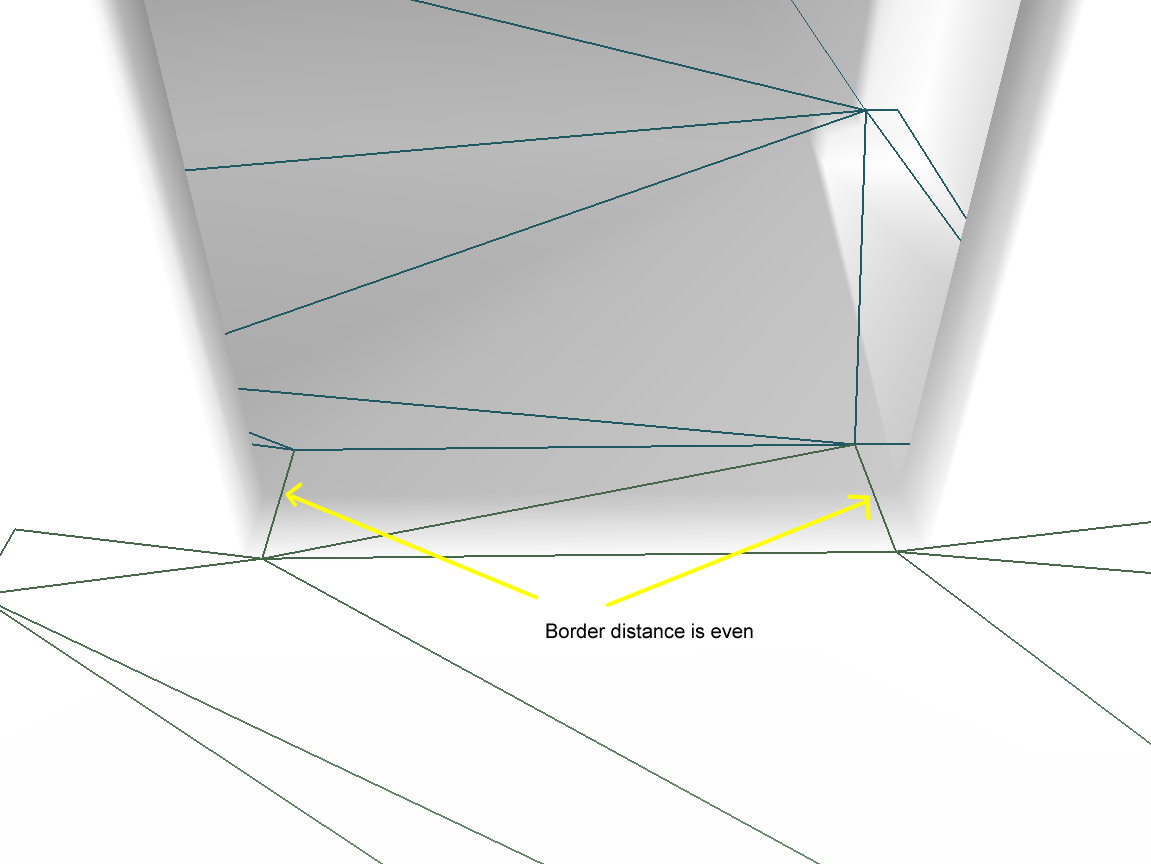
cellSize不是越小越好,设定的太小则需要更高的处理和内存成本,因为存储空间大概与cellSize*cellSize的大小成反比:
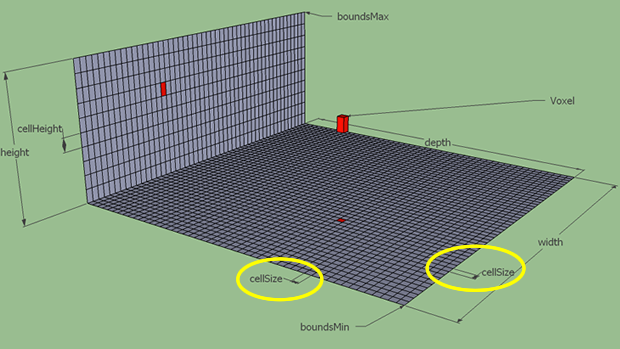
至于cellHeight这个参数,较小的值使得最终的网格更贴近几何形状的表面:
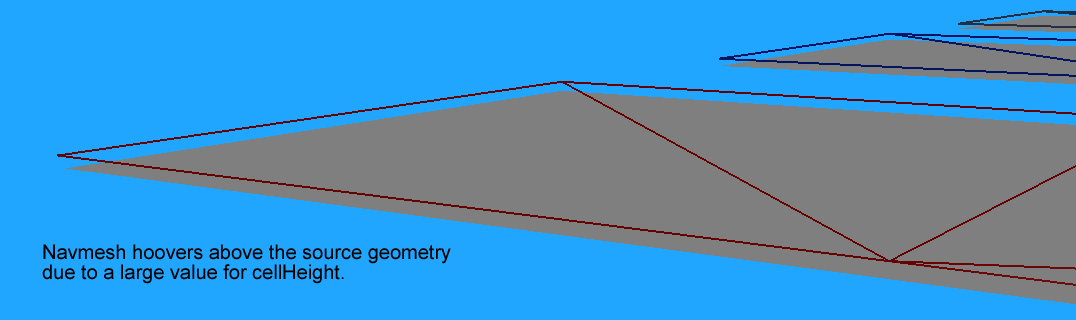
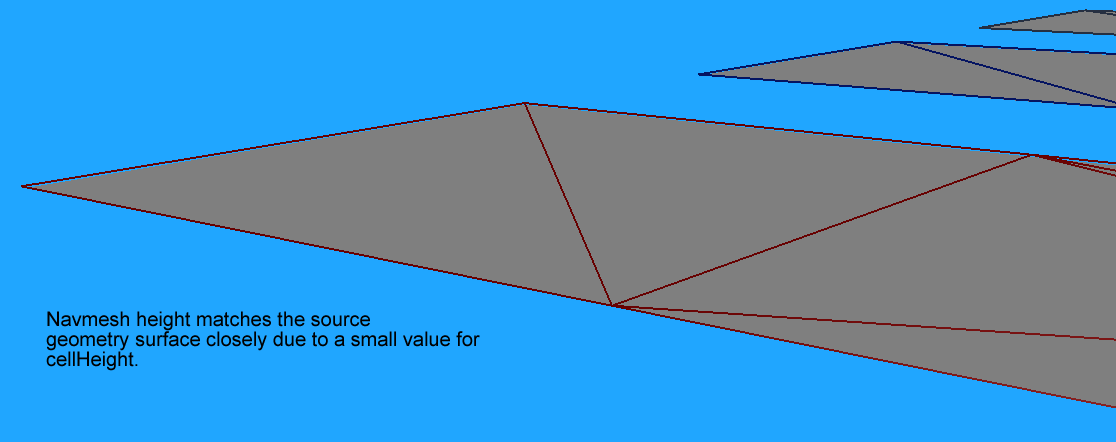
这个参数的设置会影响后续流程中所需要处理的多个参数,walkableHeight、walkableClimb 和 detailSampleMaxError需要大于这个值才能正常工作,所以经验值为walkableHeight、walkableClimb、cellSize,detailSampleMaxError的最小值的三分之一。
不过与cellSize不同的地方在于,使用较低的cellHeight值虽然同样会增加处理的耗时,但是不会显著增加内存使用,因为我们在存储每一列数据的时候使用了span这样的结构去优化。不过这里使用的span记录的是连续的实心阻挡区域,而前面章节的span记录的是连续的空心非阻挡区域。
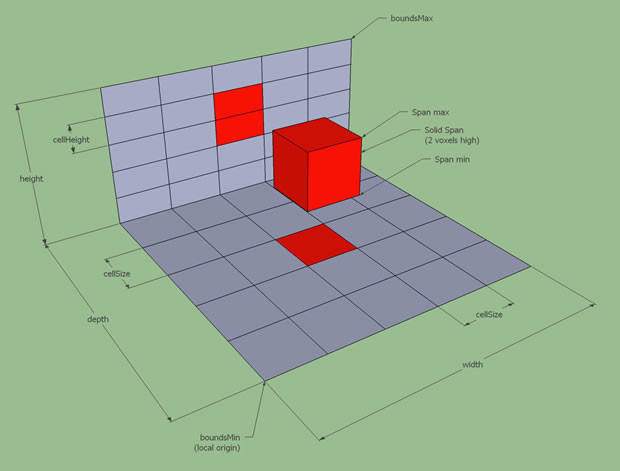
对应的结构体声明与我们之前定义的span类似:
/// Defines the number of bits allocated to rcSpan::smin and rcSpan::smax.
static const int RC_SPAN_HEIGHT_BITS = 13;
/// Defines the maximum value for rcSpan::smin and rcSpan::smax.
static const int RC_SPAN_MAX_HEIGHT = (1 << RC_SPAN_HEIGHT_BITS) - 1;
/// Represents a span in a heightfield.
/// @see rcHeightfield
struct rcSpan
{
unsigned int smin : RC_SPAN_HEIGHT_BITS; ///< The lower limit of the span. [Limit: < #smax]
unsigned int smax : RC_SPAN_HEIGHT_BITS; ///< The upper limit of the span. [Limit: <= #RC_SPAN_MAX_HEIGHT]
unsigned int area : 6; ///< The area id assigned to the span.
rcSpan* next; ///< The next span higher up in column.
};
不过这里为了省内存,使用了13个bit来存储以cellHeight来计算的高度,在cellHeight设置为10cm时,支持的场景最大高度为800M。rcSpan中还有一个area字段来做span的区域标记,默认情况下来标记这个span的上表面是否可以行走。
有了这个rcSpan之后,对应的实心高度场结构体定义如下:
/// The number of spans allocated per span spool.
/// @see rcSpanPool
static const int RC_SPANS_PER_POOL = 2048;
/// A memory pool used for quick allocation of spans within a heightfield.
/// @see rcHeightfield
struct rcSpanPool
{
rcSpanPool* next; ///< The next span pool.
rcSpan items[RC_SPANS_PER_POOL]; ///< Array of spans in the pool.
};
/// A dynamic heightfield representing obstructed space.
/// @ingroup recast
struct rcHeightfield
{
int width; ///< The width of the heightfield. (Along the x-axis in cell units.)
int height; ///< The height of the heightfield. (Along the z-axis in cell units.)
float bmin[3]; ///< The minimum bounds in world space. [(x, y, z)]
float bmax[3]; ///< The maximum bounds in world space. [(x, y, z)]
float cs; ///< The size of each cell. (On the xz-plane.)
float ch; ///< The height of each cell. (The minimum increment along the y-axis.)
rcSpan** spans; ///< Heightfield of spans (width*height).
rcSpanPool* pools; ///< Linked list of span pools.
rcSpan* freelist; ///< The next free span.
};
这里的spans就是一个行优先的二维数组,数组里每个rcSpan都是由rcSpanPool来进行分配的。采用Pool分配的好处就是避免频繁的调用malloc,直接走批量分配。而且由于所有的rcSpan的生命周期都是与rcHeightfield一致的,所以也不需要考虑单个rcSpan的free操作了,直接挂靠到freelist的开头即可。
static rcSpan* allocSpan(rcHeightfield& hf)
{
// If running out of memory, allocate new page and update the freelist.
if (!hf.freelist || !hf.freelist->next)
{
// Create new page.
// Allocate memory for the new pool.
rcSpanPool* pool = (rcSpanPool*)rcAlloc(sizeof(rcSpanPool), RC_ALLOC_PERM);
if (!pool) return 0;
// Add the pool into the list of pools.
pool->next = hf.pools;
hf.pools = pool;
// Add new items to the free list.
rcSpan* freelist = hf.freelist;
rcSpan* head = &pool->items[0];
rcSpan* it = &pool->items[RC_SPANS_PER_POOL];
do
{
--it;
it->next = freelist;
freelist = it;
}
while (it != head);
hf.freelist = it;
}
// Pop item from in front of the free list.
rcSpan* it = hf.freelist;
hf.freelist = hf.freelist->next;
return it;
}
static void freeSpan(rcHeightfield& hf, rcSpan* ptr)
{
if (!ptr) return;
// Add the node in front of the free list.
ptr->next = hf.freelist;
hf.freelist = ptr;
}
最后构造出来的实心高度场结构可视化如下图:
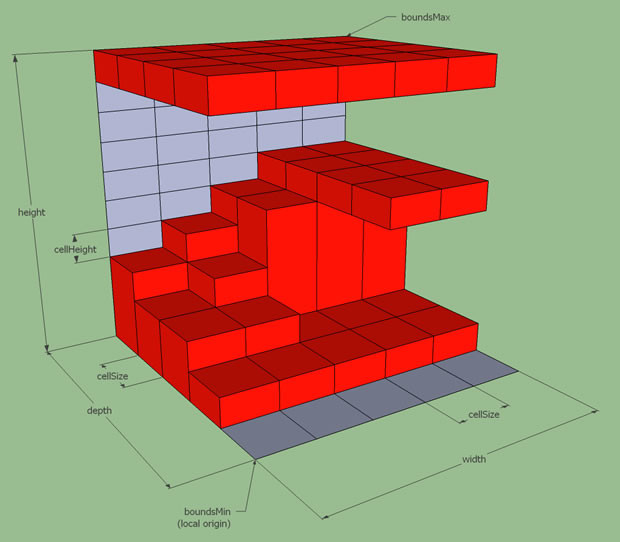
由于后续操作中经常需要执行搜索特定rcSpan的周围的邻居rcSpan的操作,这里的邻居rcSpan要满足两个需求:
- 投影在
XZ平面的网格与当前rcSpan网格相邻,即下图中的浅蓝色的8个格子
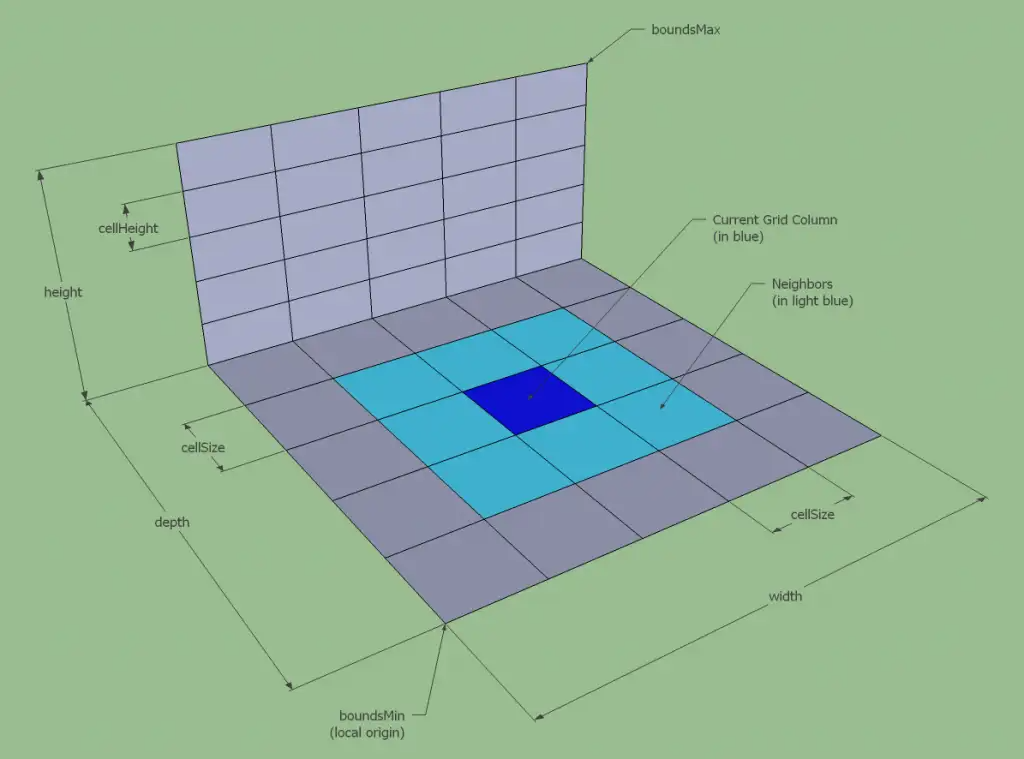
- 高度很接近
所以最终在高度场中一个rcspan的邻居rcspan如下:
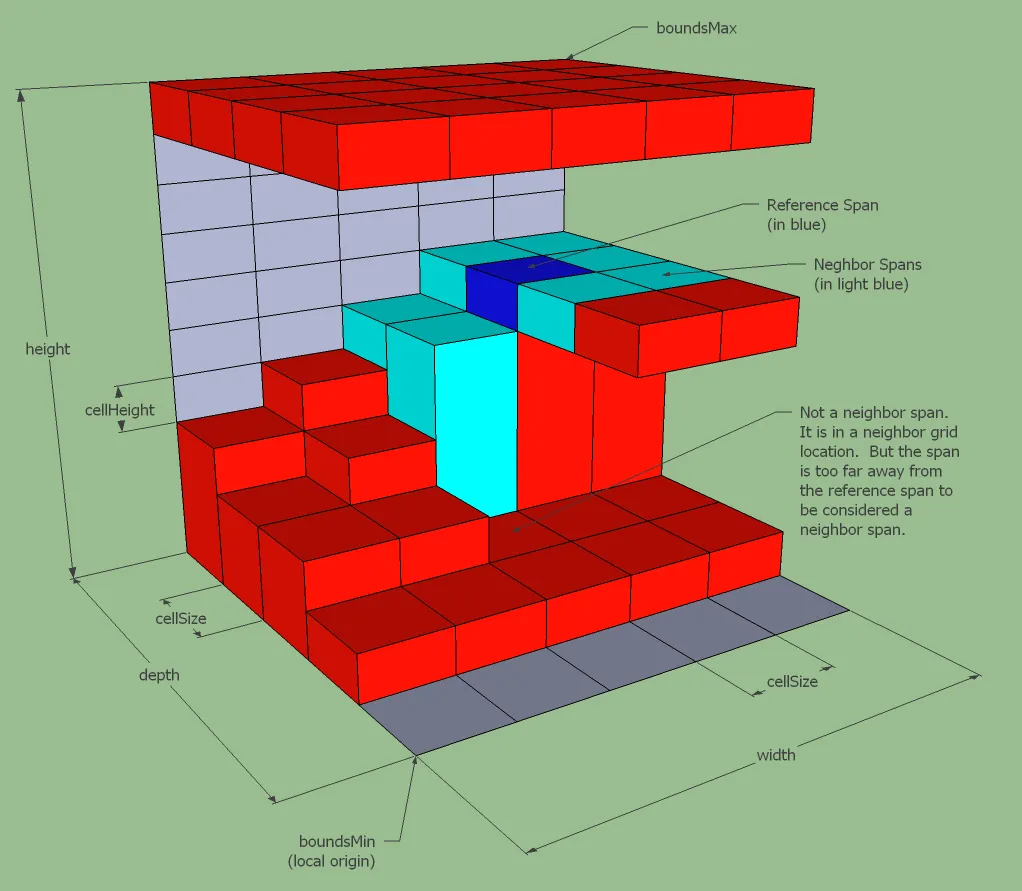
有了存储所有体素数据的高度场结构定义之后,我们开始将输入Mesh里的所有三角形进行体素化,生成一个一个的体素并将相邻的体素合并为rcspan。
每个三角形都使用保守体素化的方式进行体素化并添加到高度场中。保守体素化是一种确保多边形表面完全被生成的体素包围的算法。下面是使用保守体素化包围三角形的一个例子:
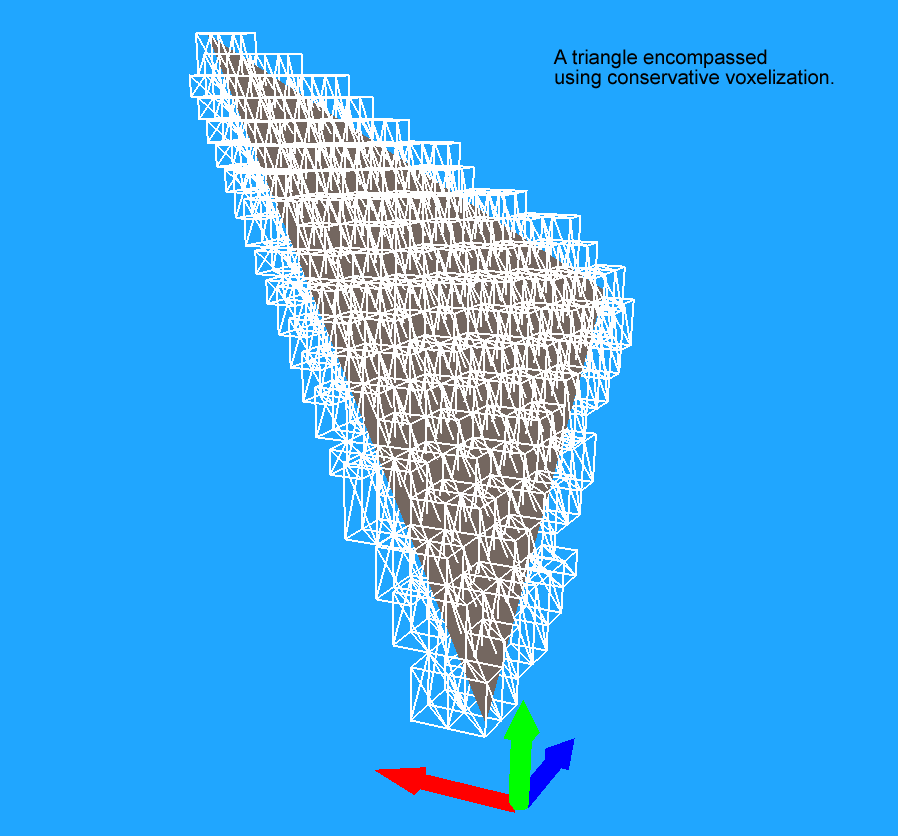
对应的体素化实现函数声明如下:
static bool rasterizeTri(const float* v0, const float* v1, const float* v2,
const unsigned char area, rcHeightfield& hf,
const float* bmin, const float* bmax,
const float cs, const float ics, const float ich,
const int flagMergeThr)
这个函数包含了两重循环:
-
最外层循环是遍历这个三角形在
Z轴上的以cellSize计量的[z_begin, z_end)中的z,计算经过(0,0,z)的XY平面与三角形的相交区域生成的位于此平面左侧的凸多边形A,同时将右侧的三角形替换原始三角形 -
第二层循环则遍历这个
A的AABB在X轴投影[x_begin, x_end)中的x,计算经过(x,0,0)的YZ平面与A的相交区域生成的位于此平面左侧凸多边形B,计算B在Y轴以CellHeight计量的坐标[y_begin, y_end),构造对应的rcSpan,添加到高度场(x,z)对应的列的头部,同时将右侧的多边形替换原始的A
这里两层循环的执行都依赖于获取一个多边形与特定坐标轴垂直平面相交切分为两个凸多边形的计算,对应的函数声明定义如下:
// divides a convex polygons into two convex polygons on both sides of a line
static void dividePoly(const float* in, int nin,
float* out1, int* nout1,
float* out2, int* nout2,
float x, int axis)
这里的(in, nin)代表输入的多边形的坐标数组,axis代表对应的坐标轴索引,取值范围为0,1,2分别对应x,y,z三个轴,而 x则代表裁剪平面在此轴上的取值,out1,nout1和out2,nout2分别代表两个输出结果多边形的顶点列表,out1存储在对应坐标轴投影值都大于x值的多边形,out2则存储在对应坐标轴上投影值都小于x的多边形。了解了上述参数定义之后,我们再来看函数体:
float d[12]; // 存储原来的多边形的每个顶点与分割轴平面的距离
for (int i = 0; i < nin; ++i)
d[i] = x - in[i*3+axis];
int m = 0, n = 0;
for (int i = 0, j = nin-1; i < nin; j=i, ++i)
{
bool ina = d[j] >= 0;
bool inb = d[i] >= 0;
if (ina != inb) // 如果当前点与前一个点分属于 分割平面的两侧
{
float s = d[j] / (d[j] - d[i]); // 计算(i,j)两点之间的直线与分割平面相交的点的坐标
out1[m*3+0] = in[j*3+0] + (in[i*3+0] - in[j*3+0])*s;
out1[m*3+1] = in[j*3+1] + (in[i*3+1] - in[j*3+1])*s;
out1[m*3+2] = in[j*3+2] + (in[i*3+2] - in[j*3+2])*s;
rcVcopy(out2 + n*3, out1 + m*3);
// 分割点需要同时存入左右两个多边形的顶点列表中
m++;
n++;
// add the i'th point to the right polygon. Do NOT add points that are on the dividing line
// since these were already added above
if (d[i] > 0)
{
// 如果当前点在投影轴上的值大于x 则也加入到out1对应的多边形中
rcVcopy(out1 + m*3, in + i*3);
m++;
}
else if (d[i] < 0)
{
// 如果当前点在投影轴上的值小于x 则也加入到out2对应的多边形中
rcVcopy(out2 + n*3, in + i*3);
n++;
}
}
else // 如果都在平面的同一侧 则根据与x的差值计算是否加入到out1还是out2
{
// add the i'th point to the right polygon. Addition is done even for points on the dividing line
if (d[i] >= 0)
{
rcVcopy(out1 + m*3, in + i*3);
m++;
if (d[i] != 0) // 注意这里 如果当前点落在了分割平面上 则则个点会同时加入到两个多边形中
continue;
}
rcVcopy(out2 + n*3, in + i*3);
n++;
}
}
*nout1 = m;
*nout2 = n;
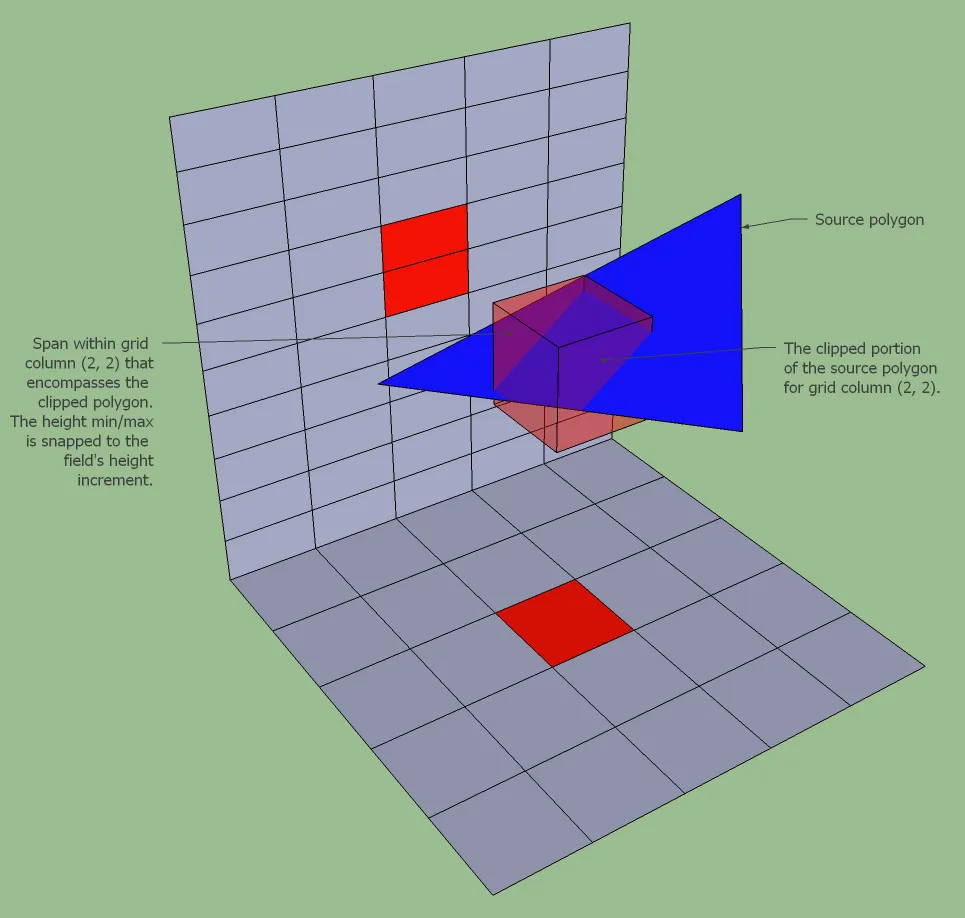
至此场景Mesh体素化的流程走完,高度场中已经拥有了基本的体素span信息,接下来我们需要对span的上表面计算是否可以行走,并更新area字段。这里是否可以行走的判定主要是通过判断这个体素来源的三角形的倾斜角度是否小于配置的参数walkableSlopeAngle,倾斜角小于这个值则代表可以行走,大于这个值则代表不可以行走:
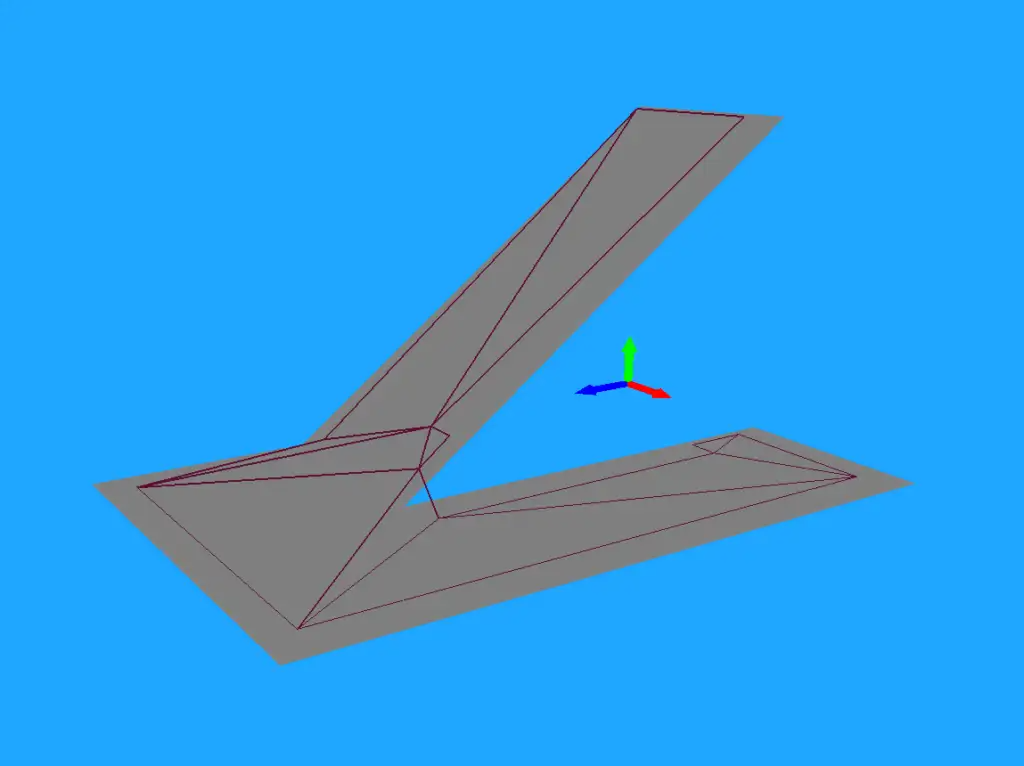
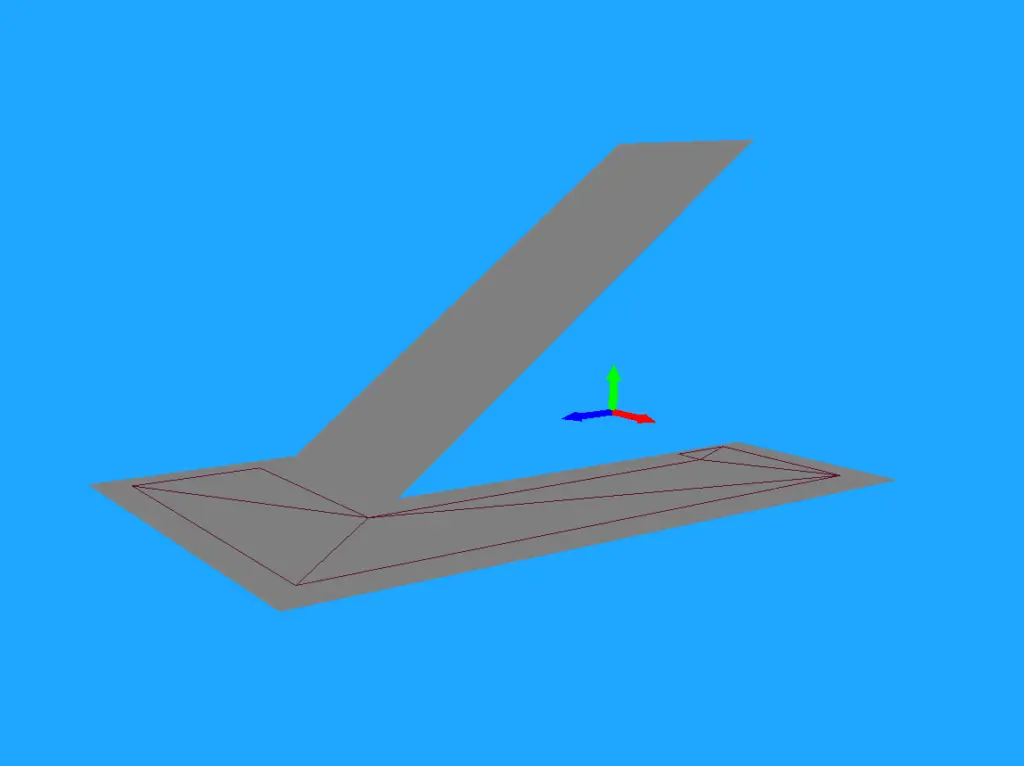
对应的判定函数为rcMarkWalkableTriangles,其函数体比较简单,纯粹的几何向量运算:
/// The default area id used to indicate a walkable polygon.
/// This is also the maximum allowed area id, and the only non-null area id
/// recognized by some steps in the build process.
static const unsigned char RC_WALKABLE_AREA = 63;
void rcMarkWalkableTriangles(rcContext* ctx, const float walkableSlopeAngle,
const float* verts, int nv,
const int* tris, int nt,
unsigned char* areas)
{
rcIgnoreUnused(ctx);
rcIgnoreUnused(nv);
// 计算对应倾斜角度单位向量在x轴的投影值
const float walkableThr = std::cos(walkableSlopeAngle/180.0f*RC_PI);
float norm[3];
for (int i = 0; i < nt; ++i)
{
const int* tri = &tris[i*3];
// 计算这个三角形的单位法线向量 使用叉积计算法线方向然后单位化即可
calcTriNormal(&verts[tri[0]*3], &verts[tri[1]*3], &verts[tri[2]*3], norm);
// 这里的norm[1]就是与Y轴的投影值 如果投影值大于夹角的cos 则代表这个三角形与XZ平面的夹角小于 walkableSlopeAngle 可以行走
if (norm[1] > walkableThr)
areas[i] = RC_WALKABLE_AREA;
}
}
这里计算出来的area负责标记一个三角形体素化添加的所有rcSpan,但是由于多个三角形构造的rcSpan可能重叠,在执行rcSpan的合并时也要对area标记进行合并。两个rcSpan进行合并时,其对应的area标记更新规则如下:
-
如果两者的顶部高度相差小于爬升高度
walkableClimb则执行两个rcspan::area的最大值来更新 -
否则选取顶部最高的
rcSpan的area来更新
筛选可行走表面
rcSpan里的area标记了当前rcSpan是否是可以行走的,判定条件就是三角形的坡度小于walkableSlopeAngle。但是这个只是一个初步的筛选,通过了这个筛选也有可能是不可行走的,例如单独的悬空低坡度小三角形。一个rcSpan的顶部是否可以行走还需要做一些额外的后处理判定,来过滤掉一些特殊情况。这里的特殊情况主要包括如下三种:
-
筛选低垂的可行走障碍 对应的函数为
rcFilterLowHangingWalkableObstacles -
过滤跳台区间 对应的函数为
rcFilterLedgeSpans -
过滤可行走的低高度区间 对应的函数为
rcFilterWalkableLowHeightSpans
//
// Step 3. Filter walkables surfaces.
//
// Once all geoemtry is rasterized, we do initial pass of filtering to
// remove unwanted overhangs caused by the conservative rasterization
// as well as filter spans where the character cannot possibly stand.
if (m_filterLowHangingObstacles)
rcFilterLowHangingWalkableObstacles(m_ctx, m_cfg.walkableClimb, *m_solid);
if (m_filterLedgeSpans)
rcFilterLedgeSpans(m_ctx, m_cfg.walkableHeight, m_cfg.walkableClimb, *m_solid);
if (m_filterWalkableLowHeightSpans)
rcFilterWalkableLowHeightSpans(m_ctx, m_cfg.walkableHeight, *m_solid);
这三种过滤方式都可以通过配置参数来开启,下面我们来分别介绍这三个过滤规则的细节与目的。
筛选低垂的可行走障碍
这个筛选的目的是将一些小的障碍物标记为可行走:如果某个不可行走的rcSpan同一列中有一个高度差不超过爬坡高度的可行走rcSpan,则此rcSpan标记为可以行走.
算法比较简单:迭代每一列,从下往上遍历rcSpan,对于同列任意两个相邻的span1(下)和span2(上),当span1可走,并且span2不可走的时候,计算这两个span的上表面高度差Diff,如果Diff小于配置参数walkableClimb,则将span2设置为可行走:
void rcFilterLowHangingWalkableObstacles(rcContext* ctx, const int walkableClimb, rcHeightfield& solid)
{
rcAssert(ctx);
rcScopedTimer timer(ctx, RC_TIMER_FILTER_LOW_OBSTACLES);
const int w = solid.width;
const int h = solid.height;
for (int y = 0; y < h; ++y)
{
for (int x = 0; x < w; ++x)
{
rcSpan* ps = 0;
bool previousWalkable = false;
unsigned char previousArea = RC_NULL_AREA;
for (rcSpan* s = solid.spans[x + y*w]; s; ps = s, s = s->next)
{
const bool walkable = s->area != RC_NULL_AREA;
// If current span is not walkable, but there is walkable
// span just below it, mark the span above it walkable too.
if (!walkable && previousWalkable)
{
if (rcAbs((int)s->smax - (int)ps->smax) <= walkableClimb)
s->area = previousArea;
}
// Copy walkable flag so that it cannot propagate
// past multiple non-walkable objects.
previousWalkable = walkable;
previousArea = s->area;
}
}
}
}
这部分主要是将一些楼梯台阶形式的行走表面连通起来:
如果这个参数设置的太小,则导致楼梯无法连通:
如果这个参数设置的太高,会导致桌子甚至房顶都可以直接从地面寻路过去:
过滤可行走的低高度区间
在使用Detour进行寻路时,参与寻路的Agent会有一个身高参数walkableHeight。如果在可行走的span(A)上方的障碍物底面与当前span(A)的顶面高度差小于这个指定的walkableHeight,那么span(A)的顶面则是不可行走的。
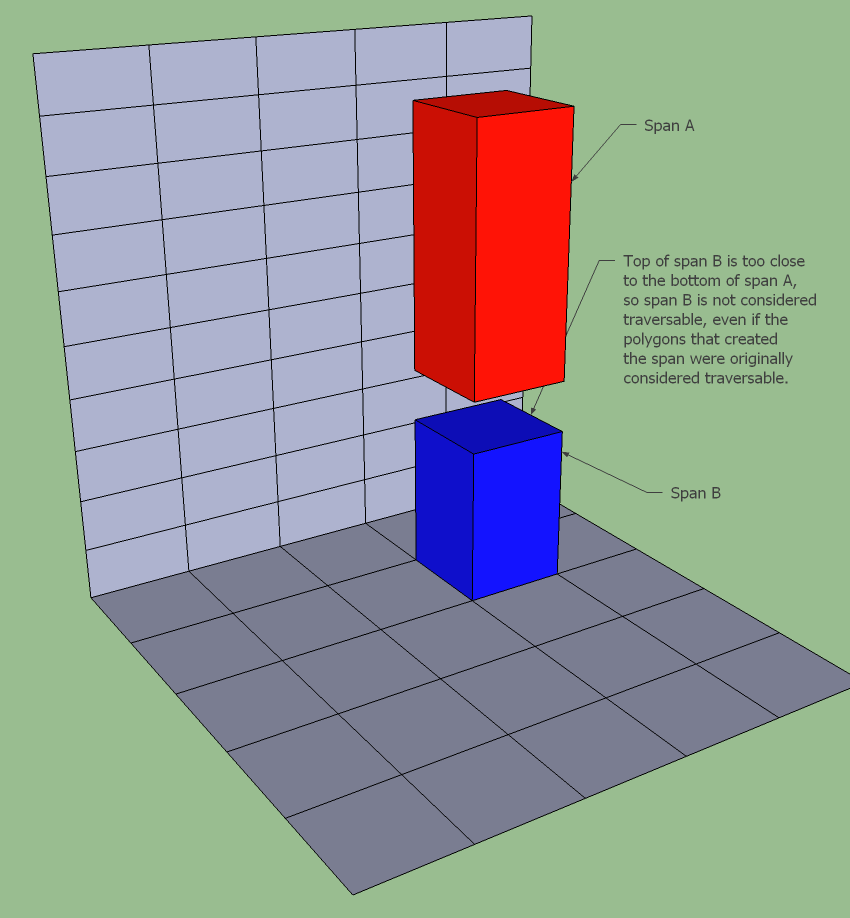
对应的实现也很简单:
void rcFilterWalkableLowHeightSpans(rcContext* ctx, int walkableHeight, rcHeightfield& solid)
{
rcAssert(ctx);
rcScopedTimer timer(ctx, RC_TIMER_FILTER_WALKABLE);
const int w = solid.width;
const int h = solid.height;
const int MAX_HEIGHT = 0xffff;
// Remove walkable flag from spans which do not have enough
// space above them for the agent to stand there.
for (int y = 0; y < h; ++y)
{
for (int x = 0; x < w; ++x)
{
for (rcSpan* s = solid.spans[x + y*w]; s; s = s->next)
{
const int bot = (int)(s->smax);
const int top = s->next ? (int)(s->next->smin) : MAX_HEIGHT;
if ((top - bot) <= walkableHeight)
s->area = RC_NULL_AREA;
}
}
}
}
这个参数也需要设置为合适的值去匹配参与寻路的entity的高度,下图就是选取了合适的参数之后,桌子下面的区域不再可通行:
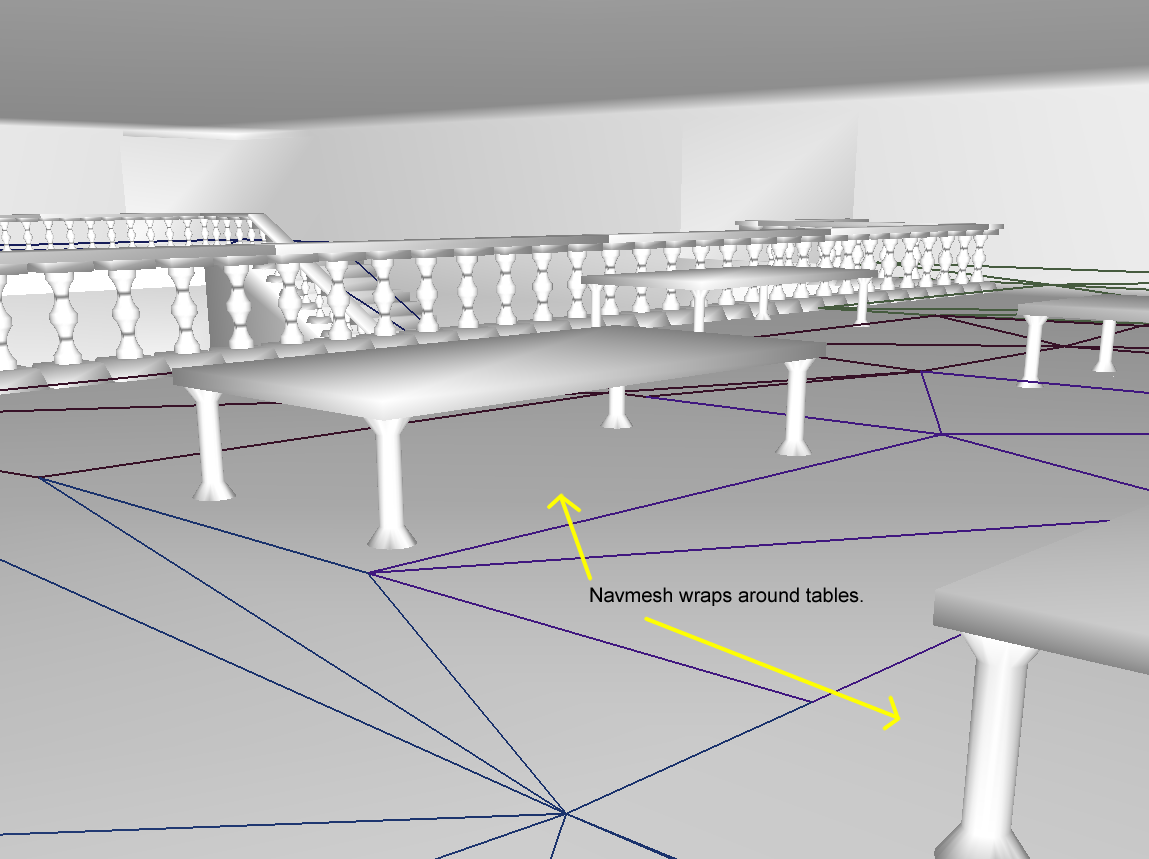
如果这个参数设置的过小,则桌子下面的区域会变得可通行,如果真实高度大于桌子高度但是又是可通行的,则会引起模型与场景的穿插:
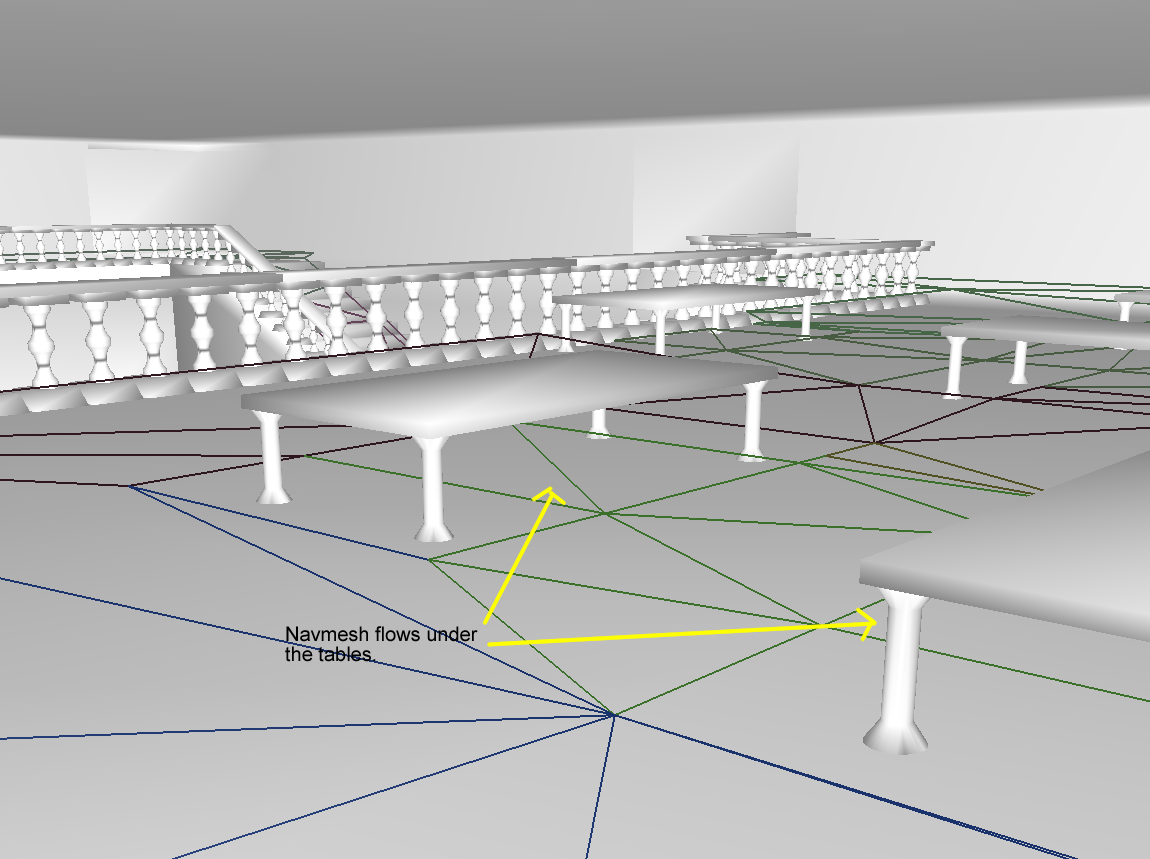
当然太大也不行,会导致下图中天花板下方的区域都不可通行:
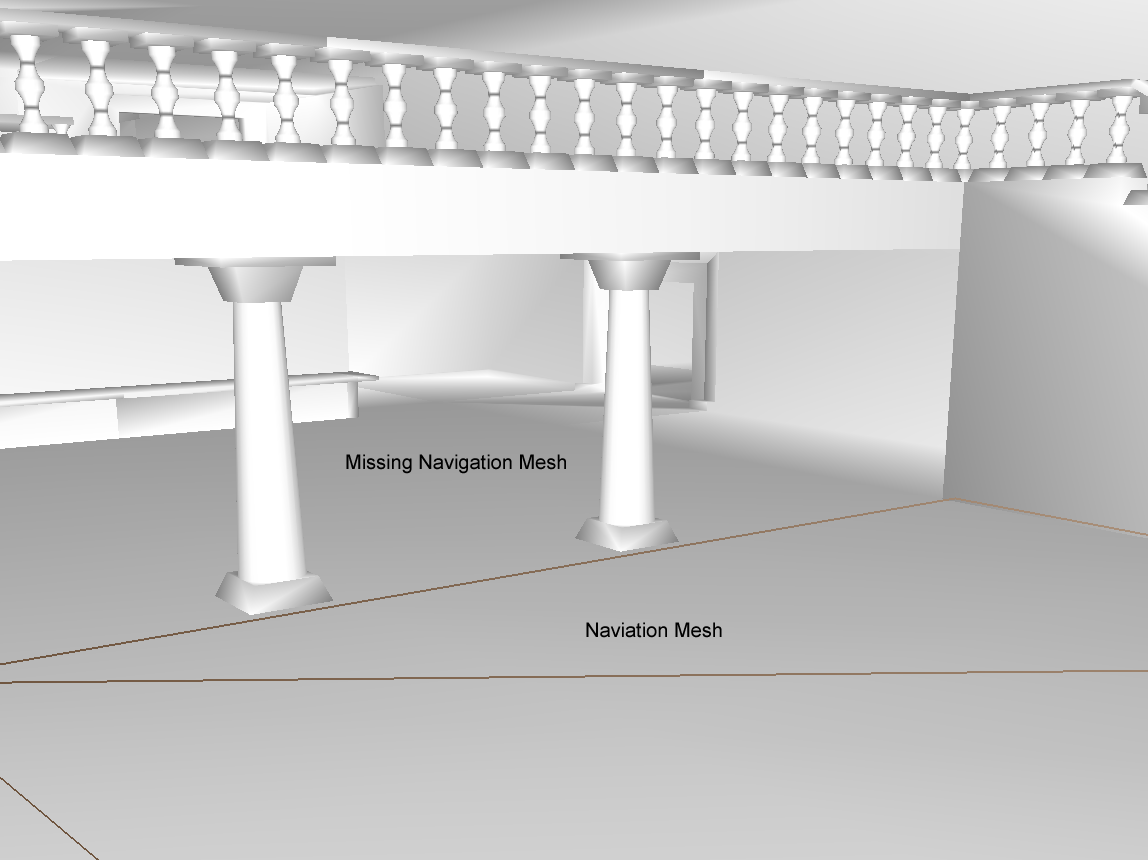
过滤跳台区间
这个步骤负责将处理跨列移动时的规则过滤,避免出现高度下降过快的情况。这里的跨列移动就是从一个可行走span(A)移动到可行走的归属于其他列的span(B),这样的移动需要满足如下条件:
-
span(B)所在的列是span(A)所在列的四个轴向邻居之一 -
Span(B)的顶面高度减去span(A)的顶面高度要小于攀爬高度walkableClimb -
span(A)移动到Span(B)时不会触发walkableHeight高度限制引发的阻挡,此时我们需要获得span(A)上面邻居span(A2)以及span(B)的上面邻居span(B2),计算A2, B2的底面最小值减去A, B的顶面最大值就是从A移动到B的最大允许高度,要求这个值要大于walkableHeight
满足上述条件的span(B)被定义为Span(A)的一个跨列邻居。下图中的浅蓝色span就是当前蓝色span的跨列邻居:
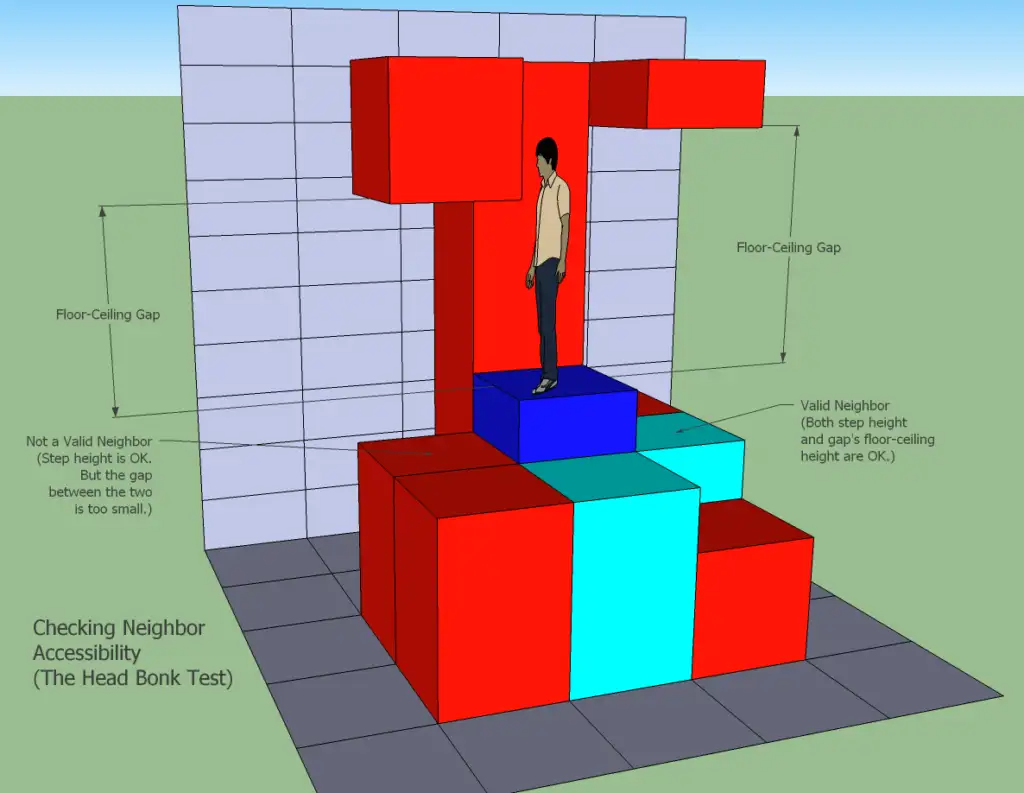
有了跨列邻居之后我们再来定义跳台区间:对于一个span(A)而言,遍历其周围四个轴邻居,对于每个轴邻居获取其中上表面低于当前span(A)上表面高度的跨列邻居span(B)中高度最高者,计算这几个span(B)与span(A)上表面高度差的最小值,如果这个最小值大于指定参数walkableClimb,则当前span(A)为跳台区间。如果span(A)对应的列在场景边界上或者在某个方向的邻居列中没有跨列邻居,则也定义为跳台区间。我们需要将所有为跳台区间的rcSpan标记为不可行走:
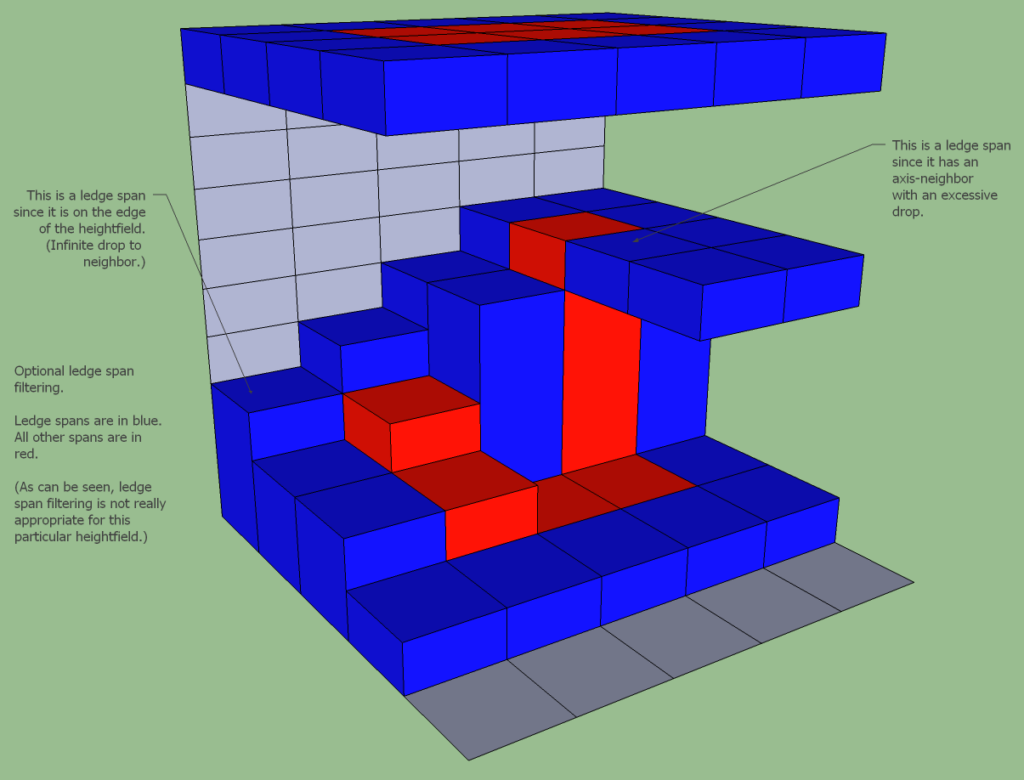
在上图中蓝色的span就是所谓的跳台区间,红色的span则是正常区间。这个过滤函数需要处理每一个可行走的rcspan的四个方向邻居列的每个有效跨列移动,因此会出现五重循环:
/// @see rcHeightfield, rcConfig
void rcFilterLedgeSpans(rcContext* ctx, const int walkableHeight, const int walkableClimb,
rcHeightfield& solid)
{
rcAssert(ctx);
rcScopedTimer timer(ctx, RC_TIMER_FILTER_BORDER);
const int w = solid.width;
const int h = solid.height;
const int MAX_HEIGHT = 0xffff;
// Mark border spans.
for (int y = 0; y < h; ++y)
{
for (int x = 0; x < w; ++x)
{
for (rcSpan* s = solid.spans[x + y*w]; s; s = s->next)
{
// Skip non walkable spans.
if (s->area == RC_NULL_AREA)
continue;
// 遍历每个原来可以行走的span
const int bot = (int)(s->smax);
const int top = s->next ? (int)(s->next->smin) : MAX_HEIGHT;
// 跨列邻居的最小高度
int minh = MAX_HEIGHT;
// Min and max height of accessible neighbours.
int asmin = s->smax;
int asmax = s->smax;
// 四方向邻居遍历
for (int dir = 0; dir < 4; ++dir)
{
int dx = x + rcGetDirOffsetX(dir);
int dy = y + rcGetDirOffsetY(dir);
// 超过边界时 不处理
if (dx < 0 || dy < 0 || dx >= w || dy >= h)
{
minh = rcMin(minh, -walkableClimb - bot);
continue;
}
// From minus infinity to the first span.
rcSpan* ns = solid.spans[dx + dy*w];
int nbot = -walkableClimb;
int ntop = ns ? (int)ns->smin : MAX_HEIGHT;
// 这里使用agent的高度过滤掉不可连通的邻居
if (rcMin(top,ntop) - rcMax(bot,nbot) > walkableHeight)
minh = rcMin(minh, nbot - bot);
// Rest of the spans.
for (ns = solid.spans[dx + dy*w]; ns; ns = ns->next)
{
nbot = (int)ns->smax;
ntop = ns->next ? (int)ns->next->smin : MAX_HEIGHT;
// 这里使用agent的高度过滤掉不可连通的邻居
if (rcMin(top,ntop) - rcMax(bot,nbot) > walkableHeight)
{
// 更新跨列邻居减去当前span顶面高度的最小值
minh = rcMin(minh, nbot - bot);
// 如果当前差值在爬升范围内 更新当前span可以上升的最大高度和最小高度
if (rcAbs(nbot - bot) <= walkableClimb)
{
if (nbot < asmin) asmin = nbot;
if (nbot > asmax) asmax = nbot;
}
}
}
}
// 如果存在一个跨列邻居使得从当前span下降到这个跨列邻居所需高度大于爬升高度 则设置为不可行走
if (minh < -walkableClimb)
{
s->area = RC_NULL_AREA;
}
// 如果当前span所能达到的最高高度与最低高度的差值大于爬升高度,则也标记为不可行走
else if ((asmax - asmin) > walkableClimb)
{
s->area = RC_NULL_AREA;
}
}
}
}
}
值得注意的是上面的过滤除了处理了当前span的下降高度之外,还处理了当前span的有效到达高度的最大值与最小值,如果这个区间长度大于爬升高度,则认为当前span会引发一个间接的快速下降过程,因此这种情况下也把当前span设置为了跳台span,标记为不可通行。
区域分割
这一阶段的目标是生成以体素表示的输入Mesh的可通过表面,并将可通过的区域分割成可以最终形成简单多边形的相邻的span(表面)区域。此时为了计算连通性,我们需要使用空心的rcCompactSpan来替代原来的rcSpan,
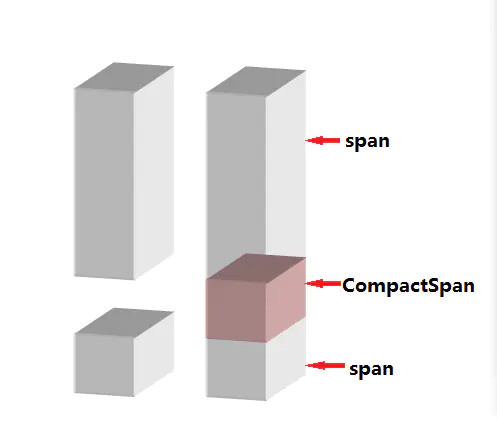
对应的高度场数据也从实心高度场数据rcHeightField转换到了空心压缩高度场数据rcCompactHeightField。
/// Provides information on the content of a cell column in a compact heightfield.
struct rcCompactCell
{
unsigned int index : 24; ///< Index to the first span in the column.
unsigned int count : 8; ///< Number of spans in the column.
};
/// Represents a span of unobstructed space within a compact heightfield.
struct rcCompactSpan
{
unsigned short y; ///< The lower extent of the span. (Measured from the heightfield's base.)
unsigned short reg; ///< The id of the region the span belongs to. (Or zero if not in a region.)
unsigned int con : 24; ///< Packed neighbor connection data.
unsigned int h : 8; ///< The height of the span. (Measured from #y.)
};
/// A compact, static heightfield representing unobstructed space.
/// @ingroup recast
struct rcCompactHeightfield
{
rcCompactHeightfield();
~rcCompactHeightfield();
int width; ///< The width of the heightfield. (Along the x-axis in cell units.)
int height; ///< The height of the heightfield. (Along the z-axis in cell units.)
int spanCount; ///< The number of spans in the heightfield.
int walkableHeight; ///< The walkable height used during the build of the field. (See: rcConfig::walkableHeight)
int walkableClimb; ///< The walkable climb used during the build of the field. (See: rcConfig::walkableClimb)
int borderSize; ///< The AABB border size used during the build of the field. (See: rcConfig::borderSize)
unsigned short maxDistance; ///< The maximum distance value of any span within the field.
unsigned short maxRegions; ///< The maximum region id of any span within the field.
float bmin[3]; ///< The minimum bounds in world space. [(x, y, z)]
float bmax[3]; ///< The maximum bounds in world space. [(x, y, z)]
float cs; ///< The size of each cell. (On the xz-plane.)
float ch; ///< The height of each cell. (The minimum increment along the y-axis.)
rcCompactCell* cells; ///< Array of cells. [Size: #width*#height]
rcCompactSpan* spans; ///< Array of spans. [Size: #spanCount]
unsigned short* dist; ///< Array containing border distance data. [Size: #spanCount]
unsigned char* areas; ///< Array containing area id data. [Size: #spanCount]
};
在上面的结构体定义中,高度场二维平面里的每个cell都有一个rcCompactCell,总体以行优先的形式存储在cells中。然后每个cell内的rcCompactSpan是连续存储的,其存储区域在spans中,所以此时不再使用链表来关联了。rcCompactCell中的index代表其内部的第一个span的在spans里的开始索引,count字段代表当前cell有多少个span。每个rcCompactSpan里用y存储下表面高度,用h存储span的长度,con字段存储了当前span与周围四个邻居cell中相连接的第一个span的数据。
将原有的实心高度场数据rcHeightField转换到空心压缩高度场数据rcCompactHeightField的函数为rcBuildCompactHeightfield,其逻辑很简单。首先预先分配spans对应的内存大小,这部分可以通过rcGetHeightFieldSpanCount计算而来,然后遍历每个rcCompactCell,获取原来实心高度场里对应的rcSpan链表,链表里每个顶面可以行走的rcSpan都会生成一个rcCompactSpan:
const int MAX_HEIGHT = 0xffff;
// Fill in cells and spans.
int idx = 0;
for (int y = 0; y < h; ++y)
{
for (int x = 0; x < w; ++x)
{
const rcSpan* s = hf.spans[x + y*w];
// If there are no spans at this cell, just leave the data to index=0, count=0.
if (!s) continue;
rcCompactCell& c = chf.cells[x+y*w];
c.index = idx;
c.count = 0;
while (s)
{
if (s->area != RC_NULL_AREA)
{
const int bot = (int)s->smax;
const int top = s->next ? (int)s->next->smin : MAX_HEIGHT;
chf.spans[idx].y = (unsigned short)rcClamp(bot, 0, 0xffff);
chf.spans[idx].h = (unsigned char)rcClamp(top - bot, 0, 0xff);
chf.areas[idx] = s->area;
idx++;
c.count++;
}
s = s->next;
}
}
}
初始化了所有rcCompactSpan的区间和area数据之后,为了后续连通性计算方便,还需要计算周围邻居数据。这里的周围邻居只包括当前rcCompactCell的四个轴向移动的其他rcCompactCell,这里使用了[0,4)作为方向标识,这四个方向邻居以顺时针形式排列:
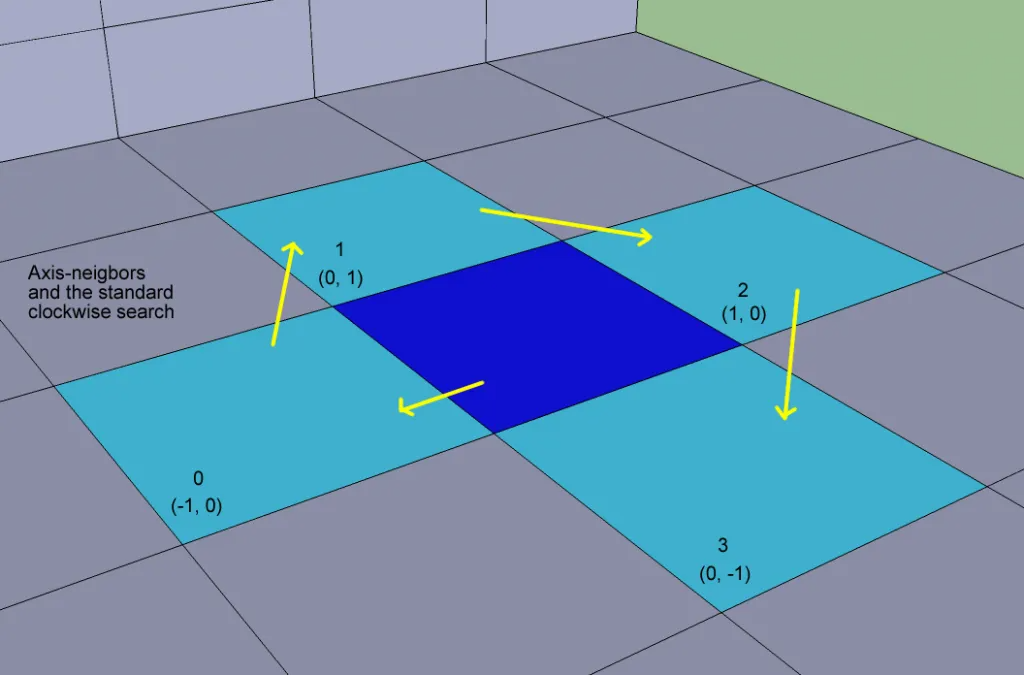
在后续的代码中,经常使用循环来遍历当前cell的邻居cell,为了避免分支判断,提供了下面的几个辅助函数来计算XZ方向上的偏移:
/// Gets the standard width (x-axis) offset for the specified direction.
/// @param[in] dir The direction. [Limits: 0 <= value < 4]
/// @return The width offset to apply to the current cell position to move
/// in the direction.
inline int rcGetDirOffsetX(int dir)
{
static const int offset[4] = { -1, 0, 1, 0, };
return offset[dir&0x03];
}
/// Gets the standard height (z-axis) offset for the specified direction.
/// @param[in] dir The direction. [Limits: 0 <= value < 4]
/// @return The height offset to apply to the current cell position to move
/// in the direction.
inline int rcGetDirOffsetY(int dir)
{
static const int offset[4] = { 0, 1, 0, -1 };
return offset[dir&0x03];
}
/// Gets the direction for the specified offset. One of x and y should be 0.
/// @param[in] x The x offset. [Limits: -1 <= value <= 1]
/// @param[in] y The y offset. [Limits: -1 <= value <= 1]
/// @return The direction that represents the offset.
inline int rcGetDirForOffset(int x, int y)
{
static const int dirs[5] = { 3, 0, -1, 2, 1 };
return dirs[((y+1)<<1)+x];
}
有了上述的邻居定义和辅助函数之后,计算当前rcCompactSpan的代码就简短了很多:
// Find neighbour connections.
const int MAX_LAYERS = RC_NOT_CONNECTED-1; //62
int tooHighNeighbour = 0;
for (int y = 0; y < h; ++y)
{
for (int x = 0; x < w; ++x)
{
const rcCompactCell& c = chf.cells[x+y*w];
for (int i = (int)c.index, ni = (int)(c.index+c.count); i < ni; ++i)
{
// 遍历当前cell里的所有span
rcCompactSpan& s = chf.spans[i];
for (int dir = 0; dir < 4; ++dir)
{
rcSetCon(s, dir, RC_NOT_CONNECTED);
const int nx = x + rcGetDirOffsetX(dir);
const int ny = y + rcGetDirOffsetY(dir);
// First check that the neighbour cell is in bounds.
if (nx < 0 || ny < 0 || nx >= w || ny >= h)
continue;
// 获取当前dir方向上的邻居cell
const rcCompactCell& nc = chf.cells[nx+ny*w];
for (int k = (int)nc.index, nk = (int)(nc.index+nc.count); k < nk; ++k)
{
const rcCompactSpan& ns = chf.spans[k];
const int bot = rcMax(s.y, ns.y);
const int top = rcMin(s.y+s.h, ns.y+ns.h);
// 遍历邻居cell里的所有空心span 获取一个跨列移动的邻居
// 两个span的高度差不能超过walkableClimb 且允许walkableHeight高度的单位进行通过
if ((top - bot) >= walkableHeight && rcAbs((int)ns.y - (int)s.y) <= walkableClimb)
{
const int lidx = k - (int)nc.index;
if (lidx < 0 || lidx > MAX_LAYERS)
{
tooHighNeighbour = rcMax(tooHighNeighbour, lidx);
continue;
}
// 记录当前方向上的跨列邻居 每一列都只记录一个
rcSetCon(s, dir, lidx);
break;
}
}
}
}
}
}
这里的rcSetCon实现的非常巧妙,尽可能的减少了数据的大小,每个方向的跨列邻居索引压缩为只使用6bit来存储,这样四个方向只需要24bit的空间即可,每次对特定方向的跨列邻居索引做get set的时候都通过位操作来进行:
/// Sets the neighbor connection data for the specified direction.
/// @param[in] s The span to update.
/// @param[in] dir The direction to set. [Limits: 0 <= value < 4]
/// @param[in] i The index of the neighbor span.
inline void rcSetCon(rcCompactSpan& s, int dir, int i)
{
const unsigned int shift = (unsigned int)dir*6;
unsigned int con = s.con;
s.con = (con & ~(0x3f << shift)) | (((unsigned int)i & 0x3f) << shift);
}
/// Gets neighbor connection data for the specified direction.
/// @param[in] s The span to check.
/// @param[in] dir The direction to check. [Limits: 0 <= value < 4]
/// @return The neighbor connection data for the specified direction,
/// or #RC_NOT_CONNECTED if there is no connection.
inline int rcGetCon(const rcCompactSpan& s, int dir)
{
const unsigned int shift = (unsigned int)dir*6;
return (s.con >> shift) & 0x3f;
}
为了省这部分内存带来的限制就是单rcCompactCell内只能有最多63个rcCompactSpan,因为63这个索引被定义为了不可通行。
搞定了压缩高度场的建立之后,下一步需要根据参数walkableRadius来把可通行区域的边缘过滤掉,这个参数的值一般设置为参与寻路的角色胶囊体半径。这个过滤的目的是为了避免寻路角色在区域边缘时出现异常,例如在悬崖边缘浮空或者与围墙穿插,所以要设置这个胶囊体半径的边缘为不可行走。
为了实现这个边缘特定范围过滤,我们需要给每个span赋予一个uint8 dis的值,代表这个span离边缘的距离。以下面的规则来初始化所有的span的dis:
-
如果这个
span不可行走,则设置为0 -
如果这个
span四个方向里存在至少一个列没有跨列邻居,则设置为0,此时需要检查rccompactSpan->con里四个方向的分量是否有等于63的 -
除此之外的
span的dis设置为255,即uint8的上限
然后执行洪泛(FloodFill)法来更新所有span的dis(A),这个更新规则如下:
-
遍历当前
span的四个轴向邻居,获取其中最小的dis(B),然后dis(A) = min(dis(A) , dis(B) + 2),这里使用2作为距离而不是1是因为使用的是最大可能距离而不是中心距离 -
遍历当前
span的四个对角线邻居,获取其中最小的dis(C),然后dis(A) = min(dis(A) , dis(C) + 3),这里使用3作为距离而不是2是因为使用的是最大可能距离而不是中心距离
这个简单的更新规则有个前置条件,即这个span九宫格周围八个span的距离已经更新好了,真要这么做就需要做一个排序。所以recast里使用了一个非常巧妙的方法,执行两次遍历:
- 第一次遍历从左下角
(0, 0)遍历到右上角(w,h),此时只计算当前span的cell偏移量为(-1, 0), (-1, -1),(0, -1), (1, -1)这四个邻居cell里的跨列邻居span,这四个span对应的cell要么在当前cell的正左边,要么在当前cell的下边,肯定在当前cell之前被当前遍历处理过了
for (int y = 0; y < h; ++y)
{
for (int x = 0; x < w; ++x)
{
// 遍历当前cell里的每个span 的(-1, 0), (-1, -1),(0, -1), (1, -1) 跨列邻居
}
}
这次遍历处理完成之后,span对应的dis值存储的就是当前span到正左边或者下边所有不可通行span距离的最小值
- 第二次遍历从右上角
(w,h)遍历到坐下角(0, 0),此时只计算当前span的cell偏移量为(1, 0), (-1, 1),(0, 1), (1, 1)这四个邻居cell里的跨列邻居span,这四个span对应的cell要么在当前cell的正右边,要么在当前cell的上边,肯定在当前cell之前被当前遍历处理过了
for (int y = h-1; y >= 0; --y)
{
for (int x = w-1; x >= 0; --x)
{
// 遍历当前cell里的每个span 的(1, 0), (-1, 1),(0, 1), (1, 1) 跨列邻居
}
}
这次遍历处理完成之后,span对应的dis值存储的就是当前span到所有有不可通行span距离的最小值
我们在span中只存储了四个轴的跨列邻居,那么是如何计算当前span的对角线邻居呢?其实调用两次获取轴向邻居就可以获得对角线邻居。这里以获取span(A)的(-1, -1)偏移量对角线邻居为例,先获取(-1, 0)方向的跨列邻居span(B),然后再获取span(B)在(0, -1)方向的跨列邻居span(C),这就是所需要的对角线邻居:
const rcCompactSpan& s = chf.spans[i];
if (rcGetCon(s, 0) != RC_NOT_CONNECTED)
{
// (-1,0)
const int ax = x + rcGetDirOffsetX(0);
const int ay = y + rcGetDirOffsetY(0);
const int ai = (int)chf.cells[ax+ay*w].index + rcGetCon(s, 0);
const rcCompactSpan& as = chf.spans[ai];
nd = (unsigned char)rcMin((int)dist[ai]+2, 255);
if (nd < dist[i])
dist[i] = nd;
// (-1,-1)
if (rcGetCon(as, 3) != RC_NOT_CONNECTED)
{
const int aax = ax + rcGetDirOffsetX(3);
const int aay = ay + rcGetDirOffsetY(3);
const int aai = (int)chf.cells[aax+aay*w].index + rcGetCon(as, 3);
nd = (unsigned char)rcMin((int)dist[aai]+3, 255);
if (nd < dist[i])
dist[i] = nd;
}
}
两轮过后,每个span参考了周围8个span的dis进行了dis更新,从而得到了正确的dis值。然后将所有dis小于两倍障碍半径的span设置为不可通行:
const unsigned char thr = (unsigned char)(radius*2);
for (int i = 0; i < chf.spanCount; ++i)
if (dist[i] < thr)
chf.areas[i] = RC_NULL_AREA;
做完了边界区域特定半径内禁止通行之后,recast还会调用rcMarkConvexPolyArea对场景中设置的area凸包围盒进行处理,这种包围盒的目的是将其内部的所有span下表面修改span::area字段,以方便后续的业务逻辑做处理。典型的应用场景为标记水体、沼泽地、公路等与平地不一样的区域。函数的执行体很简单,获取这个凸包围盒在XZ平面上的AABB包围盒之后,遍历在这个AABB内的所有cell,将底面中心点在此poly内的span设置对应的area。
for (int z = minz; z <= maxz; ++z)
{
for (int x = minx; x <= maxx; ++x)
{
const rcCompactCell& c = chf.cells[x+z*chf.width];
for (int i = (int)c.index, ni = (int)(c.index+c.count); i < ni; ++i)
{
rcCompactSpan& s = chf.spans[i];
if (chf.areas[i] == RC_NULL_AREA)
continue;
if ((int)s.y >= miny && (int)s.y <= maxy)
{
float p[3];
p[0] = chf.bmin[0] + (x+0.5f)*chf.cs;
p[1] = 0;
p[2] = chf.bmin[2] + (z+0.5f)*chf.cs;
if (pointInPoly(nverts, verts, p))
{
chf.areas[i] = areaId;
}
}
}
}
}
这一步做完之后最终到了使用压缩高度场数据生成区域的逻辑,不过这里的区域生成算法有三种,根据配置调用不同的函数来执行区域生成:
enum SamplePartitionType
{
SAMPLE_PARTITION_WATERSHED,
SAMPLE_PARTITION_MONOTONE,
SAMPLE_PARTITION_LAYERS,
};
-
SAMPLE_PARTITION_WATERSHED代表的是分水岭算法,其函数入口为rcBuildRegions -
SAMPLE_PARTITION_MONOTONE代表的是单调分区算法,其函数入口为rcBuildRegionsMonotone -
SAMPLE_PARTITION_LAYERS代表的是按层分区算法,其函数入口为rcBuildLayerRegions
使用分水岭算法进行区域分割
分水岭算法介绍
分水岭算法是在图像处理中经常使用的图片分区算法,这个算法要求将图形数据转换为二维平面的灰度数据,灰度值代表此像素的深度,也就是高度的负值。算法流程就是不断地对二维平面进行水平面增长,形成多个独立不相连的水域,深度高的地方将优先得到水域覆盖。随着水平面增长,有些原本不相连的水域开始连通,这些水域之间的连通边界就是所谓的分水岭。而在水平面提升过程中形成的水域被这些分水岭边界切分后就是我们所需要的场景区域划分。这里用文字来描述有点乏力,我们用图形来展示。假设初始时平面场景配置如下,网格中深度值为0的代表不可通行:
有了这个阻挡信息之后,我们计算网格中每个点到不可通行的网格的最短距离,这里有一个专门的名词叫做距离场(Distance Field)。这个过程类似于前面我们为了做边缘过滤时的处理,这里我们套用recast里的规定,轴向移动的距离为2,对角线移动的距离为3,从而得到了下面的距离场数据:
这里的距离场数据就是分水岭算法所期望的深度数据。有了深度数据之后,我们开始来抬升水平面,初始水平面为最大深度值。同时我们获取水平面初始化之后生成的各个独立水域,这里我们给每个水域都赋予一个字母代表的唯一标识符。上图中最大深度为8,对应的点只有一个点,我们为之分配一个区域a。当然实际情况中最大深度对应的点不止有一个,而且点之间可能连通。相同深度且可直接连接的点需要合并区域,不能分配不同的区域标识符。
有了初始水域集合之后,我们记录当前最低水位为h,同时开始抬升水位。但是由于recast设定相邻单元格之间的距离为2,所以每抬升一次,要处理的深度范围在[h-1,h]内的网格:
-
如果网格与当前某个水域相连通,则将这个网格加入此水域
-
如果网格没有与任意水域相连通,则创建一个新的水域,赋予一个新的唯一标识符
下图就是第一次抬升水平面的结果,对应的水域区间为[7, 8],此时a区域增加了两个深度为7的邻接点:
再一次抬升水位,此时水位区间为[5,6],会引发两个新水域的创建,同时a区域进行扩大:
继续抬升水位,此时水位区间为[3,4],三个区域继续扩大,此时会第一次遇到作为分水岭的格子,连通了多个水域,对于分水岭上的格子区域归属我们使用一个简单的规则,采用连通区域中唯一标识符最大的区域。这样可以避免出现小标识符的区域赢家通吃的局面,区域划分更加均衡:

最后一次抬升水位,处理水位区间为[1,2]之间的格子,整个图像分割完毕:
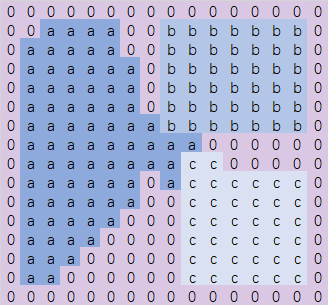
在了解完整体算法核心流程之后,我们再来对照recast的源码进行分析。
距离场创建
分水岭算法的第一步要求把输入数据转换为深度图,在recast中对应的函数为rcBuildDistanceField,内部按序调用两个函数:
-
calculateDistanceField这个就是前面所说的距离场计算函数,这里的逻辑跟前述边界距离计算基本相同,不过前面是以不可行走的span为边界,二距离场计算时遇到span::area不同时就认为遇到了边界 -
boxBlur这个函数用来将距离执行一个周围均值计算,每个span的距离值等于自身距离值加上周围八个邻居span的距离值总和的平均值,这样就可以避免相邻span之间距离差异太大
在RecastDemo中可以可视化的将距离场数据展示出来,以灰度来表明距离区域边界的值,颜色越白代表距离边界越远,颜色越黑代表距离边界越近。
分水岭算法执行
搞定了距离场之后,开始正式的执行分水岭算法的流程,对应的函数为rcBuildRegions。函数开始时负责初始化一些变量,然后开始分水岭的持续迭代:
const int LOG_NB_STACKS = 3;
const int NB_STACKS = 1 << LOG_NB_STACKS; // 8
rcTempVector<LevelStackEntry> lvlStacks[NB_STACKS]; // 这是迭代时作为数组队列使用的结构
for (int i=0; i<NB_STACKS; ++i)
lvlStacks[i].reserve(256);
rcTempVector<LevelStackEntry> stack;
stack.reserve(256);
unsigned short regionId = 1;// 下一个有效的区域id 作为计数器使用
unsigned short level = (chf.maxDistance+1) & ~1; // 距离场的最大距离 + 1
// TODO: Figure better formula, expandIters defines how much the
// watershed "overflows" and simplifies the regions. Tying it to
// agent radius was usually good indication how greedy it could be.
// const int expandIters = 4 + walkableRadius * 2;
const int expandIters = 8;
int sId = -1;
while (level > 0)
{
level = level >= 2 ? level-2 : 0; // 每次迭代时level减2 因为我们定义的相邻span进行轴向移动时的距离为2
sId = (sId+1) & (NB_STACKS-1); // 更新当前要使用的是那一个LevelStackEntry
if (sId == 0)
// 如果迭代次数整除8了 那么遍历距离场里的span 将距离值在[level, level + 16)中的span投递到这八个LevelStackEntry中
// 投递的索引为 (dis - level)/2
sortCellsByLevel(level, chf, srcReg, NB_STACKS, lvlStacks, 1);
else
// 否则将上一次迭代中还没有分配有效region_id的span添加到当前迭代中来使用
appendStacks(lvlStacks[sId-1], lvlStacks[sId], srcReg);
// 分水岭算法的迭代逻辑
// expandRegions
// FloodRegions
}
这里使用sId来索引预先分配的八个LevelStackEntry是为了节省内存,如果每次迭代中都分配一个LevelStackEntry会造成内存很大的浪费,如果只采用双缓冲的话又会导致频繁的去调用sortCellsByLevel执行距离场的遍历,这里为了权衡效率使用了常见的8作为预先分配的数组个数。这样的操作之后,lvlStacks[sId]就存储了当前level里要考虑的span了,现在我们使用expandRegions进行区域扩张,看看哪些span能够合并到现有的区域之中:
static void expandRegions(int maxIter, unsigned short level,
rcCompactHeightfield& chf,
unsigned short* srcReg, unsigned short* srcDist,
rcTempVector<LevelStackEntry>& stack,
bool fillStack)
这个函数的第一个参数代表执行多少次迭代,每次迭代都会执行下面的代码,来尝试将stack里没有region_id的spans合并到相邻的region中:
for (int j = 0; j < stack.size(); j++)
{
int x = stack[j].x;
int y = stack[j].y;
int i = stack[j].index; // 这里的index字段为负数代表已经分配了对应的region
if (i < 0)
{
failed++;
continue;
}
// 所以当前span还没有分配对应region
unsigned short r = srcReg[i];
unsigned short d2 = 0xffff;
const unsigned char area = chf.areas[i];
const rcCompactSpan& s = chf.spans[i];
for (int dir = 0; dir < 4; ++dir)
{
// 遍历四个方向上的邻居
if (rcGetCon(s, dir) == RC_NOT_CONNECTED) continue;
const int ax = x + rcGetDirOffsetX(dir);
const int ay = y + rcGetDirOffsetY(dir);
const int ai = (int)chf.cells[ax+ay*w].index + rcGetCon(s, dir);
// 如果此邻居的表面类型与当前span的表面类型不一样 那么不参与与这个邻居的区域合并
if (chf.areas[ai] != area) continue;
if (srcReg[ai] > 0 && (srcReg[ai] & RC_BORDER_REG) == 0)
{
// srcReg[ai] 大于0代表不是边界,RC_BORDER_REG这个bit代表这个span在高度场的边界内
if ((int)srcDist[ai]+2 < (int)d2)
{
// 选择周围邻居中深度最小的那个作为合并region
// 这里并没有对深度相同时做更多的判断
r = srcReg[ai];
d2 = srcDist[ai]+2;
}
}
}
if (r)//如果从上面的四个邻居中找到了合并的目标region
{
stack[j].index = -1; // 标记为已经合并
dirtyEntries.push_back(DirtyEntry(i, r, d2)); //将合并的数据存下来
}
else
{
// 否则等待下一轮迭代处理
failed++;
}
}
对于在expandRegion执行后stack里还未设置对应region的span,调用floodRegion去尝试分配新的region_id:
// Mark new regions with IDs.
for (int j = 0; j<lvlStacks[sId].size(); j++)
{
LevelStackEntry current = lvlStacks[sId][j];
int x = current.x;
int y = current.y;
int i = current.index;
if (i >= 0 && srcReg[i] == 0)
{
if (floodRegion(x, y, i, level, regionId, chf, srcReg, srcDist, stack))
{
if (regionId == 0xFFFF)
{
ctx->log(RC_LOG_ERROR, "rcBuildRegions: Region ID overflow");
return false;
}
regionId++;
}
}
}
在这个floodRegion中,会执行用栈模拟的DFS遍历,将能从当前span连通的所有其他span都设置上对应的新region_id。不过这里递归时也是有条件的,如果当前要处理的span的八个邻居中存在一个已经分配了区域的span,那这个span不能加入到当前region中,需要等待下一次expandRegion时计算距离最短的region来赋值。这里遍历八个邻居的算法很巧妙,完全通过索引数组来计算的:
// 以顺时针遍历所有的八个邻居
for (int dir = 0; dir < 4; ++dir)
{
// 8 connected
if (rcGetCon(cs, dir) != RC_NOT_CONNECTED)
{
const int ax = cx + rcGetDirOffsetX(dir);
const int ay = cy + rcGetDirOffsetY(dir);
const int ai = (int)chf.cells[ax+ay*w].index + rcGetCon(cs, dir);
// as就是当前的轴向邻居
const rcCompactSpan& as = chf.spans[ai];
const int dir2 = (dir+1) & 0x3;
if (rcGetCon(as, dir2) != RC_NOT_CONNECTED)
{
const int ax2 = ax + rcGetDirOffsetX(dir2);
const int ay2 = ay + rcGetDirOffsetY(dir2);
const int ai2 = (int)chf.cells[ax2+ay2*w].index + rcGetCon(as, dir2);
// as2就是顺时针顺序中as的下一个
const rcCompactSpan& as2 = chf.spans[ai2];
}
}
}
下图就是对应的邻居遍历顺序:
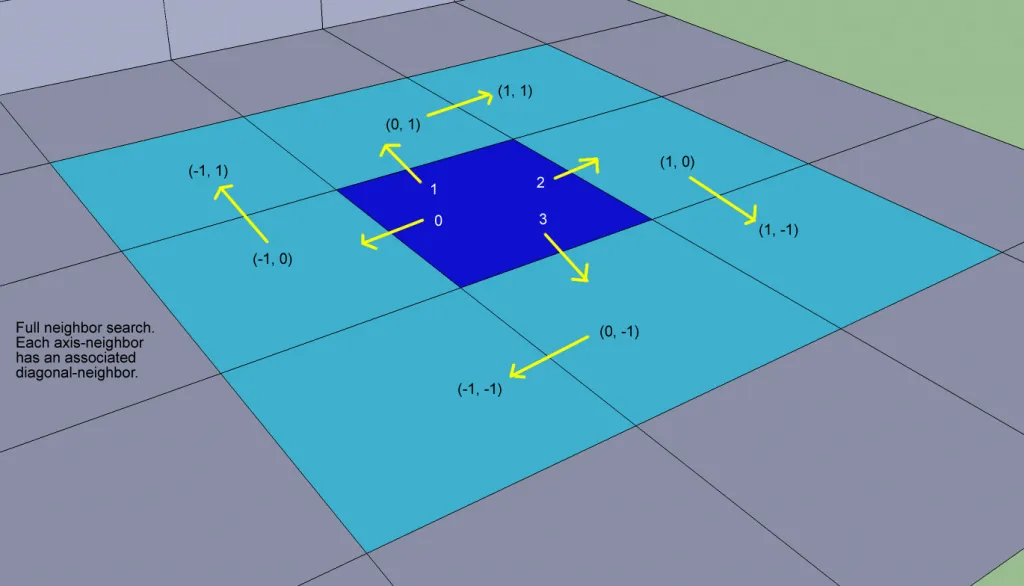
至此,分水岭算法执行区域划分的流程结束。整体流程的时间复杂度大概为span的数量乘以距离场里的最大值,由于单cell中span数量最多为64,所以最坏时间复杂度大概为XZ平面边长的立方。因此随着场景的变大,此过程的执行时间会膨胀的很快。不过NavMesh一般都是离线执行的,所以一般来说也不在乎生成时间,同时又由于分水岭的区域分割效果比较好,因此默认选取这个算法作为区域生成算法。
region 结构体创建
在分水岭算法将span都标记好了对应的区域之后,开始调用mergeAndFilterRegions创建region信息。
struct rcRegion
{
inline rcRegion(unsigned short i) :
spanCount(0),
id(i),
areaType(0),
remap(false),
visited(false),
overlap(false),
connectsToBorder(false),
ymin(0xffff),
ymax(0)
{}
int spanCount; // 当前region内有多少个span
unsigned short id; // 当前region的唯一标识符 大于0
unsigned char areaType; // 当前region的区域类型
bool remap;
bool visited; // 这是一个临时变量不用管
bool overlap; // 当前region是否会跨层 即包括同一个cell里的多个span
bool connectsToBorder; // 当前region是否在边缘
unsigned short ymin, ymax; // 当前region的高度上下界
rcIntArray connections; // 与当前region连通的其他region的id
rcIntArray floors; //这里存储在`XZ`平面上与当前region有重叠的其他region的id
};
这里connections字段的初始化逻辑比较复杂,采用了下面的逻辑来处理:
// Check if this cell is next to a border.
int ndir = -1;
for (int dir = 0; dir < 4; ++dir)
{
if (isSolidEdge(chf, srcReg, x, y, i, dir))
{
ndir = dir;
break;
}
}
if (ndir != -1)
{
// The cell is at border.
// Walk around the contour to find all the neighbours.
walkContour(x, y, i, ndir, chf, srcReg, reg.connections);
}
首先遍历当前span的四个方向邻居,调用isSolidEdge来判定当前span在dir方向的邻居是否归属于其他region。如果当前span存在某个方向能连接到其他region,则调用walkContour从这个span出来沿着当前region的边界上的span进行遍历,同时收集与当前region邻接的region_id存储到connections中。
static void walkContour(int x, int y, int i, int dir,
rcCompactHeightfield& chf,
const unsigned short* srcReg,
rcIntArray& cont)
{
// 初始的时候 cells[x][y] 上的span[i] 在dir方向能连通到其他区域 因此当前span肯定是当前region边界上的一个span
int startDir = dir;
int starti = i;
const rcCompactSpan& ss = chf.spans[i];
unsigned short curReg = 0;
if (rcGetCon(ss, dir) != RC_NOT_CONNECTED)
{
// 这个连通判断在外面已经判断通过了
const int ax = x + rcGetDirOffsetX(dir);
const int ay = y + rcGetDirOffsetY(dir);
const int ai = (int)chf.cells[ax+ay*chf.width].index + rcGetCon(ss, dir);
curReg = srcReg[ai];
}
cont.push(curReg); // 加入到连通数组中
int iter = 0;
while (++iter < 40000)
{
const rcCompactSpan& s = chf.spans[i];
// 获取当前要处理的span在当前dir方向是否能连接到其他region
if (isSolidEdge(chf, srcReg, x, y, i, dir))
{
// r代表此方向上的连通region
unsigned short r = 0;
if (rcGetCon(s, dir) != RC_NOT_CONNECTED)
{
const int ax = x + rcGetDirOffsetX(dir);
const int ay = y + rcGetDirOffsetY(dir);
const int ai = (int)chf.cells[ax+ay*chf.width].index + rcGetCon(s, dir);
r = srcReg[ai];
}
if (r != curReg)
{
curReg = r;
cont.push(curReg);
}
// 然后更新下一个判断方向,为顺时针遍历
dir = (dir+1) & 0x3; // Rotate CW
}
else
{
// 如果此方向上的邻居还属于当前region
int ni = -1;
const int nx = x + rcGetDirOffsetX(dir);
const int ny = y + rcGetDirOffsetY(dir);
if (rcGetCon(s, dir) != RC_NOT_CONNECTED)
{
const rcCompactCell& nc = chf.cells[nx+ny*chf.width];
ni = (int)nc.index + rcGetCon(s, dir);
}
if (ni == -1)
{
// Should not happen.
return;
}
// 则将span进行更新 同时方向逆时针回拨
x = nx;
y = ny;
i = ni;
dir = (dir+3) & 0x3; // Rotate CCW
}
if (starti == i && startDir == dir)
{
// 到这里说明已经回到了初始点的初始方向 遍历边界结束
break;
}
}
// 由于region与region之间的边界是连续的 所以con数组有很多连续相同的元素 这里会进行连续重复元素的精简
if (cont.size() > 1)
{
for (int j = 0; j < cont.size(); )
{
int nj = (j+1) % cont.size();
if (cont[j] == cont[nj])
{
for (int k = j; k < cont.size()-1; ++k)
cont[k] = cont[k+1];
cont.pop();
}
else
++j;
}
}
}
上面的遍历边界流程可以用下面的图形来可视化的展示,初始的时候我们选择这条浅蓝色的边,箭头指向的方向为其邻居region的连通方向:

然后继续遍历当前span顺时针下去的其他方向,直到某个方向上连接的是自身区域:

此时需要切换span,同时方向逆时针回拨90度,然后继续开始遍历边界,下面的带序号的边代表在对应的span里遍历四个轴方向的顺序:
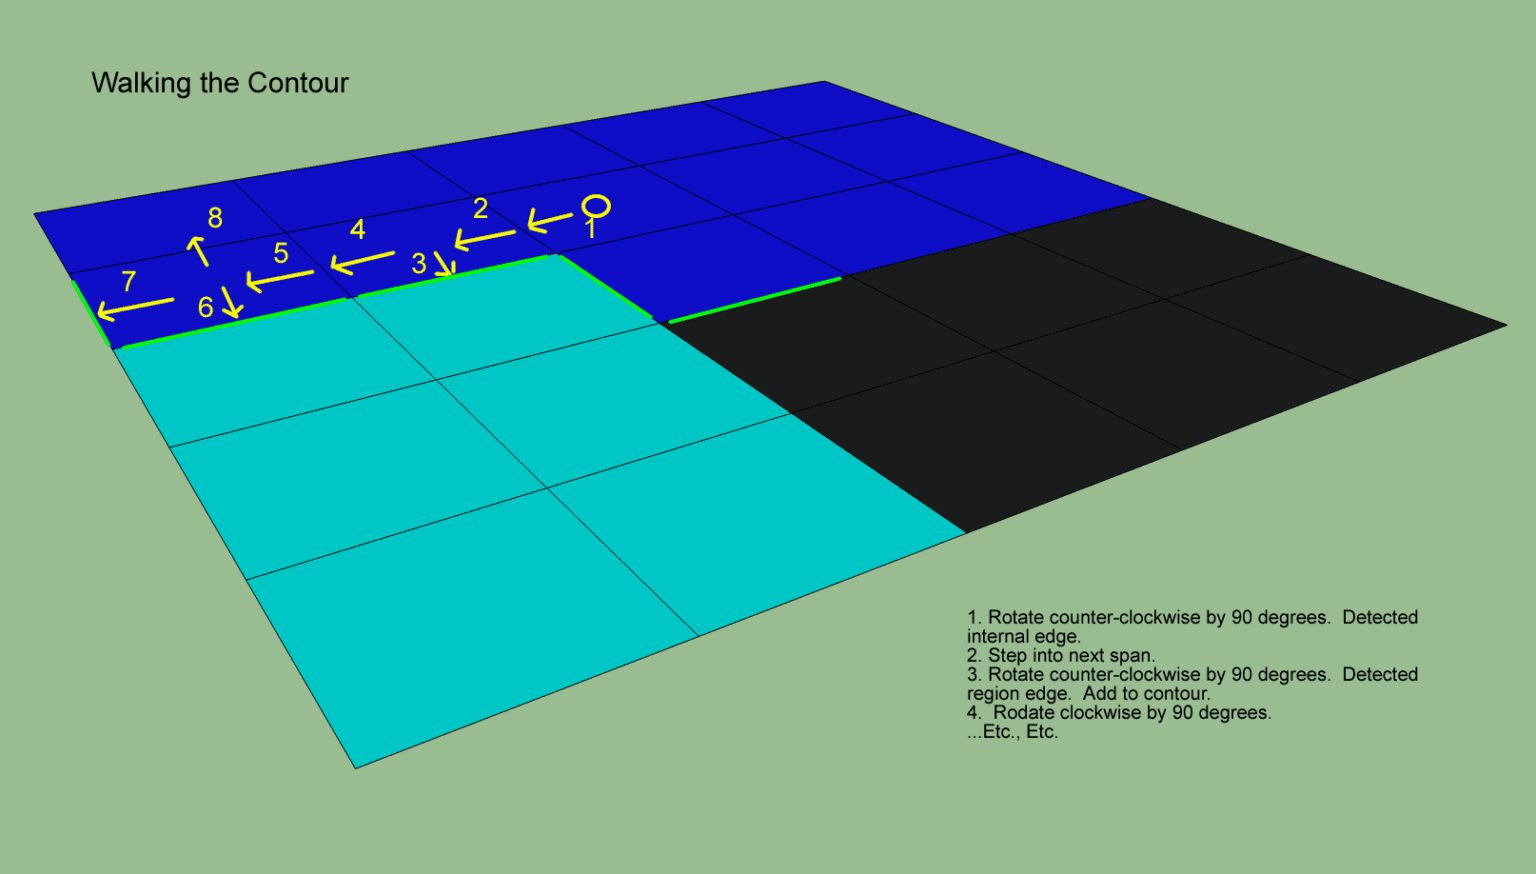
面积过小区域合并
建立了初始的区域之后还要接入一个后处理,删除一些面积过于小的区域。因为分水岭算法经常会造成一小块凸起区域被周围的一个大区域围住,导致后续的多边形划分出现问题。这里有个配置参数minRegionArea,代表最小可行走区域面积,用此参数来删除所有的小区域。实现上就是遍历所有生成的region,如果从这个region可直接或间接连通的所有region的span总数小于这个minRegionArea,这把这些连通的小region都删除:
// Remove too small regions.
rcIntArray stack(32);
rcIntArray trace(32);
for (int i = 0; i < nreg; ++i)
{
rcRegion& reg = regions[i];
if (reg.id == 0 || (reg.id & RC_BORDER_REG)) //边界region不处理
continue;
if (reg.spanCount == 0) //异常region不处理
continue;
if (reg.visited) // 已经在之前遍历的region连通过了 不处理
continue;
// Count the total size of all the connected regions.
// Also keep track of the regions connects to a tile border.
bool connectsToBorder = false;
int spanCount = 0;
stack.clear();
trace.clear();
reg.visited = true;
stack.push(i);
// 下面计算所有可以从当前region出发能到达的region的集合 其实就是一个无向图的连通分量
while (stack.size())
{
// Pop
int ri = stack.pop();
rcRegion& creg = regions[ri];
spanCount += creg.spanCount;
trace.push(ri);
for (int j = 0; j < creg.connections.size(); ++j)
{
if (creg.connections[j] & RC_BORDER_REG)
{
connectsToBorder = true;
continue;
}
rcRegion& neireg = regions[creg.connections[j]];
if (neireg.visited)
continue;
if (neireg.id == 0 || (neireg.id & RC_BORDER_REG))
continue;
// Visit
stack.push(neireg.id);
neireg.visited = true;
}
}
// 如果当前连通分量的span数量小于指定值,且不是tile边界上的的区域 则删除当前连通分量里的所有region
if (spanCount < minRegionArea && !connectsToBorder)
{
// Kill all visited regions.
for (int j = 0; j < trace.size(); ++j)
{
regions[trace[j]].spanCount = 0;
regions[trace[j]].id = 0;
}
}
}
最终成果就是将下图中的桌面设置为了不可行走,因为其表面积太小了:
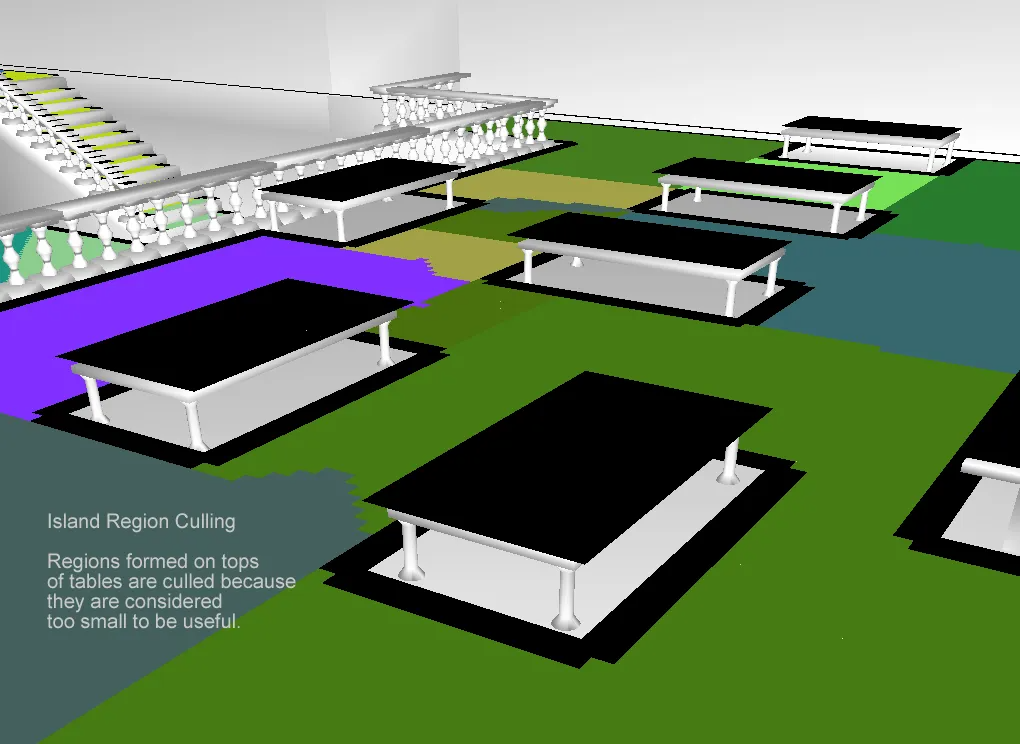
裁剪完成之后,一些小区域仍然可能残留下来,因为其连通着某些大区域,此时需要将这些小区域合并到对应的大区域中,这里有一个配置参数mergeRegionSize,span数量小于此配置的region将会被合并,不过两个region能否合并还需要通过一个额外的测试:
static bool canMergeWithRegion(const rcRegion& rega, const rcRegion& regb)
{
// 两个区域的表面类型不同 无法合并
if (rega.areaType != regb.areaType)
return false;
int n = 0;
for (int i = 0; i < rega.connections.size(); ++i)
{
if (rega.connections[i] == regb.id)
n++;
}
// 如果两者之间有多条邻接边 合并时可能导致新的大region把原来的某个临接region包围住 因此不能合并
if (n > 1)
return false;
// 如果两个区域在XZ平面上有重叠,也不能参与合并
for (int i = 0; i < rega.floors.size(); ++i)
{
if (rega.floors[i] == regb.id)
return false;
}
return true;
}
有了上面这个合并限制之后,开始循环检测所有的region中是否有可以合并的:
// Merge too small regions to neighbour regions.
int mergeCount = 0 ;
do
{
mergeCount = 0;
for (int i = 0; i < nreg; ++i)
{
rcRegion& reg = regions[i];
if (reg.id == 0 || (reg.id & RC_BORDER_REG)) // 不可行走或者tile边界区域不会合并
continue;
if (reg.overlap) // 有跨层联通span的不会合并
continue;
if (reg.spanCount == 0) // 异常区域不会合并
continue;
// span数量大于这个值 且有个边界区域邻居的 不参与合并
if (reg.spanCount > mergeRegionSize && isRegionConnectedToBorder(reg))
continue;
// 遍历当前所有的邻居区域找到其中span数量最小的region
int smallest = 0xfffffff;
unsigned short mergeId = reg.id;
for (int j = 0; j < reg.connections.size(); ++j)
{
if (reg.connections[j] & RC_BORDER_REG) continue;
rcRegion& mreg = regions[reg.connections[j]];
// 这里要排除所有与边界region连通的邻居
if (mreg.id == 0 || (mreg.id & RC_BORDER_REG) || mreg.overlap) continue;
if (mreg.spanCount < smallest &&
canMergeWithRegion(reg, mreg) &&
canMergeWithRegion(mreg, reg))
{
smallest = mreg.spanCount;
mergeId = mreg.id;
}
}
// 找到一个邻居 将当前region合并过去
if (mergeId != reg.id)
{
unsigned short oldId = reg.id;
rcRegion& target = regions[mergeId];
// 执行span的合并 更新邻居列表
if (mergeRegions(target, reg))
{
for (int j = 0; j < nreg; ++j)
{
if (regions[j].id == 0 || (regions[j].id & RC_BORDER_REG)) continue;
// 如果之前有一个region已经被合并到了当前region 更新其合并目标为新的region
if (regions[j].id == oldId)
regions[j].id = mergeId;
// 将原来所有region里指向当前region的边 都替换为指向要合并的region
replaceNeighbour(regions[j], oldId, mergeId);
}
mergeCount++;
}
}
}
}
while (mergeCount > 0); // 直到一轮循环过后没有新的region触发合并 才结束整体的合并流程
区域重映射
经过区域裁剪和合并后,有效region会变少。为了减少后续操作中不必要的内存开销,现在需要对区域的regionID执行remap操作来重新映射为连续的数字,以此来降低regionID的最大值。
// Compress region Ids.
for (int i = 0; i < nreg; ++i)
{
regions[i].remap = false;
if (regions[i].id == 0) continue; // Skip nil regions.
if (regions[i].id & RC_BORDER_REG) continue; // Skip external regions.
regions[i].remap = true; // 标记所有可行走的且非边界上的区域为可重定向
}
unsigned short regIdGen = 0;
for (int i = 0; i < nreg; ++i)
{
if (!regions[i].remap) // 如果已经被重定向了 则不需要处理
continue;
unsigned short oldId = regions[i].id;
unsigned short newId = ++regIdGen;
// 合并组里的id统一更换
for (int j = i; j < nreg; ++j)
{
if (regions[j].id == oldId)
{
regions[j].id = newId;
regions[j].remap = false;
}
}
}
maxRegionId = regIdGen;
// 最后更新span对应的区域id
for (int i = 0; i < chf.spanCount; ++i)
{
if ((srcReg[i] & RC_BORDER_REG) == 0)
srcReg[i] = regions[srcReg[i]].id;
}
区域的重叠问题
这里其实还有最后一个步骤,将所有含有跨层数据的区域的id记录下来并返回:
// Return regions that we found to be overlapping.
for (int i = 0; i < nreg; ++i)
if (regions[i].overlap)
overlaps.push(regions[i].id);
但是其实外部并没有对这个数组做处理,只是在注释里说要把这些与自身重叠的区域拆成多个不重叠的:
// Merge regions and filter out smalle regions.
rcIntArray overlaps;
chf.maxRegions = regionId;
if (!mergeAndFilterRegions(ctx, minRegionArea, mergeRegionArea, chf.maxRegions, chf, srcReg, overlaps))
return false;
// If overlapping regions were found during merging, split those regions.
if (overlaps.size() > 0)
{
ctx->log(RC_LOG_ERROR, "rcBuildRegions: %d overlapping regions.", overlaps.size());
}
看来只是写了一个TODO,但是没有具体实现,打了一个错误日志对使用者进行警告。那这种overlap的情况会带来怎样的危害呢,请看下图:
在这张图中,我们发现在旋转楼梯上出现了一个很不符合直觉的可行走三角形,同时一些本来应该在楼梯上的三角形并没有生成。造成这个异常的原因是螺旋楼梯中的一部分跨层数据归属于同一个region,然后这种跨层region在后续的三角形切分时无法正确的被处理。
如果想要去解决这个overlap问题,则需要将这个region继续做切分。最简单的做法就是选择一个特定高度Y的XZ平面将原有的区域切分成为上中下三个部分,所有底面高度大于Y+walkableClimb的span划分到一个region,所有底面高度小于Y-walkableClimb的span划分到一个region,剩下的span划分为一个region, 如果切分后的region还有重叠部分再继续切割。例如上图中选择旋转楼梯的转角平面部分作为切分平面,两个切分平面构造出五个不再overlap的区域。当然这个方法也不保证一定有效,所以recast官方也暂时将此问题搁置了。
使用单调分区算法进行区域分割
单调分区算法相对于分水岭算法来说就简单很多了,在平面网格上进行一次二维遍历即可得到结果区域,下面我们继续使用之前使用的平面网格示例来介绍其算法核心思想。初始时的平面网格如下:
在这个地图上我们开始从下到上从左到右的逐行扫描,如果遇到一个不与之前分配好的region连通的可行走网格,则分配一个新的region。所以扫描了第一行之后,我们创建了两个新的区域:
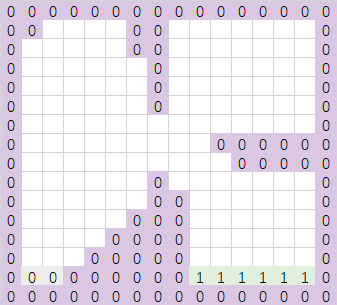
再向上扫描一行,得到下面的区域扩散结果:
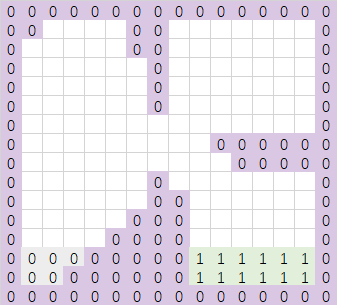
继续扫描四行,结果如下:
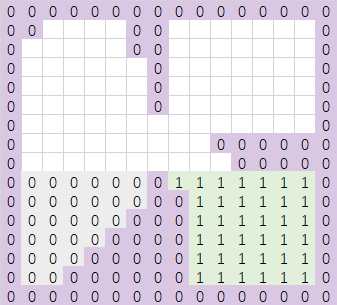
此时要扫描的下一行有点特殊,因为这一行会同时与区域0和区域1相交,对于这种同时与多个区域相连通的连续行,分配一个新的region,继续向上扫描两行之后得到了下面的结果:
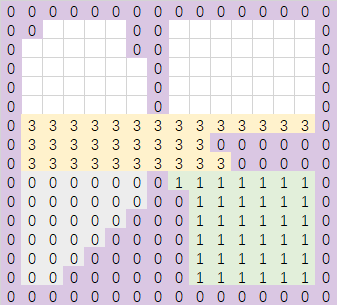
再上面一行会出现两个不连通的连续区域,此时将这两个区域分配新的region,然后继续向上,得到的最终结果如下:
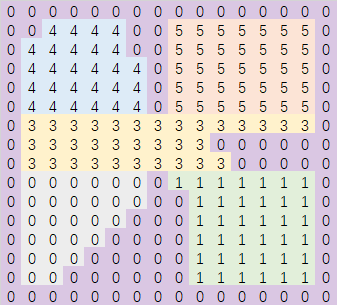
在Recast的源码中负责这个流程的函数为rcBuildRegionsMonotone, 在函数流程中为了方便记录每一行切分出来的每条连续网格组成的条带,使用了下面的数据结构:
struct rcSweepSpan
{
unsigned short rid; // 当前条带在所属行里的条带id
unsigned short id; // 当前条带分配的区域id
unsigned short ns; // 当前条带里的span数量
unsigned short nei; // 当前条带下方的邻居区域id 0代表没有初始化 RC_NULL_NEI 代表有多个
};
算法开始时需要分配好一些资源:
const int nsweeps = rcMax(chf.width,chf.height); // 最坏情况下每个cell单独一个条带
rcScopedDelete<rcSweepSpan> sweeps((rcSweepSpan*)rcAlloc(sizeof(rcSweepSpan)*nsweeps, RC_ALLOC_TEMP));
rcIntArray prev(256); // 存储
unsigned short id = 1; // 用来分配区域id的计数器
// 每次扫描XZ平面的一行
for (int y = borderSize; y < h-borderSize; ++y)
{
// Collect spans from this row.
prev.resize(id+1);
memset(&prev[0],0,sizeof(int)*id);
unsigned short rid = 1;
for (int x = borderSize; x < w-borderSize; ++x)
{
// 遍历这行中的每一个cell
const rcCompactCell& c = chf.cells[x+y*w];
for (int i = (int)c.index, ni = (int)(c.index+c.count); i < ni; ++i)
{
// 遍历当前cell里的每一个span
const rcCompactSpan& s = chf.spans[i];
if (chf.areas[i] == RC_NULL_AREA) continue;
// 找到当前spanXZ平面左边的邻居对应的已分配区域id
unsigned short previd = 0;
if (rcGetCon(s, 0) != RC_NOT_CONNECTED)
{
const int ax = x + rcGetDirOffsetX(0);
const int ay = y + rcGetDirOffsetY(0);
const int ai = (int)chf.cells[ax+ay*w].index + rcGetCon(s, 0);
if ((srcReg[ai] & RC_BORDER_REG) == 0 && chf.areas[i] == chf.areas[ai])
previd = srcReg[ai];
}
if (!previd) // 如果左边没有邻居 说明当前span是一个新的条带的开始 分配一个新的条带id
{
previd = rid++;
sweeps[previd].rid = previd;
sweeps[previd].ns = 0;
sweeps[previd].nei = 0;
}
// 然后再找当前span下方邻居对应的区域id
if (rcGetCon(s,3) != RC_NOT_CONNECTED)
{
const int ax = x + rcGetDirOffsetX(3);
const int ay = y + rcGetDirOffsetY(3);
const int ai = (int)chf.cells[ax+ay*w].index + rcGetCon(s, 3);
if (srcReg[ai] && (srcReg[ai] & RC_BORDER_REG) == 0 && chf.areas[i] == chf.areas[ai])
{
unsigned short nr = srcReg[ai];
if (!sweeps[previd].nei || sweeps[previd].nei == nr)
{
// 如果前面条带下方邻居区域没有初始化过 或者下方的邻居所属区域等于前面计算好的邻居区域id
// 则把当前点加入到前面条带中
sweeps[previd].nei = nr;
sweeps[previd].ns++;
prev[nr]++;
}
else
{
// 前面条带下面有多个不同区域的邻居 需要分配单独的区域id
sweeps[previd].nei = RC_NULL_NEI;
}
}
}
// 先暂时赋值为条带id 等待后续条带id分配了region id之后再修正
srcReg[i] = previd;
}
}
// Create unique ID.
for (int i = 1; i < rid; ++i)
{
// 遍历前面分割出来的多个条带
if (sweeps[i].nei != RC_NULL_NEI && sweeps[i].nei != 0 &&
prev[sweeps[i].nei] == (int)sweeps[i].ns)
{
// 如果这个条带下方的邻居区域只有一个 且这个邻居区域上方的条带也只有一个
// 则当前条带的区域id等于其下方邻居所属的区域id
sweeps[i].id = sweeps[i].nei;
}
else
{
// 下方有多个相邻区域 或者与多个条带共享当前下方的邻居
// 需要分配一个新的区域id
sweeps[i].id = id++;
}
}
// 所有的条带id都分配了一个对应的region id之后
// 将每个span的region id正确的赋值为对应条带的region id
for (int x = borderSize; x < w-borderSize; ++x)
{
const rcCompactCell& c = chf.cells[x+y*w];
for (int i = (int)c.index, ni = (int)(c.index+c.count); i < ni; ++i)
{
if (srcReg[i] > 0 && srcReg[i] < rid)
srcReg[i] = sweeps[srcReg[i]].id;
}
}
}
上面的部分就是执行monotone算法的过程,函数整体就是使用三重循环去遍历所有的span,所以整个monotone算法的时间复杂度为span数量的常数,已经不可能再降低下去了。但是这个算法过于追求速度导致了区域的形状非常不令人满意,会出现很多的长条,唯一的好处就是这种分区方法不会造成前述的overlap问题。
执行完成之后也会调用mergeAndFilterRegions这个函数来创建Region结构体并合并一些过于小的区域到周围的大区域中。
{
rcScopedTimer timerFilter(ctx, RC_TIMER_BUILD_REGIONS_FILTER);
// Merge regions and filter out small regions.
rcIntArray overlaps;
chf.maxRegions = id;
if (!mergeAndFilterRegions(ctx, minRegionArea, mergeRegionArea, chf.maxRegions, chf, srcReg, overlaps))
return false;
// Monotone partitioning does not generate overlapping regions.
}
由于mergeAndFilterRegions的时间复杂度也是span数量的常数,所以整体不影响rcBuildRegionsMonotone的整体时间复杂度。,但是调用mergeAndFilterRegions合并之后可能会导致region的overlap。除非是运行时生成NavMesh。正常情况下不会去选择monotone作为生成方式。
使用分层算法进行区域分割
这里分层算法的入口是rcBuildLayerRegions,这个算法基本等价于monotone算法,唯一的修正就是进行最后的区域合并过程调用的不再是可能会造成overlap的mergeAndFilterRegions,换成了一个确保不会造成overlap的mergeAndFilterLayerRegions。不过这个函数与mergeAndFilterRegions的差异没多大,就下面部分体现出了不同,这部分代码在创建初始Region之后:
// Create 2D layers from regions.
unsigned short layerId = 1;
for (int i = 0; i < nreg; ++i)
regions[i].id = 0;
// Merge montone regions to create non-overlapping areas.
rcIntArray stack(32);
for (int i = 1; i < nreg; ++i)
{
rcRegion& root = regions[i];
// Skip already visited.
if (root.id != 0)
continue;
// Start search.
root.id = layerId;
stack.clear();
stack.push(i);
while (stack.size() > 0)
{
// Pop front
rcRegion& reg = regions[stack[0]];
for (int j = 0; j < stack.size()-1; ++j)
stack[j] = stack[j+1];
stack.resize(stack.size()-1);
const int ncons = (int)reg.connections.size();
for (int j = 0; j < ncons; ++j)
{
const int nei = reg.connections[j];
rcRegion& regn = regions[nei];
// Skip already visited.
if (regn.id != 0)
continue;
// Skip if different area type, do not connect regions with different area type.
if (reg.areaType != regn.areaType)
continue;
// 如果当前邻居span所属的region与当前合并中的region有xz平面交集 则禁止合并
bool overlap = false;
for (int k = 0; k < root.floors.size(); k++)
{
if (root.floors[k] == nei)
{
overlap = true;
break;
}
}
if (overlap)
continue;
// Deepen
stack.push(nei);
// Mark layer id
regn.id = layerId;
// 如果合并进去了 则将地面xz的相交区域扩大
for (int k = 0; k < regn.floors.size(); ++k)
addUniqueFloorRegion(root, regn.floors[k]);
root.ymin = rcMin(root.ymin, regn.ymin);
root.ymax = rcMax(root.ymax, regn.ymax);
root.spanCount += regn.spanCount;
regn.spanCount = 0;
root.connectsToBorder = root.connectsToBorder || regn.connectsToBorder;
}
}
layerId++;
}
上面的代码就是查找连接过来的region时如果发现与当前计算出来的合并区域有overlap的地方,则不把这个区域与当前已经生成的合并区域进行合并。不过这个函数无法在分水岭生成的初始区域上执行,因为分水岭生成的初始区域可能已经有overlap了,这里再考虑避免overlap已经晚了。
区域轮廓生成与平滑
在经过区域生成之后,原有的压缩高度场里的span都分配好了对应的区域id。这些区域数据可以极大的加速原来基于span的联通路径查找,因为我们可以把整个场景的连通图从span连通图切换到区域连通图,节点数量会降低到原来的几十分之一甚至几百分之一。但是Recast并没有止步于此,因为存储span的压缩高度场数据消耗了过多的内存。为了打造一个更加完美的寻路数据结构,需要找到一个更省内存的描述区域数据的方法。Recast使用的方法是只存储区域的边界信息,生成一些简单的多边形,也就是区域的轮廓Contour,这个过程对应的函数为rcBuildContours。
标记在边界区域的span
这部分的代码很简单,遍历每个span查找其四个方向的邻居所属区域是否等于当前区域即可:
// 这里的flag数组标记每个span在四个方向是否与其他非自身可行区域相连 如果相连则对应方向的bit设置为1
// 如果与边界相邻 则设置为0
rcScopedDelete<unsigned char> flags((unsigned char*)rcAlloc(sizeof(unsigned char)*chf.spanCount, RC_ALLOC_TEMP));
// Mark boundaries.
for (int y = 0; y < h; ++y)
{
for (int x = 0; x < w; ++x)
{
const rcCompactCell& c = chf.cells[x+y*w];
for (int i = (int)c.index, ni = (int)(c.index+c.count); i < ni; ++i)
{
unsigned char res = 0;
const rcCompactSpan& s = chf.spans[i];
if (!chf.spans[i].reg || (chf.spans[i].reg & RC_BORDER_REG))
{
flags[i] = 0;
continue;
}
for (int dir = 0; dir < 4; ++dir)
{
unsigned short r = 0;
if (rcGetCon(s, dir) != RC_NOT_CONNECTED) // 找到当前方向的邻居span所在的区域
{
const int ax = x + rcGetDirOffsetX(dir);
const int ay = y + rcGetDirOffsetY(dir);
const int ai = (int)chf.cells[ax+ay*w].index + rcGetCon(s, dir);
r = chf.spans[ai].reg;
}
if (r == chf.spans[i].reg) // 如果邻居区域与当前span的区域相同
res |= (1 << dir); // 则这方向对应的bit设置为1
}
// 然后取反 所以某个方向的bit为1代表此方向连通到其他区域
flags[i] = res ^ 0xf;
}
}
}
构造区域轮廓点
这里定义了一个与之前创建Region时使用的WalkContour同名的函数来收集一个Region的顺时针存储的边界span列表。之所以同名是因为其逻辑类似,但是又有那么一些不同。
static void walkContour(int x, int y, int i,
rcCompactHeightfield& chf,
unsigned char* flags, rcIntArray& points)
{
// 找到第一个与其他区域连通的方向
unsigned char dir = 0;
while ((flags[i] & (1 << dir)) == 0)
dir++;
unsigned char startDir = dir;
int starti = i;
const unsigned char area = chf.areas[i];
int iter = 0;
while (++iter < 40000)
{
// 如果当前span在dir方向联通到了其他区域
if (flags[i] & (1 << dir))
{
bool isBorderVertex = false;
bool isAreaBorder = false;
// 下面的px py pz 代表当前点对应的轮廓点坐标
int px = x;
int py = getCornerHeight(x, y, i, dir, chf, isBorderVertex);
int pz = y;
switch(dir)
{
case 0: pz++; break;
case 1: px++; pz++; break;
case 2: px++; break;
}
int r = 0;
const rcCompactSpan& s = chf.spans[i];
if (rcGetCon(s, dir) != RC_NOT_CONNECTED)
{
const int ax = x + rcGetDirOffsetX(dir);
const int ay = y + rcGetDirOffsetY(dir);
const int ai = (int)chf.cells[ax+ay*chf.width].index + rcGetCon(s, dir);
r = (int)chf.spans[ai].reg;
if (area != chf.areas[ai]) // 检测邻居区域的地表类型是否改变
isAreaBorder = true;
}
if (isBorderVertex)
r |= RC_BORDER_VERTEX;
if (isAreaBorder)
r |= RC_AREA_BORDER;
// 将当前点加入到边界拐角点
points.push(px);
points.push(py);
points.push(pz);
points.push(r);
// 清除掉此方向的边界联通标记 避免后面的循环重复处理
flags[i] &= ~(1 << dir);
dir = (dir+1) & 0x3; // 顺时针旋转90度
}
else
{
// 如果此方向不与其他区域相连 那么应该是与当前同区域的一个span相连
int ni = -1; // 记录此方向 联通的邻居span的索引
const int nx = x + rcGetDirOffsetX(dir);
const int ny = y + rcGetDirOffsetY(dir);
const rcCompactSpan& s = chf.spans[i];
if (rcGetCon(s, dir) != RC_NOT_CONNECTED)
{
const rcCompactCell& nc = chf.cells[nx+ny*chf.width];
ni = (int)nc.index + rcGetCon(s, dir);
}
if (ni == -1)
{
// Should not happen.
return;
}
// 跳转到这个邻居span
x = nx;
y = ny;
i = ni;
dir = (dir+3) & 0x3; // 同时逆时针旋转90度
}
if (starti == i && startDir == dir) // 如果遇到了开始时的节点与方向 则迭代结束
{
break;
}
}
}
这个walkContour函数与区域构建时的walkContour唯一不同的地方在于计算了遍历时遇到的轮廓点(px, py, pz)。轮廓点连接起来则组成了当前Region的轮廓边,为了让相邻的两个区域共享同一条轮廓边,需要让两个连通且属于不同区域的span计算出来的轮廓点坐标相同。所以这里的轮廓点根据连通方向来选择:
- 连通方向为左边
dir=0,轮廓点选择当前span的XZ上方,即pz++ - 连通方向为上边
dir=1,轮廓点选择当前span的XZ右上方,即px++,pz++ - 连通方向为右边
dir=2,轮廓点选择当前span的XZ右方,即px++ - 连通方向为下边
dir=3,轮廓点取其自身
所以一个轮廓点会最多对应四个边界span。
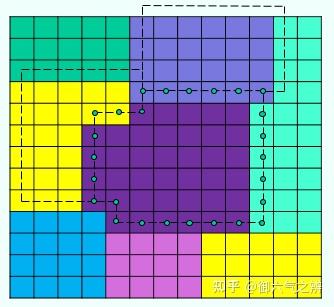
上面的规则只是计算出来了轮廓点的XZ平面坐标,我们还需要知道这个轮廓点的Y轴坐标。由于同一个span作为轮廓点可能出现四次,所以其Y轴坐标有四种选择方案:

为了避免出现太多的轮廓点,我们需要为这四种情况计算出相同的Y轴坐标,最安全的的方法就是选取表面高度最高的,这样能避免轮廓边与地表出现穿插:
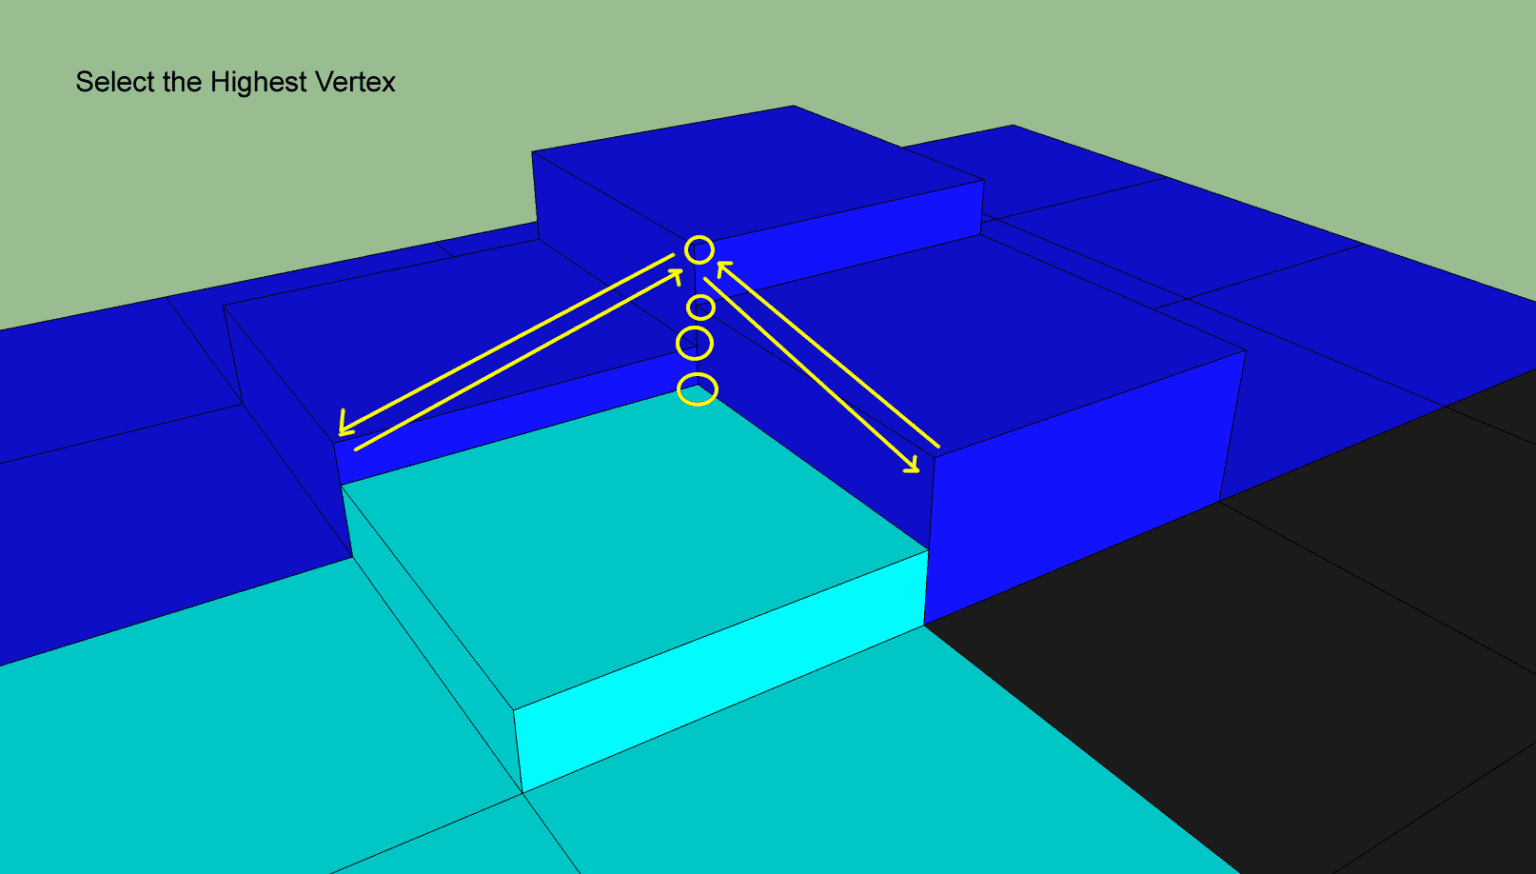
这部分使用了getCornerHeight(x, y, i, dir, chf, isBorderVertex)来计算,不过这个函数不仅计算了轮廓点的Y值,还计算了这个轮廓点是否处于边界上:
static int getCornerHeight(int x, int y, int i, int dir,
const rcCompactHeightfield& chf,
bool& isBorderVertex)
{
const rcCompactSpan& s = chf.spans[i];
int ch = (int)s.y;
int dirp = (dir+1) & 0x3; //顺时针旋转90度
// 一个轮廓点对应了四个span 0自身 1 dir方向 2 dir+45度 3 dir加90度
unsigned int regs[4] = {0,0,0,0};
// 每个int低16位代表邻居的区域id 高16位代表邻居的地表类型
// 在两个不同地表边界上的轮廓点会被标记起来
regs[0] = chf.spans[i].reg | (chf.areas[i] << 16);
if (rcGetCon(s, dir) != RC_NOT_CONNECTED)
{
const int ax = x + rcGetDirOffsetX(dir);
const int ay = y + rcGetDirOffsetY(dir);
const int ai = (int)chf.cells[ax+ay*chf.width].index + rcGetCon(s, dir);
const rcCompactSpan& as = chf.spans[ai];
ch = rcMax(ch, (int)as.y);
regs[1] = chf.spans[ai].reg | (chf.areas[ai] << 16); //
if (rcGetCon(as, dirp) != RC_NOT_CONNECTED)
{
// 这里就是dir + 45度的邻居
const int ax2 = ax + rcGetDirOffsetX(dirp);
const int ay2 = ay + rcGetDirOffsetY(dirp);
const int ai2 = (int)chf.cells[ax2+ay2*chf.width].index + rcGetCon(as, dirp);
const rcCompactSpan& as2 = chf.spans[ai2];
ch = rcMax(ch, (int)as2.y);
regs[2] = chf.spans[ai2].reg | (chf.areas[ai2] << 16);
}
}
if (rcGetCon(s, dirp) != RC_NOT_CONNECTED)
{
// 这里是dir + 90度的邻居
const int ax = x + rcGetDirOffsetX(dirp);
const int ay = y + rcGetDirOffsetY(dirp);
const int ai = (int)chf.cells[ax+ay*chf.width].index + rcGetCon(s, dirp);
const rcCompactSpan& as = chf.spans[ai];
ch = rcMax(ch, (int)as.y);
regs[3] = chf.spans[ai].reg | (chf.areas[ai] << 16);
if (rcGetCon(as, dir) != RC_NOT_CONNECTED)
{
// 这里又计算了一次dir + 45
const int ax2 = ax + rcGetDirOffsetX(dir);
const int ay2 = ay + rcGetDirOffsetY(dir);
const int ai2 = (int)chf.cells[ax2+ay2*chf.width].index + rcGetCon(as, dir);
const rcCompactSpan& as2 = chf.spans[ai2];
ch = rcMax(ch, (int)as2.y);
regs[2] = chf.spans[ai2].reg | (chf.areas[ai2] << 16);
}
}
// 检查是否是特殊边界顶点
for (int j = 0; j < 4; ++j)
{
// 构造顺时针顺序
const int a = j;
const int b = (j+1) & 0x3;
const int c = (j+2) & 0x3;
const int d = (j+3) & 0x3;
// 当前span与后面的span同属于一个边界区域
const bool twoSameExts = (regs[a] & regs[b] & RC_BORDER_REG) != 0 && regs[a] == regs[b];
// 剩下的两个span都不在边界区域内
const bool twoInts = ((regs[c] | regs[d]) & RC_BORDER_REG) == 0;
// 剩下的两个span的地表相同
const bool intsSameArea = (regs[c]>>16) == (regs[d]>>16);
// 四个点都是可行走平面
const bool noZeros = regs[a] != 0 && regs[b] != 0 && regs[c] != 0 && regs[d] != 0;
if (twoSameExts && twoInts && intsSameArea && noZeros)
{
// 则当前轮廓点在边界上
isBorderVertex = true;
break;
}
}
return ch;
}
获取轮廓强制顶点
经过上面的轮廓点构造之后,每个区域都可以使用连续且闭合的轮廓点路径来描述。但是这个路径里的相邻轮廓点组成的边数量太多了,因为相邻的两个轮廓点要么是轴邻居要么是对角线邻居,最大距离只有3。
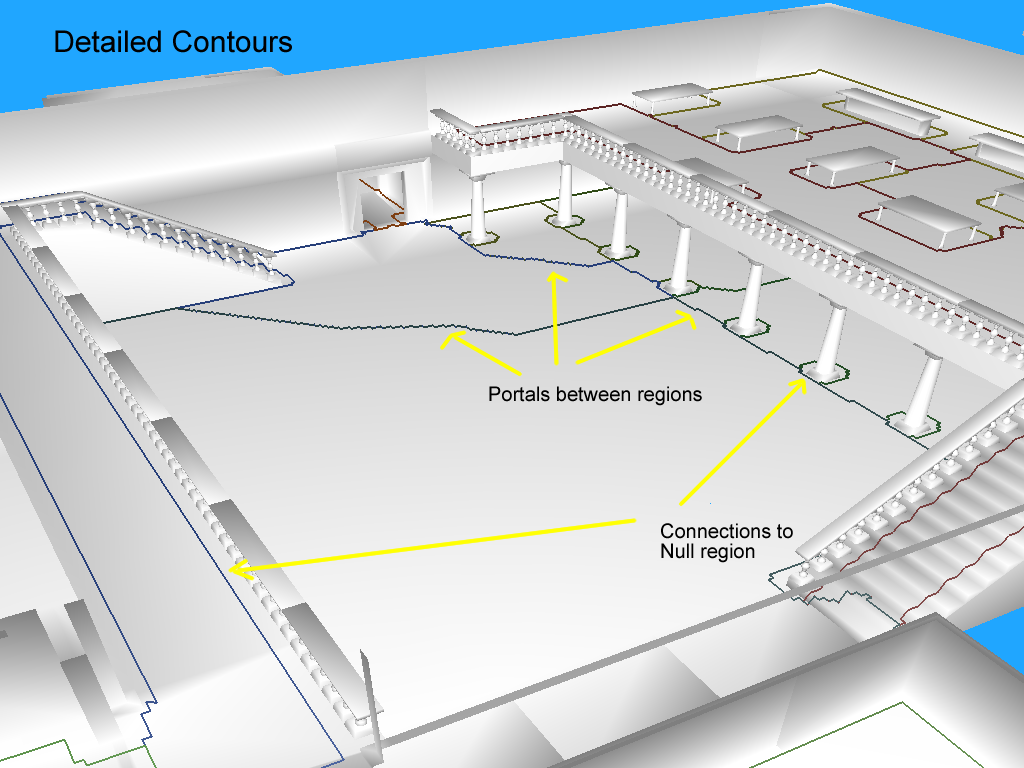
在平面中其实很多轮廓点是共线的,或者近似共线。如上图所示,连续轮廓点组成了很多的轴平行直线或者锯齿样折线。对于一条线段来说,只使用首尾两个端点的数据即可描述,然而其体素化的点数量则与线段长度正相关。所以接下来Recast将连续相邻的轮廓点闭合路径转简化形状相似的线段闭合路径,用这个线段闭合路径来描述区域,这个简化过程其实就是轮廓点的删除过程。为了确定哪些轮廓点可以删除哪些轮廓点必须保留,Recast引入了强制顶点(Mandatory Vertices)的概念:区域连接发生变化的顶点。这种强制顶点需要满足下面的两个条件之一:
-
两个可行走区域边界上的顶点
-
可行走区域与不可行走区域边界上的顶点
这个简化过程会将对应的函数为simplifyContour::
static void simplifyContour(rcIntArray& points, rcIntArray& simplified,
const float maxError, const int maxEdgeLen, const int buildFlags)
points参数里存储了一个区域的轮廓点数组, 每个轮廓点由四个整数组成(x,y,z,r),这里的r是通过前述的walkContour构造而来的,低16位代表区域标识符,如果为0则代表不可行走:
// walkcontour中的r相关代码片段
static const int RC_BORDER_VERTEX = 0x10000;
static const int RC_AREA_BORDER = 0x20000;
bool isBorderVertex = false;
bool isAreaBorder = false;
int py = getCornerHeight(x, y, i, dir, chf, isBorderVertex);
r = (int)chf.spans[ai].reg;
if (area != chf.areas[ai])
isAreaBorder = true;
if (isBorderVertex) // 如果当前轮廓点连通到不可行走区域 则设置此bit为true
r |= RC_BORDER_VERTEX;
if (isAreaBorder)
r |= RC_AREA_BORDER; // 如果当前轮廓点会连接不同的地表 则设置此bit为true
在simplifyContour中,开头先找到初始的简化点:
static const int RC_CONTOUR_REG_MASK = 0xffff;
// Add initial points.
bool hasConnections = false; // 这个代表是否连通到其他可行走区域
for (int i = 0; i < points.size(); i += 4) // 每个轮廓点用了四个int(x,y,z,r)
{
if ((points[i+3] & RC_CONTOUR_REG_MASK) != 0)
{
hasConnections = true;
break;
}
}
if (hasConnections)
{
// 找到轮廓点中邻居区域发生改变的点
for (int i = 0, ni = points.size()/4; i < ni; ++i)
{
int ii = (i+1) % ni;
// 相邻两个点的连通邻居不一样
const bool differentRegs = (points[i*4+3] & RC_CONTOUR_REG_MASK) != (points[ii*4+3] & RC_CONTOUR_REG_MASK);
// 出现了从可行走区域到不可行走区域的变化
const bool areaBorders = (points[i*4+3] & RC_AREA_BORDER) != (points[ii*4+3] & RC_AREA_BORDER);
if (differentRegs || areaBorders)
{
// 将(x, y, z, i) 这四元组存储到simplified中
simplified.push(points[i*4+0]);
simplified.push(points[i*4+1]);
simplified.push(points[i*4+2]);
simplified.push(i);
}
}
}
下图中使用黄色圆圈来标注一些符合上述要求的强制顶点:
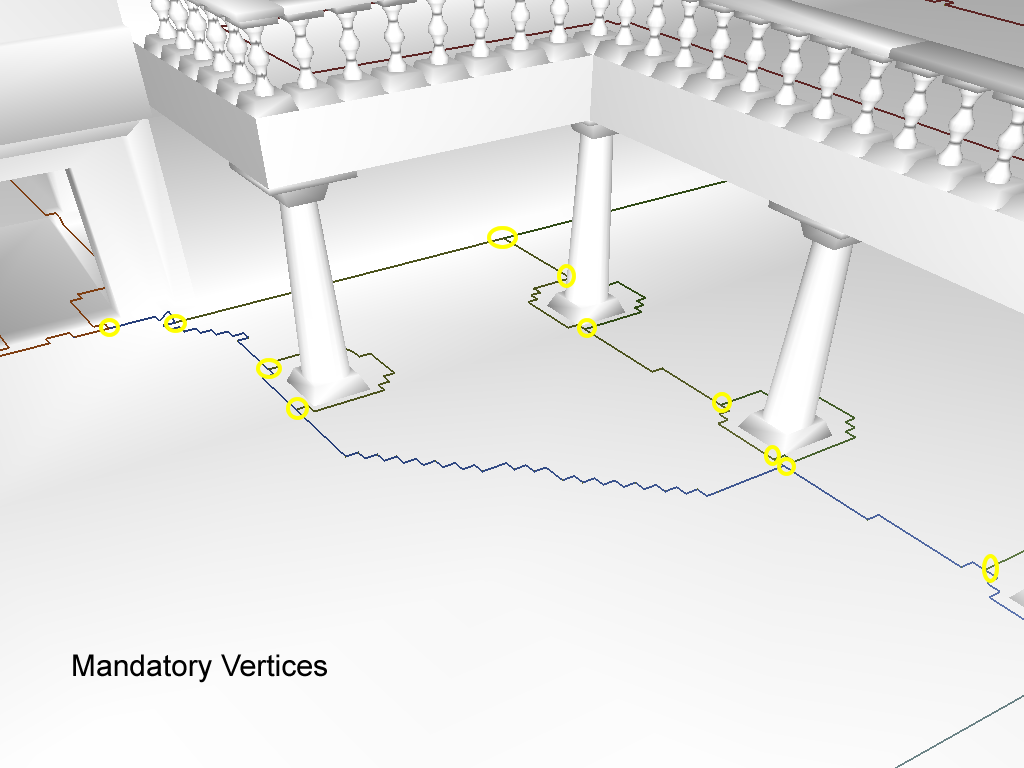
如果当前区域没有符合要求的简化点,则会选择左下和右上的两个点作为简化点:
if (simplified.size() == 0)
{
// If there is no connections at all,
// create some initial points for the simplification process.
// Find lower-left and upper-right vertices of the contour.
int llx = points[0];
int lly = points[1];
int llz = points[2];
int lli = 0;
int urx = points[0];
int ury = points[1];
int urz = points[2];
int uri = 0;
for (int i = 0; i < points.size(); i += 4)
{
int x = points[i+0];
int y = points[i+1];
int z = points[i+2];
if (x < llx || (x == llx && z < llz))
{
llx = x;
lly = y;
llz = z;
lli = i/4;
}
if (x > urx || (x == urx && z > urz))
{
urx = x;
ury = y;
urz = z;
uri = i/4;
}
}
simplified.push(llx);
simplified.push(lly);
simplified.push(llz);
simplified.push(lli);
simplified.push(urx);
simplified.push(ury);
simplified.push(urz);
simplified.push(uri);
}
获取了强制顶点之后,将一个区域内按照顺时针存储的强制顶点首尾相连,就形成了当前区域的简化边界:

回收轮廓点来匹配区域边界
不过这样的简化边界可能过于简化了,会导致与原始区域不怎么匹配。此时需要找到原始的轮廓点里与对应的简化边界距离大于最大简化误差maxSimplificationError的点,重新插入到简化边界中,使得边界更匹配原始区域形状。这里的距离计算使用的是在XZ平面上点到直线的距离,因此执行轮廓点回收之后,多边形的XZ平面投影能够更加的拟合原始区域的XZ投影。
当完全不使用maxSimplificationError来添加节点的时候,会产生下面的偏移比较严重的边界:
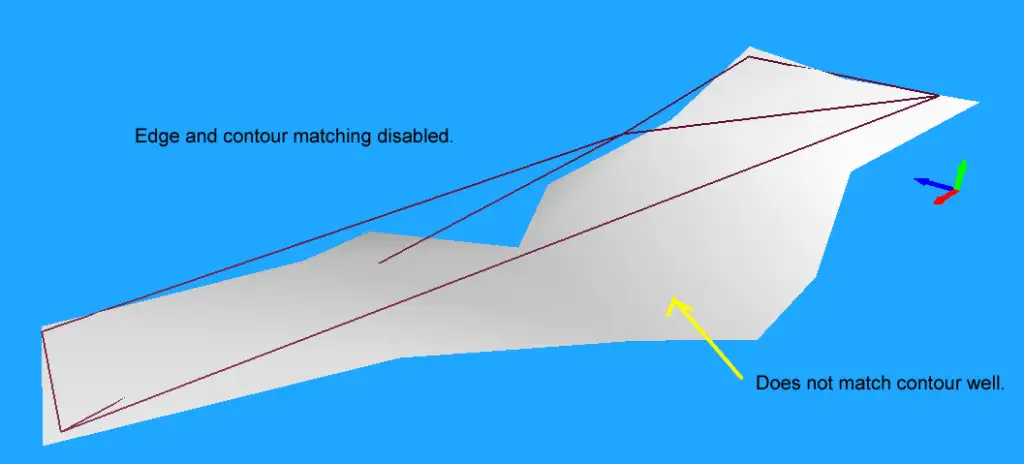
使用合适大小的最大简化误差来增加轮廓点之后,得到了一个比较完美的匹配:
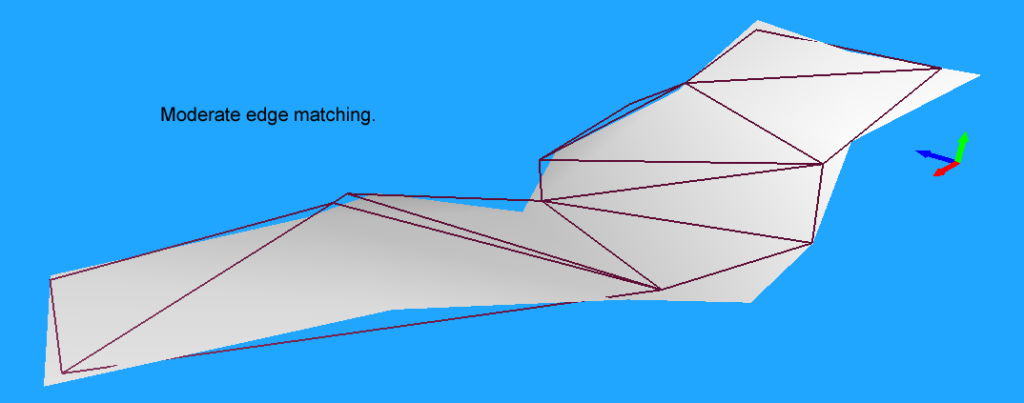
不过此参数如果设置的太小,会导致回收了太多的轮廓点从而生成了很多的小多边形,反而影响后续各种处理的效率:

这个过程其实是一个递归过程,每次处理存储在simplified两个相邻的简化点A,B,这两个简化点对应的points数组连续区间为[C, D],遍历[C, D]中所有的点计算到边(A, B)的距离最大值,如果这个最大值大于了maxSimplificationError,则将距离最大值对应的点E插入到simplified数组中,使得A,E,B是三个相邻的元素,然后再对A,E递归处理。
下面给出这个递归处理的图例来加深理解,初始时我们选择了两个点,构造了一条简化边:
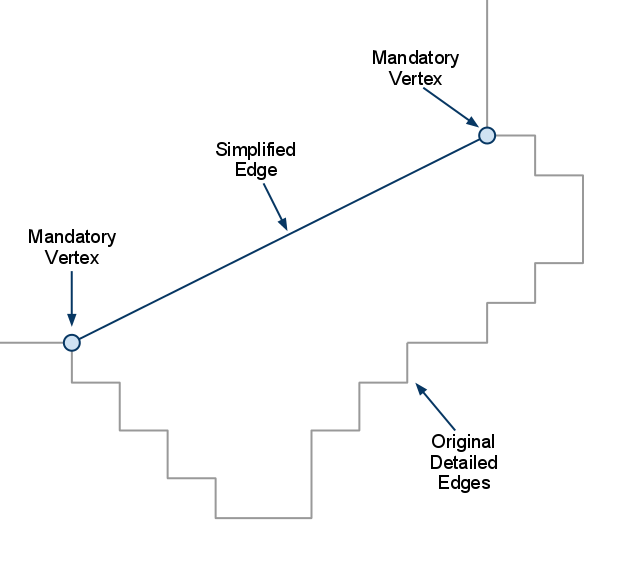
找到覆盖的原始轮廓点区间内与这条简化边偏移最大的,如果大于偏移误差则添加这个点到简化点中,同时构造了两个新的简化边:
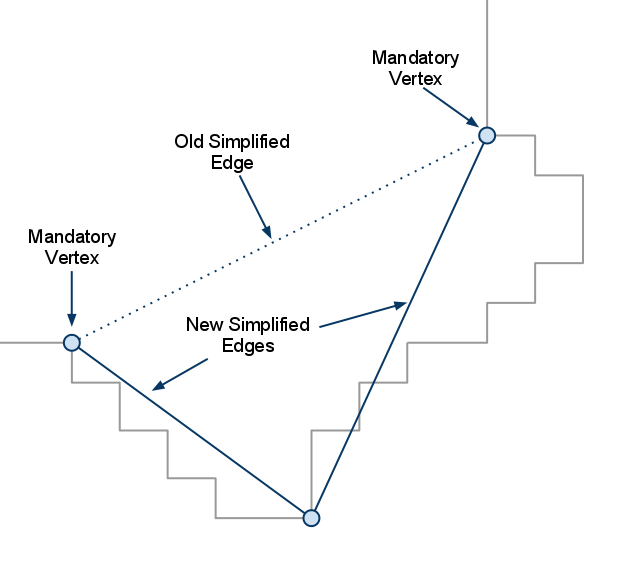
然后再递归处理这两条新的边,直到没有新的简化点出现,代表最开始的简化边的轮廓点回收执行完成:
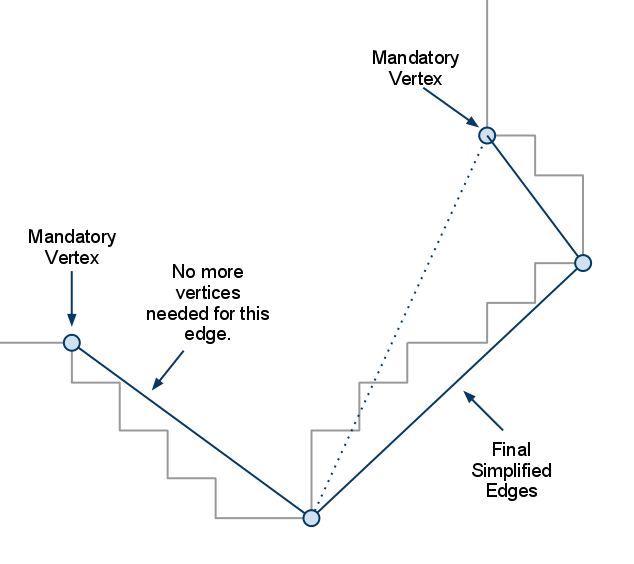
对应的代码如下:
// Add points until all raw points are within
// error tolerance to the simplified shape.
const int pn = points.size()/4;
for (int i = 0; i < simplified.size()/4; )
{
// 获取相邻的两个点 构造一条简化边
int ii = (i+1) % (simplified.size()/4);
int ax = simplified[i*4+0];
int az = simplified[i*4+2];
int ai = simplified[i*4+3];
int bx = simplified[ii*4+0];
int bz = simplified[ii*4+2];
int bi = simplified[ii*4+3];
// Find maximum deviation from the segment.
float maxd = 0;
int maxi = -1;
// 下面三个变量是用来控制节点便利时的方向
int ci, cinc, endi;
// 下面的操作来确保b点一定在a点右侧 这样方便后续的距离计算
if (bx > ax || (bx == ax && bz > az))
{
cinc = 1;
ci = (ai+cinc) % pn;
endi = bi;
}
else
{
// 不在右侧则swap
cinc = pn-1;
ci = (bi+cinc) % pn;
endi = ai;
rcSwap(ax, bx);
rcSwap(az, bz);
}
// 只处理与不可连通区域交界的边
if ((points[ci*4+3] & RC_CONTOUR_REG_MASK) == 0 ||
(points[ci*4+3] & RC_AREA_BORDER))
{
while (ci != endi)
{
float d = distancePtSeg(points[ci*4+0], points[ci*4+2], ax, az, bx, bz);
if (d > maxd)
{
maxd = d; // 获取简化边对应的节点区间内离简化边最远的点索引
maxi = ci;
}
ci = (ci+cinc) % pn;
}
}
if (maxi != -1 && maxd > (maxError*maxError))
{
// 添加这个最远点到simplified数组中
simplified.resize(simplified.size()+4);
const int n = simplified.size()/4;
for (int j = n-1; j > i; --j)
{
// 触发了所有后续节点的移动
simplified[j*4+0] = simplified[(j-1)*4+0];
simplified[j*4+1] = simplified[(j-1)*4+1];
simplified[j*4+2] = simplified[(j-1)*4+2];
simplified[j*4+3] = simplified[(j-1)*4+3];
}
simplified[(i+1)*4+0] = points[maxi*4+0];
simplified[(i+1)*4+1] = points[maxi*4+1];
simplified[(i+1)*4+2] = points[maxi*4+2];
simplified[(i+1)*4+3] = maxi;
}
else
{
// 没有需要添加的点 处理下一条简化边
++i;
}
}
回收了一些轮廓点之后,得到了下图中的简化轮廓:
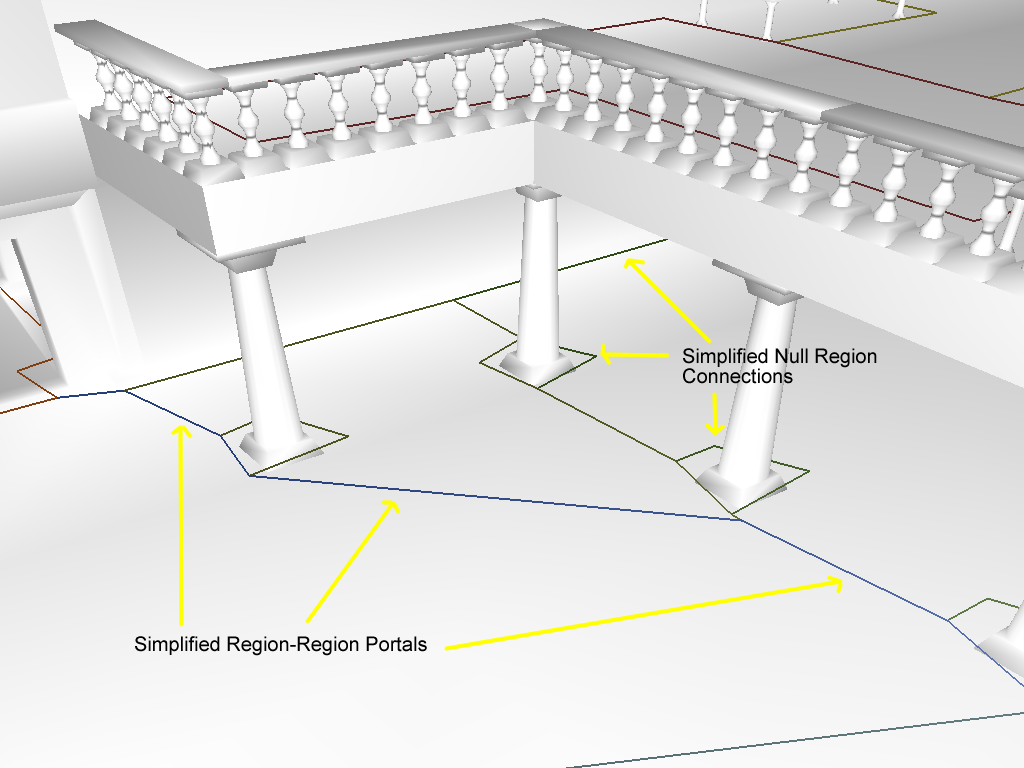
拆分过长的边界线段
为了避免在后续的三角化分中出现过于长且细的三角形,接下来还有一步后处理,将太长的简化边进行切分,这里使用了外部传递过来的maxEdgeLen作为边长度的筛选参数。
在开启这个长边拆分之前,生成的三角形如下:
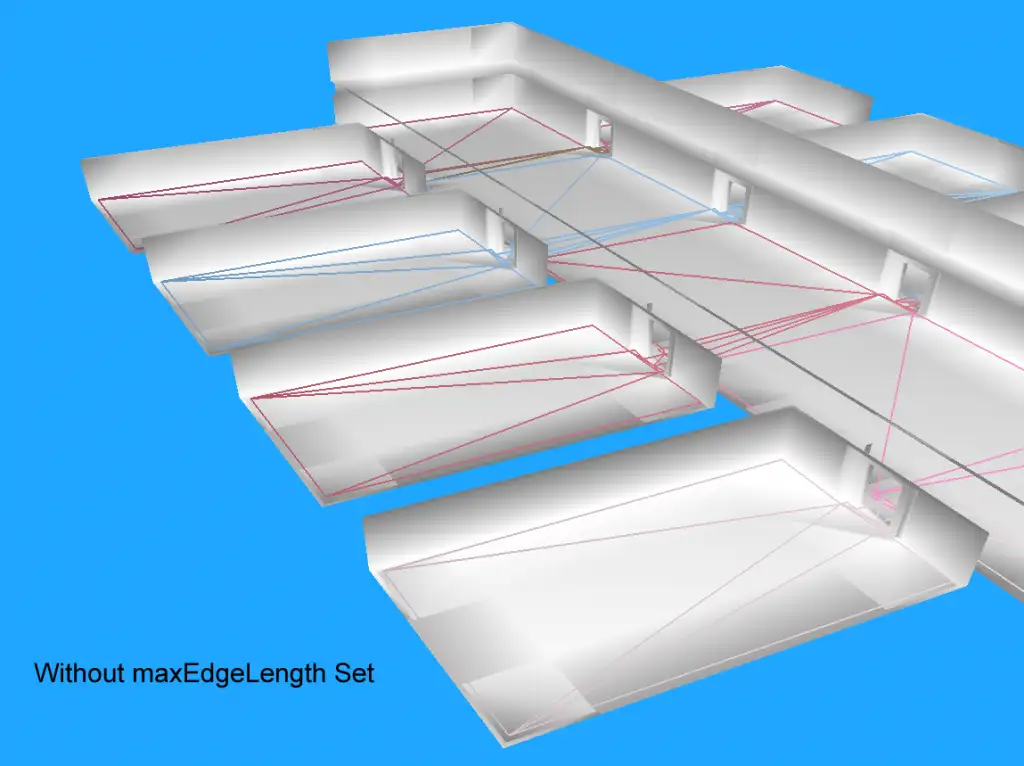
开启长边拆分后,生成的三角形如下:
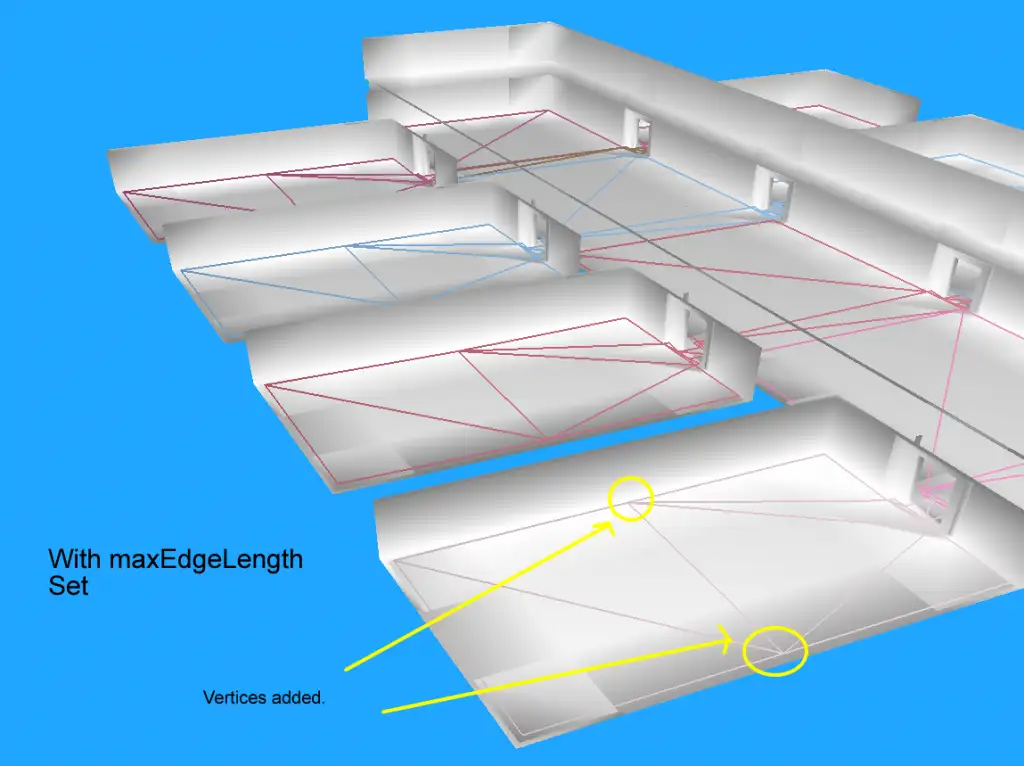
这个长边拆分执行过程与前面的回收轮廓点的流程基本差不多,也是一个递归过程:
// Split too long edges.
if (maxEdgeLen > 0 && (buildFlags & (RC_CONTOUR_TESS_WALL_EDGES|RC_CONTOUR_TESS_AREA_EDGES)) != 0)
{
for (int i = 0; i < simplified.size()/4; )
{
const int ii = (i+1) % (simplified.size()/4);
const int ax = simplified[i*4+0];
const int az = simplified[i*4+2];
const int ai = simplified[i*4+3];
const int bx = simplified[ii*4+0];
const int bz = simplified[ii*4+2];
const int bi = simplified[ii*4+3];
// Find maximum deviation from the segment.
int maxi = -1;
int ci = (ai+1) % pn;
bool tess = false;
// 靠近非连通区域的边
if ((buildFlags & RC_CONTOUR_TESS_WALL_EDGES) && (points[ci*4+3] & RC_CONTOUR_REG_MASK) == 0)
tess = true;
// 靠近不同地表的边
if ((buildFlags & RC_CONTOUR_TESS_AREA_EDGES) && (points[ci*4+3] & RC_AREA_BORDER))
tess = true;
if (tess)
{
int dx = bx - ax;
int dz = bz - az;
if (dx*dx + dz*dz > maxEdgeLen*maxEdgeLen)
{
// 如果当前边长度过长
const int n = bi < ai ? (bi+pn - ai) : (bi - ai);
if (n > 1) // 两点之间有其他轮廓点
{
// 则将边对应轮廓点区间的中间点加入
if (bx > ax || (bx == ax && bz > az))
maxi = (ai + n/2) % pn;
else
maxi = (ai + (n+1)/2) % pn;
}
}
}
// 将这个指定点添加到simplified数组 构造出两条新的边
if (maxi != -1)
{
// Add space for the new point.
// 这段代码与前一段代码块中对应内容一样 因此省略
}
else
{
++i;
}
}
}
创建基础轮廓信息
/// Represents a simple, non-overlapping contour in field space.
struct rcContour
{
int* verts; ///< Simplified contour vertex and connection data. [Size: 4 * #nverts]
int nverts; ///< The number of vertices in the simplified contour.
int* rverts; ///< Raw contour vertex and connection data. [Size: 4 * #nrverts]
int nrverts; ///< The number of vertices in the raw contour.
unsigned short reg; ///< The region id of the contour.
unsigned char area; ///< The area id of the contour.
};
rcContour* cont = &cset.conts[cset.nconts++];
cont->nverts = simplified.size()/4;
cont->verts = (int*)rcAlloc(sizeof(int)*cont->nverts*4, RC_ALLOC_PERM);
if (!cont->verts)
{
ctx->log(RC_LOG_ERROR, "rcBuildContours: Out of memory 'verts' (%d).", cont->nverts);
return false;
}
memcpy(cont->verts, &simplified[0], sizeof(int)*cont->nverts*4);
cont->nrverts = verts.size()/4;
cont->rverts = (int*)rcAlloc(sizeof(int)*cont->nrverts*4, RC_ALLOC_PERM);
if (!cont->rverts)
{
ctx->log(RC_LOG_ERROR, "rcBuildContours: Out of memory 'rverts' (%d).", cont->nrverts);
return false;
}
memcpy(cont->rverts, &verts[0], sizeof(int)*cont->nrverts*4);
cont->reg = reg;
cont->area = area;
消除空洞
在使用分水岭算法生成区域时,如果遇到一些无法寻路的小凸起,会形成一些不可寻路的小空洞。如果这个空洞的外围属于同一个区域的话,会导致区域的边界无法组成一个简单多边形,导致后续的三角形切分失败。所以区域轮廓生成的最后一部需要将这些空洞对应的多边形轮廓删除,合并到包围这个空洞的区域内。
由于我们之前计算出来的正常轮廓所存储的顶点都是顺时针的,而包围空洞的轮廓里对应的点则是逆时针的,所以判断一个轮廓是否是空洞只需要判断这个轮廓对应的多边形节点序列是否是逆时针存储的。对于一个三角形来说,其描述顶点的顺序可以通过计算相邻向量的叉积的正负来判断。在Recast采用的OpenGl坐标系中,对于(A,B,C)组成的三角形,如果(B-A)与(C-B)计算出来的叉积的Y值为正,则代表这个三角形是顺时针存储的,否则就是逆时针存储的。同时这个叉积的Y值的绝对值就是这个三角形投影在XZ平面的面积。利用叉积的这两个性质。多边形的顶点顺序则可以通过统计其内部所有三角形的叉积值的总和计算出来:
static int calcAreaOfPolygon2D(const int* verts, const int nverts)
{
int area = 0;
for (int i = 0, j = nverts-1; i < nverts; j=i++)
{
const int* vi = &verts[i*4];
const int* vj = &verts[j*4];
area += vi[0] * vj[2] - vj[0] * vi[2];
}
return (area+1) / 2;
}
下面就是一个空洞的示意图,所有B开头的点组成了一个空洞区域,而A开头的点组成了一个外围区域:
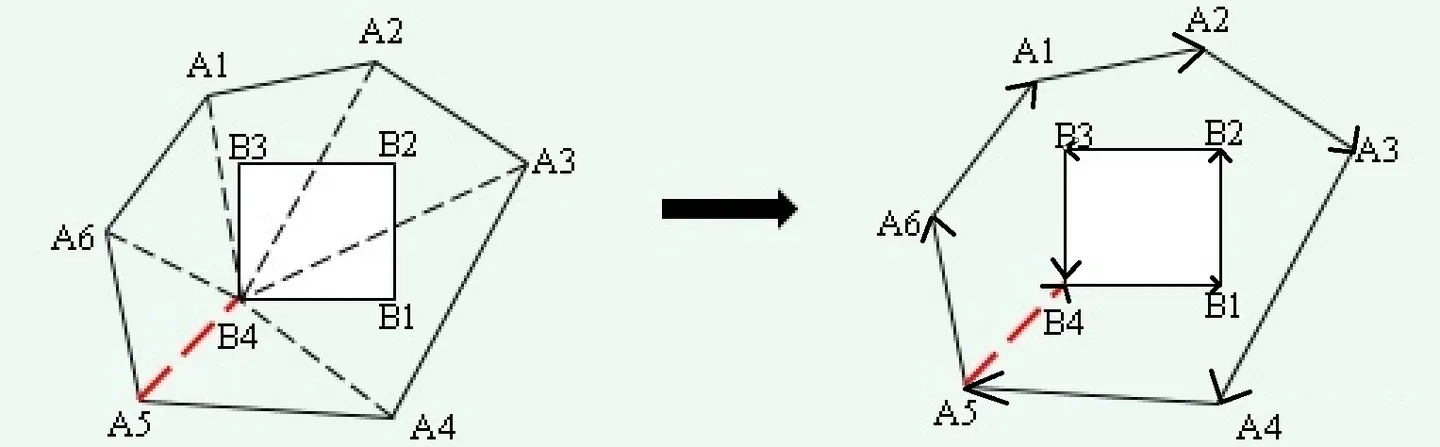
检测出空洞之后,Recast开始执行轮廓合并:
- 找到空洞的左下方顶点,在上图中为
B4 - 将外围轮廓中的每个点都与这个点连接,获取其中不与空洞相交的最短的线段对应的线段,即上图中的
A4B4, A5B4,A6B4 - 选择其中长度最短的,将空洞的节点序列拼接到原来的外围节点序列之中
所以上图经过合并处理之后,外围轮廓的节点序列为A5,A6,A1,A2,A3,A4,A5,B4,B1,B2,B3。 如果一个区域内有多个空洞的话,空洞按照其左下角顶点排序,依次合入到外围轮廓的顶点中。
讲解完空洞合并的基本原理之后,我们再来对照recast的源码来探究实现。首先遍历所有的轮廓,查看是否是逆时针存储的空洞
/ Calculate winding of all polygons.
rcScopedDelete<signed char> winding((signed char*)rcAlloc(sizeof(signed char)*cset.nconts, RC_ALLOC_TEMP));
if (!winding)
{
ctx->log(RC_LOG_ERROR, "rcBuildContours: Out of memory 'hole' (%d).", cset.nconts);
return false;
}
int nholes = 0; // 所有的空洞的数量
for (int i = 0; i < cset.nconts; ++i)
{
rcContour& cont = cset.conts[i];
// If the contour is wound backwards, it is a hole.
winding[i] = calcAreaOfPolygon2D(cont.verts, cont.nverts) < 0 ? -1 : 1;
if (winding[i] < 0)
nholes++;
}
然后记录每个外围轮廓里的空洞,这里使用了几个专门的数据结构来描述空洞信息:
struct rcContourHole// 空洞结构体
{
rcContour* contour; // 空洞对应的轮廓
int minx, minz, leftmost; // 左下角cell的 x z 以及是当前contour内的第几个节点
};
struct rcContourRegion //一个外围轮廓数据
{
rcContour* outline; // 对应的轮廓
rcContourHole* holes; // 对应的空洞数组
int nholes; // 空洞的数量
};
有了这些结构体之后,遍历之前创建的轮廓rcContour来归类:
// Collect outline contour and holes contours per region.
// We assume that there is one outline and multiple holes.
const int nregions = chf.maxRegions+1;
rcScopedDelete<rcContourRegion> regions((rcContourRegion*)rcAlloc(sizeof(rcContourRegion)*nregions, RC_ALLOC_TEMP));
if (!regions)
{
ctx->log(RC_LOG_ERROR, "rcBuildContours: Out of memory 'regions' (%d).", nregions);
return false;
}
memset(regions, 0, sizeof(rcContourRegion)*nregions);
rcScopedDelete<rcContourHole> holes((rcContourHole*)rcAlloc(sizeof(rcContourHole)*cset.nconts, RC_ALLOC_TEMP));
if (!holes)
{
ctx->log(RC_LOG_ERROR, "rcBuildContours: Out of memory 'holes' (%d).", cset.nconts);
return false;
}
memset(holes, 0, sizeof(rcContourHole)*cset.nconts);
for (int i = 0; i < cset.nconts; ++i)
{
rcContour& cont = cset.conts[i];
// 这里值为正数代表是外部轮廓 负值代表空洞
if (winding[i] > 0)
{
if (regions[cont.reg].outline)
ctx->log(RC_LOG_ERROR, "rcBuildContours: Multiple outlines for region %d.", cont.reg);
regions[cont.reg].outline = &cont;
}
else
{
regions[cont.reg].nholes++;// 当前region的空洞数量加1
}
}
int index = 0;
for (int i = 0; i < nregions; i++)
{
if (regions[i].nholes > 0) // 这里负责分配存储空间
{
regions[i].holes = &holes[index];
index += regions[i].nholes;
regions[i].nholes = 0;
}
}
for (int i = 0; i < cset.nconts; ++i)
{
rcContour& cont = cset.conts[i];
rcContourRegion& reg = regions[cont.reg];
if (winding[i] < 0)
reg.holes[reg.nholes++].contour = &cont; // 然后记录所有的空洞到对应的region上
}
其实用vector去存储每个region的空洞就可以避免最后执行两次遍历来收集空洞的情况,不过这里为了执行效率直接走预分配大数组的形式。构造每个区域对应的rcContourRegion之后,开始对每个rcContourRegion执行空洞合并的函数mergeRegionHoles:
static void mergeRegionHoles(rcContext* ctx, rcContourRegion& region)
{
// 这里设置好每个hole的左下角坐标信息
for (int i = 0; i < region.nholes; i++)
findLeftMostVertex(region.holes[i].contour, ®ion.holes[i].minx, ®ion.holes[i].minz, ®ion.holes[i].leftmost);
// 然后按照左下角坐标的递增序排序
qsort(region.holes, region.nholes, sizeof(rcContourHole), compareHoles);
int maxVerts = region.outline->nverts; // 当前region里所有的顶点数量
for (int i = 0; i < region.nholes; i++)
maxVerts += region.holes[i].contour->nverts;
// 这里存储最佳连接线信息
rcScopedDelete<rcPotentialDiagonal> diags((rcPotentialDiagonal*)rcAlloc(sizeof(rcPotentialDiagonal)*maxVerts, RC_ALLOC_TEMP));
if (!diags)
{
ctx->log(RC_LOG_WARNING, "mergeRegionHoles: Failed to allocated diags %d.", maxVerts);
return;
}
rcContour* outline = region.outline;
// Merge holes into the outline one by one.
for (int i = 0; i < region.nholes; i++)
{
rcContour* hole = region.holes[i].contour;
int index = -1;
int bestVertex = region.holes[i].leftmost;
for (int iter = 0; iter < hole->nverts; iter++) // 以最左下的节点开始遍历当前空洞里的所有点
{
// 最优连接点一定在 (j-1, j, j+1) 组成的夹角锥形内
// ..o j-1
// |
// | * best
// |
// j o-----o j+1
// :
int ndiags = 0;
const int* corner = &hole->verts[bestVertex*4];
for (int j = 0; j < outline->nverts; j++)
{
if (inCone(j, outline->nverts, outline->verts, corner))
{
// 记录所有可能的短接
int dx = outline->verts[j*4+0] - corner[0];
int dz = outline->verts[j*4+2] - corner[2];
diags[ndiags].vert = j;
diags[ndiags].dist = dx*dx + dz*dz;
ndiags++;
}
}
// 然后按照短接线段的距离来排序
qsort(diags, ndiags, sizeof(rcPotentialDiagonal), compareDiagDist);
// 寻找一个不与当前外部轮廓相交 也不与后续的空洞相交的连接
index = -1;
for (int j = 0; j < ndiags; j++)
{
const int* pt = &outline->verts[diags[j].vert*4];
bool intersect = intersectSegCountour(pt, corner, diags[i].vert, outline->nverts, outline->verts);
for (int k = i; k < region.nholes && !intersect; k++)
intersect |= intersectSegCountour(pt, corner, -1, region.holes[k].contour->nverts, region.holes[k].contour->verts);
if (!intersect)
{
index = diags[j].vert;
break;
}
}
// 如果找到了一个可行连接 则不再需要查找后续的节点
if (index != -1)
break;
// All the potential diagonals for the current vertex were intersecting, try next vertex.
bestVertex = (bestVertex + 1) % hole->nverts;
}
if (index == -1) //当前空洞合并失败 忽略
{
ctx->log(RC_LOG_WARNING, "mergeHoles: Failed to find merge points for %p and %p.", region.outline, hole);
continue;
}
if (!mergeContours(*region.outline, *hole, index, bestVertex)) // 将空洞里的点按照当前短接 插入到外部轮廓中
{
ctx->log(RC_LOG_WARNING, "mergeHoles: Failed to merge contours %p and %p.", region.outline, hole);
continue;
}
}
}
凸多边形生成
经过上个步骤,Recast生成了以连续顶点描述的多边形轮廓rcContour。但是这个多边形轮廓并不能高效的用来执行点的位置查询,而且由于可能的空洞的存在,同一个轮廓里的两个点甚至可能无法直接连通。这几个缺陷刚好被凸多边形完美解决,因为凸多边形有如下几个性质:
- 判断一个点是否在凸多边形内只需要多次向量叉积即可,次数不会大于凸多边形的顶点数量
- 根据凸的定义,凸多边形内的任意两点之间的连线一定不会与凸多边形的边界交叉,即可以保证内部任意两点都可以直接连通
- 查询一个点在哪一个凸多边形内可以使用
BVH等辅助结构来加速查询,效率很高
因此Recast会将上个步骤中生成的rcContour拆分为多个凸多边形的集合,以方便后续的寻路查询来使用。这个步骤对应的函数为rcBuildPolyMesh,其执行流程分为两步:
- 将
rcContour拆分为多个不重叠的三角形,这个过程在计算几何中称之为三角剖分Triangulation - 尽可能的合并多个相邻三角形为凸多边形
多边形轮廓的三角剖分
计算几何中最经典的三角剖分算法为Delaunay三角剖分,但是我们现在遇到的输入已经是多边形了,而不是原始的离散点的集合。针对已经构造好的多边形进行拆分主要使用耳切法Ear Clipping。
简单多边形的耳朵,是指由连续顶点V0,V1,V2组成的内部不包含其他任意顶点的三角形。在计算机几何术语中,v0与V2之间的连线 称之为多边形的对角线,点V1称之为耳尖。一个由四个顶点(或者更多)组成的多边形至少有两个不重叠的耳尖。这个特性提供了一个通过递归来解决三角化分割的方法。针对由N个定点组成的多边形,找到其耳尖,移除唯一耳尖上的顶点,此时剩余顶点组成了一个n-1个顶点的简单多边形。重复这个操作直到剩余三个顶点。这样的话会产生一个复杂度为O(N3)的算法。
由于一个多边形中的耳朵可能有很多个,Recast在每次迭代时选取其中新添加的内部边中最短的那个。具体实现上是每次将多边形轮廓中相邻的不共线的三个点连接起来组成一个三角形,检查这个三角形是否在多边形内,然后记录首尾两个端点组成的边长度。下图中的绿色虚线就是有效的新分割边,而红色虚线则是无效的分割边。
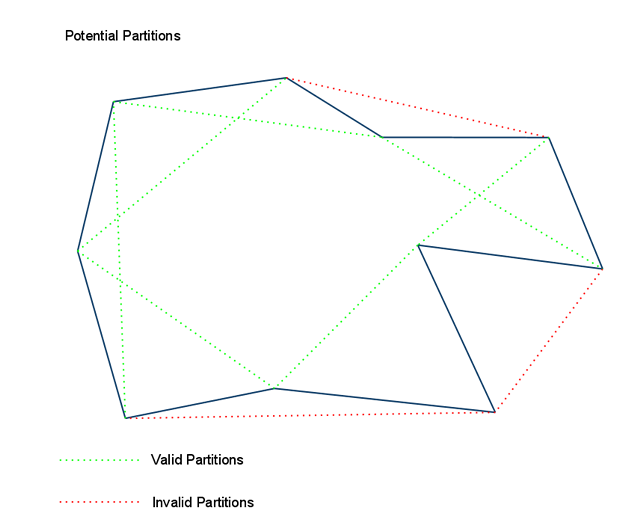
使用最短分割边的原因是,在概率上试图每次分出去一个尽可能小的三角形,以此增加最终分割的三角形的数量,进而增强分割后的信息量。
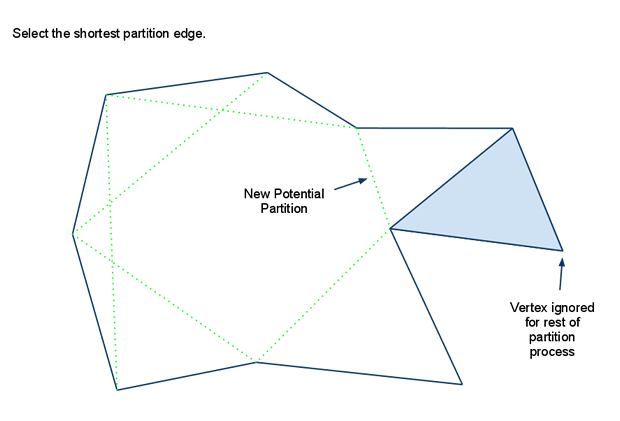
下图是迭代五次以后的结果,剩下的是一个凸多边形,不过算法流程还需要继续分割:
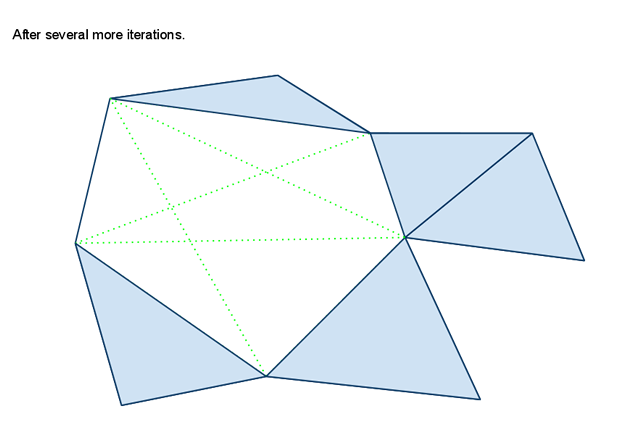
持续迭代之后,最终得到的三角剖分如下图:
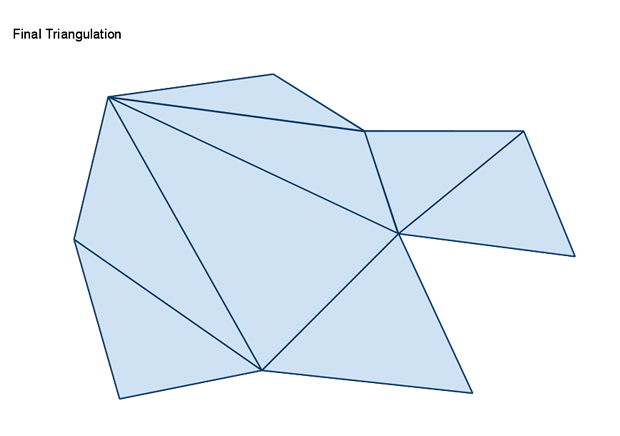
有效切分判定
上述切分过程实现上来说比较直白,唯一的难点在于如何判断一条切割边是否在多边形内,对应的函数为diagonal:
static bool diagonal(int i, int j, int n, const int* verts, int* indices)
{
return inCone(i, j, n, verts, indices) && diagonalie(i, j, n, verts, indices);
}
这个函数里的两个子函数执行的都是纯数学过程,只看代码不好理解,需要先用图形化的方法来展示其内部逻辑。
我们先来看inCone函数,这个函数负责检测(i,j)连接的线段是否完全在当前多边形的内部,这里使用的是内角算法(The Internal Angle Algorithm)来判定的。这里先需要给出内角的定义,对于多边形上的任意顶点A,获取其前序顶点B和后继顶点C,从AB旋转到AC对应的夹角为外角Exterior Angle,对应的从AC旋转到AB对应的角称之为内角Interior Angle。如下图所示红色文字所在区域为当前点的外角,绿色文字区域为当前点的内角:

有了内角的定义之后,判断一条边是否在多边形内部只需要判断连接点B是否在连接点A的内角中。这里根据A点是否是一个凸点走两个不同的判断分支,假设C是A在多边形中的前序节点, 而D是A在多边形中的后继节点:
-
如果
A不是凸点,对应上图中的情况,此时判断C->A->B组成的三角形和B->A->D组成的三角形是否都是逆时针三角形,如果都是的话则B在内角外,此时连接线非法 -
如果
A是凸点,对应下图中的情况,此时要求判断C->A->B组成的三角形和B->A->D组成的三角形是否都是顺时针三角形,如果都是的话则B在内角内,此时连接线合法
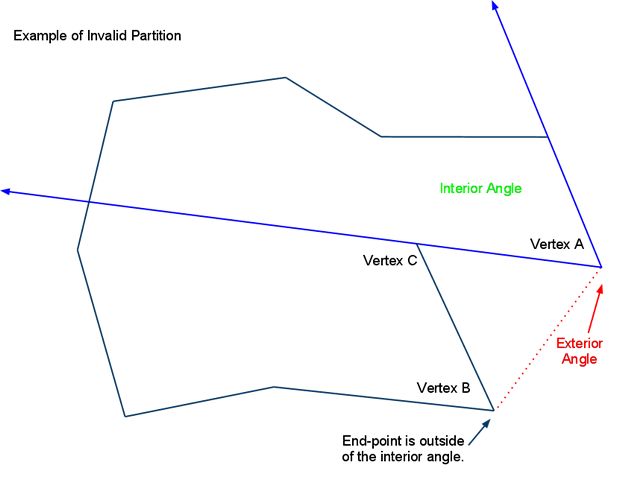
则判断是否在内角内的函数inCone的实现如下:
// 判断c点是否在a->b直线的左边 即 a b c以顺时针的方式组成一个三角形
inline bool left(const int* a, const int* b, const int* c)
{
return area2(a, b, c) < 0;
}
// 判断c点是否在a->b直线的左边或者共线
inline bool leftOn(const int* a, const int* b, const int* c)
{
return area2(a, b, c) <= 0;
}
// 判断(i,j)对角线段是否在当前多边形内
static bool inCone(int i, int j, int n, const int* verts, int* indices)
{
const int* pi = &verts[(indices[i] & 0x0fffffff) * 4]; // i点对应坐标
const int* pj = &verts[(indices[j] & 0x0fffffff) * 4]; // j点对应坐标
const int* pi1 = &verts[(indices[next(i, n)] & 0x0fffffff) * 4]; // i的后继点对应坐标
const int* pin1 = &verts[(indices[prev(i, n)] & 0x0fffffff) * 4]; // i的前序点对应坐标
// 如果i点是当前多边形的一个凸点,三个连续点组成了一个顺时针三角形
if (leftOn(pin1, pi, pi1))
// 要求 这两个三角形都是顺时针的
return left(pi, pj, pin1) && left(pj, pi, pi1);
// 要求这两个三角形不能都是顺时针的
return !(leftOn(pi, pj, pi1) && leftOn(pj, pi, pin1));
}
通过了内角判断之后,还需要调用diagonalie排除掉这条边会与当前多边形穿插的情况。此函数执行的是边相交算法(The Edge Intersection Algorithm),这个算法比较简单,判断这条分割边是否与当前多边形内的任意一条边有交叉,如果有交叉则认为不是一条有效的连接边:
// Returns T iff (v_i, v_j) is a proper internal *or* external
// diagonal of P, *ignoring edges incident to v_i and v_j*.
static bool diagonalie(int i, int j, int n, const int* verts, int* indices)
{
const int* d0 = &verts[(indices[i] & 0x0fffffff) * 4];
const int* d1 = &verts[(indices[j] & 0x0fffffff) * 4];
// For each edge (k,k+1) of P
for (int k = 0; k < n; k++)
{
int k1 = next(k, n);
// Skip edges incident to i or j
if (!((k == i) || (k1 == i) || (k == j) || (k1 == j)))
{
const int* p0 = &verts[(indices[k] & 0x0fffffff) * 4];
const int* p1 = &verts[(indices[k1] & 0x0fffffff) * 4];
if (vequal(d0, p0) || vequal(d1, p0) || vequal(d0, p1) || vequal(d1, p1))
continue;
// 线段相交判断
if (intersect(d0, d1, p0, p1))
return false;
}
}
return true;
}
在了解了有效连接边的判定之后,耳切法的执行流程如下:
static int triangulate(int n, const int* verts, int* indices, int* tris)
{
int ntris = 0;
int* dst = tris;
for (int i = 0; i < n; i++)
{
int i1 = next(i, n);
int i2 = next(i1, n);
// 如果i->i2的连接线是有效的 则标记i1是一个耳尖
if (diagonal(i, i2, n, verts, indices))
indices[i1] |= 0x80000000;
}
while (n > 3)
{
// 每一轮循环寻找剩下的最短有效连接线
int minLen = -1;
int mini = -1;
for (int i = 0; i < n; i++)
{
int i1 = next(i, n);
if (indices[i1] & 0x80000000)
{
const int* p0 = &verts[(indices[i] & 0x0fffffff) * 4];
const int* p2 = &verts[(indices[next(i1, n)] & 0x0fffffff) * 4];
int dx = p2[0] - p0[0];
int dy = p2[2] - p0[2];
int len = dx*dx + dy*dy;
if (minLen < 0 || len < minLen)
{
minLen = len;
mini = i;
}
}
}
if (mini == -1)
{
// 找不到可能的耳尖,可能是因为线段重叠了 放松不共线的需求再寻找一次
// We might get here because the contour has overlapping segments, like this:
//
// A o-o=====o---o B
// / |C D| \.
// o o o o
// : : : :
// We'll try to recover by loosing up the inCone test a bit so that a diagonal
// like A-B or C-D can be found and we can continue.
minLen = -1;
mini = -1;
for (int i = 0; i < n; i++)
{
int i1 = next(i, n);
int i2 = next(i1, n);
if (diagonalLoose(i, i2, n, verts, indices))
{
const int* p0 = &verts[(indices[i] & 0x0fffffff) * 4];
const int* p2 = &verts[(indices[next(i2, n)] & 0x0fffffff) * 4];
int dx = p2[0] - p0[0];
int dy = p2[2] - p0[2];
int len = dx*dx + dy*dy;
if (minLen < 0 || len < minLen)
{
minLen = len;
mini = i;
}
}
}
if (mini == -1)
{
// The contour is messed up. This sometimes happens
// if the contour simplification is too aggressive.
return -ntris;
}
}
// 找到了一个可以分割的三角形
int i = mini;
int i1 = next(i, n);
int i2 = next(i1, n);
*dst++ = indices[i] & 0x0fffffff;
*dst++ = indices[i1] & 0x0fffffff;
*dst++ = indices[i2] & 0x0fffffff;
ntris++;
// Removes P[i1] by copying P[i+1]...P[n-1] left one index.
n--;
for (int k = i1; k < n; k++)
indices[k] = indices[k+1];
if (i1 >= n) i1 = 0;
i = prev(i1,n);
// 更新连接线的两个点是否是耳尖
if (diagonal(prev(i, n), i1, n, verts, indices))
indices[i] |= 0x80000000;
else
indices[i] &= 0x0fffffff;
if (diagonal(i, next(i1, n), n, verts, indices))
indices[i1] |= 0x80000000;
else
indices[i1] &= 0x0fffffff;
}
// Append the remaining triangle.
*dst++ = indices[0] & 0x0fffffff;
*dst++ = indices[1] & 0x0fffffff;
*dst++ = indices[2] & 0x0fffffff;
ntris++;
return ntris;
}
三角形合并
上一个步骤执行之后,我们就得到了一个完全用三角形进行描述的场景可行走表面,这份数据已经可以用来高效的执行寻路操作。n个三角形需要3*n个节点索引来描述,而合并为一个大的凸多边形之后只需要n+2个节点索引即可,内存降低到了原来的1/3。所以为了进一步优化内存占用,Recast会尝试将同一个区域内的多个三角形合并为一个凸多边形。
由于三角形合并之后会形成凸多边形,而凸多边形还可以进一步与其他凸多边形进行合并,所以Recast实际执行的是凸多边形的合并(三角形是最简单的凸多边形)。其合并流程可以简化描述为下面的四个步骤:
- 将当前区域内的所有三角形转换为待合并的多边形集合
S
// Build initial polygons.
int npolys = 0;
memset(polys, 0xff, maxVertsPerCont*nvp*sizeof(unsigned short));
for (int j = 0; j < ntris; ++j)
{
int* t = &tris[j*3];
if (t[0] != t[1] && t[0] != t[2] && t[1] != t[2])
{
polys[npolys*nvp+0] = (unsigned short)indices[t[0]];
polys[npolys*nvp+1] = (unsigned short)indices[t[1]];
polys[npolys*nvp+2] = (unsigned short)indices[t[2]];
npolys++;
}
}
- 遍历
S中的两个可以合并的多边形元素对(A,B),选取其中共享边最长的进行合并,形成新的凸多边形C - 从
S中删除A, B两个凸多边形,加入凸多边形C - 重复步骤
2直到没有可选合并
for(;;)
{
// Find best polygons to merge.
int bestMergeVal = 0;
int bestPa = 0, bestPb = 0, bestEa = 0, bestEb = 0;
// 遍历所有的多边形元素对
for (int j = 0; j < npolys-1; ++j)
{
unsigned short* pj = &polys[j*nvp];
for (int k = j+1; k < npolys; ++k)
{
unsigned short* pk = &polys[k*nvp];
int ea, eb;
int v = getPolyMergeValue(pj, pk, mesh.verts, ea, eb, nvp); // 计算共享边长度 如果合并后不是凸多边形 返回负值
if (v > bestMergeVal)
{
bestMergeVal = v;
bestPa = j;
bestPb = k;
bestEa = ea;
bestEb = eb;
}
}
}
if (bestMergeVal > 0)
{
// 找到 一个可合并边 还是合并
unsigned short* pa = &polys[bestPa*nvp];
unsigned short* pb = &polys[bestPb*nvp];
mergePolyVerts(pa, pb, bestEa, bestEb, tmpPoly, nvp);
unsigned short* lastPoly = &polys[(npolys-1)*nvp];
if (pb != lastPoly)
memcpy(pb, lastPoly, sizeof(unsigned short)*nvp);
npolys--;
}
else
{
// Could not merge any polygons, stop.
break;
}
}
上面过程中的核心逻辑在于函数getPolyMergeValue,此函数判定A,B两个凸多边形是否可以合并,其判断规则如下:
-
A,B两者共享一条边 -
A,B合并之后形成的C需要是凸多边形
是否共享一条边的检测非常容易,两个凸多边形做一下边集合的交集即可。但是判定两个凸多边形合并成为的新多边形是否还是凸多边形就比较麻烦了,这里我们继续使用前面介绍的内角算法,判定共享边上的两个顶点对应的内角是否是小于等于180度的,等价于判断:对于共享边的任意顶点A,获取其在新多边形的前序顶点B和后续顶点C,判断B->C是一条有效的连接边。这部分的判定可以直接复用我们在前面一节中介绍的有效连接边判定,所以这里就不再做介绍。
然后Recast为了控制凸多边形的形状,还额外添加了一条限制:合并后的凸多边形的节点数量不得超过传入的参数maxVertsPerPoly,也就是上面代码中的nvp变量。因为凸多边形的绝大部分操作时间复杂度与节点数量成正相关,这样就避免后续使用中出现奇怪的巨型多边形引发的过多时间消耗。最终getPolyMergeValue的定义如下:
static int getPolyMergeValue(unsigned short* pa, unsigned short* pb,
const unsigned short* verts, int& ea, int& eb,
const int nvp)
{
const int na = countPolyVerts(pa, nvp);
const int nb = countPolyVerts(pb, nvp);
// 如果合并后的多边形节点数量大于最大节点数量限制nvp 则禁止合并
if (na+nb-2 > nvp)
return -1;
// Check if the polygons share an edge.
ea = -1;
eb = -1;
// 计算出共享边
for (int i = 0; i < na; ++i)
{
unsigned short va0 = pa[i];
unsigned short va1 = pa[(i+1) % na];
if (va0 > va1)
rcSwap(va0, va1);
for (int j = 0; j < nb; ++j)
{
unsigned short vb0 = pb[j];
unsigned short vb1 = pb[(j+1) % nb];
if (vb0 > vb1)
rcSwap(vb0, vb1);
if (va0 == vb0 && va1 == vb1)
{
ea = i;
eb = j;
break;
}
}
}
// 没有共享边 返回负值
if (ea == -1 || eb == -1)
return -1;
// 判断共享边两个顶点作为中间节点的顺时针连续三个节点构成的三角形是否是顺时针三角形
// 任何一个不是顺时针三角形都代表非凸 返回负值
unsigned short va, vb, vc;
va = pa[(ea+na-1) % na];
vb = pa[ea];
vc = pb[(eb+2) % nb];
if (!uleft(&verts[va*3], &verts[vb*3], &verts[vc*3]))
return -1;
va = pb[(eb+nb-1) % nb];
vb = pb[eb];
vc = pa[(ea+2) % na];
if (!uleft(&verts[va*3], &verts[vb*3], &verts[vc*3]))
return -1;
va = pa[ea];
vb = pa[(ea+1)%na];
int dx = (int)verts[va*3+0] - (int)verts[vb*3+0];
int dy = (int)verts[va*3+2] - (int)verts[vb*3+2];
// 通过判断 返回边长度
return dx*dx + dy*dy;
}
Recast使用RcPolyMesh的结构体来存储当前场景里的所有多边形:
struct rcPolyMesh
{
rcPolyMesh();
~rcPolyMesh();
unsigned short* verts; ///< The mesh vertices. [Form: (x, y, z) * #nverts]
unsigned short* polys; ///< Polygon and neighbor data. [Length: #maxpolys * 2 * #nvp]
unsigned short* regs; ///< The region id assigned to each polygon. [Length: #maxpolys]
unsigned short* flags; ///< The user defined flags for each polygon. [Length: #maxpolys]
unsigned char* areas; ///< The area id assigned to each polygon. [Length: #maxpolys]
int nverts; ///< The number of vertices.
int npolys; ///< The number of polygons.
int maxpolys; ///< The number of allocated polygons.
int nvp; ///< The maximum number of vertices per polygon.
float bmin[3]; ///< The minimum bounds in world space. [(x, y, z)]
float bmax[3]; ///< The maximum bounds in world space. [(x, y, z)]
float cs; ///< The size of each cell. (On the xz-plane.)
float ch; ///< The height of each cell. (The minimum increment along the y-axis.)
int borderSize; ///< The AABB border size used to generate the source data from which the mesh was derived.
float maxEdgeError; ///< The max error of the polygon edges in the mesh.
};
所以在上一节对每个区域进行凸多边形合并之后,需要将此区域内的所有凸多边形数据存储到这个全局的rcPolyMesh内:
// Store polygons.
for (int j = 0; j < npolys; ++j)
{
unsigned short* p = &mesh.polys[mesh.npolys*nvp*2];
unsigned short* q = &polys[j*nvp];
for (int k = 0; k < nvp; ++k)
p[k] = q[k];
mesh.regs[mesh.npolys] = cont.reg;
mesh.areas[mesh.npolys] = cont.area;
mesh.npolys++;
if (mesh.npolys > maxTris)
{
ctx->log(RC_LOG_ERROR, "rcBuildPolyMesh: Too many polygons %d (max:%d).", mesh.npolys, maxTris);
return false;
}
}
凸多边形邻居信息存储
构造完成凸多边形之后,为了方便使用凸多边形寻路时快速的获取当前凸多边形的邻居,Recast在生成rcPolyMesh时也会顺带的将多边形的邻居数据计算好,存储在polys字段中。每个poly会在这个数组中使用short[2*maxVertsPerPoly]这么大的存储区域来描述,[0, maxVertsPerPoly)中存储的是当前凸多边形的顶点索引,而[maxVertsPerPoly, 2*maxVertsPerPoly)区域存储的是其邻居多边形的id列表。这个计算邻接多边形的函数为buildMeshAdjacency。其实这个函数执行流程很简单,其内部包含了两个大循环:
- 第一个循环遍历每个
Poly的每条边,构造下面的结构体
struct rcEdge
{
unsigned short vert[2]; // 边的两个点的索引
unsigned short polyEdge[2]; // 邻接的两个多边形的边的索引
unsigned short poly[2]; // 邻接的两个多边形的索引
};
// 遍历每个poly的每个点
for (int i = 0; i < npolys; ++i)
{
unsigned short* t = &polys[i*vertsPerPoly*2];
for (int j = 0; j < vertsPerPoly; ++j)
{
if (t[j] == RC_MESH_NULL_IDX) break;
unsigned short v0 = t[j];
// 获取v0开始的顺时针边的另外一个顶点
unsigned short v1 = (j+1 >= vertsPerPoly || t[j+1] == RC_MESH_NULL_IDX) ? t[0] : t[j+1];
if (v0 < v1)
{
rcEdge& edge = edges[edgeCount];
edge.vert[0] = v0;
edge.vert[1] = v1;
edge.poly[0] = (unsigned short)i;
edge.polyEdge[0] = (unsigned short)j;
edge.poly[1] = (unsigned short)i;
edge.polyEdge[1] = 0;
// 这里的firstEdge和nextEdge 为每个顶点都构造出来了一个边索引的list
nextEdge[edgeCount] = firstEdge[v0];
firstEdge[v0] = (unsigned short)edgeCount;
edgeCount++;
}
}
}
这里rcEdge里只填充了一半信息,剩余信息等待下面的大循环来填充。
- 第二次遍历所有
poly的所有边,过滤出vert[0]>vert[1]的,然后查询之前以vert[0],vert[1]构造好一半信息的rcEdge,填充当前多边形的id和当前边的索引:
for (int i = 0; i < npolys; ++i)
{
unsigned short* t = &polys[i*vertsPerPoly*2];
for (int j = 0; j < vertsPerPoly; ++j)
{
if (t[j] == RC_MESH_NULL_IDX) break;
unsigned short v0 = t[j];
unsigned short v1 = (j+1 >= vertsPerPoly || t[j+1] == RC_MESH_NULL_IDX) ? t[0] : t[j+1];
if (v0 > v1)
{
// 遍历v1对应的链表 找到当前edge 填充剩余信息
for (unsigned short e = firstEdge[v1]; e != RC_MESH_NULL_IDX; e = nextEdge[e])
{
rcEdge& edge = edges[e];
if (edge.vert[1] == v0 && edge.poly[0] == edge.poly[1])
{
edge.poly[1] = (unsigned short)i;
edge.polyEdge[1] = (unsigned short)j;
break;
}
}
}
}
}
- 查询信息填充完整的
rcEdge,以这个作为共享边记录下当前的邻接多边形到指定的边索引里:
// Store adjacency
for (int i = 0; i < edgeCount; ++i)
{
const rcEdge& e = edges[i];
if (e.poly[0] != e.poly[1])
{
unsigned short* p0 = &polys[e.poly[0]*vertsPerPoly*2];
unsigned short* p1 = &polys[e.poly[1]*vertsPerPoly*2];
p0[vertsPerPoly + e.polyEdge[0]] = e.poly[1];
p1[vertsPerPoly + e.polyEdge[1]] = e.poly[0];
}
}
至此整个rcPolyMesh创建完成。
创建细节网格
在前面的很多步骤中,我们基本只使用了点在XZ平面上的投影坐标,例如在平滑轮廓的时候只是为了匹配在XZ平面上的轮廓。这些忽略Y轴坐标的计算会导致最后的rcPolyMesh中的多边形形状与原始场景的地表形状在Y轴上出现很大差异,影响后续的在三维空间中查询给定点对应的表面凸多边形计算。下图中的楼梯部分就是典型的可行走区域Y轴高度不匹配:
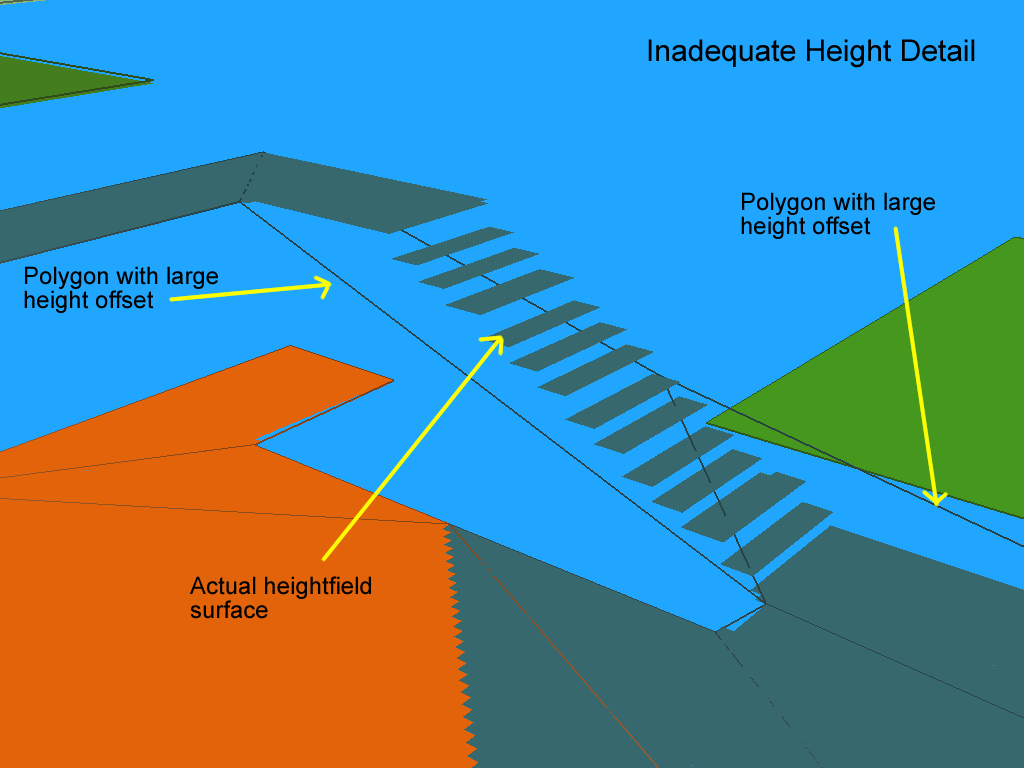
这种Y轴高度不匹配会引发寻路时模型与地表出现严重的穿插状况,所以Recast还会对生成的rcPolyMesh做一次高度拟合操作,生成一个更加贴合地表的rcDetailMesh:
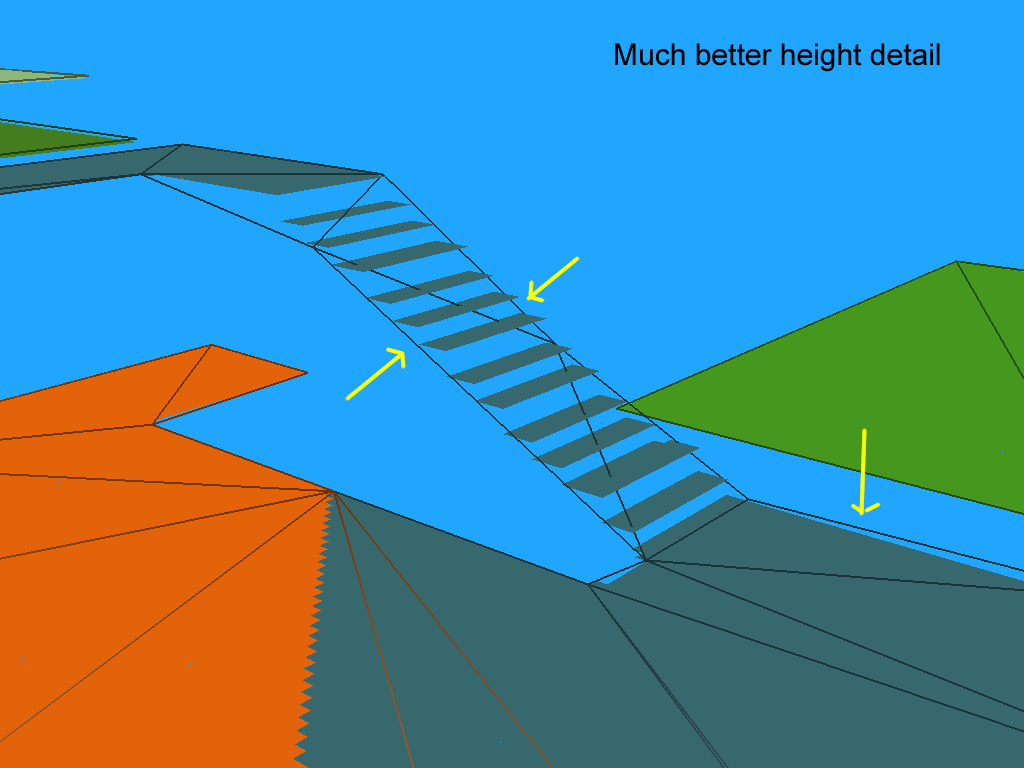
为了添加高度细节,我们需要能够确定一个多边形的表面是否它的开放高度场的span距离太远,高度补丁rcHeightPatch即用于此目的:
struct rcHeightPatch
{
inline rcHeightPatch() : data(0), xmin(0), ymin(0), width(0), height(0) {}
inline ~rcHeightPatch() { rcFree(data); }
unsigned short* data;
int xmin, ymin, width, height;
};
结构体中的data字段是一个数组,存储了与当前多边形相交的每个开放高度场网格位置的以cellHeight计算的预期高度。xmin, ymin, width, height则存储了当前多边形的AABB包围盒形状:
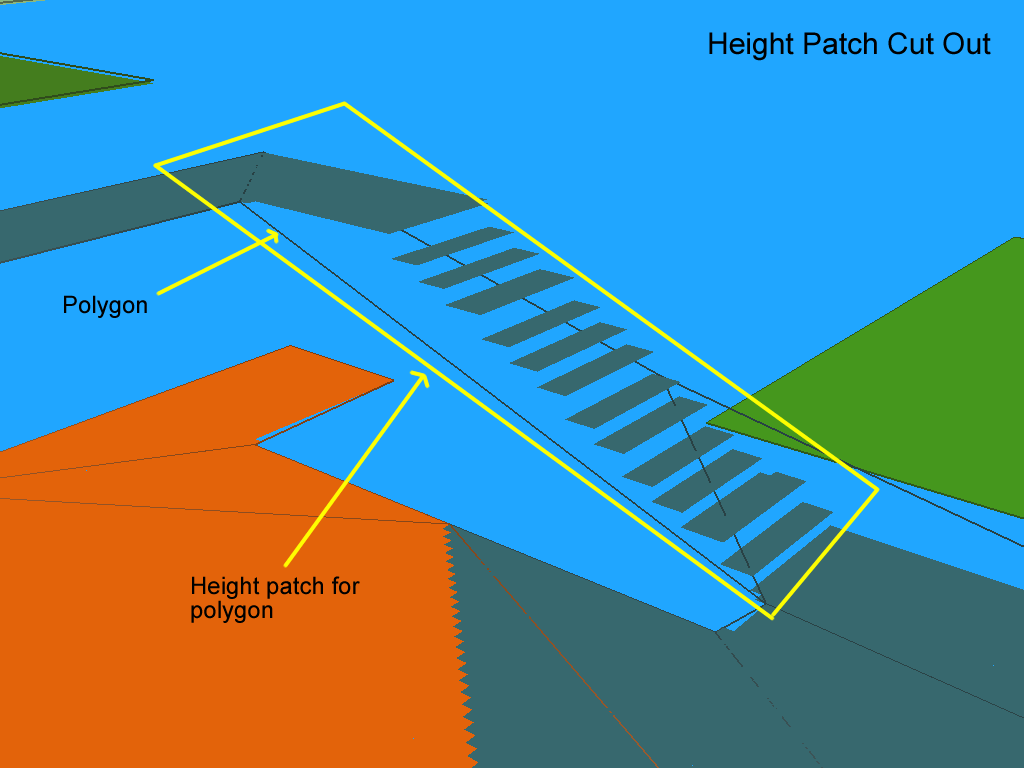
执行细节网格添加的函数为rcBuildPolyMeshDetail, 其核心逻辑为:
for (int i = 0; i < mesh.npolys; ++i)
{
const unsigned short* p = &mesh.polys[i*nvp*2];
// 将存储与当前多边形里的所有顶点 复制一份到poly数组中
int npoly = 0;
for (int j = 0; j < nvp; ++j)
{
if(p[j] == RC_MESH_NULL_IDX) break;
const unsigned short* v = &mesh.verts[p[j]*3];
poly[j*3+0] = v[0]*cs;
poly[j*3+1] = v[1]*ch;
poly[j*3+2] = v[2]*cs;
npoly++;
}
// 计算当前poly的aabb
hp.xmin = bounds[i*4+0];
hp.ymin = bounds[i*4+2];
hp.width = bounds[i*4+1]-bounds[i*4+0];
hp.height = bounds[i*4+3]-bounds[i*4+2];
// 利用原来存储的高度场数据来更新hp.data 即当前多边形AABB内所有cell与当前多边形相交点的高度
getHeightData(ctx, chf, p, npoly, mesh.verts, borderSize, hp, arr, mesh.regs[i]);
// 然后开始进行采样 补充节点
int nverts = 0;
if (!buildPolyDetail(ctx, poly, npoly,
sampleDist, sampleMaxError,
heightSearchRadius, chf, hp,
verts, nverts, tris,
edges, samples))
{
return false;
}
}
记录多边形AABB的高度数据
这里的getHeightData里用三层循环来计算AABB内所有cell对应的体素高度:
for (int hy = 0; hy < hp.height; hy++)
{
int y = hp.ymin + hy + bs;
for (int hx = 0; hx < hp.width; hx++)
{
int x = hp.xmin + hx + bs;
const rcCompactCell& c = chf.cells[x + y*chf.width];
for (int i = (int)c.index, ni = (int)(c.index + c.count); i < ni; ++i)
{
const rcCompactSpan& s = chf.spans[i];
if (s.reg == region)
{
// Store height
hp.data[hx + hy*hp.width] = s.y;
empty = false;
// 检查当前span是否在边界上
bool border = false;
for (int dir = 0; dir < 4; ++dir)
{
if (rcGetCon(s, dir) != RC_NOT_CONNECTED)
{
const int ax = x + rcGetDirOffsetX(dir);
const int ay = y + rcGetDirOffsetY(dir);
const int ai = (int)chf.cells[ax + ay*chf.width].index + rcGetCon(s, dir);
const rcCompactSpan& as = chf.spans[ai];
if (as.reg != region)
{
border = true;
break;
}
}
}
if (border)
push3(queue, x, y, i);
break;
}
}
}
}
前面两层循环负责获取对应的cell,最后一层循环从低到高遍历当前cell的所有span,遇到第一个属于当前区域的则取这个span的高度作为cell与当前多边形的交叉点高度。如果当前cell找不到与当前poly同region的span,则需要从这个cell的spans中找到离当前region最近的一个span作为相交点的高度。这里实现上采用了近似的手法,将每个当前已经计算好高度的span依次洪范传播,某个未设置高度的cell被第一次洪范到时,选取当前洪范过来的span作为相交span。而洪范时采用的初始队列则为原始区域中所有在边界上的span,也就是上面计算border的代码,如果发现当前span在边界上,则把当前span加入到queue中等待后续的洪范处理。
static const int RETRACT_SIZE = 256;
int head = 0;
while (head*3 < queue.size())
{
int cx = queue[head*3+0];
int cy = queue[head*3+1];
int ci = queue[head*3+2];
head++;
if (head >= RETRACT_SIZE) // 对std::queue拙劣的模仿
{
head = 0;
if (queue.size() > RETRACT_SIZE*3)
memmove(&queue[0], &queue[RETRACT_SIZE*3], sizeof(int)*(queue.size()-RETRACT_SIZE*3));
queue.resize(queue.size()-RETRACT_SIZE*3);
}
const rcCompactSpan& cs = chf.spans[ci]; //当前要洪范的span
for (int dir = 0; dir < 4; ++dir) // 四个方向以此洪范
{
if (rcGetCon(cs, dir) == RC_NOT_CONNECTED) continue;
const int ax = cx + rcGetDirOffsetX(dir);
const int ay = cy + rcGetDirOffsetY(dir);
const int hx = ax - hp.xmin - bs;
const int hy = ay - hp.ymin - bs;
if ((unsigned int)hx >= (unsigned int)hp.width || (unsigned int)hy >= (unsigned int)hp.height)
continue;
if (hp.data[hx + hy*hp.width] != RC_UNSET_HEIGHT) //如果此方向邻居的高度已经设置过了 则忽略
continue;
const int ai = (int)chf.cells[ax + ay*chf.width].index + rcGetCon(cs, dir);
const rcCompactSpan& as = chf.spans[ai];
hp.data[hx + hy*hp.width] = as.y; // 设置当前cell对应高度为当前span的高度
push3(queue, ax, ay, ai); // 放入队列 等待后续洪范
}
}
对多边形的边添加采样点
有了高度补丁数据之后,开始对原来的多边形的边按照detailSampleDist进行分段:
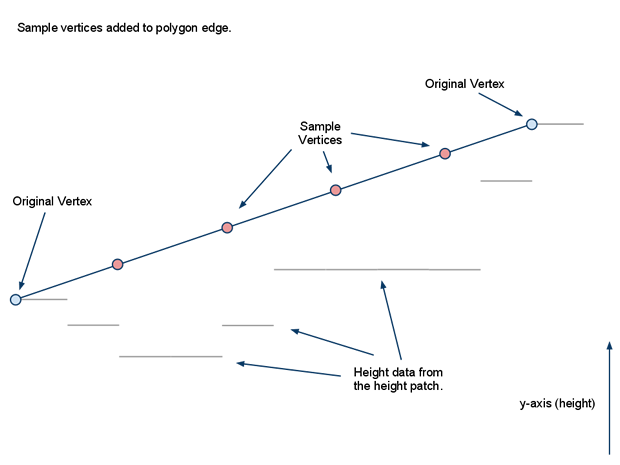
每段的终点都执行一次高度查询,计算当前点的高度与采样出来的高度之间的差值:
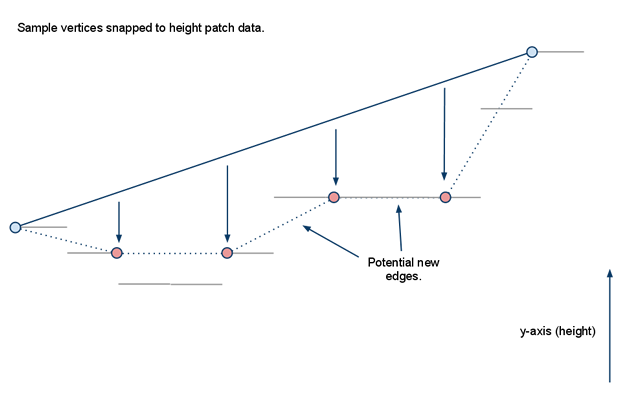
选取其中差值最大的点,如果这个点的插值大于最大偏差detailSampleMaxError,则考虑在这个高度上增加一个新的节点:
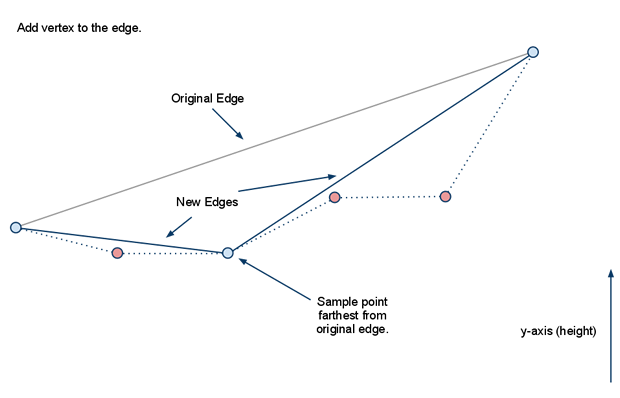
如果还有其他点的高度差值大于detailSampleMaxError,则继续执行新点的增加过程:
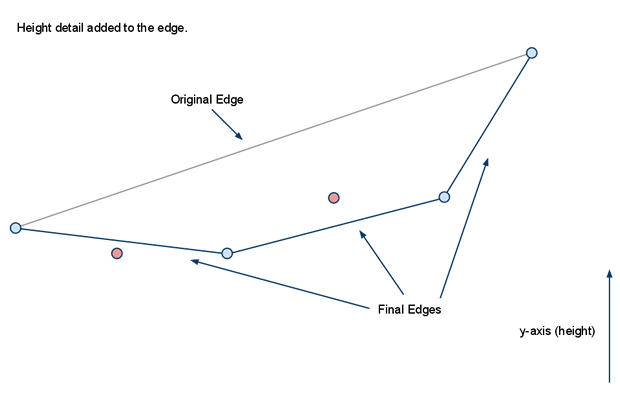
最后生成的细节网格与真正的地表高度贴合度与detailSampleMaxError成反比,下面的三张图分别代表detailSampleMaxError从大到小时的细节网格形状,表面是越来越贴合,但是三角形数量也是越来越多:


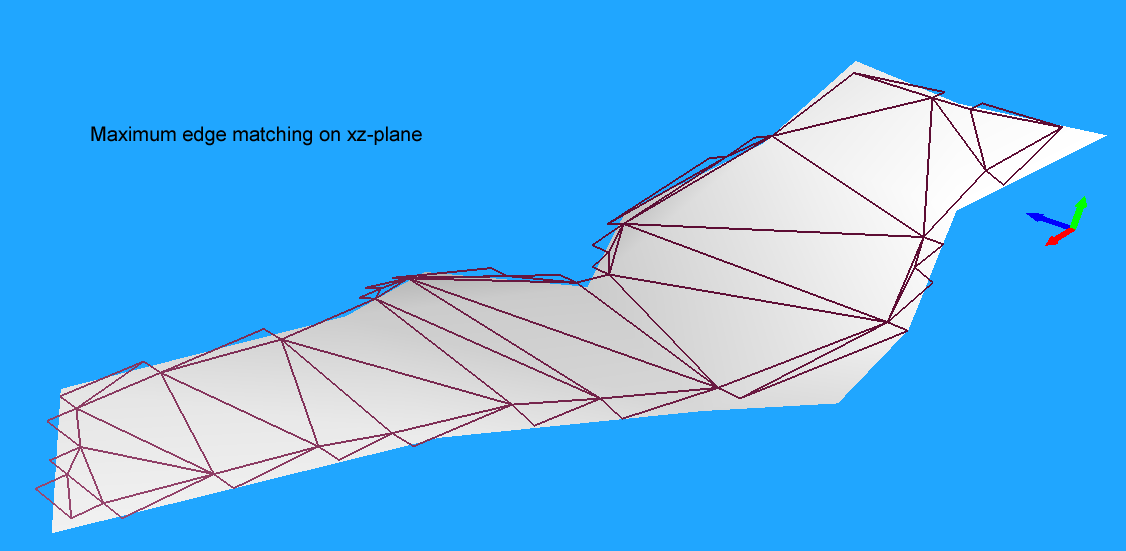
这部分对应的代码在:
// float in[nin*3] 代表原始多边形的节点数组
if (sampleDist > 0)
{
for (int i = 0, j = nin-1; i < nin; j=i++)
{
const float* vj = &in[j*3];
const float* vi = &in[i*3];
bool swapped = false;
// 这里让相邻的两个点按照std::pair(x, z)的顺序来重排序
if (std::abs(vj[0]-vi[0]) < 1e-6f)
{
if (vj[2] > vi[2])
{
rcSwap(vj,vi);
swapped = true;
}
}
else
{
if (vj[0] > vi[0])
{
rcSwap(vj,vi);
swapped = true;
}
}
// Create samples along the edge.
float dx = vi[0] - vj[0];
float dy = vi[1] - vj[1];
float dz = vi[2] - vj[2];
float d = std::sqrt(dx*dx + dz*dz);
int nn = 1 + (int)std::floor(d/sampleDist); // 采样个数
if (nn >= MAX_VERTS_PER_EDGE) nn = MAX_VERTS_PER_EDGE-1;
if (nverts+nn >= MAX_VERTS)
nn = MAX_VERTS-1-nverts;
// 记录每个采样点的高度
for (int k = 0; k <= nn; ++k)
{
float u = (float)k/(float)nn;
float* pos = &edge[k*3];
pos[0] = vj[0] + dx*u;
pos[1] = vj[1] + dy*u;
pos[2] = vj[2] + dz*u;
pos[1] = getHeight(pos[0],pos[1],pos[2], cs, ics, chf.ch, heightSearchRadius, hp)*chf.ch;
}
// idx 相邻两个点代表搜索区间
int idx[MAX_VERTS_PER_EDGE] = {0,nn};
int nidx = 2;
for (int k = 0; k < nidx-1; )
{
const int a = idx[k];
const int b = idx[k+1];
const float* va = &edge[a*3];
const float* vb = &edge[b*3];
// 找到偏移值最大的采样点
float maxd = 0;
int maxi = -1;
for (int m = a+1; m < b; ++m)
{
float dev = distancePtSeg(&edge[m*3],va,vb);
if (dev > maxd)
{
maxd = dev;
maxi = m;
}
}
// 如果最大的偏移值大于sampleMaxError
if (maxi != -1 && maxd > rcSqr(sampleMaxError))
{
// 则插入这个采样点到节点列表中 这样会构造出两个新的搜索区间
for (int m = nidx; m > k; --m)
idx[m] = idx[m-1];
idx[k+1] = maxi;
nidx++;
// 当前的区间变小了,下一次继续检查当前区间
}
else//当前区间内没有需要添加的点 继续到下一个区间
{
++k;
}
}
hull[nhull++] = j;//这个数组存储当前多边形最终的点
// 根据是否换向 插入当前边的所有采样后的点
if (swapped)
{
for (int k = nidx-2; k > 0; --k)
{
rcVcopy(&verts[nverts*3], &edge[idx[k]*3]);
hull[nhull++] = nverts;
nverts++;
}
}
else
{
for (int k = 1; k < nidx-1; ++k)
{
rcVcopy(&verts[nverts*3], &edge[idx[k]*3]);
hull[nhull++] = nverts;
nverts++;
}
}
}
}
重新三角化
在执行完上面这部分添加采样点的操作之后,hull中存储的节点数量可能会超过原来规定的上限,所以需要对这个凸多边形进行三角剖分,但是不会再合并为多个凸多边形。这里可以复用之前介绍过的耳切法流程拆分为小三角形,但是由于目前我们已经保证了当前的输入已经是一个凸多边形了,不需要再做那么多连接边是否在多边形内的判断了。所以这里直接使用一个贪心的方法对凸多边形进行三角剖分:
- 选取分割后周长最短的三角形作为第一个分割三角形
- 对于每个被切分出去的三角形,获取这个三角形连接边上的两个点,计算这两个点对应的新的切分三角形的周长,选择其中周长最短的三角形做切分
- 重复上面的过程2,直到无法再切分
执行上述流程的函数为triangulateHull,对应的代码很简短,理解起来也没啥难度:
static void triangulateHull(const int /*nverts*/, const float* verts, const int nhull, const int* hull, const int nin, rcIntArray& tris)
{
int start = 0, left = 1, right = nhull-1;
// 本次循环先找到分割后周长对端的三角形
float dmin = RC_REAL_MAX;
for (int i = 0; i < nhull; i++)
{
if (hull[i] >= nin) continue; // Ears are triangles with original vertices as middle vertex while others are actually line segments on edges
int pi = prev(i, nhull);
int ni = next(i, nhull);
const float* pv = &verts[hull[pi]*3];
const float* cv = &verts[hull[i]*3];
const float* nv = &verts[hull[ni]*3];
const float d = vdist2(pv,cv) + vdist2(cv,nv) + vdist2(nv,pv);
if (d < dmin)
{
start = i;
left = ni;
right = pi;
dmin = d;
}
}
// 添加这个三角形到结果中
tris.push(hull[start]);
tris.push(hull[left]);
tris.push(hull[right]);
tris.push(0);
// 只要剩下的点大于3个 就持续切分
while (next(left, nhull) != right)
{
// 计算连接边两个顶点对应的三角形哪个周长更短
int nleft = next(left, nhull);
int nright = prev(right, nhull);
const float* cvleft = &verts[hull[left]*3];
const float* nvleft = &verts[hull[nleft]*3];
const float* cvright = &verts[hull[right]*3];
const float* nvright = &verts[hull[nright]*3];
const float dleft = vdist2(cvleft, nvleft) + vdist2(nvleft, cvright);
const float dright = vdist2(cvright, nvright) + vdist2(cvleft, nvright);
// 选取周长更短的作为结果三角形
if (dleft < dright)
{
tris.push(hull[left]);
tris.push(hull[nleft]);
tris.push(hull[right]);
tris.push(0);
left = nleft;
}
else
{
tris.push(hull[left]);
tris.push(hull[nright]);
tris.push(hull[right]);
tris.push(0);
right = nright;
}
}
}
添加细节顶点以匹配高度
上述操作之后,Recast保证了细节网格上的三角形任意一个点都不会与真实高度相差大于sampleMaxError,但是对于三角形内部的任意一点其与真实地表高度的差值是没有保证的。为了进一步贴合地表,Recast还对这个多边形的XZ投影进行了以detailSampleDist为粒度的网格采样,如果采样点的真实高度与通过所在三角形计算出来的高度差值较大,则添加这个采样点,同时将所在三角形切分为三个新的小三角形。
整个网格采样并添加点的流程可以用图形来表示,下图就是初始的网格采样点:

然后丢弃不在当前多边形内的采样点:
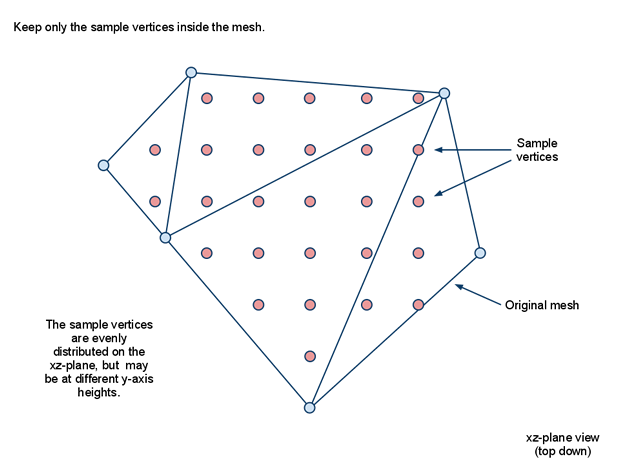
上述两个部分的代码如下:
// Create sample locations in a grid.
float bmin[3], bmax[3];
rcVcopy(bmin, in);
rcVcopy(bmax, in);
for (int i = 1; i < nin; ++i)
{
rcVmin(bmin, &in[i*3]);
rcVmax(bmax, &in[i*3]);
}
int x0 = (int)std::floor(bmin[0]/sampleDist);
int x1 = (int)std::ceil(bmax[0]/sampleDist);
int z0 = (int)std::floor(bmin[2]/sampleDist);
int z1 = (int)std::ceil(bmax[2]/sampleDist);
samples.clear();
for (int z = z0; z < z1; ++z)
{
for (int x = x0; x < x1; ++x)
{
float pt[3];
pt[0] = x*sampleDist;
pt[1] = (bmax[1]+bmin[1])*0.5f;
pt[2] = z*sampleDist;
// 丢弃不在多边形内的点
if (distToPoly(nin,in,pt) > -sampleDist/2) continue;
samples.push(x);
samples.push(getHeight(pt[0], pt[1], pt[2], cs, ics, chf.ch, heightSearchRadius, hp));//获取当前点的高度
samples.push(z);
samples.push(0); // Not added
}
}
然后选取剩下的点中高度差最大的点,如果这个的高度差大于了detailSampleMaxError,则往多边形节点集合中添加这个点:
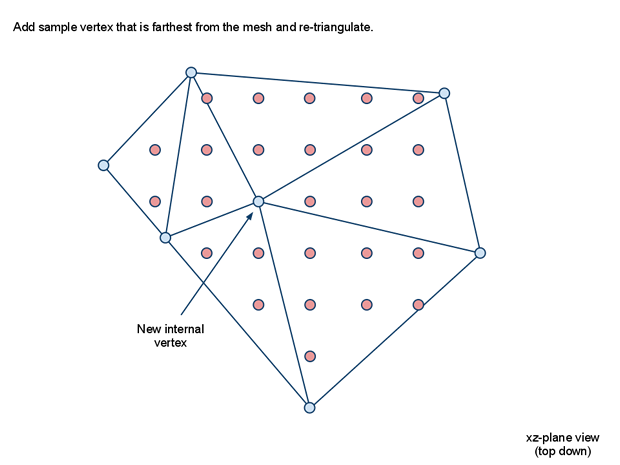
并重新执行三角剖分,不过这里使用的是最知名的delaunay三角剖分:
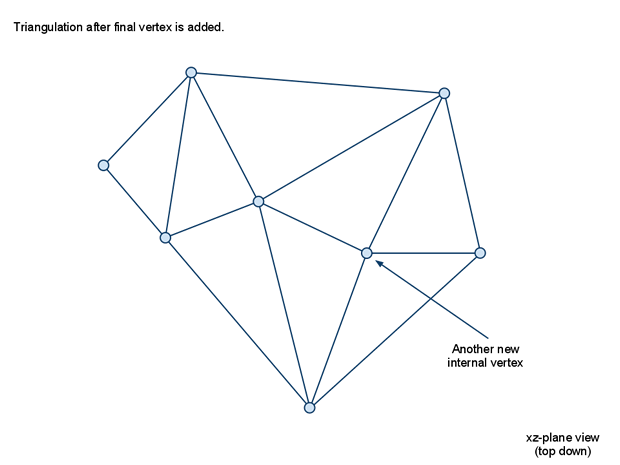
const int nsamples = samples.size()/4;
for (int iter = 0; iter < nsamples; ++iter)
{
if (nverts >= MAX_VERTS)
break;
// Find sample with most error.
float bestpt[3] = {0,0,0};
float bestd = 0;
int besti = -1;
// 获取剩余采样点中高度差值最大的
for (int i = 0; i < nsamples; ++i)
{
const int* s = &samples[i*4];
if (s[3]) continue; // 第四个分量代表已经添加过了
float pt[3];
// The sample location is jittered to get rid of some bad triangulations
// which are cause by symmetrical data from the grid structure.
pt[0] = s[0]*sampleDist + getJitterX(i)*cs*0.1f;
pt[1] = s[1]*chf.ch;
pt[2] = s[2]*sampleDist + getJitterY(i)*cs*0.1f;
float d = distToTriMesh(pt, verts, nverts, &tris[0], tris.size()/4);
if (d < 0) continue; // did not hit the mesh.
if (d > bestd)
{
bestd = d;
besti = i;
rcVcopy(bestpt,pt);
}
}
// 没有需要继续切分的 停止搜索
if (bestd <= sampleMaxError || besti == -1)
break;
// Mark sample as added.
samples[besti*4+3] = 1;
// Add the new sample point.
rcVcopy(&verts[nverts*3],bestpt);
nverts++;
// 有新的节点之后 使用delaunay方法对新的节点集合进行三角剖分
edges.clear();
tris.clear();
delaunayHull(ctx, nverts, verts, nhull, hull, tris, edges);
}
细节网格与寻路
其实这部分rcDetailMesh的数据其实是可选的,因为如果只是计算Poly的连通路径的话,当前的rcPolyMesh已经带有了足够的信息,事实上执行寻路的Detour返回的多边形列表就是rcPolyMesh里的多边形,即使rcDetailMesh数据存在。只有使用DetourCrowd来驱动寻路entity的每帧位置更新时,才可能需要rcDetailMesh这样更精确的地表数据,来对输出的entity新位置做高度修正。
navmesh数据序列化到文件
上述流程完整的介绍了如何从场景数据生成NavMesh中的PolyMesh和DetailMesh, 对于一个1km*1km的常规场景来说,这个完整流程大概耗时1min左右。这种分钟级别的耗时导致了不可能进行实时的NavMesh生成,只能在场景编辑完成之后做离线生成,然后序列化对应的数据到文件,以供游戏加载对应场景时加载此NavMesh文件来支持寻路功能。Recast支持将数据以下面的三种格式进行序列化:
SoloMesh格式,最简单的文件格式,对全场景执行上述的NavMesh生成之后,通过dtCreateNavMeshData将计算好的PolyMesh和DetailMesh存储到文件TileMesh格式,按照一定大小的矩形对全场景的XZ平面进行分割,分割后的区块称之为Tile,然后对每个Tile执行NavMesh的生成流程,生成完成之后再调用dtCreateNavMeshData对每个Tile对应的NavMesh数据拼接到同一个文件之中TileCache格式,这个格式并不存储最终的NavMesh数据,存储的是以Tile进行划分的压缩高度场数据,寻路系统运行时在加载完TileCache数据之后需要执行后续的区域生成、多边形生成、细节网格生成等缺失步骤来构造完整的NavMesh数据才能支持寻路查询
事实上SoloMesh与TileMesh的格式是一样的,其结构体都是dtNavMesh, 存储的都是Tile对应NavMesh数据的数组,只不过SoloMesh里的数组大小为1。而TileCache这种运行时重新生成NavMesh会消耗大量的CPU资源,所以只有在需要动态的对场景进行改变时才有使用的需求。所以实际项目中使用最多的是TileMesh格式,因为划分Tile之后可以开启多线程来支持多个Tile之间的并发生成NavMesh,这样就极大的减少了全流程的等待时间,从而加速了迭代效率。虽然这个格式相对于SoleMesh格式来说会浪费一些空间来存储每个Tile数据的描述信息字段,但是这种浪费的空间相对于完整的NavMesh大小来说基本可以忽略。因此下面我们只详解一下TileMesh的序列化流程。
生成TileMesh首先需要以指定的Tile大小对原始的场景进行切分,然后对每个Tile执行NavMesh的生成流程:
void Sample_TileMesh::buildAllTiles()
{
if (!m_geom) return;
if (!m_navMesh) return;
const float* bmin = m_geom->getNavMeshBoundsMin();
const float* bmax = m_geom->getNavMeshBoundsMax();
int gw = 0, gh = 0;
rcCalcGridSize(bmin, bmax, m_cellSize, &gw, &gh);
const int ts = (int)m_tileSize;
const int tw = (gw + ts-1) / ts;
const int th = (gh + ts-1) / ts;
const float tcs = m_tileSize*m_cellSize;
// Start the build process.
m_ctx->startTimer(RC_TIMER_TEMP);
for (int y = 0; y < th; ++y)
{
for (int x = 0; x < tw; ++x)
{
m_lastBuiltTileBmin[0] = bmin[0] + x*tcs;
m_lastBuiltTileBmin[1] = bmin[1];
m_lastBuiltTileBmin[2] = bmin[2] + y*tcs;
m_lastBuiltTileBmax[0] = bmin[0] + (x+1)*tcs;
m_lastBuiltTileBmax[1] = bmax[1];
m_lastBuiltTileBmax[2] = bmin[2] + (y+1)*tcs;
int dataSize = 0;
unsigned char* data = buildTileMesh(x, y, m_lastBuiltTileBmin, m_lastBuiltTileBmax, dataSize);
if (data)
{
// Remove any previous data (navmesh owns and deletes the data).
m_navMesh->removeTile(m_navMesh->getTileRefAt(x,y,0),0,0);
// Let the navmesh own the data.
dtStatus status = m_navMesh->addTile(data,dataSize,DT_TILE_FREE_DATA,0,0);
if (dtStatusFailed(status))
dtFree(data);
}
}
}
// Start the build process.
m_ctx->stopTimer(RC_TIMER_TEMP);
m_totalBuildTimeMs = m_ctx->getAccumulatedTime(RC_TIMER_TEMP)/1000.0f;
}
在RecastDemo中使用了正方形的Tile,其边长为传入的参数m_tileSize。划分好每个Tile之后执行buildTileMesh来执行这个Tile对应的NavMesh数据生成,内部调用了dtCreateNavMeshData序列化为了一个字节数组,生成之后调用addTile函数加入到dtNavMesh中。
在Tile生成初始的体素数据时,并不是以当前Tile计算出来的包围盒来过滤的,而是将这个包围盒向外扩张一定的大小BorderSize * CellSize,:
//
// :''''''''':
// : +-----+ :
// : | | :
// : | |<--- tile to build
// : | | :
// : +-----+ :<-- geometry needed
// :.........:
//
m_cfg.borderSize = m_cfg.walkableRadius + 3; // Reserve enough padding.
m_cfg.width = m_cfg.tileSize + m_cfg.borderSize*2;
m_cfg.height = m_cfg.tileSize + m_cfg.borderSize*2;
rcVcopy(m_cfg.bmin, bmin);
rcVcopy(m_cfg.bmax, bmax);
m_cfg.bmin[0] -= m_cfg.borderSize*m_cfg.cs;
m_cfg.bmin[2] -= m_cfg.borderSize*m_cfg.cs;
m_cfg.bmax[0] += m_cfg.borderSize*m_cfg.cs;
m_cfg.bmax[2] += m_cfg.borderSize*m_cfg.cs;
这里的BorderSize使用了边缘半径加上3,这样做的目的是能够正确的处理边界上的障碍物,同时能够与周围的八个Tile的边界有交集。
在最后的DetailMesh生成完成之后,调用dtCreateNavMeshData来创建这个Tile对应的二进制数据:
rcPolyMesh* m_pmesh; // 生成的多边形网格数据
rcPolyMeshDetail* m_dmesh; // 生成的细节网格数据
dtNavMeshCreateParams params;
memset(¶ms, 0, sizeof(params));
params.verts = m_pmesh->verts;
params.vertCount = m_pmesh->nverts;
params.polys = m_pmesh->polys;
params.polyAreas = m_pmesh->areas;
params.polyFlags = m_pmesh->flags;
params.polyCount = m_pmesh->npolys;
params.nvp = m_pmesh->nvp;
params.detailMeshes = m_dmesh->meshes;
params.detailVerts = m_dmesh->verts;
params.detailVertsCount = m_dmesh->nverts;
params.detailTris = m_dmesh->tris;
params.detailTriCount = m_dmesh->ntris;
params.offMeshConVerts = m_geom->getOffMeshConnectionVerts();
params.offMeshConRad = m_geom->getOffMeshConnectionRads();
params.offMeshConDir = m_geom->getOffMeshConnectionDirs();
params.offMeshConAreas = m_geom->getOffMeshConnectionAreas();
params.offMeshConFlags = m_geom->getOffMeshConnectionFlags();
params.offMeshConUserID = m_geom->getOffMeshConnectionId();
params.offMeshConCount = m_geom->getOffMeshConnectionCount();
params.walkableHeight = m_agentHeight;
params.walkableRadius = m_agentRadius;
params.walkableClimb = m_agentMaxClimb;
params.tileX = tx; // 当前tile在XZ平面以TileSize计算的X坐标
params.tileY = ty; // 当前tile在XZ平面以TileSize计算的Y坐标
params.tileLayer = 0;
rcVcopy(params.bmin, m_pmesh->bmin);
rcVcopy(params.bmax, m_pmesh->bmax);
params.cs = m_cfg.cs;
params.ch = m_cfg.ch;
params.buildBvTree = true;
if (!dtCreateNavMeshData(¶ms, &navData, &navDataSize))
{
m_ctx->log(RC_LOG_ERROR, "Could not build Detour navmesh.");
return 0;
}
这里的OffMeshCon相关的字段代表一些在场景内手动添加的两点之间特殊连通数据,这些数据主要是用来处理跳跃、攀爬等一些不使用表面寻路的特殊寻路类型。在生成Tile对应NavMesh数据时,会获取在当前Tile范围内的OffMeshCon的点的数量:
unsigned char* offMeshConClass = 0;
int storedOffMeshConCount = 0; //起点在当前tile内的offmeshlink数量
int offMeshConLinkCount = 0; // 在当前tile内的offmeshlink节点的数量
offMeshConClass = (unsigned char*)dtAlloc(sizeof(unsigned char)*params->offMeshConCount*2, DT_ALLOC_TEMP);
float hmin = DT_REAL_MAX; // 计算当前tile的具体高度上下限
float hmax = -DT_REAL_MAX;
if (params->detailVerts && params->detailVertsCount)
{
for (int i = 0; i < params->detailVertsCount; ++i)
{
const float h = params->detailVerts[i*3+1];
hmin = dtMin(hmin,h);
hmax = dtMax(hmax,h);
}
}
else
{
for (int i = 0; i < params->vertCount; ++i)
{
const unsigned short* iv = ¶ms->verts[i*3];
const float h = params->bmin[1] + iv[1] * params->ch;
hmin = dtMin(hmin,h);
hmax = dtMax(hmax,h);
}
}
hmin -= params->walkableClimb;
hmax += params->walkableClimb;
float bmin[3], bmax[3]; // 计算出当前tile的AABB包围盒
dtVcopy(bmin, params->bmin);
dtVcopy(bmax, params->bmax);
bmin[1] = hmin;
bmax[1] = hmax;
for (int i = 0; i < params->offMeshConCount; ++i)
{
// 计算非mesh连接的两个点是否在当前poly的XZ范围内 如果在则对应的值为0xff
const float* p0 = ¶ms->offMeshConVerts[(i*2+0)*3];
const float* p1 = ¶ms->offMeshConVerts[(i*2+1)*3];
offMeshConClass[i*2+0] = classifyOffMeshPoint(p0, bmin, bmax);
offMeshConClass[i*2+1] = classifyOffMeshPoint(p1, bmin, bmax);
// 这里对起点做额外判断 如果高度不在范围内 则认为这个连接与当前tile不相关
if (offMeshConClass[i*2+0] == 0xff)
{
if (p0[1] < bmin[1] || p0[1] > bmax[1])
offMeshConClass[i*2+0] = 0;
}
// 当前tile可能会有多少条offmeshlink
if (offMeshConClass[i*2+0] == 0xff)
offMeshConLinkCount++;
if (offMeshConClass[i*2+1] == 0xff)
offMeshConLinkCount++;
if (offMeshConClass[i*2+0] == 0xff) // 存储起点在当前tile的offmeshlink数量
storedOffMeshConCount++;
}
计算好了OffMeshLink的数量之后,整体NavMesh的大小也就可以确定了:
// Calculate data size
const int headerSize = dtAlign4(sizeof(dtMeshHeader)); // 每个tile都会有的dtMeshHeader 代表一些元数据信息
const int vertsSize = dtAlign4(sizeof(float)*3*totVertCount); // 当前tile的节点数据 每个节点有3个float存储
const int polysSize = dtAlign4(sizeof(dtPoly)*totPolyCount); // 当前tile的网格数据,每个网格用dtPoly来存储
const int linksSize = dtAlign4(sizeof(dtLink)*maxLinkCount); // 当前tile内所有可能的多边形之间的link数据 每个link使用dtLink来存储
// 下面三个字段是细节网格的数据
const int detailMeshesSize = dtAlign4(sizeof(dtPolyDetail)*params->polyCount);
const int detailVertsSize = dtAlign4(sizeof(float)*3*uniqueDetailVertCount);
const int detailTrisSize = dtAlign4(sizeof(unsigned char)*4*detailTriCount);
// 下面这个是使用数组存储的BVH数据,这里的BVH叶子节点只包含一个Poly,所以这里最大节点数量不会超过polyCount*2
const int bvTreeSize = params->buildBvTree ? dtAlign4(sizeof(dtBVNode)*params->polyCount*2) : 0;
// 每个起点在当前tile内的offmeshcon数据
const int offMeshConsSize = dtAlign4(sizeof(dtOffMeshConnection)*storedOffMeshConCount);
const int dataSize = headerSize + vertsSize + polysSize + linksSize +
detailMeshesSize + detailVertsSize + detailTrisSize +
bvTreeSize + offMeshConsSize;
unsigned char* data = (unsigned char*)dtAlloc(sizeof(unsigned char)*dataSize, DT_ALLOC_PERM);
if (!data)
{
dtFree(offMeshConClass);
return false;
}
memset(data, 0, dataSize);
unsigned char* d = data;
// 每个存储部分的开始地址
dtMeshHeader* header = dtGetThenAdvanceBufferPointer<dtMeshHeader>(d, headerSize);
float* navVerts = dtGetThenAdvanceBufferPointer<float>(d, vertsSize);
dtPoly* navPolys = dtGetThenAdvanceBufferPointer<dtPoly>(d, polysSize);
d += linksSize; // 这里其实并没有存储Poly之间的连接数据 而是留了一段空白 这段空白区域会在navmesh加载所有tile之后重新计算
dtPolyDetail* navDMeshes = dtGetThenAdvanceBufferPointer<dtPolyDetail>(d, detailMeshesSize);
float* navDVerts = dtGetThenAdvanceBufferPointer<float>(d, detailVertsSize);
unsigned char* navDTris = dtGetThenAdvanceBufferPointer<unsigned char>(d, detailTrisSize);
dtBVNode* navBvtree = dtGetThenAdvanceBufferPointer<dtBVNode>(d, bvTreeSize);
dtOffMeshConnection* offMeshCons = dtGetThenAdvanceBufferPointer<dtOffMeshConnection>(d, offMeshConsSize);
在存储多边形数据时,会受到OffmeshLink的影响,因为针对每个起点在当前Tile内的OffMeshLink,都会生成一个包含两个节点的假多边形:
const int offMeshVertsBase = params->vertCount; // 节点数据先存储正常多边形的数据 然后再存储offmeshcon的数据
const int offMeshPolyBase = params->polyCount; // 多边形索引数据先存储正常多边形 然后存储offmeshlink生成的假多边形
// 存储节点数据
int n = 0;
for (int i = 0; i < params->offMeshConCount; ++i)
{
// 只存储起点在当前tile内的offmeshlink的节点数据
if (offMeshConClass[i*2+0] == 0xff)
{
// 复制当前link的两个端点
const float* linkv = ¶ms->offMeshConVerts[i*2*3];
float* v = &navVerts[(offMeshVertsBase + n*2)*3];
dtVcopy(&v[0], &linkv[0]);
dtVcopy(&v[3], &linkv[3]);
n++;
}
}
// 存储多边形的节点索引
n = 0;
for (int i = 0; i < params->offMeshConCount; ++i)
{
// 只存储起点在当前tile内的offmeshlink
if (offMeshConClass[i*2+0] == 0xff)
{
// 构造一个假的多边形 包含两个offmeshlink点的索引
dtPoly* p = &navPolys[offMeshPolyBase+n];
p->vertCount = 2;
p->verts[0] = (unsigned short)(offMeshVertsBase + n*2+0);
p->verts[1] = (unsigned short)(offMeshVertsBase + n*2+1);
p->flags = params->offMeshConFlags[i];
p->setArea(params->offMeshConAreas[i]);
p->setType(DT_POLYTYPE_OFFMESH_CONNECTION);
n++;
}
}
除了OffMeshLink对应的假多边形节点之外,还需要存储这条OffMeshLink的详细信息:
// Store Off-Mesh connections.
n = 0;
for (int i = 0; i < params->offMeshConCount; ++i)
{
// 只存储起点在当前tile内的offmeshlink
if (offMeshConClass[i*2+0] == 0xff)
{
dtOffMeshConnection* con = &offMeshCons[n];
con->poly = (unsigned short)(offMeshPolyBase + n);
// 这里又复制了一份两个端点的数据
const float* endPts = ¶ms->offMeshConVerts[i*2*3];
dtVcopy(&con->pos[0], &endPts[0]);
dtVcopy(&con->pos[3], &endPts[3]);
con->rad = params->offMeshConRad[i];
con->flags = params->offMeshConDir[i] ? DT_OFFMESH_CON_BIDIR : 0;
con->side = offMeshConClass[i*2+1]; //终点所在的tile相对于当前tile的方向
if (params->offMeshConUserID)
con->userId = params->offMeshConUserID[i];
n++;
}
}
序列化完成一个Tile的数据之后,执行addTile流程,这里除了会把data复制过去之外,还会执行一些连接边的计算,以填充之前留白的dtLink数组。这部分数据只有在真正执行寻路的时候才有用,当前我们只考虑序列化流程,所以不对这部分进行讨论。最终生成的dtNavMesh写入到文件的代码就比较简单了,先写dtNavMesh的头部元数据,然后遍历每个单独的Tile进行数据追加:
void Sample::saveAll(const char* path, const dtNavMesh* mesh)
{
if (!mesh) return;
FILE* fp = fopen(path, "wb");
if (!fp)
return;
// 写入dtNavmesh的头部元数据
NavMeshSetHeader header;
header.magic = NAVMESHSET_MAGIC;
header.version = NAVMESHSET_VERSION;
header.numTiles = 0;
for (int i = 0; i < mesh->getMaxTiles(); ++i)
{
const dtMeshTile* tile = mesh->getTile(i);
if (!tile || !tile->header || !tile->dataSize) continue;
header.numTiles++;
}
memcpy(&header.params, mesh->getParams(), sizeof(dtNavMeshParams));
fwrite(&header, sizeof(NavMeshSetHeader), 1, fp);
// 追加每个tile的数据
for (int i = 0; i < mesh->getMaxTiles(); ++i)
{
const dtMeshTile* tile = mesh->getTile(i);
if (!tile || !tile->header || !tile->dataSize) continue;
NavMeshTileHeader tileHeader;
tileHeader.tileRef = mesh->getTileRef(tile);
tileHeader.dataSize = tile->dataSize;
fwrite(&tileHeader, sizeof(tileHeader), 1, fp);
fwrite(tile->data, tile->dataSize, 1, fp);
}
fclose(fp);
}
一个1km*1km的场景生成的dtNavMesh数据序列化到文件之后,其数据文件大小一般不会超过1MB,而加载之后的内存大小基本等于数据文件大小,可以看出NavMesh在内存上的优势。如果想要极限的减少数据存储则可以将dtLink相关的数据不写入文件,这样做的话文件大小能够减少1/3左右,只有当场景变得超级大时才会有明显的内存优化效果。
使用NavMesh执行寻路
在前面的章节中我们详细的介绍了Recast从接受一个Obj格式描述的场景到最终生成相应的寻路网格NavMesh数据的,接下来我们将介绍如何加载序列化到文件的NavMesh数据并使用这份NavMesh数据来支持各种寻路请求。
NavMesh的装载
在前面一章的最后一节中我们展示了RecastDemo将dtNavMesh数据序列化到文件的基本流程:先写入NavMeshSetHeader然后再遍历内部存储的所有dtMeshTile按字节输出到文件。对应的加载过程则是上面的逆过程:先读取NavMeshSetHeader然后再一个一个的读取dtMeshTile并调用addTile添加到dtNavMesh中:
dtNavMesh* Sample::loadAll(const char* path)
{
FILE* fp = fopen(path, "rb");
if (!fp) return 0;
// Read header.
NavMeshSetHeader header;
size_t readLen = fread(&header, sizeof(NavMeshSetHeader), 1, fp);
// 这里省略一些数据有效检查
dtNavMesh* mesh = dtAllocNavMesh();
if (!mesh)
{
fclose(fp);
return 0;
}
dtStatus status = mesh->init(&header.params);
if (dtStatusFailed(status))
{
fclose(fp);
return 0;
}
// Read tiles.
for (int i = 0; i < header.numTiles; ++i)
{
NavMeshTileHeader tileHeader;
readLen = fread(&tileHeader, sizeof(tileHeader), 1, fp);
if (readLen != 1)
{
fclose(fp);
return 0;
}
if (!tileHeader.tileRef || !tileHeader.dataSize)
break;
// 读取一份tile数据
unsigned char* data = (unsigned char*)dtAlloc(tileHeader.dataSize, DT_ALLOC_PERM);
if (!data) break;
memset(data, 0, tileHeader.dataSize);
readLen = fread(data, tileHeader.dataSize, 1, fp);
if (readLen != 1)
{
dtFree(data);
fclose(fp);
return 0;
}
// 将这份tile数据加入到dtNavMesh中
mesh->addTile(data, tileHeader.dataSize, DT_TILE_FREE_DATA, tileHeader.tileRef, 0);
}
fclose(fp);
return mesh;
}
对于每个dtMeshTile,其头部元数据字段都会存储其在场景中的位置信息(x,y,layer):
int x; ///< The x-position of the tile within the dtNavMesh tile grid. (x, y, layer)
int y; ///< The y-position of the tile within the dtNavMesh tile grid. (x, y, layer)
int layer; ///< The layer of the tile within the dtNavMesh tile grid. (x, y, layer)
这里的layer字段代表当前Tile是对应的(x,y)的第几层Tile,不过这个字段只有在开启了dtTileCache的时候有作用,其他时候都设置为0。dtNavMesh内使用了一个自己实现的简单版本HashMap来存储所有的dtMeshTile,这里用来查询的key就是(x,y,layer)三元组:
// 一个非常简单且稳定的hash函数
inline int computeTileHash(int x, int y, const int mask)
{
const unsigned int h1 = 0x8da6b343; // Large multiplicative constants;
const unsigned int h2 = 0xd8163841; // here arbitrarily chosen primes
unsigned int n = h1 * x + h2 * y;
return (int)(n & mask);
}
const dtMeshTile* dtNavMesh::getTileAt(const int x, const int y, const int layer) const
{
// 这里只使用(x,y)来计算hash
int h = computeTileHash(x,y,m_tileLutMask);
dtMeshTile* tile = m_posLookup[h]; // m_posLookup是一个数组,数组里存储的都是dtMeshTile组成的链表
while (tile) // 遍历链表查询 (x,y,layer)三元组对应的元素
{
if (tile->header &&
tile->header->x == x &&
tile->header->y == y &&
tile->header->layer == layer)
{
return tile;
}
tile = tile->next;
}
return 0;
}
然后所有的dtMeshTile数据都是在dtNavMesh::init初始化的时候根据参数里传递的最大Tile数量预先分配的:
// 根据传入的m_maxTiles来预先分配所有的tile数据
m_tiles = (dtMeshTile*)dtAlloc(sizeof(dtMeshTile)*m_maxTiles, DT_ALLOC_PERM);
if (!m_tiles)
return DT_FAILURE | DT_OUT_OF_MEMORY;
// 创建hashmap对应的数组
m_posLookup = (dtMeshTile**)dtAlloc(sizeof(dtMeshTile*)*m_tileLutSize, DT_ALLOC_PERM);
if (!m_posLookup)
return DT_FAILURE | DT_OUT_OF_MEMORY;
memset(m_tiles, 0, sizeof(dtMeshTile)*m_maxTiles);
memset(m_posLookup, 0, sizeof(dtMeshTile*)*m_tileLutSize);
m_nextFree = 0; // 使用m_nextFree构造一个空闲tile的链表
for (int i = m_maxTiles-1; i >= 0; --i)
{
m_tiles[i].salt = 1;
m_tiles[i].next = m_nextFree;
m_nextFree = &m_tiles[i];
}
对于每个有效的dtMeshTile,其内存地址一定在m_tiles数组之中,因此可以用一个偏移量去获取数据指针,没有必要每次都用getTileAt(x,y,layer)去执行查询。不过由于dtNavMesh支持对指定dtMeshTile做运行时加载和卸载的操作,所以为了区分dtMeshTile的数据版本,在dtMeshTile内部添加了一个salt字段来代表数据版本号。此时查询获取一个指定的dtMeshTile的指针可以通过(salt, tile_id)这两个字段进行查询,这两个字段拼接成为一个uint64就叫做dtTileRef。不过实际上真正使用的并不是由这个二元组组成的dtTileRef, 而是由(salt, tile_id, poly_id)这个三元组组成的dtPolyRef:
static const unsigned int DT_SALT_BITS = 16;
static const unsigned int DT_TILE_BITS = 28; // 最多支持1 <<28个tile
static const unsigned int DT_POLY_BITS = 20; // 单tile内最多支持 1<<20 个poly
typedef uint64_t dtPolyRef;
typedef uint64_t dtTileRef;
inline dtPolyRef encodePolyId(unsigned int salt, unsigned int it, unsigned int ip) const
{
return ((dtPolyRef)salt << (DT_POLY_BITS+DT_TILE_BITS)) | ((dtPolyRef)it << DT_POLY_BITS) | (dtPolyRef)ip;
}
inline unsigned int decodePolyIdSalt(dtPolyRef ref) const
{
const dtPolyRef saltMask = ((dtPolyRef)1<<DT_SALT_BITS)-1;
return (unsigned int)((ref >> (DT_POLY_BITS+DT_TILE_BITS)) & saltMask);
}
inline unsigned int decodePolyIdTile(dtPolyRef ref) const
{
const dtPolyRef tileMask = ((dtPolyRef)1<<DT_TILE_BITS)-1;
return (unsigned int)((ref >> DT_POLY_BITS) & tileMask);
}
dtTileRef dtNavMesh::getTileRef(const dtMeshTile* tile) const
{
if (!tile) return 0;
const unsigned int it = (unsigned int)(tile - m_tiles);
return (dtTileRef)encodePolyId(tile->salt, it, 0);
}
const dtMeshTile* dtNavMesh::getTileByRef(dtTileRef ref) const
{
if (!ref)
return 0;
unsigned int tileIndex = decodePolyIdTile((dtPolyRef)ref);
unsigned int tileSalt = decodePolyIdSalt((dtPolyRef)ref);
if ((int)tileIndex >= m_maxTiles)
return 0;
const dtMeshTile* tile = &m_tiles[tileIndex];
if (tile->salt != tileSalt)
return 0;
return tile;
}
有了dtPolyRef这个handle,就可以比较快速且安全的获取一个dtMeshTile,以规避裸指针访问dtMeshTile数据时的版本不匹配问题。
了解了dtMeshTile的分配之后,我们才能继续讲解addTile的内部过程, 首先寻找一个空闲的dtMeshTile来装载传入的数据:
// data开头的部分是dtMeshHeader 检查对应的版本号是否匹配
dtMeshHeader* header = (dtMeshHeader*)data;
if (header->magic != DT_NAVMESH_MAGIC)
return DT_FAILURE | DT_WRONG_MAGIC;
if (header->version != DT_NAVMESH_VERSION)
return DT_FAILURE | DT_WRONG_VERSION;
// Make sure the location is free.
if (getTileAt(header->x, header->y, header->layer)) // 如果已经有相同位置的tile被添加了 返回错误
return DT_FAILURE | DT_ALREADY_OCCUPIED;
// Allocate a tile.
dtMeshTile* tile = 0;
if (!lastRef) // lastRef代表指定dtTileRef 这个选项一般不使用 所以这里的逻辑忽略else部分
{
if (m_nextFree)
{
tile = m_nextFree;
m_nextFree = tile->next;
tile->next = 0;
}
}
// Make sure we could allocate a tile.
if (!tile)
return DT_FAILURE | DT_OUT_OF_MEMORY;
// 更新hash表对应表项的链表
int h = computeTileHash(header->x, header->y, m_tileLutMask);
tile->next = m_posLookup[h];
m_posLookup[h] = tile;
找到一个合适的dtMeshTile之后,按照保存时的各项数据的偏移量来初始化dtMeshTile的各个成员变量指针,这里甚至不需要执行内存的复制操作,直接进行指针计算即可:
const int headerSize = dtAlign4(sizeof(dtMeshHeader));
const int vertsSize = dtAlign4(sizeof(float)*3*header->vertCount);
const int polysSize = dtAlign4(sizeof(dtPoly)*header->polyCount);
const int linksSize = dtAlign4(sizeof(dtLink)*(header->maxLinkCount));
const int detailMeshesSize = dtAlign4(sizeof(dtPolyDetail)*header->detailMeshCount);
const int detailVertsSize = dtAlign4(sizeof(float)*3*header->detailVertCount);
const int detailTrisSize = dtAlign4(sizeof(unsigned char)*4*header->detailTriCount);
const int bvtreeSize = dtAlign4(sizeof(dtBVNode)*header->bvNodeCount);
const int offMeshLinksSize = dtAlign4(sizeof(dtOffMeshConnection)*header->offMeshConCount);
unsigned char* d = data + headerSize;
tile->verts = dtGetThenAdvanceBufferPointer<float>(d, vertsSize);
tile->polys = dtGetThenAdvanceBufferPointer<dtPoly>(d, polysSize);
tile->links = dtGetThenAdvanceBufferPointer<dtLink>(d, linksSize);
tile->detailMeshes = dtGetThenAdvanceBufferPointer<dtPolyDetail>(d, detailMeshesSize);
tile->detailVerts = dtGetThenAdvanceBufferPointer<float>(d, detailVertsSize);
tile->detailTris = dtGetThenAdvanceBufferPointer<unsigned char>(d, detailTrisSize);
tile->bvTree = dtGetThenAdvanceBufferPointer<dtBVNode>(d, bvtreeSize);
tile->offMeshCons = dtGetThenAdvanceBufferPointer<dtOffMeshConnection>(d, offMeshLinksSize);
// 初始化空闲links链表
tile->linksFreeList = 0;
tile->links[header->maxLinkCount-1].next = DT_NULL_LINK;
for (int i = 0; i < header->maxLinkCount-1; ++i)
tile->links[i].next = i+1;
// Init tile.
tile->header = header;
tile->data = data;
tile->dataSize = dataSize;
tile->flags = flags;
接下来才是addTile的核心内容,构建从当前dtMeshTile内的任一poly出发的dtLink。首先构造的是起点poly和终点poly都在当前dtMeshTile内的dtLink。由于dtPoly结构体内已经用neis字段存储了当前的邻接Poly,所以这个部分的构建流程就比较简单,对应的函数调用为connectIntLinks(tile):
void dtNavMesh::connectIntLinks(dtMeshTile* tile)
{
if (!tile) return;
dtPolyRef base = getPolyRefBase(tile); // 以(salt, tile_id, 0) 组装成为一个uint64
for (int i = 0; i < tile->header->polyCount; ++i)
{
dtPoly* poly = &tile->polys[i];
poly->firstLink = DT_NULL_LINK;
if (poly->getType() == DT_POLYTYPE_OFFMESH_CONNECTION) //忽略非mesh poly
continue;
// 逆向遍历节点对应的邻居 这样links链表对应的边索引就是从低到高排序的
for (int j = poly->vertCount-1; j >= 0; --j)
{
// 跳过tile 边界边
if (poly->neis[j] == 0 || (poly->neis[j] & DT_EXT_LINK)) continue;
// 从tile的空闲dtlink链表摘取头部
unsigned int idx = allocLink(tile);
if (idx != DT_NULL_LINK)
{
dtLink* link = &tile->links[idx];
link->ref = base | (dtPolyRef)(poly->neis[j]-1);
link->edge = (unsigned char)j; // 存储边索引
link->side = 0xff; // 这里的side为oxff代表是同一tile内的边
link->bmin = link->bmax = 0;
// 维护当前poly对应的links链表
link->next = poly->firstLink;
poly->firstLink = idx;
}
}
}
}
搞定了Tile内部正常多边形直接连接之后,开始处理在当前Tile内的OffMeshPoly。这里会构造两个dtLink,一条dtLink负责从当前OffMeshPoly连接到最近的正常地面Poly也叫做landpoly,另外一个dtLink负责从landpoly连接到OffMeshPoly:
void dtNavMesh::baseOffMeshLinks(dtMeshTile* tile)
{
if (!tile) return;
dtPolyRef base = getPolyRefBase(tile);
// Base off-mesh connection start points.
for (int i = 0; i < tile->header->offMeshConCount; ++i)
{
dtOffMeshConnection* con = &tile->offMeshCons[i];
dtPoly* poly = &tile->polys[con->poly]; // 当前的OffmeshPoly
const float halfExtents[3] = { con->rad, tile->header->walkableClimb, con->rad };
// 查找当前Tile内当前OffMeshConnection起点最近的Poly
const float* p = &con->pos[0]; // First vertex
float nearestPt[3];
dtPolyRef ref = findNearestPolyInTile(tile, p, halfExtents, nearestPt);
if (!ref) continue;
// 如果距离太远则认为不连通 跳过
if (dtSqr(nearestPt[0]-p[0])+dtSqr(nearestPt[2]-p[2]) > dtSqr(con->rad))
continue;
// 存储poly上离con的起点最近的点
float* v = &tile->verts[poly->verts[0]*3];
dtVcopy(v, nearestPt);
// 构造从当前的OffmeshPoly指向landpoly的dtlink
unsigned int idx = allocLink(tile);
if (idx != DT_NULL_LINK)
{
dtLink* link = &tile->links[idx];
link->ref = ref;
link->edge = (unsigned char)0;
link->side = 0xff;// 当前tile内部边
link->bmin = link->bmax = 0;
// 维持好poly对应link链表
link->next = poly->firstLink;
poly->firstLink = idx;
}
// 构造从landpoly指向offmeshpoly的dtlink
unsigned int tidx = allocLink(tile);
if (tidx != DT_NULL_LINK)
{
const unsigned short landPolyIdx = (unsigned short)decodePolyIdPoly(ref);
dtPoly* landPoly = &tile->polys[landPolyIdx];
dtLink* link = &tile->links[tidx];
link->ref = base | (dtPolyRef)(con->poly);
link->edge = 0xff; // 这里的0xff代表是到offmeshpoly的边
link->side = 0xff; // 当前tile内部边
link->bmin = link->bmax = 0;
// 维持好poly对应link链表
link->next = landPoly->firstLink;
landPoly->firstLink = tidx;
}
}
}
然后对于每一条OffMeshCon,构造对应的dtLink,如果OffMeshCon是单向连通的,则构造一条,如果是双向连通的,则构造两条:
// 这个函数负责构造两个tile之间的所有OffMeshCon对应的Link
// OffMeshCon的起点在target 终点在当前tile side 代表target相对于tile的方向偏移 0xff代表是同一个tile
void dtNavMesh::connectExtOffMeshLinks(dtMeshTile* tile, dtMeshTile* target, int side)
{
if (!tile) return;
const unsigned char oppositeSide = (side == -1) ? 0xff : (unsigned char)dtOppositeTile(side);
for (int i = 0; i < target->header->offMeshConCount; ++i)
{
dtOffMeshConnection* targetCon = &target->offMeshCons[i];
if (targetCon->side != oppositeSide) // 过滤掉不是往当前tile连接的offmeshCon
continue;
dtPoly* targetPoly = &target->polys[targetCon->poly];
// 如果targetPoly在targetTile内没有landpoly与之连接 说明当前offmeshcon没有意义 跳过
if (targetPoly->firstLink == DT_NULL_LINK)
continue;
const float halfExtents[3] = { targetCon->rad, target->header->walkableClimb, targetCon->rad };
// 查找targetCon终点在当前tile对应的landpoly
const float* p = &targetCon->pos[3];
float nearestPt[3];
dtPolyRef ref = findNearestPolyInTile(tile, p, halfExtents, nearestPt);
if (!ref)
continue;
// findNearestPoly may return too optimistic results, further check to make sure.
if (dtSqr(nearestPt[0]-p[0])+dtSqr(nearestPt[2]-p[2]) > dtSqr(targetCon->rad))
continue;
// 找到了有效的landpoly和投影点 复制到offmeshpoly的第二个节点
float* v = &target->verts[targetPoly->verts[1]*3];
dtVcopy(v, nearestPt);
// 构造OffmeshPoly到landpoly的dtlink
unsigned int idx = allocLink(target);
if (idx != DT_NULL_LINK)
{
dtLink* link = &target->links[idx];
link->ref = ref;
link->edge = (unsigned char)1;
link->side = oppositeSide;
link->bmin = link->bmax = 0;
// Add to linked list.
link->next = targetPoly->firstLink;
targetPoly->firstLink = idx;
}
// 如果当前连接是双向的 则也构造一条从landpoly指向当前offmeshpoly的dtlink
if (targetCon->flags & DT_OFFMESH_CON_BIDIR)
{
unsigned int tidx = allocLink(tile);
if (tidx != DT_NULL_LINK)
{
const unsigned short landPolyIdx = (unsigned short)decodePolyIdPoly(ref);
dtPoly* landPoly = &tile->polys[landPolyIdx];
dtLink* link = &tile->links[tidx];
link->ref = getPolyRefBase(target) | (dtPolyRef)(targetCon->poly);
link->edge = 0xff;
link->side = (unsigned char)(side == -1 ? 0xff : side);
link->bmin = link->bmax = 0;
// Add to linked list.
link->next = landPoly->firstLink;
landPoly->firstLink = tidx;
}
}
}
}
注意这个函数可以指定两个dtMeshTile做参数,因此这个函数可以构造以当前Tile为中心的九宫格内所有Tile到当前Tile的OffMeshCon对应的dtLink,所以如果外部如果设置了两个OffMeshLink的距离太远超过九宫格范围的话,NavMesh中不会生成对应的dtLink:
connectExtOffMeshLinks(tile, tile, -1); // 构造起点和终点都在当前tile内的所有offmeshcon对应的dtlink
// Create connections with neighbour tiles.
static const int MAX_NEIS = 32;
dtMeshTile* neis[MAX_NEIS];
int nneis;
// Connect with layers in current tile.
nneis = getTilesAt(header->x, header->y, neis, MAX_NEIS); // 查询(x,y)上的多层tile
for (int j = 0; j < nneis; ++j)
{
if (neis[j] == tile)
continue;
connectExtLinks(tile, neis[j], -1);// 构造两者的边界连通dtlink
connectExtLinks(neis[j], tile, -1);
connectExtOffMeshLinks(tile, neis[j], -1); // 构造两者的offmeshCon对应的dtlink
connectExtOffMeshLinks(neis[j], tile, -1);
}
// 构造八个方向邻居的所有边界连通边与offmeshCon对应的Dtlink
for (int i = 0; i < 8; ++i)
{
// 获取当前i方向的所有layer的邻居tile
nneis = getNeighbourTilesAt(header->x, header->y, i, neis, MAX_NEIS);
for (int j = 0; j < nneis; ++j)
{
connectExtLinks(tile, neis[j], i);// 构造两者的边界连通dtlink
connectExtLinks(neis[j], tile, dtOppositeTile(i));
connectExtOffMeshLinks(tile, neis[j], i);// 构造两者的offmeshCon对应的dtlink
connectExtOffMeshLinks(neis[j], tile, dtOppositeTile(i));
}
}
上面的代码中除了调用connectExtOffMeshLinks来构造非地表连接形成的dtLink之外,还使用了connectExtLinks来构造相邻(包括y轴相邻和xz平面九宫格相邻)dtMeshTile之间的边界portal连接。其实构建portal边只会涉及到四个轴方向的邻居,其他方向都不会构造portal边,所以下面的代码里只判断了这四个轴方向:
// 构造从tile出发连接到target的边界边
void dtNavMesh::connectExtLinks(dtMeshTile* tile, dtMeshTile* target, int side)
{
if (!tile) return;
// Connect border links.
for (int i = 0; i < tile->header->polyCount; ++i)
{
dtPoly* poly = &tile->polys[i];
const int nv = poly->vertCount;
for (int j = 0; j < nv; ++j)
{
// 遍历每一条边 过滤掉不连通到target 的
if ((poly->neis[j] & DT_EXT_LINK) == 0)
continue;
const int dir = (int)(poly->neis[j] & 0xff);
if (side != -1 && dir != side)
continue;
// 当前边是一条边界边
const float* va = &tile->verts[poly->verts[j]*3];
const float* vb = &tile->verts[poly->verts[(j+1) % nv]*3];
dtPolyRef nei[4]; // 邻接poly的handle
float neia[4*2]; // 邻接的线段在当前线段的位置百分比
// 找到target里与当前边界边相邻的一些poly
int nnei = findConnectingPolys(va,vb, target, dtOppositeTile(dir), nei,neia,4);
for (int k = 0; k < nnei; ++k) // 对于每个邻接的poly 构造一个dtlink
{
unsigned int idx = allocLink(tile);
if (idx != DT_NULL_LINK)
{
dtLink* link = &tile->links[idx];
link->ref = nei[k];
link->edge = (unsigned char)j;
link->side = (unsigned char)dir; //邻居tile的方向
// 填充到当前poly的link链表中
link->next = poly->firstLink;
poly->firstLink = idx;
// 对于轴向的四个方向邻居tile 计算对应的aabb box
if (dir == 0 || dir == 4)
{
float tmin = (neia[k*2+0]-va[2]) / (vb[2]-va[2]);
float tmax = (neia[k*2+1]-va[2]) / (vb[2]-va[2]);
if (tmin > tmax)
dtSwap(tmin,tmax);
link->bmin = (unsigned char)std::round(dtClamp<float>(tmin, 0.0f, 1.0f)*255.0f);
link->bmax = (unsigned char)std::round(dtClamp<float>(tmax, 0.0f, 1.0f)*255.0f);
}
else if (dir == 2 || dir == 6)
{
float tmin = (neia[k*2+0]-va[0]) / (vb[0]-va[0]);
float tmax = (neia[k*2+1]-va[0]) / (vb[0]-va[0]);
if (tmin > tmax)
dtSwap(tmin,tmax);
link->bmin = (unsigned char)std::round(dtClamp<float>(tmin, 0.0f, 1.0f)*255.0f);
link->bmax = (unsigned char)std::round(dtClamp<float>(tmax, 0.0f, 1.0f)*255.0f);
}
}
}
}
}
}
上面函数还是比较浅显易懂的,核心的逻辑都在findConnectingPolys函数内了,这个函数负责计算指定tile内与某条线段靠近的Poly,注意这里从side与邻居tile的偏移量对应如下:
int dtNavMesh::getNeighbourTilesAt(const int x, const int y, const int side, dtMeshTile** tiles, const int maxTiles) const
{
int nx = x, ny = y;
switch (side)
{
case 0: nx++; break;
case 1: nx++; ny++; break;
case 2: ny++; break;
case 3: nx--; ny++; break;
case 4: nx--; break;
case 5: nx--; ny--; break;
case 6: ny--; break;
case 7: nx++; ny--; break;
};
return getTilesAt(nx, ny, tiles, maxTiles);
}
// 计算side的反方向
inline int dtOppositeTile(int side) { return (side+4) & 0x7; }
从上面的代码可以看出0,4对应的是X轴方向的邻居,2,6对应的是Z轴方向的邻居,其他奇数方向对应的是对角线方向的邻居。然后side从0增大到7就是一个顺时针查找所有方向的邻居的过程。了解了side的定义之后,我们才能更好的了解findConnectingPolys:
// 计算 va 点在 side 方向的轴上的坐标点
// 如果 side 是在 X 轴方向上寻找邻居,则返回的是 x 轴坐标
// 如果 side 是在 Z 轴方向上寻找邻居,则返回的是 z 轴坐标
// 如果不是轴方向 则返回0
static float getSlabCoord(const float* va, const int side)
{
if (side == 0 || side == 4)
return va[0];
else if (side == 2 || side == 6)
return va[2];
return 0;
}
int dtNavMesh::findConnectingPolys(const float* va, const float* vb,
const dtMeshTile* tile, int side,
dtPolyRef* con, float* conarea, int maxcon) const
{
if (!tile) return 0;
// 这两个字段只有在四个轴方向时才起作用 用来加速非相交判断的
// 计算除掉当前side对应的轴方向的AABB box 这里的[1]对应的永远是高度轴 即Y轴
float amin[2], amax[2];
calcSlabEndPoints(va, vb, amin, amax, side);
// 计算 va 点在 side 方向的轴上的坐标点
const float apos = getSlabCoord(va, side);
// Remove links pointing to 'side' and compact the links array.
float bmin[2], bmax[2];
unsigned short m = DT_EXT_LINK | (unsigned short)side;
int n = 0;
dtPolyRef base = getPolyRefBase(tile);
for (int i = 0; i < tile->header->polyCount; ++i)
{
dtPoly* poly = &tile->polys[i];
const int nv = poly->vertCount;
for (int j = 0; j < nv; ++j)
{
// 跳过不与当前来源tile方向连通的边
if (poly->neis[j] != m) continue;
const float* vc = &tile->verts[poly->verts[j]*3];
const float* vd = &tile->verts[poly->verts[(j+1) % nv]*3];
// 计算vc在当前轴方向的投影值
const float bpos = getSlabCoord(vc, side);
// 对于非轴方向 两者都是0 所以会执行后续代码
// 对于轴方向 会利用两者差值进行过滤
if (dtAbs(apos-bpos) > 0.01f)
continue;
// 计算除掉当前side对应的轴方向的AABB box 这里的[1]对应的永远是高度轴 即Y轴
calcSlabEndPoints(vc,vd, bmin,bmax, side);
// 这里会计算两个aabb box之间是否相交
// 这里还考虑了爬升高度
if (!overlapSlabs(amin,amax, bmin,bmax, 0.01f, tile->header->walkableClimb)) continue;
// Add return value.
if (n < maxcon)
{
// 获取投影相交区域的非side对应轴坐标的最大最小值
conarea[n*2+0] = dtMax(amin[0], bmin[0]);
conarea[n*2+1] = dtMin(amax[0], bmax[0]);
con[n] = base | (dtPolyRef)i;
n++;
}
break;
}
}
return n;
}
这里的overlapSlabs负责计算两条线段对应的AABB矩形间隔是否在爬升范围walkableClimb之内,实现的有点复杂,我们需要对照源代码讲解一下:
inline bool overlapSlabs(const float* amin, const float* amax,
const float* bmin, const float* bmax,
const float px, const float py)
{
const float minx = dtMax(amin[0]+px,bmin[0]+px);
const float maxx = dtMin(amax[0]-px,bmax[0]-px);
// 两个 portal edge 必定不会有重叠的情况
// 其中收缩了 px 的距离,主要是防止 a 的 min 和 b 的 max 恰好重合的情况
// 对于两个 portal edge 仅仅只是端点相邻的情况是不构成连接
// 也可以理解成只有两个 portal edge 需要重叠一部分,才能保证这两个是实实在在的相邻
if (minx > maxx)
return false;
// 现在主要看垂直切面上的情况,只有两种情况,一种是 XY 平面,一种是 ZY 平面
// 写法基本一致,所以前面把 x 或 z 的坐标设置到了 [0] 里,y 则放到 [1] 里
// ad 代表线段a的斜率
const float ad = (amax[1]-amin[1]) / (amax[0]-amin[0]);
// 这里使用平面坐标系上直线的斜截式公式求在 Y 轴上的截距
// 已知直线表达式 y = kx + b 带入点 amin 得到 amin[1] = k * amin[0] + b
// 由于斜率 k 已知,即可得到截距 b = amin[1] - ad * amin[0]
const float ak = amin[1] - ad*amin[0];
// 同理计算 b 的截距
const float bd = (bmax[1]-bmin[1]) / (bmax[0]-bmin[0]);
const float bk = bmin[1] - bd*bmin[0];
// 将上一步的 minx 点带入到 a 的直线中得到 aminy
const float aminy = ad*minx + ak;
// 将上一步的 maxx 点带入到 a 的直线中得到 amaxy
const float amaxy = ad*maxx + ak;
// 同理带入 b 的直线中得到 bminy bmaxy
const float bminy = bd*minx + bk;
const float bmaxy = bd*maxx + bk;
// 两条线段投影到Y轴之后 计算上下端点的差值
const float dmin = bminy - aminy;
const float dmax = bmaxy - amaxy;
// 线段发生交叉的情况 说明当前aabb肯定相交
if (dmin*dmax < 0)
return true;
// 没有发生交叉,则就看看距离
const float thr = dtSqr(py*2);
if (dmin*dmin <= thr || dmax*dmax <= thr)
return true;
return false;
}
因为portal边从XY或ZY切面上看可能是斜着的,所以还需要判断高度范围的重叠情况。如果 dmin*dmax小于0,说明a线段和b线段重叠部分必有一个交点。否则要么a线段完全在b线段上或者下,此时直接比较下两端距离和agentClimb的大小即可。
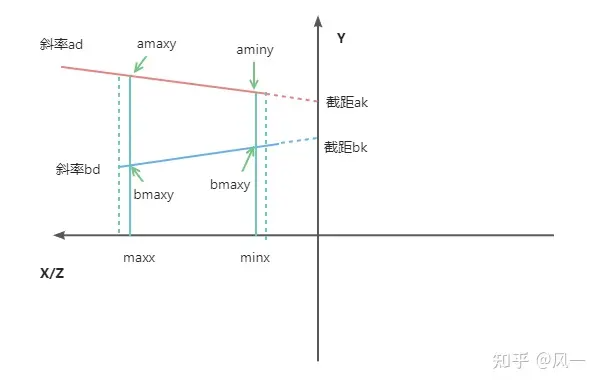
NavMesh的路径查询
dtNavMesh类提供了一些简单的接口来支撑路径查询:
/// 查询某个tile中特定aabb内的poly
int queryPolygonsInTile(const dtMeshTile* tile, const float* qmin, const float* qmax,
dtPolyRef* polys, const int maxPolys) const;
/// 查询某个tile中与特定点最近的poly nearestPt里存储这个poly里距离center最近的点坐标
dtPolyRef findNearestPolyInTile(const dtMeshTile* tile, const float* center,
const float* halfExtents, float* nearestPt) const;
// 计算点投影到某个poly的高度 如果点在poly下面则返回false 在上面返回true 高度存储在height中
bool getPolyHeight(const dtMeshTile* tile, const dtPoly* poly, const float* pos, float* height) const;
/// 计算某个poly上离指定点最近的点
void closestPointOnPoly(dtPolyRef ref, const float* pos, float* closest, bool* posOverPoly) const;
路径查询首先需要知道一个点对应的Poly是哪个,这个功能就对应了上面的findNearestPolyInTile接口。findNearestPolyInTile内部使用queryPolygonsInTile来获取查询范围内的所有Poly,然后再对这些Poly调用closestPointOnPoly获取一个多边形距离目标点最近的点及距离,获取其中距离最短的作为目标Poly进行返回。如果dtNavMesh生成的时候没有配置生成BVH数据,则queryPolygonsInTile与findNearestPolyInTile的实现都只能通过遍历当前Tile内所有的Poly来执行区间相交过滤,时间复杂度就是Poly数量的线性。如果配置了BVH数据,则可以使用BVH来加速区间查询,这部分的代码与之前在RecastNavMesh生成的时候介绍的BVH查询基本一致。
closestPointOnPoly内部会调用getPolyHeight来计算目标点在当前Poly上的投影高度,这个查询会利用当前Poly对应的细节三角形数据来计算最贴近表面的高度:
bool dtNavMesh::getPolyHeight(const dtMeshTile* tile, const dtPoly* poly, const float* pos, float* height) const
{
// offmesh poly不参与这个计算
if (poly->getType() == DT_POLYTYPE_OFFMESH_CONNECTION)
return false;
const unsigned int ip = (unsigned int)(poly - tile->polys);
const dtPolyDetail* pd = &tile->detailMeshes[ip];
float verts[DT_VERTS_PER_POLYGON*3];
const int nv = poly->vertCount;
for (int i = 0; i < nv; ++i)
dtVcopy(&verts[i*3], &tile->verts[poly->verts[i]*3]);
// 使用凸包算法判断点在XZ平面的投影在这个多边形的XZ投影内
if (!dtPointInPolygon(pos, verts, nv))
return false;
if (!height)
return true;
// 遍历当前poly对应的细节三角形 计算投影点
for (int j = 0; j < pd->triCount; ++j)
{
const unsigned char* t = &tile->detailTris[(pd->triBase+j)*4];
const float* v[3];
for (int k = 0; k < 3; ++k)
{
if (t[k] < poly->vertCount)
v[k] = &tile->verts[poly->verts[t[k]]*3];
else
v[k] = &tile->detailVerts[(pd->vertBase+(t[k]-poly->vertCount))*3];
}
float h;
if (dtClosestHeightPointTriangle(pos, v[0], v[1], v[2], h))
{
*height = h;
return true;
}
}
// 如果不在细节三角形内 则遍历细节三角形的边界边上离目标点最近的点
float closest[3];
closestPointOnDetailEdges<false>(tile, poly, pos, closest);
*height = closest[1];
return true;
}
由于OffMeshPoly的存在,closestPointOnPoly还需要做一些额外判断:
void dtNavMesh::closestPointOnPoly(dtPolyRef ref, const float* pos, float* closest, bool* posOverPoly) const
{
const dtMeshTile* tile = 0;
const dtPoly* poly = 0;
getTileAndPolyByRefUnsafe(ref, &tile, &poly);
dtVcopy(closest, pos);
if (getPolyHeight(tile, poly, pos, &closest[1]))
{
// 如果点的投影在当前多边形内 直接计算投影点
if (posOverPoly)
*posOverPoly = true;
return;
}
if (posOverPoly)
*posOverPoly = false;
// 如果是offmesh poly 计算两点连线上与当前点最近的点
if (poly->getType() == DT_POLYTYPE_OFFMESH_CONNECTION)
{
const float* v0 = &tile->verts[poly->verts[0]*3];
const float* v1 = &tile->verts[poly->verts[1]*3];
float t;
dtDistancePtSegSqr2D(pos, v0, v1, t);
dtVlerp(closest, v0, v1, t);
return;
}
// 计算当前Poly所有边中距离目标点最近的点
closestPointOnDetailEdges<true>(tile, poly, pos, closest);
}
实际上Detour并不推荐使用者直接使用dtNavMesh提供的这几个接口来做查询,而是提供了一个专用的查询类dtNavMeshQuery。这个类型上提供了最终对外的寻路查询接口,不仅包括了点对应的最近Poly查询,还包括了两点之间的Poly路径查询。此外dtNavMeshQuery还支持了dtQueryFilter来对路径上的不同Area类型的多边形进行查询权重修改:
class dtQueryFilter
{
float m_areaCost[DT_MAX_AREAS]; /// 每种类型的Area在路径查询时的cost
unsigned short m_includeFlags; /// 路径查询时能被使用的多边形的flag
unsigned short m_excludeFlags; /// 路径查询时不能被使用的多边形的flag
public:
dtQueryFilter();
virtual ~dtQueryFilter() { }
// 判断一个poly能否通过当前queryfilter的要求
virtual bool passFilter(const dtPolyRef ref,
const dtMeshTile* tile,
const dtPoly* poly) const;
/// 计算跨poly移动时的cost
virtual float getCost(const float* pa, const float* pb,
const dtPolyRef prevRef, const dtMeshTile* prevTile, const dtPoly* prevPoly,
const dtPolyRef curRef, const dtMeshTile* curTile, const dtPoly* curPoly,
const dtPolyRef nextRef, const dtMeshTile* nextTile, const dtPoly* nextPoly) const;
};
因此dtNavMeshQuery上提供的所有查询接口都需要带上这个QueryFilter:
// 寻找一个点最近的poly
dtStatus findNearestPoly(const float* center, const float* halfExtents,
const dtQueryFilter* filter,
dtPolyRef* nearestRef, float* nearestPt, bool* isOverPoly) const;
// 寻找两个多边形之间的多边形连通路径
dtStatus findPath(dtPolyRef startRef, dtPolyRef endRef,
const float* startPos, const float* endPos,
const dtQueryFilter* filter,
dtPolyRef* path, int* pathCount, const int maxPath) const;
findNearestPoly的实现与dtNavMesh上的findNearestPolyInTile实现基本一致,只是多加了dtQueryFilter的多边形过滤,因此这里不再详细介绍。而findPath则是整个NavMesh系统最重要的接口,其核心逻辑就是利用Poly中存储的邻接关系来执行A*搜索构造连通路径,下面我们来重点分析搜索的实现细节。首先定义了一个dtNode的结构体来描述A*搜索时使用的节点:
enum dtNodeFlags
{
DT_NODE_OPEN = 0x01, // 当前node在A*搜索的OpenList中
DT_NODE_CLOSED = 0x02, // 当前node在A*搜索的ClosedList中
DT_NODE_PARENT_DETACHED = 0x04, // 当前节点的父节点并不是直接边相邻的 而是通过raycast计算出来的
};
static const int DT_NODE_PARENT_BITS = 24;
static const int DT_NODE_STATE_BITS = 2;
struct dtNode
{
float pos[3]; ///< 当前点的坐标
float cost; ///< 前面的节点移动到当前节点的cost
float total; ///< 当前点的综合cost 等于从起点到当前点的cost加上当前点到目标点的启发cost
unsigned int pidx : DT_NODE_PARENT_BITS; ///< 父节点dtNode的在全局dtNode数组中的偏移量
unsigned int state : DT_NODE_STATE_BITS; ///< 一些自定义的额外信息字段
unsigned int flags : 3; ///< 当前node的dtNodeFlags信息
dtPolyRef id; ///< 当前节点所在的polyid
};
A*搜索执行时会构造很多的dtNode,dtNavMeshQuery使用了一个dtNodePool来管理dtNode的分配和查询,内部用一个dtNode数组作为线性的内存分配器,所以dtNode中使用了一个24bit的整数来替代一个完整的dtNode指针。为了支持多边形对应的dtNode的查询,dtNodePool使用了一个C风格的HashMap来处理PolyId到dtNode的查询映射:
class dtNodePool
{
public:
dtNodePool(int maxNodes, int hashSize);
~dtNodePool();
void clear();
// 根据(id,state)来查询对应的dtNode 如果不存在则分配一个对应的dtNode
dtNode* getNode(dtPolyRef id, unsigned char state=0);
// 根据(id,state)来查询对应的dtNode 如果不存在则返回null
dtNode* findNode(dtPolyRef id, unsigned char state);
// 查询一个poly id对应的所有节点
unsigned int findNodes(dtPolyRef id, dtNode** nodes, const int maxNodes);
// 对外提供Node的索引 0是无效索引 有效的索引都是偏移值加上1
inline unsigned int getNodeIdx(const dtNode* node) const
{
if (!node) return 0;
return (unsigned int)(node - m_nodes) + 1;
}
inline dtNode* getNodeAtIdx(unsigned int idx)
{
if (!idx) return 0;
return &m_nodes[idx - 1];
}
private:
// Explicitly disabled copy constructor and copy assignment operator.
dtNodePool(const dtNodePool&);
dtNodePool& operator=(const dtNodePool&);
dtNode* m_nodes;
dtNodeIndex* m_first;
dtNodeIndex* m_next;
const int m_maxNodes;
const int m_hashSize;
int m_nodeCount;
};
了解了dtNode的相关定义之后,我们开始正式的启动A*搜索的流程,首先需要构造初始节点:
dtNode* startNode = m_nodePool->getNode(startRef);
dtVcopy(startNode->pos, startPos);
startNode->pidx = 0;
startNode->cost = 0;
startNode->total = dtVdist(startPos, endPos) * H_SCALE;
startNode->id = startRef;
startNode->flags = DT_NODE_OPEN;
m_openList->push(startNode);
dtNode* lastBestNode = startNode;
float lastBestNodeCost = startNode->total;
上面的m_openList是一个由最小堆实现的优先队列dtNodeQueue,提供了top,pop,push,modify等接口,以方便每次迭代时获取综合cost最小的dtNode。设置好初始节点之后,就开始了A*的循环迭代流程,不断的获取m_openList中的top,获取这个dtNode对应的Poly:
// Remove node from open list and put it in closed list.
dtNode* bestNode = m_openList->pop();
bestNode->flags &= ~DT_NODE_OPEN;
bestNode->flags |= DT_NODE_CLOSED;
// Reached the goal, stop searching.
if (bestNode->id == endRef)
{
lastBestNode = bestNode;
break;
}
// Get current poly and tile.
// The API input has been cheked already, skip checking internal data.
const dtPolyRef bestRef = bestNode->id;
const dtMeshTile* bestTile = 0;
const dtPoly* bestPoly = 0;
m_nav->getTileAndPolyByRefUnsafe(bestRef, &bestTile, &bestPoly);
// Get parent poly and tile.
dtPolyRef parentRef = 0;
const dtMeshTile* parentTile = 0;
const dtPoly* parentPoly = 0;
if (bestNode->pidx)
parentRef = m_nodePool->getNodeAtIdx(bestNode->pidx)->id;
if (parentRef)
m_nav->getTileAndPolyByRefUnsafe(parentRef, &parentTile, &parentPoly);
遍历这个dtNode里Poly对应的边,去更新相邻Poly对应的dtNode:
for (unsigned int i = bestPoly->firstLink; i != DT_NULL_LINK; i = bestTile->links[i].next)
{
dtPolyRef neighbourRef = bestTile->links[i].ref;
// Skip invalid ids and do not expand back to where we came from.
if (!neighbourRef || neighbourRef == parentRef)
continue;
// Get neighbour poly and tile.
// The API input has been cheked already, skip checking internal data.
const dtMeshTile* neighbourTile = 0;
const dtPoly* neighbourPoly = 0;
m_nav->getTileAndPolyByRefUnsafe(neighbourRef, &neighbourTile, &neighbourPoly);
if (!filter->passFilter(neighbourRef, neighbourTile, neighbourPoly))
continue;
// deal explicitly with crossing tile boundaries
unsigned char crossSide = 0;
if (bestTile->links[i].side != 0xff)
crossSide = bestTile->links[i].side >> 1;
// get the node
dtNode* neighbourNode = m_nodePool->getNode(neighbourRef, crossSide);
if (!neighbourNode)
{
outOfNodes = true;
continue;
}
// If the node is visited the first time, calculate node position.
if (neighbourNode->flags == 0)
{
getEdgeMidPoint(bestRef, bestPoly, bestTile,
neighbourRef, neighbourPoly, neighbourTile,
neighbourNode->pos);
}
// 此处剩余对这个Node进行Cost计算和更新的代码
}
上面获取了一个有效的邻居Poly之后,会利用getEdgeMidPoint计算当前连接dtLink的中间节点坐标作为当前dtNode的坐标,而不是常规的以Poly中心作为距离计算坐标。有了这个路点坐标之后,计算综合cost,如果cost变小了,则更新当前dtNode的parent为之前获取的m_openList中的top,并更新m_openList中对应的dtNode,维护最小堆性质:
// Calculate cost and heuristic.
float cost = 0;
float heuristic = 0;
// Special case for last node.
if (neighbourRef == endRef)
{
// Cost
const float curCost = filter->getCost(bestNode->pos, neighbourNode->pos,
parentRef, parentTile, parentPoly,
bestRef, bestTile, bestPoly,
neighbourRef, neighbourTile, neighbourPoly);
const float endCost = filter->getCost(neighbourNode->pos, endPos,
bestRef, bestTile, bestPoly,
neighbourRef, neighbourTile, neighbourPoly,
0, 0, 0);
cost = bestNode->cost + curCost + endCost;
heuristic = 0;
}
else
{
// Cost
const float curCost = filter->getCost(bestNode->pos, neighbourNode->pos,
parentRef, parentTile, parentPoly,
bestRef, bestTile, bestPoly,
neighbourRef, neighbourTile, neighbourPoly);
cost = bestNode->cost + curCost;
heuristic = dtVdist(neighbourNode->pos, endPos)*H_SCALE;
}
const float total = cost + heuristic;
// The node is already in open list and the new result is worse, skip.
if ((neighbourNode->flags & DT_NODE_OPEN) && total >= neighbourNode->total)
continue;
// The node is already visited and process, and the new result is worse, skip.
if ((neighbourNode->flags & DT_NODE_CLOSED) && total >= neighbourNode->total)
continue;
// Add or update the node.
neighbourNode->pidx = m_nodePool->getNodeIdx(bestNode);
neighbourNode->id = neighbourRef;
neighbourNode->flags = (neighbourNode->flags & ~DT_NODE_CLOSED);
neighbourNode->cost = cost;
neighbourNode->total = total;
if (neighbourNode->flags & DT_NODE_OPEN)
{
// Already in open, update node location.
m_openList->modify(neighbourNode);
}
else
{
// Put the node in open list.
neighbourNode->flags |= DT_NODE_OPEN;
m_openList->push(neighbourNode);
}
这里还有一个额外的一步,记录当前已经计算出来的离目标点启发cost最小的点:
// Update nearest node to target so far.
if (heuristic < lastBestNodeCost)
{
lastBestNodeCost = heuristic;
lastBestNode = neighbourNode;
}
之所以需要记录这个启发cost最小,是因为如果起点与终点不连通的情况下,findPath也需要计算出一条尽可能靠近目标的路径。当然如果起点和终点连通,则这个lastBestNode就是终点。在A*循环迭代完成之后,通过dtNode.parent来反向传播,计算出从起点到lastBestNode的Poly路径,如果lastBestNode不是最终目的地的话,返回值里也会携带相关信息:
dtStatus status = getPathToNode(lastBestNode, path, pathCount, maxPath);
if (lastBestNode->id != endRef)
status |= DT_PARTIAL_RESULT;
if (outOfNodes)
status |= DT_OUT_OF_NODES;
return status;
这个findPath返回的Poly路径中的路点就是相邻Poly的连接边中点,这样的路点连接而成的线段会有很多转角,不够直。所以会执行一个string pulling过程来做后处理,减少不必要的路点并拉直路线。
dtNavMeshQuery也提供了一个函数findStraightPath来执行拉绳过程,函数的开始先初始化拉绳时的拐点和对应的左右两个端点:
float portalApex[3], portalLeft[3], portalRight[3];
dtVcopy(portalApex, closestStartPos);
dtVcopy(portalLeft, portalApex);
dtVcopy(portalRight, portalApex);
int apexIndex = 0;
int leftIndex = 0;
int rightIndex = 0;
unsigned char leftPolyType = 0;
unsigned char rightPolyType = 0;
dtPolyRef leftPolyRef = path[0];
dtPolyRef rightPolyRef = path[0];
然后不断的遍历findPath返回路径中的两个相邻Poly,利用getPortalPoints函数获取对应的portal边对应的两个顶点存储到left,right中:
for (int i = 0; i < pathSize; ++i)
{
float left[3], right[3];
unsigned char toType;
if (i+1 < pathSize)
{
unsigned char fromType; // fromType is ignored.
// Next portal.
getPortalPoints(path[i], path[i+1], left, right, fromType, toType);
// 后续代码暂时省略
}
}
然后利用向量的叉积来分别判断新计算的left,right是否在当前portalLeft->portalApex->portalRight组成的锥形范围内:
- 如果在锥形范围内则替换对应的
portalLeft,portalRight, - 如果不在锥形范围内的话则需要将当前
portalApex加入到最终的路径中,并将拐点portalApex替换为对应的portalLeft或者portalRight,然后更新新的portalLeft和portalRight为portalApex
这部分逻辑对应的代码如下,由于对于左右两个节点的处理是镜像的,所以下面只贴出处理right节点的部分:
// 如果right在 portalApex->portalRight构成的直线的左侧 或者portalApex与portalRight重叠
// 即在锥形内
if (dtTriArea2D(portalApex, portalRight, right) <= 0.0f)
{
if (dtVequal(portalApex, portalRight) || dtTriArea2D(portalApex, portalLeft, right) > 0.0f)
{
// 如果portalApex与portalRight重叠 或者 right在portalApex->portalLeft的右侧
// 则直接更新portalRight为 right
dtVcopy(portalRight, right);
rightPolyRef = (i+1 < pathSize) ? path[i+1] : 0;
rightPolyType = toType;
rightIndex = i;
}
else
{
//当前right在portalApex->portalLeft的左侧 说明当前的portalLeft是一个新的拐点
// 如果开启了portal边记录 这里会存一下数据
if (options & (DT_STRAIGHTPATH_AREA_CROSSINGS | DT_STRAIGHTPATH_ALL_CROSSINGS))
{
stat = appendPortals(apexIndex, leftIndex, portalLeft, path,
straightPath, straightPathFlags, straightPathRefs,
straightPathCount, maxStraightPath, options);
if (stat != DT_IN_PROGRESS)
return stat;
}
// 将拐点设置为当前的portalleft
dtVcopy(portalApex, portalLeft);
apexIndex = leftIndex;
unsigned char flags = 0;
if (!leftPolyRef)
flags = DT_STRAIGHTPATH_END;
else if (leftPolyType == DT_POLYTYPE_OFFMESH_CONNECTION)
flags = DT_STRAIGHTPATH_OFFMESH_CONNECTION;
dtPolyRef ref = leftPolyRef;
// 添加当前拐点到最后的直线路径
stat = appendVertex(portalApex, flags, ref,
straightPath, straightPathFlags, straightPathRefs,
straightPathCount, maxStraightPath);
if (stat != DT_IN_PROGRESS)
return stat;
// 设置三个点重合
dtVcopy(portalLeft, portalApex);
dtVcopy(portalRight, portalApex);
leftIndex = apexIndex;
rightIndex = apexIndex;
// 将i重置为拐点对应的poly索引,重新触发后续的计算
i = apexIndex;
continue;
}
}
迭代整理完成之后straightPath中就存储了最后拉直了的线段列表,至此使用NavMesh的路径查询功能完成。
NavMesh的群体寻路
如果想要以findStraightPath返回的线段列表来驱动寻路entity的每帧位置更新,只需要让entity以一定的速度沿着线段列表进行位置插值计算即可。但是游戏场景里会有多个entity参与寻路,如果每个entity都独立的执行寻路位置更新,很容易就会出现不同entity之间的模型出现穿插。因为使用线段列表插值计算出来的是一个点,而游戏中的entity都是有模型外观的,其形状一般都会被抽象为圆柱体或者更为精确的胶囊体。一个更加合乎直觉的寻路系统不能只用点去驱动entity的位置更新,还需要加入碰撞避免(Collision Avoidance)部分,这部分会根据entity的形状半径来进行路径微调,以避免出现穿插。
因此RecastNavigation还提供了一个带有碰撞避免功能的DetourCrowd子系统,这个子系统负责多个entity的批量寻路更新,这个寻路处理不仅仅是从原点到目标点的路径规划,还包括分步骤的位置更新、碰撞避免、自适应速度等功能。他的管理单位为单个的寻路dtCrowdAgent,每个dtCrowdAgent都有对应的唯一index,与外部代码的交互就是通过index来进行:
const dtCrowdAgent* getAgent(const int idx);
/// Gets the specified agent from the pool.
/// @param[in] idx The agent index. [Limits: 0 <= value < #getAgentCount()]
/// @return The requested agent.
dtCrowdAgent* getEditableAgent(const int idx);
/// The maximum number of agents that can be managed by the object.
/// @return The maximum number of agents.
int getAgentCount() const;
/// Adds a new agent to the crowd.
/// @param[in] pos The requested position of the agent. [(x, y, z)]
/// @param[in] params The configutation of the agent.
/// @return The index of the agent in the agent pool. Or -1 if the agent could not be added.
int addAgent(const float* pos, const dtCrowdAgentParams* params);
/// Removes the agent from the crowd.
/// @param[in] idx The agent index. [Limits: 0 <= value < #getAgentCount()]
void removeAgent(const int idx);
每个dtCrowdAgent在碰撞避免时被当作一个圆柱体来看待,当然碰撞避免系统不仅仅需要Agent的形状参数,还有很多额外参数, 所以dtCrowdAgent里有一个dtCrowdAgentParams类型字段来统一封装所有的参数。使用addAgent初始化dtCrowdAgent时需要提供这个参数,同时运行时可以使用updateAgentParameters动态的修改这个参数:
struct dtCrowdAgentParams
{
float radius; ///< 圆柱体的半径
float height; ///< 圆柱体的高度
float maxAcceleration; ///< 最大加速度
float maxSpeed; ///< 最大速度
/// 碰撞避免预警范围
float collisionQueryRange;
float pathOptimizationRange; ///< 路径优化范围
/// 碰撞避免时的质量权重 质量越大 碰撞避免时对于原始路径的偏移越小
float separationWeight;
/// 更新时的一些标记位
unsigned char updateFlags;
// 碰撞避免类型 指向detourcrowd内部的一个 dtObstacleAvoidanceParams参数数组 用来配置速度改变的行为
unsigned char obstacleAvoidanceType;
/// 这个是dtQueryFilter的索引 detourcrowd内部有一个数组来存储一些queryfilter
unsigned char queryFilterType;
/// 外部提供的一些额外数据 不影响detourcrowd的运行 一般用来调试或者可视化
void* userData;
};
/// Updates the specified agent's configuration.
/// @param[in] idx The agent index. [Limits: 0 <= value < #getAgentCount()]
/// @param[in] params The new agent configuration.
void updateAgentParameters(const int idx, const dtCrowdAgentParams* params);
在初始化好了一个entity对应的dtCrowdAgent之后,dtCrowdAgent处于静止状态,外部可以调用下面的接口来指定寻路的目标点以切换为寻路状态:
/// Submits a new move request for the specified agent.
/// @param[in] idx The agent index. [Limits: 0 <= value < #getAgentCount()]
/// @param[in] ref The position's polygon reference.
/// @param[in] pos The position within the polygon. [(x, y, z)]
/// @return True if the request was successfully submitted.
bool requestMoveTarget(const int idx, dtPolyRef ref, const float* pos);
不过这个函数内部其实并没有做路径计算的相关操作,而是只记录目标点信息:
bool dtCrowd::requestMoveTarget(const int idx, dtPolyRef ref, const float* pos)
{
if (idx < 0 || idx >= m_maxAgents)
return false;
if (!ref)
return false;
dtCrowdAgent* ag = &m_agents[idx];
// Initialize request.
ag->targetRef = ref;
dtVcopy(ag->targetPos, pos);
ag->targetPathqRef = DT_PATHQ_INVALID;
ag->targetReplan = false;
if (ag->targetRef)
ag->targetState = DT_CROWDAGENT_TARGET_REQUESTING;
else
ag->targetState = DT_CROWDAGENT_TARGET_FAILED;
return true;
}
整个DetourCrowd的逻辑处理都在void dtCrowd::update(const float dt, dtCrowdAgentDebugInfo* debug)这个函数里,外部通过调用此接口来按照步长dt(也就是距离上次更新的时间差)更新内部所有agent的状态,包括位置、速度、规划路径等。这个函数比较大,下面就分步骤来解释函数内部代码流程。
生成规划路径
首先要做的就是先修正每个agent从当前点到目标点的规划路径,对应的代码如下:
dtCrowdAgent** agents = m_activeAgents;
int nagents = getActiveAgents(agents, m_maxAgents);
// Check that all agents still have valid paths.
checkPathValidity(agents, nagents, dt);
// Update async move request and path finder.
updateMoveRequest(dt);
// Optimize path topology.
updateTopologyOptimization(agents, nagents, dt);
这里的checkPathValidity会对于位置不在预定path或合法path上的agent,寻找附近离对应path最近的一个Poly,重新生成一次move request,从而进入到下面的updateMoveRequest。
之前的寻路开启函数requestMoveTarget只设置了一个agent的targetState为DT_CROWDAGENT_TARGET_REQUESTING,而updateMoveRequest则负责获取所有状态为DT_CROWDAGENT_TARGET_REQUESTING的agent,推动分步迭代计算一个寻路请求的完整路径:
const dtPolyRef* path = ag->corridor.getPath();
const int npath = ag->corridor.getPathCount();
dtAssert(npath);
static const int MAX_RES = 32;
float reqPos[3];
dtPolyRef reqPath[MAX_RES]; // The path to the request location
int reqPathCount = 0;
// Quick search towards the goal.
static const int MAX_ITER = 20;
m_navquery->initSlicedFindPath(path[0], ag->targetRef, ag->npos, ag->targetPos, &m_filters[ag->params.queryFilterType]);
m_navquery->updateSlicedFindPath(MAX_ITER, 0);
dtStatus status = 0;
if (ag->targetReplan) // && npath > 10)
{
// Try to use existing steady path during replan if possible.
status = m_navquery->finalizeSlicedFindPathPartial(path, npath, reqPath, &reqPathCount, MAX_RES);
}
else
{
// Try to move towards target when goal changes.
status = m_navquery->finalizeSlicedFindPath(reqPath, &reqPathCount, MAX_RES);
}
核心是调用如下三个接口:
initSlicedFindPath初始化一个寻路请求计算的相关资源updateSlicedFindPath内部执行的是一个有迭代次数上限的A*搜索,其代码与dtNavMeshQuery::findPath中的A*搜索实现基本一样finalizeSlicedFindPath释放initSlicedFindPath之前请求的迭代计算资源
但是仅仅在设置好的32次A*迭代就能获取到目标点的完整路径概率其实比较低,所以很大概率上面的三个步骤执行完成之后ag->corridor中存储的路径并没有连接到终点,此时需要记录当前agent的路径搜索未完成,需要后续继续推进:
if (!dtStatusFailed(status) && reqPathCount > 0)
{
// 如果计算出来的路径末端不是最终点
if (reqPath[reqPathCount-1] != ag->targetRef)
{
// 当前reqPath是个非完整路径 计算当前最后一个poly上离最终目标点targetPos最近的一个点 作为中转目标点
status = m_navquery->closestPointOnPoly(reqPath[reqPathCount-1], ag->targetPos, reqPos, 0);
if (dtStatusFailed(status))
reqPathCount = 0;
}
else // 当前是一个完整路径
{
dtVcopy(reqPos, ag->targetPos);
}
}
else
{
reqPathCount = 0;
}
if (!reqPathCount)
{
// Could not find path, start the request from current location.
dtVcopy(reqPos, ag->npos);
reqPath[0] = path[0];
reqPathCount = 1;
}
ag->corridor.setCorridor(reqPos, reqPath, reqPathCount);
ag->boundary.reset();
ag->partial = false;
if (reqPath[reqPathCount-1] == ag->targetRef) // 如果完成了路径搜索 则agent切换为可以寻路的状态
{
ag->targetState = DT_CROWDAGENT_TARGET_VALID;
ag->targetReplanTime = 0.0;
}
else // 否则标记当前agent的路径还未完成 需要后续的推进
{
ag->targetState = DT_CROWDAGENT_TARGET_WAITING_FOR_QUEUE;
}
由于当前处理的是多个agent的寻路,所以可能会有多个agent同时处于路径未完成的状态,DetourCrowd使用了一个有最大容量限制的有序数组queue来存储所有需要后续推进路径查询的agent:
if (ag->targetState == DT_CROWDAGENT_TARGET_WAITING_FOR_QUEUE)
{
nqueue = addToPathQueue(ag, queue, nqueue, PATH_MAX_AGENTS);
}
上面的addToPathQueue其实就是一个插入排序,排序的依据为agent->targetReplanTime,代表下一次路径计算的期望时间,值越小则优先级越大。
在收集好了未完成路径搜索的排序好的agent数组queue之后,会放入一个DetourPathQueue m_pathq的容器中,记录对应的未完成部分的路径查询:
for (int i = 0; i < nqueue; ++i)
{
dtCrowdAgent* ag = queue[i];
ag->targetPathqRef = m_pathq.request(ag->corridor.getLastPoly(), ag->targetRef,
ag->corridor.getTarget(), ag->targetPos, &m_filters[ag->params.queryFilterType]);
if (ag->targetPathqRef != DT_PATHQ_INVALID) //添加成功才能切换到waiting_for_path状态
ag->targetState = DT_CROWDAGENT_TARGET_WAITING_FOR_PATH;
}
不过这里的m_pathq其实也是有容量上限的,最大支持static const int MAX_QUEUE = 8 个元素,所以如果添加不进去的话,当前agent的状态会维持在DT_CROWDAGENT_TARGET_WAITING_FOR_QUEUE状态,如果添加成功,才能切换到DT_CROWDAGENT_TARGET_WAITING_FOR_PATH状态。
在detourPathQueue添加request完成之后,执行一次统一更新来驱动所有的未完成路径的推进:
static const int MAX_ITERS_PER_UPDATE = 100;
// Update requests.
m_pathq.update(MAX_ITERS_PER_UPDATE);
不过这个update函数也是有最大迭代次数上限的:
void dtPathQueue::update(const int maxIters)
{
static const int MAX_KEEP_ALIVE = 2; // in update ticks.
// Update path request until there is nothing to update
// or upto maxIters pathfinder iterations has been consumed.
int iterCount = maxIters;
for (int i = 0; i < MAX_QUEUE; ++i)
{
PathQuery& q = m_queue[m_queueHead % MAX_QUEUE];
// Skip inactive requests.
if (q.ref == DT_PATHQ_INVALID)
{
m_queueHead++;
continue;
}
// 遍历当前pathqueue中需要处理的寻路请求
// Handle completed request.
if (dtStatusSucceed(q.status) || dtStatusFailed(q.status))
{
// 如果路径计算完成但是外部长时间没有读取路径查询状态 则释放当前寻路请求所占据的槽位
q.keepAlive++;
if (q.keepAlive > MAX_KEEP_ALIVE)
{
q.ref = DT_PATHQ_INVALID; // 标记为当前槽位可用
q.status = 0;
}
m_queueHead++;
continue;
}
// status为0 代表还未初始化当前查询
if (q.status == 0)
{
q.status = m_navquery->initSlicedFindPath(q.startRef, q.endRef, q.startPos, q.endPos, q.filter);
}
// 推进路径查询的迭代 最大迭代次数为iterCount 迭代完成之后扣除剩余迭代次数
if (dtStatusInProgress(q.status))
{
int iters = 0;
q.status = m_navquery->updateSlicedFindPath(iterCount, &iters);
iterCount -= iters;
}
if (dtStatusSucceed(q.status)) // 路过路径查询完成 则可以释放相关资源
{
q.status = m_navquery->finalizeSlicedFindPath(q.path, &q.npath, m_maxPathSize);
}
if (iterCount <= 0) // 如果整体迭代次数已经用完 则退出循环
break;
m_queueHead++;
}
}
注意上面的m_queueHead,这个字段用来指定下一次循环处理m_queue中哪一个slot,每次处理完之后都递增,以增加不同请求之间的公平性。因为每次都从0开始遍历会导致slot越大优先级越低的情况, 极端情况下后面的几个slot的请求永远不会被处理,出现饥饿现象。不过上面代码的最后一个部分也有问题,如果一个长路径请求没有完成,则会导致每次update执行时都尝试推进这个长路径请求,在路径不可达的情况下会阻塞住所有其他请求的更新。所以应该将m_queueHead++放到if (iterCount <= 0)的前面,这样才能增加公平性。
m_pathq.update执行完成之后,需要遍历所有状态为DT_CROWDAGENT_TARGET_WAITING_FOR_PATH的agent, 获取路径查询的推进状态,只有真正完成了路径查询的agent才会切换到DT_CROWDAGENT_TARGET_VALID状态:
// 获取pathq中路径查询结果已经出来的
if (ag->targetState == DT_CROWDAGENT_TARGET_WAITING_FOR_PATH)
{
// 获取路径查询的结果
status = m_pathq.getRequestStatus(ag->targetPathqRef);
if (dtStatusFailed(status)) // 路径查询失败
{
// Path find failed, retry if the target location is still valid.
ag->targetPathqRef = DT_PATHQ_INVALID;
if (ag->targetRef)
ag->targetState = DT_CROWDAGENT_TARGET_REQUESTING;
else
ag->targetState = DT_CROWDAGENT_TARGET_FAILED;
ag->targetReplanTime = 0.0;
}
else if (dtStatusSucceed(status)) // 路径查询成功
{
const dtPolyRef* path = ag->corridor.getPath();
const int npath = ag->corridor.getPathCount();
dtAssert(npath);
// Apply results.
float targetPos[3];
dtVcopy(targetPos, ag->targetPos);
dtPolyRef* res = m_pathResult;
bool valid = true;
int nres = 0;
status = m_pathq.getPathResult(ag->targetPathqRef, res, &nres, m_maxPathResult);
if (dtStatusFailed(status) || !nres)
valid = false;
if (dtStatusDetail(status, DT_PARTIAL_RESULT))
ag->partial = true;
else
ag->partial = false;
// 由于agent可能重新发起了移动请求 所以这里需要检查corridor的末尾是否等于当前查询的开始
if (valid && path[npath-1] != res[0])
valid = false;
if (valid)
{
if (npath > 1)
{
// 这部分代码负责将原来的路径与新查询的路径做合并
// 路径中出现A->B->A的状况,则会把B->A 这个线段删除
}
// 如果仍然没有到达目标点 则计算末尾poly中离目标点最近的点
if (res[nres-1] != ag->targetRef)
{
// Partial path, constrain target position inside the last polygon.
float nearest[3];
status = m_navquery->closestPointOnPoly(res[nres-1], targetPos, nearest, 0);
if (dtStatusSucceed(status))
dtVcopy(targetPos, nearest);
else
valid = false;
}
}
if (valid)
{
// 更新corridor
ag->corridor.setCorridor(targetPos, res, nres);
// 由于agent开始移动了 所以要清楚之前计算的周围障碍物信息
ag->boundary.reset();
ag->targetState = DT_CROWDAGENT_TARGET_VALID; // valid代表可以开始移动了
}
else
{
// 请求失败
ag->targetState = DT_CROWDAGENT_TARGET_FAILED;
}
ag->targetReplanTime = 0.0;
}
}
至此updateMoveRequest的函数体结束,整体而言updateMoveRequest实现了一个比较公平的多agent的寻路请求带上限的时间片机制,通过这个时间片机制避免了完整的计算寻路路径时消耗时间太长的问题。,使得dtcrowd::update函数的执行时间总体可控,这样才能更好的接入游戏循环,避免dtcrowd::update可能引发的卡帧现象。
updateTopologyOptimization函数则负责矫正一些agent位置由于碰撞避免强制调整位置系统引发的corridor偏移现象,此时会定期的对corridor进行重新计算。这里也使用了一个带迭代上限和优先级的时间片机制,每个agent的路径优化间隔要求大于0.5s:
void dtCrowd::updateTopologyOptimization(dtCrowdAgent** agents, const int nagents, const float dt)
{
if (!nagents)
return;
const float OPT_TIME_THR = 0.5f; // seconds
const int OPT_MAX_AGENTS = 1; // 这里的常量为1 代表本次最多处理一个agent的路径优化
dtCrowdAgent* queue[OPT_MAX_AGENTS];
int nqueue = 0;
for (int i = 0; i < nagents; ++i)
{
dtCrowdAgent* ag = agents[i];
if (ag->state != DT_CROWDAGENT_STATE_WALKING)
continue;
if (ag->targetState == DT_CROWDAGENT_TARGET_NONE || ag->targetState == DT_CROWDAGENT_TARGET_VELOCITY)
continue;
if ((ag->params.updateFlags & DT_CROWD_OPTIMIZE_TOPO) == 0)
continue;
ag->topologyOptTime += dt;
if (ag->topologyOptTime >= OPT_TIME_THR) // 只有间隔时间大于0.5的才会考虑优化 避免频繁重算
nqueue = addToOptQueue(ag, queue, nqueue, OPT_MAX_AGENTS);
}
for (int i = 0; i < nqueue; ++i) // 对于上面收集的需要重算的agent 调用对应corridor的路径优化函数
{
dtCrowdAgent* ag = queue[i];
// 这里的optimizePathTopology 其实就是执行一次开始到末尾的有32次迭代次数限制的A*搜索
// 搜索出来的临时路径会与之前的完整路径做合并
ag->corridor.optimizePathTopology(m_navquery, &m_filters[ag->params.queryFilterType]);
ag->topologyOptTime = 0;
}
}
周围阻挡物计算
在完成了初始的路径规划之后,接下来需要获取每个agent周围阻挡范围内的其他agent的集合,以及周围不可通行的多边形的边集合,以计算agent接受的排斥力的合力。
获取周围一定半径的的agent集合就是我们在之前介绍过的AOI系统,DetourCrowd使用的是最常见的九宫格系统,其逻辑都被dtProximityGrid这个类型承担了:
// 先把所有的agent都添加到dtProximityGrid中
m_grid->clear();
for (int i = 0; i < nagents; ++i)
{
dtCrowdAgent* ag = agents[i];
const float* p = ag->npos;
const float r = ag->params.radius;
m_grid->addItem((unsigned short)i, p[0]-r, p[2]-r, p[0]+r, p[2]+r);
}
// 计算每个agent周围的阻挡poly和其他agent
for (int i = 0; i < nagents; ++i)
{
dtCrowdAgent* ag = agents[i];
if (ag->state != DT_CROWDAGENT_STATE_WALKING)
continue;
// ag->boundary里负责存储当前agent一定范围内的不可通行poly的边
// 由于每次都重新计算boundary会很消耗时间 因此只有当agent与上次计算的位置相差大于一定范围之后才触发重新计算
const float updateThr = ag->params.collisionQueryRange*0.25f;
if (dtVdist2DSqr(ag->npos, ag->boundary.getCenter()) > dtSqr(updateThr) ||
!ag->boundary.isValid(m_navquery, &m_filters[ag->params.queryFilterType]))
{
ag->boundary.update(ag->corridor.getFirstPoly(), ag->npos, ag->params.collisionQueryRange,
m_navquery, &m_filters[ag->params.queryFilterType]);
}
// 使用dtProximityGrid实现的九宫格来查询周围一定范围内的其他agent
ag->nneis = getNeighbours(ag->npos, ag->params.height, ag->params.collisionQueryRange,
ag, ag->neis, DT_CROWDAGENT_MAX_NEIGHBOURS,
agents, nagents, m_grid);
for (int j = 0; j < ag->nneis; j++)
ag->neis[j].idx = getAgentIndex(agents[ag->neis[j].idx]);
}
由于dtProximityGrid的实现与常规的九宫格AOI实现基本相同,所以这里就直接掠过,重点介绍一下ag->boundary的计算:
static const int DT_VERTS_PER_POLYGON = 6;
void dtLocalBoundary::update(dtPolyRef ref, const float* pos, const float collisionQueryRange,
dtNavMeshQuery* navquery, const dtQueryFilter* filter)
{
static const int MAX_SEGS_PER_POLY = DT_VERTS_PER_POLYGON*3; // 18
if (!ref)
{
dtVset(m_center, DT_REAL_MAX,DT_REAL_MAX,DT_REAL_MAX);
m_nsegs = 0;
m_npolys = 0;
return;
}
dtVcopy(m_center, pos);
// 这里先查询当前一定半径内的与当前agent所在poly不重叠的所有其他poly
navquery->findLocalNeighbourhood(ref, pos, collisionQueryRange,
filter, m_polys, 0, &m_npolys, MAX_LOCAL_POLYS);
// Secondly, store all polygon edges.
m_nsegs = 0;
float segs[MAX_SEGS_PER_POLY*6];
int nsegs = 0;
for (int j = 0; j < m_npolys; ++j)
{
// 这里会计算这个poly中当前agent 的filter无法通过的边集合
navquery->getPolyWallSegments(m_polys[j], filter, segs, 0, &nsegs, MAX_SEGS_PER_POLY);
for (int k = 0; k < nsegs; ++k)
{
const float* s = &segs[k*6];
// Skip too distant segments.
float tseg;
const float distSqr = dtDistancePtSegSqr2D(pos, s, s+3, tseg);
if (distSqr > dtSqr(collisionQueryRange)) // 如果当前agent离这条边太远 则忽略
continue;
addSegment(distSqr, s); // 这里会存储不可通行边和对应的距离
}
}
}
dtLocalBoundary内部对于阻挡边的存储也使用了一个带上限的有序数组,数组中存储的元素则是阻挡边的两个端点和当前agent位置到阻挡边的距离:
class dtLocalBoundary
{
static const int MAX_LOCAL_SEGS = 8;
static const int MAX_LOCAL_POLYS = 16;
struct Segment
{
float s[6]; ///< Segment start/end
float d; ///< Distance for pruning.
};
float m_center[3]; // 每次update时agent的位置
Segment m_segs[MAX_LOCAL_SEGS]; // 阻挡边数组
int m_nsegs; // 阻挡边个数
dtPolyRef m_polys[MAX_LOCAL_POLYS]; //周围的多边形
int m_npolys;
void addSegment(const float dist, const float* s);
}
速度计算
期望最大速度
为了计算速度,我们首先需要获取每个agent路径上的每个拐点,这部分逻辑由ag->corridor.findCorners负责,其实就是调用之前介绍的findStraightPath来执行拉绳算法并获取拐点。计算好每一个拐点之后,开始来校正速度偏向。首先执行下面的逻辑:
// Calculate steering direction.
if (ag->params.updateFlags & DT_CROWD_ANTICIPATE_TURNS)
calcSmoothSteerDirection(ag, dvel);
else
calcStraightSteerDirection(ag, dvel);
calcSmoothSteerDirection 流程简略版如下:
- 设置当前节点为
np, 第一个拐点为p0, 第二个拐点为p1 - 向量
d0为p0 - np,len0为d0长度,向量d1为p1 - np,len1为d1长度 - 归一化
d0, d1为单位向量 - 计算
d2 = d0 - d1 * 0.5,然后归一化为单位向量,返回d2这里的减法,相当于朝下下个拐点的反方向偏移,避免靠的太近,从而形成一个光滑的圆弧。而calcStraightSteerDirection则简单多了,直接计算d0的单位向量返回即可。
计算完偏向力之后,我们再来计算速度的衰减:这个只有在靠近目标点的时候才会出发这个衰减,计算方式大概为speedscale = min(1, distance(np, dest_p)/ slowDownRadius)。
计算完上面这几个参数之后,我们计算出agent的期望最大速度dvel = maxSpeed * d2 * speedScale。这个devl就是纯的不考虑任何碰撞避免寻路时的速度计算。
碰撞避免速度修正
为了避免多个agent寻路出现重叠,会给每个agent上设置一个碰撞避免距离separationDist。对于当前agent距离separationDist内的所有其他agent,都会给当前agent施加一个斥力。斥力大小与两者距离反比,计算公式为max(0, 1 - distance(onp - anp) / range),其中anp为当前agent的坐标, onp为其他agent的坐标, range为分离半径。然后一个agent上的所有斥力向量和的结果为这个agent的disp向量, 同时施加了斥力的agent数量为isp_num。有了这几个参数之后,我们进一步修正上一步计算的速度偏向:
dvel = dvel + disp/isp_num
上面的分离斥力只是在进入碰撞之后的疏解措施,最好的方法是预先规划出来的路径可以避免碰撞重叠的发生。为此我们先构造碰撞环境,然后再进行碰撞寻路速度修正。碰撞环境就是agent的邻居及对应的碰撞半径,以及自身路径规划里的poly边界:
m_obstacleQuery->reset();
// Add neighbours as obstacles.
for (int j = 0; j < ag->nneis; ++j)
{
const dtCrowdAgent* nei = &m_agents[ag->neis[j].idx];
m_obstacleQuery->addCircle(nei->npos, nei->params.radius, nei->vel, nei->dvel);
}
// Append neighbour segments as obstacles.
for (int j = 0; j < ag->boundary.getSegmentCount(); ++j)
{
const float* s = ag->boundary.getSegment(j);
// 注意这里利用了叉积的方向来过滤不需要处理的边
if (dtTriArea2D(ag->npos, s, s+3) < 0.0f)
continue;
m_obstacleQuery->addSegment(s, s+3);
}
而后的速度规划又有两种模式:
const dtObstacleAvoidanceParams* params = &m_obstacleQueryParams[ag->params.obstacleAvoidanceType];
if (adaptive)
{
ns = m_obstacleQuery->sampleVelocityAdaptive(ag->npos, ag->params.radius, ag->desiredSpeed,
ag->vel, ag->dvel, ag->nvel, params, vod);
}
else
{
ns = m_obstacleQuery->sampleVelocityGrid(ag->npos, ag->params.radius, ag->desiredSpeed,
ag->vel, ag->dvel, ag->nvel, params, vod);
}
先来看简单版本的sampleVelocityGrid,这个函数会构造一个可选的速度集合,遍历集合中的每个合法的速度vcand,来计算在此速度下与障碍物相撞的惩罚系数:
int dtObstacleAvoidanceQuery::sampleVelocityGrid(const float* pos, const float rad, const float vmax,
const float* vel, const float* dvel, float* nvel,
const dtObstacleAvoidanceParams* params,
dtObstacleAvoidanceDebugData* debug)
{
prepare(pos, dvel);
memcpy(&m_params, params, sizeof(dtObstacleAvoidanceParams));
m_invHorizTime = 1.0f / m_params.horizTime;
m_vmax = vmax;
m_invVmax = vmax > 0 ? 1.0f / vmax : DT_REAL_MAX;
dtVset(nvel, 0,0,0);
if (debug)
debug->reset();
const float cvx = dvel[0] * m_params.velBias;
const float cvz = dvel[2] * m_params.velBias;
const float cs = vmax * 2 * (1 - m_params.velBias) / (float)(m_params.gridSize-1); // 速度变化的最小单位
const float half = (m_params.gridSize-1)*cs*0.5f; // x z 两个方向速度的最大变动范围
float minPenalty = DT_REAL_MAX;
int ns = 0;
// 这里会生成一个gridSize * gridSize的采样
for (int y = 0; y < m_params.gridSize; ++y)
{
for (int x = 0; x < m_params.gridSize; ++x)
{
float vcand[3]; // 构造一个随机扰动后的速度
vcand[0] = cvx + x*cs - half;
vcand[1] = 0;
vcand[2] = cvz + y*cs - half;
// 如果速度超过最大值一定阈值则放弃这个速度
if (dtSqr(vcand[0])+dtSqr(vcand[2]) > dtSqr(vmax+cs/2)) continue;
// 计算当前速度下的碰撞惩罚值
const float penalty = processSample(vcand, cs, pos,rad,vel,dvel, minPenalty, debug);
ns++;
if (penalty < minPenalty)// 获取惩罚值最小的速度
{
minPenalty = penalty;
dtVcopy(nvel, vcand);
}
}
}
return ns;
}
通过processSample计算出当前可选速度的惩罚值之后,选取惩罚最小的,计算出新的修正速度。这里的processSample计算penalty不仅考虑了当前速度下与周围障碍物相撞的最早时间,还考虑了为了避免与agent碰撞引发的速度修正惩罚(这里需要考虑当前速度和之前路径规划计算的期望速度),以及正面相撞的惩罚:
// penalty for straying away from the desired and current velocities
const float vpen = m_params.weightDesVel * (dtVdist2D(vcand, dvel) * m_invVmax); // 与当前无阻挡期望速度之间的差值
const float vcpen = m_params.weightCurVel * (dtVdist2D(vcand, vel) * m_invVmax); // 与当前实际速度之间的差值
float tmin = m_params.horizTime;
float side = 0; // 代表冲击系数 这个值越大代表agent之间的正面对撞的趋势越大
int nside = 0; // 代表与多少个agent相交
for (int i = 0; i < m_ncircles; ++i)
{
// 计算在当前速度下与其他agent相撞的最早时间 其实就是计算两个带有速度的圆形何时相撞
const dtObstacleCircle* cir = &m_circles[i];
float vab[3];
dtVscale(vab, vcand, 2);
dtVsub(vab, vab, vel);
dtVsub(vab, vab, cir->vel);
// cir->dp代表两个agent之间连线的单位向量 cir->np 代表与dp垂直的单位向量
side += dtClamp<float>(dtMin(dtVdot2D(cir->dp,vab)*0.5f+0.5f, dtVdot2D(cir->np,vab)*2), 0.0f, 1.0f);
nside++;
float htmin = 0, htmax = 0;
// 省略一些代码
}
for (int i = 0; i < m_nsegments; ++i)
{
// 计算当前速度方向与周围不可通行边的最早相撞时间
const dtObstacleSegment* seg = &m_segments[i];
float htmin = 0;
// 省略一些代码
}
// Normalize side bias, to prevent it dominating too much.
if (nside)
side /= nside;
const float spen = m_params.weightSide * side;
const float tpen = m_params.weightToi * (1.0f/(0.1f+tmin*m_invHorizTime)); // 这部分则是碰撞事件的惩罚项
const float penalty = vpen + vcpen + spen + tpen;
而sampleVelocityAdaptive与前面的sampleVelocityGrid大同小异,他首先设置一个速度差异采样半径r,然后在当前速度dvel末端为圆心半径为r的圆上以均匀角度间隔进行速度采样v,获取processSample计算出来的惩罚最小速度。然后再将采样半径r进行收缩一定比例,在v末端以r为半径的园上再次进行速度采样获取其中惩罚最小速度,重复这个过程多次直到相邻两次迭代的惩罚系数差值小于一定值,或者达到了最大迭代次数上限。sampleVelocityAdaptive的调用processSample的次数会比sampleVelocityGrid大很多,好处是能够获得一个更好的避障速度。不过实际场景中一般都是运行速度优先,选择的都是sampleVelocityGrid,以至于sampleVelocityAdaptive代码里面有数组越界,还是在我自己跑样例测试的时候发现的,对应的issue在https://github.com/recastnavigation/recastnavigation/issues/496。
位置更新
基于速度的位置更新
在前面计算好速度之后,调用integrate(dtCrowdAgent* ag, const float dt)来更新agent的位置,这里考虑了这个agent在最大加速情况下的位置移动长度。
static void integrate(dtCrowdAgent* ag, const float dt)
{
// Fake dynamic constraint.
const float maxDelta = ag->params.maxAcceleration * dt;
float dv[3];
dtVsub(dv, ag->nvel, ag->vel); // nvel是指定方向上的最大速度 这里计算当前速度与期望最大速度的差值
float ds = dtVlen(dv);
if (ds > maxDelta) // 以最大加速度来限制速度的变化范围
dtVscale(dv, dv, maxDelta/ds);
dtVadd(ag->vel, ag->vel, dv); // 最后更新速度到vel上
// 速度乘以时间就是本次update中当前agent的位置偏移值
if (dtVlen(ag->vel) > 0.0001f)
dtVmad(ag->npos, ag->npos, ag->vel, dt);
else // 速度太小则直接设置为静止
dtVset(ag->vel,0,0,0);
}
碰撞避免位置微调
在上面的位置更新之后,我们需要重新计算一下位置下的所有agent之间的碰撞惩罚,然后再微调一下碰撞斥力因为的位置更新。有四轮微调,每次都用agent的调整之后的位置,每一对agent B对agent A的位置更新计算如下:
diff = a.npos - b.npos计算两个agent之间的位置差,dist为欧几里得距离pen = (1 / dist) *(radius_a + radius_b - dist) * Factor,为两者的碰撞半径减去两者的距离然后再除以两者之间的距离,作为碰撞惩罚值isp_offset = average(diff * pen),计算所有agent贡献的偏移量的均值,作为位置修正的值npos = npos + isp_offset, 更新目标位置,加上新计算出来的修正值
注意这里进行碰撞避免微调的时候是无视了不可通行多边形的,所以这里微调结束之后可能会出现位置已经不在可行走表面的情况,所以后续还需要一步来将调整后的位置拉回可行走表面。
将位置限制在表面
上面我们计算的位置更新都是基于2d的位置更新,我们需要将这个2d位置映射到3d寻路网格上的点。此时不再需要投影计算所有的相交Poly,只需要利用之前路径规划的Poly结果缩小检索范围即可,对应的函数为dtPathCorridor::movePosition:
bool dtPathCorridor::movePosition(const dtReal_t* npos, dtNavMeshQuery* navquery, const dtQueryFilter* filter)
{
dtAssert(m_path);
dtAssert(m_npath);
// Move along navmesh and update new position.
dtReal_t result[3];
static const int MAX_VISITED = 16;
dtPolyRef visited[MAX_VISITED];
int nvisited = 0;
// 从m_pos 移动到npos 记录其经过的一些poly 如果npos不可达则result会记录可行走表面上离它最近的位置
dtStatus status = navquery->moveAlongSurface(m_path[0], m_pos, npos, filter,
result, visited, &nvisited, MAX_VISITED);
if (dtStatusSucceed(status)) {
// 删除原始路径开头已经走完的poly
m_npath = dtMergeCorridorStartMoved(m_path, m_npath, m_maxPath, visited, nvisited);
// 然后再计算result在mesh上的高度
dtReal_t h = m_pos[1];
navquery->getPolyHeight(m_path[0], result, &h);
result[1] = h;
dtVcopy(m_pos, result);
return true;
}
return false;
}
上面的核心函数为moveAlongSurface其实执行的也是一次A*搜索,搜索了从m_pos到n_pos经过的多边形路径,如果n_pos不可达则会选择周围可行走多边形里离npos最近的一个位置,并更新到result中。一般来说在单次update时间内m_pos与npos之间的多边形路径长度在两个以内,所以这个函数的整体执行时间还是很短的。
Mosaic Game 中的寻路系统
mosaic_game的寻路方案完全基于RecastNavigation, 不过为了适应大世界的精度需求使用了double来替换原来的float,修改后的仓库见https://github.com/huangfeidian/recastnavigation。基于此项目的RecastDemo导出的NavMesh文件需要放到工程目录的/data/map/navmesh文件夹下,而对应的Obj文件则需要放到/data/map/wavefront文件夹下,指定编号的场景对应的地形文件和寻路文件映射则需要在/data/xlsx/场景表.xlsx中进行配置。每个Space都有一个对应的space_navi_component, 当一个Space被创建之后,space_navi_component的activate函数则会向map_server请求创建一个对应的群体寻路管理器:
void space_navi_component::activate()
{
json cur_msg, cur_param;
cur_msg["cmd"] = "request_create_navi_crowd";
cur_param["anchor"] = *m_owner->get_call_proxy();
cur_param["resource_path"] = m_navi_map;
cur_param["max_agent_num"] = m_navi_agent_num;
cur_param["max_agent_radius"] = m_max_agent_radius;
cur_param["extend"] = m_half_extend;
cur_msg["param"] = std::move(cur_param);
m_owner->call_map_server(cur_msg);
}
这里传递的参数都在space_navi_component::init的时候从对应的配置项中读取:
bool space_navi_component::init(const json& data)
{
auto cur_space_sysd = m_owner->space_sysd();
if(!cur_space_sysd.expect_value("navi_map", m_navi_map))
{
m_owner->logger()->error("cant find navi_map for space {} with value {}", m_owner->space_no(), cur_space_sysd.get_cell("navi_map").dump());
return false;
}
if(!cur_space_sysd.expect_value("navi_agent_num", m_navi_agent_num))
{
m_owner->logger()->error("cant find navi_agent_num for space {}", m_owner->space_no());
return false;
}
if(!cur_space_sysd.expect_value("navi_half_extend", m_half_extend))
{
m_owner->logger()->error("cant find navi_half_extend for space {}", m_owner->space_no());
return false;
}
if(!cur_space_sysd.expect_value("navi_agent_max_radius", m_max_agent_radius))
{
m_owner->logger()->error("cant find navi_agent_max_radius for space {}", m_owner->space_no());
return false;
}
m_handler_to_entities = std::vector<actor_entity*>(m_navi_agent_num+1, nullptr);
return true;
}
当map_server接收到创建新场景的群体寻路管理器时,并不会每个场景都尝试加载对应的NavMesh文件到内存中,而是会先判断对应的NavMesh是否已经被加载了,如果加载了则复用这份const dtNavMesh*来创建群体寻路管理器,如果没有加载则再尝试加载,通过寻路资源复用来减少内存占用。
resource_path = m_map_config.navi_resource_folder +"/"+ resource_path;
if(!std::filesystem::exists(resource_path))
{
m_logger->error("on_request_create_navi_crowd cant find map {} ", resource_path);
return;
}
auto loaded_nav_iter = m_loaded_navi_maps.find(resource_path);
if(loaded_nav_iter == m_loaded_navi_maps.end()) // 如果没有加载
{
auto loading_nav_iter = m_pending_load_navmesh.find(resource_path);
if(loading_nav_iter == m_pending_load_navmesh.end())// 如果不在加载过程中
{
// 执行真正的加载
add_task_to_async_loop([this, resource_path]()
{
begin_load_navi_map(resource_path);
});
// 同时记录同时有多少个请求在等待这个寻路资源
m_pending_load_navmesh[resource_path].push_back(msg);
}
else
{
// 添加当前消息到等待队列
loading_nav_iter->second.push_back(msg);
}
}
else
{
if(!loaded_nav_iter->second)
{
m_logger->error("on_request_create_navi_crowd invalid map {}", resource_path);
return;
}
// 给每个群体寻路管理器分配一个唯一id
auto cur_crowd_index = ++m_navi_crowd_counter;
auto cur_nav_crowd = std::make_shared<navi_crowd>(this, cur_crowd_index, loaded_nav_iter->second, max_agent_num, max_agent_radius, space_anchor);
m_navi_crowds[cur_crowd_index] = cur_nav_crowd;
utility::rpc_msg cur_msg;
cur_msg.cmd = "reply_create_navi_map";
cur_msg.set_args(cur_crowd_index); // 将这个id返回给space 后续的通信需要带上这个crowd index
call_entity(cur_nav_crowd->m_space_anchor, cur_msg);
finish_update_navi_crowd(cur_nav_crowd->m_crowd_index); // 将当前的navi_crowd放到等待更新的队列中
return;
}
然后map_server的每帧更新中,都会处理固定数量的navi_crowd的更新:
void map_server::on_new_frame()
{
json_server::on_new_frame();
update_navi_crowds();
}
void map_server::update_navi_crowds()
{
std::uint32_t i = 10;
auto cur_ts = utility::timer_manager::now_ts();
while(i > 1 && !m_navi_crowd_update_queue.empty())
{
i--;
if(m_navi_crowd_update_queue.front().second > cur_ts)
{
// 当前task还没到执行时间 后续的task也不需要继续处理了
return;
}
auto temp_navi_crowd_index = m_navi_crowd_update_queue.front().first;
m_navi_crowd_update_queue.pop();
auto temp_iter = m_navi_crowds.find(temp_navi_crowd_index);
if(temp_iter == m_navi_crowds.end())
{
continue;;
}
auto temp_crowd = temp_iter->second;
add_task_to_async_loop([this, temp_crowd]()
{
temp_crowd->update();
add_task_to_main_loop([this, temp_crowd]()
{
finish_update_navi_crowd(temp_crowd->m_crowd_index);
});
}, temp_crowd->m_crowd_index);
}
}
上面的add_task_to_async_loop会将一个任务扔到异步线程池中的一个线程中执行,同时为了保证同一个navi_crowd的所有操作都是在同一个线程中执行的,这里需要传递m_crowd_index来指定线程:
void basic_stub::add_task_to_async_loop(std::function<void()>&& cur_task, std::uint64_t channel_index)
{
if(m_async_task_channels.empty())
{
m_logger->error("add_task_to_async_loop fail task channel is empty");
return;
}
if(m_async_task_channels.size() == 1)
{
channel_index = 0;
}
else
{
if(channel_index == 0)
{
channel_index = gen_unique_uint64() % m_async_task_channels.size();
}
else
{
channel_index = channel_index % m_async_threads.size();
}
}
m_async_task_channels[channel_index].push_msg(std::forward<std::function<void()>>(cur_task));
}
如果外部传递的索引是0,则代表这个任务不需要与其他任务串行化,内部则随机指定一个线程即可。
当单个的navi_crowd执行完成之后,需要将这个navi_crowd重新挂载到待更新的队列中,由于这个队列只在主线程维护,因此使用了add_task_to_main_loop来操作这个线程安全队列:
void basic_stub::add_task_to_main_loop(std::function<void()>&& cur_task)
{
m_main_loop_tasks.push_msg(std::forward<std::function<void()>>(cur_task));
}
在主线程的main_loop中会主动调用poll_mainloop_tasks去获取m_main_loop_tasks里的任务去执行:
std::size_t basic_stub::poll_mainloop_tasks()
{
const static std::uint32_t batch_task_num =10;
std::array<std::function<void()>, batch_task_num> temp_tasks;
std::uint64_t pop_get_num = 0;
std::uint64_t total_pop_num = 0;
while((pop_get_num = m_main_loop_tasks.pop_bulk_msg(temp_tasks.data(), batch_task_num)))
{
total_pop_num += pop_get_num;
for(std::uint32_t i = 0; i< pop_get_num; i++)
{
temp_tasks[i]();
}
}
return total_pop_num;
}
在space_navi_component发起创建群体寻路管理器的请求到接收到map_server的回应期间,所有actor_entity寻路相关的请求都会被缓存起来,当收到map_server的创建群体寻路管理器回答之后,再将这些请求发送到map_server上:
void space_navi_component::reply_create_navi_map(const utility::rpc_msg& msg, const std::uint64_t navi_map_handler)
{
m_navi_map_handler = navi_map_handler;
m_owner->logger()->info("reply_create_navi_map {} with {} buffered_reqs", m_navi_map_handler, m_buffered_reqs.size());
for(auto & one_req: m_buffered_reqs)
{
one_req["param"]["navi_crowd"] = m_navi_map_handler;
m_owner->call_map_server(one_req);
}
m_buffered_reqs.clear();
}
当一个actor_entity发起一个具体的寻路请求时,会调用到space_navi_component上的中转接口:
bool actor_navi_component::navi_to_pos(const std::array<double, 3>& dest, const double radius)
{
// 这里省略一些代码
cur_space_navi_comp->navi_to_pos(m_owner, cur_navi_prop->request_version(), dest, radius);
}
void space_navi_component::navi_to_pos(actor_entity* cur_entity, std::uint32_t req_version, const std::array<double, 3>& dest, const double radius)
{
utility::navi_request cur_nav_req;
cur_nav_req.cmd = utility::navi_cmd::move_to_pos;
cur_nav_req.req_version = req_version;
cur_nav_req.pos = dest;
cur_nav_req.dest_radius = radius;
cur_nav_req.from_handler = cur_entity->navi_handler();
send_navi_req(cur_entity, cur_nav_req);
}
这个中转接口负责打包出来一个navi_request,调用send_navi_req发送到map_server的对应navi_crowd去处理,为了正确的路由到对应的navi_crowd,请求中需要携带创建群体寻路管理器响应中初始化的navi_map_handler:
void space_navi_component::send_navi_req(actor_entity* cur_entity, const utility::navi_request& cur_req)
{
cur_entity->dispatcher().dispatch(cur_req.cmd, cur_req);
json cur_msg, cur_param;
cur_msg["cmd"] = "navi_request";
cur_param["navi_req"] = serialize::encode(cur_req);
cur_param["navi_crowd"] = m_navi_map_handler; // navi_crowd的唯一索引
if(m_owner)
{
if(m_owner->is_cell_space())
{
cur_param["anchor"] = *cur_entity->get_call_proxy();
}
else
{
cur_param["anchor"] = "";
}
}
else
{
cur_param["anchor"] = "";
}
cur_msg["param"] = std::move(cur_param);
if(m_navi_map_handler == 0)
{
m_owner->logger()->warn("send_navi_req {} while map handler invalid ", cur_req.encode().dump());
m_buffered_reqs.push_back(cur_msg);
return;
}
m_owner->call_map_server(cur_msg);
}
当map_server接收到具体的寻路请求之后,解析出其中传递的navi_crowd_index,然后创建一个异步任务将这个请求转发到对应的navi_crowd所在的线程:
void map_server::on_navi_request(const json& msg)
{
std::uint64_t temp_navi_crowd_index;
json navi_req_json;
utility::navi_request navi_req;
std::string callback_anchor;
try
{
msg.at("navi_crowd").get_to(temp_navi_crowd_index);
msg.at("navi_req").get_to(navi_req_json);
msg.at("anchor").get_to(callback_anchor);
}
catch(const std::exception& e)
{
m_logger->error("on_navi_request fail to parse msg {} with error {}", msg.dump(), e.what());
return;
}
if(!serialize::decode(navi_req_json, navi_req))
{
m_logger->error("on_navi_request fail to parse msg {} to navi_req", navi_req_json.dump());
return;
}
auto temp_iter = m_navi_crowds.find(temp_navi_crowd_index);
if(temp_iter == m_navi_crowds.end())
{
return;
}
auto temp_crowd = temp_iter->second;
add_task_to_async_loop([temp_crowd, navi_req, callback_anchor]()
{
temp_crowd->on_navi_request(callback_anchor, navi_req);
}, temp_crowd->m_crowd_index);
}
上面构造lambda的时候可以尝试使用右值引用来初始化被捕获的变量,以避免各种不必要的内存分配,不过这里偷懒就没有去做优化。
当navi_crowd处理传递过来的navi_request时,根据navi_request内部的cmd进行指令路由:
void navi_crowd::on_navi_request(const std::string& agent_anchor, const utility::navi_request& req_data)
{
switch(req_data.cmd)
{
case utility::navi_cmd::add:
{
return on_navi_add_req(agent_anchor, req_data);
}
case utility::navi_cmd::remove:
{
return on_navi_remove_req(agent_anchor, req_data);
}
// 此处省略其他cmd
}
}
当一个请求被对应的函数处理之后,会构造一个navi_reply对象发送到请求方:
//navi_crowd::on_navi_add_req
utility::navi_reply rep_data;
rep_data.cmd = req_data.cmd;
rep_data.req_version = req_data.req_version;
rep_data.entity_index = req_data.entity_index;
rep_data.from_handler = cur_agent_idx + 1;
if(agent_anchor.empty())
{
m_agent_anchors[rep_data.from_handler] = m_space_anchor;
}
else
{
m_agent_anchors[rep_data.from_handler] = std::make_shared<std::string>(agent_anchor);
}
m_agent_cmd_versions[rep_data.from_handler] = req_data.req_version;
send_reply(m_agent_anchors[rep_data.from_handler], rep_data);
上面的from_handler记录了本次创建的dtCrowdAgent的AgentIndex + 1,而entity_index则对应了对应entity的线上唯一索引,send_reply函数负责将请求传递到主线程去执行真正的消息发送:
void navi_crowd::send_reply(std::shared_ptr<std::string> anchor, const utility::navi_reply& rep_data)
{
if(!anchor)
{
anchor = m_space_anchor;
}
utility::rpc_msg rep_msg;
rep_msg.cmd = "navi_reply";
rep_msg.args.push_back(rep_data.encode());
m_server->add_task_to_main_loop([=, rep_msg = std::move(rep_msg)]()
{
m_server->call_entity(anchor, rep_msg);
});
}
当space_navi_component收到对应的navi_reply之后,会根据对应的from_handler找到发起请求的actor_entity来执行应答通知:
void space_navi_component::navi_reply(const utility::rpc_msg& msg, const json& rep_msg)
{
utility::navi_reply cur_reply;
if(!serialize::decode(rep_msg, cur_reply))
{
return;
}
if(cur_reply.cmd == utility::navi_cmd::add)
{
auto cur_entity = m_owner->get_entity(utility::entity_desc::gen_local_id(cur_reply.entity_index));
if(!cur_entity)
{
utility::navi_request cur_nav_req;
cur_nav_req.cmd = utility::navi_cmd::remove;
cur_nav_req.req_version = 0;
cur_nav_req.from_handler = cur_reply.from_handler;
send_navi_req(nullptr, cur_nav_req);
return;
}
m_handler_to_entities[cur_reply.from_handler] = cur_entity;
}
if(cur_reply.cmd == utility::navi_cmd::remove)
{
return;
}
m_handler_to_entities[cur_reply.from_handler]->on_navi_reply(cur_reply);
}
至此一个完成的寻路请求处理流程结束,下面是对应的调用时序图:
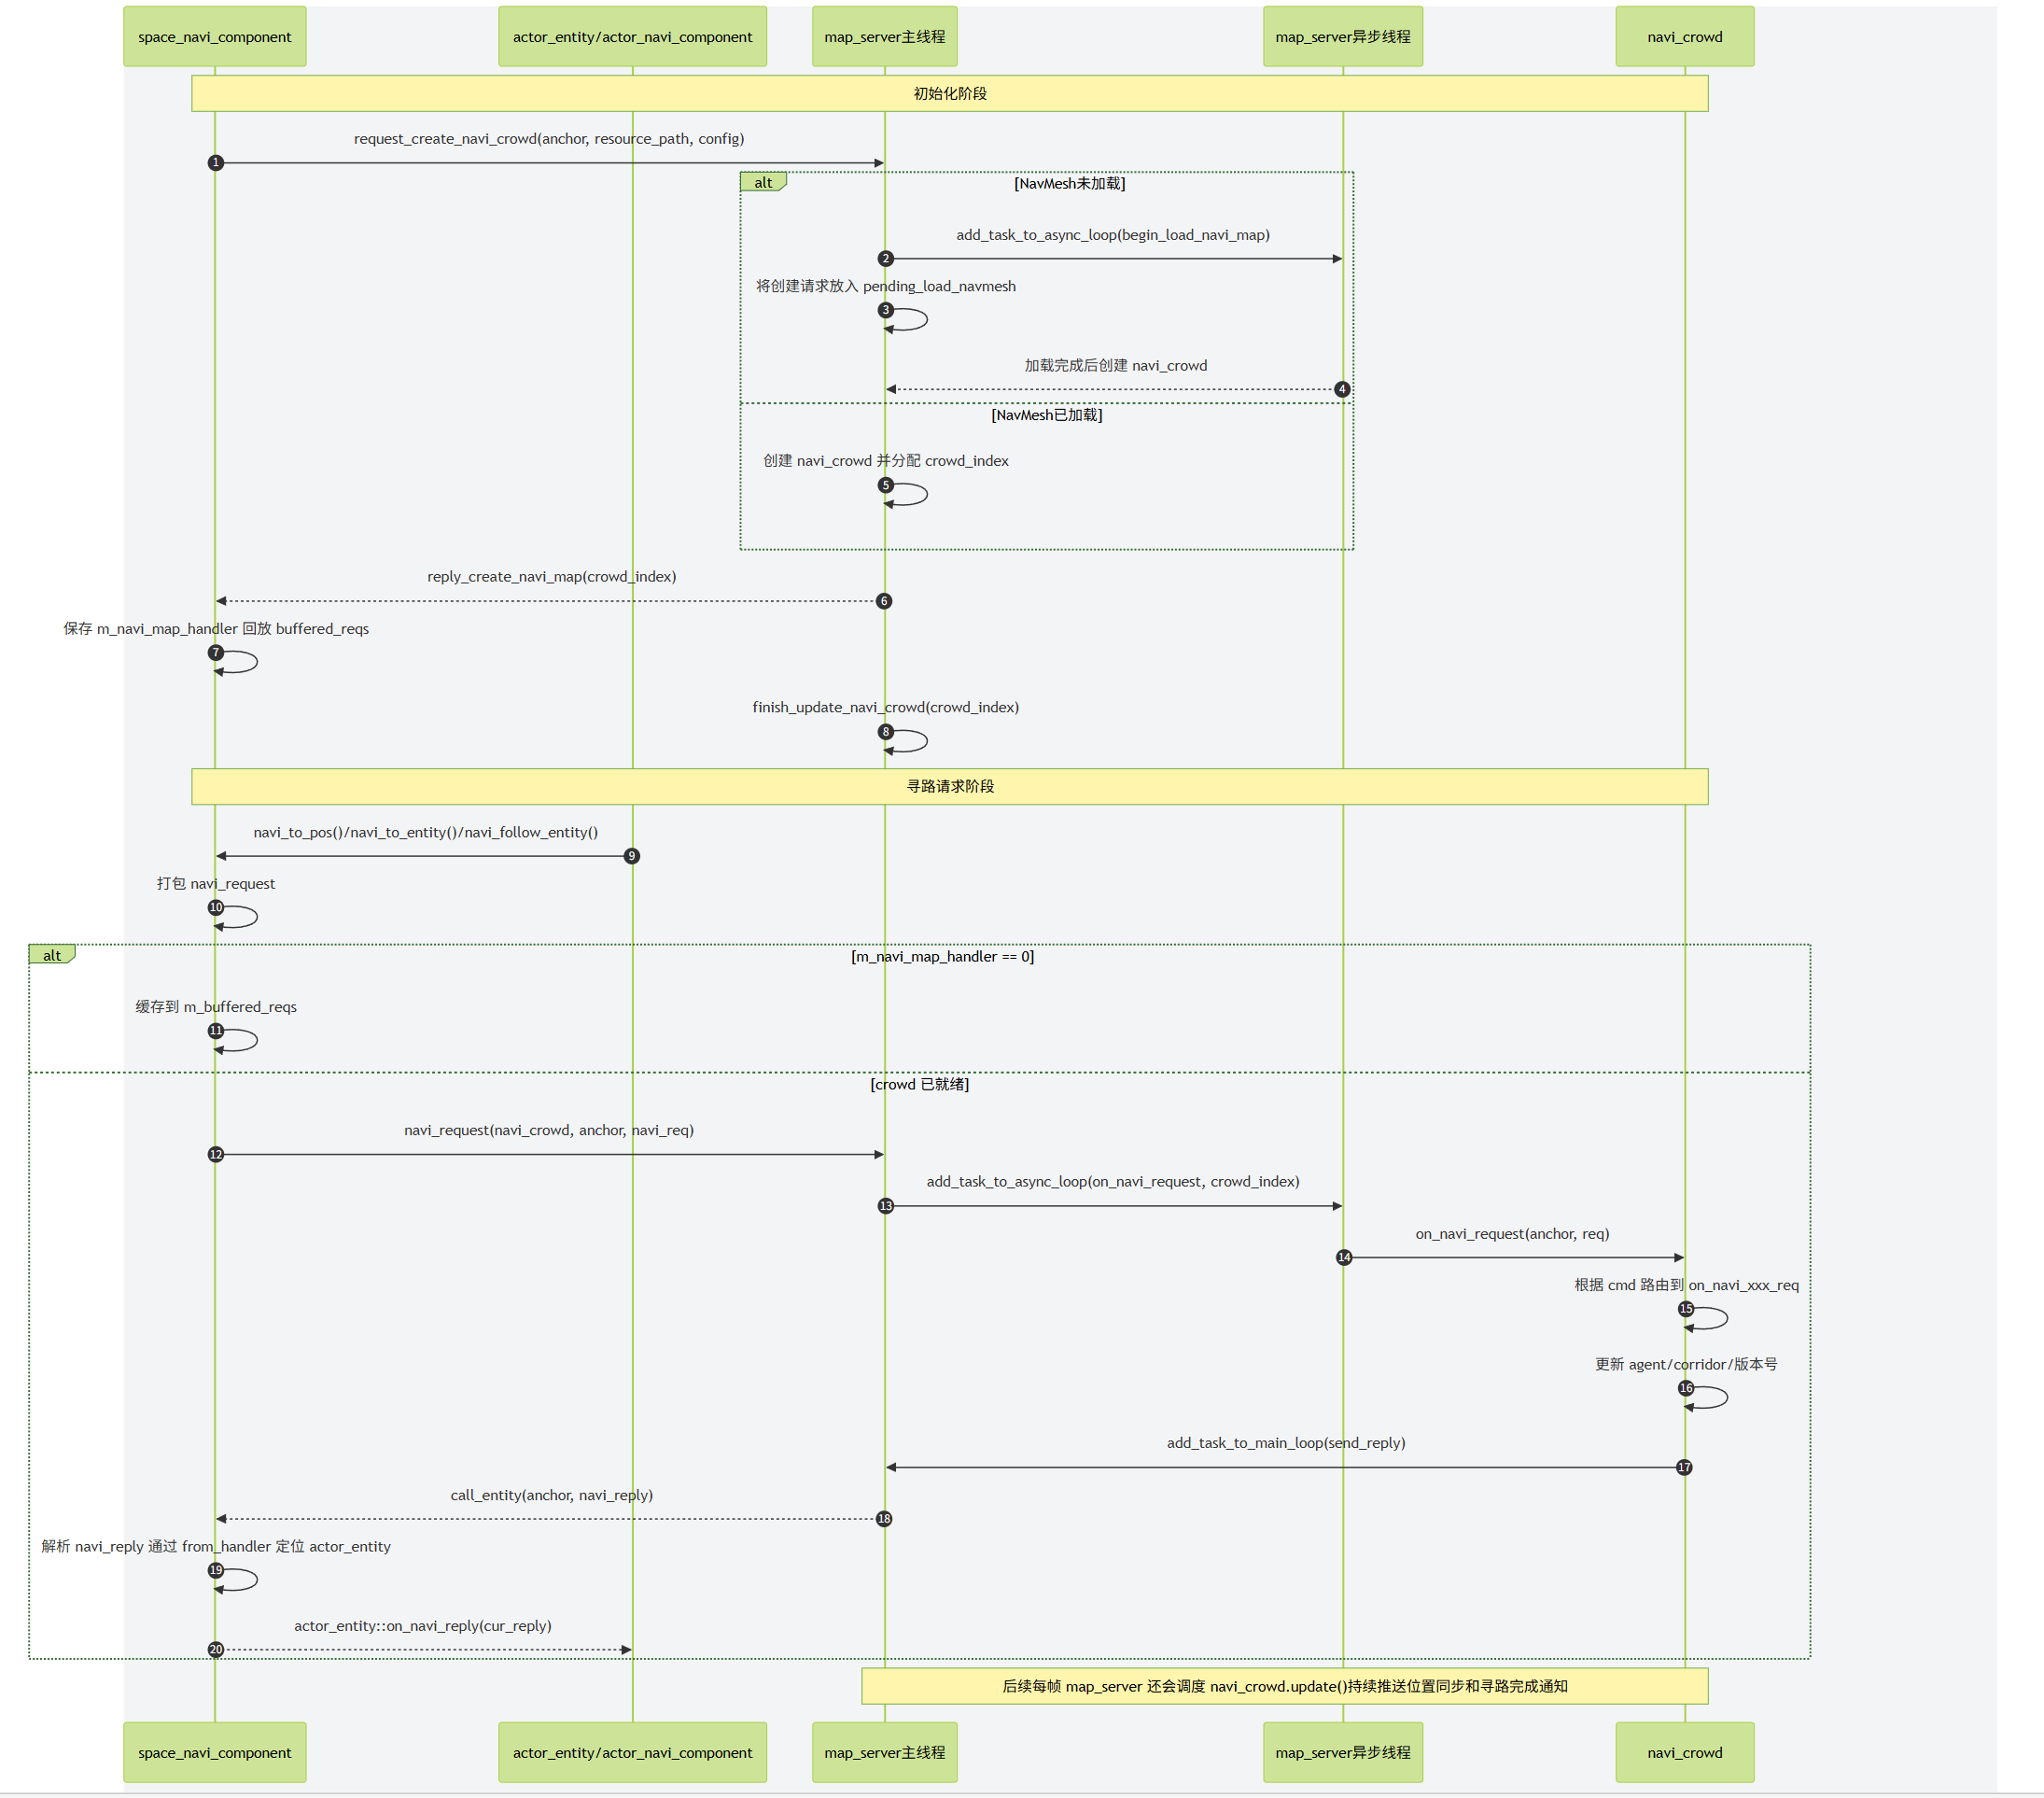
map_server中创建的navi_crowd其实并不负责真正的群体寻路管理器的更新,只是作为一个异步操作群体寻路管理器的封装而存在的,将请求解析好之后进一步转发到真正的DetourCrowd中:
void navi_crowd::on_navi_to_pos_req(const std::string& agent_anchor, const utility::navi_request& req_data)
{
if(req_data.from_handler == 0 || !m_agent_anchors[req_data.from_handler])
{
return;
}
m_agent_cmd_versions[req_data.from_handler] = req_data.req_version;
m_detour_crowd->requestMoveTarget(req_data.from_handler - 1, 0, req_data.pos.data(), req_data.dest_radius);
utility::navi_reply rep_data;
rep_data.cmd = req_data.cmd;
rep_data.req_version = req_data.req_version;
rep_data.from_handler = req_data.from_handler;
send_reply(m_agent_anchors[rep_data.from_handler], rep_data);
}
navi_crowd主要的逻辑除了这些寻路请求接口的转发之外,还负责在detourCrwod执行更新之后将所有的dtAgent的新位置收集起来通知对应的actor_entity,同时将寻路任务的完成状况通知到对应的actor_entity:
void navi_crowd::update()
{
auto cur_ms = utility::timer_manager::now_ts();
float dt = (cur_ms - m_last_update_ms) / 1000.0f;
m_last_update_ms = cur_ms;
m_detour_crowd->update(dt, nullptr); // 驱动detourcrowd的更新
auto active_num = m_detour_crowd->getActiveAgents(m_active_agent_vec.data(), m_active_agent_vec.size());
system::navigation::ExtendDetourCrowdAgent* idx_0_agent = m_detour_crowd->getEditableAgent(0);
m_temp_batch_replys.clear();
for (int i = 0; i < active_num; i++) // 将所有的正在移动的agent的最新位置收集起来
{
auto cur_agent = m_active_agent_vec[i];
if(cur_agent->targetState != spiritsaway::system::navigation::ExtendDetourMoveRequestState::TARGET_VALID)
{
continue;
}
utility::navi_reply one_ack;
one_ack.from_handler = std::distance(idx_0_agent, cur_agent) + 1;
one_ack.req_version = m_agent_cmd_versions[one_ack.from_handler];
one_ack.cmd = utility::navi_cmd::notify_sync_pos;
std::copy(cur_agent->npos, cur_agent->npos + 3, one_ack.pos.data());
std::copy(cur_agent->vel, cur_agent->vel + 3, one_ack.speed.data());
if(m_agent_anchors[one_ack.from_handler] == m_space_anchor)
{
// 对应的是非分布式场景 直接加入到这个数组中
m_temp_batch_replys.push_back(one_ack);
}
else
{
// 否则每个agent的位置单独走rpc推送更新
send_reply(m_agent_anchors[one_ack.from_handler], one_ack);
}
}
if(!m_temp_batch_replys.empty())
{
// 这里走批量更新 避免构造多个数据包 减少流量
send_replys(m_temp_batch_replys);
}
m_temp_batch_replys.clear();
// 收集所有已经达到寻路目标点的agent 通知其寻路任务结束
auto finish_num = m_detour_crowd->fetchAndClearArrived(m_finished_agent_vec.data(), m_finished_agent_vec.size());
for (int i = 0; i < finish_num; i++)
{
utility::navi_reply one_ack;
one_ack.from_handler = m_finished_agent_vec[i] + 1;
one_ack.req_version = m_agent_cmd_versions[one_ack.from_handler];
one_ack.cmd = utility::navi_cmd::notify_move_finish;
if(m_agent_anchors[one_ack.from_handler] == m_space_anchor)
{
m_temp_batch_replys.push_back(one_ack);
}
else
{
send_reply(m_agent_anchors[one_ack.from_handler], one_ack);
}
}
if(!m_temp_batch_replys.empty())
{
send_replys(m_temp_batch_replys);
}
}
由于detour_crowd的更新在map_server上,而actor_entity的寻路请求在space_server上,两者只能通过网络异步通信,所以有可能actor_entity取消了寻路并强制修改本地位置之后,之前的寻路请求导致的位置更新被推送下来,导致位置被覆写,出现拉扯的情况。为了避免这种情况的发生,我们在actor_entity上增加了寻路请求版本号req_version,每次发起寻路时这个版本号都会自增,初始时为0。
// bool actor_navi_component::navi_to_pos(const std::array<double, 3>& dest, const double radius)
cur_navi_prop_proxy->request_version().set(cur_navi_prop->request_version() + 1);
cur_navi_prop_proxy->state().set(std::uint8_t(utility::navi_cmd::move_to_pos));
cur_navi_prop_proxy->dest_pos().set(dest);
cur_navi_prop_proxy->dest_radius().set(radius);
cur_space_navi_comp->navi_to_pos(m_owner, cur_navi_prop->request_version(), dest, radius);
当actor_entity收到navi_reply的时候,需要检查一下版本号是否匹配:
void actor_navi_component::on_navi_reply(const utility::navi_reply& cur_navi_reply)
{
auto cur_navi_prop_proxy = m_owner->navi_prop_proxy();
if(cur_navi_reply.req_version != cur_navi_prop_proxy->request_version().get())
{
return;
}
// 省略其他代码
}
在actor_navi_component上提供了如下的几个寻路接口:
bool navi_to_pos(const std::array<double, 3>& dest, const double radius);
bool navi_to_entity(actor_entity* dest_entity, const double radius);
bool navi_follow_entity(actor_entity* dest_entity, const double radius);
void navi_cancel();
navi_to_pos负责开启一个走向固定点的寻路任务,对应的就是detourCrowd中的requestMoveTarget接口。而navi_to_entity和navi_follow_entity分别对应了移动到某个Entity周围和开启对某个Entity的跟随移动,这两个移动任务在原始的DetourCrowd中是没有的,属于mosaic_game中对DetourCrowd的扩展。我将这个扩展版本的DetourCrowd命名为ExtendDetourCrowd,对应的文件在工程目录的/common/extend_detour中。代码的大部分都来自于DetourCrowd,为了处理上述的趋近寻路和跟随寻路增加了下面的接口:
/// Submits a new move request for the specified agent.
/// @param[in] idx The agent index. [Limits: 0 <= value < #getAgentCount()]
/// @param[in] ref The position's polygon reference.
/// @param[in] pos The position within the polygon. [(x, y, z)]
/// @param[in] target_radius distance to pos less than raget_radius considered complete
/// @param[in] follow continue to follow when in target_radius
/// @return True if the request was successfully submitted.
bool requestChaseTarget(const int idx, const int target_idx, const dtReal_t target_radius = 0, const bool follow = false);
idx代表发起寻路的agent索引,target_idx代表目标agent索引,follow代表是否开启持续性的跟随。跟requestMoveTarget接口一样,这个接口只负责初始化相关的dtAgent成员变量:
ag->target_agent = target_idx; // 所追踪的目标agent的索引
m_agents[target_idx].follow_by_agent_count++; // 目标agent上记录当前被多少agent追踪
ag->continue_follow = follow; // 是否开启持续跟随
updateAgentFollowTarget(ag); // 根据目标agent来设置当前agent的终点poly和position信息
驱动跟随时位移其实就是定期的以趋近目标所在的poly和position来更新当前agent的目标位置并触发路径重新规划,这样就可以复用原始DetourCrowd的所有基于点目标进行移动的代码:
// 这个函数负责驱动趋近移动时corridor的更新
void ExtendDetourCrowd::checkFollowSteer(ExtendDetourCrowdAgent** agents, const int nagents)
{
for (int i = 0; i < nagents; ++i)
{
ExtendDetourCrowdAgent* ag = agents[i];
if (ag->targetState != ExtendDetourMoveRequestState::TARGET_VALID && ag->targetState != ExtendDetourMoveRequestState::TARGET_VELOCITY)
{
continue;
}
if (ag->state != ExtendDetourCrowdAgentState::STATE_WALKING)
{
continue;
}
if (ag->move_state != ExtendDetourCrowdAgentMoveState::STATE_MOVING)
{
continue;
}
if (ag->target_agent == -1)
{
continue;
}
auto target_ag = getAgent(ag->target_agent);
if (!target_ag || !target_ag->active)
{
ag->move_state = ExtendDetourCrowdAgentMoveState::STATE_FINISHED;
dtVset(ag->dvel, 0, 0, 0);
ag->targetState = ExtendDetourMoveRequestState::TARGET_FAILED;
continue;
}
// 两倍半径和作为阈值
auto dist_threhold = 2*(ag->params.radius + ag->target_radius + target_ag->params.radius);
auto cur_dis = dtVdist(ag->npos, target_ag->npos);
dtReal_t offset[3];
dtVsub(offset, target_ag->npos, ag->npos);
dtVnormalize(offset);
dtVscale(offset, offset, ag->params.maxSpeed);
if (ag->targetState == ExtendDetourMoveRequestState::TARGET_VALID)
{
if (cur_dis < dist_threhold)// 如果两个agent的距离小于上面计算的阈值 则开启存粹的基于速度的移动
{
// 根据两者的位置差异来确定移动速度方向
requestMoveVelocity(getAgentIndex(ag), offset);
continue;
}
}
else // 在基于速度的移动状态
{
if (cur_dis > 2 * dist_threhold) // 如果大于了两倍阈值 则切换到目标点移动状态
{
updateAgentFollowTarget(ag);
ag->targetState = ExtendDetourMoveRequestState::TARGET_VALID;
}
else
{
// 继续使用基于速度的插值位置更新
dtVcopy(ag->targetPos, offset);
continue;
}
}
auto now_to_cor_dis = dtVdist(ag->npos, ag->corridor.getTarget());
auto cor_to_target_dis = dtVdist(ag->corridor.getTarget(), target_ag->npos);
// 如果当前agent的corridor末尾点距离目标agent的距离大于指定阈值 且当前corridor的长度小于这个距离的10倍
// 则更新当前agent的corridor末尾为target_ag->pos
// 这样避免离很远时经常更新corridor
if (cor_to_target_dis < dist_threhold && now_to_cor_dis < 10 * cor_to_target_dis)
{
updateAgentFollowTarget(ag);
ag->corridor.moveTargetPosition(target_ag->npos, m_navquery, &m_filters[ag->params.queryFilterType]);
continue;
}
// 如果ag->npos ag->corridor target_ag->pos 三个点组成了一个倒角
// 则认为当前路径离最短路径差异较大 需要重新规划
if (cor_to_target_dis + now_to_cor_dis > 1.5 * cur_dis)
{
updateAgentFollowTarget(ag);
requestMoveTargetReplan(getAgentIndex(ag), ag->targetRef, ag->targetPos);
continue;
}
}
}
如果开启了持续跟随,当当前agent与目标agent之间的距离小于跟随范围时,当前agent会暂停移动,临时性的不再参与寻路系统的更新。为了将这种临时暂停与没有寻路任务区分开来,我们增加了一个枚举来代表当前agent的移动状态:
enum class ExtendDetourCrowdAgentMoveState
{
STATE_IDLE, // 无移动任务
STATE_MOVING, // 正在移动
STATE_WAITING, // 正在休眠
STATE_FINISHED, // 运动已经结束
};
struct ExtendDetourCrowdAgent
{
// 增加了一个move_state字段代表移动状态
ExtendDetourCrowdAgentMoveState move_state = ExtendDetourCrowdAgentMoveState::STATE_IDLE;
};
当跟随移动时两者距离小于指定阈值时进入STATE_WAITING状态,直到两者之间的距离差距拉大到了ag->params.radius + ag->target_radius + target_ag->params.radius时重新进入到STATE_MOVING。而STATE_FINISHED则代表当前寻路任务完成,这个状态由checkArrived函数进行设置,该函数在ExtendDetourCrowd::update的末尾进行调用:
void ExtendDetourCrowd::checkArrived(ExtendDetourCrowdAgent** agents, const int nagents)
{
for (int i = 0; i < nagents; ++i)
{
ExtendDetourCrowdAgent* ag = agents[i];
if (ag->state != ExtendDetourCrowdAgentState::STATE_WALKING)
{
continue;
}
if (ag->target_agent < 0) // 基于目标点的寻路
{
if (ag->targetState != ExtendDetourMoveRequestState::TARGET_VALID)
{
continue;
}
auto cur_dis = dtVdist(ag->npos, ag->targetPos);
bool close_tag = false; //是否已经到了阈值半径内
if (ag->target_radius != 0)
{
close_tag = cur_dis <= ag->target_radius;
}
else
{
close_tag = cur_dis <= ag->params.radius * 0.5;
}
if (close_tag)
{// 到了阈值半径内标记为寻路结束
ag->move_state = ExtendDetourCrowdAgentMoveState::STATE_FINISHED;
dtVset(ag->vel, 0, 0, 0);
}
}
else // 在执行趋近寻路
{
if (ag->targetState != ExtendDetourMoveRequestState::TARGET_VALID && ag->targetState != ExtendDetourMoveRequestState::TARGET_VELOCITY)
{
continue;
}
auto target_ag = getAgent(ag->target_agent);
if (!target_ag) // 趋近目标不存在时 认为寻路完成
{
ag->move_state = ExtendDetourCrowdAgentMoveState::STATE_FINISHED;
dtVset(ag->vel, 0, 0, 0);
continue;
}
if (ag->move_state == ExtendDetourCrowdAgentMoveState::STATE_WAITING) // 跟随等待状态 不处理
{
continue;
}
auto cur_dis = dtVdist(ag->npos, target_ag->npos);
bool close_tag = false;
if (ag->target_radius != 0)
{
close_tag = cur_dis <= ag->target_radius;
}
else
{
close_tag = cur_dis <= (ag->params.radius + target_ag->params.radius) * 0.5;
}
if (close_tag)//是否已经到了阈值半径内
{
if (ag->continue_follow) // 如果开启了持续跟随 则进入暂停等待状态
{
ag->move_state = ExtendDetourCrowdAgentMoveState::STATE_WAITING;
dtVset(ag->vel, 0, 0, 0);
}
else // 代表趋近寻路完成
{
ag->move_state = ExtendDetourCrowdAgentMoveState::STATE_FINISHED;
dtVset(ag->vel, 0, 0, 0);
}
}
}
}
}
外部的navi_crowd在触发了ExtendDetourCrowd的update之后,会调用ExtendDetourCrowd::fetchAndClearArrived来收集所有寻路完成的agent,然后向相关的actor_entity进行通知任务完成:
int ExtendDetourCrowd::fetchAndClearArrived(int* result, const int max_result)
{
ExtendDetourCrowdAgent** agents = m_activeAgents;
int nagents = getActiveAgents(agents, m_maxAgents);
int count = 0;
for (int i = 0; i < nagents; i++)
{
if (agents[i]->move_state == ExtendDetourCrowdAgentMoveState::STATE_MOVING)
{
if (agents[i]->targetState == ExtendDetourMoveRequestState::TARGET_FAILED)
{
agents[i]->move_state = ExtendDetourCrowdAgentMoveState::STATE_FINISHED;
}
}
if (agents[i]->move_state == ExtendDetourCrowdAgentMoveState::STATE_FINISHED)
{
auto cur_agent_idx = getAgentIndex(agents[i]);
result[count] = cur_agent_idx;
count++;
resetMoveTarget(cur_agent_idx);
if (count >= max_result)
{
break;
}
}
}
return count;
}
Unreal Engine 的寻路系统
Unreal Engine的寻路系统也是基于RecastNavigation,不过为了隐藏具体的实现,提供了一个NavigationSystemBase的基类作为接口类,提供了获取当前寻路数据的相关接口:
class ENGINE_API UNavigationSystemBase : public UObject
{
GENERATED_BODY()
public:
virtual ~UNavigationSystemBase(){}
/**
* If you're using NavigationSysstem module consider calling
* FNavigationSystem::GetCurrent<UNavigationSystemV1>()->GetDefaultNavDataInstance
* instead.
*/
virtual INavigationDataInterface* GetMainNavData() const { return nullptr; }
UE_DEPRECATED(4.20, "GetMainNavData is deprecated. Use FNavigationSystem::GetCurrent<UNavigationSystemV1>()->GetDefaultNavDataInstance instead")
INavigationDataInterface* GetMainNavData(int) { return nullptr; }
};
这里的INavigationDataInterface其实也是一个接口类,不承担实现:
class INavigationDataInterface
{
GENERATED_IINTERFACE_BODY()
public:
/** Tries to move current nav location towards target constrained to navigable area.
* @param OutLocation if successful this variable will be filed with result
* @return true if successful, false otherwise
*/
virtual bool FindMoveAlongSurface(const FNavLocation& StartLocation, const FVector& TargetPosition, FNavLocation& OutLocation, FSharedConstNavQueryFilter Filter = nullptr, const UObject* Querier = nullptr) const PURE_VIRTUAL(INavigationDataInterface::FindMoveAlongSurface, return false;);
/** Tries to project given Point to this navigation type, within given Extent.
* @param OutLocation if successful this variable will be filed with result
* @return true if successful, false otherwise
*/
virtual bool ProjectPoint(const FVector& Point, FNavLocation& OutLocation, const FVector& Extent, FSharedConstNavQueryFilter Filter = nullptr, const UObject* Querier = nullptr) const PURE_VIRTUAL(INavigationDataInterface::ProjectPoint, return false;);
/** Determines whether the specified NavNodeRef is still valid
* @param NodeRef the NavNodeRef to test for validity
* @return true if valid, false otherwise
*/
virtual bool IsNodeRefValid(NavNodeRef NodeRef) const PURE_VIRTUAL(INavigationDataInterface::IsNodeRefValid, return true;);
};
实际使用中的NavigationSystem实例是UNavigationSystemV1这个类型:
class NAVIGATIONSYSTEM_API UNavigationSystemV1 : public UNavigationSystemBase
{
GENERATED_BODY()
friend UNavigationSystemModuleConfig;
public:
UNavigationSystemV1(const FObjectInitializer& ObjectInitializer = FObjectInitializer::Get());
virtual ~UNavigationSystemV1();
UPROPERTY(Transient)
ANavigationData* MainNavData;
/** special navigation data for managing direct paths, not part of NavDataSet! */
UPROPERTY(Transient)
ANavigationData* AbstractNavData;
};
这里存储的ANavigationData就是存储的寻路数据,继承自前面的INavigationDataInterface:
class NAVIGATIONSYSTEM_API ANavigationData : public AActor, public INavigationDataInterface
但是这个类型其实也是一个接口类,提供了一些路径查询的接口声明,真正的实现类在ARecastNavMesh上:
class NAVIGATIONSYSTEM_API ARecastNavMesh : public ANavigationData
{
private:
/**
* This is a pimpl-style arrangement used to tightly hide the Recast internals from the rest of the engine.
* Using this class should *not* require the inclusion of the private RecastNavMesh.h
* @NOTE: if we switch over to C++11 this should be unique_ptr
* @TODO since it's no secret we're using recast there's no point in having separate implementation class. FPImplRecastNavMesh should be merged into ARecastNavMesh
*/
FPImplRecastNavMesh* RecastNavMeshImpl;
};
而这个ARecastNavMesh其实只是接口转发类,所有的寻路查询都会以Pimpl的形式转发到上面的RecastNavMeshImpl指针上,这个FPImplRecastNavMesh才会真正的拥有我们之前介绍的dtNavMesh、dtNavMeshQuery以及存储了动态体素数据的dtTileCache:
/** Engine Private! - Private Implementation details of ARecastNavMesh */
class NAVIGATIONSYSTEM_API FPImplRecastNavMesh
{
public:
/** Constructor */
FPImplRecastNavMesh(ARecastNavMesh* Owner);
/** Dtor */
~FPImplRecastNavMesh();
public:
dtNavMesh const* GetRecastMesh() const { return DetourNavMesh; };
dtNavMesh* GetRecastMesh() { return DetourNavMesh; };
private:
ARecastNavMesh* NavMeshOwner;
/** Recast's runtime navmesh data that we can query against */
dtNavMesh* DetourNavMesh;
/** Compressed layers data, can be reused for tiles generation */
TMap<FIntPoint, TArray<FNavMeshTileData> > CompressedTileCacheLayers;
#if RECAST_INTERNAL_DEBUG_DATA
TMap<FIntPoint, FRecastInternalDebugData> DebugDataMap;
#endif
/** query used for searching data on game thread */
mutable dtNavMeshQuery SharedNavQuery;
};
这样的四层转发的结构设计,能够很方便的分离接口与实现,避免了代码之间的强耦合,有助于降低工程的编译时间(虽然还是很慢)。很多UE的寻路数据导出插件都以下面的方式直接获取内部实现dtNavMesh的指针:
ANavigationData* NavData = FNavigationSystem::GetCurrent<UNavigationSystemV1>()->GetDefaultNavDataInstance();
ARecastNavMesh* RecastNavMesh = Cast<ARecastNavMesh>(NavData);
const dtNavMesh* DtNavMesh = RecastNavMesh->GetRecastMesh();
UE4的NavMesh数据生成
实际上这三行简单的代码可能在第三行就Crash了,爆出空指针错误,因为当前场景里可能压根没有创建NavigationData。如果需要创建NavigationData来支持寻路请求,需要将寻路网格体边界体积(Nav Mesh Bounds Volume)这样的长方体放置到场景中,并调节这个长方体的大小以覆盖需要生成寻路数据的区域:
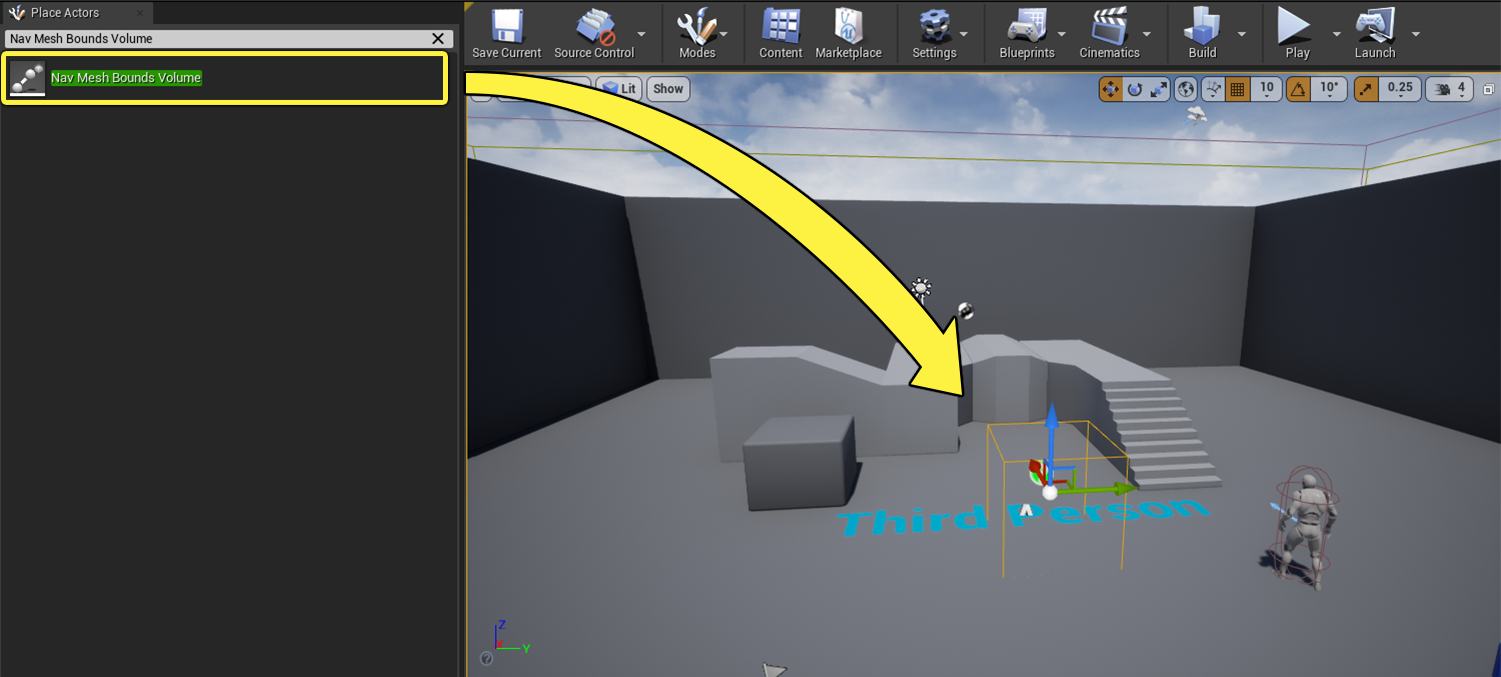
被这个长方体覆盖的区域就会生成寻路数据,在UE渲染窗口的Show按钮中勾选Navigation复选框(或者使用键盘输入字母P)即可开启寻路数据的渲染,生成的NavMesh里的多边形会以绿色的形式进行呈现,不过多边形的高度会增加DrawOffset,以避免与地形完全重合:
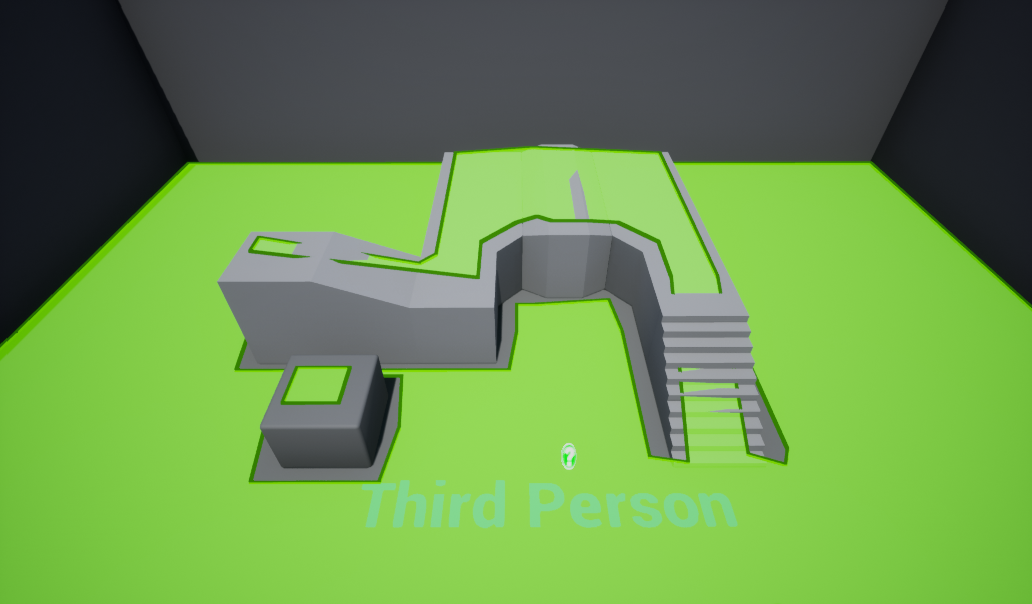
如果要配置生成NavMesh时的各种参数,则需要在当前场景里找到ARecastNavData对应的Actor,修改其暴露的一些属性字段:
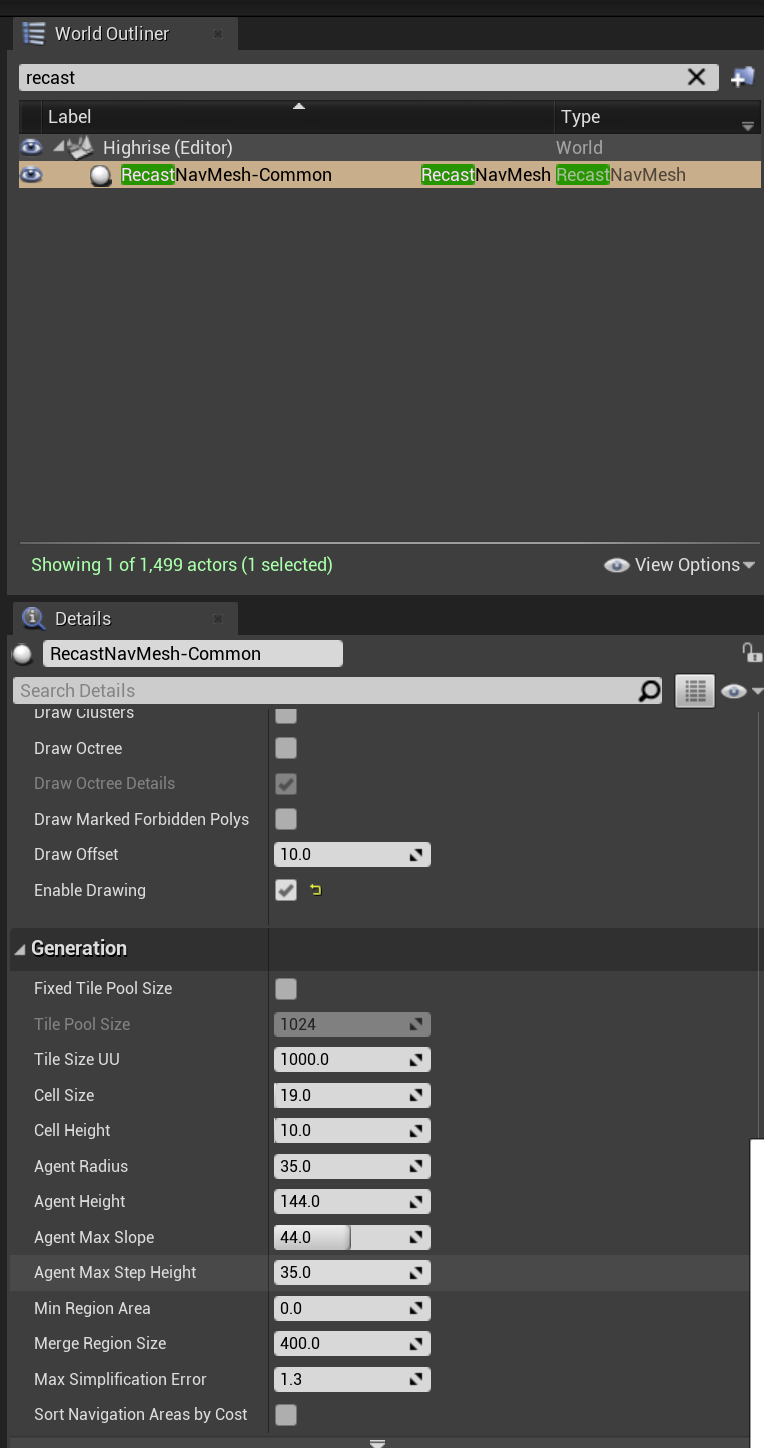
上述字段基本可以与原生的rcConfig对应起来,唯一需要注意的是UE使用的长度单位是CM,而常规的RecastDemo使用的长度单位为M,调整相关参数的时候需要注意这个数量级的差别。
当场景里的寻路网格体边界体积被修改或者寻路数据生成配置被修改之后,会触发场景内寻路数据的重新构建,通过层层转发之后,最后会落到这个函数上:
bool FRecastNavMeshGenerator::RebuildAll()
{
DestNavMesh->UpdateNavVersion();
// Recreate recast navmesh
DestNavMesh->GetRecastNavMeshImpl()->ReleaseDetourNavMesh();
RcNavMeshOrigin = Unreal2RecastPoint(DestNavMesh->NavMeshOriginOffset);
ConstructTiledNavMesh();
if (MarkNavBoundsDirty() == false)
{
// There are no navigation bounds to build, probably navmesh was resized and we just need to update debug draw
DestNavMesh->RequestDrawingUpdate();
}
return true;
}
这里的FRecastNavMeshGenerator负责管理从场景中的几何体中收集寻路相关的网格数据并最终生成dtNavMesh,由于Recast使用的坐标系与UE使用的坐标系不一样,所以两者之间的坐标需要使用Unreal2RecastPoint,Recast2UnrealPoint这两个函数来互相转换。UE使用的NavMesh格式为TileMesh,所以上面会调用ConstructTiledNavMesh来初始化TileMesh,然后MarkNavBoundsDirty负责收集场景里的NavMeshBoundVoume来计算所有的Tile:
bool FRecastNavMeshGenerator::MarkNavBoundsDirty()
{
// if rebuilding all no point in keeping "old" invalidated areas
TArray<FNavigationDirtyArea> DirtyAreas;
for (FBox AreaBounds : InclusionBounds)
{
FNavigationDirtyArea DirtyArea(AreaBounds, ENavigationDirtyFlag::All | ENavigationDirtyFlag::NavigationBounds);
DirtyAreas.Add(DirtyArea);
}
if (DirtyAreas.Num())
{
MarkDirtyTiles(DirtyAreas);
return true;
}
return false;
}
这里的MarkDirtyTiles负责收集所有需要重新生成NavMesh的Tile,然后按照离当前玩家距离进行排序,构造生成Tile具体数据的优先级:
void FRecastNavMeshGenerator::MarkDirtyTiles(const TArray<FNavigationDirtyArea>& DirtyAreas)
{
// 省略一大堆由volume计算tile的代码
// Append remaining new dirty tile elements
PendingDirtyTiles.Reserve(PendingDirtyTiles.Num() + DirtyTiles.Num());
for(const FPendingTileElement& Element : DirtyTiles)
{
PendingDirtyTiles.Add(Element);
}
// Sort tiles by proximity to players
if (NumTilesMarked > 0)
{
SortPendingBuildTiles();
}
}
所以整个RebuildAll函数执行完成之后,Tile数据并没有得到更新,只是创建了FPendingTileElement数组,作为生成Tile的任务队列,整个寻路数据的更新其实是异步的。然后驱动所有的异步寻路网格生成任务的入口函数为:void FRecastNavMeshGenerator::TickAsyncBuild(float DeltaSeconds), 这个函数又会调用ProcessTileTasks来调用同步或者异步的ProcessTileTasksSync, ProcessTileTasksAsync, ProcessTileTasksSyncTimeSliced来执行执行更新任务。 下面是ProcessTileTasksAsync,的核心代码:
int32 NumProcessedTasks = 0;
// Submit pending tile elements
for (int32 ElementIdx = PendingDirtyTiles.Num()-1; ElementIdx >= 0 && NumProcessedTasks < NumTasksToProcess; ElementIdx--)
{
QUICK_SCOPE_CYCLE_COUNTER(STAT_RecastNavMeshGenerator_ProcessTileTasks_NewTasks);
FPendingTileElement& PendingElement = PendingDirtyTiles[ElementIdx];
FRunningTileElement RunningElement(PendingElement.Coord);
// Make sure that we are not submitting generator for grid cell that is currently being regenerated
if (!RunningDirtyTiles.Contains(RunningElement))
{
// Spawn async task
TUniquePtr<FRecastTileGeneratorTask> TileTask = MakeUnique<FRecastTileGeneratorTask>(CreateTileGenerator(PendingElement.Coord, PendingElement.DirtyAreas));
// Start it in background in case it has something to build
if (TileTask->GetTask().TileGenerator->HasDataToBuild())
{
RunningElement.AsyncTask = TileTask.Release();
if (!GNavmeshSynchronousTileGeneration)
{
RunningElement.AsyncTask->StartBackgroundTask();
}
else
{
RunningElement.AsyncTask->StartSynchronousTask();
}
RunningDirtyTiles.Add(RunningElement);
}
else if (!bGameStaticNavMesh)
{
RemoveLayers(PendingElement.Coord, UpdatedTiles);
}
// Remove submitted element from pending list
PendingDirtyTiles.RemoveAt(ElementIdx, 1, /*bAllowShrinking=*/false);
NumProcessedTasks++;
}
}
上面的核心就是使用CreateTileGenerator创建一个FRecastTileGenerator, 并以这个TileGenerator创建一个异步任务FRecastTileGeneratorTask,然后调用StartBackgroundTask来将任务进行投递到线程池,当这个Task被执行时,会执行到FRecastTileGenerator::DoWork函数:
struct NAVIGATIONSYSTEM_API FRecastTileGeneratorWrapper : public FNonAbandonableTask
{
TSharedRef<FRecastTileGenerator> TileGenerator;
FRecastTileGeneratorWrapper(TSharedRef<FRecastTileGenerator> InTileGenerator)
: TileGenerator(InTileGenerator)
{
}
void DoWork()
{
TileGenerator->DoWork();
}
FORCEINLINE TStatId GetStatId() const
{
RETURN_QUICK_DECLARE_CYCLE_STAT(FRecastTileGenerator, STATGROUP_ThreadPoolAsyncTasks);
}
};
这个FRecastTileGenerator::DoWork函数会收集场景中与当前Tile区域相交的影响寻路的几何体信息:
bool FRecastTileGenerator::DoWork()
{
SCOPE_CYCLE_COUNTER(STAT_Navigation_DoWork);
TSharedPtr<FNavDataGenerator, ESPMode::ThreadSafe> ParentGenerator = ParentGeneratorWeakPtr.Pin();
bool bSucceess = true;
if (ParentGenerator.IsValid())
{
if (InclusionBounds.Num())
{
GatherGeometryFromSources();
}
bSucceess = GenerateTile();
DumpAsyncData();
}
return bSucceess;
}
这里的GenerateTile会先使用体素化方法生成当前Tile的TileCache数据,然后再生成Tile数据:
bool FRecastTileGenerator::GenerateTile()
{
FNavMeshBuildContext BuildContext(*this);
bool bSuccess = true;
if (bRegenerateCompressedLayers)
{
CompressedLayers.Reset();
bSuccess = GenerateCompressedLayers(BuildContext);
if (bSuccess)
{
// Mark all layers as dirty
DirtyLayers.Init(true, CompressedLayers.Num());
}
}
if (bSuccess)
{
bSuccess = GenerateNavigationData(BuildContext);
}
// it's possible to have valid generation with empty resulting tile (no navigable geometry in tile)
return bSuccess;
}
完全生成了新的NavData之后,执行下面的一行来加入到最后的NavigationData数组里:
GenerationContext.NavigationData.Add(FNavMeshTileData(NavData, NavDataSize, LayerIdx, CompressedData.LayerBBox));
这行执行完成之后,最后的数据会进入FRecastTileGenerator::NavigationData里。但是由于dtNavMesh的更新是多线程不安全的,所以此时异步线程池生成的TileData不能加入到dtNavMesh中。主线程中执行的FRecastNavMeshGenerator::ProcessTileTasksAsync的后半部分代码负责收集执行完成的TileGenerate任务,然后再执行AddGeneratedTiles加入到dtNavMesh里:
// Collect completed tasks and apply generated data to navmesh
for (int32 Idx = RunningDirtyTiles.Num() - 1; Idx >=0; --Idx)
{
QUICK_SCOPE_CYCLE_COUNTER(STAT_RecastNavMeshGenerator_ProcessTileTasks_FinishedTasks);
FRunningTileElement& Element = RunningDirtyTiles[Idx];
check(Element.AsyncTask);
if (Element.AsyncTask->IsDone())
{
// Add generated tiles to navmesh
if (!Element.bShouldDiscard)
{
FRecastTileGenerator& TileGenerator = *(Element.AsyncTask->GetTask().TileGenerator);
TArray<uint32> UpdatedTileIndices = AddGeneratedTiles(TileGenerator);
UpdatedTiles.Append(UpdatedTileIndices);
StoreCompressedTileCacheLayers(TileGenerator, Element.Coord.X, Element.Coord.Y);
#if RECAST_INTERNAL_DEBUG_DATA
StoreDebugData(TileGenerator, Element.Coord.X, Element.Coord.Y);
#endif
}
{
QUICK_SCOPE_CYCLE_COUNTER(STAT_RecastNavMeshGenerator_TileGeneratorRemoval);
// Destroy tile generator task
delete Element.AsyncTask;
Element.AsyncTask = nullptr;
// Remove completed tile element from a list of running tasks
RunningDirtyTiles.RemoveAtSwap(Idx, 1, false);
}
}
}
AddGeneratedTiles里面的核心调用就是熟悉的addTile:
// let navmesh know it's tile generator who owns the data
status = DetourMesh->addTile(LayerData.GetData(), LayerData.DataSize, DT_TILE_FREE_DATA, OldTileRef, &ResultTileRef);
// if tile index was already taken by other layer try adding it on first free entry (salt was already updated by whatever took that spot)
if (dtStatusFailed(status) && dtStatusDetail(status, DT_OUT_OF_MEMORY) && OldTileRef)
{
OldTileRef = 0;
status = DetourMesh->addTile(LayerData.GetData(), LayerData.DataSize, DT_TILE_FREE_DATA, OldTileRef, &ResultTileRef);
}
每次TickBuild之后,如果有数据更新,会调用DestNavMesh->RequestDrawingUpdate()来加入异步渲染队列,这样就能及时刷新NavMesh的渲染状态:
FSimpleDelegateGraphTask::CreateAndDispatchWhenReady(
FSimpleDelegateGraphTask::FDelegate::CreateUObject(this, &ARecastNavMesh::UpdateDrawing),
GET_STATID(STAT_FSimpleDelegateGraphTask_RequestingNavmeshRedraw), NULL, ENamedThreads::GameThread);
上面介绍的就是UE使用多线程来执行NavMesh生成的全流程,不过这里有一个很重要的细节没有介绍:如何收集一个Tile相重叠的影响寻路的几何体,也就是前面引用到的GatherGeometryFromSources函数。这个函数自身代码其实很简单,就是遍历当前的FRecastTileGenerator内存储的NavigationRelevantData数组来收集FNavigationRelevantData:
void FRecastTileGenerator::GatherGeometryFromSources()
{
QUICK_SCOPE_CYCLE_COUNTER(STAT_RecastNavMeshGenerator_GatherGeometryFromSources);
UNavigationSystemV1* NavSys = NavSystem.Get();
if (NavSys == nullptr)
{
return;
}
for (TSharedRef<FNavigationRelevantData, ESPMode::ThreadSafe>& ElementData : NavigationRelevantData)
{
if (ElementData->GetOwner() == nullptr)
{
UE_LOG(LogNavigation, Warning, TEXT("%s: skipping an element with no longer valid Owner"), ANSI_TO_TCHAR(__FUNCTION__));
continue;
}
GatherNavigationDataGeometry(ElementData, *NavSys, NavDataConfig, bUpdateGeometry);
}
}
NavigationRelevantData数据在开始的准备阶段就填充好了,寻路系统使用了一个八叉树来存储场景内的所有FNavigationRelevantData, 所以计算当前Tile相交的寻路数据只需要调用一下八叉树提供的BoundingBox查询接口即可:
void FRecastTileGenerator::PrepareGeometrySources(const FRecastNavMeshGenerator& ParentGenerator, bool bGeometryChanged)
{
QUICK_SCOPE_CYCLE_COUNTER(STAT_RecastNavMeshGenerator_PrepareGeometrySources);
UNavigationSystemV1* NavSys = FNavigationSystem::GetCurrent<UNavigationSystemV1>(ParentGenerator.GetWorld());
FNavigationOctree* NavOctreeInstance = NavSys ? NavSys->GetMutableNavOctree() : nullptr;
check(NavOctreeInstance);
NavigationRelevantData.Reset();
NavSystem = NavSys;
bUpdateGeometry = bGeometryChanged;
NavOctreeInstance->FindElementsWithBoundsTest(ParentGenerator.GrowBoundingBox(TileBB, /*bIncludeAgentHeight*/ false), [this, bGeometryChanged](const FNavigationOctreeElement& Element)
{
const bool bShouldUse = Element.ShouldUseGeometry(NavDataConfig);
if (bShouldUse)
{
const bool bExportGeometry = bGeometryChanged && (Element.Data->HasGeometry() || Element.Data->IsPendingLazyGeometryGathering());
if (bExportGeometry ||
Element.Data->NeedAnyPendingLazyModifiersGathering() ||
Element.Data->Modifiers.HasMetaAreas() == true ||
Element.Data->Modifiers.IsEmpty() == false)
{
NavigationRelevantData.Add(Element.Data);
}
}
});
}
所有在碰撞设置里勾选了CanEverAffectNavigation的UActorComponent和继承了INavRelevantInterface的UActorComponent都会在创建完成之后自动的将当前的形状注册到这个全局的八叉树之中。
void USceneComponent::PropagateTransformUpdate(bool bTransformChanged, EUpdateTransformFlags UpdateTransformFlags, ETeleportType Teleport)
{
// 省略很多代码
// Refresh navigation
if (bNavigationRelevant && bRegistered)
{
UpdateNavigationData();
}
// 省略很多代码
}
void USceneComponent::UpdateNavigationData()
{
SCOPE_CYCLE_COUNTER(STAT_ComponentUpdateNavData);
if (IsRegistered())
{
UWorld* MyWorld = GetWorld();
if ((MyWorld != nullptr) && (!MyWorld->IsGameWorld() || !MyWorld->IsNetMode(ENetMode::NM_Client)))
{
// use propagated component's transform update in editor OR server game with additional navsys check
FNavigationSystem::UpdateComponentData(*this);
}
}
}
void UNavigationSystemV1::UpdateComponentInNavOctree(UActorComponent& Comp)
{
SCOPE_CYCLE_COUNTER(STAT_DebugNavOctree);
if (ShouldUpdateNavOctreeOnComponentChange() == false)
{
return;
}
// special case for early out: use cached nav relevancy
if (Comp.bNavigationRelevant == true)
{
AActor* OwnerActor = Comp.GetOwner();
if (OwnerActor)
{
INavRelevantInterface* NavElement = Cast<INavRelevantInterface>(&Comp);
if (NavElement)
{
UNavigationSystemV1* NavSys = FNavigationSystem::GetCurrent<UNavigationSystemV1>(OwnerActor->GetWorld());
if (NavSys)
{
if (OwnerActor->IsComponentRelevantForNavigation(&Comp))
{
NavSys->UpdateNavOctreeElement(&Comp, NavElement, FNavigationOctreeController::OctreeUpdate_Default);
}
else
{
NavSys->UnregisterNavOctreeElement(&Comp, NavElement, FNavigationOctreeController::OctreeUpdate_Default);
}
}
}
}
}
else if (Comp.CanEverAffectNavigation())
{
// could have been relevant before and not it isn't. Need to check if there's an octree element ID for it
INavRelevantInterface* NavElement = Cast<INavRelevantInterface>(&Comp);
if (NavElement)
{
AActor* OwnerActor = Comp.GetOwner();
if (OwnerActor)
{
UNavigationSystemV1* NavSys = FNavigationSystem::GetCurrent<UNavigationSystemV1>(OwnerActor->GetWorld());
if (NavSys)
{
NavSys->UnregisterNavOctreeElement(&Comp, NavElement, FNavigationOctreeController::OctreeUpdate_Default);
}
}
}
}
}
对NavigationRelevantData中的每个几何体都会执行GatherNavigationDataGeometry, 并最终会调用到FRecastTileGenerator::AppendGeometry函数,这个函数会真正的执行获取当前几何体的碰撞数据并转化为一个GeometryElement数据加入到当前Tile的几何体数组RawGeometry之中:
void FRecastTileGenerator::AppendGeometry(const FNavigationRelevantData& DataRef, const FCompositeNavModifier& InModifier, const FNavDataPerInstanceTransformDelegate& InTransformsDelegate)
{
const TNavStatArray<uint8>& RawCollisionCache = DataRef.CollisionData;
if (RawCollisionCache.Num() == 0)
{
return;
}
FRecastRawGeometryElement GeometryElement;
// To prevent navmesh generation under the geometry, set the RC_PROJECT_TO_BOTTOM flag to true.
// This rasterize triangles as filled columns down to the HF lower bound.
GeometryElement.RasterizationFlags = InModifier.GetFillCollisionUnderneathForNavmesh() ? RC_PROJECT_TO_BOTTOM : rcRasterizationFlags(0);
FRecastGeometryCache CollisionCache(RawCollisionCache.GetData());
// Gather per instance transforms
if (InTransformsDelegate.IsBound())
{
InTransformsDelegate.Execute(TileBBExpandedForAgent, GeometryElement.PerInstanceTransform);
if (GeometryElement.PerInstanceTransform.Num() == 0)
{
return;
}
}
const int32 NumCoords = CollisionCache.Header.NumVerts * 3;
const int32 NumIndices = CollisionCache.Header.NumFaces * 3;
if (NumIndices > 0)
{
UE_LOG(LogNavigationDataBuild, VeryVerbose, TEXT("%s adding %i vertices from %s."), ANSI_TO_TCHAR(__FUNCTION__), CollisionCache.Header.NumVerts, *GetFullNameSafe(DataRef.GetOwner()));
GeometryElement.GeomCoords.SetNumUninitialized(NumCoords);
GeometryElement.GeomIndices.SetNumUninitialized(NumIndices);
// 复制原来的碰撞体数据到GeometryElement中
FMemory::Memcpy(GeometryElement.GeomCoords.GetData(), CollisionCache.Verts, sizeof(float) * NumCoords);
FMemory::Memcpy(GeometryElement.GeomIndices.GetData(), CollisionCache.Indices, sizeof(int32) * NumIndices);
// 这里的RawGeometry就是当前Tile的Mesh集合
RawGeometry.Add(MoveTemp(GeometryElement));
}
}
这个几何体数组RawGeometry在体素化三角形的时候会被使用到:
void FRecastTileGenerator::RasterizeTriangles(FNavMeshBuildContext& BuildContext, FTileRasterizationContext& RasterContext)
{
// Rasterize geometry
SCOPE_CYCLE_COUNTER(STAT_Navigation_RecastRasterizeTriangles)
for (int32 RawGeomIdx = 0; RawGeomIdx < RawGeometry.Num(); ++RawGeomIdx)
{
const FRecastRawGeometryElement& Element = RawGeometry[RawGeomIdx];
if (Element.PerInstanceTransform.Num() > 0)
{
for (const FTransform& InstanceTransform : Element.PerInstanceTransform)
{
// 如果采取了相对坐标系 则先执行到世界坐标系的变换再调用RasterizeGeometryRecast
RasterizeGeometry(BuildContext, Element.GeomCoords, Element.GeomIndices, InstanceTransform, Element.RasterizationFlags, RasterContext);
}
}
else
{
RasterizeGeometryRecast(BuildContext, Element.GeomCoords, Element.GeomIndices, Element.RasterizationFlags, RasterContext);
}
}
}
上面的RasterizeGeometry其实就是一个对RasterizeGeometryRecast的简单封装,处理了一下有些几何体并没有使用世界坐标系的问题。而RasterizeGeometryRecast则负责调用Recast提供的相关接口来创建高度场数据:
void FRecastTileGenerator::RasterizeGeometryRecast(FNavMeshBuildContext& BuildContext, const TArray<float>& Coords, const TArray<int32>& Indices, const rcRasterizationFlags RasterizationFlags, FTileRasterizationContext& RasterContext)
{
QUICK_SCOPE_CYCLE_COUNTER(STAT_Navigation_RasterizeGeometryRecast);
const int32 NumFaces = Indices.Num() / 3;
const int32 NumVerts = Coords.Num() / 3;
RasterizeGeomRecastTriAreas.AddZeroed(NumFaces);
{
QUICK_SCOPE_CYCLE_COUNTER(STAT_Navigation_MarkWalkableTriangles);
rcMarkWalkableTriangles(&BuildContext, TileConfig.walkableSlopeAngle,
Coords.GetData(), NumVerts, Indices.GetData(), NumFaces,
RasterizeGeomRecastTriAreas.GetData());
}
{
QUICK_SCOPE_CYCLE_COUNTER(STAT_Navigation_RasterizeGeomRecastRasterizeTriangles);
TInlineMaskArray::ElementType* MaskArray = RasterContext.RasterizationMasks.Num() > 0 ? RasterContext.RasterizationMasks.GetData() : nullptr;
rcRasterizeTriangles(&BuildContext,
Coords.GetData(), NumVerts,
Indices.GetData(), RasterizeGeomRecastTriAreas.GetData(), NumFaces,
*RasterContext.SolidHF, TileConfig.walkableClimb, RasterizationFlags, MaskArray);
}
RasterizeGeomRecastTriAreas.Reset();
}
初始化好了高度场数据之后,后续的流程就与原版的RacastNavigation一样了,有需要的读者可以去回顾一下Recast生成NavMesh的相关内容。
UE4的寻路数据使用
UE中客户端控制的玩家的位移都是输入驱动的,只有被AIController控制的Actor才会使用基于NavMesh驱动的位置更新。在AIBlueprintLibrary这个类型上提供了两个用来驱动位置更新的接口:
UFUNCTION(BlueprintCallable, Category = "AI|Navigation")
static void SimpleMoveToActor(AController* Controller, const AActor* Goal);
UFUNCTION(BlueprintCallable, Category = "AI|Navigation")
static void SimpleMoveToLocation(AController* Controller, const FVector& Goal);
SimpleMoveToActor负责移动到另外一个Actor附近,而SimpleMoveToLocation则负责到指定点的移动。这两个接口其实都不负责具体的业务逻辑,只是将相关的请求转发到UPathFollowingComponent上,下面的就是移除了一些异常状况处理的SimpleMoveToLocation核心代码:
void UAIBlueprintHelperLibrary::SimpleMoveToLocation(AController* Controller, const FVector& GoalLocation)
{
UPathFollowingComponent* PFollowComp = InitNavigationControl(*Controller);
const FVector AgentNavLocation = Controller->GetNavAgentLocation();
const ANavigationData* NavData = NavSys->GetNavDataForProps(Controller->GetNavAgentPropertiesRef(), AgentNavLocation);
if (NavData)
{
FPathFindingQuery Query(Controller, *NavData, AgentNavLocation, GoalLocation);
FPathFindingResult Result = NavSys->FindPathSync(Query);
if (Result.IsSuccessful())
{
PFollowComp->RequestMove(FAIMoveRequest(GoalLocation), Result.Path);
}
else if (PFollowComp->GetStatus() != EPathFollowingStatus::Idle)
{
PFollowComp->RequestMoveWithImmediateFinish(EPathFollowingResult::Invalid);
}
}
}
上面的代码中首先以目标位置进行路径查询,如果路径有效则调用UPathFollowingComponent::RequestMove开启一个寻路移动请求FAIMoveRequest。FindPathSync最终会中转到ARecastNavMesh::FindPath上去执行路径查询,最后调用的是DetourNavMeshQuery提供的路径搜索接口:
Result.Result = RecastNavMesh->RecastNavMeshImpl->FindPath(Query.StartLocation, AdjustedEndLocation, Query.CostLimit, *NavMeshPath, *NavFilter, Query.Owner.Get());
所以查询路径这里执行的是一个完整的A*路径搜索,也就是说使用UAIBlueprintHelperLibrary将不会被群体寻路管理器管理,也就没有了分帧驱动路径查询完成的逻辑,可能会造成卡帧。
SimpleMoveToActor的代码与SimpleMoveToLocation基本一致,只有在调用RequestMove的升级后传递的参数有点不一样:
Result.Path->SetGoalActorObservation(*Goal, 100.0f);
PFollowComp->RequestMove(FAIMoveRequest(Goal), Result.Path);
这里的SetGoalActorObservation的第二个参数代表当目标Actor的最新位置与之前记录的位置大于这个值时,尝试去更新之前查询的路径结果。这个距离差值的检查在ANavigationData::TickActor中对所有的趋近寻路统一执行:
void ANavigationData::TickActor(float DeltaTime, enum ELevelTick TickType, FActorTickFunction& ThisTickFunction)
{
Super::TickActor(DeltaTime, TickType, ThisTickFunction);
PurgeUnusedPaths();
INC_DWORD_STAT_BY(STAT_Navigation_ObservedPathsCount, ObservedPaths.Num());
if (NextObservedPathsTickInSeconds >= 0.f)
{
NextObservedPathsTickInSeconds -= DeltaTime;
if (NextObservedPathsTickInSeconds <= 0.f)
{
RepathRequests.Reserve(ObservedPaths.Num());
for (int32 PathIndex = ObservedPaths.Num() - 1; PathIndex >= 0; --PathIndex)
{
if (ObservedPaths[PathIndex].IsValid())
{
FNavPathSharedPtr SharedPath = ObservedPaths[PathIndex].Pin();
FNavigationPath* Path = SharedPath.Get();
// 下面这个接口会检查goal的最新位置与历史记录位置差值是否大于了阈值
EPathObservationResult::Type Result = Path->TickPathObservation();
switch (Result)
{
case EPathObservationResult::NoLongerObserving:
ObservedPaths.RemoveAtSwap(PathIndex, 1, /*bAllowShrinking=*/false);
break;
case EPathObservationResult::NoChange:
// do nothing
break;
case EPathObservationResult::RequestRepath: // 这个分支代表大于了阈值 准备更新之前计算好的路径
RepathRequests.Add(FNavPathRecalculationRequest(SharedPath, ENavPathUpdateType::GoalMoved));
break;
default:
check(false && "unhandled EPathObservationResult::Type in ANavigationData::TickActor");
break;
}
}
else
{
ObservedPaths.RemoveAtSwap(PathIndex, 1, /*bAllowShrinking=*/false);
}
}
if (ObservedPaths.Num() > 0)
{
NextObservedPathsTickInSeconds = ObservedPathsTickInterval;
}
}
}
// 省略一些代码
}
TickActor后面会选取RepathRequests中头部的MaxProcessedRequests个元素进行路径更新操作。这个路径更新会直接重算起点到终点的连通路径,是一个同步调用,其实挺浪费性能的,可以参考dtCrowd中Corridor的目标位置微调来拼接现有的路径,以复用之前计算的部分结果。
算出来到目标点的路径之后再执行UPathFollowingComponent::RequestMove,其内部代码没有什么逻辑,主要是计算路径中离起点位置最近的点是哪一个,要么是第一个点,要么是第二个点:
// determine with path segment should be followed
const uint32 CurrentSegment = DetermineStartingPathPoint(InPath.Get());
SetMoveSegment(CurrentSegment);
那UPathFollowingComponent如何驱动位置更新呢,答案在UPathFollowingComponent::TickComponent中:
void UPathFollowingComponent::TickComponent(float DeltaTime, enum ELevelTick TickType, FActorComponentTickFunction *ThisTickFunction)
{
Super::TickComponent(DeltaTime, TickType, ThisTickFunction);
if (Status == EPathFollowingStatus::Moving)
{
// check finish conditions, update current segment if needed
UpdatePathSegment();
}
if (Status == EPathFollowingStatus::Moving)
{
// follow current path segment
FollowPathSegment(DeltaTime);
}
};
这里的UpdatePathSegment主要逻辑就是检查当前Actor是否已经到达了下一个临时目标点,也就是前面设置好的CurrentSegment。如果到达了这个CurrentSegment且计算好的路径中后面还有若干点,则执行CurrentSegment++。这样保证当前的临时目标点一定是Path[CurrentSegment],这样才能配合后面的FollowPathSegment,这个函数负责以当前Actor朝向临时目标点Path[CurrentSegment]的方向来模拟移动输入,并以这个移动输入来驱动位置更新:
void UPathFollowingComponent::FollowPathSegment(float DeltaTime)
{
if (!Path.IsValid() || MovementComp == nullptr)
{
return;
}
const FVector CurrentLocation = MovementComp->GetActorFeetLocation();
const FVector CurrentTarget = GetCurrentTargetLocation();
// set to false by default, we will set set this back to true if appropriate
bIsDecelerating = false;
// 这个bool代表是否采取有加速度限制的路径跟随
const bool bAccelerationBased = MovementComp->UseAccelerationForPathFollowing();
if (bAccelerationBased)
{
// 计算当前点与临时目标点之间的向量 并单位化
CurrentMoveInput = (CurrentTarget - CurrentLocation).GetSafeNormal();
if (MoveSegmentStartIndex >= DecelerationSegmentIndex) // 快接近目标点的时候要开启减速
{
const FVector PathEnd = Path->GetEndLocation();
const float DistToEndSq = FVector::DistSquared(CurrentLocation, PathEnd);
const bool bShouldDecelerate = DistToEndSq < FMath::Square(CachedBrakingDistance);
if (bShouldDecelerate)
{
bIsDecelerating = true; // 减速开启
const float SpeedPct = FMath::Clamp(FMath::Sqrt(DistToEndSq) / CachedBrakingDistance, 0.0f, 1.0f);
CurrentMoveInput *= SpeedPct;
}
}
PostProcessMove.ExecuteIfBound(this, CurrentMoveInput);
MovementComp->RequestPathMove(CurrentMoveInput); // 将这个向量作为移动输入传递到移动组件
}
else // 否则直接以最大速度向前冲
{
FVector MoveVelocity = (CurrentTarget - CurrentLocation) / DeltaTime;
const int32 LastSegmentStartIndex = Path->GetPathPoints().Num() - 2;
const bool bNotFollowingLastSegment = (MoveSegmentStartIndex < LastSegmentStartIndex);
PostProcessMove.ExecuteIfBound(this, MoveVelocity);
MovementComp->RequestDirectMove(MoveVelocity, bNotFollowingLastSegment);
}
}
虽然这里的MovementComp类型是UNavMovementComponent,但是其提供的RequestDirectMove和RequestPathMove都是非常简单的虚函数:
/** 通过直接设置速度的方式去驱动位移 */
virtual void RequestDirectMove(const FVector& MoveVelocity, bool bForceMaxSpeed);
/**通过模拟输入的方式去驱动位移 */
virtual void RequestPathMove(const FVector& MoveInput);
void UNavMovementComponent::RequestDirectMove(const FVector& MoveVelocity, bool bForceMaxSpeed)
{
Velocity = MoveVelocity;
}
void UNavMovementComponent::RequestPathMove(const FVector& MoveInput)
{
// empty in base class, requires at least PawnMovementComponent for input related operations
}
真正执行移动相关逻辑都在其子类UPawnMovementComponent和UCharacterMovementComponent中:
void UPawnMovementComponent::RequestPathMove(const FVector& MoveInput)
{
if (PawnOwner)
{
PawnOwner->Internal_AddMovementInput(MoveInput); // 真正的模拟了移动输入 与客户端键盘驱动移动一致了
}
}
void UCharacterMovementComponent::RequestDirectMove(const FVector& MoveVelocity, bool bForceMaxSpeed)
{
if (MoveVelocity.SizeSquared() < KINDA_SMALL_NUMBER)
{
return;
}
if (ShouldPerformAirControlForPathFollowing()) // 这里居然有飞行寻路管理
{
const FVector FallVelocity = MoveVelocity.GetClampedToMaxSize(GetMaxSpeed());
PerformAirControlForPathFollowing(FallVelocity, FallVelocity.Z);
return;
}
RequestedVelocity = MoveVelocity;
bHasRequestedVelocity = true;
bRequestedMoveWithMaxSpeed = bForceMaxSpeed;
if (IsMovingOnGround()) // 地面寻路状态则删除高度轴的速度分量
{
RequestedVelocity.Z = 0.0f;
}
}
UE4的群体寻路管理
纵观整个使用NavMesh寻路并驱动位置更新的流程,其核心逻辑就是计算出到目标点的路径,并不断的切换临时目标点去走完整条路径。限制其在地表和避免与其他Actor进行碰撞的部分都由移动组件的物理模拟部分负责,这部分的负担太重了,如果可以使用DetourCrowd则可以减少很多物理上的工作量。因此UE提供了UCrowdFollowingComponent来实现带群体寻路避障功能的寻路。UCrowdFollowingComponent主要通过重写SetMoveSegment这个UPathFollowingComponent提供的接口来将查询好的路径提供给全局的群体寻路管理器,下面是简化后的核心代码实现:
void UCrowdFollowingComponent::SetMoveSegment(int32 SegmentStartIndex)
{
if (!IsCrowdSimulationEnabled()) // 如果没有启用群体寻路 则恢复到父类的实现
{
Super::SetMoveSegment(SegmentStartIndex);
return;
}
FVector CurrentTargetPt = Path->GetPathPoints().Last().Location; // 这个变量存储当前寻路的目标点
FNavMeshPath* NavMeshPath = Path->CastPath<FNavMeshPath>();
UCrowdManager* CrowdManager = UCrowdManager::GetCurrent(GetWorld());
const int32 PathPartSize = 15;
const int32 LastPolyIdx = NavMeshPath->PathCorridor.Num() - 1;
// 下面的操作会选择原来计算的路径的开头15个poly组成的路径当作临时路径 相当于把可能的长路径先截断
int32 PathPartEndIdx = FMath::Min(PathStartIndex + PathPartSize, LastPolyIdx);
bool bFinalPathPart = (PathPartEndIdx == LastPolyIdx);
CrowdAgentMoveDirection = FVector::ZeroVector;
MoveSegmentDirection = FVector::ZeroVector;
CurrentDestination.Set(Path->GetBaseActor(), CurrentTargetPt); //记录最终路径
RecastNavData->GetPolyCenter(NavMeshPath->PathCorridor[PathPartEndIdx], CurrentTargetPt); // 计算截断后的路径的最后一个点
LogPathPartHelper(GetOwner(), NavMeshPath, PathStartIndex, PathPartEndIdx);
UE_VLOG_SEGMENT(GetOwner(), LogCrowdFollowing, Log, MovementComp->GetActorFeetLocation(), CurrentTargetPt, FColor::Red, TEXT("path part"));
UE_VLOG(GetOwner(), LogCrowdFollowing, Log, TEXT("SetMoveSegment, from:%d segments:%d%s"),
PathStartIndex, (PathPartEndIdx - PathStartIndex)+1, bFinalPathPart ? TEXT(" (final)") : TEXT(""));
// 将这个截断后的临时路径提交到群体寻路管理器中
CrowdManager->SetAgentMovePath(this, NavMeshPath, PathStartIndex, PathPartEndIdx, CurrentTargetPt);
}
这里的UCrowdManager其实就是一个对DetourCrowd的简单封装,上面的寻路请求提交接口SetAgentMovePath最终会调用到DetourCrowd::requestMoveTarget上:
bool UCrowdManager::SetAgentMovePath(const UCrowdFollowingComponent* AgentComponent, const FNavMeshPath* Path,
int32 PathSectionStart, int32 PathSectionEnd, const FVector& PathSectionEndLocation) const
{
SCOPE_CYCLE_COUNTER(STAT_AI_Crowd_AgentUpdateTime);
bool bSuccess = false;
#if WITH_RECAST
const FCrowdAgentData* AgentData = ActiveAgents.Find(AgentComponent);
ARecastNavMesh* RecastNavData = Cast<ARecastNavMesh>(MyNavData);
if (AgentData && AgentData->bIsSimulated && AgentData->IsValid() &&
DetourCrowd && RecastNavData &&
Path && (Path->GetPathPoints().Num() > 1) &&
Path->PathCorridor.IsValidIndex(PathSectionStart) && Path->PathCorridor.IsValidIndex(PathSectionEnd))
{
FVector TargetPos = PathSectionEndLocation;
if (PathSectionEnd < (Path->PathCorridor.Num() - 1))
{
RecastNavData->GetPolyCenter(Path->PathCorridor[PathSectionEnd], TargetPos);
}
TArray<dtPolyRef> PathRefs;
for (int32 Idx = PathSectionStart; Idx <= PathSectionEnd; Idx++)
{
PathRefs.Add(Path->PathCorridor[Idx]);
}
const INavigationQueryFilterInterface* NavFilter = Path->GetFilter().IsValid() ? Path->GetFilter()->GetImplementation() : MyNavData->GetDefaultQueryFilterImpl();
const dtQueryFilter* DetourFilter = ((const FRecastQueryFilter*)NavFilter)->GetAsDetourQueryFilter();
DetourCrowd->updateAgentFilter(AgentData->AgentIndex, DetourFilter);
DetourCrowd->updateAgentState(AgentData->AgentIndex, false);
const FVector RcTargetPos = Unreal2RecastPoint(TargetPos);
bSuccess = DetourCrowd->requestMoveTarget(AgentData->AgentIndex, PathRefs.Last(), &RcTargetPos.X);
if (bSuccess)
{
bSuccess = DetourCrowd->setAgentCorridor(AgentData->AgentIndex, PathRefs.GetData(), PathRefs.Num());
}
}
#endif
return bSuccess;
}
由于发起寻路的时候已经通过FindPathSync来算出来了初始的寻路路径,所以上面的代码中会复制传入的FNavMeshPath,以初始化这个dtAgent的Corridor,这样就可以避免再次执行一次非常耗时的寻路计算。
当寻路请求被提交到了UCrowdManager之后,UCrowdManager::Tick会来驱动内部的dtCrowd的更新,更新完成之后会将所有active的Agent的速度设置回对应的Actor上:
void UCrowdManager::Tick(float DeltaTime)
{
// 这里省略执行detourcrowd的所有更新步骤的相关代码
// velocity updates
{
SCOPE_CYCLE_COUNTER(STAT_AI_Crowd_StepMovementTime);
for (auto It = ActiveAgents.CreateIterator(); It; ++It)
{
const FCrowdAgentData& AgentData = It.Value();
if (AgentData.bIsSimulated && AgentData.IsValid())
{
UCrowdFollowingComponent* CrowdComponent = Cast<UCrowdFollowingComponent>(It.Key());
if (CrowdComponent && CrowdComponent->IsCrowdSimulationEnabled())
{
ApplyVelocity(CrowdComponent, AgentData.AgentIndex);
}
}
}
}
}
void UCrowdManager::ApplyVelocity(UCrowdFollowingComponent* AgentComponent, int32 AgentIndex) const
{
const dtCrowdAgent* ag = DetourCrowd->getAgent(AgentIndex);
const dtCrowdAgentAnimation* anims = DetourCrowd->getAgentAnims();
const FVector NewVelocity = Recast2UnrealPoint(ag->nvel);
const float* RcDestCorner = anims[AgentIndex].active ? anims[AgentIndex].endPos :
ag->ncorners ? &ag->cornerVerts[0] : &ag->npos[0];
const bool bIsNearEndOfPath = (ag->ncorners == 1) && ((ag->cornerFlags[0] & DT_STRAIGHTPATH_OFFMESH_CONNECTION) == 0);
const FVector DestPathCorner = Recast2UnrealPoint(RcDestCorner);
AgentComponent->ApplyCrowdAgentVelocity(NewVelocity, DestPathCorner, anims[AgentIndex].active != 0, bIsNearEndOfPath);
if (bResolveCollisions)
{
const FVector NewPosition = Recast2UnrealPoint(ag->npos);
AgentComponent->ApplyCrowdAgentPosition(NewPosition);
}
}
ApplyVelocity这个函数负责获取dtCrowdAgent计算出来的速度nvel通过ApplyCrowdAgentVelocity接口设置回移动组件。这个ApplyCrowdAgentVelocity的实现与之前分析过的UPathFollowingComponent::FollowPathSegment逻辑类似,都是将计算好的速度通过移动组件的RequestPathMove或者RequestDirectMove接口来驱动移动组件的内部位置更新逻辑:
void UCrowdFollowingComponent::ApplyCrowdAgentVelocity(const FVector& NewVelocity, const FVector& DestPathCorner, bool bTraversingLink, bool bIsNearEndOfPath)
{
bCanCheckMovingTooFar = !bTraversingLink && bIsNearEndOfPath;
if (IsCrowdSimulationEnabled() && Status == EPathFollowingStatus::Moving && MovementComp)
{
const bool bIsNotFalling = (MovementComp == nullptr || !MovementComp->IsFalling());
if (bAffectFallingVelocity || bIsNotFalling)
{
UpdateCachedDirections(NewVelocity, DestPathCorner, bTraversingLink);
const bool bAccelerationBased = MovementComp->UseAccelerationForPathFollowing();
if (bAccelerationBased)
{
const float MaxSpeed = GetCrowdAgentMaxSpeed();
const float NewSpeed = NewVelocity.Size();
const float SpeedPct = FMath::Clamp(NewSpeed / MaxSpeed, 0.0f, 1.0f);
const FVector MoveInput = FMath::IsNearlyZero(NewSpeed) ? FVector::ZeroVector : ((NewVelocity / NewSpeed) * SpeedPct);
MovementComp->RequestPathMove(MoveInput);
}
else
{
MovementComp->RequestDirectMove(NewVelocity, false);
}
}
}
// call deprecated function in case someone is overriding it
ApplyCrowdAgentVelocity(NewVelocity, DestPathCorner, bTraversingLink);
}
ApplyVelocity末尾有个特殊的逻辑,这里会判断bResolveCollision,如果这个选项被开启了,则代表外部的移动组件不再处理Pawn之间的移动碰撞问题,直接使用detourcrowd更新后的最新位置调用ApplyCrowdAgentPosition来强制设置寻路发起者的位置。现在我们来看看这个函数的具体实现:
void UCrowdFollowingComponent::ApplyCrowdAgentPosition(const FVector& NewPosition)
{
// base implementation does nothing
}
居然是空函数耶!说明detourcrowd计算出来的位置其实是完全被忽略的,毕竟detourcrowd只需要考虑避障就行了,而移动组件需要考虑的东西就太多了。 由于Actor上的最新位置最终是由移动组件确定的,这个位置与dtCrowdAgent::npos肯定是有差异的,当两者差异累积到一定值时detourcrowd计算出来的速度可能就完全错了。所以需要一个机制定期的将最新的ActorLocation更新到DetourCrowd中,这个就是UCrowdManager::PrepareAgentStep接口:
void UCrowdManager::PrepareAgentStep(const ICrowdAgentInterface* Agent, FCrowdAgentData& AgentData, float DeltaTime) const
{
dtCrowdAgent* ag = (dtCrowdAgent*)DetourCrowd->getAgent(AgentData.AgentIndex);
ag->params.maxSpeed = Agent->GetCrowdAgentMaxSpeed();
FVector RcLocation = Unreal2RecastPoint(Agent->GetCrowdAgentLocation());
FVector RcVelocity = Unreal2RecastPoint(Agent->GetCrowdAgentVelocity());
dtVcopy(ag->npos, &RcLocation.X);
dtVcopy(ag->vel, &RcVelocity.X);
if (AgentData.bWantsPathOptimization)
{
AgentData.PathOptRemainingTime -= DeltaTime;
if (AgentData.PathOptRemainingTime > 0)
{
ag->params.updateFlags &= ~DT_CROWD_OPTIMIZE_VIS;
}
else
{
ag->params.updateFlags |= DT_CROWD_OPTIMIZE_VIS;
AgentData.PathOptRemainingTime = PathOptimizationInterval;
}
}
}
这个函数在detourcrowd执行更新之前,通过dtVcopy将当前Actor的最新位置和最新速度更新到ag->npos和ag->vel中,用来执行位置和速度修正。修正完成之后才执行detourcrowd的更新,这样就保证了dtCrowdAgent的状态永远与对应的Actor同步。
使用RVO执行碰撞避免
基于DetourCrowd实现的碰撞避免在实践中的效果经常无法令人满意,特别是大规模聚集的时候这种完全基于斥力的碰撞避免会消耗很大的CPU时间,同时经常出现互相阻塞卡住的问题,我甚至遇到过两个Agent面对面移动互不相让导致的卡死问题。在相关的论文中也提到了这种完全基于斥力的碰撞避免系统可能出现的死锁现象:
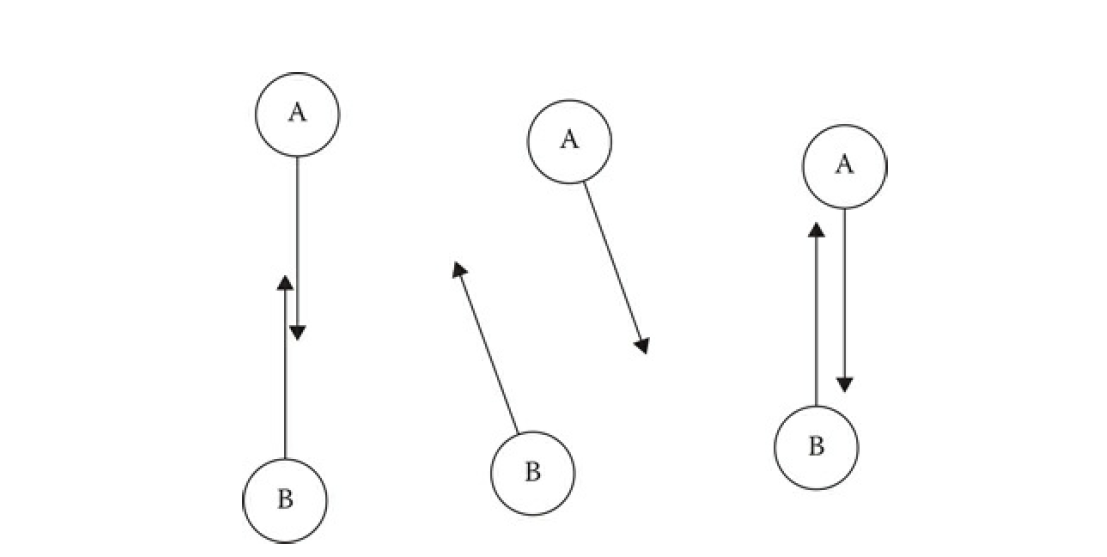
上图中就展示了死锁的现象,初始状态为图中的左侧,两个Agent正对着移动,在一个update之后计算出来两者应该选择一个避让速度,从而变化成为了上图中间,但是在下一次update的时候这两个agent发现当前速度下不会发生碰撞,因此又把速度调整为了刚开始的方向,就是上图右侧,此时又进入了初始状态,只有位移有一点点改变。
UE也发现了DetourCrowd在效率和效果上的不足之处,因此UE在UCharacterMovementComponent之上提供了另外的一种碰撞避免机制,相对速度障碍物算法(Reciprocal Velocity Obstacles,即RVO。在UE的官方文档在寻路系统中使用避障机制中有一个非常简单但是效果明显的对比测试,体现出了RVO在碰撞避免上的优越性。不过这里我们将不去讨论UE的RVO代码实现,因为他提供的实现比较简单,而且还会出现避障时被挤出寻路网格表面的情况。所以这里我们来详细的介绍一下有论文支撑的碰撞避免开源库RVO2,这个库实现了论文中提出的最优相对速度障碍法(Optimal Reciprocal Collision Avoidance简称ORCA)。这个ORCA算法能获取Optimal这个前缀自然是有实力的,因为他的内部实现会将多个Agent的碰撞避免进行协调,而不是DetourCrowd的基于斥力的各自独立避让。下面我们来结合ORCA的论文来深度的分析一下RVO2的实现,并讨论一下如何对其进行修改以避免冲出NavMesh的边界。
速度障碍物
了解ORCA前我们需要了解一个前置概念,什么叫速度障碍Velocity Obstacle。在二维平面中参与避障的Agent有两个基本的描述参数(P,R),P代表Agent的位置,而R代表这个Agent的碰撞半径。假设平面中存在两个Agent, 以(Pa, Ra)和(Pb, Rb)进行描述:
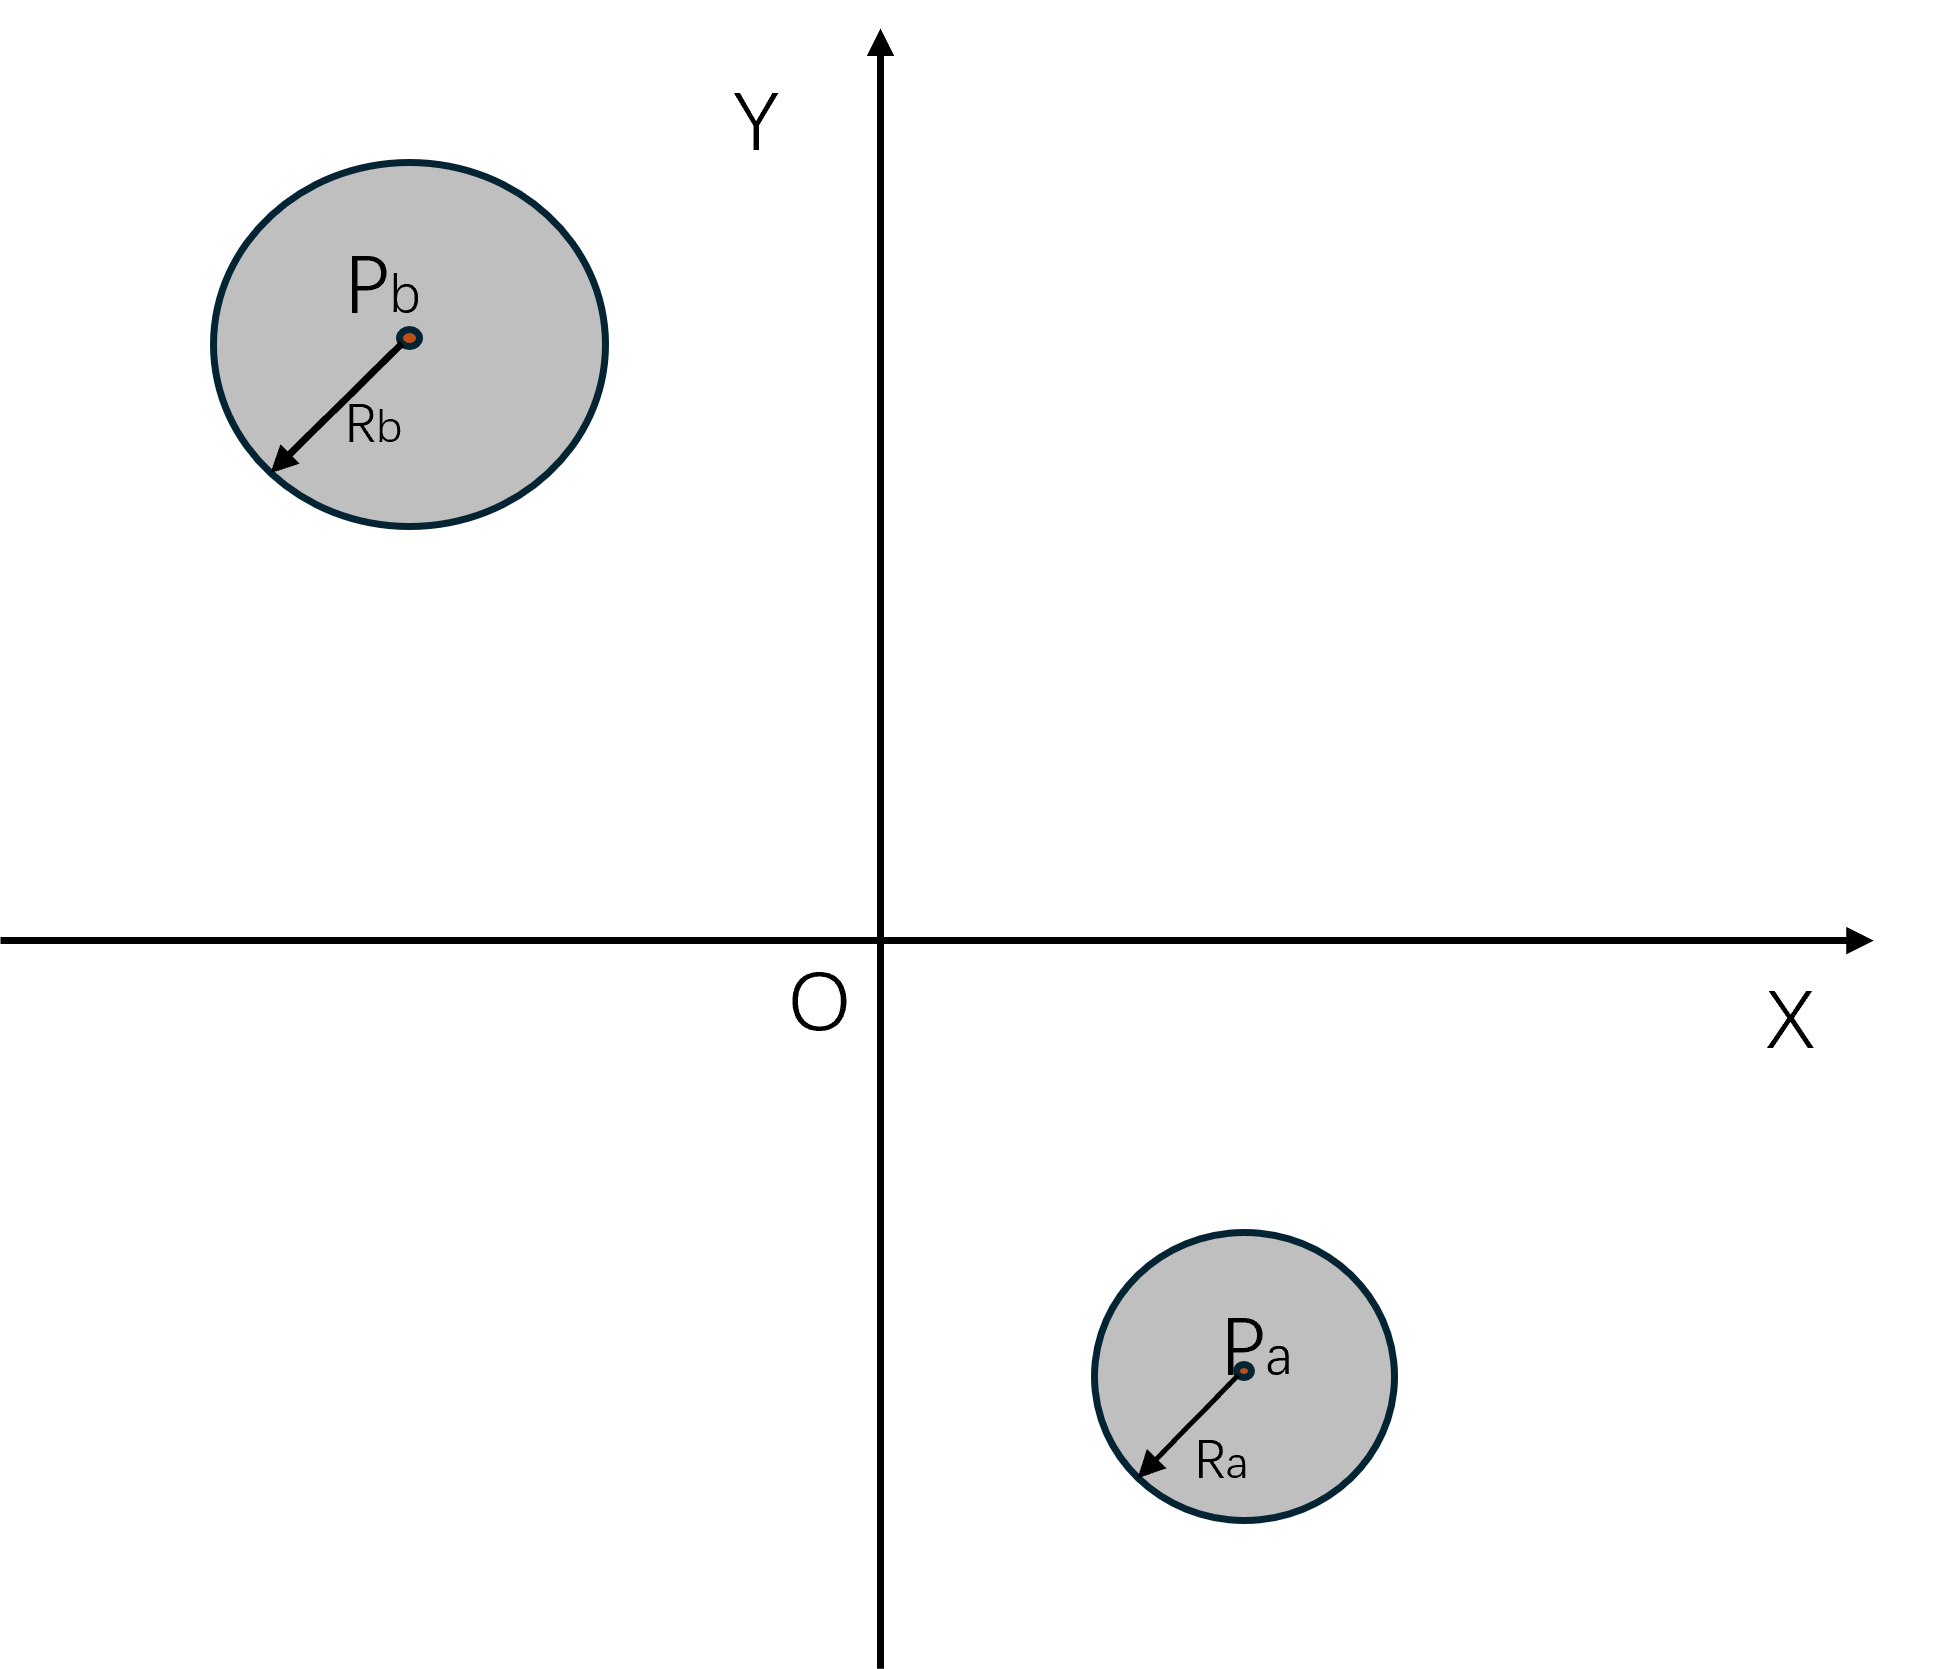
此时B的速度为0,我们来考虑A应该选取什么速度来避免在后续的匀速移动中遇到B。由于坐标系的平移对于速度来说是没有任何影响的,所以我们可以把Pa的位置设置为坐标系的圆心,这样作图更美观一些,此时B的坐标变成了Pb-Pa,但是半径不变:
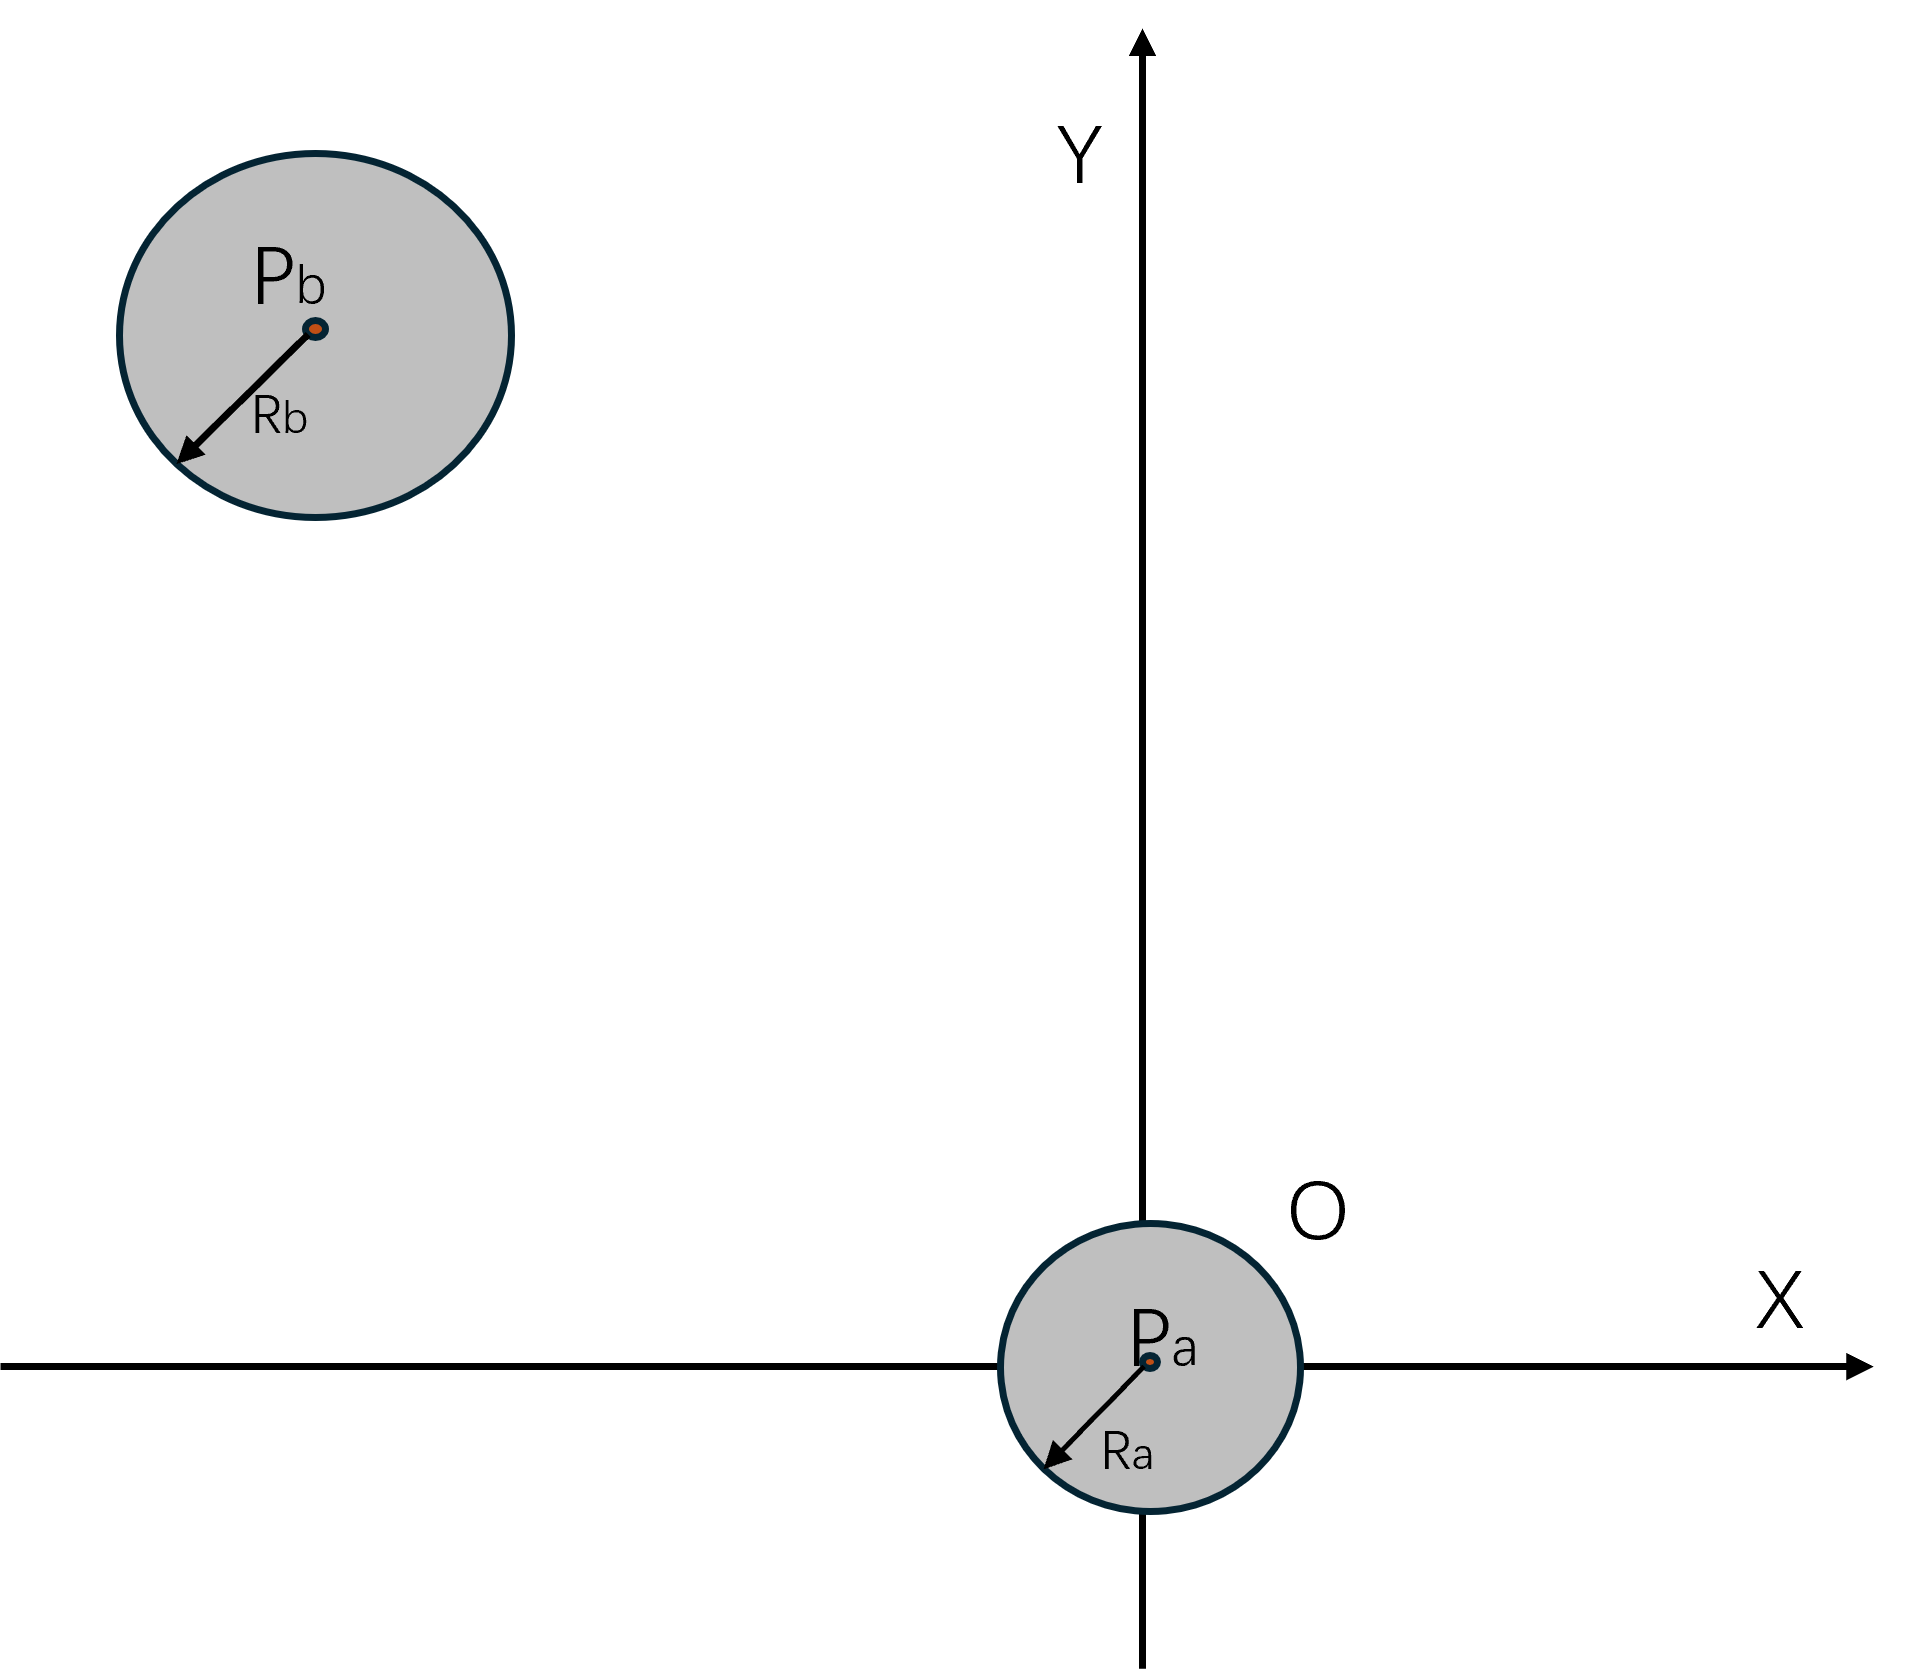
我们在上面的这张图中寻找两个可以使得A刚好与B相切的速度,相切时A的位置分别为C和D:
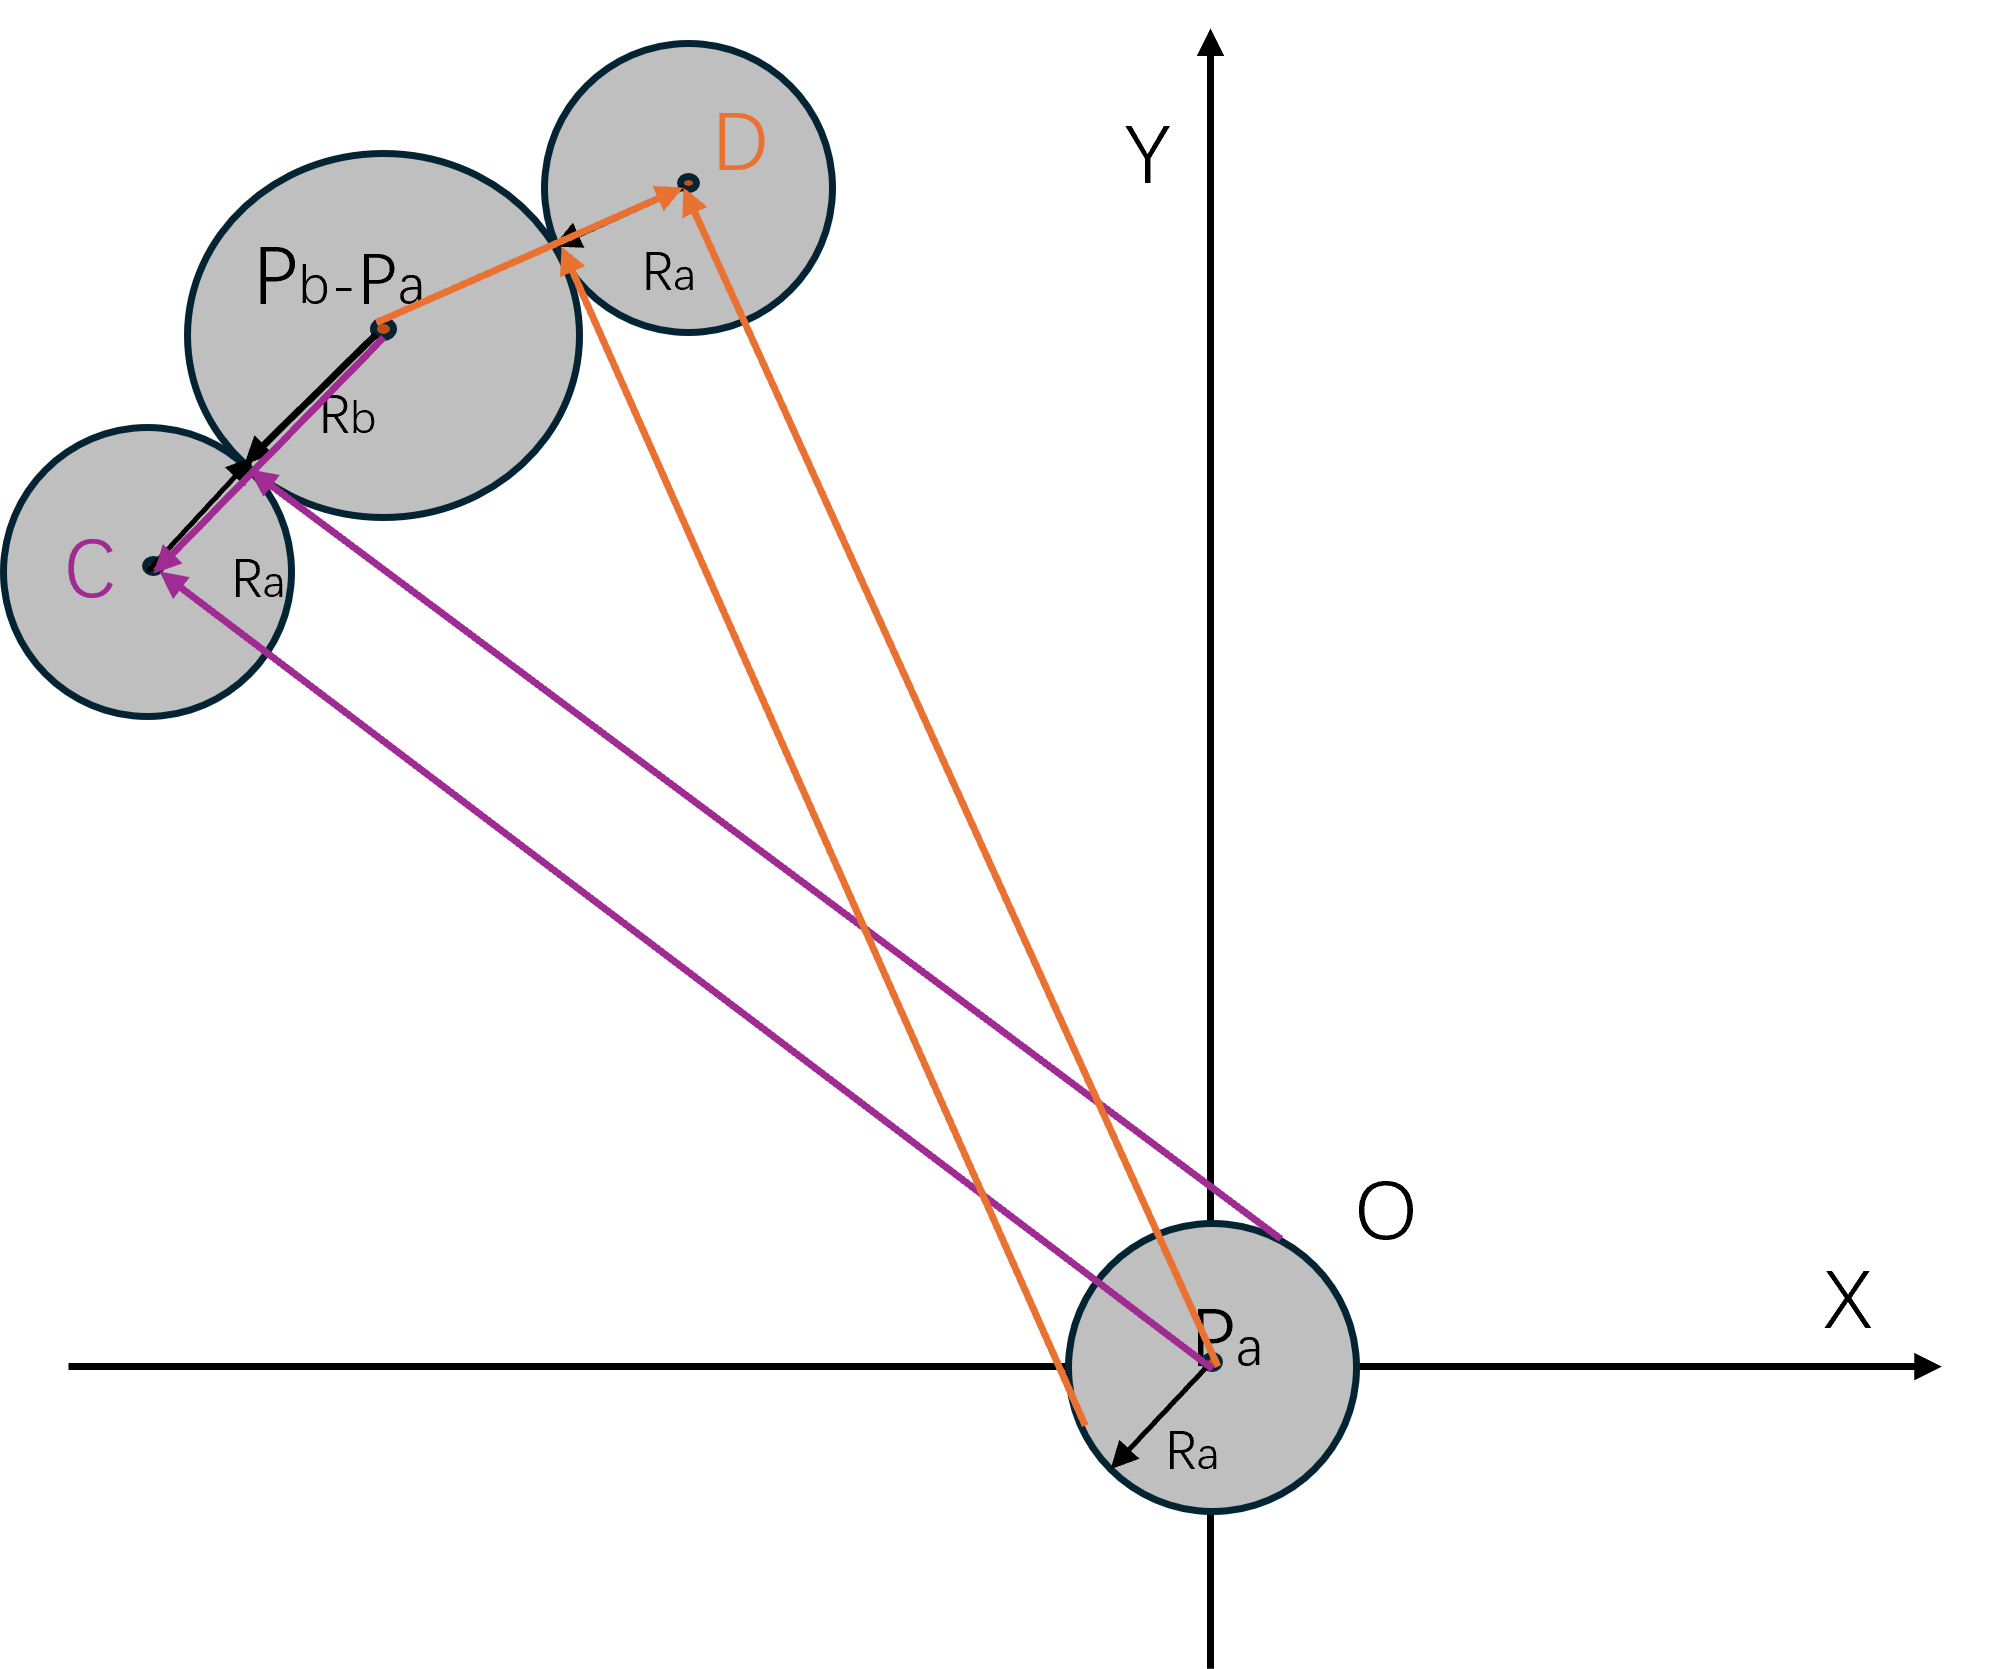
AC向量和AD向量分别代表了相切时的A的速度方向。由于圆的切线性质可知,BC和BD的长度都等于Ra+Rb,BC与AC垂直,且BD与AD垂直。
所以两个带半径的Agent的避障速度选择可以简化为一个质点与一个指定圆的避障速度选择,这个指定圆的半径为原始的两个Agent的半径之和。
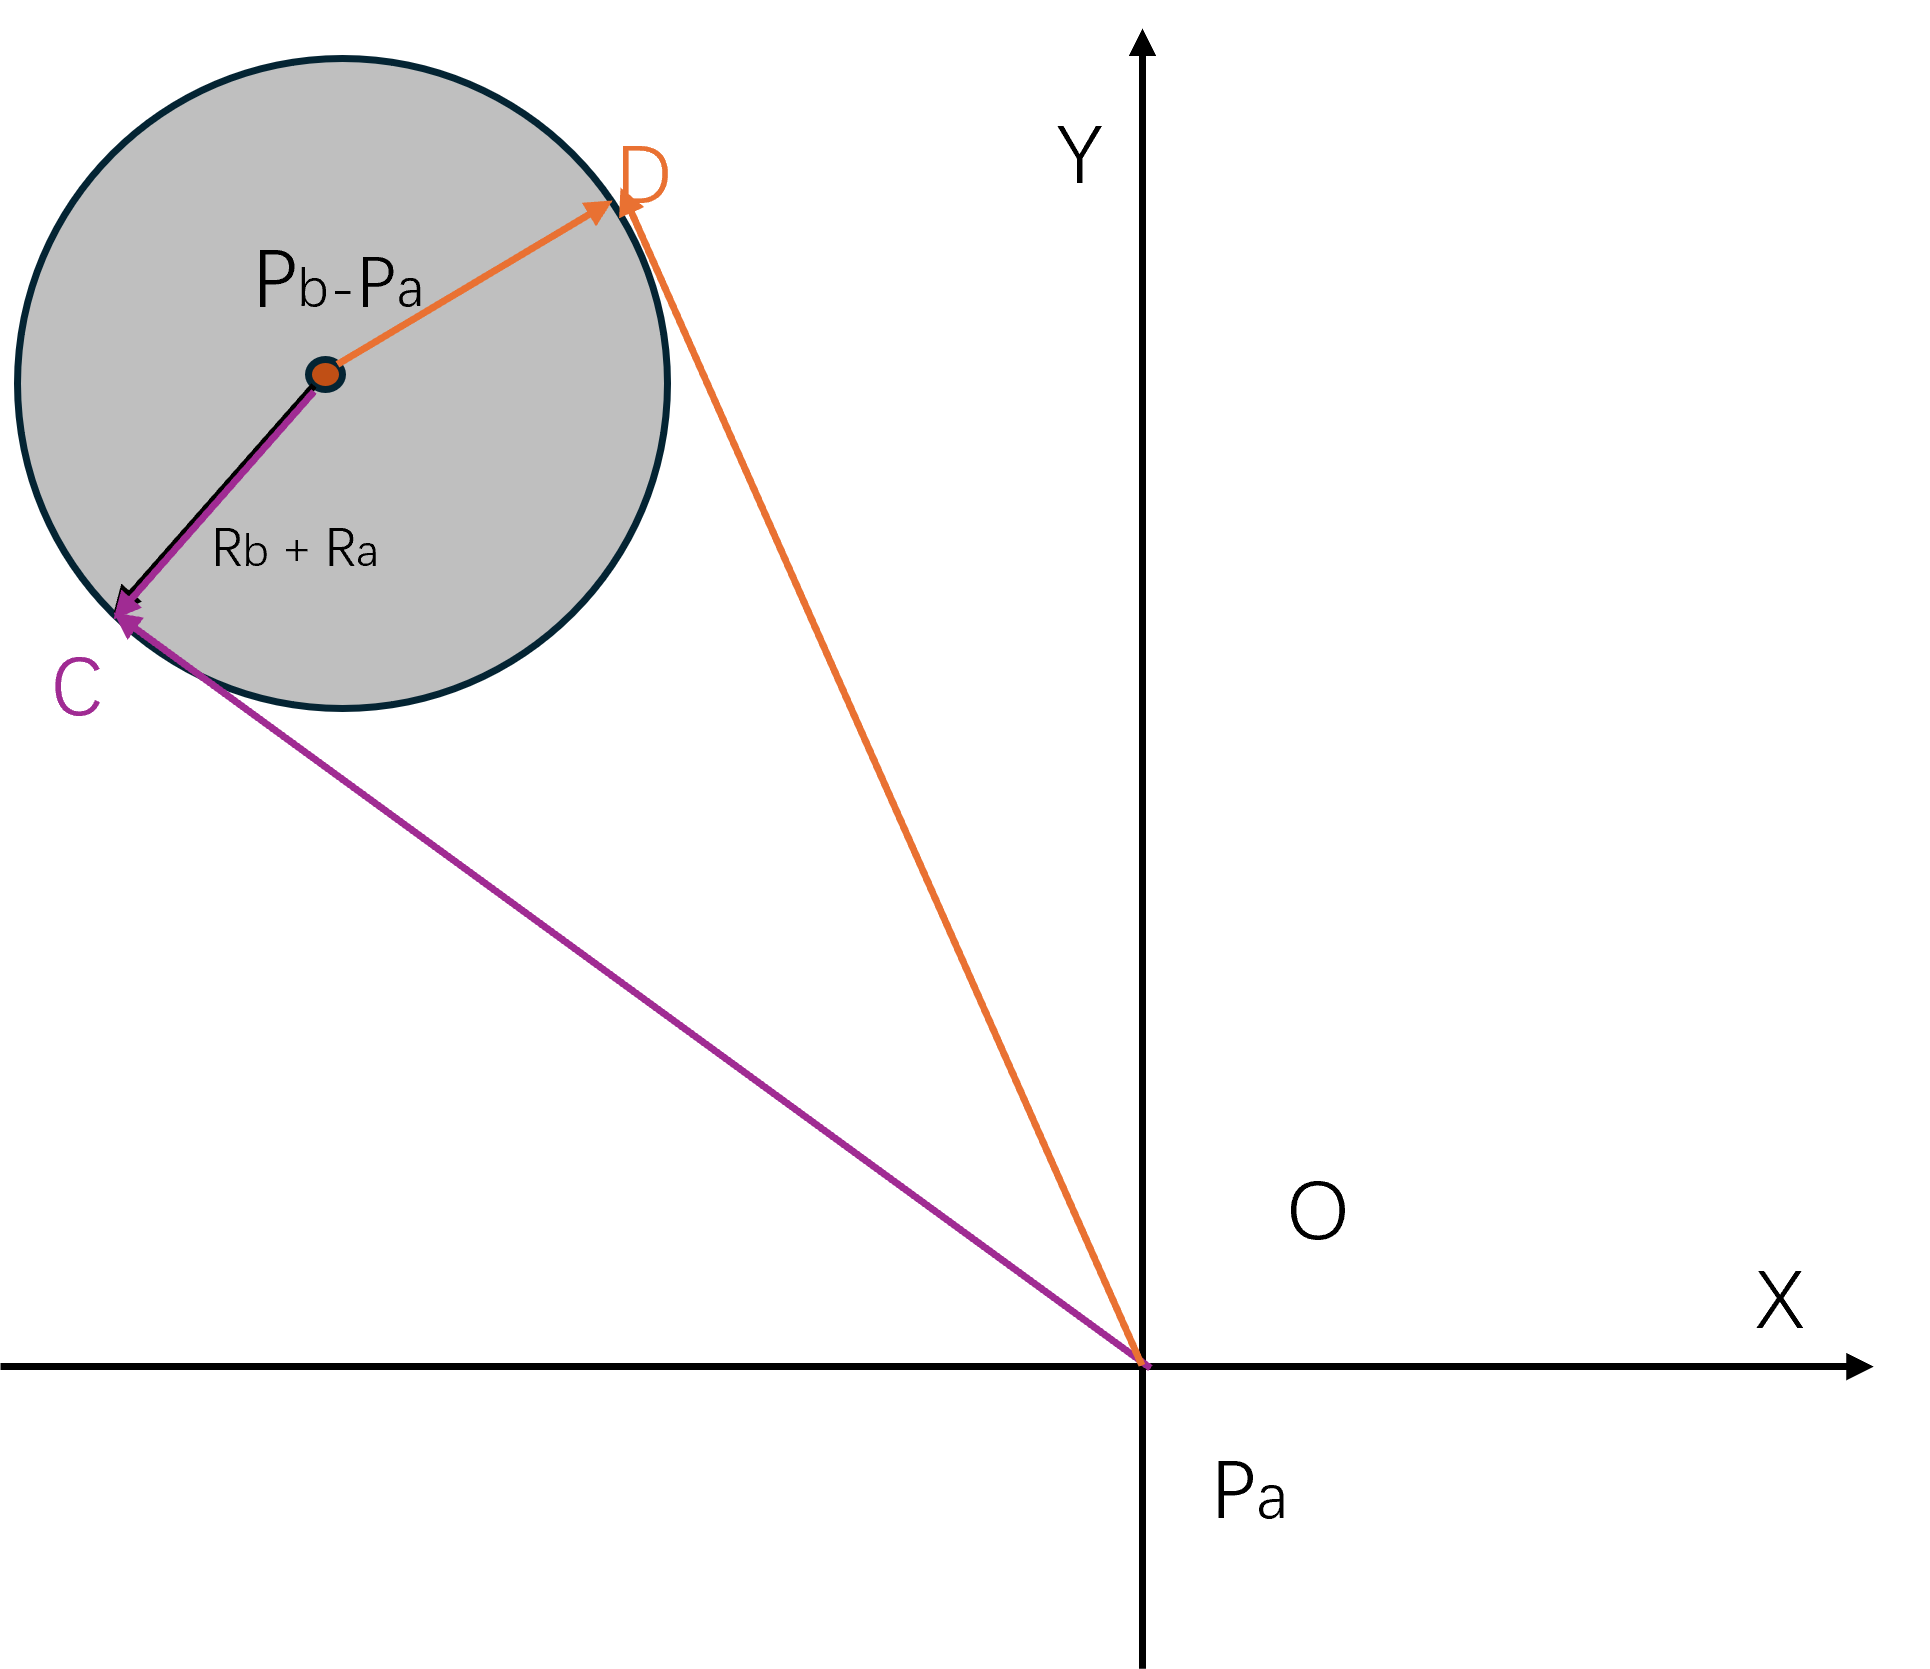
此时可以看出如果A的移动速度处于由AC和AD两个涉嫌组成的锥形Cone内时,其移动轨迹最终一定会与B相交,这个会触发A与B相交的速度选择区域就叫做A相对于B的速度障碍Velocity Obstacle, 简称为。
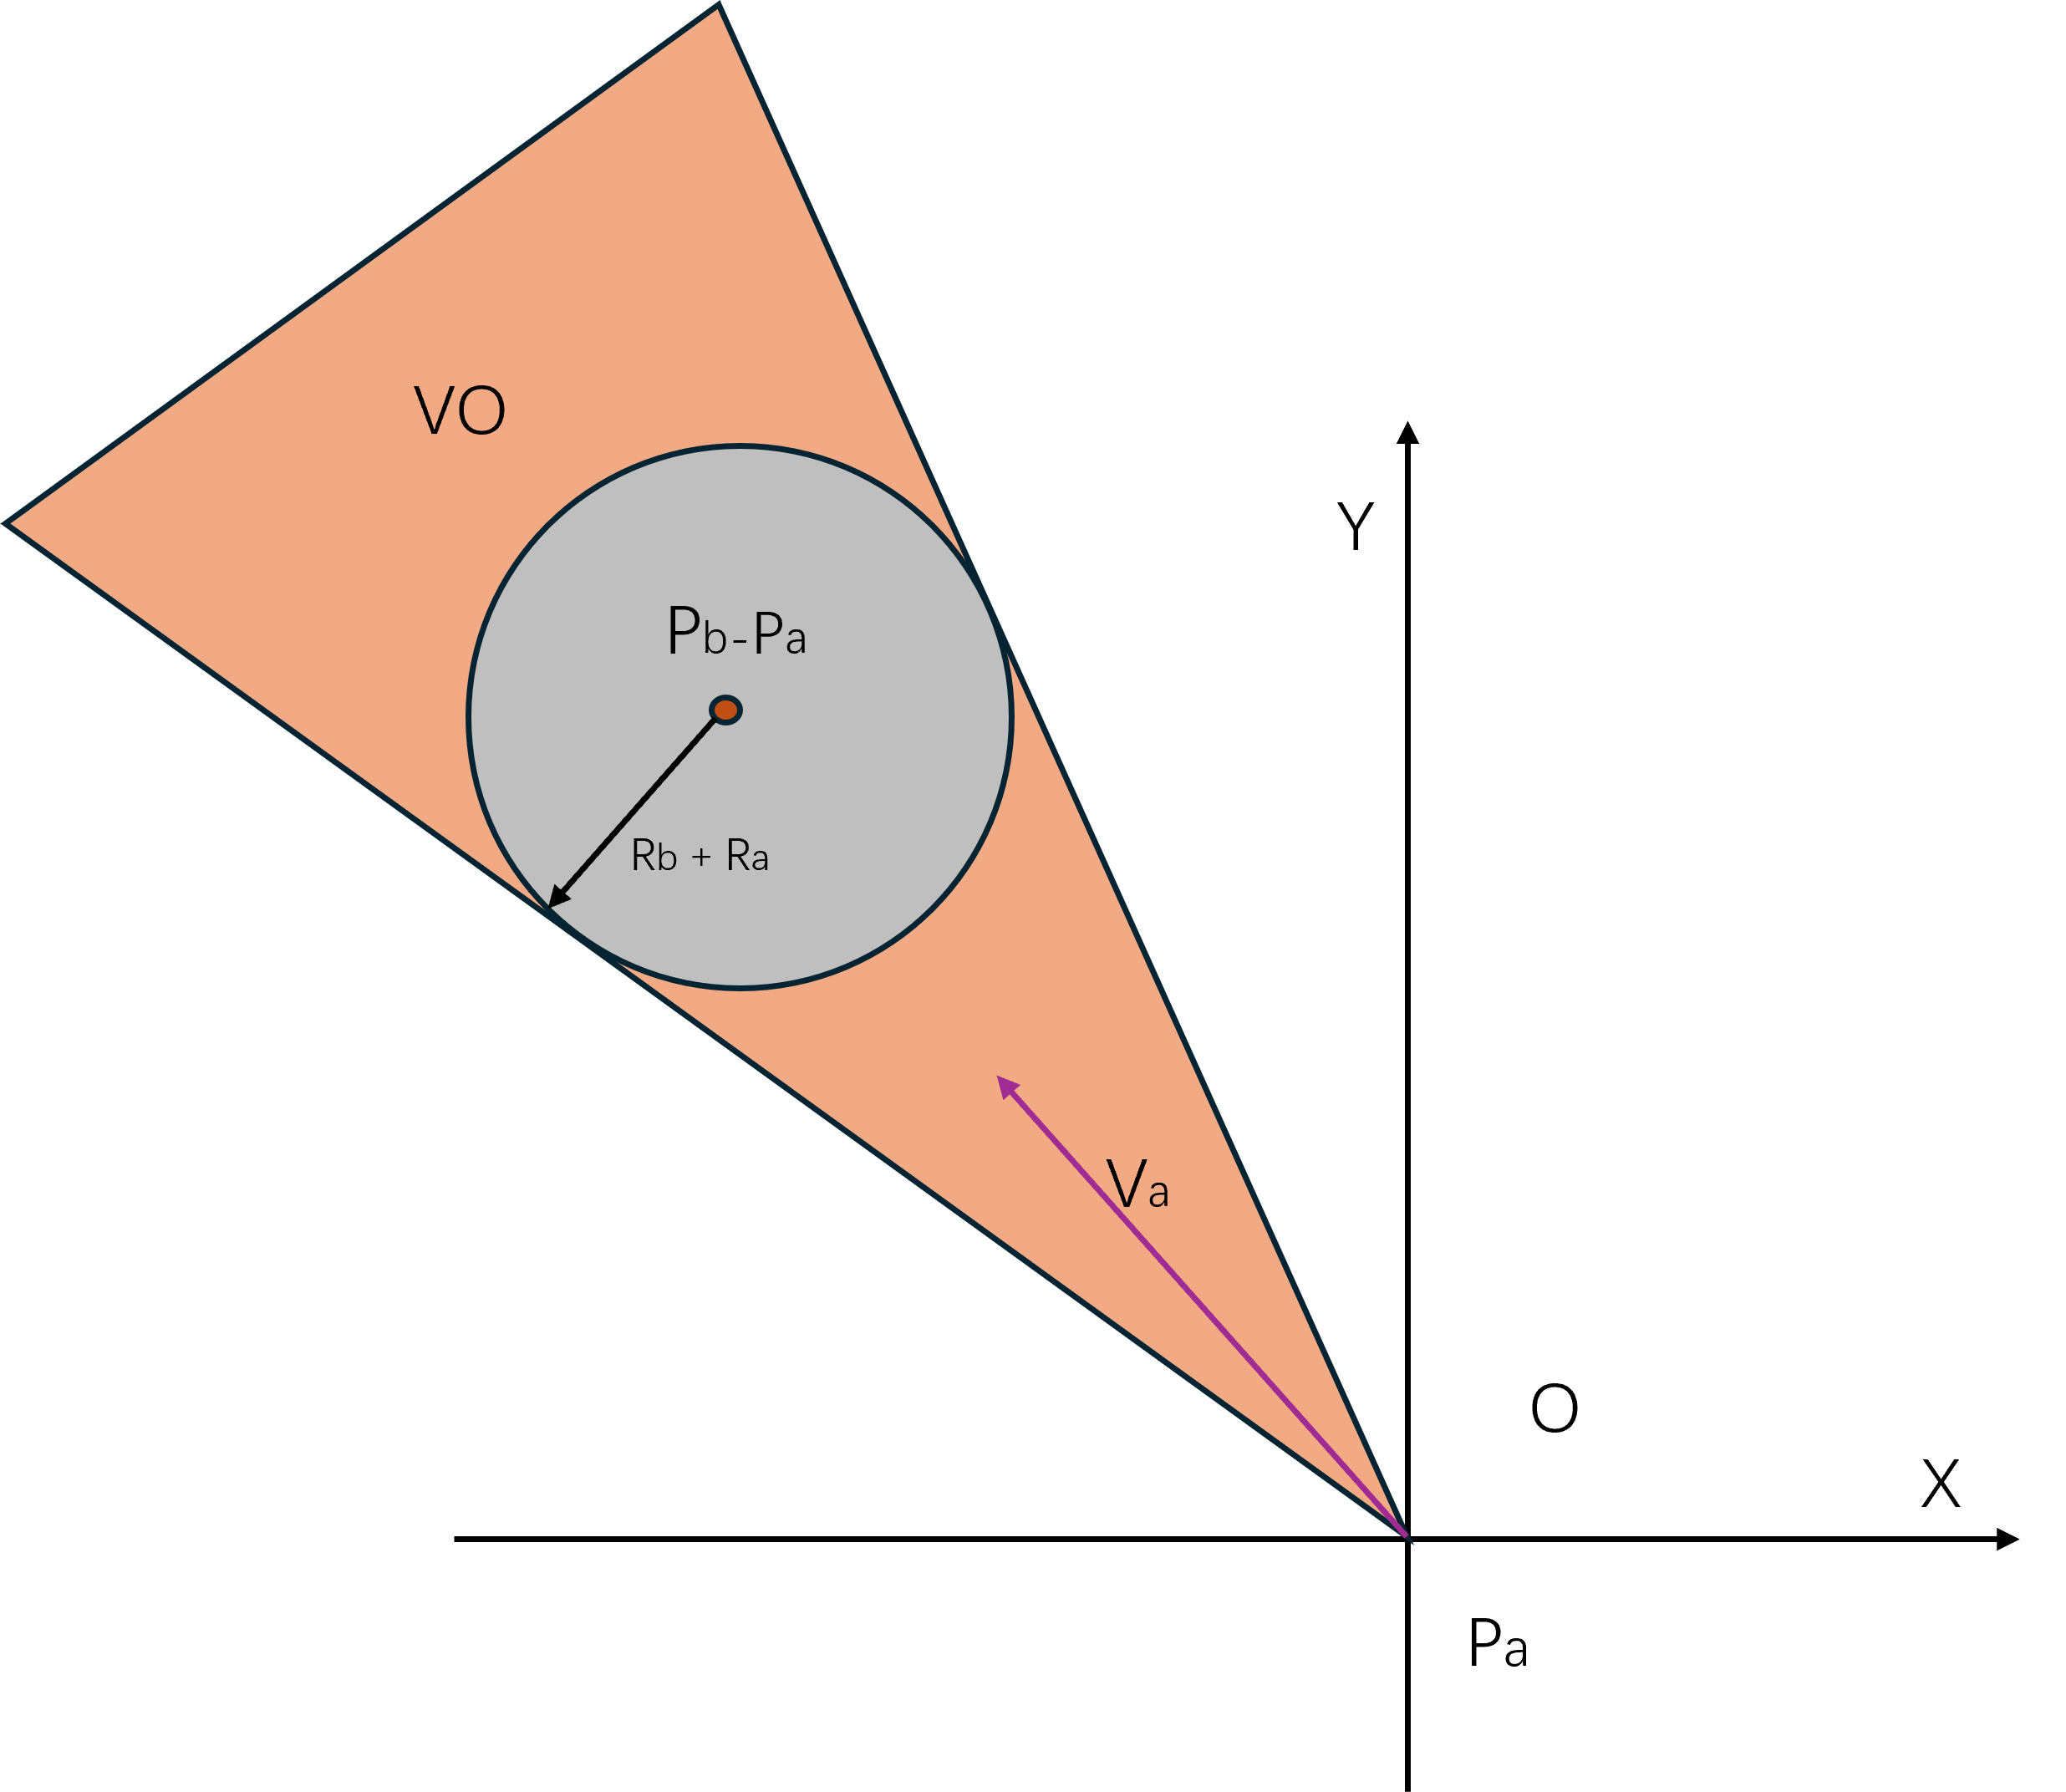
上图中的橙黄色区域就是,对于任意一个不在内的点F,若A采取这个点F作为移动速度,则A一定不会与B相交。
前面讨论的都是B处于静止的情形,如果B有移动速度Vb,则此时的只需要将静止的加一个坐标偏移Vb即可,也就是从下图中的黄色区域VO1移动到了下图中的绿色区域VO2。
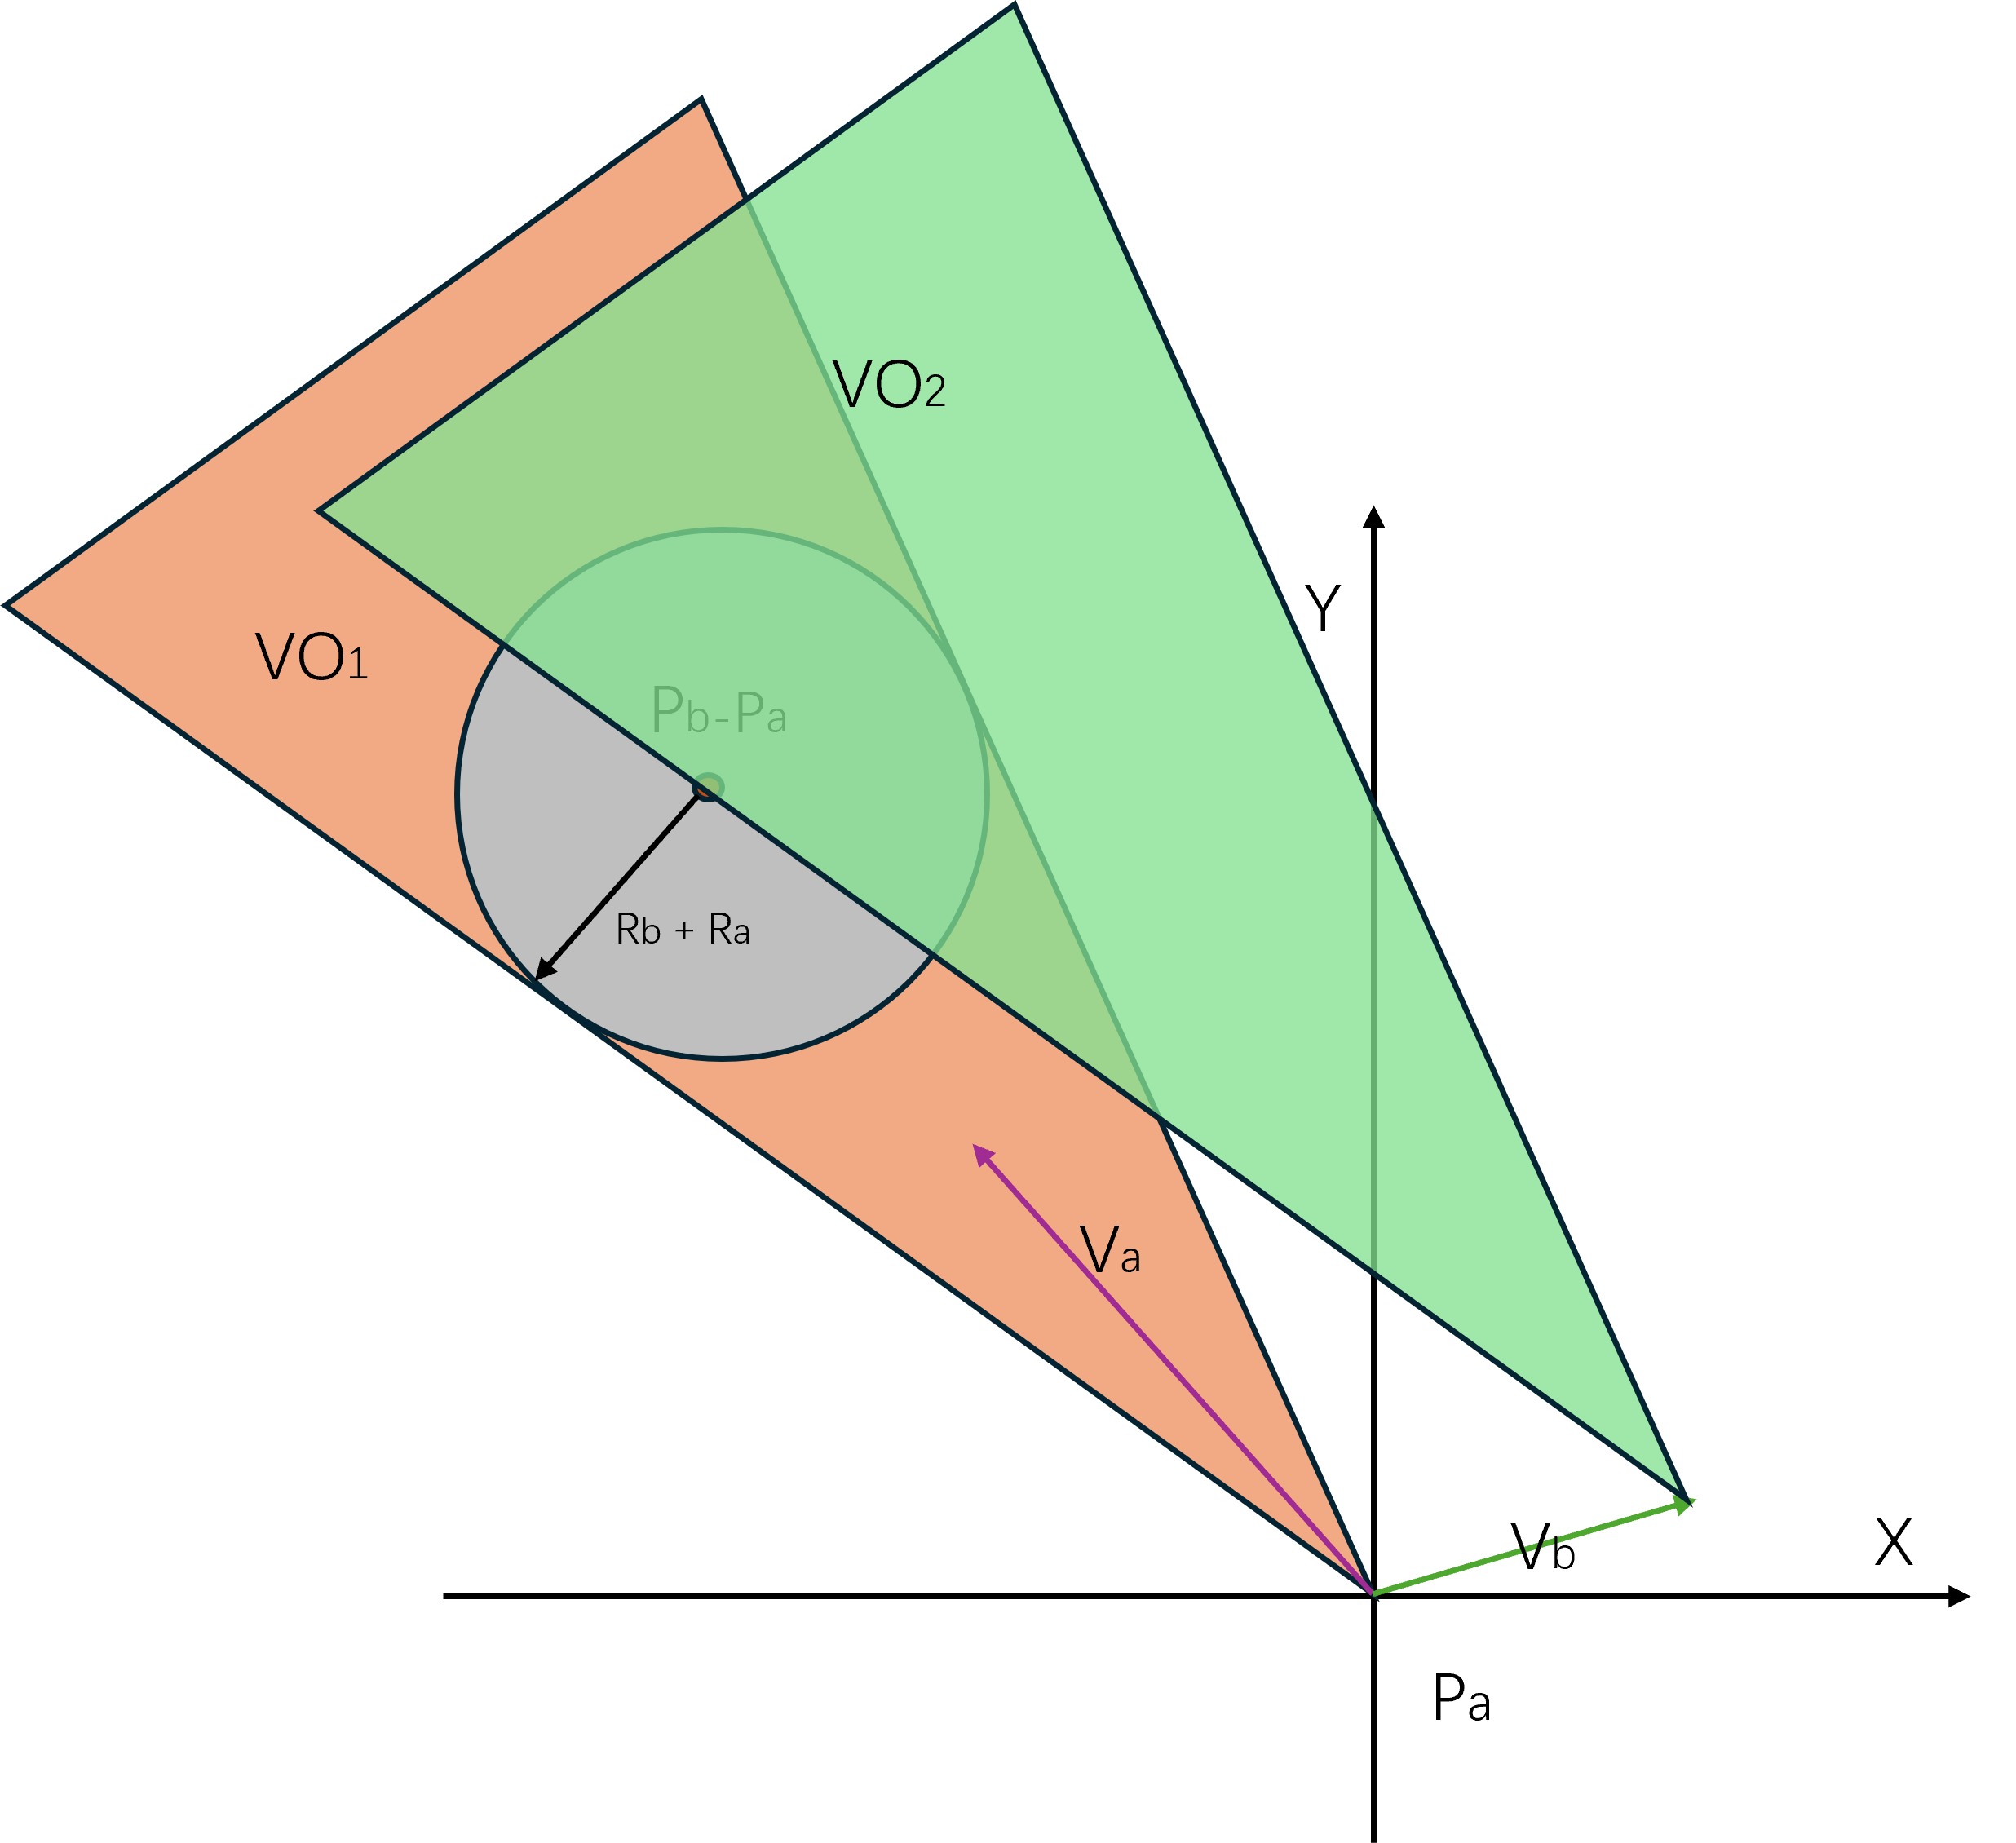
在实际的场景模拟中所有Agent的速度都是动态变动中的,所以以某一个时刻的状态去计算一个永远不与其他Agent相碰撞的速度是没有意义,而且很多时候是不可行的。就以我们人类自身的移动来说,只会规划将来很短的一段时间内与周围的人群进行碰撞避免。所以实际的世界模拟设置中,计算的是Agent在时间t内会与周围的Agent相交的速度。此时我们需要对B的形状和位置都除以t,构造出新的:
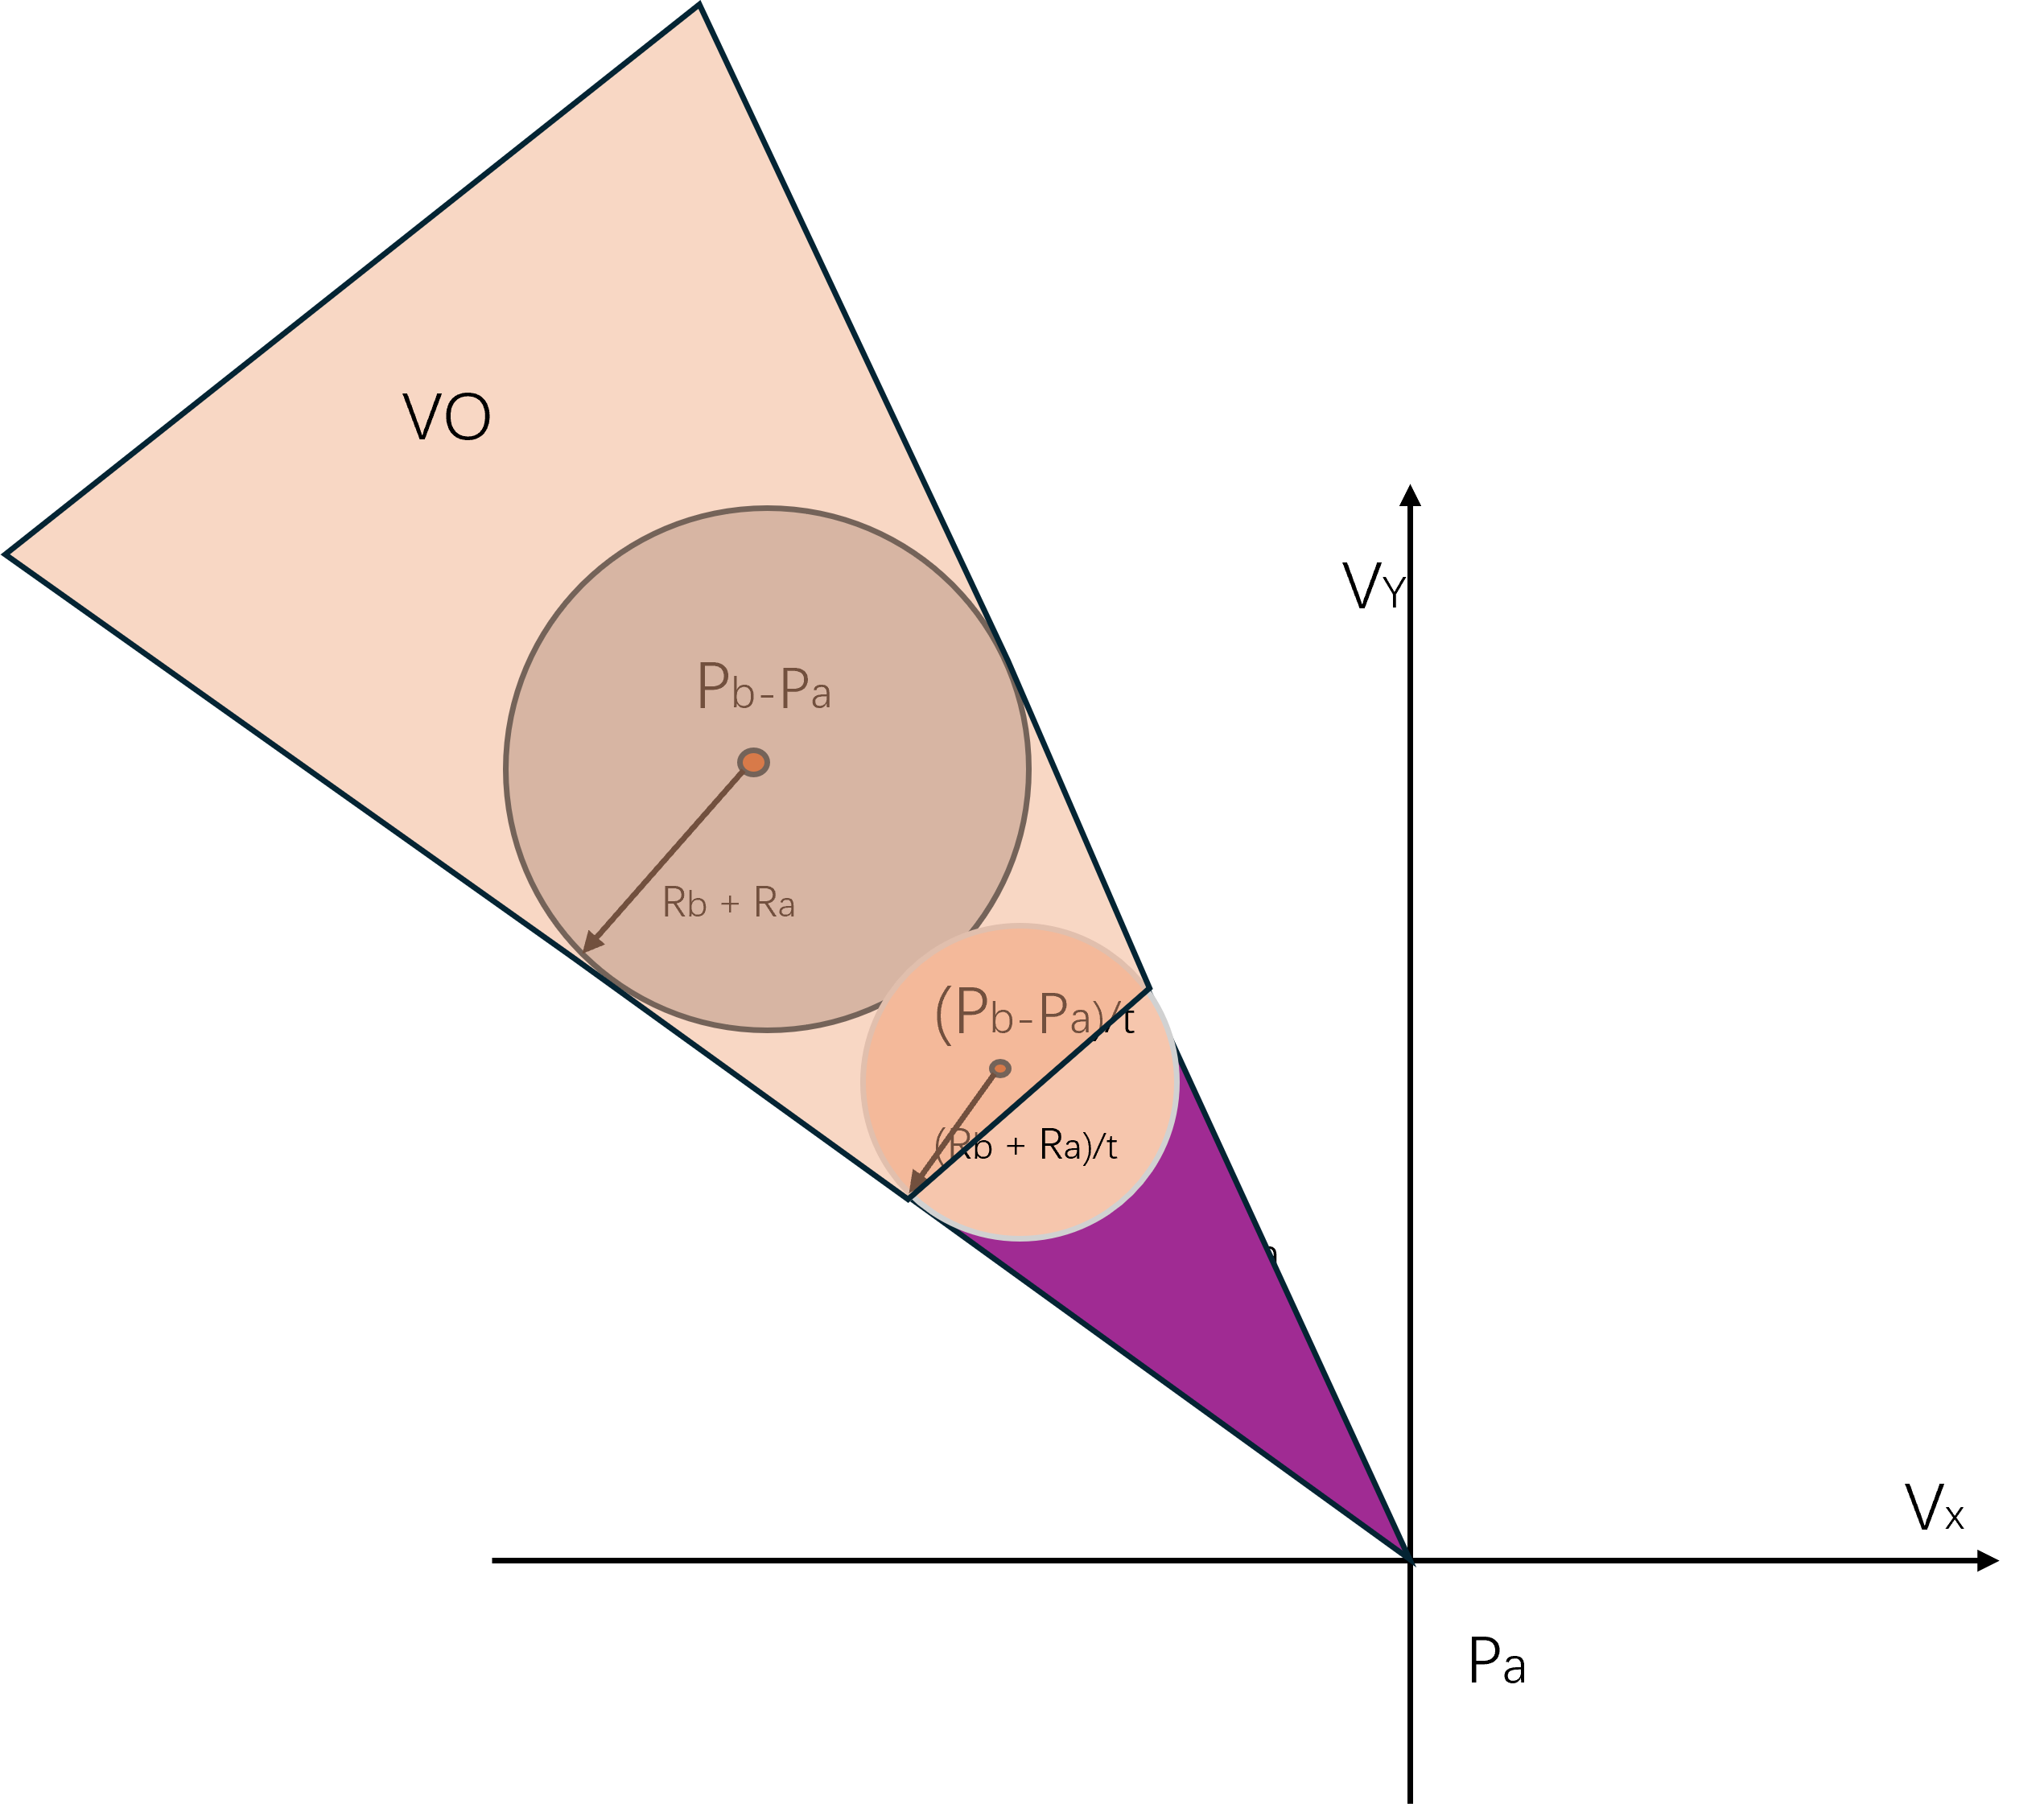
其实可以看出新的与老的是同样的形状,但是需要剔除掉时间t内不会引发碰撞的速度,即上图中的紫色区域。这个带时间t限制的我们用符号来表示,他的形状是一个圆角的锥形。根据定义可知与在平面上关于原点对称。
如果B有移动速度Vb,则也需要加上这个移动速度Vb:
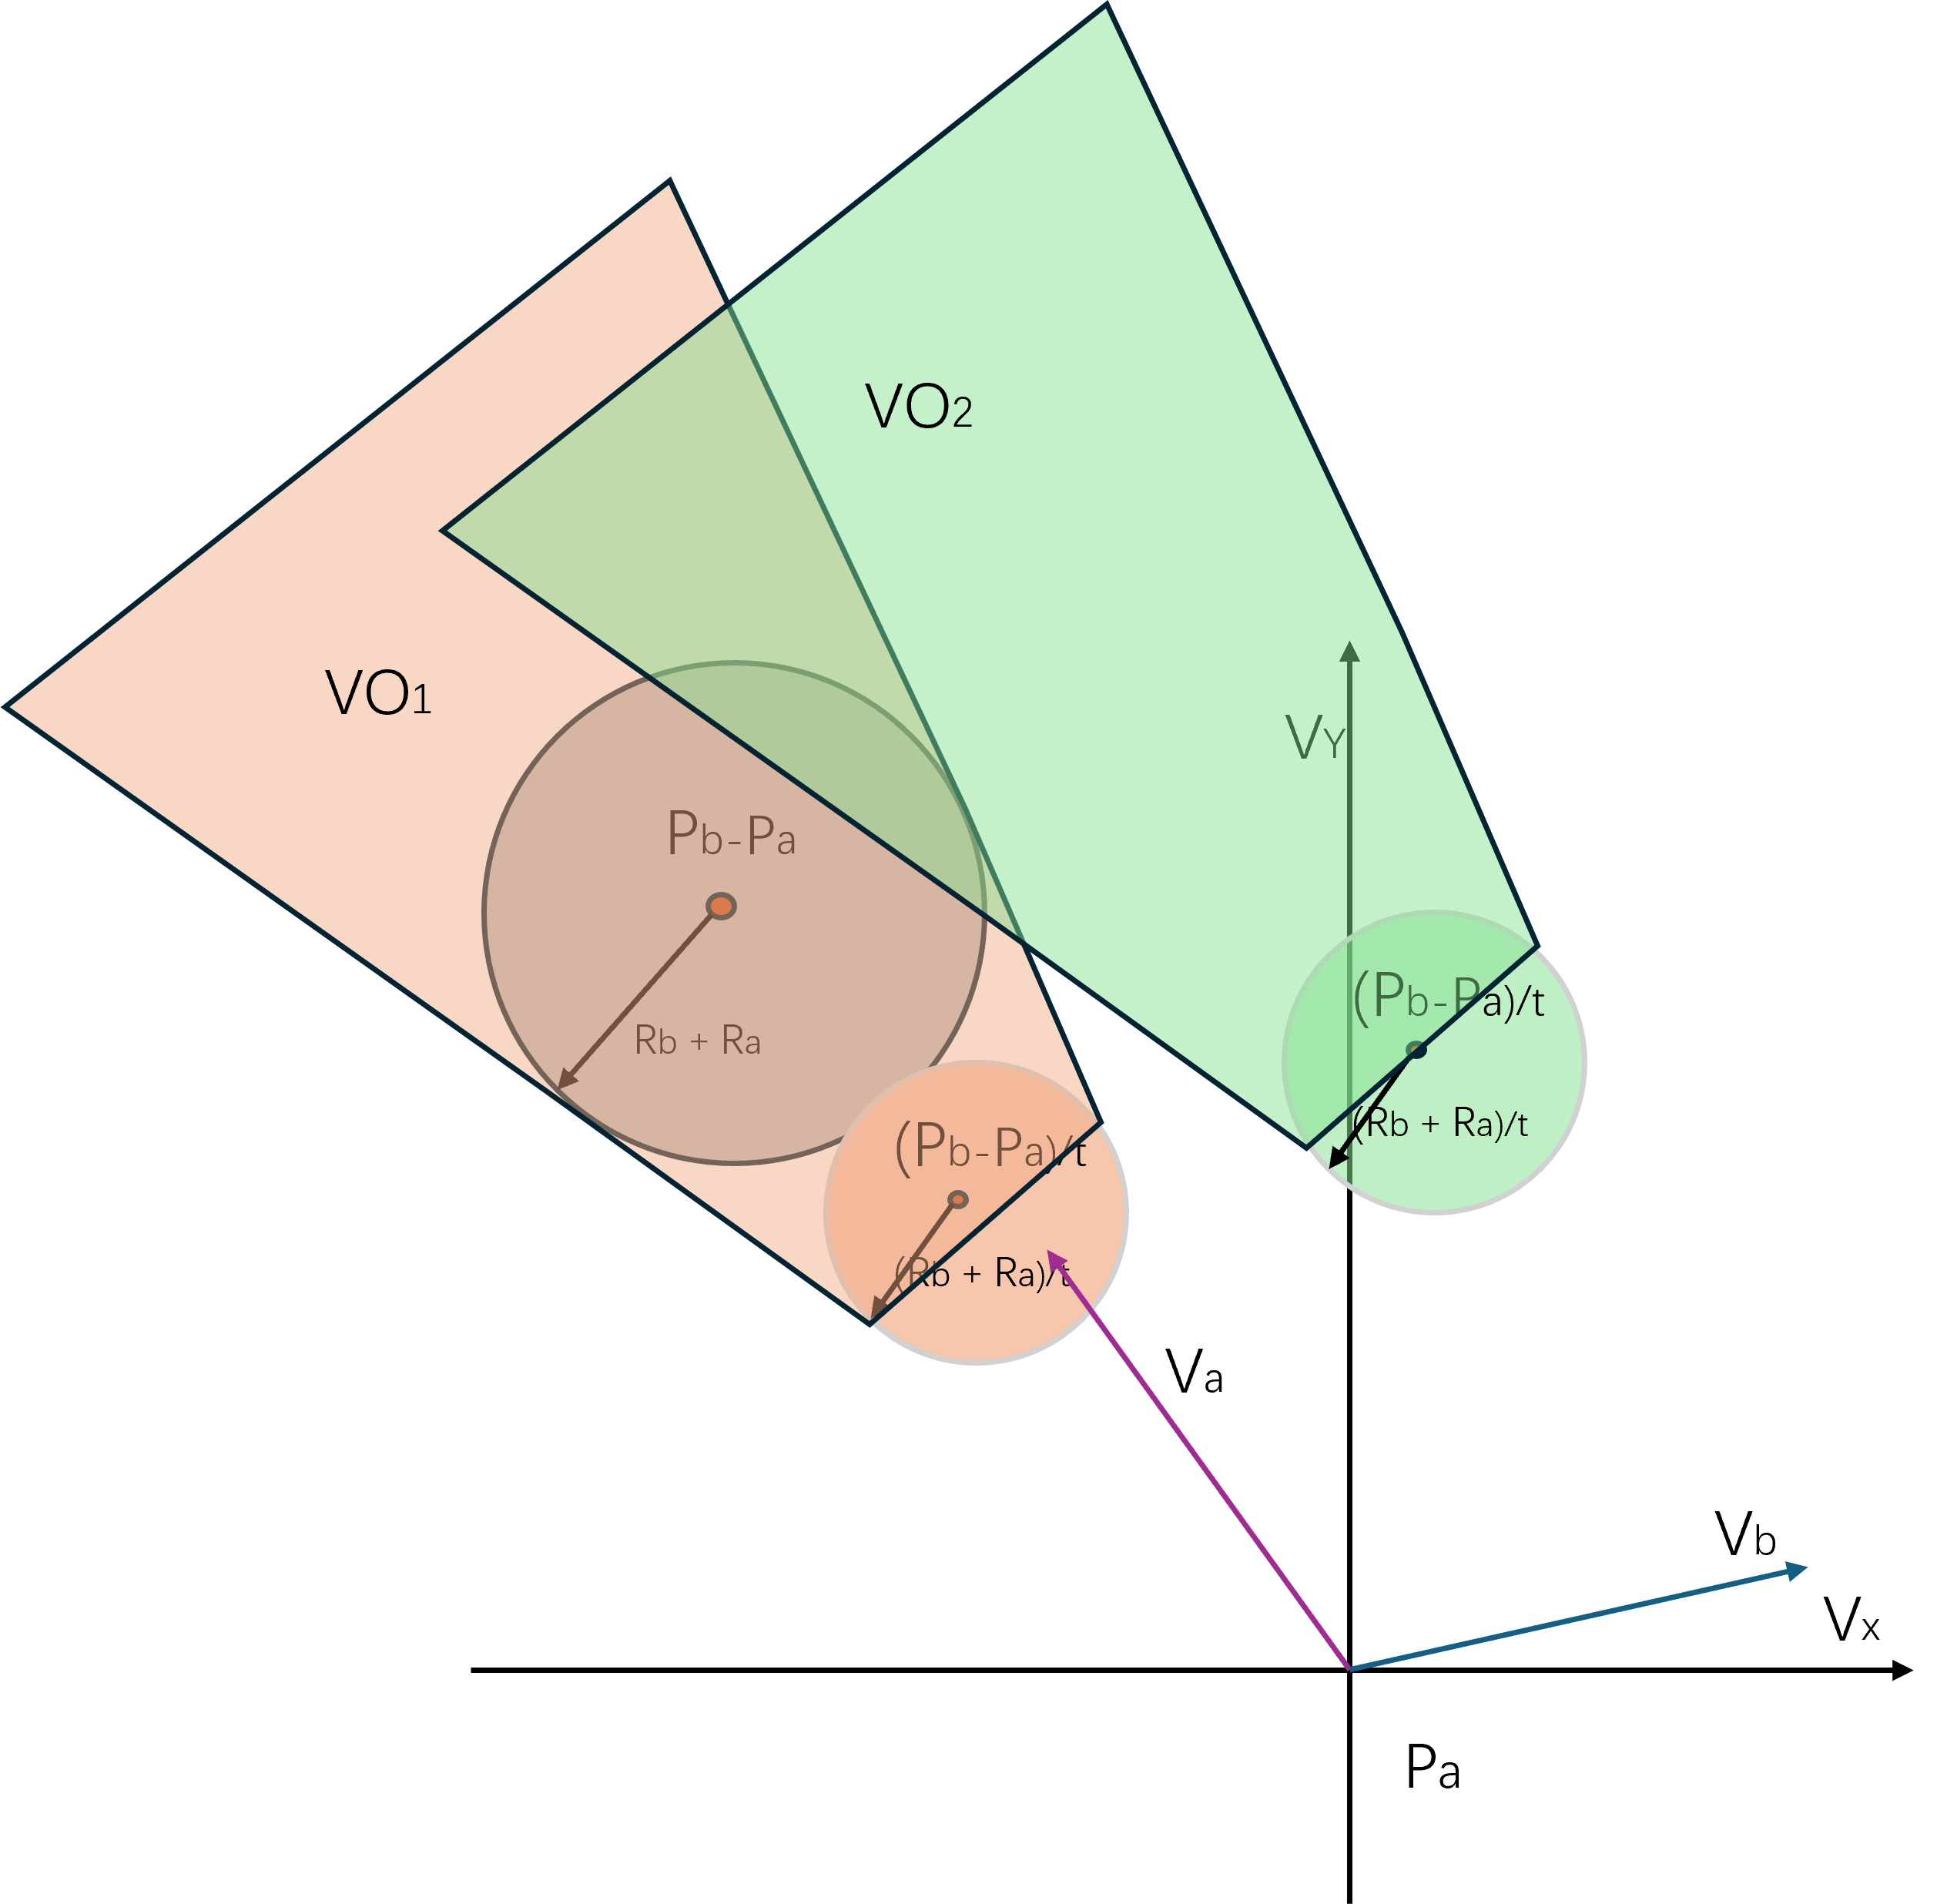
如果Vb的并不是一个固定值,在t时间内的取值范围为,则类似的需要将原始的中的每个向量都加上中的每个向量构造出一个新的形状, 这个两个形状的操作就是闵可夫斯基和(Minkowski sum):
下图中左侧代表原始的,在这个操作下变换出来的为下图中的右侧:
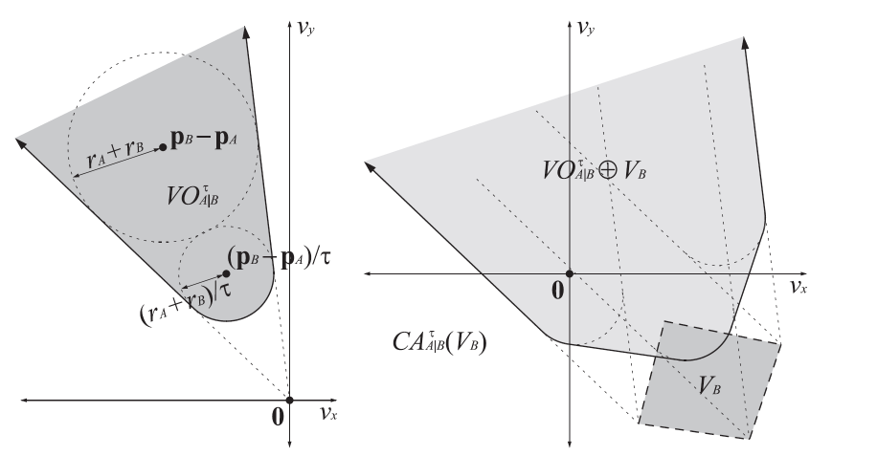
A选取任何一个不在中的速度都可以保证时间t内不会与B发生碰撞,这个速度的集合我们标记为碰撞避免速度Collision Avoiding Velocity,数学符号为, 其实就是的补集:
最优碰撞避免
假如A的速度在内且B的速度在内,则可以保证时间t内A与B绝对不会发生碰撞,此时我们将与定义为相互碰撞避免速度(reciprocally collision-avoiding)。如果此时且,则将与之间的关系称为相互最大碰撞避免速度(reciprocally maximal)。
有了上述概念的定义之后,碰撞避免系统的更新目标就是对于每个寻路实体A,求解出其相对于系统内每个其他寻路实体B的碰撞避免速度的交集C,选取C中的任意速度都可以保证A在时间t内不会出现碰撞。由于C是一个集合,任意的从集合中选取元素作为移动速度的话表现上就会出现一堆无头苍蝇在做布朗运动。考虑到碰撞避免系统中的每个寻路实体都是带着目标的移动,其在不考虑其他实体的情况下期望的最优速度就是朝向目标点的最大速度。所以我们从C中选取与方向偏差最小的速度作为A的最优碰撞避免速度(Optimal Reciprocal Collision Avoidance),简称为ORCA,这个也是一个集合。在每个寻路实体都采用这个最优碰撞避免速度来作为更新后的移动速度时,碰撞避免系统的最优化目标就是尽可能的将变大,这样使得后续移动时每个实体能选择的碰撞避免速度范围更大,能保证更多的对突发的环境变化的容错。所以此时碰撞避免系统计算出来的和需要满足下面的最优性质,循环套用计算出来的碰撞避免速度集合不会变化,且都是相互最大碰撞避免速度:
同时需要与期望最优速度尽可能的接近,以及对于任意的半径, 集合与以为圆心为半径的圆的交集都会比其他的碰撞避免速度与的交集大,即对于任意的属于A,B之间的碰撞避免速度集合
都有下面的性质:
写这么多公式都不如用一张图进行解释:
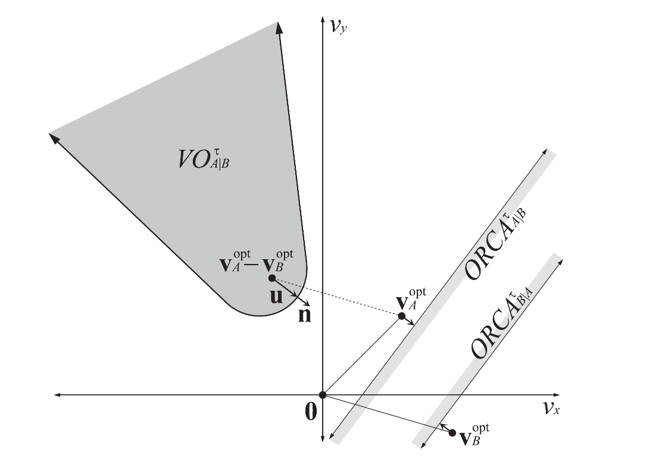
在上面的图中,我们先以相对位置和时间t构造出了,此时A相对于B的最优速度差值的点坐标为,如果这个不在中,则两者在时间t内不会发生碰撞。如果在内,为了达到对最优期望速度扰动最小且避免碰撞,我们需要挑选在边界上且与差值最小的点,记录速度差值,会与点在边界上离开的法线方向共线,这样才能符合差值最小的定义。此时只需要将调整为或者将调整为即可成功的实现碰撞避免。单独调整一个Agent的速度来实现碰撞避免会导致Agent的速度调整会很大,ORCA中将速度调整的任务平摊到了参与避障的两个Agent中,即将调整为同时将调整为。此时我们以点和正方向构造一个半平面,这就是我们所求的,这个半平面有下面的性质:
类似的以点和正方向构造一个半平面为。上面的示意图对应的是在,其实对于不在内部时上面的内的速度依然会避免碰撞,因为我们将定义为了逃离的方向,不在只会将这两条半平面分割线的距离增加而已,也就是各自拉远单位距离。
寻路场景里不仅有相互参与碰撞避免的寻路实体,而且还有一些障碍物,对于动态障碍物而言我们可以将其转化为一个速度不可变的Agent来处理,形状抽象为这个障碍物的外接圆,避障所需的速度改变完全由其他的agent来承担,也就是将上面公式里的0.5改成0.0,而避障的另外一方的0.5则改成1,这样就可以服用前面所述的各种流程了。对于静态障碍物,我们将障碍物的每条边单独拿出来处理,其闵可夫斯基和就是,这是一个胶囊体。使用这个胶囊体进行缩放也可以构造出一个时间t内会触发碰撞的。此时以下图c的方式来构造,即以这个鞍型的底边作为分割线,获取0所在的半平面,因为A如果速度为0则一定不会与相撞。
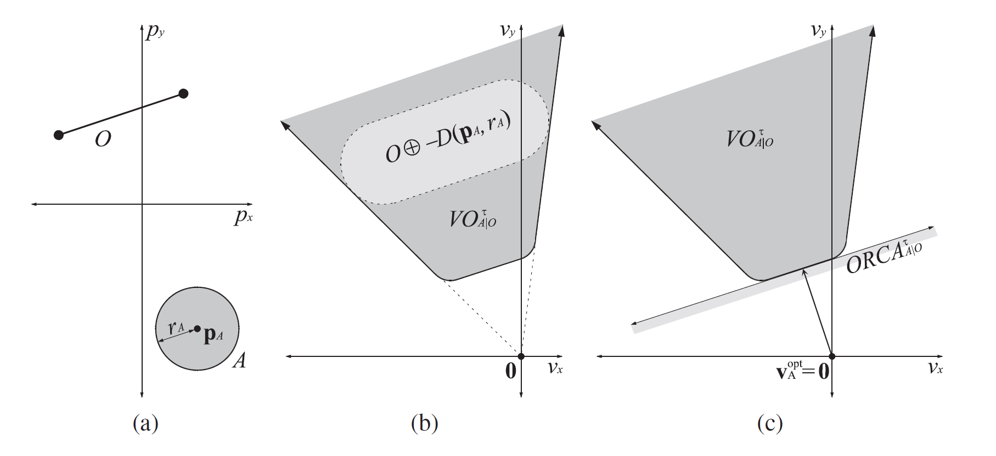
上面的计算只考虑了两个寻路实体之间的相互影响,如果场景里有多个参与寻路的实体,则需要综合考虑每两个实体之间的ORCA,此时在时间t内A的最优碰撞避免安全速度集合定义为,就是之前计算的多个半平面的交集,同时限定在当前实体的最大速度范围之内:
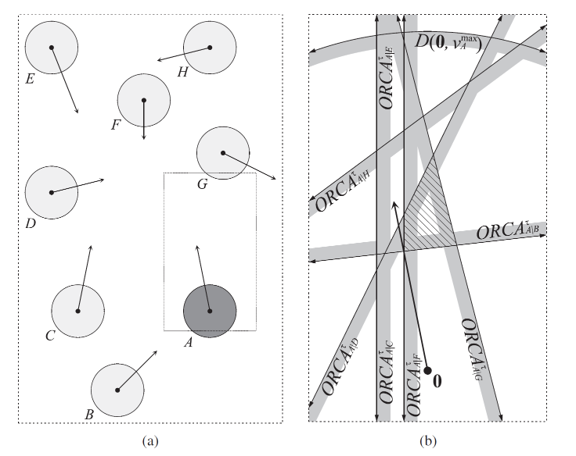
然后再选取中与期望速度差值最小的速度作为更新后的速度:
由于半平面是一个有凸Convex性质的形状,而根据凸形状相交之后形成的形状也是凸的这一性质,上面的公式其实就是在一个给定的凸区域内获取一个到指定点距离最小的点的凸优化问题,更详细点的说是在多个半平面限制下的求二次函数最小值的线性规划问题。如果区域非空,问题的求解是可行的,则总是可以获得一个最小值。但是有些情况下会出现半平面交为空,如下图中的配置,阴影方向代表这个半平面的正向,:
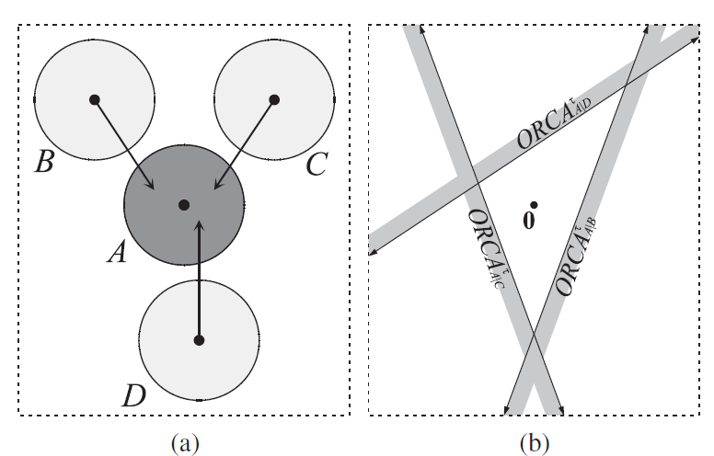
出现这种情况时,碰撞避免系统也不能放弃治疗,仍然需要选出一个最优速度出来,不过此时最优的目标需要改一下,将速度与这些半平面的分割线之间的带符号距离的最大值最小化,当速度对应的点在半平面内时,这个值为负数,数值为点到这个分割线的距离,当速度对应的点在半平面外时,值的符号为正。此时新的优化目标为:
是一个圆,其也是一个凸区域,而对一个凸函数执行minmax转换后对应的函数依然是凸的,所以上面这个公式仍然可以规约到凸优化问题上。其几何意义就是将所有的半平面分割边都朝着其方向的反向移动距离,使得这些半平面的交集不为空,刚好包含0这一个元素。
RVO2 代码流程
RVO2提供了若干的样例测试来展示如何使用这个库,其中最简单的就是Circle程序,这个程序在一个特定大小的圆环上等间距的排列若干参与碰撞避免的Agent,然后让每个Agent都移动到圆环的对侧,下面就是其初始化代码:
/* Store the goals of the agents. */
std::vector<RVO::Vector2> goals;
void setupScenario(RVO::RVOSimulator *sim)
{
/* Specify the global time step of the simulation. */
sim->setTimeStep(0.25f);
// 初始化一些agent的默认参数
sim->setAgentDefaults(15.0f, 10, 10.0f, 10.0f, 1.5f, 2.0f);
// 创建250个agent 均匀的分布在圆环上 同时设置其移动目标为对角线
for (size_t i = 0; i < 250; ++i) {
sim->addAgent(200.0f *
RVO::Vector2(std::cos(i * 2.0f * M_PI / 250.0f),
std::sin(i * 2.0f * M_PI / 250.0f)));
goals.push_back(-sim->getAgentPosition(i));
}
}
上面的setAgentDefaults初始化了如下六个参数:
void RVOSimulator::setAgentDefaults(float neighborDist, size_t maxNeighbors, float timeHorizon, float timeHorizonObst, float radius, float maxSpeed, const Vector2 &velocity)
{
if (defaultAgent_ == NULL) {
defaultAgent_ = new Agent(this);
}
defaultAgent_->maxNeighbors_ = maxNeighbors;
defaultAgent_->maxSpeed_ = maxSpeed;
defaultAgent_->neighborDist_ = neighborDist;
defaultAgent_->radius_ = radius;
defaultAgent_->timeHorizon_ = timeHorizon;
defaultAgent_->timeHorizonObst_ = timeHorizonObst;
defaultAgent_->velocity_ = velocity;
}
RVO2与DetourCrowd都将Agent当作一个圆形来看待,因此每个Agent都有半径radius和最大速度maxSpeed这两个参数。RVO2执行碰撞避免时需要与DetourCrowd一样计算一个Agent周围一定半径的其他Agent和障碍物,这里的neighborDist用来获取周围邻居的圆半径,而maxNeighbors则是过度拥挤的情况下只保留最多这些数量的邻居Agent。timeHorizon代表如果两个Agent的预估碰撞时间小于这个值时才考虑这两者的碰撞避免,timeHorizonObst代表与某个静态障碍物的碰撞时间小于这个值时才考虑将这个障碍物与当前Agent之间的碰撞避免。
添加好了所有参与更新的Agent之后开始进入更新循环:
do {
setPreferredVelocities(sim);
sim->doStep();
}
while (!reachedGoal(sim));
这里的setPreferredVelocities就是将每个agent设置一下期望最优速度,设置完最优速度之后再调用doStep来执行一次内部更新:
void RVOSimulator::doStep()
{
kdTree_->buildAgentTree();
#ifdef _OPENMP
#pragma omp parallel for
#endif
for (int i = 0; i < static_cast<int>(agents_.size()); ++i) {
agents_[i]->computeNeighbors();
agents_[i]->computeNewVelocity();
}
#ifdef _OPENMP
#pragma omp parallel for
#endif
for (int i = 0; i < static_cast<int>(agents_.size()); ++i) {
agents_[i]->update();
}
globalTime_ += timeStep_;
}
这里的doStep其实依赖了一个timeStep的参数,代表距离上次更新的时间间隔。在函数的开头会调用kdTree_->buildAgentTree()来构建当前所有Agent的KDTree,这个空间索引结构我们在之前已经介绍过了,因此此处不再介绍。 然后遍历所有的agent,调用computeNeighbors来获取本次更新时需要考虑的周围的避障Agent和障碍物,并使用computeNewVelocity来计算最优避障速度。这里的computeNeighbors分为了两个部分,先计算周围的静态障碍物,然后再计算周围的其他agent:
void Agent::computeNeighbors()
{
obstacleNeighbors_.clear();
float rangeSq = sqr(timeHorizonObst_ * maxSpeed_ + radius_);
sim_->kdTree_->computeObstacleNeighbors(this, rangeSq);
agentNeighbors_.clear();
if (maxNeighbors_ > 0) {
rangeSq = sqr(neighborDist_);
sim_->kdTree_->computeAgentNeighbors(this, rangeSq);
}
}
虽然这里computeObstacleNeighbors的this指针指向的是KDTree,但是其实他的实现是二叉空间分割BSP(Binary Space Paritioning)树。
BSP树是一个树形结构,其定义如下:
- 树中每个节点最多有两个子节点
- 每个节点里存储一条
2D空间线段的信息 - 对于任意节点
N,其左子树中的所有线段都处于节点N所存储的线段L的左边 - 对于任意节点
N,其右子树中的所有线段都处于节点N所存储的线段L的右边
BSP算法的基本构思是找到对于特定集合的线段,寻找这个集合内的最优线段,使得集合内其他的线段在这条线段左边的数量与出现在右边的数量插值最小。然后递归的对左右两边的线段集合进行分割,并最后建立一个树形结构。
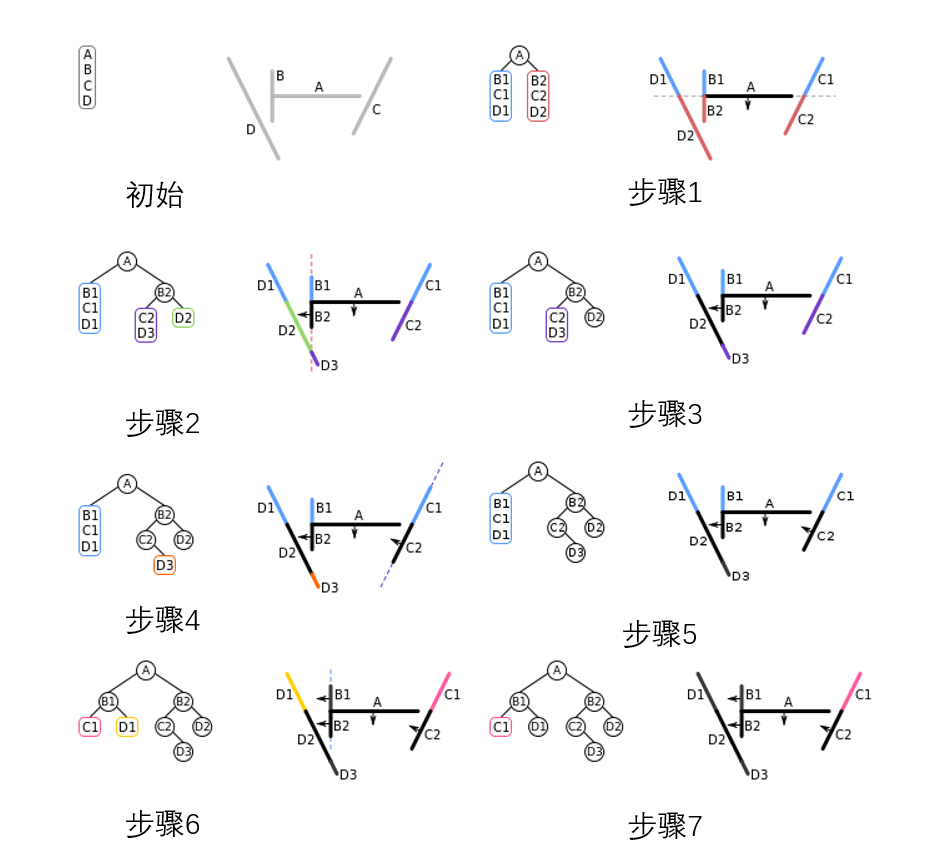
上图就是BSP算法在一个样例多边形上的执行BSP树的构建过程:
- 在平面上初始有四条线段,初始待分割集合为
[A, B,C,D] - 步骤1:选择线段
A作为分割线段,此线段将线段B切分为B1、B2, 线段C切分为C1、C2,线段D切分为D1、D2,所有在线段A左侧的线段集合[B1,C1,D1]分割进入左子树,所有在线段A右侧的线段集合[B2,C2,D2]进入右子树,形成步骤1中左边的树结构,然后递归处理右子节点[B2,C2,D2] - 步骤2:对于
[B2,C2,D2]集合,选择线段B2作为分割线段,这条线段将D2切分为D2,D3两个部分,然后在左边的线段集合为[C2, D3],在右边的线段集合为[C2],分别创建为当前节点的左右子节点,然后处理右子节点[D2] - 步骤3:对于
[D2]这个子节点,不可再分割,回溯到左边的兄弟节点[C2,D3] - 步骤4:选取
C2对[C2,D3]集合进行划分,将[D3]集合构造为当前节点的右子树 - 步骤5:由于当前
[D3]集合无法再划分,因此回溯到[B1,C1,D1]节点进行递归处理 - 步骤6:选取
B1对[B1,C1,D1]进行划分,[C1]设置为左子节点,[D1]设置为右子节点 - 步骤7:此时两个子节点的线段集合都只有一个元素,因此无法再分割,自此
BSP树构建完成
在场景内线段数量为N时,构建流程的时间复杂度为N*N。在N比较大时,BSP树的创建时间会急速增大,导致无法在开放大场景里支持大量的空间障碍物。构建流程中最耗时的部分为寻找集合内的最优线段,使得集合内其他的线段在这条线段左边的数量与出现在右边的数量插值最小。这个设定导致必须遍历集合内所有的线段,计算这个线段与集合内其他线段的相交状态,在集合大小为N时,会进行此相交状态比较。
在构建好BSP树之后,我们可以利用这棵树的结构来做范围内的阻挡边查询。对于给定的一个点C以及查询半径R,我们来执行下述过程来获取当前BSP树内所有与这个碰撞范围相交的线段集合S,设当前正在处理的BSP节点为N
- 计算当前点
C与节点N的分割线段L所在直线的投影距离为D - 如果
D小于等于R- 计算点
C到线段L的距离 如果小于R,则把L加入到结果集合S - 如果
D有子节点则对D所有的子节点递归的进行查询操作
- 计算点
- 如果
D大于R,则判断点C在线段L的哪一侧- 如果
C在L的左侧 则递归的处理节点N的右子节点 - 如果
C在L的右侧,则递归的处理节点N的左子节点
- 如果
在递归下降处理完成之后,集合S里包含的线段就是所有与圆心为C半径为R的圆圈相交的线段。
通过BSP树查询得到的相交线段都会存储到数组obstacleNeighbors_中,数组中的元素按当前Agent到这条线段的距离排列的:
void Agent::insertObstacleNeighbor(const Obstacle *obstacle, float rangeSq)
{
const Obstacle *const nextObstacle = obstacle->nextObstacle_;
const float distSq = distSqPointLineSegment(obstacle->point_, nextObstacle->point_, position_);
if (distSq < rangeSq) {
obstacleNeighbors_.push_back(std::make_pair(distSq, obstacle));
size_t i = obstacleNeighbors_.size() - 1;
while (i != 0 && distSq < obstacleNeighbors_[i - 1].first) {
obstacleNeighbors_[i] = obstacleNeighbors_[i - 1];
--i;
}
obstacleNeighbors_[i] = std::make_pair(distSq, obstacle);
}
}
用来查询一定范围内的其他agent的函数computeAgentNeighbors没什么特殊的,就是平常的递归查询KDTree的实现,不过这里由于存储的邻居数量有限制,所以会优先存距离最近的那些:
void Agent::insertAgentNeighbor(const Agent *agent, float &rangeSq)
{
if (this != agent) {
const float distSq = absSq(position_ - agent->position_);
if (distSq < rangeSq) {
if (agentNeighbors_.size() < maxNeighbors_) {
agentNeighbors_.push_back(std::make_pair(distSq, agent));
}
size_t i = agentNeighbors_.size() - 1;
while (i != 0 && distSq < agentNeighbors_[i - 1].first) {
agentNeighbors_[i] = agentNeighbors_[i - 1];
--i;
}
agentNeighbors_[i] = std::make_pair(distSq, agent);
if (agentNeighbors_.size() == maxNeighbors_) {
rangeSq = agentNeighbors_.back().first;
}
}
}
}
为了维持这个距离最近的限制,agentNeighbors_里存储的元素其实是按照离当前Agent的距离排列的,插入的时候走的是一个插入排序。
在构造了周围需要考虑碰撞避免的agent与静态障碍物之后,开始调用computeNewVelocity来计算最优速度。
RVO中的分割线
在了解了整体的基于RVO的碰撞避免最优化问题的定义之后,我们来研究一下RVO2是如何对这些最优化问题来进行求解的,对应的代码都在Agent::computeNewVelocity之中。这里先介绍一下RVO2中如何定义一个ORCA半平面的:
/**
* \brief Defines a directed line.
*/
class RVO_EXPORT Line {
public:
/**
* \brief A point on the directed line.
*/
Vector2 point;
/**
* \brief The direction of the directed line.
*/
Vector2 direction;
};
他这里复用了一个直线的定义,作为这个ORCA半平面的分割线,direction的向量大小一定是1。由于一条分割线会产生两个半平面,所以RVO2这里规定,direction对应的方向向量逆时针旋转90度之后生成的向量朝向ORCA半平面内部,作为direction的法线方向,也就是说半平面在分割线方向的左侧,这就刚好与前面论文中的定义一样了。不过由于ORCA中一般首先计算出来的是最优避障速度的方向u,此时由u构造ORCA分割线方向需要顺时针旋转90,所以在后面的代码中会经常看到下面的变换:
Vector2 unitW; // 通过某种途径计算出来的最优避障速度方向
line.direction = Vector2(unitW.y(), -unitW.x()); // 顺时针旋转90 度 构造orca分割线的正向
// 假设w = (-1,1) 算出来的direction=(1,1) 刚好是顺时针旋转90度的方向
对应的逆时针旋转90度的代码如下:
line.direction = Vector2(-unitW.y(), unitW.x()); // 逆时针旋转90 度
// 假设w = (-1,1) 算出来的direction=(-1,-1) 刚好是逆时针旋转90度的方向
构造障碍物的ORCA半平面
computeNewVelocity代码的开始首先遍历之前计算好的静态障碍物线段,来创建每个静态障碍物线段对应的orca线:
orcaLines_.clear();
// 这里计算逆是为了后续老是执行除法
const float invTimeHorizonObst = 1.0f / timeHorizonObst_;
/* Create obstacle ORCA lines. */
for (size_t i = 0; i < obstacleNeighbors_.size(); ++i) {
const Obstacle *obstacle1 = obstacleNeighbors_[i].second;
const Obstacle *obstacle2 = obstacle1->nextObstacle_;
// 在当前agent坐标系下阻挡线段的左端点 我们记录为p1
const Vector2 relativePosition1 = obstacle1->point_ - position_;
// 在当前agent坐标系下阻挡线段的右端点 我们记录为p2
const Vector2 relativePosition2 = obstacle2->point_ - position_;
/*
* Check if velocity obstacle of obstacle is already taken care of by
* previously constructed obstacle ORCA lines.
*/
bool alreadyCovered = false;
for (size_t j = 0; j < orcaLines_.size(); ++j) {
// 计算当前线段两个端点到orcaline的距离都大于0 则当前agent会先与orcaline发生碰撞 然后再与当前obstacle发生碰撞 所以此时不需要把当前的obstacle创建对应的orcaline
if (det(invTimeHorizonObst * relativePosition1 - orcaLines_[j].point, orcaLines_[j].direction) - invTimeHorizonObst * radius_ >= -RVO_EPSILON && det(invTimeHorizonObst * relativePosition2 - orcaLines_[j].point, orcaLines_[j].direction) - invTimeHorizonObst * radius_ >= -RVO_EPSILON) {
alreadyCovered = true;
break;
}
}
if (alreadyCovered) {
continue;
}
// 后续的创建障碍物orca的代码
}
上面有一个判断,如果当前的阻挡线段被现有的一条orca线挡住了,则这个阻挡线段不需要再考虑了。如果没有被其他orca线挡住,则考虑创建对应的orca。
const float distSq1 = absSq(relativePosition1);
const float distSq2 = absSq(relativePosition2);
const float radiusSq = sqr(radius_);
// 当前阻挡线段的方向向量
const Vector2 obstacleVector = obstacle2->point_ - obstacle1->point_;
// 这个s代表投影点与左侧端点的连线是在这个向量的多少倍 负值代表在投影点在左侧端点的左边 大于1代表投影点在右侧端点的右边
// 大于0小于1 代表投影点在这个线段上
const float s = (-relativePosition1 * obstacleVector) / absSq(obstacleVector);
// distSqLine 代表agent当前位置到阻挡线段所在直线的距离
const float distSqLine = absSq(-relativePosition1 - s * obstacleVector);
Line line;
if (s < 0.0f && distSq1 <= radiusSq) {
// 发生了碰撞 投影点在左侧端点的左边且左端点在agent的radius内
/* Collision with left vertex. Ignore if non-convex. */
if (obstacle1->isConvex_) {
// 建立一条orcaline 起点为原点 最优速度方向为relativePosition1的反方向,direction方向为最优速度方向减去90度
line.point = Vector2(0.0f, 0.0f);
line.direction = normalize(Vector2(-relativePosition1.y(), relativePosition1.x()));
orcaLines_.push_back(line);
}
continue;
}
else if (s > 1.0f && distSq2 <= radiusSq) {
// 与上面类似 不过是右端点 还需要额外考虑这个相对位置方向会指向当前凸包的内部
if (obstacle2->isConvex_ && det(relativePosition2, obstacle2->unitDir_) >= 0.0f) {
line.point = Vector2(0.0f, 0.0f);
line.direction = normalize(Vector2(-relativePosition2.y(), relativePosition2.x()));
orcaLines_.push_back(line);
}
continue;
}
else if (s >= 0.0f && s <= 1.0f && distSqLine <= radiusSq) {
// 与阻挡线段相交且两个端点都不在圆内 直接以这个阻挡线段的方向的负方向作为orca线
// 这里之所以乘以-1 是因为这个阻挡边的法线方向永远是朝向阻挡凸包内的 我们为了远离凸包 需要将法线旋转180度 因此需要乘以-1
line.point = Vector2(0.0f, 0.0f);
line.direction = -obstacle1->unitDir_;
orcaLines_.push_back(line);
continue;
}
上面代码的第一个分支对应下图中的a,左端点在圆内。第二个分支对应下图中的b,右端点在圆内。第三个分支对应下图中的c,没有端点在圆内。每个子图中的浅绿色线段代表阻挡线段所在的直线,浅黄色线段代表阻挡边向量,紫色线段代表当前agent位置出发的与阻挡线段垂直的向量,红色线段代表最后添加的orca半平面分界向量,注意其箭头方向。
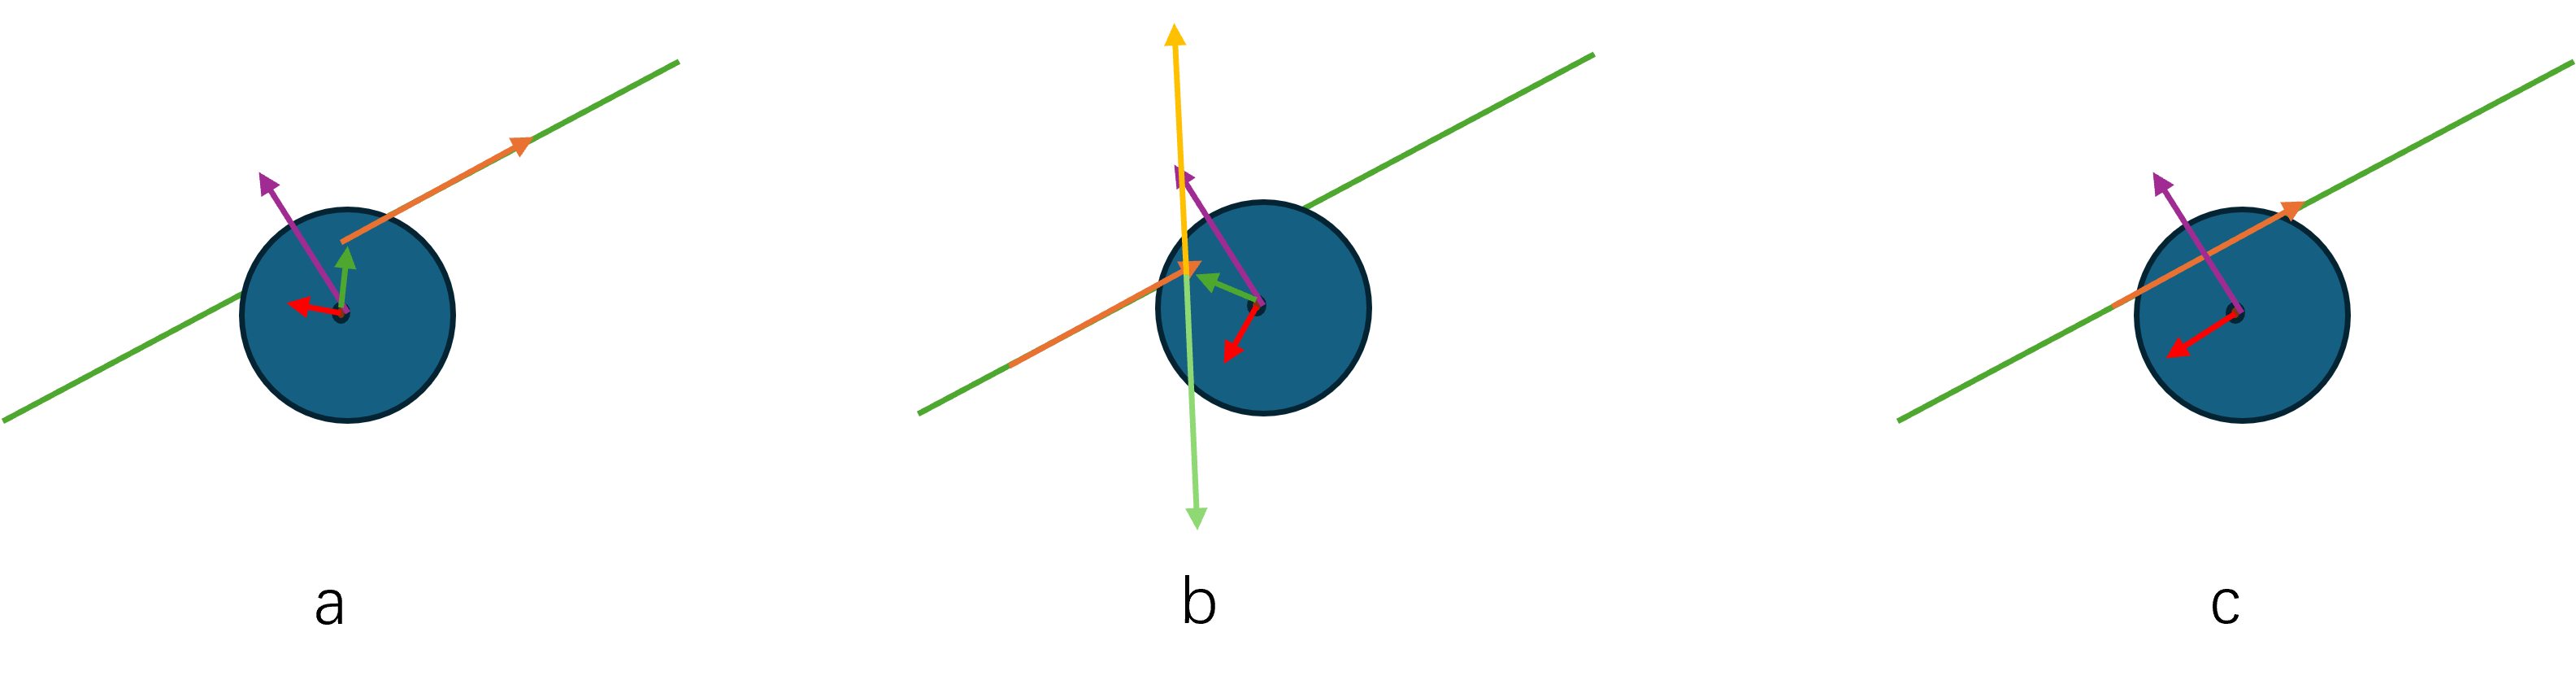
上面这些代码处理的是阻挡线段与agent相交的情况,接下来处理阻挡线段所在直线是否与agent相交:
Vector2 leftLegDirection, rightLegDirection;
if (s < 0.0f && distSqLine <= radiusSq) {
/*
* Obstacle viewed obliquely so that left vertex
* defines velocity obstacle.
*/
// 投影点在左端点的左侧
if (!obstacle1->isConvex_) {
/* Ignore obstacle. */
continue;
}
obstacle2 = obstacle1; // 只考虑单点阻挡
const float leg1 = std::sqrt(distSq1 - radiusSq);
leftLegDirection = Vector2(relativePosition1.x() * leg1 - relativePosition1.y() * radius_, relativePosition1.x() * radius_ + relativePosition1.y() * leg1) / distSq1;
rightLegDirection = Vector2(relativePosition1.x() * leg1 + relativePosition1.y() * radius_, -relativePosition1.x() * radius_ + relativePosition1.y() * leg1) / distSq1;
}
else if (s > 1.0f && distSqLine <= radiusSq) {
/*
* Obstacle viewed obliquely so that
* right vertex defines velocity obstacle.
*/
// 如果投影点在右端点的右侧
if (!obstacle2->isConvex_) {
/* Ignore obstacle. */
continue;
}
obstacle1 = obstacle2; // 只考虑单点阻挡
const float leg2 = std::sqrt(distSq2 - radiusSq);
leftLegDirection = Vector2(relativePosition2.x() * leg2 - relativePosition2.y() * radius_, relativePosition2.x() * radius_ + relativePosition2.y() * leg2) / distSq2;
rightLegDirection = Vector2(relativePosition2.x() * leg2 + relativePosition2.y() * radius_, -relativePosition2.x() * radius_ + relativePosition2.y() * leg2) / distSq2;
}
else {
// 投影点在左右两个端点中间 且投影距离大于圆的半径
/* Usual situation. */
if (obstacle1->isConvex_) {
const float leg1 = std::sqrt(distSq1 - radiusSq);
leftLegDirection = Vector2(relativePosition1.x() * leg1 - relativePosition1.y() * radius_, relativePosition1.x() * radius_ + relativePosition1.y() * leg1) / distSq1;
}
else {
/* Left vertex non-convex; left leg extends cut-off line. */
leftLegDirection = -obstacle1->unitDir_;
}
if (obstacle2->isConvex_) {
const float leg2 = std::sqrt(distSq2 - radiusSq);
rightLegDirection = Vector2(relativePosition2.x() * leg2 + relativePosition2.y() * radius_, -relativePosition2.x() * radius_ + relativePosition2.y() * leg2) / distSq2;
}
else {
/* Right vertex non-convex; right leg extends cut-off line. */
rightLegDirection = obstacle1->unitDir_;
}
}
上面的代码里有一些求点到圆形的切线方向这样的操作,都是一些数学计算,不怎么好理解,这里使用图例来说明。
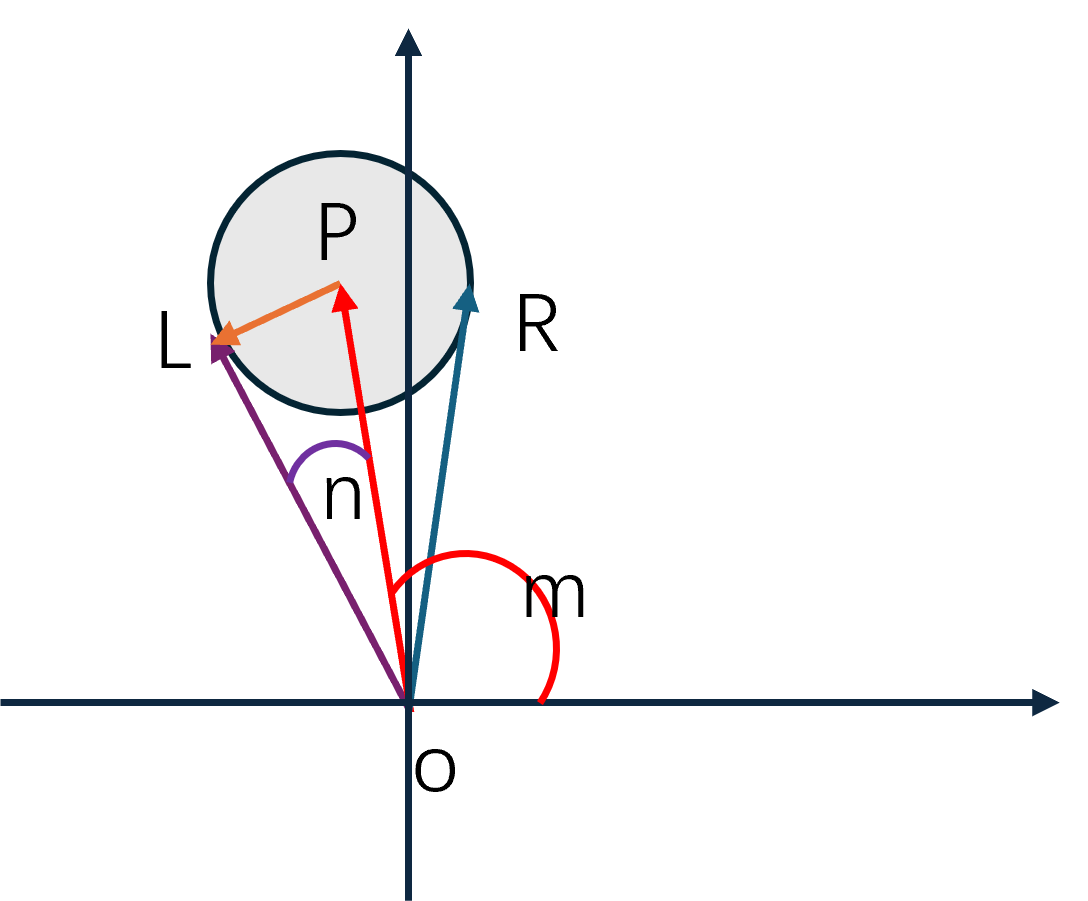
在上面的图中,红色线段对应的长度的平方为distSq1简称为S,relativePosition1对应的点为P,其半径为radius_简称为r,从O点到这个圆的左边切线与圆的交点为L,则线段LO的长度为leg1简称为leg。假设向量OP与x轴的夹角为m,对应上图中的红色圆弧,而OP与OL之间的夹角为n,对应上图中的紫色圆弧。在这些变量的定义下,我们可以通过下面的方式来计算L的方向:
所以leftLegDirection计算的就是左切线的单位向量。对应的右切线的单位向量计算方式如下:
可以看出这个结果与上面的rightLegDirection是完全对的上的。
在搞清楚上面的leftLegDirection和rightLegDirection的计算公式之后,对应的分支判断也就非常清楚了。上面代码的第一个分支对应下图中的a,直线相交且最近点为左端点,此时以这个左端点为圆心画一个半径为radius_的浅色的圆,agent位置与这个圆的切线夹角区域所代表的速度在将来的某一个时候会引发碰撞,所以以这两个切线作为VO区域的左右两条腿。第二个分支对应下图中的b,直线相交且最近点为右端点。第三个分支对应下图中的c,最近点为agent位置到这个直线的投影点。每个子图中的浅绿色线段代表阻挡线段所在的直线,浅黄色线段代表阻挡边向量,紫色线段代表当前agent位置出发的与阻挡线段垂直的向量,蓝色向量代表左边的腿,红色向量代表右边的腿,注意其箭头方向。
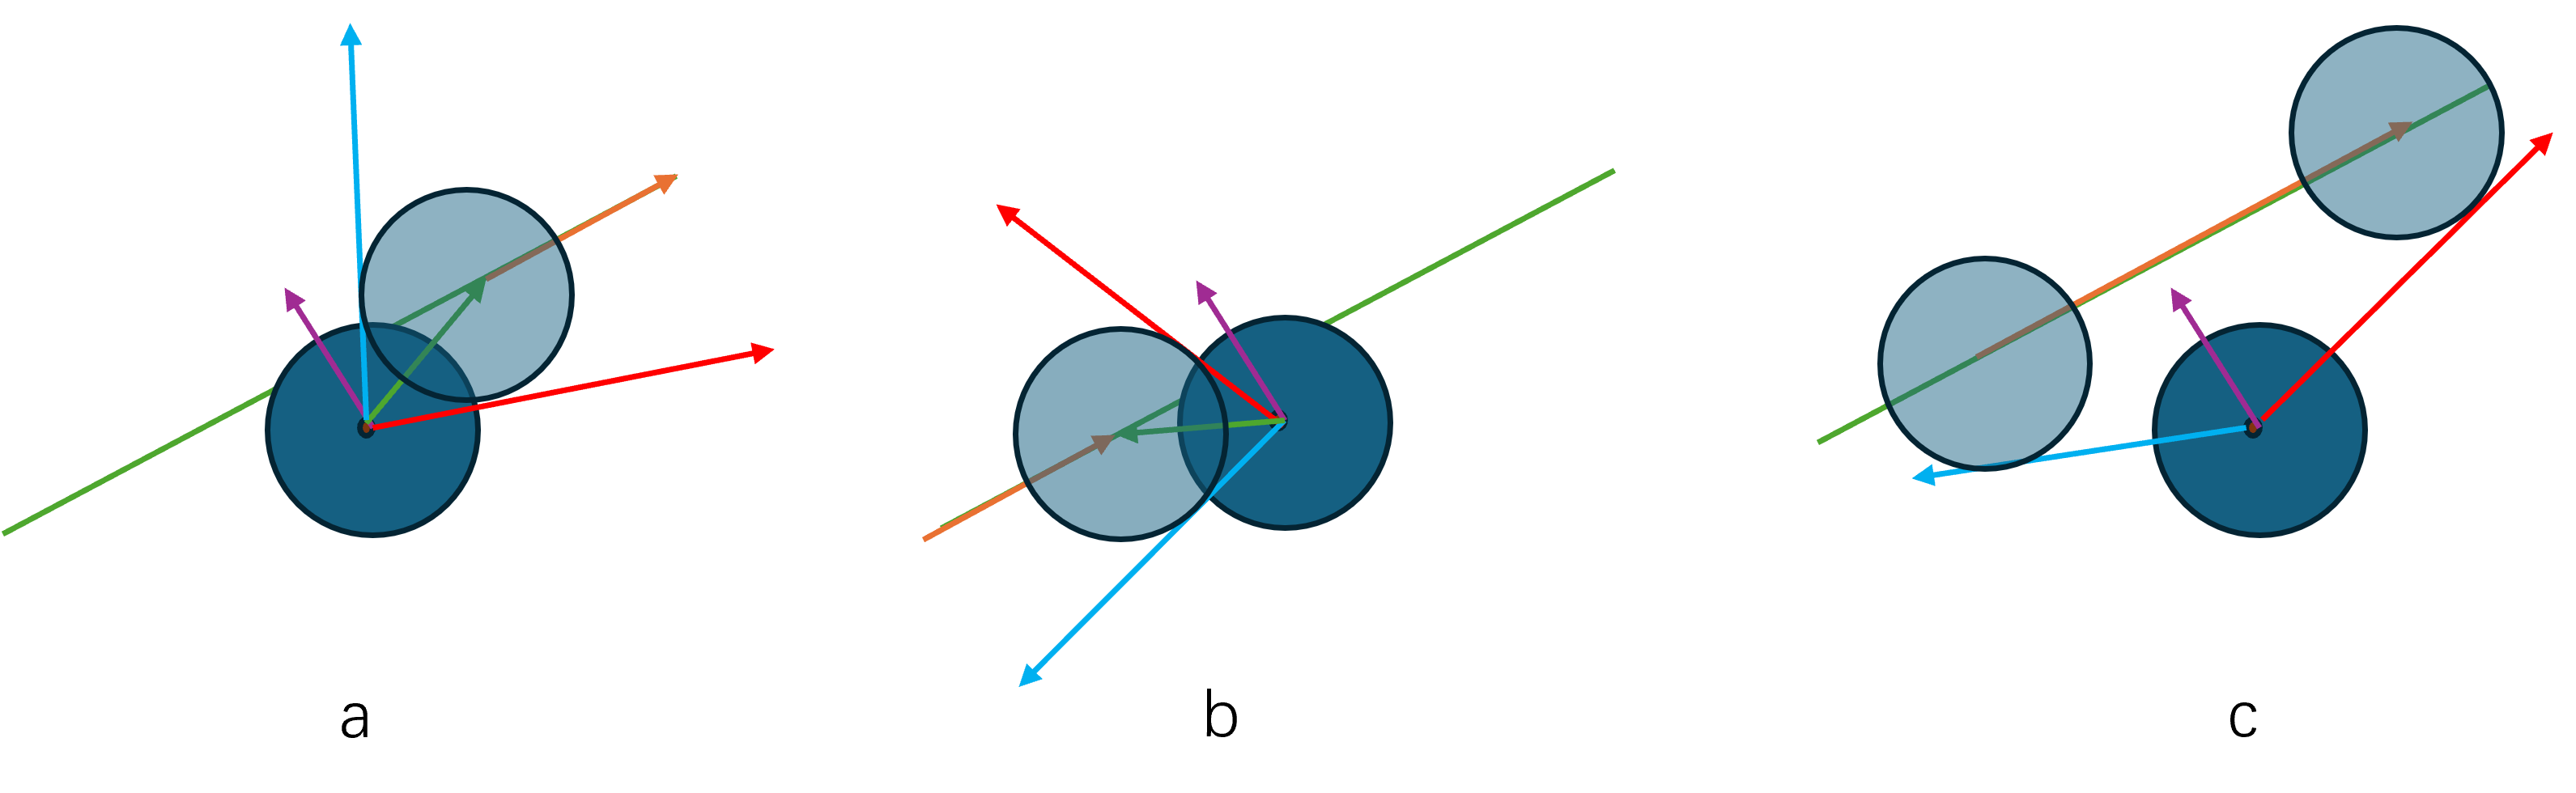
在构造完成VO区域的两条腿之后,我们需要做一下凸包修正:
// 避免两条腿边会指向回当前凸包阻挡体
const Obstacle *const leftNeighbor = obstacle1->prevObstacle_;
bool isLeftLegForeign = false; // 左腿边是否会指向当前凸包内部
bool isRightLegForeign = false; // 右腿边是否会指向回凸包内部
// 如果指向回了凸包内部 则代表不需要考虑 因为在其他边的处理中已经考虑过了
if (obstacle1->isConvex_ && det(leftLegDirection, -leftNeighbor->unitDir_) >= 0.0f) {
/* Left leg points into obstacle. */
leftLegDirection = -leftNeighbor->unitDir_;
isLeftLegForeign = true;
}
if (obstacle2->isConvex_ && det(rightLegDirection, obstacle2->unitDir_) <= 0.0f) {
/* Right leg points into obstacle. */
rightLegDirection = obstacle2->unitDir_;
isRightLegForeign = true;
}
计算isLeftLegForeign的图形如下,左边的子图代表leftLegDirection会指向原来的凸包内部,棕色的边代表前一条边,此时需要修正方向为前一条边的单位方向乘以-1,即新添加的从原点位置延申出来的棕色腿,右子图则不需要:
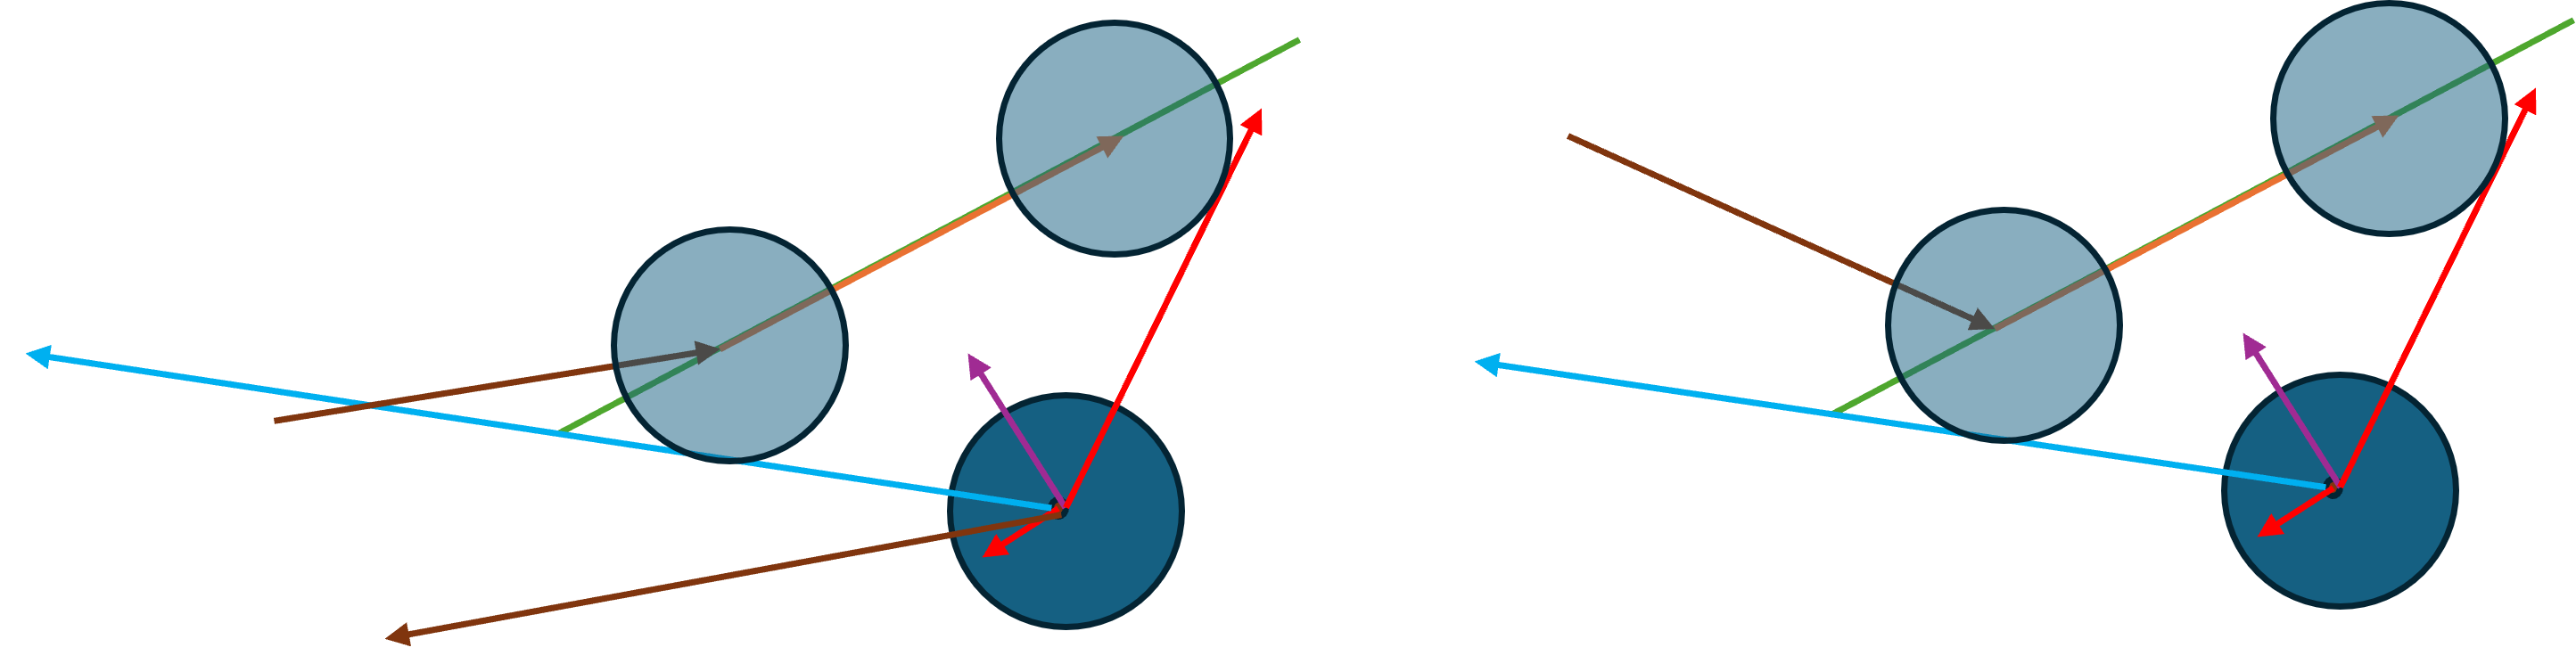
计算isRightLegForeign的图形如下,左边的子图代表rightLegDirection会指向原来的凸包内部,棕色的边代表后一条边,此时需要修正方向为前一条边的单位方向,即新添加的从原点位置延申出来的棕色腿,右子图则不需要:
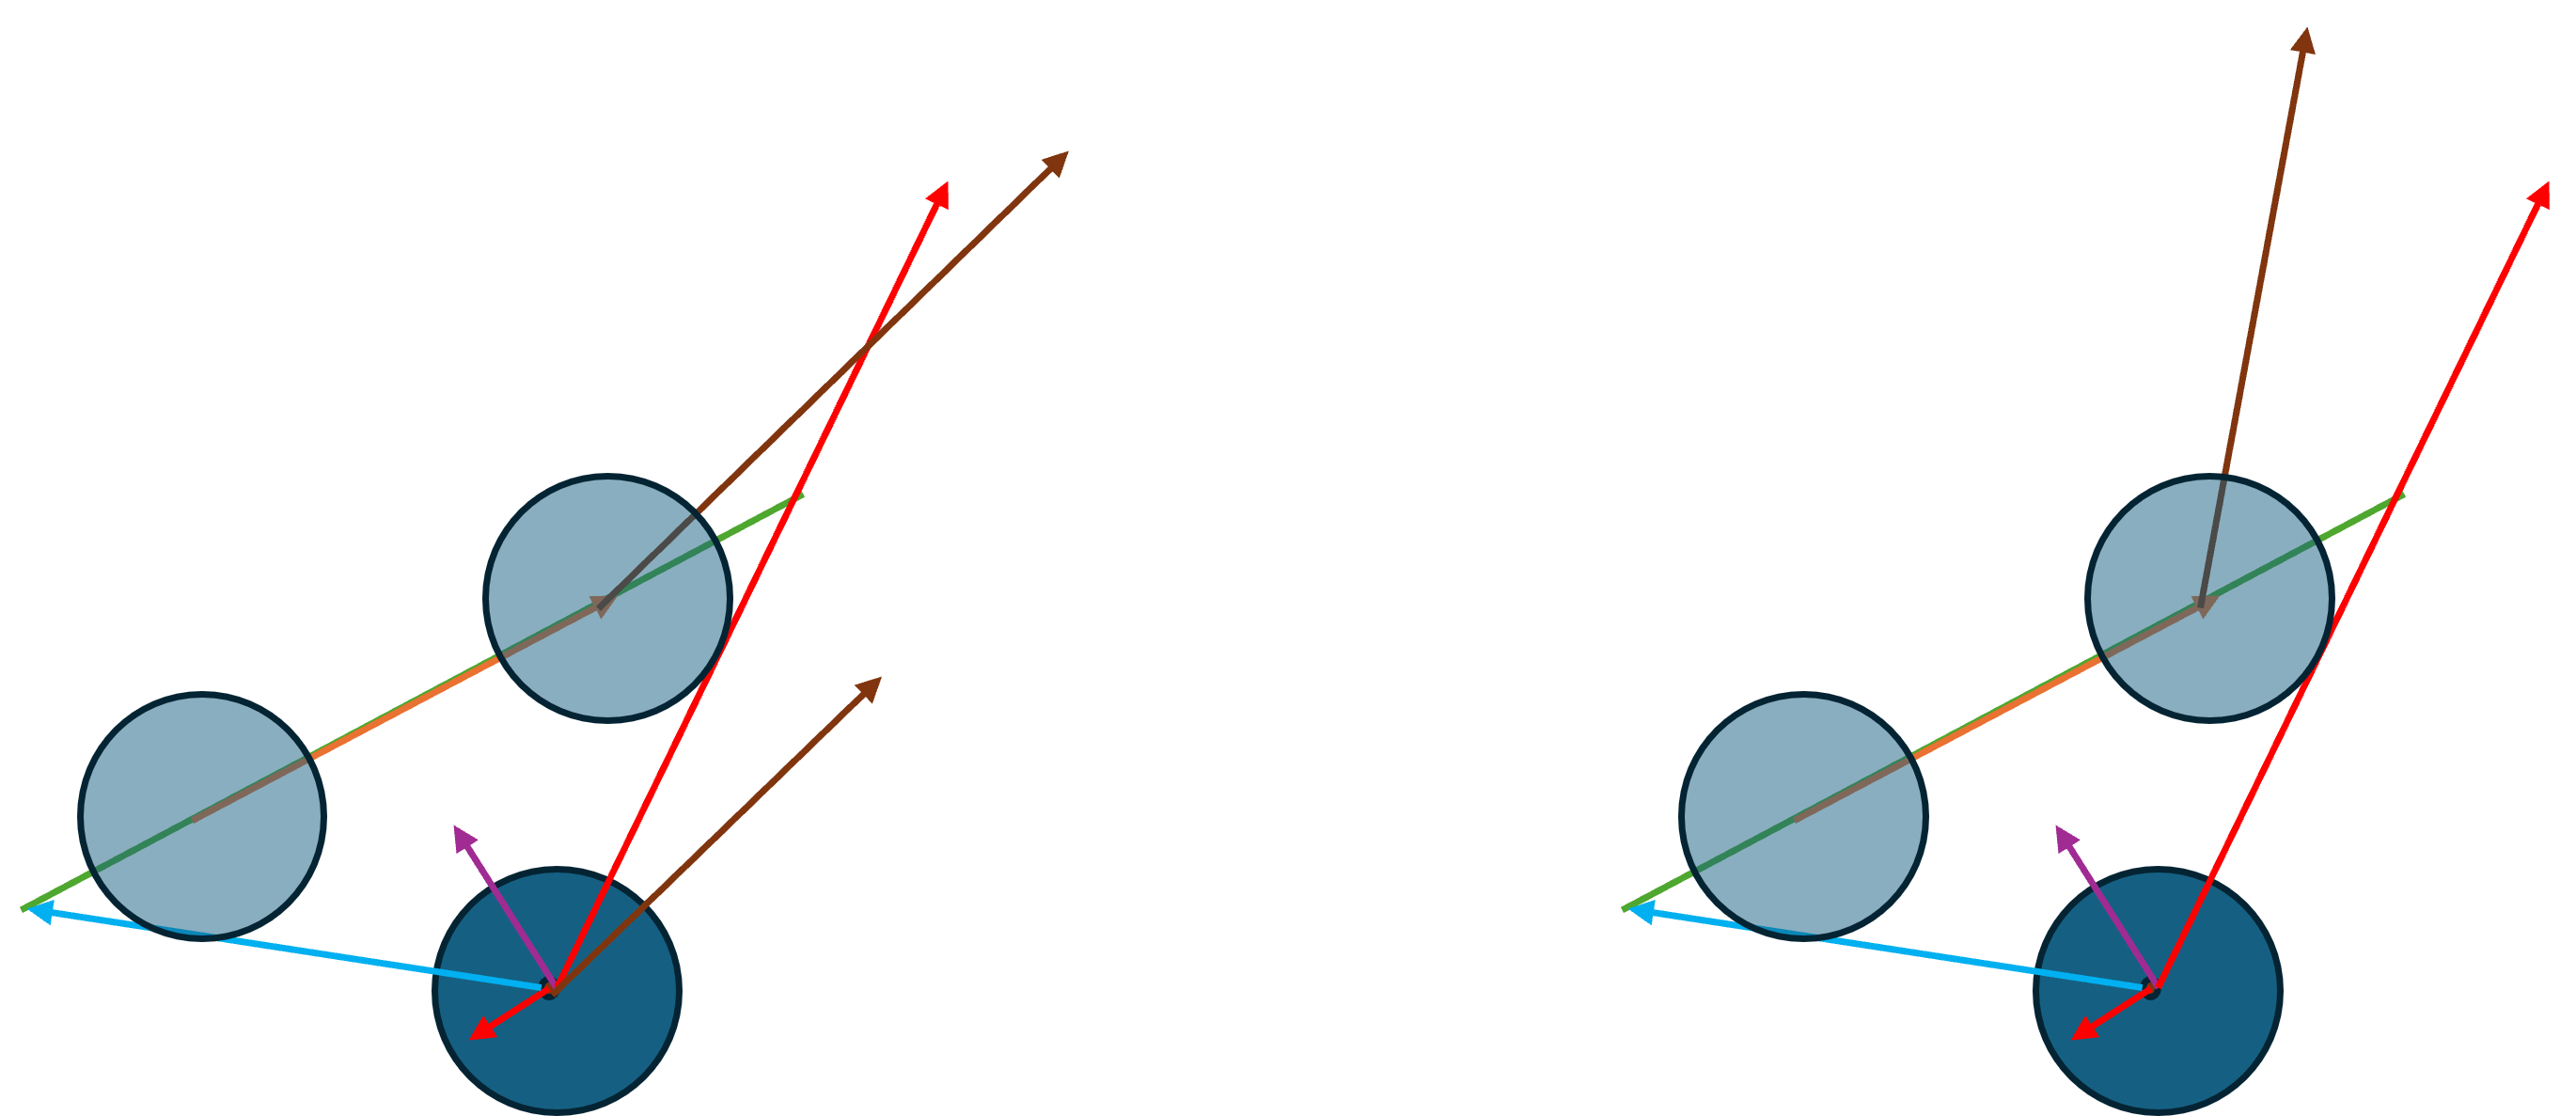
修正完了之后,再来计算当前速度是否在时间t内会触发与这个边的碰撞:
// 底面胶囊体的左右两个中心点
const Vector2 leftCutoff = invTimeHorizonObst * (obstacle1->point_ - position_);
const Vector2 rightCutoff = invTimeHorizonObst * (obstacle2->point_ - position_);
// cutoffvec底面胶囊体中心的连线 会与VO的底面边平行
const Vector2 cutoffVec = rightCutoff - leftCutoff;
/* Project current velocity on velocity obstacle. */
/* Check if current velocity is projected on cutoff circles. */
// t代表当前速度减去底面胶囊左中心之后的向量投影到底面向量的带符号长度
const float t = (obstacle1 == obstacle2 ? 0.5f : ((velocity_ - leftCutoff) * cutoffVec) / absSq(cutoffVec));
// tleft代表当前速度在左腿上的投影向量
const float tLeft = ((velocity_ - leftCutoff) * leftLegDirection);
// tright代表当前速度在右腿上的投影向量
const float tRight = ((velocity_ - rightCutoff) * rightLegDirection);
if ((t < 0.0f && tLeft < 0.0f) || (obstacle1 == obstacle2 && tLeft < 0.0f && tRight < 0.0f)) {
/* Project on left cut-off circle. */
const Vector2 unitW = normalize(velocity_ - leftCutoff);
// 选择逃离左圆心的速度 然后初始点定位与leftcutoff的距离为当前圆的半径 这样就保证继续以运行下去在t时间内都不会与左圆心碰撞
line.direction = Vector2(unitW.y(), -unitW.x());
line.point = leftCutoff + radius_ * invTimeHorizonObst * unitW;
orcaLines_.push_back(line);
continue;
}
else if (t > 1.0f && tRight < 0.0f) {
/* Project on right cut-off circle. */
const Vector2 unitW = normalize(velocity_ - rightCutoff);
// 选择逃离右圆心的速度 然后初始点定位与leftcutoff的距离为当前圆的半径 这样就保证继续以运行下去在t时间内都不会与右圆心碰撞
line.direction = Vector2(unitW.y(), -unitW.x());
line.point = rightCutoff + radius_ * invTimeHorizonObst * unitW;
orcaLines_.push_back(line);
continue;
}
这里的两个分支讨论基本是一样的,我们只需要解释第一个分支的代码,此时agent的速度对应的图形如下:
由线段的左端点构造出两条分割线。这里的长的紫色线段与阻挡线段垂直,对应的左侧半平面满足t<0.0f。同时绿色线段与VO的左腿垂直,对应的右侧半平面满足tLeft <0.0f,两条新添加的直线构造的半平面交(以棕色填充区域来表示)内的速度就能满足t < 0.0f && tLeft < 0.0f。如果agent的速度va处于这个区域,则远离阻挡边最快的方向就是左端点到速度点的连线方向。所以此时添加的orca线会以逃离leftCutoff的方向作为最优速度来构造,同时为了为了让orca线对应的区域最大化,选取了这个方向与左边端点对应的半圆弧的交点作为经过的点。
最后讨论的是一般情况下,当前速度会在时间t内的某个时刻与阻挡边相交:
/*
* Project on left leg, right leg, or cut-off line, whichever is closest
* to velocity.
*/
const float distSqCutoff = ((t < 0.0f || t > 1.0f || obstacle1 == obstacle2) ? std::numeric_limits<float>::infinity() : absSq(velocity_ - (leftCutoff + t * cutoffVec)));
const float distSqLeft = ((tLeft < 0.0f) ? std::numeric_limits<float>::infinity() : absSq(velocity_ - (leftCutoff + tLeft * leftLegDirection)));
const float distSqRight = ((tRight < 0.0f) ? std::numeric_limits<float>::infinity() : absSq(velocity_ - (rightCutoff + tRight * rightLegDirection)));
// 获取当前速度到这三条线段或者射线的最短距离
if (distSqCutoff <= distSqLeft && distSqCutoff <= distSqRight) {
/* Project on cut-off line. */
line.direction = -obstacle1->unitDir_; // 这里取反方向因为要保证法线方向朝orca区域的内部 远离vo
line.point = leftCutoff + radius_ * invTimeHorizonObst * Vector2(-line.direction.y(), line.direction.x());
orcaLines_.push_back(line);
continue;
}
else if (distSqLeft <= distSqRight) {
/* Project on left leg. */
if (isLeftLegForeign) {
continue;
}
// 法线方向永远是当前direction 加90度 以保证朝外
line.direction = leftLegDirection;
line.point = leftCutoff + radius_ * invTimeHorizonObst * Vector2(-line.direction.y(), line.direction.x());
orcaLines_.push_back(line);
continue;
}
else {
/* Project on right leg. */
if (isRightLegForeign) {
continue;
}
// 右边界需要乘以负一 以保证其法线方向会远离当前vo
line.direction = -rightLegDirection;
line.point = rightCutoff + radius_ * invTimeHorizonObst * Vector2(-line.direction.y(), line.direction.x());
orcaLines_.push_back(line);
continue;
}
上面的代码会计算当前速度与VO的哪一条边距离最近,下图中三条浅绿色的线段就是当前速度到三条边的垂直距离,选择距离最近的那一条边的方向同时会以radius_ * invTimeHorizonObst为偏移距离来构造orca分割线,这样就保证时间t内当前agent不会与当前障碍物相撞:
构造Agent之间的ORCA半平面
在消化了如何从静态障碍物构造ORCA半平面之后,对于后续的从agent构造ORCA半平面的流程就更容易理解了。这里也是分类讨论,首先判断当前两个Agent现在是否已经发生碰撞,根据是否已经撞上了走不同的分支逻辑:
const Agent *const other = agentNeighbors_[i].second;
const Vector2 relativePosition = other->position_ - position_;
const Vector2 relativeVelocity = velocity_ - other->velocity_;
const float distSq = absSq(relativePosition); // 相对速度的平方
const float combinedRadius = radius_ + other->radius_;
const float combinedRadiusSq = sqr(combinedRadius);
Line line;
Vector2 u;
if (distSq > combinedRadiusSq)
{
// 这部分代码处理当前没有碰撞的情况
}
else
{
/* Collision. Project on cut-off circle of time timeStep. */
// 已经撞上了 则 选取当前速度与相对圆心的连线向量
const float invTimeStep = 1.0f / sim_->timeStep_;
/* Vector from cutoff center to relative velocity. */
const Vector2 w = relativeVelocity - invTimeStep * relativePosition;
const float wLength = abs(w);
const Vector2 unitW = w / wLength;
// 照这个方向执行移动可以在sim_->timestep之后脱离接触
line.direction = Vector2(unitW.y(), -unitW.x());
u = (combinedRadius * invTimeStep - wLength) * unitW;
}
当发现相撞之后,RVO2力图在时间t内将两者脱离接触,此时最快的脱离速度方向就是两点连线的逆方向,也就是上文中的w,其单位向量为unitW,由这个逃逸速度方向构造的orca分割线正向就是顺时针旋转90度之后的Vector2(unitW.y(), -unitW.x())。其对应的示意图如下:
上图中灰色的圆代表平移坐标系后的相对圆,此时原点在圆内,所以目前已经相交。而橙色小圆则代表这个相对圆除以t之后形成的圆。根据当前的相对速度relativeVelocity是否在这个小圆内可以画出两种不同的结果。途中的浅绿色线段代表两种不同情况的relativeVelocity,此时两个对应的黄色端点就是最后算出来的u,而紫色线段就代表unitW对应的方向,经过黄色端点并与紫色线段垂直的就是两种情况下的orca分割线,可以看出都是unitW顺时针旋转90度之后形成的。
在没有处于碰撞的情况下,就是经典的锥形区域的ORCA分析,根据与VO的最优逃逸速度方向计算方式可以分为三种情况:
/* No collision. */
// 小圆圆心invTimeHorizon * relativePosition
// w为小圆圆心指向当前速度位置的向量
const Vector2 w = relativeVelocity - invTimeHorizon * relativePosition;
/* Vector from cutoff center to relative velocity. */
const float wLengthSq = absSq(w);
// w向量在relativePosition向量上的投影
const float dotProduct1 = w * relativePosition;
// 以上条件都满足,也就是说在小圆弧上计算u
if (dotProduct1 < 0.0f && sqr(dotProduct1) > combinedRadiusSq * wLengthSq) {
/* Project on cut-off circle. */
const float wLength = std::sqrt(wLengthSq);
const Vector2 unitW = w / wLength;
// 直接以这个向量作为法向 此时direction需要顺时针旋转90度
line.direction = Vector2(unitW.y(), -unitW.x());
u = (combinedRadius * invTimeHorizon - wLength) * unitW;
}
else {
/* Project on legs. */
const float leg = std::sqrt(distSq - combinedRadiusSq);
if (det(relativePosition, w) > 0.0f) {
/* Project on left leg. */
// 更靠近左边的腿 计算方向为左腿与大圆的切线方向
line.direction = Vector2(relativePosition.x() * leg - relativePosition.y() * combinedRadius, relativePosition.x() * combinedRadius + relativePosition.y() * leg) / distSq;
}
else {
/* Project on right leg. */
// 注意右腿需要乘以-1
line.direction = -Vector2(relativePosition.x() * leg + relativePosition.y() * combinedRadius, -relativePosition.x() * combinedRadius + relativePosition.y() * leg) / distSq;
}
// dotProduct2是相对速度点到腿上的投影长度
const float dotProduct2 = relativeVelocity * line.direction;
// 相对速度点到腿上的投影向量,减去相对速度向量,就得到了u
u = dotProduct2 * line.direction - relativeVelocity;
}
line.point = velocity_ + 0.5f * u;
orcaLines_.push_back(line);
这里比较难理解的就是刚开始的判断条件如何定位到当前速度点离VO边界上最近的点是在VO的圆弧区域上。
设小圆圆心为A,大圆圆心为B,则 OB=t*OA。当前相对速度relativeVelocity为原点出发的蓝色线段OV,则w就是图中小圆圆心引出的橙色线段AV。假设w与AO的夹角为m,则dotProduct1 = w*OB = |OB| * |w| * cos(180-n)。所以dotProduct1 <0.0时n<90, 此时V处于由A出发的与OB垂直的分割线(图中经过A的蓝色线段)引发的下方半平面中。
取两条腿与小圆的任意一个切点为C,此时AC即为上图中A出发的绿色线段。设AC与AO之间的夹角为m,则cos(m) = |AC|/|AO|= combinedRadius/|BO|, 即combinedRadius = |BO| * cos(m),所以sqr(dotProduct1) > combinedRadiusSq * wLengthSq可以转化为:
由于dotProduct1 <0.0限定了n是一个锐角,同时由于m也是一个锐角,所以可以推断出m > n,所以此时V处于两个切点构造的两条AC形成的锥形区域, 即下图中的阴影区域内:
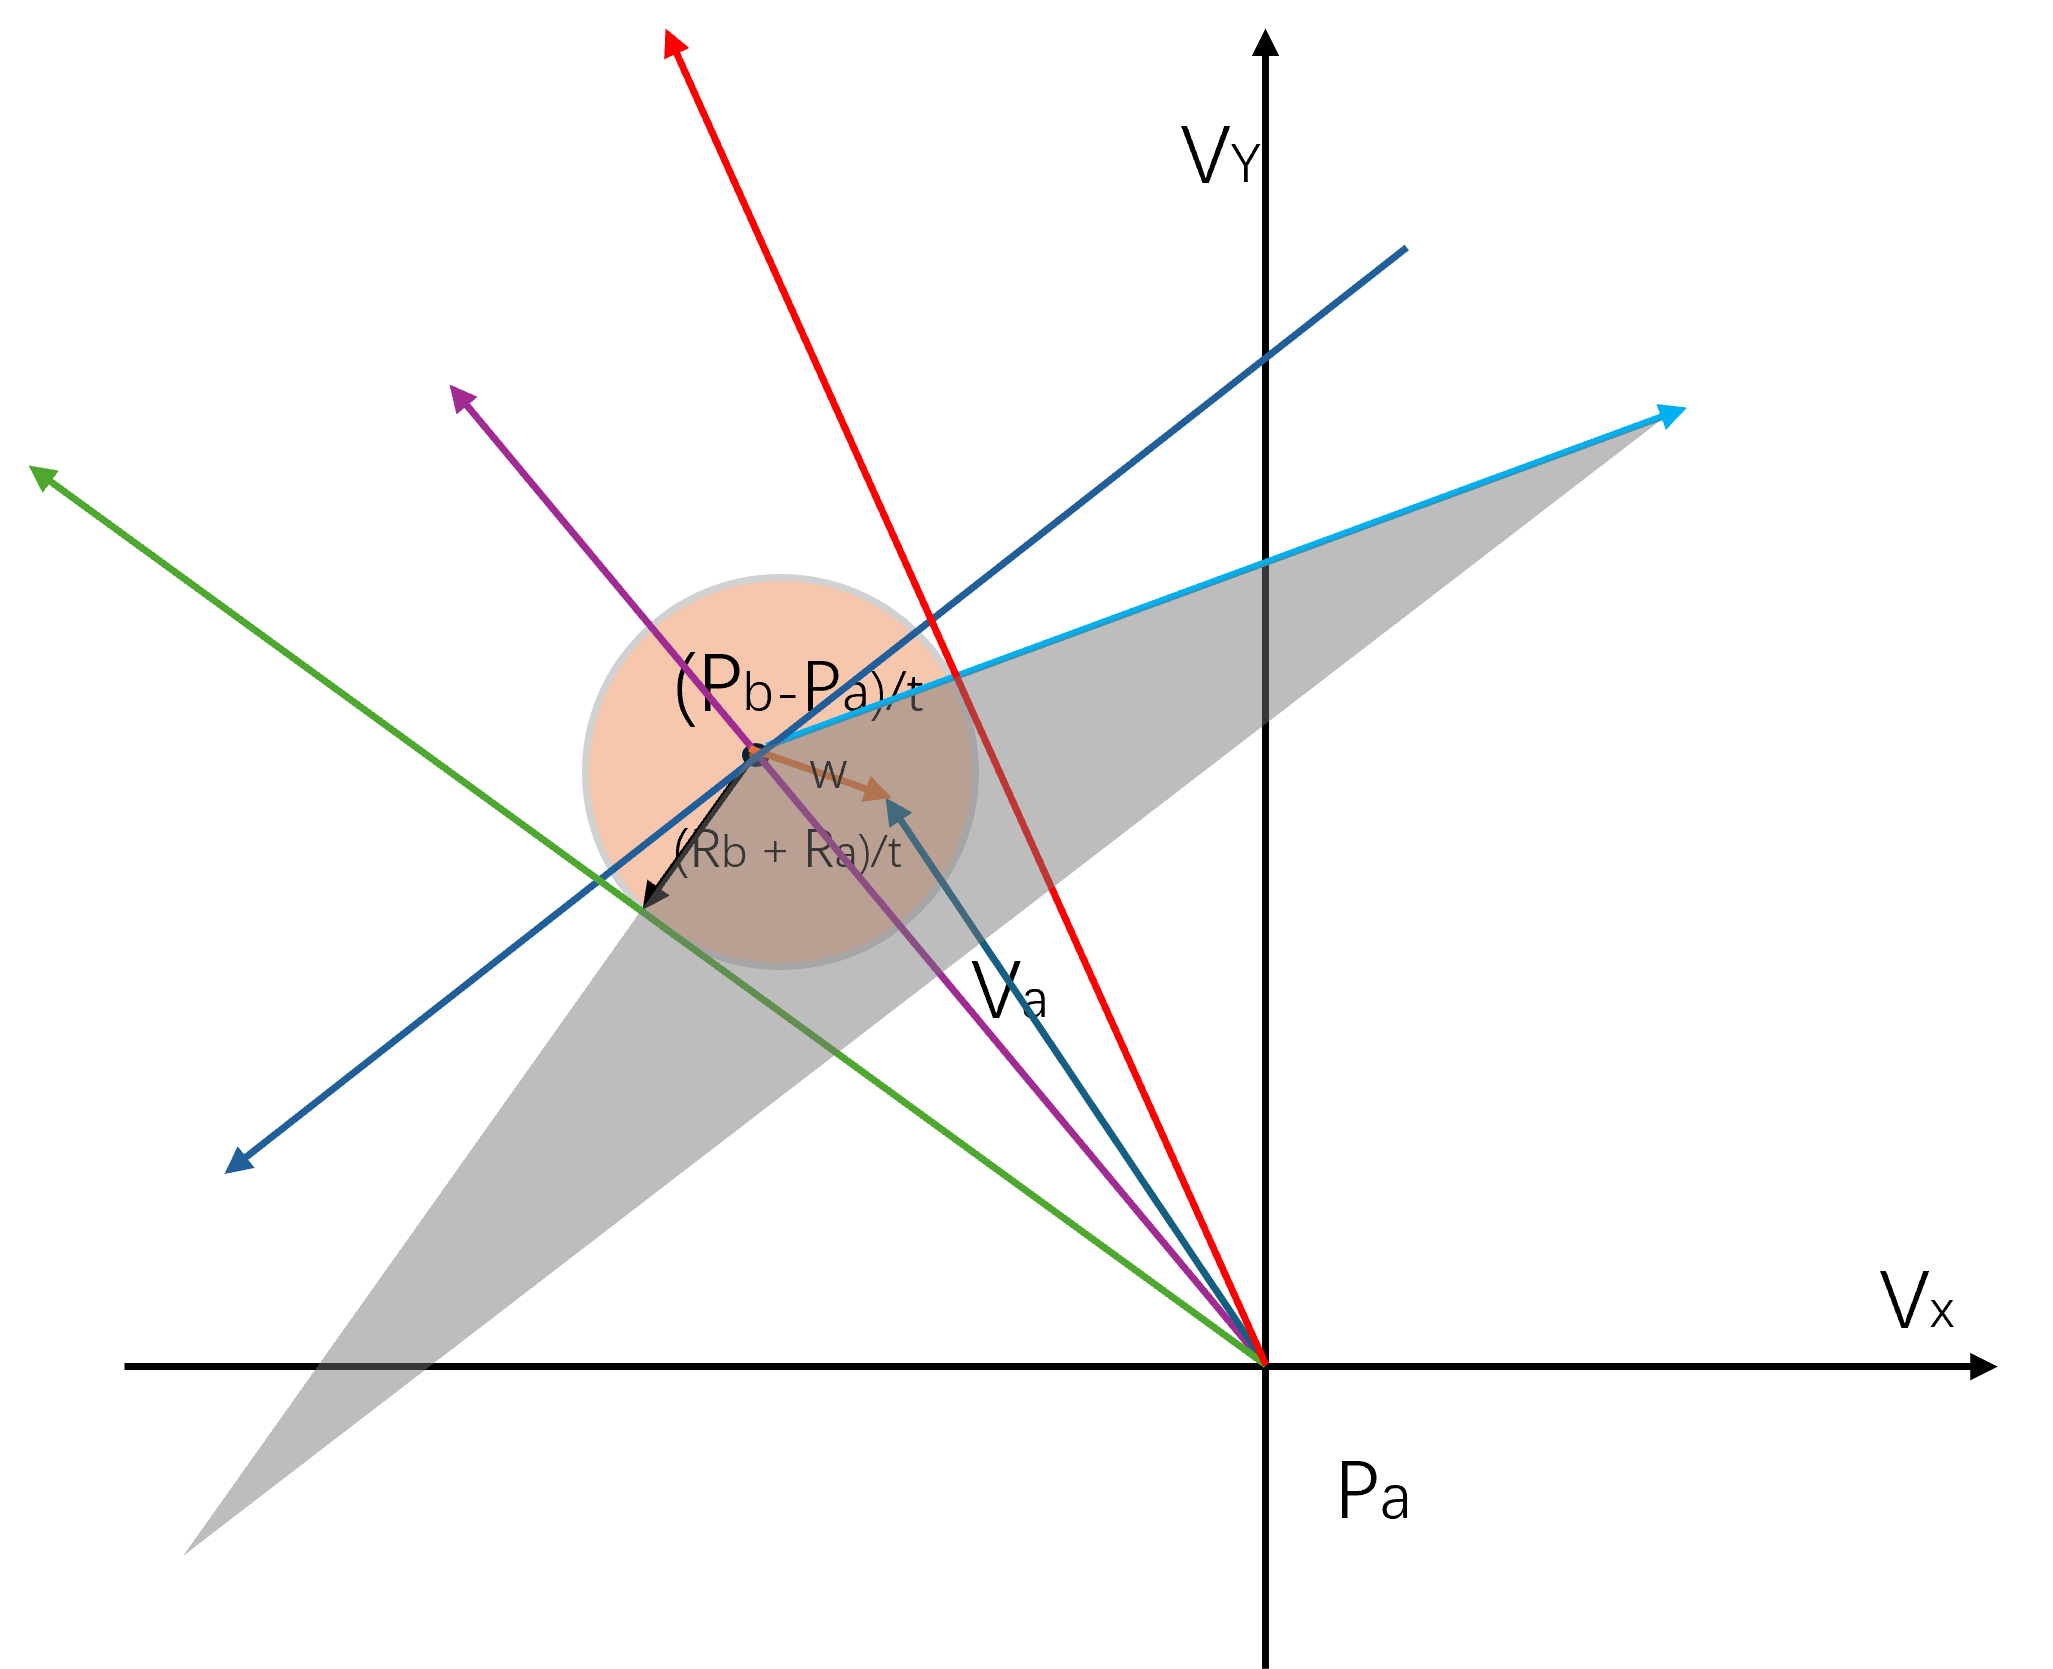
处于这个区域内的V有两种情况,分别是在小圆中或者不在小圆中。如果在小圆中,代表此速度下会发生碰撞,此时能够避免碰撞同时与当前速度差值最小的速度为w延伸到小圆的圆周上交点。如果不在小圆中,代表此速度下不会发生碰撞,此时能够触发碰撞且与当前速度差值最小的速度为w回缩到小圆的圆周上的交点。两种情况下的最优速度方向都是w,其对应的ORCA线方向需要顺时针旋转90度,即 Vector2(unitW.y(), -unitW.x())。此时的VC向量就是u,其带符号长度(正值代表w向量延申,负值代表w向量收缩)就是小圆的半径减去w的长度,也就是combinedRadius - invTimeHorizon - wLength。
剩下的两个分支讨论就是V到两个腿的距离会比V到小圆的外侧圆弧距离更短的情况,内部分为了离左腿更短还是离右腿更短,此时line.direction的赋值都使用了之前介绍的点到圆的切线方向计算公式,注意如果是右边的切线对应的ORCA分割线需要反向。在三种分支都讨论完成之后,执行line.point = velocity_ + 0.5f * u来设定半平面分割线应该经过的点,这里的0.5代表就是agent之间各自避让一半。
对避障速度区域进行求解
上面计算好了所有的ORCA线之后,RVO开始对这些ORCA线定义的半平面求交,并获取一个可行避障速度。这部分的代码就这一行:
size_t lineFail = linearProgram2(orcaLines_, maxSpeed_, prefVelocity_, false, newVelocity_);
这个函数的定义如下:
size_t linearProgram2(const std::vector<Line> &lines, float radius, const Vector2 &optVelocity, bool directionOpt, Vector2 &result)
{
if (directionOpt) {
// 此时要求optVelocity的长度为1
result = optVelocity * radius;
}
else if (absSq(optVelocity) > sqr(radius)) {
// 对于超过最大速度的时候 拉回最大速度
result = normalize(optVelocity) * radius;
}
else {
// 否则不对最大速度进行修改
result = optVelocity;
}
for (size_t i = 0; i < lines.size(); ++i) {
if (det(lines[i].direction, lines[i].point - result) > 0.0f) {
/* 当前result处于lines[i]对应的半平面之外 会导致与lines[i]对应的VO发生碰撞 需要对result进行修正 */
const Vector2 tempResult = result;
if (!linearProgram1(lines, i, radius, optVelocity, directionOpt, result)) {
result = tempResult;
return i;
}
}
}
return lines.size();
}
这里的radius参数对应的并不是agent的碰撞半径,而是最大可能速度,optVelocity代表当前不考虑阻挡情况下的最优速度,directionOpt这个代表传入的速度已经被单位化了需要恢复到最大速度,result参数代表最后算出来的最优速度。而函数的返回值代表内部迭代过程执行到第几条ORCA线的时候发现半平面交集为空,如果返回值等于分割线数组的大小,代表相交区域不为空。内部其实就是一个非常简单的循环,以此遍历所有的分割平面,判断当前result是否在这个分割平面内,如果不在则需要对result进行修正。这里的det(A,B)>0就代表从A逆时针旋转到B所需要的夹角要大于180度,也就是说B点不在A向量定义的经过原点的半平面内。
这里我们再提供一个凸优化中的断言:一个凸函数在凸区域的极值点一定在这个凸区域的边界上。所以为了求Agent在这些ORCA线组成的半平面交的与最优速度相差最小的最优速度,只需要处理这些半平面交的边界线上的所有点即可。所以如果result满足了前面i-1条线所定义的半平面交但是不满足lines[i]定义的半平面交,则我们只需要处理lines[i]与前i-1条线所形成的凸区域的相交线段并获取这条线段上最优速度即可。这里的速度修正调用的linearProgram1函数定义如下:
bool linearProgram1(const std::vector<Line> &lines, size_t lineNo, float radius, const Vector2 &optVelocity, bool directionOpt, Vector2 &result)
参数中的radius还是最开始传入的最大速度,接下来我们将这个函数体按步骤进行解析:
const float dotProduct = lines[lineNo].point * lines[lineNo].direction;
const float discriminant = sqr(dotProduct) + sqr(radius) - absSq(lines[lineNo].point);
if (discriminant < 0.0f) {
/* Max speed circle fully invalidates line lineNo. */
return false;
}
dotProduct计算的是这段代码的意思lines[lineNo].point这个向量投影到这条线的长度,absSq(lines[lineNo].point) - sqr(dotProduct)则计算的是原点到这条ORCA线的距离h的平方。如果discriminant小于零代表,原点到这条ORCA的距离h大于了最大速度radius,则说明在agent在速度长度限制下的任意速度都不会与当前ORCA线的半平面产生交集。因此Agent会与当前orca线所代表的物体相撞,无法找到一个可行避障速度,此时对应下面的图例:
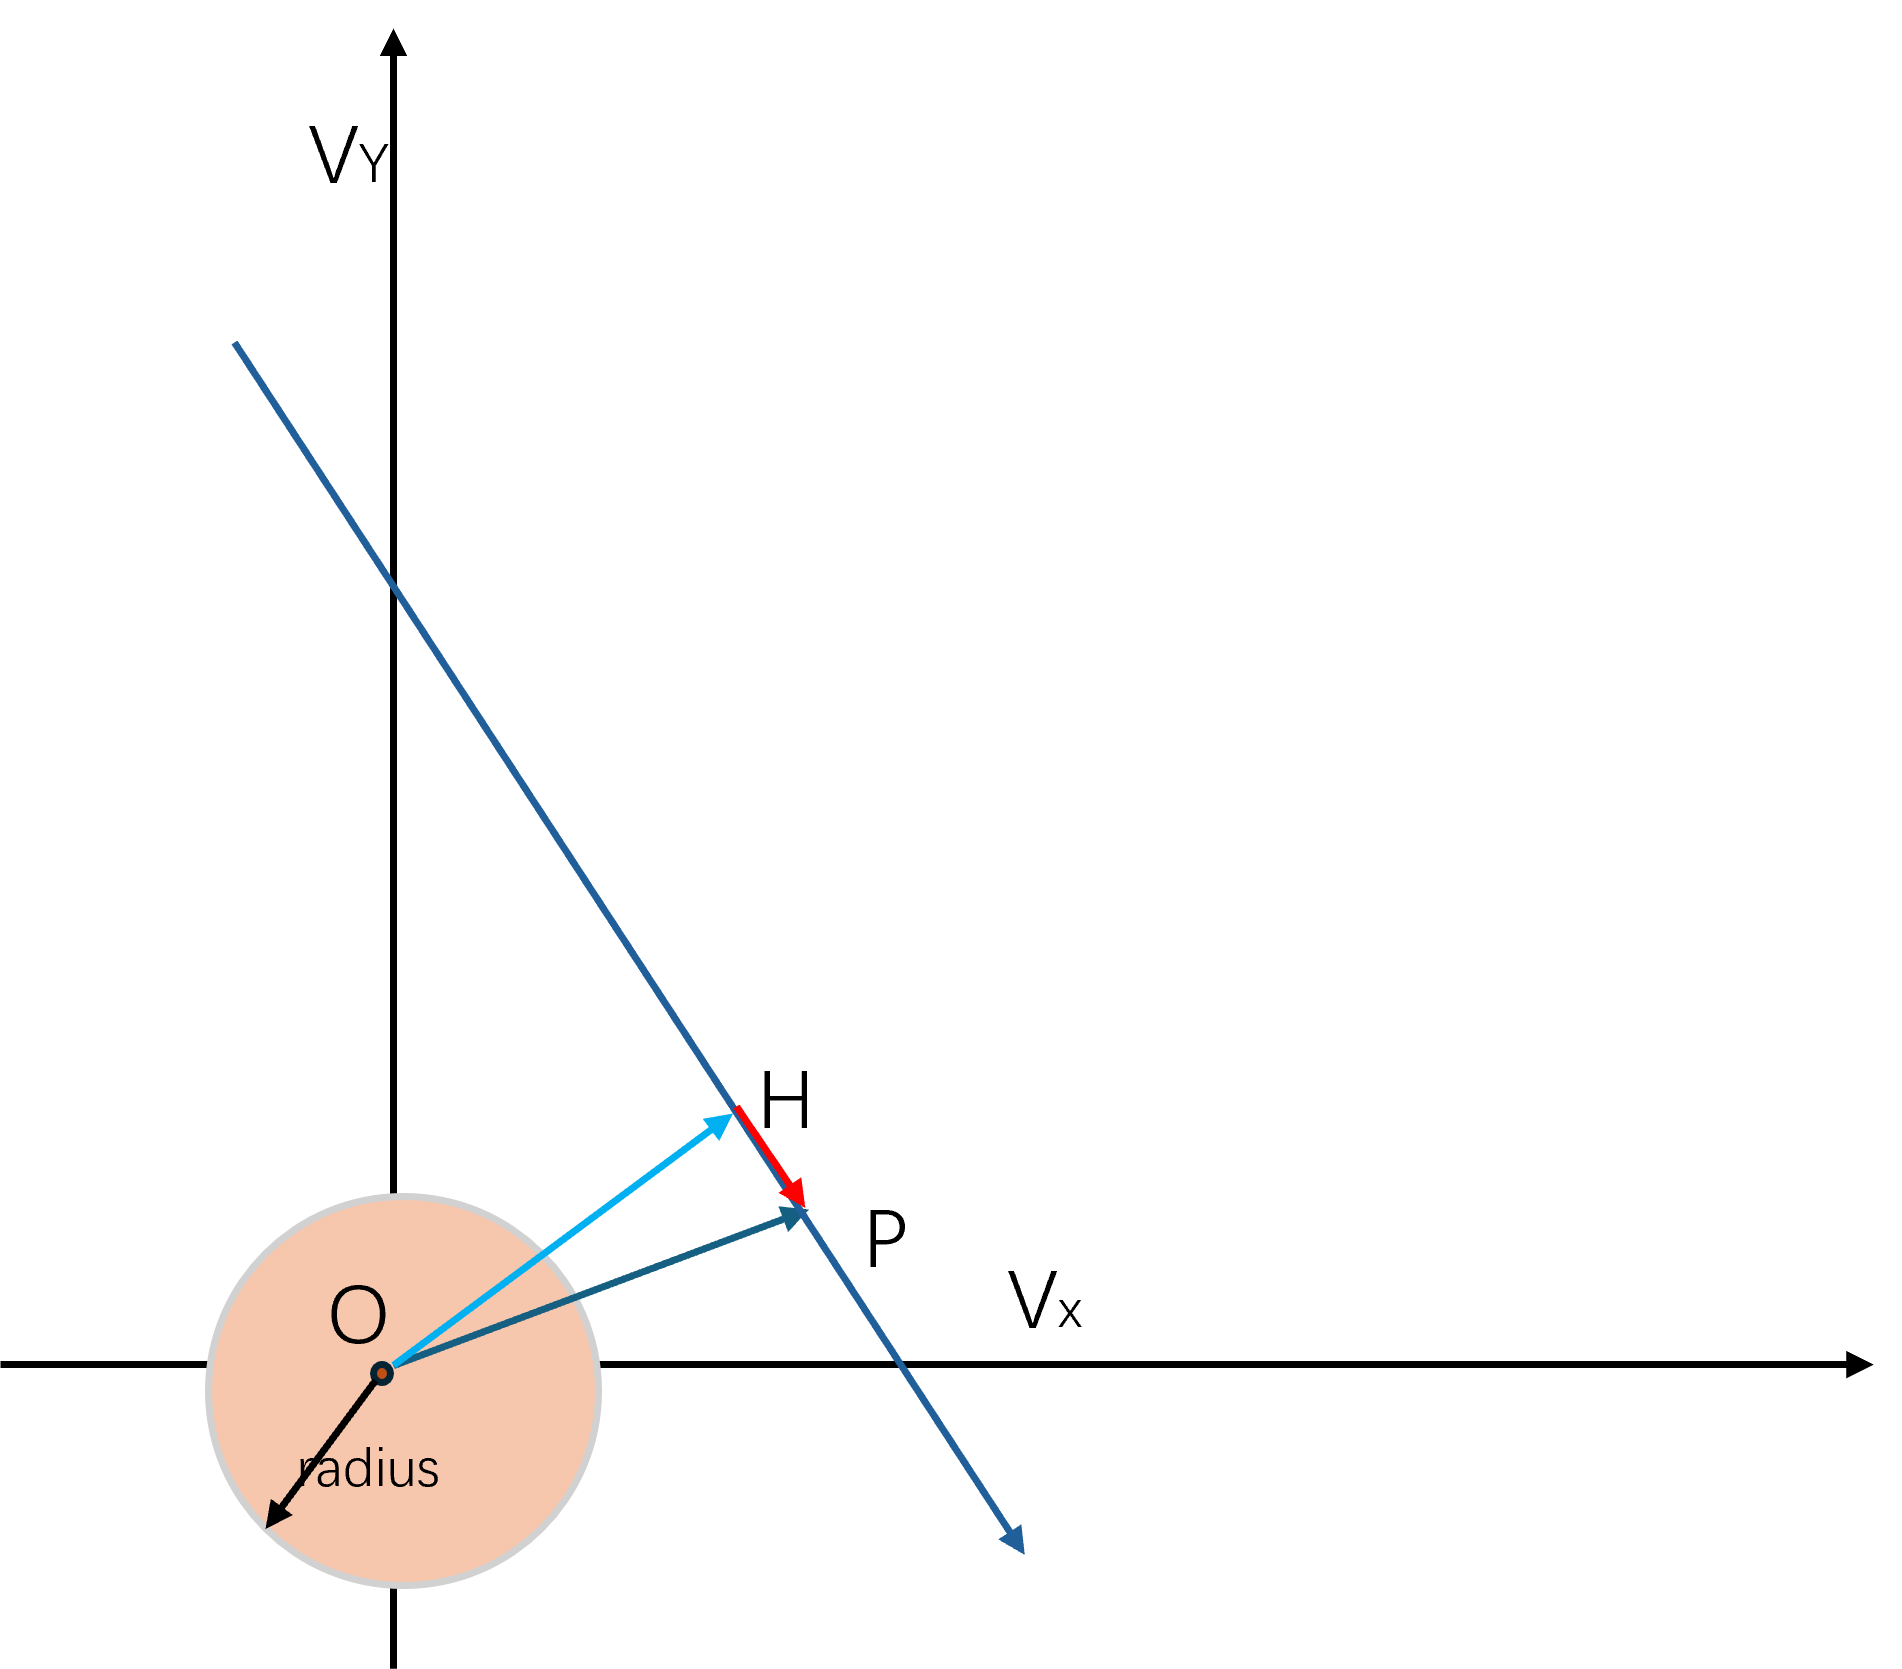
上图中的P点就是lines[lineNo].point,H点是原点O到这个线的最短距离点,所以OH与HP垂直, HP等于dotProduct,sqr(radius) - OH*OH = sqr(radius) - (OP*OP - HP*HP) = discriminant。
接下来分析radius半径大小的圆与当前分割线有交点的时候,此时的图例如下:
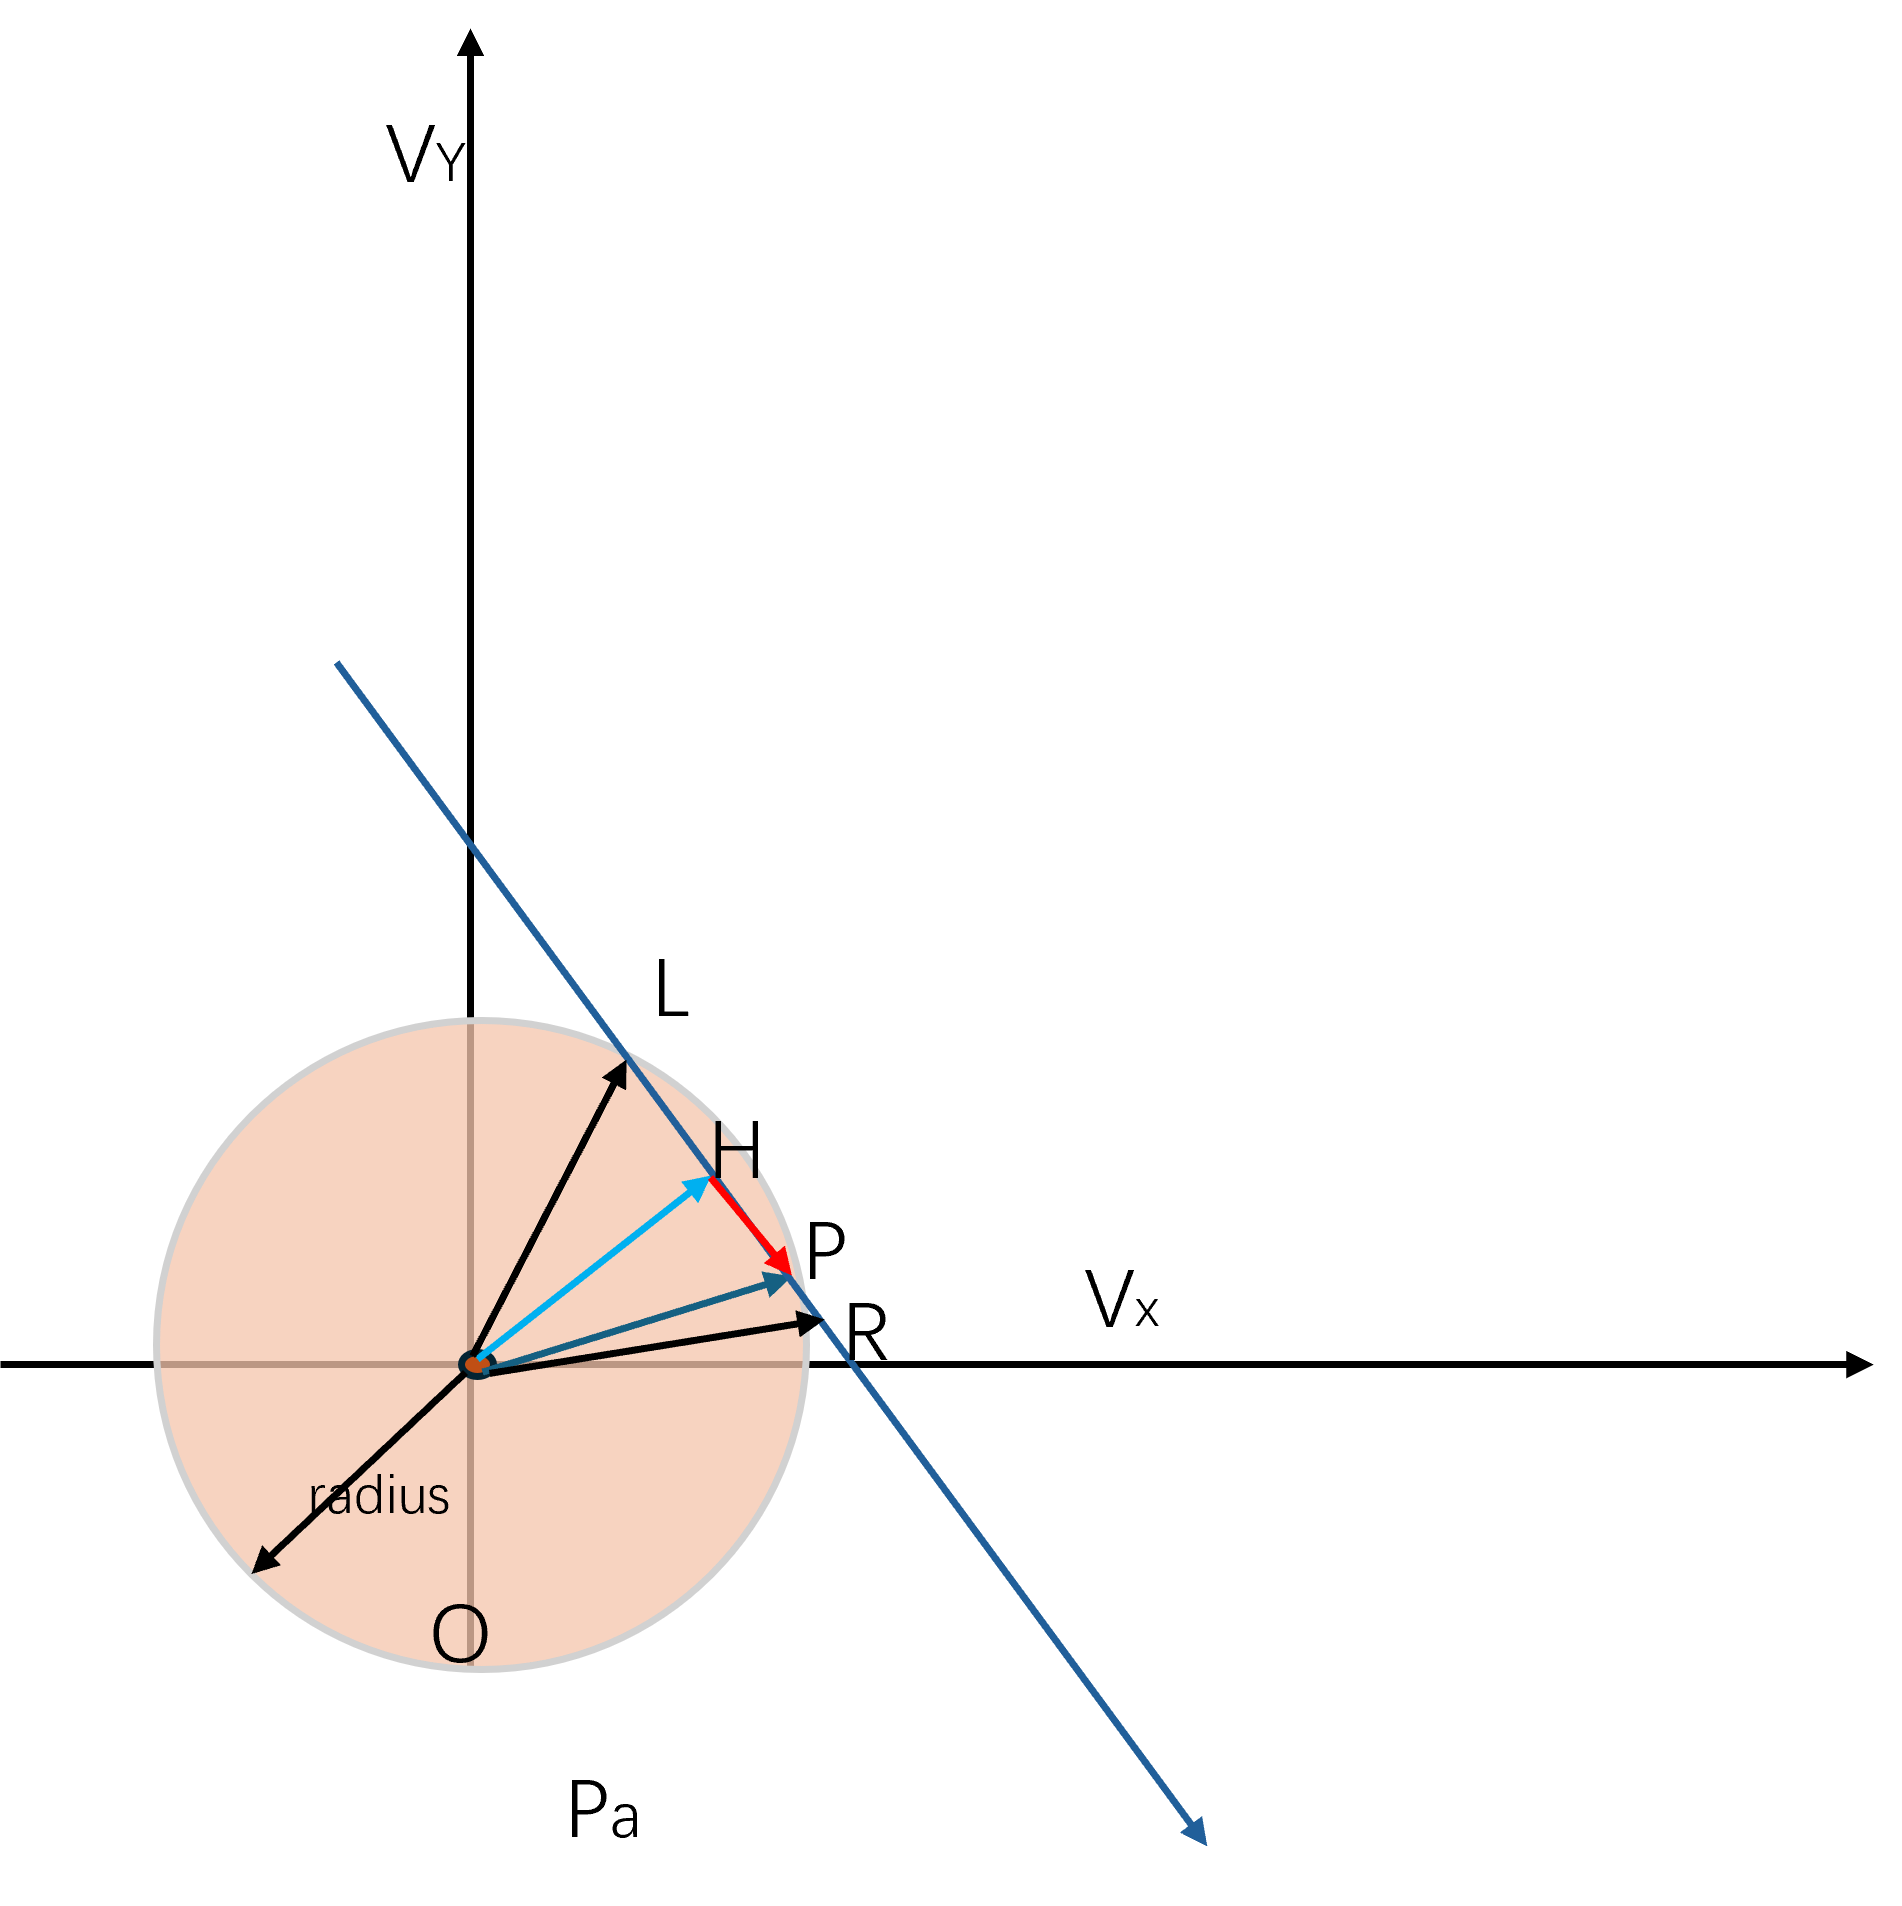
这里设最大速度半径圆形与分割线的交点分别为L,R, OL在OH左侧,而OR在OH右侧,代码中首先求出这两个交点的位置:
const float sqrtDiscriminant = std::sqrt(discriminant);
float tLeft = -dotProduct - sqrtDiscriminant;
float tRight = -dotProduct + sqrtDiscriminant;
此时|HR| = |HL| = sqrt(sqr(radius) - OH*OH) 也就是sqrtDiscriminant,此时向量PL等于-HP - HR,长度等于HP + HR,所以此时tLeft代表的是向量PL在这条线的正方向的带符号长度,对应的tRight就代表了向量PR在这条线的正方向的带符号长度。 对应的任意t,如果满足了tLeft<=t<=tRight,则代表OP + t * line.direction所代表的点T一定在线段LR内,此时OT代表的速度刚好可以保证当前Agent与这条ORCA线对应的VO相切。
接下来要考虑前面的lineNo-1条分割线组成的凸区域S与lines[lineNo]的相交线段,这个线段一定在LR之内,因为在直线lines[lineNo]上只有LR线段上的点才能保证不碰撞,而S区域内的任意点都不会触发碰撞。 求相交线段的流程其实就是遍历之前的所有直线与当前lines[lineNo]的相交点,然后更新LR线段:
for (size_t i = 0; i < lineNo; ++i) {
const float denominator = det(lines[lineNo].direction, lines[i].direction);
const float numerator = det(lines[i].direction, lines[lineNo].point - lines[i].point);
if (std::fabs(denominator) <= RVO_EPSILON) {
/* 说明是平行线 */
if (numerator < 0.0f) {
// 如果平行线方向完全相反 同时由于当前result 不满足lines[lineNo], 则说明交集区域肯定为空
return false;
}
else {
continue;
}
}
const float t = numerator / denominator;
if (denominator >= 0.0f) {
/* Line i bounds line lineNo on the right. */
tRight = std::min(tRight, t);
}
else {
/* Line i bounds line lineNo on the left. */
tLeft = std::max(tLeft, t);
}
if (tLeft > tRight) {
return false;
}
}
设遍历过程中lines[i].point为Q,同时两条直线的交点为T,此时令向量PT = t * lines[lineNo].direction,则向量TQ = OT - OQ = OP + PT - OQ 与lines[i].direction共线,即det(TQ, lines[i].direction) = 0, 由于向量的叉积也是满足加法的,所以det(QP + PT , lines[i].direction) = 0进一步可以拆解为det(PT, lines[i].direction) = det(PQ, lines[i].direction) = numerator。又因为det(PT, lines[i].direction) = t* det(lines[lineNo].direction, lines[i].direction) = t * denominator,所以最后可以得到t = numerator / denominator。
我们上一步求出了T点的坐标,但是我们需要的是获取经过T点且与lines[lineNo].direction共线的满足lines[i]半平面需求的射线, 获取了这条射线之后在与之前求出来的LR线段求交,用求交后的结果线段来更新LR,这样就可以保证LR线段是[0,lineNo]这些分割线所定义的凸区域的一条边界。用T去更新LR需要明确这个射线方向上t是逐渐增大的还是逐渐减小的。当t是逐渐增大时则T可以用来替换L,而t是逐渐减小时则T可以用来替换R。
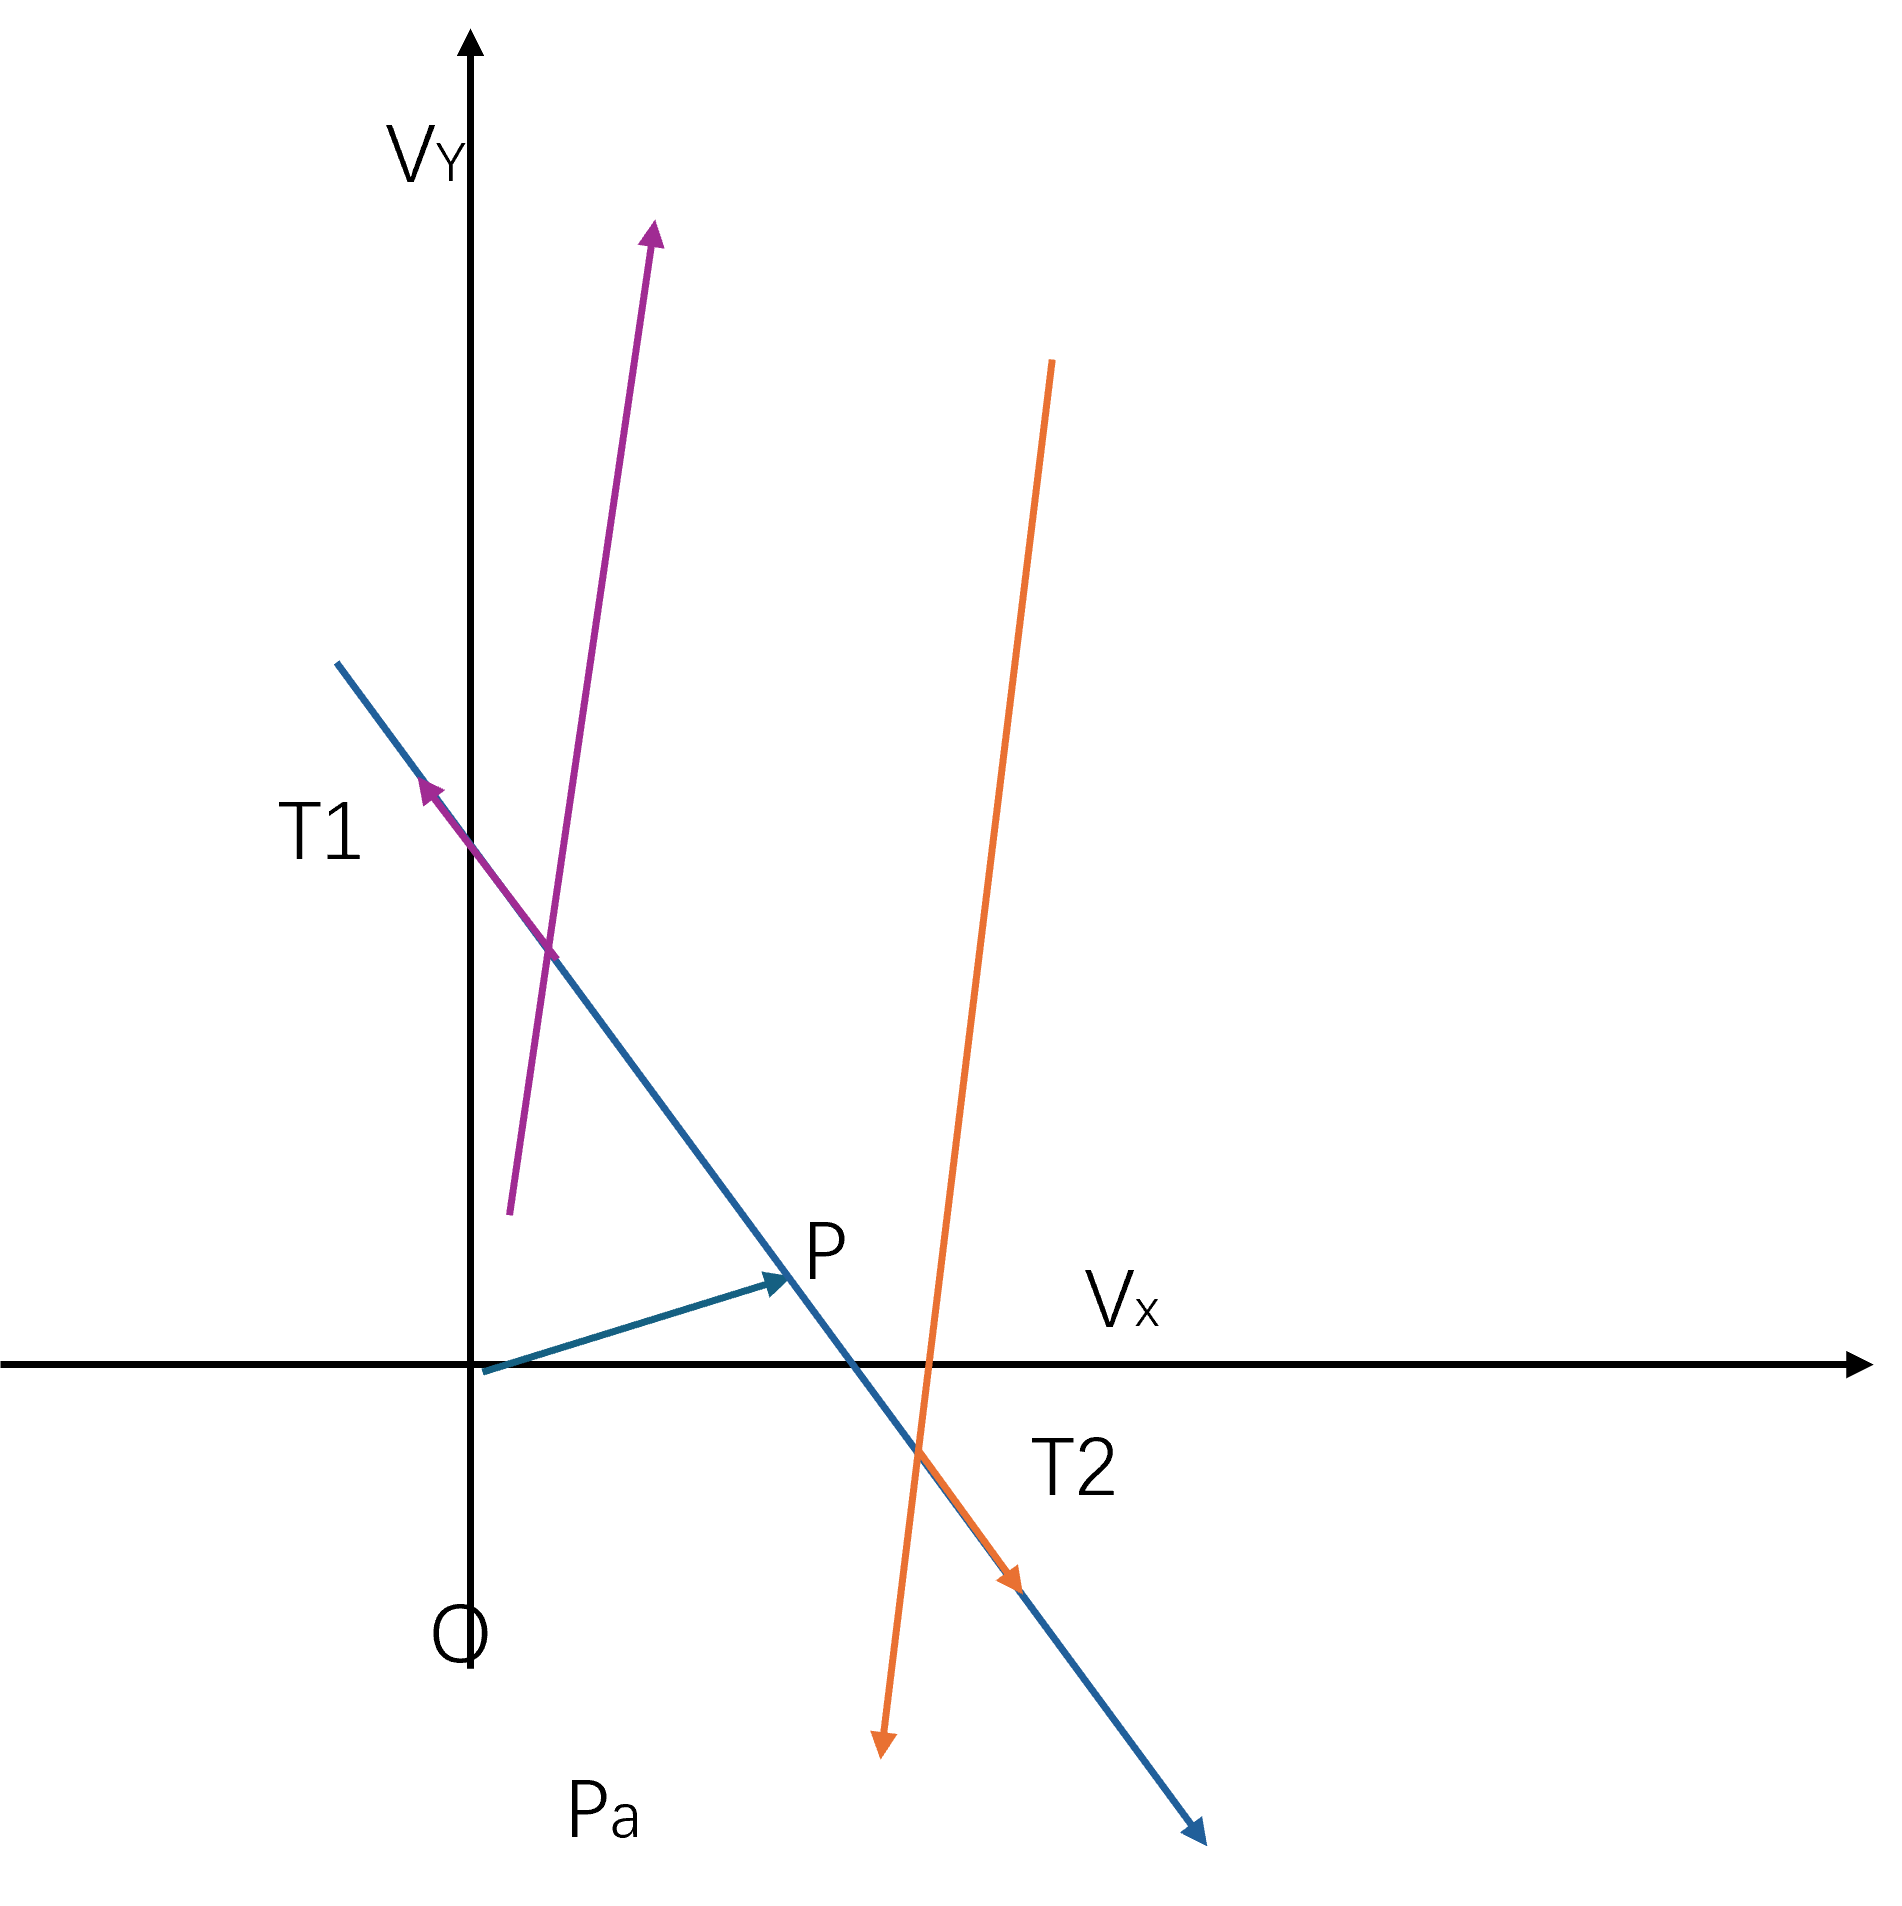
在上面的图中,我们提供了两个用来测试的直线:
- 对于紫色的长直线
L1,其交点为T1,由于两条分割线方向的叉积det(L,L1)为正,此时的紫色短射线代表所求的射线,t需要逐渐减小,所以需要去替换端点R。 - 对于黄色的长直线
L2,其交点为T2, 由于两条分割线方向的叉积det(L,L2)为负, 此时的黄色短射线代表所求的射线,t需要逐渐减增大,所以需要去替换端点L。
如果迭代过程中发现L >R,则说明当前[0,lineNo]这些分割线所定义的凸区域为空,此时返回false代表找不到求解区间。
在找到可行区间之后,以下面的逻辑来选择调整后的最优速度:
if (directionOpt) {
/* Optimize direction. */
if (optVelocity * lines[lineNo].direction > 0.0f) {
/* Take right extreme. */
result = lines[lineNo].point + tRight * lines[lineNo].direction;
}
else {
/* Take left extreme. */
result = lines[lineNo].point + tLeft * lines[lineNo].direction;
}
}
else {
const float t = lines[lineNo].direction * (optVelocity - lines[lineNo].point);
if (t < tLeft) {
result = lines[lineNo].point + tLeft * lines[lineNo].direction;
}
else if (t > tRight) {
result = lines[lineNo].point + tRight * lines[lineNo].direction;
}
else {
result = lines[lineNo].point + t * lines[lineNo].direction;
}
}
return true;
-
如果开启了
directionOpt选项,则代表尽可能的选择与最优速度夹角最小的点 -
如果关闭了
directionOpt选项,则代表尽可能的选择与最优速度偏差最小的点,为此这里需要首选计算出最优速度在这条直线上的投影点Q对应的向量PQ在当前分割线方向上的带符号长度t,根据t的取值来选择偏差最小的点
在无可行解情况下的处理
在VO比较稠密的情况下之前的linearProgram2可能没有可行解,所以此时要按照之前论文里介绍的方法来获取一个比较安全的速度。
size_t lineFail = linearProgram2(orcaLines_, maxSpeed_, prefVelocity_, false, newVelocity_);
if (lineFail < orcaLines_.size()) {
linearProgram3(orcaLines_, numObstLines, lineFail, maxSpeed_, newVelocity_);
}
这个调整方法linearProgram3就是将所有的分割线都朝外侧拉远一定距离h,直到交集区域出现了一个点v,此时的v就是所求的一个比较安全的速度,这个往外侧拉远同样距离的调整可以看作允许Agent之间发生一定程度的碰撞。不过对于静态障碍物来说任何碰撞都是不允许的,所以这个函数最终的实现如下:
void linearProgram3(const std::vector<Line> &lines, size_t numObstLines, size_t beginLine, float radius, Vector2 &result)
{
float distance = 0.0f;
for (size_t i = beginLine; i < lines.size(); ++i) {
if (det(lines[i].direction, lines[i].point - result) > distance) {
// 如果当前速度点到这条orca线的距离大于了之前调整的distance 则说明我们需要继续增大distance
// 所有的静态障碍物构造出来的orca线都不能调整 直接全复制
std::vector<Line> projLines(lines.begin(), lines.begin() + static_cast<ptrdiff_t>(numObstLines));
// 遍历所有的非障碍物引发的orca线
for (size_t j = numObstLines; j < i; ++j) {
Line line;
float determinant = det(lines[i].direction, lines[j].direction);
if (std::fabs(determinant) <= RVO_EPSILON) {
// 两条直线平行
if (lines[i].direction * lines[j].direction > 0.0f) {
// 相同方向则不管
continue;
}
else {
// 不同方向 则将line向外调整 处于当前两条线的中间
line.point = 0.5f * (lines[i].point + lines[j].point);
}
}
else {
// 这里将这条线的point调整为路过两者的交点
line.point = lines[i].point + (det(lines[j].direction, lines[i].point - lines[j].point) / determinant) * lines[i].direction;
}
line.direction = normalize(lines[j].direction - lines[i].direction);
projLines.push_back(line);
}
const Vector2 tempResult = result;
// 以当前line[i]的法向作为最优速度方向 开启方向优化来计算调整后的最优速度
if (linearProgram2(projLines, radius, Vector2(-lines[i].direction.y(), lines[i].direction.x()), true, result) < projLines.size()) {
// 这个分支应该不可能进入 因为总是可以通过外移一段距离来获取非空交集
// 作者解释说 可能出现了浮点误差
result = tempResult;
}
// 获取了调整后的最优速度之后,计算这个速度到原来的分割线的距离
distance = det(lines[i].direction, lines[i].point - result);
}
}
}
上面代码里最难以弄懂的就是line.direction = normalize(lines[j].direction - lines[i].direction)的更新操作,对于平行线但是逆向的情况下,这行代码执行与不执行没啥区别,此时新的line是原来两条老的line的平分线,任何在新line上的点到原来两条平行线的距离都相等。
对于非平行情况下就比较费解了,这里我们用图例来展示一下这行代码的意图:
这里我们用直线J代表lines[j],直线I代表lines[i]、以两直线相交点为圆心做一个半径为1的圆形,lines[j].direction - lines[i].direction就是上图中的线段n,保持这个n的方向并平移到这个圆心得到了直线m,此时我们可以证明直线m就是直线J与直线-I之间的角平分线。在角平分线上的任意一点到直线I的距离都等于到直线J的距离。上图中的虚线I和虚线J就是原来的实线I与实线J向外扩展距离h之后形成的新分割线,这两条虚线的交点到原来的两条实线的交点都是h。同时这条角平分线对应的半平面内部(不在边界上)的点到直线J的距离一定会大于到直线I的距离。由于在凸区域上凸函数的极值点一定在这个区域的边界上,所以最终算出来的最优速度到任意直线I的距离一定不大于到直线J的距离,同时存在一条直线I使得最优速度点到直线I与直线J的距离相等。因此此时计算出来的distance就是在前J条线的限制下需要让交集区域不为空的最小外延距离。
Unreal Engine 的 RVO 系统
RVO 系统的接入
在unreal engine中也集成了一个简单版本的rvo, 类名为UAvoidanceManager,每个World都会创建一个。时机在initworld中,安排在物理与寻路的后面:
void UWorld::InitWorld(const InitializationValues IVS)
{
if (!ensure(!bIsWorldInitialized))
{
return;
}
FCoreUObjectDelegates::GetPostGarbageCollect().AddUObject(this, &UWorld::OnPostGC);
InitializeSubsystems();
FWorldDelegates::OnPreWorldInitialization.Broadcast(this, IVS);
AWorldSettings* WorldSettings = GetWorldSettings();
if (IVS.bInitializeScenes)
{
#if WITH_EDITOR
bEnableTraceCollision = IVS.bEnableTraceCollision;
bForceUseMovementComponentInNonGameWorld = IVS.bForceUseMovementComponentInNonGameWorld;
#endif
if (IVS.bCreatePhysicsScene)
{
// Create the physics scene
CreatePhysicsScene(WorldSettings);
}
bShouldSimulatePhysics = IVS.bShouldSimulatePhysics;
// Save off the value used to create the scene, so this UWorld can recreate its scene later
bRequiresHitProxies = IVS.bRequiresHitProxies;
GetRendererModule().AllocateScene(this, bRequiresHitProxies, IVS.bCreateFXSystem, GetFeatureLevel());
}
// Prepare AI systems
if (WorldSettings)
{
if (IVS.bCreateNavigation || IVS.bCreateAISystem)
{
if (IVS.bCreateNavigation)
{
FNavigationSystem::AddNavigationSystemToWorld(*this, FNavigationSystemRunMode::InvalidMode, WorldSettings->GetNavigationSystemConfig(), /*bInitializeForWorld=*/false);
}
if (IVS.bCreateAISystem && WorldSettings->IsAISystemEnabled())
{
CreateAISystem();
}
}
}
if (GEngine->AvoidanceManagerClass != NULL)
{
AvoidanceManager = NewObject<UAvoidanceManager>(this, GEngine->AvoidanceManagerClass);
}
}
这里的AvoidanceManagerClass是根据配置的类路径来创建的:
/** Sets the AvoidanceManager class, which can be overridden to change AI crowd behavior. */
UPROPERTY(globalconfig, noclear, meta=(MetaClass="/Script/Engine.AvoidanceManager", DisplayName="Avoidance Manager Class"))
FSoftClassPath AvoidanceManagerClassName;
UPROPERTY()
TSubclassOf<class UAvoidanceManager> AvoidanceManagerClass;
Engine在启动的时候会加载这个class:
if (AvoidanceManagerClassName.IsValid())
{
LoadEngineClass<UAvoidanceManager>(AvoidanceManagerClassName, AvoidanceManagerClass);
}
在BaseEngine.ini里这个路径填的就是AvoidanceManager,当然我们可以在工程目录下的DefaultEngine.ini里覆盖:
AvoidanceManagerClassName=/Script/Engine.AvoidanceManager
在CharacterMovementComponent上有一个开关选项,来配置是否使用RVO来驱动碰撞避免:
/** If set, component will use RVO avoidance. This only runs on the server. */
UPROPERTY(Category="Character Movement: Avoidance", EditAnywhere, BlueprintReadOnly)
uint8 bUseRVOAvoidance:1;
在开启了RVO支持之后,就会向AvoidanceManager里注册当前CharacterMovementComponent:
void UCharacterMovementComponent::SetUpdatedComponent(USceneComponent* NewUpdatedComponent)
{
// 省略其他代码
if (bUseRVOAvoidance && IsValid(NewUpdatedComponent))
{
UAvoidanceManager* AvoidanceManager = GetWorld()->GetAvoidanceManager();
if (AvoidanceManager)
{
AvoidanceManager->RegisterMovementComponent(this, AvoidanceWeight);
}
}
}
这个RVO的介入也可以在运行时开关,暴露了SetAvoidanceEnabled接口,来触发RegisterMovementComponent或者RemoveAvoidanceObject:
void UCharacterMovementComponent::SetAvoidanceEnabled(bool bEnable)
{
if (bUseRVOAvoidance != bEnable)
{
bUseRVOAvoidance = bEnable;
const int32 OldAvoidanceUID = AvoidanceUID;
AvoidanceUID = 0;
// this is a safety check - it's possible to not have CharacterOwner at this point if this function gets
// called too early
ensure(GetCharacterOwner());
if (GetCharacterOwner() != nullptr)
{
UWorld* World = GetWorld();
UAvoidanceManager* AvoidanceManager = World ? World->GetAvoidanceManager() : nullptr;
if (AvoidanceManager)
{
if (bEnable)
{
AvoidanceManager->RegisterMovementComponent(this, AvoidanceWeight);
}
else if (!AvoidanceManager->IsAutoPurgeEnabled())
{
// When disabling avoidance the object needs to be removed immediately if the manager isn't set to auto purge.
// Otherwise we would leak the object since there isn't anything left to remove it.
AvoidanceManager->RemoveAvoidanceObject(OldAvoidanceUID);
}
}
}
}
}
避让速度计算
在接入了RVO之后,在更新移动速度的最后面,会调用到CalcAvoidanceVelocity:
void UCharacterMovementComponent::CalcVelocity(float DeltaTime, float Friction, bool bFluid, float BrakingDeceleration)
{
// 省略所有的速度计算相关代码
// 最后的两行是通过rvo去调整
if (bUseRVOAvoidance)
{
CalcAvoidanceVelocity(DeltaTime);
}
}
CalcAvoidanceVelocity里的逻辑就是调用AvoidanceManager->GetAvoidanceVelocityForComponent这个接口来计算避障速度,
void UCharacterMovementComponent::CalcAvoidanceVelocity(float DeltaTime)
{
SCOPE_CYCLE_COUNTER(STAT_AI_ObstacleAvoidance);
UAvoidanceManager* AvoidanceManager = GetWorld()->GetAvoidanceManager();
if (AvoidanceWeight >= 1.0f || AvoidanceManager == NULL || GetCharacterOwner() == NULL)
{
return;
}
if (GetCharacterOwner()->GetLocalRole() != ROLE_Authority)
{
return;
}
//Adjust velocity only if we're in "Walking" mode. We should also check if we're dazed, being knocked around, maybe off-navmesh, etc.
UCapsuleComponent *OurCapsule = GetCharacterOwner()->GetCapsuleComponent();
if (!Velocity.IsZero() && IsMovingOnGround() && OurCapsule)
{
//See if we're doing a locked avoidance move already, and if so, skip the testing and just do the move.
if (AvoidanceLockTimer > 0.0f)
{
Velocity = AvoidanceLockVelocity;
}
else
{
FVector NewVelocity = AvoidanceManager->GetAvoidanceVelocityForComponent(this);
if (bUseRVOPostProcess)
{
PostProcessAvoidanceVelocity(NewVelocity);
}
if (!NewVelocity.Equals(Velocity)) //Really want to branch hint that this will probably not pass
{
//Had to divert course, lock this avoidance move in for a short time. This will make us a VO, so unlocked others will know to avoid us.
Velocity = NewVelocity;
SetAvoidanceVelocityLock(AvoidanceManager, AvoidanceManager->LockTimeAfterAvoid);
}
else
{
//Although we didn't divert course, our velocity for this frame is decided. We will not reciprocate anything further, so treat as a VO for the remainder of this frame.
SetAvoidanceVelocityLock(AvoidanceManager, AvoidanceManager->LockTimeAfterClean); //10 ms of lock time should be adequate.
}
}
//RickH - We might do better to do this later in our update
AvoidanceManager->UpdateRVO(this);
bWasAvoidanceUpdated = true;
}
}
计算完成之后,再调用AvoidanceManager->SetAvoidanceVelocityLock接口将当前角色的速度脱离RVO的控制一个很短的时间,这样可以避免移动速度的震荡,这两个时间窗口常量都在UAvoidanceManager里初始化的:
UAvoidanceManager::UAvoidanceManager(const FObjectInitializer& ObjectInitializer) : Super(ObjectInitializer)
{
DefaultTimeToLive = 1.5f;
LockTimeAfterAvoid = 0.2f; // 每0.2s才更新一次rvo的速度
LockTimeAfterClean = 0.001f; // 注释里说这个应该是10ms 但是目前是1ms 其实意义差不多 就是为了让当前帧的速度不再被rvo影响
// 省略后续代码
}
GetAvoidanceVelocityForComponent只是一个简单的转发函数,真正计算速度的函数为GetAvoidanceVelocity_Internal:
FVector UAvoidanceManager::GetAvoidanceVelocityForComponent(UCharacterMovementComponent* MovementComp)
{
check(MovementComp);
FNavAvoidanceData AvoidanceData(this, MovementComp);
return GetAvoidanceVelocityIgnoringUID(AvoidanceData, DeltaTimeToPredict, MovementComp->GetRVOAvoidanceUIDFast());
}
FVector UAvoidanceManager::GetAvoidanceVelocityIgnoringUID(const FNavAvoidanceData& inAvoidanceData, float DeltaTime, int32 inIgnoreThisUID)
{
return GetAvoidanceVelocity_Internal(inAvoidanceData, DeltaTime, &inIgnoreThisUID);
}
这个函数比较长,这里将拆成多个部分来分段介绍。首先是初始化一些变量,这里的MaxSpeed是当前帧内这个角色能移动的最大距离,
FVector ReturnVelocity = inAvoidanceData.Velocity * DeltaTime;
FVector::FReal MaxSpeed = ReturnVelocity.Size2D();
double CurrentTime;
UWorld* MyWorld = Cast<UWorld>(GetOuter());
if (MyWorld)
{
CurrentTime = MyWorld->TimeSeconds;
}
else
{
//No world? OK, just quietly back out and don't alter anything.
return inAvoidanceData.Velocity;
}
然后就开始收集当前角色的速度障碍物VelocityObstacle,每个速度障碍物都是一个锥形区域,由两个平面来定义:
template<typename T>
struct alignas(16) TPlane
: public TVector<T>
{
public:
using FReal = T;
using TVector<T>::X;
using TVector<T>::Y;
using TVector<T>::Z;
/** The w-component. */
T W;
};
struct FVelocityAvoidanceCone
{
FPlane ConePlane[2]; //Left and right cone planes - these should point in toward each other. Technically, this is a convex hull, it's just unbounded.
};
结果都会放到AllCones中:
bool Unobstructed = true;
AllCones.Empty(AllCones.Max());
for (auto& AvoidanceObj : AvoidanceObjects)
{
// 过滤掉一些不参与VO的
// 然后再生成VO 添加到AllCones数组中
}
在遍历所有可能的速度障碍物的时候,首先有一些过滤条件:
if ((inIgnoreThisUID) && (*inIgnoreThisUID == AvoidanceObj.Key))
{
continue;
}
FNavAvoidanceData& OtherObject = AvoidanceObj.Value;
// 就是之前SetAvoidanceVelocityLock里设置的锁定时间
if (OtherObject.ShouldBeIgnored())
{
continue;
}
// 根据rvo碰撞组去过滤掉一些不需要结算的
if (inAvoidanceData.ShouldIgnoreGroup(OtherObject.GroupMask))
{
continue;
}
// 两者距离大于碰撞半径的也放弃
if (FVector2D(OtherObject.Center - inAvoidanceData.Center).SizeSquared() > FMath::Square(inAvoidanceData.TestRadius2D))
{
continue;
}
// 高度差大于两者高度之和的也过滤掉
if (FMath::Abs(OtherObject.Center.Z - inAvoidanceData.Center.Z) > OtherObject.HalfHeight + inAvoidanceData.HalfHeight + HeightCheckMargin)
{
continue;
}
//当前速度方向正在远离的也过滤掉 完全不考虑对方正在加速过来的问题
if ((ReturnVelocity | (OtherObject.Center - inAvoidanceData.Center)) <= 0.0f)
{
continue;
}
过滤条件都通过之后,才开始创建VO:
//Create data for the avoidance routine
{
FVector PointAWorld = inAvoidanceData.Center;
FVector PointBRelative = OtherObject.Center - PointAWorld; // 向量AB
FVector TowardB, SidewaysFromB;
FVector VelAdjustment;
FVector VelAfterAdjustment;
float RadiusB = OtherObject.Radius + inAvoidanceData.Radius; //
PointBRelative.Z = 0.0f;
TowardB = PointBRelative.GetSafeNormal2D(); //Don't care about height for this game. Rough height-checking will come in later, but even then it will be acceptable to do this.
if (TowardB.IsZero())
{
//Already intersecting, or aligned vertically, scrap this whole object.
continue;
}
SidewaysFromB.Set(-TowardB.Y, TowardB.X, 0.0f); // 向量AB逆时针旋转90度
{
FVector PointPlane[2];
FVector EffectiveVelocityB;
FVelocityAvoidanceCone NewCone;
// 这里的OverrideWeightTime 代表这个时间之前认为此对象质量无穷大
// velocity投影为负代表角色B正在冲向角色A
if ((OtherObject.OverrideWeightTime <= CurrentTime) && ((OtherObject.Velocity|PointBRelative) < 0.0f))
{// 这个分支计算的是RVO 这里考虑了各自的重量 默认重量是1 所以默认算出来的是0.5
float OtherWeight = (OtherObject.Weight + (1.0f - inAvoidanceData.Weight)) * 0.5f;
// 两者速度执行加权 代表对象B在本帧内的期望移动距离
EffectiveVelocityB = ((inAvoidanceData.Velocity * (1.0f - OtherWeight)) + (OtherObject.Velocity * OtherWeight)) * DeltaTime;
}
else
{
// 这个是完全不避让的情况下 B在本帧内的移动距离 退化为简单VO
EffectiveVelocityB = OtherObject.Velocity * DeltaTime;
}
checkSlow(EffectiveVelocityB.Z == 0.0f);
// 现在开始构建VO 圆心为 EffectiveVelocityB + PointBRelative 相当于本帧过后B相对于A的位置 然后半径为RadiusB
//先构建左侧的边界 ,然后加上远离AB连线上的分量 这里的P1只是用来保证平面与XY平面垂直
PointPlane[0] = EffectiveVelocityB + (PointBRelative + (SidewaysFromB * RadiusB));
PointPlane[1].Set(PointPlane[0].X, PointPlane[0].Y, PointPlane[0].Z + 100.0f);
NewCone.ConePlane[0] = FPlane(EffectiveVelocityB, PointPlane[0], PointPlane[1]); //First point is relative to A, which is ZeroVector in this implementation
// 检查B的后续位置在VO内
checkSlow((((PointBRelative+EffectiveVelocityB)|NewCone.ConePlane[0]) - NewCone.ConePlane[0].W) > 0.0f);
//做右侧的边界
PointPlane[0] = EffectiveVelocityB + (PointBRelative - (SidewaysFromB * RadiusB));
PointPlane[1].Set(PointPlane[0].X, PointPlane[0].Y, PointPlane[0].Z - 100.0f);
NewCone.ConePlane[1] = FPlane(EffectiveVelocityB, PointPlane[0], PointPlane[1]); //First point is relative to A, which is ZeroVector in this implementation
checkSlow((((PointBRelative+EffectiveVelocityB)|NewCone.ConePlane[1]) - NewCone.ConePlane[1].W) > 0.0f);
// 如果当前速度在两个半平面交内 则代表会发生碰撞
if ((((ReturnVelocity|NewCone.ConePlane[0]) - NewCone.ConePlane[0].W) > 0.0f)
&& (((ReturnVelocity|NewCone.ConePlane[1]) - NewCone.ConePlane[1].W) > 0.0f))
{
Unobstructed = false;
}
AllCones.Add(NewCone);
}
}
如果之前算出来的所有角色都不会生成速度障碍物,则当前移动速度是一个合法速度,直接返回:
if (Unobstructed)
{
//Trivial case, our ideal velocity is available.
return inAvoidanceData.Velocity;
}
这里就开始考虑调整速度了,此时需要将周围的阻挡边加入进来:
TArray<FNavEdgeSegment> NavEdges;
if (EdgeProviderOb.IsValid())
{
DECLARE_SCOPE_CYCLE_COUNTER(TEXT("Avoidance: collect nav edges"), STAT_AIAvoidanceEdgeCollect, STATGROUP_AI);
EdgeProviderInterface->GetEdges(inAvoidanceData.Center, inAvoidanceData.TestRadius2D, NavEdges);
}
这里并不是使用线性规划的方法去生成最优速度,而是构造八个可选速度,从中获取评分最高的,这八个可选速度的与当前速度的夹角分别是23,40,55,85,分布在当前速度的左右两侧:
FVector::FReal AngleCurrent;
FVector::FReal AngleF = ReturnVelocity.HeadingAngle();
FVector::FReal BestScore = 0.0f;
FVector::FReal BestScorePotential;
FVector BestVelocity = FVector::ZeroVector; //Worst case is we just stand completely still. Should we also allow backing up? Should we test standing still?
const int AngleCount = 4; //Every angle will be tested both right and left.
FVector::FReal AngleOffset[AngleCount] = {FMath::DegreesToRadians<float>(23.0f), FMath::DegreesToRadians<float>(40.0f), FMath::DegreesToRadians<float>(55.0f), FMath::DegreesToRadians<float>(85.0f)};
FVector AngleVector[AngleCount<<1];
//Determine check angles
for (int i = 0; i < AngleCount; ++i)
{
AngleCurrent = AngleF - AngleOffset[i];
AngleVector[(i<<1)].Set(FMath::Cos(AngleCurrent), FMath::Sin(AngleCurrent), 0.0f);
AngleCurrent = AngleF + AngleOffset[i];
AngleVector[(i<<1) + 1].Set(FMath::Cos(AngleCurrent), FMath::Sin(AngleCurrent), 0.0f);
}
然后遍历这八个速度,开始计算得分:
//Sample velocity-space destination points and drag them back to form lines
for (int AngleToCheck = 0; AngleToCheck < (AngleCount<<1); ++AngleToCheck)
{
FVector VelSpacePoint = AngleVector[AngleToCheck] * MaxSpeed;
//Skip testing if we know we can't possibly get a better score than what we have already.
//Note: This assumes the furthest point is the highest-scoring value (i.e. VelSpacePoint is not moving backward relative to ReturnVelocity)
BestScorePotential = (VelSpacePoint|ReturnVelocity) * (VelSpacePoint|VelSpacePoint);
if (BestScorePotential > BestScore)
{
const bool bAvoidsNavEdges = NavEdges.Num() > 0 ? AvoidsNavEdges(inAvoidanceData.Center, VelSpacePoint, NavEdges, inAvoidanceData.HalfHeight) : true;
if (bAvoidsNavEdges)
{
FVector CandidateVelocity = AvoidCones(AllCones, FVector::ZeroVector, VelSpacePoint, AllCones.Num());
FVector::FReal CandidateScore = (CandidateVelocity|ReturnVelocity) * (CandidateVelocity|CandidateVelocity);
//Vectors are rated by their length and their overall forward movement.
if (CandidateScore > BestScore)
{
BestScore = CandidateScore;
BestVelocity = CandidateVelocity;
}
}
}
}
ReturnVelocity = BestVelocity;
这里为了减少复杂的运算,会预先评估当前速度方向上可达到的最大评分,基本就是当前方向在基础速度方向上的投影。如果这个评分大于了之前算的最大评分,才执行后续的计算。
这里的AvoidsNavEdges实现比较简单,就是判断在这个方向下移动是否会与阻挡边相交,相交的话返回false,否则返回true:
static bool AvoidsNavEdges(const FVector& OrgLocation, const FVector& TestVelocity, const TArray<FNavEdgeSegment>& NavEdges, float MaxZDiff)
{
DECLARE_SCOPE_CYCLE_COUNTER(TEXT("Avoidance: avoid nav edges"), STAT_AIAvoidanceEdgeAvoid, STATGROUP_AI);
for (int32 Idx = 0; Idx < NavEdges.Num(); Idx++)
{
const FVector2D Seg0ToSeg1(NavEdges[Idx].P1 - NavEdges[Idx].P0);
const FVector2D OrgToNewPos(TestVelocity);
const FVector2D OrgToSeg0(NavEdges[Idx].P0 - OrgLocation);
const FVector2D::FReal CrossD = FVector2D::CrossProduct(Seg0ToSeg1, OrgToNewPos);
if (FMath::Abs(CrossD) < UE_KINDA_SMALL_NUMBER)
{
continue;
}
const FVector2D::FReal CrossS = FVector2D::CrossProduct(OrgToNewPos, OrgToSeg0) / CrossD;
const FVector2D::FReal CrossT = FVector2D::CrossProduct(Seg0ToSeg1, OrgToSeg0) / CrossD;
if (CrossS < 0.0f || CrossS > 1.0f || CrossT < 0.0f || CrossT > 1.0f)
{
continue;
}
const FVector CrossPt = FMath::Lerp(NavEdges[Idx].P0, NavEdges[Idx].P1, CrossS);
const FVector2D::FReal ZDiff = FMath::Abs(OrgLocation.Z - CrossPt.Z);
if (ZDiff > MaxZDiff)
{
continue;
}
return false;
}
return true;
}
这里的CrossS的意思代表这个方向的射线在目标阻挡线段上的直线的相交点与阻挡线段的向量比值,小于0或大于1都代表不会与阻挡线段相交。同时CrossT的意思是当前方向上的移动多远才会与阻挡直线相交,小于0或大于1都代表不会与阻挡直线相交。最后还要检查一下相交点的高度差,如果差值小于最大高度差,则认为也不会相交。
而AvoidCones就复杂了一些,除了判断相交之外还负责将这个方向上的速度执行收缩:
// 这里的BasePosition永远是速度0
FVector AvoidCones(TArray<FVelocityAvoidanceCone>& AllCones, const FVector& BasePosition, const FVector& DesiredPosition, const int NumConesToTest)
{
FVector CurrentPosition = DesiredPosition;
FVector::FReal DistanceInsidePlane_Current[2];
FVector::FReal DistanceInsidePlane_Base[2];
FVector::FReal Weighting[2];
int ConePlaneIndex;
//AllCones is non-const so that it can be reordered, but nothing should be added or removed from it.
checkSlow(NumConesToTest <= AllCones.Num());
TArray<FVelocityAvoidanceCone>::TIterator It = AllCones.CreateIterator();
for (int i = 0; i < NumConesToTest; ++i, ++It)
{
FVelocityAvoidanceCone& CurrentCone = *It;
//See if CurrentPosition is outside this cone. If it is, then this cone doesn't obstruct us.
DistanceInsidePlane_Current[0] = (CurrentPosition|CurrentCone.ConePlane[0]) - CurrentCone.ConePlane[0].W;
DistanceInsidePlane_Current[1] = (CurrentPosition|CurrentCone.ConePlane[1]) - CurrentCone.ConePlane[1].W;
if ((DistanceInsidePlane_Current[0] <= 0.0f) || (DistanceInsidePlane_Current[1] <= 0.0f))
{
// 任意一个值小于零代表这个速度下不会进入当前VO
continue;
}
//If we've gotten here, CurrentPosition is inside the cone. If BasePosition is also inside the cone, this entire segment is blocked.
DistanceInsidePlane_Base[0] = (BasePosition|CurrentCone.ConePlane[0]) - CurrentCone.ConePlane[0].W;
DistanceInsidePlane_Base[1] = (BasePosition|CurrentCone.ConePlane[1]) - CurrentCone.ConePlane[1].W;
// 这里开始计算 当前速度方向与这两个阻挡边界的最近相交点
#define CALCULATE_WEIGHTING(index) Weighting[index] = -DistanceInsidePlane_Base[index] / (DistanceInsidePlane_Current[index] - DistanceInsidePlane_Base[index]);
if (DistanceInsidePlane_Base[0] <= 0.0f)
{
CALCULATE_WEIGHTING(0);
if (DistanceInsidePlane_Base[1] <= 0.0f)
{
CALCULATE_WEIGHTING(1);
ConePlaneIndex = (Weighting[1] > Weighting[0]) ? 1 : 0;
}
else
{
ConePlaneIndex = 0;
}
}
else if (DistanceInsidePlane_Base[1] <= 0.0f)
{
CALCULATE_WEIGHTING(1);
ConePlaneIndex = 1;
}
else
{
// 如果基础速度也在vo内 没有抢救方法了 放弃后续计算 直接返回速度0
return BasePosition;
}
// 计算出相交点 这个速度下就不会与当前VO相交了
CurrentPosition = (CurrentPosition * Weighting[ConePlaneIndex]) + (BasePosition * (1.0f - Weighting[ConePlaneIndex]));
#undef CALCULATE_WEIGHTING
// 这个VO不再需要去处理 扔到最后
AllCones.Swap(i, NumConesToTest - 1);
// 然后重新开始一轮计算
return AvoidCones(AllCones, BasePosition, CurrentPosition, NumConesToTest - 1);
}
return CurrentPosition;
}
游戏AI与行为树
游戏AI介绍
游戏场景内有很多不由玩家操纵的实体,一般称之为non-player character,简写为我们常见的NPC。通常可以分为剧情NPC、战斗NPC和服务NPC等,有时也会有兼具多种功能的NPC。NPC与玩家之间是存在交互的,否则就跟场景里放置的静态组件没有差别了。这些交互都是为此NPC的设计目的服务的,最简单的交互就是出现若干按钮来提供购买、维修、寄存等服务。再进一步的交互就是根据预设的事件来触发NPC的特定表演,例如商贩NPC在下雨开始后播放收摊动作并消失,打更NPC按照既定路线巡逻并定期执行时间播报。当交互进一步演化时就会将玩家考虑进来,例如常见的怪物也是NPC的一种,他们与玩家是敌对关系,当玩家进入其战斗范围之后将触发怪物进入战斗状态,开始攻击玩家直到一方死亡。这个控制NPC与玩家之间交互的系统称之为游戏AI。
在AI逻辑比较简单的时候,我们可以直接用代码来实现NPC的逻辑驱动,以上面介绍的商贩NPC为例,其逻辑实现可以简化为下面的代码:
class pedlar: public npc
{
bool m_is_hiding = false;
void tick(float delta)
{
if(m_is_hiding)
{
if(check_is_raining())
{
play_hide_animation();
add_invisible_buff();
m_is_hiding = true;
}
}
else
{
if(!check_is_raining())
{
m_is_hiding = false;
remove_invisible_buff();
play_unhide_animation();
}
}
}
}
简单的AI可以通过编写针对性的代码来实现,但是当AI配置逐渐复杂之后,这种由代码写死的游戏逻辑就会变得非常难以维护。所以基本上所有的游戏AI实现都是由代码提供一些基础接口,然后基于AI任务配置文件来驱动NPC的交互表现。为了统一化所有NPC的交互表现配置,一般会把游戏AI拆分为三个部分:
- 感知部分 这部分负责接收玩家的交互指令以及感知周围环境的信息,天气变化、时间变化、警戒范围内的玩家进出都属于交互指令,周围有哪些玩家及相应的血量信息属于环境信息,这些感知的查询一般是底层提供好若干接口来方便调用
- 决策部分 这部分负责根据环境状态来决定当前的任务是什么,例如接收到天在下雨的事件之后商贩要决定收摊,深夜来临之后更夫要开始巡逻,玩家进入境界圈之后怪物要开始战斗,决策部分的实现一般使用的是状态机
- 行为部分 则部分负责推动任务的表现,商贩收摊时需要播放收摊动画然后在让自己隐身,更夫巡逻时要按照路径进行移动并定期报时,怪物战斗时要追逐玩家并释放技能,行为部分的实现一般使用的是行为树
游戏AI中的状态机
状态机在游戏AI中是最容易被理解的概念,他用来维护NPC的行为模式以及模式之间的切换。举个例子来说,常见怪物的状态机有三种状态:
patrol状态,用来处理怪物的巡逻,这个是状态机的默认状态fight状态,用来处理遇到敌人的战斗return状态,用来处理战斗结束之后的处理,例如先回到出生点,然后重置AI来重新以默认状态开始执行
在这个小怪的跳转表,主要处理两个事件enter_battle和exit_battle:
patrol状态遇到enter_battle事件切换到fight状态fight状态遇到exit_battle事件切换到return状态
这样一个基本的小怪AI就配置完成了。
关于状态机的具体实现,我们在之前谈论过了,这里便不再详解。不过游戏AI里的状态机与之前谈论过的登录状态机又有很多不一样的地方。其中最大的差异点就是游戏AI的状态机都是由数据文件进行配置的,状态之间的切换以及状态内的行为都是由这些数据文件来指定的。而登录状态机则是在代码里写死的,通过代码即可阅读出登录状态机里的各个状态切换逻辑。游戏AI状态机由于其灵活性,继续使用Excel来创建状态转换矩阵这种做法感觉有点不够直观,所以一般都会有专用的状态机编辑器来实现状态机的查看与编辑功能:
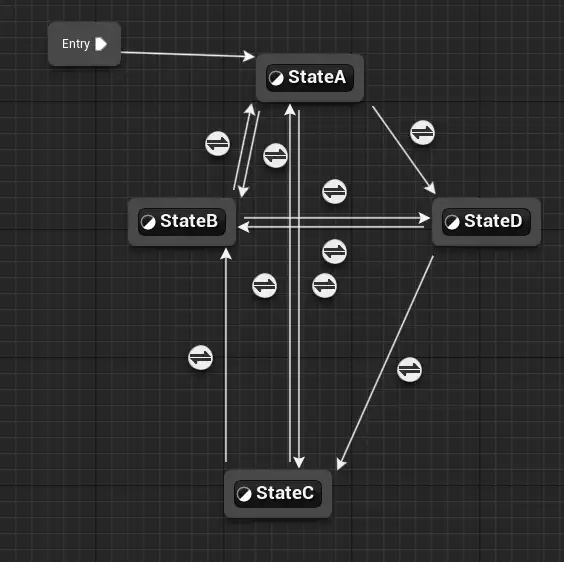
有了这个状态机编辑器之后,我们就可以很方便的看出每个状态之间是否有联系,对应的转换规则是什么。
不过当状态集合变得非常大之后,即使有状态机编辑器我们也很难进行状态的维护,整个状态切换成网状之后就是神仙难救:
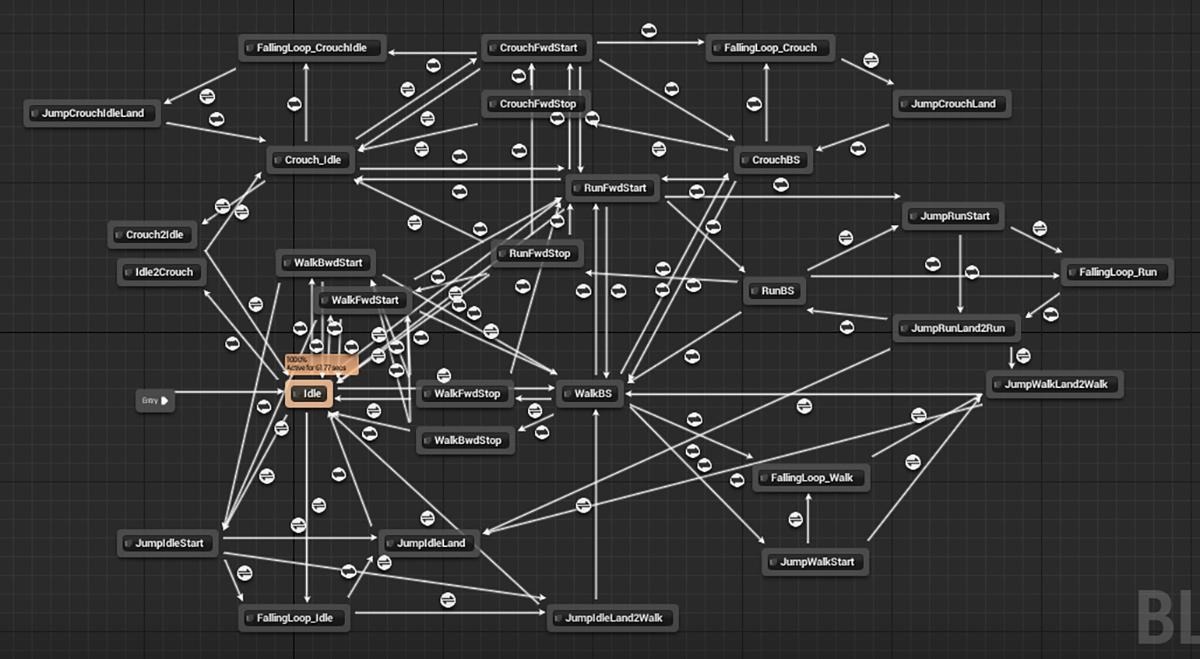
这个时候就需要将若干相似状态进行归类成组,组内的状态机节点只需要考虑与同组之间的状态切换,然后组内的所有节点共享相同的到其他组的状态切换,这种有分组的状态机就是层次状态机:
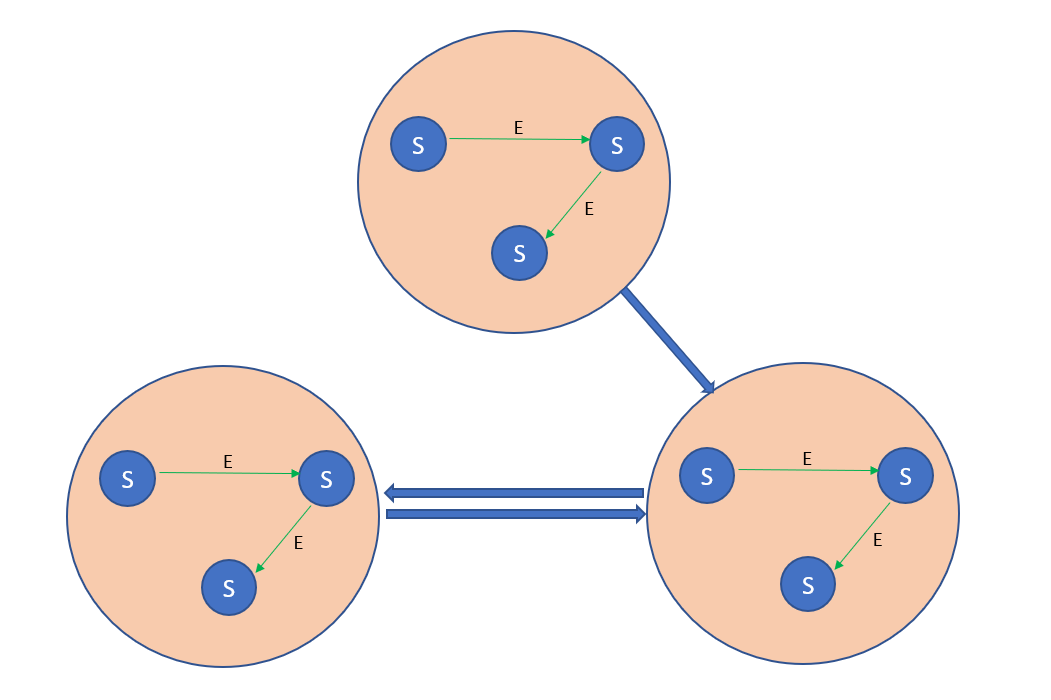
基于行为树的AI
行为树概念
行为树(behavior tree)的概念最早来源halo这款游戏里的ai控制结构,它通过类似于决策树的树形决策结构来选择当前环境下应该做出的具体行为。由于这种ai控制结构在配置、调试、复用之上的便利,行为树的使用也逐渐成为了现在游戏的主流ai配置方式。unreal现在自带了行为树功能,而unity也有很多行为树相关的插件。下图就是unreal中配置完成的一个简单的行为树结构 :
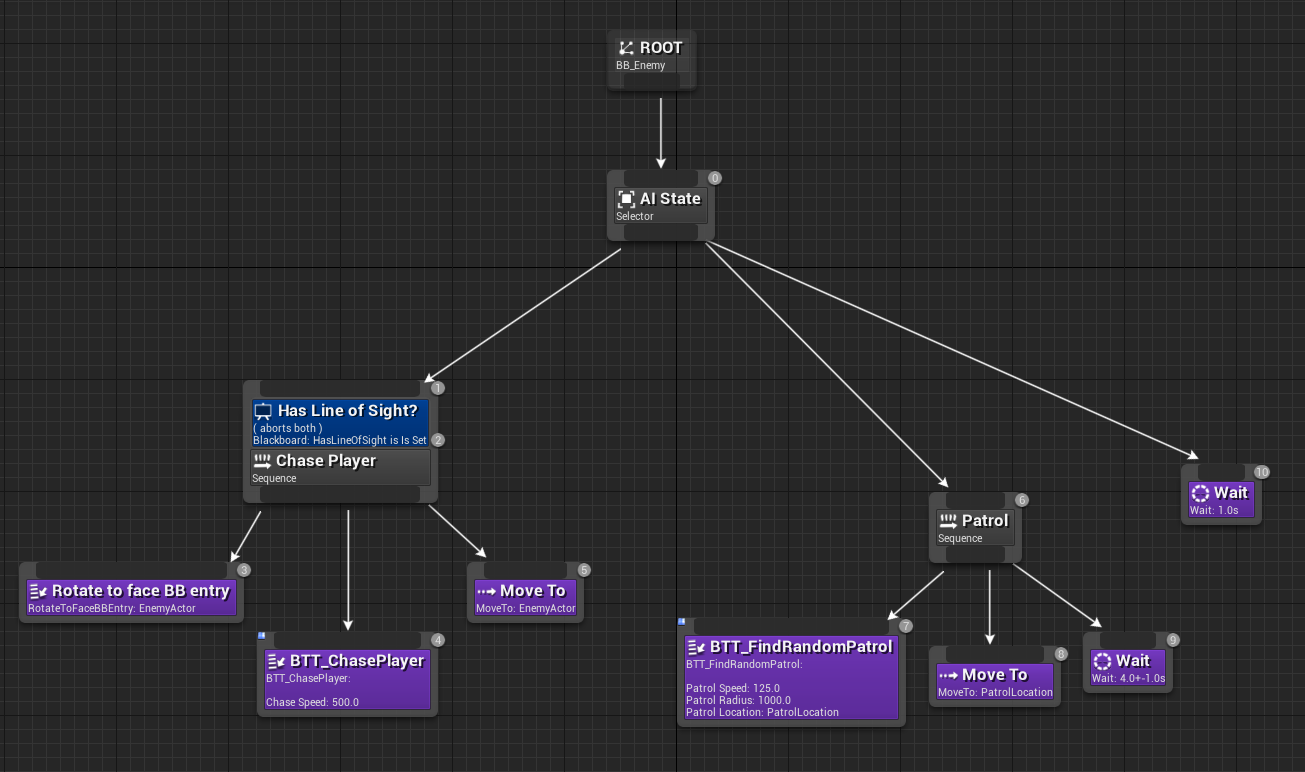
行为树样例
下面我们来简单解释一下这颗行为树的功能。unreal的行为树的执行流是从上到下,从左到右,每个节点执行之后都会有相应的返回值true 或者false, 返回之后控制权转移给当前节点的父节点,来确定下一步的执行:
-
行为树在执行时的第一个入口是
ROOT节点,所有的行为树都会有此root节点, 当root节点执行完成之后,会重新开始一次执行,类似于无终止条件的循环。 -
进入
root节点之后,进入Ai State这个Selector节点,依次从左到右执行他的三个子节点,当任一节点执行返回true的时候则不再执行后续的子节点,直接返回true给父节点。这个节点的逻辑就是让被控制的Entity进入追逐玩家状态还是进入巡逻状态。 -
chase player节点是一个sequence,这个节点被一个decorator节点修饰,导致只有在has line of sight返回true的时候才能进入执行,如果decorator返回false则执行流回到Ai State节点。它的三个子节点会从左到右依次执行,用来控制Entity去追打玩家的具体步骤:Rotate to face BB entry,朝向目标BTT_ChasePlayer设置自己进入追击状态,追击速度为500Move To,移动到敌人位置
所以这个状态内,被控制的
Entity会首先朝向敌对目标,然后设置自己为速度500的追逐状态,追逐到目标之后,返回true, 如果其中任意一个节点返回false,则后续子节点不再执行,当前节点也返回false。 -
Patrol节点是一个不带decorator的Sequence,他执行的时候也是从左到右执行三个子节点:BTT_FindRandomPatrol设置自己为以自己为中心的随机巡逻状态,巡逻速度为125,巡逻半径为1000,获取半径上的一个随机点Move To移动上一个节点确定的位置Wait等待4-5秒
所以这个
Patrol的执行内容就是,以125的速度走到以自身为中心的半径1000的圆的任意一点,走到之后等待4-5秒,然后返回。 -
最后的等待
1s是为了两个状态都无法进入的时候的fallback,避免root节点空跑占用cpu。
行为树定义
整个行为树就类似于我们写的一个函数调用,他的树形结构就类似于传说中的图形化编程。一颗行为树最终运行时,还依赖于他的执行环境,例如范围内有没有目标就可以让这棵样例行为树控制的Entity呈现出不同的表现。这些行为树的运行环境,我们可以抽象为一个KeyValue的容器,叫做黑板Blackboard, 代表行为树的内部存储的所有参数。当一颗行为树在特定的黑板环境中运行时,行为树的控制权不断地在树形结构中转移,类似于程序计数器Program Counter。运行时某一特定时刻的拥有控制权的节点集合则定义为行为树的格局Configuration。
因此一颗行为树的运行时描述,包括如下三个方面:
- 行为树的自身结构,所有节点的逻辑关系和相关参数:
Structure - 行为树的执行环境,一个键值对的集合:
Blackboard - 行为树的活动节点集合:
Configuration
行为树的结构是以树的形式来组织的,每个节点都有相应的节点类型,配合相关参数承载不同的功能。在不同的行为树之中,对于节点的划分也是各有不同。总的来说,一个行为树的结构描述都具有如下几个部分:
- 行为树是一个树结构,根节点就是
Root节点,作为行为树的入口,节点类型为Root,每个行为树有且只有一个Root类型节点; - 所有的叶子节点的类型一定是
Action,同时Action类型的节点一定不能作为非叶子节点来使用。 - 非叶子节点也称为组合节点
Composition,可以有一个或多个子节点,Root节点一定只有一个子节点
Action节点类型和Composition的节点类型可以做进一步的细分。
每种类型的的组合节点能拥有的子节点数量与节点类型有关,一个节点的所有子节点是一个有序列表,有些节点可以附加特定参数来执行,有些节点则不需要参数。一颗行为树可以以叶子节点的形式被另外一颗行为树进行调用,就相当于一棵树挂接到了另外一棵树上一样。
行为树的运行
在明确了行为树的定义之后,行为树的控制表现还依赖于它在特定环境下的执行路径。为了推理行为树的执行路径,我们需要对行为树的运行规则做规定。这里我们把一个节点标记为N, 他的子节点列表标记为N.children,第i个子节点为N.children[i] ,他的父节点标记为N.parent, 节点的运行标记为N.run(),运行完成之后返回true或者false,代表节点执行成功或者失败。
对于Action节点来说,因为他是叶子节点, 不带控制功能,所以他是不影响执行流的。能影响执行流的节点只能是Composition节点。在具体的行为树节点类型定义中,常见的Composition节点细分见下:
Sequence节点,他的执行流程就是顺序执行所有的子节点,当一个子节点执行结果为false的时候终止执行并返回false,如果没有子节点返回false则返回true。他的run函数定义如下:
bool run()
{
for(std::uint32_t i = 0 ;i < children.size(); i++)
{
if(!children[i].run())
{
return false;
}
}
return true;
}
Select节点,他的执行流程就是顺序执行所有的子节点,当一个子节点执行结果为true的时候终止执行并返回true,如果没有子节点返回true则返回false。他的run函数定义如下:
bool run()
{
for(std::uint32_t i = 0 ;i < children.size(); i++)
{
if(children[i].run())
{
return true;
}
}
return false;
}
IfElse节点,他拥有三个子节点,当第一个子节点返回true的时候执行第二个子节点并返回此子节点的返回值,否则执行第三个节点并返回这个节点的返回值。他的run函数定义如下:
bool run()
{
if(children[0].run())
{
return children[1].run();
}
else
{
return children[2].run();
}
}
While节点, 他有两个子节点,当第一个子节点执行返回true的时候,执行第二个子节点然后重新开始执行流程,如果第一个子节点返回false则执行完成,并返回true。他的run函数定义如下:
bool run()
{
while(children[0].run())
{
children[1].run();
}
return true;
}
Root节点,他只有一个子节点,当子节点返回的时候,返回子节点的返回值:
bool run()
{
return children[0].run();
}
在UnrealEngine的行为树定义中还有一类非常重要的Decorator节点,这个Decorator节点可以附着在任意非Root节点上作为被修饰节点的进入判定前置条件。这个Decorator的行为我们可以通过Sequence节点模拟出来,只需要将decorator里面的判断函数作为Action节点去执行,对于被任意装饰器修饰的节点都可以转换为含有装饰器判断节点和具体执行节点的Sequence节点进行替换。在Unreal中,他优先采用decorator方式的理由如下:
在行为树的标准模型中,条件语句是任务叶节点,除了成功和失败,它不会执行任何其他操作。虽然没有什么可以阻止您执行传统的条件语句任务,但是强烈建议使用我们的装饰器
(Decorator)系统处理条件语句。 使条件语句成为装饰器而非任务有几个显著的优点。
- 首先,条件语句装饰器使行为树UI更直观、更易于阅读。由于条件语句位于它们所控制的分支树的树根,如果不满足条件语句,您可以立即看到行为树的哪个部分是“关闭的”。
- 而且,由于所有的树叶都是操作任务,因此更容易看到行为树对实际操作的排序。在传统模型中,条件语句位于树叶之间,因此您需要花费更多的时间来确定哪些树叶是条件语句,哪些树叶是操作。
条件语句装饰器的另一个优点是,很容易让这些装饰器充当行为树中关键节点的观察者(等待事件)。这个功能对于充分利用行为树的事件驱动性质至关重要。
行为树的驱动方式
在标准行为树中,节点的运行是由tick-driven的,每间隔一段时间开始从root节点开始执行。当特定外部事件需要响应的时候,有时会按需调用root节点的执行。由于这个行为树在执行的时候,对于上次的执行结果是无记忆的,所以Entity的状态机要处理好各种追击、攻击、受击、巡逻状态的强制切换,避免表现异常。最坏情况下一次执行会遍历所有的节点,如果tick间隔过小,则行为树执行会消耗大量cpu。同时如果一段时间内执行的路径结果都相同,行为树就相当于空跑浪费cpu。所以在标准行为树模型里面,如何动态的选择tick间隔是优化的重点。
为了解决这种tick间隔带来的问题,行为树的模型演进出了基于事件驱动(event-driven)的行为树。这里行为树的更新不再是基于tick,而是基于任务的完成和外部事件的dispatch。同时每个Action节点开始有了状态,他的执行可能不再是调用之后立即返回,而是开始了一个需要一定时间才能执行的过程,当过程执行结束之后才返回执行结果。同时,任意的一个过程现在都需要支持中断操作,以支持外部环境的改变引发的更高优先级任务的处理。
以追逐目标这个例子来说:
-
在
tick驱动的行为树中,我们需要定期从根节点执行,查询我们是否已经离目标点足够近,如果足够近则执行已经到达目标的分支,否则执行追逐逻辑。到发起追逐到追逐完成期间,可能多次执行行为树。 -
在事件驱动的行为树中,一旦进入了
Move To节点,则会发起一个寻路过程,同时节点标记为running状态。在寻路到目标之后过程返回,控制权移交到当前节点的父节点,然后进行下一步的操作。一个完整的流程不涉及到行为树的其他节点,相对tick驱动的行为树来说,行为树的决策消耗大大降低了。
在寻路过程中,目标可能已经死亡或者传送了导致目标丢失,此时我们需要终止当前过程的执行。在事件驱动的行为树中,为了实现对外部事件的响应功能,常见的可选方案有如下两个:
-
为过程添加前置条件,在过程执行期间定期检查前置条件是否满足,如果不满足则中断当前过程的执行并返回
false。 -
为行为树添加
Parallel节点和WaitEvent节点,Parallel节点执行时,会顺序执行所有的子节点,而不会阻塞在子节点的过程调用上,如果任一子节点返回,则所有的其他节点都会被打断, 同时Parallel节点返回true。为了支持这个结构,我们需要对原有的行为树调用结构进行修正,因为这里暂时不再给出他的run函数定义。WaitEvent节点执行时,会注册对特定事件的回调,然后阻塞不返回。当行为树接收到特定事件之后,对应的回调句柄被调用,相关的WaitEvent节点返回true。
通过在
Parallel节点下同时挂载多个节点,就可以达到在执行特定过程的时候对外部事件进行响应的功能。
主流的行为树实现采用是Parallel方案,但是引入Parallel方案也带来了新的问题,就是策划可能配置出多个过程同时进行的Parallel节点。试想一下同时开启两个对不同目标点的寻路所带来的后果,Entity的状态表现会非常的糟糕。Parallel结构里面不能同时开启多个持续性过程,一般来说是一个主要目标过程附加一些WaitEvent或者WaitTimer的阻塞过程,这些附加的阻塞过程不会干扰主要目标过程,他们的执行也是一些辅助性的工作。
所以在Unreal中,特别提到了Simple Parallel节点。
简单平行节点只有两个子项:一个必须是单个任务节点(拥有可选的装饰器),另一个可以是完整的子树。可以将简单平行节点理解为“执行
A的同时,也在执行B"。例如“攻击敌人,同时也朝敌人移动。“从基本上而言,A是主要任务,B是在等待A完成期间的次要任务或填充任务。
行为树与状态机
但是如果遇到了需要终止当前主要任务的事件,则Parallel结构也是不够用的。例如在巡逻过程中遇到敌人,我们需要立即进入战斗状态,此时需要中断当前任务的执行来开启新的任务。类似的还有在不断的放技能过程中如果发现自己的血量低于了特定百分比则进入狂暴状态。为了处理这种紧急事件的打断,实现方案是在行为树的上层加一个状态机来进行管理。
状态机有一个默认状态,在每个状态中执行特定任务的行为树,同时状态与状态之间有一个基于事件的跳转表。当Entity的AI接受到一个外部事件的时候,当前状态所执行的行为树优先处理这个事件,查看当前阻塞的WaitEvent的节点是否有对此事件的监听:
- 如果有,则行为树来处理这个事件
- 如果行为树没有对这个事件进行处理,则状态机来查看当前状态下是否有对于这个事件的新状态跳转。如果有对应的跳转,终止当前行为树的执行,跳转到对应的状态,开启新状态下的行为树的执行
行为树的黑板
行为树的流程控制节点的逻辑基本都是固定的,都是直接在代码中直接实现。而行为树的动作节点逻辑则是包罗万象各有不同,例如等待一段时间、移动到特定点、跟随特定目标、给自身加buff等。动作节点可能立即就执行完,也可能发起一个异步任务。而且这些动作节点基本都是需要传入一些参数去执行的,其参数个数与类型各不一样,例如等待一段时间节点需要一个浮点值作为等待的时间,移动到特定点这个节点需要两个参数,分别是目标坐标和目标半径。所以在实现动作节点的时候,一般会将动作节点的执行函数声明为这样的虚函数:
std::optional<bool> run(const std::vector<json>& args)
这里用vector<json>来存储这个节点执行所需的所有参数,然后返回值的optional<bool>可以表明当前节点是否立即返回,如果optional<bool>.has_value()为true则代表这是一个同步执行,否则代表这个节点发起了一个异步任务还未执行完。
确定好了执行函数的签名之后,我们需要继续考虑这些函数所需参数如何传递的问题。最简单的函数传递方式就是在行为树文件里提供好每个action节点所需的参数的json数组,但是这样的参数传值设计完全无法应对执行环境的动态性。例如移动到指定玩家的一定距离内这个节点需要两个参数,分别是目标玩家的id和到达半径radius。到达半径radius可以设置为一个经验值,例如150cm,但是目标玩家的id需要在运行时才能决定具体的值,在行为树编辑的时候我们完全无法确定其值到底是什么。所以这种在行为树编辑阶段就确定好所有节点的执行参数的设计是完全不可行的,我们需要一种传递运行时才能确定的参数值的方法。行为树黑板BlackBoard这个概念就自然而然的演化出来了,这个对象就是一个运行时变量存储的容器,其类型可以简单的抽象为map<string,json>。每个运行行为树的entity在执行行为树的时候都会创建一个BlackBoard对象,这个对象作为数值容器既可以被行为树内部节点来读写,也能被外部环境来读写,从而实现一种行为树内部与外部环境通信的机制。在有了黑板系统之后,函数参数的传递就分为了两种情况:
- 参数传入的值是立即值,即
1, false, "hello"这种,在参数被求值时其字符串可以直接序列化为json的值 - 参数传入的值是黑板值,即一个字符串,代表这个值在黑板中的名字,当这个参数被求值时需要从黑板中以这个字符串作为
key去获取对应值
此时我们需要对应的调整动作节点的执行,需要再封装一层run_wrapper来做传入参数的求职然后再调用到run函数:
struct action_arg
{
std::string value;
bool is_blackboard;
}
json get_blackboard(const std::string& key);
std::optional<bool> run_wrapper(const std::vector<actions_arg>& args)
{
std::vector<json> real_args;
for(const auto& one_arg: args)
{
if(one_arg.is_blackboard)
{
real_args.push_back(get_blackboard(one_arg.value));
}
else
{
real_args.push_back(json::parse(one_arg.value));
}
}
return run(real_args)l
}
举个例子来说,行为树寻找仇恨最大目标并移动到其附近再攻击的逻辑可以通过黑板这样来实现:
store_combat_target_to_blackboard(action_arg{"target_key", false});
move_to_target(action_arg{"target_key", true}, 100);
hit_target(action_arg{"target_key", true})
这样我们就用黑板解决了运行时参数绑定的问题,同时在事件传递之外额外提供了一种外部来修改行为树运行逻辑的方式。
黑板概念还可以继续进行演化,例如群体黑板以及场景黑板:
- 群体黑板用来在一组
NPC中共享,例如一组附近的怪物共享攻击目标,双boss战时的技能指令共享 - 场景黑板用来存储场景全局信息的以及一些全局状态改变通知
Mosaic Game 的行为树
mosaic_game中的行为树是作为一个独立库存在的,已经开源为behavior_tree。这个库包含了编辑器、运行时、调试器三个部分。编辑器负责产生Json格式的行为树文件,运行时负责执行编辑器生成的行为树文件并在指定条件下将执行过程引发的状态改变输出为Json字符串,而调试器则在编辑器的基础上增加了读取运行时生成的Json格式调试字符串并高亮执行节点和黑板值改变的功能。接下来将对这三个部分做具体的介绍。
behavior_tree中的行为树编辑器
behavior_tree中的行为树编辑器编辑器相关代码在behavior_tree/editor目录下,是一个以Qt5编写的GUI程序,源代码位于工程目录下的editor文件夹,其基本界面如下图:
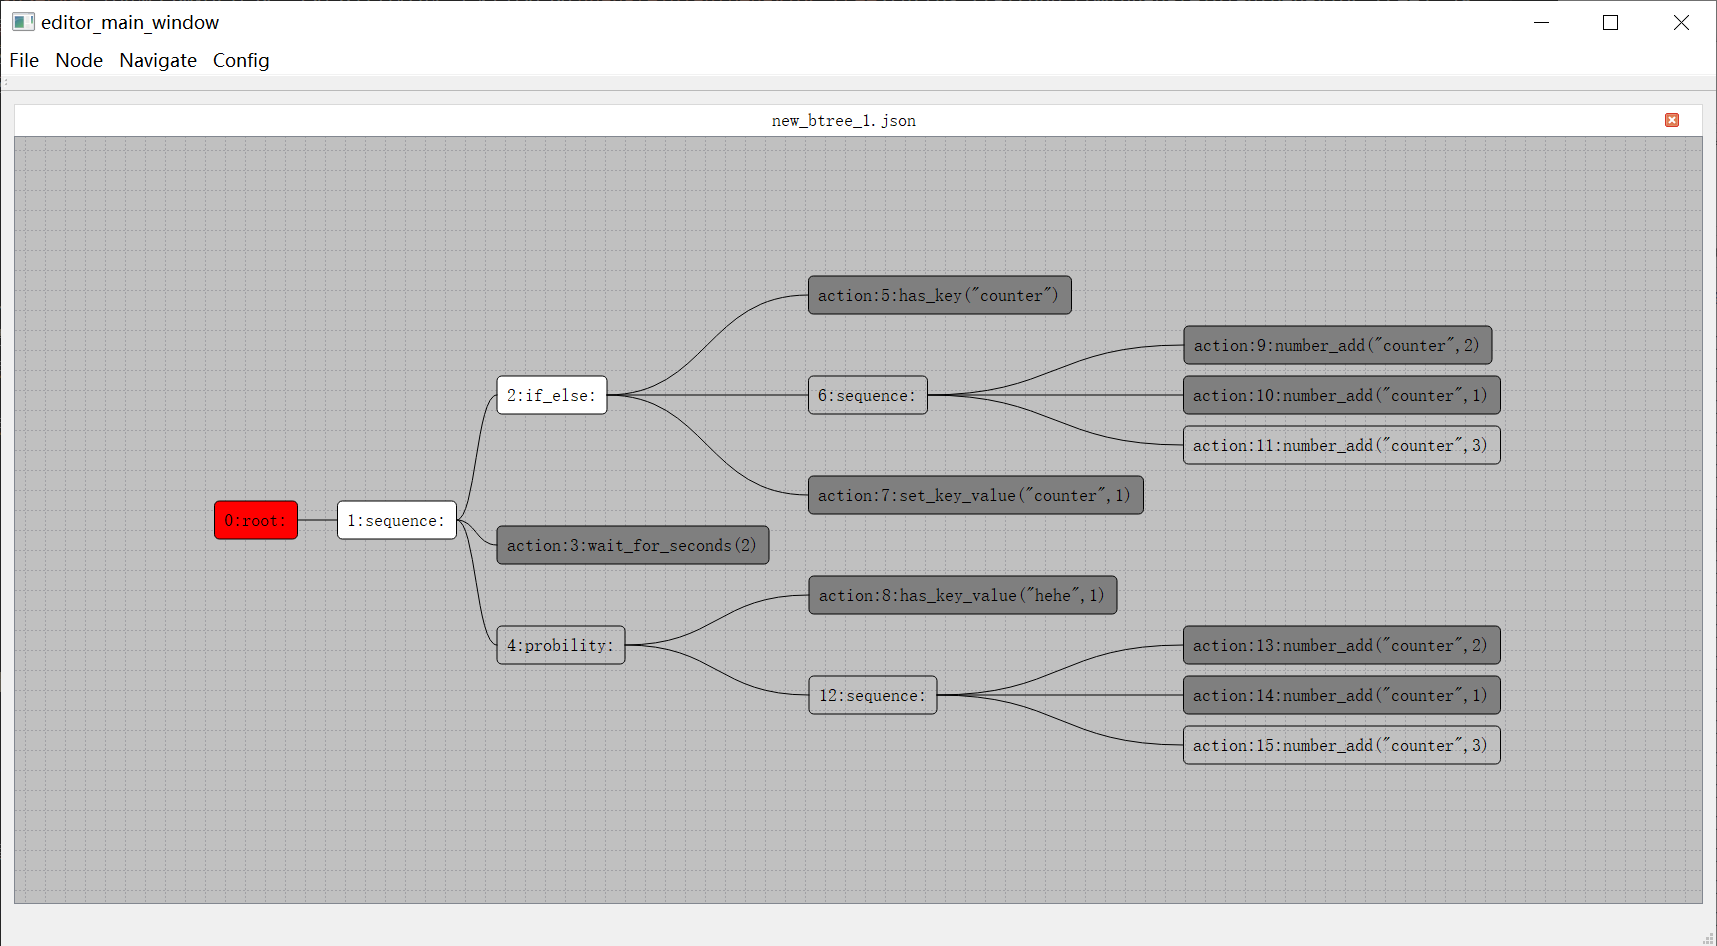
这个编辑器支持多tab,每个tab都是是行为树树形结构展示窗口。值得注意的是这里的树根节点在左侧,之前介绍的UE4行为树根节点是顶部。与此同时行为树节点遍历顺序也从UE的从上到下从左到右变成了从左到右从上到下。每个节点都以圆角矩形框来显示,框内左侧的数字代表这个节点的编号,注意这里的编号并不代表节点的遍历顺序,只是作为节点的唯一标识符使用,内部实现是这个节点在当前行为树的创建顺序。
节点编辑时,首先需要选中一个节点,然后按下对应的快捷键:
Insert代表插入一个节点,作为当前节点排序最低的子节点Delete代表删除一个节点,root节点不可删除MoveUp,快捷键为Ctrl加上方向箭头, 代表把提升当前节点在父节点里的排序MoveDown快捷键为Ctrl加下方向箭头,代表降低当前节点在父节点里的排序Copy代表把当前节点为根的子树复制Paste代表把上次复制的节点粘贴为当前节点排序最低的新的子节点Cut代表剪切当前节点
另外如果树里面的某个节点对应的子树节点太多,可以通过双击这个节点,将对应的子树进行折叠,同时这个节点右侧将会出现一个小的粉色钝角三角形,再双击则会展开折叠:
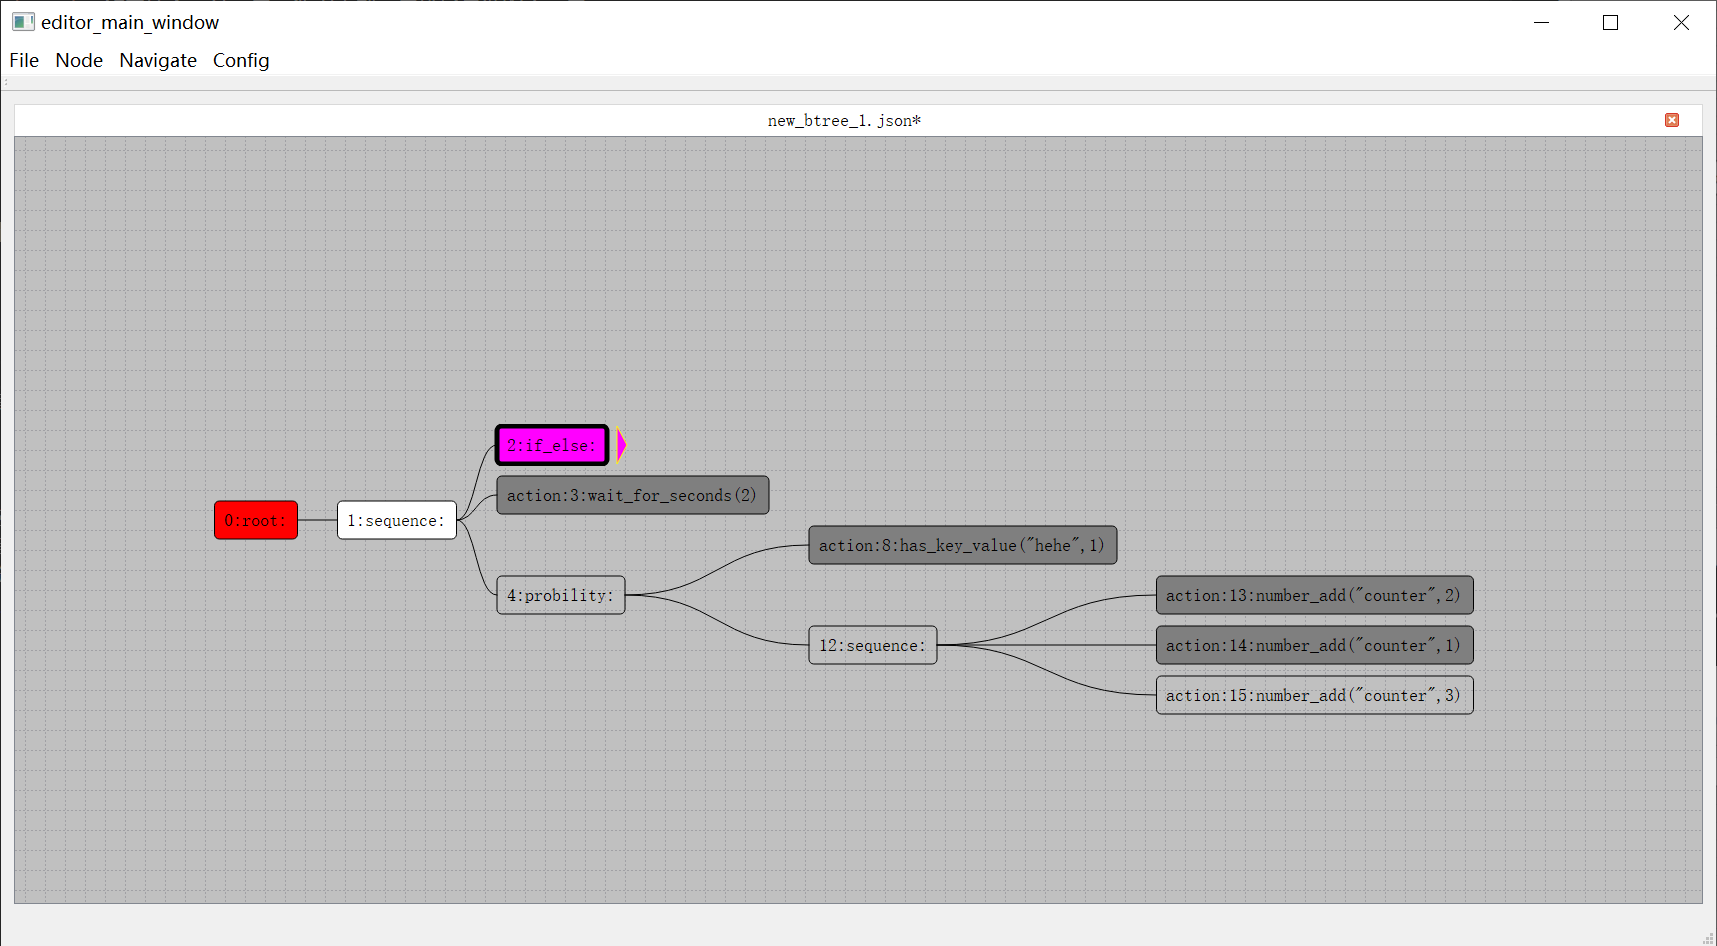
如果需要为一个复合节点增加一个新的子节点,则需要在选中一个复合节点之后按下Insert键,此时会弹出一个子节点创建选择窗口:
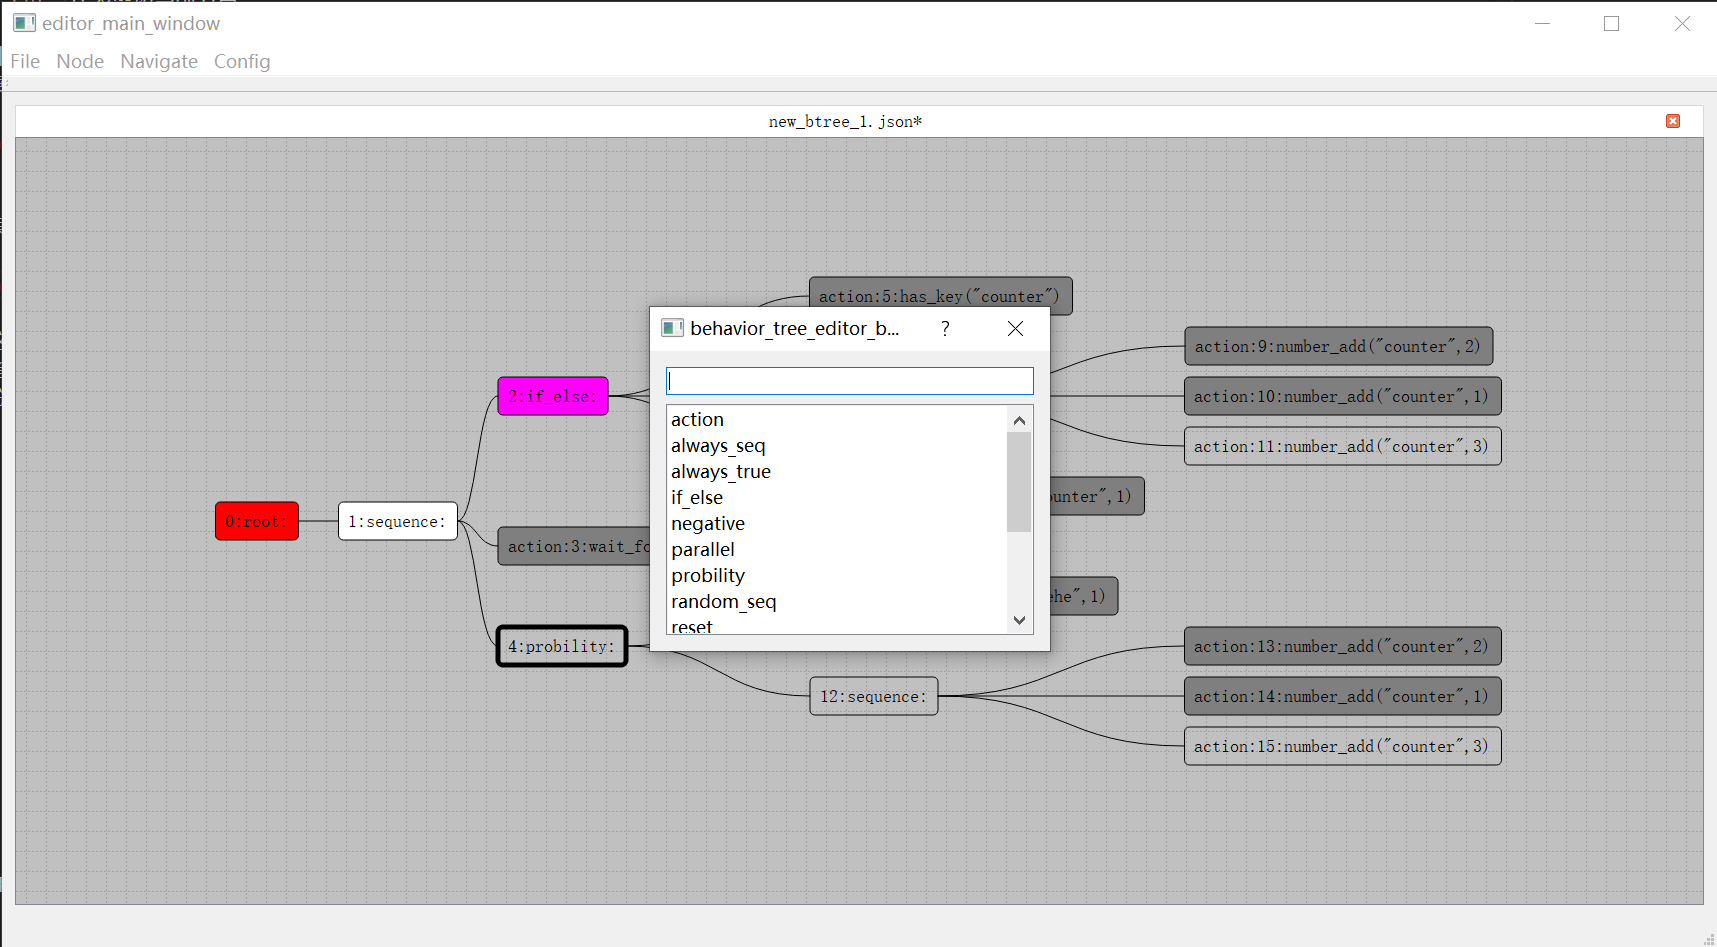
在这个文本框中可以执行搜索过滤,双击下面列表中的一项即为确认选择并以选择的节点类型来创建子节点。子节点的类型并没有在编辑器中写死,而是以配置文件来指定。使用者需要提供一个Json格式的节点类型说明文件,来表明可以创建的复合节点类型以及其子节点的数量限制。下面就是使用中的节点类型说明文件的部分:
{
"root": {
"child_min": 0,
"child_max": 1,
},
"negative": {
"child_min": 1,
"child_max": 1,
},
"sequence": {
"child_min": 1,
"child_max": 20,
}
}
在样例工程中,除了常规的root,sequence,select,parallel复合节点之外,为了很方便的映射到常规的代码逻辑,提供了以下类型的复合节点定义:
AlwaysSequence, 顺序执行所有子节点,不管子节点的返回值,执行完所有子节点之后返回true;RandomSequence, 每次执行的时候都以随机序列去执行所有的子节点,任一子节点在执行时返回false则中断执行并返回false,否则返回trueProbility,允许有多个子节点,每次进入当前Probility时都会随机的选择其中一个子节点来执行,这个子节点的返回值就是当前Probility节点的返回值,编辑器界面可以配置每个节点的相对权重Negative,只允许有一个子节点,代表把这个子节点的执行结果取反作为当前节点的返回值AlwaysTrue,只允许有一个子节点,不管这个子节点的返回值,当前节点永远返回true
然后对于任务节点,也是需要提供一个Json格式的任务节点配置文件来指定任务列表以及各个任务的相关参数,下面就是工程中自带的任务节点配置文件的部分内容:
{
"has_key": {
"args": [
{
"comment": "key的名字",
"name": "bb_key",
"type": "const std::string &"
}
],
"brief": "判断黑板内是否有特定key",
"name": "has_key",
"return": "如果有这个key返回true 否则返回false"
},
"has_key_value":{
"args": [
{
"comment": "黑板key的名字.",
"name": "bb_key",
"type": "const std::string &"
},
{
"comment": "要比较的值",
"name": "value",
"type": "any_value"
}
],
"brief": "判断黑板里特定key是否等于特定值",
"name": "has_key_value",
"return": "如果没有这个key或者这个key的值不等于value 返回false 否则返回true"
}
}
在任意节点上右键将会出现右键菜单,包括四个菜单项:
Comment字段是个文本编辑区域,默认为空,如果有值,对应的值会作为节点图形展示信息;Color字段用来更改节点的颜色。Content字段会弹出这个节点的详细信息界面Collapse字段会将当前的复合节点进行折叠,如果已经为折叠状态此时菜单名字切换为Expand
这个Content菜单主要是为Action节点服务的,在一个Action节点双击之后,将会弹出同样的详情界面:
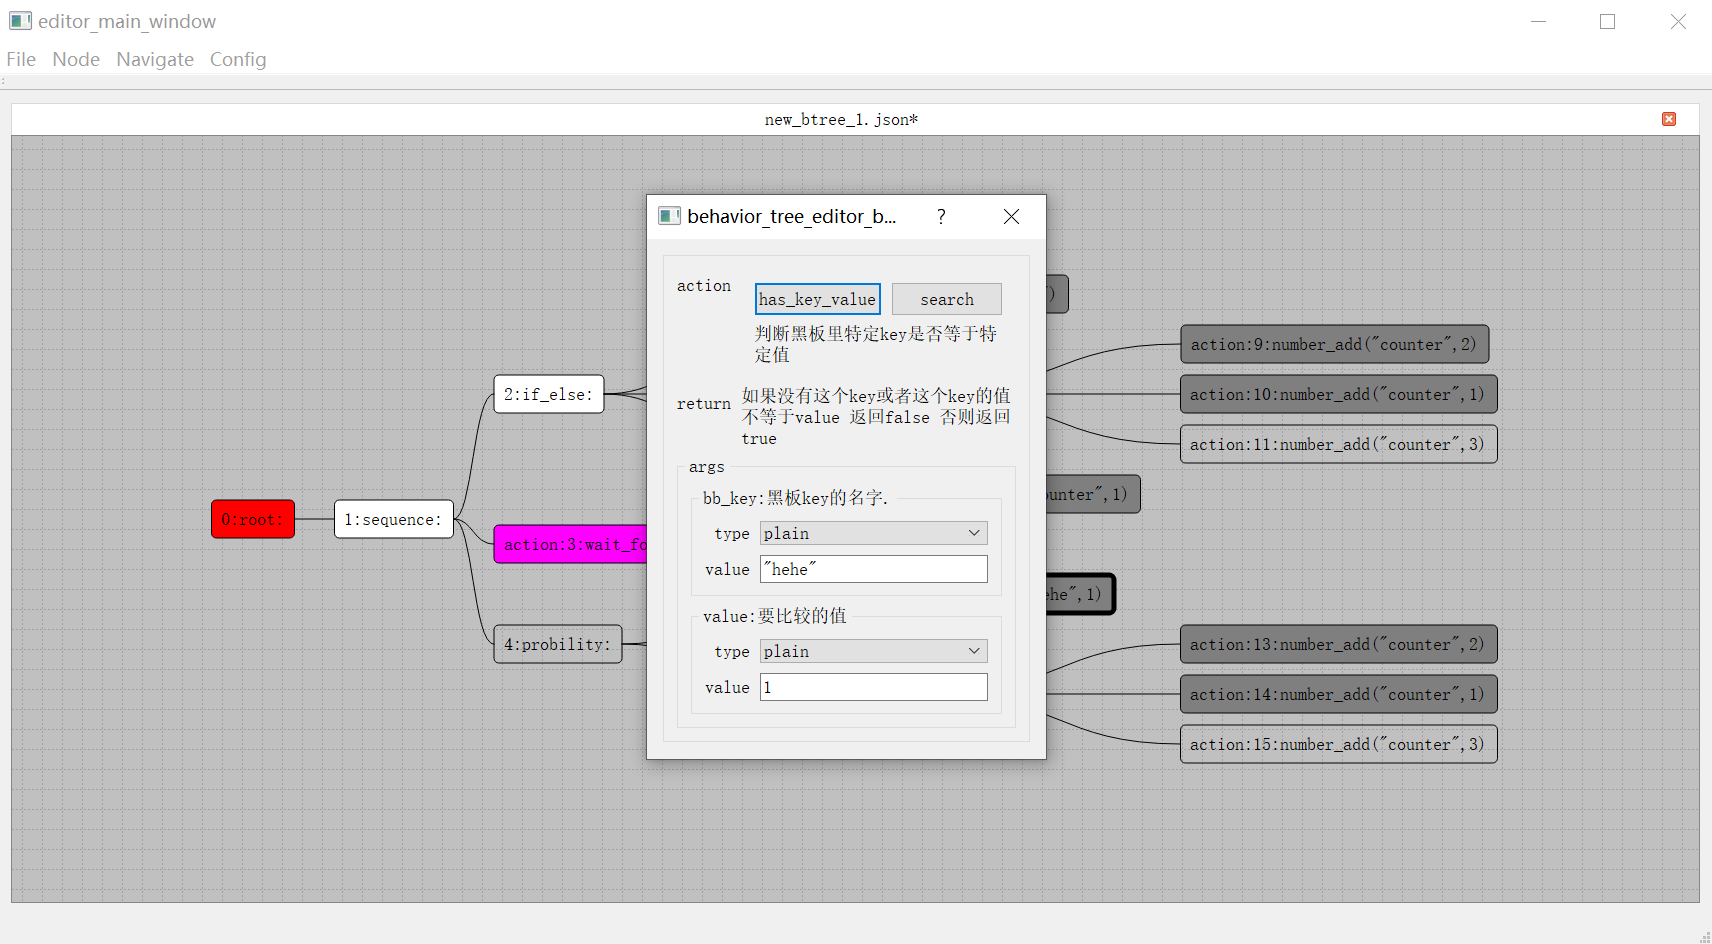
这个界面展示了任务节点里执行的任务名字以及相关的参数设置,包括如下几个部分:
-
action当前任务节点的action图里显示的action是has_key_value,下面的文本区域代表这个action的意义是什么,后面的return文本编辑区域代表这个action的各个情况的返回值是什么 -
args这个是当前action的所有参数的编辑部分。当前图中对应区域有两个参数,分别是log_level和log_info。每个参数的可选值类型有两种:- 一个是
plain,代表直接使用编辑器内输入的值, - 另外一种是
blackboard,代表使用当前输入的key对应的黑板值,
输入框里面允许输入的都是
json字符串,但是目前不允许输入object类型的值。如果想输入object类型,请转换为[[key,value]]的数组形式去输入。 - 一个是
在编辑完成一个行为树之后,其保存的文件为Json格式的文本文件,可以很方便的进行源代码管理的Diff操作。除了这个Json数据文件之外,还会保存一个对整个行为树最后编辑状态进行截图的Png文件,方便使用者能够快速的预览当前行为树的结构。
behavior_tree 中的行为树运行时
行为树运行时相关代码在behavior_tree/runtime目录下,整体实现是非常简洁的,include子目录下只有四个头文件:
nodes.h定义了所有的运行时节点的基类base_node,以及相关派生的各种子节点,如sequence,if_else等agent.h定义了驱动行为树运行的agent,这个文件负责加载行为树开始其执行,同时负责执行中的节点调度和事件监听,此外还管理了行为树所依赖的黑板,提供了黑板的get/set接口action_agent.h提供了一些最基础的action实现,如行为树的黑板读写,一些数值计算与比较,以及计时器相关actiontimer_manager.h提供了一个非常基础的计时器管理类,可以用来注册计时器回调,同时对外暴露poll接口来执行已过期的计时器的回调
其实timer_manager.h并不属于行为树运行时的核心代码,因为计时器相关操作一般都会转接到Agent所属的Entity去执行并管理相关回调与生命周期,这里提供一个非常简单的计时器管理类的实现主要是为了让行为树运行时测试程序能够跑起来。所以在action_agent类声明的创建计时器的接口是virtual的,方便具体的实现去覆盖这个实现。
行为树必须依附于一个Agent去执行,这里的Agent可以理解为Entity的一个组件,提供了一些行为树操作的对外接口,例如运行、暂停、黑板值读写、事件发送等:
bool poll(); // first handle events then handle fronts
void dispatch_event(const event_type& new_event);
bool is_running() const
{
return m_enabled;
}
void notify_stop();
bool load_btree(const std::string& btree_name);
json blackboard_get(const std::string& key) const;
void blackboard_set(const std::string& key, const json& value);
bool blackboard_has(const std::string& key) const;
bool blackboard_pop(const std::string & key);
此外针对行为树的调试器需求,也提供了一些接口来对接,这些调试相关接口的含义将在调试器部分介绍:
cmd_receiver* set_debug(cmd_receiver* _in_receiver);
void push_cmd_queue(std::uint32_t teee_idx, std::uint32_t node_idx, agent_cmd _cmd, const json::array_t& _param);
void push_cmd_queue(agent_cmd _cmd, const json::array_t& _param) ;
bool during_debug() const;
运行一个指定行为树的入口为load_btree,这个函数负责从行为树Json文件中反序列化出一个行为树:
bool agent::load_btree(const std::string& btree_name)
{
if (cur_root_node)
{
reset();
if (cur_root_node->tree_name() == btree_name)
{
return true;
}
else
{
delete cur_root_node;
cur_root_node = nullptr;
}
}
cur_root_node = create_tree(btree_name, nullptr);
if (!cur_root_node)
{
return false;
}
add_to_front(cur_root_node);
return true;
}
在加载之前会判断一下当前是否已经在运行其他行为树,决定是否要做一下清理工作。加载完成之后调用add_to_front将这个行为树的根节点加入到活动节点集合中:
std::vector<node*> m_fronts; // node ready to run
void agent::add_to_front(node* cur_node)
{
for (auto one_node : m_fronts)
{
if (one_node == cur_node)
{
return;
}
}
m_fronts.push_back(cur_node);
}
这里使用vector来做集合的原因是普通情况下这个集合里只会有一个节点,只有在执行路径上引入了一个Parallel节点之后这个集合才会有额外的节点。这个fronts集合会被轮询函数poll_fronts来读取,遍历其中的每一个节点,触发这个节点的执行:
bool agent::poll_fronts()
{
if (m_fronts.empty())
{
return false;
}
m_pre_fronts.clear();
std::swap(m_pre_fronts, m_fronts);
int ready_count = 0;
for (const auto& one_node : m_pre_fronts)
{
if (one_node->node_state_is_ready())
{
ready_count++;
poll_node(one_node);
if (!m_enabled)
{
break;
return false;
}
}
else
{
if (one_node->m_state == node_state::blocking)
{
add_to_front(one_node);
}
}
}
m_pre_fronts.clear();
return m_enabled && ready_count > 0;
}
由于在遍历的过程中可能会触发节点从fronts删除,所以这里先用m_pre_fronts来制造一个副本来处理遍历,同时将原有的fronts清空,遍历过程会重新填充fronts集合。
遍历节点的最主要逻辑就是判断一个节点的状态,这里我们使用枚举类型来规定节点的状态:
enum class node_state
{
init = 0,
entering,
awaken,
revisiting,
blocking,
wait_child,
dead,
};
init代表节点只是刚初始化好,并没有参与调度entering代表当前节点正式开始执行,这是一个临时状态awaken代表当前复合节点由于其某个子节点的执行完成,成为了下一个要执行的节点revisiting代表当前复合节点在awaken状态被调度执行时的临时状态,此时还未选择下一个要执行的节点blocking代表当前节点正在执行一个持续性任务,只有Action节点才能有这个状态wait_child代表当前复合节点已经将其一个子节点指定为了下一个要执行的节点,正在等待这个子节点的执行完成dead代表当前节点已经执行完成
因此这里的m_fronts存储的活动节点的状态只会有三种:
init状态 代表因为被父节点选中, 引发当前节点加入到活动节点集合awaken状态 代表因为子节点执行完成,引发当前节点加入到活动节点集合blocking状态 代表这个Action节点的任务在执行中,因此保持在活动节点集合
这里在节点上封装了node_state_is_ready()接口,代表这个节点需要执行逻辑:
bool node_state_is_ready()
{
return m_state == node_state::init || m_state == node_state::awaken;
}
在行为树刚加载的时候,所有的节点状态都是node_state::init状态,代表刚初始化完成。在将root节点添加到fronts之后,poll_fronts会遍历到这个节点,执行poll_node,触发对应节点的visit:
void agent::poll_node(node* cur_node)
{
current_poll_node = cur_node;
cur_node->visit();
current_poll_node = nullptr;
}
void node::visit()
{
switch (m_state)
{
case node_state::init:
create_children();
on_enter();
if (m_state == node_state::entering)
{
m_logger->warn("btree {} on_enter node {} while after state {}",
btree_config.tree_name, node_config.idx, int(m_state));
m_agent->notify_stop();
}
break;
case node_state::awaken:
on_revisit();
if (m_state == node_state::revisiting)
{
m_logger->warn("btree {} revisit node {} while after state {}",
btree_config.tree_name, node_config.idx, int(m_state));
m_agent->notify_stop();
}
break;
default:
m_logger->warn("btree {} visit node {} with invalid state {}",
btree_config.tree_name, node_config.idx, int(m_state));
m_agent->notify_stop();
break;
}
}
init状态与awaken状态的区别我们之前已经介绍过了。当前节点的状态为init的时候会调用create_children来按需创建当前节点的子节点,因为我们之前的load_btree只负责创建出root节点。创建好子节点之后再执行on_enter:
void node::on_enter()
{
m_state = node_state::entering;
next_child_idx = 0;
result = false;
for (auto one_child : m_children)
{
one_child->m_state = node_state::init;
}
if (m_agent->during_debug())
{
m_agent->push_cmd_queue(m_agent->get_tree_idx(btree_config.tree_name), node_config.idx, agent_cmd::node_enter, {});
}
}
on_enter这里会设置为当前节点的状态为entering,同时将所有的子节点状态设置为init以保证可以调度,同时将当前节点被激活的消息发送到调试器中。
实际上这个on_enter是一个虚函数,复合节点的on_enter负责选择一个子节点去运行:
void root::on_enter()
{
node::on_enter();
visit_child(0);
}
void sequence::on_enter()
{
node::on_enter();
next_child_idx = 0;
visit_child(0);
}
这里的visit_child负责将指定的子节点放入到活动节点集合中,同时将自身状态切换为wait_child:
void node::visit_child(std::uint32_t child_idx)
{
if (child_idx >= m_children.size())
{
m_logger->warn("btree {} visit child {} at node {} while m_children size is {}",
btree_config.tree_name, child_idx, node_config.idx, m_children.size());
m_agent->notify_stop();
return;
}
m_children[child_idx]->m_state = node_state::init;
m_agent->add_to_front(m_children[child_idx]);
m_state = node_state::wait_child;
}
而Action节点的on_enter负责执行其封装的任务,这里主要的逻辑就是对所需的参数进行求值,生成一个vector<json>的参数,并根据指定的action名字去执行函数调用:
void action::on_enter()
{
node::on_enter();
if (!load_action_config())
{
m_logger->warn("{} fail to load action args with extra {}", debug_info(), serialize::encode(node_config.extra).dump());
m_agent->notify_stop();
return;
}
json::array_t real_action_args; // 负责解析action所需的所有参数 主要是处理黑板值
for (const auto& one_arg : action_args)
{
if (one_arg.first == action_arg_type::blackboard)
{
auto cur_key = one_arg.second.get<std::string>();
if (!m_agent->blackboard_has(cur_key))
{
m_logger->warn("{} invalid blackboard arg name {}", debug_info(), cur_key);
m_agent->notify_stop();
return;
}
auto cur_bb_value = m_agent->blackboard_get(cur_key);
real_action_args.push_back(cur_bb_value);
}
else
{
real_action_args.push_back(one_arg.second);
}
}
if (m_agent->during_debug()) // 将执行时的信息发送到调试器消息队列
{
m_agent->push_cmd_queue(agent_cmd::node_action, {action_name, real_action_args});
}
std::optional<bool> action_result = m_agent->agent_action(action_name, real_action_args);
if (m_agent->during_poll())
{
if (!action_result)
{
m_state = node_state::blocking;
m_agent->add_to_front(this);
return;
}
else
{
set_result(action_result.value());
}
}
else
{
return;
}
}
这里执行任务函数的接口为agent_action,这是一个虚函数,返回值为std::optional<bool>:
virtual std::optional<bool> agent::agent_action(const std::string& action_name,
const json::array_t& action_args)
{
return std::nullopt;
}
这个agent_action函数的具体实现在agent的子类action_agent上,action_agent内部使用了一个map来存储所有注册过来的action:
using action_func_type = std::function<std::optional<bool>(const std::vector<json>&)>;
std::unordered_map<std::string, action_func_type> m_action_funcs_map;
std::optional<bool> action_agent::agent_action(const std::string& action_name,
const json::array_t& action_args)
{
auto action_iter = m_action_funcs_map.find(action_name);
if (action_iter == m_action_funcs_map.end())
{
m_logger->warn("cant find action {}", action_name);
notify_stop();
return std::nullopt;
}
return action_iter->second.operator()(action_args);
}
注册函数action函数的时候,使用模板技巧来支持所有能与json进行转换的函数参数,这样就可以自动的将函数签名类型擦除为action_func_type了:
template <typename T, typename... Args>
void add_action(const std::string& name, T* c, bool (T::* action_func)(Args...))
{
auto cur_lambda = [=](const std::vector<json>& input_args) -> std::optional<bool>
{
if (sizeof...(Args) != input_args.size())
{
return false;
}
std::tuple<std::remove_const_t<std::remove_reference_t<Args>>...> temp_tuple;
if (!spiritsaway::serialize::decode(input_args, temp_tuple))
{
return false;
}
return apply_impl(c, action_func, temp_tuple, std::index_sequence_for<Args...>{});
};
m_action_funcs_map[name] = cur_lambda;
}
template <typename T, typename... Args>
void add_async_action(const std::string& name, T* c, std::optional<bool>(T::* action_func)(Args...))
{
auto cur_lambda = [=](const std::vector<json>& input_args)-> std::optional<bool>
{
if (sizeof...(Args) != input_args.size())
{
return false;
}
std::tuple<std::remove_const_t<std::remove_reference_t<Args>>...> temp_tuple;
if (!spiritsaway::serialize::decode(input_args, temp_tuple))
{
return false;
}
return apply_impl(c, action_func, temp_tuple, std::index_sequence_for<Args...>{});
};
m_action_funcs_map[name] = cur_lambda;
}
在这两个辅助函数的帮助下,注册一个action就只需要一行代码即可:
bool action_agent::has_key(const std::string& bb_key);
bool action_agent::set_key_value(const std::string& bb_key,
const json& new_value);
std::optional<bool> action_agent::wait_for_seconds(double duration)
add_action("has_key", this, &action_agent::has_key);
add_action("has_key_value", this, &action_agent::has_key_value);
add_async_action("wait_for_seconds", this, &action_agent::wait_for_seconds);
当agent_action返回后,如果optional内有值,代表这个action立即执行完成,optional内的值就是action的返回结果,此时通过set_result接口来回溯到其父节点并重新激活,进入awaken状态;
void node::set_result(bool new_result)
{
if (node_state_is_forbid_enter())
{
m_logger->warn("current state is {} while set result {} at node {}", int(m_state), new_result, node_config.idx);
m_agent->notify_stop();
return;
}
result = new_result;
m_state = node_state::dead;
backtrace();
}
void node::backtrace()
{
leave();
if (m_parent)
{
m_agent->add_to_front(m_parent);
m_parent->m_state = node_state::awaken;
}
else
{
m_agent->add_to_front(this);
m_state = node_state::awaken;
}
m_agent->poll();
}
这里的leave()函数负责清理这个节点的状态,以及将节点执行完成的消息推送到行为树调试器:
void node::leave()
{
m_closure.reset();
if (m_agent->during_debug())
{
m_agent->push_cmd_queue(m_agent->get_tree_idx(btree_config.tree_name), node_config.idx, agent_cmd::node_leave, {});
}
}
如果optional内没有值,则代表发起了一个异步任务,此节点的状态设置为blocking,同时加入到活动节点集合中。
当一个复合节点从awaken状态进入执行时,对应的接口是on_revisit,这也是一个虚接口,子类中负责重写并继承实现:
void node::on_revisit()
{
m_state = node_state::revisiting;
}
void root::on_revisit()
{
node::on_revisit();
if (!m_parent)
{
on_enter();
}
else
{
bool result = m_children[0]->result;
set_result(result);
}
}
void sequence::on_revisit()
{
node::on_revisit();
if (!m_children[next_child_idx]->result)
{
set_result(false);
return;
}
next_child_idx += 1;
if (next_child_idx == m_children.size())
{
set_result(true);
return;
}
visit_child(next_child_idx);
}
对于非root节点的复合节点而言,on_revisit的工作就是选取下一个子节点去执行,如果无法选择下一个子节点,则设置好当前节点的执行结果,并使用set_result将父节点激活,加入到活动节点集合中,等待下一次poll。
至此行为树单次处理活动节点集合的poll_fronts逻辑基本完成,由于poll_fronts的执行可能会引入新的节点加入到fronts集合,如果在下一次Tick的时候再执行poll_fronts的话会导致行为树的节点调度延迟极大,所以在poll_fronts之上增加了一个poll函数,这个poll函数负责循环执行poll_fronts,直到poll_fronts不再引发fronts集合修改为止:
bool agent::poll()
{
if (m_during_poll)
{
return false;
}
m_during_poll = true;
push_cmd_queue(agent_cmd::poll_begin, {});
std::size_t poll_count = 0;
while (true)
{
if (!m_enabled)
{
return false;
}
bool poll_result = false;
poll_result |= poll_events();
poll_result |= poll_fronts();
if (!reset_flag)
{
if (!poll_result)
{
break;
}
}
else
{
reset_flag = false;
add_to_front(cur_root_node);
}
poll_count += 1;
}
m_during_poll = false;
if (poll_count)
{
return true;
}
else
{
return false;
}
}
这个poll内部while循环内处理处理poll_fronts之外,还调用了poll_events,这个函数用来处理外部向行为树传递的事件,主要是为了对接wait_event这个节点注册的事件等待:
bool agent::poll_events()
{
if (m_events.empty())
{
return false;
}
for (const auto& one_event : m_events)
{
m_pre_fronts.clear();
std::swap(m_pre_fronts, m_fronts);
bool event_has_handled = false;
for (auto one_node : m_pre_fronts)
{
if (!event_has_handled)
{
if (one_node->handle_event(one_event))
{
one_node->set_result(true);
event_has_handled = true;
}
else
{
add_to_front(one_node);
}
}
else
{
add_to_front(one_node);
}
}
}
m_events.clear();
return true;
}
virtual bool node::handle_event(const event_type& cur_event)
{
return false;
}
bool wait_event::handle_event(const event_type& cur_event)
{
if(cur_event == event)
{
return true;
}
else
{
return false;
}
}
一般来说,只使用事件通知是不够的,还需要获取事件所携带的一些额外数据。实际使用这个事件系统的时候,在发送事件之前会将事件相关的参数设置到黑板之中的特定黑板值之上,这样行为树中的事件处理逻辑可以通过黑板查询接口来获取相关参数。
behavior_tree 中的行为树调试器
行为树是一种配置NPC预期行为表现有力工具,但是实践过程中难免会因为各种原因导致NPC的行为并没有达到预期。在出现异常表现之后策划经常会让程序去排查行为树是否有配置问题,而行为树这个类似于虚拟机的结构比较难一眼就看出问题的所在,特别是执行逻辑会被黑板值和外部事件影响。在本人负责项目AI的早期阶段深受这个行为树表现异常的问题困扰,早期的问题定位手段就只有给关键的节点添加日志,然后人肉根据日志来模拟此时行为树的执行流程。这种方式去定位问题费时费力费眼睛,为此对原来的行为树运行时增加了运行状态记录到日志队列的功能,对应的接口为push_cmd_queue:
void agent::push_cmd_queue(std::uint32_t tree_idx, std::uint32_t node_idx, agent_cmd _cmd, const json::array_t& _param)
{
if (m_cmd_receiver)
{
m_cmd_receiver->add(tree_idx, node_idx, _cmd, _param);
}
}
void agent::push_cmd_queue(agent_cmd _cmd, const json::array_t& _param)
{
if (current_poll_node)
{
push_cmd_queue(get_tree_idx(current_poll_node->btree_config.tree_name), current_poll_node->m_node_idx, _cmd, _param);
}
else
{
push_cmd_queue(0, 0, _cmd, _param);
}
}
这里的cmd_receiver是一个纯虚类,作为一个消息投递的目标来使用,实际项目中可以设置为直接输出日志或者打印到单独文件,也可以通过网络输出到指定服务器:
struct cmd_receiver
{
virtual void add(std::uint32_t tree_idx, std::uint32_t node_idx, agent_cmd _cmd, const json::array_t& _param)
{
}
};
push_cmd_queue在节点的enter/leave时都会记录一次数据到日志队列中:
void node::on_enter()
{
m_state = node_state::entering;
next_child_idx = 0;
result = false;
for (auto one_child : m_children)
{
one_child->m_state = node_state::init;
}
if (m_agent->during_debug())
{
m_agent->push_cmd_queue(m_agent->get_tree_idx(btree_config.tree_name), node_config.idx, agent_cmd::node_enter, {});
}
}
void node::leave()
{
m_closure.reset();
if (m_agent->during_debug())
{
m_agent->push_cmd_queue(m_agent->get_tree_idx(btree_config.tree_name), node_config.idx, agent_cmd::node_leave, {});
}
}
调试日志所支持的日志类型并不只限制于node_enter/node_leave这两个agent_cmd,完整的agent_cmd定义如下:
enum class agent_cmd
{
poll_begin = 0,
snapshot, //tree_indexes node_idxes blackboard
push_tree,// new tree name, tree_idx
node_enter,//
node_leave,//
node_action,//action_name, action_args
bb_set,//key, value
bb_remove, //key
bb_clear,
reset,
};
poll_begin,记录一次行为树状态更新的开始snapshot,当开启调试时,记录此时的活动节点状态和黑板值push_tree,这个代表触发了一颗行为树子树时的加载node_enter,一个行为树节点由于其父节点的调度导致被加入到活跃节点集合node_leave, 一个行为树节点由于其对应子树的任务结束引发的节点从活跃节点集合中删除node_action, 一个Action节点执行的任务名字以及相关的运行时参数bb_set记录所有的黑板值赋值bb_remove记录所有的黑板值删除一个keybb_clear记录所有的黑板值清空reset记录一次行为树状态完全重置
了解了行为树运行时对调试的支持之后,我们再来介绍一下行为树的调试器,调试器的代码位于behavior_tree/debugger目录下,首先需要明确的是调试器的日志输入目前支持两种格式:
enum class debug_source
{
no_debug,
file_debug,
http_debug,
};
这里的file_debug对应的是记录了调试日志的一个Json文件,而http_debug则代表开启一个非常简单的http服务器来接受调试日志的网络传输。file_debug偏离线分析,而http_debug对应的则是在线分析。
在指定了调试日志数据源之后,调试器界面就可以打开了,这个也是一个QT5的GUI程序,其运行界面如下:
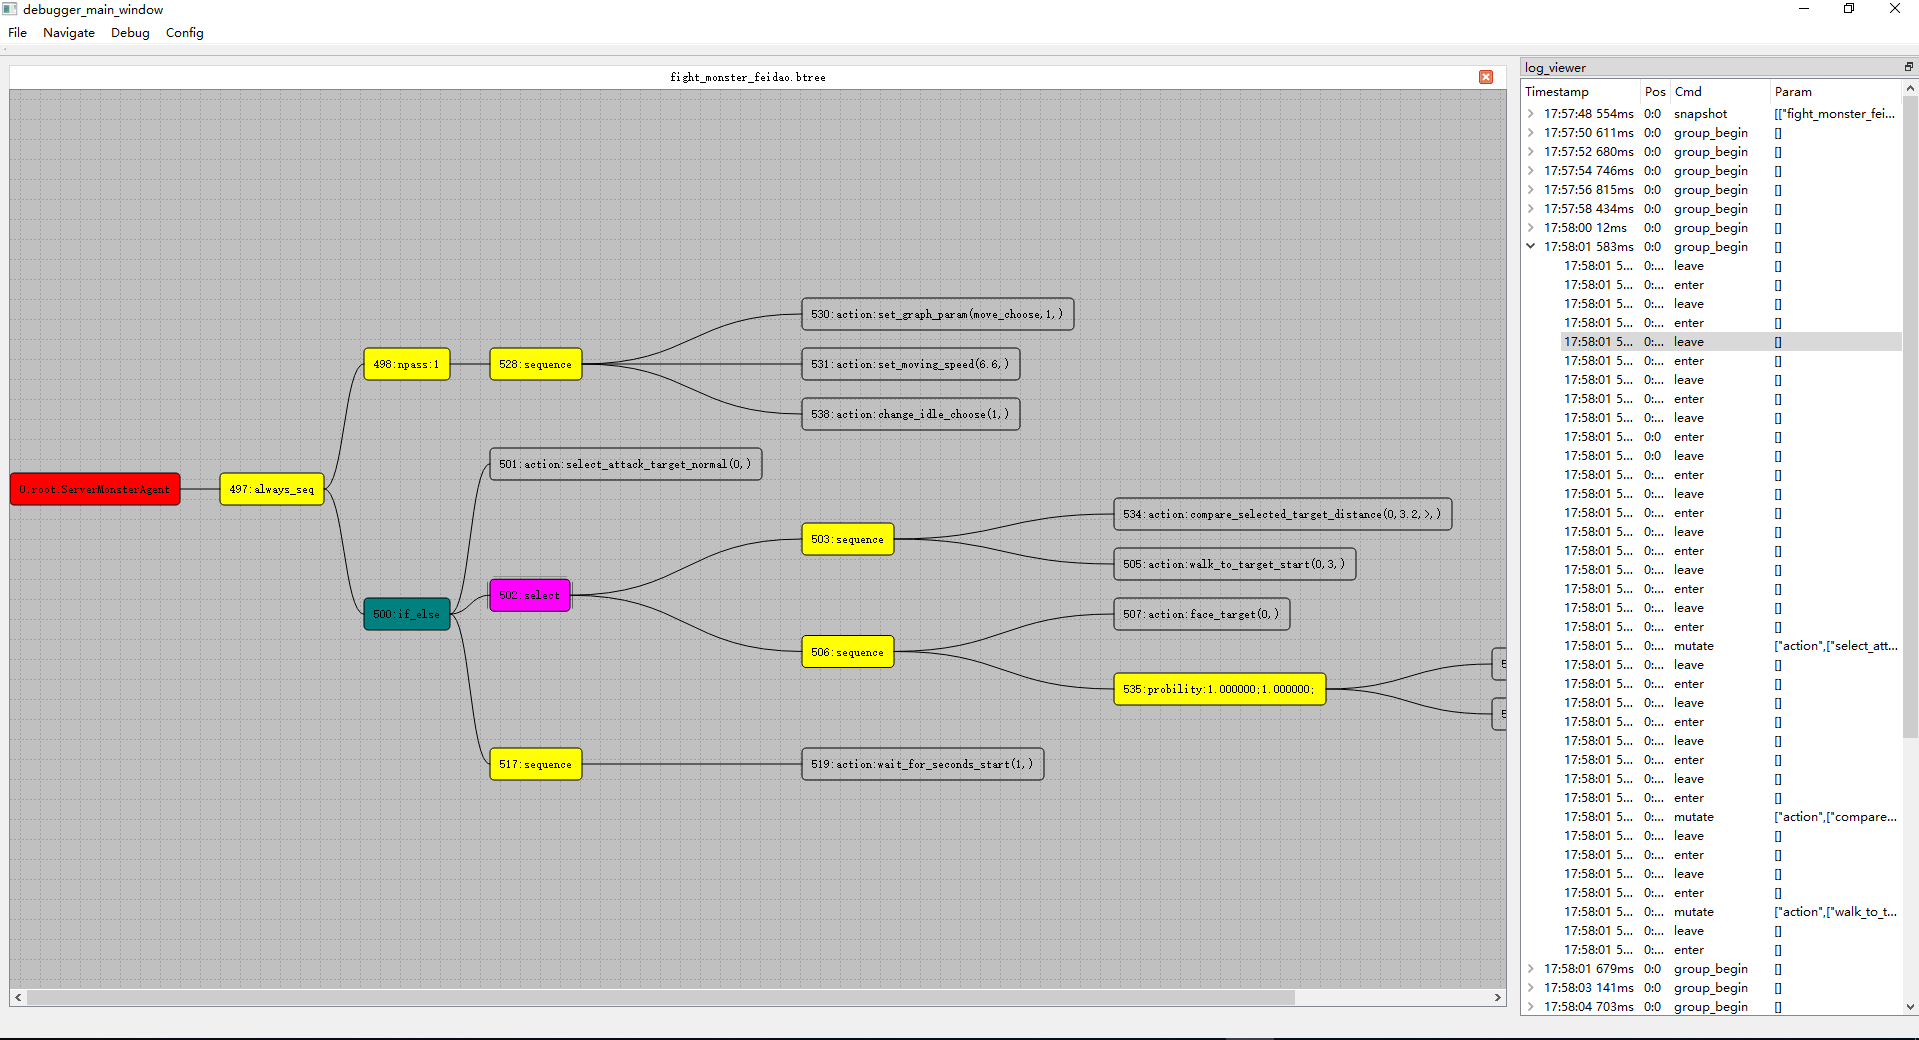
界面左侧窗口负责展示当前正在被执行的行为树,而右侧窗口则是调试日志的基于记录时间的有序列表展示。调试日志里的每一项都会有这四个字段来记录信息:
TimeStamp代表这个日志的发生时间Pos代表这个日志对应的节点编号Cmd代表这个日志对应的行为树运行时操作agent_cmdParams代表这个操作时所携带的运行参数
同时所有的日志都会被归类到所属的poll日志下,呈现为两层目录结构,默认被对应的poll日志所折叠,点击左侧箭头时即可展开折叠。这样设计就可以更加
明显的看出某一行日志所发生的时机。
双击调试窗口中的任意一项都会使得当前正在执行的节点被粉红色高亮,在这个项上右键可以获取此时的所有黑板值状态。
有了这个行为树调试器之后,查找行为树表现异常的问题就可以以图形化的形式来定位了,相对于之前的人肉阅读日志来模拟行为树执行来说轻松了很多。
Mosaic Game 的行为树接入
mosaic_game的NPC行为控制对接了bahavior_tree/runtime,在下面列举的Actor中添加了管理行为树的xxx_ai_component:
mosaic_game::entity::monster上使用monster_ai_component来驱动monster_agent来实现战斗和巡逻相关流程mosaic_game::entity::client_player上使用player_ai_component来驱动client_player_agent,以实现压测时的各种操作模拟和副本流程中的挂机mosaic_game::entity::client_account上使用account_ai_component来驱动account_agent,以实现压测时的自动注册、登录、创建玩家等行为
上面三个agent类型中monster_agent提供的功能最典型,因此这里只对monster_agent做详细介绍。monster_agent并没有直接继承自behavior_tree运行时提供的action_agent,中间还有一层actor_agent。这个actor_agent实现了常规的计时器、寻路、搜索entity等action.计时器的实现很简单,就是重写了一下action_agent上对应的虚接口:
std::uint64_t actor_agent::create_timer(std::uint64_t expire_gap_ms)
{
auto cur_migrate_timer = m_ai_component->add_ai_timer(expire_gap_ms);
return cur_migrate_timer;
}
void actor_agent::do_remove_timer(std::uint64_t handler)
{
m_ai_component->cancel_ai_timer(handler);
}
std::uint64_t actor_agent::gen_next_timer_seq()
{
m_next_timer_seq++;
return m_next_timer_seq;
}
为了支持统一管理一个actor上的所有行为树创建的计时器,方便随时执行行为树的终止与重启,actor_ai_component上使用了一个专用接口add_ai_timer管理创建,同时使用cancel_ai_timer来管理取消。这里需要再详细解释一下action_agent的计时器创造细节:
std::optional<bool> action_agent::wait_for_seconds(double duration)
{
duration = std::max(0.5, duration);
auto cur_timer_handler = create_timer(int(duration*1000));
auto cur_timeout_closure = std::make_shared<timeout_closure>(current_poll_node, json(cur_timer_handler));
current_poll_node->m_closure = cur_timeout_closure;
add_timer(cur_timer_handler, current_poll_node);
return std::nullopt;
}
在获取了一个计时器的handler之后,需要在构造一个timerout_closure来保存这个计时器的信息到节点的m_closure上
std::shared_ptr<node_closure> m_closure;
class timeout_closure : public node_closure
{
public:
const std::uint64_t m_timer_handler;
timeout_closure(node* cur_node, const json& data);
static std::string closure_name()
{
return "time_out";
}
virtual ~timeout_closure();
};
设计这个node_closure的目的是为了支持异常中断,以处理持续性任务被行为树的高优先级事件中断时的现场清理。例如在攻击状态下在超目标移动的过程中接收到了目标死亡的事件,此时会导致整个处理战斗的行为树reset,reset的时候需要终止所有持续性任务的运行,此时我们需要通知寻路系统来取消当前正在执行的寻路。所以我们将这个节点结束清理的逻辑都统一放在node_closure的析构函数中,这样在节点退出的时候清空m_closure对应的智能指针就会触发清理操作:
void node::leave()
{
m_closure.reset();
if (m_agent->during_debug())
{
m_agent->push_cmd_queue(m_agent->get_tree_idx(btree_config.tree_name), node_config.idx, agent_cmd::node_leave, {});
}
}
void node::interrupt()
{
m_closure.reset();
if (m_state == node_state::dead)
{
return;
}
if (next_child_idx < m_children.size())
{
m_children[next_child_idx]->interrupt();
}
m_state = node_state::dead;
next_child_idx = 0;
}
所以在actor_agent上提供的所有寻路接口都会设置一个寻路的closure:
void actor_agent::add_navi_finish_callback()
{
auto cur_navi_closure = std::make_shared<navi_closure>(current_poll_node, json{});
current_poll_node->m_closure = cur_navi_closure;
}
class navi_closure: public behavior_tree::runtime::node_closure
{
protected:
utility::listen_handler<utility::enum_type_value_pair> m_navi_finish_handler;
entity::actor_entity* m_actor;
public:
navi_closure(behavior_tree::runtime::node* cur_node, const json& data);
void on_finish(const utility::enum_type_value_pair& cmd, const utility::navi_reply& cur_navi_rep);
static std::string closure_name()
{
return "navi";
}
~navi_closure();
};
void navi_closure::on_finish(const utility::enum_type_value_pair& cmd, const utility::navi_reply& cur_navi_rep)
{
m_actor->dispatcher().remove_listener(m_navi_finish_handler);
m_node->set_result(true);
}
navi_closure::~navi_closure()
{
if(m_navi_finish_handler.valid())
{
m_actor->dispatcher().remove_listener(m_navi_finish_handler);
auto cur_navi_comp = m_actor->get_component<entity::actor_navi_component>();
if(cur_navi_comp)
{
cur_navi_comp->navi_cancel();
}
}
}
类似的我们在actor_agent上设计了一个hit_end_closure来处理攻击结束的清理操作。
由于行为树的黑板被我们设计成了一个map<string,json>,所以无法方便的保存计算所需的其他actor的指针,因此这里提供了actor_entity*与uint64_t相互转换的函数来进行actor_entity*的黑板值读写操作,这个uint64就是actor_entity在第一次创建时所赋予的全局唯一在线编号:
entity::actor_entity* actor_agent::entity_from_u64(std::uint64_t eid)
{
return m_owner->get_space()->actor_from_u64(eid);
}
std::uint64_t actor_agent::entity_to_u64(const entity::actor_entity* in_actor)
{
return m_owner->get_space()->actor_to_u64(in_actor);
}
UnrealEngine中的行为树
行为树编辑套件
在UE中提供了一个继承自蓝图编辑功能的行为树编辑系统,整个系统的详尽介绍可以参考其官方文档ue行为树快速入门,在这张图中展示了UE4官方示例ShooterGame的行为树配置:
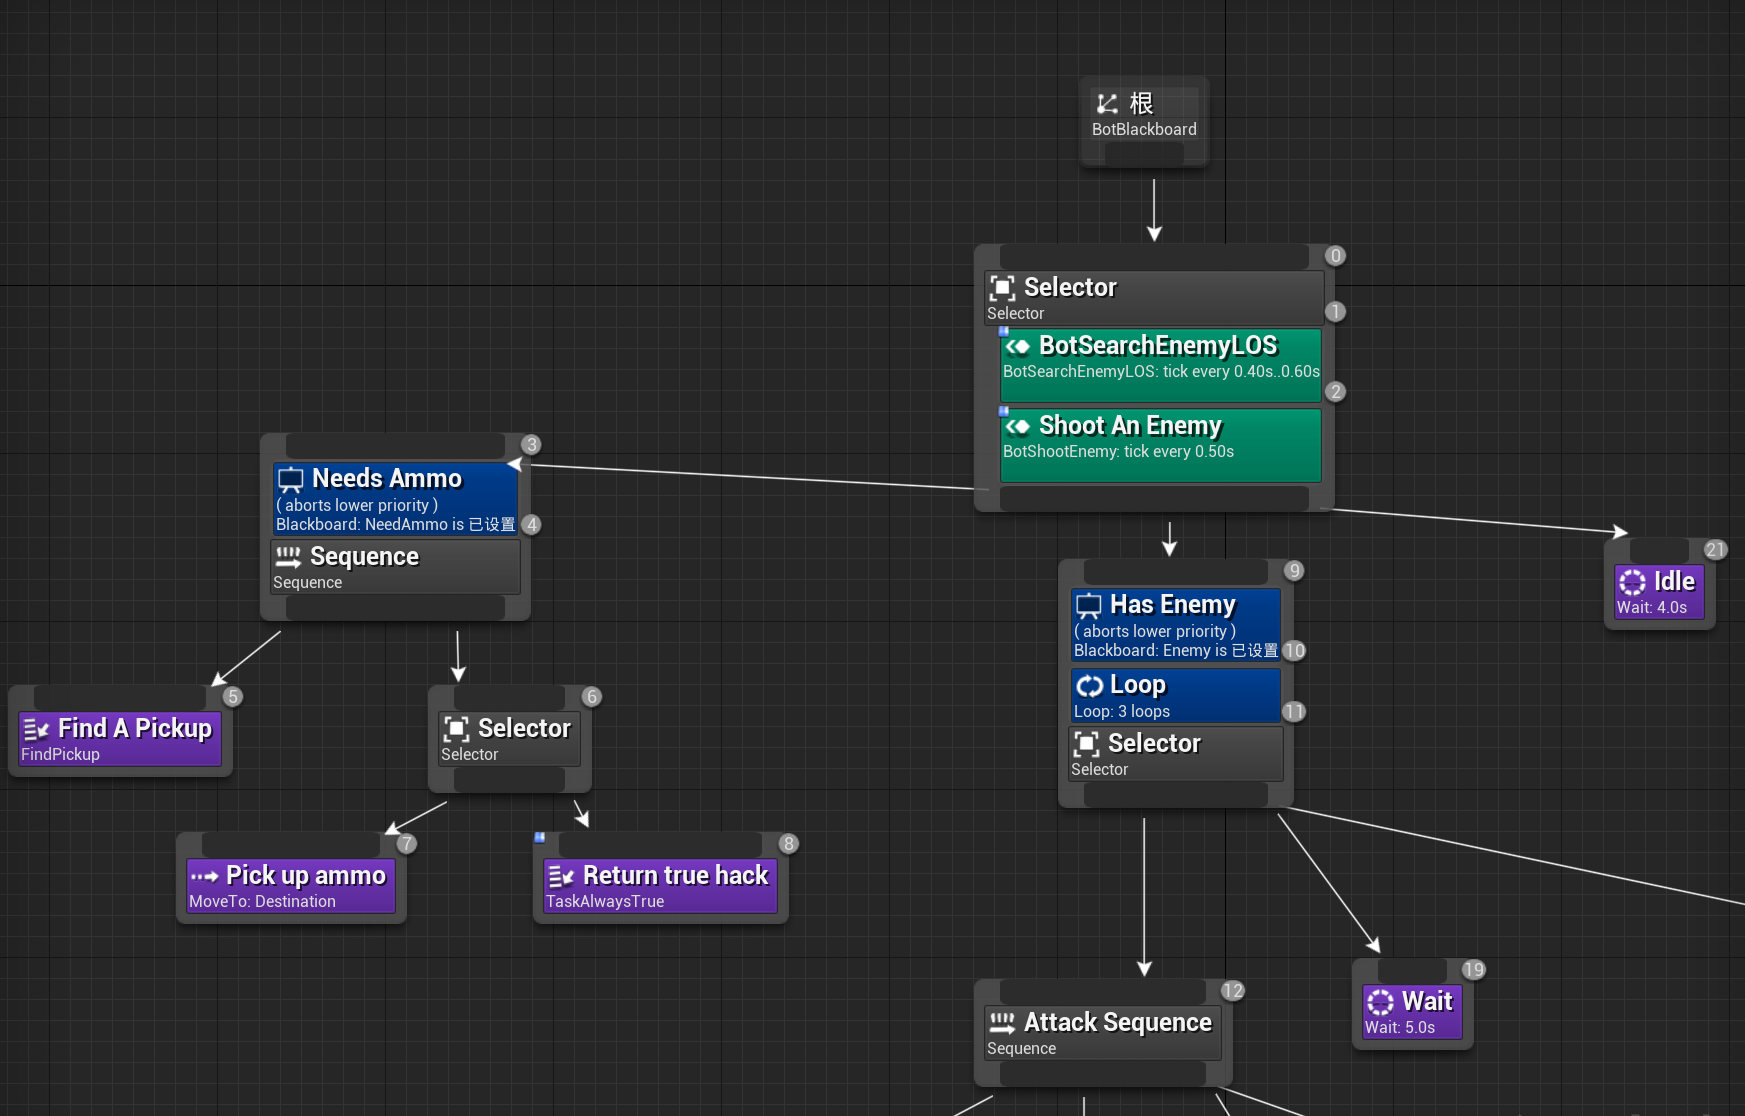
在UE的行为树设置中,节点是以从上到下、从左到右的方式来组织的,每个节点都继承自UBTNode,根节点位于最顶端。UE的行为树提供了如下几种类型的节点来给创作者来使用:
- 复合节点
(UBTCompositeNode),对应上图中底色为灰色的节点,这种节点下面可以挂载一个或者多个子节点,根节点就是只有一个子节点的复合节点。复合节点负责承担当一个子节点结束之后选择下一个节点的任务,对于只有一个子节点的就直接返回到父节点。对于有多个子节点的复合节点,根据其选择逻辑又细分为了三种:UBTComposite_Selector,对应之前介绍的选择节点UBTComposite_Sequence,对应之前介绍的顺序节点UBTComposite_SimpleParallel, 对应之前介绍的并行节点,不过做了一些限制与简化,简单平行(Simple Parallel)节点只包含两个节点,左边的节点为主节点,只能设置为任务节点,而右边的节点可以挂载任务节点、复合节点以及一颗完整的行为树。简单并行节点允许这两个子节点同时运行。主任务完成后,结束模式Finish Mode中的设置会指示该节点是应该立即结束,同时中止次要树,还是应该推迟结束,直到次要树完成。
- 任务节点
(UBTTaskNode)对应上图中底色为紫色的节点,负责执行具体的任务,每一种具体的任务都需要从这个节点继承,如移动任务UBTTask_MoveTo和等待任务UBTTask_Wait - 辅助节点
(UBTAuxiliaryNode)这种节点可以附加在复合节点和任务节点之上,一个复合节点和任务节点可以附加多个辅助节点。根据这些辅助节点的功能分类,可以细分为两种:- 装饰器节点
(UBTDecorator)装饰器节点对应上图中底色为蓝色的节点,这个节点作为条件判断节点来使用,多个装饰器节点一起组成了所修饰节点的执行前置条件,需要都返回true才能启动执行。典型的装饰器节点包括判断黑板值是否相等的节点UBTDecorator_CompareBBEntries以及限制最多执行次数的节点UBTDecorator_Loop - 服务节点
(UBTService)服务节点对应上图中的底色为浅绿色的节点,其作用就是在所修饰的节点执行期间定期的Tick执行一些操作,例如更新目标选择,定期射击等任务
- 装饰器节点
树中的每个节点都有一个数字代表其优先级,数字越小则优先级越高。复合节点、任务节点、服务节点的优先级在节点对应方框的右上角,而辅助节点对应的优先级在对应方框的右下角。这个优先级其实就是整个行为树先序遍历时每个节点的访问顺序。
UE行为树编辑系统里不仅提供了上述的行为树编辑器,还提供了黑板值编辑器和任务编辑器。
黑板值编辑器提供了一个强类型的变量编辑器,相对于我们在mosaic_game中基于map<string, json>实现的黑板系统可优秀太多了,声明的变量类型支持所有蓝图可用类型,也就是说UObject和UStruct都可以。下图中的EnemyActor就是一个Actor类型的黑板值,之前在mosaic_game中要存储一个Entity还需要通过Entity->entity_idx()来转换:
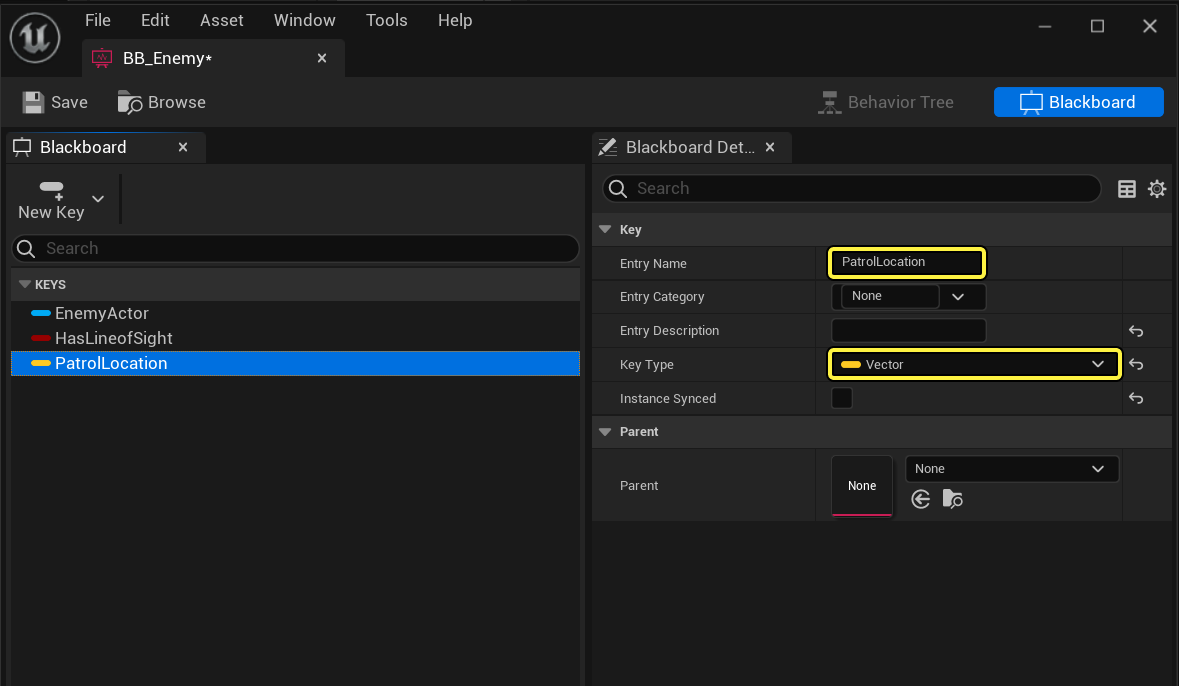
行为树黑板是作为一个单独的资产来编辑的,不能脱离行为树来使用。创建行为树的时候可以附加一个黑板资产来作为内部数据存储:
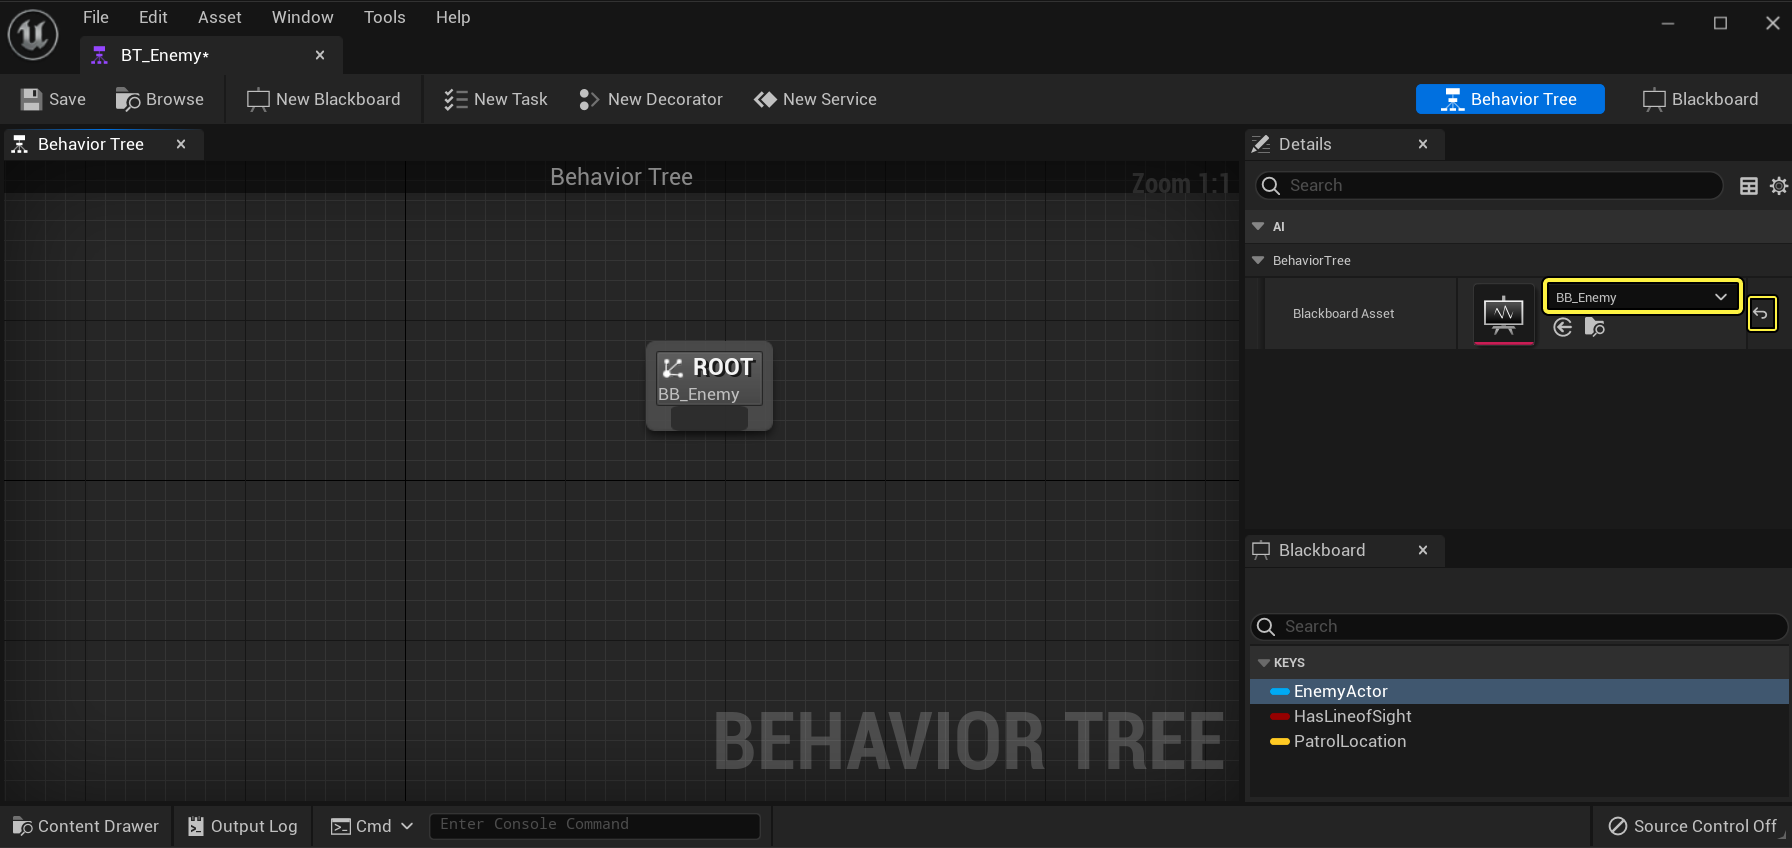
在真正使用key去查询或者设置黑板值的时候,需要自己在接口中指定值的类型,按道理应该直接从黑板对应值拉出一个连线过来:
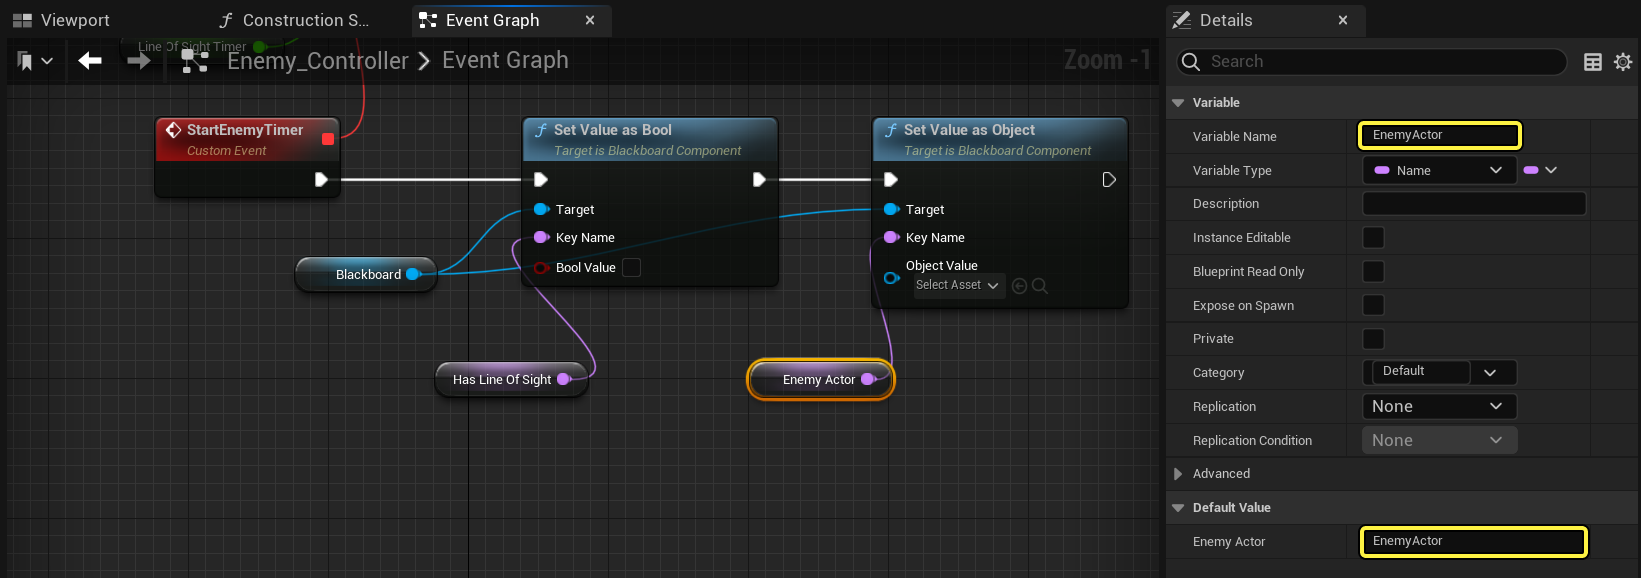
任务编辑器其实就相当于使用蓝图新建了一个自定义的任务函数,从而在不修改代码的情况下实现一种自定义的任务节点。外层行为树将这个任务当作类的虚接口来使用,不需要在乎内部实现,这样使得上层框架更加简洁。下图就是官方文档中的选择周围一定半径内随机点进行巡逻的任务实现,:
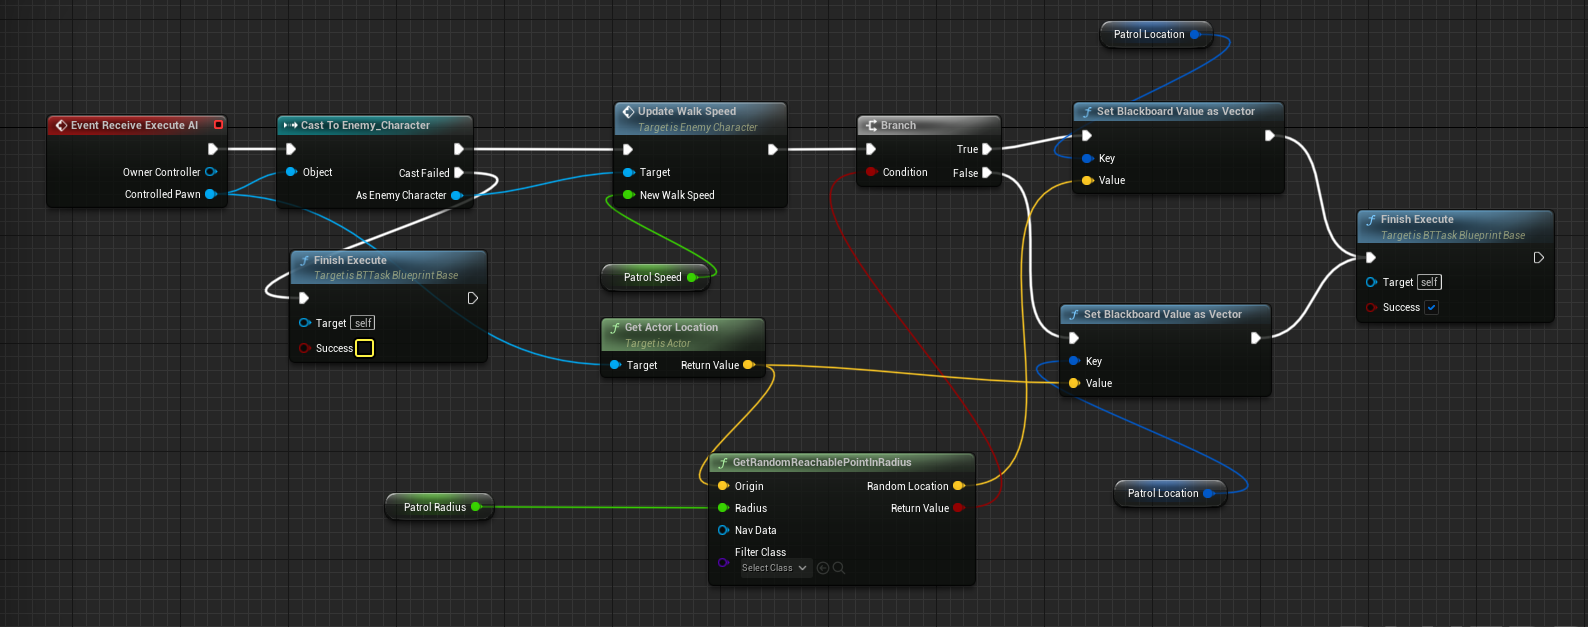
行为树的任意当前节点执行完成之后的结果,是一个枚举类,有成功、失败、被终止、持续中四种状态:
namespace EBTNodeResult
{
// keep in sync with DescribeNodeResult()
enum Type
{
Succeeded, // finished as success
Failed, // finished as failure
Aborted, // finished aborting = failure
InProgress, // not finished yet
};
}
每个节点被激活之后,会构造一个EBTNodeResult来返回,通知其父节点执行后续的节点调度,这个节点调度的流程我们将在后文中进行详解。
UE行为树的黑板
UE行为树黑板的类型继承自UAsset,内部使用Array来存储所有声明的变量:
UCLASS(BlueprintType, AutoExpandCategories=(Blackboard))
class AIMODULE_API UBlackboardData : public UDataAsset
{
GENERATED_UCLASS_BODY()
DECLARE_MULTICAST_DELEGATE_OneParam(FKeyUpdate, UBlackboardData* /*asset*/);
/** parent blackboard (keys can be overridden) */
UPROPERTY(EditAnywhere, Category=Parent)
UBlackboardData* Parent;
#if WITH_EDITORONLY_DATA
/** all keys inherited from parent chain */
UPROPERTY(VisibleDefaultsOnly, Transient, Category=Parent)
TArray<FBlackboardEntry> ParentKeys;
#endif
/** blackboard keys */
UPROPERTY(EditAnywhere, Category=Blackboard)
TArray<FBlackboardEntry> Keys;
};
从这个类成员可以看出黑板是可以级联拼接的,通过Parent指针来对原始的黑板值列表进行扩充或者复写,从逻辑上实现了对Parent黑板的类型继承。
黑板中的每一个值都是一个FBlackboardEntry,内部存储了值的名字、类型和描述信息:
/** blackboard entry definition */
USTRUCT()
struct FBlackboardEntry
{
GENERATED_USTRUCT_BODY()
UPROPERTY(EditAnywhere, Category=Blackboard)
FName EntryName;
#if WITH_EDITORONLY_DATA
UPROPERTY(EditAnywhere, Category=Blackboard, Meta=(ToolTip="Optional description to explain what this blackboard entry does."))
FString EntryDescription;
UPROPERTY(EditAnywhere, Category=Blackboard)
FName EntryCategory;
#endif // WITH_EDITORONLY_DATA
/** key type and additional properties */
UPROPERTY(EditAnywhere, Instanced, Category=Blackboard)
UBlackboardKeyType* KeyType;
/** if set to true then this field will be synchronized across all instances of this blackboard */
UPROPERTY(EditAnywhere, Category=Blackboard)
uint32 bInstanceSynced : 1;
FBlackboardEntry()
: KeyType(nullptr), bInstanceSynced(0)
{}
bool operator==(const FBlackboardEntry& Other) const;
};
KeyType就是当前值的类型信息,这个类型信息继承自UBlackboardKeyType。对应的衍生类型每个类型都会在/Engine/Source/Runtime/AIModule/Classes/BehaviorTree/Blackboard文件夹下有一个单独的头文件:
$ ls
BlackboardKeyAllTypes.h BlackboardKeyType_Name.h
BlackboardKeyType.h BlackboardKeyType_NativeEnum.h
BlackboardKeyType_Bool.h BlackboardKeyType_Object.h
BlackboardKeyType_Class.h BlackboardKeyType_Rotator.h
BlackboardKeyType_Enum.h BlackboardKeyType_String.h
BlackboardKeyType_Float.h BlackboardKeyType_Vector.h
BlackboardKeyType_Int.h
对于常规的数据类型,在UBlackboardComponent提供了这些类型的Get/Set接口:
UFUNCTION(BlueprintCallable, Category="AI|Components|Blackboard")
UObject* GetValueAsObject(const FName& KeyName) const;
UFUNCTION(BlueprintCallable, Category="AI|Components|Blackboard")
UClass* GetValueAsClass(const FName& KeyName) const;
UFUNCTION(BlueprintCallable, Category="AI|Components|Blackboard")
uint8 GetValueAsEnum(const FName& KeyName) const;
UFUNCTION(BlueprintCallable, Category="AI|Components|Blackboard")
int32 GetValueAsInt(const FName& KeyName) const;
UFUNCTION(BlueprintCallable, Category="AI|Components|Blackboard")
void SetValueAsObject(const FName& KeyName, UObject* ObjectValue);
UFUNCTION(BlueprintCallable, Category="AI|Components|Blackboard")
void SetValueAsClass(const FName& KeyName, UClass* ClassValue);
UFUNCTION(BlueprintCallable, Category="AI|Components|Blackboard")
void SetValueAsEnum(const FName& KeyName, uint8 EnumValue);
UFUNCTION(BlueprintCallable, Category="AI|Components|Blackboard")
void SetValueAsInt(const FName& KeyName, int32 IntValue);
外部在获取和设置值的时候会检查类型是否匹配:
int32 UBlackboardComponent::GetValueAsInt(const FName& KeyName) const
{
return GetValue<UBlackboardKeyType_Int>(KeyName);
}
template<class TDataClass>
typename TDataClass::FDataType UBlackboardComponent::GetValue(const FName& KeyName) const
{
const FBlackboard::FKey KeyID = GetKeyID(KeyName);
return GetValue<TDataClass>(KeyID);
}
template<class TDataClass>
typename TDataClass::FDataType UBlackboardComponent::GetValue(FBlackboard::FKey KeyID) const
{
const FBlackboardEntry* EntryInfo = BlackboardAsset ? BlackboardAsset->GetKey(KeyID) : nullptr;
if ((EntryInfo == nullptr) || (EntryInfo->KeyType == nullptr) || (EntryInfo->KeyType->GetClass() != TDataClass::StaticClass()))
{
return TDataClass::InvalidValue;
}
UBlackboardKeyType* KeyOb = EntryInfo->KeyType->HasInstance() ? KeyInstances[KeyID] : EntryInfo->KeyType;
const uint16 DataOffset = EntryInfo->KeyType->HasInstance() ? sizeof(FBlackboardInstancedKeyMemory) : 0;
const uint8* RawData = GetKeyRawData(KeyID) + DataOffset;
return RawData ? TDataClass::GetValue((TDataClass*)KeyOb, RawData) : TDataClass::InvalidValue;
}
从这个GetValue的实现可以看出,FBlackboardEntry中并没有存储这个黑板值的运行时数据。访问一个KeyName对应的真正数值时需要先转化为FBlackboard::FKey,然后再查询这个FKey对应的内存偏移值作为数据开始的指针。这个运行时内存和字段偏移记录都存储在UBlackboardComponent中:
/** memory block holding all values */
TArray<uint8> ValueMemory;
/** offsets in ValueMemory for each key */
TArray<uint16> ValueOffsets;
/** get pointer to raw data for given key */
FORCEINLINE uint8* GetKeyRawData(const FName& KeyName) { return GetKeyRawData(GetKeyID(KeyName)); }
FORCEINLINE uint8* GetKeyRawData(FBlackboard::FKey KeyID) { return ValueMemory.Num() && ValueOffsets.IsValidIndex(KeyID) ? (ValueMemory.GetData() + ValueOffsets[KeyID]) : NULL; }
而这两个字段是在UBlackboardComponent绑定一个UBlackboardData初始化的:
UBlackboardComponent::InitializeBlackboard(UBlackboardData& NewAsset)
{
// 省略一些代码
TArray<FBlackboardInitializationData> InitList;
const int32 NumKeys = BlackboardAsset->GetNumKeys();
InitList.Reserve(NumKeys);
ValueOffsets.AddZeroed(NumKeys);
for (UBlackboardData* It = BlackboardAsset; It; It = It->Parent)
{
for (int32 KeyIndex = 0; KeyIndex < It->Keys.Num(); KeyIndex++)
{
UBlackboardKeyType* KeyType = It->Keys[KeyIndex].KeyType;
if (KeyType)
{
KeyType->PreInitialize(*this);
const uint16 KeyMemory = KeyType->GetValueSize() + (KeyType->HasInstance() ? sizeof(FBlackboardInstancedKeyMemory) : 0);
InitList.Add(FBlackboardInitializationData(KeyIndex + It->GetFirstKeyID(), KeyMemory));
}
}
}
// sort key values by memory size, so they can be packed better
// it still won't protect against structures, that are internally misaligned (-> uint8, uint32)
// but since all Engine level keys are good...
InitList.Sort(FBlackboardInitializationData::FMemorySort());
uint16 MemoryOffset = 0;
for (int32 Index = 0; Index < InitList.Num(); Index++)
{
ValueOffsets[InitList[Index].KeyID] = MemoryOffset;
MemoryOffset += InitList[Index].DataSize;
}
ValueMemory.AddZeroed(MemoryOffset);
// initialize memory
KeyInstances.AddZeroed(InitList.Num());
}
这里为了让内存总大小尽可能的小,会根据每个Item的总内存大小从大到小排序,然后再连续分配。这样会带来一个问题就是获取出来的指针其实并没有遵照相关类型的对齐规则。不过这里注释说对于引擎提供好的这些黑板值类型,不对齐也没啥影响。如果黑板值是POD类型的话的确没啥影响,但是如果是FString这种动态容器类型感觉会出问题。所以我们来看一下这里对FString是如何处理的,先来看一下这个类型的构造函数:
UBlackboardKeyType_String::UBlackboardKeyType_String(const FObjectInitializer& ObjectInitializer) : Super(ObjectInitializer)
{
ValueSize = 0;
bCreateKeyInstance = true;
SupportedOp = EBlackboardKeyOperation::Text;
}
这里有两个特殊的字段:
ValueSize代表这个类型对应的运行时值的字节大小,这里初始化为0bCreateKeyInstance代表这个类型是否需要创建KeyInstance,这里初始化为true
所以下面这一句在计算当前Key的内存大小的时候,遇到FString则会返回sizeof(FBlackboardInstancedKeyMemory)
const uint16 KeyMemory = KeyType->GetValueSize() + (KeyType->HasInstance() ? sizeof(FBlackboardInstancedKeyMemory) : 0);
FORCEINLINE uint16 UBlackboardKeyType::GetValueSize() const
{
return ValueSize;
}
FORCEINLINE bool UBlackboardKeyType::HasInstance() const
{
return bCreateKeyInstance;
}
而这个FBlackboardInstancedKeyMemory其实只是作为索引使用的,指向UBlackboardComponent的另外一个动态内存分配区KeyInstances:
struct FBlackboardInstancedKeyMemory
{
/** index of instanced key in UBlackboardComponent::InstancedKeys */
int32 KeyIdx;
};
/** instanced keys with custom data allocations */
UPROPERTY(transient)
TArray<UBlackboardKeyType*> KeyInstances;
在UBlackboardKeyType_String执行InitializeKey的时候,由于其bCreateKeyInstance=true,所以会使用NewObject来创建一个新的UBlackboardKeyType_String对象,这个对象作为当前UBlackboardComponent里当前UBlackboardKeyType_String真正实例:
void UBlackboardKeyType::InitializeKey(UBlackboardComponent& OwnerComp, FBlackboard::FKey KeyID)
{
uint8* RawData = OwnerComp.GetKeyRawData(KeyID);
if (bCreateKeyInstance)
{
FBlackboardInstancedKeyMemory* MyMemory = (FBlackboardInstancedKeyMemory*)RawData;
UBlackboardKeyType* KeyInstance = NewObject<UBlackboardKeyType>(&OwnerComp, GetClass());
KeyInstance->bIsInstanced = true;
MyMemory->KeyIdx = KeyID;
OwnerComp.KeyInstances[KeyID] = KeyInstance;
uint8* InstanceMemoryBlock = RawData + sizeof(FBlackboardInstancedKeyMemory);
KeyInstance->InitializeMemory(OwnerComp, InstanceMemoryBlock);
}
else
{
InitializeMemory(OwnerComp, RawData);
}
}
所以对于UBlackboardKeyType_String来说,其在ValueMemory占据的四个字节内存不代表任何意义,只是为了避免不同字段的数据开始指针相同而存在的,其读取和设置数据的时候完全忽视了传入的RawData:
FString UBlackboardKeyType_String::GetValue(const UBlackboardKeyType_String* KeyOb, const uint8* RawData)
{
return KeyOb->StringValue;
}
bool UBlackboardKeyType_String::SetValue(UBlackboardKeyType_String* KeyOb, uint8* RawData, const FString& Value)
{
const bool bChanged = !KeyOb->StringValue.Equals(Value);
KeyOb->StringValue = Value;
return bChanged;
}
黑板值除了作为存储区来使用之外,还可以用来做一些数值运算和文本运算,在UBlackboardKeyType这个基类上提供了这些运算的接口:
/** various value testing, works directly on provided memory/properties */
virtual bool TestBasicOperation(const UBlackboardComponent& OwnerComp, const uint8* MemoryBlock, EBasicKeyOperation::Type Op) const;
virtual bool TestArithmeticOperation(const UBlackboardComponent& OwnerComp, const uint8* MemoryBlock, EArithmeticKeyOperation::Type Op, int32 OtherIntValue, float OtherFloatValue) const;
virtual bool TestTextOperation(const UBlackboardComponent& OwnerComp, const uint8* MemoryBlock, ETextKeyOperation::Type Op, const FString& OtherString) const;
可惜的是这些接口都只能在Decorator节点里来使用,不像mosaic_game中的行为树可以作为一般的Action节点来使用:
bool UBTDecorator_Blackboard::CalculateRawConditionValue(UBehaviorTreeComponent& OwnerComp, uint8* NodeMemory) const
{
const UBlackboardComponent* BlackboardComp = OwnerComp.GetBlackboardComponent();
// note that this may produce unexpected logical results. FALSE is a valid return value here as well
// @todo signal it
return BlackboardComp && EvaluateOnBlackboard(*BlackboardComp);
}
bool UBTDecorator_Blackboard::EvaluateOnBlackboard(const UBlackboardComponent& BlackboardComp) const
{
bool bResult = false;
if (BlackboardKey.SelectedKeyType)
{
UBlackboardKeyType* KeyCDO = BlackboardKey.SelectedKeyType->GetDefaultObject<UBlackboardKeyType>();
const uint8* KeyMemory = BlackboardComp.GetKeyRawData(BlackboardKey.GetSelectedKeyID());
// KeyMemory can be NULL if the blackboard has its data setup wrong, so we must conditionally handle that case.
if (ensure(KeyCDO != NULL) && (KeyMemory != NULL))
{
const EBlackboardKeyOperation::Type Op = KeyCDO->GetTestOperation();
switch (Op)
{
case EBlackboardKeyOperation::Basic:
bResult = KeyCDO->WrappedTestBasicOperation(BlackboardComp, KeyMemory, (EBasicKeyOperation::Type)OperationType);
break;
case EBlackboardKeyOperation::Arithmetic:
bResult = KeyCDO->WrappedTestArithmeticOperation(BlackboardComp, KeyMemory, (EArithmeticKeyOperation::Type)OperationType, IntValue, FloatValue);
break;
case EBlackboardKeyOperation::Text:
bResult = KeyCDO->WrappedTestTextOperation(BlackboardComp, KeyMemory, (ETextKeyOperation::Type)OperationType, StringValue);
break;
default:
break;
}
}
}
return bResult;
}
在UE介绍装饰器的官方文档中就提供了一个比较两个黑板值的Decorator节点:
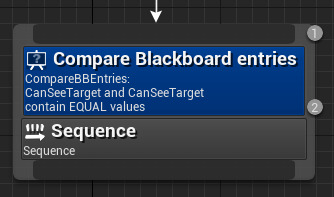
这个节点的类型继承自上面的UBTDecorator:
class AIMODULE_API UBTDecorator_CompareBBEntries : public UBTDecorator
UE的黑板设计里还有一个高级特性,就是监听一个黑板值的变化。
/** register observer for blackboard key */
FDelegateHandle RegisterObserver(FBlackboard::FKey KeyID, UObject* NotifyOwner, FOnBlackboardChangeNotification ObserverDelegate);
/** unregister observer from blackboard key */
void UnregisterObserver(FBlackboard::FKey KeyID, FDelegateHandle ObserverHandle);
/** unregister all observers associated with given owner */
void UnregisterObserversFrom(UObject* NotifyOwner);
/** notifies behavior tree decorators about change in blackboard */
void NotifyObservers(FBlackboard::FKey KeyID) const;
这个UBlackboardComponent内部使用一个TMultiMap来记录每个key对应的多个监听者:
/** observers registered for blackboard keys */
mutable TMultiMap<uint8, FOnBlackboardChangeNotificationInfo> Observers;
FDelegateHandle UBlackboardComponent::RegisterObserver(FBlackboard::FKey KeyID, UObject* NotifyOwner, FOnBlackboardChangeNotification ObserverDelegate)
{
for (auto It = Observers.CreateConstKeyIterator(KeyID); It; ++It)
{
// If the pair's value matches, return a pointer to it.
if (It.Value().GetHandle() == ObserverDelegate.GetHandle())
{
return It.Value().GetHandle();
}
}
FDelegateHandle Handle = Observers.Add(KeyID, ObserverDelegate).GetHandle();
ObserverHandles.Add(NotifyOwner, Handle);
return Handle;
}
在每次修改一个黑板值的时候,都会调用NotifyObserver来广播这个黑板值的改变:
template<class TDataClass>
bool UBlackboardComponent::SetValue(FBlackboard::FKey KeyID, typename TDataClass::FDataType Value)
{
const FBlackboardEntry* EntryInfo = BlackboardAsset ? BlackboardAsset->GetKey(KeyID) : nullptr;
if ((EntryInfo == nullptr) || (EntryInfo->KeyType == nullptr) || (EntryInfo->KeyType->GetClass() != TDataClass::StaticClass()))
{
return false;
}
const uint16 DataOffset = EntryInfo->KeyType->HasInstance() ? sizeof(FBlackboardInstancedKeyMemory) : 0;
uint8* RawData = GetKeyRawData(KeyID) + DataOffset;
if (RawData)
{
UBlackboardKeyType* KeyOb = EntryInfo->KeyType->HasInstance() ? KeyInstances[KeyID] : EntryInfo->KeyType;
const bool bChanged = TDataClass::SetValue((TDataClass*)KeyOb, RawData, Value);
if (bChanged)
{
NotifyObservers(KeyID);
// 省略一些无关代码
}
return true;
}
return false;
}
黑板值改变通知的典型应用场景就是Decorator节点里比较两个黑板值是否相等,这里会注册对这两个黑板值的监听,当数据有变化的时候按需要去终止对应的复合节点的运行:
void UBTDecorator_CompareBBEntries::OnBecomeRelevant(UBehaviorTreeComponent& OwnerComp, uint8* NodeMemory)
{
UBlackboardComponent* BlackboardComp = OwnerComp.GetBlackboardComponent();
if (BlackboardComp)
{
BlackboardComp->RegisterObserver(BlackboardKeyA.GetSelectedKeyID(), this, FOnBlackboardChangeNotification::CreateUObject(this, &UBTDecorator_CompareBBEntries::OnBlackboardKeyValueChange));
BlackboardComp->RegisterObserver(BlackboardKeyB.GetSelectedKeyID(), this, FOnBlackboardChangeNotification::CreateUObject(this, &UBTDecorator_CompareBBEntries::OnBlackboardKeyValueChange));
}
}
还有另外一个重要的使用场景就是UBTTask_MoveTo这个移动到目标位置的寻路任务,这个任务会监听目标位置的变化,来触发路线调整和重新规划:
if (NodeResult == EBTNodeResult::InProgress && bObserveBlackboardValue)
{
UBlackboardComponent* BlackboardComp = OwnerComp.GetBlackboardComponent();
if (ensure(BlackboardComp))
{
if (MyMemory->BBObserverDelegateHandle.IsValid())
{
UE_VLOG(MyController, LogBehaviorTree, Warning, TEXT("UBTTask_MoveTo::ExecuteTask \'%s\' Old BBObserverDelegateHandle is still valid! Removing old Observer."), *GetNodeName());
BlackboardComp->UnregisterObserver(BlackboardKey.GetSelectedKeyID(), MyMemory->BBObserverDelegateHandle);
}
MyMemory->BBObserverDelegateHandle = BlackboardComp->RegisterObserver(BlackboardKey.GetSelectedKeyID(), this, FOnBlackboardChangeNotification::CreateUObject(this, &UBTTask_MoveTo::OnBlackboardValueChange));
}
}
UE行为树的加载
UE的行为树必须依托在AAIController才能执行逻辑,其函数入口为RunBehaviorTree,这个函数需要附加上其对应的UBehaviorTree资产:
bool AAIController::RunBehaviorTree(UBehaviorTree* BTAsset)
{
// @todo: find BrainComponent and see if it's BehaviorTreeComponent
// Also check if BTAsset requires BlackBoardComponent, and if so
// check if BB type is accepted by BTAsset.
// Spawn BehaviorTreeComponent if none present.
// Spawn BlackBoardComponent if none present, but fail if one is present but is not of compatible class
if (BTAsset == NULL)
{
UE_VLOG(this, LogBehaviorTree, Warning, TEXT("RunBehaviorTree: Unable to run NULL behavior tree"));
return false;
}
bool bSuccess = true;
// see if need a blackboard component at all
UBlackboardComponent* BlackboardComp = Blackboard;
if (BTAsset->BlackboardAsset && (Blackboard == nullptr || Blackboard->IsCompatibleWith(BTAsset->BlackboardAsset) == false))
{
bSuccess = UseBlackboard(BTAsset->BlackboardAsset, BlackboardComp);
}
if (bSuccess)
{
UBehaviorTreeComponent* BTComp = Cast<UBehaviorTreeComponent>(BrainComponent);
if (BTComp == NULL)
{
UE_VLOG(this, LogBehaviorTree, Log, TEXT("RunBehaviorTree: spawning BehaviorTreeComponent.."));
BTComp = NewObject<UBehaviorTreeComponent>(this, TEXT("BTComponent"));
BTComp->RegisterComponent();
}
// make sure BrainComponent points at the newly created BT component
BrainComponent = BTComp;
check(BTComp != NULL);
BTComp->StartTree(*BTAsset, EBTExecutionMode::Looped);
}
return bSuccess;
}
其内部实现分为了三个步骤:
- 获取自身的
UBlackboardComponent组件,使用UseBlackboard来读取当前行为树挂载的黑板资产,最终会调用到前述分析了的UBlackboardComponent::InitializeBlackboard来初始化内部的所有黑板值 - 创建一个
UBehaviorTreeComponent组件,并赋值到BrainComponent上, - 执行
UBehaviorTreeComponent::StartTree来启动行为树
这里的StartTree经过一些之前的行为树状态清理之后,使用PushInstance来加载这个行为树资产:
bool UBehaviorTreeComponent::PushInstance(UBehaviorTree& TreeAsset);
其实这个PushInstance不仅仅是启动行为树的时候会被调用到,而且还会在行为树节点RunBehavior执行子树的时候被调用,由于有些节点不能执行子树,所以这个函数的开头会做一下挂载检查:
// check if parent node allows it
const UBTNode* ActiveNode = GetActiveNode();
const UBTCompositeNode* ActiveParent = ActiveNode ? ActiveNode->GetParentNode() : NULL;
if (ActiveParent)
{
uint8* ParentMemory = GetNodeMemory((UBTNode*)ActiveParent, InstanceStack.Num() - 1);
int32 ChildIdx = ActiveNode ? ActiveParent->GetChildIndex(*ActiveNode) : INDEX_NONE;
const bool bIsAllowed = ActiveParent->CanPushSubtree(*this, ParentMemory, ChildIdx);
if (!bIsAllowed)
{
UE_VLOG(GetOwner(), LogBehaviorTree, Warning, TEXT("Failed to execute tree %s: parent of active node does not allow it! (%s)"),
*TreeAsset.GetName(), *UBehaviorTreeTypes::DescribeNodeHelper(ActiveParent));
return false;
}
}
在目前的行为树设计实现中,只有SimpleParallel节点增加了这种子树不能作为主任务来挂载的限制:
bool UBTComposite_SimpleParallel::CanPushSubtree(UBehaviorTreeComponent& OwnerComp, uint8* NodeMemory, int32 ChildIdx) const
{
return (ChildIdx != EBTParallelChild::MainTask);
}
通过加载允许检查之后,开始以这个Asset来创建行为树运行逻辑结构数据:
UBTCompositeNode* RootNode = NULL;
uint16 InstanceMemorySize = 0;
const bool bLoaded = BTManager->LoadTree(TreeAsset, RootNode, InstanceMemorySize);
由于同一份行为树资产对应的运行逻辑结构都是一样的,所以BTManager会存储已经加载的Asset对应的逻辑结构数据,加载的时候优先使用之前的结果,避免重复创建,这个加载设计跟mosaic_game其实是一样的:
for (int32 TemplateIndex = 0; TemplateIndex < LoadedTemplates.Num(); TemplateIndex++)
{
FBehaviorTreeTemplateInfo& TemplateInfo = LoadedTemplates[TemplateIndex];
if (TemplateInfo.Asset == &Asset)
{
Root = TemplateInfo.Template;
InstanceMemorySize = TemplateInfo.InstanceMemorySize;
return true;
}
}
如果已加载列表里找不到所需的结果,才会真正的触发构造行为树逻辑结构的流程:
if (Asset.RootNode)
{
FBehaviorTreeTemplateInfo TemplateInfo;
TemplateInfo.Asset = &Asset;
TemplateInfo.Template = Cast<UBTCompositeNode>(StaticDuplicateObject(Asset.RootNode, this));
TArray<FNodeInitializationData> InitList;
uint16 ExecutionIndex = 0;
InitializeNodeHelper(NULL, TemplateInfo.Template, 0, ExecutionIndex, InitList, Asset, this);
// 暂时省略一些代码
}
这里的InitializeNodeHelper负责给行为树的创建所有的节点,每个节点附加一个编号,其简化版本的代码可以明显的看出这是一个递归函数:
static void InitializeNodeHelper(UBTCompositeNode* ParentNode, UBTNode* NodeOb,
uint8 TreeDepth, uint16& ExecutionIndex, TArray<FNodeInitializationData>& InitList,
UBehaviorTree& TreeAsset, UObject* NodeOuter)
{
InitList.Add(FNodeInitializationData(NodeOb, ParentNode, ExecutionIndex, TreeDepth, NodeOb->GetInstanceMemorySize(), NodeOb->GetSpecialMemorySize()));
NodeOb->InitializeFromAsset(TreeAsset);
ExecutionIndex++;
UBTCompositeNode* CompositeOb = Cast<UBTCompositeNode>(NodeOb);
if (CompositeOb)
{
for (int32 ChildIndex = 0; ChildIndex < CompositeOb->Children.Num(); ChildIndex++)
{
FBTCompositeChild& ChildInfo = CompositeOb->Children[ChildIndex];
UBTNode* ChildNode = NULL;
if (ChildInfo.ChildComposite)
{
ChildInfo.ChildComposite = Cast<UBTCompositeNode>(StaticDuplicateObject(ChildInfo.ChildComposite, NodeOuter));
ChildNode = ChildInfo.ChildComposite;
}
else if (ChildInfo.ChildTask)
{
ChildInfo.ChildTask = Cast<UBTTaskNode>(StaticDuplicateObject(ChildInfo.ChildTask, NodeOuter));
ChildNode = ChildInfo.ChildTask;
}
if (ChildNode)
{
InitializeNodeHelper(CompositeOb, ChildNode, TreeDepth + 1, ExecutionIndex, InitList, TreeAsset, NodeOuter);
}
}
CompositeOb->InitializeComposite(ExecutionIndex - 1);
}
}
这个递归函数会填充每个UBTCompositeNode的Children子节点信息,但是此时子节点里并没有存其Parent信息。初始化每个节点的Parent信息是一个单独的步骤InitializeNode:
void UBTNode::InitializeNode(UBTCompositeNode* InParentNode, uint16 InExecutionIndex, uint16 InMemoryOffset, uint8 InTreeDepth)
{
ParentNode = InParentNode;
ExecutionIndex = InExecutionIndex;
MemoryOffset = InMemoryOffset;
TreeDepth = InTreeDepth;
}
所以LoadTree函数会用到InitializeNodeHelper这个递归函数填充的InitList节点描述信息数组来逐一调用InitializeNode:
// sort nodes by memory size, so they can be packed better
// it still won't protect against structures, that are internally misaligned (-> uint8, uint32)
// but since all Engine level nodes are good...
InitList.Sort(FNodeInitializationData::FMemorySort());
uint16 MemoryOffset = 0;
for (int32 Index = 0; Index < InitList.Num(); Index++)
{
InitList[Index].Node->InitializeNode(InitList[Index].ParentNode, InitList[Index].ExecutionIndex, InitList[Index].SpecialDataSize + MemoryOffset, InitList[Index].TreeDepth);
MemoryOffset += InitList[Index].DataSize;
}
TemplateInfo.InstanceMemorySize = MemoryOffset;
INC_DWORD_STAT(STAT_AI_BehaviorTree_NumTemplates);
LoadedTemplates.Add(TemplateInfo);
Root = TemplateInfo.Template;
InstanceMemorySize = TemplateInfo.InstanceMemorySize;
return true;
在这个加载代码中我们看到了与黑板值类似的节点总内存统计逻辑,所以我们大概可以猜到行为树的运行结构和运行存储是分别管理的,就跟黑板一样。每个节点需要提供这个接口的实现来返回当前节点所需的运行时数据大小:
virtual uint16 UBTNode::GetInstanceMemorySize() const
{
return 0;
}
在具体的节点实现中,一般会单独声明一个FBTXXXMemory的结构体来表明当前节点所需的所有运行时数据的描述:
struct FBTCompositeMemory
{
/** index of currently active child node */
int8 CurrentChild;
/** child override for next selection */
int8 OverrideChild;
};
uint16 UBTCompositeNode::GetInstanceMemorySize() const
{
return sizeof(FBTCompositeMemory);
}
struct FBTParallelMemory : public FBTCompositeMemory
{
/** last Id of search, detect infinite loops when there isn't any valid task in background tree */
int32 LastSearchId;
/** finish result of main task */
TEnumAsByte<EBTNodeResult::Type> MainTaskResult;
/** set when main task is running */
uint8 bMainTaskIsActive : 1;
/** try running background tree task even if main task has finished */
uint8 bForceBackgroundTree : 1;
/** set when main task needs to be repeated */
uint8 bRepeatMainTask : 1;
};
uint16 UBTComposite_SimpleParallel::GetInstanceMemorySize() const
{
return sizeof(FBTParallelMemory);
}
struct FBTWaitTaskMemory
{
/** time left */
float RemainingWaitTime;
};
uint16 UBTTask_Wait::GetInstanceMemorySize() const
{
return sizeof(FBTWaitTaskMemory);
}
就这样,行为树运行时实现了逻辑与数据完全分离,同一份行为树资产的运行时逻辑结构共享,每个单独的实例分配自己的运行时数据。所以在PushInstance函数的最后,会根据计算出来的运行时数据大小去分配内存:
UBTCompositeNode* RootNode = NULL;
uint16 InstanceMemorySize = 0;
const bool bLoaded = BTManager->LoadTree(TreeAsset, RootNode, InstanceMemorySize);
if (bLoaded)
{
FBehaviorTreeInstance NewInstance;
NewInstance.InstanceIdIndex = UpdateInstanceId(&TreeAsset, ActiveNode, InstanceStack.Num() - 1);
NewInstance.RootNode = RootNode;
NewInstance.ActiveNode = NULL;
NewInstance.ActiveNodeType = EBTActiveNode::Composite;
// initialize memory and node instances
FBehaviorTreeInstanceId& InstanceInfo = KnownInstances[NewInstance.InstanceIdIndex];
int32 NodeInstanceIndex = InstanceInfo.FirstNodeInstance;
const bool bFirstTime = (InstanceInfo.InstanceMemory.Num() != InstanceMemorySize);
if (bFirstTime)
{
InstanceInfo.InstanceMemory.AddZeroed(InstanceMemorySize);
InstanceInfo.RootNode = RootNode;
}
NewInstance.SetInstanceMemory(InstanceInfo.InstanceMemory);
NewInstance.Initialize(*this, *RootNode, NodeInstanceIndex, bFirstTime ? EBTMemoryInit::Initialize : EBTMemoryInit::RestoreSubtree);
InstanceStack.Push(NewInstance);
ActiveInstanceIdx = InstanceStack.Num() - 1;
}
每个节点在获取自己的数据存储区域的时候,利用传入的FBehaviorTreeInstance和自己内部存储的MemoryOffset相加即可:
template<typename T>
T* UBTNode::GetNodeMemory(FBehaviorTreeInstance& BTInstance) const
{
return (T*)(BTInstance.GetInstanceMemory().GetData() + MemoryOffset);
}
template<typename T>
const T* UBTNode::GetNodeMemory(const FBehaviorTreeInstance& BTInstance) const
{
return (const T*)(BTInstance.GetInstanceMemory().GetData() + MemoryOffset);
}
在NewInstance.SetInstanceMemory之后会调用FBehaviorTreeInstance::Initialize来执行每个节点的内存数据初始化,这也是一个递归的过程:
void FBehaviorTreeInstance::Initialize(UBehaviorTreeComponent& OwnerComp, UBTCompositeNode& Node, int32& InstancedIndex, EBTMemoryInit::Type InitType)
{
uint8* NodeMemory = Node.GetNodeMemory<uint8>(*this);
Node.InitializeInSubtree(OwnerComp, NodeMemory, InstancedIndex, InitType);
UBTCompositeNode* InstancedComposite = Cast<UBTCompositeNode>(Node.GetNodeInstance(OwnerComp, NodeMemory));
if (InstancedComposite)
{
InstancedComposite->InitializeComposite(Node.GetLastExecutionIndex());
}
for (int32 ChildIndex = 0; ChildIndex < Node.Children.Num(); ChildIndex++)
{
FBTCompositeChild& ChildInfo = Node.Children[ChildIndex];
if (ChildInfo.ChildComposite)
{
Initialize(OwnerComp, *(ChildInfo.ChildComposite), InstancedIndex, InitType);
}
else if (ChildInfo.ChildTask)
{
ChildInfo.ChildTask->InitializeInSubtree(OwnerComp, ChildInfo.ChildTask->GetNodeMemory<uint8>(*this), InstancedIndex, InitType);
}
}
}
在这个递归过程中,会让每个节点都执行InitializeInSubtree函数,这个函数的主要作用就是去为每个行为树节点绑定并初始化对应的数据内存区:
void UBTNode::InitializeInSubtree(UBehaviorTreeComponent& OwnerComp, uint8* NodeMemory, int32& NextInstancedIndex, EBTMemoryInit::Type InitType) const
{
FBTInstancedNodeMemory* SpecialMemory = GetSpecialNodeMemory<FBTInstancedNodeMemory>(NodeMemory);
if (SpecialMemory)
{
SpecialMemory->NodeIdx = INDEX_NONE;
}
if (bCreateNodeInstance)
{
// composite nodes can't be instanced!
check(IsA(UBTCompositeNode::StaticClass()) == false);
UBTNode* NodeInstance = OwnerComp.NodeInstances.IsValidIndex(NextInstancedIndex) ? OwnerComp.NodeInstances[NextInstancedIndex] : NULL;
if (NodeInstance == NULL)
{
NodeInstance = (UBTNode*)StaticDuplicateObject(this, &OwnerComp);
NodeInstance->InitializeNode(GetParentNode(), GetExecutionIndex(), GetMemoryOffset(), GetTreeDepth());
NodeInstance->bIsInstanced = true;
OwnerComp.NodeInstances.Add(NodeInstance);
}
check(NodeInstance);
check(SpecialMemory);
SpecialMemory->NodeIdx = NextInstancedIndex;
NodeInstance->SetOwner(OwnerComp.GetOwner());
NodeInstance->InitializeMemory(OwnerComp, NodeMemory, InitType);
check(TreeAsset);
NodeInstance->InitializeFromAsset(*TreeAsset);
NodeInstance->OnInstanceCreated(OwnerComp);
NextInstancedIndex++;
}
else
{
InitializeMemory(OwnerComp, NodeMemory, InitType);
}
}
这个函数有一个分支判断,使用的是bCreateNodeInstance变量,这个变量的意义与我们之前在介绍黑板值的时候提到的bCreateKeyInstance一样,都代表是否需要创建当前对象的副本。其用途也是为了处理节点所需数据不能用POD数据类型表示的情况,例如数据成员里有FString。如果需要创建副本,这个节点返回的数据成员大小就是sizeof(FBTInstancedNodeMemory),内部用一个int32去保存当前创建的动态节点的索引,即上面函数传入的NextInstancedIndex。
virtual uint16 UBTNode::GetInstanceMemorySize() const
{
return 0;
}
uint16 UBTNode::GetSpecialMemorySize() const
{
return bCreateNodeInstance ? sizeof(FBTInstancedNodeMemory) : 0;
}
struct FBTInstancedNodeMemory
{
int32 NodeIdx;
};
这个索引代表的是UBehaviorTreeComponent::NodeInstances中的元素索引, 所有被创建的行为树节点实例都会保存在UBehaviorTreeComponent::NodeInstances这个数组之中:
UPROPERTY(transient)
TArray<UBTNode*> NodeInstances;
UBTNode* UBTNode::GetNodeInstance(const UBehaviorTreeComponent& OwnerComp, uint8* NodeMemory) const
{
FBTInstancedNodeMemory* MyMemory = GetSpecialNodeMemory<FBTInstancedNodeMemory>(NodeMemory);
return MyMemory && OwnerComp.NodeInstances.IsValidIndex(MyMemory->NodeIdx) ?
OwnerComp.NodeInstances[MyMemory->NodeIdx] : NULL;
}
这个FBTInstancedNodeMemory的存储位置通过GetSpecialNodeMemory函数来计算,不过这里有个非常奇怪的设计就是这个地址是比NodeMemory更靠前的,而不是与黑板一样直接复用NodeMemory作为开始地址:
template<typename T>
T* UBTNode::GetSpecialNodeMemory(uint8* NodeMemory) const
{
const int32 SpecialMemorySize = GetSpecialMemorySize();
return SpecialMemorySize ? (T*)(NodeMemory - ((SpecialMemorySize + 3) & ~3)) : nullptr;
}
为了了解为什么这么做,这里再来回顾一下节点数据内存的创建以及偏移量的计算相关代码。在收集节点的时候会同时记录节点的特殊内存和实例内存这两个数据:
InitList.Add(FNodeInitializationData(NodeOb, ParentNode, ExecutionIndex, TreeDepth, NodeOb->GetInstanceMemorySize(), NodeOb->GetSpecialMemorySize()));
FNodeInitializationData内部使用一个DataSize字段来记录这两个内存的总和:
FNodeInitializationData(UBTNode* InNode, UBTCompositeNode* InParentNode,
uint16 InExecutionIndex, uint8 InTreeDepth, uint16 NodeMemory, uint16 SpecialNodeMemory = 0)
: Node(InNode), ParentNode(InParentNode), ExecutionIndex(InExecutionIndex), TreeDepth(InTreeDepth)
{
SpecialDataSize = UBehaviorTreeManager::GetAlignedDataSize(SpecialNodeMemory);
const uint16 NodeMemorySize = NodeMemory + SpecialDataSize;
DataSize = (NodeMemorySize <= 2) ? NodeMemorySize : UBehaviorTreeManager::GetAlignedDataSize(NodeMemorySize);
}
计算总的MemoryOffset的时候累加的值是DataSize字段,保证同时统计到这两份内存(其实两者其一一定为0),然后使用InitializeNode初始化一个节点的时候使用的是SpecialDataSize + MemoryOffset作为这个节点的MemoryOffset,这样就保证了这个MemoryOffset之前的SpecialDataSize字节一定是为这个节点保留的SpecialNodeMemory:
InitList.Sort(FNodeInitializationData::FMemorySort());
uint16 MemoryOffset = 0;
for (int32 Index = 0; Index < InitList.Num(); Index++)
{
InitList[Index].Node->InitializeNode(InitList[Index].ParentNode, InitList[Index].ExecutionIndex, InitList[Index].SpecialDataSize + MemoryOffset, InitList[Index].TreeDepth);
MemoryOffset += InitList[Index].DataSize;
}
TemplateInfo.InstanceMemorySize = MemoryOffset;
按道理黑板值的Instance内存偏移量机制与BTNode的Instance内存偏移量机制要采用同一套方案,这样就可以降低理解难度了。
在PushInstance加载好一个行为树之后,其内部最后会将这个行为树的根节点加入调度系统来执行:
FBehaviorTreeDelegates::OnTreeStarted.Broadcast(*this, TreeAsset);
// start new task
RequestExecution(RootNode, ActiveInstanceIdx, RootNode, 0, EBTNodeResult::InProgress);
这个RequestExecution就是执行一个节点逻辑的入口,指定来执行一个复合节点的某个子节点。其代码逻辑比较复杂,需要我们理解更多的信息之后才能理解其具体执行流,所以目前这里先略过。
UE行为树装饰器
装饰器Decorator的作用是限制所修饰的节点的准入条件,一个复合节点或者任务节点可以加任意数量的Decorator去修饰。所以复合节点里存储的子节点的描述信息就包括装饰器数组这个字段:
USTRUCT()
struct FBTCompositeChild
{
GENERATED_USTRUCT_BODY()
/** child node */
UPROPERTY()
UBTCompositeNode* ChildComposite = nullptr;
UPROPERTY()
UBTTaskNode* ChildTask = nullptr;
/** execution decorators */
UPROPERTY()
TArray<UBTDecorator*> Decorators;
/** logic operations for decorators */
UPROPERTY()
TArray<FBTDecoratorLogic> DecoratorOps;
};
这里还有一个装饰器逻辑操作数组DecoratorOps,用来组合装饰器之间的逻辑运算的,目前看上编辑器没有提供这个的支持,所以暂时忽略。
一个节点能否通过对应的Decorator数组判定的接口是DoDecoratorsAllowExecution,正常情况下这个函数逻辑就是遍历当前节点的所有Decorator,执行Decorator->WrapperCanExecute。如果所有Decorator执行WrappedCanExecute返回的结果都是true则代表可以执行,否则不可以执行。这个WrapperCanExecute只是对获取Decorator节点执行数据的一个封装,真正的判定在CalculateRawConditionValue:
bool UBTDecorator::WrappedCanExecute(UBehaviorTreeComponent& OwnerComp, uint8* NodeMemory) const
{
const UBTDecorator* NodeOb = bCreateNodeInstance ? (const UBTDecorator*)GetNodeInstance(OwnerComp, NodeMemory) : this;
return NodeOb ? (IsInversed() != NodeOb->CalculateRawConditionValue(OwnerComp, NodeMemory)) : false;
}
这个CalculateRawConditionValue是一个虚函数,具体的Decorator对这个虚函数进行重写,下面的就是比较两个黑板值是否相等的Decorator的判定逻辑实现:
bool UBTDecorator_CompareBBEntries::CalculateRawConditionValue(UBehaviorTreeComponent& OwnerComp, uint8* NodeMemory) const
{
// first of all require same type
// @todo this could be checked statically (i.e. in editor, asset creation time)!
if (BlackboardKeyA.SelectedKeyType != BlackboardKeyB.SelectedKeyType)
{
return false;
}
const UBlackboardComponent* BlackboardComp = OwnerComp.GetBlackboardComponent();
if (BlackboardComp)
{
const EBlackboardCompare::Type Result = BlackboardComp->CompareKeyValues(BlackboardKeyA.SelectedKeyType, BlackboardKeyA.GetSelectedKeyID(), BlackboardKeyB.GetSelectedKeyID());
return ((Result == EBlackboardCompare::Equal) == (Operator == EBlackBoardEntryComparison::Equal));
}
return false;
}
上面介绍的是装饰器作为被修饰节点的前置检查的相关代码。装饰器其实还有一个非常重要的特性,就是节点对应的任务持续运行时,如果装饰器的判定结果由于外部影响导致变成False时,还有可能打断当前被修饰节点的执行。而具体的打断机制则依赖于这个装饰器的打断设置,目前可以最多允许四种打断设置:
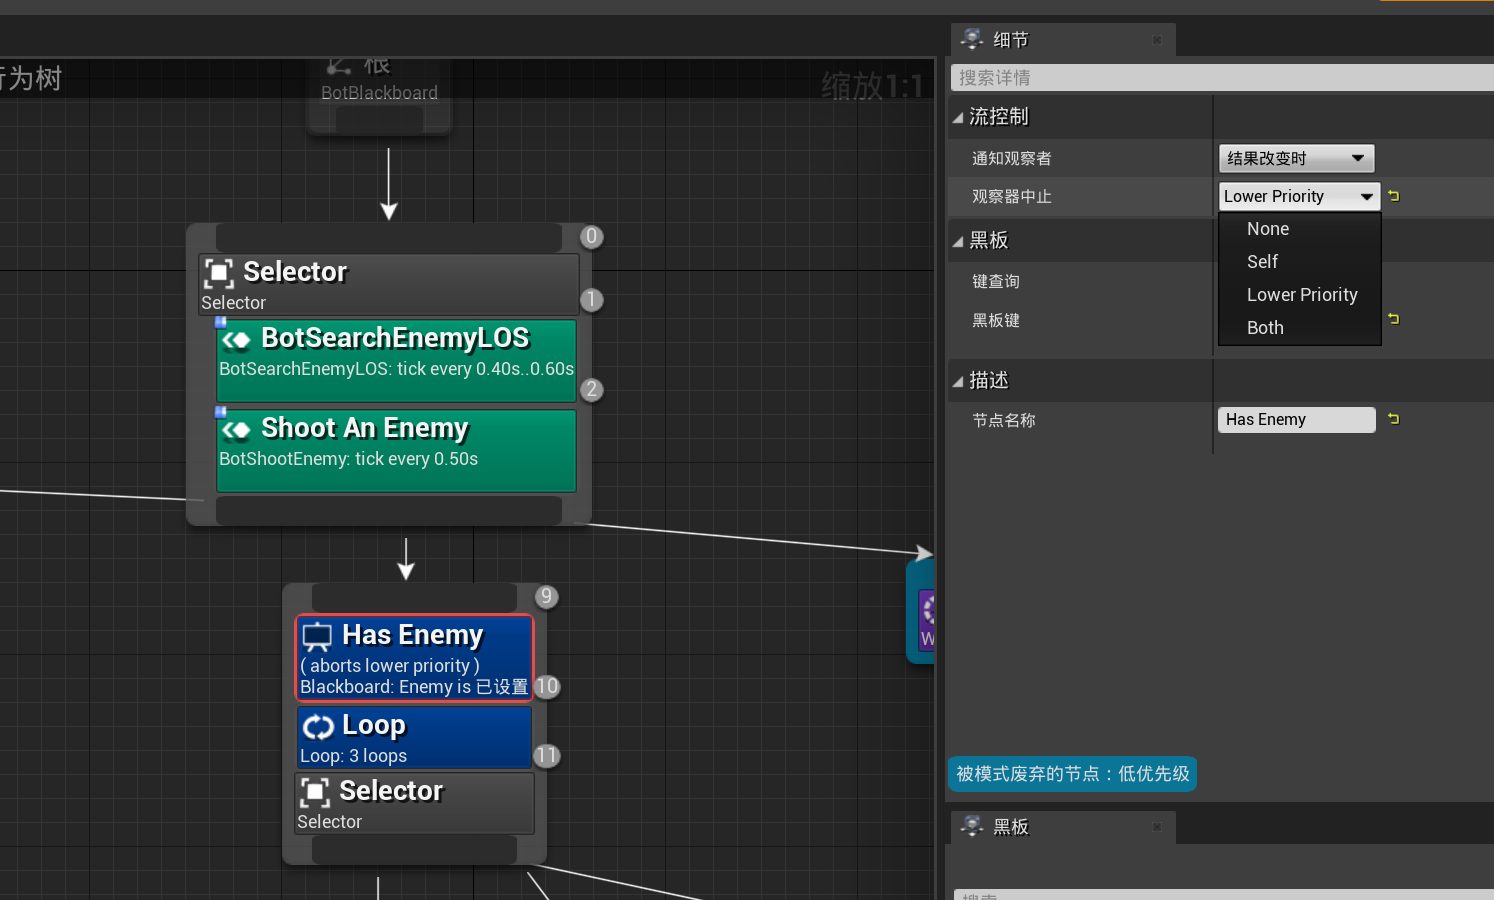
这四种打断设置对应一个枚举类型EBTFlowAbortMode:
namespace EBTFlowAbortMode
{
// keep in sync with DescribeFlowAbortMode()
enum Type
{
None UMETA(DisplayName="Nothing"),
LowerPriority UMETA(DisplayName="Lower Priority"),
Self UMETA(DisplayName="Self"),
Both UMETA(DisplayName="Both"),
};
}
None不中断,即无视装饰器的运行时值改变Lower Priority:打断除去自己子树外所有比自己优先级更低(执行索引更大)的节点,抢夺执行权。Self:立即终止自己子节点的执行,让出执行权。Both:结合了Lower Priority和Self的特性,打断包括自己子节点在内的所有比自己优先级低(执行索引更大)的节点。
其实只有修饰的节点是Selector的子节点的时候才会出现这四个选项,如果修饰的节点的父节点不是Selector节点则只会出现Self, None两种。这里有一个非常反直觉的Lower Priority设置,代表如果这个Decorator的判定从False切换为True时,如果当前正在运行的任务节点A优先级比当前装饰器所修饰的节点B优先级低,且B的所有装饰器都返回True,则这个正在运行的节点A将会被打断,同时B节点会被加入到调度。现在我们来使用ShooterGame的行为树来理解优先级打断:
节点0是一个Selector,下方有三个分支:
- 节点
3对应的分支进入条件是装饰器4,代表如果需要弹药则优先采集弹药 - 节点
9对应的分支有两个装饰器来限制进入条件,主要是节点10,要求有敌人时才发起攻击然后等待5s - 节点
21对应的分支就是前面两个分支都失败的时候才进入,进入一个4s的等待,避免死循环
假如某次节点0执行时,发现弹药充足且发现了敌人,则会进入节点9对应的分支来攻击敌人,但是如果节点9执行的过程中发现弹药打光了,此时节点4对应的装饰器会变成true,从而导致节点3的运行条件被满足。由于节点4的中断设置为LowerPriority,则此时会打断节点9整个子树的运行,同时将节点3设置为运行态。本来如果不适用优先级打断这个功能的话,常规的行为树在节点9中会定期检查弹药充足,如果弹药短缺了则节点9执行失败,并将执行结果通知回节点0,然后一路上升到根结点,再触发一次根节点的重新执行。有了优先级打断之后,只需要检查这些优先级打断的装饰器即可快速的切换到当前应该执行的更高优先级任务,这样就避免了行为树的回溯与重启。
但是一般来说行为树执行的时候只会记录当前正在运行的节点,检查这个节点是否会被自己的执行条件装饰器打断只需要递归遍历节点的父节点的装饰器是否满足即可。但是为了处理高优先级打断,我们还需要处理那些优先级较高且不在执行链路上的装饰器,比较暴力的方法就是外界环境变化的时候检查一下所有的高优先级的装饰器。但是这样的实现效率太低了,更好的方式是记录在行为树搜索调度过程中遇到的所有需要关心的装饰器到一个集合之中,这样就避免了整棵树的遍历去寻找高优先级装饰器,也避免了递归上升找当前节点的执行链路。
实现的时候,每个行为树实例都会记录在这个行为树上的活动装饰器的集合,字段为ActiveAuxNodes:
/** data required for instance of single subtree */
struct FBehaviorTreeInstance
{
/** root node in template */
UBTCompositeNode* RootNode;
/** active node in template */
UBTNode* ActiveNode;
/** active auxiliary nodes */
TArray<UBTAuxiliaryNode*> ActiveAuxNodes;
// 省略很多字段
};
不过这个集合并不会被直接操作,而是先将增加和删除的指令存储到FBehaviorTreeSearchData里的PendingUpdates数组中:
/** node update data */
struct FBehaviorTreeSearchUpdate
{
UBTAuxiliaryNode* AuxNode;
UBTTaskNode* TaskNode;
uint16 InstanceIndex;
TEnumAsByte<EBTNodeUpdateMode::Type> Mode;
/** if set, this entry will be applied AFTER other are processed */
uint8 bPostUpdate : 1;
};
/** node search data */
struct FBehaviorTreeSearchData
{
/** BT component */
UBehaviorTreeComponent& OwnerComp;
/** requested updates of additional nodes (preconditions, services, parallels)
* buffered during search to prevent instant add & remove pairs */
TArray<FBehaviorTreeSearchUpdate> PendingUpdates;
// 省略其他的代码
};
更新这个PendingUpdates集合的逻辑被附加到了复合节点上,复合节点在处理子节点的时候,会有如下逻辑:
- 当复合节点的某个子节点被成功激活时,会调用到
UBTCompositeNode::NotifyDecoratorsOnActivation来将中断逻辑设置为Self,Both的装饰器加入到PendingUpdates中,同时将中断逻辑为LowerPriority的装饰器从PendingUpdates中删除 - 当复合节点的某个子节点执行完成时,会调用到
UBTCompositeNode::NotifyDecoratorsOnDeactivation来将中断逻辑设置为Self的装饰器从PendingUpdates中删除,同时将中断逻辑为LowerPriority的装饰器加入到PendingUpdates中 - 当符合节点的某个子节点激活失败时,会调用到
UBTCompositeNode::NotifyDecoratorsOnFailedActivation来将中断逻辑设置为LowerPriority,Both的装饰器加入到PendingUpdates
这样的设置下,只要一个更高优先级的节点不在执行,则这个节点的所有中断设置为LowerPriority,Both的装饰器都会在PendingUpdates中。而正在执行的节点到Root节点整个链路中的的所有中断设置为``Self,Both的装饰器都会在PendingUpdates`中。
在UBehaviorTreeComponent::ApplySearchUpdates会真正处理这个PendingUpdate集合的更新,如果添加装饰器节点则会调用节点的OnBecomeRelevant,如果删除节点则会调用节点的OnCeaseRelevant:
// void UBehaviorTreeComponent::ApplySearchUpdates(const TArray<FBehaviorTreeSearchUpdate>& UpdateList, int32 NewNodeExecutionIndex, bool bPostUpdate)
for (int32 Index = 0; Index < UpdateList.Num(); Index++)
{
const FBehaviorTreeSearchUpdate& UpdateInfo = UpdateList[Index];
uint8* NodeMemory = (uint8*)UpdateNode->GetNodeMemory<uint8>(UpdateInstance);
if (UpdateInfo.Mode == EBTNodeUpdateMode::Remove)
{
UpdateInstance.RemoveFromActiveAuxNodes(UpdateInfo.AuxNode);
UpdateInfo.AuxNode->WrappedOnCeaseRelevant(*this, NodeMemory);
}
else
{
UpdateInstance.AddToActiveAuxNodes(UpdateInfo.AuxNode);
UpdateInfo.AuxNode->WrappedOnBecomeRelevant(*this, NodeMemory);
}
}
Decorator运行时可以监听一些事件来检查是否需要打断执行,这个事件监听的添加时机就是OnBecomeRelevant,删除时机就是OnCeaseRelevant。例如所有继承自UBTDecorator_BlueprintBase的OnBecomeRelevant都会注册相关黑板值的修改回调,黑板值变化之后都需要检查一下运行条件是否还满足:
void UBTDecorator_BlackboardBase::OnBecomeRelevant(UBehaviorTreeComponent& OwnerComp, uint8* NodeMemory)
{
UBlackboardComponent* BlackboardComp = OwnerComp.GetBlackboardComponent();
if (BlackboardComp)
{
auto KeyID = BlackboardKey.GetSelectedKeyID();
BlackboardComp->RegisterObserver(KeyID, this, FOnBlackboardChangeNotification::CreateUObject(this, &UBTDecorator_BlackboardBase::OnBlackboardKeyValueChange));
}
}
EBlackboardNotificationResult UBTDecorator_BlueprintBase::OnBlackboardKeyValueChange(const UBlackboardComponent& Blackboard, FBlackboard::FKey ChangedKeyID)
{
UBehaviorTreeComponent* BehaviorComp = (UBehaviorTreeComponent*)Blackboard.GetBrainComponent();
if (BehaviorComp && GetShouldAbort(*BehaviorComp))
{
BehaviorComp->RequestExecution(this);
}
return BehaviorComp ? EBlackboardNotificationResult::ContinueObserving : EBlackboardNotificationResult::RemoveObserver;
}
这里的GetShouldAbort就是检查是否需要Abort的位置,这个函数内会根据当前装饰器的打断模式来决定是否应该打断:
bool UBTDecorator_BlueprintBase::GetShouldAbort(UBehaviorTreeComponent& OwnerComp) const
{
// if there's no condition-checking function implemented we always want to abort on any change
if (PerformConditionCheckImplementations == 0)
{
return true;
}
const bool bIsOnActiveBranch = OwnerComp.IsExecutingBranch(GetMyNode(), GetChildIndex());
bool bShouldAbort = false;
if (bIsOnActiveBranch)
{
bShouldAbort = (FlowAbortMode == EBTFlowAbortMode::Self || FlowAbortMode == EBTFlowAbortMode::Both) && CalculateRawConditionValueImpl(OwnerComp) == IsInversed();
}
else
{
bShouldAbort = (FlowAbortMode == EBTFlowAbortMode::LowerPriority || FlowAbortMode == EBTFlowAbortMode::Both) && CalculateRawConditionValueImpl(OwnerComp) != IsInversed();
}
return bShouldAbort;
}
- 当所修饰的节点在执行的时候,首先检查打断模式是否为
Self,Both其中一个,如果是再使用CalculateRawConditionValueImpl来计算执行条件是否还满足,不满足的时候就返回应该打断 - 当所修饰的节点不在执行的时候,首先检查打断模式是否为
LowerPriority,Both其中一个,如果是再使用CalculateRawConditionValueImpl来计算执行条件是否还满足,满足的时候就返回应该打断,这就是优先级抢占
当这个装饰器节点被判定应该打断运行的节点执行的时候,BehaviorComp->RequestExecution(this)就会被调用,这个函数的具体含义我们将在后面的节点调度中详细介绍。
UE行为树复合节点
当复合节点的一个子节点执行彻底结束之后,或者这个复合节点第一次进入时,都需要去寻找下一个子节点去执行,对应的接口为FindChildToExecute:
int32 UBTCompositeNode::FindChildToExecute(FBehaviorTreeSearchData& SearchData, EBTNodeResult::Type& LastResult) const
{
FBTCompositeMemory* NodeMemory = GetNodeMemory<FBTCompositeMemory>(SearchData);
int32 RetIdx = BTSpecialChild::ReturnToParent;
if (Children.Num())
{
int32 ChildIdx = GetNextChild(SearchData, NodeMemory->CurrentChild, LastResult);
while (Children.IsValidIndex(ChildIdx) && !SearchData.bPostponeSearch)
{
// check decorators
if (DoDecoratorsAllowExecution(SearchData.OwnerComp, SearchData.OwnerComp.ActiveInstanceIdx, ChildIdx))
{
OnChildActivation(SearchData, ChildIdx);
RetIdx = ChildIdx;
break;
}
else
{
LastResult = EBTNodeResult::Failed;
const bool bCanNotify = !bUseDecoratorsFailedActivationCheck || CanNotifyDecoratorsOnFailedActivation(SearchData, ChildIdx, LastResult);
if (bCanNotify)
{
NotifyDecoratorsOnFailedActivation(SearchData, ChildIdx, LastResult);
}
}
ChildIdx = GetNextChild(SearchData, ChildIdx, LastResult);
}
}
return RetIdx;
}
这个接口会带上当前子节点的执行结果LastResult,然后通过GetNextChild来获取下一个子节点的索引。这个GetNextChild正常情况下,会调用到GetNextChildHandler来获取结果:
NextChildIndex = GetNextChildHandler(SearchData, LastChildIdx, LastResult);
GetNextChildHandler是一个虚函数,在Selector与Sequence中有不同的实现:
int32 UBTComposite_Selector::GetNextChildHandler(FBehaviorTreeSearchData& SearchData, int32 PrevChild, EBTNodeResult::Type LastResult) const
{
// success = quit
int32 NextChildIdx = BTSpecialChild::ReturnToParent;
if (PrevChild == BTSpecialChild::NotInitialized)
{
// newly activated: start from first
NextChildIdx = 0;
}
else if (LastResult == EBTNodeResult::Failed && (PrevChild + 1) < GetChildrenNum())
{
// failed = choose next child
NextChildIdx = PrevChild + 1;
}
return NextChildIdx;
}
int32 UBTComposite_Sequence::GetNextChildHandler(FBehaviorTreeSearchData& SearchData, int32 PrevChild, EBTNodeResult::Type LastResult) const
{
// failure = quit
int32 NextChildIdx = BTSpecialChild::ReturnToParent;
if (PrevChild == BTSpecialChild::NotInitialized)
{
// newly activated: start from first
NextChildIdx = 0;
}
else if (LastResult == EBTNodeResult::Succeeded && (PrevChild + 1) < GetChildrenNum())
{
// success = choose next child
NextChildIdx = PrevChild + 1;
}
return NextChildIdx;
}
这个函数的差别基本就是UBTComposite_Selector与UBTComposite_Sequence的实现上的所有差别,其他功能逻辑全都在其父类UBTCompositeNode中实现。
当找到一个待处理的ChildIndex之后,还需要检查一下这个子节点的Decorator是否允许这个节点去执行,所以会执行下面的几行:
if (DoDecoratorsAllowExecution(SearchData.OwnerComp, SearchData.OwnerComp.ActiveInstanceIdx, ChildIdx))
{
OnChildActivation(SearchData, ChildIdx);
RetIdx = ChildIdx;
break;
}
这里的DoDecoratorsAllowExecution就是我们之前介绍过的Decorator检查逻辑,会遍历这个Child的所有装饰器来做逻辑判断。当装饰器检查通过之后进入OnChildActivation逻辑,也就是激活这个子节点来作为当前运行节点:
void UBTCompositeNode::OnChildActivation(FBehaviorTreeSearchData& SearchData, int32 ChildIndex) const
{
const FBTCompositeChild& ChildInfo = Children[ChildIndex];
FBTCompositeMemory* NodeMemory = GetNodeMemory<FBTCompositeMemory>(SearchData);
// pass to decorators before changing current child in node memory
// so they can access previously executed one if needed
const bool bCanNotify = !bUseDecoratorsActivationCheck || CanNotifyDecoratorsOnActivation(SearchData, ChildIndex);
if (bCanNotify)
{
NotifyDecoratorsOnActivation(SearchData, ChildIndex);
}
// don't activate task services here, it's applied BEFORE aborting (e.g. abort lower pri decorator)
// use UBehaviorTreeComponent::ExecuteTask instead
// pass to child composite
if (ChildInfo.ChildComposite)
{
ChildInfo.ChildComposite->OnNodeActivation(SearchData);
}
// update active node in current context: child node
NodeMemory->CurrentChild = ChildIndex;
}
由于目前源码实现原因,bCanNotify会永远为true,所以这里的NotifyDecoratorsOnActivation永远会执行,执行内容就是通知这个子节点的所有Decorator当前子节点已经被激活了,例如UBTDecorator_Loop这个在被所附属节点被激活之后会减去内部的计数器,UBTDecorator_TimeLimit则会开启一个超时的计时器。除了激活装饰器节点的执行之外,还会处理节点的装饰器是否需要记录到之前提到的PendingUpdates中来处理运行时打断:
void UBTCompositeNode::NotifyDecoratorsOnActivation(FBehaviorTreeSearchData& SearchData, int32 ChildIdx) const
{
const FBTCompositeChild& ChildInfo = Children[ChildIdx];
for (int32 DecoratorIndex = 0; DecoratorIndex < ChildInfo.Decorators.Num(); DecoratorIndex++)
{
const UBTDecorator* DecoratorOb = ChildInfo.Decorators[DecoratorIndex];
DecoratorOb->WrappedOnNodeActivation(SearchData);
switch (DecoratorOb->GetFlowAbortMode())
{
case EBTFlowAbortMode::LowerPriority:
SearchData.AddUniqueUpdate(FBehaviorTreeSearchUpdate(DecoratorOb, SearchData.OwnerComp.GetActiveInstanceIdx(), EBTNodeUpdateMode::Remove));
break;
case EBTFlowAbortMode::Self:
case EBTFlowAbortMode::Both:
SearchData.AddUniqueUpdate(FBehaviorTreeSearchUpdate(DecoratorOb, SearchData.OwnerComp.GetActiveInstanceIdx(), EBTNodeUpdateMode::Add));
break;
default:
break;
}
}
}
当装饰器被通知之后,再执行这个子节点,但是从源码来看,只有子节点是复合节点的时候才会执行:
// don't activate task services here, it's applied BEFORE aborting (e.g. abort lower pri decorator)
// use UBehaviorTreeComponent::ExecuteTask instead
// pass to child composite
if (ChildInfo.ChildComposite)
{
ChildInfo.ChildComposite->OnNodeActivation(SearchData);
}
那这个子节点如果不是复合节点而是任务节点的时候,对应的OnNodeActivation需要在行为树的节点调度里去设置,这个我们留到后文中再讨论。
UE行为树任务节点
一个任务节点的执行入口在UBehaviorTreeComponent::ExecuteTask中:
void UBehaviorTreeComponent::ExecuteTask(UBTTaskNode* TaskNode)
{
SCOPE_CYCLE_COUNTER(STAT_AI_BehaviorTree_ExecutionTime);
// We expect that there should be valid instances on the stack
if (!ensure(InstanceStack.IsValidIndex(ActiveInstanceIdx)))
{
return;
}
FBehaviorTreeInstance& ActiveInstance = InstanceStack[ActiveInstanceIdx];
// 省略一些处理服务节点ServiceNode的代码
ActiveInstance.ActiveNode = TaskNode;
ActiveInstance.ActiveNodeType = EBTActiveNode::ActiveTask;
// make a snapshot for debugger
StoreDebuggerExecutionStep(EBTExecutionSnap::Regular);
UE_VLOG(GetOwner(), LogBehaviorTree, Log, TEXT("Execute task: %s"), *UBehaviorTreeTypes::DescribeNodeHelper(TaskNode));
// store instance before execution, it could result in pushing a subtree
uint16 InstanceIdx = ActiveInstanceIdx;
EBTNodeResult::Type TaskResult;
{
SCOPE_CYCLE_UOBJECT(TaskNode, TaskNode);
uint8* NodeMemory = (uint8*)(TaskNode->GetNodeMemory<uint8>(ActiveInstance));
TaskResult = TaskNode->WrappedExecuteTask(*this, NodeMemory);
}
// pass task finished if wasn't already notified (FinishLatentTask)
const UBTNode* ActiveNodeAfterExecution = GetActiveNode();
if (ActiveNodeAfterExecution == TaskNode)
{
// update task's runtime values after it had a chance to initialize memory
UpdateDebuggerAfterExecution(TaskNode, InstanceIdx);
OnTaskFinished(TaskNode, TaskResult);
}
}
当一个TaskNode被执行时,首先遍历其拥有的所有ServiceNode,通知其执行OnBecomeRelevant,然后再调用WrapperExecuteTask来真正的执行当前节点对应的任务ExecuteTask,不同的任务其ExecuteTask有不同的实现:
EBTNodeResult::Type UBTTaskNode::WrappedExecuteTask(UBehaviorTreeComponent& OwnerComp, uint8* NodeMemory) const
{
const UBTNode* NodeOb = bCreateNodeInstance ? GetNodeInstance(OwnerComp, NodeMemory) : this;
return NodeOb ? ((UBTTaskNode*)NodeOb)->ExecuteTask(OwnerComp, NodeMemory) : EBTNodeResult::Failed;
}
EBTNodeResult::Type UBTTask_Wait::ExecuteTask(UBehaviorTreeComponent& OwnerComp, uint8* NodeMemory)
{
FBTWaitTaskMemory* MyMemory = (FBTWaitTaskMemory*)NodeMemory;
MyMemory->RemainingWaitTime = FMath::FRandRange(FMath::Max(0.0f, WaitTime - RandomDeviation), (WaitTime + RandomDeviation));
return EBTNodeResult::InProgress;
}
这个ExecuteTask是带有返回值的,代表节点执行的结果,这个枚举值的四种取值之前已经介绍过了。当这个任务的发起结束之后,再使用OnTaskFinished来检查这个节点是否执行完了所代表的任务,这个函数分为了两个分支:
- 如果正常的执行返回了
success或者fail,则调用TaskNode->WrappedOnTaskFinished来调用TaskNode->OnTaskFinished做一些任务的清理工作,然后调用RequestExecution(TaskResult)来推动行为树寻找下一个节点去调度 - 如果返回的是
InProgress,则什么都不做
这里我们又看到了熟悉的RequestExecution函数,下面我们来具体的介绍这个函数是怎么驱动行为树选择下一个节点的。
UE行为树节点调度
现在我们已经了解了足够多的信息,可以来正面攻克行为树的节点调度了,这个节点调度函数RequestExecution有三个不同的函数签名:
/** request execution change */
void RequestExecution(UBTCompositeNode* RequestedOn, int32 InstanceIdx,
const UBTNode* RequestedBy, int32 RequestedByChildIndex,
EBTNodeResult::Type ContinueWithResult, bool bStoreForDebugger = true);
/** request execution change: helpers for decorator nodes */
void RequestExecution(const UBTDecorator* RequestedBy);
/** request execution change: helpers for task nodes */
void RequestExecution(EBTNodeResult::Type ContinueWithResult);
参数最多的那个版本我们在行为树加载完成之后的根节点调度中见过,当一棵行为树被加载完成之后会调用这个接口来开始运行,其具体调用参数如下:
RequestExecution(RootNode, ActiveInstanceIdx, RootNode, 0, EBTNodeResult::InProgress);
以const UBTDecorator*为参数的RequestExecution我们在装饰器的打断机制介绍过,当一个装饰器需要处理打断逻辑的时候,会以下面的方式去调用:
BehaviorComp->RequestExecution(this);
以EBTNodeResult::Type为参数的RequestExecution我们在任务节点调度中介绍过,在这个节点执行成功或者失败的时候会以这个方式去调用:
RequestExecution(TaskResult);
其实后面两个单参数的版本都是最上面那个版本的封装。对于装饰器中断触发的RequestExecution来说,主要负责填充完整版RequestExecution所需的ContinueWithResult。
void UBehaviorTreeComponent::RequestExecution(const UBTDecorator* RequestedBy)
{
check(RequestedBy);
// search range depends on decorator's FlowAbortMode:
//
// - LowerPri: try entering branch = search only nodes under decorator
//
// - Self: leave execution = from node under decorator to end of tree
//
// - Both: check if active node is within inner child nodes and choose Self or LowerPri
//
EBTFlowAbortMode::Type AbortMode = RequestedBy->GetFlowAbortMode();
if (AbortMode == EBTFlowAbortMode::None)
{
return;
}
const int32 InstanceIdx = FindInstanceContainingNode(RequestedBy->GetParentNode());
if (InstanceIdx == INDEX_NONE)
{
return;
}
if (AbortMode == EBTFlowAbortMode::Both)
{
const bool bIsExecutingChildNodes = IsExecutingBranch(RequestedBy, RequestedBy->GetChildIndex());
AbortMode = bIsExecutingChildNodes ? EBTFlowAbortMode::Self : EBTFlowAbortMode::LowerPriority;
}
EBTNodeResult::Type ContinueResult = (AbortMode == EBTFlowAbortMode::Self) ? EBTNodeResult::Failed : EBTNodeResult::Aborted;
RequestExecution(RequestedBy->GetParentNode(), InstanceIdx, RequestedBy, RequestedBy->GetChildIndex(), ContinueResult);
}
这个参数的填充规则如下:
- 如果当前装饰器所修饰的节点在执行链路上,则设置为
Fail,代表当前执行链路执行失败 - 如果当前装饰器所修饰的节点不在执行链路上,则设置为
Aborted,代表准备处理高优先级抢占逻辑
另外这里需要注意的是装饰器的GetParentNode返回的并不是这个装饰器所修饰的节点,而是所修饰节点的父节点;同时装饰器的GetChildIndex返回的是所修饰节点在父节点中的索引。
对于任务节点正常返回从而调用的RequestExecution版本来说就更简单了,按照规则填充对应的六个参数即可:
void UBehaviorTreeComponent::RequestExecution(EBTNodeResult::Type LastResult)
{
// task helpers can't continue with InProgress or Aborted result, it should be handled
// either by decorator helper or regular RequestExecution() (6 param version)
if (LastResult != EBTNodeResult::Aborted && LastResult != EBTNodeResult::InProgress && InstanceStack.IsValidIndex(ActiveInstanceIdx))
{
const FBehaviorTreeInstance& ActiveInstance = InstanceStack[ActiveInstanceIdx];
UBTCompositeNode* ExecuteParent = (ActiveInstance.ActiveNode == NULL) ? ActiveInstance.RootNode :
(ActiveInstance.ActiveNodeType == EBTActiveNode::Composite) ? (UBTCompositeNode*)ActiveInstance.ActiveNode :
ActiveInstance.ActiveNode->GetParentNode();
RequestExecution(ExecuteParent, InstanceStack.Num() - 1,
ActiveInstance.ActiveNode ? ActiveInstance.ActiveNode : ActiveInstance.RootNode, -1,
LastResult, false);
}
}
这里注意一下传入的第四个参数是-1,代表需要这个节点的父节点重新根据这个执行结果执行一下调度。
而完整版RequestExecution的显示调用主要是在加载完一颗行为树之后的根节点调度时才会被用到,此时对应的bContinueWithResult参数被设置为了InProgress:
// start new task
RequestExecution(RootNode, ActiveInstanceIdx, RootNode, 0, EBTNodeResult::InProgress);
接下来我们去理解这个完整版本RequestExecution函数的实现。这个函数的实现很长,考虑了很多细节。这里我们把更高优先级任务引发的执行流打断相关逻辑先进行忽略,只考虑普通情况下的执行,这样就能简化很多了。在没有更高优先级任务的情况下,会执行这部分代码:
const bool bSwitchToHigherPriority = (ContinueWithResult == EBTNodeResult::Aborted);
const bool bAlreadyHasRequest = (ExecutionRequest.ExecuteNode != NULL);
const UBTNode* DebuggerNode = bStoreForDebugger ? RequestedBy : NULL;
FBTNodeIndex ExecutionIdx;
ExecutionIdx.InstanceIndex = InstanceIdx;
ExecutionIdx.ExecutionIndex = RequestedBy->GetExecutionIndex();
开头的bSwitchToHigherPriority就是装饰器节点触发高优先级打断的标记位,当这个值为False的时候紧接着会执行下面的这一段代码:
// check if decorators allow execution on requesting link (only when restart comes from composite decorator)
const bool bShouldCheckDecorators = RequestedOn->Children.IsValidIndex(RequestedByChildIndex) &&
(RequestedOn->Children[RequestedByChildIndex].DecoratorOps.Num() > 0) &&
RequestedBy->IsA(UBTDecorator::StaticClass());
const bool bCanExecute = bShouldCheckDecorators && RequestedOn->DoDecoratorsAllowExecution(*this, InstanceIdx, RequestedByChildIndex);
if (bCanExecute)
{
UE_VLOG(GetOwner(), LogBehaviorTree, Log, TEXT("> skip: decorators are still allowing execution"));
StoreDebuggerRestart(DebuggerNode, InstanceIdx, false);
return;
}
ExecutionRequest.ExecuteNode = RequestedOn;
ExecutionRequest.ExecuteInstanceIdx = InstanceIdx;
这里会检查一下Decorator是否允许当前节点执行,但是这个检查Decorator限制有一个前提条件,就是当前的RequestBy是一个Decorator。在非切换到高优先级的情况下,RequestBy为Decorator只有一种可能,就是这个装饰器的所需条件不再满足需要打断自身所修饰的节点的执行,如果此时检查发现所修饰的节点的所有装饰器都满足了执行条件则提前返回,说明这个打断估计是一个误报。对于其他正常情况下,只有最后的两行代码起作用了。这两行代码的意思就是记录一下下一次要执行的节点信息。
但是当这个值为true的时候,代码就很多了,主要是确定当前RequestOn节点是可以执行的,其实就是递归的处理这个RequestOn节点的父节点判断是否可以执行。这里实现使用很多代码的原因就是做了一个优化,当递归回溯到一个存在于当前正在执行的节点的父系节点CommonParent时停止。这一句有点绕口,我们以例子来说明。假设从根节点到当前正在执行的任务节点的链路为A->B->M->N,但是此时一个更高优先级的节点E的装饰器发出了高优先级打断请求,从A到E的链路为A->B->C->D->E,则如果要切换到节点E去执行,则需要保证A->B->C->D->E的所有装饰器都满足需求。但是考虑到当前正在执行的链路A->B->M->N上的所有装饰器肯定都是满足需求的,所以从E一路回溯的时候,只需要回溯到B即可认为全链路的装饰器都满足需求,不再需要重新检查A,B两个节点的执行条件了,此时B就是所求的CommonParent。
如果发现请求打断执行的节点全链路无法通过装饰器检查,则直接返回不再处理这个高优先级抢占请求。如果装饰器检查全都通过了,也会设置一下ExecutionRequest的这两个字段,值得注意的是这里的ExecuteNope不是RequestOn,而是CommonParent:
ExecutionRequest.ExecuteNode = CommonParent;
ExecutionRequest.ExecuteInstanceIdx = CommonInstanceIdx;
在正常分支和优先级抢占分支都设置好这两个字段之后,后续还会设置一下这个结构体的多个其他字段:
ExecutionRequest.SearchStart = ExecutionIdx;
ExecutionRequest.ContinueWithResult = ContinueWithResult;
ExecutionRequest.bTryNextChild = !bSwitchToHigherPriority;
ExecutionRequest.bIsRestart = (RequestedBy != GetActiveNode());
这个ExecutionRequest所对应的结构体FBTNodeExecutionInfo在行为树节点调度中比较重要,我们来看一下主要的字段含义:
struct FBTNodeIndex
{
/** index of instance of stack */
uint16 InstanceIndex;
/** execution index within instance */
uint16 ExecutionIndex;
};
struct FBTNodeExecutionInfo
{
/** index of first task allowed to be executed */
FBTNodeIndex SearchStart;
/** index of last task allowed to be executed */
FBTNodeIndex SearchEnd;
/** node to be executed */
UBTCompositeNode* ExecuteNode;
/** subtree index */
uint16 ExecuteInstanceIdx;
/** result used for resuming execution */
TEnumAsByte<EBTNodeResult::Type> ContinueWithResult;
/** if set, tree will try to execute next child of composite instead of forcing branch containing SearchStart */
uint8 bTryNextChild : 1;
/** if set, request was not instigated by finishing task/initialization but is a restart (e.g. decorator) */
uint8 bIsRestart : 1;
FBTNodeExecutionInfo() : ExecuteNode(NULL), bTryNextChild(false), bIsRestart(false) { }
};
这里为了标识一个运行中的唯一节点信息,使用了FBTNodeIndex结构,里面的InstanceIndex代表子树堆栈数组里的索引,也就是某个运行时行为树的id,而ExecutionIndex则是在这个行为树实例中的节点索引,当FBTNodeIndex比较优先级的时候使用的是(InstanceIndex, ExecutionIndex)这个Pair的词法序比较。FBTNodeExecutionInfo结构体代表一次节点调度时的搜索范围,SearchStart和SearchEnd代表搜索的树节点区间,ExecuteNode代表当前开始执行搜索的起点,ContinueWithResult代表上次节点的执行返回值。这里的bTryNextChild为true的时候代表本次调度的时候需要执行GetNextChild来获取下一个应该执行的RequestOn的子节点,也就是正常的复合节点获取下一个子节点的流程。bTryNextChild为false的时候代表这是一次优先级切换引发的异常调度,直接以-1来作为上一次子节点的索引来触发当前节点的重进入调度。
当各种检查都通过之后,RequestExecution并不会直接执行这个节点,而是标记当前节点需要在下一次Tick去执行:
if (bScheduleNewSearch)
{
ScheduleExecutionUpdate();
}
这个ScheduleExecutionUpdate函数其实就是将UBehaviorTreeComponent的下次Tick间隔降低到最小值,也就是下一帧立即执行:
void UBehaviorTreeComponent::ScheduleExecutionUpdate()
{
ScheduleNextTick(0.0f);
bRequestedFlowUpdate = true;
}
void UBehaviorTreeComponent::ScheduleNextTick(const float NextNeededDeltaTime)
{
NextTickDeltaTime = NextNeededDeltaTime;
if (bRequestedFlowUpdate)
{
NextTickDeltaTime = 0.0f;
}
UE_VLOG(GetOwner(), LogBehaviorTree, VeryVerbose, TEXT("BT(%i) schedule next tick %f, asked %f."), GFrameCounter, NextTickDeltaTime, NextNeededDeltaTime);
if (NextTickDeltaTime == FLT_MAX)
{
if (IsComponentTickEnabled())
{
SetComponentTickEnabled(false);
}
}
else
{
if (!IsComponentTickEnabled())
{
SetComponentTickEnabled(true);
}
// We need to force a small dt to tell the TickTaskManager we might not want to be tick every frame.
const float FORCE_TICK_INTERVAL_DT = KINDA_SMALL_NUMBER;
SetComponentTickIntervalAndCooldown(!bTickedOnce && NextTickDeltaTime < FORCE_TICK_INTERVAL_DT ? FORCE_TICK_INTERVAL_DT : NextTickDeltaTime);
}
UWorld* MyWorld = GetWorld();
LastRequestedDeltaTimeGameTime = MyWorld ? MyWorld->GetTimeSeconds() : 0.0f;
}
在下一帧执行的时候,会调用ProcessExecutionRequest来真正的触发节点执行。这个ProcessExecutionRequest也是一个非常复杂的函数,负责从之前的ExecutionData中寻找一个合适的任务节点去执行。由于这个寻找可能失败,所以在函数的开头首先记录一下之前的状态,以方便回滚:
bool bIsSearchValid = true;
SearchData.RollbackInstanceIdx = ActiveInstanceIdx;
SearchData.RollbackDeactivatedBranchStart = SearchData.DeactivatedBranchStart;
SearchData.RollbackDeactivatedBranchEnd = SearchData.DeactivatedBranchEnd;
// copy current memory in case we need to rollback search
CopyInstanceMemoryToPersistent();
这里的备份状态还会把当前行为树的完整数据复制一遍,执行的是Memcpy,如果树所需内存比较大的话会出现比较严重的性能瓶颈:
void UBehaviorTreeComponent::CopyInstanceMemoryToPersistent()
{
for (int32 InstanceIndex = 0; InstanceIndex < InstanceStack.Num(); InstanceIndex++)
{
const FBehaviorTreeInstance& InstanceData = InstanceStack[InstanceIndex];
FBehaviorTreeInstanceId& InstanceInfo = KnownInstances[InstanceData.InstanceIdIndex];
InstanceInfo.InstanceMemory = InstanceData.GetInstanceMemory();
}
}
备份完所需数据之后,使用DeactivateUpTo将正在执行的任务节点通知执行结束,并一路回溯到当前被请求执行的节点ExecutionRequest.ExecuteNode上:
// deactivate up to ExecuteNode
if (InstanceStack[ActiveInstanceIdx].ActiveNode != ExecutionRequest.ExecuteNode)
{
int32 LastDeactivatedChildIndex = INDEX_NONE;
const bool bDeactivated = DeactivateUpTo(ExecutionRequest.ExecuteNode, ExecutionRequest.ExecuteInstanceIdx, NodeResult, LastDeactivatedChildIndex);
if (!bDeactivated)
{
// error occurred and tree will restart, all pending deactivation notifies will be lost
// this is should happen
SearchData.PendingUpdates.Reset();
return;
}
else if (LastDeactivatedChildIndex != INDEX_NONE)
{
// Calculating/expanding the deactivated branch for filtering execution request while applying changes.
FBTNodeIndex NewDeactivatedBranchStart(ExecutionRequest.ExecuteInstanceIdx, ExecutionRequest.ExecuteNode->GetChildExecutionIndex(LastDeactivatedChildIndex, EBTChildIndex::FirstNode));
FBTNodeIndex NewDeactivatedBranchEnd(ExecutionRequest.ExecuteInstanceIdx, ExecutionRequest.ExecuteNode->GetChildExecutionIndex(LastDeactivatedChildIndex + 1, EBTChildIndex::FirstNode));
SearchData.DeactivatedBranchEnd = NewDeactivatedBranchEnd;
}
}
在这个DeactivateUpTo函数内部,会调用被结束执行的节点的OnChildDeactivation,这个函数负责删除对应任务节点的所有服务节点,以及所有的装饰器进出PendingUpdates集合:
void UBTCompositeNode::OnChildDeactivation(FBehaviorTreeSearchData& SearchData, int32 ChildIndex, EBTNodeResult::Type& NodeResult) const
{
const FBTCompositeChild& ChildInfo = Children[ChildIndex];
// pass to task services
if (ChildInfo.ChildTask)
{
for (int32 ServiceIndex = 0; ServiceIndex < ChildInfo.ChildTask->Services.Num(); ServiceIndex++)
{
SearchData.AddUniqueUpdate(FBehaviorTreeSearchUpdate(ChildInfo.ChildTask->Services[ServiceIndex], SearchData.OwnerComp.GetActiveInstanceIdx(), EBTNodeUpdateMode::Remove));
}
}
// pass to child composite
else if (ChildInfo.ChildComposite)
{
ChildInfo.ChildComposite->OnNodeDeactivation(SearchData, NodeResult);
}
// pass to decorators after composite is updated (so far only simple parallel uses it)
// to have them working on correct result + they must be able to modify it if requested (e.g. force success)
const bool bCanNotify = !bUseDecoratorsDeactivationCheck || CanNotifyDecoratorsOnDeactivation(SearchData, ChildIndex, NodeResult);
if (bCanNotify)
{
NotifyDecoratorsOnDeactivation(SearchData, ChildIndex, NodeResult);
}
}
做好了这些被结束节点的清理工作之后,ProcessExecutionRequest再来处理之前设置好的准备执行节点,寻找合适的节点去执行,这里又根据bTryNextChild分为了两个分支,分别代表正常任务返回时寻找当前节点的下一个子节点还是由于高优先级中断导致的当前节点重启:
FBehaviorTreeInstance& ActiveInstance = InstanceStack[ActiveInstanceIdx];
UBTCompositeNode* TestNode = ExecutionRequest.ExecuteNode;
SearchData.AssignSearchId();
SearchData.bPostponeSearch = false;
SearchData.bSearchInProgress = true;
SearchData.SearchRootNode = FBTNodeIndex(ExecutionRequest.ExecuteInstanceIdx, ExecutionRequest.ExecuteNode->GetExecutionIndex());
// additional operations for restarting:
if (!ExecutionRequest.bTryNextChild)
{
// mark all decorators less important than current search start node for removal
const FBTNodeIndex DeactivateIdx(ExecutionRequest.SearchStart.InstanceIndex, ExecutionRequest.SearchStart.ExecutionIndex - 1);
UnregisterAuxNodesUpTo(ExecutionRequest.SearchStart.ExecutionIndex ? DeactivateIdx : ExecutionRequest.SearchStart);
// reactivate top search node, so it could use search range correctly
BT_SEARCHLOG(SearchData, Verbose, TEXT("Reactivate node: %s [restart]"), *UBehaviorTreeTypes::DescribeNodeHelper(TestNode));
ExecutionRequest.ExecuteNode->OnNodeRestart(SearchData);
SearchData.SearchStart = ExecutionRequest.SearchStart;
SearchData.SearchEnd = ExecutionRequest.SearchEnd;
BT_SEARCHLOG(SearchData, Verbose, TEXT("Clamping search range: %s .. %s"),
*SearchData.SearchStart.Describe(), *SearchData.SearchEnd.Describe());
}
else
{
// mark all decorators less important than current search start node for removal
// (keep aux nodes for requesting node since it is higher priority)
if (ExecutionRequest.ContinueWithResult == EBTNodeResult::Failed)
{
BT_SEARCHLOG(SearchData, Verbose, TEXT("Unregistering aux nodes up to %s"), *ExecutionRequest.SearchStart.Describe());
UnregisterAuxNodesUpTo(ExecutionRequest.SearchStart);
}
// make sure it's reset before starting new search
SearchData.SearchStart = FBTNodeIndex();
SearchData.SearchEnd = FBTNodeIndex();
}
这两个分支的代码都是为了确定下一个待执行节点的搜索范围,在明确了搜索范围之后,才真正的执行搜索流程。这个搜索流程的代码就比较符合直觉了,简单来说每次对当前的复合节点使用FindChildToExecute寻找下一个子节点,如果找不到子节点则递归回溯到其父节点去重新搜索,直到找到一个具体的任务节点去执行:
// start looking for next task
while (TestNode && NextTask == NULL)
{
BT_SEARCHLOG(SearchData, Verbose, TEXT("Testing node: %s"), *UBehaviorTreeTypes::DescribeNodeHelper(TestNode));
const int32 ChildBranchIdx = TestNode->FindChildToExecute(SearchData, NodeResult);
UBTNode* StoreNode = TestNode;
if (SearchData.bPostponeSearch)
{
// break out of current search loop
TestNode = NULL;
bIsSearchValid = false;
}
else if (ChildBranchIdx == BTSpecialChild::ReturnToParent)
{
UBTCompositeNode* ChildNode = TestNode;
TestNode = TestNode->GetParentNode();
// does it want to move up the tree?
if (TestNode == NULL)
{
// special case for leaving instance: deactivate root manually
ChildNode->OnNodeDeactivation(SearchData, NodeResult);
// don't remove top instance from stack, so it could be looped
if (ActiveInstanceIdx > 0)
{
StoreDebuggerSearchStep(InstanceStack[ActiveInstanceIdx].ActiveNode, ActiveInstanceIdx, NodeResult);
StoreDebuggerRemovedInstance(ActiveInstanceIdx);
InstanceStack[ActiveInstanceIdx].DeactivateNodes(SearchData, ActiveInstanceIdx);
// store notify for later use if search is not reverted
SearchData.PendingNotifies.Add(FBehaviorTreeSearchUpdateNotify(ActiveInstanceIdx, NodeResult));
// and leave subtree
ActiveInstanceIdx--;
StoreDebuggerSearchStep(InstanceStack[ActiveInstanceIdx].ActiveNode, ActiveInstanceIdx, NodeResult);
TestNode = InstanceStack[ActiveInstanceIdx].ActiveNode->GetParentNode();
}
}
if (TestNode)
{
TestNode->OnChildDeactivation(SearchData, *ChildNode, NodeResult);
}
}
else if (TestNode->Children.IsValidIndex(ChildBranchIdx))
{
// was new task found?
NextTask = TestNode->Children[ChildBranchIdx].ChildTask;
// or it wants to move down the tree?
TestNode = TestNode->Children[ChildBranchIdx].ChildComposite;
}
// store after node deactivation had chance to modify result
StoreDebuggerSearchStep(StoreNode, ActiveInstanceIdx, NodeResult);
}
其实完全不考虑优先级抢占的话,行为树的节点调度核心应该就上面的一点点代码。
当找到一个任务节点去执行时,再检查一下这个任务节点是否在之前设定的搜索范围[ExecutionRequest.SearchBegin, ExecutionRequest.SearchEnd]内,如果超过了搜索范围就会涉及到回滚:
// is search within requested bounds?
if (NextTask)
{
const FBTNodeIndex NextTaskIdx(ActiveInstanceIdx, NextTask->GetExecutionIndex());
bIsSearchValid = NextTaskIdx.TakesPriorityOver(ExecutionRequest.SearchEnd);
// is new task is valid, but wants to ignore rerunning itself
// check it's the same as active node (or any of active parallel tasks)
if (bIsSearchValid && NextTask->ShouldIgnoreRestartSelf())
{
const bool bIsTaskRunning = InstanceStack[ActiveInstanceIdx].HasActiveNode(NextTaskIdx.ExecutionIndex);
if (bIsTaskRunning)
{
BT_SEARCHLOG(SearchData, Verbose, TEXT("Task doesn't allow restart and it's already running! Discarding search."));
bIsSearchValid = false;
}
}
}
if (!bIsSearchValid || SearchData.bPostponeSearch)
{
RollbackSearchChanges();
UE_VLOG(GetOwner(), LogBehaviorTree, Verbose, TEXT("Search %s, reverted all changes."), !bIsSearchValid ? TEXT("is not valid") : TEXT("will be retried"));
}
SearchData.bSearchInProgress = false;
这里的ShouldIgnoreRestartSelf代表如果搜索出来的节点就是当前正在执行的节点,是否需要避免重启这个节点的执行。如果需要避免重复执行的话则认为本次搜索失败。
找到一个合适的Task之后,先使用AbortCurrentTask来结束正在执行的其他任务,然后挂载在PendingExecution.NextTask上,接下来使用ProcessPendingExecution来启动这个NextTask的执行:
if (!SearchData.bPostponeSearch)
{
// clear request accumulator
ExecutionRequest = FBTNodeExecutionInfo();
// unlock execution data, can get locked again if AbortCurrentTask starts any new requests
PendingExecution.Unlock();
if (bIsSearchValid)
{
// abort task if needed
if (InstanceStack.Last().ActiveNodeType == EBTActiveNode::ActiveTask)
{
// prevent new execution requests for nodes inside the deactivated branch
// that may result from the aborted task.
SearchData.bFilterOutRequestFromDeactivatedBranch = true;
AbortCurrentTask();
SearchData.bFilterOutRequestFromDeactivatedBranch = false;
}
// set next task to execute only when not lock for execution as everything has been cancelled/rollback
if (!PendingExecution.IsLocked())
{
PendingExecution.NextTask = NextTask;
PendingExecution.bOutOfNodes = (NextTask == NULL);
}
}
ProcessPendingExecution();
}
else
{
// more important execution request was found
// stop everything and search again in next tick
ScheduleExecutionUpdate();
}
ProcessPendingExecution执行的时候,先把之前设置的PendingExecution存为SaveInfo,然后以这个SaveInfo里存储的NextTask去调用UBehaviorTreeComponent::ExecuteTask去发起任务的真正执行:
void UBehaviorTreeComponent::ProcessPendingExecution()
{
// can't continue if current task is still aborting
if (bWaitingForAbortingTasks || !PendingExecution.IsSet())
{
return;
}
FBTPendingExecutionInfo SavedInfo = PendingExecution;
PendingExecution = FBTPendingExecutionInfo();
// collect all aux nodes that have lower priority than new task
// occurs when normal execution is forced to revisit lower priority nodes (e.g. loop decorator)
const FBTNodeIndex NextTaskIdx = SavedInfo.NextTask ? FBTNodeIndex(ActiveInstanceIdx, SavedInfo.NextTask->GetExecutionIndex()) : FBTNodeIndex(0, 0);
UnregisterAuxNodesUpTo(NextTaskIdx);
// change aux nodes
ApplySearchData(SavedInfo.NextTask);
// make sure that we don't have any additional instances on stack
if (InstanceStack.Num() > (ActiveInstanceIdx + 1))
{
for (int32 InstanceIndex = ActiveInstanceIdx + 1; InstanceIndex < InstanceStack.Num(); InstanceIndex++)
{
InstanceStack[InstanceIndex].Cleanup(*this, EBTMemoryClear::StoreSubtree);
}
InstanceStack.SetNum(ActiveInstanceIdx + 1);
}
// execute next task / notify out of nodes
// validate active instance as well, execution can be delayed AND can have AbortCurrentTask call before using instance index
if (SavedInfo.NextTask && InstanceStack.IsValidIndex(ActiveInstanceIdx))
{
ExecuteTask(SavedInfo.NextTask);
}
else
{
OnTreeFinished();
}
}
注意这里的ApplySearchData,这个函数才会将我们之前提交到装饰器集合SearchData.PendingUpdates的添加和删除请求真正的执行,内部会遍历SearchData.PendingUpdates的每个元素,根据其提交的是Add还是Remove来调用对应的OnBecomeRelevant和OnCeaseRelevant,同时维护每个行为树Instance的ActiveAuxNodes集合:
if (UpdateInfo.AuxNode)
{
// special case: service node at root of top most subtree - don't remove/re-add them when tree is in looping mode
// don't bother with decorators parent == root means that they are on child branches
if (bLoopExecution && UpdateInfo.AuxNode->GetMyNode() == InstanceStack[0].RootNode &&
UpdateInfo.AuxNode->IsA(UBTService::StaticClass()))
{
if (UpdateInfo.Mode == EBTNodeUpdateMode::Remove ||
InstanceStack[0].GetActiveAuxNodes().Contains(UpdateInfo.AuxNode))
{
UE_VLOG(GetOwner(), LogBehaviorTree, Verbose, TEXT("> skip [looped execution]"));
continue;
}
}
uint8* NodeMemory = (uint8*)UpdateNode->GetNodeMemory<uint8>(UpdateInstance);
if (UpdateInfo.Mode == EBTNodeUpdateMode::Remove)
{
UpdateInstance.RemoveFromActiveAuxNodes(UpdateInfo.AuxNode);
UpdateInfo.AuxNode->WrappedOnCeaseRelevant(*this, NodeMemory);
}
else
{
UpdateInstance.AddToActiveAuxNodes(UpdateInfo.AuxNode);
UpdateInfo.AuxNode->WrappedOnBecomeRelevant(*this, NodeMemory);
}
}
维护好活跃装饰器节点集合之后,再通知执行ExecuteTask, 这个ExecuteTask我们在介绍任务节点的时候已经介绍过了,用来真正的执行任务节点的逻辑的,至此行为树节点的完整调度流程基本结束。
UE行为树的Tick
前面一节的分析里我们知道被选择的节点已经被设置到了ExecutionRequest上,并通知当前的UBehaviorTreeComponent::TickComponent开启下一次的立即Tick。接下来我们来看行为树的TickComponent中是如何触发节点的真正执行的。在这个TickComponent的开头会首先检查等待时间片NextTickDeltaTime是否已经用完,如果还没用完则直接返回,不执行任何逻辑:
// Check if we really have reached the asked DeltaTime,
// If not then accumulate it and reschedule
NextTickDeltaTime -= DeltaTime;
if (NextTickDeltaTime > 0.0f)
{
// The TickManager is using global time to calculate delta since last ticked time. When the value is big, we can get into float precision errors compare to our calculation.
if (NextTickDeltaTime > KINDA_SMALL_NUMBER)
{
UE_VLOG(GetOwner(), LogBehaviorTree, Error, TEXT("BT(%i) did not need to be tick, ask deltatime of %fs got %fs with a diff of %fs."), GFrameCounter, NextTickDeltaTime + AccumulatedTickDeltaTime + DeltaTime, DeltaTime + AccumulatedTickDeltaTime, NextTickDeltaTime);
}
AccumulatedTickDeltaTime += DeltaTime;
ScheduleNextTick(NextTickDeltaTime);
return;
}
DeltaTime += AccumulatedTickDeltaTime;
AccumulatedTickDeltaTime = 0.0f;
如果等待时间片已经用完,则先遍历每个行为树实例上的所有装饰器节点与服务节点,执行这些节点的TickNode,同时获取下一次Tick的间隔NextNeededDeltaTime:
// tick active auxiliary nodes (in execution order, before task)
// do it before processing execution request to give BP driven logic chance to accumulate execution requests
// newly added aux nodes are ticked as part of SearchData application
for (int32 InstanceIndex = 0; InstanceIndex < InstanceStack.Num(); InstanceIndex++)
{
FBehaviorTreeInstance& InstanceInfo = InstanceStack[InstanceIndex];
InstanceInfo.ExecuteOnEachAuxNode([&InstanceInfo, this, &bDoneSomething, DeltaTime, &NextNeededDeltaTime](const UBTAuxiliaryNode& AuxNode)
{
uint8* NodeMemory = AuxNode.GetNodeMemory<uint8>(InstanceInfo);
SCOPE_CYCLE_UOBJECT(AuxNode, &AuxNode);
bDoneSomething |= AuxNode.WrappedTickNode(*this, NodeMemory, DeltaTime, NextNeededDeltaTime);
});
}
处理完这些辅助节点的Tick逻辑之后,再查询一下是否有节点调度请求,如果有则调用ProcessExecutionRequest去处理:
if (bRequestedFlowUpdate)
{
ProcessExecutionRequest();
bDoneSomething = true;
// Since hierarchy might changed in the ProcessExecutionRequest, we need to go through all the active auxiliary nodes again to fetch new next DeltaTime
bActiveAuxiliaryNodeDTDirty = true;
NextNeededDeltaTime = FLT_MAX;
}
处理完新节点的调度之后,再执行所有活跃任务节点的Tick,这个活跃任务节点由两个部分构成:
- 当前
InstanceStack里活跃的行为树实例里的任务节点 - 当前
InstanceStack里所有行为树实例的ParallelTask节点
TickComponent里会遍历当前正在执行的所有任务节点,然后调用其WrappedTickTask来驱动这个任务的Tick更新。但是这个WrappedTickTask其实只是一个转接函数,真正执行任务的是TickTask, WrappedTickTask只是用来确定TickTask的this指针是哪一个:
bool UBTTaskNode::WrappedTickTask(UBehaviorTreeComponent& OwnerComp, uint8* NodeMemory, float DeltaSeconds, float& NextNeededDeltaTime) const
{
if (bNotifyTick)
{
const UBTNode* NodeOb = bCreateNodeInstance ? GetNodeInstance(OwnerComp, NodeMemory) : this;
if (NodeOb)
{
((UBTTaskNode*)NodeOb)->TickTask(OwnerComp, NodeMemory, DeltaSeconds);
NextNeededDeltaTime = 0.0f;
return true;
}
}
return false;
}
/** ticks this task
* this function should be considered as const (don't modify state of object) if node is not instanced! */
virtual void TickTask(UBehaviorTreeComponent& OwnerComp, uint8* NodeMemory, float DeltaSeconds);
这里的TickTask是一个虚函数,默认实现是一个空函数体,具体的Tick逻辑在实现具体任务的子节点中,最简单的样例就是计时器等待节点:
void UBTTask_Wait::TickTask(UBehaviorTreeComponent& OwnerComp, uint8* NodeMemory, float DeltaSeconds)
{
FBTWaitTaskMemory* MyMemory = (FBTWaitTaskMemory*)NodeMemory;
MyMemory->RemainingWaitTime -= DeltaSeconds;
if (MyMemory->RemainingWaitTime <= 0.0f)
{
// continue execution from this node
FinishLatentTask(OwnerComp, EBTNodeResult::Succeeded);
}
}
在UBTTask_Wait::TickTask中逐渐减少剩余时间,当剩余时间小于等于0时调用FinishLatentTask来通知行为树当前任务成功结束:
void UBTTaskNode::FinishLatentTask(UBehaviorTreeComponent& OwnerComp, EBTNodeResult::Type TaskResult) const
{
// OnTaskFinished must receive valid template node
UBTTaskNode* TemplateNode = (UBTTaskNode*)OwnerComp.FindTemplateNode(this);
OwnerComp.OnTaskFinished(TemplateNode, TaskResult);
}
UE行为树的消息通知
UE行为树的任务节点在执行持续性任务时,需要内部自己去处理任务的完成。这里检查对应任务是否执行完成有两个机制,第一个机制就是上面所说的行为树Tick中调用任务节点的TickTask来检查内部状态是否可以完成,另外一种机制则是监听事件来驱动完成。在TaskNode上提供了监听外部事件驱动完成的相关接口:
void UBTTaskNode::WaitForMessage(UBehaviorTreeComponent& OwnerComp, FName MessageType) const
{
// messages delegates should be called on node instances (if they exists)
OwnerComp.RegisterMessageObserver(this, MessageType);
}
void UBTTaskNode::WaitForMessage(UBehaviorTreeComponent& OwnerComp, FName MessageType, int32 RequestID) const
{
// messages delegates should be called on node instances (if they exists)
OwnerComp.RegisterMessageObserver(this, MessageType, RequestID);
}
void UBTTaskNode::StopWaitingForMessages(UBehaviorTreeComponent& OwnerComp) const
{
// messages delegates should be called on node instances (if they exists)
OwnerComp.UnregisterMessageObserversFrom(this);
}
这些接口都会转接到BehaviorTreeComponent上:
/** setup message observer for given task */
void RegisterMessageObserver(const UBTTaskNode* TaskNode, FName MessageType);
void RegisterMessageObserver(const UBTTaskNode* TaskNode, FName MessageType, FAIRequestID MessageID);
/** remove message observers registered with task */
void UnregisterMessageObserversFrom(const UBTTaskNode* TaskNode);
void UnregisterMessageObserversFrom(const FBTNodeIndex& TaskIdx);
UBehaviorTreeComponent内部使用一个Map来记录所有节点注册的事件监听:
/** message observers mapped by instance & execution index */
TMultiMap<FBTNodeIndex,FAIMessageObserverHandle> TaskMessageObservers;
void UBehaviorTreeComponent::RegisterMessageObserver(const UBTTaskNode* TaskNode, FName MessageType)
{
if (TaskNode)
{
FBTNodeIndex NodeIdx;
NodeIdx.ExecutionIndex = TaskNode->GetExecutionIndex();
NodeIdx.InstanceIndex = InstanceStack.Num() - 1;
TaskMessageObservers.Add(NodeIdx,
FAIMessageObserver::Create(this, MessageType, FOnAIMessage::CreateUObject(const_cast<UBTTaskNode*>(TaskNode), &UBTTaskNode::ReceivedMessage))
);
UE_VLOG(GetOwner(), LogBehaviorTree, Log, TEXT("Message[%s] observer added for %s"),
*MessageType.ToString(), *UBehaviorTreeTypes::DescribeNodeHelper(TaskNode));
}
}
但是UBehaviorTreeComponent其实并没有处理事件的逻辑,这个事件监听的逻辑在其父类UBrainTreeComponent中:
FAIMessageObserverHandle FAIMessageObserver::Create(UBrainComponent* BrainComp, FName MessageType, FAIRequestID MessageID, FOnAIMessage const& Delegate)
{
FAIMessageObserverHandle ObserverHandle;
if (BrainComp)
{
FAIMessageObserver* NewObserver = new FAIMessageObserver();
NewObserver->MessageType = MessageType;
NewObserver->MessageID = MessageID;
NewObserver->bFilterByID = true;
NewObserver->ObserverDelegate = Delegate;
NewObserver->Register(BrainComp);
ObserverHandle = MakeShareable(NewObserver);
}
return ObserverHandle;
}
void FAIMessageObserver::Register(UBrainComponent* OwnerComp)
{
OwnerComp->MessageObservers.Add(this);
Owner = OwnerComp;
}
// UBrainComponent
/** active message observers */
TArray<FAIMessageObserver*> MessageObservers;
每次创建一个事件监听的时候,创建的FAIMessageObserver都会把自己注册到UBrainComponent::MessageObservers数组中,当有一个AI事件被发送到UBrainComponent的时候,会先存在一个消息数组MessagesToProcess中,然后在UBrainComponent::TickComponent中会遍历这个数组来执行广播通知:
void FAIMessage::Send(AController* Controller, const FAIMessage& Message)
{
UBrainComponent* BrainComp = FindBrainComponentHelper(Controller);
Send(BrainComp, Message);
}
void FAIMessage::Send(APawn* Pawn, const FAIMessage& Message)
{
UBrainComponent* BrainComp = FindBrainComponentHelper(Pawn);
Send(BrainComp, Message);
}
void FAIMessage::Send(UBrainComponent* BrainComp, const FAIMessage& Message)
{
if (BrainComp)
{
BrainComp->HandleMessage(Message);
}
}
void UBrainComponent::HandleMessage(const FAIMessage& Message)
{
MessagesToProcess.Add(Message);
}
void UBrainComponent::TickComponent(float DeltaTime, enum ELevelTick TickType, FActorComponentTickFunction *ThisTickFunction)
{
if (MessagesToProcess.Num() > 0)
{
const int32 NumMessages = MessagesToProcess.Num();
for (int32 Idx = 0; Idx < NumMessages; Idx++)
{
// create a copy of message in case MessagesToProcess is changed during loop
const FAIMessage MessageCopy(MessagesToProcess[Idx]);
for (int32 ObserverIndex = 0; ObserverIndex < MessageObservers.Num(); ObserverIndex++)
{
MessageObservers[ObserverIndex]->OnMessage(MessageCopy);
}
}
MessagesToProcess.RemoveAt(0, NumMessages, false);
}
}
void FAIMessageObserver::OnMessage(const FAIMessage& Message)
{
if (Message.MessageName == MessageType)
{
if (!bFilterByID || Message.RequestID.IsEquivalent(MessageID))
{
ObserverDelegate.ExecuteIfBound(Owner.Get(), Message);
}
}
}
这里的AI消息的样例场景就是发起一个移动请求的时候,寻路任务UBTTask_MoveTo等待寻路系统通知其移动结束:
// EBTNodeResult::Type UBTTask_MoveTo::PerformMoveTask(UBehaviorTreeComponent& OwnerComp, uint8* NodeMemory)
FPathFollowingRequestResult RequestResult = MyController->MoveTo(MoveReq);
if (RequestResult.Code == EPathFollowingRequestResult::RequestSuccessful)
{
MyMemory->MoveRequestID = RequestResult.MoveId;
WaitForMessage(OwnerComp, UBrainComponent::AIMessage_MoveFinished, RequestResult.MoveId);
WaitForMessage(OwnerComp, UBrainComponent::AIMessage_RepathFailed);
NodeResult = EBTNodeResult::InProgress;
}
else if (RequestResult.Code == EPathFollowingRequestResult::AlreadyAtGoal)
{
NodeResult = EBTNodeResult::Succeeded;
}
当寻路系统完成了一个AI发起的寻路之后,会构造一个UBrainComponent::AIMessage_MoveFinished类型的AI消息,投递到AController上挂载的UBrainComponent上,让其进行任务通知:
void UPathFollowingComponent::OnPathFinished(const FPathFollowingResult& Result)
{
UE_VLOG(GetOwner(), LogPathFollowing, Log, TEXT("OnPathFinished: %s"), *Result.ToString());
INavLinkCustomInterface* CustomNavLink = Cast<INavLinkCustomInterface>(CurrentCustomLinkOb.Get());
if (CustomNavLink)
{
CustomNavLink->OnLinkMoveFinished(this);
CurrentCustomLinkOb.Reset();
}
// update meta path if needed
if (bIsUsingMetaPath && Result.IsSuccess() && MovementComp)
{
FMetaNavMeshPath* MetaNavPath = Path->CastPath<FMetaNavMeshPath>();
const bool bNeedPathUpdate = MetaNavPath && MetaNavPath->ConditionalMoveToNextSection(MovementComp->GetActorFeetLocation(), EMetaPathUpdateReason::PathFinished);
if (bNeedPathUpdate)
{
// keep move request active
return;
}
}
// save move status
bLastMoveReachedGoal = Result.IsSuccess() && !HasPartialPath();
// save data required for observers before reseting temporary variables
const FAIRequestID FinishedMoveId = CurrentRequestId;
Reset();
UpdateMoveFocus();
if (bStopMovementOnFinish && MovementComp && HasMovementAuthority() && !MovementComp->UseAccelerationForPathFollowing())
{
MovementComp->StopMovementKeepPathing();
}
// notify observers after state was reset (they can request another move)
OnRequestFinished.Broadcast(FinishedMoveId, Result);
FAIMessage Msg(UBrainComponent::AIMessage_MoveFinished, this, FinishedMoveId, Result.IsSuccess());
Msg.SetFlag(Result.Flags & 0xff);
FAIMessage::Send(Cast<AController>(GetOwner()), Msg);
}
除了这个与外部交互的消息通知之外,行为树内部还有一个专用的黑板值改变通知,这个在黑板系统和装饰器节点中都提到过,因此这里不再赘述。
数据配置表
游戏数据的形态
游戏中的绝大部分业务逻辑都是由相关配置数据来驱动的,例如之前介绍的移动同步中的最大速度、最大加速度,AOI同步中的视野半径以及视野内实体上限,这两种就是最简单的全局数据配置。对于这种整个游戏内共享一份的数据,我们可以简单的使用单例模式来声明相关全局变量,从而来控制相关配置的初始化以及数据的获取。这种每一个数据都提供一个变量声明去对应的方式在数据配置项超过20时就会显得很愚蠢。真实的游戏内所需要的数据配置数量其实是远远超过一般人能够想象的,典型的MMO游戏中,一个角色的属性系统里包含的属性除了常见的生命、法力值、攻击力、防御力之外,还有各种抗性、增伤、暴击、爆伤、闪避、减伤、格挡等,林林总总的各种属性数量经常超过50个,不同的门派种族会有不同的初始属性和随等级增长的属性。除了属性系统之外,还有各种纷杂的技能系统、状态buff系统、装备系统、怪物系统、宝石系统等,这些系统都有很多需要配置的数据,累积起来可能有上百万个数值,同时这些数值会经过非常频繁的调整。因此给每个数值都提供一个变量声明是完全不可能的,因为这样不仅会极大的膨胀运行时文件的符号表,而且每次数值修改都会导致运行时文件的重新编译。所以这些数值系统一般都会独立于代码之外,作为数据文件而存在。游戏运行时会按照业务逻辑需求去按需加载这些配置文件,读取其中的特定元素,来决定玩家的血量、速度、攻击等各项数值,以及驱动游戏内各项逻辑。
数据文件一般会存在两种状态,编辑态和运行态。所谓数据文件的编辑态代表这个数据文件可以方便的被游戏开发人员手工修改,二数据文件的运行态则代表这个数据文件可以方便的被运行时的游戏读取。对于简单的数据配置来说,其编辑态和运行态是同一种形态,例如按行分割的文本文件,逗号分隔符文件,以及Json文件等。但是当数据量开始膨胀时,其编辑态与运行态开始隔离。运行态的数据文件开始以某种人类不可辨识但是机器可以快速读取的形式存在,典型的就是编译后的lua\python字节码文件,带Schema的protobuf文件,以及更加硬核的自定义格式二进制文件。而编辑态的数据文件则一般会提供一个更加方便的带数据增删改查界面的软件来便利游戏开发人员对这些数据来做频繁的调整。
游戏数据的编辑
因为游戏中会存在很多组结构相同的数据,例如装备数据、道具数据、buff数据、任务数据、等级成长数据等。每种类型的数据都共享同一种数据结构格式,即Schema。所以Excel作为带Schema的游戏运行数据的配置软件是一个非常合适的选择,因为这个软件天生就带有固定首行功能,这个首行里的每一列就可以当作数据Schema中的每个配置项。除了基本的复制粘贴和全文搜索之外,他还有快速填充、条件查询、过滤筛选、公式计算、交叉引用等很多方便的功能。同时又因为这个软件的获取方便、容易上手、教程繁多,同时主流语言都有读写Excel文件的相关库,所以基本上所有的游戏公司都会将Excel文件格式作为首选的游戏数据编辑态。就以前段时间很火的太吾绘卷来说,他在游戏代码内插入了很多数据代码, 下面的图就是其中一类数据代码的实例:
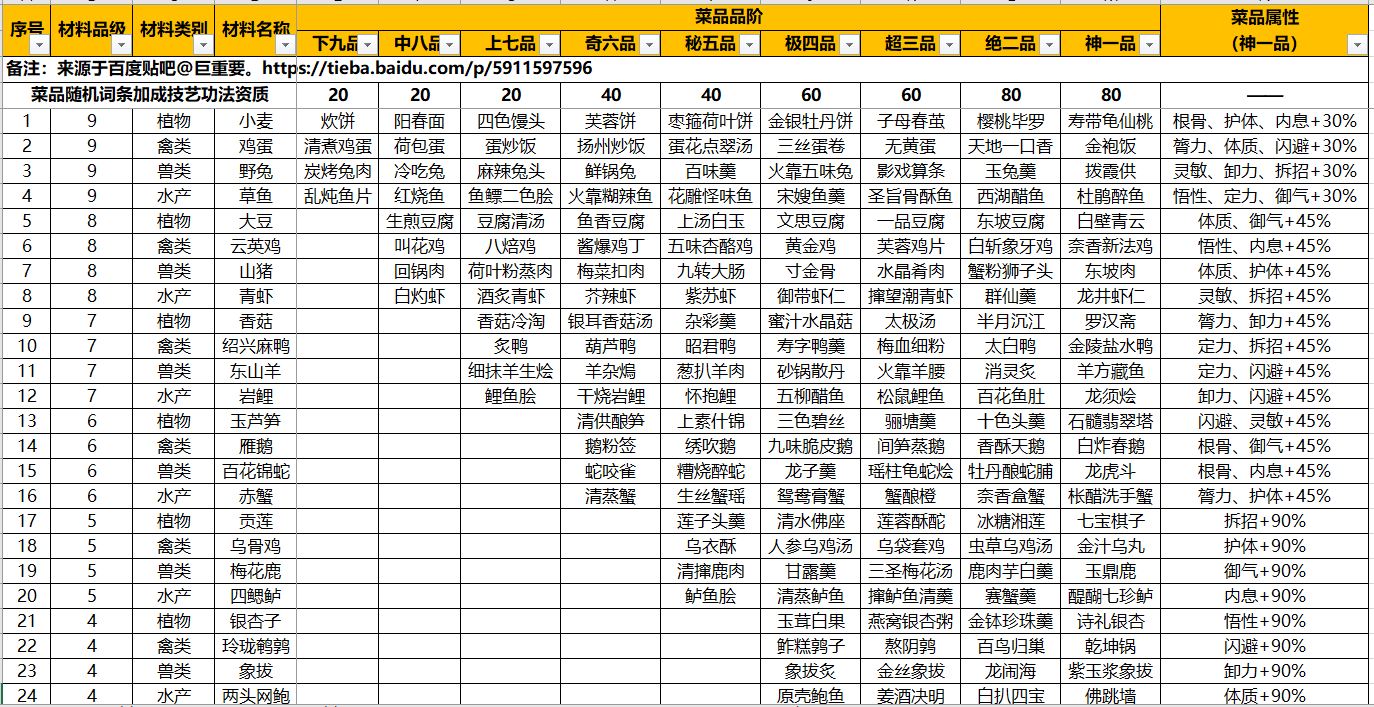
这些数据的第一列都是作为索引列,用来处理行数据的读取,然后每一行里面的数据结构相同。行内数据可以当作一个Vector,通过下标可以读取对应的数据。实际上,游戏程序并不会直接使用下标去读取数据,这样代码的可读性非常的差,我们需要对每一列都提供一个名字,这样每一行数据可以当作一个map,访问特定列的数据的时候,使用列名去查找。这样我们的查询代码更清晰了:
equips_data_row[3] ==> equips_data_row[equip_name]
equips_data_row[4] ==> equips_data_row[equip_level]
代码里都期望列名是字母组成,但是在中文环境下看字母总是有一点别扭,无法看名知意,所以一般来说每一列都会有英文名、中文名。 每一行数据有相同的结构,代表的不仅仅是他们有相同的列数和列名,而且还需要有每一列的数据都有相同的类型。上图中的数据就是类型一致的典范,我们可以看出第一列第二列第四列都是整数,其他的都是字符串。但是加入策划填错表了,应该填整数的地方填成了字符串,游戏里去读取这个数据的时候就会崩溃。所以我们对每一列不仅仅是要提供列名,而且还需要提供列的格式需求。所以我们所期待的Excel格式就变成了这样:
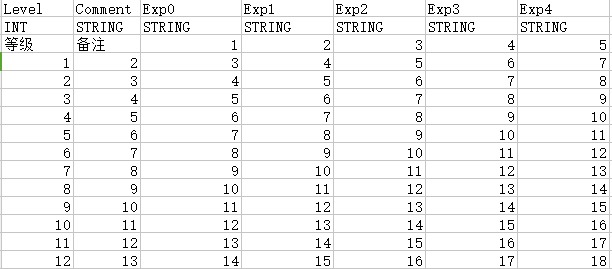
这里的第一行是列名,第二行是列数据描述,第三行是中文注释。至此一个简单的游戏数据配置表结构设计完成,策划可以从1填充到999。而对于程序来说,我们对excel内容结构怎么设计的不怎么感兴趣,我们只对游戏中最后怎么使用excel内的数据感兴趣。
游戏数据的导出
游戏内是无法直接读取Excel的,引入一个读取Excel的第三方库不太实际。同时一个Excel文件相对于我们最终所需要的纯文本数据来说实在是太大了,对比相同内容的csv文件,所需磁盘大小有几十倍上百倍的差距。所以我们需要将从Excel转变到游戏所需数据,因此需要做如下几步:
-
读取特定
Excel路径的特定sheet的内容,转变为一个m*n的矩阵 -
将数据矩阵拆分为两个部分: 列描述信息和真正的数据矩阵,
-
针对数据矩阵里的每一列数据,都采用这一列的格式描述数据去校验,检查是否符合列的类型描述说明
-
通过了数据类型检测之后,将最后的数据矩阵导出到代码文件,同时这个代码文件里需要附加列描述信息,以方便程序去查询行和列
针对上面的内容,知乎上已经有从Excel到游戏数据介绍了一下怎么用c#来实现 。我们游戏里使用的是python,这个方案涉及到公司内部,所以无法细讲。所以这里我就用当前服务器引擎使用的语言cpp,从0开始,来实现了一下上述功能。用cpp去处理excel相对于python,c#去处理excel内容,难度大了好几个数量级。因为python有xlsxreader,c#也有各种现成的库,而cpp去读取xlsx文件的库真是凤毛菱角,难得遇到几个,里面所提供的功能太多引发的依赖太多,导致使用起来不太方便。所以最终还是走上了使用cpp造轮子的老路,方案开源为typed_matrix。如果读者目前有正规游戏项目的实际需求,轻量化的解决方案可以采用我这个方形轮子,比较严肃且广泛的解决方案可以采用开源解决方案luban。
excel 文件格式
为了读取excel的xlsx文件,我们首先需要知道xlsx文件的格式是什么。
整个xlsx格式其实是一个zip压缩包,事实上office2007及以后的版本,所有的数据文件格式都是zip压缩包,整体的格式说明是ECMA-376标准, 微软官方提供了相关的c# sdk去解析。 但是考虑到这么多文档根本看不完,里面的很多功能压根用不到。我就通过不断的构造最小样例的形式去摸索xlsx解压之后的内容,解压之后的目录格式如下:
$ unzip ./test.xlsx
Archive: ./test.xlsx
inflating: [Content_Types].xml
inflating: _rels/.rels
inflating: docProps/app.xml
extracting: [trash]/0000.dat
inflating: xl/_rels/workbook.xml.rels
inflating: xl/styles.xml
inflating: xl/theme/theme1.xml
inflating: xl/workbook.xml
inflating: xl/worksheets/sheet1.xml
inflating: docProps/core.xml
_rels文件夹 没啥用 直接忽略docProps文件夹 没啥用 直接忽略[Content_Types].xml文件 没啥用 忽略[trash]文件夹 没啥用 忽略xl文件夹 里面有我们真正需要的数据
解析xl文件夹的入口是xl\workbook.xml, 里面有列出所有的相关sheet:
<row r="1" spans="1:2" x14ac:dyDescent="0.2">
<c r="A1" t="s">
<v>16</v>
</c>
<c r="B1" t="s">
<v>17</v>
</c>
</row>
这里的r是行号,从1开始,里面的每个c区域代表一个cell,里面的r就是列标签。每个cell的内容在子标签v里面。如果这个c区域的t字段有值,且t的值是s,则v里面的值是一个数组数字,代表全局共享字符串数组里的索引,对应的字符串值需要查询workbook的全局共享字符串表;否则他就是一个简单字符串。
这里引入了一个概念,全局常量字符串表,这个表是整个workbook共享的,里面存储了当前workbook里的高频字符串, 所有worksheet里用到这个字符串的地方都以对应的全局共享字符串表里的索引代替。这样的优化,主要是为了减少xlsx的文件大小。这个全局共享字符串表的内容在xl\sharedStrings.xml里,其结构如下:
<sst xmlns="http://schemas.openxmlformats.org/spreadsheetml/2006/main" count="32" uniqueCount="19">
<si>
<t>id</t>
<phoneticPr fontId="1" type="noConversion"/>
</si>
<si>
<t>int</t>
<phoneticPr fontId="1" type="noConversion"/>
</si>
<si>
<t>没啥意思</t>
<phoneticPr fontId="1" type="noConversion"/>
</si>
</sst>
sst就是SharedStringTable的缩写,代表一个字符串数组,里面的每个si区块代表一个共享的字符串,t区域内的值就是共享字符串的内容。通过字符串索引去访问这个sst的时候,注意索引是从1开始的。
至此, 简单xlsx的整体格式就介绍完毕,我们可以利用这些信息来获取每个sheet的m*n的文本矩阵了。
数据格式检查
获取了文本矩阵之后,我们要获取列描述信息,其中最重要的是获取当前列的数据的格式应该是什么。对于格式规定,我们可能照搬常见的数据格式int float string bool。但是这些格式过于简单,表现力不够强,无法描述更复杂的信息。 例如我们规定这一列提供的是rgb颜色信息,这个rgb的值由三个正整数组成,每个正整数都在0-255之间。还有,装备的品级只能取我们规定好的普通、黄金、暗金、套装四种值。对于这种枚举值的需求,简单的数值类型也是无法描述的。对于这种数据格式检查,我们之前在介绍rpc编码的时候也提到过,网络通信界使用最广的强类型方案protobuf由于其依赖太重导致被否。为此,我们需要自定义描述格式。这里我就用我的小项目typed_string里的数据格式来介绍一种方案。在这个库里我使用typed_string_desc这个结构来作为字符串的类型描述, 首先支持如下几种基础类型:
str字符串类型boolbool值类型 取值要么是1 要么是0uint无符号整数int带符号整数float浮点数
然后对于基础类型,我们可以增加他的取值范围限定,方式为{"xxx": [a, b, c]},这里的xxx就是基础类型名字, 而a,b,c则是可以供选择的值,其类型为xxx:
{"int": [1, 2]}{"str": ["A", "B", "C"]}{"float": [1.0, 2.0]}
在这些基础类型之上我们提供了两种组合类型:
tuple类型,可以理解为结构体,声明方式为[A, B, C], 这里的A,B,C数量为任意多个,且每个元素都是一个有效的typed_string_desc,例子["float", "int", {"int": [1, 2]}]list类型,可以理解为数组, 声明方式为[A, n],这里的A是一个有效的typed_string_desc,而n是一个非负整数,表示数组的大小, 如果n==0,则表明是一个不限制大小的数组,例子["int", 2], [["int", "float"], 0]
为了避免自己写一个字符串parser,上面描述的符合类型格式都是一个有效的json字符串,这样从描述字符串转换为typed_string_desc就很简单了:
std::optional<basic_value_type> str_to_value_type(std::string_view input)
{
static const std::unordered_map<std::string_view, basic_value_type> look_map = {
{"any", basic_value_type::any},
{"str", basic_value_type::str},
{"bool", basic_value_type::number_bool},
{"int", basic_value_type::number_int},
{"uint", basic_value_type::number_uint},
{"float", basic_value_type::number_float},
};
auto cur_iter = look_map.find(input);
if (cur_iter == look_map.end())
{
return {};
}
else
{
return cur_iter->second;
}
}
std::shared_ptr <const typed_string_desc> typed_string_desc::get_type_from_str(std::string_view type_string)
{
auto cur_basic_type = str_to_value_type(type_string);
if (cur_basic_type)
{
return std::make_shared<typed_string_desc>(cur_basic_type.value(), std::vector<json>{});
}
if (!json::accept(type_string))
{
return {};
}
auto cur_type_json = json::parse(type_string);
return get_type_from_json(cur_type_json);
}
这里没有标注源代码的get_type_from_json逻辑其实非常简单,递归的进行规则化解析即可,因为最复杂的字符串parse已经被json处理好了。
在规定了列的格式定义之后,我们还需要做一个非常重要的选择:某一列数据没有填会怎样处理。因为随着功能的扩展,表的列越来越多,我们的任务表和buff表都有五百多个表头,但是一行数据最终用到的列其实不会很多, 所以很多列的数据都是没有必要填的。代码层处理这种数据没有填的情况,一般来说要么返回规定的默认值,要么返回对应列类型的空值。这个默认值可以通过给列加一行描述信息来实现,当然如果列的默认值与列格式的空值一样的话,处理起来最简单。
数据矩阵的导出序列化
在验证了所有的列的值都符合预期之后, 我们再检查一下作为索引的第一列的值是否有重复的,如果没有重复的,则可以开始导出到文件。整个导出文件的内容包括三个部分:
- 列数据格式描述信息 这里是一个
map,key是列的名字,value是列的描述嘻嘻你 - 每一行的索引值到这行数据在真正的数据矩阵里的索引的映射 其实就是一个
map - 真正的数据矩阵 这里是一个
matrix,但是有些时候会对空列太多的时候做优化,对稀疏数据做压缩存储。
这里导出到文件又有两种选择:
- 二进制文件 例如
msgpack,bson或者自定义格式 - 纯文本文件 例如
csv,json
在易用性来说,纯文本文件有很大的优势,毕竟人机皆可读。查找特定行特定列数据的时候直接用纯文本编辑器打开, 执行ctrl+F即可。在测试的时候,也可以自己手动改特定的行列的值来查看效果。而二进制格式导出的优点就是加载速度和内存占用了。事实上可以对某些文件同时采用两种模式,同时导出二进制和纯文本,开发期使用纯文本,最终的客户端使用二进制。
数据导出配置
前面的内容已经基本介绍完了一个数据是怎么从excel转变为导出数据的,作为实际使用中,游戏配置的excel会有很多,无脑的导出特定目录下所有的excel并维持目录结构的话会带来管理上的灾难。在项目使用中,可以通过提供配置表来规定某个excel的某个sheet导出为某个文件,放到某个目录。每次执行导出excel的时候,先读取这个配置表,遍历里面的每一项一一导出即可。但是在大项目里,会有各种进阶的数据导出需求,导致这种简单的方案无法满足需求:
-
我们需要对导出的内容做后处理,然后再导出。例如任务表里一行一个任务,每个任务有一个
post_task表头来填写下一个任务是什么。在游戏逻辑中我们有些时候有获取特定任务的终末任务或者开始任务是什么的需求,这个需求可以在代码里手动遍历去实现。更好的方案是离线算好对应的值,加入到导出数据里,添加一个final_task和一个start_task的表头。 -
特定
sheet可能会同时导出多张数据文件,例如有些列的数据客户端是不关心的,在客户端内存有限的情况下客户端的对应数据里就可以将这些表头的数据删除,而服务端则提供全量的数据,毕竟服务器内存多。 -
有些数据分散在多个
sheet里,导出的时候需要做一下合并,例如装备表可能拆分为了各个门派各个部位的装备数据,最终需要合并所有的相关数据为一个统一的装备表文件 -
有些数据表并不是直接由
excel生成的,而是依赖于特定的几张数据表,需要综合相关数据才能生成最后的数据,典型例子就是数据库里的join查询 -
当需要导出的文件越来越多的时候,全量的
excel导出所花费的时间越来越长。其实很多表在近期都没有改动过,这些没有改动过的excel都不需要重新执行导出操作,所以我们需要设计一个增量导出的系统,扫描导出列表里所有改动过的excel,分析所有依赖于这些excel的数据文件。注意由于上一条的需求,这些数据文件之间也可能有依赖,因此我们需要进行拓扑排序,规定数据文件的生成顺序,按序导出。
数据文件的装载
在最后的客户端,游戏运行时,我们需要读取这些到处数据的内容。一个简单的想法就是启动游戏的时候全量装载所有数据文件到内存中,这个简单的想法从来没有被任何游戏采用,原因有如下几点:
- 启动的时候去读取这些文件极大的拖慢了游戏的启动速度
- 游戏的可用内存是有限的,全量装载这些数据文件进内存会进一步压缩游戏执行时可用内存,有些时候甚至光加载这些数据内存就爆了
所以实际的项目中采取的都是按需加载的策略,同时配合缓存来使用。在游戏运行的时候,读取表格的方式主要有如下三种:
get_cell(sheet_name, row, column)获取特定数据文件的特定cell的值get_row(sheet_name, row)获取特定数据文件的特定行数据get_matrix(sheet_name)获取特定数据文件的矩阵数据
我们做cache的时候,一般来说针对获取cell和获取row做cache,对于获取整张表的请求则不做cache,直接请求文件系统。所以在代码里避免出现获取全表内容进行扫描的操作,有这种需求的推荐在导出流程里额外添加一个数据文件,来做查询索引。
当缓存不命中的时候,我们需要去请求文件系统装载数据,此时又可能出现一些问题:
- 对应表的数据实在太大,导致内存抖动,甚至内存不够无法装载,此时唯一的解决方式就是将这个大文件通过某种方式对查询
key通过hash进行划分,拆分为多个小文件。然后通过行索引去访问数据的时候,先查询当前行应该在哪个子文件里,然后再读取对应的子文件。这种拆分小文件的数据无法提供get_matrix这个接口,代码这里需要注意。 - 导出数据里有大量的单行配置表的数据,导致有很多极小文件,数量到了一定程度对于磁盘的压力就会变得很大,因为很多时候是
4k对齐的大小。此时需要做多小文件合并为一个大文件,来减少磁盘占用。
Mosaic Game 的数据配置
前面介绍的typed_matrix就是一个基础的带数据格式的excel数据导出方案,mosaic_game在这个方案的基础上做了一下二次开发。首先是导出项目的配置,在data/xslx/export_config.json中我们使用json格式来指定哪些excel的哪些sheet需要导出的文件名是什么:
{
"files": {
"场景表": {
"场景表": "space.json",
"场景类型表": "space_type.json",
"初始场景表": "init_spaces.json"
},
"属性表": {
"玩家属性表": "sect_attrs.json",
"怪物属性表": "monster_attrs.json",
"全局属性表": "global_attrs.json"
},
}
}
上面的files字段就是每个单一sheet的导出列表。在mosaic_game的实际开发中发现,副本数据用这个列表来配置每个sheet有点繁琐。因为每个副本的目录结构和excel结构都一样,不同副本的导出配置只有其前缀不同:
qian@qian-desktop:~/Github/mosaic_game/data/xlsx/spaces$ ls ./s1
怪物表.xlsx 流程表.xlsx 陷阱表.xlsx
qian@qian-desktop:~/Github/mosaic_game/data/xlsx/spaces$ ls ./s2
怪物表.xlsx 流程表.xlsx 陷阱表.xlsx
qian@qian-desktop:~/Github/mosaic_game/data/xlsx/spaces$ ls ./s3
怪物表.xlsx 流程表.xlsx 陷阱表.xlsx
只是前缀不同的情况下每次都重复相同的配置是很无聊的,所以在export_config.json中,添加了folder字段,代表自动扫描目录下所有的子目录,将这些excel导出到带子目录前缀的文件夹中:
{
"folders": {
"spaces": {
"陷阱表": {
"陷阱表": "trap.json"
},
"怪物表": {
"怪物表": "monster.json"
},
"流程表": {
"流程表": "quest.json"
}
}
}
}
这样就可以自动创建子文件夹并做导出了:
qian@qian-desktop:~/Github/mosaic_game/data/export/xlsx/spaces$ ls ./s1
monster.json quest.json trap.json
qian@qian-desktop:~/Github/mosaic_game/data/export/xlsx/spaces$ ls ./s2
monster.json quest.json trap.json
qian@qian-desktop:~/Github/mosaic_game/data/export/xlsx/spaces$ ls ./s3
monster.json quest.json trap.json
然后为了加快导出速度,做了一下增量导出的功能,即记录每个导出json所依赖的excel的上次修改时间戳到export_timestamps.json中。
{"spaces/s1/怪物表":"2023_11_16_23_18_47","spaces/s1/流程表":"2023_11_16_23_18_47"}
导出某个json时查询对应的excel的最近修改时间戳,如果与这个export_timestamps.json中记录的时间戳不一样时才会去生成这个json。如果想触发全量导表则只需要清空这个时间戳文件里的内容即可。
导出的数据格式是json格式,其顶层为一个map,内部包含四个key:
{
"headers": [
[
"idx",
"类型",
"uint"
],
[
"hp_per_str",
"每点力量增长血量",
"float"
],
[
"mp_per_int",
"每点智力增长蓝量",
"float"
],
[
"armor_per_dex",
"护甲敏捷系数",
"float"
],
[
"base_magic_defence",
"基础魔法抗性",
"float"
]
],
"shared_json_table": [
null,
1,
20,
10,
0.4,
15
],
"extras" : [],
"row_matrix": [
[
1, // (idx, 1)
2, // (hp_per_str, 20)
3, // (mp_per_int, 10)
4, // (armor_per_dex, 0.4)
5 // (base_magic_defence, 15)
]
]
}
headers字段存储了导出数据的表头信息,这里又包括三个字符串值,按照顺序分别是表头英文名、表头中文名、表头格式typed_string_desc对应的字符串shared_json_table这里是一个数组,里面存储了整个sheet里所有cell导出的json值集合,其作用相当于之前提到的excel文件格式中的共享字符串表row_matrix这是一个二维数组,存储的是导出的matrix中每个cell对应的json值在shared_json_table中的索引。注意这里采用了带注释的json,这样就可以很方便的看出当前cell对应的表头英文名字和json值extras这个是用来支持手动编辑导出数据文件功能的,是一个数组,数组内每个元素都是(row_key, column_key, cell_value)这样的三元组,这个三元组用来覆盖原始的导出的数据值,其作用相当于rows[row_key].columns[column_key]=cell_value。使用extras字段可以在开发期方便的对导出数据进行改动,避免每次都要去修改对应的excel然后再重新导出,这样加快调试迭代速度。
游戏里的配置数据是很庞大的,全加载的话需要大量的CPU和内存资源,但是实际运行时只会访问其中很小的一部分。典型例子就是道具系统和时装系统,这些系统会有上百万行数据,但是一个角色自身只会有上百个道具和几十种时装,没必要将所有的数据都加载进来,所以一般来说配置表都是按需加载部分数据。在mosaic_game中为了执行按需加载,构造了一个typed_matrix_data_manager来提供按需加载的get接口
class typed_matrix_data_manager
{
private:
std::unordered_map<std::string, std::unique_ptr<const typed_matrix::typed_matrix>> m_datas;
public:
const std::string m_dir;
private:
typed_matrix_data_manager(const std::string& dir)
: m_dir(dir)
{
}
static typed_matrix_data_manager* m_the_instance;
public:
static bool init(const std::string& dir)
{
if(m_the_instance)
{
return false;
}
if(dir.empty())
{
return false;
}
m_the_instance = new typed_matrix_data_manager(dir);
return true;
}
static typed_matrix_data_manager* instance()
{
return m_the_instance;
}
const typed_matrix::typed_matrix* get(const std::string& name);
};
其数据成员m_datas就存储了所有已经加载的数据表,这里我们只把按需加载控制在表这个级别,并没有增加更加高级的缓存淘汰策略,因此数据表加载之后就不会卸载,只有进程彻底退出的时候通过std::unique_ptr<const typed_matrix::typed_matrix>来自动释放资源。
当业务代码要读取某张表时,直接根据数据表的路径从typed_matrix_data_manager::get得到typed_matrix,然后通过下面的两个接口来通过行对应的key来查询指定行的数据handler:
class typed_row
{
const typed_matrix* m_matrix;
std::uint16_t m_row_index;
friend class typed_matrix;
typed_row(const typed_matrix* matrix, std::uint16_t row_index);
};
typed_row get_row(const std::string& cur_row_key) const;
typed_row get_row(const std::uint32_t& cur_row_key) const;
由于整个typed_matrix的cell数据是以二维数组存在的,所以支持在得到了指定行之后,获取一个指定列的数据可以通过下面的两个接口:
const json& get_cell(typed_matrix::column_index column_idx) const;
const json& get_cell(const std::string& cur_column_key) const;
这里的column_index其实就是封装了一个不可变的uint16_t,这样通过(typed_row, column_index)可以快速定位到一个cell并获取其值。
class column_index
{
std::uint16_t m_value;
};
typed_matrix::column_index typed_row::get_column_idx(const std::string& cur_column_key) const
{
if (!m_matrix || !m_row_index)
{
return {};
}
else
{
return m_matrix->get_column_idx(cur_column_key);
}
}
const json& typed_row::get_cell(typed_matrix::column_index column_idx) const
{
static const json invalid_result;
if (!m_matrix)
{
return invalid_result;
}
return m_matrix->get_cell(*this, column_idx);
}
const json& typed_matrix::get_cell(const typed_row& row_idx, const typed_matrix::column_index col_idx) const
{
if (row_idx.m_matrix != this)
{
return m_cell_json_values[0];
}
if (row_idx.m_row_index == 0)
{
return m_cell_json_values[0];
}
if (!col_idx.valid())
{
return m_cell_json_values[0];
}
std::uint16_t cur_row_idx = row_idx.m_row_index - 1;
std::uint16_t cur_column_idx = col_idx.value() - 1;
if (cur_row_idx >= m_row_sz)
{
return m_cell_json_values[0];
}
if (cur_column_idx >= m_column_sz)
{
return m_cell_json_values[0];
}
return get_cell_safe(cur_row_idx, cur_column_idx);
}
而使用string作为参数的版本需要传入此列表头英文名字,再转换为column_index,所以执行时慢一点:
const json& typed_row::get_cell(const std::string& cur_column_key) const
{
static const json invalid_result;
if (!m_matrix)
{
return invalid_result;
}
return m_matrix->get_cell(*this, cur_column_key);
}
const json& typed_matrix::get_cell(const typed_row& row_idx, const std::string& cur_column_key) const
{
if (row_idx.m_matrix != this)
{
return m_cell_json_values[0];
}
if (row_idx.m_row_index == 0)
{
return m_cell_json_values[0];
}
auto cur_iter = m_column_indexes.find(cur_column_key);
if (cur_iter == m_column_indexes.end())
{
return m_cell_json_values[0];
}
std::uint16_t cur_row_idx = row_idx.m_row_index - 1;
std::uint16_t cur_column_idx = cur_iter->second;
if (cur_row_idx >= m_row_sz)
{
return m_cell_json_values[0];
}
return get_cell_safe(cur_row_idx, cur_column_idx);
}
如果只是读取单行的指定列的数据,这两个接口其实是等价的,因为column_index总归是要传入一个string来做查询。如果是遍历多行的指定列,则推荐先预先获取这个列对应的column_index,再执行行遍历时get_cell使用column_index的版本,这样可以避免在循环内重复执行column_index的计算。例如在场景初始化时需要遍历其中的怪物表monsters.json来创建怪物,这里使用monster_sysd_columns这样的结构来存储所需的列的column_index:
struct monster_sysd_columns
{
typed_matrix::typed_matrix::column_index spawn;
typed_matrix::typed_matrix::column_index pos;
typed_matrix::typed_matrix::column_index sid;
typed_matrix::typed_matrix::column_index yaw;
typed_matrix::typed_matrix::column_index no;
typed_matrix::typed_matrix::column_index name;
bool valid() const
{
return spawn.valid() && pos.valid() && sid.valid() && no.valid() && name.valid() && yaw.valid();
}
bool load(const typed_matrix::typed_matrix* cur_monster_sysd)
{
spawn = cur_monster_sysd->get_column_idx("spawn_type");
pos = cur_monster_sysd->get_column_idx("pos");
no = cur_monster_sysd->get_column_idx("no");
sid = cur_monster_sysd->get_column_idx("sid");
yaw = cur_monster_sysd->get_column_idx("yaw");
name = cur_monster_sysd->get_column_idx("name");
}
};
业务逻辑中所期待的数据是强类型的,获取了json之后业务方还需要自己去做检查和转换,会出现很多重复的代码,因此typed_row上提供了一些很方便的强类型数据获取接口:
template <typename T>
bool expect_value(const std::string& key, T& dest)
{
auto cur_cell_v = get_cell(key);
if (cur_cell_v.is_null())
{
return false;
}
return serialize::decode(cur_cell_v, dest);
}
template <typename T>
bool expect_value(typed_matrix::column_index col_idx, T& dest)
{
auto cur_cell_v = get_cell(col_idx);
if (cur_cell_v.is_null())
{
return false;
}
return serialize::decode(cur_cell_v, dest);
}
这里的serialize::decode又复用了我们之前提到的自己写的方形轮子any_container,这个库提供了任意基础类型和STL类型到Json格式的互相转换。
Unreal Engine 的数据表
UE数据表的编辑
UE由于有自己实现一切的理念,所以其并没有使用Excel来作为数据表格编辑工具,而是自己实现了一套更加贴合其UObject系统的数据表系统,包括编辑器、运行时、导入导出工具。下图就是其编辑界面:
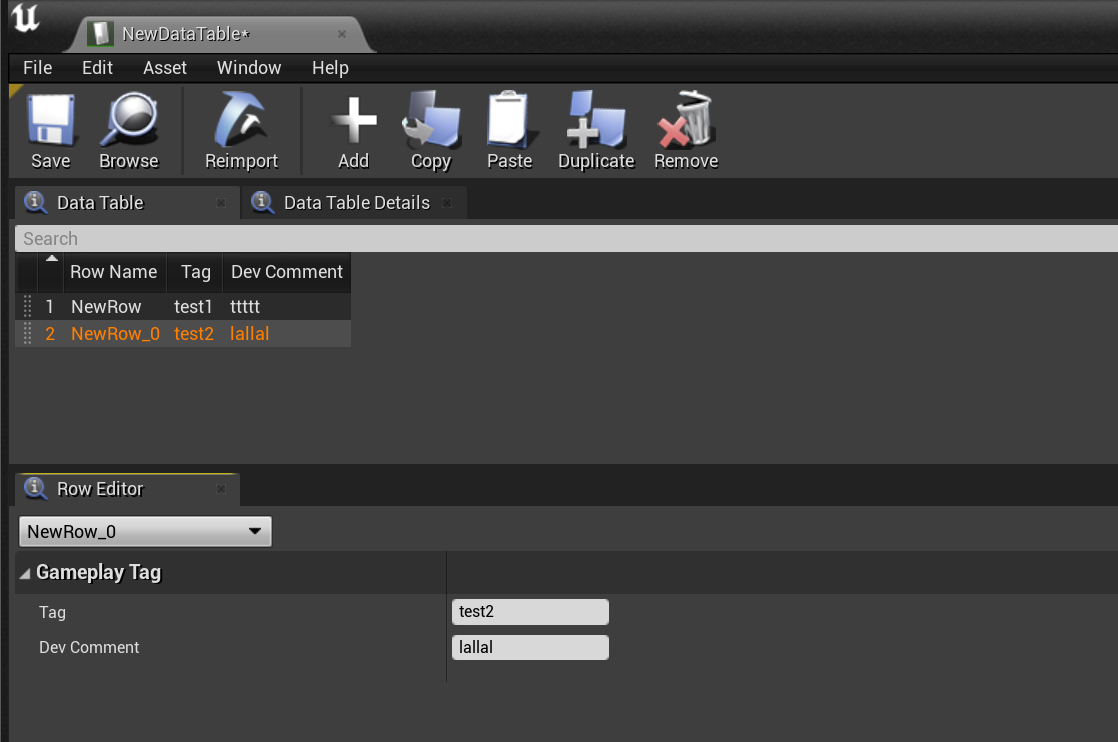
可以看出这里实现了非常基本的行数据编辑系统,提供了新建、复制、粘贴、删除等基本操作。每一个数据表都是UDataTable类型,为了明确其存储的内容以及方便强类型的数据读写,其创建时需要指定当前数据表所选用的行定义是什么:
这些类型可以通过蓝图创建一个Struct,不过更推荐直接在cpp代码中创建数据行的定义,下面就是引擎中实际使用的FGameplayTagTableRow的定义:
/** Simple struct for a table row in the gameplay tag table and element in the ini list */
USTRUCT()
struct FGameplayTagTableRow : public FTableRowBase
{
GENERATED_USTRUCT_BODY()
/** Tag specified in the table */
UPROPERTY(EditAnywhere, BlueprintReadOnly, Category=GameplayTag)
FName Tag;
/** Developer comment clarifying the usage of a particular tag, not user facing */
UPROPERTY(EditAnywhere, BlueprintReadOnly, Category=GameplayTag)
FString DevComment;
};
每个数据行类型都需要继承自FTableRowBase,然后在结构体内部通过定义一系列的UPROPERTY来给出当前行中所需要的每一列的数据类型和访问所使用的名字。注意这里的行定义不需要指定作为行索引的key字段,因为UDataTable会自动的给每一行增加一个Name字段,也就是前面的编辑器图中的Row Name所展示的列。只有这个Row Name列的数据才会作为索引存在,使用者可以自由的编辑每一行的Row Name。
然后UE里除了支持整数、字符串、浮点数、布尔等基础类型之外,也支持了FVector,TArray等复合类型,这部分的功能基本对齐了常规的各种数据配置解决方案。为了与UObject联系更加紧密,他还支持了各种资产类型,例如动画、声音等,下面的类型定义中就提供了一个成就图标作为等级数据的其中一个字段:
/** Structure that defines a level up table entry */
USTRUCT(BlueprintType)
struct FLevelUpData : public FTableRowBase
{
GENERATED_USTRUCT_BODY()
public:
FLevelUpData()
: XPtoLvl(0)
, AdditionalHP(0)
{}
/** The 'Name' column is the same as the XP Level */
/** XP to get to the given level from the previous level */
UPROPERTY(EditAnywhere, BlueprintReadWrite, Category=LevelUp)
int32 XPtoLvl;
/** Extra HitPoints gained at this level */
UPROPERTY(EditAnywhere, BlueprintReadWrite, Category=LevelUp)
int32 AdditionalHP;
/** Icon to use for Achivement */
UPROPERTY(EditAnywhere, BlueprintReadWrite, Category=LevelUp)
TSoftObjectPtr<UTexture> AchievementIcon;
};
注意这里并没有直接使用UTexture*而是使用TSoftObjectPtr<UTexture>,因为直接使用UTexture*会导致加载这个数据表的时候递归的把内部直接引用的这些UTexture字段一并同步加载,这样会导致主线程卡顿。所以这里使用TSoftObjectPtr<UTexture>作为对应资源的软引用,运行时使用这行数据里的AchievementIcon时,只需要执行AchievementIcon->LoadSynchronous()即可按需的进行单一资源的加载,这样就避免了同步加载太多不需要的资源,优化了执行时间。
UE数据表的导入与导出
从前面的编辑器截图可以看出,这个编辑器相对于excel来说还是太简陋了,尤其是对大量数据进行编辑和条件化查询的时候。因此UE也妥协了一点,支持了数据表与csv/json这两种文本格式的互相转换:
/** Output entire contents of table as CSV */
ENGINE_API FString GetTableAsCSV(const EDataTableExportFlags InDTExportFlags = EDataTableExportFlags::None) const;
/** Output entire contents of table as JSON */
ENGINE_API FString GetTableAsJSON(const EDataTableExportFlags InDTExportFlags = EDataTableExportFlags::None) const;
/**
* Create table from CSV style comma-separated string.
* RowStruct must be defined before calling this function.
* @return Set of problems encountered while processing input
*/
ENGINE_API TArray<FString> CreateTableFromCSVString(const FString& InString);
/**
* Create table from JSON style string.
* RowStruct must be defined before calling this function.
* @return Set of problems encountered while processing input
*/
ENGINE_API TArray<FString> CreateTableFromJSONString(const FString& InString);
我们来对前面贴出的两行数据做转换,只需要在这个资产上右键,顶部就会出现导出菜单:
当转换为csv格式时,第一行作为列名,第一列作为索引列,样例内容如下:
---,Tag,DevComment
NewRow,"test1","ttttt"
NewRow_0,"test2","lallal"
当转换为json时,输出为一个数组,数组中以JsonObject的形式来存储一行数据,其中Name字段存储当前行索引,样例内容如下:
[
{
"Name": "NewRow",
"Tag": "test1",
"DevComment": "ttttt"
},
{
"Name": "NewRow_0",
"Tag": "test2",
"DevComment": "lallal"
}
]
对于基础类型和数组类型的字段可以很简单的映射到文本值或者Json值,如果是字段是资产或者资产的软引用的话,这里会转换为对应的资产引用路径。
打开一个指定的数据表资产之后,可以使用其中的导入按钮来从csv/json更新数据:

当导入成功之后,上面的Source File里会记录上次导入的源文件是什么,以方便快速的重新导入。
UE数据表的序列化与反序列化
UDataTable的结构其实很简单,其中的数据字段其实很少,一般情况下只需要考虑这几个数据成员即可:
class UDataTable
: public UObject
{
/** Structure to use for each row of the table, must inherit from FTableRowBase */
UPROPERTY(VisibleAnywhere, Category=DataTable, meta=(DisplayThumbnail="false"))
UScriptStruct* RowStruct;
/** Map of name of row to row data structure. */
TMap<FName, uint8*> RowMap;
/** Set to true to not cook this data table into client builds. Useful for sensitive tables that only servers should know about. */
UPROPERTY(EditAnywhere, Category=DataTable)
uint8 bStripFromClientBuilds : 1;
/** Set to true to ignore extra fields in the import data, if false it will warn about them */
UPROPERTY(EditAnywhere, Category=ImportOptions)
uint8 bIgnoreExtraFields : 1;
/** Set to true to ignore any fields that are expected but missing, if false it will warn about them */
UPROPERTY(EditAnywhere, Category = ImportOptions)
uint8 bIgnoreMissingFields : 1;
/** Explicit field in import data to use as key. If this is empty it uses Name for JSON and the first field found for CSV */
UPROPERTY(EditAnywhere, Category=ImportOptions)
FString ImportKeyField;
}
这里的RowStruct存储的是当前数据表的行结构体信息,后续的三个布尔值用来控制一些杂项,我们这里就先忽略,ImportKeyField存储的是与外部数据文件进行导入导出时每一行的索引值。真正存储数据的位置在RowMap中,但是这个字段并没有被UProperty标记,无法参与默认的UClass的序列化反序列化,所以UDataTable在序列化反序列化时,先使用UClass默认的序列化函数来处理这些被UProperty包裹的数据字段,然后再单独处理RowMap字段:
void UDataTable::Serialize(FStructuredArchiveRecord Record)
{
FArchive& BaseArchive = Record.GetUnderlyingArchive();
#if WITH_EDITORONLY_DATA
// Make sure and update RowStructName before calling the parent Serialize (which will save the properties)
if (BaseArchive.IsSaving() && RowStruct)
{
RowStructName = RowStruct->GetFName();
}
#endif // WITH_EDITORONLY_DATA
Super::Serialize(Record); // When loading, this should load our RowStruct!
if (RowStruct && RowStruct->HasAnyFlags(RF_NeedLoad))
{
auto RowStructLinker = RowStruct->GetLinker();
if (RowStructLinker)
{
RowStructLinker->Preload(RowStruct);
}
}
if(BaseArchive.IsLoading())
{
DATATABLE_CHANGE_SCOPE();
EmptyTable();
LoadStructData(Record.EnterField(SA_FIELD_NAME(TEXT("Data"))));
}
else if(BaseArchive.IsSaving())
{
SaveStructData(Record.EnterField(SA_FIELD_NAME(TEXT("Data"))));
}
}
由于LoadStructData与SaveStructData是一个互逆的关系,所以我们这里只看SaveStructData,按照正常逻辑大家应该可以猜到就是遍历每一行,然后遍历行结构体里的每个UProperty字段,进行写入,其代码也的确是这样写的:
void UDataTable::SaveStructData(FStructuredArchiveSlot Slot)
{
UScriptStruct* SaveUsingStruct = RowStruct;
if (!SaveUsingStruct)
{
if (!HasAnyFlags(RF_ClassDefaultObject) && GetOutermost() != GetTransientPackage())
{
UE_LOG(LogDataTable, Error, TEXT("Missing RowStruct while saving DataTable '%s'!"), *GetPathName());
}
SaveUsingStruct = FTableRowBase::StaticStruct();
}
int32 NumRows = RowMap.Num();
FStructuredArchiveArray Array = Slot.EnterArray(NumRows);
// Now iterate over rows in the map
for (auto RowIt = RowMap.CreateIterator(); RowIt; ++RowIt)
{
// Save out name
FName RowName = RowIt.Key();
FStructuredArchiveRecord Row = Array.EnterElement().EnterRecord();
Row << SA_VALUE(TEXT("Name"), RowName);
// Save out data
uint8* RowData = RowIt.Value();
SaveUsingStruct->SerializeItem(Row.EnterField(SA_FIELD_NAME(TEXT("Value"))), RowData, nullptr);
}
}
最后的SaveUsingStruct->SerializeItem就是遍历所有属性字段的流程,对于表格的行结构体来说,最终会执行下面的函数调用:
SerializeTaggedProperties(Slot, (uint8*)Value, this, (uint8*)Defaults);
// ==>
SerializeVersionedTaggedProperties(Slot, Data, DefaultsStruct, Defaults, BreakRecursionIfFullyLoad);
// ==>
最后的函数里会有一个循环来遍历所有的属性来进行写入,下面的就是负责写入一个Property的部分,重点看PropertySlot的相关操作:
uint8* DataPtr = Property->ContainerPtrToValuePtr <uint8>(Data, Idx);
uint8* DefaultValue = Property->ContainerPtrToValuePtrForDefaults<uint8>(DefaultsStruct, Defaults, Idx);
if (StaticArrayContainer.IsSet() || CustomPropertyNode || !UnderlyingArchive.DoDelta() || UnderlyingArchive.IsTransacting() || (!Defaults && !dynamic_cast<const UClass*>(this)) || !Property->Identical(DataPtr, DefaultValue, UnderlyingArchive.GetPortFlags()))
{
if (bUseAtomicSerialization)
{
DefaultValue = NULL;
}
TestCollector.RecordSavedProperty(Property);
FPropertyTag Tag( UnderlyingArchive, Property, Idx, DataPtr, DefaultValue );
// If available use the property guid from BlueprintGeneratedClasses, provided we aren't cooking data.
if (bArePropertyGuidsAvailable && !UnderlyingArchive.IsCooking())
{
const FGuid PropertyGuid = FindPropertyGuidFromName(Tag.Name);
Tag.SetPropertyGuid(PropertyGuid);
}
TStringBuilder<256> TagName;
Tag.Name.ToString(TagName);
FStructuredArchive::FSlot PropertySlot = StaticArrayContainer.IsSet() ? StaticArrayContainer->EnterElement() : PropertiesRecord.EnterField(SA_FIELD_NAME(TagName.ToString()));
PropertySlot << Tag;
// need to know how much data this call to SerializeTaggedProperty consumes, so mark where we are
int64 DataOffset = UnderlyingArchive.Tell();
// if using it, save the current custom property list and switch to its sub property list (in case of UStruct serialization)
const FCustomPropertyListNode* SavedCustomPropertyList = nullptr;
if (UnderlyingArchive.ArUseCustomPropertyList && CustomPropertyNode)
{
SavedCustomPropertyList = UnderlyingArchive.ArCustomPropertyList;
UnderlyingArchive.ArCustomPropertyList = CustomPropertyNode->SubPropertyList;
}
Tag.SerializeTaggedProperty(PropertySlot, Property, DataPtr, DefaultValue);
// 省略一下后续代码
}
最后的SerializeTaggedProperty会调用到Property->SerializeItem(Slot, Value, Defaults);,这里负责真正的单一属性对应的值写入到Archive中,在写入这个Archive之前会先执行PropertiesRecord.EnterField(SA_FIELD_NAME(TagName.ToString()))将这个属性的名字先写入。从这一小段流程代码可以看出整个行结构体的序列化其实在以JsonObject类似的形式递归的写入整个行。不过这里相对于JsonObject来说有一个非常低效的地方在于每个属性字段在序列化时都要执行PropertySlot << Tag,这个调用就是在写入当前属性的元信息:
void operator<<(FStructuredArchive::FSlot Slot, FPropertyTag& Tag)
{
FArchive& UnderlyingArchive = Slot.GetUnderlyingArchive();
bool bIsTextFormat = UnderlyingArchive.IsTextFormat();
int32 Version = UnderlyingArchive.UE4Ver();
check(!UnderlyingArchive.GetArchiveState().UseUnversionedPropertySerialization());
checkf(!UnderlyingArchive.IsSaving() || Tag.Prop, TEXT("FPropertyTag must be constructed with a valid property when used for saving data!"));
if (!bIsTextFormat)
{
// Name.
Slot << SA_ATTRIBUTE(TEXT("Name"), Tag.Name);
if (Tag.Name.IsNone())
{
return;
}
}
Slot << SA_ATTRIBUTE(TEXT("Type"), Tag.Type);
// 省略一些代码
if (!bIsTextFormat)
{
FArchive::FScopeSetDebugSerializationFlags S(UnderlyingArchive, DSF_IgnoreDiff);
Slot << SA_ATTRIBUTE(TEXT("Size"), Tag.Size);
Slot << SA_ATTRIBUTE(TEXT("ArrayIndex"), Tag.ArrayIndex);
}
FNameEntryId TagType = Tag.Type.GetComparisonIndex();
if (Tag.Type.GetNumber() == 0)
{
// only need to serialize this for structs
if (TagType == NAME_StructProperty)
{
Slot << SA_ATTRIBUTE(TEXT("StructName"), Tag.StructName);
if (Version >= VER_UE4_STRUCT_GUID_IN_PROPERTY_TAG)
{
if (bIsTextFormat)
{
Slot << SA_OPTIONAL_ATTRIBUTE(TEXT("StructGuid"), Tag.StructGuid, FGuid());
}
else
{
Slot << SA_ATTRIBUTE(TEXT("StructGuid"), Tag.StructGuid);
}
}
}
// only need to serialize this for bools
else if (TagType == NAME_BoolProperty && !UnderlyingArchive.IsTextFormat())
{
if (UnderlyingArchive.IsSaving())
{
FSerializedPropertyScope SerializedProperty(UnderlyingArchive, Tag.Prop);
Slot << SA_ATTRIBUTE(TEXT("BoolVal"), Tag.BoolVal);
}
else
{
Slot << SA_ATTRIBUTE(TEXT("BoolVal"), Tag.BoolVal);
}
}
// 省略其他的分支判断
}
}
可以看出,在这个调用中,属性的名字、类型、数组维度、默认值等信息都会写一遍,这样的序列化方法对于UDataTable来说是极大的浪费的,因为他每一行数据这些字段都是一样的。最优的方法应该是UDataTable开头只写一次,然后每行数据只写真正的数据,忽略属性元信息。
此外UDataTable这样的序列化规则在处理稀疏数据表的时候会把与默认值相等的属性也写入,因为其调用每一行的结构体序列化时最后一个代表默认值的参数传入的是nullptr:
SaveUsingStruct->SerializeItem(Row.EnterField(SA_FIELD_NAME(TEXT("Value"))), RowData, nullptr)
void UScriptStruct::SerializeItem(FStructuredArchive::FSlot Slot, void* Value, void const* Defaults);
如果传入的是一个默认构造的行结构体的话就可以避免这些默认值的写入。
UDataTable在从文件加载的时候,执行LoadStructData来遍历之前序列化出来的Array,Array中的每个元素都对应一行数据:
void UDataTable::LoadStructData(FStructuredArchiveSlot Slot)
{
UScriptStruct* LoadUsingStruct = RowStruct;
if (!LoadUsingStruct)
{
if (!HasAnyFlags(RF_ClassDefaultObject) && GetOutermost() != GetTransientPackage())
{
UE_LOG(LogDataTable, Error, TEXT("Missing RowStruct while loading DataTable '%s'!"), *GetPathName());
}
LoadUsingStruct = FTableRowBase::StaticStruct();
}
int32 NumRows;
FStructuredArchiveArray Array = Slot.EnterArray(NumRows);
DATATABLE_CHANGE_SCOPE();
RowMap.Reserve(NumRows);
for (int32 RowIdx = 0; RowIdx < NumRows; RowIdx++)
{
FStructuredArchiveRecord RowRecord = Array.EnterElement().EnterRecord();
// Load row name
FName RowName;
RowRecord << SA_VALUE(TEXT("Name"), RowName);
// Load row data
uint8* RowData = (uint8*)FMemory::Malloc(LoadUsingStruct->GetStructureSize());
// And be sure to call DestroyScriptStruct later
LoadUsingStruct->InitializeStruct(RowData);
LoadUsingStruct->SerializeItem(RowRecord.EnterField(SA_FIELD_NAME(TEXT("Value"))), RowData, nullptr);
// Add to map
RowMap.Add(RowName, RowData);
}
}
上面代码中的FMemory::Malloc就是动态内存分配的调用,加载一行时首先使用InitializeStruct来初始化为行结构体的默认值,然后再使用SerializeItem来遍历当前行结构体里的所有UProperty并执行反序列化,从而来填充当前行里的所有列。对于每一行数据都会触发一次动态内存分配的加载模式其实挺浪费资源的,对于数据量比较大的UDataTable来说很容易就出现加载时的性能瓶颈。对于最终打包好的游戏而言,UDataTable基本就是一个只读对象,所以可以尝试将这里的按行分配切换为提前分配一个包含所有行所需内存的大内存块来避免动态内存分配。
在这些因素的作用下,面对超过上万行的数据表,UDataTable的序列化反序列化会出现比较明显的性能瓶颈。如果想优化的话可以尝试从上面的分析结论入手。
UE数据表的查询
将每一行反序列化完成之后,所有行数据会存储在内部的一个TMap中,对外暴露的查询接口都是对这个TMap的一个封装:
TMap<FName, uint8*> RowMap;
template <class T>
void GetAllRows(const TCHAR* ContextString, OUT TArray<T*>& OutRowArray) const;
template <class T>
void GetAllRows(const FString& ContextString, OUT TArray<T*>& OutRowArray) const;
/** Function to find the row of a table given its name. */
template <class T>
T* FindRow(FName RowName, const TCHAR* ContextString, bool bWarnIfRowMissing = true) const;
/** Perform some operation for every row. */
template <class T>
void ForeachRow(const TCHAR* ContextString, TFunctionRef<void (const FName& Key, const T& Value)> Predicate) const;
这里的查询使用的Key类型是FName类型,并不是平常我们使用的FString类型。在UE官方文档介绍FName时,提到了FName在进行比较和查询时相对于FString有很大的优势。这里我们来深入的了解一下这样的优势来源,首先来查看一下这个FName的类型定义:
/** Index into the Names array (used to find String portion of the string/number pair used for comparison) */
FNameEntryId ComparisonIndex;
#if WITH_CASE_PRESERVING_NAME
/** Index into the Names array (used to find String portion of the string/number pair used for display) */
FNameEntryId DisplayIndex;
#endif // WITH_CASE_PRESERVING_NAME
/** Number portion of the string/number pair (stored internally as 1 more than actual, so zero'd memory will be the default, no-instance case) */
uint32 Number;
其实FName的数据成员只有这三个,其中的DisplayIndex还只有在开启了WITH_CASE_PRESERVING_NAME这个大小写敏感宏的时候才会启用,而FNameEntryId其实只是对一个只读的uint32的封装,所以默认情况下这个结构体只有8字节大小。那这两个字段是如何代表一个字符串的呢,这就需要查看这个类型的构造函数,其构造函数有很多不过都大同小易,我们来查看其从转换到FString的函数:
#define NAME_NO_NUMBER_INTERNAL 0
/** Conversion routines between external representations and internal */
#define NAME_INTERNAL_TO_EXTERNAL(x) (x - 1)
#define NAME_EXTERNAL_TO_INTERNAL(x) (x + 1)
void FName::ToString(FString& Out) const
{
// A version of ToString that saves at least one string copy
const FNameEntry* const NameEntry = GetDisplayNameEntry();
if (GetNumber() == NAME_NO_NUMBER_INTERNAL)
{
Out.Empty(NameEntry->GetNameLength());
NameEntry->AppendNameToString(Out);
}
else
{
Out.Empty(NameEntry->GetNameLength() + 6);
NameEntry->AppendNameToString(Out);
Out += TEXT('_');
Out.AppendInt(NAME_INTERNAL_TO_EXTERNAL(GetNumber()));
}
}
从这个函数的实现可以看出,FName主要针对的是AAA_BBB类型的字符串,其中BBB代表的是一个非负整数。而这种字符串格式又是UE默认的相似资产命名格式,这样的将末尾的数字拆出的设计相当于在UE的环境下的专属优化。注意上面代码中列出来的宏,表明如果代表的字符串并没有数字后缀,则其Number=0,否则Number=BBB+1,所以FName是可以用于无数字后缀的字符串的,ComparisonIndex就代表了除掉可能的数字后缀的字符串。
ComparisonIndex作为一个对uint32的封装,是无法通过自身来表示一个完整的字符串的,其作用是充当一个全局常量字符串池中的字符串索引。为了确保FName相等时对应的字符串也相等,不等时对应的字符串也不等,需要这个全局常量字符串池对于同一个字符串产生一个唯一的uint32:
static FName Make(FNameStringView View, EFindName FindType, int32 InternalNumber)
{
FNamePool& Pool = GetNamePool();
FNameEntryId DisplayId, ComparisonId;
if (FindType == FNAME_Add)
{
DisplayId = Pool.Store(View);
#if WITH_CASE_PRESERVING_NAME
ComparisonId = Pool.Resolve(DisplayId).ComparisonId;
#else
ComparisonId = DisplayId;
#endif
}
else if (FindType == FNAME_Find)
{
DisplayId = Pool.Find(View);
#if WITH_CASE_PRESERVING_NAME
ComparisonId = DisplayId ? Pool.Resolve(DisplayId).ComparisonId : DisplayId;
#else
ComparisonId = DisplayId;
#endif
}
else
{
check(FindType == FNAME_Replace_Not_Safe_For_Threading);
#if FNAME_WRITE_PROTECT_PAGES
checkf(false, TEXT("FNAME_Replace_Not_Safe_For_Threading can't be used together with page protection."));
#endif
DisplayId = Pool.Store(View);
#if WITH_CASE_PRESERVING_NAME
ComparisonId = Pool.Resolve(DisplayId).ComparisonId;
#else
ComparisonId = DisplayId;
#endif
ReplaceName(Pool.Resolve(ComparisonId), View);
}
return FName(ComparisonId, DisplayId, InternalNumber);
}
从上面的FName创建接口可以看出FNamePool& Pool = GetNamePool();这里的Pool就是设计中的全局常量字符串表,DisplayId = Pool.Store(View)返回的就是传入字符串对应的uint32索引:
FNameEntryId FNamePool::Store(FNameStringView Name)
{
#if WITH_CASE_PRESERVING_NAME
FNameDisplayValue DisplayValue(Name);
if (FNameEntryId Existing = DisplayShards[DisplayValue.Hash.ShardIndex].Find(DisplayValue))
{
return Existing;
}
#endif
bool bAdded = false;
// Insert comparison name first since display value must contain comparison name
FNameComparisonValue ComparisonValue(Name);
FNameEntryId ComparisonId = ComparisonShards[ComparisonValue.Hash.ShardIndex].Insert(ComparisonValue, bAdded);
#if WITH_CASE_PRESERVING_NAME
DisplayValue.ComparisonId = ComparisonId;
return StoreValue(DisplayValue, bAdded);
#else
return ComparisonId;
#endif
}
这里的FNameComparisonValue构造的时候会计算出当前传入字符串的Hash,以这个Hash的分片索引去选择ComparisonShards数组中其中一个来进行寻找和插入,并构造出一个FNameEntryId进行返回。这里的Hash计算有一个非常重要的特性,即其忽略了字符串的大小写,计算时会将大写字母全都转换为小写字母来然后调用Google发明的面向短字符串优化的CityHash64来计算hash:
template<class CharType>
static uint64 GenerateHash(const CharType* Str, int32 Len)
{
return CityHash64(reinterpret_cast<const char*>(Str), Len * sizeof(CharType));
}
template<class CharType>
FNameHash(const CharType* Str, int32 Len)
: FNameHash(Str, Len, GenerateHash(Str, Len))
{}
template<class CharType>
FORCENOINLINE FNameHash HashLowerCase(const CharType* Str, uint32 Len)
{
CharType LowerStr[NAME_SIZE];
for (uint32 I = 0; I < Len; ++I)
{
LowerStr[I] = TChar<CharType>::ToLower(Str[I]);
}
return FNameHash(LowerStr, Len);
}
template<>
FNameHash HashName<ENameCase::IgnoreCase>(FNameStringView Name)
{
return Name.IsAnsi() ? HashLowerCase(Name.Ansi, Name.Len) : HashLowerCase(Name.Wide, Name.Len);
}
template<ENameCase Sensitivity>
struct FNameValue
{
explicit FNameValue(FNameStringView InName)
: Name(InName)
, Hash(HashName<Sensitivity>(InName))
{}
FNameValue(FNameStringView InName, FNameHash InHash)
: Name(InName)
, Hash(InHash)
{}
FNameValue(FNameStringView InName, uint64 InHash)
: Name(InName)
, Hash(Name.bIsWide ? FNameHash(Name.Wide, Name.Len, InHash) : FNameHash(Name.Ansi, Name.Len, InHash))
{}
FNameStringView Name;
FNameHash Hash;
#if WITH_CASE_PRESERVING_NAME
FNameEntryId ComparisonId;
#endif
};
using FNameComparisonValue = FNameValue<ENameCase::IgnoreCase>;
由于这个Hash是忽略了大小写的,所以整个FName都是一个忽略了大小写的字符串索引,使用FName要特别注意其大小写不敏感的特点,极其容易引发各种bug。
同时由于FName是忽略大小写的,所以ComparisonShards.Insert接口来进行字符串相等判定时也是忽略大小写的:
FNamePoolShard<ENameCase::IgnoreCase> ComparisonShards[FNamePoolShards];
template<ENameCase Sensitivity>
class FNamePoolShard : public FNamePoolShardBase
{
public:
FNameEntryId Find(const FNameValue<Sensitivity>& Value) const
{
FRWScopeLock _(Lock, FRWScopeLockType::SLT_ReadOnly);
return Probe(Value).GetId();
}
template<class ScopeLock = FWriteScopeLock>
FORCEINLINE FNameEntryId Insert(const FNameValue<Sensitivity>& Value, bool& bCreatedNewEntry)
{
ScopeLock _(Lock);
FNameSlot& Slot = Probe(Value);
if (Slot.Used())
{
return Slot.GetId();
}
bCreatedNewEntry = true;
return CreateAndInsertEntry<ScopeLock>(Slot, Value);
}
/** Find slot containing value or the first free slot that should be used to store it */
FORCEINLINE FNameSlot& Probe(const FNameValue<Sensitivity>& Value) const
{
return Probe(Value.Hash.UnmaskedSlotIndex,
[&](FNameSlot Slot) { return Slot.GetProbeHash() == Value.Hash.SlotProbeHash &&
EntryEqualsValue<Sensitivity>(Entries->Resolve(Slot.GetId()), Value); });
}
/** Find slot that fulfills predicate or the first free slot */
template<class PredicateFn>
FORCEINLINE FNameSlot& Probe(uint32 UnmaskedSlotIndex, PredicateFn Predicate) const
{
const uint32 Mask = CapacityMask;
for (uint32 I = FNameHash::GetProbeStart(UnmaskedSlotIndex, Mask); true; I = (I + 1) & Mask)
{
FNameSlot& Slot = Slots[I];
if (!Slot.Used() || Predicate(Slot))
{
return Slot;
}
}
}
}
上面的代码逻辑就相当于把FNamePoolShard当作一个开放寻址的Hash表来使用,这里执行字符串相等判定的地方在EntryEqualsValue中:
template<ENameCase Sensitivity>
FORCEINLINE bool EqualsSameDimensions(FNameStringView A, FNameStringView B)
{
checkSlow(A.Len == B.Len && A.IsAnsi() == B.IsAnsi());
int32 Len = A.Len;
if (Sensitivity == ENameCase::CaseSensitive)
{
return B.IsAnsi() ? !FPlatformString::Strncmp(A.Ansi, B.Ansi, Len) : !FPlatformString::Strncmp(A.Wide, B.Wide, Len);
}
else
{
return B.IsAnsi() ? !FPlatformString::Strnicmp(A.Ansi, B.Ansi, Len) : !FPlatformString::Strnicmp(A.Wide, B.Wide, Len);
}
}
虽然在判定相等和计算Hash的时候都使用了大写向小写转换,期间并没有修改原始字符串,特别是在计算Hash时生成一个临时字符串来辅助计算。当最终插入字符串的时候,插入进去的仍然是最开始传入的字符串:
void FNameEntry::StoreName(const ANSICHAR* InName, uint32 Len)
{
FPlatformMemory::Memcpy(AnsiName, InName, sizeof(ANSICHAR) * Len);
Encode(AnsiName, Len);
}
void FNameEntry::StoreName(const WIDECHAR* InName, uint32 Len)
{
FPlatformMemory::Memcpy(WideName, InName, sizeof(WIDECHAR) * Len);
Encode(WideName, Len);
}
template<class ScopeLock>
FNameEntryHandle FNameEntryAllocator::Create(FNameStringView Name, TOptional<FNameEntryId> ComparisonId, FNameEntryHeader Header)
{
FPlatformMisc::Prefetch(Blocks[CurrentBlock]);
FNameEntryHandle Handle = Allocate<ScopeLock>(FNameEntry::GetDataOffset() + Name.BytesWithoutTerminator());
FNameEntry& Entry = Resolve(Handle);
#if WITH_CASE_PRESERVING_NAME
Entry.ComparisonId = ComparisonId.IsSet() ? ComparisonId.GetValue() : FNameEntryId(Handle);
#endif
Entry.Header = Header;
if (Name.bIsWide)
{
Entry.StoreName(Name.Wide, Name.Len);
}
else
{
Entry.StoreName(Name.Ansi, Name.Len);
}
return Handle;
}
所以将一个FName转换到字符串时,其输出的内容又保留了最开始第一次插入时的大小写,即如果先以字符串AAA构造好了一个FName之后, 字符串aaa构造的FName就会等于AAA对应的FName,但是这个FName输出的字符串又会变成AAA。
总体看下来这个FName对于TMap的查询加速主要由这几点机制贡献的:
FName的大小很小,在以值进行传递时不会引入复制损耗,如果用FString做值传递则会触发动态内存分配FName的创建里计算Hash使用了非常快的CityHash,然后比较相等的时候只需要比较id即可,不需要不需要执行FString的逐字节计算FName将前缀与数字后缀分离的设计更适合来做UE的路径唯一标识符
不过这些优势的前提是查询时传入的FString已经转化为了FName。如果将FString转换为FName的时间考虑进去的话,在没有数字后缀的字符串上可能没啥优势,因为创建FName的时候内部会有加锁。虽然使用了一个比较大的预分配ComparisonShards数组来避免使用一个唯一的全局锁,但是在没有冲突的情况下执行锁操作还是会有一定损耗的。知乎上的网友freestriker在FName的基础上做了一个简化版的全局字符串池,有兴趣的同志们可以去参考一下其简化实现InternedString
Unreal Engine 的 config 系统
前述的UDataTable主要是用来处理固定格式的批量数据,面对一些全局唯一配置的时候使用这个UDataTable系统就过于重度,且效率低下。面对这种全局唯一配置的需求,UE提供了配置文件来更方便的进行这些全局唯一数据的设定。
配置文件(Configuration Files或Config Files)提供 虚幻引擎(UE) 的初始设置。 在最基本的层面上,配置文件包含若干键/值对的列表,这些键/值对还组织为不同的分段。 这些文件用于为所有版本和平台设置在虚幻引擎启动时加载的对象和属性的默认值。 配置文件使用 .ini 文件扩展名, 其文件内语法结构如下:
[SECTION1]
<KEY1>=<VALUE1>
<KEY2>=<VALUE2>
[SECTION2]
<KEY3>=<VALUE3>
每个配置变量必须属于一个 [SECTION],并且必须包含 KEY 且后跟 = 符号。 例如,在 BaseEngine.ini 中:
[Core.Log]
LogTemp=warning
分段名称为字母字符串,可以将其设置为任何值。 无论项目代码中是否存在配置变量,配置系统都会加载配置文件中的所有声明。模块中包含的可配置对象的分段标题使用以下语法:
[/Script/ModuleName.ClassName]
其中:ModuleName代表包含可配置对象的模块的名称。ClassName代表ModuleName模块中包含可配置对象的类的名称。插件中的配置也是相同的,只不过需要将ModuleName替换为PluginName。
在配置文件中的Value可以有四种类型:字符串,数字,数组,结构体。这四种类型的表示方式可以参考官方文档。
然后配置文件是有优先级的,同一个配置项在不同优先级的文件中出现时,使用最高优先级的配置文件里设置的值。完整的优先级从低到高排列如下:
Engine/Config/Base.ini
Engine/Config/Base<CATEGORY>.ini
Engine/Config/<PLATFORM>/Base<PLATFORM><CATEGORY>.ini
Engine/Platforms/<PLATFORM>/Config/Base<PLATFORM><CATEGORY>.ini
<PROJECT_DIRECTORY>/Config/Default<CATEGORY>.ini
Engine/Config/<PLATFORM>/<PLATFORM><CATEGORY>.ini
Engine/Platforms/<PLATFORM>/Config/<PLATFORM><CATEGORY>.ini
<PROJECT_DIRECTORY>/Config/<PLATFORM>/<PLATFORM><CATEGORY>.ini
<PROJECT_DIRECTORY>/Platforms/<PLATFORM>/Config/<PLATFORM><CATEGORY>.ini
<LOCAL_APP_DATA>/Unreal Engine/Engine/Config/User<CATEGORY>.ini
<MY_DOCUMENTS>/Unreal Engine/Engine/Config/User<CATEGORY>.ini
<PROJECT_DIRECTORY>/Config/User<CATEGORY>.ini
同一个层级中,可以出现多个不同类别的配置分类,引擎自带的配置分类主要有:
- Compat(兼容性)
- DeviceProfiles(设备概述文件)
- Editor(编辑器)
- EditorGameAgnostic(编辑器游戏未知)
- EditorKeyBindings(编辑器按键绑定)
- EditorUserSettings(编辑器用户设置)
- Engine(引擎)
- Game(游戏)
- Input(输入)
- Lightmass(全局光照)
- Scalability(可扩展性)
配置文件加载完成之后,编程人员可以使用接口去手动的读取想要的配置项:
int MyConfigVariable;
GConfig->GetInt(TEXT("MyCategoryName"), TEXT("MyVariable"), MyConfigVariable, GGameIni);
除了GetInt外还有GetBool,GetString,GetDouble等多种接口。不过更好的方式是利用UObject系统自带的配置变量的支持来自动的将配置文件里的值填充到对应的UObject中。假设一个名为 MyGameModule 的模块有一个名为 AMyConfigActor 的类,并假设 AMyConfigActor 包含你希望能够在配置文件中更改的名为 MyConfigVariable 的成员变量,为了使用配置文件来自动设置初始值,我们需要做如下三步:
- 配置要在 UCLASS 声明中读取的配置文件类目。 此示例使用
Game类目:
UCLASS(config=Game)
class AMyConfigActor : public UObject
- 将类中要配置的任何成员变量标记为
Config:
UPROPERTY(Config)
int32 MyConfigVariable;
- 将上述变量设置在所选配置文件类目的层级中的任意位置。 例如,由于此示例使用
Game类目,因此可以在项目目录内的DefaultGame.ini中设置以下配置:
[/Script/MyGameModule.MyConfigActor]
MyConfigVariable=3
至于这里面如何自动映射与加载的原理这里就不再详细介绍了,因为这里面没有啥高深的技巧,也没有多少提升性能的空间,开发人员用就好了。
游戏中的随机
游戏中的很多系统会使用随机性来构造更加丰富的游戏体验。由于随机结果是无法预测的,所以随机判定发生了那种远超玩家预期的结果时会给玩家带来一些值得记忆与分享的惊喜时刻。其中随机性特性最明显的场景主要有如下两类:
- 依据指定概率触发某种事件,攻击触发暴击、被动晕就是这种。打过
Dota的玩家想必都体验过白牛无限晕、蓝胖四倍点金的快乐:

在暗黑破坏神2中刷了几十年的的玩家想必都知道满变量悔恨的含金量:
- 依据指定权重分布来生成某种物品道具,玩家常说的开宝箱就是这种。但是一般来说这些随机事件的概率都不是很高,所以大部分时候玩家对于这种随机性感受到的体验都比较负面。这种概率过低的随机造成了无数个玩家即使在暗黑破坏神2中游荡了几十年依然没有收集齐所有的符文,并在阴阳师大火的时候获得了“非酋”这一专属荣誉称号。各位“非酋”也试图在游戏内表演斋戒焚香沐浴更衣等各种行为艺术来试图增加这些物品的掉落概率,这也就造成了游戏界口口相传的一句话:
玄不救非, 氪不改命
在受到无数玩家的口诛笔伐之后,最终相关监管部门提出了游戏公司必须提前公布随机掉落概率这一规定。不过这种公布概率的规定也并没有抚平各位“非酋”心中的创伤,也没有扭转他们之前的各种玄学行为。
为此本章就来介绍一下游戏内对于这两种随机机制的具体实现,来解答玩家对这种随机性的疑惑。
依概率触发
依概率触发事件这种随机模式最广为人知的场景就是攻击时判定是否触发暴击、闪避、眩晕等这些特殊攻击效果,由于这些随机事件的概率一般都是在5%以上,所以玩家对于这种随机事件都是喜闻乐见。这种随机事件的判定计算也比较简单,利用随机数生成器生成一个[0,1]之间的浮点数a,然后与指定的发生概率b做比较,如果a>=b则代表这个随机事件判定通过可以发生。
虽然这种简单的实现虽然是正确的,但是由于攻击判定的频率比较高,可以达到一秒多次,每次随机判定之间毫无关系,这样就很容易出现短时间内若干的连续不触发或者连续的触发这种现象,也就是Dota玩家常说的“欧洲晕锤”与“非洲晕锤”。假设攻击时有25%的概率触发被动晕,则连续三次攻击中触发被动晕的次数呈如下分布,三次都触发眩晕的概率为0.0156:
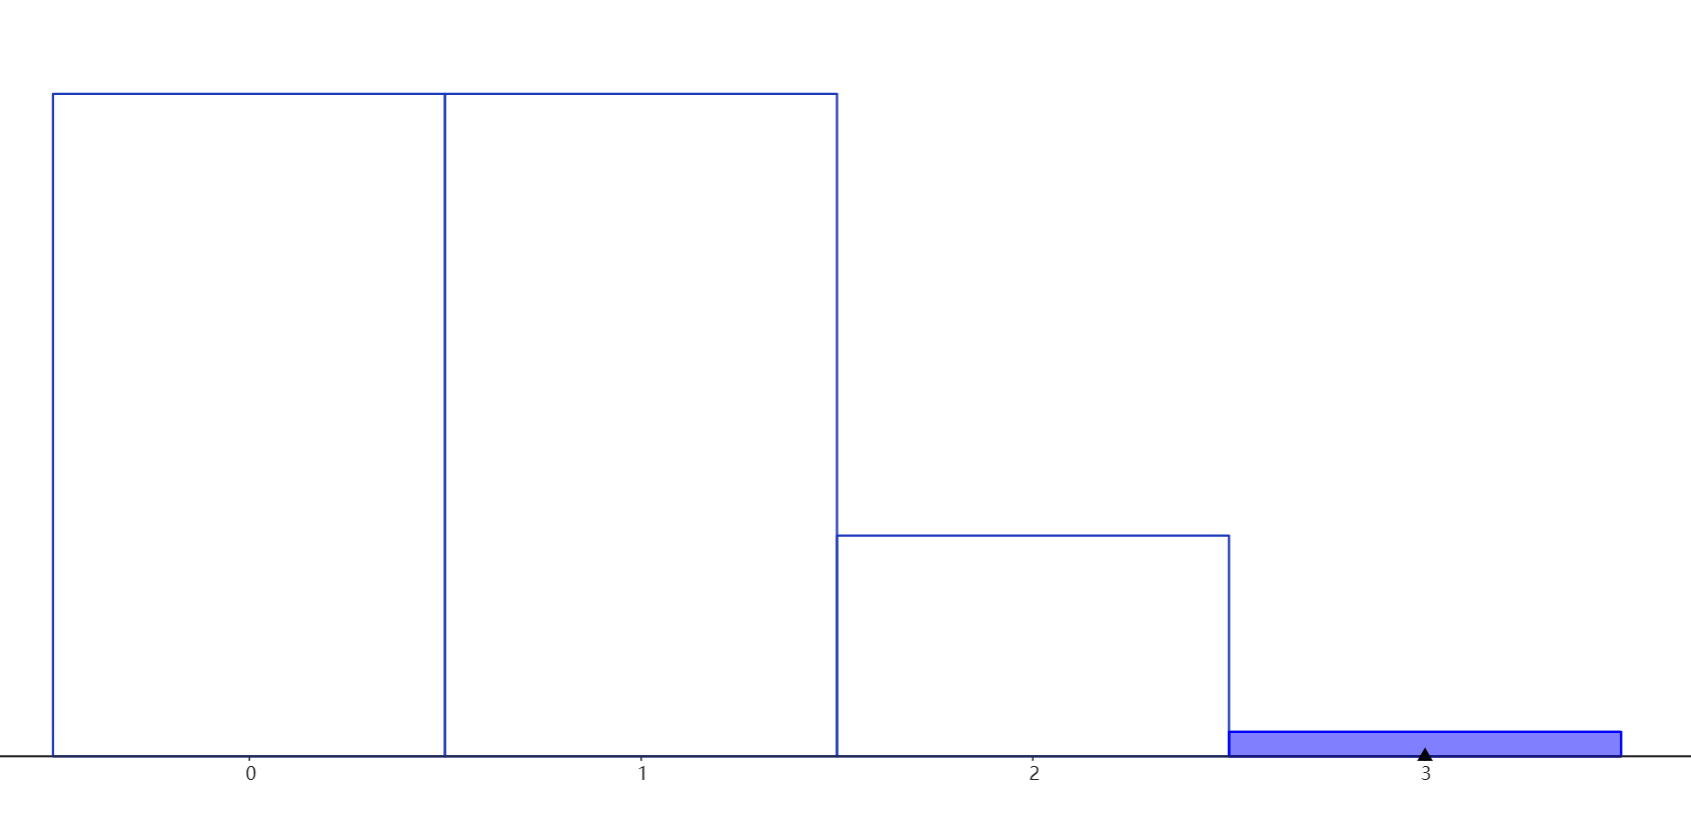
这样的分布还是比较符合玩家直觉的,我们考虑进一步把攻击次数扩大到100,此时再来看一下触发次数的概率分布:
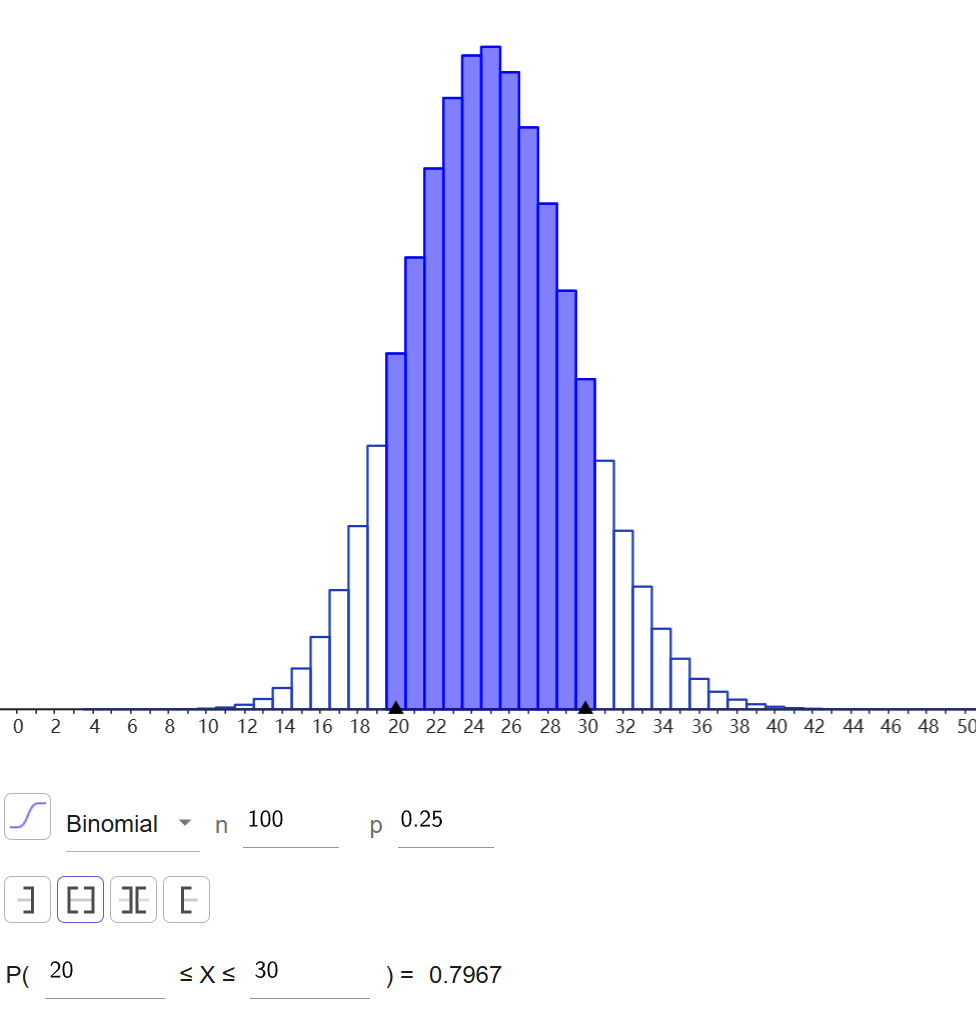
可以看出触发次数在[20,30]区间内的概率为0.8,在这个区间之外的概率仍然比较大超过0.2,连续10次没有触发的概率为,这个值仍然比较大。这种随机事件的由于其相互独立的性质导致出现与平均概率比较大差异的情况仍然是比较常见的。这种概率偏差对于观赏性来说是一种佐料,但是对于游戏平衡性来说却是有害的。因为这种刀刀烈火、无限被动晕现象的出现非常明显的影响了游戏的后续结算结果。对于竞技游戏来说这种完全不可控的随机性是要想方设法避免的,所以Dota2 6.81版本中率先引入了反击螺旋随机触发的伪随机机制:
伪随机分布(pseudo-random distribution,简称PRD)在DotA中用来表示关于一些有一定几率的装备和技能的统计机制。在这种实现中,事件的几率会在每一次没有发生时增加,但作为补偿,第一次的几率较低。这使得效果的触发结果更加一致。
效果在上次成功触发后第N次测试中发生的几率(简称proc)成功触发的几率为。对于每一个没有成功触发的实例来说,PRD系统为下一次效果触发的几率增加一个常数C。该常数也会作为初始几率,比效果说明中的几率要低,并且是不可见的。一旦效果触发,这个计数器就会重置。
技术上,如果以表示第次事件发生, 表示事件不发生。伪随机分布使用。同样地,当时,如果事件一直没有发生,那么在满足中的最小次判定时,该事件必然发生。 事件必然发生。因此概率分布为:
用更通俗的文字来阐述伪随机的做法是这样的:
- 对于某个以概率
P触发的事件,计算出一个数值C,同时建立一个变量N来记录已经连续多少次没有触发 - 每次采样来计算触发时,使用的概率不是
P,而是(N+1)*Q, - 如果此次采样触发了这个事件,则将
N设置为0 - 如果此次采样没有触发这个事件,则将
N设置为N+1
总的来说就是随着连续不触发的次数增大对应的触发概率也增大,这样总会导致概率大于1,从而引发一次事件触发。下面就是碎颅锤的伪随机例子:
对近战英雄,碎颅锤的重击有
25%几率对目标造成眩晕。那么在第一次攻击时,实际上只有大约8.5%几率触发重击。随后每一次失败的触发会增加大约8.5%触发几率。于是到了第二次攻击,几率就变成大约17%,第三次大约25.5%,以此类推。在一次重击触发后,下一次攻击的触发几率又会重置到大约8.5%。那么经过一段时间之后,这些重击几率的平均值就会接近25%。
为了保证这个PRD算法的正确,我们需要为每个P计算出对应的C出来,这里需要用到牛顿二分法来做数值逼近:
// 这个函数计算给定的C时对应的P
double PfromC( double C )
{
double pProcOnN = 0;
double pProcByN = 0;
double sumNpProcOnN = 0;
int maxFails = (int)std::ceil( 1 / C );
for (int N = 1; N <= maxFails; ++N)
{
pProcOnN = std::min( 1, N * C ) * (1 - pProcByN);
pProcByN += pProcOnN;
sumNpProcOnN += N * pProcOnN;
}
return ( 1 / sumNpProcOnN );
}
// 下面这个函数使用二分法来逼近 直到由这个C计算出来的P与传入的P基本相等
double CfromP( double p )
{
double Cupper = p;
double Clower = 0;
double Cmid;
double p1;
double p2 = 1;
while(true)
{
Cmid = ( Cupper + Clower ) / 2;
p1 = PfromC( Cmid );
if ( std::abs( p1 - p2 ) <= 0 ) break;
if ( p1 > p )
{
Cupper = Cmid;
}
else
{
Clower = Cmid;
}
p2 = p1;
}
return Cmid;
}
每次去运行时计算这个C还是比较耗时的,幸运的是对于常见的概率已经有现成的表格可以查询到对应的C值:
| C | 通常几率 | C近似值 |
|---|---|---|
| 0.003801658303553139101756466 | 5% | 0.38% |
| 0.014745844781072675877050816 | 10% | 1.5% |
| 0.032220914373087674975117359 | 15% | 3.2% |
| 0.055704042949781851858398652 | 20% | 5.6% |
| 0.084744091852316990275274806 | 25% | 8.5% |
| 0.118949192725403987583755553 | 30% | 12% |
| 0.157983098125747077557540462 | 35% | 16% |
| 0.201547413607754017070679639 | 40% | 20% |
| 0.249306998440163189714677100 | 45% | 25% |
| 0.302103025348741965169160432 | 50% | 30% |
| 0.360397850933168697104686803 | 55% | 36% |
| 0.422649730810374235490851220 | 60% | 42% |
| 0.481125478337229174401911323 | 65% | 48% |
| 0.571428571428571428571428572 | 70% | 57% |
| 0.666666666666666666666666667 | 75% | 67% |
| 0.750000000000000000000000000 | 80% | 75% |
| 0.823529411764705882352941177 | 85% | 82% |
| 0.888888888888888888888888889 | 90% | 89% |
| 0.947368421052631578947368421 | 95% | 95% |
下面我们来使用程序来模拟C=0.085的时候统计触发所需次数,对应程序的代码在https://github.com/huangfeidian/random_util/blob/main/test/test_trigger_by_prob.cpp上,下面的是统计了100次触发的所需次数分布结果:
| 第N次才触发 | 出现次数 |
|---|---|
| 1 | 7 |
| 2 | 17 |
| 3 | 21 |
| 4 | 22 |
| 5 | 16 |
| 6 | 8 |
| 7 | 5 |
| 8 | 4 |
从这个表格中可以看出,触发所需次数大多在[2,5]区间内,比较平均,同时大于8次才触发的情况并没有出现。而且完成这100次触发所执行的采样次数为1*7+2*17+3*21+4*22+5*16+6*8+7*5+8*4=387,对应的触发概率为0.258,与目标值非常接近了。
基于PRD的效果连续多次触发或多次不触发是非常罕见的。这使得游戏的运气成分大大降低,在Dota 2中一个有那么多带几率的技能的世界中增加了一致性。
加权随机选择
加权随机选择(Weighted Random Choice)就是广大玩家深恶痛绝的开箱子玩法,打开宝箱玩家可以获取多种物品中的一个。单个宝箱中不同物品出现的概率由策划配置的出现权重来指定,在配表中会以这样的vector<pair<item_id, item_weight>>的形式存在,同时指定item_id为0的配置项对应本次宝箱结算不生成任何物品。对于这样的一个配置数组A,设total_weight为这个数组中所有元素的item_weight之和,则第i个item对应的随机获取概率为A[i].item_weight/total_weight。一般来说这里的item_weight类型就是uint32,所以这个宝箱结算问题也被成为离散加权随机选择。
这个问题最简单的解法就是生成一个[0, total_weight)之间的随机数A,然后顺序遍历这个权重数组并扣除每个元素对应的权重值B,直到A<B就返回当前遍历到的元素对应的item_id作为选择结果:
struct item_weight_config
{
std::uint32_t item_id;
std::uint32_t item_weight;
};
float uniform_random(float begin, float end); // 负责等概率的生成[begin, end)的一个随机数
item_id random_select_1(const vector<item_weight_config>& weights)
{
assert(weights.size());
std::uint32_t total_weight = 0;
for(const auto& one_weight_config:weights)
{
total_weight += one_weight_config.item_weight;
}
std::uint32_t temp_random_value = std::uint32_t(std::floor(uniform_random(0, total_weight)));
for(const auto& one_weight_config: weights)
{
if(temp_random_value <one_weight_config.item_weight)
{
return one_weight_config.item_id;
}
temp_random_value -= one_weight_config.item_weight;
}
return weights.back().item_id;
}
这个算法简明易懂,就是执行过程中有两次遍历,如果一个配置会被用来结算多次,则可以使用预先计算total_weight来避免这个值的重复计算:
struct select_context
{
vector<item_weight_config> weights;
std::uint32_t total_weight;
void init()
{
total_weight = 0;
for(const auto& one_weight_config:weights)
{
total_weight += one_weight_config.item_weight;
}
}
};
item_id random_select_2(const select_context& ctx)
{
assert(ctx.total_weight);
std::uint32_t temp_random_value = std::uint32_t(std::floor(uniform_random(0, ctx.total_weight)));
for(const auto& one_weight_config: ctx.weights)
{
if(temp_random_value <one_weight_config.item_weight)
{
return one_weight_config.item_id;
}
temp_random_value -= one_weight_config.item_weight;
}
return ctx.weights.back().item_id;
}
这样就可以将两次遍历降低到一次遍历,所需执行时间降低到原来的一半。在这个优化基础上,我们还可以通过预先计算前缀和来避免遍历时对temp_random_value的更新,进一步降低遍历时的工作量:
struct select_context
{
vector<item_weight_config> weights;
vector<std::uint32_t> sum_weights;
void init()
{
sum_weights.resize(weights.size());
std::uint32_t total_weight = 0;
for(std::uint32_t i = 0; i< weights.size(); i++)
{
total_weight += weights[i].item_weight;
sum_weights[i] = total_weight;
}
}
};
item_id random_select_3(const select_context& ctx)
{
assert(ctx.sum_weights.size());
std::uint32_t temp_random_value = std::uint32_t(std::floor(uniform_random(0, ctx.sum_weights.back())));
for(std::uint32_t i = 0; i< ctx.sum_weights.size(); i++)
{
if(temp_random_value <ctx.sum_weights[i])
{
return ctx.weights[i].item_id;
}
}
return ctx.weights.back().item_id;
}
这样在选择时的循环遍历只需要做一次比较操作即可。由于权重永远是正数,所以sum_weights数组肯定是一个递增的序列,我们可以利用这个性质使用二分查找来找到第一个大于temp_random_value的元素序号,以替代顺序遍历:
item_id random_select_4(const select_context& ctx)
{
assert(ctx.sum_weights.size());
std::uint32_t temp_random_value = std::uint32_t(std::floor(uniform_random(0, ctx.sum_weights.back())));
auto temp_iter = std::upper_bound(ctx.sum_weights.begin(), ctx.sum_weights.end(), temp_random_value);
return ctx.weights[std::distance(ctx.sum_weights.begin(), temp_iter)].item_id;
}
在这样的搜索实现下,预处理之外的复杂度从数组大小N降低到了log(N),在N>10时就可有显著提升。
log(N)复杂度的算法已经是非常高效了,但是这个复杂度其实并不是加权随机选择问题最终的王者,还存在一种预处理之外只需要常数时间即可获得选择结果的最优算法。不过在介绍这个最优算法之前,我们需要先了解一下这个算法最初的一个效率不怎么高的版本。
假设随机的权重数组为[[0,6],[1,4], [2,1], [3,1]],即道具[0,1,2,3]各自的权重为[6,4,1,1],这四个道具的随机概率为[1/2, 1/3, 1/12, 1/12],其柱状图如下:
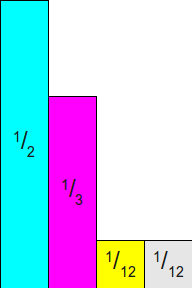
假设我们在上面图中的大矩形里随机选取一个点,所选点落入这四个柱形区域内的概率正比于这四个柱形的面积。由于是选点是均匀随机的,且柱形区域的底边长度一样高度等于随机概率,所以柱形区域的面积正比于其对应道具的随机概率。如果这个点在这四个带颜色的柱形区域内,则选择所在柱形对应的索引作为随机结果即可。但是上面图中右上角还有一大块区域是没有被柱形区域覆盖的,如果随机到的点在这个白色区域内,则需要再次随机,直到点落入到柱形区域内。采用这种随机选择方式,可以正确的依照权重来获取道具:
struct select_context
{
vector<item_weight_config> weights;
vector<float> relative_weights;
float p_max = 0;
void init()
{
relative_weights.resize(weights.size());
total_weight = 0;
for(std::uint32_t i = 0; i< weights.size(); i++)
{
total_weight += weights[i].item_weight;
}
for(std::uint32_t i = 0; i< weights.size(); i++)
{
relative_weights[i] = weights[i].item_weight * 1.0f/ total_weight;
p_max = std::max(p_max, relative_weights[i]);
}
}
};
item_id random_select_5(const select_context& ctx)
{
assert(ctx.weights.size());
while(true)
{
std::uint32_t random_index = std::uint32_t(std::floor((uniform_random(0, ctx.weights.size()))));
float random_weight = uniform_random(0, ctx.p_max);
if(random_weight <= ctx.relative_weights[random_index])
{
return ctx.weights[random_index].item_id;
}
}
}
在while循环内,单次循环体就可能得到最终的随机结果,这样成功的概率为所有柱形的面积除以最小包围矩形的面积,这个最小包围矩形的高度就是在init中计算的p_max,所以单次成功的概率为p=1/(n*p_max)。单次就成功只是理想情况,可能我们需要在while循环内执行多次才能获取随机选择结果,为了获取这个算法的复杂度我们需要计算while执行次数的期望。第k次才成功返回的概率为,所以总的次数期望为:
上面的后半部分可以转换为求,此时注意到:
将代入进入得到,所以最终的结果为:
所以期望执行的循环次数为n*p_max,这个的复杂度也是N的常数级别,比起前面介绍的二分查找慢了许多。
如果以某种机制来提高单次随机的成功概率p,则期望执行的循环次数会反比例的减小,当p被提升到1时,则只需要执行一次循环就可以获得随机选择的结果,接下来我们就来介绍如何通过巧妙的构造将p提升到1。
首先将前面的柱形分布图里所有的柱形高度都乘以n,这样会所有的柱形的面积累加值等于n,在这个缩放后的矩形里去随机选点等价于未缩放前:
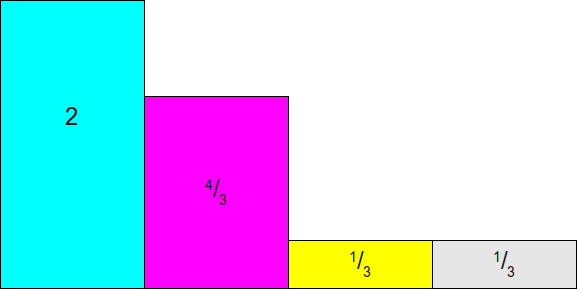
然后再以y=1画一条线,这条线与底边x轴构成的矩形面积等于n:
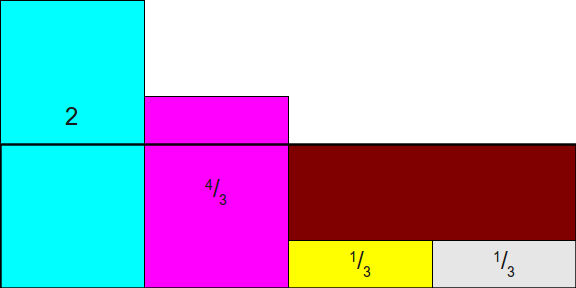
由于所有柱形的面积也等于n,所以可以通过某些切割机制将原来的柱形切分为多个小柱形,然后再拼接为前面辅助线构造的矩形。上图中的褐色区域就是需要填充的空间,而辅助线y=1上方的那些彩色柱形区域就是要切割掉的空间。
我们首先从面积为2的那个柱形中切分出一个2/3面积的部分,然后将这部分填充到最右方的1/3上面,剩下的图形如下:
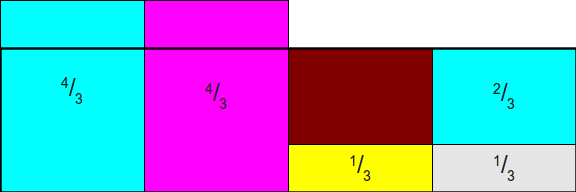
接下来继续从最左边剩下的4/3中切分出2/3给剩下的那个没有填充的1/3:
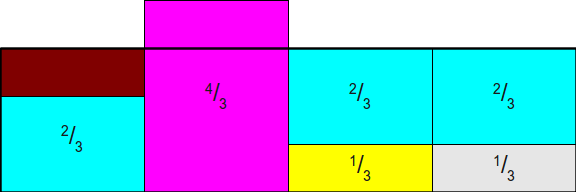
最后再从第二个柱形中切分出1/3给第一个柱形的剩下部分,这样就完成了柱形的切分再组装:
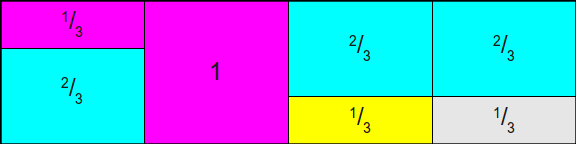
最后拼接出来的图形面积仍然是n,同时各个颜色的总面积等价于切分之前的总面积。但是此时已经不存在未被彩色柱形覆盖的区域了,所以在这个图形里随机选取一个点,计算出这个点对应的颜色,就可以获得随机选择的结果,不再需要多次抽样。就以上面的图来说,每个[k, k+1)区间内的小矩形数量最多为2,我们可以构造这样的一个数组来描述拼接的结构:
// 描述[k,k+1)的拼接信息
struct split_info
{
float self_prob = 0; // 每个小矩形的高度
uint32_t self_index = 0; // 每个小矩形的原始样本id
};
利用这个拼接数组,可以非常简单的单次随机即可计算出正确的结果:
uint32_t random_select_6(const std::vector<std::array<split_info, 2>>& rect_split_infos)
{
float temp_random_value = uniform_random(0, rect_split_infos.size());
uint32_t base_index = uint32_t(std::floor(temp_random_value));
float remain_random_value = temp_random_value - base_index;
if(remain_random_value <= rect_split_infos[base_index][0].self_prob)
{
return rect_split_infos[base_index][0].self_index;
}
else
{
return rect_split_infos[base_index][1].self_index;
}
}
上面的图里每个[k, k+1)区间内的小矩形数量最多为2目前来说只是一个特例,如果我们无法保证小矩形数量最多为2,上面的array<split_info, 2>要被替换为vector<split_info>,此时随机的实现就会变得不怎么高效了:
uint32_t random_select_7(const std::vector<std::vector<split_info>>& rect_split_infos)
{
float temp_random_value = uniform_random(0, rect_split_infos.size());
uint32_t base_index = uint32_t(std::floor(temp_random_value));
float remain_random_value = temp_random_value - base_index;
for(const auto& one_split_info: rect_split_infos[base_index])
{
if(remain_random_value <= one_split_info.self_prob)
{
return one_split_info.self_index;
}
remain_random_value -= one_split_info.self_prob;
}
}
这样的实现导致算法最坏执行时间被次级vector的最大容量所决定,对于这个最大容量我们唯一知道的信息是不会大于样本数量n,所以此时这个算法的复杂度仍然是样本数量n的线性复杂度。但是看前面介绍的简单样例只需要单次判断即可获得结果,如果有一种划分方法能保证最大容量为2的话,这个算法就只有常数时间复杂度,这样的最优情况非常吸引人。幸运的是我们可以证明存在这样的最大容量为2的划分,首先我们需要形式化的定义这个命题:
存在对于一个容量为n的vector<float> A, 如果accumulate(A.begin(), A.end(), 0) == A.size()且A中任意元素都大于0, 则存在一个std::vector<std::array<split_info, 2>> B,使得B.size()==n,且对于区间内[0, n)任意整数i,下面的条件都成立:
B[i][0].self_prob + B[i][1].self_prob == 1B[i][0].self_prob >=0 && B[i][1].self_prob >=0- 遍历
B中的每个元素C,再遍历C中的每个元素D,如果D.self_index==i,则累加D.self_prob,最后得到的累加值等于A[i]
这样的B就是我们所期望的最大容量为2的重整切割划分。接下来我们使用数学归纳法来证明对于上面的命题对于任意的正整数n都成立:
-
当样本数量为
1时,不需要执行切分合并,直接B[0][0].self_prob=1, B[0][0].self_index, B[0][1]={0,0}就可以满足需求,所以这个命题在n=1的时候成立。 -
假设对于样本数量为
k-1的A总是存在对应的B作为其最大容量为2的重整切割划分。当样本数量为k的时候,我们总是可以从A中选择两个索引i,j,使得A[i]>=A[j]且A[i]>=1>=A[j],此时从A[i]中切分一部分1-A[j]并填充到A[j]上,也就是B[j][0]={A[j],j}, B[j][1]={1-A[j], i},然后A[i]-=1-A[j], A[j]=1, swap(A[j], A.back()), swap(B[j], B.back())。此时我们将A[0],...A[k-2]构造为一个新的数组A2,将B[0],...B[k-2]构造出新的数组B2,这两个数组的大小为k-1。由于之前我们证明了对于n=k-1的时候总是存在一个B2是A2的重整切割划分,所以B2把里面的为j的self_index都重新赋值为k-1,然后再赋值到B[0],...B[k-2],此时的B也是对于原始A的最大容量为2的重整切割划分,即命题在n=k的时候也是成立。
上面的数学归纳法证明了对于任意的分布A我们总是可以构造一个最大容量为2的重整切割划分B,但是这里的构造算法不是很高效。每次缩减样本空间都需要扫描整个A数组来获取合符条件的两个索引i,j。下面我们来提出一种高效的算法来从A构造出B,这个构造方法可以避免每次扫描整个数组:
- 首先从
A数组构造两个新数组vector<pair<uint32_t, float>> C,D,C中存储原来高度大于1的所有元素的索引和高度,D中存储原来高度小于等于1的所有元素的索引和高度 - 每次从
D的末尾弹出一个元素E,- 如果
E.second==1,则代表此时不需要其他样本进行切分,执行B[E.first][0] = {E.first, E.second} - 如果
E.second<1,此时从C获取末尾元素F,从F中切除一部分1-E.second,使得E.first对应的区域被填充为1,以这个切分去构造B[E.first]
- 如果
- 判断
F.second是否小于等于1,如果小于等于1则将F从C的末尾转移到D的末尾 - 如果
D不为空,则回溯到步骤2再次执行;如果D为空,返回B作为结果。
下面的就是上述过程的cpp代码描述:
struct select_context
{
vector<item_weight_config> weights;
vector<std::array<split_info, 2>> rect_split_infos;
void init()
{
rect_split_infos.resize(weights.size());
std::vector<std::pair<uint32_t, float>> weights_gt_1;
std::vector<std::pair<uint32_t, float>> weights_le_1;
std::uint32_t total_weight = 0;
for(std::uint32_t i = 0; i< weights.size(); i++)
{
total_weight += weights[i].item_weight;
}
for(std::uint32_t i = 0; i< weights.size(); i++) // 对应步骤1
{
float relative_weight = weights.size() * weights[i].item_weight * 1.0f/ total_weight;
if(relative_weight > 1)
{
weights_gt_1.push_back(make_pair(i, relative_weight));
}
else
{
weights_le_1.push_back(make_pair(i, relative_weight));
}
}
while(!weights_le_1.empty()) // 对应步骤2
{
auto temp_le_1_back = weights_le_1.back();
weights_le_1.pop_back();
if(temp_le_1_back.second == 1) // 已经是1了 不需要再处理填充
{
rect_split_infos[temp_le_1_back.first][0].self_index = temp_le_1_back.first;
rect_split_infos[temp_le_1_back.first][0].self_prob = temp_le_1_back.second;
continue;
}
assert(!weights_gt_1.empty());
auto& temp_gt_1_back = weights_gt_1.back();
rect_split_infos[temp_le_1_back.first][0].self_index = temp_le_1_back.first;
rect_split_infos[temp_le_1_back.first][0].self_prob = temp_le_1_back.second;
rect_split_infos[temp_le_1_back.first][1].self_index = temp_gt_1_back.first;
rect_split_infos[temp_le_1_back.first][1].self_prob = 1- temp_le_1_back.second;
temp_gt_1_back.second -= 1 - temp_le_1_back.second;
if(temp_gt_1_back.second < 1) // 对应步骤3
{
weights_le_1.push_back(temp_gt_1_back);
weights_gt_1.pop_back();
}
}
}
};
上面的代码里有三个循环,每个循环的最大次数都被原始的输入数组大小限制住了,所以这个初始化流程相当于遍历了三次原始输入数组,其总时间复杂度为输入的线性复杂度。有了这个构造好的rect_split_infos之后,获取一个随机选择的值就很简单了:
uint32_t random_select_8(const select_context& ctx)
{
float temp_random_value = uniform_random(0, ctx.rect_split_infos.size());
uint32_t base_index = uint32_t(std::floor(temp_random_value));
float remain_random_value = temp_random_value - base_index;
if(remain_random_value <= ctx.rect_split_infos[base_index][0].self_prob)
{
return ctx.rect_split_infos[base_index][0].self_index;
}
else
{
return ctx.rect_split_infos[base_index][1].self_index;
}
}
上面介绍的方法也叫做Alias method,其更多的细节介绍可以参考https://www.keithschwarz.com/darts-dice-coins/。我自己也在Github上开源了一个简单的实现在https://github.com/huangfeidian/random_util/blob/main/include/choose_by_weight.h上,读者可以用这个基础代码作为参考实现。使用alias table算法就可以实现以常数时间来执行加权随机选择,所需的预处理时间也只是输入的线性时间。对于常见的十连抽一百连抽这种同一组配置会触发很多次随机选择的情况,这个算法是一个非常大的优化。
其实按照上面的代码流程构造出来的rect_split_infos可以保证rect_split_infos[i][0].self_index = i,可以利用这个性质来节省一点内存,不过这个性质对于算法的时间复杂度并没有任何改进,所以这里我就不去证明了,读者可以自己去证明这个性质。
角色属性公式计算
角色属性介绍
在游戏之中,我们操纵的角色和一些非玩家角色都会有相关的数值描述,例如血量、等级、攻击、防御等等。下面就是Dota2的一个角色的属性面板。
在这个界面上,我们可以看到很多游戏内非常常规的属性:等级、生命值、魔法值、生命恢复速度、魔法恢复速度、攻击力、护甲、移动速度、力量、敏捷、智力、攻击速度、攻击距离、运动速度、技能增强、物理抗性、魔法抗性、状态抗性、减速抗性、闪避。其中有些属性还相互关联:
Dota2的角色属性系统还算是比较简单的,只有十几个属性字段,而暗黑破坏神2则有数十个属性字段,下面的面板其实只展示了其中的一部分:
一个角色的属性描述的几十个字段并不是毫无逻辑关系的,同时完整的属性关系之间可能还有其他的面板不可见属性作为中间变量存在。以Dota2中的护甲计算公式为例:
护甲 = 基础护甲 + 额外护甲 + 敏捷 / 3
这里的基础护甲是每个英雄的自带属性,并没有直接在属性面板上显示,额外护甲这个变量则是所有装备的护甲值累加计算出来的中间变量,也就是属性面板中护甲值的绿色部分,而敏捷这个变量其实也是由计算公式生成的
敏捷 = (基础敏捷 + 等级 * 敏捷成长) *(1 + 敏捷放大倍数) + 额外敏捷
这里可以看出,等级提升之后,敏捷会相应提升,并因此更新护甲。这就是最基础的一个护甲属性变化计算公式,非常的简洁明了。其实敏捷这个属性不仅参与了护甲的计算,还会参与攻速的计算。在Dota2中力量敏捷智力这三个属性其实影响了很多其他属性:
- 力量敏捷智力这三个数值会随着角色等级自动增长,这几个属性的每一级增长的数值在不同的英雄中也是不同的。
- 力量敏捷智力之中作为主属性的那个还会增加到攻击力,
- 力量的成长会带来生命值与生命恢复速度的变化,每一点力量对应
19点生命值,每十点力量对应一点生命恢复 - 敏捷的增长会带来攻击速度和护甲的变化,每一点敏捷对应一点攻击速度,每三点敏捷对应一点护甲
- 智力的增长会带来魔法值、魔法恢复速度和魔法抗性的变化,每一点智力对应
12点魔法值,每20点智力对应一点魔法恢复速度,每10点智力对应一点魔法抗性
角色的属性系统除了让面板变得更好看之外,最重要的作用是计算角色之间的伤害,一次攻击,附加伤害是多少,是否会暴击,准确率是多少,是否被会闪避。在Dota2游戏中,伤害计算公式还是比较简单的,只需要考虑两个属性,攻击力与护甲:
伤害=攻击力*(1-敌方物理抗性) 物理抗性= 护甲 * 0.06/(1+abs(护甲 * 0.06))
这里的物理抗性公式基本继承自魔兽争霸3,其目的就是为了控制物理抗性的取值范围在之内,其函数曲线如下:
遇到比较复杂的游戏,属性计算就会变得很复杂,例如下面的就是暗黑破坏神2中的伤害计算公式:
近战最终伤害=((基本伤害x1.5{无形物品})*(1+武器ed数值/100)+直接最小/最大伤害增加值)*(1+力量或敏捷/100+非武器ed数值/100+技能ed数值/100)*((1-技能伤害惩罚/100))*2(临界一击或者致命一击) + 元素伤害
这个伤害计算已经有点复杂了,但是这个伤害在结算的时候并不是立刻参与扣除攻击目标的血量,还需要经过多轮计算。首先需要处理的就是命中率,在暗黑破坏神2中的命中率公式如下:
实际命中率=自身命中率/(自身命中率+目标防御力)*(自身等级*2/(自身等级+对方等级))
而这里的防御力其实也是一个属性,根据各种参数计算而来:
防御力总值 =(人基本防御+装备防御+各种地方的直接额外防御)*(1+各种防御百分百加成)
计算出命中率之后,再经过一次随机数生成来判定当前能否击中,如果没有击中则本次攻击无效,如果击中则继续走后面的流程,包括粉碎性打击、伤害减免、物理抗性、元素抗性等。完整的一次从伤害计算到血量扣除其实会涉及到非常多的属性计算,下图就是网友总结的DNF中的伤害计算公式:
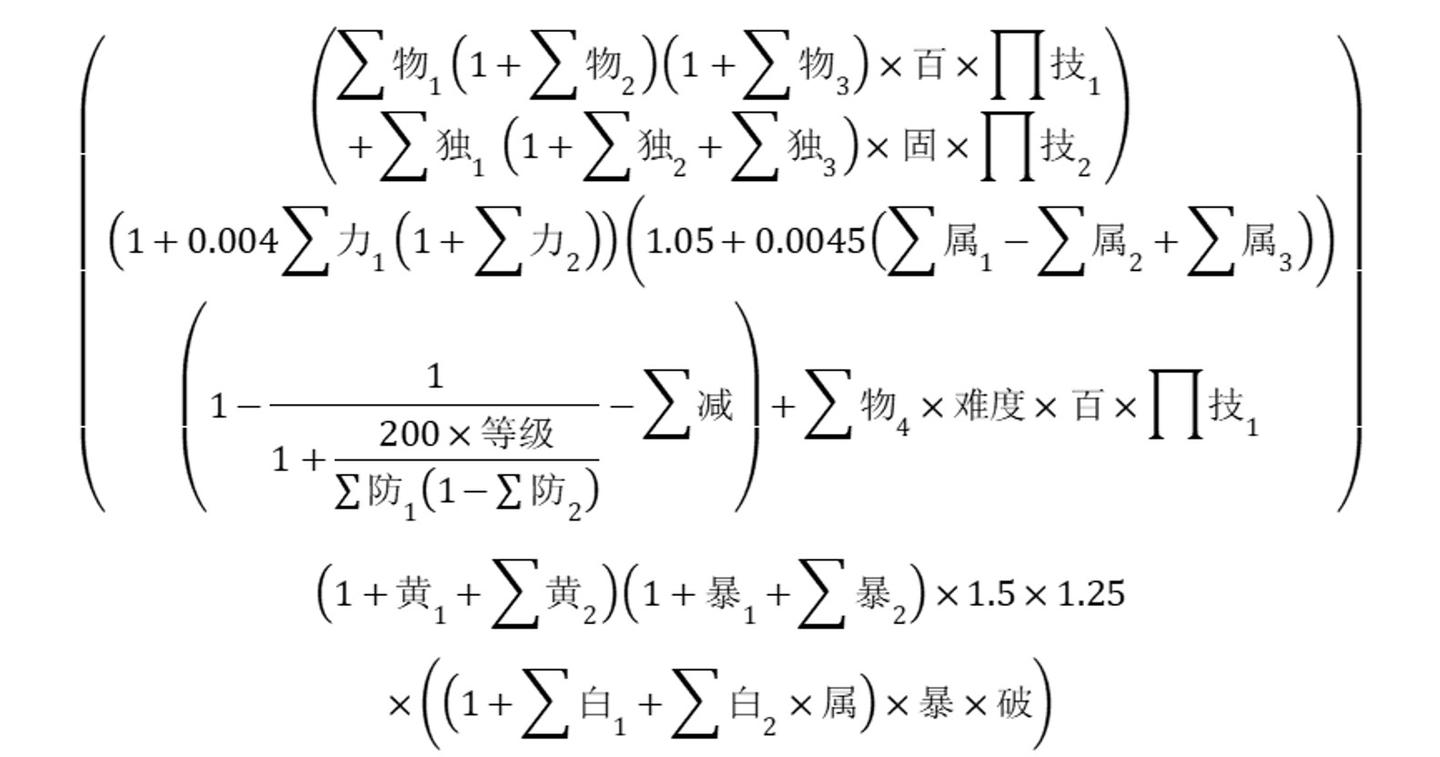
复杂度低的情况下程序可以在代码里硬编码这些计算属性计算公式:
double strength()
{
return base_strength + extra_str + level * str_per_level;
}
double dexterity()
{
return base_dexterity + extra_dex + level * dex_per_level;
}
double intelligence()
{
return base_intelligence + extra_int + level * int_per_level;
}
double health()
{
return base_health + extra_health + strength * health_per_str;
}
double mana()
{
return base_mana + extra_mana + intelligence * mana_per_int;
}
当属性系统不断膨胀时,伤害计算公式将会演变的极其复杂,同时由于技能和buff、道具系统的的无限扩充,伤害计算公式里就可能涉及到上百个属性。在这种复杂的属性系统中,靠程序在代码中直接编码这些公式逻辑已经不太现实。此外属性计算公式的规则基本都是策划主导的,而且在大型游戏中策划根据实际体验去调整计算公式是很频繁的,这样写死在代码里会带来及其繁重的编译和更新成本。同时这些属性更新计算在大型MMO的pvp活动中调用非常频繁,需要一个高效的结构去维护更新。
基于上述因素考虑,需要提供方便的工具让策划对这些属性计算公式进行编辑,同时让程序可以方便的将确定好的公式映射到代码。为了满足这个属性计算公式的编辑、展示、运行的需求,本人根据已有的项目经验,提供了一个比较完整的解决方案,开源在Github/formula_tree,在这个工程中提供了编辑器、调试器以及运行时。
属性公式编辑器
属性公式编辑器的源代码在formula_tree/editor中,是一个QT5的GUI程序,提供了公式的查看与编辑功能。
在属性公式编辑器中,我们把每一个变量的计算都组织成一颗公式计算树,下面这张图就对应了之前提及到的护甲计算流程:
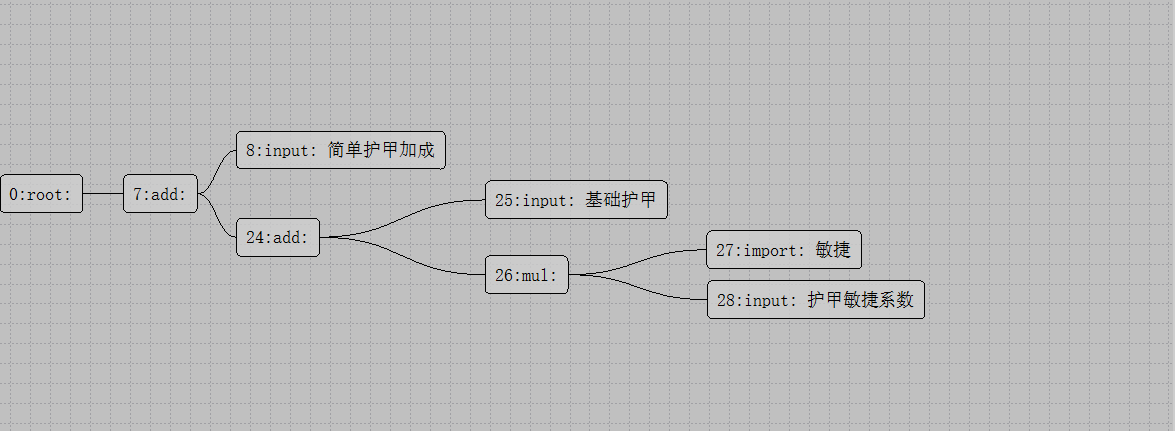
由于护甲依赖于敏捷,而敏捷同样是根据属性公式计算出来的,所以对于敏捷也有一颗计算树:
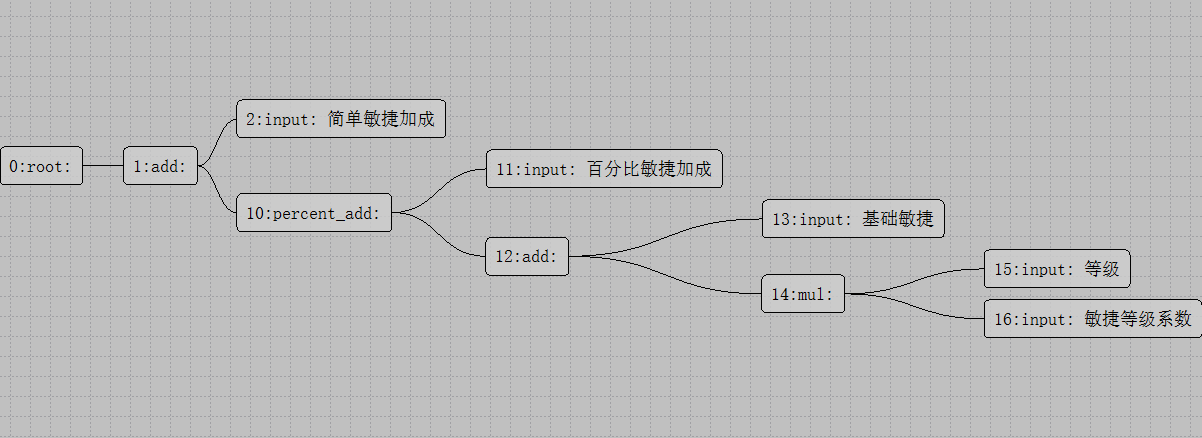
在这个属性公式计算树结构中,最左侧为根节点,代表当前计算树的最终输出,其他的非叶子节点代表一个数学计算函数,所以这些非叶子节点也称之为计算节点,子节点作为参数的顺序是从上到下。最右侧的则是叶子节点,叶子节点有三种类型:
- 字面值常量(
literal node),代表一个浮点数 - 输入变量(
input node),代表外部提供的一个变量,可以被外部修改 - 引用变量(
import node), 是通过计算公式计算出来的值,无法直接被外部修改,
每个引用变量都有对应名字的单独公式计算树文件,其文件格式为Json。
在了解了公式计算树中的叶子节点、计算节点和根节点之后,要启动这个计算公式编辑器需要额外提供两个文件:
- 提供变量清单的
json文件, 里面有两个字段 一个是input_attrs,这个是所有的输入节点的名字,另外一个是import_attrs,这个是所有的输出节点的名字。如果需要添加输入变量或者输出变量,则需要更新这个文件,下面就是测试用配置的一部分:
{
"input_attrs":
{
"level": "等级",
"strength_base": "基础力量",
"dexterity_base": "基础敏捷",
"intelligence_base": "基础智力",
"str_level_cof": "力量等级系数",
"dex_level_cof": "敏捷等级系数",
"int_level_cof": "智力等级系数",
"hp_base": "基础血量",
"hp_str_cof": "血量力量系数",
"armor_base": "基础护甲",
"armor_add": "简单护甲加成",
"armor_dex_cof": "护甲敏捷系数"
},
"import_attrs":
{
"max_hp": "最大血量",
"strength": "力量",
"dexterity": "敏捷",
"intelligence": "智力",
"armor": "护甲",
"phy_atk": "物理伤害",
"magic_atk": "法术伤害",
"magic_resist": "法术抗性",
"output_phy_atk": "最终物理伤害",
"output_magic_atk": "最终法术伤害"
}
}
- 提供运算符清单的
json文件, 里面定义了所有类型的计算节点编辑器相关字段,如果想添加计算函数,需要更新这个文件,下面就是测试用配置的一部分:
{
"add": {
"child_min": 2,
"child_max": 2,
"editable_item": {},
"comment": "a+b"
},
"dec": {
"child_min": 2,
"child_max": 2,
"editable_item": {},
"comment": "a-b"
},
"mul": {
"child_min": 2,
"child_max": 2,
"editable_item": {},
"comment": "a*b"
}
}
每个节点都以圆角矩形框来显示,框内左侧的数字代表这个节点的编号,注意这里的编号并不代表节点的遍历顺序,只是作为节点的唯一标识符使用,内部实现是这个节点在当前计算树中的创建顺序。
节点编辑时,首先需要选中一个节点,然后按下对应的快捷键:
Insert代表插入一个节点,作为当前节点排序最低的子节点Delete代表删除一个节点,root节点不可删除MoveUp,快捷键为Ctrl加上方向箭头, 代表把提升当前节点在父节点里的排序MoveDown快捷键为Ctrl加下方向箭头,代表降低当前节点在父节点里的排序Copy代表把当前节点为根的子树复制Paste代表把上次复制的节点粘贴为当前节点排序最低的新的子节点Cut代表剪切当前节点
另外如果树里面的某个节点对应的子树节点太多,可以通过双击这个节点,将对应的子树进行折叠,同时这个节点右侧将会出现一个小的粉色钝角三角形,再双击则会展开折叠:
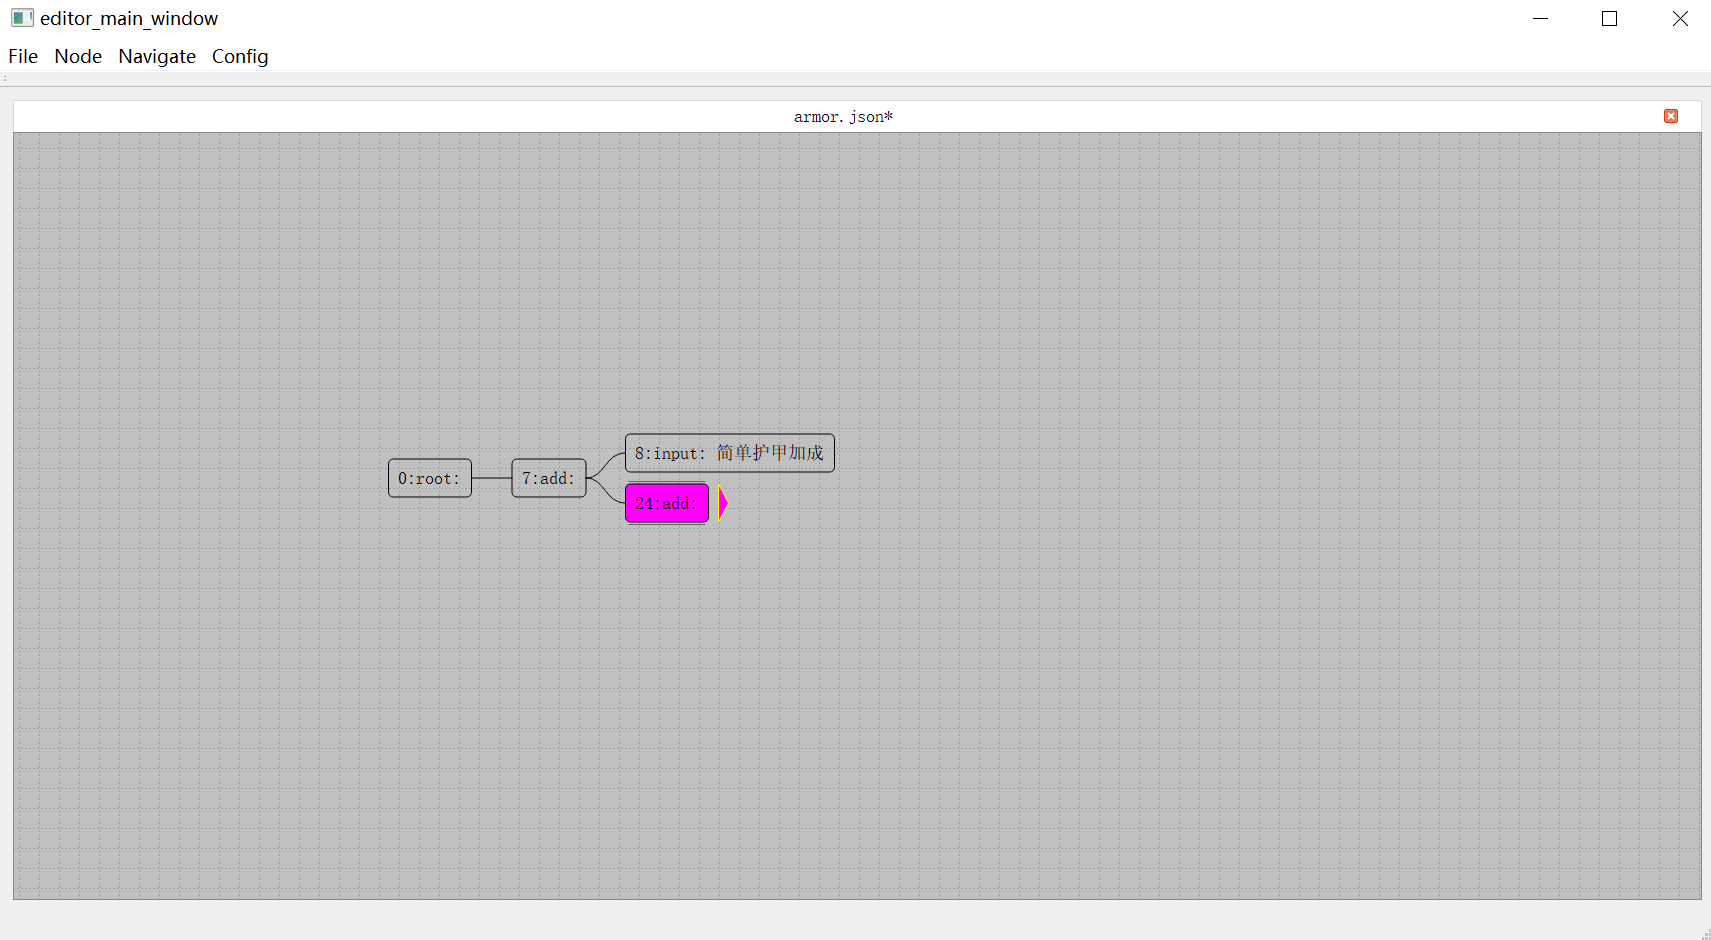
如果需要为一个复合节点增加一个新的子节点,则需要在选中一个复合节点之后按下Insert键,此时会弹出一个子节点创建选择窗口:
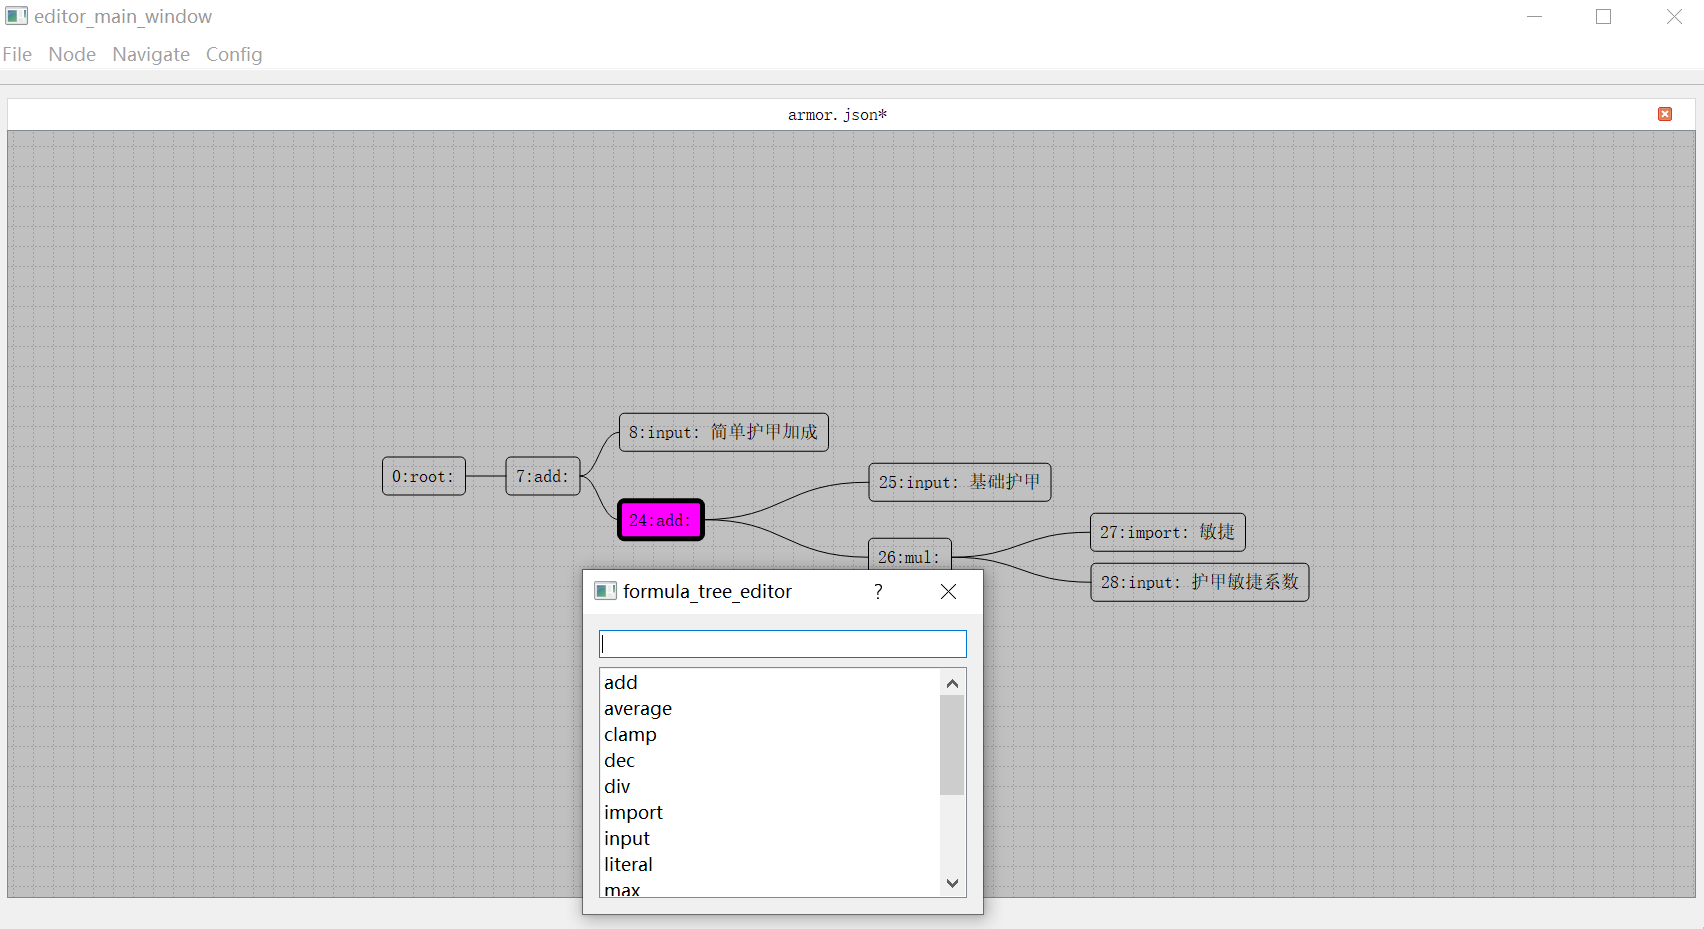
在这个文本框中可以执行搜索过滤,双击下面列表中的一项即为确认选择并以选择的节点类型来创建子节点。
在完成了编辑工作之后,保存的计算树文件是一个json文件,可以很方便的进行diff,下面就是护甲对应的计算树文件中的一部分,以数组的形式存储了整个树结构:
{
"extra": {},
"name": "armor.json",
"nodes": [
{
"children": [
7
],
"color": 0,
"comment": "",
"extra": {},
"idx": 0,
"is_collapsed": false,
"type": "root"
},
{
"children": [
8,
24
],
"color": 0,
"comment": "",
"extra": {},
"idx": 7,
"is_collapsed": false,
"parent": 0,
"type": "add"
}
]
}
有了公式编辑器的帮助,策划可以比较直观的去编辑与查看公式。不过如果有大批量的公式变动的话,整体的去浏览与修改公式就比较繁琐了,这个时候策划更倾向于直接修改基于文本的属性公式,例如这样的公式定义文件:
double base_strength = 1.0;
double base_dexterity = 1.0;
double base_intelligence = 1.0;
double extra_str = 0.0;
double extra_dex = 0.0;
double extra_int = 0.0;
double str_per_level = 1.0;
double dex_per_level = 1.0;
double int_per_level = 1.0;
double level = 1.0;
double base_armor = 0;
double extra_armor = 0;
double armor_per_dex = 1;
double base_physical_damage = 10;
double extra_physical_damage = 0;
double base_magic_defence = 15;
double extra_magic_defence = 0;
double base_health = 500;
double base_mana = 100;
double extra_health = 0;
double extra_mana = 0;
double health_per_str = 20;
double mana_per_int = 10;
double base_health_recovery = 2.0;
double base_mana_recovery = 1.0;
double extra_health_recovery = 0.0;
double extra_mana_recovery = 0.0;
double main_attr = 1.0;
double base_attack_gap = 2.0;
double minimal_attack_gap = 0.2;
double attack_speed_per_dex = 1;
double extra_attack_speed = 0;
double min(...);
double max(...);
double average(...);
double mul(...);
double add(...);
double clamp(double min, double max, double cur);
double pow(double base, double index);
double abs(double value);
double strength = base_strength + extra_str + level * str_per_level;
double dexterity = base_dexterity + extra_dex + level * dex_per_level;
double intelligence = base_intelligence + extra_int + level * int_per_level;
double armor = base_armor + extra_armor + dexterity * armor_per_dex;
double health = base_health + extra_health + strength * health_per_str;
double mana = base_mana + extra_mana + intelligence * mana_per_int;
double physical_damage = base_physical_damage + main_attr + extra_physical_damage;
double attack_speed = 100 + extra_attack_speed + attack_speed_per_dex * dexterity;
double attack_gap = max(minimal_attack_gap, base_attack_gap * 100 / attack_speed);
通过这个文件来看,这种完全基于文本的属性的计算公式在大量公式的可读性和可修改性方面的确有比较明显的优势。所以我在formula_tree/runtime/test/parse_formula中也提供了这种手写公式批量转换到公式计算树json文件的支持,同时在编辑器中也提供了公式树到上述的纯文本公式的转换功能。
属性公式运行时
属性公式运行时的源代码在formula_tree/runtime中,提供了公式的加载、求值等功能。
一个角色的所有属性所需公式被称为一组公式,里面有所有外部可见的输出变量名称,加载这一组公式的时候需要提供一个输出变量名的集合:
std::unordered_set<std::string> related_outputs =
{
"armor",
"dexterity",
"intelligence",
"magic_atk",
"magic_resist",
"max_hp",
"output_magic_atk",
"output_phy_atk",
"phy_atk",
"strength",
};
formula_tree_mgr::instance().set_repo_dir("../../data/export/");
auto cur_formula_tree = formula_tree_mgr::instance().load_formula_group("player", formula_desc{ related_outputs });
这里的load_formula_group内部流程可以概括如下:
-
公式系统会装载所有提供的公式,并对公式内部所引用的输出变量也进行递归加载。
-
每个对输出变量的引用都会生成一条输出变量的
root节点到当前import节点的边,通过这样的连接,组成了一个有向图。如果这个有向图里面有环的话,代表变量之间互相引用了,这是一个非法的公式。 -
在组成一个有向无环图之后,我们再删除所有的引用节点,把从引用节点出发的边的起点都转移到对应的输出变量的
root节点上。降低一点树的深度。
自此,一个角色的公式计算图构建完成。不过这里有一个非常重要的优化细节在上面的流程中没有提到:
- 同一组公式的结构是共享的,第一次加载之后这组公式的计算图就会保留,后续的同样的一组公式就直接复用这个计算图,这样就避免了重复的去加载同一组公式相关的公式文件并建立计算图的过程;
- 由于计算图被共享了,所以运行时公式的具体数值并没有放在计算图的节点里,而是每个使用这组公式的
entity自己创建一片连续内存区来存储这些数值,entity更新属性值的时候需要传递这块连续内存区域的指针进来
在这种设计下,我们需要对计算图中的每一个节点去分配一个唯一且连续的索引,作为运行时数值内存区域的偏移量,因此计算图中的计算节点定义如下:
class calc_node
{
std::vector<calc_node*> children; // 计算当前变量所需的所有子节点
std::vector<std::uint32_t> m_children_idxes; // 每个子节点的唯一索引
std::vector<calc_node*> parents; // 当前依赖当前节点计算结果的其他节点
formula_structure_tree* tree = nullptr; // 所属的计算图
std::uint32_t m_node_idx = 0;// 当前节点对应的唯一索引
node_type cacl_type; // 当前节点的节点类型
std::string name; // 当前节点的名字 如果是中间计算节点则会使用编辑器里设置的节点编号加上原始公式树中的编号
}
void calc_node::add_child(calc_node* child)
{
children.push_back(child);
m_children_idxes.push_back(child->m_node_idx);
child->parents.push_back(this);
}
在这样的节点定义之下,由初始的所有节点构造计算图的流程里除了需要维护好计算图结构之外,还需要处理好每个节点的索引赋值流程:
class formula_structure_tree
{
std::unordered_map<std::string, std::uint32_t> m_name_to_idx; // 每个带名字的节点对应的节点索引
std::vector<calc_node> m_nodes; // 计算图中的所有节点
std::vector<double> m_literals; // 计算图中的所有常量
}
formula_structure_tree::formula_structure_tree(const formula_desc_flat& flat_nodes_info)
{
std::uint32_t name_idx = 0;
m_nodes.reserve(flat_nodes_info.flat_nodes.size());
m_literals.resize(flat_nodes_info.flat_nodes.size(), 0);
// create all nodes
for (auto& one_node : flat_nodes_info.flat_nodes)
{
auto cur_node_name = one_node.name;
if (cur_node_name.empty())
{
cur_node_name = "T-" + std::to_string(name_idx++);
}
auto cur_pointer_node = calc_node(this, m_nodes.size(), cur_node_name, one_node.type);
if (one_node.type == node_type::literal)
{
m_literals[m_nodes.size()] = one_node.value;
}
m_nodes.push_back(cur_pointer_node);
}
// map names to node pointer
auto node_begin_pointer = m_nodes.data();
for (const auto& [k, v] : flat_nodes_info.node_indexes)
{
m_name_to_idx[k] = v;
}
// replace import/input leaf nodes with mapped node pointer
for (auto& one_node : flat_nodes_info.flat_nodes)
{
auto& cur_node = m_nodes[one_node.idx];
for (auto one_child : one_node.children)
{
auto& cur_child_name = flat_nodes_info.flat_nodes[one_child].name;
if (cur_child_name.empty())
{
// for non leaf/ literal nodes
cur_node.add_child(node_begin_pointer + one_child);
}
else
{
// for import input children nodes
cur_node.add_child(&m_nodes[m_name_to_idx[cur_child_name]]);
}
}
}
}
建立好这个计算图之后,每个使用这个计算图的实例都需要分配一个formula_value_tree的结构来作为计算过程中的数值存储区域:
class formula_value_tree
{
std::vector<double> m_node_values; // 这个数组的大小与计算图结构中的节点数量保持一致
const formula_structure_tree& m_node_tree; // 对应的计算图结构
};
formula_value_tree* formula_tree_mgr::load_formula_group(const std::string& formula_group_name, const formula_desc& output_node)
{
auto cur_iter = named_formulas.find(formula_group_name);
if (cur_iter != named_formulas.end())
{
return new formula_value_tree(*cur_iter->second);
}
else
{
auto cur_flat_info = formula_desc_flat(output_node);
auto cur_tree = new formula_structure_tree(cur_flat_info);
named_formulas[formula_group_name] = std::unique_ptr<formula_structure_tree>(cur_tree);
return new formula_value_tree(*cur_tree);
}
}
有了这个formula_value_tree之后我们来描述一下属性更新逻辑。简单版本的公式更新就是:每更新一个节点,就深度优先的更新他的parent节点。但是这样的更新有很严重的问题,如果从这个节点A出发到某个节点B有多条路径,则B节点及从B出发可达的节点会被重复更新多次。例如之前的物理减免公式0.06*dex/(1+abs(0.06*dex)),其构造出来的计算树里会出现多次敏捷这个临时变量:
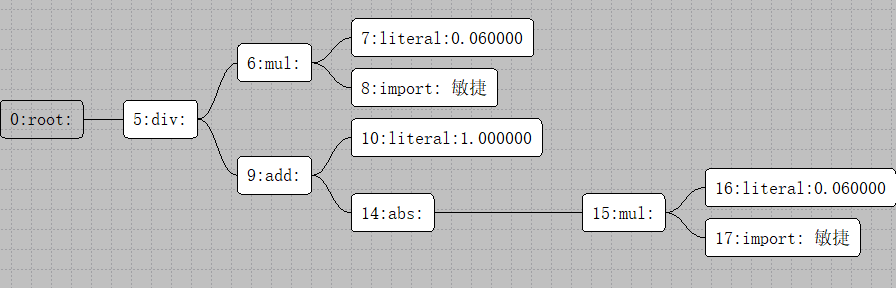
当敏捷更新的时候,会分别触发17->15->14->9->5->0和8->6->5->0这两个更新链路,两条链路都更新完成之后最终的输出才是正确的。
类似的问题在一次性更新多个变量的时候也存在,如果节点A依赖于输入节点B和输入节点C, 某一次更新流程中如果B、C的值都发生了改变,会导致A被更新多次。这种同一个节点在一次计算过程中被更新多次是非常浪费计算资源的,为了优化计算效率我们需要提供一个最优更新逻辑,保证一个节点最多只被更新一次。因此,在上面构建的公式计算图的基础上,我们需要标注节点的额外信息:
对每个节点进行高度标记,所有的输入节点的高度设置为
0,然后进行递归更新,每个节点的高度等于所有子节点的高度最大值再加上1
此时calc_node结构体上需要增加一个字段,来表示这个节点在计算图中的高度,同时在构造计算图的时候要设置好这个高度:
class calc_node
{
// 省略之前的字段
std::uint32_t m_height = 0;
};
formula_structure_tree::formula_structure_tree(const formula_desc_flat& flat_nodes_info)
{
// 省略之前提到的构造计算图逻辑 开始处理节点的深度计算
std::vector<std::uint64_t> node_child_count(m_nodes.size(), 0); // 每个节点的子节点个数
std::deque<calc_node*> height_queue; // 所有的待处理节点
for (auto& one_node : flat_nodes_info.flat_nodes)
{
auto& cur_node = m_nodes[one_node.idx];
auto cur_child_size = one_node.children.size();
if (cur_child_size)
{
node_child_count[one_node.idx] = cur_child_size;
}
else
{
height_queue.push_back(node_begin_pointer + one_node.idx);
}
}
// 在这里 height_queue里的节点都是高度为0的常量节点和输入节点
while (!height_queue.empty())
{
auto cur_node = height_queue.front();
height_queue.pop_front();
for (auto one_parent : cur_node->parents)
{
// 每个节点的高度为所有子节点的最大高度加1
one_parent->m_height = std::max(one_parent->m_height, cur_node->m_height + 1);
// 每次把入度为0的节点删除 同时扣除所有与其连接的其他节点的入度
auto cur_child_count = node_child_count[one_parent->m_node_idx]--;
if (cur_child_count == 1)
{
// 当入度为0的时候 加入到处理队列中
height_queue.push_back(one_parent);
}
}
}
}
在这个新增加的信息基础上, 我们提供了单变量更新和批量更新,其实单变量更新就是只有一个变量的批量更新,所以我们这里只阐述批量更新的逻辑:
void formula_value_tree::update_attr_batch(const std::vector<std::pair<std::string, double>>& input_attrs)
{
const auto& name_to_idx = m_node_tree.name_to_idx();
for (auto one_attr : input_attrs)
{
auto cur_iter = name_to_idx.find(one_attr.first);
if (cur_iter == name_to_idx.end())
{
continue;
}
m_node_tree.nodes()[cur_iter->second].update_value(this, m_node_values, one_attr.second);
}
m_updated_attrs.clear();
return process_update_queue();
}
update_value负责把设置这些节点的最新值,同时这些节点的父节点加入到任务队列中,这里用一个m_node_in_queue_flag数组作为集合来避免重复添加节点到队列中:
void calc_node::update_value(formula_value_tree* value_tree, std::vector<double>& node_values, double new_value) const
{
if (new_value == node_values[m_node_idx])
{
return;
}
node_values[m_node_idx] = new_value;
for (auto one_parent : parents)
{
value_tree->add_node_to_update_queue(one_parent);
}
}
bool formula_value_tree::add_node_to_update_queue(const calc_node* new_node)
{
if (m_node_in_queue_flag[new_node->node_idx()])
{
return false;
}
m_node_in_queue_flag[new_node->node_idx()] = 1;
m_in_queue_nodes.push_back(std::uint32_t(new_node->node_idx()));
update_queue.push(new_node);
return true;
}
然后调用process_update_queue来处理递归更新:只要队列不为空,从队列中取出高度值最低的节点,进行更新计算,如果值进行了改变,则将当前节点的所有可达节点中不在任务队列中的节点加入到任务队列,如此重复直到任务队列为空。由于我们给每个节点设置了一个高度作为计算优先级,所以这个update_queue的定义如下:
struct node_compare
{
bool operator()(const calc_node* a, const calc_node* b) const
{
return a->height() > b->height();
}
};
class formula_value_tree
{
std::priority_queue<const calc_node*, std::vector<const calc_node*>, node_compare> update_queue;
};
有了这个node_compare的支持之后,整个更新流程代码就比较简洁了:
void formula_value_tree::process_update_queue()
{
std::unordered_set<std::string> reached_name;
while (!update_queue.empty())
{
auto cur_top = update_queue.top();
update_queue.pop();
if (cur_top->update(m_node_values))
{
for (auto one_parent : cur_top->parents)
{
add_node_to_update_queue(one_parent);
}
}
}
for (const auto& one_idx : m_in_queue_nodes)
{
m_node_in_queue_flag[one_idx] = 0;
}
m_in_queue_nodes.clear();
}
在上面的更新结构下,我们给每个节点都赋予了一个更新优先级,在优先级的驱动下,我们就保证了一个节点最多被更新一次。这里的cur_top->update就是公式计算的逻辑分发函数,内部发现计算前后的数值一样的话就不再递归更新:
bool calc_node::update(std::vector<double>& node_values) const
{
double result;
switch (cacl_type)
{
case node_type::root:
result = node_values[m_children_idxes[0]];
break;
case node_type::literal:
result = node_values[m_node_idx];
break;
case node_type::add:
result = 0.0;
for (auto one_child: m_children_idxes)
{
result += node_values[one_child];
}
break;
case node_type::dec:
result = node_values[m_children_idxes[0]] - node_values[m_children_idxes[1]];
break;
case node_type::mul:
result = 1.0;
for (auto one_child: m_children_idxes)
{
result *= node_values[one_child];
}
break;
// 下面省略很多其他分支
}
if (result == node_values[m_node_idx])
{
return false;
}
else
{
node_values[m_node_idx] = result;
return true;
}
}
如果外界系统想要知道本次更新过程中有哪些属性被更改,可以注册属性的更新观察:
struct attr_update_info
{
std::uint32_t node_idx; // 公式图使用的内部节点索引
std::uint32_t watch_idx; //外部监听者使用的属性索引
double value;
};
// 所有被关注的节点索引映射到外部的属性索引 如果为0代表没有被关注
std::vector<std::uint32_t> m_node_watch_idxes;
// 本次计算过程中的所有被修改属性
std::vector< attr_update_info> m_updated_attrs;
const std::vector< attr_update_info>& updated_attrs() const
{
return m_updated_attrs;
}
// 将一些attr的名字映射为外部的一些索引 更新attr的时候顺便会更新m_updated_attrs 外部可以通过这些索引来加速处理 不再需要名字来查找
void watch_nodes(const std::unordered_map<std::string, std::uint32_t>& watch_indexes)
{
m_updated_attrs.clear();
std::fill(m_node_watch_idxes.begin(), m_node_watch_idxes.end(), 0);
const auto& all_names = m_node_tree.name_to_idx();
for (const auto& one_pair : watch_indexes)
{
auto temp_iter = all_names.find(one_pair.first);
if (temp_iter == all_names.end())
{
continue;
}
m_node_watch_idxes[temp_iter->second] = one_pair.second;
}
}
在执行队列里的优先级更新的时候,如果发现当前遇到的节点是一个输出节点,则加入到通知列表中:
if (cur_top->cacl_type == node_type::root)
{
auto cur_watch_idx = m_node_watch_idxes[cur_top->m_node_idx];
if (cur_watch_idx)
{
m_updated_attrs.push_back(attr_update_info{ cur_top->m_node_idx, cur_watch_idx, m_node_values[cur_top->m_node_idx] });
}
}
外部系统需要在更新完成之后获取这个m_update_attrs来执行相应的修改回调。
为了方便使用者去验证运行时变量的更新状态是否正确,我还在属性公式运行时里增加了比较方便的调试输出功能,外部可以传递一个函数进来接收属性字段更新时的调试信息:
void formula_value_tree::set_debug(std::function<void(const std::string&)> debug_func)
{
m_debug_print_func = debug_func;
}
在process_update_queue的时候,每次遇到一个root节点,都会调用这个调试输出函数,这样就可以非常方便的跟踪公式计算流程了:
if (cur_top->cacl_type == node_type::root)
{
auto cur_watch_idx = m_node_watch_idxes[cur_top->m_node_idx];
if (cur_watch_idx)
{
m_updated_attrs.push_back(attr_update_info{ cur_top->m_node_idx, cur_watch_idx, m_node_values[cur_top->m_node_idx] });
}
if (m_debug_print_func)
{
std::ostringstream oss;
cur_top->pretty_print_value(m_node_values, reached_name, oss);
m_debug_print_func(oss.str());
}
}
Mosaic Game中的属性公式
在mosaic_game中并没有使用编辑器去创建公式,而是使用前面介绍过的直接从公式文件生成公式树的方法来创建,对应的公式源文件在generator/config/attr_formula/attr_formula.cpp。在这个公式源文件中会引用到很多输入变量,例如随等级提升的各种属性值,这些变量的值并不是固定的,而是根据配置文件来确定的,下面就是基于excel的怪物属性配置文件:
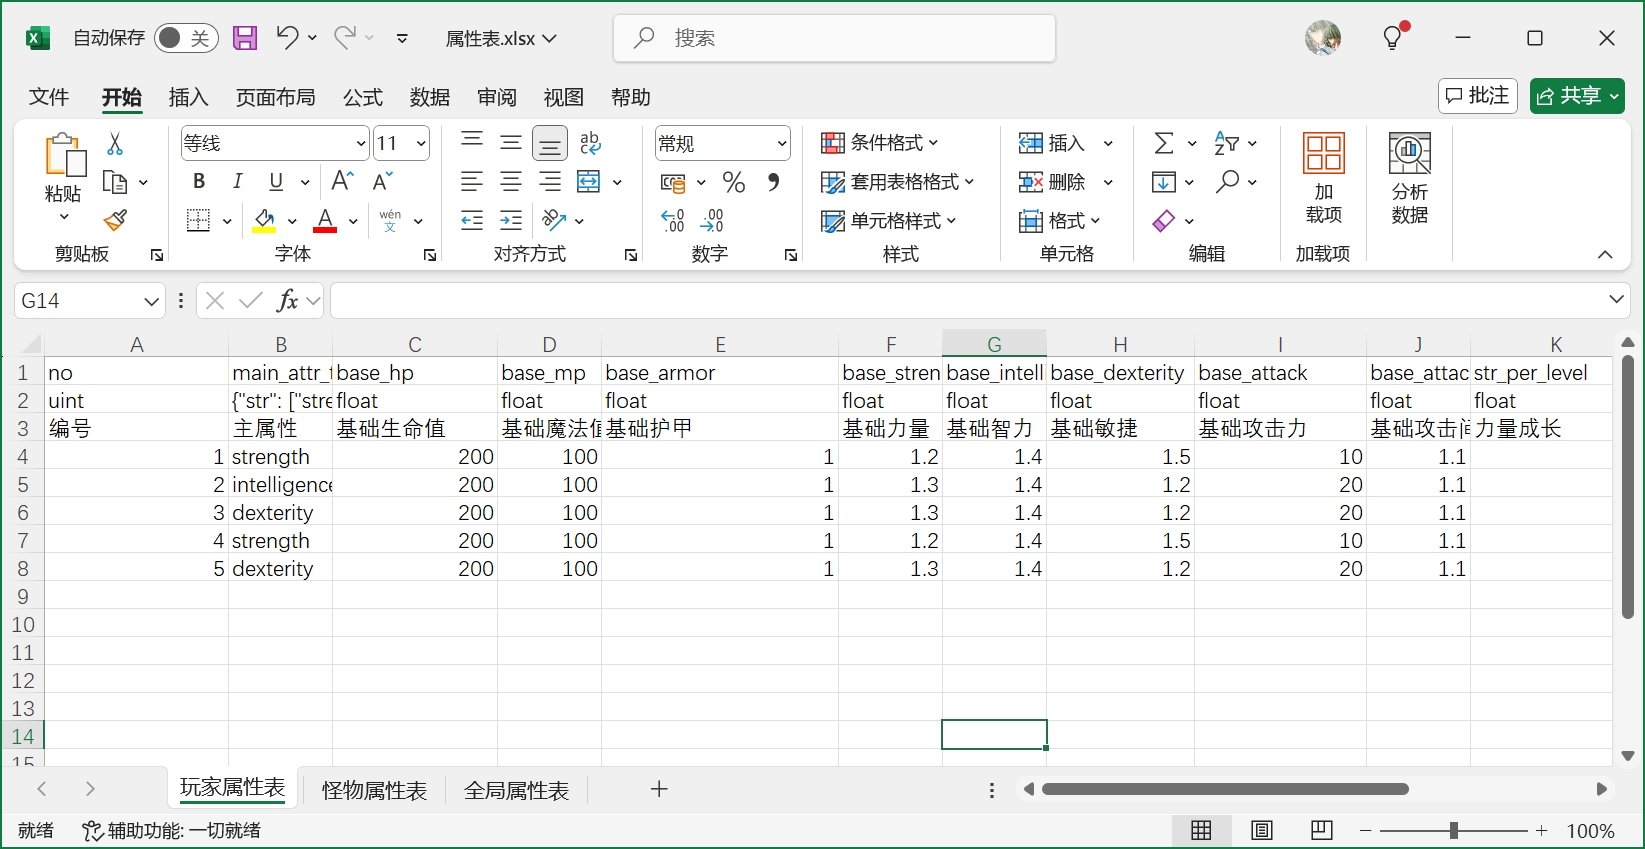
在每个有战斗功能的actor上,都会有一个对应的actor_attr_component来管理属性公式:
struct attr_desc
{
double value = 0.0;
std::uint32_t idx_in_tree = 0;
std::uint32_t update_count = 0;
};
class Meta(rpc) actor_attr_component final: public actor_component::sub_class<actor_attr_component>
{
std::unique_ptr<formula_tree::runtime::formula_value_tree> m_attr_formula_tree;
std::vector<attr_desc> m_attr_inputs;
std::vector<attr_desc> m_attr_outputs;
}
这里的m_attr_formula_tree就是当前actor所拥有的属性计算图的数值实例,m_attr_inputs里存储了属性计算图里的所有输入节点,m_attr_outputs里存储了属性计算图里的所有输出节点。这两个数组的索引都对应各自的枚举值定义,m_attr_inputs对应的是attr_input,m_attr_outputs对应的是attr_output,下面展示这两个枚举类的部分定义:
enum class attr_input
{
extra_str = 0,
extra_dex,
extra_int,
extra_armor,
extra_attack,
};
enum class attr_output
{
strength,
dexterity,
intelligence,
armor,
hp_max,
mp_max,
attack,
attack_speed,
attack_gap,
physical_damage_final_ratio,
magical_damage_final_ratio,
physical_damage_final,
magical_damage_final,
total_hp_recovery,
total_mp_recovery,
max_output,
};
这里的enums::attr_output定义了所有的actor外部可见的属性名,在attr_formula_init中以这些属性名作为引脚去调用load_formula_group来创建actor这一组公式,构造公式计算图:
void actor_attr_component::attr_formula_init()
{
if(m_attr_formula_tree)
{
return;
}
formula_tree::runtime::formula_desc cur_formula_desc;
for(auto one_output_enum: magic_enum::enum_entries<enums::attr_output>())
{
if(one_output_enum.first == enums::attr_output::max_output)
{
continue;
}
cur_formula_desc.output_names.insert(std::string(one_output_enum.second));
}
auto cur_formula_tree = formula_tree::runtime::formula_tree_mgr::instance().load_formula_group("actor", cur_formula_desc);
m_attr_formula_tree.reset(cur_formula_tree);
// 暂时省略后续代码
}
在加载好公式计算图之后,读取之前excel中配置好的输入节点数据,来执行公式系统的第一次数值初始化:
std::vector<std::pair<std::uint32_t, double>> batched_input_attrs;
batched_input_attrs.reserve(m_attr_inputs.size());
for(auto one_input_enum: magic_enum::enum_entries<enums::attr_input>())
{
if(one_input_enum.first == enums::attr_input::max_input)
{
continue;
}
auto& cur_attr_input = m_attr_inputs[int(one_input_enum.first)];
cur_attr_input.idx_in_tree = cur_formula_tree->name_to_node_idx(std::string(one_input_enum.second));
batched_input_attrs.push_back(std::make_pair(cur_attr_input.idx_in_tree, cur_attr_input.value));
// m_owner->logger()->debug("update input attr {} with value {}", one_input_enum.second, cur_attr_input.value);
}
cur_formula_tree->update_attr_batch(batched_input_attrs);
在第一次数值初始化之后,获取此时的所有属性输出节点的最新值。由于这些数值属性会参与到属性同步系统,所以需要通过set_attr_property来将这些输出数值属性设置到属性同步系统的对应字段上:
for(auto one_output_enum: magic_enum::enum_entries<enums::attr_output>())
{
if(one_output_enum.first == enums::attr_output::max_output)
{
continue;
}
auto& cur_attr_output = m_attr_outputs[int(one_output_enum.first)];
cur_attr_output.idx_in_tree = cur_formula_tree->name_to_node_idx(std::string(one_output_enum.second));
cur_attr_output.value = cur_formula_tree->get_attr_value(cur_attr_output.idx_in_tree).value();
set_attr_property(one_output_enum.first);
}
m_owner->dispatcher().dispatch(enums::event_category::attr_init_finish, std::string{});
set_attr_property的实现就是一个简单的switch_case,将attr_output的枚举映射到参与属性同步的具体字段上:
class Meta(property) attr_prop
{
Meta(property(sync_clients)) double m_hp;
Meta(property(sync_clients)) double m_mp;
Meta(property(sync_clients)) double m_hp_max;
Meta(property(sync_clients)) double m_mp_max;
Meta(property(sync_clients)) double m_str;
Meta(property(sync_clients)) double m_dex;
Meta(property(sync_clients)) double m_intel;
Meta(property(sync_clients)) double m_armor;
Meta(property(sync_clients)) double m_attack_gap;
Meta(property(sync_clients)) double m_attack_speed;
Meta(property(sync_clients)) double m_attack;
Meta(property(sync_clients)) double m_magic_defence;
Meta(property(sync_clients)) std::uint64_t m_recovery_check_ts;
#ifndef __meta_parse__
#include "common/attr_prop.generated.inch"
#endif
};
void actor_attr_component::set_attr_property(enums::attr_output cur_attr_type)
{
auto cur_attr_value = m_attr_outputs[int(cur_attr_type)].value;
// m_owner->logger()->debug("update output attr {} with value {}", magic_enum::enum_name(cur_attr_type), cur_attr_value);
switch (cur_attr_type)
{
case enums::attr_output::strength:
m_owner->attr_prop_proxy()->str().set(cur_attr_value);
break;
case enums::attr_output::dexterity:
m_owner->attr_prop_proxy()->dex().set(cur_attr_value);
break;
case enums::attr_output::intelligence:
m_owner->attr_prop_proxy()->intel().set(cur_attr_value);
break;
case enums::attr_output::armor:
m_owner->attr_prop_proxy()->armor().set(cur_attr_value);
break;
case enums::attr_output::attack:
m_owner->attr_prop_proxy()->attack().set(cur_attr_value);
break;
case enums::attr_output::attack_speed:
m_owner->attr_prop_proxy()->attack_speed().set(cur_attr_value);
break;
case enums::attr_output::attack_gap:
m_owner->attr_prop_proxy()->attack_gap().set(cur_attr_value);
break;
case enums::attr_output::hp_max:
m_owner->attr_prop_proxy()->hp_max().set(cur_attr_value);
break;
case enums::attr_output::mp_max:
m_owner->attr_prop_proxy()->mp_max().set(cur_attr_value);
break;
default:
break;
}
}
上面的逻辑只是做了数值属性初始化时向属性同步系统里的相关属性做初始同步。如果外部的数值输入节点发生了变化,需要将这个输入节点的最新值推送到公式计算图中:
void attr_input_update(enums::attr_input attr_input_type, double delta);
void attr_input_update_batch(const std::vector<std::pair<std::uint32_t, double>>& batch_delta_attrs, bool is_add = true);
void attr_input_set(enums::attr_input attr_input_type, double value);
在这三个接口中都会驱动公式计算图里的相关节点进行数值更新。为了能够及时的通知到属性同步系统,需要在公式计算图中注册相关输出节点的变化通知,所以第一次初始化数值属性的时候顺带的把这些节点改变的监听增加上:
std::unordered_map<std::string, std::uint32_t> cur_watched_nodes;
for(auto one_output_enum: magic_enum::enum_entries<enums::attr_output>())
{
if(one_output_enum.first == enums::attr_output::max_output)
{
continue;
}
cur_watched_nodes[std::string(one_output_enum.second)] = std::uint32_t(one_output_enum.first) + 1;
}
cur_formula_tree->watch_nodes(cur_watched_nodes);
在完成这些注册之后,每次外部触发了公式计算图的更新,都需要使用process_formula_updates检查输出的属性更新信息,并使用set_attr_property通知到属性同步系统:
void actor_attr_component::process_formula_updates()
{
auto& cur_updated_attrs = m_attr_formula_tree->updated_attrs();
for(const auto& one_attr: cur_updated_attrs)
{
auto cur_watch_idx = one_attr.watch_idx - 1;
m_attr_outputs[cur_watch_idx].value = one_attr.value;
m_attr_outputs[cur_watch_idx].update_count++;
set_attr_property(enums::attr_output(cur_watch_idx));
m_owner->dispatcher().dispatch(enums::event_category::attr_update, m_attr_outputs[cur_watch_idx]);
}
}
群组与队伍
在游戏这个这个虚拟空间里玩家可以自由进行探索,方便的体验四时风物,历史人情。但是游戏能提供的体验内容总是有限的,多人在线游戏中必须不断的更新新内容来维持玩家在游戏内的活跃度。但是策划设计新场景任务的速度是永远都赶不上玩家的探索速度的,故意的提高全探索全收集的难度来减缓内容消耗速度又会造成玩家在多次尝试之后被劝退。因此。在多人在线游戏中,丰富的社群系统是不可或缺的。这些社交系统负责让玩家在等待内容更新的期间能够持续的在游戏内与其他玩家进行互动。主流的多人在线游戏的社群有很多种形式,例如群组、队伍、门派、帮派、师徒、势力、结义、姻缘、邻里等。在MosaicGame中也实现了其中最基本的两种形式:群组与队伍,因为这两种最基础也最广泛。至于其他类型的社群这里就不去涉及了,牵涉到了太多的具体的业务逻辑,同时结构上其实与群组并没有多大的差别,因此对这些不做介绍。
群组
群组结构定义
群组作为所有社群的基础,需要承担两个极其重要的社群职责:
- 群组成员结构的维系,主要是处理群组的创建删除以及组内人员的进出
- 群组的状态同步,主要是将群组内的可见状态推送到组内成员中
在MosaicGame中使用了group_service来管理群组,每一个群组都用一个结构体group_resource来描述:
class group_resource
{
public:
property::group::group_data_item m_prop;
spiritsaway::property::top_msg_queue m_prop_queue;
spiritsaway::property::prop_record_proxy<property::group::group_data_item> m_prop_proxy;
std::vector<id_anchor_pair> m_online_id_anchors;
mutable std::vector<std::string> m_temp_online_anchors;
std::vector<std::string> m_all_online_anchors;
misc::group_impl_handler m_handler;
std::vector<std::uint8_t> m_dirty_fields;
std::vector<std::uint8_t> m_db_fields;
};
群组内的状态完全用property::group::group_data_item m_prop这个property_item来表征:
class Meta(property) group_data_item : public spiritsaway::property::property_bag_item<std::uint32_t>
{
public:
Meta(property(sync_self, save_db)) std::string m_name;
Meta(property(sync_self, save_db)) group_players m_players;
// 只需要给 leader进行同步
Meta(property(sync_self, sync_leader, save_db)) group_applys m_recieve_applys;
Meta(property(sync_self, save_db)) group_invites m_send_invites;
Meta(property(sync_self, save_db)) std::string m_leader_id;
Meta(property(sync_self, save_db)) std::map<std::string, json> m_common_data;
Meta(property(sync_self, save_db)) bool m_allow_apply = false;
Meta(property(sync_self, save_db)) bool m_only_leader_invite = false;
Meta(property(sync_self, save_db)) std::uint32_t m_group_size = 0;
Meta(property(sync_self, save_db)) std::uint64_t m_last_chat_seq = 0;
};
在这个group_data_item中,m_players也是一个property_bag,存储了队伍内的玩家数据。目前除了聊天之外没有其他业务逻辑使用群组,因此这里的玩家成员信息是非常简陋的,只记录了玩家的pid,进组时间以及是否在线,:
class Meta(property) group_player_item: public spiritsaway::property::property_bag_item<std::string>
{
public:
Meta(property(sync_self, save_db)) std::uint64_t m_enter_ts = 0;
Meta(property(sync_self)) bool m_online = false;
};
using group_players = spiritsaway::property::property_bag<group_player_item>;
其中在线状态并不需要存库,因此在线状态的property_flag没有save_db。
群组状态修改
进入一个群组有三种方式:创建时自动进入、邀请进入、申请进入。默认情况下组内任意成员都可以邀请其他非当前组的成员进入当前群组,不过这里有一个m_only_leader_invite字段来控制是否只允许群组所有者才能邀请。玩家可以向任意群组发出入组申请,这些申请只能被群组的所有者进行审批。因为入组申请其他组员完全没有处理权限。所以group_data_item中的m_recieve_applys有一个比较特殊的地方,这个字段的property_flag里出现了一个与众不同的sync_leader字段。这个字段的作用是通知属性同步系统这个字段只需要给当前群组的所有者进行同步,因为只有所有者才有权去修改这个字段。
离开一个群组有两种方式:自愿退出或者被所有者强制移除。这里实现起来都比较简单,但是有一个需要注意的地方:如果群组的所有者自愿退出了,那么需要在剩余的组员中寻找一个作为新的所有者,如果没有剩余组员则彻底删除这个群组。此外还有一个强制解散当前群组的指令,这个解散指令只有群组所有者才有权发起。
所有的群组操作都是由玩家从客户端界面发起,RPC经过对应的服务端entity处理过后再发送给group_service去做最终的裁定。在这个操作传递链中,会经过客户端玩家、服务端玩家、群组服务三轮操作合法性检查。常规的实现里为了图方便可能就是把类似甚至相同的代码复制三遍,这样的实现在规则修改的时候很容易出现有其他地方漏改的情况。因此对于群组的相关接口的参数合法性检查被统一到了一个group_check_handler上,这个group_check_handler是一个非常轻量的对象,创建的时候只需要传入当前群组的group_data_item属性:
class group_check_handler
{
public:
const property::group::group_data_item& m_group_data;
public:
group_check_handler(const property::group::group_data_item& in_group_data);
enums::group_errcode dismiss(const std::string& action_player_id);
enums::group_errcode kick(const std::string& dest_player_id, const std::string& action_player_id);
enums::group_errcode exit(const std::string& action_player_id);
enums::group_errcode apply(const property::group::group_apply_item& apply_player_info);
enums::group_errcode handle_apply(const std::string& apply_player_id, bool is_confirm, const std::string& action_player_id);
enums::group_errcode retract_apply(const std::string& apply_player_id);
enums::group_errcode invite(const std::string& dest_player_id, const std::string& action_player_id);
enums::group_errcode retract_invite(const std::string& dest_player_id, const std::string& action_player_id);
enums::group_errcode accept_invite(const property::group::group_player_item& apply_player_info);
enums::group_errcode change_leader(const std::string& dest_player_id, const std::string& action_player_id);
enums::group_errcode set_allow_apply(bool is_confirm, const std::string& action_player_id);
enums::group_errcode set_allow_invite(bool is_confirm, const std::string& action_player_id);
enums::group_errcode update_member_info(const json& new_info, const std::string& action_player_id);
enums::group_errcode change_name(const std::string& new_name, const std::string& action_player_id);
enums::group_errcode update_common_info(const std::string& data_key, const json& new_info, const std::string& action_player_id);
void check_apply_expire(std::uint64_t now_ts, std::vector<std::string>& expired_player_ids);
void check_invite_expire(std::uint64_t now_ts, std::vector<std::string>& expired_player_ids);
};
每个接口都需要传入接口调用人与相关参数,同时返回这个接口的相关错误码,当发现相关参数不合法时,将拒绝这个接口的执行,并将相关错误信息传递到客户端。下面就是一个强制移除成员的RPC接口例子,完整的说明了一个群组接口在服务端的检查之后的转发流程,其他接口的代码结构基本与此例子类似:
void player_group_component::group_kick(const utility::rpc_msg& msg, std::uint32_t group_id, const std::string& dest_player_id)
{
enums::group_errcode cur_err = enums::group_errcode::ok;
do
{
auto temp_group_data = m_player->prop_data().m_group.m_group_datas.get(group_id);
if(!temp_group_data)
{
cur_err = enums::group_errcode::invalid_group_id;
break;
}
auto temp_group_check_handler = misc::group_check_handler(*temp_group_data);
cur_err = temp_group_check_handler.kick(dest_player_id, m_owner->entity_id());
} while (false);
if(cur_err != enums::group_errcode::ok)
{
utility::rpc_msg reply_msg;
reply_msg.set_args(std::uint8_t(enums::group_action::kick), group_id, msg.args, std::uint32_t(cur_err));
reply_msg.cmd = "group_action_reply";
m_player->call_client(reply_msg);
return;
}
group_call_service(msg);
}
如果检查失败会通过group_action_reply这个通用的群组RPC结果通知接口传递到客户端,这里的第一个参数也是一个枚举类型enums::group_action,用来表明当前执行的操作是哪个。中间的两个参数负责记录要操作的群组以及相关的操作参数,最后的参数就是错误码。如果错误码等于enums::group_errcode::ok,则将这个操作转发到group_service上,再次做一轮检查,检查通过之后才能执行相关效果:
void group_service::group_kick(const utility::rpc_msg& msg, std::uint32_t dest_group_idx, const std::string& dest_player_id, const std::string& action_player_id)
{
enums::group_errcode cur_err = enums::group_errcode::ok;
group_resource* dest_group = nullptr;
do
{
auto temp_group_iter = m_group_resources.find(dest_group_idx);
if(temp_group_iter == m_group_resources.end())
{
cur_err = enums::group_errcode::invalid_group_id;
break;
}
dest_group = temp_group_iter->second.get();
cur_err = dest_group->m_handler.kick(dest_player_id, action_player_id);
if(cur_err != enums::group_errcode::ok)
{
break;
}
} while (false);
if(cur_err == enums::group_errcode::ok)
{
on_player_leave_group(dest_player_id, dest_group, std::uint8_t(enums::group_action::kick));
std::vector<json> temp_args;
temp_args.push_back(dest_player_id);
group_sync_props(dest_group, std::uint8_t(enums::group_action::kick), std::move(temp_args), {});
}
auto temp_player_iter = m_player_infos.find(action_player_id);
if(temp_player_iter == m_player_infos.end())
{
return;
}
group_action_reply(temp_player_iter->second.anchor, std::uint8_t(enums::group_action::kick), dest_group_idx, msg, std::uint32_t(cur_err));
}
这里的dest_group->m_handler就不是之前提到的group_check_handler了,而是group_impl_handler。这个group_impl_handler内部会先调用group_check_handler来检查参数合法性,如果合法则执行相关操作,修改存储在group_service上的对应group_data_item属性:
enums::group_errcode group_impl_handler::kick(const std::string& dest_player_id, const std::string& action_player_id)
{
auto cur_err = group_check_handler::kick(dest_player_id, action_player_id);
if(cur_err != enums::group_errcode::ok)
{
return cur_err;
}
m_group_proxy.players().erase(dest_player_id);
return cur_err;
}
由于复用了group_check_handler的所有代码,因此此处的代码量其实很少。
群组属性同步
group_check_handler减轻了很多代码维护上的工作量,group_impl_handler只需要维护好属性修改即可。但是目前group_impl_handler修改的只是存储在group_service上的一个group_data_item,修改之后我们还需要将这些修改通知到群组内所有的服务端玩家。因此对于group_service上的每一个group_data_item,都会有一个封装其修改与同步操作的group_resource,内部使用一个spiritsaway::property::top_msg_queue m_prop_queue;来暂存所有的属性同步消息:
group_resource::group_resource(group_service& in_service, const std::uint32_t& group_id, const std::string& group_name, const property::group::group_player_item& leader_info, const std::uint32_t group_sz)
: m_prop_queue(group_prop_flags(), true, true)
, m_prop_proxy(m_prop, m_prop_queue, spiritsaway::property::property_record_offset(), spiritsaway::property::property_flags{ spiritsaway::mosaic_game::property::property_flags::mask_all }, 0)
, m_handler(m_prop_proxy)
{
m_prop.m_id = group_id;
m_prop.m_name = group_name;
m_prop.m_leader_id = leader_info.m_id;
m_prop.m_group_size = group_sz;
m_prop_proxy.players().insert(leader_info);
// 直接清空属性同步队列
m_prop_queue.dump();
}
group_resource::group_resource(property::group::group_data_item&& in_prop)
: m_prop(std::move(in_prop))
, m_prop_queue(group_prop_flags(), true, true)
, m_prop_proxy(m_prop, m_prop_queue, spiritsaway::property::property_record_offset(), spiritsaway::property::property_flags{ spiritsaway::mosaic_game::property::property_flags::mask_all }, 0)
, m_handler(m_prop_proxy)
{
// 直接清空属性同步队列
m_prop_queue.dump();
}
每次处理的群组action引发了属性修改之后,外部需要执行group_sync_props将这些属性同步消息广播到所有在线的群组内玩家:
void group_service::group_sync_props(group_resource* cur_group_ptr, std::uint8_t cur_action_id, std::vector<json>&& action_args, const std::string& except_id)
{
auto cur_prop_deltas = cur_group_ptr->m_prop_queue.dump();
if(cur_prop_deltas.empty())
{
m_logger->info("cur_action_id {} action_args {} prop_delta empty", cur_action_id, json(action_args).dump());
return;
}
std::vector<json> prop_delta_jsons;
prop_delta_jsons.reserve(cur_prop_deltas.size());
bool has_leader_prop = false;
for(auto& one_prop_info: cur_prop_deltas)
{
if(cur_group_ptr->add_dirty_field(one_prop_info.offset.top()))
{
m_dirty_groups.emplace(cur_group_ptr->m_prop.m_id, utility::timer_manager::now_ts());
}
if(one_prop_info.flag.value & spiritsaway::mosaic_game::property::property_flags::sync_leader)
{
has_leader_prop = true;
}
else
{
std::vector<json> team_prop_json;
team_prop_json.reserve(4);
team_prop_json.push_back(one_prop_info.offset.value());
team_prop_json.push_back(std::uint8_t(one_prop_info.cmd));
team_prop_json.push_back(one_prop_info.flag.value);
team_prop_json.push_back(std::move(one_prop_info.data));
prop_delta_jsons.push_back(std::move(team_prop_json));
}
}
std::vector<json> rpc_args;
rpc_args.reserve(3);
rpc_args.push_back(cur_action_id);
rpc_args.push_back(action_args);
rpc_args.push_back(std::move(prop_delta_jsons));
group_broadcast(cur_group_ptr, "group_prop_delta", rpc_args, except_id, has_leader_prop);
if(has_leader_prop)
{
prop_delta_jsons.clear();
for(auto& one_prop_info: cur_prop_deltas)
{
std::vector<json> team_prop_json;
team_prop_json.reserve(4);
team_prop_json.push_back(one_prop_info.offset.value());
team_prop_json.push_back(std::uint8_t(one_prop_info.cmd));
team_prop_json.push_back(one_prop_info.flag.value);
team_prop_json.push_back(std::move(one_prop_info.data));
prop_delta_jsons.push_back(std::move(team_prop_json));
}
rpc_args.back() = std::move(prop_delta_jsons);
group_call_leader(cur_group_ptr, "group_prop_delta", std::move(rpc_args));
}
}
这个属性同步接口有一半的内容基本是重复的,主要是为了处理m_recieve_applys这个只有群组拥有者才可见的属性的同步问题,也就是上面代码中的has_leader_prop部分。
当在线玩家通过group_prop_delta接收到了最新的群组修改数据之后,需要一个自动的机制将所有的修改在自身身上回放。其实这个回放过程与我们之前做的服务端属性同步到客户端后回放的流程基本类似,不同的地方在于客户端使用了prop_replay_proxy,而服务端使用的是prop_record_proxy:
void player_group_component::group_prop_delta(const utility::rpc_msg& msg, std::uint32_t group_id, std::uint8_t group_action_id, const std::vector<json>& action_args, const std::vector<json>& prop_deltas)
{
m_owner->logger()->info("group_prop_delta group_id {} receive action_id {} args {}, deltas {}", group_id, magic_enum::enum_name(enums::group_action(group_action_id)), msg.args[2].dump(), msg.args[3].dump());
misc::group_prop_sync_event cur_prop_sync_event{false, group_id, action_args};
m_owner->dispatcher().dispatch(enums::group_action(group_action_id), cur_prop_sync_event);
auto cur_group_proxy_opt = m_player->prop_proxy().group().group_datas().get(group_id);
if(!cur_group_proxy_opt.has_value())
{
assert(false);
return;
}
for(const auto& one_prop: prop_deltas)
{
std::uint64_t offset;
std::uint8_t cmd;
std::uint64_t flag;
json prop_data;
if(!serialize::decode_multi(one_prop, offset, cmd, flag, prop_data))
{
m_owner->logger()->error("fail to decode team prop delta {}", one_prop.dump());
continue;
}
auto cur_cmd_enum = spiritsaway::property::property_cmd(cmd);
cur_group_proxy_opt.value().replay(spiritsaway::property::property_record_offset(offset).to_replay_offset(), cur_cmd_enum, prop_data);
}
cur_prop_sync_event.is_finish = true;
m_owner->dispatcher().dispatch(enums::group_action(group_action_id), cur_prop_sync_event);
}
不过这里用了这个prop_record_proxy上的一个比较高级的用法replay,即回放另外一个prop_record_proxy修改的同时,会将修改的信息再传一份到prop_msg_queue中,并最终通过prop_msg_queue再同步到客户端。这样就实现了group_data_item在group_service端修改后的所有在线群组成员的服务端和客户端的属性修改同步。
群组数据加载
群组服务是我们目前接触到的第一个游戏局外系统,局外系统相对于局内系统有一个非常大的不同,即其状态是需要持久化的。玩家下线后再上线需要看到其最后的修改结果,同时游戏服务器关服再开服要保证前后的数据是一致的。为了将这些局外数据进行持久化,我们这里需要将这些数据编码之后存储到外部数据库中,然后在游戏启动之后再从数据库中恢复出这些数据。所以在group_service的启动阶段会去数据库中加载所有的群组数据。由于群组数量可能非常多,单次数据库查询的结果会非常大,可能导致网络层将这个数据丢弃。因此在加载的时候执行的是分批加载,每次加载一个固定的数量batch_num。为了配合这样的分批加载,每个group_data_item上的id字段就会当作计算批次的依据:
const std::string& group_service::group_counter_field()
{
static std::string counter_field = "id";
return counter_field;
}
为了知道什么时候加载完成,需要首先获取当前所有的群组编号的最大值,这个最大值存储在通用的counter数据库中:
bool group_service::init(const json::object_t& data)
{
m_service_state = service_state::invalid;
if(!base_service::init(data))
{
return false;
}
server::unique_counter_manager::instance().get_current_counter(group_db_name(), [cur_server = m_service_server, cur_service_id = m_base_desc.m_global_id, this](const std::string& query_err, std::uint64_t result_counter)
{
if(!cur_server->check_service_active(cur_service_id))
{
return;
}
on_query_counter_back(query_err, result_counter);
});
m_service_state = service_state::query_counter;
return true;
}
在counter查询回调回来之后,会利用一个辅助类型collection_loader_manager来托管分批加载的流程,业务只需要提供一个最终完成的回调即可:
void group_service::on_query_counter_back(const std::string& query_err, std::uint64_t result_counter)
{
m_logger->info("on_query_counter_back err {} result_counter {}", query_err, result_counter);
if(!query_err.empty())
{
m_logger->error("on_query_counter_back fail with err {}", query_err);
m_service_state = service_state::fail;
return;
}
m_logger->info("on_query_counter_back with counter {}", result_counter);
if(m_service_state != service_state::query_counter)
{
m_logger->error("on_query_counter_back while state is {}", int(m_service_state));
return;
}
if(result_counter == 0)
{
m_service_state = service_state::ready;
report_ready();
return;
}
m_service_state = service_state::load_db;
server::collection_load_params cur_load_param;
cur_load_param.collection_name = group_db_name();
cur_load_param.counter_field = group_counter_field();
cur_load_param.counter_max = result_counter;
cur_load_param.batch_num = 100;
m_load_db_sid = server::collection_loader_manager::instance().request_load_collection(cur_load_param, [this](const std::string& db_err ,const json::array_t& result_datas)
{
on_load_db_back(db_err, result_datas);
});
}
collection_loader_manager的使用提供collection_load_params结构体来明确要加载的数据库、最大流水号、批次设置、流水号字段,这样内部就会循环回调的形式来执行数据的分批全量加载:
std::uint32_t collection_loader_manager::request_load_collection(const collection_load_params& load_param, callback_type load_callback)
{
if(load_param.counter_max == 0)
{
return 0;
}
m_load_sid++;
auto cur_sid = m_load_sid;
loading_result temp_loading_result;
temp_loading_result.param = load_param;
temp_loading_result.load_callback = load_callback;
m_loading_results[cur_sid] = temp_loading_result;
m_loading_results[cur_sid].collection_data.reserve(load_param.batch_num);
start_next_load(cur_sid);
return cur_sid;
}
void collection_loader_manager::start_next_load(std::uint32_t cur_load_sid)
{
auto temp_iter = m_loading_results.find(cur_load_sid);
if(temp_iter == m_loading_results.end())
{
return;
}
auto cur_db_callback = [this, cur_load_sid](const json& db_reply)
{
this->get_data_callback(cur_load_sid, db_reply);
};
tasks::db_task_desc::base_task cur_task_base(tasks::db_task_desc::task_op::find_multi, std::string{}, "", temp_iter->second.param.collection_name);
json counter_seq_query;
counter_seq_query["$gte"] = temp_iter->second.m_next_seq_to_load;
counter_seq_query["$lt"] = std::min(temp_iter->second.param.counter_max + 1, temp_iter->second.m_next_seq_to_load + temp_iter->second.param.batch_num);
json collection_query;
collection_query[temp_iter->second.param.counter_field] = counter_seq_query;
auto cur_find_task = tasks::db_task_desc::find_task::find_multi(cur_task_base, collection_query, temp_iter->second.param.batch_num);
m_server->call_db(cur_find_task->to_json(), cur_db_callback);
}
这里的get_data_callback会判断当前返回数据的批次号是否已经达到了最大批次号,如果达到了就执行数据完全加载的回调,否则就开启下一个批次的加载:
// void collection_loader_manager::get_data_callback(std::uint32_t cur_load_sid, const json& db_reply)
_logger->info("get_data_callback for cur_load_sid {} collection {} next_seq_to_load {} update with size {}", cur_load_sid, temp_iter->second.param.collection_name, temp_iter->second.m_next_seq_to_load, temp_iter->second.collection_data.size());
temp_iter->second.m_next_seq_to_load += temp_iter->second.param.batch_num;
if(temp_iter->second.m_next_seq_to_load > temp_iter->second.param.counter_max)
{
m_logger->info("get_data_callback for cur_load_sid {} collection {} finished with num {}", cur_load_sid, temp_iter->second.param.collection_name, temp_iter->second.collection_data.size());
auto final_data = std::move(temp_iter->second.collection_data);
auto cur_callback = std::move(temp_iter->second.load_callback);
m_loading_results.erase(temp_iter);
cur_callback(error, final_data);
return;
}
start_next_load(cur_load_sid);
群组数据存库
同时为了避免游戏的突然崩溃造成存档丢失,局外系统的数据一般会在修改后以一定频率执行一下对外部数据库的同步。如果是充值记录等重要的数据,基本都需要立即写数据库,等到数据库落库回调回来之后才能执行后续的逻辑。但是对于群组数据这种不是非常重要的数据,则不需要在每次修改之后就立即同步。因为群组数据的修改频率会非常的高,每次都直写数据库会给数据库增加非常大的负载压力,因此这里对于群组数据的持久化采用的是定期存库的策略。在group_service上会开启一个计时器来执行存库:
m_check_save_timer = add_timer_with_gap(std::chrono::milliseconds(m_check_save_gap_ms), [this]()
{
check_save();
});
group_service上使用了一个unordered_map<uint32, uint64> m_dirty_groups来记录所有需要存库的群组数据以及其修改时间戳。由于同一时刻需要存库的群组数据可能比较多,为了避免大量群组数据的编码发送触发cpu的瞬间升高以及网络拥堵,这个check_save函数内部会将修改时间最早的m_check_save_num个群组数据来执行存库,剩下的未存库数据需要等到下一次check_save再执行判断:
void group_service::check_save()
{
m_sorted_dirty_groups.clear();
m_sorted_dirty_groups.reserve(m_dirty_groups.size());
for(const auto& one_pair: m_dirty_groups)
{
std::pair<std::uint64_t, std::uint32_t> new_pair; // first是修改时间戳 second是群组的id
new_pair.first = one_pair.second;
new_pair.second = one_pair.first;
m_sorted_dirty_groups.push_back(new_pair);
}
std::uint32_t final_save_num = m_sorted_dirty_groups.size();
if(m_sorted_dirty_groups.size() > m_check_save_num)
{
std::nth_element(m_sorted_dirty_groups.begin(), m_sorted_dirty_groups.begin() + m_check_save_num, m_sorted_dirty_groups.end());
final_save_num = m_check_save_num;
}
// 省略真正执行存库的代码
}
每次存库都将整个group_data_item都执行一次encode的代价有点大,在有些属性压根没有修改的情况下,这样的操作既浪费cpu又浪费流量,所以我们这里使用一个数组来m_dirty_fields记录哪些需要存库的字段被修改了,存库的时候只需要对这些字段执行encode即可:
for(std::uint32_t i = 0;i<final_save_num;i++)
{
auto cur_group_idx = m_sorted_dirty_groups[i].second;
auto temp_iter = m_group_resources.find(cur_group_idx);
if(temp_iter == m_group_resources.end())
{
continue;
}
temp_iter->second->m_handler.clear_expired_applys_and_invites(utility::timer_manager::now_ts(), temp_pid_buffer);
spiritsaway::property::property_flags cur_save_db_flag;
cur_save_db_flag.value = property::property_flags::save_db;
auto cur_group_json = temp_iter->second->m_prop.encode_fields_with_flag(temp_iter->second->m_dirty_fields, cur_save_db_flag, false);
if(cur_group_json.empty())
{
continue;
}
// 只存储diff的字段
temp_iter->second->m_dirty_fields.clear();
auto cur_db_calback = [this](const json& db_reply)
{
this->on_save_group_db_back(db_reply);
};
auto cur_db_callback_id = m_callback_mgr.add_callback(cur_db_calback);
tasks::db_task_desc::base_task cur_task_base(tasks::db_task_desc::task_op::update_one, std::string{}, std::to_string(cur_db_callback_id.value()), group_db_name());
json query_doc, db_doc;
query_doc[group_counter_field()] = cur_group_idx;
db_doc["$set"] = std::move(cur_group_json);
auto cur_update_task = tasks::db_task_desc::update_task::update_one(cur_task_base, query_doc, db_doc, false);
get_server()->call_db(cur_update_task->to_json(), this, cur_db_callback_id);
m_dirty_groups.erase(cur_group_idx);
}
m_dirty_fields的维护是通过add_dirty_field函数来做的,需要在属性有修改之后使用add_dirty_field过滤掉这些不需要存库的字段,同时记录一下哪些需要存库的字段被修改了:
bool group_resource::add_dirty_field(std::uint8_t cur_field, const spiritsaway::property::property_flags& prop_flag)
{
if(!(prop_flag.value & spiritsaway::mosaic_game::property::property_flags::save_db))
{
return false;
}
auto temp_iter = std::find(m_dirty_fields.begin(), m_dirty_fields.end(), cur_field);
if(temp_iter == m_dirty_fields.end())
{
m_dirty_fields.push_back(cur_field);
return true;
}
return false;
}
每次group_data_item修改之后group_sync_props内都检查一下相关字段的prop_flags里是否有save_db这个标记,如果有的话则加入到m_dirty_groups中,记录群组的标识符以及修改时间戳,这里的emplace接口会保证对应流水号已经在m_dirty_groups中时不会去更新时间戳:
for(auto& one_prop_info: cur_prop_deltas)
{
if(cur_group_ptr->add_dirty_field(one_prop_info.offset.top(), one_prop_info.flag))
{
m_dirty_groups.emplace(cur_group_ptr->m_prop.m_id, utility::timer_manager::now_ts());
}
// 省略其他代码
}
队伍
队伍可以看作一个固定了成员上限的小型群组,因此在组队相关逻辑这里依照群组的实现模式构造了team_check_handler与team_impl_handler来实现队伍创建、退出、邀请、申请等相关操作的检查与执行,同时team_service上也利用了prop_record_proxy配合team_broadcast来执行队伍相关属性的广播同步。所以读者可以在team_service,player_team_component上看到很多之前介绍过的群组相关代码的影子。
但是队伍相对于群组来说又有两个非常明显的差异:
-
队伍只是在服务器运行期间才存在的,队伍成员全都下线之后队伍自动解散,因此
team_service上队伍数据不需要执行数据库的读取与存库操作,同时玩家身上的队伍数据team_prop也没有save_db相关字段。 -
一个玩家在同一时间内最多会有一个对应的队伍,而一个玩家可以同时归属于多个群组,所以队伍服务
team_service上需要记录所有在线人员对应的队伍信息,同时玩家身上的team_prop只有一个,
队伍除了成员管理、聊天等群组通用的功能之外,还有组队投票、组队撮合等队伍独有功能,这两点需要着重说一下。
组队撮合
正常来说一个玩家如果想进入一个队伍,要么目标队伍中有人向自己发出了邀请,要么自己往目标队伍发生了申请。这两个功能的实现基本与群组中的对应功能一致,所以这里就不去展开。不过队伍这个小型群组有个比较特殊的地方,就是他的临时性。因为一个队伍组建起来一般都是为了一个临时性的目标,例如完成日常的组队任务、组队副本、组队PK等这些强行要求组队的玩法。而完成了这些玩法之后,对应的队伍一般都会进行解散,这就是所谓的野团。为了提升游戏里的社交,策划设计的组队玩法会非常多,所以玩家的入队和退队频率是很高的,这些队伍的创建销毁也十分频繁。但是不同玩家在不同时间点的组队需求是不一样的,可能A想去做组队副本M,而B想去做组队副本N,组完队之后再去商量下一个目标是什么就会吵起来。然后玩家如果想从大厅里寻找一个特定任务的队伍,需要遍历当前的所有空闲队伍列表,一个个的去询问队长当前的目标是否与自己相匹配,这种体验非常的差。因此一般来说会在队伍属性里添加一个target字段,代表当前队伍的阶段性目标是什么,这样就可以方便玩家寻找队伍时来过滤掉大量无关队伍。同时很多组队任务并不是集齐任意的指定数量的玩家就可以通过的,例如很多副本里需要队伍中同时存在战法牧这三种角色才能勉为其难的通关,如果全是战士或者全是奶妈则基本没有机会。然后不同的副本对应的战斗强度不一样,队伍成员的战斗力过低会大大的拖累任务的完成,甚至导致任务的失败。所以队伍需要能够自定义的准入条件,包括上述描述到的目标、职业、等级、装等、战力、修为、进度等要素,来限制掉一些不符合要求的入队申请。在mosaic_game里目前提供了下面的三个字段来做一些过滤:
class Meta(property) team_prop
{
public:
Meta(property(sync_clients, sync_redis)) std::string m_id;
Meta(property(sync_self, sync_redis)) std::string m_target; // 队伍的目标,例如组队副本、组队PK等
Meta(property(sync_self, sync_redis)) std::vector<std::uint32_t> m_sects_need; // 队伍限定的新入队玩家的职业
Meta(property(sync_self, sync_redis)) std::uint32_t m_level_need = 0; // 队伍限定的新入队玩家的等级
// 省略很多字段
};
然后在往目标队伍发出申请的时候,需要带上自己的相关信息team_player_item,来辅助是否满足队伍设置的相关限制条件:
class Meta(property) team_player_item: public spiritsaway::property::property_slot_item<std::uint64_t>
{
public:
Meta(property(sync_self, sync_redis)) std::string m_nickname;
Meta(property(sync_self, sync_redis)) std::string m_pid; // 存库用id
Meta(property(sync_self, sync_redis)) std::uint32_t m_sect = 0;
Meta(property(sync_self, sync_redis)) std::uint32_t m_level = 0;
Meta(property(sync_self, sync_redis)) std::uint32_t m_space_no = 0;
Meta(property(sync_self, sync_redis)) std::string m_space_id;
Meta(property(sync_self)) std::string m_anchor;
Meta(property(sync_self, sync_redis)) bool m_client_online = true;
Meta(property(sync_self)) std::uint64_t m_appply_ts = 0;
#ifndef __meta_parse__
#include "team/team_player_item.generated.inch"
#endif
};
enums::team_errcode team_check_handler::apply(const property::team::team_player_item& apply_player_info)
{
const auto cur_apply_player_oid = apply_player_info.id();
if(m_team_data.recieve_applys().get(cur_apply_player_oid))
{
return enums::team_errcode::already_during_apply;
}
if(m_team_data.players().full())
{
return enums::team_errcode::team_full;
}
if(!m_team_data.allow_apply())
{
return enums::team_errcode::apply_not_allowed;
}
if(m_team_data.recieve_applys().index().size() >= enums::team_max_apply_sz)
{
return enums::team_errcode::applys_too_much;
}
if(m_team_data.match_info().match_index())
{
return enums::team_errcode::during_match;
}
if(m_team_data.locked())
{
return enums::team_errcode::team_locked;
}
if(!m_team_data.m_sects_need.empty())
{
if(std::find(m_team_data.m_sects_need.begin(), m_team_data.m_sects_need.end(), apply_player_info.sect()) == m_team_data.m_sects_need.end())
{
return enums::team_errcode::sect_not_match;
}
}
if(apply_player_info.level() < m_team_data.level_require())
{
return enums::team_errcode::level_not_match;
}
return enums::team_errcode::ok;
}
同时team_service上提供一个根据目标和等级来查询合适队伍的接口,这样方便客户端去查询合适的队伍并发送申请入队请求:
void team_service::team_fetch_teams(const utility::rpc_msg& msg, const std::string& team_target, std::uint32_t max_num, std::uint32_t player_level, const std::uint64_t action_player_oid)
{
auto cur_player_iter = m_player_infos.find(action_player_oid);
if(cur_player_iter == m_player_infos.end())
{
return;
}
auto cur_target_iter = m_teams_by_target.find(team_target);
std::vector<const team_resource*> result_team_ptrs;
result_team_ptrs.reserve(8);
if(cur_target_iter != m_teams_by_target.end())
{
for(const auto& cur_team_ptr: cur_target_iter->second)
{
if(!cur_team_ptr->m_prop.m_allow_apply)
{
continue;
}
if(cur_team_ptr->m_prop.m_target != team_target)
{
continue;
}
if(cur_team_ptr->m_prop.m_level_need > player_level)
{
continue;
}
if(cur_team_ptr->m_prop.m_players.full())
{
continue;
}
result_team_ptrs.push_back(cur_team_ptr);
if(result_team_ptrs.size() >= max_num)
{
break;
}
}
}
std::vector<json> result_team_infos;
result_team_infos.reserve(result_team_ptrs.size());
for(auto one_team_ptr: result_team_ptrs)
{
result_team_infos.push_back(one_team_ptr->m_prop.encode_with_flag(spiritsaway::property::property_flags{mosaic_game::property::property_flags::sync_redis}, true, false));
}
std::vector<json> rpc_args;
rpc_args.push_back(std::move(result_team_infos));
team_call_player(cur_player_iter->second.anchor, "team_fetch_teams_back", std::move(rpc_args));
}
这里为了快速过滤target字段,所以在team_service上维护了一个m_teams_by_target字段,用这个map来根据目标来快速查询相关队伍集合:
std::unordered_map<std::string, std::unordered_set<const team_resource*>> m_teams_by_target;
由于这个搜索合适的队伍是一个比较频繁的操作,且每个队伍都需要打包sync_redis的字段,这就会带来不少的客户端服务端之间的通信流量。更好的方法是将m_teams_by_target推送到对外服务的redis集群中,这样客户端就可以直接从redis中查询到合适的队伍,而不需要再去服务端查询。
组队投票
组队活动中有些时候任务流程的继续进行需要征求队伍成员的同意,虽然可以通过队伍内聊天来执行相关信息的沟通与收集,但是很多时候这种交互流程效率很低,因为涉及到打字沟通和人工统计这两个步骤。考虑到此时队员的回复一般都比较简单,基本都是是否同意这样的信息,所以队伍系统这边就引入了投票机制,来加速这个信息收集流程的处理。
由于一个队伍里可能同时存在多个进行中的投票活动,因为这个投票数据在team_prop上设置为了一个背包,key为投票的字符串唯一id,value为一个team_vote_item对象,用来存储单个投票相关的信息:
class Meta(property) team_vote_item: public spiritsaway::property::property_bag_item<std::string>
{
public:
Meta(property(sync_self)) std::uint32_t m_vote_type = 0;
Meta(property(sync_self)) std::uint64_t m_expire_ts;
Meta(property(sync_self)) std::vector<std::uint64_t> m_vote_players; //sorted oids
Meta(property(sync_self)) json m_extra_info;
Meta(property(sync_self)) std::vector<team_vote_choice> m_vote_choices;
#ifndef __meta_parse__
#include "team/team_vote_item.generated.inch"
#endif
public:
bool has_vote_player(const std::uint64_t& oid) const
{
return std::binary_search(m_vote_players.begin(), m_vote_players.end(), oid);
}
bool has_voted(const std::uint64_t& oid) const
{
for(const auto& one_choice: m_vote_choices)
{
if(one_choice.oid == oid)
{
return true;
}
}
return false;
}
};
using team_vote_bag = spiritsaway::property::property_bag<team_vote_item>;
class Meta(property) team_prop
{
public:
// 省略其他字段
Meta(property(sync_self)) team_vote_bag m_team_votes;
public:
std::uint64_t get_vote_win_oid(const team_vote_item& cur_vote_item) const;
};
由于这些投票数据只需要自己可见,不需要暴露给redis,所以属性同步flag设置为了sync_self,而不是sync_redis。
team_vote_item的m_vote_players字段存储所有有资格投票的队伍成员id,这个字段在投票开始时就会被初始化,后续不会再改变。同时m_vote_choices存储所有已经投票信息team_vote_choice,这个结构体存储了队伍成员id、他们的投票结果以及对应的投票时间戳。
struct team_vote_choice
{
std::uint64_t oid; // 在线id
std::uint64_t ts;
std::uint32_t value;
};
team_vote_item的m_vote_type字段用来存储投票的类型,目前有两种类型:
enum class team_vote_type
{
invalid_vote = 0,
unanimous_vote,
fixed_players_vote,
};
-
全员一致投票:
vote_type = unanimous_vote,要求所有队员都来参加,投票结果为1表示同意,0表示拒绝,一旦任意一个队员投票结果为0,则投票以失败结束,所有成员都赞成时投票以成功结束。 -
部分成员投票:
vote_type = fixed_players_vote,限制为指定的成员集合参加,指定集合内的玩家都必须投票,当所有指定集合内的玩家都投票完毕后,投票结束。
bool team_check_handler::check_vote_finish(const property::team::team_vote_item& cur_vote)
{
switch (cur_vote.vote_type())
{
case std::uint32_t(enums::team_vote_type::unanimous_vote):
{
if(cur_vote.vote_choices().size() == m_team_data.players().index().size())
{
return true;
}
for(const auto& one_choice: cur_vote.vote_choices())
{
if(one_choice.value == 0)
{
return true;
}
}
return false;
}
case std::uint32_t(enums::team_vote_type::fixed_players_vote):
{
// all remain players has vote
std::uint32_t remain_player_sz = 0;
for(const auto& one_player: m_team_data.players().index())
{
if(std::binary_search(cur_vote.vote_players().begin(), cur_vote.vote_players().end(), one_player.first))
{
remain_player_sz++;
}
}
if(!remain_player_sz)
{
return true;
}
for(const auto& one_choice: cur_vote.vote_choices())
{
if(m_team_data.players().get(one_choice.oid))
{
remain_player_sz--;
}
}
return remain_player_sz==0;
}
default:
{
return true;
}
}
}
在team_service上的投票接口并没有针对具体的投票类型来做区分,每个操作都只有一个接口:
- 创建投票接口
void team_create_vote(const utility::rpc_msg& msg, const json& cur_vote_info,const std::uint64_t action_player_oid),这里的cur_vote_info其实就是team_vote_item对象的json表示:
property::team::team_vote_item cur_vote;
if(!cur_vote.decode(cur_vote_info))
{
team_action_reply(cur_player_iter->second.anchor, cur_action_id, msg, std::uint32_t(enums::team_errcode::invalid_param));
return;
}
- 参与投票接口
void team_cast_vote(const utility::rpc_msg& msg, const std::string& vote_id, const json& cur_choice_info, const std::uint64_t action_player_oid),这里的cur_choice_info其实就是team_vote_choice对象的json表示:
property::team::team_vote_choice cur_vote_choice;
if(!cur_vote_choice.decode(cur_choice_info))
{
team_action_reply(cur_player_iter->second.anchor, cur_action_id, msg, std::uint32_t(enums::team_errcode::invalid_param));
return;
}
一旦有一个队员成功的创建了自己的投票结果,服务端就会在cast_vote之后调用erase_vote_when_end检查当前投票是否可以结束,如果结束了则可以删除指定的投票数据:
bool team_impl_handler::erase_vote_when_end(const std::string& vote_id, property::team::team_vote_item& detail)
{
auto cur_vote_ptr = m_team_data.team_votes().get(vote_id);
if(!cur_vote_ptr)
{
return false;
}
if(team_check_handler::check_vote_finish(*cur_vote_ptr))
{
detail = *cur_vote_ptr;
m_team_proxy.team_votes().erase(vote_id);
return true;
}
return false;
}
void team_service::team_cast_vote(const utility::rpc_msg& msg, const std::string& vote_id, const json& cur_choice_info, const std::uint64_t action_player_oid)
{
// 省略之前的检查 和 投票代码
// 接下来开始判断投票是否结束 如果结束了 则删除投票数据
if(cur_err == enums::team_errcode::ok)
{
property::team::team_vote_item cur_vote_detail;
if(cur_team_ptr->m_handler.erase_vote_when_end(vote_id, cur_vote_detail))
{
std::vector<json> temp_sync_args;
temp_sync_args.push_back(vote_id);
team_sync_props(cur_team_ptr, std::uint8_t(enums::team_action::vote_finish), std::move(temp_sync_args));
// 省略其他代码
}
}
}
这里的team_sync_props负责将当前队伍的数据进行增量同步到所有的在线玩家。当数据同步到玩家身上时,会利用team_prop_delta来执行数据的回放:
void player_team_component::team_prop_delta(const utility::rpc_msg& msg, std::uint8_t team_action_id, const std::vector<json>& action_args, const std::vector<json>& prop_deltas)
{
m_owner->logger()->info("team_prop_delta receive action_id {} args {}, deltas {}", magic_enum::enum_name(enums::team_action(team_action_id)), msg.args[1].dump(), msg.args[2].dump());
misc::team_prop_sync_event cur_prop_sync_event{false, action_args};
m_owner->dispatcher().dispatch(enums::team_action(team_action_id), cur_prop_sync_event);
for(const auto& one_prop: prop_deltas)
{
std::uint64_t offset;
std::uint8_t cmd;
std::uint64_t flag;
json prop_data;
if(!serialize::decode_multi(one_prop, offset, cmd, flag, prop_data))
{
m_owner->logger()->error("fail to decode team prop delta {}", one_prop.dump());
continue;
}
auto cur_cmd_enum = spiritsaway::property::property_cmd(cmd);
spiritsaway::property::property_record_offset cur_record_offset{offset};
m_player->prop_proxy().team().replay(cur_record_offset.to_replay_offset(), cur_cmd_enum, prop_data);
}
cur_prop_sync_event.is_finish = true;
m_owner->dispatcher().dispatch(enums::team_action(team_action_id), cur_prop_sync_event);
}
注意这里会前后执行两次team_prop_sync_event的dispatch,第一次是在属性修改之前,第二次是在属性修改之后。两次dispatch的is_finish字段分别是false和true,然后这里的事件id是带类型的枚举enums::team_action,这里会根据不同的team_action来触发不同的事件。
player_team_component在初始化的时候就会注册vote_finish事件的监听器,当收到vote_finish这个事件时,会调用player_team_component::team_event_listener来处理,如果事件是vote_finish且is_finish为false,则会调用on_team_vote_finish来处理投票结果,此时相关的属性还没有被修改,可以通过这些属性来结算当前的投票结果:
bool player_team_component::init(const json& data)
{
m_player = dynamic_cast<player_entity*>(m_owner);
if(!m_player)
{
return false;
}
m_player->login_dispatcher().add_listener(&player_team_component::on_login, this);
m_player->logout_dispatcher().add_listener(&player_team_component::on_logout, this);
m_owner->dispatcher().add_listener(enums::team_action::vote_abort, &player_team_component::team_event_listener, this);
m_owner->dispatcher().add_listener(enums::team_action::vote_finish, &player_team_component::team_event_listener, this);
m_owner->dispatcher().add_listener(enums::team_action::vote_expire, &player_team_component::team_event_listener, this);
m_team_handler = std::make_unique<misc::team_check_handler>(m_player->prop_data().team());
return true;
}
void player_team_component::team_event_listener(const utility::enum_type_value_pair& ev_cat, const misc::team_prop_sync_event& detail)
{
if(ev_cat.enum_type == utility::type_hash::hash<enums::team_action>())
{
switch (ev_cat.enum_value)
{
// 省略其他分支
case std::uint32_t(enums::team_action::vote_finish):
{
if(detail.is_finish)
{
return;
}
std::vector<std::string> vote_ids;
if(!serialize::decode(detail.sync_action_args, vote_ids))
{
return;
}
for(const auto& one_vote_id: vote_ids)
{
on_team_vote_finish(one_vote_id);
}
break;
}
default:
break;
}
}
}
在on_team_vote_finish中,会根据投票的类型来处理投票结果,这里主要是根据vote_type来判断投票的类型,然后根据投票的结果来触发不同的事件,一致性投票成功的时候发出unanimouse_vote_suc事件,失败的时候发出unanimouse_vote_fail事件, 而部分成员投票结束的时候发出player_win_vote事件:
void player_team_component::on_team_vote_finish(const std::string& vote_id)
{
auto cur_vote_ptr = m_player->prop_data().team().team_votes().get(vote_id);
if(!cur_vote_ptr)
{
return;
}
m_owner->logger()->info("on_team_vote_finish {} with info {}", vote_id, cur_vote_ptr->encode().dump());
switch (cur_vote_ptr->m_vote_type)
{
case std::uint32_t(enums::team_vote_type::unanimous_vote):
{
bool suc = true;
for(const auto& one_choice: cur_vote_ptr->vote_choices())
{
if(one_choice.value == 0)
{
suc = false;
break;
}
}
if(suc)
{
m_owner->dispatcher().dispatch(enums::team_vote_events::unanimouse_vote_suc, vote_id);
}
else
{
m_owner->dispatcher().dispatch(enums::team_vote_events::unanimouse_vote_fail, vote_id);
}
return;
}
case std::uint32_t(enums::team_vote_type::fixed_players_vote):
{
if(m_player->prop_data().team().get_vote_win_oid(*cur_vote_ptr) == m_owner->online_entity_id())
{
m_owner->logger()->info("{} win vote {} extra {}", m_owner->online_entity_id(), vote_id, cur_vote_ptr->extra_info().dump());
m_owner->dispatcher().dispatch(enums::team_vote_events::player_win_vote, vote_id);
}
return;
}
default:
break;
}
}
这里的get_vote_win_oid会从已经投票的结果中获取当前优先级最高的作为结果,常见于队伍内需要分配一些稀有物品的时候,例如组队副本的装备掉落。策划会要求队员们进行一个roll点投票来决定谁能拿到这个物品。每个队员只能投一次票,服务端会随机生成对应的roll点数。最后系统会统计出所有队员的投票结果来决定物品的归属。
std::uint64_t team_prop::get_vote_win_oid(const team_vote_item& cur_vote_item) const
{
std::uint64_t win_player_oid = 0;
std::uint32_t win_score = 0;
std::uint64_t win_ts = std::numeric_limits<std::uint64_t>::max();
for(const auto& one_choice: cur_vote_item.vote_choices())
{
if(!players().get(one_choice.oid))
{
continue;
}
if(one_choice.value > win_score)
{
win_score = one_choice.value;
win_ts = one_choice.ts;
win_player_oid = one_choice.oid;
}
else if(one_choice.value == win_score)
{
if(win_ts > one_choice.ts)
{
win_ts = one_choice.ts;
win_player_oid = one_choice.oid;
}
}
}
return win_player_oid;
}
组队副本进入投票
如果一组队伍想进入一个组队副本,客户端玩家会发起一个request_create_team_dungeon的请求,如果检查通过,就会发起一个全员一致性投票,这里会设置好extra_info字段,存储要进入的场景信息,同时对应的投票id被强制指定为team_dungeon,因为同一个时刻只允许进入一个组队副本:
void player_space_component::request_create_team_dungeon(const utility::rpc_msg& msg, std::uint32_t space_no)
{
const auto& cur_team_prop = m_player->prop_data().team();
const auto& cur_space_prop = m_player->prop_data().space();
utility::rpc_msg reply_msg;
// 省略条件检查相关代码
reply_msg.cmd = "reply_create_team_dungeon";
reply_msg.args.push_back(space_no);
m_player->call_client(reply_msg);
if(!reply_msg.err.empty())
{
return;
}
m_player->prop_proxy().space().last_team_dungeon_request_ts().set(utility::timer_manager::now_ts());
auto cur_team_comp = m_player->get_component<player_team_component>();
if(!cur_team_comp)
{
return;
}
json dungeon_vote_extra;
dungeon_vote_extra["space_no"] = space_no;
dungeon_vote_extra["space_id"] = m_owner->gen_unique_str();
cur_team_comp->team_create_vote_impl("team_dungeon", std::uint32_t(enums::team_vote_type::unanimous_vote), dungeon_vote_extra);
}
然后当玩家身上通过team_prop_delta接收到unanimouse_vote_suc通知的时候,会判断当前是否是组队副本的进入投票,如果是则会解析出其中的参数space_no和space_id,填充对应的参数往space_service上发起一个request_create_space的请求,来创建一个新的场景:
void player_space_component::on_team_dungeon_vote_finish(const utility::enum_type_value_pair& ev_cat, const std::string& vote_id)
{
if(ev_cat.enum_value != std::uint32_t(enums::team_vote_events::unanimouse_vote_suc) || vote_id != "team_dungeon")
{
return;
}
const auto& cur_team_prop = m_player->prop_data().team();
const auto& cur_space_prop = m_player->prop_data().space();
if(cur_team_prop.leader_oid() != m_owner->online_entity_id())
{
return;
}
if(cur_space_prop.entering_space_no())
{
return;
}
const auto cur_space = m_owner->get_space();
if(!cur_space || !cur_space->space_type_info()->is_town_space)
{
return;
}
const auto& cur_vote_info = cur_team_prop.team_votes().get("team_dungeon")->extra_info();
std::uint32_t dest_space_no = 0;
std::string dest_space_id;
try
{
cur_vote_info.at("space_no").get_to(dest_space_no);
cur_vote_info.at("space_id").get_to(dest_space_id);
}
catch(const std::exception& e)
{
m_owner->logger()->error("on_team_dungeon_vote_finish read vote space info fail with {}", e.what());
return;
}
utility::rpc_msg create_space_msg;
json::object_t space_init_info;
space_init_info["team_id"] = cur_team_prop.id();
create_space_msg.cmd = "request_create_space";
create_space_msg.set_args(dest_space_no, dest_space_id, std::string(), space_init_info);
m_owner->call_service("space_service", create_space_msg);
}
当space_service成功的创建好了对应的组队副本之后,会在对应的上报处理接口space_service::report_space_created里将这个信息发送到team_service:
utility::rpc_msg team_forward_msg;
team_forward_msg.cmd = "notify_team_dungeon_created";
team_forward_msg.set_args(cur_space_iter->second->team_id, cur_space_iter->second->space_no, space_id, game_id);
get_server()->call_service("team_service", team_forward_msg);
在team_service收到这个通知之后,会往这个队伍内所有的在线玩家发送一个enums::team_action::dungeon_created事件,来通知场景创建好了,同时将场景的space_id和space_no填充到队伍的team_dungeon_space_id和team_dungeon_space_no字段里:
void team_service::notify_team_dungeon_created(const utility::rpc_msg& msg, const std::string& tid, std::uint32_t space_no, const std::string& space_id , const std::string& game_id)
{
auto cur_team_iter = m_team_resources.find(tid);
if(cur_team_iter == m_team_resources.end())
{
return;
}
cur_team_iter->second->m_prop_proxy.team_dungeon_space_id().set(space_id);
cur_team_iter->second->m_prop_proxy.team_dungeon_space_no().set(space_no);
team_sync_props(cur_team_iter->second.get(), std::uint8_t(enums::team_action::dungeon_created), {});
}
最后当这个属性修改同步到玩家身上的时候,就会发起一个request_enter_space的请求,来进入到组队副本的场景里,注意此时的is_finish为true,表示属性同步完成,因为只有属性同步完成之后team_dungeon_space_id和team_dungeon_space_no才会被填充好:
void player_space_component::on_team_dungeon_created(const utility::enum_type_value_pair& ev_cat, const misc::team_prop_sync_event& detail)
{
if(ev_cat.enum_value != std::uint32_t(enums::team_action::dungeon_created) || !detail.is_finish)
{
return;
}
const auto& cur_team_prop = m_player->prop_data().team();
const auto& cur_space_prop = m_player->prop_data().space();
if(cur_space_prop.entering_space_no())
{
return;
}
const auto cur_space = m_owner->get_space();
if(!cur_space || !cur_space->space_type_info()->is_town_space)
{
return;
}
const auto& dest_space_id = cur_team_prop.team_dungeon_space_id();
auto dest_space_no = cur_team_prop.team_dungeon_space_no();
utility::rpc_msg enter_msg;
enter_msg.cmd = "request_enter_space";
json::object_t enter_info;
enter_msg.set_args(dest_space_no, dest_space_id, enter_info);
m_owner->rpc_owner_on_rpc(enter_msg);
}
上述就是组队副本的完成进入流程。

道具奖励Roll点投票
在组队副本中,击杀一些怪物的时候会随机的掉落一些奖励,为了决定每个奖励的归属,副本会自动的发起一个Roll点投票,这个Roll点投票的发起是在monster_death_component::on_killed_by里,会构造一个notify_team_dungeon_monster_kill_reward的rpc来通知team_service,注意到这里的team_roll_reward是一个数组,代表一个怪物可能掉落多个物品奖励:
void monster_death_component::on_killed_by(actor_entity* killer, const std::string& killer_proxy, const hit_record& hit_info, double hit_dmg)
{
auto cur_monster_sysd = m_monster->monster_sysd();
auto cur_space = m_owner->get_space();
if(cur_space->space_type_info()->is_team_dungeon)
{
std::vector<std::uint32_t> team_roll_reward;
cur_monster_sysd.expect_value(std::string("team_roll_reward"), team_roll_reward);
if(!team_roll_reward.empty())
{
utility::rpc_msg team_reward_msg;
team_reward_msg.cmd = "notify_team_dungeon_monster_kill_reward";
team_reward_msg.set_args(cur_space->team_id(), cur_space->space_no(), cur_space->entity_id(), team_roll_reward);
}
}
// 省略其他代码
}
在team_service::notify_team_dungeon_monster_kill_reward里会根据rewards里的道具编号,来创建一个或者多个team_vote_item,并将这个投票项发送到队伍内的所有玩家,玩家在投票的时候会根据reward_no来判断哪个道具是自己投票的目标:
void team_service::notify_team_dungeon_monster_kill_reward(const utility::rpc_msg& msg, const std::string& tid, std::uint32_t space_no, const std::string& space_id, std::vector<std::uint32_t>& rewards)
{
auto cur_team_iter = m_team_resources.find(tid);
if(cur_team_iter == m_team_resources.end())
{
return;
}
auto cur_team_ptr = cur_team_iter->second.get();
for(auto one_reward: rewards)
{
property::team::team_vote_item cur_vote;
cur_vote.m_expire_ts = utility::timer_manager::now_ts() + 30 * 1000;
cur_vote.m_extra_info["reward_no"] = one_reward;
cur_vote.m_extra_info["space_id"] = space_id;
cur_vote.m_extra_info["space_no"] = space_no;
cur_vote.m_id = get_server()->gen_unique_str();
cur_vote.m_vote_type = std::uint32_t(enums::team_vote_type::fixed_players_vote);
cur_vote.m_vote_players.reserve(cur_team_ptr->m_prop.m_players.index().size());
for(const auto& one_pair: cur_team_ptr->m_prop.m_players.index())
{
cur_vote.m_vote_players.push_back(one_pair.first);
}
auto cur_err = cur_team_ptr->m_handler.create_vote(cur_vote, cur_team_ptr->m_prop.leader_oid());
if(cur_err == enums::team_errcode::ok)
{
std::vector<json> temp_sync_args;
team_sync_props(cur_team_ptr, std::uint32_t(enums::team_action::create_vote), std::move(temp_sync_args));
}
}
}
player_actor的player_dungeon_component会在初始化的时候注册对player_win_vote的事件监听。当收到player_win_vote事件时,会调用player_dungeon_component::on_player_win_vote来处理,在这个函数中会根据投票的结果来判断哪个玩家应该获得投票的奖励,这里会从team_vote_item创建时就初始化好的extra_info里拿出reward_no字段,作为道具进行发送:
bool player_dungeon_component::init(const json& data)
{
m_player = dynamic_cast<player_entity*>(m_owner);
if(!m_player)
{
return false;
}
m_owner->dispatcher().add_listener(enums::team_vote_events::player_win_vote, &player_dungeon_component::event_listener, this);
return true;
}
void player_dungeon_component::event_listener(const utility::enum_type_value_pair& ev_cat, const std::string& detail)
{
if(ev_cat == utility::enum_type_value_pair(enums::team_vote_events::player_win_vote))
{
auto cur_vote_info = m_player->prop_data().team().team_votes().get(detail);
if(!cur_vote_info)
{
return;
}
const auto& cur_vote_extra = cur_vote_info->extra_info();
auto temp_iter = cur_vote_extra.find("reward_no");
if(temp_iter == cur_vote_extra.end() || !temp_iter->is_number_unsigned())
{
return;
}
auto cur_stuff_comp = m_player->get_component<player_stuff_component>();
m_owner->logger()->info("get stuff reward {} from vote {}", cur_vote_extra.dump(), detail);
cur_stuff_comp->add_stuff(temp_iter->get<std::uint32_t>(), 1);
}
}
上述就是组队副本里的道具奖励Roll点投票的流程。

聊天系统
聊天功能也是联网游戏必不可少的功能,这个系统的初衷是为了团队协作中的信息交流,以及玩家之间的休闲交流。但是MMO游戏在生涯后期常见日常玩法基本都变成了一键挂机,游戏的日活完全就由用户间的聊天交互支撑,逐渐蜕变成为了大型在线聊天游戏。聊天系统作为社交游戏的基石,需要一个简单高效且容易扩展的设计来对接后续的任意系统的接入。任何有网络编程经验的开发者应该都尝试过写一个非常简单的聊天系统,但是这种简单的聊天系统一般就只实现了点对点或者全广播的在线聊天功能。网上能看到的功能更加齐全的聊天系统设计基本都牵涉到了使用互联网中常见的中间件,这些设计对于游戏来说有一些参考价,不过在游戏内用互联网架构去做一个聊天系统就有点杀鸡有牛刀了。因为游戏一般都使用分区分服架构,同服务器的玩家数量不会超过10w,所以单点服务就基本可以满足要求,不需要考虑各种分布式的问题,也不需要考虑大规模数据存储的问题。本文就来介绍一下mosaic_game中的聊天系统设计,介绍一下其实现单人聊天、组队聊天、群组聊天以及广播聊天的各种细节。
聊天消息格式
聊天系统中最基础的就是单人聊天,只需要明确聊天消息格式以及对应的收发RPC即可。一般的聊天系统中定义的消息格式一般都包括如下几个字段:
- 发送者 发送者一些身份信息,包括全局唯一
id以及一些客户端显示头像所需要的门派等级等信息。所以一般会拆分为两个字段,一个player_id字段和一个player_info字段,这个player_info字段一般都设计成为了json::object_t形式来支持各种不定类型的字段 - 接收者 如果是一对一聊天的话接收者就是消息发送对象的唯一
id,如果是群组聊天、组队聊天、全服聊天等聊天目标的话,一般会保持类型一致的同时,添加一个易于区分的前缀,作为聊天的频道,组成group_xxx,team_xxx,world_xxx这样的形式。这里的xxx都是在对应系统里的唯一标识符,例如群组id,队伍id等 - 时间戳,这个是聊天消息的发送时间戳,不过这个发送时间并不是客户端发起消息发送
rpc的时间,而是聊天服务接受到发送消息请求之后合法性判定通过后的消息投递开始时间,这样就可以维护消息在客户端显示时的有序性 - 基本正文 这个就是玩家输入的消息文本,或者一些系统生成的固定格式文本
- 消息类型 由于各个系统都可以接入到消息系统中去展示各自的内容,而这些内容一般都不是纯文本形式能够表达的,会引入一些更加高级的展示形式。如向其他玩家炫耀自己的装备道具时,需要指定当前的消息类型为道具展示消息;发送红包时,需要指定当前的消息类型为红包消息。这里的消息类型为了可维护一般都会指定为整数类型,并在消息类型表中指定这个整数的意义
- 额外字段 对于非纯文本类型的消息,展示这个消息的细节一般会需要提供很多的额外参数。如装备系统中的各项数值,红包系统中的红包
id以及总额等信息。为了对接各种消息类型的额外信息,这个字段一般都是json::object_t类型,满足最大程度的灵活性 - 消息计数器,对于一些需要知道未读消息个数以及一些已读确认的消息而言,需要用一个局部范围内的唯一且不减标识符来区分不同的消息,所以这个字段一般设计为
uint64,这样可以避免各种可能的数值溢出问题
在客户端发送聊天时,上述字段中的发送者、时间戳、消息计数器这三个字段并不需要提供。因为这三个字段都涉及到正确性,所以相关数据由服务端填充。在mosaic_game中,使用了一个json::object_t去包装上面提到的基本正文、消息类型和额外字段,此时一个客户端请求发送聊天消息的rpc就很简单了:
void player_chat_component::chat_add_msg_request(const utility::rpc_msg& msg, std::uint8_t chat_type, const std::string& to_player_id, const json::object_t& detail);
这里的chat_type对应mosaic_game内部规定的一个枚举类型,支持了一下单聊、群组聊天、组队聊天和广播聊天:
enum class chat_type
{
personal = 0,
group,
team,
broadcast,
max
};
聊天消息收发
上面提到的chat_add_msg_request是整个发送聊天消息的入口,除了广播聊天之外,其他几种聊天都会中转到chat_service去处理:
auto cur_chat_key = misc::chat_utils::gen_chat_key(enums::chat_type(chat_type), m_owner->entity_id(), other_id);
if(chat_type != std::uint8_t(enums::chat_type::broadcast))
{
auto cur_chat_prop_proxy = m_player->prop_proxy().chats().get_insert(cur_chat_key);
if(cur_chat_prop_proxy.other_id().get().empty())
{
cur_chat_prop_proxy.other_id().set(other_id);
cur_chat_prop_proxy.chat_type().set(chat_type);
}
utility::rpc_msg request_msg;
request_msg.cmd = "request_add_chat";
request_msg.set_args(m_owner->entity_id(), cur_chat_key, detail);
m_owner->call_service("chat_service", request_msg);
}
else
{
// 广播消息处理暂时省略
}
这里的misc::chat_utils::gen_chat_key内部由于根据传入的聊天类型拼接出一个聊天消息投递标识符,主要处理单人聊天的标识符归一化,这样A-B两个人私聊的时候会使用同一个投递标识符:
std::string chat_utils::gen_chat_key(enums::chat_type chat_type, const std::string& self_id, const std::string& other_id)
{
switch (chat_type)
{
case enums::chat_type::personal:
{
if(self_id < other_id)
{
return std::to_string(std::uint8_t(chat_type)) + "_" + self_id + "_" + other_id;
}
else
{
return std::to_string(std::uint8_t(chat_type)) + "_" + other_id + "_" + self_id;
}
}
default:
return std::to_string(std::uint8_t(chat_type)) + "_" + other_id;
}
}
在chat_service::request_add_chat中通过内部的m_chat_data_mgr将这个聊天消息持久化之后,再通过on_add_msg来执行聊天消息的推送:
void chat_service::request_add_chat(const utility::rpc_msg& msg, const std::string& from_player_id, const std::string& chat_key, const json::object_t& chat_info)
{
// 时间戳用 ms
auto cur_chat_ts = std::chrono::steady_clock::now().time_since_epoch().count()/(1000*1000);
m_chat_data_mgr->add_msg(chat_key, from_player_id, chat_info, cur_chat_ts, [from_player_id, chat_key, this, chat_info, cur_chat_ts](uint32_t new_msg_seq)
{
on_add_msg(from_player_id, chat_key, cur_chat_ts, new_msg_seq, chat_info);
});
}
on_add_msg按照这个投递标识符的生成规则,使用decode_chat_key重新解析原始的参数:
std::pair<enums::chat_type, std::string_view> chat_utils::decode_chat_key(std::string_view chat_key, std::string_view self_id)
void chat_service::on_add_msg(const std::string& from_player_id, const std::string& chat_key, std::uint64_t chat_ts, uint64_t new_msg_seq, const json::object_t& chat_info)
{
auto cur_decode_result = misc::chat_utils::decode_chat_key(chat_key, from_player_id);
if(cur_decode_result.second.empty())
{
return;
}
std::vector<json> notify_args;
notify_args.push_back(chat_key);
notify_args.push_back(chat_ts);
notify_args.push_back(new_msg_seq);
notify_args.push_back(chat_info);
json::object_t notify_msg;
switch (cur_decode_result.first)
{
case enums::chat_type::personal:
{
notify_msg["cmd"] = "chat_add_msg_notify";
notify_msg["args"] = notify_args;
server::offline_msg_manager::instance().add_msg(
std::string(cur_decode_result.second), notify_msg);
break;
}
case enums::chat_type::group:
{
utility::rpc_msg service_msg;
service_msg.cmd = "group_add_chat";
service_msg.set_args(std::stol(std::string(cur_decode_result.second)),chat_ts, new_msg_seq, chat_info, from_player_id);
get_server()->call_service("group_service", service_msg);
break;
}
case enums::chat_type::team:
{
utility::rpc_msg service_msg;
service_msg.cmd = "team_add_chat";
service_msg.set_args(std::string(cur_decode_result.second),chat_ts, new_msg_seq, chat_info, from_player_id);
get_server()->call_service("team_service", service_msg);
break;
}
default:
break;
}
notify_msg["cmd"] = "chat_add_msg_reply";
notify_msg["args"] = notify_args;
server::offline_msg_manager::instance().add_msg(from_player_id, notify_msg);
}
这里根据聊天频道类型,走不同的消息推送逻辑。单人聊天时的处理最简单,通过offline_msg_manager来执行聊天消息的推送,保证目标能够接收到这个消息的提示。这个chat_add_msg_notify函数里会对这个chat_key构造一个chat_item,来记录最近聊天时间以及最新聊天信息序列号:
void player_chat_component::chat_add_msg_notify(const utility::rpc_msg& msg, const std::string& chat_key, std::uint64_t chat_ts, std::uint64_t msg_seq, const json::object_t& detail)
{
auto cur_chat_prop_proxy = m_player->prop_proxy().chats().get_insert(chat_key);
if(cur_chat_prop_proxy.other_id().get().empty())
{
auto cur_decode_result = misc::chat_utils::decode_chat_key(chat_key, m_owner->entity_id());
cur_chat_prop_proxy.other_id().set(std::string(cur_decode_result.second));
cur_chat_prop_proxy.chat_type().set(std::uint8_t(cur_decode_result.first));
}
if(msg_seq >= cur_chat_prop_proxy.next_msg_seq().get())
{
cur_chat_prop_proxy.next_msg_seq().set(msg_seq + 1);
cur_chat_prop_proxy.last_chat_ts().set(chat_ts);
}
m_player->call_client(msg);
}
对于群组聊天频道,会将相关消息转发到group_service之后,找到对应群组并对群组数据进行修改,然后再使用group_broadcast对群组内在线人员进行推送:
void group_service::group_add_chat(const utility::rpc_msg& msg, std::uint32_t dest_group_idx, std::uint64_t chat_ts, std::uint64_t new_seq, const json& chat_info, const std::string& action_player_id)
{
enums::group_errcode cur_err = enums::group_errcode::ok;
group_resource* dest_group = nullptr;
do
{
auto temp_group_iter = m_group_resources.find(dest_group_idx);
if(temp_group_iter == m_group_resources.end())
{
cur_err = enums::group_errcode::invalid_group_id;
break;
}
dest_group = temp_group_iter->second.get();
cur_err = dest_group->m_handler.add_chat(new_seq, action_player_id);
} while (false);
if(cur_err == enums::group_errcode::ok)
{
std::vector<json> temp_args;
group_sync_props(dest_group, std::uint8_t(enums::group_action::chat), {}, {});
utility::rpc_msg new_msg;
new_msg.cmd = "chat_add_msg_notify";
new_msg.set_args(misc::chat_utils::gen_chat_key(enums::chat_type::group, action_player_id, std::to_string(dest_group_idx)), chat_ts, new_seq, chat_info);
group_broadcast(dest_group, new_msg.cmd, new_msg.args, {});
}
}
队伍聊天可以认为是一个专门化的群组聊天,所以两者的逻辑都是相似的:
void team_service::team_add_chat(const utility::rpc_msg& msg, const std::string& tid, std::uint64_t chat_ts, std::uint64_t new_seq, const json& chat_info, const std::string& from_player_id)
{
auto cur_team_iter = m_team_resources.find(tid);
if(cur_team_iter == m_team_resources.end())
{
return;
}
auto cur_team_ptr = cur_team_iter->second.get();
auto cur_err = cur_team_ptr->m_handler.add_chat(new_seq, from_player_id);
if(cur_err == enums::team_errcode::ok)
{
std::vector<json> temp_sync_args;
team_sync_props(cur_team_ptr, std::uint32_t(enums::team_action::add_chat), std::move(temp_sync_args), std::string{});
utility::rpc_msg new_msg;
new_msg.cmd = "chat_add_msg_notify";
new_msg.set_args(misc::chat_utils::gen_chat_key(enums::chat_type::team, from_player_id, tid), chat_ts, new_seq, chat_info);
team_broadcast(cur_team_ptr, new_msg.cmd, new_msg.args, {});
}
}
对于广播聊天,则走我们之前介绍notify_component上的客户端群组广播接口:
auto cur_notify_component = m_player->get_component<player_notify_component>();
if(!cur_notify_component)
{
return;
}
utility::rpc_msg request_msg;
request_msg.cmd = "chat_add_broadcast_msg_notify";
request_msg.set_args(m_owner->entity_id(), cur_chat_key, detail, utility::timer_manager::now_ts());
cur_notify_component->send_msg_to_broadcast_group(other_id, request_msg);
聊天历史记录
任何一个聊天系统都会有查看历史记录的功能,mosaic_game中也不例外。聊天历史记录相关的功能由于比较独立,这里将这部分功能构造为了一个单独的库,见于huangfeidian/chat,mosaic_game上的chat_service其实就是一个对这个chat库的一个简单封装,用来做聊天历史记录功能。 聊天历史记录里最核心的一点就是需要维护同一个聊天标识符对应的聊天数据里的序列号是递增的。这里我们使用chat_data_proxy类来封装一个聊天标识符对应的聊天数据,内部使用一个std::uint64_t m_next_seq来记录这个递增标识符,最终执行添加新聊天消息的函数内部会对这个字段进行自增:
void chat_data_proxy::add_chat_impl(const std::string &from_player_id, const json::object_t &chat_info, std::uint64_t chat_ts)
{
chat_record cur_chat_record;
cur_chat_record.detail = chat_info;
cur_chat_record.from = from_player_id;
cur_chat_record.seq = m_next_seq;
cur_chat_record.ts = chat_ts;
m_loaded_docs.rbegin()->second.records.push_back(std::move(cur_chat_record));
m_next_seq++;
m_dirty_count++;
// 暂时省略一些存库代码
}
分配好唯一递增标识符之后,这可以将这条聊天数据存库了。在数据库的聊天表里对这个seq做好唯一索引,查询聊天记录就非常简单,直接利用数据库对这个字段的区间查询支持做一个[begin_seq, end_seq]的查询即可。这个简单的方案虽然可行,但是有一个非常大的性能弊端,就是每个聊天消息都作为一个数据库的行记录的话,数据库的读写就会非常的频繁。所以游戏里为了减轻对数据库的压力,一般会将若干连续的seq对应的聊天数据聚合起来作为数据库聊天表里的读写基础单位,这样可以显著的降低对数据库的读写需求。在huangfeidian/chat中,chat_doc就是这样的聚合起来的存库消息类型:
struct chat_doc
{
std::string chat_key;
chat_record_seq_t doc_seq;
std::vector<chat_record> records;
std::uint32_t ttl; // 在缓存中的剩余有效时间
NLOHMANN_DEFINE_TYPE_INTRUSIVE(chat_doc, chat_key, doc_seq, records)
};
这里用一个doc_seq来作为存库消息的递增序列号,这个序列号与单个聊天消息的序列号之间的关系很简单,就是设置单个chat_doc最大聊天数据量record_num_in_doc。只有一个chat_doc的records数量达到record_num_in_doc时才会新建一个chat_doc,同时对应的doc_seq会进行加一操作,这部分的逻辑对应的就是上面add_chat_impl里暂时省略的存库代码:
if (m_loaded_docs.rbegin()->second.records.size() == m_record_num_in_doc)
{
save();
chat_doc new_chat_doc;
new_chat_doc.chat_key = m_chat_key;
new_chat_doc.doc_seq = m_loaded_docs.rbegin()->second.doc_seq + 1;
new_chat_doc.ttl = m_default_loaded_doc_ttl;
m_loaded_docs[new_chat_doc.doc_seq] = std::move(new_chat_doc);
}
这里的save负责调用m_save_func函数存储两个聊天表行数据到数据库中,这个函数的具体实现需要外部传递过来,这样可以对接各种数据库:
using chat_data_save_func = std::function<void(const std::string&, const json::object_t&, const json&)>;
chat_data_save_func m_save_func;
bool chat_data_proxy::save()
{
if (!m_dirty_count)
{
return false;
}
json::object_t temp_query;
temp_query["chat_key"] = m_chat_key;
temp_query["doc_seq"] = m_loaded_docs.rbegin()->second.doc_seq;
json cur_doc_json = m_loaded_docs.rbegin()->second;
m_save_func(m_chat_key, temp_query, cur_doc_json);
temp_query["doc_seq"] = std::numeric_limits<chat_record_seq_t>::max();
json cur_meta_doc = temp_query;
cur_meta_doc["next_seq"] = m_next_seq;
m_save_func(m_chat_key, temp_query, cur_meta_doc);
m_dirty_count = 0;
return true;
}
第一个数据是当前chat_doc对应的数据,第二个数据是记录当前chat_key对应的聊天历史记录元数据,这个元数据负责记录下一个可以使用的聊天消息序列号。这里的元数据行用的索引是doc_seq == std::numeric_limits<chat_record_seq_t>::max(),这里存储的信息压根就不是chat_doc格式,但是也放在聊天表里,其实就是在偷懒取巧,因为正常情况下这个doc_seq应该不可能达到到uint64_t::max这个值。
这里的save触发时机就是当一个chat_doc里存储的chat_record数量达到设定的m_record_num_in_doc时触发,此外还有一个定时自动存库的机制来触发save,入口在chat_manager::tick_save中,这里使用了std::vector<std::shared_ptr< chat_data_proxy>> m_dirty_chat_datas作为存储队列,每次添加成功一个聊天消息之后都将这个chat_data_proxy放到这个队列的末尾,这里使用dirty_count作为已经在这个队列中的标记位来使用:
void chat_manager::add_msg_cb(std::shared_ptr<chat_data_proxy> cur_data, chat_record_seq_t msg_seq, std::function<void(chat_record_seq_t)> seq_cb)
{
if (cur_data->dirty_count() == 1)
{
m_dirty_chat_datas.push_back(cur_data);
}
seq_cb(msg_seq);
}
std::vector<std::string> chat_manager::tick_save(chat_record_seq_t max_num)
{
std::vector<std::string> result;
std::reverse(m_dirty_chat_datas.begin(), m_dirty_chat_datas.end());
chat_record_seq_t result_num = 0;
for (int i = 0; i < max_num; i++)
{
if (m_dirty_chat_datas.empty())
{
break;
}
auto cur_back = m_dirty_chat_datas.back();
m_dirty_chat_datas.pop_back();
if (cur_back->save())
{
result.push_back(cur_back->m_chat_key);
result_num++;
}
if (result_num >= max_num)
{
break;
}
}
std::reverse(m_dirty_chat_datas.begin(), m_dirty_chat_datas.end());
return result;
}
chat_service启动的时候不可能加载聊天表中的所有chat_data_proxy,运行时采取类似于LRU的形式去控制内存中的chat_data_proxy的加载与卸载。当一个chat_data_proxy被初始化之后,先从聊天数据表中读取存储了元数据的那个chat_doc,然后用这个元数据chat_doc去加载最新的chat_doc。为了尽可能的增加聊天服务的吞吐量,这里对数据库的读写都是异步的,避免卡住主线程,所以整个chat_data_proxy的构造过程被异步读取数据库切分为了三个阶段:
chat_data_proxy::chat_data_proxy(const std::string chat_key, chat_data_load_meta_func load_meta_func, chat_data_load_normal_func load_normal_func, chat_data_save_func save_func, chat_record_seq_t record_num_in_doc, chat_record_seq_t fetch_record_max_num)
: m_chat_key(chat_key)
, m_chat_key_hash(std::hash<std::string>{}(chat_key))
, m_load_meta_func(load_meta_func), m_load_normal_func(load_normal_func), m_save_func(save_func)
, m_record_num_in_doc(record_num_in_doc)
, m_create_ts(utility::timer_mgr::now_ts())
, m_fetch_record_max_num(fetch_record_max_num)
{
json::object_t temp_query;
temp_query["chat_key"] = m_chat_key;
temp_query["doc_seq"] = std::numeric_limits<chat_record_seq_t>::max();
json::object_t temp_doc;
temp_doc["chat_key"] = m_chat_key;
temp_doc["doc_seq"] = std::numeric_limits<chat_record_seq_t>::max();
temp_doc["next_seq"] = 0;
m_load_meta_func(m_chat_key, temp_query, temp_doc);
}
当这个m_load_meta_func执行数据库查询获取元数据chat_doc回来之后,需要调用chat_manager::on_meta_doc_loaded去调用chat_data_proxy上的元数据初始化接口:
void chat_manager::on_meta_doc_loaded(const std::string& chat_key, const json::object_t& doc)
{
auto cur_iter = m_chat_datas.find(chat_key);
if (cur_iter == m_chat_datas.end())
{
return;
}
cur_iter->second->on_meta_doc_loaded(doc);
}
bool chat_data_proxy::on_meta_doc_loaded(const json::object_t &meta_doc)
{
try
{
meta_doc.at("next_seq").get_to(m_next_seq);
}
catch (const std::exception &e)
{
return false;
}
if (m_next_seq % m_record_num_in_doc == 0)
{
m_is_ready = true;
chat_doc temp_doc;
auto cur_doc_seq = m_next_seq / m_record_num_in_doc;
temp_doc.doc_seq = cur_doc_seq;
temp_doc.chat_key = m_chat_key;
temp_doc.ttl = m_default_loaded_doc_ttl;
m_loaded_docs[cur_doc_seq] = std::move(temp_doc);
on_ready();
return true;
}
json::object_t temp_query;
temp_query["chat_key"] = m_chat_key;
temp_query["doc_seq"] = m_next_seq / m_record_num_in_doc;
m_load_normal_func(m_chat_key, temp_query);
return true;
}
这个元数据初始化接口在被调用到时,会检查最新的一个chat_doc是否已经满了:
- 满了就立即创建一个新的
chat_doc,同时m_is_ready设置为true,并使用on_ready来通知chat_data_proxy已经初始化好 - 没有满则再次去数据库中加载这个最新
chat_doc,加载完成后通过chat_manager::on_load通知对应的chat_data_proxy里执行on_ready,这里也需要将m_is_ready设置为true:
void chat_manager::on_load(const std::string& chat_key, const json::object_t& doc)
{
auto cur_iter = m_chat_datas.find(chat_key);
if (cur_iter == m_chat_datas.end())
{
return;
}
cur_iter->second->on_normal_doc_loaded(doc);
}
bool chat_data_proxy::on_normal_doc_loaded(const json::object_t&cur_doc)
{
chat_doc temp_doc;
try
{
json(cur_doc).get_to(temp_doc);
}
catch (const std::exception &e)
{
return false;
}
auto cur_temp_doc_seq = temp_doc.doc_seq;
m_pending_load_docs.erase(cur_temp_doc_seq);
temp_doc.ttl = m_default_loaded_doc_ttl;
m_loaded_docs[cur_temp_doc_seq] = std::move(temp_doc);
if (cur_temp_doc_seq == m_next_seq / m_record_num_in_doc)
{
m_is_ready = true;
on_ready();
return true;
}
// 暂时省略一些其他逻辑代码
}
在聊天消息的添加和历史记录的读取时,对应的chat_data_proxy可能都没有从数据库加载出来,所以相关接口也要支持异步模式,都需要考虑如果有多个人同时操作的情况,因此异步操作的代码相对于同步操作来说复杂很多。
在添加一个新的聊天消息时,需要判断当前最新的chat_doc是否已经加载,然后走同步处理或者异步处理:
void chat_data_proxy::add_chat(const std::string &from_player_id, const json::object_t &chat_info, std::uint64_t chat_ts, std::function<void(chat_record_seq_t)> add_cb)
{
if (ready())
{
if (m_next_seq != std::numeric_limits<chat_record_seq_t>::max())
{
auto cur_record_seq = m_next_seq;
add_chat_impl(from_player_id, chat_info, chat_ts);
add_cb(cur_record_seq);
return;
}
else
{
// 消息编号达到了 uint64::max 基本不可能
add_cb(std::numeric_limits<chat_record_seq_t>::max());
}
}
else
{
chat_add_task cur_add_task;
cur_add_task.add_cb = add_cb;
cur_add_task.detail = chat_info;
cur_add_task.from = from_player_id;
cur_add_task.chat_ts = chat_ts;
m_add_tasks.push_back(std::move(cur_add_task));
}
}
同步处理很简单,使用add_chat_impl添加最新聊天之后,直接调用add_cb来执行回调。而异步处理则需要将这个添加消息的操作放到当前chat_data_proxy的内部队列m_add_tasks中。最新的chat_doc和会检查这个队列中是否有值,并依照添加顺序执行:
void chat_data_proxy::on_ready()
{
for (auto& one_cb : m_on_meta_doc_loaded_cbs)
{
one_cb(*this);
}
m_on_meta_doc_loaded_cbs.clear();
for (auto &one_add_task : m_add_tasks)
{
auto cur_add_seq = m_next_seq;
add_chat_impl(one_add_task.from, one_add_task.detail, one_add_task.chat_ts);
one_add_task.add_cb(cur_add_seq);
}
m_add_tasks.clear();
// 此处省略与添加消息无关的代码
}
类似的,查询聊天历史记录的时候也需要注意chat_data_proxy没有ready的问题,首先将对应的查询任务挂载到一个队列上,如果已经ready了则检查任务是否可以完成或者可以启动所需数据的加载:
void chat_manager::fetch_history(const std::string& chat_key, chat_record_seq_t seq_begin, chat_record_seq_t seq_end, std::function<void(const std::vector<chat_record>&)> fetch_cb)
{
auto cur_chat_proxy = get_or_create_chat_data(chat_key);
cur_chat_proxy->fetch_records(seq_begin, seq_end, fetch_cb);
}
void chat_data_proxy::fetch_records(chat_record_seq_t seq_begin, chat_record_seq_t seq_end, std::function<void(const std::vector<chat_record> &)> fetch_cb)
{
std::vector<chat_record> temp_result;
if (seq_end < seq_begin)
{
return fetch_cb(temp_result);
}
if (seq_end - seq_begin >= m_fetch_record_max_num)
{
return fetch_cb(temp_result);
}
if (ready()) // 如果已经ready了
{
if (seq_end >= m_next_seq) // 如果最大序列号大于最新序列号 说明请求非法
{
return fetch_cb(temp_result);
}
if (fetch_record_impl(seq_begin, seq_end, temp_result)) // 如果现有数据满足要求 立即执行
{
fetch_cb(temp_result);
return;
}
}
// 添加聊天记录获取任务
chat_fetch_task cur_fetch_task;
cur_fetch_task.chat_seq_begin = seq_begin;
cur_fetch_task.chat_seq_end = seq_end;
cur_fetch_task.fetch_cb = fetch_cb;
m_fetch_tasks.push_back(std::move(cur_fetch_task));
if (!m_is_ready) // 没有初始化的情况下 先暂存请求
{
return;
}
// 计算好要加载哪些doc_seq
auto cur_fetch_doc_begin = seq_begin / m_record_num_in_doc;
auto cur_fetch_doc_end = seq_end / m_record_num_in_doc + 1;
for (auto i = cur_fetch_doc_begin; i < cur_fetch_doc_end; i++)
{
auto cur_iter = m_loaded_docs.find(i);
if (cur_iter == m_loaded_docs.end())
{
m_pending_load_docs.insert(i);
}
}
if (m_fetch_tasks.size() != 1)
{
return;// 已经在执行加载任务了 等待之前的加载任务执行完
}
json::object_t temp_query;
temp_query["chat_key"] = m_chat_key;
temp_query["doc_seq"] = *m_pending_load_docs.rbegin();
m_load_normal_func(m_chat_key, temp_query);
return;
}
由于chat_data_proxy在ready之后也会检查这个m_fetch_tasks队列,所以在没有ready的情况下就不会发起最后的m_load_normal_func去查询数据库。同时如果m_fetch_tasks的大小不是1,说明现在已经在处理这个队列了,所以也不需要发起数据库查询任务。只有在ready下且自己是第一个添加查询任务的调用时才会发起数据查询。当一个chat_doc被加载之后,末尾会检查一下这个数据的加载是否会导致某个聊天历史查询任务所需数据都得到了满足:
bool chat_data_proxy::on_normal_doc_loaded(const json::object_t&cur_doc)
{
// 这里省略了之前贴出的相关代码 新增加检查聊天记录查询的代码
check_fetch_complete(cur_temp_doc_seq);
if (!m_pending_load_docs.empty())
{
json::object_t temp_query;
temp_query["chat_key"] = m_chat_key;
temp_query["doc_seq"] = *m_pending_load_docs.rbegin();
m_load_normal_func(m_chat_key, temp_query);
}
return true;
}
这里的check_fetch_complete实现的比较暴力,直接对所有的fetch_task进行检查,使用fetch_record_impl来判定是否满足回调执行条件:
void chat_data_proxy::check_fetch_complete(chat_record_seq_t cur_doc_seq)
{
chat_record_seq_t cur_doc_record_seq_begin = cur_doc_seq * m_record_num_in_doc;
chat_record_seq_t cur_doc_record_seq_end = cur_doc_record_seq_begin + m_record_num_in_doc;
chat_record_seq_t has_cb_invoked = 0;
std::vector<chat_record> cur_fetch_result;
for (std::uint32_t i = 0; i < m_fetch_tasks.size(); i++)
{
auto &cur_cb = m_fetch_tasks[i];
if (cur_cb.chat_seq_begin >= cur_doc_record_seq_end || cur_cb.chat_seq_end < cur_doc_record_seq_begin)
{
continue;
}
cur_fetch_result.clear();
if (!fetch_record_impl(cur_cb.chat_seq_begin, cur_cb.chat_seq_end, cur_fetch_result))
{
continue;
}
cur_cb.fetch_cb(cur_fetch_result);
cur_cb.chat_seq_begin = std::numeric_limits<chat_record_seq_t>::max(); // 标记已经执行的任务
has_cb_invoked++;
}
// 删除已经执行了的任务
for (std::uint32_t i = 0; i < m_fetch_tasks.size(); i++)
{
if (m_fetch_tasks[i].chat_seq_begin != std::numeric_limits<chat_record_seq_t>::max())
{
continue;
}
while (!m_fetch_tasks.empty() && m_fetch_tasks.back().chat_seq_begin == std::numeric_limits<chat_record_seq_t>::max())
{
m_fetch_tasks.pop_back();
}
if (i >= m_fetch_tasks.size())
{
break;
}
if (i + 1 != m_fetch_tasks.size())
{
std::swap(m_fetch_tasks[i], m_fetch_tasks.back());
}
m_fetch_tasks.pop_back();
}
}
后面的那个for循环使用swap模式去删除已经执行完成的查询任务,同时维护队列的有序性。
如果每个聊天记录获取任务执行完成之后都在内存中释放对应的chat_doc,就会导致一些热点chat_doc被重复加载,这种情况在群组聊天中非常常见。但是获取任务执行完不去清楚这些chat_doc的话,随着聊天记录的拉取,m_loaded_docs这里的存储数据会不断的增多。为了限制这部分内存的增长,chat_doc上加入了一个ttl字段来代表其存活时间,每次一个新的chat_doc被创建时都会设置这个字段为m_default_expire_ttl,外部定期执行expire_loaded来删除不再被使用的chat_doc:
std::uint64_t chat_data_proxy::expire_loaded()
{
std::unordered_set<chat_record_seq_t> doc_seq_needed;
for (const auto& one_fetch_task : m_fetch_tasks)
{
auto cur_fetch_doc_begin = one_fetch_task.chat_seq_begin / m_record_num_in_doc;
auto cur_fetch_doc_end = one_fetch_task.chat_seq_end / m_record_num_in_doc + 1;
for (auto i = cur_fetch_doc_begin; i < cur_fetch_doc_end; i++)
{
doc_seq_needed.insert(i);
}
}
auto current_doc_seq = m_next_seq / m_record_num_in_doc;
const std::uint32_t always_in_loaded_doc_num = 3; // 最新的若干页面永驻
for (std::uint32_t i = 0; i < always_in_loaded_doc_num; i++)
{
doc_seq_needed.insert(current_doc_seq);
if (current_doc_seq == 0)
{
break;
}
current_doc_seq--;
}
std::vector<std::uint64_t> doc_seqs_to_delete;
for (auto& one_pair : m_loaded_docs)
{
if (doc_seq_needed.find(one_pair.first) != doc_seq_needed.end())
{
one_pair.second.ttl = m_default_loaded_doc_ttl;
continue;
}
one_pair.second.ttl--;
if (one_pair.second.ttl == 0)
{
doc_seqs_to_delete.push_back(one_pair.first);
}
}
for (auto one_doc_seq : doc_seqs_to_delete)
{
m_loaded_docs.erase(one_doc_seq);
}
return doc_seqs_to_delete.size();
}
这个expire_loaded不仅仅使用ttl字段来判定是否需要删除,如果一个chat_doc会被历史记录读取任务队列使用或者是最新的若干chat_doc,则暂时不处理其ttl,因为这些chat_doc即将被使用的概率是很大的。
同时由于chat_data_proxy也是chat_manager按需加载创建的,存储在std::unordered_map<std::string, std::shared_ptr<chat_data_proxy>> m_chat_datas中,随着请求的不断被处理这个map也是逐渐增大的。 chat_manager里不能无限制的去保留所有的chat_data_proxy,因此这里也是用一个ttl机制去剔除一定时间内不被使用的chat_data_proxy:
std::vector<std::string> chat_manager::tick_expire(chat_record_seq_t max_num)
{
std::vector<const chat_data_proxy*> result_expire_datas;
for (const auto& one_pair : m_chat_datas)
{
one_pair.second->expire_loaded();
if (one_pair.second->dirty_count() == 0 && one_pair.second->safe_to_remove())
{
result_expire_datas.push_back(one_pair.second.get());
}
}
std::sort(result_expire_datas.begin(), result_expire_datas.end(), [](const chat_data_proxy* a, const chat_data_proxy* b)
{
return a->m_create_ts > b->m_create_ts;
});
std::vector<std::string> result;
chat_record_seq_t result_num = 0;
for (int i = 0; i < max_num; i++)
{
if (result_expire_datas.empty())
{
break;
}
auto cur_back = result_expire_datas.back();
result_expire_datas.pop_back();
result.push_back(cur_back->m_chat_key);
m_chat_datas.erase(cur_back->m_chat_key);
result_num++;
}
return result;
}
这里优先剔除创建时间最早的max_num个可以被剔除的chat_data_proxy。
聊天未读管理
未读消息管理也是聊天系统中的必要部分,所有的聊天系统中都会以红点加数字的形式来提示使用者指定的聊天会话中有多少条未读消息。在chat的属性设置中提供了一个字段m_next_msg_seq来存储当前会话的最新消息序列号,同时也有一个字段m_readed_msg_seq来存储客户端汇报上来的最大已读序列号,这两个序列号之间的差值就是就是未读消息的数量:
class Meta(property) chat_item: public spiritsaway::property::property_bag_item<std::string>
{
public:
Meta(property(sync_clients, save_db)) std::uint64_t m_last_chat_ts = 0;
Meta(property(sync_clients, save_db)) std::uint64_t m_next_msg_seq = 0;
Meta(property(sync_clients, save_db)) std::uint64_t m_readed_msg_seq = 0;
// 第一条可以拉到历史记录的消息编号
Meta(property(sync_clients, save_db)) std::uint64_t m_visible_msg_seq = 0;
Meta(property(sync_clients, save_db)) std::uint8_t m_chat_type = 0;
Meta(property(sync_clients, save_db)) std::string m_other_id;
#ifndef __meta_parse__
#include "player/chat_item.generated.inch"
#endif
};
玩家每次接收到服务端推送的聊天消息时,都会修改这个m_next_msg_seq:
// 被动接收消息成功
void player_chat_component::chat_add_msg_notify(const utility::rpc_msg& msg, const std::string& chat_key, std::uint64_t chat_ts, std::uint64_t msg_seq, const json::object_t& detail)
{
auto cur_chat_prop_proxy = m_player->prop_proxy().chats().get_insert(chat_key);
if(cur_chat_prop_proxy.other_id().get().empty())
{
auto cur_decode_result = misc::chat_utils::decode_chat_key(chat_key, m_owner->entity_id());
cur_chat_prop_proxy.other_id().set(std::string(cur_decode_result.second));
cur_chat_prop_proxy.chat_type().set(std::uint8_t(cur_decode_result.first));
}
if(msg_seq >= cur_chat_prop_proxy.next_msg_seq().get())
{
cur_chat_prop_proxy.next_msg_seq().set(msg_seq + 1);
cur_chat_prop_proxy.last_chat_ts().set(chat_ts);
}
m_player->call_client(msg);
}
// 主动发送消息成功
void player_chat_component::chat_add_msg_reply(const utility::rpc_msg& msg, const std::string& chat_key, std::uint64_t chat_ts, std::uint64_t msg_seq, const json::object_t& detail)
{
auto cur_chat_prop_proxy = m_player->prop_proxy().chats().get_insert(chat_key);
if(msg_seq >= cur_chat_prop_proxy.next_msg_seq().get())
{
cur_chat_prop_proxy.next_msg_seq().set(msg_seq + 1);
cur_chat_prop_proxy.last_chat_ts().set(chat_ts);
}
m_player->call_client(msg);
}
而已读消息序列号则需要客户端进行上报:
void player_chat_component::chat_set_readed_request(const utility::rpc_msg& msg, const std::string& chat_key, std::uint64_t msg_seq)
{
auto cur_chat_prop_proxy = m_player->prop_proxy().chats().get_insert(chat_key);
if(msg_seq >= cur_chat_prop_proxy.readed_msg_seq().get())
{
cur_chat_prop_proxy.readed_msg_seq().set(msg_seq + 1);
}
}
这种方式可以非常简单的管理未读消息,但是这种维护方式与主流的消息未读设计很不一样。当前的未读消息设计下,客户端每次打开一个聊天会话的时候,都需要从readed_msg_seq的位置开始拉取后续连续的若干条消息,等到玩家查看新拉下的这些消息之后,客户端上报最新的已读序列号并设置到readed_msg_seq上,然后再继续重复这个循环直到没有未读消息,即整个读取未读消息的流程就是不断的下拉聊天记录。而像微信等主流聊天软件中的设计与之完全相反,客户端每次打开一个聊天会话时,展现的是最新的若干条聊天消息,汇报已读聊天消息需要提供当前显示窗口里对应的聊天序列号区间[a, b], 读取未读消息的流程就是不断的上拉聊天记录。同时由于可能在未清除所有未读消息的情况下又会接收到新的未读消息,所以这种系统中未读消息系统不能单独的存储一个最大已读流水号,而需要存储若干个不相交的已读序列号区间:
// [begin, end) 左闭右开区间
struct chat_readed_region
{
std::uint64_t begin;
std::uint64_t end;
};
class unread_msg_mgr
{
std::vector<chat_readed_region> readed_regions; // 所有已经设置为已读的不相交上升区间
std::uint64_t max_msg_seq; // 最新消息的编号
std::uint64_t unread_msg_num; // 剩下未读消息的数量
void add_new_msg(std::uint64_t new_msg_seq) // 添加一个新的未读消息
{
if (new_msg_seq > max_msg_seq)
{
unread_msg_num += new_msg_seq - max_msg_seq;
max_msg_seq = new_msg_seq;
}
}
void mark_all_readed()
{
readed_regions.clear();
readed_regions.push_back(chat_readed_region{ 0, max_msg_seq + 1 });
}
void mark_readed(std::uint64_t begin, std::uint64_t end); // 执行区间合并相关操作
};
这里的mark_readed需要传入一个与readed_regions里任意区间都不相交的区间,实现时需要比较小心的处理左右两侧已读区间的合并操作,具体可以分为下面的四种情况:
- 不与任何区间进行合并,创建一个新区间
[begin, end) - 与左侧区间合并,修改左侧区间的
end为新的end - 与右侧区间合并, 修改右侧区间的
begin为新的begin - 触发左右两侧区间的合并,三个连续区间合并为一个大区间
所以代码实现上有比较多的if判断,需要提前规划好每个分支需要处理的逻辑:
void mark_readed(std::uint64_t begin, std::uint64_t end)
{
if (end <= begin || end > max_msg_seq + 1 || begin > max_msg_seq)
{
return;
}
std::uint64_t i = 0;
for (; i < readed_regions.size(); i++)
{
if (readed_regions[i].begin > begin)
{
break;
}
}
bool merge_left = false;
bool merge_right = false;
if (i != 0)
{
assert(readed_regions[i - 1].end <= begin);
if (readed_regions[i - 1].end == begin)
{
readed_regions[i - 1].end = end;
merge_left = true;
}
}
if (i != readed_regions.size())
{
assert(readed_regions[i].begin >= end);
if (readed_regions[i].begin == end)
{
readed_regions[i].begin = begin;
merge_right = true;
}
}
if (merge_left && merge_right)
{
readed_regions[i - 1].end = readed_regions[i].end;
readed_regions.erase(readed_regions.begin() + i);
}
if (!merge_left && !merge_right)
{
readed_regions.insert(readed_regions.begin() + i, chat_readed_region{ begin, end });
}
unread_msg_num -= end - begin;
}
上面的实现代码里的for循环其实可以利用readed_regions里的有序性质来用二分搜索来快速定位,这样时间复杂度可以从线性降低为对数。
游戏中的排行榜
绝大部分游戏中都会设置各种排行榜,来代表玩家某个维度的积分排名。最令人熟知的就是天梯排行榜,比较知名的就是国服第一白牛这类排行。除了天梯排行榜外,排行榜的种类则是五花八门,我们耳熟能详的其他排行榜包括但不限于:等级排行榜,战力排行榜,竞速排行榜,成就排行榜,大秘境排行榜等。这些排行榜是玩家实力的光荣榜,不断的激励着游戏玩家在游戏内做很多重复性的劳动来打磨技巧,就为了能够在社区分享自己在榜上的截图。笔者当前也是深受其害,为了进入暗黑破坏神3的大秘境野蛮人排行榜首页浪费了好多时间:
![]()
从上面的这张图可以看出,一个大秘境排行榜其实被地区、职业、赛季、人数、模式等多个规则细分出了很多个子榜,所以完整榜单数量会有上百个。而且对于每个排行榜,其上榜人数也很多,暗黑3这里设置为了1000人:
![]()
由于有这么多的排行榜,每个排行榜上的人数也很多,使用一个高效的结构来管理排行榜是非常必要的。这些排行榜逻辑与算法面试中经常被考察的Top(N)排序很相似,不过游戏中面对的场景主要是大量动态变化的在线数据,而常规的Top(N)排序处理的是指定的已经生成好的离线数组。除了这个Top(N)排序之外,排行榜还需要处理排名查询,即获取指定玩家在这个排行榜的第几名。常规的最佳Top(N)结构最小堆在应对这个查询请求时呈现出来非常大的劣势,因为在堆中计算排名会触发一次完整遍历,其复杂度为O(N),所以堆这个结构完全不适合用来实现排行榜。此外游戏排行榜对于同分排名也有一些特殊需求,一般都会要求最早到达此分数的排在前面。下面我们将对游戏中的常见排行榜的实现来做一些梳理,展示其主要难点与解决技巧。
基于数组的实现
固定人数的排行榜是排行榜的主流,典型的设计中这种排行榜的大小一般都会保持在10000以内,在这种数量级上使用一个固定大小的有序数组来实现排行榜是简单且有效的方法。下面就是用有序数组实现排行榜功能的核心代码,也就一百行出头,简单有效:
struct player_rank
{
const std::string player_id;
double rank_score; // 分数越大代表排名越靠前
std::uint64_t update_ts;// 更新时间戳 用来参与同分排序
player_rank(const std::string& in_player_id, double in_score)
: player_id(in_player_id)
, rank_score(in_score)
{
}
std::pair<double, std::string_view> compare_key() const
{
return std::make_pair(-1 * rank_score, update_ts);
}
};
struct player_rank_wrapper
{
const player_rank* rank_ptr;
bool operator<(const player_rank_wrapper& other) const
{
return rank_ptr->compare_key() < other.rank_ptr->compare_key();
}
};
class array_rank
{
std::unordered_map<std::string, std::unique_ptr<player_rank>> m_player_ranks;
const std::uint32_t m_rank_size;
std::vector<player_rank_wrapper> m_sorted_ranks;
std::uint64_t m_update_ts_counter = 0;
public:
array_rank(std::uint32_t in_rank_size)
: m_rank_size(in_rank_size)
{
m_sorted_ranks.reserve(in_rank_size);
}
std::uint64_t gen_update_ts()// 用来分配递增时间戳 以避免同分
{
return ++m_update_ts_counter;
}
// 返回更新之后玩家的排名 从1 开始计数 如果为0 代表不在排行榜上
std::uint32_t update(const std::string& player_id, double rank_score)
{
auto temp_iter = m_player_ranks.find(player_id);
if (temp_iter == m_player_ranks.end()) // 一个不在排行榜上的玩家
{
if (m_sorted_ranks.size() == m_rank_size) // 当前榜上人数已满
{
player_rank temp_player_rank(player_id, rank_score);
if (m_sorted_ranks.back() < player_rank_wrapper{ &temp_player_rank })
{
// 分数小于最后一名 则不上榜
return 0;
}
else
{
// 删除最后一名
m_player_ranks.erase(m_sorted_ranks.back().rank_ptr->player_id);
m_sorted_ranks.pop_back();
auto temp_rank_ptr = std::make_unique<player_rank>(player_id, rank_score);
temp_rank_ptr->update_ts = gen_update_ts();
// 然后用二分法执行插入
auto insert_iter = std::lower_bound(m_sorted_ranks.begin(), m_sorted_ranks.end(), player_rank_wrapper{ temp_rank_ptr.get() });
auto result_iter = m_sorted_ranks.insert(insert_iter, player_rank_wrapper{ temp_rank_ptr.get() });
m_player_ranks[player_id] = std::move(temp_rank_ptr);
return std::distance(m_sorted_ranks.begin(), result_iter) + 1;
}
}
}
else
{
// 已经在排行榜上 根据分数上升或者下降进行前后遍历以找到自身位置
auto pre_key = temp_iter->second->compare_key();
auto self_iter = std::lower_bound(m_sorted_ranks.begin(), m_sorted_ranks.end(), player_rank_wrapper{ temp_iter->second.get() });
if (rank_score == temp_iter->second->rank_score)// 分数相同直接返回之前的排名
{
return std::distance(m_sorted_ranks.begin(), self_iter) + 1;
}
temp_iter->second->rank_score = rank_score;
temp_iter->second->update_ts = gen_update_ts();
auto new_key = temp_iter->second->compare_key();
if (new_key < pre_key)// 向前搜索
{
while (self_iter != m_sorted_ranks.begin())
{
auto pre_iter = self_iter - 1;
if (*pre_iter < *self_iter)
{
return std::distance(m_sorted_ranks.begin(), self_iter) + 1;
}
else
{
std::swap(*self_iter, *pre_iter);
self_iter = pre_iter;
}
}
}
else// 向后搜索
{
while ((self_iter + 1) != m_sorted_ranks.end())
{
auto next_iter = self_iter + 1;
if (*self_iter < *next_iter)
{
return std::distance(m_sorted_ranks.begin(), self_iter) + 1;
}
else
{
std::swap(*self_iter, *next_iter);
self_iter = next_iter;
}
}
}
}
}
std::uint32_t get_rank(const std::string& player_id) const
{
auto temp_iter = m_player_ranks.find(player_id);
if (temp_iter == m_player_ranks.end()) // 一个不在排行榜上的玩家
{
return 0;
}
else
{
auto self_iter = std::lower_bound(m_sorted_ranks.begin(), m_sorted_ranks.end(), player_rank_wrapper{ temp_iter->second.get() });
return std::distance(m_sorted_ranks.begin(), self_iter) + 1;
}
}
};
上面的代码中实现了一个更新排行的核心接口update,主要流程就是如果新加入的话则删除最后一名然后二分寻找插入位置执行插入,如果已经在榜上则根据积分的下降或者上升执行对应的前后搜索。插入时可能会将整个排行榜数组的元素都后移一位,前后搜索时也可能遍历整个排行榜数组,所以这个接口的最坏复杂度为O(N),这里的N就是当前排行榜数组的大小。不过由于数组是连续存储的,且数组里的元素只是一个指针,所以在内存的缓存系统帮助下其执行时间并没有想象中的那么长。相对而言查询排行榜的接口get_rank就很高效了,只需要执行一次二分查找即可,时间复杂度为O(logN)。
不过这里需要考虑到游戏内用来决定排名的玩家积分其实是动态变化的,所以我们不能设置这个有序数组的大小为排行榜大小。如果这样设置的话,如果排行榜上的某个玩家A由于某种原因导致积分下降,导致其并不在真正的Top(N)之中,但是由于没有其他合适的玩家来补充上榜,导致A只能下降为排行榜的最后一名。此时如果玩家B比玩家A积分高,但是发现玩家A在排行榜上但是自己并不在排行榜,排行榜的正确性就会遭受质疑。这种缺乏补位导致的排行榜问题很容易引发各种运营事故,特别是这个排行榜涉及到一些比较贵重的奖励的时候。所以实践中会设置这个大小比排名大小大,经验参数差不多大50%即可,也就是说如果排行榜大小为1000,则有序数组设置为1500。在Github上我建立了一个仓库https://github.com/huangfeidian/rank来用不同的数据结构来实现排行榜,其中的include/array_rank.h部分就对应了前述的带冗余的有序数组排行榜实现。
预留额外容量的方法很大程度上避免了前述的缺乏补位引发的排行榜不正确的问题,不过这个方法并没有根治补位问题。假设某种情况引发这个1500数组中的501个元素都大规模降分导致不在top(1500)之中,此时原来的1501名玩家C就应该出现在排行榜。但是由于C之前并不在之前的top(1500)中,所以此时C并没有上榜。不过考虑到这种大量玩家同时下榜的情况很少见,所以游戏中并不会力求完全解决这个问题,一般来说扩大排行榜内的冗余量到一两倍基本可以避免这个问题。还有一个比较取巧的方法就是客户端在拉取到排行榜Top(N)数据之后,将自身数据通过插入排序加入到获取的数据中然后再选择其中的Top(N)进行显示,这样自身客户端就可以显示正确了。如果发现自身应该上榜但是并没有在排行榜上,则同时向服务器发起一个排行榜更新请求将自身的积分信息推送过去,从而将自身数据插入到服务端的排行榜有序数组中。
基于跳表的实现
前述的使用数组实现的排行榜有个非常大的硬伤就是其更新的时间复杂度为O(N),N为其数组的最大容量,这样就导致了这样的实现在N达到100000以上的级别时单次更新的最坏时间达到了毫秒级别。这个最坏复杂度主要是由数组插入新元素引发的整体后移导致的,而链表在插入一个新元素所需的时间为O(1),不禁让人想用链表来替代数组。但是使用链表来存储有序数据的话,就无法使用lower_bound来执行二分查找,这样导致寻找插入位置所需的时间变成了O(N),顺带的将查询接口get_rank的时间也从O(logN)劣化到了O(N)。所以单纯的使用链表来替换数组反而是一种劣化的实现,想扭转这种劣势需要以某种方式通过记录的额外信息来快速查询链表节点排名,刚好跳表SkipList就是这样的一种支持快速定位的链表结构。
跳表是由 William Pugh 在1990发明的一种查找数据结构,支持对数据的快速查找,插入和删除。这个数据结构的插入新元素的时间复杂度为O(logN),同时查询元素位置和删除元素的时间复杂度也是O(LogN),可以说是非常优秀,非常适合用来解决这里的排行榜问题。Redis的zset底层数据结构使用的就是跳表,所以有很多文章都介绍了完全依赖Redis的zset功能来实现排行榜,官方网站也提供了文章来介绍这个排行榜功能。考虑到这个数据结构的实现上并没有很复杂,我们在这里就来详解一下跳表的底层实现,分析一下为何能够达到这样的最优复杂度。
跳表的底层实现是一个多级链表,每一级的链表都是一个有序链表。最底层的0级链表是包含了所有元素的有序链表,在其之上的每一级有序链表都是对应的下一级有序链表的一个稀疏抽样。下图中的a->b->c->d->e就生动的展示了每一级的稀疏抽样过程,最终生成了有五级链表的跳表:
![]()
在每一级的有序链表生成下一级的有序链表时,当前级别的链表里每个节点进入下一级的概率都是指定的常数p。每一级每个节点计算概率时都是独立无关事件。所以一个0级节点在第k级有序链表中存在相应节点的概率为,一个0级节点的最大层数为k(k>=1)的概率为。因此一个0级节点所有层级的对应节点的数量期望为:
上面的后半部分可以转换为求,此时注意到:
将代入进入得到,所以最终的结果为:
所以跳表中的各层级的总节点数量期望为,也就是O(n),所以引入多级有序链表对于总体的空间复杂度来说影响不大。
有了这样的多级链表定义之后,查询一个元素对应的节点就不再需要去遍历整个链表,可以利用这里的多级性质来加速查询。搜索开始时我们定义一个变量search_node,初始化为头节点,然后开始循环处理:
- 如果
search_node里存储的值等于目标值,则返回search_node - 如果
search_node比目标值小- 如果
search_node的后续节点为尾节点,或者后续节点的值大于目标值,则将search_node替换为其下一级的节点,如果没有下一级则返回空 - 如果
search_node的后续节点的值大于目标值,则将search_node替换为这个后续节点
- 如果
语言描述流程还是过于抽象不好理解,接下来我们用图形来表示。假如我们需要在下图中查找71代表的节点排名:
![]()
运用上述流程之后,搜索路径如下:
![]()
了解这个搜索流程之后,获取一个节点的排名就非常简单了。如果任意层级中的任意节点都记录了这个节点到其同层级右边节点之间所包含的0级节点数量到节点的span字段上,则最后找到的节点排名就等于中间路过的所有触发了向右移动的search_node的span字段累加值加上向右移动的次数。在上述的搜索路径中,第3层头节点到第三层31节点之间的0级节点数量为4,然后第0层31节点到第0层71节点之间的0级节点数量为0,span累加值为4,同时向右移动次数为2,因此总体排名为6。
我们再用简短的代码将这个流程精确化。首先我们需要给出跳表的结构定义,这里为了精简代码就不把之前的update_ts带入了,只考虑存value字段来参与比较:
template<typename V>
struct skiplist_node
{
struct node_level_info
{
skiplist_node* forward; // 在这个level 链表中的下一个节点
std::uint32_t span; // 当前节点与这个level 链表中的下一个节点 之间的节点数量
}
V value; // 跳表中存储的有序值 外部需要保证跳表中这是一个严格偏序的 不存在相等的情况
std::vector<node_level_info> levels; // 当前节点存储的所有level信息 索引0对应的是最底层的链表
};
template<typename K, typename V>
class skiplist
{
const double m_p; // 指定的抽样概率p
std::unordered_map<K, std::unique_ptr<skiplist_node<V>*>> m_key_to_nodes;
skiplist_node<V> m_head_node; // head_node里存储的value比最小可能值还小
skiplist_node<V> m_tail_node;// tail_node里存储的value比最大可能值还大
int m_level; // 当前跳表的最高层级
};
在这样的结构定义下,搜索节点并获取排名的操作代码就比较简短了:
void skiplist::get_prev_info(std::vector<const skiplist_node<V>*>& prev_nodes, std::vector<std::uint32_t> prev_ranks, const skiplist_node<V>* dest) const
{
const skiplist_node<V>* search_node = &m_head_node;
std::uint32_t last_level_rank = 0;
for(int i = m_level; i>=0; i--)
{
prev_ranks[i] = last_leve_rank;
while(search_node->levels[i].forward->value < dest->value)
{
prev_ranks[i] += search_node->levels[i].span + 1;
search_node = search_node->levels[i].forward;
}
last_level_rank = prev_ranks[i];
}
}
std::uint32_t skiplist::get_rank(const K& p) const
{
auto p_iter = m_key_to_nodes.find(p);
if(p_iter == m_key_to_nodes.end())
{
return 0;
}
std::vector<const skiplist_node<V>*> prev_nodes(m_level + 1, nullptr);
std::vector<std::uint32_t> prev_ranks(m_level + 1, 0);
get_prev_info(prev_nodes, prev_ranks, p_iter->second.get());
return prev_ranks[0];
}
这种要么往右要么往下的二分思想从直觉上来说类似于二叉树的搜索,所以我们猜测其时间复杂度应该与O(logN)差不多,不过这个结论还需要一个更加数学的证明。这里的复杂度分析采用的是从后向前分析查找路径,这个过程可以分为从最底层爬到最顶层和后续左移到头节点两个部分。假设当前我们处于一个第 i 层的节点 x,我们并不知道x 的最大层数和x左侧节点的最大层数,只知道x的最大层数至少为i。如果x的最大层数大于i,那么下一步应该是向上走,这种情况的概率为p;如果x的最大层数等于i,那么下一步应该是向左走,这种情况概率为1-p。现在我们用C(i)来表示一个0级节点在搜索过程中上升到第i级的某个节点时所消耗的时间,根据我们前面的分析,可以得到这样的递推式:
使用这个递推式可以非常简单的得到。在到达最顶端的第k层之后,向左移动的次数最大不会超过这一层的所有节点数量,而第k层的节点数量期望为。所以在节点数为n且层数为k的跳表中,整个的回溯操作时间复杂度为。注意到最顶层的节点数量期望会小于,因为如果大于这个值的话这一层的节点数量乘以升级概率会导致下一级的期望节点数量大于等于1,违背了我们最顶层的定义。所以n个节点的跳表最高层数k下有这样的性质:
所以最大层数k的期望值可以用来表示,这样带入到原来计算出来的整体复杂度,可以得到:
经验算整体复杂度就是O(logN)量级,符合我们之前的直觉。剩下的问题就是我们如何高效的构造出跳表,首先要处理的是如何找到新的节点在0级有序链表中的插入位置。这个插入位置定位其实也是非常巧妙的,完整的利用了之前查询排名时的代码:
// 插入一个新的元素 返回插入之后的排名
std::uint32_t skiplist::insert(const K& p, const V& score)
{
auto p_iter = m_key_to_nodes.find(p);
if(p_iter != m_key_to_nodes.end())
{
// 这里暂时省略已经在排行榜上的讨论
return 0;
}
skiplist_node<V>* temp_node = new skiplist_node<V>();
temp_node->value = score;
std::vector<const skiplist_node<V>*> prev_nodes(m_level + 1, nullptr);
std::vector<std::uint32_t> prev_ranks(m_level + 1, 0);
get_prev_info(prev_nodes, prev_ranks, temp_node);
temp_node->levels.push_back({});
temp_node->levels[0].forward = prev_nodes[0]->levels[0]->forward;
prev_nodes[0]->levels[0]->forward = temp_node;
// 剩下一些代码来执行概率上升的逻辑
m_key_to_nodes[p] = temp_node;
return prev_ranks[0] + 1;
}
上面展示的代码成功的将这个新节点插入到了0级有序链表中,但是后续的依概率逐级上升的逻辑并没有体现在这里。所以在找到插入位置之后,需要以这样的形式来执行逐级上升插入:
while(true)
{
int cur_node_level = temp_node->levels.size();
if(m_level<cur_node_level)
{
// 当前节点高度可能比原来的层数高了 需要新建一层
m_level++;
m_head_node.levels.push_back(level_info{&m_tail_node, m_key_to_nodes.size()});
prev_nodes.push_back(&m_head_node);
prev_ranks.push_back(m_key_to_nodes.size());
}
temp_node->levels.push_back({});
temp_node->levels[cur_node_level].forward = prev_nodes[cur_node_level]->levels[cur_node_level]->forward;
prev_nodes[cur_node_level]->levels[cur_node_level]->forward = temp_node;
if(random() > m_p)
{
// 概率测试没有通过,停止上升
break;
}
}
上面的代码成功的依照概率p对这个新节点做好了多层链表的上升操作,维护好了链表中的forward指针,但是span字段由于插入了这个新节点导致很多地方都需要调整,所以需要这样的去维护span:
// 原来维护链表指针的代码
for(int i = 0; i< prev_nodes.size(); i++)
{
if(i < temp_node->levels.size())
{
// prev 节点的排名
uint32_t prev_node_rank = prev_ranks[i];
// forward节点在插入temp_node后的排名
uint32_t forward_node_rank = prev_node_rank + prev_nodes[i]->levels[i].span + 1 + 1;
// temp_node节点的排名
uint32_t self_node_rank = prev_node_rank[0] + 1;
// 利用这三个变量来更新temp_node 和prev_node 的span
prev_nodes[i]->levels[i].span = self_node_rank - prev_node_rank - 1;
temp_node->levels[i].span = forward_node_rank - self_node_rank - 1;
}
else
{
// 这一层级大于temp_node的高度 因此只需要将span+1即可
prev_nodes[i]->levels[i].span++;
}
}
现在来计算一下整个插入过程的时间复杂度。首先是查找初始插入位置,这部分的复杂度就是之前的查询复杂度,也就是O(logN)。然后执行不断上升,每上升一层所需要的额外代价就是调整两个forward和两个span,所以可以认为这个上升的时间与这个节点的期望高度成线性相关,又由于单节点的期望高度为,所以这个的调整时间可以认为是常数。综上讨论,插入的时间复杂度等价于查询复杂度,都是O(logN)。
接下来考虑删除节点这个操作,删除节点的过程就是原来插入节点过程的逆过程,查询了prev_nodes,prev_ranks之后再调整forward,span即可,所以这个删除的复杂度也是O(logN)。至于已有节点的更新,可以通过先从跳表中删除这个节点然后更新积分最后重新插入这个节点来实现,所以这个更新操作的时间复杂度也是O(logN)。可以看出跳表的所有操作都是非常高效无短板,而且相关的实现代码也很简短,因此特别适合用来维护大规模的排行榜。我自己在前面介绍的rank仓库中也提供了一个基于跳表的排行榜实现,代码在include/skiplist_rank.h中。不过在我自己的对比测试test/speed_test中发现不符合直觉的结果,在100w左右的数据量上跳表的排行榜实现与数组的排行榜实现并没有非常显著的性能优势。感觉数组的线性内存读取在缓存结构的加持下比链表的遍历有碾压性的性能优势,否则无法解释这样的结果。
基于树的实现
在没有接触跳表之前,有些人会尝试用二叉平衡树结构去实现一个排行榜。因为对于二叉平衡树来说,插入删除节点的复杂度也是O(logN)。如果需要获取一个节点的排名,则需要在树的节点中定义一个额外字段来存储这个节点对应的子树节点个数:
struct binary_tree_node
{
binary_tree_node* left;
binary_tree_node* right;
std::uint32_t subtree_node_count; // 当前节点对应的子树里总节点个数
V score;
};
有了这个字段之后,获取一个节点的排名就是收集从根节点到这个节点的路径上所有触发右转的节点的左子树节点数量的累加值,最后再加上1。下面就是描述这个获取排名的代码:
// 使用者需要保证在树中不存在两个节点有同样的score值
std::uint32_t binary_tree_node::get_rank(const V& other_score) const
{
std::uint32_t rank_value = 0;
if(score<=other_score)
{
std::uint32_t cur_node_rank = 1;
if(left)
{
cur_node_rank += left->subtree_node_count;
}
if(score == other_score)
{
return cur_node_rank
}
if(right)
{
return right->get_rank(other_key, other_score) + cur_node_rank;
}
else
{
return cur_node_rank + 1;
}
}
else
{
return left->get_rank();
}
}
为了简单起见这里使用递归来不断下降,可以看出这个获取排名的过程与二叉树的查找过程并没有多大的差异,因此这个排名获取的时间复杂度也是O(logN)。既然平衡二叉树结构的所有操作复杂度都是O(logN),那为什么业界基本没有使用平衡二叉树来做排行榜呢。这个主要是因为实现一个平衡二叉树所需的代码实在是太多了,avl树的实现所需代码比跳表来说多了好几倍,更不用说更加复杂的红黑树了。而且树结构的节点访问在内存局部性上与跳表一样劣势很大,所以其在常见的100-1000的排行榜大小上远远不及数组的实现。这两个因素的作用下导致树结构在排行榜实现上基本无人问津。
基于树状数组的实现
有些游戏允许任何拥有积分的玩家都可以查询自己的排名,这样排名值可能到千万级别。前述的数组排行榜已经难堪大用,只剩跳表和平衡二叉树结构能应对这种情况。不过如果这种积分排名中会在低分段聚集绝大部分的玩家,同分玩家数会有非常多。可以利用这个性质来构造这些分数子排行榜,这样一个总榜就可以被切分为上万个子榜,每个子榜单独维护,可以极大的降低整体维护复杂度。不过切分为子榜之后,对于排名值的查询就分为了三步:
- 根据分数定位到这个分数所在的子榜,然后通过这个子榜获取榜内排名
A - 获取这个子榜前面所有的高排名子榜中的玩家数量之和
B - 返回
A+B作为最终的排名值
这里的子榜内玩家一般也就不到100000级别,可以使用之前介绍的各种排行榜的数据结构来维护。如果单一子榜内玩家数量过多,此时还可以放弃先到先得的排序规则,进一步根据玩家名字进行hash然后创建更低一级的子榜。这样就形成了三级排行榜结构,保证每一级的排行榜数量都控制在10000以内,处理起来就快的多了。
搞定了第一步子榜内部的维护之后,接下来需要处理第二步,对所有高优先级子榜进行求和。为了简化这个求和问题的讨论,我们假设每个排行榜内的玩家个数都存储到一个数组vector<uint32> rank_nums之中,此时要解决的问题就是给定索引i,对rank_nums[0],...,rank_nums[i-1]这些元素进行求和。这个简单点的实现就是遍历相关排行榜进行累加,即sum(rank_nums.begin(), rank_nums.begin()+i, 0),时间复杂度就是子榜数量的线性复杂度O(N)。考虑到这种排行榜玩家数量为千万,且子榜数量也超过10000,线性复杂度乘以玩家数量也是一个天文数字。所以我们需要寻找一个更优的结构来获取前序子排行榜的容量之和,最好其更新与查询复杂度都是O(logN)级别,而树状数组正是满足这一需求的数据结构。
树状数组也叫做二元索引树Binary Indexed Tree,最早由 PeterM.Fenwick于1994年在A New Data Structure for Cumulative Frequency Tables提出。这个数据结构多用于高效计算数列的前缀和与区间和,这些操作的时间复杂度都是O(logN)。这个数据结构在原始的数组数据a之外创建了一个额外的数组c,数组c中的每个元素都是a中一段连续元素的累加和,c与a的对应关系图如下:
![]()
这张图只是一个粗略的展示,整个c与a之间的映射关系有一个完整的形式定义。树状数组中,规定c[x]管辖的区间为长度为,对应a的这个闭区间的元素和,其中:
- 设二进制最低位为第
0位,则k恰好为x二进制表示中,最低位的1所在的二进制位数; - 恰好为
x二进制表示中,最低位的1以及后面所有0组成的数
举例来说,88的二进制表示为01011000,所以这个k就是3,此时对应的区间左侧为,因此。
事实上我们并不需要求出k来,求其实更加方便,这里只需要使用一个非常简单的二进制操作就可以得到x对应的:
int lowbit(int x) {
// x 的二进制中,最低位的 1 以及后面所有 0 组成的数。
// lowbit(0b01011000) == 0b00001000
// ~~~~^~~~
// lowbit(0b01110010) == 0b00000010
// ~~~~~~^~
return x & -x;
}
这里使用的主要是补码操作,类似巧妙的位操作在Hacker's Delight里还介绍了很多,有兴趣的读者可以尝试去看看。
有了这个结构之后,我们再来探究如何利用这个结构高效的计算出。首先我们先获取c[n],以及其覆盖的区间[m, n],此时可以得到:
这样问题就转换为了同类型但是处理范围更小的问题上,使用这个转化方法来求的最终过程如下,红色的元素就是最终被访问到的数组c元素:
![]()
对应的cpp代码也非常简短:
std::uint64_t pre_sum(std::uint32_t k)
{
std::uint64_t result = 0;
while(true)
{
result += c[k];
k -= lowbit(k);
if(k==0)
{
return result;
}
}
}
由于m-1=n-lowbit(n),也就是说新的子问题对应的n2相当于将原来的n的二进制表示最低位的1变换为0。由于n的二进制表示里1的数量不超过log(N)+1,所以最多只需要执行log(N)+1次这样的操作就可以获取的值。由于每次转化操作所需操作只有一个求和和lowbit调用,所以求前缀和的整体复杂度就是O(logN)。也就是说在树状数组的帮助下,我们可以在对数时间复杂度内获取任意一个玩家的排名!
讲完了如何使用树状数组来优化排行榜的查询,接下来我们来讲如何在排行榜更新过程中去维护这个对应的树状数组。假设分段k对应的子榜新加入了一个玩家,这样就会导致a[k]+=1,此时我们需要去维护受影响的c。从上面的图可以观察出a[k]会立即更新到c[k]。然后对于任意c[k],其覆盖的区间总是被c[k+lowbit(k)]所覆盖的区间所包围,因此需要递归更新:
void update(std::uint32_t k, int delta)
{
while(true)
{
c[k]+=delta;
k= k + lowbit(k);
if(k >= c.size())
{
return;
}
}
}
由于循环过程中的每次操作都会将k的二进制表示中最低位的1向左推进起码一位,因此整个循环次数不会大于log(p) + 1,其中p为c的大小。由于每次循环中的消耗也只是两次加法和一次lowbit调用,因此整体的更新复杂度也是对数复杂度。
如果一个玩家的分数更新之后导致从子榜m切换到n,则我们需要先对a[m]做一次减法更新update(m,-1),然后再对a[n]做一次加法更新update(n,1)。两个操作都是对数时间复杂度,因此整个切换子榜的操作也是对数时间复杂度。
综上所述,使用树状数组可以非常高校的实现多级分段排行榜的查询与更新,所有操作的复杂度都是对数时间复杂度。
Mosaic Game 中的排行榜
mosaic_game中也集成了排行榜服务,其实现在roles/server/service_server/include/service/rank_service.h上。这个服务在启动的时候会去读取配置文件rank_list.json里的排行榜配置来生成多个由https://github.com/huangfeidian/rank/include/array_rank.h为底层数据结构的排行榜。在创建好这些没有数据的排行榜之后,再读取之前存在数据库中的历史排行榜数据,来实现排行榜的数据加载:
// bool rank_service::init(const json::object_t& data);
auto cur_rank_ptr = std::make_unique<system::rank::array_rank>(cur_rank_name, cur_rank_sz, cur_rank_pool_sz, -100000, 100000);
m_array_ranks[cur_rank_name] = std::move(cur_rank_ptr);
tasks::db_task_desc::base_task cur_task_base(tasks::db_task_desc::task_op::find_one, std::string{}, "", collection_name());
auto cur_db_callback = [cur_rank_name, this](const json& db_reply)
{
load_rank_cb(cur_rank_name, db_reply);
};
json query;
query["name"] = cur_rank_name;
auto cur_find_task = tasks::db_task_desc::find_task::find_one(cur_task_base, json(query), {});
auto cur_server = get_server();
cur_server->call_db(cur_find_task->to_json(), cur_db_callback);
m_remain_ranks_to_load.insert(cur_rank_name);
为了支持排行榜数据的存库,我们还在排行榜基类上提供了与json之间进行转换的接口:
virtual json rank_interface::encode() const
{
json result;
result["name"] = m_name;
result["impl_name"] = rank_impl_name();
result["rank_sz"] = m_rank_sz;
result["pool_sz"] = m_pool_sz;
result["min_value"] = m_min_value;
result["max_value"] = m_max_value;
return result;
}
virtual bool rank_interface::decode(const json& data) = 0;
json array_rank::encode() const
{
std::vector<rank_info> temp_sorted_rank_info;
temp_sorted_rank_info.reserve(m_sorted_rank_ptrs.size());
for (const auto &one_key : m_sorted_rank_ptrs)
{
temp_sorted_rank_info.push_back(*one_key.ptr);
}
json result = rank_interface::encode();
result["sorted_ranks"] = temp_sorted_rank_info;
return result;
}
bool array_rank::decode(const json &data)
{
std::uint32_t rank_sz;
std::uint32_t pool_sz;
std::string name;
std::vector<rank_info> temp_sorted_rank_info;
try
{
data.at("name").get_to(name);
data.at("pool_sz").get_to(pool_sz);
data.at("rank_sz").get_to(rank_sz);
data.at("sorted_ranks").get_to(temp_sorted_rank_info);
}
catch (std::exception &e)
{
assert(false);
return false;
}
reset(temp_sorted_rank_info);
return true;
}
排行榜的更新操作是一个低频可控操作,但是排行榜的查询操作却是一个完全由玩家行为决定的不可用操作,而且很多排行榜处理的查询都是返回所有榜上结果的整榜查询,所以rank_service的绝大部分cpu时间都是在处理查询任务上。为了减轻rank_service的cpu负担,mosaic_game中将排行榜的查询功能委托到了每个进程都有的rank_manager单例上,这个单例会拥有rank_service上所有排行榜数据的一个只读副本,以供Space进程来执行本地查询。
这个rank_manager在所在进程启动之后往rank_service注册,获取此时所有排行榜的全量数据副本,然后以这些数据副本来初始化一系列的arary_rank:
void rank_manager::sync_full_msg(const utility::rpc_msg& data, const json::array_t& all_rank_datas)
{
m_timer_mgr.cancel_timer(m_register_timer);
m_rank_datas.clear();
for(const auto& one_rank_data: all_rank_datas)
{
auto temp_array_rank = system::rank::array_rank::create(one_rank_data);
if(!temp_array_rank)
{
m_logger->error("fail to create rank with data {}", one_rank_data.dump());
continue;
}
m_rank_datas[temp_array_rank->m_name] = std::move(temp_array_rank);
}
}
这个只是rank_manager启动的时候执行与rank_service之间的数据同步,如果后续rank_service由于玩家上报了新的积分导致排行榜发生变化,也需要将这个变化同步到所有注册过来的rank_manager。简单的实现可以将rank_service接收到的所有的更新请求都往注册过来的rank_manager转发一份,让rank_manager也同步执行所有更新。不过这个暴力的实现会导致很多性能的浪费,因为绝大部分的玩家更新都不会引发排行榜的变动。为了知道一次update操作是否引发了排行榜的变化,之前的排行榜基类rank_interface::update接口就不能只返回这个玩家的最新排名,还需要返回一些额外信息:
struct update_rank_result
{
std::uint32_t pre_rank = 0; // 更新前的排名
std::uint32_t new_rank = 0; // 更新后的排名
std::uint64_t update_ts = 0; // 更新后的玩家积分时间戳
};
// rank 为1 代表第一名 为0 代表不在排行榜上
virtual update_rank_result update(const rank_info& one_player) = 0;
有了这个返回数据之后,我们就可以非常方便的判定此次更新是否会影响到排行榜,结果中的pre_rank和new_rank任何一个是有效排名值都会影响到排行榜,只有都不是有效排名值的时候才不会影响:
void rank_service::update_rank(const utility::rpc_msg& msg, const std::string& rank_name, const std::string& player_id, const json::object_t& player_info, double rank_value)
{
if(m_delay_broadcast_timer.valid())
{
return;
}
auto cur_rank_iter = m_array_ranks.find(rank_name);
if(cur_rank_iter == m_array_ranks.end())
{
return;
}
system::rank::rank_info new_rank_info;
new_rank_info.player_id = player_id;
new_rank_info.player_info = player_info;
new_rank_info.rank_value = rank_value;
auto cur_update_result = cur_rank_iter->second->update(new_rank_info);
new_rank_info.update_ts = cur_update_result.update_ts;
auto cur_rank_pool_sz = cur_rank_iter->second->m_rank_sz;
bool should_sync_manager = false;
if(cur_update_result.new_rank >0 && cur_update_result.new_rank <= cur_rank_pool_sz)
{
should_sync_manager = true;
}
else
{
if(cur_update_result.pre_rank >0 && cur_update_result.pre_rank <= cur_rank_pool_sz)
{
should_sync_manager = true;
}
}
if(should_sync_manager)
{
sync_rank(rank_name, "update_rank", json(new_rank_info));
}
}
这里的sync_rank接口就是负责将这个排行榜的更新操作广播到所有注册过来的rank_manager,rank_manager接收到这个update_rank指令之后就会执行一次更新的回放,从而达到与rank_service的同步:
void rank_manager::sync_rank(const utility::rpc_msg& data, const std::string& rank_name, const std::string& sync_cmd, const json& sync_data)
{
auto cur_rank_iter = m_rank_datas.find(rank_name);
if(cur_rank_iter == m_rank_datas.end())
{
return;
}
auto& cur_array_rank = *cur_rank_iter->second.get();
if(sync_cmd == "update_rank")
{
system::rank::rank_info temp_rank_info;
try
{
sync_data.get_to(temp_rank_info);
}
catch(const std::exception& e)
{
m_logger->error("sync_rank rank {} cmd {} data {} decode fail error {}", rank_name, sync_cmd, sync_data.dump(), e.what());
return;
}
cur_array_rank.update(temp_rank_info);
return;
}
}
在客户端的排行榜展示界面中,除了要展示榜上玩家的唯一id与积分值之外,还要显示玩家的很多描述性字段,例如名称、门派、职业、种族、帮派、等级等各种杂七杂八的头像框信息。由于这些信息都是在随时变动的,所以在这些信息变动的时候都需要通知rank_service来执行玩家信息的更新操作:
void rank_service::update_player_info(const utility::rpc_msg& msg, const std::string& rank_name, const std::string& player_id, const json::object_t& player_info)
{
if(m_delay_broadcast_timer.valid())
{
return;
}
auto cur_rank_iter = m_array_ranks.find(rank_name);
if(cur_rank_iter == m_array_ranks.end())
{
return;
}
if(!cur_rank_iter->second->update_player_info(player_id, player_info))
{
return;
}
json temp_array;
temp_array.push_back(player_id);
temp_array.push_back(player_info);
sync_rank(rank_name, "update_player_info", temp_array);
}
由于玩家自己并不知道自己是否在排行榜上,所以当其中某一个字段发生变化之后,玩家需要向所有的排行榜发出一个更新player_info的操作,更新之后还需要通过sync_rank广播到所有的rank_manager上。在player_info里字段越来越多的时候,这个广播操作也是越来越频繁,而且频率远比更新排名积分高。实际上维护这个player_info并不是排行榜的本职需求,假如客户端可以以某种途径方便的通过player_id拿到这个玩家的最新player_info的话,rank_service这里可以删除player_info的维护逻辑,这样就可以进一步大规模的减轻排行榜服务的负担。
匹配系统
匹配系统概览
多人在线游戏的游戏内容可以粗略的分为两类:
player versus environment, 也就是常说的PVE,游戏玩家负责与游戏程序设定好的非玩家角色执行互动,MMO中的副本玩法可以归为此类player versus player,也就是常说的PVP,游戏玩家与游戏玩家在游戏内执行亲切友好的交流,Dota/LOL/CS/PUBG等游戏可以归为此类
PVE玩法由于其都是预设好的玩法流程,在玩家尝试过几次之后都会厌倦,所以这类玩法需要不断的更新内容、添加不同等级的难度来维护用户粘性。而PVP游戏则只需要提供一个完善的游戏玩法机制,再加上一个合适的玩家匹配系统,就可以在低频的内容更新下吸引大量的玩家在此游戏中流连忘返。毕竟与人斗其乐无穷,如果在深夜最后一把经历了一个棋逢对手并最终在被破三路的情况下翻盘,我想此时的玩家应该会在后面的一个多月内不断的回味这盘比赛。
为了做到棋逢对手,我们首先要为参与匹配的每个游戏玩家的游戏技术来做一个量化,专业数据叫MatchMaking Rating。在不同的游戏中这个量化指标会以不同的名词来体现,例如等级分、天梯分、金银铜铁段位。
![]()
有些游戏里使用了不止一个分数来决定匹配决策,例如行为分、英雄分、位置分等等。有了这些量化分数之后,玩家申请匹配游戏的时候就会将自己以及相关的分数加入到匹配池,匹配池通过内部的撮合算法来生成两边分数比较均衡的队伍,来作为一局游戏的人员配置,通知对局服务器开启一局新的游戏。下图中就是一局Dota2游戏中的人员配置,玩家名字附近的数字就代表了其天梯分数的排名,底色则代表了其排行所属的段位。
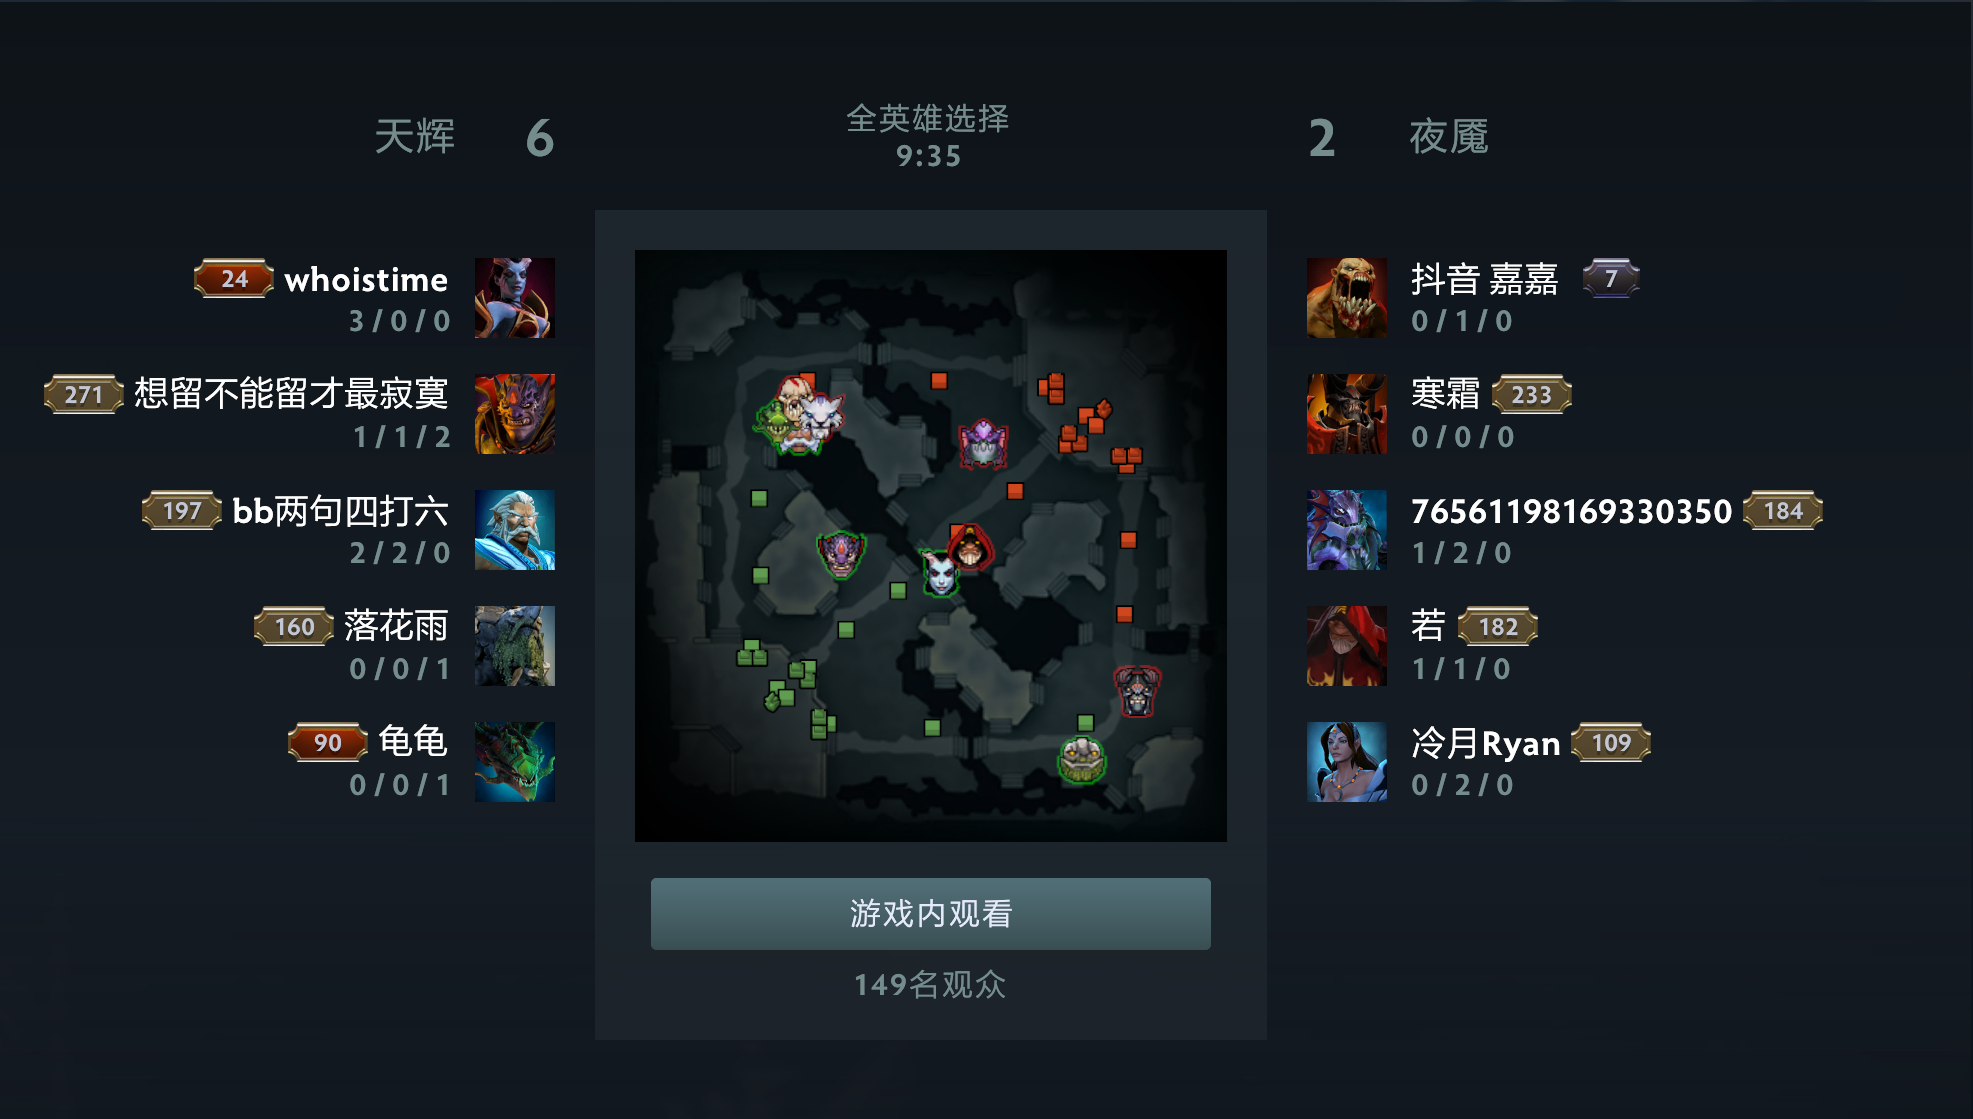
当一场游戏结束之后,会根据比赛的输赢以及每个玩家的局内表现,执行一下分数的调整。玩家使用更新后的分数再次进入匹配池,在这样的循环机制下玩家的分数将趋于稳定,同时其匹配到的对手与队友也逐渐棋逢对手。
综上,一个匹配系统主要需要做到两个部分:对局撮合,分数调整。下面将对这两部分进行分别介绍。
评分系统
ELO评分系统
国际象棋比赛中使用的ELO评分系统在匹配系统中极为出名。这个ELO评分系统对于参赛选手的实力有一个假设:其实际发挥出来的实力遵从一个正态分布函数:
这里的代表了玩家的平均实力,而则代表实力分布的标准差,整个正态分布的图形描述见下:
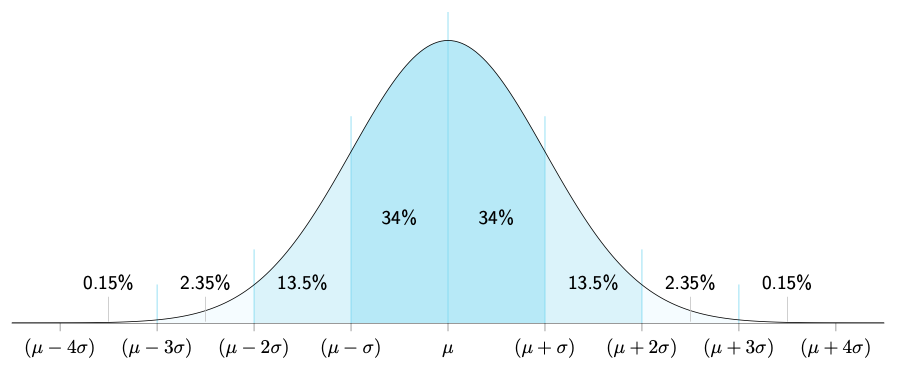
假如两个玩家X,Y的实力分布都服从这个假设,即的同时。在某一局中X赢Y的概率等于的概率。由于两个正态分布相减得到的结果仍然是正态分布,即。所以等于下面这个积分:
其中。
由于这个公式有点过于复杂,在常规情况下可以做一个近似,用来替换,此时的概率函数可以近似表示为,下面是更加容易理解的图形化表示:
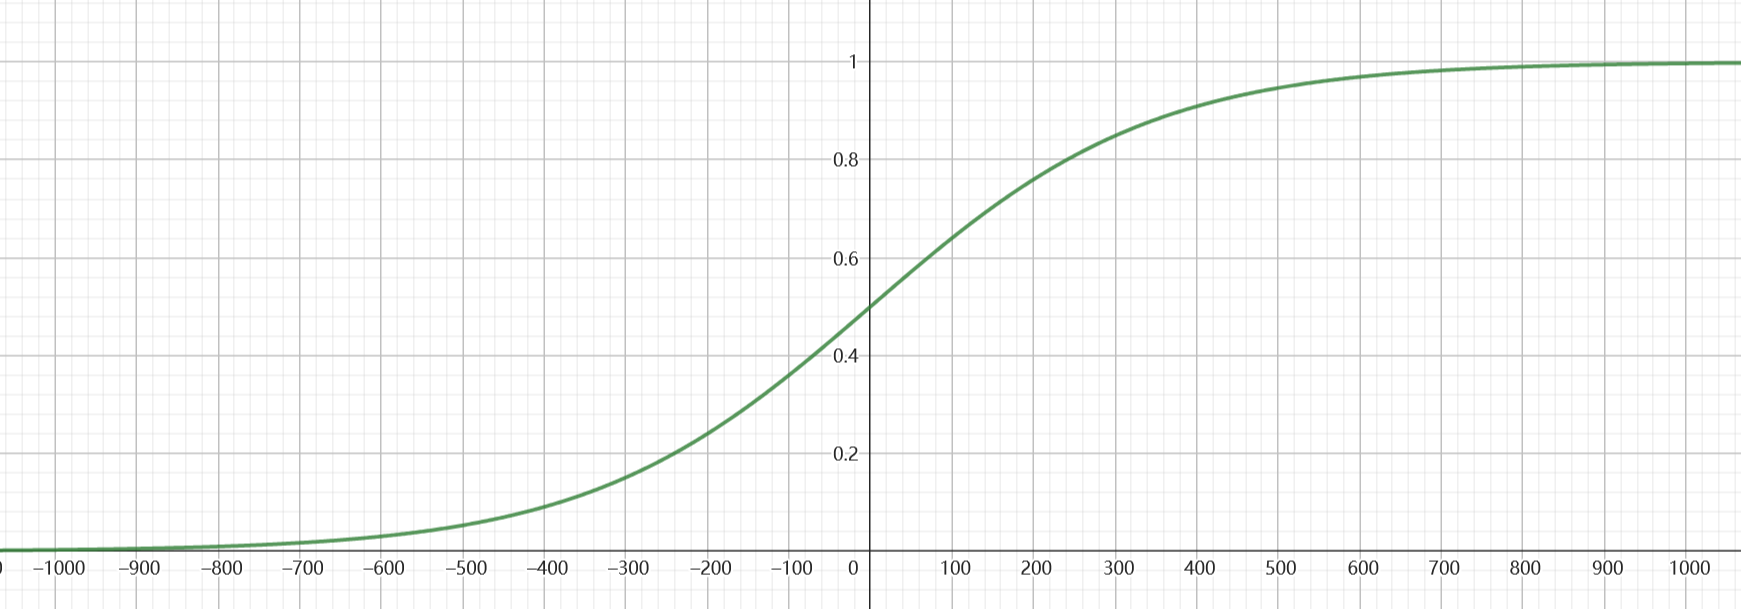
对于两个ELO分数为R1,R2的玩家来说,其赢的概率分别为和。我们可以验证这两个概率的和为1:
在一个对局结束后,两个玩家的分数都需要进行更新,分数更新的公式为R=R+K*(ActualScore - ExpectedScore)。在大多数游戏中,ActualScore根据对局的输赢分别设置为0或1,如果平局则设置为0.5,而ExpectedScore则设置为其在这个对剧中应该赢的概率。这里的K则是预先设置好的一个常数,其数值的选择将显著的影响分数的变化。
举例来说,两个玩家的ELO分数分别是1200,1000,则各自赢的概率分别为:
假设此时常数K设置为30,对局结束之后的分数变化如下:
- 在
1200分数的玩家赢的时候,赢家分数将更新为,输家分数将更新为 - 在
1000分数的玩家赢的时候,赢家分数将更新为,输家分数将更新为
在这两种情况下可以看出ELO有这样的性质,对局结束之后玩家的总分不变,分数高的玩家赢下之后得到的分数远小于输了之后扣掉的分数。分数的增减与分差之间的对应曲线见下图:
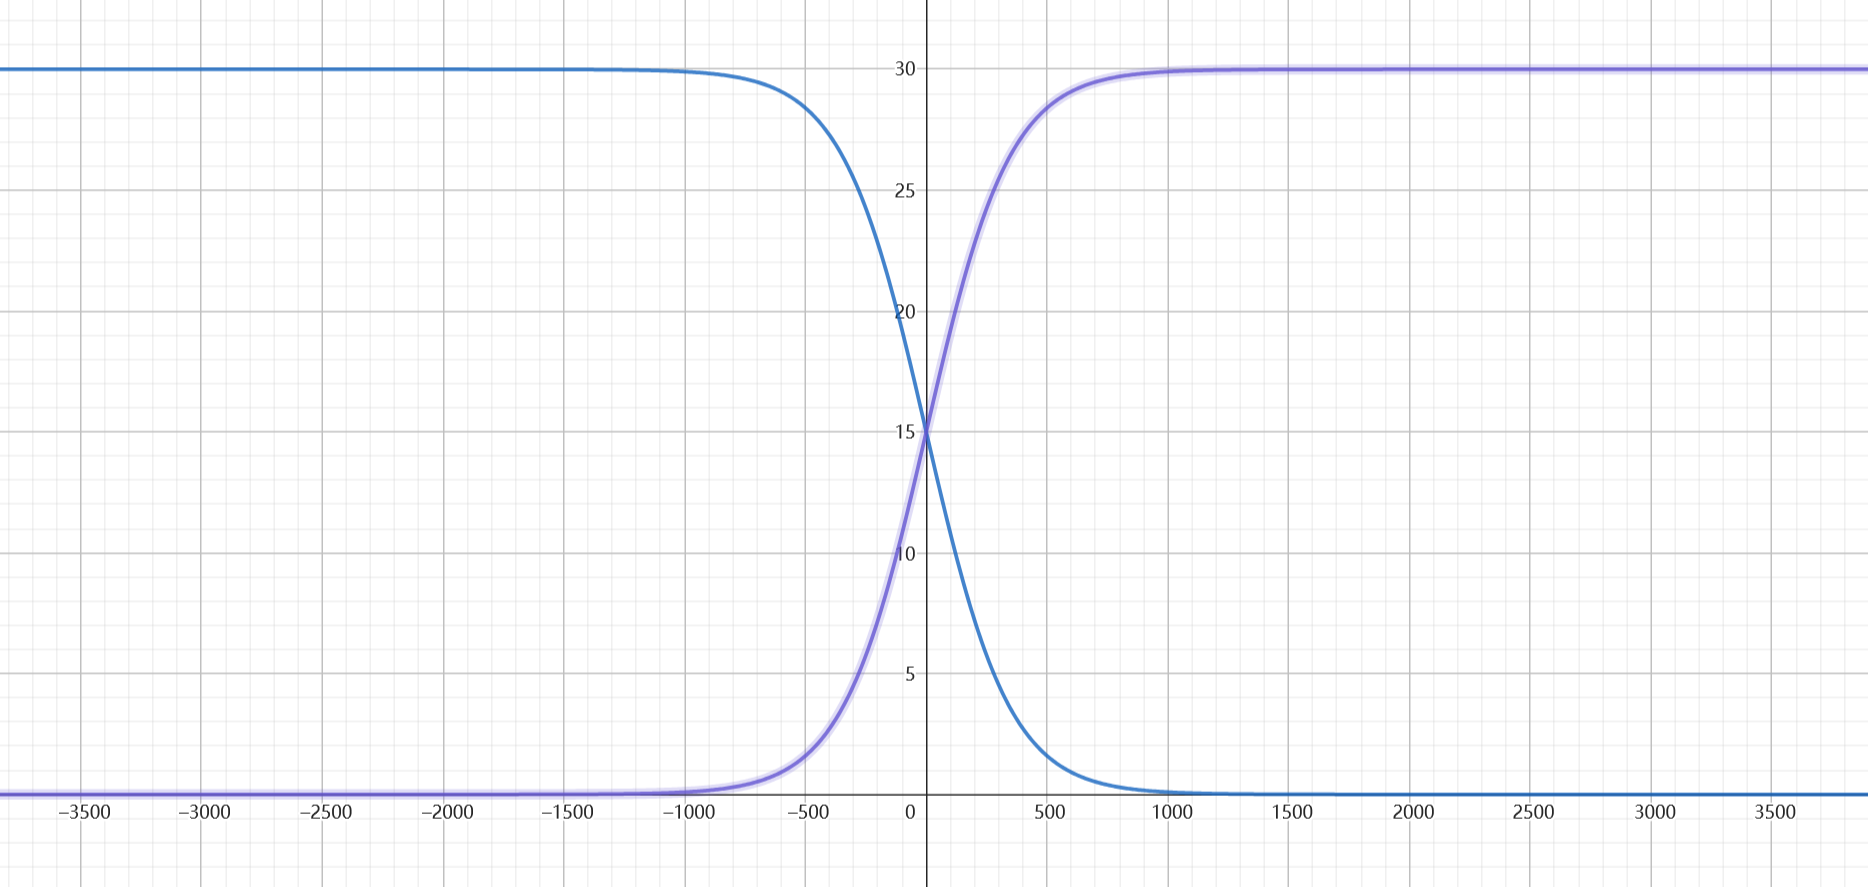
从这张图中可以观察到:玩家分数差距越大时,赢了得到的分数越小,输了减去的分数越大,单局最大分数更新值将无限趋近于预设的常数。整体分数更新逻辑可以用下面的简单代码流程来阐明:
#include <bits/stdc++.h>
using namespace std;
// Function to calculate the Probability
float Probability(int rating1, int rating2)
{
// Calculate and return the expected score
return 1.0 / (1 + pow(10, (rating1 - rating2) / 400.0));
}
// Function to calculate Elo rating
// K is a constant.
// outcome determines the outcome: 1 for Player A win, 0 for Player B win, 0.5 for draw.
void EloRating(float Ra, float Rb, int K, float outcome)
{
// Calculate the Winning Probability of Player B
float Pb = Probability(Ra, Rb);
// Calculate the Winning Probability of Player A
float Pa = Probability(Rb, Ra);
// Update the Elo Ratings
Ra = Ra + K * (outcome - Pa);
Rb = Rb + K * ((1 - outcome) - Pb);
// Print updated ratings
cout << "Updated Ratings:-\n";
cout << "Ra = " << Ra << " Rb = " << Rb << endl;
}
// Driver code
int main()
{
// Current ELO ratings
float Ra = 1200, Rb = 1000;
// K is a constant
int K = 30;
// Outcome: 1 for Player A win, 0 for Player B win, 0.5 for draw
float outcome = 1;
// Function call
EloRating(Ra, Rb, K, outcome);
return 0;
}
前述的规则只适用于1v1类型的比赛,现在的游戏大多都是多人竞技类型,最常见的就是3v3,5v5的队伍配置,为此需要将ELO评分系统做多人模式的扩展。比较简单的一种扩展就是队伍总体的ELO分数等于队伍内所有人的ELO加权平均或者几何平均,一个玩家的局后分数更新值等于自己与敌方阵营中每个选手计算出来的单人ELO更新值的总和。同时为了限制单局引发的分数变化幅度,会将K值除以敌方阵营内人数。至于不怎么常见的1v1v1v1这种多阵营且每个阵营中只有一个人的情况,也可以采用对应的分别计算之后进行累加的机制。
Glicko评分系统
不同于传统的棋类游戏,现在的多人竞技网络游戏里玩家的角色特征比较复杂,单纯的使用ELO评分系统有很多缺点。特别是在处理新玩家和回流玩家的时候有很大的缺陷:
-
对于一个新号,
ELO会给予其一个基础分,如1000。假如一个真实实力为2000分的玩家创建一个新号,在单局分数变动上限为20的情况下,能够很轻松的在1000-1600分数段实现三十连胜。这种现象就是俗称的小号炸鱼。而如果一个完全意义上的新手玩家,其真实实力可能只有200,他将经受无限的连败,直到其ELO被矫正到200,这种玩家就是俗称的鱼苗。 -
对于一个回流玩家,其由于长时间没有练习以及游戏版本更新的原因,其实际水平其实比之前的
ELO分数低很多。此时使用其以往的ELO分数来执行匹配的话,其对手和队友会明显察觉出此人已经不适合这个版本了,自己输的概率非常大,导致好不容易回流的玩家由于无法跟上比赛节奏而被迫再次流失
为了修正这两个缺陷,ELO系统中一般会调整用来更新分数的K值,对于新手玩家和回流玩家其K值将会显著的增大,以方便这些玩家能够快速的矫正到其真实实力。为了更加自动化的来执行这个K值的调整,Mark Glickman在其1995年的论文The Glicko system中提出了Glicko系统。在Glicko系统中,一个玩家的实力除了原来的均值之外,还有一个偏差值ratings deviation(RD)来描述。一个更高的偏差值代表这个玩家近期比赛次数少或者比赛总数少,低偏差值则代表这个玩家近期很活跃。偏差值大的时候玩家的分数调整幅度就大,反之则小。由于偏差值的存在,导致输赢两边的分数调整总和将不再永远是0。同时由于偏差值的存在,描述一个玩家的分数的时候,单变量已经不够用了,一般使用95%置信区间来作为玩家的分数范围,这个分数范围的差值就是偏差值的两倍。举个例子来说,一个玩家的评分是1850同时其偏差值为50,则其分数的95%置信区间就是[1750,1950]。
在了解偏差值的概念之后,我们再来解释一下Glicko系统的运作过程。首先我们需要对新手玩家和回流玩家执行一些初始化:
- 对于新手玩家,初始化其基础分为
1500,同时偏差值设置为350 - 对于回流玩家,设置其偏差值为,这里的
c是一个预先设置的常量,t是不活跃时间
在玩家完成了m场比赛之后,其分数通过下面的公式来执行更新:
其中代表每个对手的分数,代表每个对手的偏差值,代表每个比赛这个玩家的输赢,则是ELO规则下对局获胜的概率,其他几个变量的定义见下:
在原始的论文中作者提供了一个具体的数据更新例子,提供了计算过程,来加深一下对整个系统的了解。在这个例子中,为了方便描述一个玩家的数据特征,我们使用这个二元组来表征。主角的数据为, 与三个对手进行了三次比赛的对应结果为赢、输、输。在这样的三个对局过后,系统开始执行新一轮的分数与偏差值矫正:
| 1 | 1400 | 30 | 0.9955 | 0.639 | 1 |
| 2 | 1550 | 100 | 0.9531 | 0.432 | 0 |
| 3 | 1700 | 300 | 0.7242 | 0.303 | 0 |
有了这些基础对局数据之后,可以计算出:
有了之后,就可以计算出和:
所以最终这名玩家的分数被更新为。
由于Glicko显著的比ELO系统更加优秀,很多游戏都逐渐的切换到Glicko系统中,典型样例就是Dota2 7.33更新所带来的积分系统修改:

原作者在Glicko的基础上在2022年提出了Glicko2,主要的改进是考虑到玩家的实力发挥的稳定性。为此在Glicko2中又加入了一个波动性volatility参数,用来描述实力的稳定性。偏差作为评分变化的乘数;偏差较大意味着你的评分增减会被放大。每次比赛后,偏差也会发生变化;这一变化由你的波动性驱动。如果你的偏差相对于波动性较高,它会下降;如果偏差较低,它会增加。最后,你的波动性将根据比赛结果进行更新。极端的成绩,比如5-0或1-7,会使波动性上升,而3-2或2-3的成绩则会使波动性下降。
至于Glicko2的细节我就不在这里描述了,有兴趣的读者可以根据提供的连接去阅读原文。这里我们只介绍一下大家更加喜闻乐见的基于Glicko2评分系统的漏洞利用问题,最早出现漏洞利用的是知名游戏Pokemon Go BattleLeague(GBL)。有GBL的玩家发现自己会出现异常的高评分变动,在多名玩家都汇报了此类情况之后,社区总结出这些玩家的共性:都是在赛季初期故意输掉多场比赛的玩家。
根据更加深入的探究之后,相关人员最终发现了Glicko2系统存在一个巨大的缺陷,这个评分系统可以被利用来暂时达到非常高的评分,具体过程如下:
- 通过故意输掉比赛,玩家将自己的评分降低到远低于真实技能水平。
- 玩家与同样低评分的对手进行多场比赛。与比自己弱得多的对手对战时,玩家可以选择按需赢或输。通过这样做,他强迫自己进行极端的比赛;要么在一组比赛中赢得所有游戏,要么输掉所有游戏。玩家的波动性会稳步增加;偏差也随之变化。
- 通过按需要交替赢输比赛,玩家可以保持评分相对稳定,让他可以继续这个过程,持续时间没有限制。
- 在波动性和偏差被培养到足够高后,玩家开始恢复正常比赛,逐渐将评分恢复到自己的真实技能水平。
- 评分调整的速度比波动性大很多,所以即使波动性和偏差在恢复评分过程中下降,波动性仍然会很高。
- 玩家现在处于自己的真实评分,但在游戏中的得失会被严重放大。现在他正常比赛,直到获得一次好的连胜,将评分推到顶峰。
- 由于玩家的偏差极高,这个评分顶峰会比正常情况下应有的要高得多。
所以基于这样的严重缺陷,不推荐使用Glicko2,直接使用Glicko作为评分系统更加合适。
TrueSkill 系统
TrueSkill 是由微软开发的一种玩家匹配和排名系统,最早用于 Xbox Live 平台,类似于Elo评级系统,但更适用于多人游戏和团队对战。它的核心思想是用贝叶斯推理来估计玩家的真实实力,并动态调整他们的排名。这个机制的细节里充满了各种统计学公式,不是非常好理解,因此这里就直接掠过不去介绍了。有兴趣的读者可以去阅读微软提供的TrueSkill官方网站。
撮合系统
撮合系统规则
在明确了玩家的分数表征之后,就可以开始执行玩家之间的匹配工作。为了让比赛呈现势均力敌卧龙凤雏的效果,撮合系统需要让队伍两边的分数差尽可能的小。最简单的实现方法就是将分数切分为多个等距离的分数段,每个参与匹配的玩家投递到对应的段中,执行撮合时直接从同一段中的所有玩家随机选择所需的人数来开启一个对局。如果有些分数段由于人太少导致无法出现满足条件的对局人数,这个简单的策略将导致这个分数段的玩家永远都匹配不到其他玩家。此时的一个缓解措施就是将一个玩家投递到一定区间[A-B, A+B]内的所有段中去参与匹配,这里的A是玩家的天梯分数,B是匹配容差,这个B随着等待时间的增长而变大。
但是撮合系统不仅仅需要考虑分数差这个因素,还有很多其他因素要注意,常见的其他因素包括:
- 玩家的等待时间,对于节奏快二十分钟左右就结束的游戏来说,玩家不想浪费十来分钟去等待一个完美的匹配。他们只想快速的开一把游戏,装模做样的对线,到六就开始启动,打不过就投。所以快节奏的游戏中撮合机制会将匹配容差
B快速的拉大,以尽可能的快速撮合出队伍。即使三局里面只能赢一局,那这个玩家一个小时内还是能高兴一段时间的。而对于把把六十多分钟的游戏来说,一个尽可能平衡的队伍则是非常必要的,否则十分钟三路炸然后再坐牢等待半小时高地才被拆的游戏毫无体验。 - 玩家的延迟,玩家希望游戏与服务器之间的延迟尽可能低,同时希望与具有相同低延迟的玩家匹配在一起。当年的南方电信北方网通时代每个玩家必须选择好自己要匹配的哪个区,选错了那就是毫无游戏体验
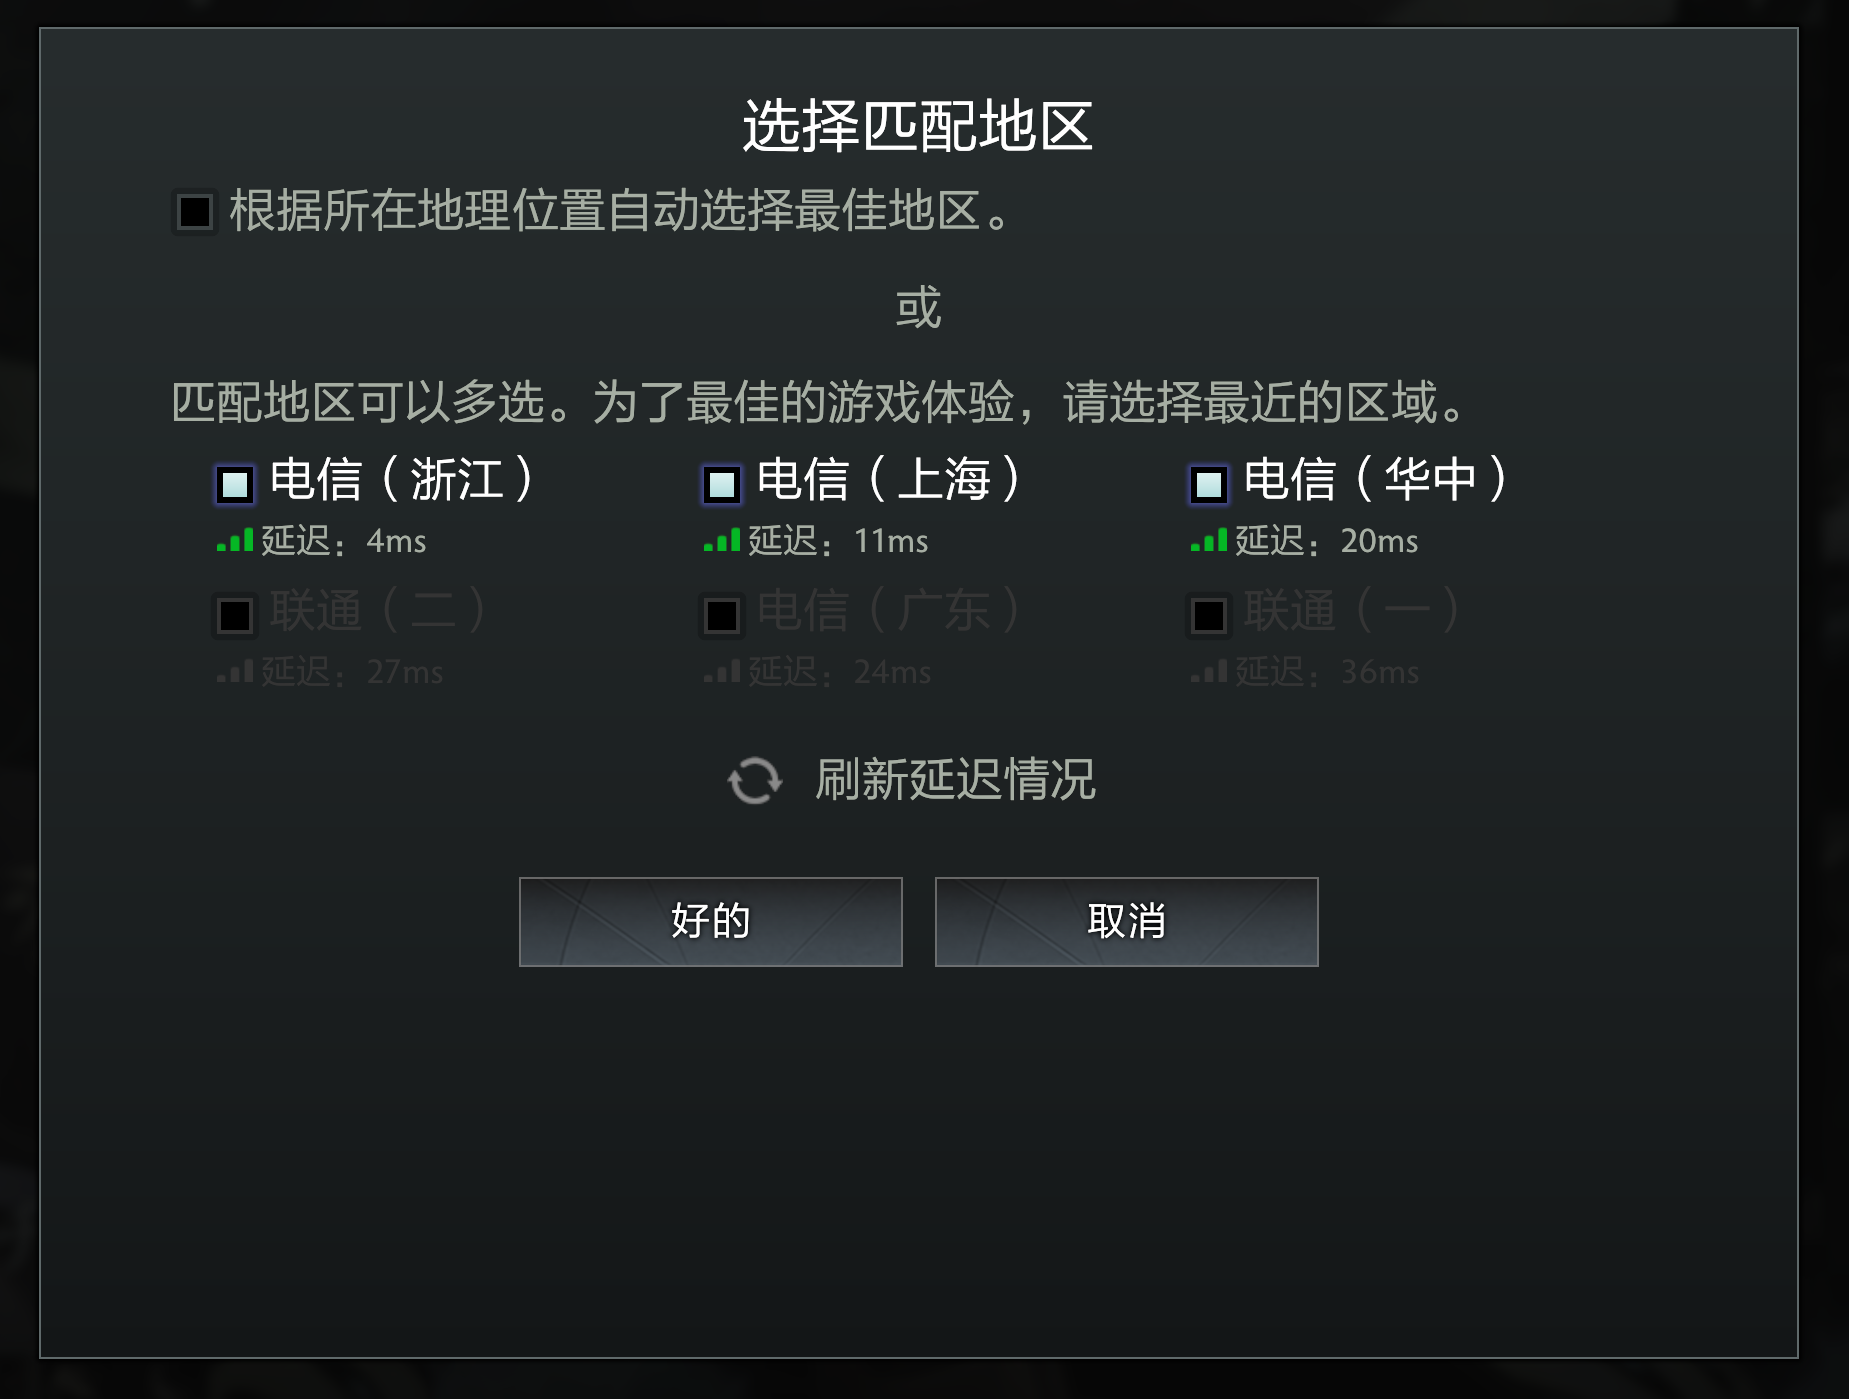
实际被使用的成熟的商业匹配系统考虑的因素会更加多,所以他们的匹配规则就更加的灵活。假设要为一款团队射击游戏做匹配系统,要求每支队伍的玩家数量相等,且每队至少 4 人,最多 8 人。为了让两只队伍看上去势均力敌,两支队伍的平均玩家技能水平需要相差不超过 10 分。此外,为了避免玩家等待时间过长,希望在 5 秒后放宽技能匹配规则,使队伍间的平均技能差距上限提高到 50分,并在 15 秒后进一步放宽至 100 分。下面是匹配规则在aws中的FlexMatch匹配配置样例:
{
"name": "aliens_vs_cowboys",
"ruleLanguageVersion": "1.0",
"playerAttributes": [{
"name": "skill",
"type": "number",
"default": 10
}],
"teams": [{
"name": "cowboys",
"maxPlayers": 8,
"minPlayers": 4
}, {
"name": "aliens",
"maxPlayers": 8,
"minPlayers": 4
}],
"rules": [{
"name": "FairTeamSkill",
"description": "The average skill of players in each team is within 10 points from the average skill of players in the match",
"type": "distance",
// get skill values for players in each team and average separately to produce list of two numbers
"measurements": [ "avg(teams[*].players.attributes[skill])" ],
// get skill values for players in each team, flatten into a single list, and average to produce an overall average
"referenceValue": "avg(flatten(teams[*].players.attributes[skill]))",
"maxDistance": 10 // minDistance would achieve the opposite result
}, {
"name": "EqualTeamSizes",
"description": "Only launch a game when the number of players in each team matches, e.g. 4v4, 5v5, 6v6, 7v7, 8v8",
"type": "comparison",
"measurements": [ "count(teams[cowboys].players)" ],
"referenceValue": "count(teams[aliens].players)",
"operation": "=" // other operations: !=, <, <=, >, >=
}],
"expansions": [{
"target": "rules[FairTeamSkill].maxDistance",
"steps": [{
"waitTimeSeconds": 5,
"value": 50
}, {
"waitTimeSeconds": 15,
"value": 100
}]
}]
}
在mosaic_game中使用了一个非常简单的撮合系统,这部分的代码作为一个独立模块开源在huangfeidian/match_maker,这里就简单介绍一下这个撮合系统如何使用的。
首先我们需要明确匹配撮合的目标:产生这个对局需要几个阵营,每个阵营中需要几个人。这些信息我们使用match_base_config来描述:
struct match_base_config
{
std::uint32_t faction_num;// 阵营数量
std::uint32_t faction_player_sz; // 阵营内玩家数量
std::uint32_t min_team_player_sz; // 阵营内单一队伍最小玩家数量
std::uint32_t max_team_player_sz; // 阵营内单一队伍最大玩家数量
};
我们会以这个结构体来初始化match_maker_base,这个类型负责管理单一目标的匹配撮合。如果游戏内同时可能有多种匹配,如普通模式、天梯模式、快速模式,则需要创建对应数量的match_maker_base。
接下来需要明确参与匹配的单元,我们用team_info来描述,内部可能包含一个或多个玩家,同时携带这个队伍的整体积分:
struct player_info
{
std::string pid;
};
struct team_info
{
std::vector<player_info> players;
float rank_score;
std::string tid;
};
匹配产生的结果就是一组阵营,每个阵营内有多个参与匹配的队伍单元:
struct faction_group
{
std::vector<team_info> teams;
};
struct match_result
{
std::vector<faction_group> factions;
};
在明确好了输入与输出的结构定义之后,我们再来解释match_maker_base如何构造出符合规则的对局阵营:
virtual std::vector<match_result> make_matchs() = 0;
无视分数的撮合
首先来介绍一下完全无视队伍分数的撮合系统naive_set_match_maker,这个撮合系统只负责构造出符合人数规则的对局。在这个匹配系统的make_matchs函数中,首先构造出一个数组team_ptr_by_sz,这个数组内的元素也是一个数组,次级数组里存储了所有拥有指定人员数量的candidate_team的指针:
std::vector<std::vector<candidate_team*>> faction_result;
std::vector<candidate_team*> temp_faction;
std::vector<std::vector< candidate_team*>> team_ptrs_by_sz(m_teams_by_sz.size());
for (std::uint32_t i = 1; i < team_ptrs_by_sz.size(); i++)
{
std::sort(m_teams_by_sz[i].begin(), m_teams_by_sz[i].end(), [](const candidate_team& team_a, const candidate_team& team_b)
{
return team_a.apply_ts < team_b.apply_ts;
});
team_ptrs_by_sz[i].resize(m_teams_by_sz[i].size());
for (std::uint32_t j = 0; j < m_teams_by_sz[i].size(); j++)
{
team_ptrs_by_sz[i][j] = m_teams_by_sz[i].data() + j;
}
}
这里candidate_team继承自team_info,多谢带了两个字段,分别是当前的匹配状态和进入匹配池的时间:
enum class basic_match_state
{
idle = 0,
candidate_for_faction,
in_result
};
struct candidate_team : public team_info
{
std::uint32_t match_state = 0;
std::uint64_t apply_ts = 0;
};
这里将参与匹配的队伍按照进入匹配池的时间顺序进行排序,这样做的目的是让更早进入匹配池的有更高的优先级被撮合成为对局。
然后撮合流程就比较简单了,两层遍历,第一层从人员数量大的队伍遍历到只有一个人的队伍,第二层遍历次级队伍数组中的所有没有被撮合的队伍,以这个队伍为开始的搜索条件来执行深度优先遍历,尝试去生成一个可行的阵营。这里优先挑选人数多的队伍是因为队伍越大越不好撮合,优先选择大队伍就可以显著的降低这些队伍的等待时间。
for (std::uint32_t i = team_ptrs_by_sz.size() - 1; i > 0; i--)
{
for (std::uint32_t j = 0; j < team_ptrs_by_sz[i].size(); j++)
{
if (team_ptrs_by_sz[i][j]->match_state != std::uint32_t(basic_match_state::idle))
{
continue;
}
temp_faction.clear();
team_ptrs_by_sz[i][j]->match_state = std::uint32_t(basic_match_state::candidate_for_faction);
temp_faction.push_back(team_ptrs_by_sz[i][j]);
if (search_for_faction(team_ptrs_by_sz, temp_faction, m_base_config.faction_player_sz - i, i, j))
{
faction_result.push_back({});
faction_result.back().reserve(temp_faction.size());
for (auto one_team : temp_faction)
{
one_team->match_state = std::uint32_t(basic_match_state::in_result);
faction_result.back().push_back(one_team);
}
}
else
{
temp_faction.pop_back();
team_ptrs_by_sz[i][j]->match_state = std::uint32_t(basic_match_state::idle);
break;
}
}
}
这里的search_for_faction就是以当前team_ptrs_by_sz[i][j]为种子来执行撮合搜索的函数,这个函数负责寻找一些人员数量不大于cur_team_sz的其他队伍来生成一个阵营撮合。这个阵营撮合的过程是一个递归搜索的过程,每个被搜索到的队伍都会修改其状态为candidate_for_faction。如果发现递归搜索失败,需要将构造为临时匹配阵营的队伍状态切换为idle。
bool match_maker_base::search_for_faction_recursive(const std::vector<std::vector< candidate_team*>>& team_ptrs_by_sz, std::vector<candidate_team*>& cur_faction_group, const std::uint32_t remain_capacity, const std::uint32_t cur_team_sz, const std::uint32_t last_choose_idx)
{
if (remain_capacity == 0) // 剩余需要的队伍人数为0 阵营撮合成功
{
return true;
}
if (remain_capacity >= cur_team_sz)
{
for (std::uint32_t i = last_choose_idx + 1; i < team_ptrs_by_sz[cur_team_sz].size(); i++)
{
auto cur_team_ptr = team_ptrs_by_sz[cur_team_sz][i];
if (cur_team_ptr->match_state != std::uint32_t(basic_match_state::idle))
{
continue;
}
// 切换为已经进入阵营状态
cur_team_ptr->match_state = std::uint32_t(basic_match_state::candidate_for_faction);
cur_faction_group.push_back(cur_team_ptr);
if (search_for_faction_recursive(team_ptrs_by_sz, cur_faction_group, remain_capacity - cur_team_sz, cur_team_sz, i))
{// 阵营成功 直接返回
return true;
}
else
{ // 阵营撮合失败 回退状态 放弃在当前队伍数组中继续寻找队伍
cur_faction_group.pop_back();
cur_team_ptr->match_state = std::uint32_t(basic_match_state::idle);
break;
}
}
}
// 走到这里说明继续添加一个同样大小的队伍会导致阵营无法被撮合,因此需要往更小的队伍里开始寻找
for (std::uint32_t i = std::min(cur_team_sz - 1, remain_capacity); i > 0; i--)
{
for (std::uint32_t j = 0; j < team_ptrs_by_sz[i].size(); j++)
{
auto cur_team_ptr = team_ptrs_by_sz[i][j];
if (cur_team_ptr->match_state != std::uint32_t(basic_match_state::idle))
{
continue;
}
cur_team_ptr->match_state = std::uint32_t(basic_match_state::candidate_for_faction);
cur_faction_group.push_back(cur_team_ptr);
if (search_for_faction_recursive(team_ptrs_by_sz, cur_faction_group, remain_capacity - i, i, j ))
{
return true;
}
else
{
cur_faction_group.pop_back();
cur_team_ptr->match_state = std::uint32_t(basic_match_state::idle);
break;
}
}
}
return false;
}
每个被撮合成功的阵营都会放到faction_result之中,该阵营中的每个candidate_team队伍的状态都会被切换为candidate_for_faction。
当多个阵营被生成之后,接下来就简单了,挑选指定数量的阵营来生成一个对局:
std::vector<match_result> match_results(faction_result.size() / m_base_config.faction_num);
for (std::uint32_t i = 0; i < match_results.size(); i++)
{
match_results[i].factions.resize(m_base_config.faction_num);
for (std::uint32_t j = 0; j < m_base_config.faction_num; j++)
{
match_results[i].factions[j].teams.reserve(faction_result[i * m_base_config.faction_num + j].size());
for (auto one_team_ptr : faction_result[i * m_base_config.faction_num + j])
{
match_results[i].factions[j].teams.push_back(*one_team_ptr);
m_sz_for_team.erase(one_team_ptr->tid);
}
}
}
对于那些没有进入对局的队伍,将其状态切换为idle状态,等待下一次匹配来撮合。对于那些撮合成功的队伍,从匹配池中删除掉。
for (std::uint32_t i = match_results.size() * m_base_config.faction_num; i < faction_result.size(); i++)
{
for (auto one_team_ptr : faction_result[i])
{
one_team_ptr->match_state = std::uint32_t(basic_match_state::idle);
}
}
std::vector<candidate_team> remain_teams;
remain_teams.reserve(8);
for (std::uint32_t i = 1; i < m_teams_by_sz.size(); i++)
{
if (m_teams_by_sz[i].empty())
{
continue;
}
remain_teams.clear();
for (const auto& one_team : m_teams_by_sz[i])
{
if (one_team.match_state == std::uint32_t(basic_match_state::idle))
{
remain_teams.push_back(one_team);
}
}
std::swap(remain_teams, m_teams_by_sz[i]);
}
这个的实现既有两重循环,又有递归,复杂度还是比较高的。在没有一次触发搜索回溯的情况下,整体的复杂度大概是m_teams_by_sz这个数组里每个非空元素的队伍数量的乘积。
考虑分数的撮合
前面介绍的撮合系统具体实现是非常简陋的,为了撮合而撮合,忽略了最重要的一个维度:分数平衡。 当然绝对的分数平衡计算起来代价是很高的,类似于装箱问题,是个NP-Hard复杂度的。所以一般来说会将分数按照指定间隔划分为多个分数段,将参与匹配的团队按照其分数投递到分数段中。每个分数段内自己执行前述的无视分数的撮合,如果一个队伍长时间没有被匹配成功,则允许其参与附近的相关分数段里的匹配,这就是naive_ranked_match_maker::make_matchs的执行过程。在创建这个naive_ranked_match_maker的时候,需要传入分数段相关的配置项:
struct ranked_match_config
{
float rank_level_gap_score; // 分数段的分数间隔
std::uint64_t extend_level_tolerance_time_gap; // 随着等待时间变长而扩充的分数段匹配容差系数
std::uint32_t max_level_diff_tolerance; // 最大允许的分数段差距
};
在开头,首先获取参与匹配的所有队伍的最大分数与最小分数,从而来创建分数段:
float min_score, max_score;
bool score_set = false;
for (const auto& one_team_vec : m_teams_by_sz)
{
for (const auto& one_team : one_team_vec)
{
if (!score_set)
{
score_set = true;
min_score = one_team.rank_score;
max_score = one_team.rank_score;
}
else
{
min_score = std::min(min_score, one_team.rank_score);
max_score = std::max(max_score, one_team.rank_score);
}
}
}
if (!score_set)
{
return {};
}
int min_score_level = int(std::floor(min_score / m_ranked_config.rank_level_gap_score));
int max_score_level = int(std::ceil(max_score / m_ranked_config.rank_level_gap_score));
min_score = min_score_level * m_ranked_config.rank_level_gap_score;
max_score = max_score_level * m_ranked_config.rank_level_gap_score;
std::uint32_t level_range_sz = max_score_level - min_score_level + 1;
std::vector<std::vector<std::vector< candidate_team*>>> team_ptrs_by_sz_and_level(level_range_sz, std::vector<std::vector< candidate_team*>>(m_teams_by_sz.size()));
std::vector<match_result> final_match_results;
这里的team_ptrs_by_sz_and_level就是每个分数段里的队伍匹配池,接下来要遍历所有的队伍,根据其分数以及分数段容差,投递到一个或者多个分数段匹配池中:
for (std::uint32_t i = 1; i < m_teams_by_sz.size(); i++)
{
std::sort(m_teams_by_sz[i].begin(), m_teams_by_sz[i].end(), [](const candidate_team& team_a, const candidate_team& team_b)
{
return team_a.apply_ts < team_b.apply_ts;
});
for (std::uint32_t j = 0; j < m_teams_by_sz[i].size(); j++)
{
candidate_team* cur_team_ptr = &m_teams_by_sz[i][j];
auto cur_team_match_level_tolerance = int((m_now_ts - cur_team_ptr->apply_ts) / m_ranked_config.extend_level_tolerance_time_gap);
cur_team_match_level_tolerance = std::min(cur_team_match_level_tolerance, int(m_ranked_config.max_level_diff_tolerance));
int cur_team_match_level = int(cur_team_ptr->rank_score / m_ranked_config.rank_level_gap_score);
for (int k = std::max(min_score_level, cur_team_match_level - cur_team_match_level_tolerance); k <= std::min(max_score_level, cur_team_match_level + cur_team_match_level_tolerance); k++)
{
auto& cur_team_vec = team_ptrs_by_sz_and_level[k - min_score_level][cur_team_ptr->players.size()];
if (cur_team_vec.capacity() < 8)
{
cur_team_vec.reserve(8);
}
cur_team_vec.push_back(cur_team_ptr);
}
}
}
接下来的流程就很好理解了,基本照抄自前述的无视分数的撮合,只不过外部加了一个遍历所有分数段的循环:
for (std::uint32_t k = 0; k < team_ptrs_by_sz_and_level.size(); k++)
{
// 循环体内执行每个分数段内无视分数的撮合
}
剩下的没有进入撮合对局的队伍,重新构成匹配池,这里的逻辑与之前一样:
std::vector<candidate_team> remain_teams;
remain_teams.reserve(8);
for (std::uint32_t i = 1; i < m_teams_by_sz.size(); i++)
{
if (m_teams_by_sz[i].empty())
{
continue;
}
remain_teams.clear();
for (const auto& one_team : m_teams_by_sz[i])
{
if (one_team.match_state == std::uint32_t(basic_match_state::idle))
{
remain_teams.push_back(one_team);
}
}
std::swap(remain_teams, m_teams_by_sz[i]);
}
虽说这个匹配流程相对于之前的无视分数的流程多加了一轮循环,但是实际上由于拆分成了多个独立的分数段执行撮合,整体的计算复杂度其实是降低的。同时按照分数段隔离的匹配保证了两边的分差不会太离谱,因此实际中这个匹配的实现是更优的。
Mosaic Game 中的匹配
match_service上的匹配管理
在mosaic_game中接入了huangfeidian/match_maker来做匹配服务match_service。在match_service上的接口数量不多,提供了加入匹配池、退出匹配池、确认匹配结果这几个rpc:
Meta(rpc) void apply_matchmaking(const utility::rpc_msg& msg, const std::uint32_t match_index, const std::string& tid, const std::vector<std::string>& pids, const float score);
Meta(rpc) void leave_matchmaking(const utility::rpc_msg& msg, const std::uint32_t match_index, const std::string& tid);
match_service中会维护系统中所有的匹配,不同的匹配目标由一个唯一整数match_index来控制,这个match_index就是匹配数据表utility::typed_matrix_data_manager::instance()->get("match_list")中的索引值。在匹配数据表中会定义每种匹配项目的阵营数量、阵营内玩家数量、最大队伍大小、最小队伍大小等限制,用来初始化每个不同的match_maker。然后在match_service的tick中会遍历所有的match_maker来执行撮合逻辑:
void match_service::tick()
{
auto cur_ts = utility::timer_manager::now_ts();
for(auto& one_match_maker: m_match_makers)
{
if(one_match_maker.next_match_ts > cur_ts)
{
continue;
}
one_match_maker.next_match_ts = cur_ts + one_match_maker.match_make_gap;
auto cur_match_results = one_match_maker.match_maker_impl->make_matchs();
// 暂时省略后续代码
}
}
在match_service的设计中,每次对局撮合成功之后需要通知相关的玩家与队伍来确认,只有都确认接受此对局之后,才能真正的算对局开启。所以会对make_matchs的结果执行遍历,收集当前撮合的所有阵营信息,并将这些信息通过team_match_init_notify这个rpc发送到team_service,让team_service去通知相关队伍内的所有人来处理这个撮合成功消息,:
for(const auto& one_match_result: cur_match_results)
{
m_match_result_counter++;
waiting_confirm_matchs cur_confirm_match;
cur_confirm_match.match_index = one_match_maker.match_index;
cur_confirm_match.expire_ts = cur_ts + one_match_maker.confirm_gap;
cur_confirm_match.factions = one_match_result.factions;
cur_confirm_match.all_tids.reserve(8);
cur_confirm_match.match_uid = m_match_result_counter;
std::map<std::string, json::object_t> cur_team_infos;
std::uint32_t faction_idx = 0;
for(const auto& one_faction: cur_confirm_match.factions)
{
for(const auto& one_team: one_faction.teams)
{
cur_confirm_match.all_tids.push_back(one_team.tid);
json::object_t temp_team_info;
temp_team_info["faction"] = faction_idx;
std::vector<std::string> players_in_team;
for(const auto& one_player: one_team.players)
{
players_in_team.push_back(one_player.pid);
}
temp_team_info["pids"] = players_in_team;
temp_team_info["score"] = one_team.rank_score;
cur_team_infos[one_team.tid] = temp_team_info;
}
faction_idx++;
}
utility::rpc_msg sync_msg;
sync_msg.cmd = "team_match_init_notify";
sync_msg.set_args(cur_confirm_match.all_tids, one_match_maker.match_index, m_match_result_counter, cur_confirm_match.expire_ts, cur_team_infos);
get_server()->call_service("team_service", sync_msg);
m_waiting_confirm_matchs[m_match_result_counter] = cur_confirm_match;
}
每个对局都会有其唯一标识符,由m_match_result_counter++生成,等待确认撮合的对局会存储在m_waiting_confirm_matchs中,key就是这个唯一标识符。被撮合的阵营内所有玩家与队伍都可以接受或者拒绝当前撮合,所以match_service提供了这样的接口来确认参与方的选择,这里的result_match_uid就是在撮合成功后生成的当前撮合唯一id:
Meta(rpc) void accept_matchmaking(const utility::rpc_msg& msg, const std::uint32_t result_match_uid, const std::string& tid);
Meta(rpc) void refuse_matchmaking(const utility::rpc_msg& msg, const std::uint32_t result_match_uid, const std::string& tid);
对局内任意一方执行了接受或者拒绝之后,都会将这个信息通过组队服务广播到对局内的所有玩家身上:
// accept时的广播处理
cur_match.accept_tids.push_back(tid);
utility::rpc_msg sync_msg;
sync_msg.cmd = "team_match_ack_notify";
sync_msg.set_args(temp_iter->second.all_tids, result_match_uid, tid, true);
get_server()->call_service("team_service", sync_msg);
// refuse时的广播处理
utility::rpc_msg sync_msg;
sync_msg.cmd = "team_match_ack_notify";
sync_msg.set_args(temp_iter->second.all_tids, result_match_uid, tid, false);
get_server()->call_service("team_service", sync_msg);
当所有队伍都确认接受撮合之后,才会执行对局开始的处理:
if(cur_match.accept_tids.size() == cur_match.all_tids.size())
{
do_match_start(temp_iter->second);
m_waiting_confirm_matchs.erase(temp_iter);
}
而一旦有一方拒绝了这个对局,则当前对局被取消,除了对局内的所有队伍重新进入匹配池,除了当前拒绝的队伍:
auto cur_match_maker = get_match_maker(cur_match.match_index);
for(const auto& one_faction: cur_match.factions)
{
for(const auto& one_team: one_faction.teams)
{
if(one_team.tid == tid)
{
continue;
}
cur_match_maker->add_candidate(one_team);
}
}
m_waiting_confirm_matchs.erase(temp_iter);
每个队伍撮合成功之后,都会设立一个确认超时计时器,然后在tick中检查这个计时器是否超时。如果在这个计时器超时的时候仍然没有得到所有队伍同意,则当前对局也算撮合失败,此时会将所有发出了确认的队伍重新放到匹配池中:
// void match_service::tick()
std::vector<std::uint32_t> expired_match_uids;
for(const auto& one_match_pair: m_waiting_confirm_matchs)
{
if(one_match_pair.second.expire_ts > cur_ts)
{
continue;
}
expired_match_uids.push_back(one_match_pair.first);
utility::rpc_msg sync_msg;
sync_msg.cmd = "team_match_expire_notify";
sync_msg.set_args(one_match_pair.second.all_tids, one_match_pair.first);
get_server()->call_service("team_service", sync_msg);
const auto& cur_factions = one_match_pair.second;
for(const auto& one_faction_group: cur_factions.factions)
{
for(const auto& one_team: one_faction_group.teams)
{
if(std::find(cur_factions.accept_tids.begin(), cur_factions.accept_tids.end(), one_team.tid) != cur_factions.accept_tids.end())
{
get_match_maker(one_match_pair.second.match_index)->add_candidate(one_team);
}
}
}
}
for(const auto& one_match_uid: expired_match_uids)
{
m_waiting_confirm_matchs.erase(one_match_uid);
}
每个对局被完全确认后,都会通知场景服务去创建一个专用的比赛场景:
void match_service::do_match_start(const waiting_confirm_matchs& cur_match)
{
auto cur_match_space = m_match_makers[cur_match.match_index].match_space;
std::map<std::string, std::uint32_t> player_factions;
for(std::uint32_t i = 0; i< cur_match.factions.size(); i++)
{
for(const auto& one_team: cur_match.factions[i].teams)
{
for(const auto& one_player: one_team.players)
{
player_factions[one_player.pid] = i;
}
}
}
auto cur_space_id = get_server()->gen_unique_str();
json::object_t space_init_info;
space_init_info["player_factions"] = player_factions;
space_init_info["match_uid"] = cur_match.match_uid;
space_init_info["match_index"] = cur_match.match_index;
utility::rpc_msg create_space_msg;
create_space_msg.cmd = "request_create_space";
create_space_msg.set_args(cur_match_space, cur_space_id, space_init_info);
create_space_msg.from = m_local_anchor;
get_server()->call_service("space_service", create_space_msg);
on_going_matchs cur_ongoing_match;
cur_ongoing_match.factions = cur_match.factions;
cur_ongoing_match.match_index = cur_match.match_index;
cur_ongoing_match.space_no = cur_match_space;
cur_ongoing_match.space_id = cur_space_id;
cur_ongoing_match.match_uid = cur_match.match_uid;
cur_ongoing_match.all_tids = cur_match.all_tids;
m_on_going_matchs[cur_match.match_uid] = cur_ongoing_match;
utility::rpc_msg start_msg;
start_msg.cmd = "team_match_start_notify";
start_msg.set_args(cur_match.all_tids, cur_match.match_uid, cur_match_space, cur_space_id);
get_server()->call_service("team_service", start_msg);
m_logger->info("match uid {} index {} create_space no {} id {}", cur_match.match_uid, cur_match.match_index, cur_match_space, cur_space_id);
}
在场景服务器创建好这个场景之后,会反向通知匹配服务:
Meta(rpc) void reply_create_space(const utility::rpc_msg& msg,std::uint32_t space_no, const std::string& space_id, const json::object_t& init_info);
此时匹配服务会通过login_service来通知对局内的所有人去进入这个比赛场景:
// void match_service::reply_create_space(const utility::rpc_msg& msg,std::uint32_t space_no, const std::string& space_id, const json::object_t& init_info)
utility::rpc_msg notify_enter_msg;
notify_enter_msg.cmd = "request_call_multi_online";
std::vector<json> enter_args;
std::vector<std::string> players;
players.reserve(10);
for(const auto& one_faction: temp_iter2->second.factions)
{
for(const auto& one_team: one_faction.teams)
{
for(const auto& one_player: one_team.players)
{
players.push_back(one_player.pid);
}
}
}
enter_args.reserve(3);
enter_args.push_back(cur_match_uid);
enter_args.push_back(space_no);
enter_args.push_back(space_id);
notify_enter_msg.set_args(players, "notify_match_space_created", enter_args);
get_server()->call_service("login_service", notify_enter_msg);
当所有玩家都进入比赛场景后,局内就完全被场景所托管。在对局结束之后,比赛场景会将对局结果发回match_service,然后由match_service做后续的处理。这部分的逻辑也需要rpc来做场景与match_service之间的消息传递:
Meta(rpc) void report_match_finish(const utility::rpc_msg& msg,std::uint32_t match_uid, std::uint32_t winner_faction, const std::map<std::string, float>& delta_scores)
{
auto temp_iter = m_on_going_matchs.find(match_uid);
if(temp_iter == m_on_going_matchs.end())
{
return;
}
temp_iter->second.result_score_delta = delta_scores;
temp_iter->second.winner_faction = winner_faction;
on_match_finish(temp_iter->second);
m_on_going_matchs.erase(temp_iter);
}
这里的on_match_finish实现的比较简单,根据场景发回来的对局分数修改执行相关的离线消息推送:
void match_service::on_match_finish(const on_going_matchs& cur_match)
{
utility::rpc_msg sync_msg;
sync_msg.cmd = "team_match_finish_notify";
sync_msg.set_args(cur_match.all_tids, cur_match.match_uid, cur_match.winner_faction, cur_match.result_score_delta);
get_server()->call_service("team_service", sync_msg);
auto& cur_offline_msg_mgr = server::offline_msg_manager::instance();
for(const auto& one_pair: cur_match.result_score_delta)
{
std::vector<json> msg_args;
msg_args.reserve(3);
msg_args.push_back(cur_match.match_index);
msg_args.push_back(cur_match.match_uid);
msg_args.push_back(one_pair.second);
json::object_t temp_doc;
temp_doc["cmd"] = "notify_match_score_delta";
temp_doc["args"] = msg_args;
cur_offline_msg_mgr.add_msg(one_pair.first, temp_doc);
}
}
space上的对局管理
在space_service接收到建立比赛场景的请求之后,会将这个对局的信息打包到场景创建参数中,这样场景自己就知道当前对局的所有信息:
// space_entity上的一些字段
std::uint32_t m_match_index = 0;
std::uint32_t m_match_uid = 0;
std::map<std::string, std::uint32_t> m_player_factions; // 限定的玩家阵营
// bool space_entity::init(const json::object_t& data)
// 在场景被创建的时候去解析创建参数
try
{
data.at("space_no").get_to(m_space_no);
data.at("union_space_id").get_to(m_union_space_id);
auto temp_iter_1 = data.find("player_id");
if(temp_iter_1 != data.end())
{
temp_iter_1->second.get_to(m_player_id);
}
temp_iter_1 = data.find("team_id");
if(temp_iter_1 != data.end())
{
temp_iter_1->second.get_to(m_team_id);
}
temp_iter_1 = data.find("match_index");
if(temp_iter_1 != data.end())
{
temp_iter_1->second.get_to(m_match_index);
}
temp_iter_1 = data.find("match_uid");
if(temp_iter_1 != data.end())
{
temp_iter_1->second.get_to(m_match_uid);
}
temp_iter_1 = data.find("player_factions");
if(temp_iter_1 != data.end())
{
temp_iter_1->second.get_to(m_player_factions);
}
}
在比赛场景创建完成之后,后续的比赛流程由space_match_component来托管,主要是根据比赛的类型来确认比赛的结束规则以及超时时间:
bool space_match_component::init(const json& data)
{
if(m_owner->match_index())
{
auto cur_match_table = utility::typed_matrix_data_manager::instance()->get("match_list");
auto cur_match_sysd = cur_match_table->get_row(m_owner->match_index());
if(!cur_match_sysd.valid())
{
return false;
}
std::string temp_match_finish_type;
if(!cur_match_sysd.expect_value(std::string("match_finish_type"), temp_match_finish_type))
{
return false;
}
auto temp_match_finish_type_opt = magic_enum::enum_cast<enums::match_finish_type>(temp_match_finish_type);
if(!temp_match_finish_type_opt)
{
return false;
}
m_match_finish_type = temp_match_finish_type_opt.value();
cur_match_sysd.expect_value(std::string("faction_num"), m_faction_num);
cur_match_sysd.expect_value(std::string("faction_player_size"), m_faction_player_size);
cur_match_sysd.expect_value(std::string("match_duration"), m_match_duration);
cur_match_sysd.expect_value(std::string("support_respawn"), m_support_respawn);
m_faction_death_counter.resize(m_faction_num, 0);
m_faction_kill_counter.resize(m_faction_num, 0);
m_owner->get_space_data_entity()->prop_proxy().faction_death_counter().set(m_faction_death_counter);
m_owner->get_space_data_entity()->prop_proxy().faction_kill_counter().set(m_faction_kill_counter);
m_owner->get_space_data_entity()->prop_proxy().match_winner_faction().set(m_faction_num);
m_match_finish_timer = m_owner->add_timer_with_gap(std::chrono::milliseconds(m_match_duration*1000), [=]()
{
finish_match();
});
}
return true;
}
目前支持的比赛胜利判定模式只有两种:
enum class match_finish_type
{
invalid = 0,
most_kill =1, // 击杀最多
min_death = 2// 死亡最少
};
- 死亡次数最少的成为胜者,判定函数为
std::uint32_t space_match_component::check_winner_min_death() const - 击杀最多的成为胜者,判定函数为
std::uint32_t space_match_component::check_winner_most_kill() const
在比赛设置为死亡后不可复活时,最后剩下的阵营将自动成为胜者, 判定函数为std::uint32_t space_match_component::check_winner_no_respawn() const,每次有玩家死亡的时候都会触发这个函数的执行。
在场景初始化的时候,会根据场景最长比赛时间来添加一个结算用的计时器。当计时器超时的时候自动调用finish_match来生成对局结果,然后将结果发送回match_service,并开启场景的自动销毁:
void space_match_component::finish_match()
{
m_owner->cancel_timer(m_match_finish_timer);
m_match_finish_timer.reset();
m_is_match_finish = true;
m_owner->get_space_data_entity()->prop_proxy().match_finish().set(true);
std::uint32_t cur_winner_faction = m_faction_num;
if(m_match_finish_type == enums::match_finish_type::min_death)
{
cur_winner_faction = check_winner_min_death();
}
else if(m_match_finish_type == enums::match_finish_type::most_kill)
{
cur_winner_faction = check_winner_most_kill();
}
m_owner->get_space_data_entity()->prop_proxy().match_winner_faction().set(cur_winner_faction);
std::map<std::string, float> delta_scores;
for(const auto& one_pair: m_owner->player_factions())
{
if(one_pair.second == cur_winner_faction)
{
delta_scores[one_pair.first] = 20;
}
else
{
delta_scores[one_pair.first] = -10;
}
}
utility::rpc_msg finish_msg;
finish_msg.cmd = "report_match_finish";
finish_msg.set_args(m_owner->match_uid(), cur_winner_faction, delta_scores);
m_owner->call_service("match_service", finish_msg);
utility::rpc_msg countdown_msg;
countdown_msg.cmd = "request_countdown_destroy";
std::uint32_t countdown_ts = 10; // 10s之后自动销毁
countdown_msg.set_args(m_owner->entity_id(), countdown_ts);
m_owner->call_service("space_service", countdown_msg);
m_owner->get_space_data_entity()->prop_proxy().destroy_ts().set(utility::timer_manager::now_ts() + 1000 * countdown_ts);
}
这里对局结算计算分数增减的时候用了一个非常简单的规则,胜者加20分,败者减10分。实际情况下肯定不能这么处理,具体可以参考前述的ELO或者Glicko评分机制。
MosaicGame外围系统接入
游戏服务器由于游戏实时性的需要,会将所有数据都放在内存里来方便的进行读写,而不是每次都通过一些接口来与外部数据存储系统进行交互。但是这样也会带来一些问题,比如数据的持久化问题,特别是进程崩溃引发的玩家数据丢失的问题。为了解决这个问题,游戏服务器会定期将内存中的数据同步到外部数据存储系统中。除了这个持久化问题之外,有些非实时交互的功能需要去读取游戏相关的数据,这种延迟要求不高的数据查询一般都是使用外部存储系统去支持,而不是直接去查询游戏内存中的数据。因为数据查询很多时候会访问大量的数据并执行查询过滤,同时下发的数据量也会很大,这样如果直接使用游戏进程去承载这些数据查询的话负载会非常的大。基于数据持久化与负载优化的考量,游戏服务器里会不可避免的接入外围系统,这些外围系统里最主要的就是缓存系统和数据库系统。缓存系统目前已经有了标准化的解决方案Redis,在mosaic_game里也同样的使用Redis作为缓存系统的实现。至于数据库系统,目前游戏业界一般使用的是MySql或者MongoDB,由于MongoDB使用起来比较简单,所以在mosaic_game里采用了MongoDB作为数据库后端,其实使用MySQL作为数据库后端对于代码上的修改也没多少,因为上层基本都有接口封装,不会直接与数据库进行交互。接下来对这两个系统的接入部分来做一些阐述。
基于Redis的缓存系统
Redis提供了很多的功能,最知名的就是KV缓存和排行榜。在游戏业务里主要用的是其KV缓存功能,主要用来存储一些实时性要求不高的数据,比如玩家的属性快照。至于排行榜功能,游戏内一般都使用自己开发的组件,因为游戏排行榜有很多奇怪的结算逻辑,对比排序逻辑就不怎么重要了,因此没必要去与Redis做一些额外的交互。
游戏里使用Redis做KV缓存的数据一般都是读取操作的数量远比写入操作高,例如其他玩家的头像信息,这些头像信息一般来说只有玩家升级、更换体型和门派的时候才需要去更新,但是这个头像数据很容易出现在客户端的各种UI里,最明显的样例就是排行榜UI里需要同时显示数十个玩家角色的头像信息,所以这个头像信息的查询操作远远比更新操作频繁。特别是在排行榜刷新的那一刻,由于大量玩家想要看到最新的排行榜结果,会导致巨量的玩家同时刷新排行榜,而排行榜上单页面就可以引发数十个头像数据查询操作,此时的查询QPS很容易达到上万级别。如果每次去获取一个玩家对应的最新头像信息都去查询数据库,那么面对这种巨量同时查询的情况很容易把后端数据库打爆,即使后端数据库使用了分布式集群。所以游戏服务器业务里一般会把这些被客户端频繁查询的数据都放到Redis集群里,同时这个Redis集群提供基于HTTP的查询接口,然后客户端在查询这些数据的时候使用基于HTTP接口封装的批量查询MGET操作。这样即使出现短时间内大批量的数据查询,也只是让Redis的集群负载升高和客户端的响应延迟升高而已,并不会影响到真正的游戏服务器。由于Redis在处理缓存查询的速度远比数据库查询的速度快,所以基于HTTP接口的查询延迟在普通情况下都会比基于服务器转发数据库查询的延迟小很多,即使HTTP会涉及到基于TCP的三次握手延迟。
在mosaic_game里,专门在player上添加了一个player_redis_component来封装所有与redis的交互,在这个组件上提供了将玩家基本信息上传到Redis集群的接口update_player_info_for_redis,这个接口会将当前玩家的属性里所有添加了sync_redis标记的属性打包为一个json,主要是base_prop和team_prop里的一些字段:
enum class property_flags_enum: std::uint8_t
{
save_db = 0,
sync_self,
sync_ghost,
sync_other,
sync_redis,
sync_leader,
};
class property_flags
{
private:
// 省略其他字段
const static std::uint64_t sync_redis_bit = 1 << std::uint8_t(property_flags_enum::sync_redis);
public:
const static std::uint64_t no_proxy = 0;
const static std::uint64_t sync_redis = sync_redis_bit;
// 省略其他字段
const static std::uint64_t mask_all = std::numeric_limits<std::uint64_t>::max();
};
class Meta(property) base_prop
{
public:
Meta(property(sync_clients, save_db, sync_redis)) std::string m_account_name;
Meta(property(sync_clients, save_db, sync_redis)) std::string m_entity_id;
Meta(property(sync_clients, save_db)) std::uint64_t m_create_ts;
Meta(property(sync_clients, save_db, sync_redis)) std::string m_nickname;
Meta(property(sync_clients, save_db, sync_redis)) std::uint32_t m_sect = 0;
Meta(property(sync_clients, save_db, sync_redis)) std::uint32_t m_level = 0;
Meta(property(sync_self, save_db)) std::uint32_t m_exp = 0;
Meta(property()) std::uint64_t m_save_db_ts = 0;
Meta(property(sync_ghost)) std::string m_account_anchor;
#ifndef __meta_parse__
#include "player/base_prop.generated.inch"
#endif
};
void player_redis_component::update_player_info_for_redis()
{
json::object_t encode_result;
m_player->prop_data().encode_with_flag(spiritsaway::property::property_flags{mosaic_game::property::property_flags::sync_redis}, true, encode_result);
std::string cur_redis_str = redis::command::hash::set("Player", m_owner->entity_id(), json(encode_result).dump());
redis::redis_task_desc cur_redis_task;
cur_redis_task.cmds.push_back(std::move(cur_redis_str));
m_owner->call_redis(json(cur_redis_task), utility::mixed_callback_manager::callback_handler{});
}
这个接口承接了一些事件监听操作,例如玩家登录、升级等事件。当玩家触发了这些事件时,这个Redis更新接口就会被调用:
bool player_redis_component::init(const json& data)
{
m_player = dynamic_cast<player_entity*>(m_owner);
if(!m_player)
{
return false;
}
m_player->login_dispatcher().add_listener(&player_redis_component::on_login, this);
m_player->levelup_dispatcher().add_listener(&player_redis_component::update_player_info_for_redis, this);
return true;
}
void player_redis_component::on_login(bool is_relay)
{
if(is_relay)
{
return;
}
update_player_info_for_redis();
}
上面的Redis样例代码里展示了如何去更新Redis里的玩家信息,其实就是对于Player这个集合做HSET操作,将玩家的一些Redis可见属性字段构造出来的Json字符串存储到Redis里。但是这里mosaic_game并没有直接将HSET这个指令发送到redis_server进程,而是自己对常用的Redis接口进行了封装,当前封装了hash、list、set、zset等各种数据结构的操作,对应的代码文件在common/redis_logic/文件夹下:
namespace spiritsaway::mosaic_game::redis::command
{
class hash
{
public:
static std::string set(const std::string& name, const std::string& key, const std::string& value);
static std::string set(const std::string& name, const std::vector<std::pair<std::string, std::string>>& kvs);
static std::string setnx(const std::string& name, const std::string& key, const std::string& value);
static std::string get(const std::string& name, const std::string& key);
static std::string get(const std::string& name, const std::vector<std::string>& keys);
// 省略其他指令
};
// 省略其他数据结构的操作
std::string hash::set(const std::string& name, const std::string& key, const std::string& value)
{
std::vector<std::string> result;
result.push_back("HSET");
result.push_back(name);
result.push_back(key);
result.push_back(value);
return cmd_join(result);
}
std::string hash::setnx(const std::string& name, const std::string& key, const std::string& value)
{
std::vector<std::string> result;
result.push_back("HSETNX");
result.push_back(name);
result.push_back(key);
result.push_back(value);
return cmd_join(result);
}
std::string hash::set(const std::string& name, const std::vector<std::pair<std::string, std::string>>& kvs)
{
std::vector<std::string> result;
result.reserve(2*kvs.size() + 2);
result.push_back("HMSET");
result.push_back(name);
for(const auto& [k, v]: kvs)
{
result.push_back(k);
result.push_back(v);
}
return cmd_join(result);
}
}
这样封装的作用是避免业务层直接对接缓存系统的具体实现,而是通过封装的接口来进行操作,从而可以在不改变业务逻辑的情况下,切换不同的缓存系统实现,毕竟KV数据库又不是只有Redis一个。
上述封装指令每次执行之后都会构造出一个std::string对象,这个对象就是Redis指令的字符串表示,mosaic_game不会直接将这个字符串对象发送到redis_server进程,而是将这个字符串对象封装到redis_task_desc这个对象里,这个对象里的cmds可以塞入多个指令来执行复合操作,channel字段则是用来区分有序执行通道来使用的,这个有序执行将在后面被介绍:
struct redis_task_desc
{
std::string channel;
std::vector<std::string> cmds;
NLOHMANN_DEFINE_TYPE_INTRUSIVE(redis_task_desc, channel, cmds)
};
最后通过call_redis接口将这个redis_task_desc提交到游戏服务器里的redis_server角色的进程去委托执行:
void server_entity::call_redis(const json& redis_task, const utility::mixed_callback_manager::callback_handler entity_callback_id)
{
get_server()->call_redis(redis_task, this, entity_callback_id);
}
void space_server::call_redis(const json& redis_task, entity::server_entity* cur_entity, const utility::mixed_callback_manager::callback_handler entity_callback_id)
{
json redis_request_info, redis_request_param;
auto cur_callback_id = create_entity_callback(cur_entity, entity_callback_id );
redis_request_param["callback_id"] = cur_callback_id;
redis_request_param["request_detail"] = redis_task;
redis_request_info["cmd"] = "redis_request";
redis_request_info["param"] = std::move(redis_request_param);
m_router->push_msg(*m_local_name_ptr, "redis_server", redis_request_info.dump(), enums::packet_cmd_helper::encode(enums::packet_cmd::server_control, 0));
m_logger->info("call_redis for entity {} entity_cb {} global_cb {}", cur_entity->entity_id(), entity_callback_id.value(), cur_callback_id);
}
这个call_redis接口允许注册一个回调函数,当redis_server进程处理完这个请求后,会将结果返回给space_server进程,space_server进程会根据这个回调函数的entity_callback_id来调用对应的回调函数。只不过目前的update_player_info_for_redis并不需要这个回调函数,所以提供了一个默认构造的空callback_handler作为参数。
在当前的mosaic_game的架构设计中,可以同时存在多个拥有redis_server角色的进程,而且每个redis_server进程所提供的服务都是无状态的,因此当一个进程想要请求执行Redis相关操作的时候,可以选择任意一个redis_server进程去处理这个请求。但是为了避免一个space_server与所有的redis_server都执行连接,这里会在space_server连接到mgr_server的时候会请求分配一个redis_server:
void space_server::on_connect(std::shared_ptr<network::net_connection> connection)
{
json_stub::on_connect(connection);
auto connection_name_ptr = get_connection_name(connection.get());
if (*connection_name_ptr == m_upstream_server.name)
{
request_allocate_counter("online_session");
request_allocate_resource_server("db_server");
request_allocate_resource_server("redis_server");
}
// 省略后续代码
}
void space_server::request_allocate_resource_server(const std::string& resource_server_type)
{
json request_msg, request_param;
request_msg["cmd"] = "request_allocate_resource";
request_param["from_server_name"] = m_local_server.name;
request_param["from_server_type"] = m_local_server.type;
request_param["resource_server_type"] = resource_server_type;
request_msg["param"] = request_param;
auto msg_ptr = std::make_shared<std::string>(request_msg.dump());
auto remote_name_ptr = std::make_shared<std::string>(m_upstream_server.name);
if (!m_router->push_msg(m_local_name_ptr, remote_name_ptr, msg_ptr, enums::packet_cmd_helper::encode(enums::packet_cmd::server_control, 0)))
{
add_timer_with_gap(std::chrono::milliseconds(2 * 1000), [resource_server_type, this]() {
request_allocate_resource_server(resource_server_type);
});
}
}
当mgr_server接收到这个redis_server的分配请求后,会根据当前的redis_server进程列表里的负载情况进行排序,并选择其中负载最低的去执行绑定,这里的负载其实就是绑定了这个redis_server的进程数量:
std::string mgr_server::allocate_resource_svr(std::unordered_map<std::string, resource_stub_info>& resource_svrs, const std::string& from_server_name)
{
if(resource_svrs.empty())
{
return {};
}
std::vector<std::pair<std::string, std::size_t>> resource_server_loads;
resource_server_loads.reserve(resource_svrs.size());
for (const auto& one_pair : resource_svrs)
{
if(!one_pair.second.ready)
{
continue;
}
resource_server_loads.emplace_back(one_pair.first, one_pair.second.connected_svrs.size());
}
std::sort(resource_server_loads.begin(), resource_server_loads.end(), [](const std::pair<std::string, std::size_t>& a, const std::pair<std::string, std::size_t>& b)
{
return a.second < b.second;
});
auto dest_resource_svr = resource_server_loads[0].first;
resource_svrs[dest_resource_svr].connected_svrs.insert(from_server_name);
return dest_resource_svr;
}
std::string mgr_server::allocate_resource_for_game(const std::string& space_server_name, const std::string& resource_svr_type)
{
auto cur_game_iter = m_space_stub_infos.find(space_server_name);
if (cur_game_iter == m_space_stub_infos.end())
{
return {};
}
auto temp_iter = cur_game_iter->second.resource_svrs.find(resource_svr_type);
if(temp_iter != cur_game_iter->second.resource_svrs.end())
{
return temp_iter->second;
}
std::string result_svr;
if(resource_svr_type == "redis_server")
{
result_svr = allocate_resource_svr(m_redis_stub_infos, space_server_name);
}
else
{
result_svr = allocate_resource_svr(m_db_stub_infos, space_server_name);
}
if(!result_svr.empty())
{
cur_game_iter->second.resource_svrs[resource_svr_type] = result_svr;
}
return result_svr;
}
当space_server接收到redis_server的分配结果后,就会使用connect_to_server发起一个网络连接到这个redis_server进程:
void space_server::on_reply_allocate_resource(std::shared_ptr<network::net_connection> con, std::shared_ptr<const std::string> dest, const json& msg)
{
stub_info cur_resource_svr;
std::string resource_server_type;
std::string cur_err;
try
{
msg.at("resource_server_type").get_to(resource_server_type);
msg.at("errcode").get_to(cur_err);
if(!cur_err.empty())
{
m_logger->warn("on_reply_allocate_resource errcode {}", cur_err);
add_timer_with_gap(std::chrono::milliseconds(2 * 1000), [resource_server_type, this]() {
request_allocate_resource_server(resource_server_type);
});
return;
}
msg.at("resource_svr").get_to(cur_resource_svr);
}
catch (std::exception& e)
{
m_logger->warn("on_reply_allocate_resource msg invalid {} error {}", msg.dump(4), e.what());
return;
}
m_named_servers[cur_resource_svr.name] = cur_resource_svr;
connect_to_server(cur_resource_svr.name);
}
当与这个redis_server进程建立好连接后,space_server就会使用link_anchor_to_connection将这个redis_server的连接绑定到redis_server通信地址上,这样后续的push_msg时使用redis_server这个名字就会自动的找到这个连接:
void space_server::on_connect(std::shared_ptr<network::net_connection> connection)
{
json_stub::on_connect(connection);
auto connection_name_ptr = get_connection_name(connection.get());
if (*connection_name_ptr == m_upstream_server.name)
{
// 省略连接到mgr_server的逻辑
}
else
{
auto cur_server_iter = m_named_servers.find(*connection_name_ptr);
if (cur_server_iter == m_named_servers.end())
{
return;
}
if (cur_server_iter->second.type == "db_server")
{
m_router->link_anchor_to_connection("db_server", connection.get());
m_logger->info("m_connected_resource_servers add {}", *connection_name_ptr);
}
else if(cur_server_iter->second.type == "redis_server")
{
m_router->link_anchor_to_connection("redis_server", connection.get());
m_logger->info("m_connected_resource_servers add {}", *connection_name_ptr);
}
else
{
return;
}
if(m_router->has_anchor("redis_server") && m_router->has_anchor("db_server"))
{
json report_ready_info, temp_param;
report_ready_info["cmd"] = "report_server_ready";
temp_param["server_name"] = *m_local_name_ptr;
temp_param["server_type"] = m_local_server.type;
report_ready_info["param"] = temp_param;
m_router->push_msg( m_local_name_ptr,std::make_shared<std::string>(m_upstream_server.name), std::make_shared<std::string>(report_ready_info.dump()), enums::packet_cmd_helper::encode(enums::packet_cmd::server_control, 0));
}
}
}
当本地存在redis_server对应的anchor之后,当前的space_server才有可能通知mgr_server本进行已经ready,可以处理业务逻辑了。所以任意Entity在调用Redis接口的时候,可以保证redis_server这个anchor有绑定的NetConnection,从而可以将请求发送到redis_server进程。
在redis_server进程的on_server_control_msg里会解析出space_server发出的redis_server请求相关参数,得到redis_task_desc和callback_id之后,就会构造出一个redis_task对象,并投递到当前的任务队列redis_task_channels里处理,当这个任务处理完成之后,对应的回调lambda就会被调用,在这个回调里负责将执行结果进行封装并以reply_redis_request这个control_msg通知回redis_request的发起方:
auto cur_lambda = [=](const std::vector<redis::redis_reply> &redis_replys)
{
json reply;
reply["cmd"] = "reply_redis_request";
json reply_param;
reply_param["callback_id"] = callback_id;
json::array_t array_result;
for (const auto &one_reply : redis_replys)
{
// 省略每个redis_reply的打包逻辑
}
reply_param["result"] = array_result;
reply["param"] = reply_param;
auto reply_str = std::make_shared<const std::string>(reply.dump());
add_task_to_main_loop([=, reply_str=std::move(reply_str)]()
{
m_router->push_msg(m_local_name_ptr, from, reply_str, enums::packet_cmd_helper::encode(enums::packet_cmd::server_control, 0));
});
};
auto cur_task = std::make_shared<redis::redis_task>(cur_task_desc, cur_lambda);
m_logger->info("add redis_task {}", json(cur_task_desc).dump());
redis_task_channels.add_task(cur_task);
当space_server接收到redis_server发回的reply_redis_request消息之后,就会调用on_reply_async_request来处理这个请求结果,这个函数会根据callback_id将之前注册的回调函数取出来并调用,从而完成整个redis异步请求的流程:
void space_server::on_reply_async_request(std::shared_ptr<network::net_connection> con, std::shared_ptr<const std::string> from, const json& msg)
{
std::uint64_t temp_callback_id;
json result;
try
{
msg.at("callback_id").get_to(temp_callback_id);
msg.at("result").get_to(result);
}
catch (std::exception& e)
{
m_logger->error("fail to handle on_reply_async_request from {} msg {} error {}", *from, msg.dump(), e.what());
return;
}
m_callback_manager.invoke_callback(m_callback_manager.reconstruct_handler(temp_callback_id), result);
}
基于MongoDB的数据库
Entity与数据库的交互模式与之前介绍的Redis交互模式非常类似,也是通过一个call_db接口来间接调用数据库的:
void server_entity::call_db(const json& db_task, const utility::mixed_callback_manager::callback_handler entity_callback_id)
{
get_server()->call_db(db_task, this, entity_callback_id);
}
void space_server::call_db(const json& db_task, entity::server_entity* cur_entity, const utility::mixed_callback_manager::callback_handler entity_callback_id)
{
json db_request_info, db_request_param;
auto cur_callback_id = create_entity_callback(cur_entity, entity_callback_id );
db_request_param["callback_id"] = cur_callback_id;
db_request_param["request_detail"] = db_task;
db_request_info["cmd"] = "db_request";
db_request_info["param"] = std::move(db_request_param);
m_router->push_msg(*m_local_name_ptr, "db_server", db_request_info.dump(), enums::packet_cmd_helper::encode(enums::packet_cmd::server_control, 0));
m_logger->info("call_db for entity {} entity_cb {} global_cb {}", cur_entity->entity_id(), entity_callback_id.value(), cur_callback_id);
}
这里会往db_server这个anchor发送最终的数据库请求。与redis_server这个anchor一样,db_server进程角色支持同时存在多个实例。每次space_server在启动的时候都会向mgr_server请求一个可用的db_server实例去执行连接与绑定。当一个space_server绑定好了redis_server与db_server之后,才能向mgr_server汇报ready:
void space_server::on_connect(std::shared_ptr<network::net_connection> connection)
{
// 省略很多代码
if (cur_server_iter->second.type == "db_server")
{
m_router->link_anchor_to_connection("db_server", connection.get());
m_logger->info("m_connected_resource_servers add {}", *connection_name_ptr);
}
else if(cur_server_iter->second.type == "redis_server")
{
m_router->link_anchor_to_connection("redis_server", connection.get());
m_logger->info("m_connected_resource_servers add {}", *connection_name_ptr);
}
else
{
return;
}
if(m_router->has_anchor("redis_server") && m_router->has_anchor("db_server"))
{
json report_ready_info, temp_param;
report_ready_info["cmd"] = "report_server_ready";
temp_param["server_name"] = *m_local_name_ptr;
temp_param["server_type"] = m_local_server.type;
report_ready_info["param"] = temp_param;
m_router->push_msg( m_local_name_ptr,std::make_shared<std::string>(m_upstream_server.name), std::make_shared<std::string>(report_ready_info.dump()), enums::packet_cmd_helper::encode(enums::packet_cmd::server_control, 0));
}
}
当db_server的on_server_control_msg接口接收到db_request请求之后,就会与redis类似的形式去构造一个db_task,绑定好db_task执行完成之后的通知回调之后,就会将这个db_task加入到内部的工作队列里去执行:
bool db_server::on_server_control_msg(std::shared_ptr<network::net_connection> con, std::shared_ptr<const std::string> from, const std::string& cmd, const json& msg)
{
// 省略很多代码
auto cur_lambda = [=](const db_task_desc::task_reply& db_reply)
{
json reply;
reply["cmd"] = "reply_db_request";
json reply_param;
reply_param["errcode"] = std::string();
reply_param["callback_id"] = callback_id;
reply_param["result"] = db_reply.to_json();
reply["param"] = reply_param;
auto reply_str = std::make_shared<const std::string>(reply.dump());
add_task_to_main_loop([=,reply_str=std::move(reply_str)]()
{
m_router->push_msg(m_local_name_ptr, from, reply_str, enums::packet_cmd_helper::encode(enums::packet_cmd::server_control, 0));
});
};
auto cur_db_task = std::make_shared<mongo_task>(cur_task, cur_lambda, m_logger);
m_logger->info("add db_task {}", db_request_detail.dump(4));
mongo_task_channels.add_task(cur_db_task);
return true;
}
这个reply_db_request回调RPC也会被space_server利用on_reply_async_request接口来处理,这里跟redis_server的处理逻辑是一致的:
bool space_server::on_server_control_msg(std::shared_ptr<network::net_connection> con, std::shared_ptr<const std::string> from, const std::string& cmd, const json& msg)
{
if(json_stub::on_server_control_msg(con, from, cmd, msg))
{
return true;
}
if (cmd == "request_create_account")
{
on_request_create_account(con, from, msg);
return true;
}
else if(cmd == "reply_db_request")
{
on_reply_async_request(con, from, msg);
return true;
}
else if(cmd == "reply_redis_request")
{
on_reply_async_request(con, from, msg);
return true;
}
else if(cmd == "reply_service_request")
{
on_reply_async_request(con, from, msg);
return true;
}
// 省略其他分支
}
Redis的接口是比较有限的,所以可以很方便的封装常见的Redis操作。但是由于mosaic_game选择的是MongoDB这个NOSQL作为数据库,其数据库操作接口非常灵活,所以无法简单对其进行封装,因此在调用的地方不得不直接使用MongoDB的一些语法。例如下面的玩家定时存库接口,其数据更新部分db_doc里使用了$set这个MongoDB专用语法,代表使用query_doc作为查询条件查到对应的玩家doc之后,将m_prop_data里的存库数据对应的json整体更新到原来的doc上:
void player_entity::save_db()
{
cancel_timer(m_save_db_timer);
auto cur_db_calback = [this](const json& db_reply)
{
this->save_db_back(db_reply);
};
auto cur_db_callback_id = m_callback_mgr.add_callback(cur_db_calback);
tasks::db_task_desc::base_task cur_task_base(tasks::db_task_desc::task_op::update_one, std::string{}, std::to_string(cur_db_callback_id.value()), "Player");
json query_doc, db_doc;
query_doc["base.entity_id"] = entity_id();
db_doc["$set"] = m_prop_data.encode_with_flag(spiritsaway::property::property_flags{spiritsaway::mosaic_game::property::property_flags::save_db}, true, false);
auto cur_update_task = tasks::db_task_desc::update_task::update_one(cur_task_base, query_doc, db_doc, false);
call_db(cur_update_task->to_json(), cur_db_callback_id);
}
虽然简单而又完美的对MongoDB的数据库操作进行封装是不可能的,但是在mosaic_game里还是尽量的对常用操作进行了封装, 封装代码在common/db_logic/include/db_task_desc.h里,下面就是被封装的所有操作的枚举类型定义:
enum class task_op
{
invalid = 0,
find_one, // 查找符合条件的一个文档
find_multi, // 查找符合条件的多个文档
count, // 统计符合条件的文档数量
insert_one, // 插入一个文档
insert_multi, // 插入多个文档
update_one, // 更新符合条件的一个文档
update_multi, // 更新符合条件的多个文档
delete_one, // 删除符合条件的一个文档
delete_multi, // 删除符合条件的多个文档
modify_update, // 修改符合条件的文档,仅更新指定字段 如果不存在则创建新文档
modify_delete // 修改符合条件的文档,仅删除指定字段
};
对于上面的每个枚举值都会有一个静态函数来构造std::shared_ptr<db_task_desc::base_task>, 例如上面样例代码里的update_one就会构造出一个继承自db_task_desc::base_task的db_task_desc::update_task类型的智能指针:
class update_task: public base_task
{
protected:
bool m_multi = false;
bool m_upset = false;
json m_doc;
json m_query;
public:
json to_json() const override;
std::string from_json(const json& data) override;
update_task(const base_task& in_base,
const json& in_doc,
bool in_multi,
bool in_upset);
bool is_multi() const;
bool is_upset() const;
const json& doc() const;
const json& query() const;
update_task(const base_task& in_base);
static std::shared_ptr<update_task> update_one(
const base_task& base,
const json& query,
const json& doc,
bool upset
);
static std::shared_ptr<update_task> update_multi(
const base_task& base,
const json& query,
const json& doc
);
};
构造出来的std::shared_ptr<db_task_desc::base_task>会通过定义的to_json接口转换为json字符串,然后通过call_db函数发送到db_server,这部分的逻辑与之前的redis_server指令封装是一致的。
Redis与MongoDB的配合使用
Redis作为一个缓存服务器,在其性能上要远远快于MongoDB,所以在mosaic_game里一般会将一些频繁访问的玩家数据缓存到Redis里,这样客户端就直接从Redis里读取数据,而不是从MongoDB里读取,非常大的减少了数据库的访问压力。但是由于Redis是一个内存数据库,其容量是有限的,所以在mosaic_game里一般不会将所有的玩家数据都缓存到Redis里,而是只缓存那些经常访问的玩家数据。同时为了避免Redis占据内存的无限膨胀,存储在Redis的那些玩家数据一般都会设置一个TTL来执行长期未访问数据的清除。这两个设计的影响下,客户端从Redis读取玩家数据的时候可能会出现某些玩家的数据并不在Redis里的情况。此时需要从MongoDB中拉取这些玩家的存库属性数据,并过滤出Redis所需要的相关字段,然后更新到Redis之中。由于数据库的操作并不对客户端暴露,所以在player_redis_component上提供了这个通过服务端批量查询多个玩家Redis信息的接口redis_query_player_infos_from_client:
void player_redis_component::redis_query_player_infos_from_client(const utility::rpc_msg& msg, const std::vector<std::string>& player_ids, std::uint64_t callback_id)
{
utility::rpc_msg forward_msg;
forward_msg.cmd = "redis_query_player_infos";
std::vector<json> callback_args;
callback_args.push_back(true);
callback_args.push_back(callback_id);
auto new_callback_id = m_owner->add_callback("reply_redis_query_players", callback_args);
forward_msg.set_args(player_ids);
m_owner->call_service_with_cb("redis_service", forward_msg, new_callback_id);
}
这个接口会将请求发送到redis_service,处理的时候会再次去redis_server里执行一次批量查询:
void redis_service::redis_query_player_infos(const utility::rpc_msg& msg, const std::vector<std::string>& player_ids, std::uint64_t callback_id)
{
redis::redis_task_desc temp_redis_task;
temp_redis_task.cmds.push_back(redis::command::hash::get(player_collection_name(), player_ids));
auto cur_redis_calback = [from = msg.from, player_ids,callback_id, this](const json& redis_reply)
{
this->on_redis_query_player_back(from, player_ids,callback_id, redis_reply);
};
auto cur_redis_callback_id = m_callback_mgr.add_callback(cur_redis_calback);
get_server()->call_redis(json(temp_redis_task), this, cur_redis_callback_id);
}
void player_redis_component::reply_redis_query_players(const utility::rpc_msg& msg, bool from_client, std::uint64_t callback_id, const json& reply)
{
if(from_client)
{
utility::rpc_msg reply_msg;
reply_msg.cmd = "reply_redis_query_players";
reply_msg.set_args(callback_id, reply);
m_player->call_client(reply_msg);
}
else
{
m_owner->invoke_callback(utility::mixed_callback_manager::reconstruct_handler(callback_id), reply);
}
}
当查询完成之后,会计算出那些玩家的数据并不在redis_server里,这些玩家的id组成数组empty_player_ids。如果这个数组不为空,则直接通过send_callback_reply将查询出来的Redis数据发送到服务端的player_entity让其执行下发操作。如果这个数组不为空,那么需要从MongoDB里拉取empty_player_ids对应的玩家数据,并更新到Redis里:
void redis_service::on_redis_query_player_back(const std::string& from, const std::vector<std::string>& player_ids, std::uint64_t callback_id, const json& redis_reply)
{
std::string cur_err;
std::vector<std::string> cur_player_infos;
json result_player_infos;
std::vector<std::string> empty_player_ids;
do
{
redis_reply.at(0).at("error").get_to(cur_err);
redis_reply.at(0).at("content").get_to(cur_player_infos);
if(cur_player_infos.size() != player_ids.size())
{
cur_err = "result sz not match";
break;
}
for(std::size_t i = 0; i< player_ids.size(); i++)
{
if(cur_player_infos[i].empty())
{
empty_player_ids.push_back(player_ids[i]);
}
else
{
try
{
result_player_infos[player_ids[i]] = json::parse(utility::base64_decode(cur_player_infos[i])).get<json::object_t>();
}
catch(const std::exception& e)
{
m_logger->error("on_redis_query_back fail for player {} with reply {} error is {}", player_ids[i], redis_reply.dump(), e.what());
cur_err = "fail to parse";
break;
}
}
}
} while(0);
if(!cur_err.empty() || empty_player_ids.empty())
{
send_callback_reply(from, callback_id, cur_err, result_player_infos);
return;
}
auto cur_db_calback = [from, callback_id, result_player_infos, empty_player_ids,this ](const json& db_reply) mutable
{
this->on_db_query_players_back(from, callback_id, result_player_infos, empty_player_ids, db_reply);
};
auto cur_db_callback_id = m_callback_mgr.add_callback(cur_db_calback);
tasks::db_task_desc::base_task cur_task_base(tasks::db_task_desc::task_op::find_multi, std::string{}, std::to_string(cur_db_callback_id.value()), player_collection_name());
json::object_t query;
query["base.entity_id"]["$in"] = empty_player_ids;
auto cur_find_task = tasks::db_task_desc::find_task::find_multi(cur_task_base, query, std::uint32_t(empty_player_ids.size()), player_redis_fields());
get_server()->call_db(cur_find_task->to_json(), this, cur_db_callback_id);
}
当数据库查询回来之后,会将查询到的玩家数据更新到result_player_infos中,然后通过send_callback_reply将result_player_infos发送到服务端的player_entity让其执行下发操作:
void redis_service::on_db_query_players_back(const std::string& from, std::uint64_t callback_id, json& result_player_infos, const std::vector<std::string>& empty_player_ids, const json& db_reply)
{
std::string cur_err;
tasks::db_task_desc::task_reply cur_reply;
std::vector<json::object_t> raw_player_infos;
std::vector<std::string> raw_player_ids;
std::vector<std::pair<std::string, std::string>> redis_info_to_set;
do
{
cur_err = cur_reply.from_json(db_reply);
if(!cur_err.empty())
{
break;
}
if(!cur_reply.error.empty())
{
cur_err = cur_reply.error;
break;
}
if(cur_reply.content.empty())
{
cur_err = "db query empty";
break;
}
raw_player_infos.reserve(cur_reply.content.size());
raw_player_ids.reserve(cur_reply.content.size());
for(std::size_t i = 0; i < cur_reply.content.size(); i++)
{
try
{
json::object_t temp_player_info;
json::parse(cur_reply.content[i]).get_to(temp_player_info);
std::string temp_player_id;
temp_player_info.at("base").at("entity_id").get_to(temp_player_id);
result_player_infos[temp_player_id] = temp_player_info;
redis_info_to_set.push_back(std::make_pair(temp_player_id, utility::base64_encode(temp_player_info["base"].dump())));
}
catch(std::exception& e)
{
cur_err = "parse db result fail";
m_logger->error("on_db_query_players_back fail to parse {} error {}", cur_reply.content[i], e.what());
break;
}
}
} while(0);
send_callback_reply(from, callback_id, cur_err, result_player_infos);
for(const auto& one_empty_player_id: empty_player_ids)
{
if(result_player_infos.find(one_empty_player_id) == result_player_infos.end())
{
redis_info_to_set.push_back(std::make_pair(one_empty_player_id, utility::base64_encode("{}")));
}
}
if(redis_info_to_set.empty())
{
return;
}
redis::redis_task_desc cur_redis_task;
for(const auto& [one_empty_player_id, one_player_info]: redis_info_to_set)
{
// 使用 setnx,避免把在 DB 查询期间已被事件写入的 Redis 值覆盖
cur_redis_task.cmds.push_back(redis::command::hash::setnx(player_collection_name(), one_empty_player_id, one_player_info));
}
auto cur_redis_calback = [this](const json& redis_reply)
{
this->on_set_redis_back(redis_reply);
};
auto cur_redis_callback_id = m_callback_mgr.add_callback(cur_redis_calback);
get_server()->call_redis(json(cur_redis_task), this, cur_redis_callback_id);
}
在执行数据下发的同时,还会将这些从数据库里获取的数据更新到Redis里,确保Redis里的数据与MongoDB里的数据保持一致。注意这里使用的是setnx命令,这个命令只有在对应的key不存在时才会设置成功。使用setnx而不是set的理由是玩家数据的存库并不是实时的,而是采取计时器的方式来做定期存库。所以如果这个玩家在线的话,DB里的数据可能会比当前内存中的玩家数据老,如果在DB查询期间这个在线的玩家通过update_player_redis_info执行了最新的redis数据的推送,那么DB查询回来之后的数据可能比当前Redis里已经存在的数据更老,所以要使用setnx来避免把在DB查询期间已经写入的Redis数据覆盖。
熟悉互联网后端业务的应该都知道缓存同步里的延迟双删这个概念,即在更新数据库之前先删除Redis里的数据,然后再更新数据库, 更新数据库完成之后再添加一个短时间的计时器来再次从Redis里删除对应的数据。这样做的目的是为了避免在更新数据库的过程中,如果有查询操作过来,查询操作会发现Redis里没有数据,就会去查询数据库,查询到的数据是旧数据,这样就会导致数据不一致的问题。假如不去做这个延迟的删除,只做开始的第一次Redis删除,就可能会出现一致性的问题,下面是单删流程里出现一致性问题的一个示例时序图:
| 时间 | 线程1 | 线程2 |
|---|---|---|
| t1 | 删除缓存 | |
| t2 | 查询数据库,得到旧值(缓存中没值,准备添加缓存) | |
| t3 | 更新数据库 | |
| t4 | 添加缓存 | |
| t5 | 更新旧值到缓存 |
由于在游戏服务器里,所有的数据都是以内存里的最新数据为准的,数据库里的数据只是作为一个持久化的备份。所以当前游戏服务器的设计里不会考虑这么复杂的机制去实现缓存一致性的问题,而是简单的采取只要是所关注的数据发生变更就立即更新Redis的方式,如果使用数据库里的数据去更新Redis则必须采用setnx的形式。此外在业务逻辑层再保证玩家上线时和下线存库之后立即更新Redis,就基本可以在Redis里维护好最新的玩家数据了。
这里还对不存在的玩家数据也进行了处理,即如果DB查询回来的玩家数据中不存在某个玩家,那么就会在Redis里设置一个空的json字符串作为这个玩家的redis数据。这样就避免了不断的对这个玩家执行数据库的查询操作,从而避免缓存击穿。
外围系统的任务调度
在HiRedis和MongoCxxDriver里提供的编程模型非常相似,都需要新建一个Context对象来作为连接上下文,这个对象在使用驱动里提供的连接接口来创建,连接成功之后外围业务就可以不断的使用Context上提供的读写接口来与后端的Redis/MongoDB来执行交互。但是Context每次只能发起一个任务,只有当后端系统处理完这个任务并发回结果之后才能发起下一个任务,即任务的执行是串行的。下面的代码就是HiRedis官方提供的最小样例代码,包含了前述描述的相关处理流程:
#include <stdio.h>
#include <stdlib.h>
#include <hiredis/hiredis.h>
int main() {
// The `redisContext` type represents the connection
// to the Redis server. Here, we connect to the
// default host and port.
redisContext *c = redisConnect("127.0.0.1", 6379);
// Check if the context is null or if a specific
// error occurred.
if (c == NULL || c->err) {
if (c != NULL) {
printf("Error: %s\n", c->errstr);
// handle error
} else {
printf("Can't allocate redis context\n");
}
exit(1);
}
// Set a string key.
redisReply *reply = redisCommand(c, "SET foo bar");
printf("Reply: %s\n", reply->str); // >>> Reply: OK
freeReplyObject(reply);
// Get the key we have just stored.
reply = redisCommand(c, "GET foo");
printf("Reply: %s\n", reply->str); // >>> Reply: bar
freeReplyObject(reply);
// Close the connection.
redisFree(c);
}
至于MongoCxxDriver会比HiRedis复杂一下,需要首先建立一个全进程唯一的instance对象,然后再创建client对象,在client对象的构造函数里负责发起到后端的网络连接,连接成功了之后再选择一下要使用的数据库Collection,最后在这个数据库Collection对象上执行具体的数据库操作:
#include <mongocxx/instance.hpp>
#include <mongocxx/client.hpp>
#include <mongocxx/uri.hpp>
#include <bsoncxx/json.hpp>
#include <mongocxx/exception/exception.hpp>
using bsoncxx::builder::basic::kvp;
using bsoncxx::builder::basic::make_document;
int main()
{
mongocxx::instance instance;
// Replace the placeholder with your Atlas connection string
mongocxx::uri uri("<connection string>");
// Create a mongocxx::client with a mongocxx::options::client object to set the Stable API version
mongocxx::options::client client_options;
mongocxx::options::server_api server_api_options(mongocxx::options::server_api::version::k_version_1);
client_options.server_api_opts(server_api_options);
mongocxx::client client(uri, client_options);
try
{
// Ping the server to verify that the connection works
auto admin = client["admin"];
auto command = make_document(kvp("ping", 1));
auto result = admin.run_command(command.view());
std::cout << bsoncxx::to_json(result) << "\n";
std::cout << "Pinged your deployment. You successfully connected to MongoDB!\n";
}
catch (const mongocxx::exception &e)
{
std::cerr << "An exception occurred: " << e.what() << "\n";
return EXIT_FAILURE;
}
}
从上面的两个最小样例代码可以看出,HiRedis和MongoCxxDriver的编程模型都是基于同步阻塞的接口,且默认不带多线程的支持。由于redis_server与db_server角色的进程都需要处理大量的请求任务,单个的redisContext/mongocxx::client很容易导致请求排队,所以需要构造多个这样的Context对象来处理请求。但是由于同步阻塞编程模型的限制,要想多个Context对象一起执行任务就必须要给每个Context安排一个专属的线程去执行。所以在redis_server/db_server进程里都使用了多线程的任务队列来处理这些请求任务,同时将每个Context对象封装成一个redis_worker/mongo_worker,每个worker对象专属一个线程。在进程启动的时候就会在do_start函数里将这些线程与worker创建好:
void db_server::do_start(const mongo_config& mongo_servers, std::uint8_t worker_num)
{
auto cur_task_logger = utility::get_logger("mongo_worker");
for (std::uint8_t i = 0; i < worker_num; i++)
{
workers.push_back(std::make_shared<mongo_worker>(mongo_servers, mongo_task_channels, cur_task_logger));
}
for (auto& one_worker : workers)
{
work_threads.emplace_back([=]()
{
one_worker->run();
});
}
json_stub::start();
}
void redis_server::do_start(const redis_config &redis_servers, std::uint8_t worker_num)
{
for (std::uint8_t i = 0; i < worker_num; i++)
{
auto cur_task_logger = utility::get_logger("redis_worker_" + std::to_string(i) );
workers.push_back(std::make_shared<redis_worker>(redis_servers, redis_task_channels, cur_task_logger));
}
for (auto &one_worker : workers)
{
work_threads.emplace_back([=]()
{ one_worker->run(); });
}
json_stub::start();
}
由于任务都是主线程通过RPC接收的,而所有的worker都拥有自己的线程,如何安全的将任务从主线程传递到worker线程就是一个容易出错的问题,这里mosaic_game采用了一种比较简单的解决方案:主线程在收到RPC请求之后,直接将请求参数和回调函数打包成一个task对象,然后投递到一个线程安全队列里:
// redis 的task封装
class redis_task
{
public:
using channel_type = std::string;
using callback_t = std::function<void(const std::vector<redis_reply>&)>;
protected:
const redis_task_desc m_desc;
callback_t m_callback;
public:
redis_task(const redis_task_desc cur_desc,
callback_t in_callback)
: m_desc(cur_desc)
, m_callback(in_callback)
{
}
redis_task(const redis_task& other) = delete;
redis_task& operator=(const redis_task& other) = delete;
const redis_task_desc& desc() const
{
return m_desc;
}
void finish(const std::vector<redis_reply>& replys)
{
if (m_callback)
{
m_callback(replys);
}
}
const std::string& channel_id() const
{
return m_desc.channel;
}
};
// 主线程redis_server::on_server_control_msg将redis_task投递到redis_task_channels
auto cur_task = std::make_shared<redis::redis_task>(cur_task_desc, cur_lambda);
m_logger->info("add redis_task {}", json(cur_task_desc).dump());
redis_task_channels.add_task(cur_task);
// mongo 的task封装
class mongo_task
{
std::shared_ptr<const db_task_desc::base_task> _db_task_desc;
db_task_desc::reply_callback_t _callback;
db_task_desc::task_reply _reply;
const cost_time_t begin_time;
cost_time_t run_begin_time;
cost_time_t run_end_time;
logger_t logger;
public:
using channel_type = std::string;
using callback_t = db_task_desc::reply_callback_t;
const std::string& channel_id() const;
std::shared_ptr<const db_task_desc::base_task> db_task_desc() const;
mongo_task(std::shared_ptr<const db_task_desc::base_task> in_db_task_desc,
db_task_desc::reply_callback_t in_callback, logger_t in_logger);
mongo_task(const mongo_task& other) = delete;
void run(mongocxx::database& db);
mongocxx::read_preference::read_mode read_mode(db_task_desc::read_prefer_mode in_read_mode) const;
void finish(const std::string& error);
protected:
void run_find_task(mongocxx::database& db);
void run_count_task(mongocxx::database& db);
void run_insert_task(mongocxx::database& db);
void run_update_task(mongocxx::database& db);
void run_modify_task(mongocxx::database& db);
void run_delete_task(mongocxx::database& db);
void run_impl(mongocxx::database& db);
};
// 主线程db_server::on_server_control_msg将db_task投递到mongo_task_channels
auto cur_db_task = std::make_shared<mongo_task>(cur_task, cur_lambda, m_logger);
m_logger->info("add db_task {}", db_request_detail.dump(4));
mongo_task_channels.add_task(cur_db_task);
这里mongo_task的实现比较复杂,主要是因为mongo的CRUD操作比较复杂,需要根据不同的task类型来调用不同的API,而redis_task只需要对接执行字符串即可。在这两个task上都提供了一个run函数和finish函数,这两个函数都会在worker线程中调用。 run函数负责执行业务请求,finish函数负责将执行结果通知回主线程。由于将数据从worker线程传递到主线程是一个多线程并行操作,所以这里为了安全起见使用了之前介绍过的add_task_to_main_loop将一个lambda投递到主线程的线程安全回调通知队列m_main_loop_tasks里去:
void basic_stub::add_task_to_main_loop(std::function<void()>&& cur_task)
{
m_main_loop_tasks.push_msg(std::forward<std::function<void()>>(cur_task));
}
// mongo_task 的finish回调
auto cur_lambda = [=](const db_task_desc::task_reply& db_reply)
{
json reply;
reply["cmd"] = "reply_db_request";
json reply_param;
reply_param["errcode"] = std::string();
reply_param["callback_id"] = callback_id;
reply_param["result"] = db_reply.to_json();
reply["param"] = reply_param;
auto reply_str = std::make_shared<const std::string>(reply.dump());
add_task_to_main_loop([=,reply_str=std::move(reply_str)]()
{
m_router->push_msg(m_local_name_ptr, from, reply_str, enums::packet_cmd_helper::encode(enums::packet_cmd::server_control, 0));
});
};
// redis_task 的finish回调
auto cur_lambda = [=](const std::vector<redis::redis_reply> &redis_replys)
{
json reply;
reply["cmd"] = "reply_redis_request";
json reply_param;
reply_param["callback_id"] = callback_id;
json::array_t array_result;
for (const auto &one_reply : redis_replys)
{
json one_result;
one_result["error"] = one_reply.error;
// 省略解析错误逻辑
array_result.push_back(one_result);
}
reply_param["result"] = array_result;
reply["param"] = reply_param;
auto reply_str = std::make_shared<const std::string>(reply.dump());
add_task_to_main_loop([=, reply_str=std::move(reply_str)]()
{
m_router->push_msg(m_local_name_ptr, from, reply_str, enums::packet_cmd_helper::encode(enums::packet_cmd::server_control, 0));
});
};
然后在主线程的main loop里调用poll_mainloop_tasks就可以将这些finish任务安全取出并依次执行:
std::size_t basic_stub::poll_mainloop_tasks()
{
const static std::uint32_t batch_task_num =10;
std::array<std::function<void()>, batch_task_num> temp_tasks;
std::uint64_t pop_get_num = 0;
std::uint64_t total_pop_num = 0;
while((pop_get_num = m_main_loop_tasks.pop_bulk_msg(temp_tasks.data(), batch_task_num)))
{
total_pop_num += pop_get_num;
for(std::uint32_t i = 0; i< pop_get_num; i++)
{
temp_tasks[i]();
}
}
return total_pop_num;
}
在业务逻辑中,我们期望在同一个Entity发起的多个db_task/redis_task可以按照发起顺序依次执行,而不是乱序执行,这样可以避免在业务逻辑中处理复杂的状态机。但是不同的Entity发起的db_task/redis_task之间不会存在先后关系,可以乱序执行。所以在设计db_task/redis_task的线程队列时,mosaic_game需要考虑上述的有序和乱序需求,为此在db_task/redis_task上都添加了一个std::string channel字段:
// mongo task的描述信息 有个m_channel字段代表有序通道
class base_task
{
protected:
std::string m_collection = "";
std::string m_channel = "";
std::string m_request_id = "";
task_op m_op_type = task_op::invalid;
json::object_t m_extra;
}
// redis task的描述信息 有个channel字段代表有序通道
struct redis_task_desc
{
std::string channel;
std::vector<std::string> cmds;
NLOHMANN_DEFINE_TYPE_INTRUSIVE(redis_task_desc, channel, cmds)
};
如果db_task/redis_task上携带的channel字段为默认值空字符串,说明这些task没有任何先后顺序要求,可以任意顺序执行。如果db_task/redis_task上携带的channel字段不为空,那么要求相同channel的task按照到达redis_server/db_server的顺序去执行。
由于这样的考虑了channel的线程安全任务队列是一个比较公用的需求,因此这个功能的实现独立出来了一个小项目task_channel。项目的代码其实比较简单,主要是利用了std::array<task_queue, HASH_BUCKET_COUNT> m_task_buckets来存储不同channel的task队列,利用std::mutex来保护对这些队列的访问:
template <typename T, bool threading = true>
class task_channels
{
public:
using channel_type = typename T::channel_type;
using task_ptr = std::shared_ptr<T>;
struct task_queue
{
std::uint32_t executor_id = 0;
std::deque<task_ptr> queue;
};
static constexpr std::size_t HASH_BUCKET_COUNT = 32;
static constexpr std::size_t HASH_MASK = HASH_BUCKET_COUNT - 1;
protected:
const channel_type m_default_channel_id;
std::array<task_queue, HASH_BUCKET_COUNT> m_task_buckets;
task_queue m_tasks_without_channel;
mutable std::mutex m_task_mutex;
std::atomic<std::size_t> m_add_task_count = 0;
std::atomic<std::size_t> m_run_task_count = 0;
std::atomic<std::size_t> m_finish_task_count = 0;
// 省略很多字段
};
在执行任务的添加的时候,根据task的channel字段来判断将task添加到哪个channel的队列中。如果task的channel字段是default_channel,说明这个task没有任何先后顺序要求,可以任意顺序执行,因此将这个task添加到m_tasks_without_channel队列中。如果task的channel字段不等于default_channel,那么要求相同channel的task按照到达redis_server/db_server的顺序去执行,所以将这个task添加到m_tasks_by_channel[hash(task.channel)]队列中:
void add_task_impl(task_ptr task)
{
auto cur_channel_id = task->channel_id();
if (!is_default_channel(cur_channel_id))
{
// 计算channel的哈希值,确定要使用的bucket
std::size_t bucket_index = hash_channel(cur_channel_id);
auto &task_queue = m_task_buckets[bucket_index];
task_queue.queue.push_back(task);
}
else
{
m_tasks_without_channel.queue.push_back(task);
}
m_add_task_count++;
}
由于channel的数量会很多,而worker的数量是有限的,所以无法将channel与worker执行一一对应。所以这里将channel进行hash来分配到m_task_buckets这个array里。只要保证m_task_buckets里的一个元素同时只能被一个worker消费,那么相同task_queue的task总是被同一个worker处理,这样就可以保证channel内任务的有序性。此外m_task_buckets的数量是固定的,而worker的数量不确定,所以需要对每个task_queue做一个标记executor_id,代表这个task_queue目前正在被哪个worker执行。如果一个非默认task_queue的executor_id为0,说明这个task_queue目前没有被任何worker执行。了解了这些设计之后,worker获取任务的代码就好理解了:
task_ptr poll_one_task_impl(channel_type prefer_channel, std::uint32_t cur_executor_id)
{
auto result_queue = select_task_queue(prefer_channel);
if (!result_queue)
{
return {};
}
result_queue->executor_id = cur_executor_id;
auto cur_task = result_queue->queue.front();
result_queue->queue.pop_front();
m_run_task_count++;
return cur_task;
}
worker在请求一个新的task的时候,会使用poll_one_task_impl这个接口,第一个参数是当前worker执行的上一个task的channel, 第二个参数是当前worker的executor_id。这个函数会调用select_task_queue来获取最终选取的channel任务队列,并更新这个channel任务队列的executor_id字段,标记这个任务队列目前被当前worker独占了。注意这里会将task从队列里pop出去,所以一个task_queue为空并不代表这个队列的任务为空,可能还有一个正在被某个worker占据正在执行,因此只能用executor_id是否为0来判定当前task_queue是否还在被独占。
获取任务队列的接口select_task_queue逻辑也非常简洁: 如果当前worker执行的上一个task的channel不是默认channel,那么说明当前worker之前执行过需要保证channel内顺序的task,所以需要优先选择这个channel所属task_queue的task。但是如果上一个channel所属task_queue已经空了,则先清空这个task_queue的executor_id,代表目前没有worker在执行这个task_queue的任务,再尝试去默认队列里拿取一个任务。如果默认队列里也拿不到,则遍历整个m_tasks_by_channel去获取一个当前没有worker占用的非空channel:
task_queue *select_task_queue(channel_type prefer_channel, std::uint32_t cur_executor_id)
{
// 1. 如果指定了非默认channel,优先检查对应的bucket
if (!is_default_channel(prefer_channel))
{
std::size_t prefer_bucket = hash_channel(prefer_channel);
auto &queue = m_task_buckets[prefer_bucket];
if (!queue.queue.empty() && (queue.executor_id == 0 || queue.executor_id == cur_executor_id))
{
return &queue;
}
}
// 2. 检查是否有默认channel的任务
if (!m_tasks_without_channel.queue.empty())
{
return &m_tasks_without_channel;
}
// 3. 遍历所有bucket,找到一个非空且未被其他worker占用的队列
// 每个worker会处理一个队列直到为空
// 使用随机起点避免每次都从第一个bucket开始 减少饥饿概率
auto random_start = m_run_task_count % HASH_BUCKET_COUNT;
for (std::size_t i = 0; i < HASH_BUCKET_COUNT; ++i)
{
auto &backet = m_task_buckets[(random_start + i) % HASH_BUCKET_COUNT];
if (!backet.queue.empty() && backet.executor_id == 0)
{
return &backet;
}
}
return nullptr;
}
当一个任务被执行完成之后,会通过finish_task_impl接口来通知task_channel,这个函数会判断当前task_queue是否为空,如果为空,则将executor_id设置为0,代表当前task_queue没有被任何worker执行了,后续添加的任务可以被其他worker来执行:
void finish_task_impl(task_ptr cur_task)
{
m_finish_task_count++;
// 如果队列现在为空,重置executor_id
if (!is_default_channel(cur_task->channel_id()))
{
std::size_t bucket_index = hash_channel(cur_task->channel_id());
auto &task_queue = m_task_buckets[bucket_index];
if (task_queue.queue.empty())
{
task_queue.executor_id = 0;
}
}
}
分布式场景
无缝大世界的需求
在常规的游戏服务器设计中,场景服务器一般采取的是多进程模式,然后每个进程内部负责承载一个或者多个场景实例。为了方便的去控制场景进程的CPU消耗上限,一般会采取单线程模式。这样物理机器上有多少个物理线程就开启多少个场景进程,完全的一对一映射,保证服务器不会因为某个进程出现了高CPU消耗的故障引发其他进程的执行变慢问题。目前见到的Unreal Engine的Dedicated Server基本全都是这种单线程模式,即其启动命令行中加入-nothreading。不过单线程模式下,玩家数量的承载比较有限,所以很多游戏服务器会开启多线程模式,主线程中只处理Entity系统所承载的业务逻辑,将网络、AOI、日志、AI、寻路等不需要与Entity系统执行高频交互的模块独立为各自单独的一个线程。主线程与其他线程之间明确好相关的多线程数据交换接口,并做好多线程互斥锁的封装,这样就可以将单进程的Entity承载数量提升很多,纯CPP服务器的话应该可以达到单进程上千玩家,而在网易使用的基于Python的Messiah Server也是两三百玩家轻松拿捏。典型例子就是网易天谕手游介绍的游戏服务端高性能框架:来看《天谕》手游千人团战实例,以及网易倩女手游介绍的《新倩女幽魂》迈向千人同屏:Avatar系统,这里倩女手游做的更加激进,将战斗结算都拆出去了。
单进程成百上千的玩家承载量基本可以覆盖所有的玩法场景需求,但是架不住策划想整个热闹氛围要求全服所有玩家都可以进入同一个大地图进行交互。此时的所有玩家的数量级一般是几万到几十万,主线程已经无法处理这个数量级的Entity业务逻辑了。此时有一种取巧的方法来假装所有玩家在同一个场景里,对于这个大场景创建数十个进程实例,每个进程都有一个各自独立的大场景,玩家选择进入这个场景的时候自动选择其中负载最低的进程,这就是MMO服务器中常见的分线。
分线以分区隔离的方式解决了大量玩家在指定场景里的负载问题,但是由于不同分线之间的玩家是互相不可见的,所以仍然没有解决这些玩家之间交互问题。特别是组队系统里要求一个队伍里的玩家要尽可能的互相可见,而这个分线的选择机制经常在组队切换场景的时候将同一个队伍中的玩家进行打散,导致不可见。想对这种情况进行补救的话,需要做一些特殊逻辑。先让队长执行场景切换,此时分线逻辑会随机指定一个分线。在队长切换过去之后,队长会将自身的分线数据广播到其他队员中,此时其他队员再以跟随的方式进入指定的分线。
这种方式可以在很大程度上缓解这个队伍内成员分线不一致的问题,不过在场景里玩家数量有硬上限的情况下这种方法有些时候会失败。例如场景设计最大承载100人,超过100人则不允许后续人员进入。某个情况下当队长随机进入一个分线的时候,场景内还有足够的余量来容纳队伍内的其他成员。但是当其他成员接收到队长切换分线的消息之后,其发送的切换场景请求达到场景服务器可能已经是队长切换分线的0.2秒之后的。在这个短暂的时间窗口内可能会有其他的玩家进入这个分线,从而导致分线的玩家数量达到上限,进而导致此队伍内的其他成员切换到指定分线场景执行失败。为了应对这个场景人员上限的问题,更好的处理方式是场景服务在给队长指定分线的时候,预先从当前分线的人员数量中临时加上当前队伍的大小。同时当队伍内其他成员进入这个分线时,不再对当前分线的人员数量进行累加。实际中的实现其实比这两句复杂的很多,要处理队伍解散,玩家进出队伍,玩家终止跟随等各种异常情况,所以这个方案对于原始的队伍内成员分线不一致的问题只能做到很大程度上的缓解,不能达到根治。
而且这还只是队伍,实际的玩法活动中有很多的类似于队伍的临时性玩家集合会有这种聚合在同一个分线场景中的需求,不过照着队伍相关的代码查找替换一下也将就能满足。整体来说,分线系统缝缝补补之后基本可以伪装成一个单一大世界,新来的同一个分线要求继续缝缝补补就可以了。不过让分线系统彻底崩塌的最后一根稻草一般来自于策划,策划突发奇想学习魔兽世界无缝大地图,要求抹掉分线这个概念,场景中的上万个玩家都要求近距离互相可见。
没办法,策划是大爷,做吧。但是怎么做呢?这就要引入BigWorld分布式场景的技术了。在服务端架构那一章简单的描述了Bigworld分布式场景的大致概念,接下来我们开始探究其具体实现细节了。
Real-Ghost的引入
对于常见的非分布式游戏场景实例,它肯定是被单一进程托管的,玩家、怪物等actor_entity只需要考虑进入场景和离开场景这两个操作。但是对于分布式大世界场景,他是由分布在多个进程中的cell_space拼接而成的,每个cell_space负责一个与其他cell_space不重叠的矩形区域,每个actor_entity都根据其位置坐标绑定到覆盖了这个位置的cell_space。但是由于actor_entity的位置坐标是动态的,同时cell_space的覆盖区域也会被负载均衡所调整,所以一个actor_entity所归属的cell_space并不是固定的,而是不断的变化之中。当一个actor_entity所属的cell_space发生改变时,这个actor_entity就需要从之前的cell_space移动到新的cell_space,这个移动的过程就叫做迁移Migration。整个迁移过程其实跟切换场景有很大的相似之处,都是需要在迁移之前打包好当前actor_entity的所有数据,然后从当前cell_space移除此actor_entity,然后通过RPC将这个actor_entity的数据发送到新cell_space,利用打包数据对这个actor_entity进行重建。
上述用来适配分布式大世界的actor_entity移动方案有一个非常大的问题:不同的cell_space之间所管理的actor_entity集合是没有交集的,每个cell_space各自处理actor_entity可见性会引发客户端的actor_entity瞬间销毁或者创建。以下图为例,在开始情况下全场景只有一个cell_space,在AOI半径为10的情况下, A,B,C,D,E五个玩家相互之间都是可见的,其客户端都会存在这五个actor_entity:
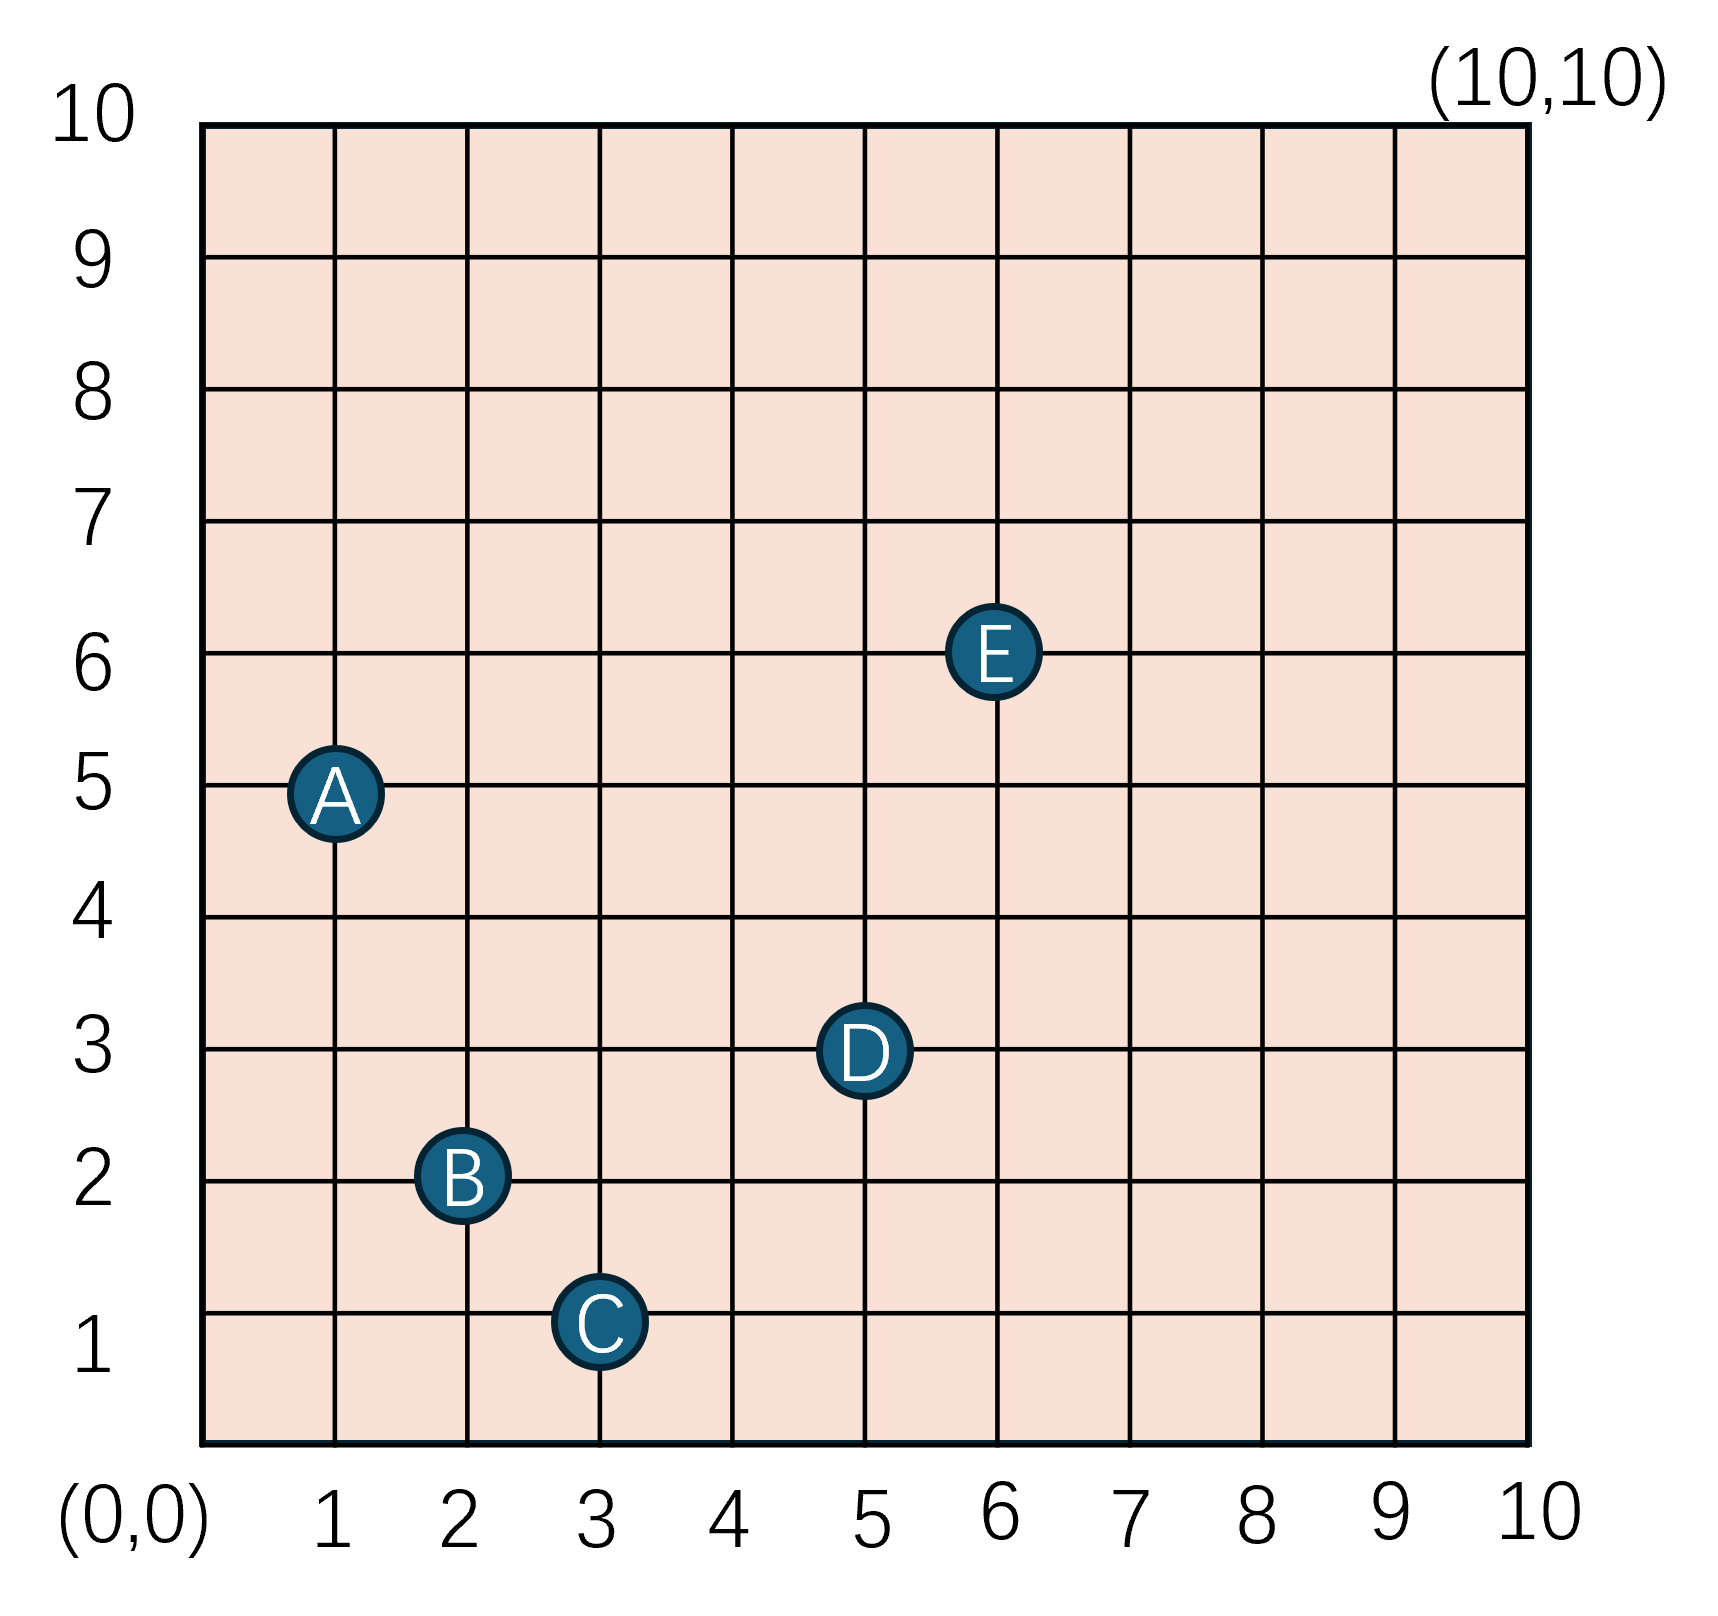
在经过负载均衡之后,原来的单个cell_space被切分为了上下两个cell_space,A,E需要迁移到新的上半部分的cell_space中,而B,C,D则保留在原来的cell_space中:
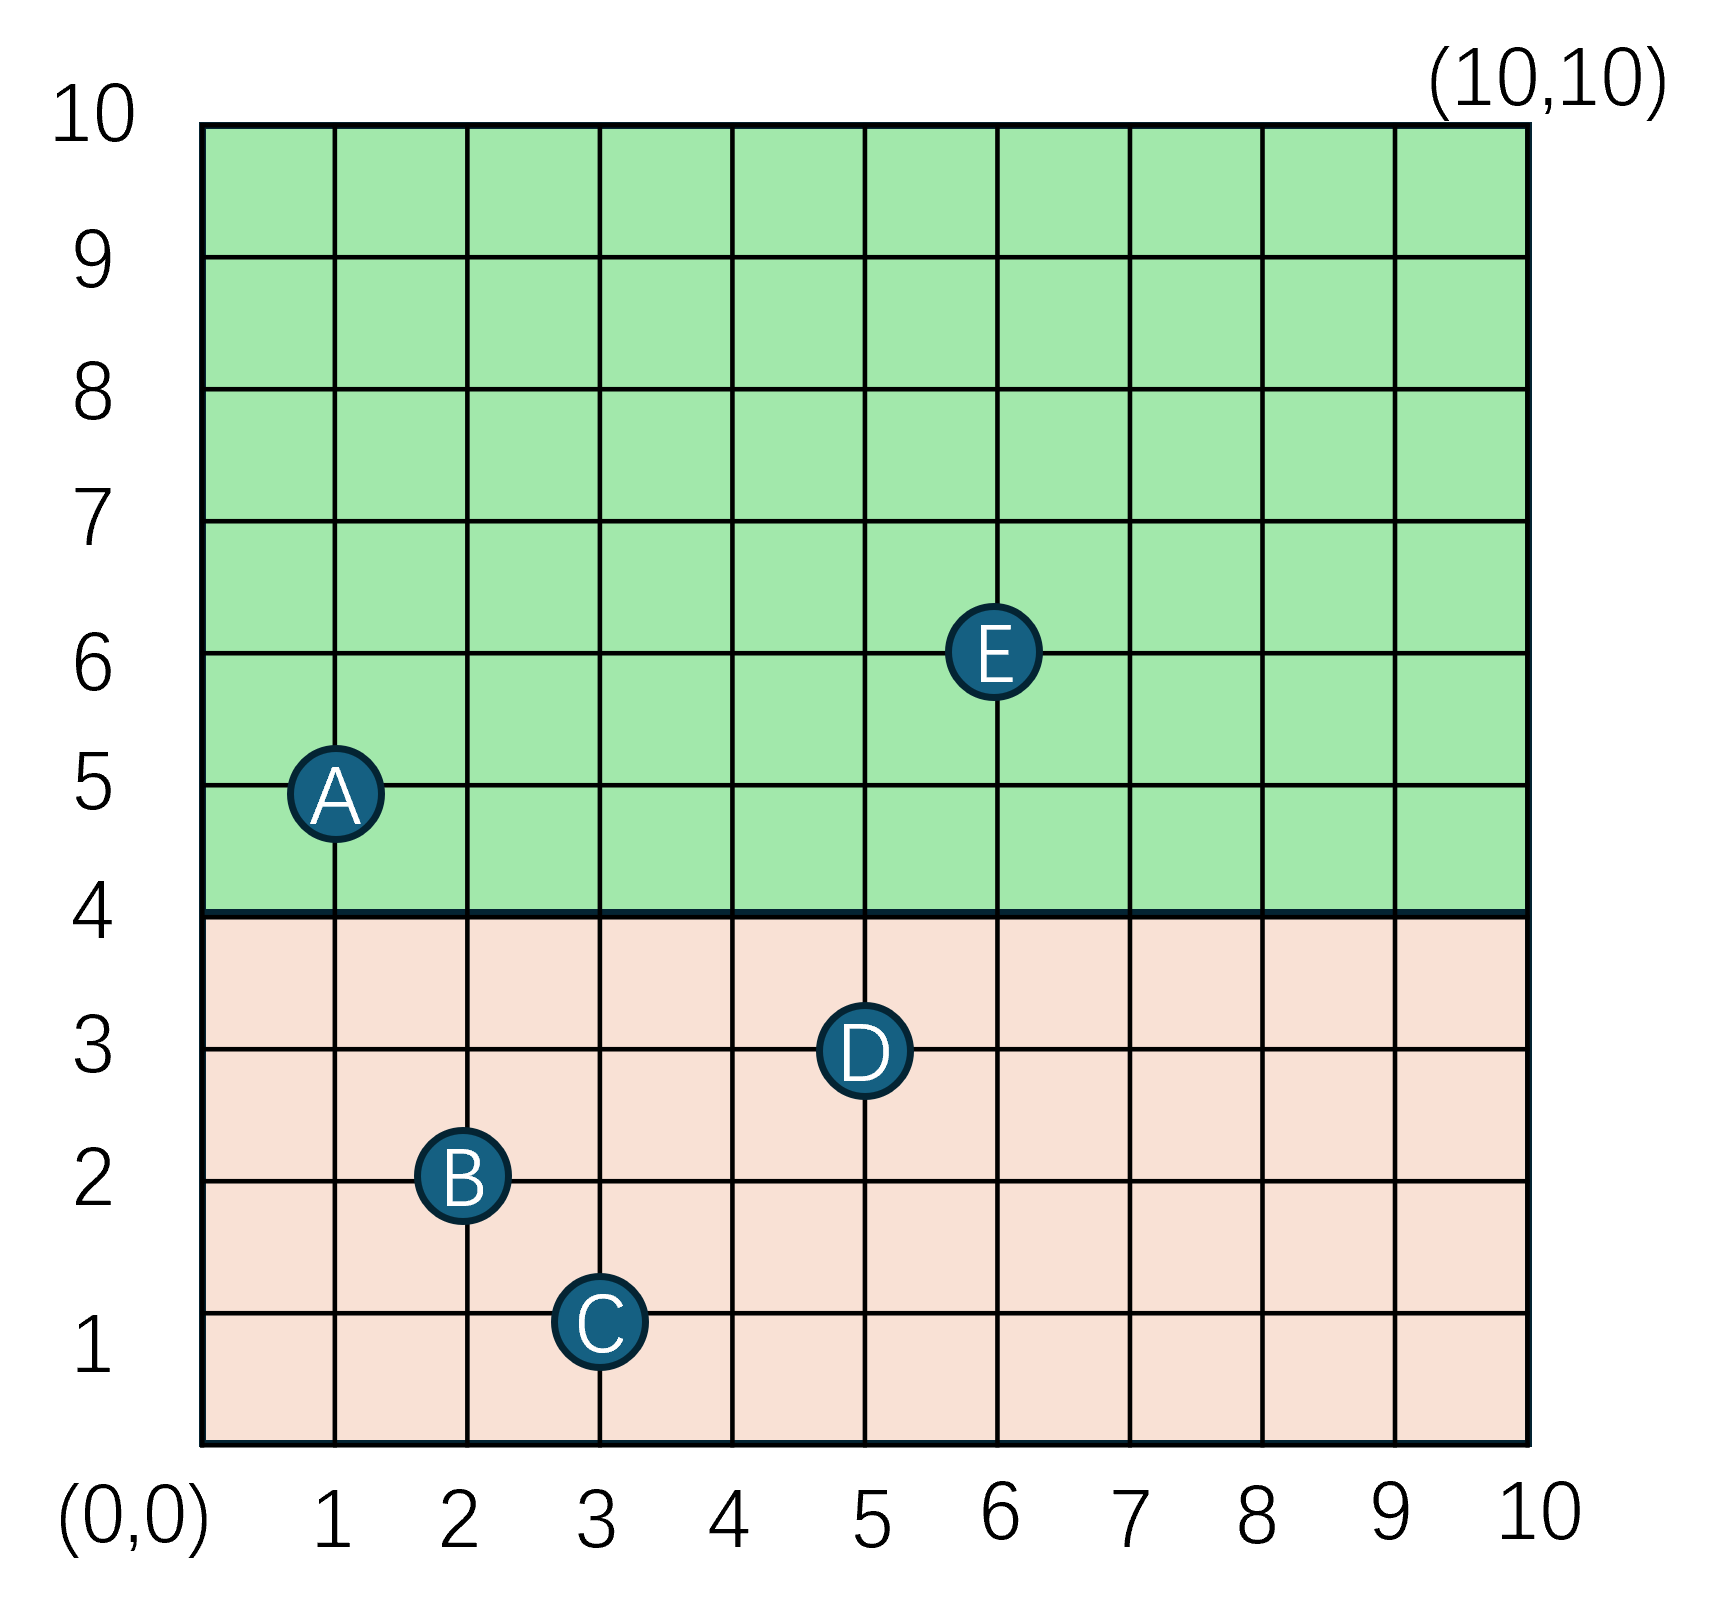
此时A,E两个actor_entity相互之间可见,同时B,C,D三个actor_entity相互之间可见, 但是A,E中任一actor_entity与B,C,D中任一actor_entity都缺乏可见性,因为每个cell_space都有其各自AOI系统,两个AOI系统管理的actor_entity集合完全无交集。在A,E玩家的客户端中, B,C,D三个原本可见的actor_entity将会被立即销毁,同时在B,C,D玩家的客户端中,原本可见的A,E两个actor_entity也会被立即销毁。
这种突发性的变化会与玩家的期望大相径庭,会给客户端带来明显的actor_entity集合变化,所以这种分布式场景的actor_entity移动方案也叫做有缝迁移。与有缝迁移相反的迁移方案就叫做无缝迁移:在迁移前后不会给客户端带来actor_entity集合变化。在主流的无缝迁移实现中,一般都使用了Real-Ghost系统。在Real-Ghost系统中,原来的actor_entity会有两类载体:real_entity和ghost_entity。real_entity与ghost_entity有如下性质:
- 对于一个
actor_entity,一定会有一个real_entity,同时会有零个或者多个ghost_entity; - 每个
ghost_entity和real_entity都会有唯一的actor_entity与之相关联; - 一个
actor_entity在一个cell_space中的关联real_entity与ghost_entity的总数不超过1; - 对于一个
actor_entity,其real_entity拥有其所有的属性数据,而ghost_entity则拥有其所有对客户端可见的属性数据 ghost_entity上的属性数据需要尽可能快的与real_entity上的属性进行同步,以保持一致
综上,real_entity承载了原有的actor_entity的所有数据与逻辑,而ghost_entity就是原来的actor_entity创建的用来参与cell_space的AOI计算的数据同步代理。
有了这个ghost_entity之后,无缝迁移的最简实现就是对于每一个actor_entity,在除了所属cell_space之外的每个cell_space都创建一个ghost_entity,这样每个cell_space都相当于有全场景actor_entity的real_entity或者ghost_entity,即AOI计算的actor_entity集合都是当前分布式大世界内的所有actor_entity。此时cell_space的任何调整都不会影响AOI计算的结果,因此这些cell_space的调整对于所有的客户端来说都是透明的,分布式大世界与单cell_space世界没有任何差别,从而实现了无缝迁移。下图中就是这种方案的一个例子,real_entity的颜色我们用蓝色来表示,ghost_entity的颜色我们用灰色来表示:
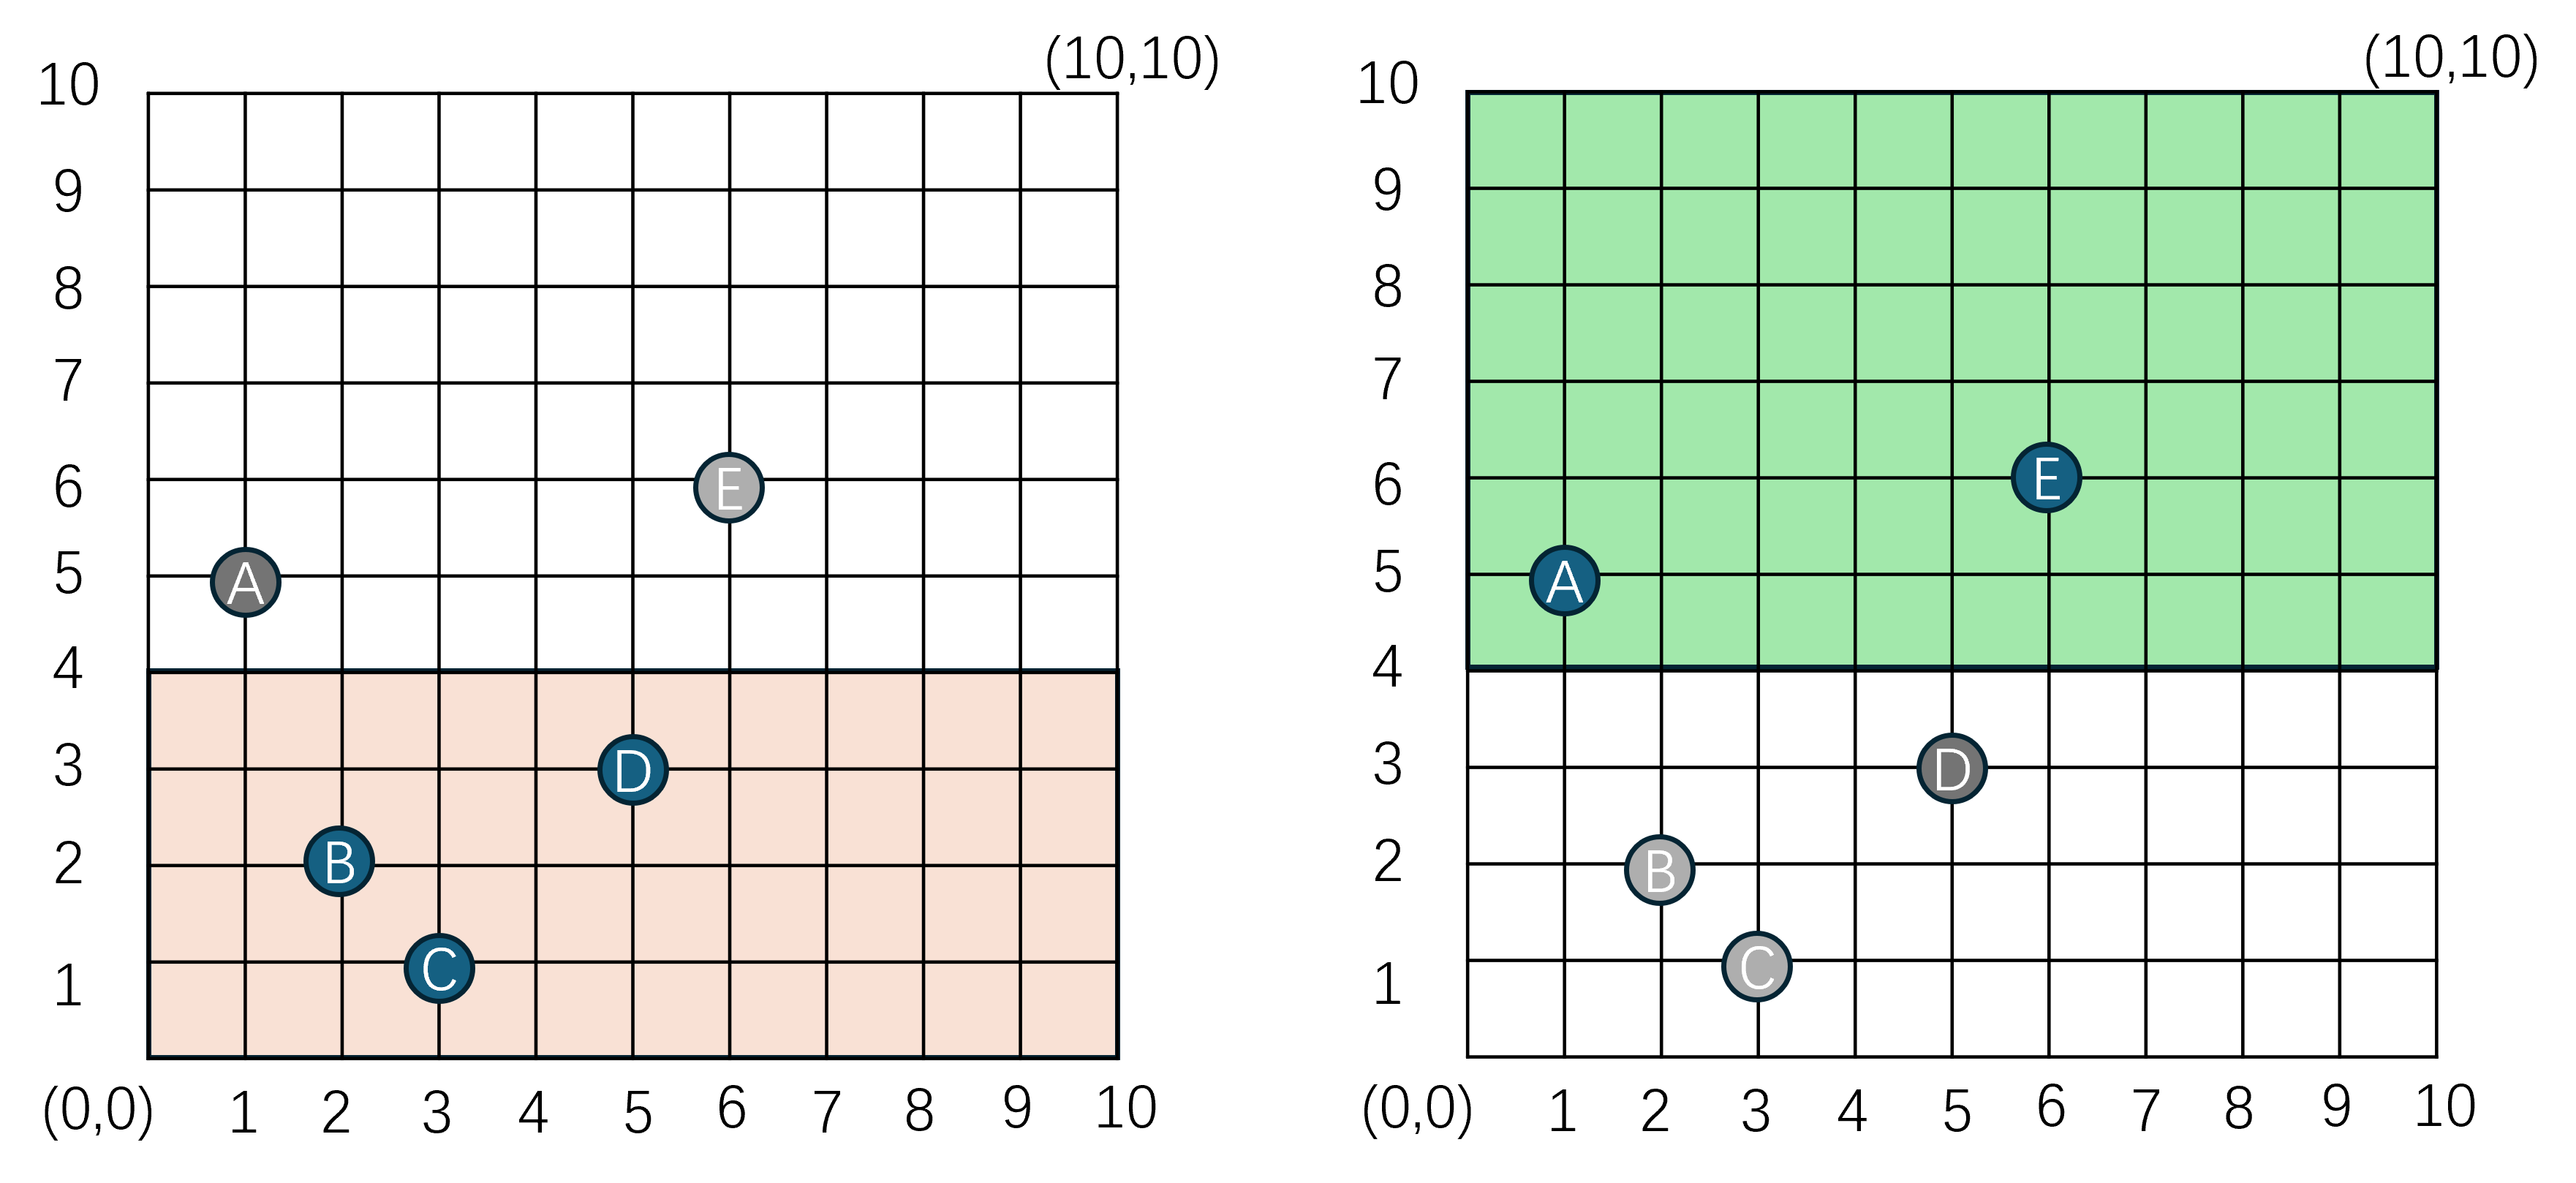
Ghost创建半径
前述的Real-Ghost维护方案虽然能够实现无缝迁移,但是其代价非常大:每个cell_space都需要获取当前大世界所有actor_entity的客户端可见属性的全量副本。为了实现这个目标,任何一个real_entity上的客户端可见属性的改变都需要推送到所有的cell_space上的对应ghost_entity,其带来的CPU和流量的压力是M*N的,其中M为cell_space的数量, N为actor_entity的数量。 实际上我们并不需要给每个actor_entity在其非所属cell_space上都创建一个ghost_entity,因为每个cell_space的AOI系统只会处理在这个cell_space内的real_entity的客户端同步。所以对于一个actor_entity来说,在离其非常远的cell_space中创建ghost_entity是纯粹的浪费资源,因为同步过去的ghost_entity在远方cell_space计算客户端同步列表的时候总是会被AOI半径所裁剪掉。基于这个同步半径裁剪的考量,演化出了一种更加高效的Real-Ghost管理机制,即只在当前actor_entity一定范围内的cell_space中创建ghost_entity,下图就是一个以20M为ghost_entity创建半径的示意图,图示展示创建范围是正方形,其实圆形可是可以的:
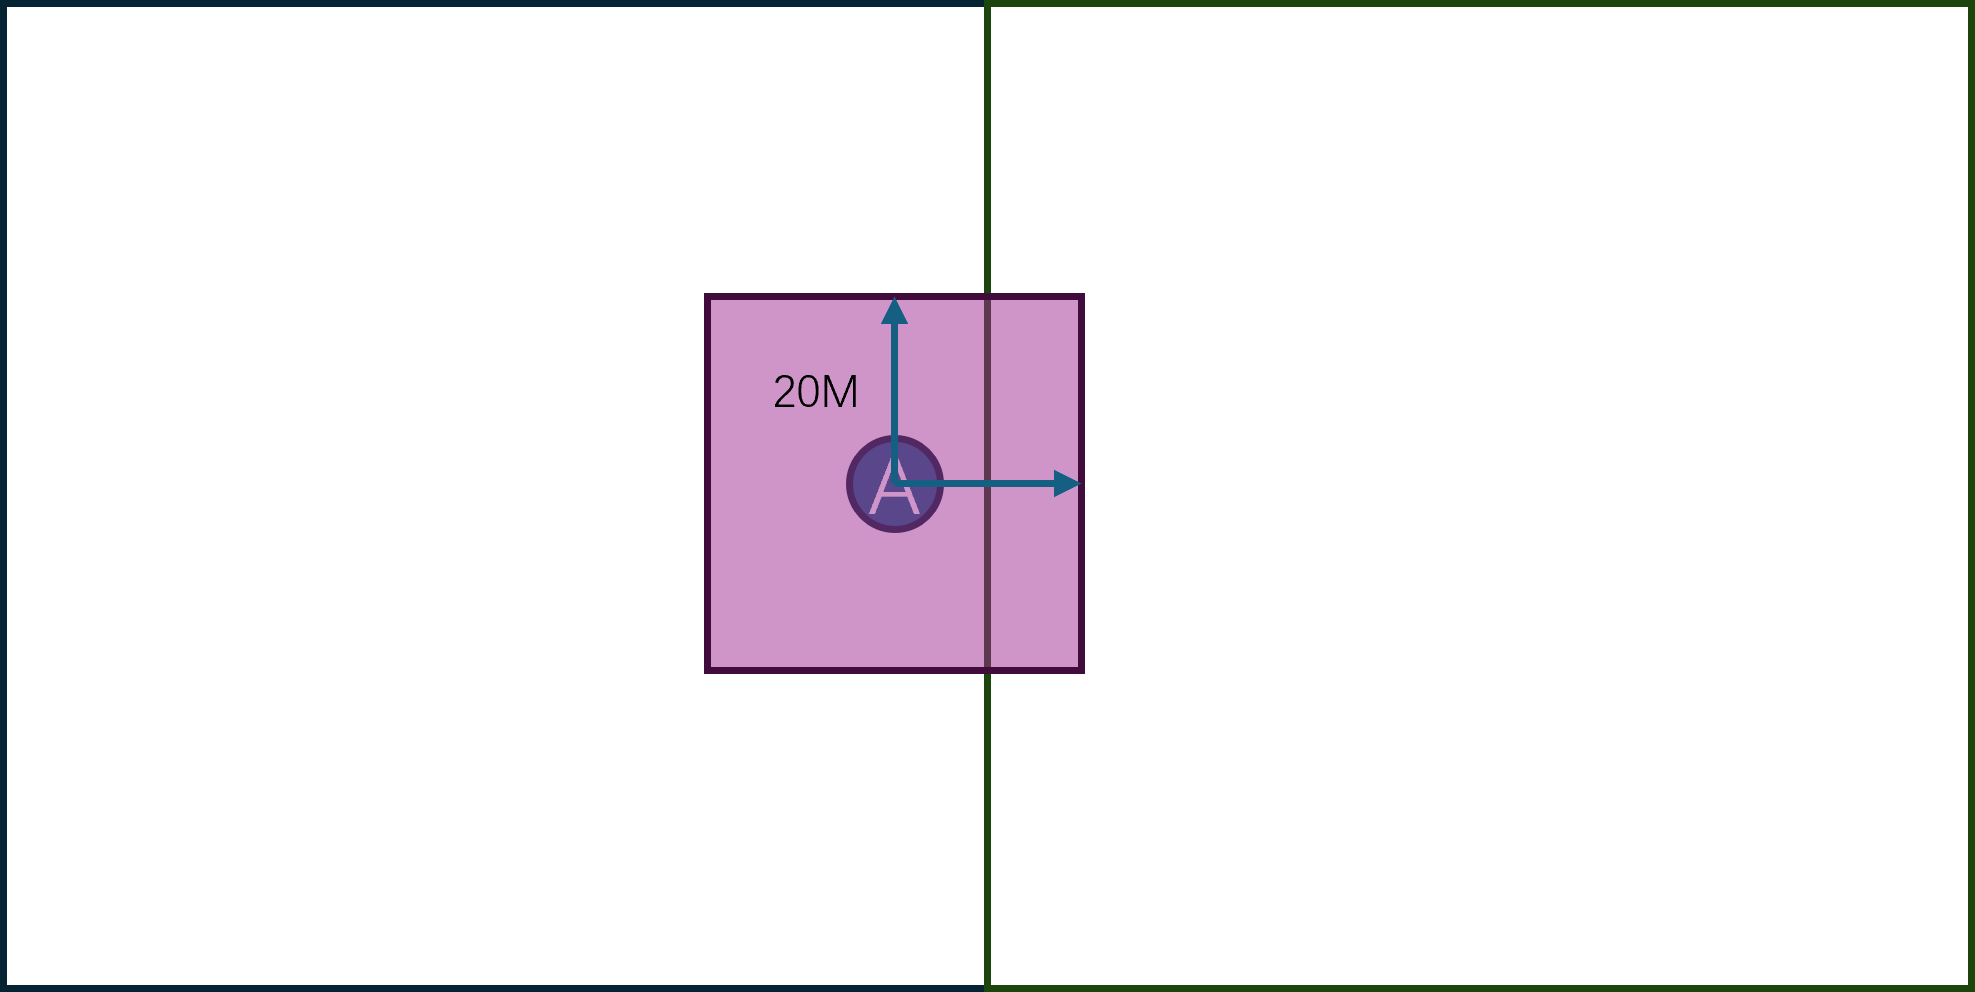
下图就是在创建半径为1.5的情况下,双cell_space的Real-Ghost格局:
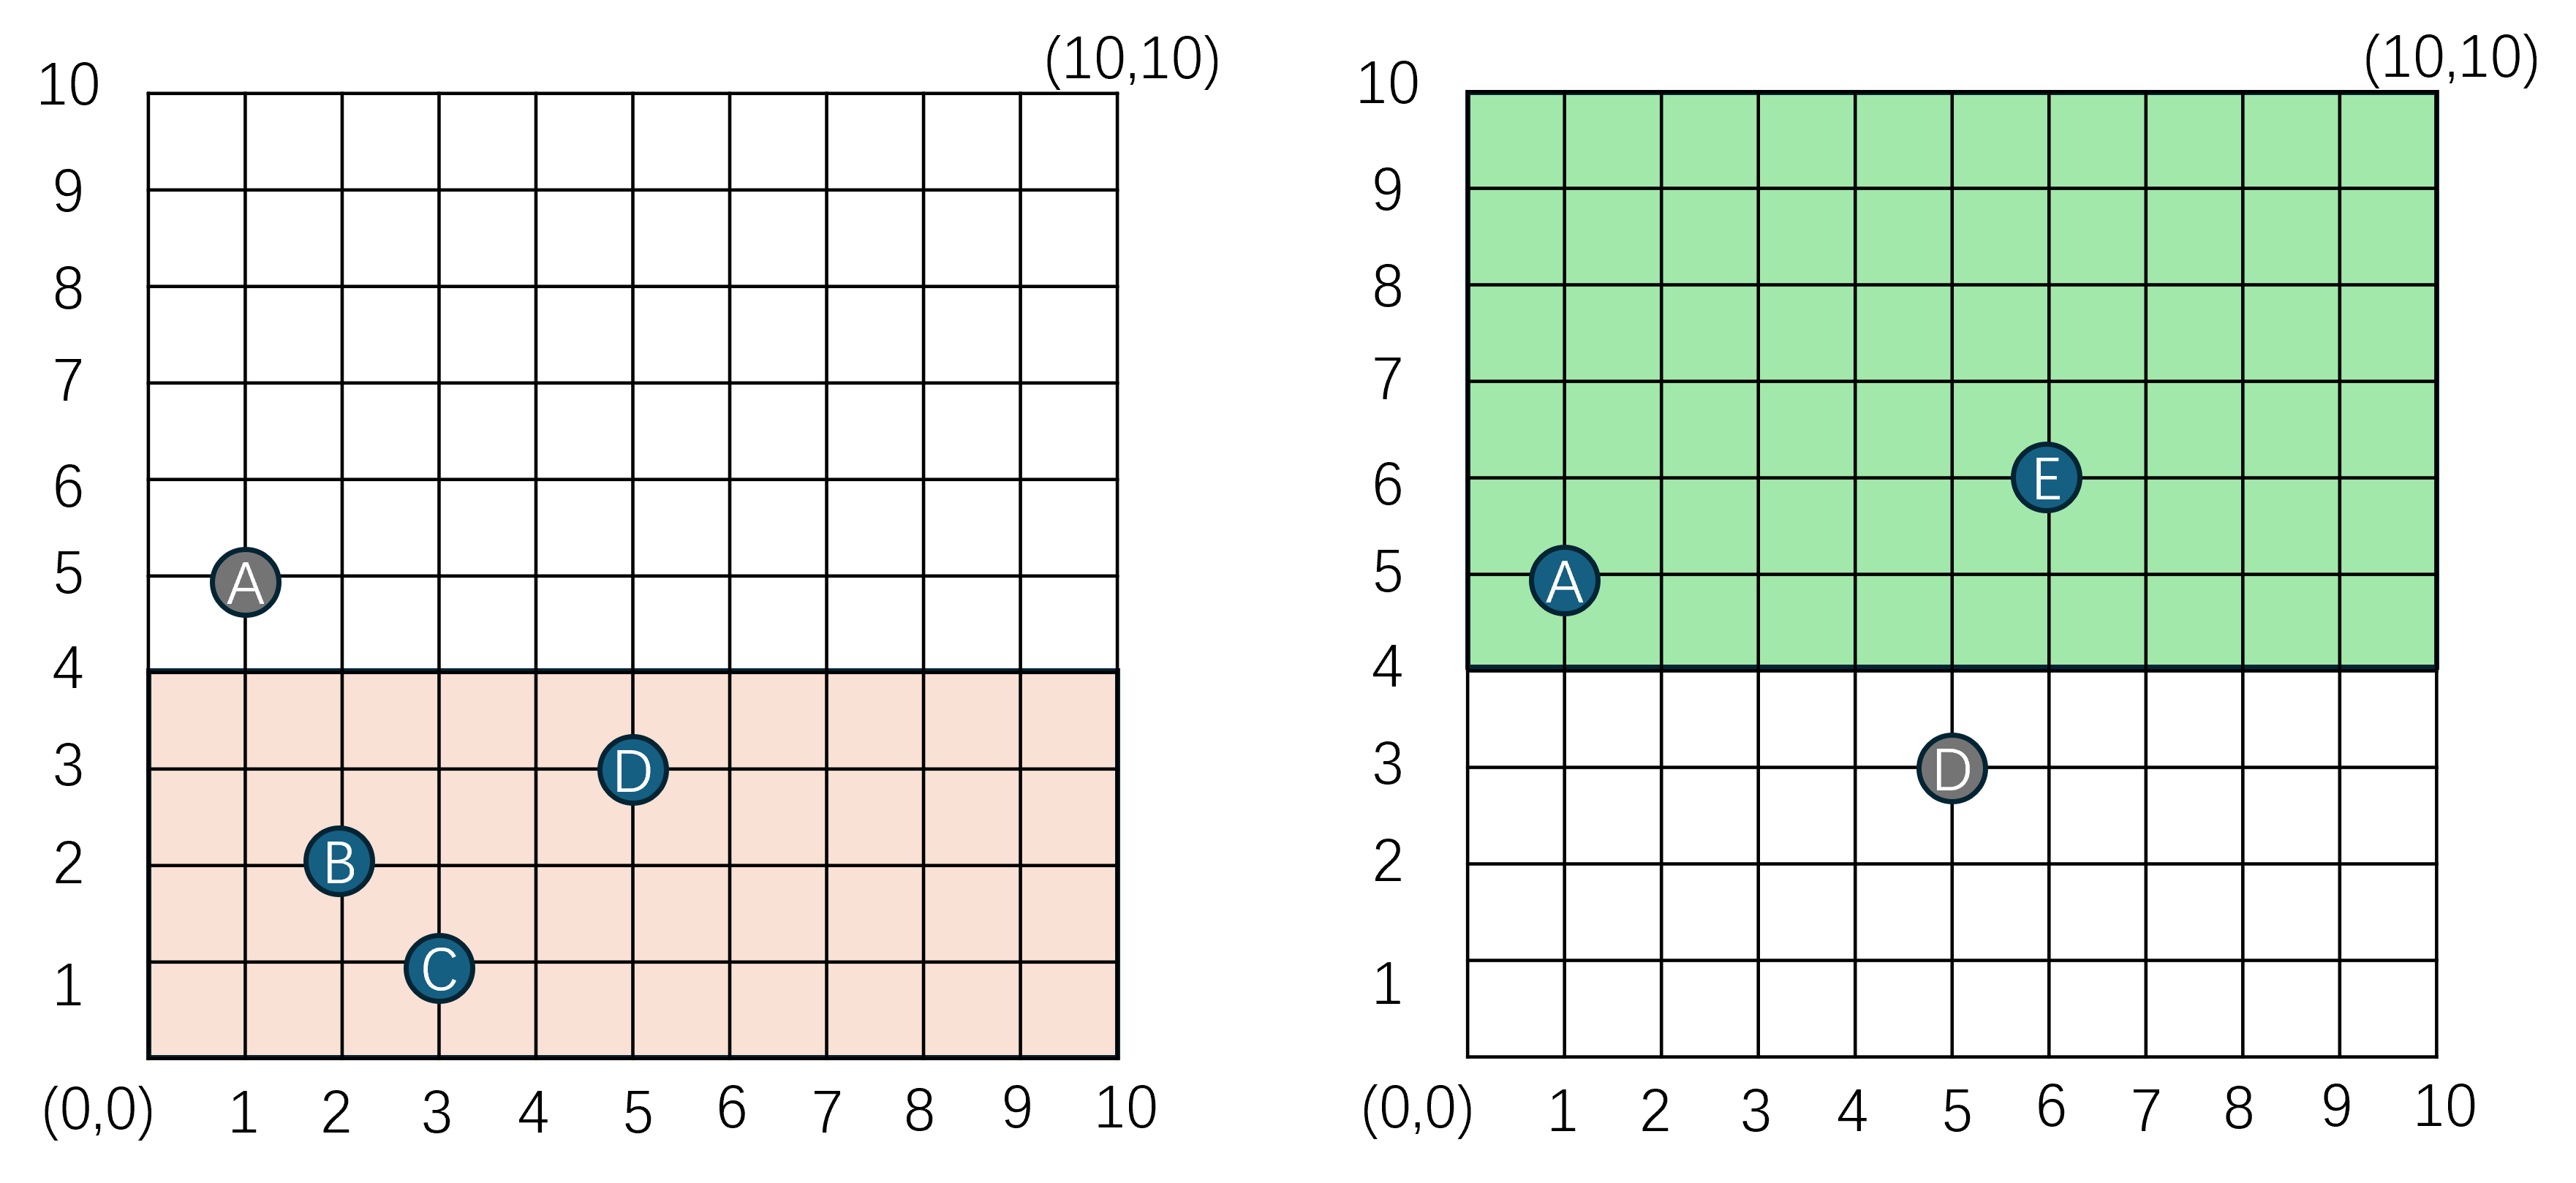
下方的cell_space只需要创建A对应的ghost_entity,上方的cell_space只需要创建D对应的ghost_entity。相对于原来的全创建设计,ghost_entity的数量从5个降低到了2个。这个优化数据看上去不怎么显眼,但是如果我们把每个cell_space的长宽都设置为这个创建ghost_entity区域的四倍,则我们可以保证一个actor_entity在整个分布式大世界的所有cell_space中,最多只会有3个ghost_entity,每个real_entity的属性修改最多需要向周围的三个cell_space进行推送。这样整个分布式大世界中的ghost_entity数量就从(M-1)*N降低到了3*N,这里M代表cell_space的数量,N代表actor_entity的数量,复杂度降低为了actor_entity数量的线性,且不受cell_space数量的影响。因此BigWorld与MosaicGame都采取了这种带ghost_entity创建范围限制的Real-Ghost管理方案。
在这个ghost_entity创建半径GhostRadius为20M的规则下,一个cell_space的边界可以演化为下图所示的三个矩形区域:
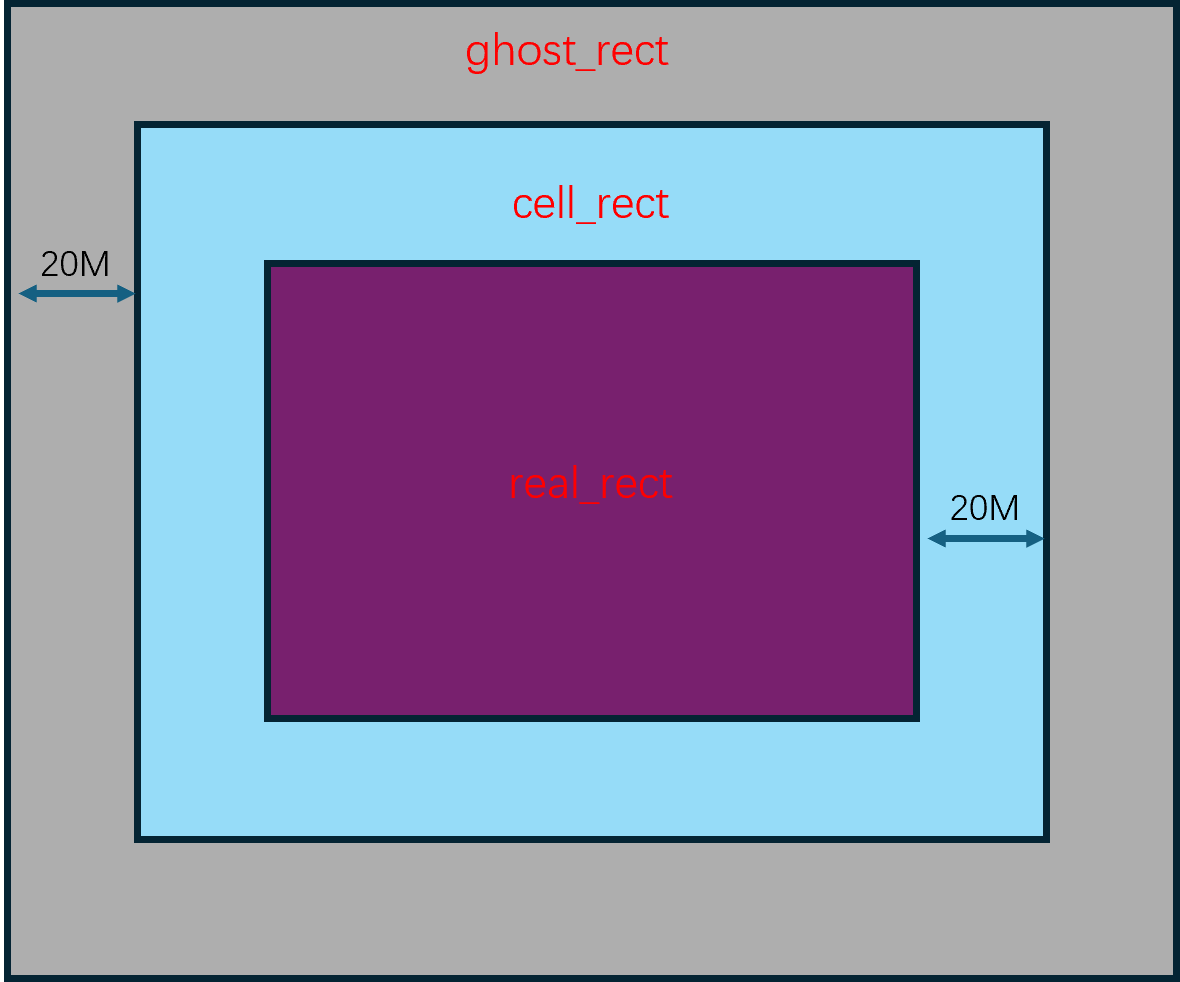
- 浅蓝色矩形区域
cell_rect,这个代表这个cell_space的自身负责区域。cell_space尽可能的将其承载的real_entity限制在这个区域中。 - 深紫色矩形区域
real_rect,相当于将cell_rect四个方向都缩小GhostRadius。一个real_entity在这个区域的话,则不需要在周围的其他cell_space去创建ghost_entity,这个real_entity对应的已有的在周围cell_space里创建的ghost_entity可以执行删除。反之一个real_entity在这个区域外的话,则需要向周围的cell_space创建ghost_entity。 - 浅灰色区域
ghost_rect,相当于将cell_rect四个方向都扩大GhostRadius,如果当前cell_space的某个real_entity在这个ghost_rect范围之外,则需要将这个real_entity迁移到周围的cell_space。
理论上来说,当一个cell_space内的某个real_entity离开其real_rect范围时,就可以考虑将其迁移到周围的cell_space中。这里设计为只有在ghost_rect之外才处理迁移,是为了避免某些real_entity在边界上往返移动时发生的频繁迁移。因为real_entity的迁移相对于维护一个ghost_entity来说是一个非常重的操作,降低迁移频率就可以有效的降低CPU负载。
当考虑到多cell_space时,每个cell_space三个矩形交织在一起就显得有点乱了,下图就是相邻两个cell_space构成的六个矩形的格局:
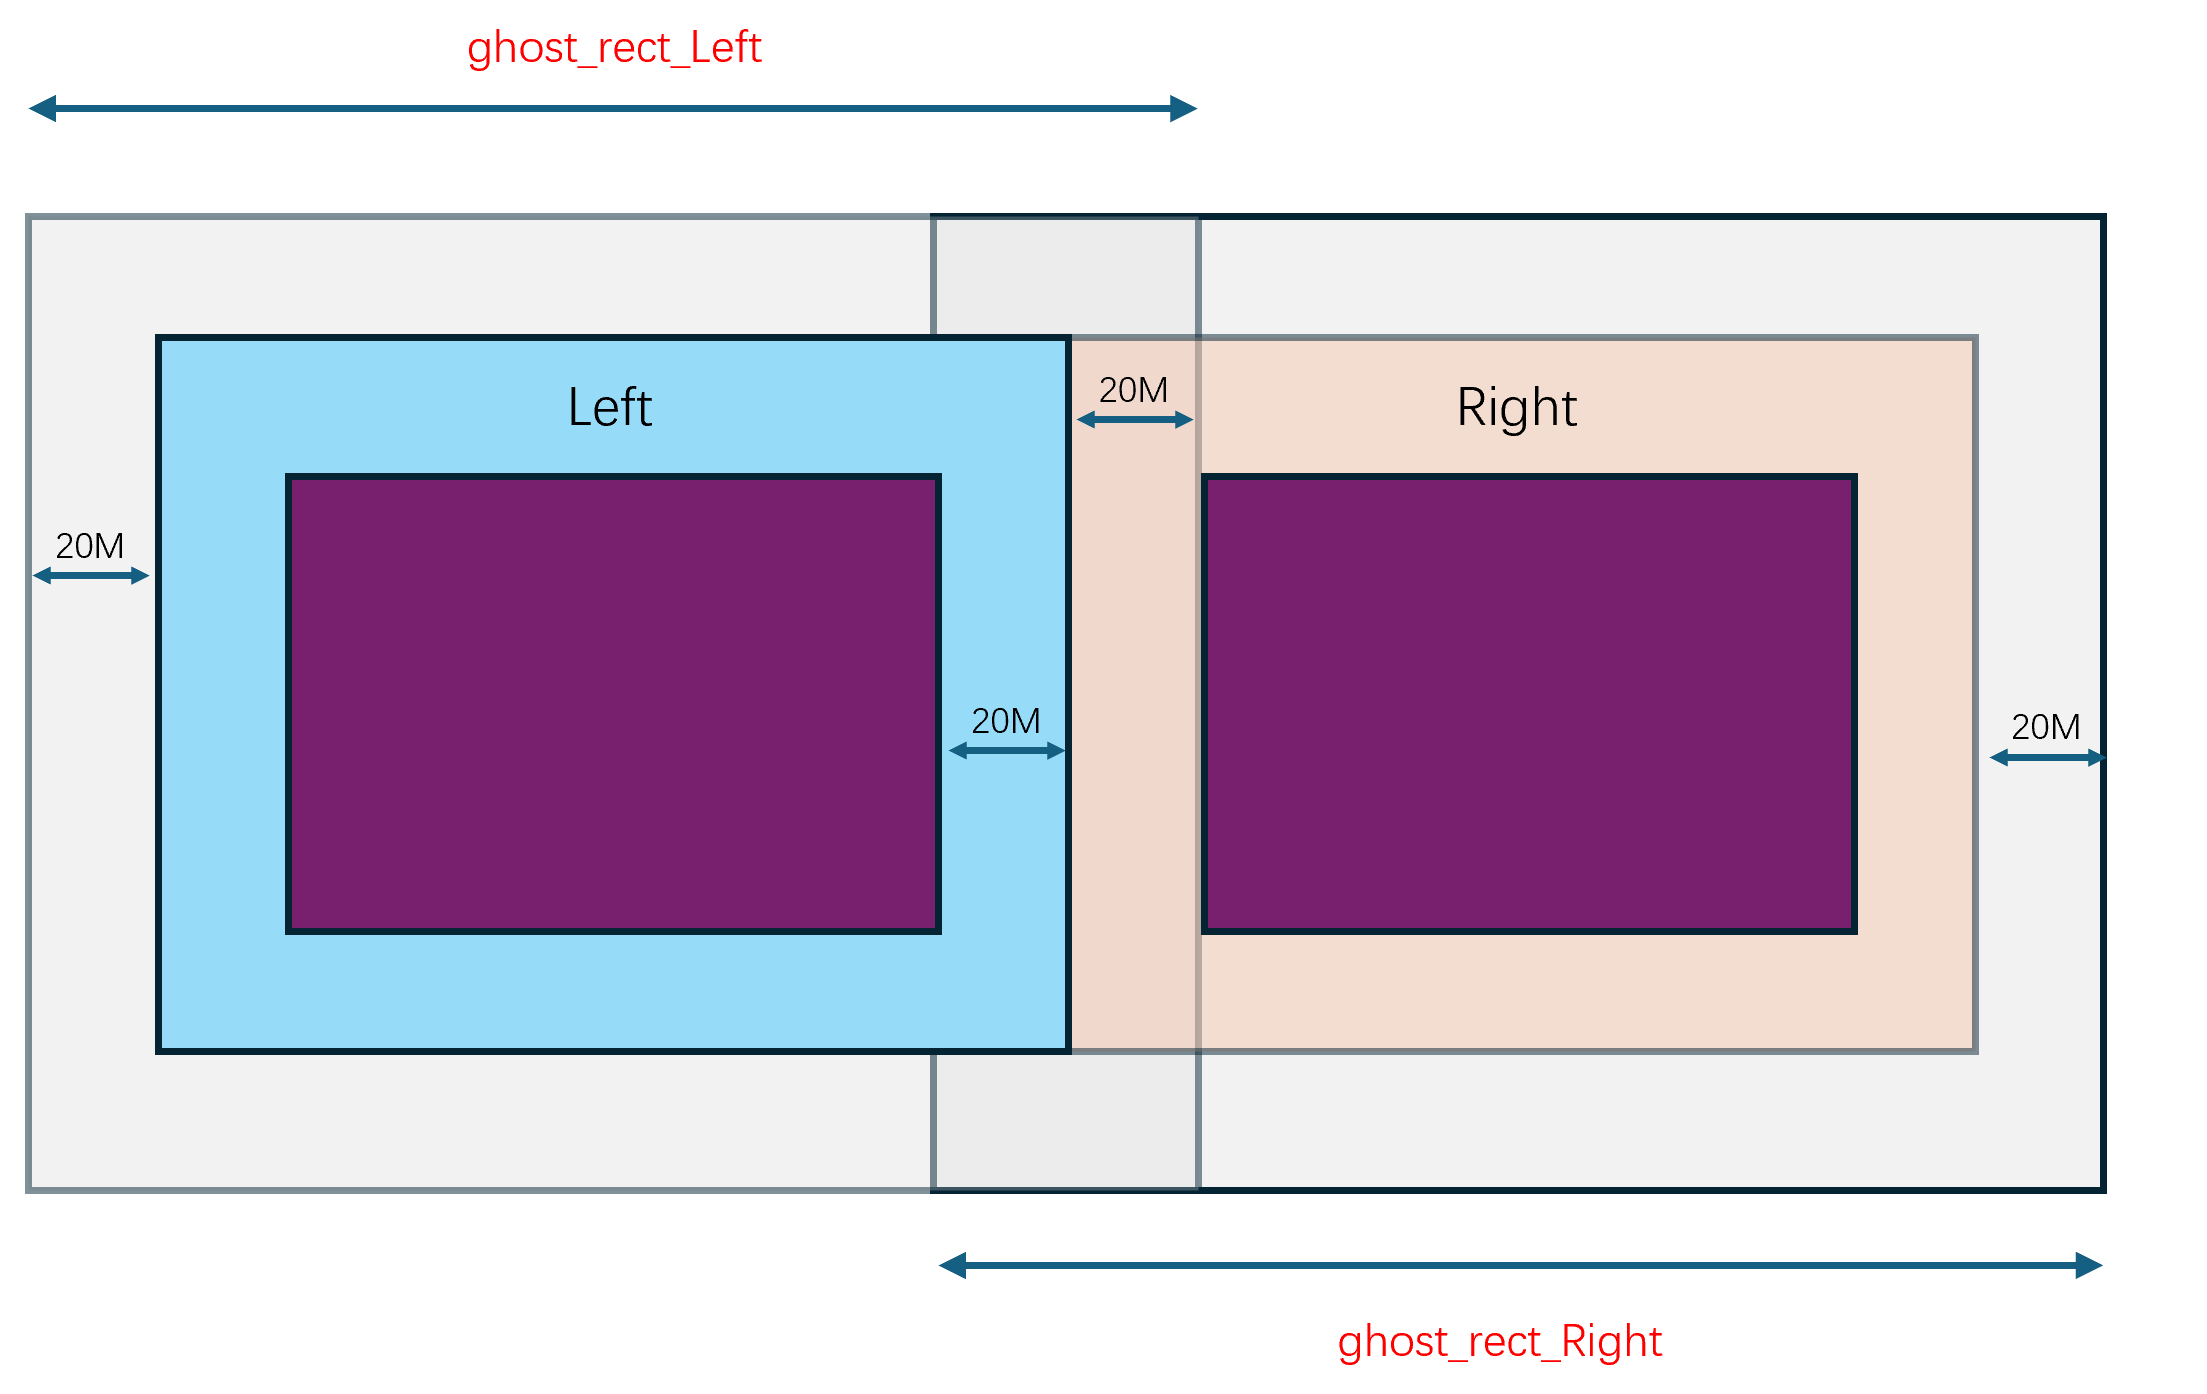
下面我再用一个在两个相邻cell_space移动中的real_entity作为例子,来展示整个Real-Ghost的在上图中的管理过程。在初始情况下,编号为A的real_entity在左侧cell_space的real_rect中,

此时这个real_entity将不会创建任何ghost_entity,所以这两个cell_space的独立视图是这样的:
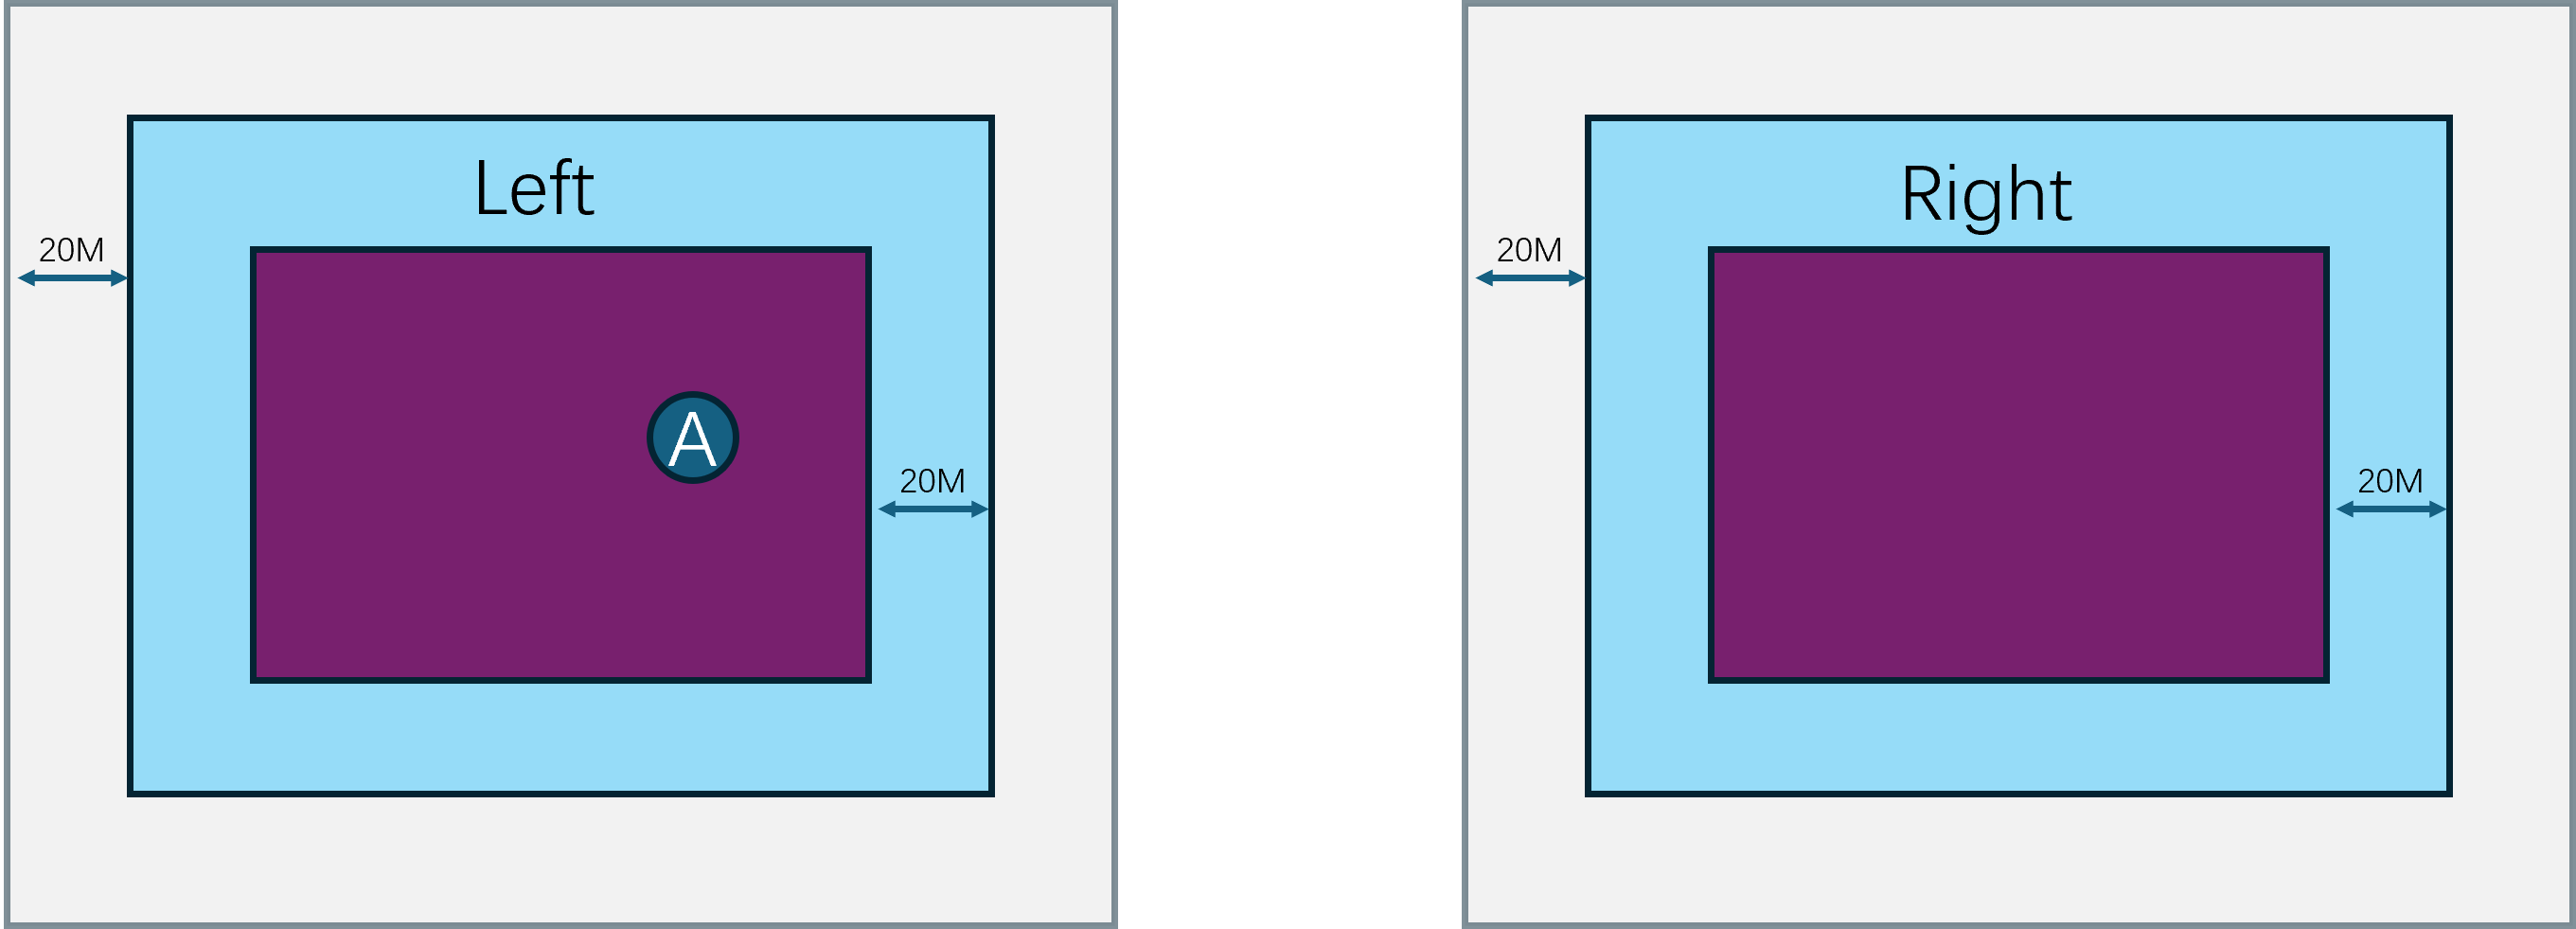
随着A逐渐的往右侧移动,离开了左侧cell_space的real_rect,同时进入了右侧cell_space的ghost_rect:
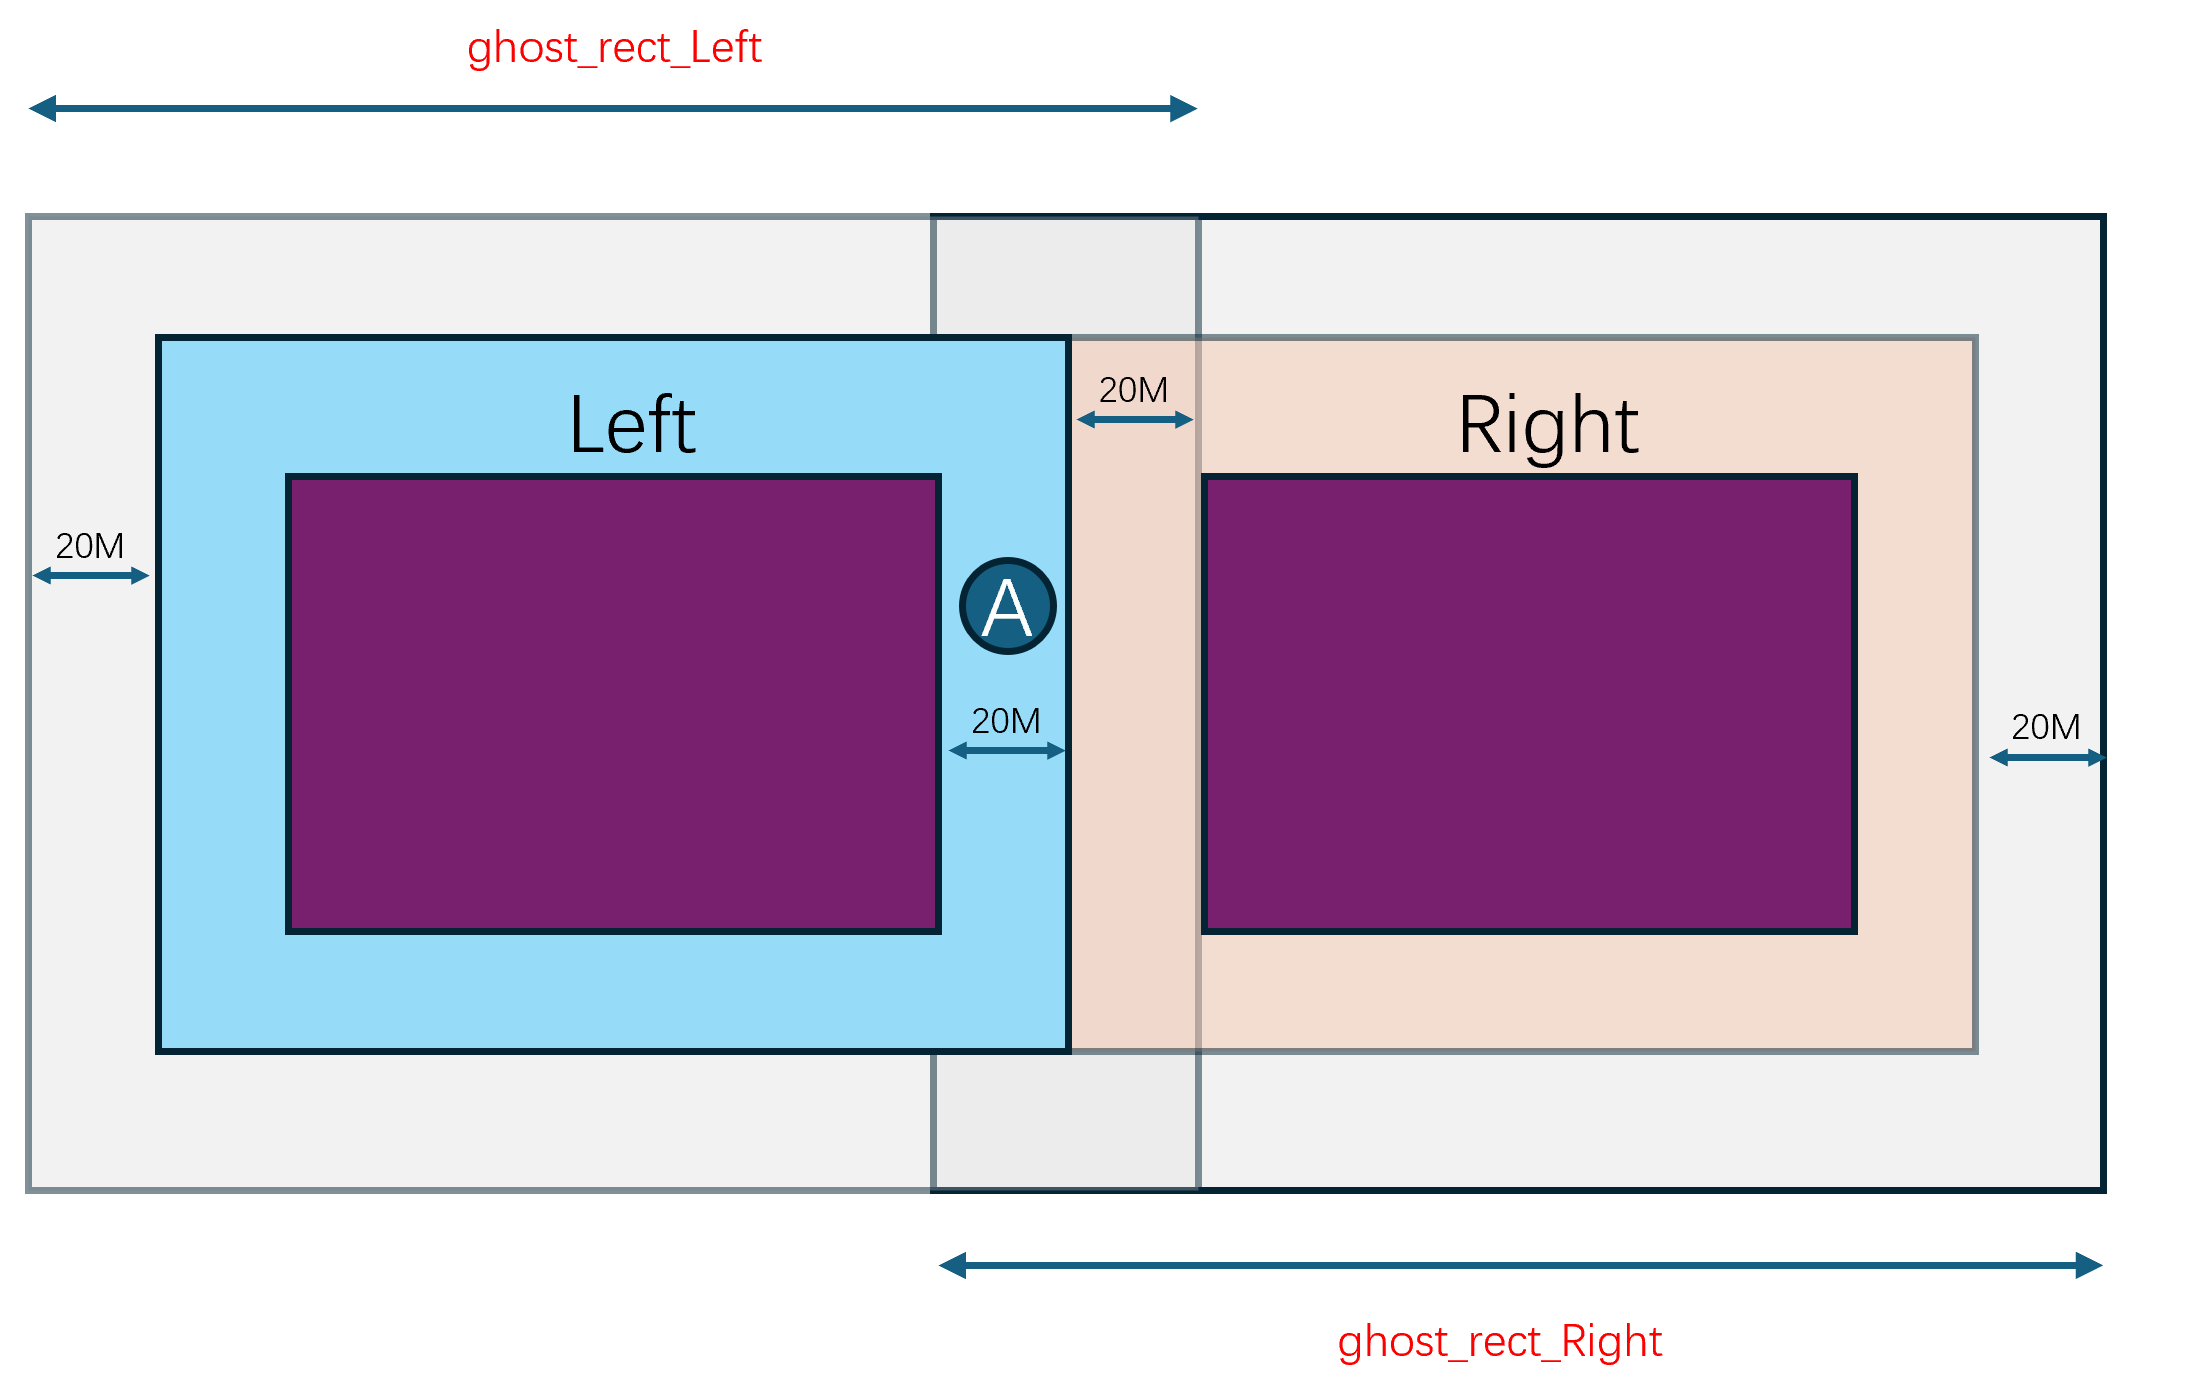
此时在左侧cell_space的real_entity(A)需要在右侧cell_space中创建一个ghost_entity(A), 因此这两个cell_space的独立视图就会演化成这样:
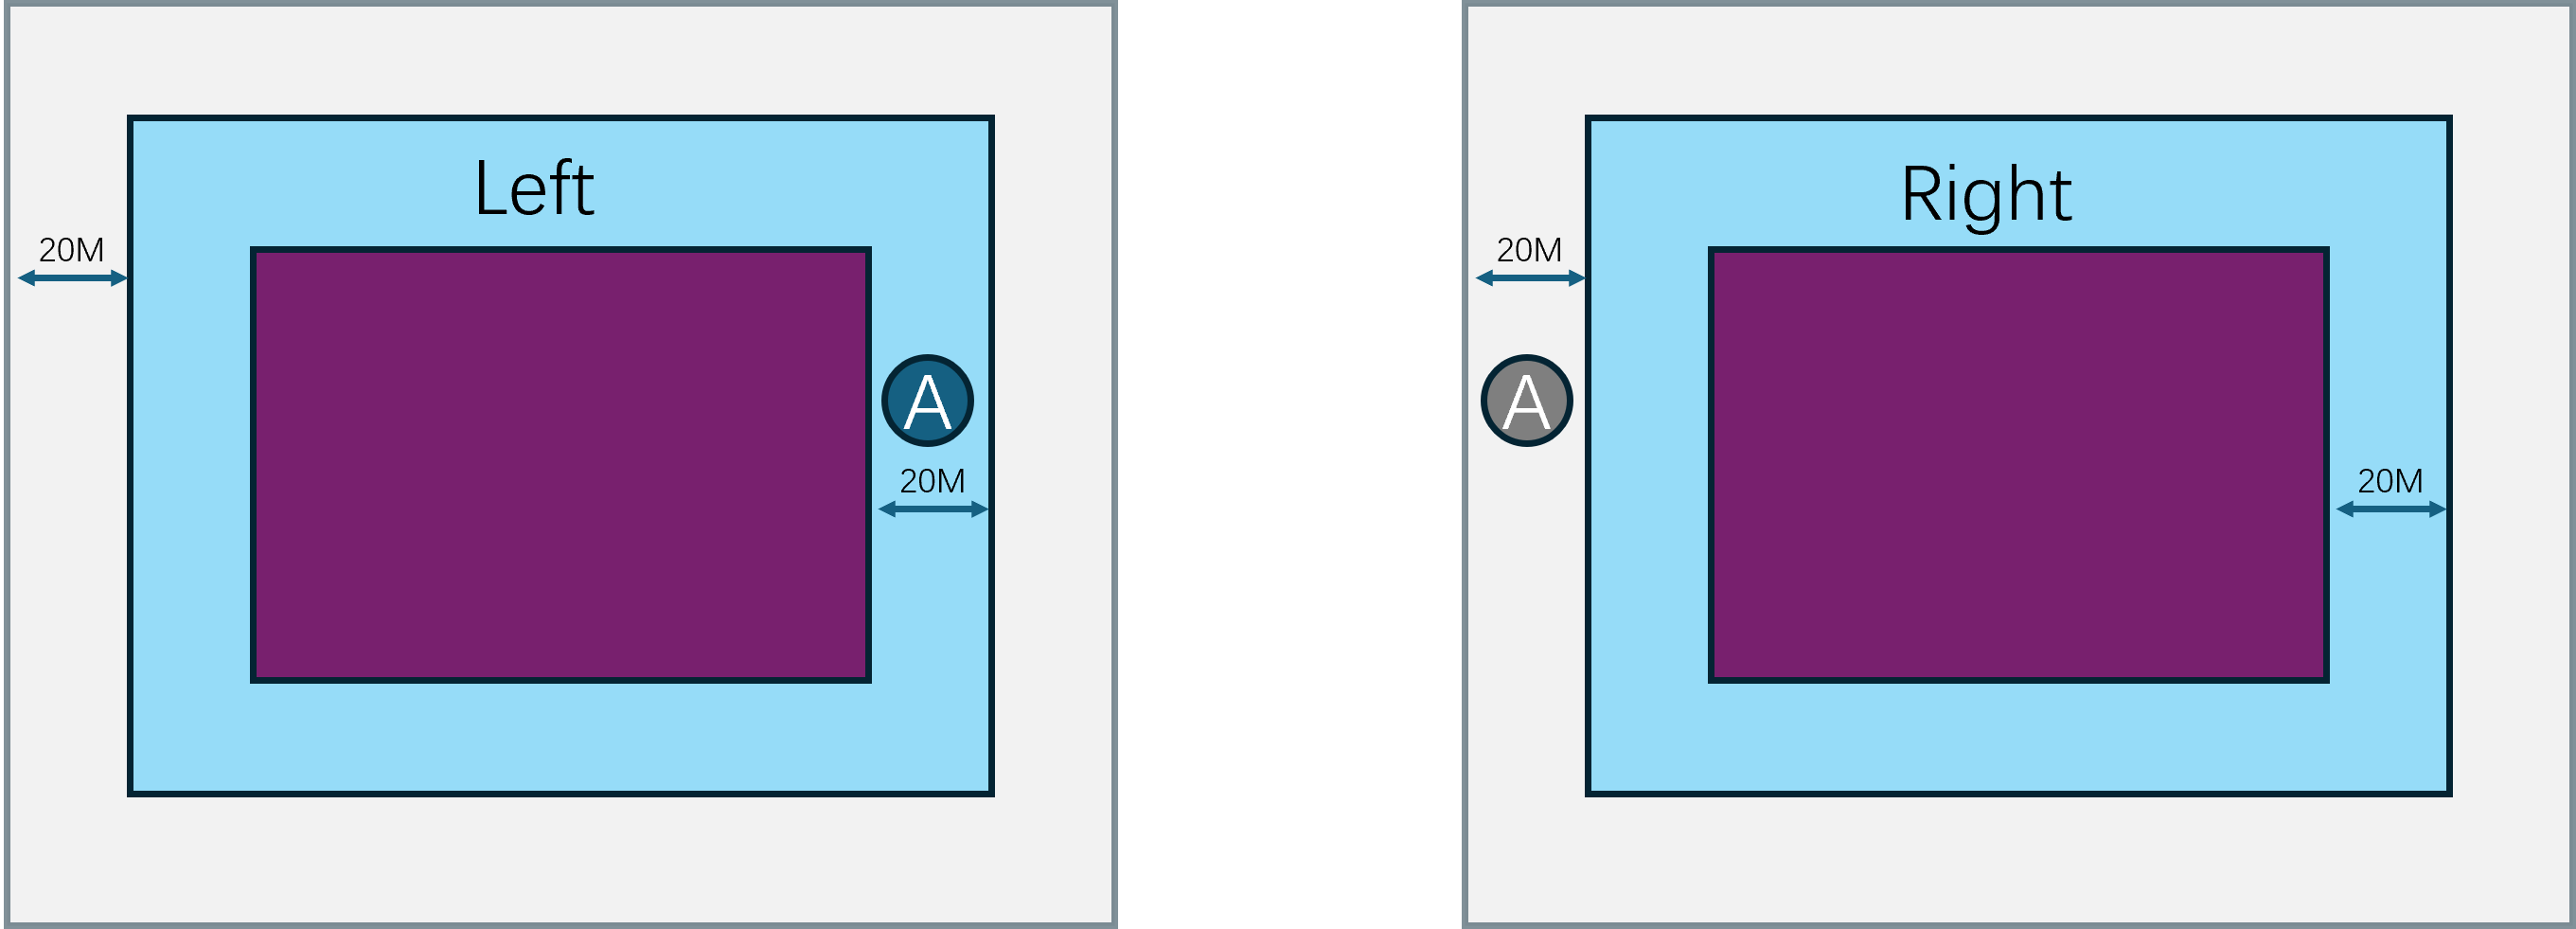
当A继续向右侧移动,脱离了左侧cell_space的cell_rect,进入了右侧cell_space的cell_rect:

此时在左侧cell_space的real_entity(A)需要在右侧cell_space中继续维持之前创建的ghost_entity(A), 因此这两个cell_space的独立视图就会演化成这样:
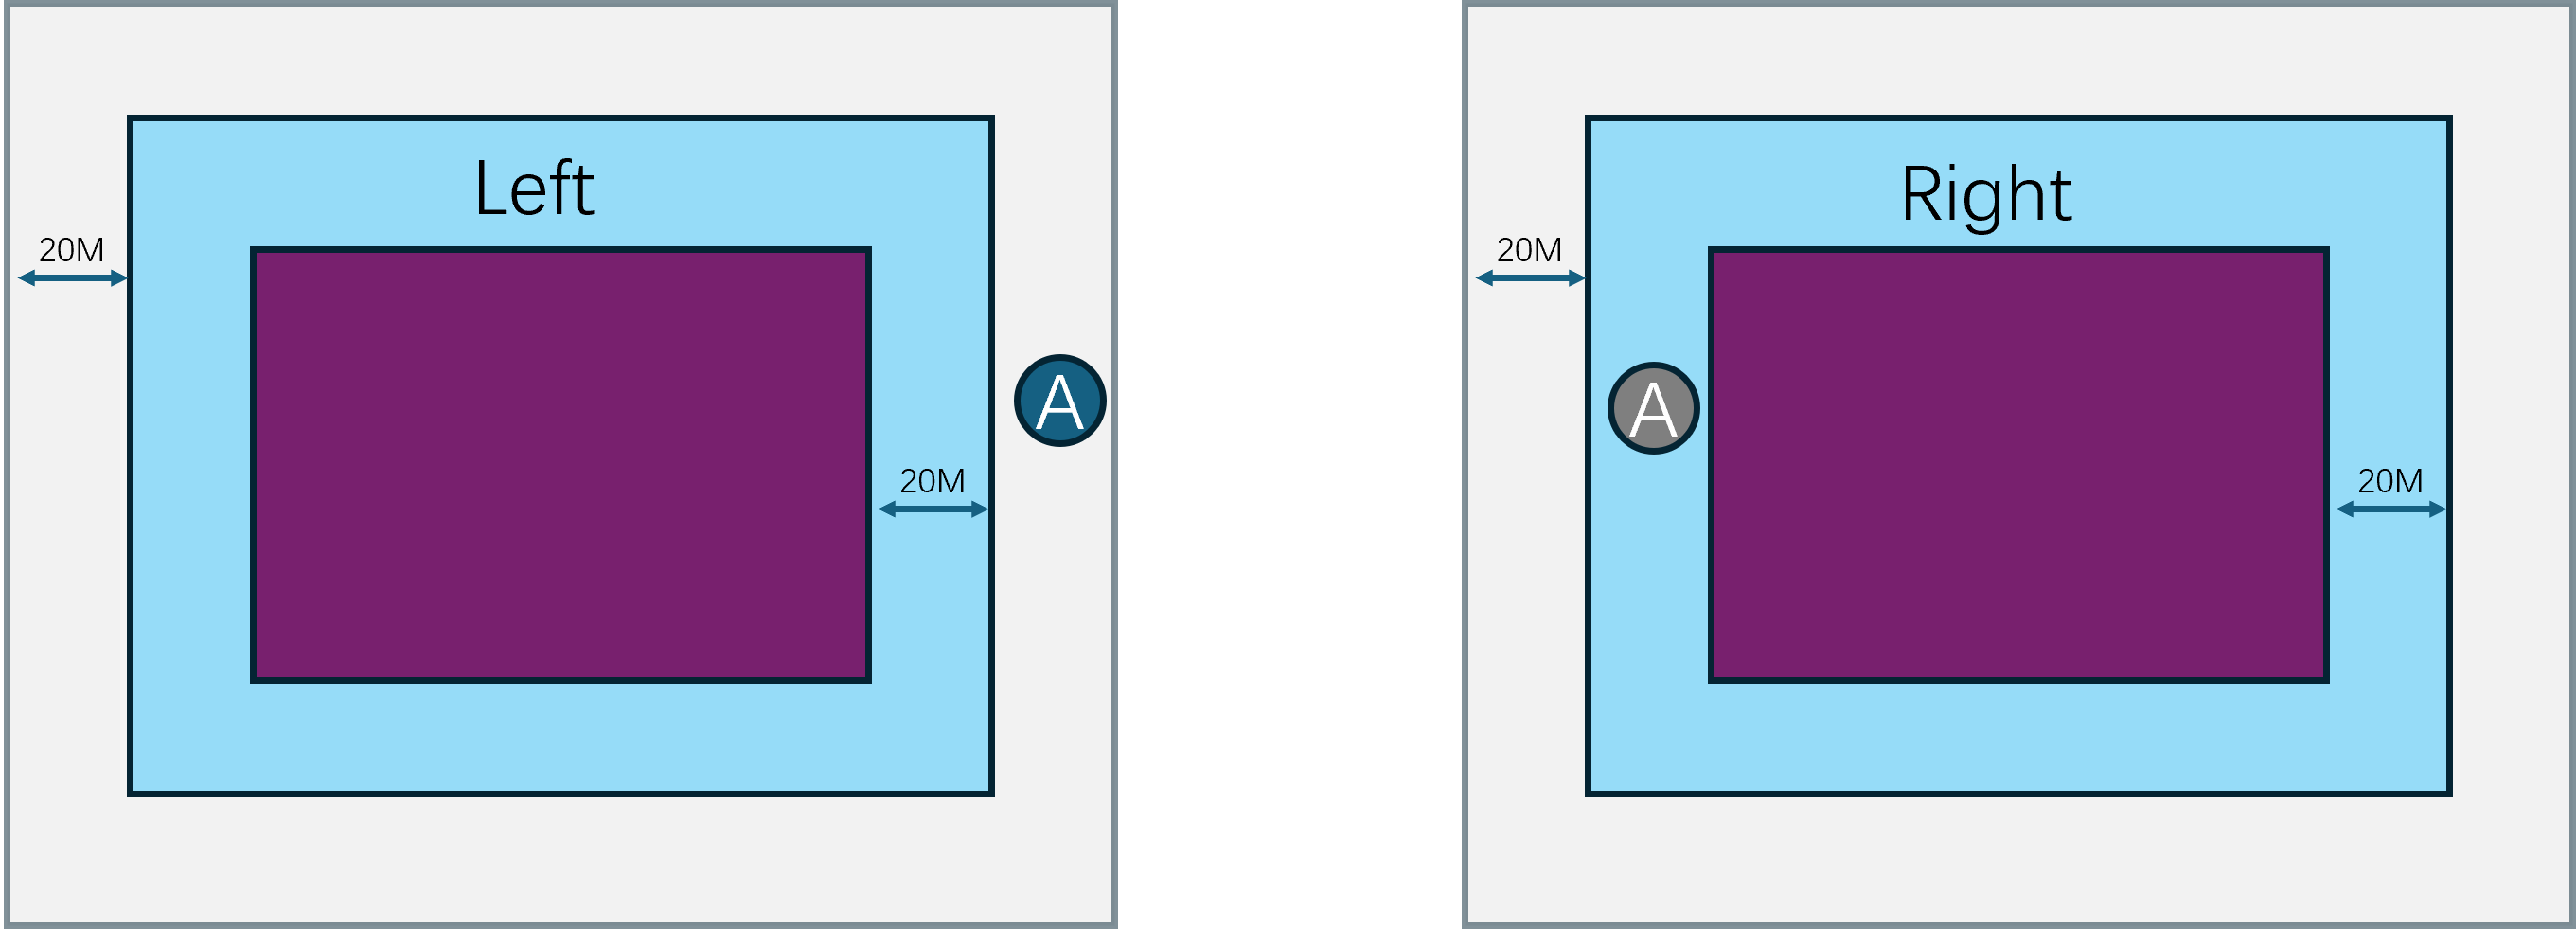
如果A继续向右侧移动,脱离了左侧cell_space的ghost_rect,进入了右侧cell_space的real_rect,此时就有必要将real_entity(A)从左侧的cell_space切换到右侧的cell_space:
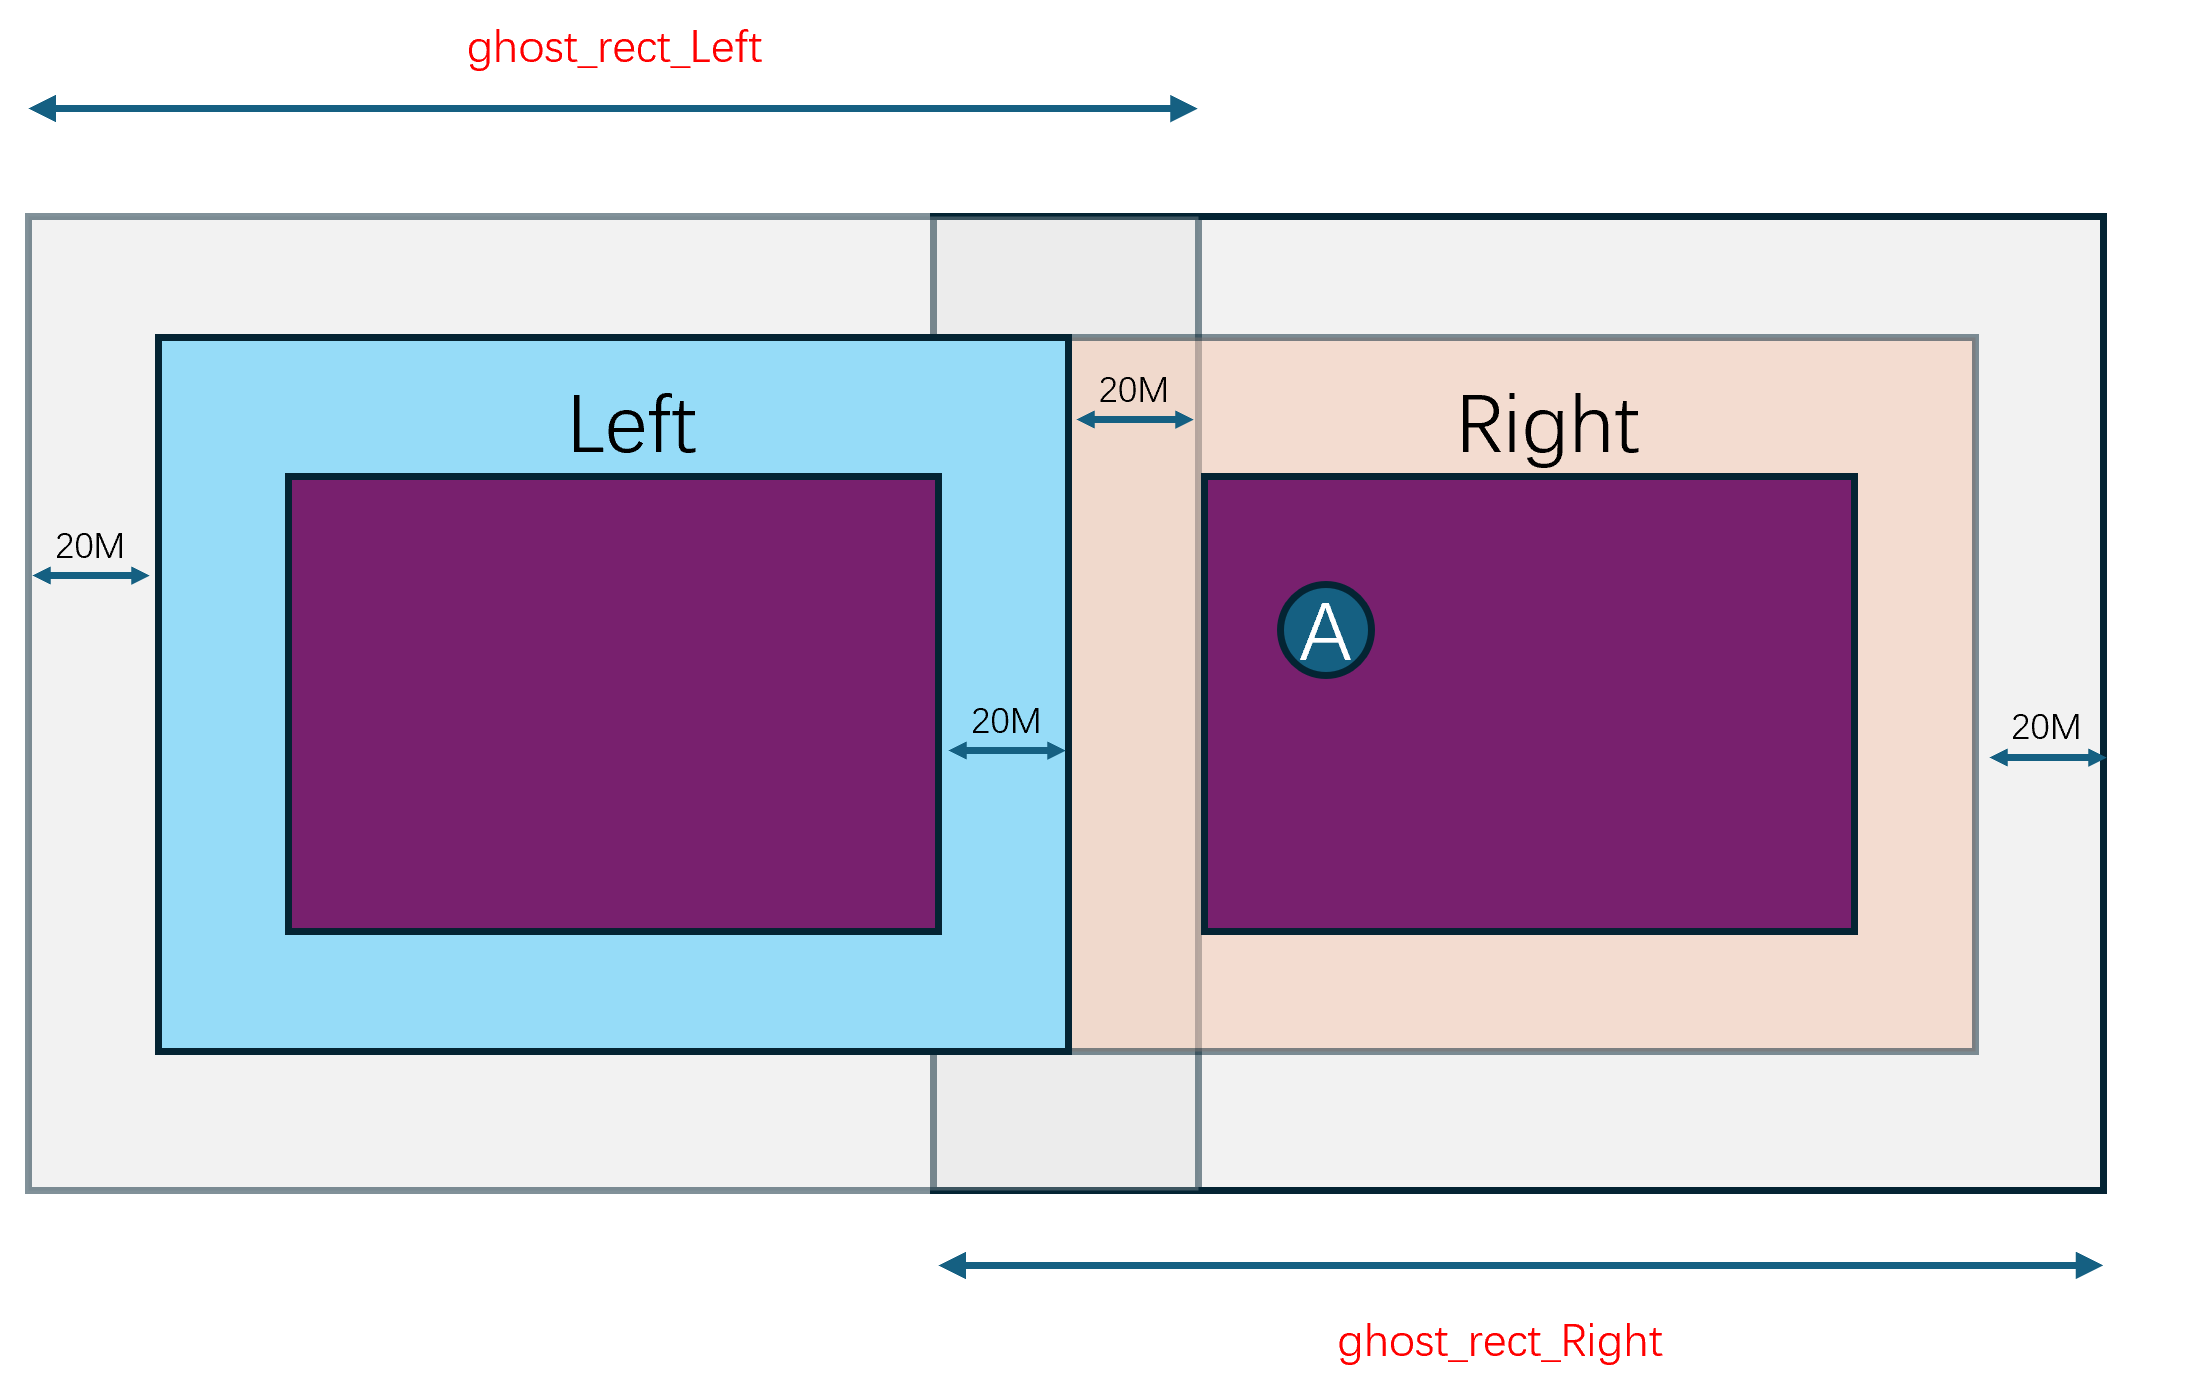
在迁移之后,左侧cell_space的real_entity(A)将转换为ghost_entity(A),同时右侧的cell_space中的ghost_entity(A)将转化成real_entity(A):
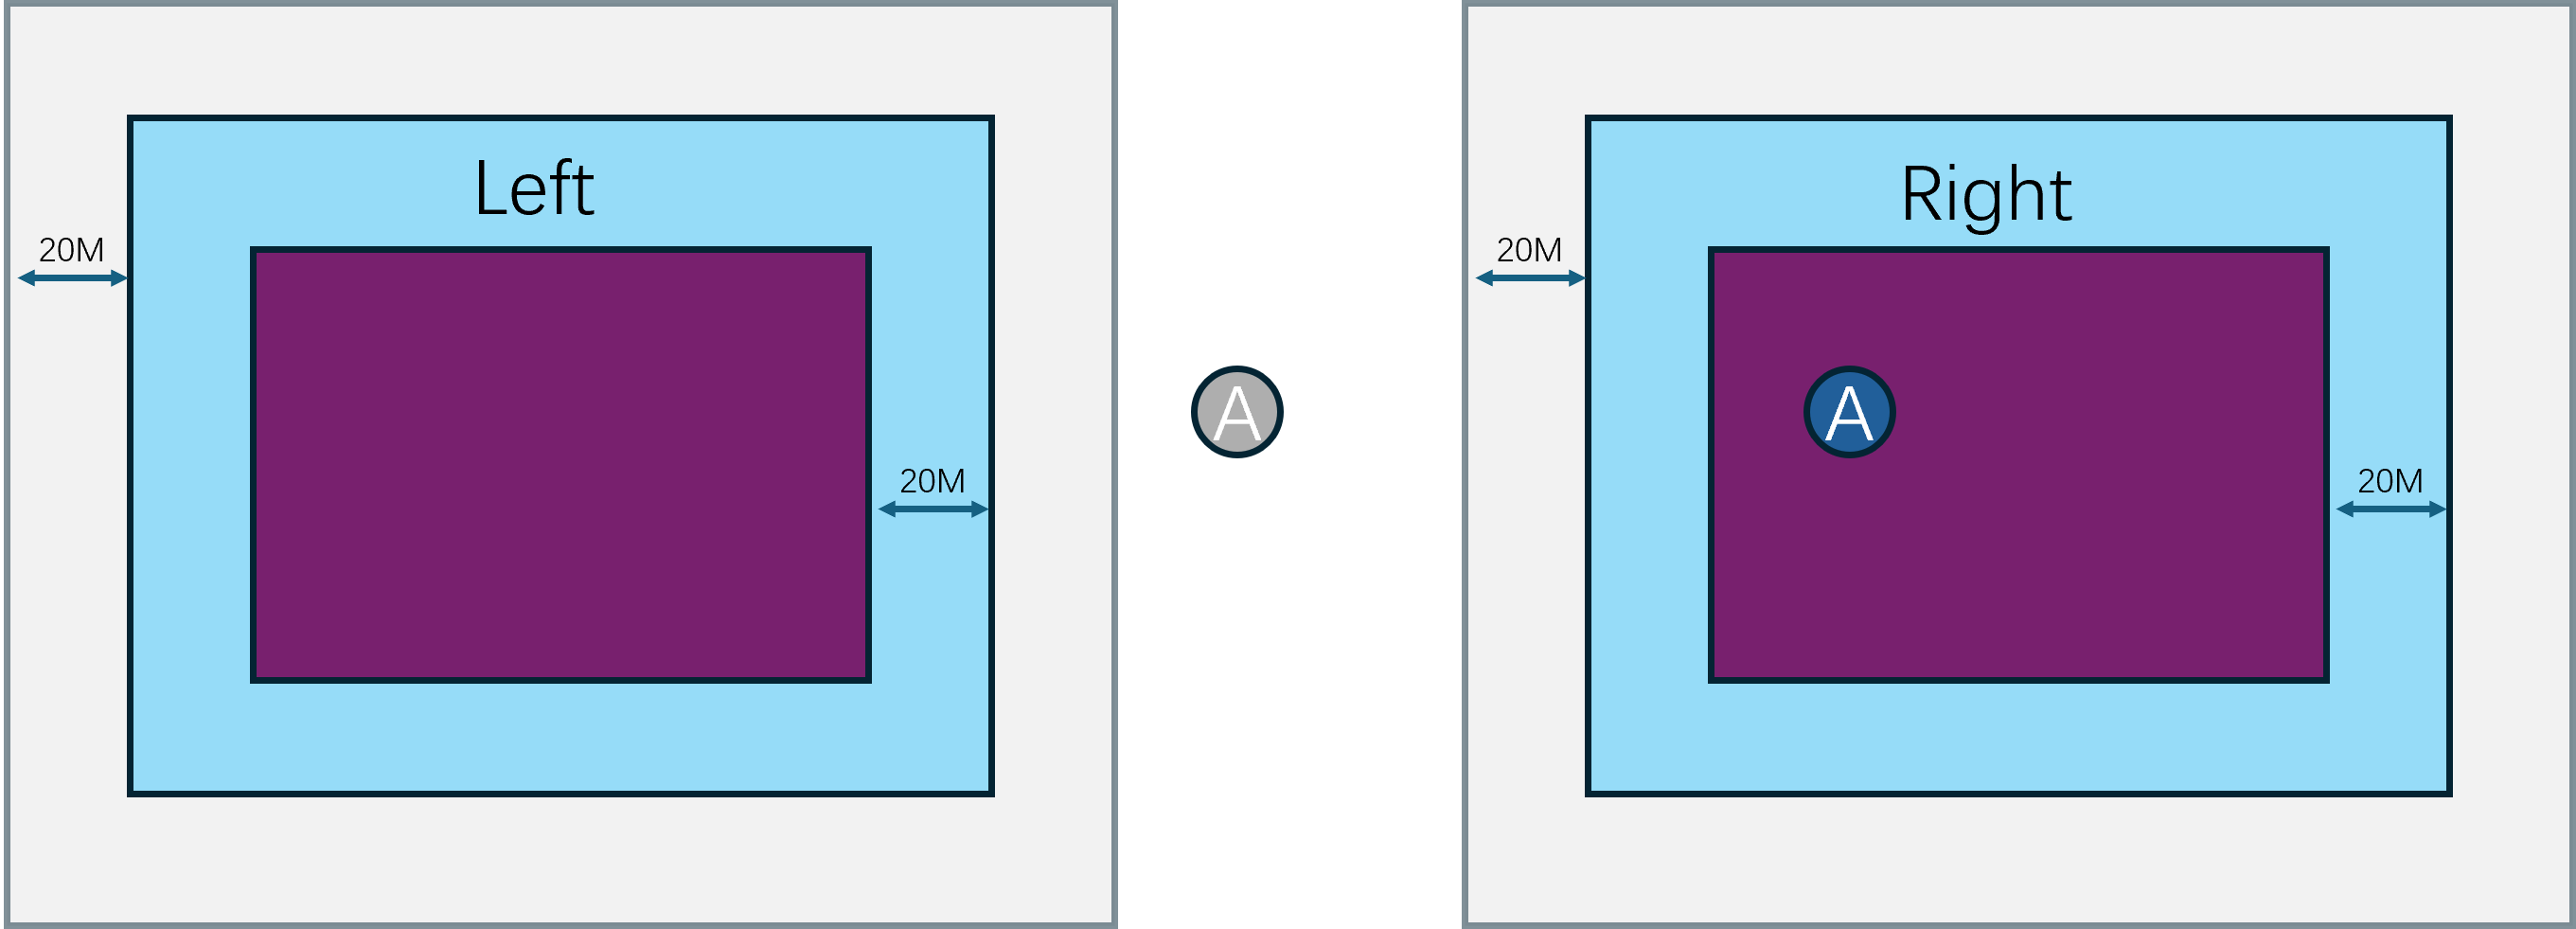
当迁移彻底完成之后,左侧cell_space的ghost_entity(A)将不再被需要,因此将在后续的处理中被删除,最终的独立视图将成为这样:
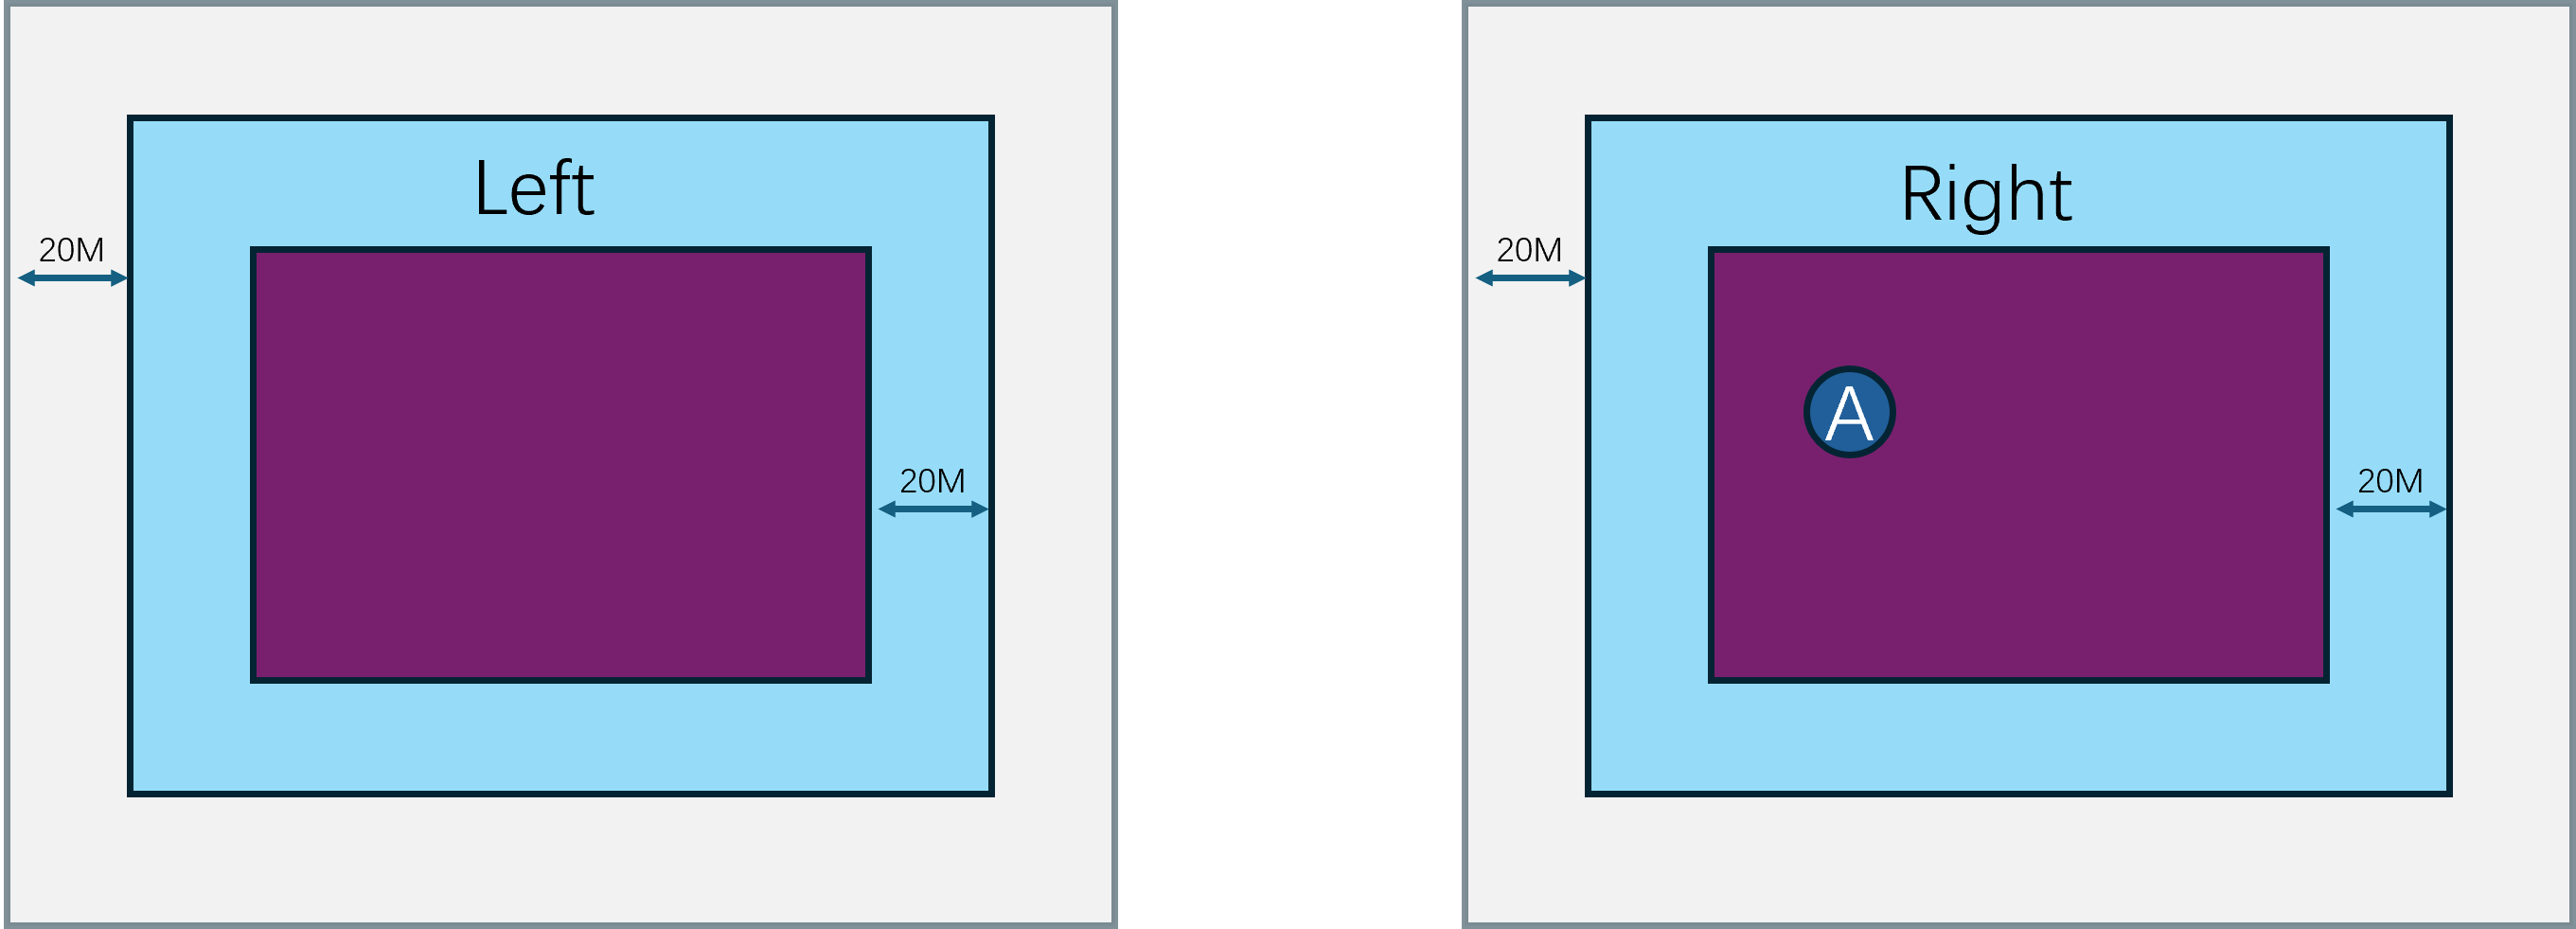
综上,我们用多张详细的示意图展示了一个actor_entity从一个cell_space移动到另外一个cell_space触发无缝迁移的整体过程,接下来我们再来看这个无缝迁移过程是在BigWorld和mosaic_game中如何实现的。
BigWorld 的分布式场景管理
在之前的内容中已经介绍过,Space是一个KDTree,每个Cell对应KDTree的一个节点,每个节点都有一个Rect区域,这个区域就是当前Cell所负责的区域。在分布式场景中,Cell会被分配到不同的CellApp进程上运行,而每个CellApp进程会负责多个Cell的运行。为了保证每个CellApp的负载均衡,需要定期对各个Cell进行检查,并根据当前的负载情况进行调整,这包括创建新的Cell来分担负载以及调整现有Cell的边界。下面来对这些Cell的调整过程来做具体的分析。
Space的Cell调整
如果大量的玩家涌进了同一个区域,那么这些玩家就会被分配到同一个Cell中,这样会让这个Cell所消耗的资源增加很多,有些情况下甚至是当前Cell下Player数量的平方复杂度。为了避免这样的Cell将当前CellApp的资源耗尽,需要定期对Cell进行资源使用量检查,如果发现大于特定阈值,则有两种选择:
- 一种是将这个
Cell进行分裂,创建一个新的Cell来共同分担当前Cell对应Rect区域的所有负载,对应的入口为CellAppMgr::metaLoadBalance - 另外一种是将这个
Cell的负责区域转移一部分给其兄弟Cell,如果其有兄弟Cell的话,对应的入口为CellAppMgr::loadBalance
这两个入口都是通过计时器定期调用的:
/**
* This method responds to timeout events.
*/
void CellAppMgr::handleTimeout( TimerHandle /*handle*/, void * arg )
{
if (pShutDownHandler_ &&
pShutDownHandler_->isPaused())
{
pShutDownHandler_->checkStatus();
return;
}
if (isShuttingDown_)
{
return;
}
switch ((uintptr)arg)
{
#ifndef BW_EVALUATION
case TIMEOUT_LOAD_BALANCE:
{
if (!this->isRecovering() && hasStarted_)
{
this->loadBalance();
}
break;
}
case TIMEOUT_META_LOAD_BALANCE:
{
if (shouldMetaLoadBalance_ && hasStarted_)
{
this->metaLoadBalance();
}
break;
}
#endif
// 省略很多代码
}
}
计时器的注册在CellAppMgr::init这个初始化函数中,根据配置的检查间隔去注册重复计时器:
/**
* The initialisation method.
*/
bool CellAppMgr::init( int argc, char * argv [] )
{
if (!this->ManagerApp::init( argc, argv ))
{
return false;
}
if (!interface_.isGood())
{
NETWORK_ERROR_MSG( "CellAppMgr::init: "
"Failed to create network interface. Unable to proceed.\n" );
return false;
}
bool isRecovery = false;
for (int i = 0; i < argc; ++i)
{
if (strcmp( argv[i], "-recover" ) == 0)
{
isRecovery = true;
}
else if (strcmp( argv[i], "-machined" ) == 0)
{
CONFIG_INFO_MSG( "CellAppMgr::init: Started from machined\n" );
}
}
ReviverSubject::instance().init( &interface_, "cellAppMgr" );
PROC_IP_INFO_MSG( "Internal address = %s\n", interface_.address().c_str() );
CONFIG_INFO_MSG( "Is Recovery = %s\n",
this->isRecovering() ? "True" : "False" );
loadBalanceTimer_ =
this->mainDispatcher().addTimer(
int( Config::loadBalancePeriod() * 1000000.0 ),
this, (void *)TIMEOUT_LOAD_BALANCE,
"LoadBalance" );
if (Config::metaLoadBalancePeriod() > 0.0)
{
metaLoadBalanceTimer_ = this->mainDispatcher().addTimer(
int( Config::metaLoadBalancePeriod() * 1000000.0 ),
this, (void *)TIMEOUT_META_LOAD_BALANCE,
"MetaLoadBalance" );
}
// 省略很多代码
}
接下来对这两种情况来做具体的梳理。
Cell 的创建
CellAppMgr::metaLoadBalance检查新Cell创建的理由有两个:
Space加载时的预先创建,这个在checkLoadingSpace函数中Space加载完成之后的根据负载按需创建,这个在appGroups.checkForOverloaded部分
/**
* This method checks whether there needs to be any migration of spaces between
* cell applications. If so, it will take action.
*/
void CellAppMgr::metaLoadBalance()
{
// Identify the CellApp groups used in meta-load-balancing. These are the
// groups of CellApps such that normal load-balancing can balance their
// loads.
CellAppGroups appGroups( cellApps_ );
const float mergeThreshold =
this->avgCellAppLoad() + CellAppMgrConfig::metaLoadBalanceTolerance();
// Do meta-balance groups need to be joined?
appGroups.checkForOverloaded( mergeThreshold );
// Should more CellApps be added to help with loading?
bool hasLoadingSpaces = this->checkLoadingSpaces();
if (!hasLoadingSpaces)
{
// Are there underloaded groups who should have Cells retired?
appGroups.checkForUnderloaded( CellAppLoadConfig::lowerBound() );
}
}
Space加载时的预先创建
这里的checkLoadingSpaces会遍历所有的Space,对于每个Space根据配置的最小和最大Cell数量来补充新的Cell,如果这个Space所需的资源还没有完全加载完成的话:
/**
* This method checks whether there are any spaces that are loading geometry
* that could benefit from more loading cells.
*/
bool CellAppMgr::checkLoadingSpaces()
{
bool hasLoadingSpaces = false;
Spaces::iterator spaceIter = spaces_.begin();
while (spaceIter != spaces_.end())
{
Space * pSpace = spaceIter->second;
// Work out whether more cells are needed to help do the initial chunk
// loading.
bool isLoading = !pSpace->hasLoadedRequiredChunks();
hasLoadingSpaces |= isLoading;
// There is an upper bound on the number of loading cells for a space
// and the minimum size of these loading cells.
bool needsMoreLoadingCells = isLoading &&
(pSpace->numCells() < Config::maxLoadingCells()) &&
(pSpace->spaceBounds().area()/pSpace->numCells() >
Config::minLoadingArea());
if (needsMoreLoadingCells)
{
CellData * pCell = pSpace->addCell();
if (pCell)
{
INFO_MSG( "CellAppMgr::checkLoadingSpaces: "
"Added CellApp %u to Space %u.\n",
pCell->cellApp().id(), pSpace->id() );
}
}
++spaceIter;
}
return hasLoadingSpaces;
}
可以看到最终会调用到pSpace->addCell()这个无参addCell的版本,并最终调用到Space::addCell( CellApp & cellApp, NULL)这个第二个参数为nullptr的双参数版本,并最终执行到这一行:
pRoot_ = (pRoot_ ? pRoot_->addCell( pCellData ) : pCellData);
由于初始创建Space的时候pRoot已经有值了,此时会执行pRoot_->addCell,这里会根据pRoot_是叶子节点CellData还是内部节点InternalNode来执行不同的addCell逻辑。
如果是CellData的话,逻辑就很简单,执行对当前CellData的水平切分,因为默认的切割方向是水平的:
BSPNode * addCell( CellData * pCell, bool isHorizontal = true )
如果是内部节点InternalNode的话,就会根据左右两个子树的节点数量大小来选择往左子树去补充还是右子树去补充:
/**
* This method adds a new cell to this subtree.
*
* @return The new subtree.
*/
BSPNode * InternalNode::addCell( CellData * pCell, bool isHorizontal )
{
bool addToLeft = false;
if (leftCount_ < rightCount_)
{
addToLeft = true;
}
else if (leftCount_ == rightCount_)
{
float value = range_.range1D( isHorizontal_ ).midPoint();
addToLeft = (position_ < value);
}
if (addToLeft && !pLeft_->isRetiring())
{
pLeft_ = pLeft_->addCell( pCell, !isHorizontal_ );
}
else
{
pRight_ = pRight_->addCell( pCell, !isHorizontal_ );
}
return this;
}
注意到这里递归调用addCell的时候,会将切割方向执行反向,这样就避免由于切割方向默认值带来的永远执行水平切割问题。
Space负载均衡时的按需创建
appGroups.checkForOverloaded这里会遍历所有的CellAppGroup,检查其平均负载是否大于指定值,如果大于指定值,则将这个CellAppGroup加入到一个临时集合OverloadedGroups中:
/**
* This method checks whether there are any overloaded CellApp groups and adds
* cells, if necessary, to help balance the load.
*/
void CellAppGroups::checkForOverloaded( float addCellThreshold )
{
OverloadedGroups overloadedGroups;
List::iterator iter = list_.begin();
while (iter != list_.end())
{
CellAppGroup & group = *iter;
if (group.avgLoad() > addCellThreshold)
{
overloadedGroups.add( group );
}
++iter;
}
overloadedGroups.addCells();
}
按照一般的设计来说,这里遍历的应该是Space,去获取哪些Space目前平均Cell负载比较高,而不是这个不明结构体CellAppGroup,所以在往后介绍addCells之前需要先明确一下这个CellAppGroup是干什么的。
/**
* This class is used to represent a group of CellApps that are in a
* meta-balance group. This is, a set of CellApps that can balance their
* load through the normal load balancing. For this to occur, there must
* be multi-cell Spaces that cover the CellApps.
*/
class CellAppGroup
{
public:
CellAppGroup() : avgLoad_( -1.f ) {}
~CellAppGroup();
void addCell();
void checkForUnderloaded( float loadLowerBound );
void insert( CellApp * );
void join( CellAppGroup * pMainGroup );
private:
typedef BW::set< CellApp * > Set;
typedef BW::map< uint32, int > CellAppsPerIPMap;
CellAppsPerIPMap cellAppsPerIP_;
float avgLoad_;
Set set_;
// 省略一些代码
};
根据这个结构体定义可以知道CellAppGroup是一组CellApp的集合,代表一组进程,这里的Insert接口会同时更新这个Set和每个独立Ip对应的CellApp的数量:
void CellAppGroup::insert( CellApp * pApp )
{
MF_ASSERT( pApp->pGroup() == NULL );
set_.insert( pApp );
pApp->pGroup_ = this;
++cellAppsPerIP_[ pApp->addr().ip ];
}
对应的avgLoad计算会对这组进程的负载进行累加然后求平均:
float CellAppGroup::avgLoad( int ifNumRemoved ) const
{
int count = -ifNumRemoved;
float totalLoad = 0.f;
CellAppGroup::iterator iter = this->begin();
while (iter != this->end())
{
CellApp * pApp = *iter;
totalLoad += pApp->smoothedLoad();
if (!pApp->hasOnlyRetiringCells())
{
++count;
}
++iter;
}
return (count > 0) ? totalLoad/count : FLT_MAX;
}
将这些CellApp聚合起来的意义在于限制某些Space新增Cell的时候选取的CellApp必须在这个Space对应的CellAppGroup中执行findBestCellApp选择,不同的CellAppGroup负载均衡完全执行隔离,也算是一种资源隔离机制:
CellData * Space::addCell()
{
CellAppGroup * pGroup = NULL;
if (!cells_.empty())
{
pGroup = cells_.front()->cellApp().pGroup();
}
const CellApps & cellApps = CellAppMgr::instance().cellApps();
CellApp * pCellApp = cellApps.findBestCellApp( this, pGroup );
return pCellApp != NULL ? this->addCell( *pCellApp ) : NULL;
}
知道CellAppGroup的意义之后,我们继续分析CellAppGroups::checkForOverloaded中最后的调用overloadedGroups.addCells,这个会遍历所有存储的CellAppGroup来尝试调用addCell函数,注意这里的遍历是逆序遍历,优先处理负载高的:
class OverloadedGroups
{
public:
void add( CellAppGroup & group )
{
map_.insert( std::make_pair( group.avgLoad(), &group ) );
}
void addCells()
{
// Iterate over in reverse order so that the most loaded group is merged
// first.
Map::reverse_iterator iter = map_.rbegin();
while (iter != map_.rend())
{
CellAppGroup * pGroup = iter->second;
pGroup->addCell();
++iter;
}
}
private:
typedef std::multimap< float, CellAppGroup * > Map;
Map map_;
};
这里的pGroup->addCell会通过chooseConnectionSpace选择内部的一个Space来尝试添加新的Cell:
/**
* This method attempts to add a cell to this group to help spread the group's
* load.
*/
void CellAppGroup::addCell()
{
if (this->isEmpty())
{
// This occurs if this group was already merged with another.
return;
}
if (!this->cancelRetiringCellApp())
{
// Which space from this group should have a Cell added?
Space * pSpace = this->chooseConnectionSpace();
if (pSpace)
{
pSpace->addCell();
}
}
}
这里的chooseConnectionSpace会根据配置的负载均衡规则来选取其中的最佳Space,规则主要有Cell数量最多的,Cell数量最小的,以及负载最大的等规则:
/**
* This method chooses a space in this group that would be good to use to
* connect to another group.
*/
Space * CellAppGroup::chooseConnectionSpace() const
{
CellAppMgrConfig::MetaLoadBalanceScheme scheme =
static_cast< CellAppMgrConfig::MetaLoadBalanceScheme >(
CellAppMgrConfig::metaLoadBalanceScheme() );
switch (scheme)
{
case CellAppMgrConfig::SCHEME_LARGEST:
{
LargestSpaceChooser chooser;
return this->chooseConnectionSpace( chooser );
}
break;
case CellAppMgrConfig::SCHEME_SMALLEST:
{
SmallestSpaceChooser chooser;
return this->chooseConnectionSpace( chooser );
}
break;
case CellAppMgrConfig::SCHEME_HYBRID:
{
HybridSpaceChooser chooser;
return this->chooseConnectionSpace( chooser );
}
break;
default:
ERROR_MSG( "CellAppGroup::chooseConnectionSpace: "
"Invalid scheme %d. Switching.\n", scheme );
CellAppMgrConfig::metaLoadBalanceScheme.set(
CellAppMgrConfig::SCHEME_HYBRID );
break;
}
return NULL;
}
一般来说同一个Space在同一个CellApp上只会有一个Cell,因为有多个的情况会显著的增加Cell间通信的复杂度,还不如直接合并为一个。
选出来一个合乎要求的Space之后,就会对这个Space执行无参数的addCell操作,这个无参addCell我们已经分析过了,就是从当前Space对应的CellAppGroup资源组里选择一个CellApp来创建Cell。但是这里有一个比较令人疑惑的点,就是新添加的Cell依然会分配在这个Space的CellAppGroup里,分裂之后相邻两个Cell之间还会添加一些额外的通信复杂度。只有在Cell内负载与负责区域面积之前的关系小于线性相关(例如与最大边长线性相关),才能造成整个CellAppGroup的总体负载下降。或者通过新Cell将一些负载从高负载的CellApp转移到低负载的CellApp上,此时总体负载上升,但是最大CellApp负载是下降的。
Cell的边界调整
只有在整个CellAppGroup的平均负载大于某个阈值之后才会触发新Cell的添加,但是平常遇到更多的情况是由于人群分布不均匀时引发的Cell间负载差异过大。此时为了避免单Cell承载了太多的负载,需要执行Cell间的边界调整,尽可能的使任意的InternalNode的左右子树的负载相对均衡。这个调整的入口在CellAppMgr::loadBalance之中,是计时器定时触发的:
/**
* This method performs load balancing on each of the spaces.
*/
void CellAppMgr::loadBalance()
{
// Balance all spaces
{
Spaces::iterator iter = spaces_.begin();
while (iter != spaces_.end())
{
if (g_shouldLoadBalance)
{
iter->second->loadBalance();
}
else
{
iter->second->informCellAppsOfGeometry( /*shouldSend*/ false );
}
iter++;
}
}
// This is done after balancing each space so that the messages to each
// CellApp are aggregated into a single bundle.
cellApps_.sendToAll();
}
CellAppMgr::loadBalance会遍历所有的Space执行loadBalance,这里的Space::loadBalance会通过BSP树的根节点来执行递归的balance:
/**
* This method changes the geometry of cells to balance the load.
*/
void Space::loadBalance()
{
#ifndef BW_EVALUATION
if (isBalancing_)
{
WARNING_MSG( "Space::loadBalance( %d ): Called recursively.\n", id_ );
return;
}
if (pRoot_ == NULL)
{
INFO_MSG( "Space::loadBalance( %d ): Called with pRoot_ == NULL.\n",
id_ );
return;
}
isBalancing_ = true;
pRoot_->updateLoad();
BW::Rect rect(
-std::numeric_limits< float >::max(),
-std::numeric_limits< float >::max(),
std::numeric_limits< float >::max(),
std::numeric_limits< float >::max() );
// If a branch has a cell that is overloaded, we do not want to make
// things worse. This is especially a cap when new cells are being
// added.
float loadSafetyBound = std::max( CellAppLoadConfig::safetyBound(),
pRoot_->avgSmoothedLoad() * CellAppLoadConfig::safetyRatio() );
bool wasLoaded = this->hasLoadedRequiredChunks();
pRoot_->balance( rect, loadSafetyBound );
pRoot_->updateLoad();
// 省略后续代码
}
函数开头会首先通过根节点的updateLoad来递归的更新BSP树中所有节点的负载,然后再计算出一个负载阈值loadSafetyBound,如果某个Cell的负载阈值大于这个loadSafetyBound,则可以考虑调整其边界。
根据我们之前的分析pRoot_可能是叶子节点CellNode,也可能是内部节点InternalNode,所以这个balance函数需要处理这两种版本。如果是叶子节点CellData就很简单了,由于其没有子节点,因此不需要考虑边界的调整,所以我们需要关心的重点是InternalNode的实现:
/**
* This method is used to balance the load between the cells.
*/
void InternalNode::balance( const BW::Rect & range,
float loadSafetyBound, bool isShrinking )
{
range_ = range;
BalanceDirection balanceDir = this->doBalance( loadSafetyBound );
this->balanceChildren( loadSafetyBound, balanceDir );
}
/**
* This method balances the children.
*/
void InternalNode::balanceChildren( float loadSafetyBound,
InternalNode::BalanceDirection balanceDir )
{
// Update child ranges, and trigger load balancing for children.
BW::Rect leftRange;
BW::Rect rightRange;
this->calculateChildRanges( leftRange, rightRange );
pLeft_->balance( leftRange, loadSafetyBound,
/* isShrinking */ balanceDir == BALANCE_LEFT );
pRight_->balance( rightRange, loadSafetyBound,
/* isShrinking */ balanceDir == BALANCE_RIGHT );
}
上面的doBalance负责根据安全负载阈值来计算当前InternalNode的分界线调整方向,并执行调整。调整完成之后再调用balanceChildren来执行左右两个子树的递归调整,不过这里的isShrinking参数好像在调整InternalNode的时候没什么用,具体用处在后面介绍Cell删除的时候才会体现。所以这个balance函数的任务基本都在doBalance函数中:
/**
* This method does that actual work of balancing.
*/
InternalNode::BalanceDirection InternalNode::doBalance( float loadSafetyBound )
{
bool shouldLimitToChunks =
CellAppMgrConfig::shouldLimitBalanceToChunks();
const bool isRetiring = pLeft_->isRetiring() || pRight_->isRetiring();
float loadDiff = 0.f;
// Do not move if we do not know if the CellApp has created the Cell.
// This avoids problems with other Cells offloading before the new Cell
// exists.
const bool childrenCreated = pLeft_->hasBeenCreated() &&
pRight_->hasBeenCreated();
// Check whether we should balance based on unloaded chunks
if (!isRetiring)
{
if (!this->hasLoadedRequiredChunks())
{
shouldLimitToChunks = false;
if ((this->maxLoad() < loadSafetyBound) &&
CellAppMgrConfig::shouldBalanceUnloadedChunks())
{
return childrenCreated ?
this->balanceOnUnloadedChunks( loadSafetyBound ) :
BALANCE_NONE;
}
}
// Difference from average.
const float leftAvgLoad = pLeft_->avgLoad();
const float rightAvgLoad = pRight_->avgLoad();
const float nodeAvgLoad = this->avgLoad();
if (leftAvgLoad > rightAvgLoad)
{
loadDiff = fabs( leftAvgLoad - nodeAvgLoad );
}
else
{
loadDiff = -fabs( rightAvgLoad - nodeAvgLoad );
}
}
else
{
loadDiff = pLeft_->isRetiring() ? 1.f : -1.f;
}
BalanceDirection balanceDir = this->dirFromLoadDiff( loadDiff );
BSPNode * pFromNode = this->growingChild( balanceDir );
const bool shouldMove = (balanceDir != BALANCE_NONE) &&
childrenCreated &&
(pFromNode->maxLoad() < loadSafetyBound);
float newPos = position_;
if (shouldMove)
{
float entityLimit = this->entityLimitInDirection( balanceDir,
loadDiff * balanceAggression_ );
float chunkLimit = shouldLimitToChunks ?
this->chunkLimitInDirection( balanceDir ) : entityLimit;
newPos = this->closestLimit( position_,
entityLimit, chunkLimit, balanceDir );
}
else
{
balanceDir = BALANCE_NONE;
}
position_ = newPos;
this->adjustAggression( balanceDir );
return balanceDir;
}
这个函数的开头会首先计算左右两个子节点的aveLoad的差值loadDiff,根据差值的符号来决定是向左移动边界还是向右移动边界,这里的左右是相对于水平划分来说的,如果是垂直划分则是向下和向上:
/**
* This method returns a balance direction given left minus right loads.
*/
InternalNode::BalanceDirection InternalNode::dirFromLoadDiff( float loadDiff )
{
return
(loadDiff > 0.f) ? BALANCE_LEFT :
(loadDiff < 0.f) ? BALANCE_RIGHT : BALANCE_NONE;
}
计算出方向之后再调用growingChild来确定要增大的子节点是哪一个:
BSPNode * growingChild( BalanceDirection direction ) const
{
return (direction == BALANCE_LEFT) ? pRight_ : pLeft_;
}
如果这个要增大范围的节点的近期最大负载小于阈值loadSafetyBound的话,才会执行真正的边界调整:
const bool shouldMove = (balanceDir != BALANCE_NONE) &&
childrenCreated &&
(pFromNode->maxLoad() < loadSafetyBound);
float newPos = position_;
if (shouldMove)
{
float entityLimit = this->entityLimitInDirection( balanceDir,
loadDiff * balanceAggression_ );
float chunkLimit = shouldLimitToChunks ?
this->chunkLimitInDirection( balanceDir ) : entityLimit;
newPos = this->closestLimit( position_,
entityLimit, chunkLimit, balanceDir );
}
else
{
balanceDir = BALANCE_NONE;
}
这里的entityLimitInDirection会根据负载差值来计算出一个合适的新边界出来:
/**
* This method returns the limit of movement based on the entity bounds in the
* direction of movement.
*/
float InternalNode::entityLimitInDirection( BalanceDirection direction,
float loadDiff ) const
{
// If less than the minimum level, don't move.
if (fabs( loadDiff ) < BalanceConfig::minCPUOffload())
{
return position_;
}
BSPNode * pToNode = this->shrinkingChild( direction );
// This also works for BALANCE_NONE case.
bool shouldGetMax = (pToNode == pLeft_);
return pToNode->entityBoundLevels().entityBoundForLoadDiff(
loadDiff,
isHorizontal_,
shouldGetMax,
position_ );
}
这里的pToNode指向的是要缩小边界的节点,计算新边界的时候会利用到EntityBoundLevels这样的结构来辅助计算,这个结构主要用来存储当前节点的分段负载信息。这里的分段只考虑单一轴方向,但是会同时存储四个方向来组成一个Rect,这四个方向分别为从左到右、从右到左,从上到下,从下到上。这里的entityBounds_存储的就是各个方向的分界线,然后entityLoads_存储的就是这个方向上到此分界线的累加负载是多少:
/**
* This class maintains entity bound levels data
* received from CellApps. It's supposed to be a property of
* internal BSP nodes and leaves.
*/
class EntityBoundLevels
{
public:
EntityBoundLevels( int numLevels ) :
entityBounds_( numLevels ),
entityLoads_( numLevels )
{
}
private:
typedef BW::vector< BW::Rect > Rects;
Rects entityBounds_;
// entityLoads_ isn't used as an array of actual rectangles
// 'left' loads may be greater than a 'right' ones and vice versa
Rects entityLoads_;
};
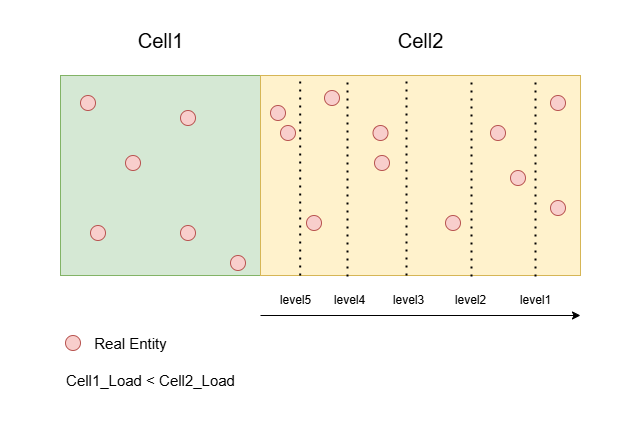
这个entityboundlevels需要尽可能的与对应的Cell的真实负载保持一致,所以CellApp那边会在Tick里的执行RPC来更新对应Cell的entityboundlevels,下面就是完整的调用链相关代码:
/**
* This method handles the game tick time slice.
*/
void CellApp::handleGameTickTimeSlice()
{
AUTO_SCOPED_PROFILE( "gameTick" );
if (this->inShutDownPause())
{
this->tickShutdown();
return;
}
this->updateLoad();
cellAppMgr_.informOfLoad( persistentLoad_ );
this->updateBoundary();
// 省略很多代码
}
/**
* This method lets the CellAppMgr know about our bounding rectangle.
*/
void CellApp::updateBoundary()
{
AUTO_SCOPED_PROFILE( "calcBoundary" );
// TODO: We could probably only send this at the load balancing rate or
// it could be part of informOfLoad?
cellAppMgr_.updateBounds( cells_ );
}
/**
* This method informs the CellAppMgr of data that it needs for load balancing.
*
* @param cells Collection of cells on this CellApp.
*/
void CellAppMgrGateway::updateBounds( const Cells & cells )
{
// TODO: Put this in the same bundle as cellAppMgr_.informOfLoad
Mercury::Bundle & bundle = channel_.bundle();
bundle.startMessage( CellAppMgrInterface::updateBounds );
cells.writeBounds( bundle );
channel_.send();
}
/**
* This method handles a message from the associated cellapp. It is used to
* inform us about where the entities are on the cells of this application.
*/
void CellApp::updateBounds( BinaryIStream & data )
{
while (data.remainingLength() != 0)
{
SpaceID spaceID;
data >> spaceID;
CellData * pCell = cells_.findFromSpaceID( spaceID );
if (pCell != NULL)
{
pCell->updateBounds( data );
}
else
{
ERROR_MSG( "CellApp::updateBounds: "
"CellApp %s has no cell in space %u\n",
this->addr().c_str(), spaceID );
// Just forget the remaining updates. It'll get it next time.
data.finish();
return;
}
}
}
/**
* This method updates the bounds associated with this cell based on
* information sent from the CellApp.
* inform us about where the entities are on the cells of this application.
*/
void CellData::updateBounds( BinaryIStream & data )
{
this->updateEntityBounds( data );
data >> chunkBounds_;
this->space().updateBounds( data );
data >> numEntities_;
if (numEntities_ > 0)
{
this->space().hasHadEntities( true );
}
}
/**
* This method reads in the entity bounds from a stream.
*/
void CellData::updateEntityBounds( BinaryIStream & data )
{
entityBoundLevels_.updateFromStream( data );
}
/**
* This method reads in the entity bounds from a stream.
*/
void EntityBoundLevels::updateFromStream( BinaryIStream & data )
{
// This needs to match CellApp's Space::writeEntityBounds.
for (int isMax = 0; isMax <= 1; ++isMax)
{
for (int isY = 0; isY <= 1; ++isY)
{
for (int level = entityBounds_.size() - 1; level >= 0; --level )
{
float pos;
float load;
data >> pos >> load;
entityBounds_[ level ].range1D( isY )[ isMax ] = pos;
entityLoads_[ level ].range1D( isY )[ isMax ] = load;
}
}
}
}
这里我们需要重点关注一下初始的Cell是如何收集EntityLevelBounds的:
/**
* This method streams on various boundaries to inform the CellAppMgr for the
* purposes of load balancing.
*
*/
void Cells::writeBounds( BinaryOStream & stream ) const
{
Container::const_iterator iter = container_.begin();
while (iter != container_.end())
{
iter->second->writeBounds( stream );
++iter;
}
}
/**
* This method streams on various boundaries to inform the CellAppMgr for the
* purposes of load balancing.
*/
void Cell::writeBounds( BinaryOStream & stream ) const
{
if (!this->isRemoved())
{
this->space().writeBounds( stream );
}
}
/**
* This method streams on various boundaries to inform the CellAppMgr for the
* purposes of load balancing.
*
*/
void Space::writeBounds( BinaryOStream & stream ) const
{
if (this->isShuttingDown())
{
return;
}
stream << this->id();
this->writeEntityBounds( stream );
this->writeChunkBounds( stream );
// Number of entities including ghosts.
stream << uint32( this->spaceEntities().size() );
}
/**
* This method writes the entity bounds to inform the CellAppMgr. These are
* used in load balancing.
*/
void Space::writeEntityBounds( BinaryOStream & stream ) const
{
// This needs to match CellAppMgr's CellData::updateEntityBounds
// Args are isMax and isY
this->writeEntityBoundsForEdge( stream, false, false ); // Left
this->writeEntityBoundsForEdge( stream, false, true ); // Bottom
this->writeEntityBoundsForEdge( stream, true, false ); // Right
this->writeEntityBoundsForEdge( stream, true, true ); // Top
}
可以看到writeEntityBounds用四组不同的参数执行了四次,对应我们之前说的四个方向的边界与负载收集。这个收集过程会利用到Space内部存储的一个十字链表,关于十字链表之前的内容已经讲过了,所以这里就不再详细阐述了。值得注意的是一个Entity会在这个十字链表上创建四个节点,来组成一个矩形,而这里的isMax,isY参数就是为了获取一个entity在isY轴方向的最大值isMax:
/**
* This method calculates boundary values for the boundaries that contains
* the real entities of this space at different sizes based on CPU. This is
* used by load balancing to calculate where to move partitions.
*
* @param stream The stream to write the levels to.
* @param isMax Indicates whether the lower or upper bound should be
* calculated.
* @param isY Indicates whether the X or Y/Z bound should be
* calculated.
*/
void Space::writeEntityBoundsForEdge( BinaryOStream & stream,
bool isMax, bool isY ) const
这个函数的开口会首先找到指定遍历方向上的第一个Real节点:
const RangeListNode * pNode =
isMax ? rangeList_.pLastNode() : rangeList_.pFirstNode();
float currCPULoad = 0.f;
int level = BalanceConfig::numCPUOffloadLevels();
float currCPULimit = BalanceConfig::cpuOffloadForLevel( --level );
float perEntityLoadShare = CellApp::instance().getPerEntityLoadShare();
bool hasEntities = false;
float lastEntityPosition = 0.f;
const float FUDGE_FACTOR = isMax ? -0.1f : 0.1f;
// Looking for the first real entity node
while (pNode && (!pNode->isEntity() ||
!EntityRangeListNode::getEntity( pNode )->isReal()))
{
pNode = pNode->getNeighbour( !isMax, isY );
}
找到第一个Real节点之后,开始按照这个轴方向持续遍历:
// Now iterate through the real entities but counting dense bursts
// within POS_DIFF_EPSILON range as one entity
while (pNode && (level >= 0))
{
const float POS_DIFF_EPSILON = 0.01f;
bool shouldCountThisEntity = true;
const RangeListNode * pNextNode = pNode->getNeighbour( !isMax, isY );
while (pNextNode && (!pNextNode->isEntity() ||
!EntityRangeListNode::getEntity( pNextNode )->isReal()))
{
pNextNode = pNextNode->getNeighbour( !isMax, isY );
}
const Entity * pEntity = EntityRangeListNode::getEntity( pNode );
const float entityPosition = pEntity->position()[ isY * 2 ];
currCPULoad += pEntity->profiler().load() + perEntityLoadShare;
const Entity * pNextEntity = NULL;
float nextEntityPosition = 0.f;
if (pNextNode)
{
pNextEntity = EntityRangeListNode::getEntity( pNextNode );
nextEntityPosition = pNextEntity->position()[ isY * 2 ];
if (almostEqual(entityPosition, nextEntityPosition, POS_DIFF_EPSILON))
{
shouldCountThisEntity = false;
}
}
if (shouldCountThisEntity)
{
if (currCPULoad > currCPULimit)
{
const float limitPosition = pNextEntity ?
(nextEntityPosition + entityPosition) / 2 :
entityPosition + FUDGE_FACTOR;
stream << limitPosition << currCPULoad;
currCPULimit = BalanceConfig::cpuOffloadForLevel( --level );
}
hasEntities = true;
lastEntityPosition = entityPosition;
}
pNode = pNextNode;
}
遍历的过程中会对currCPULoad进行更新,加上当前Entity记录的负载pEntity->profiler().load(),同时加上每个Entity都会有的一个轻量级负载perEntityLoadShare。
每当当前的currCPULoad大于指定的currCPULimit之后就会记录一行,此时分割点为当前Entity与下一个Entity的中间点,记录之后会更新新的currCPULimit,这个更新机制比较奇特,居然采取的是指数,根据这个计算公式和相关常量,currCPULimit的取值依次为[1/32,1/16,1/8,1/4,1/2],这样累加起来与1基本相等:
BW_OPTION_RO( int, numCPUOffloadLevels, 5 );
const float LEVEL_STEP = 0.5f;
/**
* This method returns the amount of CPU to attempt to offload for each
* entity bounds level.
*/
float BalanceConfig::cpuOffloadForLevel( int level )
{
// Each level offloads twice as much as the previous with the last level
// offloading maxCPUOffload.
return maxCPUOffload() * powf( LEVEL_STEP, level );
}
注意这里更新currCPULimit的时候,currCPULoad并没有清零。
如果这个轴方向相邻的两个Real Entity坐标基本一样,则划定新边界的时候最好把这两个Entity打包在一起,所以这里会根据pNextNode来计算shouldCountThisEntity,只有两者相隔一段距离之后才考虑记录到stream中。
注意到EntityBoundLevels::updateFromStream执行反序列化的时候,level是从大到小遍历的,与我们的序列化顺序相反,所以最终存储到CellAppMgr里的EntityBoundLevels的cpuLoad分界值是逆序的,即[1/2,1/4,1/8,1/16,1/32]:
/**
* This method reads in the entity bounds from a stream.
*/
void EntityBoundLevels::updateFromStream( BinaryIStream & data )
{
// This needs to match CellApp's Space::writeEntityBounds.
for (int isMax = 0; isMax <= 1; ++isMax)
{
for (int isY = 0; isY <= 1; ++isY)
{
for (int level = entityBounds_.size() - 1; level >= 0; --level )
{
float pos;
float load;
data >> pos >> load;
entityBounds_[ level ].range1D( isY )[ isMax ] = pos;
entityLoads_[ level ].range1D( isY )[ isMax ] = load;
}
}
}
}
所以选取新分界线的时候会选择第一个负载不大于loadDiff的,因为这个entityLoads_存储的值是降序的:
/**
* This method returns the entity bound best suited to offload a desired
* amount. The largest level less than this load amount is chosen.
*/
float EntityBoundLevels::entityBoundForLoadDiff( float loadDiff,
bool isHorizontal, bool isMax, float defaultPosition ) const
{
const float absLoadDiff = fabs( loadDiff );
for (int level = 0;
level < (int)entityLoads_.size();
++level)
{
if (entityLoads_[ level ].range1D(
isHorizontal )[ isMax ] <= absLoadDiff)
{
return entityBounds_[ level ].range1D( isHorizontal )[ isMax ];
}
}
return defaultPosition;
}
如果这个要变动的区域对应的负载太小导致调整效果不明显的话,则依赖后续的loadBalance来继续调整。
注意到每次负载上报的时候,只有CellData的EntityBoundLevels会被更新,InternalNode里对应的成员变量则不会被修改,这些InternalNode在执行负载均衡的时候是需要获取当前总体的EntityBoundLevels信息的,这些信息的收集则是在负载均衡开头的所有节点的updateLoad函数中:
/**
* This method updates the load associated with nodes in this sub-tree.
*/
float InternalNode::updateLoad()
{
totalLoad_ = pLeft_->updateLoad() + pRight_->updateLoad();
totalSmoothedLoad_ =
pLeft_->totalSmoothedLoad() + pRight_->totalSmoothedLoad();
numRetiring_ = pLeft_->numRetiring() + pRight_->numRetiring();
areaNotLoaded_ = pLeft_->areaNotLoaded() + pRight_->areaNotLoaded();
minLoad_ = std::min( pLeft_->minLoad(), pRight_->minLoad() );
maxLoad_ = std::max( pLeft_->maxLoad(), pRight_->maxLoad() );
entityBoundLevels_.merge( pLeft_->entityBoundLevels(),
pRight_->entityBoundLevels(),
isHorizontal_, position_ );
// 省略后续一些无关代码
}
/**
* This method merges bound levels data from left and right nodes
* into this one
*/
void EntityBoundLevels::merge( const EntityBoundLevels & left,
const EntityBoundLevels & right,
bool isHorizontal, float partitionPosition )
{
// Is the partition line horizontal?
if (isHorizontal)
{
this->mergeTwoBranches( left, right, false, false );
this->mergeTwoBranches( left, right, false, true );
this->takeSingleBranch( left, true, false, partitionPosition );
this->takeSingleBranch( right, true, true, partitionPosition );
}
else
{
this->mergeTwoBranches( left, right, true, false );
this->mergeTwoBranches( left, right, true, true );
this->takeSingleBranch( left, false, false, partitionPosition );
this->takeSingleBranch( right, false, true, partitionPosition );
}
}
这个UpdateLoad函数里会对左右两个子节点的EntityBoundLevel数据执行合并merge操作:
takeSingleBranch负责合并分割轴方向上的负载统计mergeTwoBranches负责合并非分割轴方向上的负载统计
这两个函数都有点长,这里就不去做具体介绍了。
与entityLimitInDirection对应的还有一个chunkLimitInDirection,这个方法会固定的扩张一个ghostDistance,而不考虑具体的负载,反正调整的不够的话等待下一次调整就好了:
/**
* This method returns the limit of movement based on the entity bounds in the
* direction of movement.
*/
float InternalNode::chunkLimitInDirection( BalanceDirection direction ) const
{
BSPNode * pFromNode = this->growingChild( direction );
// This also works for BALANCE_NONE case.
bool shouldGetMax = (pFromNode == pLeft_);
float ghostDistance = CellAppMgrConfig::ghostDistance();
if (shouldGetMax)
{
ghostDistance = -ghostDistance;
}
const Rect & chunkBounds = pFromNode->balanceChunkBounds();
return chunkBounds.range1D( isHorizontal_ )[ shouldGetMax ] + ghostDistance;
}
/**
* This method returns the chunk bounds that should be considered when load
* balancing.
*/
const BW::Rect & CellData::balanceChunkBounds() const
{
const float FLOATING_POINT_TOLERANCE = 1.f; // Avoid floating point issues
BW::Rect desiredRect( range_ );
desiredRect.safeInflateBy(
CellAppMgrConfig::ghostDistance() - FLOATING_POINT_TOLERANCE );
return chunkBounds_.contains( desiredRect ) ?
chunkBounds_ : range_;
}
这里的chunkBounds_代表当前Cell已经加载的场景资源范围,而range_则是期望加载的场景资源范围,一般来说chunkBounds_会比range_扩充一个CellAppMgrConfig::ghostDistance()。
最后会同时考虑entityLimitInDirection与chunkLimitInDirection的结果,选取的是调整量最小的那个新边界:
/**
* This helper method returns the limit to move to based on the direction
* of movment.
*/
static float closestLimit( float position, float limit1, float limit2,
BalanceDirection direction )
{
return (direction == BALANCE_LEFT) ?
std::min( position, std::max( limit1, limit2 ) ) :
std::max( position, std::min( limit1, limit2 ) );
}
Cell的负载记录
每个 entity 上面都有一个 profiler,基本上每个处理单独一个Entity逻辑的地方都会都调用这个profiler进行来记录消耗。记录的时候使用了宏和RAII,每次需要记录的时候在函数第一行加一下AUTO_SCOPED_THIS_ENTITY_PROFILE就好了,下面的Entity::sendMessageToReal就是一个非常简单的例子:
#define AUTO_SCOPED_ENTITY_PROFILE( ENTITY_PTR ) \
EntityProfiler::AutoScopedHelper< BaseOrEntity > \
_autoEntityProfile( ENTITY_PTR )
#define AUTO_SCOPED_THIS_ENTITY_PROFILE \
AUTO_SCOPED_ENTITY_PROFILE( this )
/**
* This class is a helper for auto-scoped profiling macros
*/
template < class ENTITY >
class AutoScopedHelper
{
public:
AutoScopedHelper( const ENTITY * pEntity ) : pEntity_()
{
if (pEntity)
{
pEntity_ = pEntity;
pEntity->profiler().start();
}
}
~AutoScopedHelper()
{
if (pEntity_)
{
pEntity_->profiler().stop();
}
}
private:
ConstSmartPointer< ENTITY > pEntity_;
};
bool Entity::sendMessageToReal( const MethodDescription * pDescription,
ScriptTuple args )
{
AUTO_SCOPED_THIS_ENTITY_PROFILE;
// 省略具体业务代码
}
这里的start/stop其实就是简单的记录一下时间戳差值,考虑了递归的情况:
INLINE void EntityProfiler::start() const
{
if (callDepth_++ > 0)
{
// we're already profiling
return;
}
startTime_ = timestamp();
}
INLINE void EntityProfiler::stop() const
{
MF_ASSERT( callDepth_ > 0 );
if (--callDepth_ > 0)
{
// we were nested inside another start/stop
return;
}
uint64 dt = timestamp() - startTime_;
elapsedTickTime_ += dt;
startTime_ = 0;
}
每个gametick,都会调用EntityProfiler::tick来重新计算每个entity的cpu load,注意这里会更新最大负载,平滑负载等各项负载消息:
void CellApp::updateLoad()
{
uint64 lastTickTimeInStamps = this->calcTickPeriod();
double tickTime = stampsToSeconds( lastTickTimeInStamps );
this->tickProfilers( lastTickTimeInStamps );
// 省略后续代码
}
/**
* This method ticks entity and entity type profilers
*/
void CellApp::tickProfilers( uint64 lastTickInStamps )
{
cells_.tickProfilers( lastTickInStamps, Config::loadSmoothingBias() );
EntityType::tickProfilers( totalEntityLoad_, totalAddedLoad_ );
}
/**
* This method ticks profilers on all the cells
*/
void Cells::tickProfilers( uint64 tickDtInStamps, float smoothingFactor )
{
Container::iterator iCell = container_.begin();
while (iCell != container_.end())
{
iCell->second->tickProfilers( tickDtInStamps, smoothingFactor );
++iCell;
}
}
/**
* This method ticks profilers on the real entities on a Cell instance.
*/
void Cell::tickProfilers( uint64 tickDtInStamps, float smoothingFactor )
{
Cell::Entities::iterator iEntity = realEntities_.begin();
while (iEntity != realEntities_.end())
{
EntityProfiler & profiler = (*iEntity)->profiler();
EntityTypeProfiler & typeProfiler = (*iEntity)->pType()->profiler();
profiler.tick( tickDtInStamps, smoothingFactor, typeProfiler );
profiler_.addEntityLoad( profiler.load(), profiler.rawLoad() );
++iEntity;
}
profiler_.tick();
}
/**
* This method should be called every tick
* to recalculate current smoothed load
*/
void EntityProfiler::tick( uint64 tickDtInStamps,
float smoothingFactor,
EntityTypeProfiler &typeProfiler )
{
// How many ticks it takes smoothed load to get from
// a' to a" with error <= 1% ( |a" - a'| / 100 )?
// numTicks = math.ceil( math.log( 0.01, (1 - SMOOTHING_FACTOR) ) )
//
// What should SMOOTHING_FACTOR be for smoothed load to get from a' to a"
// in numTicks with error <= 1% ( |a" - a'| / 100 )?
// SMOOTHING_FACTOR = 1.0 - math.pow( 0.01, (1.0 / numTicks) )
float rawLoad = (float)((double)elapsedTickTime_ / (double)tickDtInStamps);
currSmoothedLoad_ = smoothingFactor * rawLoad + \
(1.f - smoothingFactor) * \
currSmoothedLoad_;
currAdjustedLoad_ = currSmoothedLoad_;
// Calculate added load and apply min artificial load if necessary
float addedLoad = 0.f;
if (artificialMinLoad_ > currSmoothedLoad_)
{
addedLoad = artificialMinLoad_ - currSmoothedLoad_;
currAdjustedLoad_ = artificialMinLoad_;
}
currRawLoad_ = rawLoad;
if (maxRawLoad_ < rawLoad)
{
maxRawLoad_ = rawLoad;
}
elapsedTickTime_ = 0;
typeProfiler.addEntityLoad( currAdjustedLoad_, currRawLoad_, addedLoad );
}
其实除了每个Entity上会挂在一个profiler之外,每个EntityType也有一个profiler,也就是上面的typeProfiler。然后每个Cell也有一个专属的profiler来记录当前Cell内所有的Entity的负载总和。除了调整Cell间边界会使用到Cell的负载之外,CellAppMgr创建新Cell通过findBestCellApp选择最佳CellApp的时候也会使用这个负载信息。这个函数内会遍历指定资源组CellAppGroup内的所有CellApp,选取其中评分最高的作为新Cell的创建位置:
CellApp * CellApps::findBestCellApp( const Space * pSpace,
const CellAppGroup * pExcludedGroup ) const
{
MF_ASSERT( pSpace );
CellApp * pBest = NULL;
Map::const_iterator iter = map_.begin();
while (iter != map_.end())
{
CellApp * pApp = iter->second;
if (((pExcludedGroup == NULL) || (pApp->pGroup() != pExcludedGroup)) &&
!pApp->isRetiring())
{
if (cellAppComparer_.isValidApp( pApp, pSpace ) &&
cellAppComparer_.isABetterCellApp( pBest, pApp, pSpace ))
{
pBest = pApp;
}
}
++iter;
}
return pBest;
}
/**
* This method compares two CellApps, returning true if the second is better
* than the first, and false otherwise.
* The result is calculated by comparing the CellApps on each criteria, in
* order of their priority, until they are found to differ on a criterion.
*/
bool CellAppComparer::isABetterCellApp(
const CellApp * pOld, const CellApp * pNew, const Space * pSpace ) const
{
if (pOld == NULL)
{
return true;
}
Scorers::const_iterator iter = attributes_.begin();
while (iter != attributes_.end())
{
const CellAppScorer & attribute = **iter;
float result = attribute.compareCellApps( pOld, pNew, pSpace );
if (result < 0.f)
{
return false;
}
else if (result > 0.f)
{
return true;
}
++iter;
}
return false;
}
这里的isABetterCellApp并不只考虑之前提到的Entity负载,这里的attributes_存储了不同的打分函数,然后根据指定的优先级来依次选择最优的。打分函数的构造和优先级排序在CellAppComparer的初始化函数中:
void CellAppComparer::init()
{
const char * sectionName = "cellAppMgr/metaLoadBalancePriority";
DataSectionPtr pSection = BWConfig::getSection( sectionName );
if (!pSection)
{
ERROR_MSG( "CellAppComparer::init: Failed to open %s\n",
sectionName );
return;
}
DataSectionIterator iter;
iter = pSection->begin();
int numScorers = 0;
CONFIG_INFO_MSG( "Meta load-balance prioritisation:\n" );
while (iter != pSection->end())
{
if (this->addScorer( iter.tag(), *iter ))
{
CONFIG_INFO_MSG( " %d: %s",
++numScorers, iter.tag().c_str() );
}
++iter;
}
}
目前实现的打分函数包括如下几种:
limitedSpaces比较的是不同的CellApp之间的Cell数量多少cellAppLoad比较的是我们之前统计的Cell的负载groupLoad比较的是当前CellApp所属资源组的平均负载CellCellTrafficScorer比较的是当前Space在同一个物理机上的Cell数量,baseCellTraffic比较的是当前CellApp的Ip是否与当前Space的第一次创建时的Ip一致,这样在同一台物理机器上可以避免跨机通信的损耗
/**
* This method generates the criteria on which CellApps are scored.
*/
bool CellAppComparer::addScorer( const BW::string & name,
const DataSectionPtr & pSection )
{
CellAppScorer * pScorer;
if (name == "limitedSpaces")
{
pScorer = new LimitedSpacesScorer;
}
else if (name == "cellAppLoad")
{
pScorer = new CellAppLoadScorer;
}
else if (name == "groupLoad")
{
pScorer = new CellAppGroupLoadScorer;
}
else if (name == "cellCellTraffic")
{
pScorer = new CellCellTrafficScorer;
}
else if (name == "baseCellTraffic")
{
pScorer = new BaseCellTrafficScorer;
}
else
{
ERROR_MSG( "CellAppComparer::addScorer: "
"Unknown meta load-balancing priority option '%s'\n",
name.c_str() );
return false;
}
if (!pScorer->init( pSection ))
{
bw_safe_delete( pScorer );
return false;
}
else
{
this->addScorer( pScorer );
return true;
}
}
Cell的删除
常规来说,如果一个Cell的负载太低了的话,就会考虑将这个Cell所承载的区域完全转移到其兄弟Cell上,这样可以降低通信成本。这部分逻辑也在CellAppMgr::metaLoadBalance里面,最后面的appGroups.checkForUnderloaded处理的就是这些低负载的Cell:
/**
* This method checks whether there needs to be any migration of spaces between
* cell applications. If so, it will take action.
*/
void CellAppMgr::metaLoadBalance()
{
// Identify the CellApp groups used in meta-load-balancing. These are the
// groups of CellApps such that normal load-balancing can balance their
// loads.
CellAppGroups appGroups( cellApps_ );
const float mergeThreshold =
this->avgCellAppLoad() + CellAppMgrConfig::metaLoadBalanceTolerance();
// Do meta-balance groups need to be joined?
appGroups.checkForOverloaded( mergeThreshold );
// Should more CellApps be added to help with loading?
bool hasLoadingSpaces = this->checkLoadingSpaces();
if (!hasLoadingSpaces)
{
// Are there underloaded groups who should have Cells retired?
appGroups.checkForUnderloaded( CellAppLoadConfig::lowerBound() );
}
}
这里计算是否要去移除一个低负载Cell的时候并没有只考虑单独的一个Cell的负载,而是从其资源组CellAppGroup整体考虑的。这里会尝试计算这个CellAppGroup的整体负载除以当前CellApp数量减一之后得到的平均负载是否小于指定值,如果小于则代表可以选择其中负载最低的CellApp去移除:
/**
* This method checks whether this group is underloaded and removes a CellApp
* if necessary.
*/
void CellAppGroup::checkForUnderloaded( float loadLowerBound )
{
// If the expected average load with one less CellApp is lower than the
// input threshold, the least loaded CellApp is retired from the group.
if (this->avgLoad( 1 ) < loadLowerBound)
{
CellApp * pLeastLoaded = NULL;
float leastLoad = FLT_MAX;
iterator iter = this->begin();
while (iter != this->end())
{
CellApp * pApp = *iter;
if ((!pApp->hasOnlyRetiringCells() &&
pApp->smoothedLoad() < leastLoad))
{
pLeastLoaded = *iter;
leastLoad = pLeastLoaded->smoothedLoad();
}
++iter;
}
if (pLeastLoaded)
{
pLeastLoaded->retireAllCells();
}
}
}
这里看来与之前的设想不太一样,之前考虑的是移除Cell,结果发现执行的时候移除的是CellApp,这里会将此CellApp里的所有Cell都执行删除:
/**
* This method starts retiring all cells from this app.
*/
void CellApp::retireAllCells()
{
cells_.retireAll();
}
/**
* This method tells all cells to start retiring.
*/
void Cells::retireAll()
{
Container::iterator iter = cells_.begin();
while (iter != cells_.end())
{
(*iter)->startRetiring();
++iter;
}
}
/**
* This method starts the process of removing this cell.
*/
void CellData::startRetiring()
{
if (!numRetiring_)
{
INFO_MSG( "CellData::startRetiring: cell %u from space %u\n",
pCellApp_ ? pCellApp_->id() : 0,
pSpace_->id() );
if (pCellApp_)
{
pCellApp_->incCellsRetiring();
}
this->sendRetireCell( /*isRetiring:*/true );
numRetiring_ = 1;
}
}
/**
* This method sends a retireCell message to the app.
*/
void CellData::sendRetireCell( bool isRetiring ) const
{
INFO_MSG( "CellData::sendRetireCell: "
"Retiring cell %u from space %u. isRetiring = %d.\n",
pCellApp_ ? pCellApp_->id() : 0, pSpace_->id(), isRetiring );
Mercury::Bundle & bundle = this->cellApp().bundle();
bundle.startMessage( CellAppInterface::retireCell );
bundle << pSpace_->id();
bundle << isRetiring;
// Don't send immediately so that messages are aggregated.
this->cellApp().channel().delayedSend();
}
这里的删除逻辑叫retireCell,执行的时候会将当前CellData标记为numRetiring_ = 1,同时通过RPC通知具体的CellApp去执行retireCell。
如果一个CellData被标记为Retire状态的话,在InternalNode的balance函数里会执行边界调整,将所负责的区域全都转移到其兄弟节点上:
/**
* This method does that actual work of balancing.
*/
InternalNode::BalanceDirection InternalNode::doBalance( float loadSafetyBound )
{
bool shouldLimitToChunks =
CellAppMgrConfig::shouldLimitBalanceToChunks();
const bool isRetiring = pLeft_->isRetiring() || pRight_->isRetiring();
float loadDiff = 0.f;
// Do not move if we do not know if the CellApp has created the Cell.
// This avoids problems with other Cells offloading before the new Cell
// exists.
const bool childrenCreated = pLeft_->hasBeenCreated() &&
pRight_->hasBeenCreated();
// Check whether we should balance based on unloaded chunks
if (!isRetiring)
{
// 省略无retiring的相关代码
}
else
{
// 这里将loaddiff设置为1或者-1 代表把目标区域全都合并
loadDiff = pLeft_->isRetiring() ? 1.f : -1.f;
}
BalanceDirection balanceDir = this->dirFromLoadDiff( loadDiff );
BSPNode * pFromNode = this->growingChild( balanceDir );
const bool shouldMove = (balanceDir != BALANCE_NONE) &&
childrenCreated &&
(pFromNode->maxLoad() < loadSafetyBound);
float newPos = position_;
if (shouldMove)
{
float entityLimit = this->entityLimitInDirection( balanceDir,
loadDiff * balanceAggression_ );
float chunkLimit = shouldLimitToChunks ?
this->chunkLimitInDirection( balanceDir ) : entityLimit;
newPos = this->closestLimit( position_,
entityLimit, chunkLimit, balanceDir );
}
else
{
balanceDir = BALANCE_NONE;
}
position_ = newPos;
this->adjustAggression( balanceDir );
return balanceDir;
}
边界更新之后就慢慢等待所有的Entity执行转移操作。
然后这个CellData在执行负载均衡函数balance的时候如果发现自己正在Retire且当前没有Entity在所负责的区域上,则通知Space来执行删除:
/*
* Override from BSPNode.
*/
void CellData::balance( const BW::Rect & range,
float loadSafetyBound, bool isShrinking )
{
// Should not shrink if not yet created.
MF_ASSERT( hasBeenCreated_ || !isShrinking );
range_ = range;
isOverloaded_ = (this->cellApp().smoothedLoad() > loadSafetyBound);
bool hasArea = (range.xMin() < range.xMax()) &&
(range.yMin() < range.yMax());
// When a cell has no area, it should be removed if load balancing is trying
// to make it smaller.
if (!hasArea && (isShrinking || numRetiring_) && (this->numEntities() == 0))
{
Space::addCellToDelete( this );
}
}
这里的addCellToDelete只是添加到一个待删除数组中去,只有当Space::loadbalance的时候采取执行节点的删除:
// -----------------------------------------------------------------------------
// Section: Static methods
// -----------------------------------------------------------------------------
/**
* This static method is used during load balancing. If a cell has been fully
* removed, it adds itself to a set so that it can be deleted later.
*/
void Space::addCellToDelete( CellData * pCell )
{
cellsToDelete_.insert( pCell );
}
/**
* This method changes the geometry of cells to balance the load.
*/
void Space::loadBalance()
{
#ifndef BW_EVALUATION
// 省略之前已经展示过的负载均衡代码
// TODO: I don't think this is needed. isBalancing_ enforces this is not
// called recursively.
// Delete cells from this space that are no longer included. Do this
// after updateGeometry so that the cells being deleted know the latest
// layout.
{
// Take a copy here because this method is called recursively.
CellsToDelete copyOfCellsToDelete;
copyOfCellsToDelete.swap( cellsToDelete_ );
CellsToDelete::iterator iter = copyOfCellsToDelete.begin();
while (iter != copyOfCellsToDelete.end())
{
(*iter)->removeSelf();
++iter;
}
}
this->checkCellsHaveLoadedMappedGeometry();
isBalancing_ = false;
#endif
}
在最后的removeSelf中,调用BSPTree的节点删除操作,并最终删除自身,至此CellData的生命周期彻底完成:
/**
* This method removes this Cell from the system. By the end of this method,
* this object has been deleted.
*/
void CellData::removeSelf()
{
INFO_MSG( "CellData::removeSelf: Removed %u from space %u.\n",
pCellApp_ ? pCellApp_->id() : 0, pSpace_->id() );
pSpace_->eraseCell( this, true );
pSpace_ = NULL;
delete this;
}
Space的cell状态同步
一个分布式场景的所有Cell信息都存储在一棵BSP树中,这个树的状态仲裁者为CellAppMgr,同时在这个分布式场景的每个Cell中都会有一份Space副本:
/**
* This class is used to represent a cell.
*/
class Cell
{
public:
// Constructor/Destructor
Cell( Space & space, const CellInfo & cellInfo );
~Cell();
protected:
Space & space_;
ConstCellInfoPtr pCellInfo_;
};
这里的Space结构体类型是CellApp::Space,并不是之前看到过的CellAppMgr::Space,不过他们内部存储的数据基本是相同的,都是一个BSP树结构,具体实现这里就不贴出了。
根据这里Cell的定义可以看出,其实对于同一个CellApp上的同一Space的所有Cell,他们共享了同一个Space,所以这里的space_成员变量是一个引用。
这个Cell结构的创建时机在CellApp::addCell中,这个函数负责创建一个新的Cell,创建Cell的时候发现已经有对应的Space数据存在的情况下就会复用之前的Space,否则会创建一个新的,这样就保证了一个CellApp上对于同一个spaceID只需要维护同一份Space数据:
/**
* This method handles a message to add a cell to this cell application.
*/
void CellApp::addCell( const Mercury::Address & srcAddr,
const Mercury::UnpackedMessageHeader & header,
BinaryIStream & data )
{
// 省略开头一些无关代码
SpaceID spaceID;
data >> spaceID;
Space * pSpace = this->findSpace( spaceID );
if (pSpace)
{
INFO_MSG( "CellApp::addCell: Re-using space %d\n", spaceID );
pSpace->reuse();
}
else
{
pSpace = pSpaces_->create( spaceID );
}
INFO_MSG( "CellApp::addCell: Space = %u\n", spaceID );
MF_ASSERT( pSpace );
pSpace->updateGeometry( data );
CellInfo * pCellInfo = pSpace->findCell( interface_.address() );
if (pCellInfo)
{
Cell * pNewCell = pSpace->pCell();
if (pNewCell)
{
WARNING_MSG( "CellApp::addCell: "
"Cell did not fully remove; reusing.\n" );
MF_ASSERT( pCellInfo == &pNewCell->cellInfo() );
pNewCell->reuse();
}
else
{
pNewCell = new Cell( *pSpace, *pCellInfo );
cells_.add( pNewCell );
}
bool isFirstCell;
data >> isFirstCell;
bool isFromDB;
data >> isFromDB;
if (data.remainingLength() > 0)
{
pSpace->allSpaceData( data );
}
// The first cell in the first space.
if (isFirstCell && Config::useDefaultSpace() && spaceID == 1)
{
this->onGetFirstCell( isFromDB );
}
}
else
{
CRITICAL_MSG( "CellApp::addCell: Failed to add a cell for space %u\n",
spaceID );
}
}
Space数据的更新则是通过pSpace->updateGeometry( data )来做的:
/**
* This method handles a message from the server that updates geometry
* information.
*/
void Space::updateGeometry( BinaryIStream & data )
{
bool wasMulticell = !this->hasSingleCell();
// Mark them all to be deleted
{
// We could get rid of this step if we used a flip-flop value but it's
// simpler this way.
CellInfos::const_iterator iter = cellInfos_.begin();
while (iter != cellInfos_.end())
{
iter->second->shouldDelete( true );
++iter;
}
}
if (pCellInfoTree_ != NULL)
{
pCellInfoTree_->deleteTree();
}
BW::Rect rect(
-std::numeric_limits< float >::max(),
-std::numeric_limits< float >::max(),
std::numeric_limits< float >::max(),
std::numeric_limits< float >::max() );
pCellInfoTree_ = this->readTree( data, rect );
// Delete the cells that should be
//if(1)
{
CellInfos::iterator iter = cellInfos_.begin();
while (iter != cellInfos_.end())
{
CellInfos::iterator oldIter = iter;
++iter;
if (oldIter->second->shouldDelete())
{
// TODO: This assertion can be triggered. I believe this can
// occur if multiple cells are deleted at the same time. It
// would be good to confirm that this is not an issue with
// missing notifyOfCellRemoval calls.
// MF_ASSERT( oldIter->second->isDeletePending() );
cellInfos_.erase( oldIter );
}
}
}
// see if we are going to get rid of our own cell
if (pCell_)
{
if (pCell_->cellInfo().shouldDelete())
{
INFO_MSG( "Space::updateGeometry: Cell in space %u is going\n",
id_ );
}
else
{
pCell_->checkOffloadsAndGhosts();
}
}
// see if we want to expressly shut down this space now
if (wasMulticell)
{
this->checkForShutDown();
}
}
这个updateGeometry的函数体开头首先标记当前Space的所有CellInfo为等待删除状态,然后通过readTree将所有需要保留的CellInfo取消删除,最后再检查所有的CellInfo,对其中删除标记为仍然为true的进行删除。这里的readTree相当于反序列化Space:
/**
* This method reads a BSP from the stream.
*/
SpaceNode * Space::readTree( BinaryIStream & stream,
const BW::Rect & rect )
{
SpaceNode * pResult = NULL;
uint8 type = 0xFF;
stream >> type;
switch (type)
{
case 0:
case 1:
pResult =
new SpaceBranch( *this, rect,
stream, type == 0 /*isHorizontal*/ );
break;
case 2:
{
Mercury::Address addr;
stream >> addr;
CellInfo * pCellInfo = this->findCell( addr );
if (pCellInfo)
{
pCellInfo->shouldDelete( false );
pCellInfo->rect( rect );
pCellInfo->updateFromStream( stream );
pResult = pCellInfo;
}
else
{
pCellInfo = new CellInfo( id_, rect, addr, stream );
pResult = pCellInfo;
cellInfos_[ addr ] = pCellInfo;
}
break;
}
default:
ERROR_MSG( "Space::readTree: stream.error = %d. type = %d\n",
stream.error(), type );
MF_ASSERT( 0 );
break;
}
return pResult;
}
为了更好的理解这里的type以及对应的处理逻辑,此时我们再对照一下CellAppMgr上Space::AddCell时往下发送的数据:
/**
* This method creates a cell and adds it to this space.
*/
CellData * Space::addCell( CellApp & cellApp, CellData * pCellToSplit )
{
INFO_MSG( "Space::addCell: Space %u. CellApp %u (%s)\n",
id_, cellApp.id(), cellApp.addr().c_str() );
// 省略以前介绍过的创建cell的相关代码
Mercury::Bundle & bundle = cellApp.bundle();
bundle.startRequest( CellAppInterface::addCell,
new AddCellReplyHandler( cellApp.addr(), id_ ) );
this->addToStream( bundle );
bundle << isFirstCell_;
isFirstCell_ = false;
bundle << isFromDB_;
//prepare space data for sending
{
// bundle.startMessage( CellAppInterface::allSpaceData );
// bundle << id_;
bundle << (uint32)dataEntries_.size();
DataEntries::const_iterator iter = dataEntries_.begin();
while (iter != dataEntries_.end())
{
bundle << iter->first <<
iter->second.key << iter->second.data;
++iter;
}
}
cellApp.send();
return pCellData;
}
注意看这里的this->addToStream( bundle );,这里相当于将当前Space的全量数据都下发了:
/**
* This method adds this space to the input stream.
*
* @param stream The stream to add the space to.
* @param isForViewer Indicates whether the stream is being sent to CellApps or
* to SpaceViewer.
*/
void Space::addToStream( BinaryOStream & stream, bool isForViewer ) const
{
stream << id_;
if (pRoot_)
{
if (isForViewer)
{
stream << CellAppMgr::instance().numCellApps();
stream << CellAppMgr::instance().numEntities();
}
pRoot_->addToStream( stream, isForViewer );
}
}
/*
* Override from BSPNode.
*/
void CellData::addToStream( BinaryOStream & stream, bool isForViewer )
{
float smoothedLoad =
pCellApp_ ? pCellApp_->smoothedLoad() : 0.f;
stream << uint8( CM::BSP_NODE_LEAF ) << this->addr() << smoothedLoad;
if (!isForViewer)
{
// Preserve backwards compatibility for SpaceViewer.
stream << uint8( this->hasBeenCreated() );
}
else
{
if (pCellApp_)
{
stream << this->cellApp().id();
stream << this->cellApp().viewerPort();
}
else
{
stream << CellAppID( 0 ) << uint16( 0 );
}
entityBoundLevels_.addToStream( stream );
stream << chunkBounds_;
stream << (int8)this->isRetiring();
stream << isOverloaded_;
}
}
/**
* This method adds this subtree to the input stream.
*/
void InternalNode::addToStream( BinaryOStream & stream, bool isForViewer )
{
stream << uint8( isHorizontal_ ? BSP_NODE_HORIZONTAL : BSP_NODE_VERTICAL );
stream << position_;
if (isForViewer)
{
stream << this->avgLoad() << balanceAggression_;
}
pLeft_->addToStream( stream, isForViewer );
pRight_->addToStream( stream, isForViewer );
}
可以看出,每个Node的序列化开头都是当前节点的类型, 0,1都是内部节点,代表不同的分割方向, 2代表叶子节点:
enum BSPNodeType
{
BSP_NODE_HORIZONTAL,
BSP_NODE_VERTICAL,
BSP_NODE_LEAF
};
同时这个节点的序列化是一个递归的过程,直到叶子节点才停止。有了这些知识之后,我们猜测Space::readTree处理0,1时调用的SpaceBranch应该也是一个递归过程,跟进去看实现,果然是重新通过readTree做到了间接递归:
/**
* Constructor.
*/
SpaceBranch::SpaceBranch( Space & space,
const BW::Rect & rect,
BinaryIStream & stream, bool isHorizontal ) :
isHorizontal_( isHorizontal )
{
stream >> position_;
BW::Rect leftRect = rect;
BW::Rect rightRect = rect;
if (isHorizontal_)
{
leftRect.yMax_ = position_;
rightRect.yMin_ = position_;
}
else
{
leftRect.xMax_ = position_;
rightRect.xMin_ = position_;
}
pLeft_ = space.readTree( stream, leftRect );
pRight_ = space.readTree( stream, rightRect );
}
因此每次AddCell时,都会往对应的CellApp发送当前Space的全量最新数据下去。但是这里AddCell里好像没有对当前Space的其他Cell的同步通知处理,这个广播通知藏在了Space::informCellAppsOfGeometry这个函数里,这里会遍历当前的所有cells进行全量数据的推送:
/**
*
*/
void Space::informCellAppsOfGeometry( bool shouldSend )
{
Cells::iterator iter = cells_.begin();
while (iter != cells_.end())
{
Mercury::Bundle & bundle = (*iter)->cellApp().bundle();
bundle.startMessage( CellAppInterface::updateGeometry );
this->addToStream( bundle );
// TODO: This could be optimised so that we do not send this if it
// hasn't changed. This would be particularly true for single cell
// spaces.
// The send may be delayed so that all space updates are sent in one
// send.
if (shouldSend)
{
(*iter)->cellApp().send();
}
++iter;
}
}
这里发送的RPC数据会调用到之前介绍过的Space::UpdateGeometry接口,也就是Space的全量重建接口。至于Space::informCellAppsOfGeometry的调用时机,则在负载均衡函数中:
/**
* This method performs load balancing on each of the spaces.
*/
void CellAppMgr::loadBalance()
{
// Balance all spaces
{
Spaces::iterator iter = spaces_.begin();
while (iter != spaces_.end())
{
if (g_shouldLoadBalance)
{
iter->second->loadBalance();
}
else
{
iter->second->informCellAppsOfGeometry( /*shouldSend*/ false );
}
iter++;
}
}
// This is done after balancing each space so that the messages to each
// CellApp are aggregated into a single bundle.
cellApps_.sendToAll();
}
Space::loadBalance()内部也会调用一次informCellAppsOfGeometry(false),这里的shouldSend的意思是是否需要立即发送,为false的话则只是添加到对应cellapp的发送缓冲区,等待帧末尾统一发送,这样可以避免多次修改Space时的多次发送。
当一个Cell被删除时,会有一个与updategeometry不同的广播消息会对当前Space的所有CellApp进行广播:
/**
* This method removes the input cell from this space.
*/
void Space::eraseCell( CellData * pCell, bool notifyCellApps )
{
cells_.erase( pCell );
if (notifyCellApps)
{
cells_.notifyOfCellRemoval( id_, *pCell );
}
if (pRoot_)
{
pRoot_ = (pRoot_ != pCell ) ? pRoot_->removeCell( pCell ) : NULL;
this->updateRanges();
}
}
/**
*
*/
void Cells::notifyOfCellRemoval( SpaceID spaceID, CellData & removedCell ) const
{
const Mercury::Address removedAddress = removedCell.addr();
Mercury::Bundle & bundleToRemoved = removedCell.cellApp().bundle();
bundleToRemoved.startMessage( CellAppInterface::removeCell );
bundleToRemoved << spaceID;
Container::const_iterator iter = cells_.begin();
while (iter != cells_.end())
{
CellData * pCell = *iter;
// Should have been removed already.
MF_ASSERT( pCell != &removedCell );
CellApp & cellApp = pCell->cellApp();
bundleToRemoved << cellApp.addr();
Mercury::Bundle & bundle = cellApp.bundle();
bundle.startMessage( CellAppInterface::notifyOfCellRemoval );
bundle << spaceID;
bundle << removedAddress;
cellApp.channel().delayedSend();
++iter;
}
removedCell.cellApp().channel().delayedSend();
}
当每个相关CellApp接收到这个RPC时,会将消息路由到要删除的Cell上,给这个Cell增加要删除的标记:
/**
* This method is called by the CellAppMgr to inform us that this cell should
* be removed. It also sends a list of CellApp addresses. This cell should not
* be deleted until all these CellApps have confirmed that no more entities
* are on their way.
*/
void Cell::removeCell( BinaryIStream & data )
{
INFO_MSG( "Cell::removeCell(%u)\n", this->spaceID() );
MF_ASSERT( !isRemoved_ );
isRemoved_ = true;
while (data.remainingLength())
{
Mercury::Address addr;
data >> addr;
RemovalAcks::iterator iAck = receivedAcks_.find( addr );
if (iAck != receivedAcks_.end())
{
receivedAcks_.erase( iAck );
}
else
{
pendingAcks_.insert( addr );
}
}
}
至此,一个Space的Cell创建、Cell删除、Cell边界更新都会将最新的Space数据推送到所有的相关CellApp上。
BigWorld 的迁移
对于常见的非分布式游戏场景实例,一个Space肯定是被单一进程托管的,玩家、怪物等ActorEntity只需要考虑进入场景和离开场景这两个操作。但是对于分布式大世界场景,一个Space是由分布在多个进程中的CellSpace拼接而成的,每个CellSpace负责一个与其他CellSpace不重叠的矩形区域,每个ActorEntity都根据其位置坐标绑定到覆盖了这个位置的CellSpace。但是由于ActorEntity的位置坐标是动态的,同时CellSpace的覆盖区域也会被负载均衡所调整,所以一个ActorEntity所归属的CellSpace并不是固定的,而是不断的变化之中。当一个ActorEntity所属的CellSpace发生改变时,这个ActorEntity就需要从之前的CellSpace移动到新的CellSpace,这个移动的过程就叫做迁移Migration。整个迁移过程其实跟切换场景有很大的相似之处,都是需要在迁移之前打包好当前ActorEntity的所有数据,然后从当前CellSpace移除此ActorEntity,然后通过RPC将这个ActorEntity的数据发送到新CellSpace,利用打包数据对这个ActorEntity进行重建。
RealEntity的迁移
RealEntity的迁移有两种:同场景内的迁移和不同场景内的迁移。同场景内的迁移主要是当前RealEntity所归属的Cell发生变化时,触发向周围的Cell进行迁移。同场景内的迁移属于Real-Ghost管理相关内容, 这部分是引擎自动维护的,业务层不需要处理。另外一种是不同场景的迁移,这部分与业务逻辑强相关,引擎层只提供相关接口。
在BigWorld中, Real-Ghost的管理基本都被EntityGhostMaintainer这个类型负责,其逻辑入口是EntityGhostMaintainer::check,会在游戏主循环中被调用到。 其调用链为CellApp::handleGameTickTimeSlice => CellApp::checkOffloads => Cells::checkOffloads => Cell::checkOffloadsAndGhosts => OffloadChecker::run => EntityGhostMaintainer::check:
/**
* This method handles the game tick time slice.
*/
void CellApp::handleGameTickTimeSlice()
{
AUTO_SCOPED_PROFILE( "gameTick" );
// 暂时忽略一些无关代码
this->checkOffloads();
// 暂时忽略一些无关代码
}
/**
* This method checks whether any entities should be offloaded or ghosts
* created or destroyed.
*/
void CellApp::checkOffloads()
{
if ((time_ % Config::checkOffloadsPeriodInTicks()) == 0)
{
cells_.checkOffloads();
}
}
/**
* This method checks whether any cells should offload any entities or create
* or destroy any ghosts.
*
* It also destroys any cells that can now safely be destroyed.
*/
void Cells::checkOffloads()
{
Container toDelete;
Container::iterator iCell = container_.begin();
while (iCell != container_.end())
{
Cell * pCell = iCell->second;
bool isReadyForDeletion = pCell->checkOffloadsAndGhosts();
if (isReadyForDeletion)
{
toDelete[ iCell->first ] = pCell;
}
++iCell;
}
// 省略一些无关代码
}
/**
* We want to periodically update the CellApps that we have created ghosts
* for our reals on, and also offload them there if appropriate.
*
* @return True if this cell should be killed, otherwise false.
*/
bool Cell::checkOffloadsAndGhosts()
{
OffloadChecker offloadChecker( *this );
offloadChecker.run();
return this->isReadyForDeletion();
}
/**
* This method performs the offloads and ghosts check.
*/
void OffloadChecker::run()
{
// If this space is shutting down, don't offload any entities so that
// they are not lost when the cells are shut down.
if (cell_.space().isShuttingDown())
{
return;
}
static ProfileVal localProfile( "boundaryCheck" );
START_PROFILE( localProfile );
Cell::Entities::iterator iEntity = cell_.realEntities().begin();
while (iEntity != cell_.realEntities().end())
{
EntityPtr pEntity = *iEntity;
MF_ASSERT( &cell_ == &(pEntity->cell()) );
EntityGhostMaintainer entityGhostMaintainer( *this, pEntity );
entityGhostMaintainer.check();
++iEntity;
}
this->sendOffloads();
STOP_PROFILE_WITH_DATA( localProfile, offloadList_.size() );
}
CellApp::checkOffloads并不是每帧都会触发后续调用,而是以Config::checkOffloadsPeriodInTicks()为周期去检查。 Cells::checkOffloads负责触发每个Cell的检查,然后OffloadChecker::run负责遍历每个RealEntity来执行EntityGhostMaintainer::check。 在这个check函数中,checkEntityForOffload负责处理这个RealEntity的迁移, createOrUnmarkRequiredHaunts负责往周围的CellSpace创建GhostEntity,最后的deleteMarkedHaunts负责销毁已经不再需要的GhostEntity:
/**
* This method checks through this entity's ghosts and checks whether the real
* entity needs to be offloaded elsewhere.
*/
void EntityGhostMaintainer::check()
{
if (this->cell().shouldOffload())
{
this->checkEntityForOffload();
}
// We mark all the haunts for this entity, and then we unmark all the valid
// ones. The invalid ghosts are left marked and are deleted.
bool doesOffloadDestinationHaveGhost = this->markHaunts();
this->createOrUnmarkRequiredHaunts();
MF_ASSERT( (pOffloadDestination_ == NULL) ||
doesOffloadDestinationHaveGhost ||
(numGhostsCreated_ == 1) );
this->deleteMarkedHaunts();
}
我们继续跟进checkEntityForOffload的实现,这里会使用pCellAt函数来计算当前RealEntity的位置对应的CellSpace,如果这个CellSpace不是当前的CellSpace的话,就可以考虑加入到等待迁移列表中:
/**
* This method checks whether the given entity requires offloading to another
* cell.
*/
void EntityGhostMaintainer::checkEntityForOffload()
{
// Find out where we really want to live.
const Vector3 & position = pEntity_->position();
const CellInfo * pHomeCell = pEntity_->space().pCellAt(
position.x, position.z );
if ((pHomeCell == NULL) || (pHomeCell == &(this->cell().cellInfo())))
{
// Don't offload to ourselves.
return;
}
if (pHomeCell->isDeletePending())
{
// Don't offload to a cell that is being deleted.
return;
}
CellAppChannel * pOffloadDestination =
CellAppChannels::instance().get( pHomeCell->addr() );
if (!pOffloadDestination || !pOffloadDestination->isGood())
{
// Don't offload if other cell has failed or died.
return;
}
// OK to offload now.
pOffloadDestination_ = pOffloadDestination;
offloadChecker_.addToOffloads( pEntity_, pOffloadDestination_ );
}
/**
* This method adds an entity to the offload list.
*
* @param pEntity The entity to add.
* @param pOffloadDestination The destination channel.
*/
void OffloadChecker::addToOffloads( EntityPtr pEntity,
CellAppChannel * pOffloadDestination )
{
offloadList_.push_back( OffloadEntry( pEntity, pOffloadDestination ) );
}
这里的设计与我们之前设计的无缝迁移有点不同,之前的设计里是RealEntity在当前CellSpace的ghost_rect外时才触发迁移,而Bigworld里是只要在当前CellSpace的real_rect外就开始准备迁移,这种管理方式对于一些反复在边界上进行移动的情况很不友好,会触发频繁的迁移。
在OffloadChecker::run()中会调用OffloadChecker::sendOffloads()来遍历当前的等待迁移列表,来逐个通知迁移:
/**
* This method sends all the pending offloads.
*/
void OffloadChecker::sendOffloads()
{
OffloadList::iterator iOffload = offloadList_.begin();
while (iOffload != offloadList_.end())
{
this->sendOffload( iOffload );
++iOffload;
}
}
/**
* This method sends an individual offload, subject to sufficient ghosting
* capacity being present on the channels and the channels being in a good
* state.
*
* @param iOffload The iterator pointing to the entry in the offload list
* to process.
*/
void OffloadChecker::sendOffload( OffloadList::const_iterator iOffload )
{
EntityPtr pEntity = iOffload->first;
CellAppChannel * pOffloadDestination = iOffload->second;
cell_.offloadEntity( pEntity.get(), pOffloadDestination,
/* isTeleport: */ false );
}
最终会调用到Cell::offloadEntity这个接口来处理迁移逻辑。实际上跨场景传送的接口最终也是通过Cell::offloadEntity来驱动迁移的,这里我们来跟进一下传送时的具体流程,其入口是Base::teleportOther:
/**
* This method handles a message that requests to teleport another entity to
* the space of this entity.
*/
void Base::teleportOther( const Mercury::Address & srcAddr,
const Mercury::UnpackedMessageHeader & header,
const BaseAppIntInterface::teleportOtherArgs & args )
{
const EntityMailBoxRef & teleportingMB = args.cellMailBox;
if (pCellEntityMailBox_ == NULL)
{
ERROR_MSG( "Base::teleportOther( %u ): "
"pCellEntityMailBox_ is NULL while teleporting %u\n",
id_, teleportingMB.id );
return;
}
if (pCellEntityMailBox_->address().ip == 0)
{
ERROR_MSG( "Base::teleportOther( %u ): Cell mailbox has no address while "
"teleporting %u. isGetCellPending_ = %d\n",
id_, teleportingMB.id, this->isGetCellPending() );
return;
}
Mercury::Channel & channel = BaseApp::getChannel( teleportingMB.addr );
Mercury::Bundle & bundle = channel.bundle();
CellAppInterface::teleportArgs & rTeleportArgs =
CellAppInterface::teleportArgs::start( bundle, teleportingMB.id );
rTeleportArgs.dstMailBoxRef = pCellEntityMailBox_->ref();
channel.send();
}
比较神奇的是这里的Base并不是要传送的RealEntity的Base,而是传送目标场景里的一个RealEntity对应的Base。这里会使用中转Base对应的CellEntity的Cell地址来填充传送目标地址信息。按道理传送只需要目标场景的通信地址即可,但是这里却需要一个已经在目标场景的RealEntity来中转。具体为啥设计我也不怎么清楚,反正能用就行。
/**
* This method handles a message telling us to teleport to another space
* indicated by a cell mailbox.
*/
void Entity::teleport( const CellAppInterface::teleportArgs & args )
{
MF_ASSERT( pReal_ );
EntityPtr pThis = this;
pThis->callback( "onTeleport" );
if (pReal_)
{
pReal_->teleport( args.dstMailBoxRef );
}
else
{
ERROR_MSG( "Entity::teleport( %u ): "
"No longer real after onTeleport callback\n",
id_ );
}
}
/**
* This method handles a message telling us to teleport to another space
* indicated by a cell mailbox.
*/
void RealEntity::teleport( const EntityMailBoxRef & dstMailBoxRef )
{
Vector3 direction( 0.f, 0.f, 0.f );
if (!this->teleport( dstMailBoxRef, Entity::INVALID_POSITION, direction ))
{
ERROR_MSG( "RealEntity::teleport: Failed\n" );
PyErr_Print();
}
}
当要传送的RealEntity接收到这个teleport的RPC之后,会调用一个重载的teleport函数,这个函数实现比较长,处理了多种参数组合,这里我们只关心目前的跨场景传送,忽略掉其他分支的代码:
/**
* This method allows scripts to teleport this entity to another
* location in the world - possibly to another space.
* It sets a Python error if it fails.
*/
bool RealEntity::teleport( const EntityMailBoxRef & nearbyMBRef,
const Vector3 & position, const Vector3 & direction )
{
// 忽略一些异常处理
if (nearbyMBRef.component() != nearbyMBRef.CELL)
{
PyErr_SetString( PyExc_TypeError, "Entity.teleport() "
"Cannot teleport near to non-cell entities" );
return false;
}
// 忽略一些无关代码
// Note: This may actually be a channel that leads back to this CellApp, but
// this is OK. Having a circular channel works fine when single-threaded.
CellAppChannel * pChannel =
CellAppChannels::instance().get( nearbyMBRef.addr );
if (pChannel == NULL)
{
PyErr_SetString( PyExc_ValueError, "Entity.teleport() "
"Invalid destination mailbox" );
return false;
}
entity().relocated();
// 忽略一些无关代码
// Save our old pos and dir and temporarily set to the teleport ones
Vector3 oldPos = entity_.localPosition_;
Direction3D oldDir = entity_.localDirection_;
entity_.localPosition_ = position;
// XXX: This constructor takes its input as (roll, pitch, yaw)
entity_.localDirection_ = Direction3D( direction );
// Delete all ghosts
// 忽略一些无关代码
recordingSpaceEntryID_ = SpaceEntryID();
// Call this before the message is started so that the channel is in a good
// state. This should also be above the creation of the new ghost. If not,
// ghosted property changes would arrive before the ghost is created.
entity_.callback( "onLeavingCell" );
Mercury::ChannelSender sender( pChannel->channel() );
Mercury::Bundle & bundle = sender.bundle();
// Re-add haunt for destination.
this->addHaunt( *pChannel );
// We always have to create the ghost anew, even if there's already one
// there, because we have no idea which space the entity on the cellapp
// we're going to is in.
MemoryOStream ghostDataStream;
entity_.writeGhostDataToStream( ghostDataStream );
bundle.startMessage( CellAppInterface::onloadTeleportedEntity );
bundle << nearbyMBRef.id;
// so the receiver knows where the onload message starts
bundle << uint32( ghostDataStream.remainingLength() );
bundle.transfer( ghostDataStream, ghostDataStream.remainingLength() );
// And offload it
// Save a reference since offloadEntity decrefs 'this'!
EntityPtr pThisEntity = &entity_;
pThisEntity->population().rememberBaseChannel( *pThisEntity, pChannel->addr() );
pThisEntity->cell().offloadEntity( pThisEntity.get(), pChannel,
/* isTeleport: */ true );
// Restore our old pos and dir
pThisEntity->localPosition_ = oldPos;
pThisEntity->localDirection_ = oldDir;
return true;
}
可以看到这里的跨场景迁移的实现其实跟之前的Real-Ghost的迁移实现差不多,都会通过writeGhostDataToStream在目标Cell里创建一个GhostEntity,最终通过Cell::offloadEntity来调用RealEntity到GhostEntity的切换。
可以看到不管是同场景内迁移还是跨场景的迁移,最终都会调用到Cell::offloadEntity,其第二个参数代表要迁移的目标地址,第三个参数代表当前迁移是否是跨场景:
/**
* This method moves a real entity from this cell to an adjacent cell.
*
* @param pEntity The entity to offload.
* @param pChannel The channel to send on.
* @param isTeleport Indicates whether this is a teleport
*/
void Cell::offloadEntity( Entity * pEntity, CellAppChannel * pChannel,
bool isTeleport )
{
AUTO_SCOPED_PROFILE( "offloadEntity" );
SCOPED_PROFILE( TRANSIENT_LOAD_PROFILE );
// TRACE_MSG( "Cell::offloadEntity: id %d to cell %s\n", pEntity->id(),
// pChannel->address().c_str() );
// Make sure it's real.
MF_ASSERT( pEntity->pReal() != NULL );
// Make sure the entity doesn't have a zero refcount when between lists.
EntityPtr pCopy = pEntity;
// If teleporting, this has already been called so that the channel is not
// left with a partially streamed message.
if (!isTeleport)
{
pEntity->callback( "onLeavingCell" );
}
// Move the entity from being real to a ghost.
if (pEntity->isReal())
{
if (pReplayData_ && isTeleport)
{
pReplayData_->deleteEntity( pEntity->id() );
}
realEntities_.remove( pEntity );
pEntity->offload( pChannel, isTeleport );
pEntity->callback( "onLeftCell" );
}
}
offloadEntity的核心是Entity::offload,这个函数会开始将当前RealEntity的数据打包到Channel里:
/**
* This method offloads this real entity to the input adjacent cell. It should
* only be called on a real entity. This entity is converted into a ghost
* entity.
*
* @param pChannel The channel to the application to move to.
* @param isTeleport Indicates whether this is a teleport.
*
* @see onload
*/
void Entity::offload( CellAppChannel * pChannel, bool isTeleport )
{
#ifdef DEBUG_FAULT_TOLERANCE
if (g_crashOnOffload)
{
MF_ASSERT( !"Entity::offload: Crash on offload" );
}
#endif
MF_ASSERT( this->isReal() );
Mercury::Bundle & bundle = pChannel->bundle();
// if we are teleporting then we already have a message on the bundle
if (!isTeleport)
{
bundle.startMessage( CellAppInterface::onload );
}
this->convertRealToGhost( &bundle, pChannel, isTeleport );
// DEBUG_MSG( "Entity::offload( %d ): Offloading to %s\n",
// id_, pChannel->addr().c_str() );
}
Entity::offload的主要任务就是调用convertRealToGhost来执行数据流的打包工作,将当前RealEntity的所有重要数据都放入到bundle中:
/**
* This method converts a real entity into a ghost entity.
*
* @param pStream The stream to write the conversion data to.
* @param pChannel The application the real entity is being moved to. If
* NULL, the real entity is being destroyed.
* @param isTeleport Indicates whether this is a teleport.
*
* @see offload
* @see destroy
*/
void Entity::convertRealToGhost( BinaryOStream * pStream,
CellAppChannel * pChannel, bool isTeleport )
{
MF_ASSERT( this->isReal() );
MF_ASSERT( !pRealChannel_ );
Entity::callbacksPermitted( false );
Witness * pWitness = this->pReal()->pWitness();
if (pWitness != NULL)
{
pWitness->flushToClient();
}
if (pChannel != NULL)
{
// Offload the entity if we have a pChannel to the next real.
MF_ASSERT( pStream != NULL );
this->writeRealDataToStream( *pStream, isTeleport );
pRealChannel_ = pChannel;
// Once the real is created on the other CellApp, it will send a
// ghostSetReal back to this app, so we better be ready for it.
nextRealAddr_ = pRealChannel_->addr();
// Delete the real part (includes decrementing refs of haunts
// and notifying haunts of our nextRealAddr_)
this->offloadReal();
}
else
{
// Delete the real part (includes decrementing refs of haunts)
// as we're being destroyed.
this->destroyReal();
}
// 省略很多代码
}
上面的destroyReal内有个比较奇怪的操作,会用CellAppInterface::ghostSetNextRealArgs这个通知所有的GhostEntity当前的RealEntity要迁移到目标Cell的地址,来同步当前RealEntity的迁移中状态:
/**
* This method deletes this RealEntity. The pNextRealAddr parameter controls
* whether the Channel will be deleted immediately (for offloads) or
* condemned (all other cases).
*/
void RealEntity::destroy( const Mercury::Address * pNextRealAddr )
{
// Offloading
if (pNextRealAddr)
{
// Notify all ghosts that this real is about to be offloaded
for (Haunts::iterator iter = haunts_.begin();
iter != haunts_.end(); ++iter)
{
Haunt & haunt = *iter;
if (haunt.addr() != *pNextRealAddr)
{
CellAppInterface::ghostSetNextRealArgs & args =
CellAppInterface::ghostSetNextRealArgs::start(
haunt.bundle(), entity_.id() );
args.nextRealAddr = *pNextRealAddr;
}
}
// Clear out the channel's resend history so that when Channel::condemn() is
// called it is destroyed immediately. The resend history is now the
// responsibility of the channel that will be created on the dest app.
pChannel_->reset( Mercury::Address::NONE, false );
// delete pChannel_;
pChannel_->destroy();
}
// Destroying
else
{
pChannel_->condemn();
}
pChannel_ = NULL;
delete this;
}
这里会直接销毁pChannel_,无视剩下的还没有ACK的消息,因为在offload迁移时调用的writeRealDataToStreamInternal内部会让RealEntity把通道状态写到 offload流中:
/**
* This method is called by writeRealDataToStream once the decision whether or
* not to compress has been made.
*/
void Entity::writeRealDataToStreamInternal( BinaryOStream & data,
bool isTeleport ) const
{
//this->pType()->dumpRealScript( this, data );
// 暂时省略所有脚本属性的打包
TOKEN_ADD( data, "RealProps" );
pReal_->writeOffloadData( data, isTeleport );
this->writeBasePropertiesExposedForReplayToStream( data );
}
/**
* This method should put the relevant data into the input BinaryOStream so
* that this entity can be onloaded to another cell. It is mostly read off
* in the readOffloadData except for a bit done in our constructor above.
*
* @param data The stream to place the data on.
* @param isTeleport Indicates whether this is a teleport.
*/
void RealEntity::writeOffloadData( BinaryOStream & data, bool isTeleport )
{
StreamHelper::addRealEntity( data );
// -------- above here read off in our constructor above
pChannel_->addToStream( data );
// 省略后续的所有代码
}
这行代码pChannel_->addToStream( data )会把channel的待发送数据和重传历史等必要状态序列化到offload数据流,具体细节这里就不贴了。
等到RealEntity在目标CellApp上重建的时候,在其init函数中会判断当前是从迁移数据里构造数来的,因此会将通道执行恢复:
/**
* This method initialise the RealEntity. Must be called immediately after
* RealEntity is constructed. Return true if ghost position of this entity
* needs to be updated.
*/
bool RealEntity::init( BinaryIStream & data, CreateRealInfo createRealInfo,
Mercury::ChannelVersion channelVersion,
const Mercury::Address * pBadHauntAddr )
{
// The following could've been put on by:
// - py_createEntity
// - py_createEntityFromFile
// - eLoad
// - Base.createCellEntity
// - offloading
//
// This is usually added to the stream using StreamHelper::addRealEntity.
// Set the channel version if we have one
if (channelVersion != Mercury::SEQ_NULL)
{
pChannel_->version( channelVersion );
pChannel_->creationVersion( channelVersion );
}
bool requireGhostPosUpdate = false;
bool hasChangedSpace = false;
bool needsPhysicsCorrection = false;
switch( createRealInfo )
{
case CREATE_REAL_FROM_OFFLOAD:
needsPhysicsCorrection =
this->readOffloadData( data, pBadHauntAddr, &hasChangedSpace );
break;
case CREATE_REAL_FROM_RESTORE:
this->readBackupData( data );
break;
case CREATE_REAL_FROM_INIT:
requireGhostPosUpdate = true;
break;
}
// 省略后续代码
}
/**
* This method is used to stream off data that was added to a stream using
* writeOffloadData. Return true if the ghost position of the entity needs
* to be updated.
*
* @return Whether a physics correction should be sent to the client. This
* needs to be performed by the caller after it gets a witness.
*
* @see writeOffloadData
*/
bool RealEntity::readOffloadData( BinaryIStream & data,
const Mercury::Address * pBadHauntAddr, bool * pHasChangedSpace )
{
pChannel_->initFromStream( data, entity_.baseAddr() );
// 省略后续代码
}
这样执行完成之后,pChannel_就恢复到了迁移之前的状态,可以继续维护可靠消息的确认和重传。有了这个pChannel的序列化与反序列化之后,我们就不需要担心在迁移过程中的下发数据的可靠性。
每次RealEntity在迁移结束之后,在进入新的Cell时又会执行Cell::addRealEntity这个操作,这样就会将最新地址通知回Base,这样Base就有了最新的RealEntity地址。相信大家很快都发现了问题,在迁移期间从Base发往RealEntity的消息使用的仍然是RealEntity迁移前的Cell地址,那消息不就会丢了吗?
这个问题我们在mosaic_game里也遇到过,在介绍mosaic_game里的迁移时,我们为了避免迁移期间的消息丢失,会在迁移之前让actor_entity主动的通知RealEntity迁移的开始,之后所有通过RealEntity发往actor_entity的转发消息都会缓存住,直到actor_entity迁移完成之后通知RealEntity新的地址再重新开始发送。这么明显的问题BigWorld当然也考虑了,他的解决方案与mosaic_game中的很不一样,他是在老的Cell上将这些消息临时缓存起来,等到迁移完成后再执行转发。接下来我们来详细的剖析这个缓存然后等待转发的流程,首先回到之前提到的Entity处理消息的EntityMessageHandler:
/**
* This method handles this message. It is called from the InputMessageHandler
* override and from handling of buffered messages.
*/
void EntityMessageHandler::handleMessage( const Mercury::Address & srcAddr,
Mercury::UnpackedMessageHeader & header,
BinaryIStream & data,
EntityID entityID )
{
CellApp & app = ServerApp::getApp< CellApp >( header );
Entity * pEntity = app.findEntity( entityID );
AUTO_SCOPED_ENTITY_PROFILE( pEntity );
BufferedGhostMessages & bufferedMessages = app.bufferedGhostMessages();
bool shouldBufferGhostMessage =
!pEntity ||
pEntity->shouldBufferMessagesFrom( srcAddr ) ||
bufferedMessages.isDelayingMessagesFor( entityID, srcAddr );
bool isForDestroyedGhost = false;
// Message is for a destroyed ghost if it is out of subsequence order.
if (reality_ == GHOST_ONLY)
{
// 省略
}
// Drop GHOST_ONLY messages for destroyed ghost.
if (isForDestroyedGhost)
{
// 省略
}
// Buffer GHOST_ONLY messages that are out of sender order.
else if (reality_ == GHOST_ONLY && shouldBufferGhostMessage)
{
// 省略
}
// REAL_ONLY messages should be forwarded if we don't have the real.
else if (reality_ >= REAL_ONLY && (!pEntity || !pEntity->isReal()))
{
// We only try to look up the cached channel for the entity if it
// doesn't exist, since calling findRealChannel() for ghosts will
// cause an assertion.
CellAppChannel * pChannel = pEntity ?
pEntity->pRealChannel() :
Entity::population().findRealChannel( entityID );
if (pChannel)
{
Entity::forwardMessageToReal( *pChannel, entityID,
header.identifier, data, srcAddr, header.replyID );
}
else
{
ERROR_MSG( "EntityMessageHandler::handleMessage( %s [id: %d] ): "
"Dropped real message for unknown entity %u\n",
header.msgName(), int( header.identifier ), entityID );
this->sendFailure( srcAddr, header, data, entityID );
}
}
// 省略后续分支
}
这里我们重点关注reality_ >= REAL_ONLY && (!pEntity || !pEntity->isReal())这个分支,代表这个消息应该是Real去处理,但是本地只有Ghost的情况。此时会从GhostEntity上找到这个pRealChannel,然后执行转发。这个转发逻辑依赖于我们的GhostEntity知道RealEntity的下一个Cell地址是什么,这个很好设置,因为当前的GhostEntity就是RealEntity迁移之后形成的,迁移开始的时候本来就知道迁移的目标Cell
void Entity::offload( CellAppChannel * pChannel, bool isTeleport )这里的pChannel代表的就是要迁移的目标Cell的Channel,这样迁移开始的时候Entity::pRealChannel_就指向了要迁移的目标Cell,所以Entity::forwardMessageToReal就可以使用这个pRealChannel_就可以正确的将数据转发过去:
/**
* This static message is used to forward a message to another CellApp.
*
* @param realChannel The channel on which the message will be forwarded.
* @param entityID The id of the entity to send the message to.
* @param messageID The id of the message to forward.
* @param data The message data to forward.
* @param srcAddr This is used if the message is a request. The reply will be
* forwarded to this address.
* @param replyID If not REPLY_ID_NONE, the message is a
* request. The reply will be forwarded to srcAddr via this application.
*/
void Entity::forwardMessageToReal(
CellAppChannel & realChannel,
EntityID entityID,
uint8 messageID, BinaryIStream & data,
const Mercury::Address & srcAddr, Mercury::ReplyID replyID )
{
AUTO_SCOPED_PROFILE( "forwardToReal" );
Mercury::ChannelSender sender( realChannel.channel() );
Mercury::Bundle & bundle = sender.bundle();
const Mercury::InterfaceElement & ie =
CellAppInterface::gMinder.interfaceElement( messageID );
if (replyID == Mercury::REPLY_ID_NONE)
{
bundle.startMessage( ie );
}
else
{
bundle.startRequest( ie, new ReplyForwarder( srcAddr, replyID ) );
}
bundle << entityID;
bundle.transfer( data, data.remainingLength() );
}
在Base里还有一个比较重要的机制来辅助迁移,在Base创建与RealEntity之间通信的pChannel_时会设置shouldAutoSwitchToSrcAddr为true,其作用是如果收到任意消息时,这个Channel的目标地址会立即更新为这个消息的源地址:
// Base channels must auto switch to the incoming address, because if
// packets are lost before a long teleport (i.e. so old ghost will not hang
// around), incoming packets (with the setCurrentCell message) will be
// buffered and the address switch might never happen.
pChannel_->shouldAutoSwitchToSrcAddr( true );
根据其注释,大概解释一下这个选项想要解决的问题:在长时间迁移的情况下,如果RealEntity发之前发出的部分包丢失导致后面发出的setCurrentCell这个包一直在缓冲区里不会被处理,而处理包丢失的消息重传又依赖于Base知道最新的RealEntity的地址,这样就会出现一种诡异的逻辑死锁。所以这里把这个自动切换目标地址为新包源地址的功能会被打开,来自动更新为最新RealEntity的地址。
这个选项说起来简单,但是实现上考虑的是比较严谨的,并不是任意到达的数据包都会更新当前pChannel_的目标地址。在收包处理函数里UDPChannel::addToReceiveWindow会使用一个版本号系统,只有在传入数据的地址版本号大于本地记录的地址版本号的时候才会执行地址更新:
/**
* This method is called when a packet is received. It is responsible for
* adding the packet to the receive window and queueing an ACK to the next
* outgoing bundle on this channel.
*/
UDPChannel::AddToReceiveWindowResult UDPChannel::addToReceiveWindow(
Packet * p, const Address & srcAddr, PacketReceiverStats & stats )
{
const SeqNum seq = p->seq();
const bool isDebugVerbose = this->networkInterface().isDebugVerbose();
// Make sure the sequence number is valid
if (seqMask( seq ) != seq)
{
if (this->networkInterface().isVerbose())
{
ERROR_MSG( "UDPChannel::addToReceiveWindow( %s ): "
"Got out-of-range incoming seq #%u (inSeqAt: #%u)\n",
this->c_str(), seq, inSeqAt_ );
}
return PACKET_IS_CORRUPT;
}
if (shouldAutoSwitchToSrcAddr_)
{
// We switch address if the version number is acceptable. We switch on
// equal version numbers because the first packet from a cell entity
// sets the address and is version 0.
if (!seqLessThan( p->channelVersion(), version_ ))
{
version_ = p->channelVersion();
this->setAddress( srcAddr );
}
}
// 省略后续的分支处理
}
这个功能依赖于每个Packet在发送时都会带上自身的地址版本号:
/**
* This method writes this channel's state to the provided stream so that it
* can be reconstructed with initFromStream().
*/
void UDPChannel::addToStream( BinaryOStream & data )
{
// Avoid having to stream this with the channel.
if (this->hasUnsentData())
{
this->send();
}
// Increment version number for peer
data << seqMask( version_ + 1 );
// 省略后续的处理
}
当这个Base第一次创建Entity的时候,会带上自身的channel版本号作为参数:
/**
* This method creates the cell entity associated with this entity into the
* input space.
*/
bool Base::createInSpace( SpaceID spaceID, const char * pyErrorPrefix )
{
BaseApp & app = BaseApp::instance();
// TODO:
// As an optimisation, try to find a cell entity mailbox for an existing
// base entity that is in the same space.
//
// This is currently not implemented as there is a potential race-condition.
// The entity may currently be in the same space but may be in a different
// space by the time the createCellEntity message arrives.
std::auto_ptr< Mercury::ReplyMessageHandler > pHandler(
this->prepareForCellCreate( pyErrorPrefix ) );
if (!pHandler.get())
{
return false;
}
Mercury::Channel & channel = BaseApp::getChannel( app.cellAppMgrAddr() );
// We don't use the channel's own bundle here because the streaming might
// fail and the message might need to be aborted halfway through.
std::auto_ptr< Mercury::Bundle > pBundle( channel.newBundle() );
pBundle->startRequest( CellAppMgrInterface::createEntity, pHandler.get() );
*pBundle << spaceID;
// stream on the entity channel version
*pBundle << this->channel().version();
*pBundle << false; /* isRestore */
// See if we can add the necessary data to the bundle
if (!this->addCellCreationData( *pBundle, pyErrorPrefix ))
{
isCreateCellPending_ = false;
isGetCellPending_ = false;
return false;
}
channel.send( pBundle.get() );
pHandler.release(); // Handler deletes itself on callback.
return true;
}
当cellApp接收到这个createEntity请求之后,会一路传递这个channelVersion到RealEntity上:
EntityPtr Cell::createEntityInternal( BinaryIStream & data,
const ScriptDict & properties,
bool isRestore, Mercury::ChannelVersion channelVersion,
EntityPtr pNearbyEntity )
{
// 省略很多代码
// Build up the Entity structure
EntityPtr pNewEntity = space_.newEntity( id, entityTypeID );
if (!pNewEntity)
{
return NULL;
}
MF_ASSERT( pNewEntity->nextInChunk() == NULL );
MF_ASSERT( pNewEntity->prevInChunk() == NULL );
MF_ASSERT( pNewEntity->pChunk() == NULL );
Entity::callbacksPermitted( false ); // {
if (!pNewEntity->initReal( data, properties, isRestore, channelVersion,
pNearbyEntity ))
{
pNewEntity->setShouldReturnID( shouldAllocateID );
pNewEntity->decRef();
// TODO: Make a callbacksPermitted lock class to help manage the pairing
// of these calls
Entity::callbacksPermitted( true );
return NULL;
}
// 省略很多代码
}
bool Entity::initReal( BinaryIStream & data, const ScriptDict & properties,
bool isRestore,
Mercury::ChannelVersion channelVersion,
EntityPtr pNearbyEntity )
{
// 省略很多代码
this->createReal();
bool shouldUpdateGhostPositions = pReal_->init( data,
isRestore ? CREATE_REAL_FROM_RESTORE : CREATE_REAL_FROM_INIT,
channelVersion );
// 省略很多的代码
}
这里的RealEntity::init就会使用channelVersion这个版本信息作为参数来初始化pChannel内部的版本号:
/**
* This method initialise the RealEntity. Must be called immediately after
* RealEntity is constructed. Return true if ghost position of this entity
* needs to be updated.
*/
bool RealEntity::init( BinaryIStream & data, CreateRealInfo createRealInfo,
Mercury::ChannelVersion channelVersion,
const Mercury::Address * pBadHauntAddr )
{
// The following could've been put on by:
// - py_createEntity
// - py_createEntityFromFile
// - eLoad
// - Base.createCellEntity
// - offloading
//
// This is usually added to the stream using StreamHelper::addRealEntity.
// Set the channel version if we have one
if (channelVersion != Mercury::SEQ_NULL)
{
pChannel_->version( channelVersion );
pChannel_->creationVersion( channelVersion );
}
// 省略后续代码
}
上述流程走完之后,保证了从Base发出的创建Entity请求成功之后, 这个RealEntity内的pChannel的地址版本号与Base里记录的版本号是一致的。
然后RealEntity每次迁移的时候,都会在pChannel数据打包的时候将内部的Version字段进行自增:
/**
* This method writes this channel's state to the provided stream so that it
* can be reconstructed with initFromStream().
*/
void UDPChannel::addToStream( BinaryOStream & data )
{
// Avoid having to stream this with the channel.
if (this->hasUnsentData())
{
this->send();
}
// Increment version number for peer
data << seqMask( version_ + 1 );
// 省略后续代码
}
然后在解包的时候,会原样的将这个version解析出来:
/**
* This method reconstructs this channel from streamed data. It is used for
* streaming the entity channel when the real cell entity is offloaded.
*
* This assumes that this object was constructed with the same arguments as
* the source channel.
*/
void UDPChannel::initFromStream( BinaryIStream & data,
const Address & addr )
{
uint64 timeNow = timestamp();
lastReceivedTime_ = timeNow;
addr_ = addr;
data >> version_;
// 省略后续的代码
}
这样的设计就可以让每次迁移后RealEntity的pChannel的version比迁移前多1,这样就可以保证迁移后的RealEntity发出的第一个包里面的version一定是比Base上记录的pChannel的version大。在这样的设计下就可以被动的让Base上记录的pChannel的地址更新到最新迁移后的RealEntity的地址。
Base的迁移
前面我们介绍的关于RealEntity消息投递的流程里,有一个非常强的依赖:Base对象在创建之后便不会移动。有了这个不会移动的Base对象之后,往动态的RealEntity投递消息就可以简化为往静态的Base投递消息,因为Base会自动对相关消息转发到最新的RealEntity上。但是其实这个Base不会移动的假设是不成立的,在某些情况下一个Base可能会从一个BaseApp移动到另外一个BaseApp,主要有这两种情况:
- 当前
BaseApp的负载太高了,执行负载均衡时需要将一些Base从当前的BaseApp移动到负载较低的BaseApp上 - 当前的
BaseApp由于进程崩溃导退出,引发相关的Base从数据库中重建,此时会被迫创建在一个新的Base上
由于进程奔溃推出时引发的Base重建会出现可能的消息丢失,所以我们就不去考虑这种容灾的情况,下面我们来重点研究一下Base迁移时如何保证消息的可靠投递的。
负载均衡导致的Base迁移逻辑入口在BaseApp::startOffloading:
/**
* Once we have started retiring, we wait for acknowledgement from the
* BaseAppMgr that it will no longer adjust the backup hash of this app.
*/
void BaseApp::startOffloading( BinaryIStream & stream )
{
MF_ASSERT( this->isRetiring() );
INFO_MSG( "BaseApp::startOffloading: Received confirmation of "
"retirement from BaseAppMgr, destroying %zu local service"
"fragments and starting to offload %zu entities\n",
localServiceFragments_.size(),
bases_.size() );
localServiceFragments_.discardAll( /*shouldDestroy*/ true );
pBackupSender_->restartBackupCycle( bases_ );
pBackupSender_->startOffloading();
}
有一个专门的BackupSender来负责Base的迁移,其内部有一个地址数组addrs_,作为Base的可选迁移目标,这个数组在当前BaseApp被创建的时候就会被填充好,填充的数据由BaseAppMgr指定。BackupSender其最重要的接口就是根据EntityID计算的Hash来获取这个EntityID要迁移的目标地址,通过Hash的随机性来达到平分负载到目标BaseApp的目的:
/**
* This method returns the address that the input id hashes to.
*/
Mercury::Address BackupHash::addressFor( EntityID id ) const
{
if (!addrs_.empty())
{
return addrs_[ this->hashFor( id ) ];
}
return Mercury::Address( 0, 0 );
}
后续的restartBackupCycle负责将当前BaseApp里的所有Base加入到待迁移列表basesToBackUp_中:
/**
* This method restarts the backup cycle.
*
* @param bases The collection of bases to consider for backing up.
*/
void BackupSender::restartBackupCycle( const Bases & bases )
{
basesToBackUp_.clear();
Bases::const_iterator iBase = bases.begin();
while (iBase != bases.end())
{
basesToBackUp_.push_back( (iBase++)->first );
}
// Randomise the backup so we do not load ourselves if contiguous
// blocks of large entities exist in the bases collection.
std::random_shuffle( basesToBackUp_.begin(), basesToBackUp_.end() );
// TODO: It would be nicer if we maintained the random order. Currently,
// it would be possible for an entity not to be backed up for twice the
// archive period.
}
这里填充好了之后会执行一次随机化,来避免可能出现的连续多个重负载的Base聚集在一起, 这样可以方便后续的分帧处理迁移时的负载平滑。在执行完restartBackupCycle之后会将当前的BackupSender设置为正在负载均衡:
void startOffloading() { isOffloading_ = true; }
这个标记位开启之后后续就会执行Base的分帧迁移流程,分帧迁移的逻辑在BackupSender::tick函数中,这个函数会在Tick里来从basesToBackUp_的尾部拿出numToBackUp个元素来处理,避免一帧内大量Base的迁移逻辑触发卡顿:
/**
* This method sends backups for as many base entities as we are supposed to
* each tick.
*
* @param bases The collection of base entities.
* @param networkInterface The network interface to use to send backups
* through.
*
*/
void BackupSender::tick( const Bases & bases,
Mercury::NetworkInterface & networkInterface )
{
int periodInTicks = BaseAppConfig::backupPeriodInTicks();
if (periodInTicks == 0)
return;
if (!isUsingNewBackup_ && entityToAppHash_.empty())
return;
Mercury::BundleSendingMap bundles( networkInterface );
// The number of entities to back up is calculated. A floating point
// remainder is kept so that the backup period is roughly correct.
float numToBackUpFloat =
float(bases.size())/periodInTicks + backupRemainder_;
int numToBackUp = int(numToBackUpFloat);
backupRemainder_ = numToBackUpFloat - numToBackUp;
if (isOffloading_)
{
if (offloadPerTick_ < numToBackUp)
{
offloadPerTick_ = numToBackUp;
INFO_MSG( "BackupSender::tick: "
"BaseApp is retiring, offloading at %d entities per tick\n",
offloadPerTick_ );
}
else
{
numToBackUp = offloadPerTick_;
}
}
if (basesToBackUp_.empty())
{
this->restartBackupCycle( bases );
}
bool madeProgress = false;
while ((numToBackUp > 0) && !basesToBackUp_.empty())
{
Base * pBase = bases.findEntity( basesToBackUp_.back() );
basesToBackUp_.pop_back();
if (pBase && this->autoBackupBase( *pBase, bundles ) )
{
madeProgress = true;
--numToBackUp;
}
}
// Check if at least one base was backed up.
if (madeProgress)
{
// Send all the backup data to the other baseapps.
bundles.sendAll();
ticksSinceLastSuccessfulOffload_ = 0;
}
else
{
// 省略一些容错代码
}
if (basesToBackUp_.empty() && isUsingNewBackup_)
{
// If we were updating a new backup, we are now finished. Inform the
// BaseAppMgr and start using it.
this->ackNewBackupHash();
}
}
这里处理单个Base迁移的函数为autoBackupBase,其函数体负责转发业务到backupBase函数上,这个函数负责查询当前Base对应的新BaseApp的地址,并执行数据打包,打包的数据会统一放在bundles这个Map里,根据BaseApp的地址进行聚合:
/**
* This method performs the backup operation for a single base entity.
*
* @param base The base entity to backup.
* @param bundles Bundle sending map to be used for sending.
* @param pHandler The request handler for the backupEntity request
* operation on the peer BaseApp.
*
* @return True if a base was actually backed up, false otherwise.
*/
bool BackupSender::backupBase( Base & base,
Mercury::BundleSendingMap & bundles,
Mercury::ReplyMessageHandler * pHandler )
{
Mercury::Address addr = entityToAppHash_.addressFor( base.id() );
if (isUsingNewBackup_)
{
// 暂时忽略重复触发负载均衡的情况
}
if (addr == Mercury::Address::NONE)
{
return false;
}
if (isOffloading_)
{
if (base.isProxy())
{
// 忽略客户端还没有连接上来时的处理
}
// If a baseapp is offloading, the hash is immutable, so if an address
// is dead, just find another baseapp to send stuff to.
addr = baseApp_.backupHashChain().addressFor( addr, base.id() );
}
Mercury::Bundle & bundle = bundles[ addr ];
base.backupTo( addr, bundle, isOffloading_, pHandler );
return true;
}
这里的Base::backupTo里负责构造一个BaseAppIntInterface::backupBaseEntity的RPC请求,填充数据里第一个字段代表是否是由于负载均衡导致的迁移,writeBackupData这个我们就不跟进入去了,唯一需要注意的一点是内部在发现正处于负载均衡的时候会将与RealEntity之间的消息通道pChannel_也序列化进去,等到迁移到新的BaseApp之后会利用打包在里面的数据重新创建一个pChannel_,这个过程类似于RealEntity::pChannel_在RealEntity迁移时的处理:
void Base::backupTo( const Mercury::Address & addr,
Mercury::Bundle & bundle,
bool isOffloading, Mercury::ReplyMessageHandler * pHandler )
{
if (pHandler)
{
bundle.startRequest( BaseAppIntInterface::backupBaseEntity,
pHandler );
}
else
{
bundle.startMessage( BaseAppIntInterface::backupBaseEntity );
}
bundle << isOffloading;
this->writeBackupData( bundle, /*isOnload*/ isOffloading );
if (isOffloading)
{
this->offload( addr );
}
hasBeenBackedUp_ = true;
}
数据打包好了之后,还会执行一个offload操作,这个操作比较重要,我们需要跟进一下:
/**
* This method offloads the base entity to the BaseApp at the destination
* address.
*
* @param dstAddr The destination BaseApp (internal address).
*/
void Base::offload( const Mercury::Address & dstAddr )
{
BaseApp & baseApp = BaseApp::instance();
baseApp.makeLocalBackup( *this );
baseApp.addForwardingMapping( id_, dstAddr );
if (this->cellAddr() != Mercury::Address::NONE)
{
Mercury::Channel & channel =
baseApp.intInterface().findOrCreateChannel( this->cellAddr() );
Mercury::Bundle & bundle = channel.bundle();
CellAppInterface::onBaseOffloadedArgs & rOnBaseOffloadedArgs =
CellAppInterface::onBaseOffloadedArgs::start( bundle, this->id() );
rOnBaseOffloadedArgs.newBaseAddr = dstAddr;
DEBUG_MSG( "Base( %s %u )::offload: Now on baseapp %s\n",
pType_->name(), id_, dstAddr.c_str() );
channel.send();
}
// Stop the Proxy trying to disable its Witness when it offloads
// its client.
pChannel_->reset( Mercury::Address::NONE, false );
if (this->isProxy())
{
static_cast< Proxy * >( this )->offload( dstAddr );
}
this->discard( /* isOffload */ true );
}
这里的重点是addForwardingMapping( id_, dstAddr ),这里的意思是为这个id_的Base提供新地址dstAddr的消息转发。实现原理是BaseApp上维护一个id到新地址的映射map,存储在pBaseMessageForwarder_中:
/**
* This method records and sets up the forwarding for an offloaded base
* entity.
*/
void BaseApp::addForwardingMapping( EntityID entityID,
const Mercury::Address & addr )
{
pBaseMessageForwarder_->addForwardingMapping( entityID, addr );
}
/**
* This method adds a forwarding mapping for the given entity ID to the given
* destination address.
*/
void BaseMessageForwarder::addForwardingMapping( EntityID entityID,
const Mercury::Address & destAddr )
{
map_[entityID] = destAddr;
}
然后CommonBaseMessageHandler在接收消息的时候,会优先检查这个id是否需要转发:
/**
* Objects of this type are used to handle base messages
*/
class CommonBaseMessageHandler : public Mercury::InputMessageHandler
{
public:
virtual void handleMessage( const Mercury::Address & srcAddr,
Mercury::UnpackedMessageHeader & header,
BinaryIStream & data )
{
BaseApp & app = ServerApp::getApp< BaseApp >( header );
if (app.forwardBaseMessageIfNecessary( 0, srcAddr, header, data ))
{
return;
}
// 省略后续的所有代码
}
}
/**
* This message forwards a message to a recently offloaded base entity.
*/
bool BaseApp::forwardBaseMessageIfNecessary( EntityID entityID,
const Mercury::Address & srcAddr,
const Mercury::UnpackedMessageHeader & header,
BinaryIStream & data )
{
return pBaseMessageForwarder_->forwardIfNecessary(
forwardingEntityIDForCall_, srcAddr, header, data );
}
如果在map_里找到了转发地址,则封装一个forwardedBaseMessage投递到新的目的地址:
/**
* This method forwards a message if a mapping exists for this entity ID.
* Returns true if a mapping exists, and forwarding occurred, otherwise it
* returns false.
*/
bool BaseMessageForwarder::forwardIfNecessary( EntityID entityID,
const Mercury::Address & srcAddr,
const Mercury::UnpackedMessageHeader & header,
BinaryIStream & data )
{
Map::iterator iMapping = map_.find( entityID );
if (iMapping != map_.end())
{
const Mercury::Address & destAddr = iMapping->second;
Mercury::Channel & channel =
networkInterface_.findOrCreateChannel( destAddr );
Mercury::Bundle & bundle = channel.bundle();
bundle.startMessage( BaseAppIntInterface::forwardedBaseMessage );
bundle << srcAddr << header.identifier << header.replyID ;
// A REAL handler would use this: bundle << entityID;
bundle.transfer( data, data.remainingLength() );
return true;
}
return false;
}
有了这个消息转发机制之后,对于一个RealEntity来说,所有用其老Base进行消息中转的RPC都会自动的在老BaseApp上中转到新的Base上,这样就避免了使用老Base作为通信地址时的消息丢失。
同时Base::offload这里判断了cellAddr()不为空的时候,会通过这个cellAddr给对应的RealEntity发送一个onBaseOffloaded的RPC,来通知其Base要迁移过去的新地址。
/**
* This method is called when this entity's base part has been offloaded to another
* BaseApp as part of BaseApp retirement.
*/
void Entity::onBaseOffloaded(
const CellAppInterface::onBaseOffloadedArgs & args )
{
// This message is REAL_ONLY
MF_ASSERT( pReal_ );
baseAddr_ = args.newBaseAddr;
pReal_->channel().setAddress( baseAddr_ );
DEBUG_MSG( "Entity( %s %u )::onBaseOffloaded: Now on baseapp %s\n",
pEntityType_->name(), id_, baseAddr_.c_str() );
for (RealEntity::Haunts::iterator iter = pReal_->hauntsBegin();
iter != pReal_->hauntsEnd();
++iter)
{
CellAppInterface::onBaseOffloadedForGhostArgs::start(
iter->bundle(), this->id() ).newBaseAddr = baseAddr_;
}
}
/**
* This method is called when this entity's real has been told that this
* entity's base part has been offloaded to another BaseApp as part of BaseApp
* retirement.
*/
void Entity::onBaseOffloadedForGhost(
const CellAppInterface::onBaseOffloadedForGhostArgs & args )
{
// This message is GHOST_ONLY
MF_ASSERT( !pReal_ );
baseAddr_ = args.newBaseAddr;
}
这样RealEntity上的channel就更新了最新的Base的地址,同时其所有的GhostEntity也会收到这个Base地址的更新。其他RealEntity可以使用这个新的Base地址与这个RealEntity进行通信,避免使用老Base地址时导致的多一层转发延迟。
这里还针对Proxy做了一个特殊的处理,通知客户端连接当前Base正在迁移:
/**
* This function is called when this proxy is offloaded in order to transfer
* the connected client.
*/
void Proxy::offload( const Mercury::Address & dstAddr )
{
AUTO_SCOPED_THIS_ENTITY_PROFILE;
if (this->hasClient())
{
// We don't wait for an acknowledgement of this
// transfer, since we're going to be destroyed now.
this->transferClient( dstAddr, /* shouldReset */ false );
this->detachFromClient( /* shouldCondemn */ true );
}
}
/**
* This function will transfer the connected client and optionally reset
* entities on the client if it has been transferred between two
* different proxies.
*/
void Proxy::transferClient( const Mercury::Address & dstAddr,
bool shouldReset, Mercury::ReplyMessageHandler * pHandler )
{
AUTO_SCOPED_THIS_ENTITY_PROFILE;
Mercury::Bundle & bundle = this->clientBundle();
Mercury::Address externalAddr =
BaseApp::instance().getExternalAddressFor( dstAddr );
MF_ASSERT( pClientChannel_ != NULL );
if (NATConfig::isExternalIP( pClientChannel_->addr().ip ))
{
externalAddr.ip = NATConfig::externalIPFor( externalAddr.ip );
}
// Either a cross-CellApp handoff, or an offload.
MF_ASSERT( isGivingClientAway_ || pHandler == NULL );
// Abort any in-progress downloads.
DownloadCallbacks callbacks;
dataDownloads_.abortDownloads( callbacks );
DEBUG_MSG( "Proxy::transferClient( %s %d ): "
"switching client %s to BaseApp %s (%s)\n",
this->pType()->name(),
id_,
pClientChannel_->c_str(),
externalAddr.c_str(),
shouldReset ? "should reset" : "no reset" );
ClientInterface::switchBaseAppArgs & rArgs = (pHandler ?
(ClientInterface::switchBaseAppArgs::startRequest( bundle, pHandler )) :
(ClientInterface::switchBaseAppArgs::start( bundle )));
rArgs.baseAddr = externalAddr;
rArgs.shouldResetEntities = shouldReset;
this->sendBundleToClient();
// If giving the client away, we need to know that we've aborted the
// downloads.
// Otherwise, we're offloading, and the new BaseApp's copy of us
// will note the downloads active in the backup and abort them.
// If we're offloading, our backup has already been sent, so it's
// too late to change state. So we _never_ call triggerCallbacks()
if (isGivingClientAway_)
{
callbacks.triggerCallbacks( this );
}
}
这里的transferClient的实现其实就是通知原来的客户端执行一次主动断线后再去连接到新的Base上,也就是一次顶号的流程。transferClient结束之后就主动调用detachFromClient来等待被动断线。
到这里,Base迁移的准备工作就都做完了,老的BaseApp已经添加了这个Base的转发映射,这个Base的RealEntity和对应的所有GhostEntity都收到了最新BaseApp地址,剩下的工作就是等待打包好的Base数据传递到新的BaseApp上,执行恢复流程,对应的接口为BaseApp::backupBaseEntity,这个接口负责恢复一个Base:
/**
* This method handles a message containing the backup information for a base
* entity on another BaseApp.
*/
void BaseApp::backupBaseEntity( const Mercury::Address & srcAddr,
const Mercury::UnpackedMessageHeader & header,
BinaryIStream & data )
{
bool isOffload;
data >> isOffload;
EntityID entityID;
data >> entityID;
if (isOffload)
{
BasePtr pBase = this->createBaseFromStream( entityID, data );
if (pBase == NULL)
{
WARNING_MSG( "BaseApp::backupBaseEntity: "
"failed to create base %d for onload\n", entityID );
return;
}
DEBUG_MSG( "BaseApp::backupBaseEntity: Onloaded %s %d\n",
pBase->pType()->name(), entityID );
// This just culls the old backup if appropriate
pBackedUpBaseApps_->onloadedEntity( srcAddr, entityID );
// 省略一些容错代码
}
else
{
pBackedUpBaseApps_->backUpEntity( srcAddr, entityID, data );
}
// 省略reply的处理
}
backupBaseEntity首先从数据流里取出开头的isOffload和entityID,这里的isOffload代表的是否因为负载均衡而迁移,如果是负载均衡则调用createBaseFromStream从数据流里读取数据来创建一个新的Base:
/**
* This method creates a base entity from the given backup data stream as a
* restore or offload.
*/
BasePtr BaseApp::createBaseFromStream( EntityID id, BinaryIStream & stream )
{
// This can happen when an offloading baseapp offloads a restored entity
// to the baseapp that has already restored it.
if (bases_.find( id ) != bases_.end())
{
NOTICE_MSG( "BaseApp::createBaseFromStream( %d ): "
"Entity already exists\n",
id );
stream.finish();
return NULL;
}
// This should match the Base::writeBackupData, with the exception that the
// entity ID has already been streamed off as the given EntityID parameter.
EntityTypeID typeID;
BW::string templateID;
DatabaseID databaseID;
stream >> typeID >> templateID >> databaseID;
EntityTypePtr pType = EntityType::getType( typeID );
if ((pType == NULL) || !pType->canBeOnBase())
{
ERROR_MSG( "BaseApp::createBaseFromStream: "
"Invalid entity type %d for entity %d\n",
typeID, id );
stream.finish();
return NULL;
}
BasePtr pBase = pType->newEntityBase( id, databaseID );
if (!pBase)
{
ERROR_MSG( "BaseApp::createBaseFromStream: "
"Failed to create entity %d of type %d\n",
id, typeID );
stream.finish();
return NULL;
}
if (!pBase->initDelegate( templateID ))
{
ERROR_MSG( "BaseApp::createBaseFromStream: "
"Failed to initialise delegate of entity %d of type '%s' "
"with template '%s'\n",
id, pType->name(), templateID.c_str() );
stream.finish();
return NULL;
}
pBase->readBackupData( stream );
return pBase;
}
最后的pBase->readBackupData里负责重建与RealEntity通信的Channel:
/**
* This method is called by readBackupData with a stream that handles
* compression.
*/
void Base::readBackupDataInternal( BinaryIStream & stream )
{
Mercury::Address cellAddr;
stream >> cellAddr;
pChannel_->setAddress( cellAddr );
bool hasChannel;
stream >> hasChannel;
if (hasChannel)
{
pChannel_->initFromStream( stream, cellAddr );
}
if (pCellEntityMailBox_)
pCellEntityMailBox_->address( this->cellAddr() );
stream >> isCreateCellPending_ >> isGetCellPending_ >>
isDestroyCellPending_ >> spaceID_ >>
shouldAutoBackup_ >> shouldAutoArchive_ >>
cellBackupData_;
Mercury::Address clientAddr;
if (this->isProxy())
{
clientAddr = static_cast< Proxy * >( this )->readBackupData(
stream, hasChannel );
}
this->restoreTimers( stream );
this->restoreAttributes( stream );
this->restoreCellData( stream ); // Must be last. Consumes rest of data.
// Holding onto ourselves to ensure that the entity isn't destroyed in
// onRestore()
// 忽略一些脚本层的回调
if (!this->isDestroyed() && this->isProxy())
{
static_cast< Proxy * >( this )->onRestored( hasChannel, clientAddr );
}
}
这里的Proxy::onRestored处理的是当前还没有创建RealEntity的情况,这个时候直接强制让客户端掉线,反正也没有必要维护之前的状态了:
/**
* This method is called after the Base entity has finished restoring from
* the backup stream.
*/
void Proxy::onRestored( bool hasChannel, const Mercury::Address & clientAddr )
{
AUTO_SCOPED_THIS_ENTITY_PROFILE;
if (!hasChannel && (clientAddr != Mercury::Address::NONE))
{
this->onClientDeath( CLIENT_DISCONNECT_BASE_RESTORE,
/*shouldExpectClient: */ false );
}
}
到这里整个Base在新的BaseApp上的重建流程就走完了,所有数据与信道都已经恢复了,同时老的BaseApp上依然保留着老Base到新Base的转发规则,以避免用老的Base地址进行通信时的消息丢失。
虽然保证了迁移前后的消息不会丢失,但是这里好像会出现消息不保序的问题,举个例子来说,RealEntity(A)给Base(B)发出了消息Msg(M),但是此时由于Base(B)正在迁移到Base(C),所以Msg(M)会通过BaseApp(B)转发到BaseApp(C)。但是如果在转发过程中,RealEntity(A)收到了其最新地址Base(C),并向Base(C)发送了一个消息Msg(N),则Msg(N)可能会在Msg(M)之前先到达Base(C)。因为A->B->C的延迟可能会比A->C的延迟大很多,从而出现这种乱序的现象。不过BigWorld的Channel里的所有消息应该都带上了版本号,估计会在可靠UDP里做一个消息排序,具体的需要对可靠UDP里的发包和收包实现做研究。
Ghost管理
在Cell::offloadEntity中直接将当前real_entity从当前的CellSpace::realEntities_集合中删除,然后通过Entity::offload将当前real_entity的全部数据执行打包,然后再将当前Entity切换为ghost_entity,加入到CellSpace:
/**
* This method converts a real entity into a ghost entity.
*
* @param pStream The stream to write the conversion data to.
* @param pChannel The application the real entity is being moved to. If
* NULL, the real entity is being destroyed.
* @param isTeleport Indicates whether this is a teleport.
*
* @see offload
* @see destroy
*/
void Entity::convertRealToGhost( BinaryOStream * pStream,
CellAppChannel * pChannel, bool isTeleport )
{
MF_ASSERT( this->isReal() );
MF_ASSERT( !pRealChannel_ );
Entity::callbacksPermitted( false );
Witness * pWitness = this->pReal()->pWitness();
if (pWitness != NULL)
{
pWitness->flushToClient();
}
if (pChannel != NULL)
{
// Offload the entity if we have a pChannel to the next real.
MF_ASSERT( pStream != NULL );
this->writeRealDataToStream( *pStream, isTeleport );
pRealChannel_ = pChannel;
// Once the real is created on the other CellApp, it will send a
// ghostSetReal back to this app, so we better be ready for it.
nextRealAddr_ = pRealChannel_->addr();
// Delete the real part (includes decrementing refs of haunts
// and notifying haunts of our nextRealAddr_)
this->offloadReal();
}
else
{
// Delete the real part (includes decrementing refs of haunts)
// as we're being destroyed.
this->destroyReal();
}
MF_ASSERT( !this->isReal() );
// make it a ghost script
//this->pType()->convertToGhostScript( this );
// .. by dropping all the properties of the real
MF_ASSERT( properties_.size() == pEntityType_->propCountGhostPlusReal() );
for (uint i = pEntityType_->propCountGhost(); i < properties_.size(); ++i)
{
if (properties_[i])
{
pEntityType_->propIndex(i)->dataType()->detach( properties_[i] );
}
}
properties_.erase( properties_.begin() + pEntityType_->propCountGhost(),
properties_.end() );
this->relocated();
Entity::callbacksPermitted( true );
}
在打包好real_entity的数据之后,本地的Entity的属性系统中就不再需要存储非ghost_entity数据了,因此会调用properties_.erase将这些不再需要的属性执行删除,这样就完成了real_entity到ghost_entity的转换。中间还有pEntity->callback( "onLeavingCell" )和 pEntity->callback( "onLeftCell" )来通过事件系统来通知其他逻辑这个Real-Ghost的状态改变。
介绍完了real_entity的迁移之后,我们再来看EntityGhostMaintainer::check剩余部分对ghost_entity的管理,markHaunts负责把所有现有的ghost_entity都标记为需要删除,然后这在EntityGhostMaintainer::createOrUnmarkRequiredHaunts中对需要存在的ghost_entity取消标记, 最后通过deleteMarkedHaunts对仍然带有删除标记的ghost_entity真正执行删除:
/**
* This method checks through this entity's ghosts and checks whether the real
* entity needs to be offloaded elsewhere.
*/
void EntityGhostMaintainer::check()
{
if (this->cell().shouldOffload())
{
this->checkEntityForOffload();
}
// We mark all the haunts for this entity, and then we unmark all the valid
// ones. The invalid ghosts are left marked and are deleted.
bool doesOffloadDestinationHaveGhost = this->markHaunts();
this->createOrUnmarkRequiredHaunts();
MF_ASSERT( (pOffloadDestination_ == NULL) ||
doesOffloadDestinationHaveGhost ||
(numGhostsCreated_ == 1) );
this->deleteMarkedHaunts();
}
createOrUnmarkRequiredHaunts这个函数的逻辑实现比较简单,就是根据当前的位置构造出一个特定半径的矩形,这个半径为由三个部分组成:
CellAppConfig::ghostDistance()默认的GhostRadiuspEntity_->pType()->description().appealRadius()这个实体类型所带的一个额外影响半径GHOST_FUDGE这个是一个额外的容差半径, 主要是为了避免AABB相交计算时的一些浮点比较判定的误差,
/**
* This method evaluates each cell in the space's tree for suitability for
* adding a ghost to that cell for the given entity. It creates a ghost if
* one is required but not present, and leaves the channel unmarked.
*
* If a ghost exists and the cell is still a suitable haunt for the entity,
* then the haunt's channel is unmarked.
*
* Those cells that no longer require a ghost for the given entity are left
* alone (they should be marked for removal).
*
*/
void EntityGhostMaintainer::createOrUnmarkRequiredHaunts()
{
// TODO: Make this configurable.
static const float GHOST_FUDGE = 20.f;
const Vector3 & position = pEntity_->position();
// Find all the haunts that we should have.
BW::Rect interestArea( position.x, position.z, position.x, position.z );
// Entities with an appeal raidus have to ghost more
interestArea.inflateBy( CellAppConfig::ghostDistance() +
pEntity_->pType()->description().appealRadius() );
hysteresisArea_ = interestArea;
interestArea.inflateBy( GHOST_FUDGE );
pEntity_->space().visitRect( interestArea, *this );
}
构造完这个矩形之后, 遍历当前space下所有与这个矩形相交的CellSpace,检查其是否需要创建ghost_entity:
/**
* Override from CellInfoVisitor.
*/
void EntityGhostMaintainer::visit( CellInfo & cellInfo )
{
const Mercury::Address & remoteAddress = cellInfo.addr();
// discard it if it is ourself
if (remoteAddress == ownAddress_)
{
return;
}
if (cellInfo.isDeletePending())
{
// Do not have ghosts on cells that are about to be deleted.
return;
}
// If it has been marked as an existing haunt then unmark it and bail.
CellAppChannel & channel = *CellAppChannels::instance().get(
remoteAddress );
if (channel.mark() == 1)
{
channel.mark( 0 );
return;
}
// Do not create a ghost if we are about to be offloaded. Let the
// destination do this. This helps with not creating CellAppChannels
// unnecessarily and also helps prevent race conditions. We still create
// the ghost on the destination cell.
if (pOffloadDestination_ && pOffloadDestination_->addr() != remoteAddress)
{
return;
}
// and if we are not far enough in then toss it too (hysteresis check)
if (!cellInfo.rect().intersects( hysteresisArea_ ))
{
return;
}
// Otherwise we should create a new ghost.
pEntity_->pReal()->addHaunt( channel );
pEntity_->createGhost( channel.bundle() );
++numGhostsCreated_;
}
这里可以看出,如果当前Entity已经标记了准备迁移的情况下,就不会在非迁移目标里创建ghost_entity。同时如果迁移目标里还没有ghost_entity,则会新建一个。由于Cell::sendOffloads是在所有的real_entity的EntityGhostMaintainer::check都执行完成之后才执行的,所以这样就保证了要迁移的目标CellSpace一定会有当前real_entity的ghost_entity, 所以会有下面的Assert:
MF_ASSERT( (pOffloadDestination_ == NULL) ||
doesOffloadDestinationHaveGhost ||
(numGhostsCreated_ == 1) );
对于所有仍然带有删除标记的ghost_entity,在deleteMarkedHaunts会执行删除操作,不过这里执行删除的条件并不仅仅是这个标记位,还有其他的考虑条件:
- 单次删除的
ghost_entity数量有上限 - 如果一个
ghost_entity的存在时间短于MINIMUM_GHOST_LIFESPAN,则不会被删除 - 如果这个
real_entity的存在时间短于NEW_REAL_KEEP_GHOST_PERIOD_IN_SECONDS,则不会被删除 - 如果是迁移目标的
ghost_entity,则也不会被删除
/**
* This method removes ghosts on haunts that have their channels marked. All
* the required haunts would have had their channels unmakred in
* createOrUnmarkRequiredHaunts().
*
* There are criteria for when a ghost should not be deleted:
*
* * Each iteration of the offload checker has a maximum number of ghosts that
* can be deleted (configurable).
* * A ghost will not be deleted if it is a new ghost (configurable).
* * A ghost will not be deleted if the real entity has been created recently
* (2 seconds).
*
*/
void EntityGhostMaintainer::deleteMarkedHaunts()
{
static const int NEW_REAL_KEEP_GHOST_PERIOD_IN_SECONDS = 2;
const GameTime NEW_REAL_KEEP_GHOST_PERIOD =
NEW_REAL_KEEP_GHOST_PERIOD_IN_SECONDS * CellAppConfig::updateHertz();
const GameTime MINIMUM_GHOST_LIFESPAN =
CellAppConfig::minGhostLifespanInTicks();
const GameTime gameTime = CellApp::instance().time();
real_entity * pReal = pEntity_->pReal();
real_entity::Haunts::iterator iHaunt = pReal->hauntsBegin();
while (iHaunt != pReal->hauntsEnd())
{
real_entity::Haunt & haunt = *iHaunt;
CellAppChannel & channel = haunt.channel();
const bool shouldDelGhost =
// Too many ghosts deleted in this iteration.
offloadChecker_.canDeleteMoreGhosts() &&
// Keep the ghost if we're offloading there.
(&channel != pOffloadDestination_) &&
// Keep the ghost if the real entity is new.
(gameTime - pReal->creationTime() > NEW_REAL_KEEP_GHOST_PERIOD) &&
// Keep the ghost if the ghost is new.
(gameTime - haunt.creationTime() > MINIMUM_GHOST_LIFESPAN);
if (channel.mark() && shouldDelGhost)
{
// only bother telling it if it hasn't failed
if (channel.isGood())
{
pReal->addDelGhostMessage( channel.bundle() );
offloadChecker_.addDeletedGhost();
}
iHaunt = pReal->delHaunt( iHaunt );
}
else
{
++iHaunt;
}
// always clear the mark for the next user
channel.mark( 0 );
}
}
Mosaic Game 的分布式场景
space_service上的分布式场景
在mosaic_game中也实现了一个类似的分布式场景管理,这个分布式的支持并不会对所有的场景类型生效,只有对配置表中配置为了is_union_space的场景才会启用。
struct space_type_info
{
union
{
struct
{
std::uint32_t is_union_space:1; //是否是大世界可分块场景
std::uint32_t is_town_space:1; // 是否是城镇场景
std::uint32_t is_player_dungeon:1; // 是否是单人副本
std::uint32_t is_team_dungeon:1; //是否是组队副本
std::uint32_t is_match_space:1; // 是否是匹配场景
std::uint32_t auto_select_when_empty_id:1; // 空space_id进入时自动选择负载最低的instance
std::uint32_t auto_create_new_heavy_load:1; // 高负载下自动创建新场景
std::uint32_t support_back_return:1; // 是否支持离开后再回来
};
std::uint32_t all_flags = 0;
};
std::uint32_t space_type; // 场景类型
std::uint32_t max_player_load; // 单场景最大玩家数量
};
因此在mosaic_game中,一个space根据这个字段是否为true被分为了mono_space和union_space两种类型,mono_space没有分布式的支持,而union_space支持了分布式。
对于一个支持分布式的场景union_space来说,其逻辑上也是有一个或多个互不相交的cell_space组成的,同时union_space的XZ平面区域会被这些cell_space完整填充。cell_space是在单一space_server上的一个space_entity,而union_space则是将这些cell_space连接起来的结构。归属于同一个union_space的cell_space上的union_space_id都是相同的,都等于所属union_space的space_id;同时他们的space_id又是不同的,作为具体的space_entity的唯一标识符。
struct mono_space_info
{
std::string space_id;
std::unordered_map<std::string, player_info_in_space> players;
std::uint32_t space_no;
std::string game_id;
std::string team_id; // 如果有值 代表只能这个队伍的成员能进入
std::string player_id; // 如果有值 代表只有这个人能进入
std::map<std::string, std::uint32_t> player_factions; // 如果有值 则代表只能有这些玩家进入
bool ready = false;
};
struct cell_space_info
{
std::string union_space_id;
std::string space_id;
std::uint32_t space_no;
std::string game_id;
bool ready = false;
};
struct union_space_info
{
const std::string space_id;
distributed_space::space_cells cells;
const std::uint32_t space_no;
std::unordered_map<std::string, player_info_in_space> players;
bool ready = false;
union_space_info(const std::string& in_space_id, const distributed_space::cell_bound& bound, const std::uint32_t in_space_no, const std::string& cell_game_id, const std::string& cell_space_id, const double in_ghost_radius)
: space_id(in_space_id)
, cells(bound, cell_game_id, cell_space_id, in_ghost_radius)
, space_no(in_space_no)
{
}
};
上面的cell_space_info和union_space_info就是space_service上存储的分布式场景的相关信息,而mono_space_info存储的是一个非分布式场景的信息:
std::unordered_map<std::uint32_t, std::unordered_set<std::string>> m_spaces_by_no;
std::unordered_map<std::string, std::unique_ptr<mono_space_info>> m_mono_spaces;
std::unordered_map<std::string, std::unique_ptr<cell_space_info>> m_cell_spaces;
std::unordered_map<std::string, std::unique_ptr<union_space_info>> m_union_spaces;
std::unordered_map<std::string, const misc::space_type_info*> m_space_types;
仅用集合关系来描述一个union_space内的所有cell_space是不够的,其真正的结构应该是跟bigworld里一样的树形结构。每个union_space对应一棵分割树, cell_space就是这棵树里的叶子节点。 为了方便的对union_space进行管理,这里用distributed_space::space_cells来描述分割树。这个distributed_space::space_cells类型由自己编写的一个独立库distributed_space提供,这样独立出去的好处是可以更好的进行测试、调试与可视化。
cell_space管理器space_cells
之前提到了为了描述cell_space之间的关系,需要使用一个二叉KD树来串联所有的cell_space,每个cell_space都对应这个KD树中的一个叶子节点。不过在space_cells中并没有显示的用类型去区分叶子节点和内部节点,统一都使用space_node来描述一个节点的信息,这个与BigWorld中的实现不一样:
class space_node
{
private:
std::string m_space_id;
std::string m_game_id;
// boundary的长宽都需要大于四倍的ghost_radius
// removing状态下的除外 因此此时会缩小到0.5* ghost_radius
cell_bound m_boundary;
std::array<space_node*, 2> m_children;
space_node* m_parent = nullptr;
bool m_ready = false;
bool m_is_merging = false;
bool m_is_split_x = false;
};
m_parent与m_children两个字段用来组成树形关系,这里的m_children用的是array而不是vector是为了节省内存,以及避免一些动态内存分配。在这样的设计下,叶子节点的m_children存储的都是nullptr,所以判断一个节点是否是叶子节点就可以利用这个性质:
bool is_leaf_cell() const
{
return !m_children[0];
}
这里的m_boundary字段代表了这个节点所覆盖的XZ平面范围:
struct point_xz
{
union
{
struct {
double x;
double z;
};
double val[2];
};
double& operator[](int index)
{
return val[index];
}
double operator[](int index) const
{
return val[index];
}
NLOHMANN_DEFINE_TYPE_INTRUSIVE(point_xz, x, z)
};
struct cell_bound
{
point_xz min;
point_xz max;
NLOHMANN_DEFINE_TYPE_INTRUSIVE(cell_bound, min, max);
bool cover(const double x, const double z) const;
bool intersect(const cell_bound& other) const;
};
注意到m_boundary上的注释,默认情况下这个矩形的长和宽都要大于四倍的ghost_radius,这个ghost_radius代表的是ghost_entity创建的容差范围。至于为什么要限定大于4*ghost_radius,这个将会在后续的real-ghost管理中介绍。
m_is_split_x字段代表当前是内部节点时的分割轴方向,但是这里没有存储分割轴的位置信息。如果分割轴为X轴,则m_children[0]存储的是分割轴左边的子节点,m_children[1]存储的是分割轴右边的子节点;如果分割轴为Z轴,则m_children[0]存储的是分割轴下面的子节点,m_children[1]存储的是分割轴上面的子节点。在这个设定下,获取分割轴位置可以通过下面的方法计算出来:
double get_split_pos() const
{
if(m_is_split_x)
{
return m_children[0].max.x;
}
else
{
return m_children[0].max.z;
}
}
space_cells中存储了两个unordered_map来通过space_id来查询内部节点与叶子节点,同时使用一个字段m_root_node存储了这棵树的根节点:
class space_cells
{
private:
std::unordered_map<std::string, space_node*> m_leaf_nodes;
std::unordered_map<std::string, space_node*> m_internal_nodes;
// split与merge不会影响root_node
space_node* m_root_node;
std::uint64_t m_temp_node_counter = 0;
// master 代表主逻辑cell 这个cell的生命周期伴随着整个space的生命周期
// space的主体逻辑由master cell控制
// 第一个创建的cell就是master_cell
// 这个cell无法被合并到其他节点 同时也无法被负载均衡删除
std::string m_master_cell_id;
// 任何一个cell的长和宽必须大于等于四倍的ghost_radius
// removing状态下的除外
double m_ghost_radius;
};
注意到这里有一个m_master_cell_id字段,记录了这个space_cells被创建时的第一个Cell的space_id。由于一个space内需要存储一些全局性的数据以及执行一些全局相关的逻辑,为了保证这些数据与逻辑的有序性,我们需要固定住这些逻辑的承载Cell,也就是这个space_cells的master_cell。一个master_cell将不会在负载均衡时被删除,这样才能保证有序性。
在执行节点的分裂操作的时候,会创建一个内部节点,为了给这个内部节点一个不会与所有叶子节点相冲突的唯一标识符,我们将强制使用数字转成的字符串作为其space_id,而这个数字为了保证当前space_cells内唯一,使用了一个递增计数器m_temp_node_counter:
bool space_cells::check_valid_space_id(const std::string& space_id) const
{
if (space_id.empty())
{
return false;
}
return !std::all_of(space_id.begin(), space_id.end(), ::isdigit);
}
const space_cells::space_node* space_cells::split_x(double x, const std::string& origin_space_id, const std::string& new_space_game_id, const std::string& left_space_id, const std::string& right_space_id)
{
if(!check_valid_space_id(left_space_id) || ! check_valid_space_id(right_space_id))
{
return nullptr;
}
auto dest_node_iter = m_leaf_nodes.find(origin_space_id);
if(dest_node_iter == m_leaf_nodes.end())
{
return nullptr;
}
auto dest_node = dest_node_iter->second;
if(!dest_node->is_leaf_cell())
{
return nullptr;
}
m_temp_node_counter++;
auto result = dest_node->split_x(x, new_space_game_id, left_space_id, right_space_id, std::to_string(m_temp_node_counter));
if(!result)
{
return nullptr;
}
m_leaf_nodes.erase(dest_node_iter);
for(auto one_child: dest_node->children())
{
m_leaf_nodes[one_child->space_id()] = one_child;
}
m_internal_nodes[dest_node->space_id()] = dest_node;
return result;
}
SpaceCells的状态同步
除了space_service上会存储一个union_space上的space_cells结构外,这个union_space的所有Cell也会存储一个同步副本到space_cell_component中,因为space_entity上有很多逻辑需要知道当前Cell周围的其他Cell的信息:
class Meta(rpc) space_cell_component final: public space_component::sub_class<space_cell_component>
{
private:
utility::timer_handler m_check_ghost_real_timer;
private:
std::unique_ptr<distributed_space::space_cells> m_space_cells;
};
当space_service创建一个union_space时,对应的space_cells会被初始化, 然后会将这个space_cells的数据填充到场景的init数据中:
std::string space_service::do_create_space(std::uint32_t cur_space_no, std::uint32_t cur_space_type, const std::string& pref_space_id, const std::string& dest_game_id, const json::object_t &init_info)
{
auto cur_space_sysd = m_space_config_data->get_row(cur_space_no);
auto cur_game_id = dest_game_id;
if(cur_game_id.empty())
{
choose_game_for_space(cur_space_no, cur_space_sysd);
}
auto cur_space_id = pref_space_id;
if(pref_space_id.empty())
{
cur_space_id = get_server()->gen_unique_str();
}
m_logger->info("try create space no {} with id {}", cur_space_no, cur_space_id);
auto cur_space_type_info = misc::space_type_info_mgr::get_space_type_info(cur_space_type);
std::string cell_space_id;
std::string union_space_id;
json::object_t space_init_info = init_info;
utility::rpc_msg cur_msg;
cur_msg.cmd = "notify_create_space";
cur_msg.args.reserve(10);
if(cur_space_type_info->is_union_space)
{
cell_space_id = get_server()->gen_unique_str();
union_space_id = cur_space_id;
std::array<mosaic_game::utility::entity_pos_t, 2> map_range;
if(!cur_space_sysd.expect_value(std::string("map_range"), map_range))
{
return {};
}
distributed_space::cell_bound cur_map_range;
cur_map_range.min.x = map_range[0].x;
cur_map_range.max.x = map_range[1].x;
cur_map_range.min.z = map_range[0].z;
cur_map_range.max.z = map_range[1].z;
std::unique_ptr<union_space_info> cur_union_space_ptr = std::make_unique<union_space_info>(union_space_id, cur_map_range, cur_space_no, cur_game_id, cell_space_id, m_ghost_radius);
space_init_info["components"]["cell"] = cur_union_space_ptr->cells.encode(); // 填充space_cells数据
m_union_spaces[union_space_id] = std::move(cur_union_space_ptr);
m_space_types[union_space_id] = cur_space_type_info;
m_logger->info("create cell {} for union space {}", cell_space_id, union_space_id);
}
// 省略后续代码
}
当一个cell_space被初始化的时候,会从init_info中找到这个space_cells数据,来填充space_cell_component里的space_cells:
bool space_cell_component::init(const json& data)
{
if(!m_owner->is_cell_space())
{
return true;
}
distributed_space::cell_bound temp_bound;
temp_bound.min.x = -1;
temp_bound.min.z = -1;
temp_bound.max.x = 1;
temp_bound.max.z = 1;
m_space_cells = std::make_unique<distributed_space::space_cells>(temp_bound, std::string{}, std::string{}, 100);
if(!m_space_cells->decode(data))
{
m_owner->logger()->error("cant decode cell_region");
return false;
}
m_is_master_cell = m_space_cells->cells().size() == 1;
auto cur_root_cell = m_space_cells->root_node();
m_master_cell_proxy = std::make_shared<std::string>(anchor_for_cell(cur_root_cell));
check_ghost_and_real();
return true;
}
这样就做到了初始时第一个Cell的space_cells同步,如果后续创建了更多的Cell,将也会对场景创建信息init_info做同样的填充:
void space_service::after_split_space(std::uint32_t cur_space_no, const std::string& cur_union_space_id, distributed_space::space_cells& cur_space, const std::string& new_space_id, const std::string& dest_game_id)
{
add_space_load_to_game(cur_space_no, new_space_id, dest_game_id, cur_union_space_id, misc::space_type_info_mgr::get_space_type_info(cur_space_no));
utility::rpc_msg create_space_msg;
create_space_msg.cmd = "notify_create_space";
json::object_t space_init_info;
space_init_info["components"]["cell"] = cur_space.encode();
create_space_msg.set_args(new_space_id, cur_space_no, cur_union_space_id, space_init_info);
call_space_manager(dest_game_id, create_space_msg);
}
同时,space_service上任何对space_cells的修改操作,都会通过notify_cell_change向这个union_space的所有Cell进行广播:
void space_service::notify_cell_change(const std::string &union_space_id, const utility::rpc_msg ¬ify_msg, const std::string &expect_cell_id)
{
m_logger->info("notify_cell_change {} msg {} except {}", union_space_id, json(notify_msg).dump(), expect_cell_id);
auto cur_union_space_iter = m_union_spaces.find(union_space_id);
if (cur_union_space_iter == m_union_spaces.end())
{
return;
}
std::vector<std::string> cell_call_anchors;
const auto &cur_cells = cur_union_space_iter->second->cells.cells();
cell_call_anchors.reserve(cur_cells.size());
for (const auto &one_pair : cur_cells)
{
if (one_pair.first == expect_cell_id)
{
continue;
}
cell_call_anchors.push_back(utility::rpc_anchor::concat(one_pair.second->game_id(), one_pair.first));
}
get_server()->call_server_multi(notify_msg, cell_call_anchors);
}
当space_cell_component接收到相关的修改RPC之后,本地会将这些修改进行回放:
Meta(rpc) void notify_cell_ready(const utility::rpc_msg& msg, const std::string& cell_id);
Meta(rpc) void notify_split_space(const utility::rpc_msg& msg, bool is_x, double split_value, const std::string& origin_space_id, bool remain_left, const std::string& new_space_game_id, const std::string& new_space_id);
Meta(rpc) void notify_split_space_with_direction(const utility::rpc_msg& msg, const std::string& cell_id, const std::string& new_space_id, int cur_split_direction, const std::string& new_space_game_id);
Meta(rpc) void notify_start_merge_space_node(const utility::rpc_msg& msg, const std::string& cell_id);
Meta(rpc) void notify_finish_merge_space_node(const utility::rpc_msg& msg, const std::string& cell_id);
Meta(rpc) void notify_balance_space(const utility::rpc_msg& msg, const std::string& parent_space_id, double split_value);
这样就保证了对于同一个union_space,space_service上存储的space_cells与其所有Cell里space_cell_component存储的space_cells内容完成同步。
SpaceCells负载均衡
单个CellSpace的负载并不是一成不变的,特别是大量的Actor移动的时候,不同的CellSpace之间的负载分布很可能出现不均匀的情况。即使所有的Actor的位置都不发生改变,由于每个Actor的执行逻辑可能被用户输入、时间等各个因素影响,所以CellSpace的负载在这个情况下也不是固定的。为了避免由于CellSpace之间的负载分配不均匀导致若干进程的CPU过高,需要定期的对相邻的CellSpace做边界调整,有些时候甚至需要执行CellSpace的分裂来让更多的进程来平摊负载。这个负载的调整过程就是SpaceCells的负载均衡。
执行负载均衡的前提是首先需要知道单个CellSpace和单个ActorEntity上的负载度量。最简单的负载度量方法就是在一个ActorEntity(A)执行任意函数funcB之前记录一下开始时间begin_ts,执行完这个函数之后记录一下结束时间end_ts,这样end_ts - begin_ts的时间插值就是执行当前函数funcB的消耗,累积在ActorEntity(A)上作为函数消耗总度量。当这个函数调用耗时统计覆盖到ActorEntity的所有逻辑时,这个函数消耗总度量就是当前ActorEntity的负载。这里有一个非常重要的地方需要关注,即funcA可能调用funcB,如果无脑记录所有函数的消耗并执行累加,会导致funcA和funcB的消耗都累加进入,导致负载记录不准确。实际上只能记录最外层的funcA的消耗,任何内层的函数调用的消耗都不能参与累加。为了方便做到这样的只记录最外层函数消耗的目的,mosaic_game里创建了这样的一个类型entity_load_stat:
class entity_load_stat
{
// 这里的单位都是ns
std::uint64_t m_current_load; // 当前时间段内的负载统计
std::uint64_t m_accumulated_load; // 创建之后的总负载统计
std::uint32_t m_depth = 0; // 记录嵌套层级 只有为0的时候才会记录时间
std::uint64_t m_record_begin_ts = 0; // 记录第一层调用时的开始时间点
public:
entity_load_stat()
: m_current_load(0)
, m_accumulated_load(0)
{
}
std::uint64_t current_load() const
{
return m_current_load;
}
std::uint64_t accumulated_load() const
{
return m_accumulated_load;
}
void flush_period()
{
m_current_load = 0;
}
void add_load(std::uint64_t in_load)
{
m_current_load += in_load;
m_accumulated_load += in_load;
}
void push_record()
{
if(m_depth == 0)
{
m_record_begin_ts = std::chrono::duration_cast<std::chrono::nanoseconds>(std::chrono::system_clock::now().time_since_epoch()).count();
}
m_depth++;
}
void pop_record()
{
assert(m_depth> 0);
m_depth--;
if(m_depth==0)
{
auto now_ts = std::chrono::duration_cast<std::chrono::nanoseconds>(std::chrono::system_clock::now().time_since_epoch()).count();
add_load(now_ts - m_record_begin_ts);
}
}
bool is_recording() const
{
return !!m_depth;
}
};
class server_entity
{
protected:
utility::entity_load_stat m_entity_load_stat;
public:
utility::entity_load_stat& entity_load_stat()
{
return m_entity_load_stat;
}
};
每次调用一个函数的时候执行一下这里的push_record,每次执行完一个函数的时候执行一下这里的pop_record。内部使用m_depth这个计数器来记录当前的函数是第几层调用,当m_depth==0的时候代表当前执行的函数是最外层,此时才会记录begin_ts和end_ts,并将时间差值加入到统计。由于push_record与pop_record总是需要配对使用,为了避免人工加入这些代码时的配对错误,这里还提供了一个RAII类型entity_load_stat_recorder来自动的在构造函数里调用push_recrod,同时在析构函数里调用pop_record:
class entity_load_stat_recorder
{
entity_load_stat& m_dest_stat;
public:
entity_load_stat_recorder(entity_load_stat& in_dest_stat)
: m_dest_stat(in_dest_stat)
{
m_dest_stat.push_record();
}
entity_load_stat_recorder(const entity_load_stat_recorder& other) = delete;
entity_load_stat_recorder& operator=(const entity_load_stat_recorder& other) = delete;
~entity_load_stat_recorder()
{
m_dest_stat.pop_record();
}
};
有了这个函数消耗度量工具之后,剩下的任务就是如何尽可能少的修改原来的代码的同时来达到Entity主要逻辑的全覆盖。这里回想一下之前介绍的mosaic_game里的逻辑驱动方式,主要有这四种:RPC驱动,计时器驱动,事件驱动,异步回调驱动。因此只要能够有效的修改这四个逻辑驱动的源代码,就可以准确的对Entity的消耗进行统计。
首先对RPC调用做消耗记录,当前的RPC调用有两个统一的入口,都在entity_manager上,entity_manager会通过传入的entity_id找到对应的entity并在这个entity上做分发,所以只需要在做RPC分发之前插入一个entity_load_stat_recorder即可:
utility::rpc_msg::call_result dispatch_rpc_msg(const std::string& dest, const utility::rpc_msg& msg)
{
auto cur_entity = get_entity(dest);
if (!cur_entity)
{
return utility::rpc_msg::call_result::dest_not_found;
}
utility::entity_load_stat_recorder temp_recorder(cur_entity->entity_load_stat());
return cur_entity->on_rpc_msg(msg);
}
utility::rpc_msg::call_result dispatch_entity_raw_msg(const std::string& dest, std::uint8_t cmd, std::shared_ptr<const std::string> msg)
{
auto cur_entity = get_entity(dest);
if (!cur_entity)
{
return utility::rpc_msg::call_result::dest_not_found;
}
utility::entity_load_stat_recorder temp_recorder(cur_entity->entity_load_stat());
return cur_entity->on_entity_raw_msg(cmd, msg);
}
计时器的超时计算刚好也在entity_manager上提供了一个统一的入口,类似的添加entity_load_stat_recorder就好了:
std::size_t poll_timers(utility::ts_t cur_ts)
{
std::size_t result = 0;
for(auto one_slot: m_total_entities_vec)
{
if(one_slot.first)
{
utility::entity_load_stat_recorder temp_recorder(one_slot.first->entity_load_stat());
result += one_slot.first->poll_timers(cur_ts);
}
}
m_last_poll_ts = cur_ts;
return result;
}
space_server上处理异步回调也有一个唯一入口,在此添加entity_load_stat_recorder:
void space_server::handle_entity_cb(spiritsaway::mosaic_game::utility::local_entity_id local_eid, const std::shared_ptr<const std::string>& call_proxy, utility::mixed_callback_manager::callback_handler entity_cb, const json& data)
{
auto temp_entity = entity::entity_manager::instance().get_entity(local_eid);
if (temp_entity)
{
utility::entity_load_stat_recorder temp_recorder(temp_entity->entity_load_stat());
temp_entity->invoke_callback(entity_cb, data);
}
else
{
if(!call_proxy)
{
return;
}
else
{
utility::rpc_msg cur_msg;
cur_msg.cmd = "remote_invoke_cb";
cur_msg.set_args(entity_cb.value(), data);
call_server(call_proxy, cur_msg);
}
}
}
最后的事件驱动部分mosaic_game里并没有去做调用统计,因为绝大部分的事件分发都是在actor_entity自身的函数里引发的,没必要徒劳的去记录非最外层的函数调用。
space_entity的函数调用负载除了上述的统计位点之外,还需要在创建actor_entity和actor_entity进出space_entity的时候增加一下额外的统计,因为这三个逻辑很多时候是从space_manager上中转过来的:
actor_entity* space_entity::create_entity(const std::string& entity_type, const std::string& entity_id, json::object_t& init_info, const json::object_t& enter_info, std::uint64_t online_entity_id)
{
utility::entity_load_stat_recorder temp_recorder(entity_load_stat());
// 省略后续所有代码
}
void space_entity::enter_space(actor_entity* cur_entity, const json::object_t& enter_info)
{
utility::entity_load_stat_recorder temp_recorder(entity_load_stat());
// 省略后续所有代码
}
bool space_entity::leave_space(actor_entity* cur_entity)
{
utility::entity_load_stat_recorder temp_recorder(entity_load_stat());
// 省略后续所有代码
}
做好了这些准备工作之后,统计一段时间内的指定space里的所有actor_entity的负载就比较简单了,直接遍历当前场景里的所有actor_entity,获取entity_load_stat上记录的数据即可,为了后续的边界调整需要,这里还加上了每个actor_entity的位置坐标信息:
float space_entity::gather_space_load_with_actors(std::vector<spiritsaway::distributed_space::entity_load>& entity_loads_vec)
{
float total_entity_load = 0;
total_entity_load += m_entity_load_stat.current_load();
m_entity_load_stat.flush_period();
for(const auto& one_type_ent_vec: m_total_entities)
{
for(auto one_entity_pair: one_type_ent_vec)
{
auto cur_entity = one_entity_pair.second;
if(!cur_entity)
{
continue;
}
auto cur_entity_load = cur_entity->entity_load_stat().current_load();
cur_entity->entity_load_stat().flush_period();
if(is_cell_space())
{
spiritsaway::distributed_space::entity_load temp_entity_load;
temp_entity_load.is_real = !cur_entity->is_ghost();
temp_entity_load.load = cur_entity_load;
temp_entity_load.pos.x = cur_entity->pos()[0];
temp_entity_load.pos.z = cur_entity->pos()[2];
temp_entity_load.name = std::to_string(cur_entity->online_entity_id());
entity_loads_vec.push_back(std::move(temp_entity_load));
}
total_entity_load += cur_entity_load;
}
}
return total_entity_load;
}
在这个gather_space_load_with_actors接口之上可以进一步的统计当前进程里的所有space的详细负载信息,只需要对space_manager上的所有space做遍历。这个全进程统计负载的接口暴露成为了一个RPC,方便space_service来定期获取负载状态:
void space_manager::request_gather_space_loads(const utility::rpc_msg& msg)
{
auto cur_server = m_server;
if (!cur_server->has_service("space_service"))
{
return;
}
auto now_ts = utility::timer_manager::now_ts();
auto delta_ms = now_ts - m_last_report_load_ts;
m_last_report_load_ts = now_ts;
auto cur_total_load = m_server->stub_main_thread_load_total();
auto load_diff = cur_total_load - m_last_report_load_total;
m_last_report_load_total = cur_total_load;
auto cur_load = load_diff * 100.0/(delta_ms + 1);
std::vector<std::pair<std::string, float>> space_loads_arr;
std::vector<std::vector<spiritsaway::distributed_space::entity_load>> space_entity_loads;
space_loads_arr.reserve(m_spaces.size());
for(auto& [one_space_id, one_space_entity]: m_spaces)
{
space_entity_loads.push_back({});
space_loads_arr.push_back(std::make_pair(one_space_id, one_space_entity->gather_space_load_with_actors(space_entity_loads.back())/(delta_ms * 1000 * 1000)));
}
utility::rpc_msg report_space_load_msg;
report_space_load_msg.cmd = "report_space_load";
report_space_load_msg.from = m_server->gen_local_anchor(name());
report_space_load_msg.args.reserve(3);
report_space_load_msg.args.push_back(m_server->local_stub_info().name);
report_space_load_msg.args.push_back(cur_load);
report_space_load_msg.args.push_back(space_loads_arr);
report_space_load_msg.args.push_back(space_entity_loads);
m_server->call_server("space_service", report_space_load_msg);
}
这里上传的负载数据除了gather_space_load_with_actors计算的部分之外,还会加上当前进程的整体负载数据stub_main_thread_load_total,这个变量的更新比较简单,就是在服务器的主循环里对每次loop的执行时间累加到这个stub_main_thread_load_total变量上。
在space_service初始化函数里会添加一个计时器来定期的向所有的space_server上广播这个request_gather_space_loads请求,来做定期的space_server负载收集操作:
void space_service::gather_space_loads()
{
m_gather_space_loads_timer = add_timer_with_gap(std::chrono::seconds(m_gather_space_loads_gap_seconds), [=]()
{
gather_space_loads();
});
utility::rpc_msg cur_msg;
cur_msg.cmd = "request_gather_space_loads";
for(const auto& [one_game_id, _]: m_game_loads)
{
call_space_manager(one_game_id, cur_msg);
}
// 收集完成之后再执行负载均衡
m_balance_cells_timer = add_timer_with_gap(std::chrono::seconds(m_balance_cells_gap), [=]()
{
do_balance_space_loads();
});
}
当每个space_service接收到一个space_server的最新负载记录之后,首先把进程总负载更新到m_game_loads上,然后遍历每个上报过来的space负载,如果这个space对应的是分布式大世界的场景,则需要将这个记录的详细的actor_entity的负载更新到space_cell里:
void space_service::report_space_load(const utility::rpc_msg &data, const std::string &game_id, float cur_load, const std::vector<std::pair<std::string, float>>& space_loads, const std::vector<std::vector<distributed_space::entity_load>>& space_entity_loads)
{
m_game_loads[game_id].cur_load = cur_load;
m_game_loads[game_id].max_load = 100;
if(space_loads.size() != space_entity_loads.size())
{
m_logger->error("report_space_load size mismatch space_loads size {} space_entity_loads size {}", space_loads.size(), space_entity_loads.size());
return;
}
for(std::uint32_t i = 0; i< space_loads.size(); i++)
{
const auto& [one_space_id, one_space_load] = space_loads[i];
auto cur_space_type_iter = m_space_types.find(one_space_id);
if(cur_space_type_iter == m_space_types.end())
{
m_logger->error("report_space_load cant find space {} ", one_space_id);
continue;
}
if(!cur_space_type_iter->second->is_union_space)
{
continue;
}
auto cur_space_iter = m_cell_spaces.find(one_space_id);
if(cur_space_iter == m_cell_spaces.end())
{
m_logger->error("report_space_load cant find cell space {} ", one_space_id);
continue;
}
auto cur_union_space_iter = m_union_spaces.find(cur_space_iter->second->union_space_id);
if (cur_union_space_iter == m_union_spaces.end())
{
m_logger->error("space {} has invalid unity space {}", one_space_id, cur_space_iter->second->union_space_id);
continue;
}
cur_union_space_iter->second->cells.update_cell_load(one_space_id, one_space_load, space_entity_loads[i]);
}
}
void space_cells::update_cell_load(const std::string& cell_space_id, float cell_load, const std::vector<entity_load>& new_entity_loads)
{
auto cur_node_iter = m_leaf_nodes.find(cell_space_id);
if(cur_node_iter == m_leaf_nodes.end())
{
return;
}
if (cur_node_iter->second->is_leaf_cell())
{
cur_node_iter->second->update_load(cell_load, new_entity_loads);
}
}
由于后续调整space_cell边界的时候需要快速的知道分割轴位置需要调整多大才能使当前space_cell的actor_entity负载降低指定值,所以这里执行update_load的时候会按照x/z两个轴分别对entity_loads数组进行坐标排序:
void space_cells::space_node::update_load(float cur_load, const std::vector<entity_load>& new_entity_loads)
{
m_cell_load_report_counter++;
m_cell_loads[m_cell_load_report_counter % m_cell_loads.size()] = cur_load;
m_entity_loads = new_entity_loads;
make_sorted_loads();
}
void space_cells::space_node::make_sorted_loads()
{
m_sorted_entity_load_idx_by_axis[0].resize(m_entity_loads.size(), 0);
m_sorted_entity_load_idx_by_axis[1].resize(m_entity_loads.size(), 0);
for (std::uint16_t i = 0; i < m_entity_loads.size(); i++)
{
m_sorted_entity_load_idx_by_axis[0][i] = i;
m_sorted_entity_load_idx_by_axis[1][i] = i;
}
std::sort(m_sorted_entity_load_idx_by_axis[0].begin(), m_sorted_entity_load_idx_by_axis[0].end(), [this](std::uint16_t a, std::uint16_t b)
{
return this->get_entity_loads()[a].pos.x < this->get_entity_loads()[b].pos.x;
});
std::sort(m_sorted_entity_load_idx_by_axis[1].begin(), m_sorted_entity_load_idx_by_axis[1].end(), [this](std::uint16_t a, std::uint16_t b)
{
return this->get_entity_loads()[a].pos.z < this->get_entity_loads()[b].pos.z;
});
}
这里排序的时候并不是创建一个额外的m_entity_loads副本,而是使用m_sorted_entity_load_idx_by_axis这个数组来存储m_entity_loads里的数据索引,比较的时候用索引去获取真正的entity_load,并最终使用pos字段来做坐标排序。
当space_service::gather_space_loads发出广播收集负载请求之后,会等待一段时间,让所有的space_server完成数据上报。当计时器超时之后,可以认为所有负载数据已经上报完毕,可以开始调用do_balance_space_loads来执行最终的负载均衡了:
void space_service::gather_space_loads()
{
m_gather_space_loads_timer = add_timer_with_gap(std::chrono::seconds(m_gather_space_loads_gap_seconds), [=]()
{
gather_space_loads();
});
utility::rpc_msg cur_msg;
cur_msg.cmd = "request_gather_space_loads";
for(const auto& [one_game_id, _]: m_game_loads)
{
call_space_manager(one_game_id, cur_msg);
}
// 收集完成之后再执行负载均衡
m_balance_cells_timer = add_timer_with_gap(std::chrono::seconds(m_balance_cells_gap), [=]()
{
do_balance_space_loads();
});
}
这个do_balance_space_loads代码有点长,但是可以比较独立的分为四个部分:
- 处理一些非分布式大世界场景的分线按需创建
- 处理一些分布式大世界里的相邻
Cell的边界调整,在不同的Cell间转移负载 - 处理一些分布式大世界里的高负载
Cell的分裂,通过创建新的Cell来平坦负载 - 处理一些分布式大世界里的低负载
Cell的合并,通过减少Cell数量的方式来减少负载
非分布式大世界场景的新分线创建规则是这个场景配置成了自动扩缩容,且所有分线的平均负载人数大于指定阈值。此时会通过不指定game_id的定时来通过do_create_space自动的选择负载最小的场景去创建当前space_no的新实例:
void space_service::check_heavy_load_auto_create()
{
// 会定期的扫描这些开启了自动扩容的场景里的平均人数负载,如果大于了`80%`则会自动的创建一个新实例:
std::vector<std::pair<std::uint32_t, std::uint32_t>> need_create_spaces;
for(auto [cur_space_no, cur_space_type]: m_check_load_create_spaces)
{
auto temp_iter = m_spaces_by_no.find(cur_space_no);
if(temp_iter == m_spaces_by_no.end())
{
continue;
}
const auto& cur_space_ids = temp_iter->second;
int space_instance_count = 0;
int space_player_count = 0;
for(const auto& one_space_id: cur_space_ids)
{
auto cur_mono_space_instance_iter = m_mono_spaces.find(one_space_id);
if(cur_mono_space_instance_iter != m_mono_spaces.end())
{
space_instance_count++;
space_player_count += cur_mono_space_instance_iter->second->players.size();
}
}
auto cur_space_type_info = misc::space_type_info_mgr::get_space_type_info(cur_space_type);
if(cur_space_type_info && space_player_count > (space_instance_count * cur_space_type_info->max_player_load) * m_heavy_load_threshold)
{
need_create_spaces.push_back(std::make_pair(cur_space_no, cur_space_type));
}
}
m_logger->info("check_heavy_load_auto_create with result {}", serialize::encode(need_create_spaces).dump());
for(auto one_space_pair: need_create_spaces)
{
do_create_space(one_space_pair.first, one_space_pair.second, std::string{}, std::string{}, json::object_t{});
}
}
在处理相邻space_node的边界调整的时候,需要明确一下一个space_node能够作为边界缩小对象的相关规则space_node::check_can_shrink:
- 当前节点以及兄弟节点的负载最近一段时间内没有被调整过,这样可以避免对于同一个节点的短期重复调整,因为从调整边界到新的负载最终稳定需要一个过程
- 当前节点的所有叶子节点的平均负载要大于指定阈值,如果平均负载小于这个指定阈值,则代表这个节点的内部仍然有边界调整的空间,需要优先调整其内部的子节点
- 当前节点与兄弟节点的平均叶子负载的差值要大于指定阈值,这样才会有明显的负载变化
- 兄弟节点不能处于等待删除的状态,因为删除状态的节点会自动的调整边界
- 由于我们在
space_cells里为了避免单一space_node所覆盖的区域太小,给space_node增加了正常情况下长宽都要不小于四倍的ghost_radius的限定,而且我们每次调整的最小步长为一个ghost_radius,所以变成调整方向的边长要不小于5*ghost_radius
有了这个check_can_shrink的实现时候,检查一个space_cells能否执行space_node的边界调整就可以以递归的形式从根节点往下查询,这样实现的好处就是会优先执行子节点的边界调整,只有在子节点都无法调整的时候才会尝试去调整上一个层级的节点:
const space_cells::space_node* space_cells::space_node::calc_shrink_node(const std::unordered_map<std::string, float>& game_loads, const cell_load_balance_param& lb_param, const double ghost_radius) const
{
for (auto one_child : m_children)
{
if (one_child)
{
auto cur_child_result = one_child->calc_shrink_node(game_loads, lb_param, ghost_radius);
if (cur_child_result)
{
return cur_child_result;
}
}
}
if (check_can_shrink(game_loads, lb_param, ghost_radius))
{
return this;
}
return nullptr;
}
const space_cells::space_node* space_cells::get_best_node_to_shrink(const std::unordered_map<std::string, float>& game_loads, const cell_load_balance_param& lb_param)
{
return m_root_node->calc_shrink_node(game_loads, lb_param, m_ghost_radius);
}
但是这个get_best_node_to_shrink只是筛选出来了收缩边界的最佳节点,具体收缩多少边界还是需要计算的,这里calc_best_shrink_new_split_pos计算新的分割位置的时候会首先以ghost_radius作为基础的收缩大小,然后将剩余的可收缩空间切分为十份,不断的扩张搜索的大小直到通过calc_move_split_offload计算出来的负载转移值会大于指定的阈值lb_param.min_sibling_game_load_diff_when_shrink / 2:
double space_cells::space_node::calc_best_shrink_new_split_pos(const cell_load_balance_param& lb_param, const double ghost_radius) const
{
bool is_split_pos_smaller = m_parent->m_children[0] == this;
auto max_move_length = calc_max_boundary_move_length(m_parent->is_split_x(), is_split_pos_smaller);
max_move_length -= 5 * ghost_radius;
auto move_unit = max_move_length / 10;
auto cur_split_pos = m_boundary.min.x;
for (int i = 0; i < 10; i++)
{
if (m_parent->is_split_x())
{
if (is_split_pos_smaller)
{
cur_split_pos = m_boundary.max.x - ghost_radius - i * move_unit;
}
else
{
cur_split_pos = m_boundary.min.x + ghost_radius + i * move_unit;
}
}
else
{
if (is_split_pos_smaller)
{
cur_split_pos = m_boundary.max.z - ghost_radius - i * move_unit;
}
else
{
cur_split_pos = m_boundary.min.z + ghost_radius + i * move_unit;
}
}
auto cur_split_offload = calc_move_split_offload(cur_split_pos, m_parent->is_split_x(), is_split_pos_smaller);
if (cur_split_offload > lb_param.min_sibling_game_load_diff_when_shrink / 2)
{
return cur_split_pos;
}
}
return cur_split_pos;
}
当新的split_pos被计算出来之后,就需要按照新的边界来调整所有的相关节点,也就是当前调整节点的父节点下面的所有子节点:
bool space_cells::balance(double split_v, const space_cells::space_node* cur_node)
{
if (!cur_node || cur_node->is_leaf_cell())
{
return false;
}
double pre_split_pos = cur_node->m_children[0]->boundary().max.x;
if (!cur_node->is_split_x())
{
pre_split_pos = cur_node->m_children[0]->boundary().max.z;
}
auto mutable_cur_node = m_internal_nodes[cur_node->space_id()];
assert(mutable_cur_node);
mutable_cur_node->children()[0]->update_boundary_with_new_split(split_v, cur_node->is_split_x(), split_v < pre_split_pos, true);
mutable_cur_node->children()[1]->update_boundary_with_new_split(split_v, cur_node->is_split_x(), split_v < pre_split_pos, false);
return true;
}
这里的update_boundary_with_new_split是一个递归下降的过程,每次处理到一个节点的时候,都需要将当前的cell_loads计数器重置为1,这样可以避免这些节点的频繁调整,因为调整的条件之一就是m_cell_load_report_counter要大于指定阈值:
void space_cells::space_node::update_boundary_with_new_split(double new_split_pos, bool is_x, bool is_split_pos_smaller, bool is_changing_max)
{
auto cur_axis = is_x ? 0 : 1;
if (is_changing_max)
{
m_boundary.max[cur_axis] = new_split_pos;
}
else
{
m_boundary.min[cur_axis] = new_split_pos;
}
if (is_leaf_cell())
{
m_cell_loads[1] = get_latest_load();
m_cell_load_report_counter = 1;
}
else
{
if (is_x)
{
if (m_is_split_x)
{
if (is_changing_max)
{
return m_children[1]->update_boundary_with_new_split(new_split_pos, is_x, is_split_pos_smaller, is_changing_max);
}
else
{
return m_children[0]->update_boundary_with_new_split(new_split_pos, is_x, is_split_pos_smaller, is_changing_max);
}
}
else
{
m_children[1]->update_boundary_with_new_split(new_split_pos, is_x, is_split_pos_smaller, is_changing_max);
m_children[0]->update_boundary_with_new_split(new_split_pos, is_x, is_split_pos_smaller, is_changing_max);
}
}
else
{
if (m_is_split_x)
{
m_children[1]->update_boundary_with_new_split(new_split_pos, is_x, is_split_pos_smaller, is_changing_max);
m_children[0]->update_boundary_with_new_split(new_split_pos, is_x, is_split_pos_smaller, is_changing_max);
}
else
{
if (is_changing_max)
{
return m_children[1]->update_boundary_with_new_split(new_split_pos, is_x, is_split_pos_smaller, is_changing_max);
}
else
{
return m_children[0]->update_boundary_with_new_split(new_split_pos, is_x, is_split_pos_smaller, is_changing_max);
}
}
}
}
}
负载均衡里最复杂的边界调整部分讲解完了,接下来考虑节点分裂。一个节点如果需要被分裂,需要满足如下几个条件:
- 这个节点需要是叶子节点
- 这个节点的在最近多次的负载汇报里都处于高负载状态
- 这个节点的长和宽都大于
8*ghost_radius,这样可以保证分裂出来的两个子节点都维持长宽都不小于4*ghost_radius的限制 - 这个节点所在的进程负载也需要大于指定阈值,因为如果进程负载还有空余的话就没有必要去执行节点分裂了
最后如果有多个节点满足这个分裂需求,选择其中负载最高的节点,上述条件整体封装成了下面的这个函数:
const space_cells::space_node* space_cells::get_best_cell_to_split(const std::unordered_map<std::string, float>& game_loads, const cell_load_balance_param& lb_param) const
{
const space_cells::space_node* best_result = nullptr;
for (const auto& [one_cell_id, one_cell_node] : m_leaf_nodes)
{
if (!one_cell_node->is_leaf_cell())
{
continue;
}
if (one_cell_node->cell_load_report_counter() <= lb_param.min_cell_load_report_counter_when_split)
{
continue;
}
auto cur_boundary = one_cell_node->boundary();
if ((cur_boundary.max.x - cur_boundary.min.x < 8 * m_ghost_radius) && (cur_boundary.max.z - cur_boundary.min.z < 8 * m_ghost_radius))
{
continue;
}
if (one_cell_node->get_smoothed_load() < lb_param.min_cell_load_when_split)
{
continue;
}
auto temp_game_iter = game_loads.find(one_cell_node->game_id());
if (temp_game_iter == game_loads.end())
{
continue;
}
if (temp_game_iter->second < lb_param.min_game_load_when_split)
{
continue;
}
if (!best_result || one_cell_node->get_smoothed_load() >= best_result->get_smoothed_load())
{
best_result = one_cell_node;
}
}
return best_result;
}
如果通过get_best_cell_to_split找到了一个可以用来分裂的节点,执行这个节点的分裂的时候有一个非常重要的问题,就是决定在哪个位置分裂。由于我们设定分裂的时候新创建的节点的最短边长为4*ghost_radius,因此只需要选择分裂的方向即可。可选的分裂方向有四个left_x, right_x, low_z, high_z,我们需要计算这四个方向上分裂出去的entity_load,选择其中最大的作为最佳分裂方向,这个过程被封装成了下面的这个函数:
cell_split_direction space_cells::space_node::calc_best_split_direction(float ghost_radius) const
{
if (m_entity_loads.empty())
{
// 选择最长边的一个方向
if (m_boundary.max.x - m_boundary.min.x > m_boundary.max.z - m_boundary.min.z)
{
return cell_split_direction::left_x;
}
else
{
return cell_split_direction::low_z;
}
}
else
{
std::array<float, 4> split_gains;
std::fill(split_gains.begin(), split_gains.end(), 0);
float temp_acc_loads = 0;
for (int i = 0; i < 1; i++)
{
auto cur_sorted_load_idx_copy = vec_iter_wrapper(m_sorted_entity_load_idx_by_axis[i], false);
while (cur_sorted_load_idx_copy.valid())
{
auto one_index = cur_sorted_load_idx_copy.get_and_next();
const auto& one_load = m_entity_loads[one_index];
if (one_load.pos[i] > m_boundary.min[i] + 4 * ghost_radius)
{
break;
}
else
{
temp_acc_loads += one_load.load;
}
}
split_gains[i*2] = temp_acc_loads;
temp_acc_loads = 0;
auto cur_sorted_load_idx_copy_reverse = vec_iter_wrapper(m_sorted_entity_load_idx_by_axis[i], true);
while (cur_sorted_load_idx_copy_reverse.valid())
{
auto one_index = cur_sorted_load_idx_copy_reverse.get_and_next();
const auto& one_load = m_entity_loads[one_index];
if (one_load.pos[i] + 4 * ghost_radius < m_boundary.max[i])
{
break;
}
else
{
temp_acc_loads += one_load.load;
}
}
split_gains[i*2 + 1] = temp_acc_loads;
}
}
}
这里使用split_gains这个四个元素的array来记录四个方向执行分裂时移出当前节点的负载,计算的时候先使用一个for循环来遍历x/z这两个轴方向,然后在同一个轴里再计算从左侧切割和从右侧切割4*ghost_radius时能够减轻的负载。计算的时候会对m_sorted_entity_load_idx_by_axis[i]这个有序数组做遍历,m_sorted_entity_load_idx_by_axis[i]里存储的是按照对应轴坐标上升的m_entity_loads索引。这里使用一个vec_iter_wrapper来分别对这个坐标上升的数组索引做一次正向遍历和一次反向遍历,刚好对应从坐标轴的左侧切割和从坐标轴的右侧切割。
在计算出四个方向分裂的负载降低值之后,选择其中split_gain最大的作为分裂方向进行返回。为了避免当前节点的分裂方向与父节点的分裂方向一致,会对同分裂方向计算出来的负载乘以一个系数,这样期望可以得到交替方向的节点分裂:
// 避免新的子节点与原来的兄弟节点划分方向相同 以免出现连续多个同方向划分
if (m_parent)
{
if (m_parent->is_split_x())
{
if (this == m_parent->m_children[0])
{
split_gains[int(cell_split_direction::right_x)] *= 0.5f;
}
else
{
split_gains[int(cell_split_direction::left_x)] *= 0.5f;
}
}
else
{
if (this == m_parent->m_children[0])
{
split_gains[int(cell_split_direction::high_z)] *= 0.5f;
}
else
{
split_gains[int(cell_split_direction::low_z)] *= 0.5f;
}
}
}
int best_dir = 0;
float best_gain = split_gains[0];
for (int i = 1; i < 4; i++)
{
if (split_gains[i] > best_gain)
{
best_gain = split_gains[i];
best_dir = i;
}
}
return cell_split_direction(best_dir);
在明确了分裂方向之后,需要从当前所有进程里选出负载最低的进程作为新space_node的归属进程,然后通过split_at_direction来更新space_cells的内部结构:
const space_cells::space_node* space_cells::split_at_direction(const std::string& origin_space_id, cell_split_direction split_direction, const std::string& new_space_id, const std::string& new_space_game_id)
{
auto cur_cell_iter = m_leaf_nodes.find(origin_space_id);
if (cur_cell_iter == m_leaf_nodes.end())
{
return nullptr;
}
auto cur_cell = cur_cell_iter->second;
if (!cur_cell->ready() || cur_cell->cell_load_report_counter() == 0)
{
return nullptr;
}
switch (split_direction)
{
case cell_split_direction::left_x:
return split_x(cur_cell->boundary().min.x + 4 * m_ghost_radius, origin_space_id, new_space_game_id, new_space_id, origin_space_id);
case cell_split_direction::right_x:
return split_x(cur_cell->boundary().max.x - 4 * m_ghost_radius, origin_space_id, new_space_game_id, origin_space_id, new_space_id);
case cell_split_direction::low_z:
return split_z(cur_cell->boundary().min.z + 4 * m_ghost_radius, origin_space_id, new_space_game_id, new_space_id, origin_space_id);
case cell_split_direction::high_z:
return split_z(cur_cell->boundary().max.z - 4 * m_ghost_radius, origin_space_id, new_space_game_id, origin_space_id, new_space_id);
default:
return nullptr;
}
}
这里会从分割方向从当前的节点里分裂出4 * m_ghost_radius的部分,然后使用split函数来创建新节点并维护好整体的分割树。
最后的删除低负载space_node的负载均衡最简单,遍历所有的叶子节点,如果这个节点近期汇报的负载都小于阈值lb_param.max_cell_load_when_remove,则选取其中负载最低的作为要合并的节点,相关负载都需要合并到其兄弟节点里去:
const space_cells::space_node* space_cells::get_best_cell_to_merge(const std::unordered_map<std::string, float>& game_loads, const cell_load_balance_param& lb_param)
{
const space_cells::space_node* best_result = nullptr;
for (const auto& [one_cell_id, one_cell_node] : m_leaf_nodes)
{
if (!one_cell_node->is_leaf_cell())
{
continue;
}
if (one_cell_node->is_merging())
{
continue;
}
if (one_cell_node->space_id() == m_master_cell_id)
{
continue;
}
if (one_cell_node->cell_load_report_counter() <= lb_param.min_cell_load_report_counter_when_remove)
{
continue;
}
auto cur_sibling = one_cell_node->sibling();
if (!cur_sibling || cur_sibling->m_min_cell_load_report_counter <= lb_param.min_cell_load_report_counter_when_remove)
{
continue;
}
if (cur_sibling->is_merging())
{
continue;
}
if (one_cell_node->get_smoothed_load() > lb_param.max_cell_load_when_remove)
{
continue;
}
if (!best_result || one_cell_node->get_smoothed_load() < best_result->get_smoothed_load())
{
best_result = one_cell_node;
}
}
return best_result;
}
这个节点合并并不是一下就执行好的,而是先将这个节点标记为is_merging状态,同时将这个节点的边长缩小为0.5*m_ghost_radius:
bool space_cells::start_merge(const std::string& cell_id)
{
auto temp_node_iter = m_leaf_nodes.find(cell_id);
if (temp_node_iter == m_leaf_nodes.end())
{
return false;
}
auto cur_node = temp_node_iter->second;
if (!cur_node->parent())
{
return false;
}
if (cur_node->is_merging())
{
return false;
}
if(cur_node->sibling()->is_merging())
{
return false;
}
cur_node->set_is_merging();
auto cur_parent = cur_node->parent();
auto remain_radius = 0.5 * m_ghost_radius;
double new_split_pos = cur_node->boundary().min.x + remain_radius;
double old_split_pos = 0;
if (cur_parent->is_split_x())
{
if (cur_node == cur_parent->children()[0])
{
old_split_pos = cur_node->boundary().max.x;
new_split_pos = cur_node->boundary().min.x + remain_radius;
}
else
{
old_split_pos = cur_node->boundary().min.x;
new_split_pos = cur_node->boundary().max.x - remain_radius;
}
}
else
{
if (cur_node == cur_parent->children()[0])
{
old_split_pos = cur_node->boundary().max.z;
new_split_pos = cur_node->boundary().min.z + remain_radius;
}
else
{
old_split_pos = cur_node->boundary().min.z;
new_split_pos = cur_node->boundary().max.z - remain_radius;
}
}
cur_parent->children()[0]->update_boundary_with_new_split(new_split_pos, cur_parent->is_split_x(), new_split_pos < old_split_pos, true);
cur_parent->children()[1]->update_boundary_with_new_split(new_split_pos, cur_parent->is_split_x(), new_split_pos < old_split_pos, false);
return true;
}
当space_server同步到了最新的space_node的范围之后,被标记为is_merging的节点会在计时器里驱动当前节点的所有entity迁移到周围的space_node中。当所有的entity都迁移完毕之后,会通知回space_service,通过space_cells::finish_merge来最终将这两个叶子节点合并为一个节点,同时通知对应的space对象执行销毁操作:
void space_service::report_finish_cell_merge(const utility::rpc_msg& data, const std::string& cell_space_id)
{
auto cur_cell_iter = m_cell_spaces.find(cell_space_id);
if (cur_cell_iter == m_cell_spaces.end())
{
return;
}
auto cur_union_space_iter = m_union_spaces.find(cur_cell_iter->second->union_space_id);
if (cur_union_space_iter == m_union_spaces.end())
{
return;
}
auto cur_cell_game_id = cur_union_space_iter->second->cells.finish_merge(cell_space_id);
if (cur_cell_game_id.empty())
{
return;
}
utility::rpc_msg cell_notify_msg;
cell_notify_msg.cmd = "notify_finish_merge_space_node";
cell_notify_msg.set_args(cell_space_id);
notify_cell_change(cur_cell_iter->second->union_space_id, cell_notify_msg, std::string{});
utility::rpc_msg cur_destroy_msg;
cur_destroy_msg.cmd = "notify_destroy_space";
cur_destroy_msg.args.push_back(cell_space_id);
call_space_manager(cur_cell_game_id, cur_destroy_msg);
m_game_loads[cur_cell_game_id].cell_spaces.erase(cell_space_id);
m_cell_spaces.erase(cell_space_id);
m_space_types.erase(cell_space_id);
}
Mosaic Game 里的 RealGhost 管理
Real-Ghost 管理
在每个actor_entity身上都会有两个Map来记录当前正在创建和已经创建的ghost_entity集合:
class Meta(rpc) actor_ghost_component final: public actor_component::sub_class<actor_ghost_component>
{
private:
// key cell_space_id value [cell_game_id, create_ts]
std::map<std::string, std::pair<std::string,std::uint64_t>> m_ghost_creating;
// key cell_space_id value [cell_game_id, create_ts]
std::map<std::string, std::pair<std::string,std::uint64_t>> m_ghost_created;
std::vector<std::string> m_anchors_for_ghost; // 所有正在创建和已经创建的ghost的anchor
};
执行这两个集合管理的入口是space_cell_component::check_ghost_and_real, 这个函数会通过计时器的方式来定期执行。 check_ghost_and_real的函数体负责收集周围的CellSpace和当前场景内的real_entity,然后分别调用下面的两个函数:
auto cur_ghost_create_count = check_ghost_create_destroy(cur_cell, temp_real_entities, nearby_cells);
auto cur_real_transfer_count = check_transfer_real_entities(cur_cell, temp_real_entities, nearby_cells);
check_ghost_create_destroy函数负责检查一个ghost_entity的创建与销毁:
int space_cell_component::check_ghost_create_destroy(const distributed_space::space_cells::space_node* cur_cell,const std::vector<entity::actor_entity*>& real_entities, const std::vector<const distributed_space::space_cells::space_node*>& nearby_cells)
{
std::vector<std::pair<const distributed_space::space_cells::space_node*, distributed_space::cell_bound>> nearby_cells_with_ghost_bounds; // cell的boundary扩张一个aoi_radius
nearby_cells_with_ghost_bounds.reserve(nearby_cells.size());
auto aoi_radius = m_space_cells->ghost_radius();
for(auto one_cell: nearby_cells)
{
auto pre_bound = one_cell->boundary();
pre_bound.min.z -= aoi_radius;
pre_bound.max.z += aoi_radius;
pre_bound.min.x -= aoi_radius;
pre_bound.max.x += aoi_radius;
nearby_cells_with_ghost_bounds.emplace_back(one_cell, pre_bound);
}
int cur_ghost_creat_count = 0;
auto max_ghost_keep_ts = utility::timer_manager::now_ts() - m_ghost_keep_duration_seconds * 1000;
for(auto cur_entity: real_entities)
{
auto cur_ent_pos = cur_entity->pos();
for(const auto& [one_cell, one_cell_ghost_boundary] : nearby_cells_with_ghost_bounds)
{
// 查询周围的cell 如果在这些cell的可创建ghost区域则创建ghost
if(one_cell_ghost_boundary.cover(cur_ent_pos.x, cur_ent_pos.z))
{
if(cur_ghost_creat_count < m_ghost_create_limit && cur_entity->try_create_ghost(one_cell->game_id(), one_cell->space_id()))
{
cur_ghost_creat_count++;
}
}
else
{
// 否则从这个区域里删除ghost 这里会避免销毁刚创建不久的ghost
cur_entity->try_destroy_ghost(one_cell->space_id(), max_ghost_keep_ts);
}
}
}
return cur_ghost_creat_count;
}
这里的逻辑其实很简单,对每个周围的CellSpace,根据其boundary扩张一个aoi_radius,形成一个ghost_rect。然后对每个real_entity,对每个ghost_rect执行点在矩形内的测试:
- 如果这个
Entity不在这个CellSpace的ghost_rect内,则需要从这个CellSpace中删除已经创建好的ghost_entity,这里会带上一个时间戳max_ghost_keep_ts,如果这个ghost_entity的创建时间早于这个时间戳才真正执行删除,这样保证一个ghost_entity的存活时间起码为m_ghost_keep_duration_seconds - 如果这个
Entity在这个CellSpace的ghost_rect内,则需要在这个CellSpace里创建一个ghost_entity,不过这里还有一个额外限制条件,单次最多创建m_ghost_create_limit个ghost_entity,这样避免边界调整时引发短时间内的ghost_entity大量创建
当try_create_ghost真正被触发时,请求会被转发到actor_ghost_component上:
bool actor_entity::try_create_ghost(const std::string& cell_game_id, const std::string& cell_space_id)
{
if(is_ghost())
{
return false;
}
if(!get_space())
{
return false;
}
if(!get_space()->is_cell_space())
{
return false;
}
auto cur_ghost_comp = get_component<actor_ghost_component>();
if(!cur_ghost_comp)
{
return false;
}
return cur_ghost_comp->try_create_ghost(cell_game_id, cell_space_id);
}
这个函数负责将这个real_entity的ghost_entity相关属性进行打包,并向远端发起一个创建ghost_entity的请求:
bool actor_ghost_component::try_create_ghost(const std::string& cell_game_id, const std::string& cell_space_id)
{
check_ghost_creating();
if(m_ghost_creating.find(cell_space_id) != m_ghost_creating.end())
{
return false;
}
if(m_ghost_created.find(cell_space_id) != m_ghost_created.end())
{
return false;
}
if(cell_space_id == m_owner->get_space()->entity_id())
{
return false;
}
m_ghost_creating[cell_space_id] = std::make_pair(cell_game_id, utility::timer_manager::now_ts());
utility::rpc_msg ghost_create_msg;
json::object_t ghost_data;
json::object_t enter_info;
enter_info["pos"] = m_owner->pos().data;
enter_info["yaw"] = m_owner->yaw();
m_owner->prepare_ghost_data(ghost_data);
ghost_create_msg.cmd = "request_create_ghost";
ghost_create_msg.set_args(*m_owner->get_call_proxy(), cell_space_id, m_owner->type_name(), m_owner->entity_id(), m_owner->online_entity_id(), enter_info, ghost_data);
m_owner->get_server()->call_server(utility::rpc_anchor::concat(cell_game_id, "space_manager"), ghost_create_msg);
m_anchors_for_ghost.push_back(utility::rpc_anchor::concat(cell_game_id, m_owner->entity_id()));
return true;
}
这里会将创建的时间戳记录在m_ghost_creating中, 作为一个超时检查时间戳来使用。
当目标CellSpace的space_manager在接收到创建ghost_entity的请求之后,就会在指定的SpaceEntity中创建这个ghost_entity,成功创建之后回以reply_create_ghost来通知创建成功:
void space_manager::request_create_ghost(const utility::rpc_msg& msg, const std::string& reply_anchor, const std::string& space_id, const std::string& type_id, const std::string& real_eid, std::uint64_t online_entity_id, const json::object_t &enter_info, const json& init_info)
{
std::string error;
do
{
auto cur_space_iter = m_spaces.find(space_id);
if (cur_space_iter == m_spaces.end())
{
error = "cant find space";
break;
}
if(!cur_space_iter->second->can_create_ghost())
{
error = "space cant create ghost";
break;
}
auto cur_entity = m_server->create_entity(type_id, real_eid, online_entity_id, init_info, error);
if (!cur_entity)
{
m_logger->error("fail to create entity {} type {} with error {}", real_eid, type_id, error);
break;
}
cur_space_iter->second->enter_space(dynamic_cast<entity::actor_entity*>(cur_entity), enter_info);
} while (0);
utility::rpc_msg reply_create_ghost_msg;
reply_create_ghost_msg.cmd = "reply_create_ghost";
std::vector<json> temp_args;
temp_args.reserve(2);
temp_args.push_back(space_id);
temp_args.push_back(error);
reply_create_ghost_msg.args = std::move(temp_args);
m_server->call_server(reply_anchor, reply_create_ghost_msg);
}
如果创建成功,将会在m_ghost_created中记录创建成功的时间戳:
void actor_ghost_component::reply_create_ghost(const utility::rpc_msg& msg, const std::string& cell_space_id, const std::string& error)
{
m_owner->logger()->info("player {} reply_create_ghost cell_id {} error {}", m_owner->entity_id(), cell_space_id, error);
auto cur_cell_iter = m_ghost_creating.find(cell_space_id);
if(cur_cell_iter == m_ghost_creating.end())
{
return;
}
auto cur_ts = utility::timer_manager::now_ts();
// auto ghost_create_cost = cur_ts - cur_cell_iter->second;
if(error.empty())
{
m_ghost_created[cell_space_id] = std::make_pair(cur_cell_iter->second.first, cur_ts);
}
m_ghost_creating.erase(cur_cell_iter);
}
任何RPC都会有超时的情况,超时检查就在check_ghost_creating函数中,这里会遍历所有的正在创建的ghost_entity,通知其删除当前real_entity对应的ghost_entity,并从m_ghost_creating中移除相应条目,以配合后续的重试:
void actor_ghost_component::check_ghost_creating()
{
auto cur_ts = utility::timer_manager::now_ts();
auto expire_ts = cur_ts - m_ghost_create_timeout_ms * 1000; // 10s 过期
utility::rpc_msg ghost_del_msg;
ghost_del_msg.cmd = "request_delete_ghost";
ghost_del_msg.args.push_back(m_owner->entity_id());
std::vector<std::string> temp_expired_cells;
utility::map_erase_if(m_ghost_creating, [&temp_expired_cells, expire_ts, this](const auto& one_pair)
{
if(one_pair.second.second < expire_ts)
{
temp_expired_cells.push_back(utility::rpc_anchor::concat(one_pair.second.first, one_pair.first));
remove_ghost_anchor(one_pair.first);
return true;
}
else
{
return false;
}
});
m_owner->get_server()->call_server_multi(m_owner, ghost_del_msg, temp_expired_cells);
}
负责处理real_entity迁移的函数check_transfer_real_entities就复杂一点了,基础的迁移规则是real_entity在当前CellSpace的ghost_rect的外部,附加条件是单次最大迁移数量要小于指定值,以及考虑一个CellSpace在被合并时会强制将当前CellSpace内的real_entity执行迁出 :
int space_cell_component::check_transfer_real_entities(const distributed_space::space_cells::space_node* cur_cell, const std::vector<entity::actor_entity*>& real_entities, const std::vector<const distributed_space::space_cells::space_node*>& nearby_cells)
{
auto aoi_radius = m_space_cells->ghost_radius();
auto ghost_max_region = cur_cell->boundary();
ghost_max_region.min.z -= aoi_radius;
ghost_max_region.min.x -= aoi_radius;
ghost_max_region.max.x += aoi_radius;
ghost_max_region.max.z += aoi_radius;
int cur_real_migrate_count = 0;
for(auto one_ent: real_entities)
{
if(cur_real_migrate_count >= m_real_migrate_limit)
{
return cur_real_migrate_count;
}
if(one_ent->is_ghost())
{
continue;
}
auto cur_ent_pos = one_ent->pos();
if(!cur_cell->is_merging() && ghost_max_region.cover(cur_ent_pos.x, cur_ent_pos.z))
{
continue;
}
m_owner->logger()->info("space {} cant cover entity {} try get migrate dest", m_owner->entity_id(), one_ent->entity_id());
const distributed_space::space_cells::space_node* dest_cell = nullptr;
if(cur_cell->is_merging())
{
// 合并状态下 将当前点扩张为半径为aoi_radius的矩形 然后选取一个相交的周围cell来作为迁移目标 当然 迁移目标不能是merging状态下的
spiritsaway::distributed_space::cell_bound cur_migrate_bound;
cur_migrate_bound.min.x = cur_ent_pos.x;
cur_migrate_bound.min.z = cur_ent_pos.z;
cur_migrate_bound.max = cur_migrate_bound.min;
cur_migrate_bound.min.x -= aoi_radius;
cur_migrate_bound.min.z -= aoi_radius;
cur_migrate_bound.max.x += aoi_radius;
cur_migrate_bound.max.z += aoi_radius;
for(auto one_cell: nearby_cells)
{
if(!one_cell->is_merging() && one_cell->boundary().intersect(cur_migrate_bound))
{
dest_cell = one_cell;
break;
}
}
}
else
{
// 非合并状态下 选择当前点所在的cell作为迁移目标 当然 迁移目标不能是merging状态下的
for(auto one_cell : nearby_cells)
{
if(!one_cell->is_merging() &&one_cell->boundary().cover(cur_ent_pos.x, cur_ent_pos.z))
{
dest_cell = one_cell;
break;
}
}
}
if(!dest_cell)
{
dest_cell = m_space_cells->query_leaf_for_point(cur_ent_pos.x, cur_ent_pos.z);
}
if(!dest_cell)
{
continue;
}
if(one_ent->try_transfer_real(dest_cell->space_id()))
{
cur_real_migrate_count++;
}
}
return cur_real_migrate_count;
}
计算迁移目标dest_cell的规则有些复杂:
- 如果当前
CellSpace正在被合并,那么随机选择周围任意一个与当前Entity创建ghost_entity的矩形区域相交的CellSpace作为目标 - 如果当前
CellSpace没有在被合并,则选择能覆盖当前actor_entity位置的CellSpace作为目标 - 如果上面两个分支执行之后的仍然没有一个有效结果,则直接从整个
SpaceCells中查询这个点对应的CellSpace,作为迁移目标。
同时这个try_transfer_real也是将逻辑转发到actor_ghost_component上:
bool actor_entity::try_transfer_real(const std::string& cell_space_id)
{
if(is_ghost())
{
return false;
}
if(!get_space())
{
return false;
}
if(!get_space()->is_cell_space())
{
return false;
}
auto cur_ghost_comp = get_component<actor_ghost_component>();
if(!cur_ghost_comp)
{
return false;
}
return cur_ghost_comp->try_transfer_real(cell_space_id);
}
这里的迁移还有一个前置条件,即目标CellSpace已经有了当前real_entity的一个ghost_entity,这个限制其实与BigWorld中的限制差不多。不过BigWorld中要求要么已经创建好了ghost_entity,要么这个创建ghost_entity请求已经发出,而MosaicGame中要求目标进程中的已经创建好了ghost_entity,必须在m_ghost_created存在这个元素:
bool actor_ghost_component::try_transfer_real(const std::string& cell_space_id)
{
if(!can_transfer_real(cell_space_id))
{
return false;
}
return true;
}
bool actor_ghost_component::can_transfer_real(const std::string& cell_space_id)
{
if(m_migrating_real)
{
return false;
}
auto cur_cell_iter = m_ghost_created.find(cell_space_id);
if(cur_cell_iter == m_ghost_created.end())
{
return false;
}
std::string cell_game_id = cur_cell_iter->second.first;
utility::rpc_msg request_msg;
json::object_t enter_info;
enter_info["pos"] = m_owner->pos();
enter_info["yaw"] = m_owner->yaw();
enter_info["pre_cell"] = m_owner->entity_id();
request_msg.cmd = "request_migrate_begin";
request_msg.args.push_back(cell_game_id);
request_msg.args.push_back(cell_space_id);
request_msg.args.push_back(m_owner->get_space()->union_space_id());
request_msg.args.push_back(enter_info);
m_owner->call_relay_anchor(request_msg);
m_migrating_real = true;
return true;
}
这里的request_migrate_begin并不会直接将当前real_entity的数据全打包发过去,而是先通知当前actor_entity对应的RelayAnchor。同时RealAnchor在记录好迁移目标m_dest_game之后,再通知这个real_entity开始执行真正的迁移:
void relay_entity::request_migrate_begin(const utility::rpc_msg& msg, const std::string& game_id, const std::string& space_id, const std::string& union_space_id, const json::object_t& enter_info)
{
if(!m_dest_actor)
{
m_logger->error("request_migrate_begin while dest_anchor empty dest_game {} dest_eid {}", m_dest_game, m_dest_eid);
return;
}
utility::rpc_msg reply_msg;
reply_msg.cmd = "reply_migrate_begin";
reply_msg.args.push_back(game_id);
reply_msg.args.push_back(space_id);
reply_msg.args.push_back(union_space_id);
reply_msg.args.push_back(enter_info);
call_server(m_dest_actor, reply_msg);
m_dest_actor.reset();
m_dest_game = game_id;
}
在space_manager中统一处理所有的迁移逻辑,不管是分布式无缝大世界的迁移还是非无缝大世界的迁移,内部会根据要进入的场景union_space_id是否等于当前场景的union_space_id来标记enter_new_space,true代表是普通的actor_entity迁移,false代表Real-Ghost迁移:
void player_space_component::reply_migrate_begin(const utility::rpc_msg& msg, const std::string& game_id, const std::string& space_id, const std::string& union_space_id, const json::object_t& enter_info)
{
auto new_enter_info = enter_info;
server::space_manager::instance().migrate_out(m_owner, game_id, space_id, union_space_id, new_enter_info);
}
void space_manager::migrate_out(entity::actor_entity *cur_entity, const std::string &game_id, const std::string &space_id, const std::string &union_space_id, json::object_t &enter_info)
{
json::object_t migrate_info;
bool enter_new_space = true;
auto pre_space = cur_entity->get_space();
if(pre_space && pre_space->union_space_id() == union_space_id)
{
enter_new_space = false;
enter_info["pos"] = cur_entity->pos();
enter_info["yaw"] = cur_entity->yaw();
}
if(pre_space && enter_new_space)
{
pre_space->leave_space(cur_entity);
}
enter_info["enter_new_space"] = enter_new_space;
cur_entity->migrate_out(migrate_info, enter_new_space);
utility::rpc_msg cur_msg;
cur_msg.cmd = "migrate_in";
m_logger->info("migrate out entity {} to game {} space {} union_space_id {} with info {} enter_new_space {} ", cur_entity->entity_id(), game_id, space_id, union_space_id, json(migrate_info).dump(), enter_new_space);
cur_msg.args.push_back(cur_entity->entity_id());
cur_msg.args.push_back(cur_entity->online_entity_id());
cur_msg.args.push_back(cur_entity->m_base_desc.m_type_name);
cur_msg.args.push_back(space_id);
cur_msg.args.push_back(union_space_id);
cur_msg.args.push_back(enter_info);
cur_msg.args.push_back(migrate_info);
if(enter_new_space)
{
m_server->destroy_entity(cur_entity);
}
m_server->call_server(utility::rpc_anchor::concat(game_id, "space_manager"), cur_msg);
}
actor_entity::migrate_out这个接口也会对是否是大世界迁移做区分,如果是大世界迁移的话,迁移完成之后会将当前real_entity转换为ghost_entity,同时通知所有的组件这个转换操作on_become_ghost:
void actor_entity::migrate_out(json::object_t& migrate_info, bool enter_new_space)
{
encode_migrate_out_data(migrate_info, enter_new_space);
auto migrate_out_lambda = [=](actor_component* cur_comp)
{
cur_comp->migrate_out(enter_new_space);
};
call_component_interface(migrate_out_lambda);
if(!enter_new_space)
{
m_is_ghost = true;
auto become_ghost_lambda = [=](actor_component* cur_comp)
{
cur_comp->on_become_ghost();
};
call_component_interface(become_ghost_lambda);
}
}
当迁移目标ghost_entity对应的space_manager接收到这个migrate_in请求之后,也会解析出这个enter_new_space字段,来决定是创建一个新的actor_entity还是选择一个现有的ghost_entity来走后续的actor_entity::migate_in流程:
void space_manager::do_migrate_in(const std::string &entity_id, std::uint64_t online_entity_id, const std::string &type_id, const std::string &space_id, const std::string &union_space_id, const json::object_t &enter_info, const json::object_t &init_info)
{
std::string error;
auto cur_space_iter = m_spaces.find(space_id);
if (cur_space_iter == m_spaces.end())
{
if (union_space_id.empty())
{
m_logger->error("fail to create entity {} type {} with invalid space {}", entity_id, type_id, space_id);
return;
}
else
{
retry_migrate_info saved_migrate_info;
saved_migrate_info.entity_id = entity_id;
saved_migrate_info.online_entity_id = online_entity_id;
saved_migrate_info.type_id = type_id;
saved_migrate_info.union_space_id = union_space_id;
saved_migrate_info.init_info = init_info;
saved_migrate_info.retry_ts = std::chrono::duration_cast<std::chrono::milliseconds>(std::chrono::system_clock::now().time_since_epoch()).count();
m_retry_migrate_infos[entity_id] = saved_migrate_info;
utility::rpc_msg retry_msg;
retry_msg.cmd = "request_retry_migrate";
retry_msg.from = m_server->gen_local_anchor(name());
retry_msg.set_args(entity_id, union_space_id, enter_info);
m_server->call_server("space_service", retry_msg);
return;
}
}
bool enter_new_space = true;
try
{
enter_info.at("enter_new_space").get_to(enter_new_space);
}
catch(const std::exception& e)
{
m_logger->error("fail to migrate entity {} type {} read enter_new_space with error {}", entity_id, type_id, e.what());
return;
}
entity::actor_entity* cur_entity;
if(enter_new_space)
{
cur_entity = dynamic_cast<entity::actor_entity*>(m_server->create_entity(type_id, entity_id, online_entity_id, init_info, error));
if (!cur_entity)
{
m_logger->error("fail to create entity {} type {} with error {}", entity_id, type_id, error);
return;
}
}
else
{
cur_entity = entity::entity_manager::instance().get_entity<entity::actor_entity>(entity_id);
if (!cur_entity)
{
m_logger->error("fail to find entity {} type {} ", entity_id, type_id);
return;
}
if(!cur_entity->is_ghost())
{
m_logger->error("fail to find entity {} type {} with ghost", entity_id, type_id);
return;
}
}
cur_entity->migrate_in(init_info, enter_new_space);
if(enter_new_space)
{
cur_space_iter->second->enter_space(cur_entity, enter_info);
}
}
void space_manager::migrate_in(const utility::rpc_msg &data, const std::string &entity_id, std::uint64_t online_entity_id, const std::string &type_id, const std::string &space_id, const std::string &union_space_id, const json::object_t &enter_info, const json::object_t &init_info)
{
do_migrate_in(entity_id, online_entity_id, type_id, space_id, union_space_id, enter_info, init_info);
}
在actor_entity::migrate_in中,如果发现自己是ghost_entity转换为real_entity,则会通知所有的组件这个信息:
utility::rpc_msg finish_msg;
finish_msg.from = utility::persist_entity_id();
finish_msg.cmd = "notify_migrate_finish";
finish_msg.set_args(get_local_server_name());
call_relay_anchor(finish_msg);s
m_migrate_in_finish_dispatcher.dispatch();
if(!enter_new_space)
{
// ghost to real之后重新设置aoi
// auto cur_space = get_space();
migrate_data.at("space_self_event_seq").get_to(m_space_self_event_seq);
migrate_data.at("space_actor_event_seq").get_to(m_space_actor_event_seq);
migrate_fix_space_events();
auto cur_lambda = [](actor_component* cur_comp)
{
cur_comp->on_become_real();
};
call_component_interface(cur_lambda);
}
同时这里还会通知对应的relay_anchor,当前actor_entity已经迁移完成,之前缓存的消息可以重启处理了。这样就完成了real_entity迁移的全过程。
AOI管理
在之前的AOI章节中我们介绍了MosaicGame的AOI实现,以及在此之上的属性同步。简单来说就是每次属性修改之后,都会生成一个属性同步的广播,广播的消息开头两个字节就是这个发生属性改变的actor_entity在当前space_entity里的uint16_t aoi_index。在分布式大世界中,属性同步的对象不仅仅是当前进程同场景里的一些客户端,现在还包括了ghost_entity。同时一个real_entity不仅接受其他real_entity的属性同步,还需要接受当前AOI内的其他ghost_entity的属性同步。原来设计的属性同步方案已经无法满足这种分布式同步要求,为此我们在原有的属性同步上做一些额外的功能增强与修正,使得状态能够正确的同步到客户端。
在分布式大世界的情况下,原有的每个真实space_entity单独维护一个aoi_manager的设计会造成一些问题。最突出的问题就是,在不同的cell_space中,同一个actor_entity对应的real_entity与ghost_entity他们的aoi_index很有可能不一样,因为这个标识符是这个entity在进入每个space_entity时单独分配的。假设real_entity(A)在进入cell_space(M)中被分配到了aoi_index_1,此时在cell_space(M)中的另外一个player_entity(B)在其客户端以aoi_index_1创建了real_entity(A)的客户端对象。然后real_entity(A)从cell_space(M)迁移到了cell_space(N),在新场景的aoi_index_2是这个ghost_entity(A)进入cell_space(N)时被分配的。迁移之后的real_entity(A)所发生的任何广播属性同步数据都会以aoi_index_2作为标识符,而player_entity(B)的客户端中aoi_index_2可能不存在关联的actor_entity,更坏的情况是aoi_index_2关联的是其他actor_entity,这样就会导致客户端与服务器之间的属性同步错乱,并进一步导致客户端退出。
在了解原来的aoi_index分配设计在分布式大世界中的不足之后,我们来思考如何改进,目前有两种改进方案:
- 将两个字节的
aoi_index替换为八个字节的online_entity_id,因为real_entity和ghost_entity的online_entity_id总是保持一致的,但是这样会导致属性同步流量的显著升高 - 为同一个分布式大世界指定一个唯一的
aoi_manager实例,这个实例可以托管在map_server上,但是这样会导致原来所有的同步创建actor_entity都变成了异步创建actor_entity,所有的AOI查询也变成了异步调用,打破了原有的执行流;同时这样会把当前分布式大世界的同步actor_entity的上限限制在了65536个以内 - 每个
cell_space单独维护自身的aoi_manager,同时在每个player_entity迁移之后,将客户端的所有actor_entity的最新aoi_index都推送下去,重新建立一个aoi_index到actor_entity的映射
综合来看,第三种方案更优,因此MosaicGame中在player_entity迁移之前,actor_aoi_component::encode会将当前往客户端同步的actor_entity信息带上,存在entities_in_aoi_radius字段中:
json::object_t actor_aoi_component::encode(bool for_ghost)
{
if(for_ghost)
{
return json::object_t{};
}
// 先保存所有的aoi数据
json::object_t result;
auto cur_aoi_mgr = m_owner->get_space()->aoi_mgr();
std::map<std::string, std::map<std::string, std::pair<std::string, std::uint32_t>>> all_entities_in_aoi_radius;
for(const auto& one_aoi_radius: m_aoi_radius_names)
{
std::map<std::string, std::pair<std::string, std::uint32_t>> temp_aoi_eids;
const auto& cur_force_aois = m_force_aoi_eids[one_aoi_radius.second.value];
const auto& cur_aoi_guids = cur_aoi_mgr->interest_in_guids(one_aoi_radius.second);
for(auto one_guid: cur_aoi_guids)
{
actor_entity* other_entity = entity_manager::instance().get_entity_with_type<actor_entity>(utility::entity_slot::from_uint64(one_guid));
if(!other_entity)
{
continue;
}
bool is_force_aoi = cur_force_aois.find(other_entity->entity_id()) != cur_force_aois.end();
std::uint32_t temp_combined_aoi = other_entity->aoi_idx();
temp_combined_aoi <<= 16;
temp_combined_aoi += std::uint32_t(is_force_aoi);
temp_aoi_eids[other_entity->entity_id()] = std::make_pair(*other_entity->get_call_proxy(), temp_combined_aoi);
}
}
result["entities_in_aoi_radius"] = all_entities_in_aoi_radius;
return result;
}
当迁移到一个ghost_entity之后,在migrate_in函数中将这些数据解析出来,存在m_temp_all_entities_in_aoi_radius这个成员变量上:
void actor_aoi_component::migrate_in(const json::object_t& migrate_info, bool enter_new_space)
{
if(!enter_new_space)
{
return;
}
std::vector<std::string> temp_aoi_sync_actor_ids;
try
{
migrate_info.at("entities_in_aoi_radius").get_to(m_temp_all_entities_in_aoi_radius);
}
catch(const std::exception& e)
{
m_owner->logger()->error("migrate_in_restore_aoi fail to convert aoi data with error {}", e.what());
return;
}
m_owner->add_migrate_in_event(enums::migrate_event::migrate_fix_aoi_radius);
}
void player_aoi_component::event_listener(const utility::enum_type_value_pair& ev_cat, const std::string& detail)
{
if(ev_cat == utility::enum_type_value_pair(enums::migrate_event::migrate_fix_aoi_radius))
{
restore_aoi();
}
}
当迁移migrate_in开头的数据解析阶段结束之后,就会开始进行第二阶段,执行一些后处理逻辑,这里的restore_aoi就是其中的一个部分。这个restore_aoi负责调用actor_aoi_component::restore_aoi_radius函数来计算迁移之后的aoi状态改变:
void player_aoi_component::restore_aoi()
{
auto cur_actor_aoi_comp = m_owner->get_component<actor_aoi_component>();
aoi::aoi_radius_controller cur_aoi_ctrl;
cur_aoi_ctrl.any_flag = 0;
cur_aoi_ctrl.need_flag = (1ull <<std::uint8_t(enums::entity_flag::is_client_visible));
cur_aoi_ctrl.radius = 30;
cur_aoi_ctrl.min_height = cur_aoi_ctrl.max_height = 0;
cur_aoi_ctrl.forbid_flag = 0;
cur_aoi_ctrl.max_interest_in = 30;
std::vector<migrate_in_aoi_invalid_info> invalid_aois;
std::unordered_map<actor_entity*, std::uint16_t> remain_aois;
cur_actor_aoi_comp->restore_aoi_radius(cur_aoi_ctrl, [this](actor_entity* other, bool is_enter)
{
if(is_enter)
{
on_aoi_enter(other);
}
else
{
on_aoi_leave(other->entity_id(), other->aoi_idx());
}
}, static_type_name(), invalid_aois, remain_aois);
// 暂时省略后续代码
}
这里的restore_aoi_radius流程分为如下几步:
- 注册一个
aoi_radius,用来接收周围其他actor_entity进出当前player_entity的客户端同步半径事件, - 将迁移之前记录的
AOI集合中的actor_entity都先强制加入到当前actor_entity的关注集合中 - 注册
aoi_radius的回调,用来接受enter/leave事件 - 取消本来非强制关注的
actor_entity,这样如果这个actor_entity已经在同步半径外,则会触发leave事件 - 然后获取当前新的关注集合,与迁移之前记录的老关注集合做交集得到
remain_aois,同时做diff得到invalid_aois
void actor_aoi_component::restore_aoi_radius(const aoi::aoi_radius_controller& cur_aoi_ctrl, std::function<void(actor_entity*, bool)> radius_cb, const std::string& radius_name, std::vector<migrate_in_aoi_invalid_info>& invalid_aois, std::unordered_map<actor_entity*, std::uint16_t>& remain_aois)
{
auto temp_name_iter = m_aoi_radius_names.find(radius_name);
if(temp_name_iter != m_aoi_radius_names.end())
{
m_owner->logger()->error("restor_aoi_radius with duplicated name {}", radius_name);
return;
}
auto cur_space = m_owner->get_space();
auto cur_aoi_mgr = cur_space->aoi_mgr();
auto new_aoi_radius_idx = cur_aoi_mgr->add_radius_entity(aoi::aoi_pos_idx{m_aoi_pos_idx}, cur_aoi_ctrl);
if(!new_aoi_radius_idx.value)
{
m_owner->logger()->error("restor_aoi_radius with name {} fail to get radius idx", radius_name);
return;
}
m_owner->logger()->info("restor_aoi_radius with name {}", radius_name);
m_aoi_radius_names[radius_name] = new_aoi_radius_idx;
// 先恢复aoi 但是此时不要执行callback
const auto& pre_aoi_radius_info = m_temp_all_entities_in_aoi_radius[radius_name];
for(const auto& one_pair: pre_aoi_radius_info)
{
auto temp_other_actor = cur_space->get_entity(one_pair.first);
if(!temp_other_actor)
{
continue;
}
m_force_aoi_eids[new_aoi_radius_idx.value].insert(temp_other_actor->entity_id());
}
m_aoi_radius_callbacks[new_aoi_radius_idx] = radius_cb;
// 添加完之后 再触发已经不满足条件的leave
for(const auto& one_pair: pre_aoi_radius_info)
{
auto temp_other_actor = cur_space->get_entity(one_pair.first);
if(!temp_other_actor)
{
continue;
}
if(!(one_pair.second.second & 1))
{
m_force_aoi_eids[new_aoi_radius_idx.value].erase(temp_other_actor->entity_id());
}
}
// 再进行比对
auto temp_interested_guids = cur_aoi_mgr->interest_in_guids(new_aoi_radius_idx);
std::unordered_map<std::string, actor_entity*> temp_remain_actors;
for(auto one_guid: temp_interested_guids)
{
actor_entity* other_entity = entity_manager::instance().get_entity_with_type<actor_entity>(utility::entity_slot::from_uint64(one_guid));
if(!other_entity)
{
continue;
}
temp_remain_actors[other_entity->entity_id()] = other_entity;
}
for(const auto& one_pair:pre_aoi_radius_info)
{
auto temp_actor_iter = temp_remain_actors.find(one_pair.first);
if(temp_actor_iter == temp_remain_actors.end())
{
m_owner->logger()->info("notify remote aoi radois remove by radius name {} entity_id {} remote proxy {}", radius_name, one_pair.first, one_pair.second.first);
invalid_aois.push_back(migrate_in_aoi_invalid_info{one_pair.first, one_pair.second.first, std::uint16_t(one_pair.second.second>>16)});
}
else
{
remain_aois[temp_actor_iter->second] = std::uint16_t(one_pair.second.second>>16);
}
}
m_temp_all_entities_in_aoi_radius.erase(radius_name);
return;
}
invalid_aois里每个元素都代表已经在当前客户端中无效的一个actor_entity,同时remain_aois里每个元素都代表一个需要重新执行aoi_index映射的actor_entity。因此在player_aoi_component::restore_aoi得到这两个集合之后,对invalid_aois中的每个元素都执行一次on_aoi_leave回调,然后汇总remain_aois中的前后aoi_index映射,通过notify_aoi_reindex来通知客户端执行重新映射:
void player_aoi_component::restore_aoi()
{
// 省略之前已经介绍的代码
for(const auto& one_invalid_aoi: invalid_aois)
{
on_aoi_leave(one_invalid_aoi.entity_id, one_invalid_aoi.pre_aoi_idx);
}
std::map<std::uint16_t, std::uint16_t> remain_aoi_ids;
for(auto one_remain_actor: remain_aois)
{
remain_aoi_ids[one_remain_actor.second] = one_remain_actor.first->aoi_idx();
m_aoi_actors.insert(one_remain_actor.first);
one_remain_actor.first->get_component<actor_aoi_component>()->add_sync_player(m_player);
}
utility::rpc_msg reindex_aoi_msg;
reindex_aoi_msg.cmd = "notify_aoi_reindex";
reindex_aoi_msg.args.push_back(remain_aoi_ids);
m_player->call_client(reindex_aoi_msg);
auto cur_space = m_owner->get_space();
for(const auto& one_pair: cur_space->global_actors())
{
cur_actor_aoi_comp->add_force_aoi(player_aoi_component::static_type_name(), one_pair.second);
}
}
客户端接收到这个notify_aoi_reindex的通知之后,会遍历这个map中的每个元素,强制修改其aoi_index:
void player_space_component::notify_aoi_reindex(const utility::rpc_msg& msg, const std::map<std::uint16_t, std::uint16_t>& new_aoi_ids)
{
std::vector<client_actor*> cur_aoi_entities;
for(auto one_aoi_pair: new_aoi_ids)
{
auto pre_entity = m_aoi_entities[one_aoi_pair.first];
if(!pre_entity)
{
m_owner->logger()->error("fail to find entity for aoi_idx {}", one_aoi_pair.first);
continue;
}
pre_entity->set_aoi_idx(one_aoi_pair.second);
cur_aoi_entities.push_back(pre_entity);
}
// 上面的循环中不能去设置m_aoi_entities,因为可能会覆盖掉还没处理的entity
// 所以只能先缓存起来,等全部处理完再去更新m_aoi_entities
for(auto one_aoi_pair: new_aoi_ids)
{
m_aoi_entities[one_aoi_pair.first] = nullptr;
}
for(auto one_ent: cur_aoi_entities)
{
m_aoi_entities[one_ent->aoi_idx()] = one_ent;
}
}
注意在第一个循环中不能去修改m_aoi_entities,因为前后的aoi_index的集合可能重合,直接修改会数据错乱。比方说A的aoi_index要从2变成4,同时B的aoi_index要从4变成1。如果在开头的循环中直接设置m_aoi_index,处理完2->4之后就会造成m_aoi_index[2]=nullptr,m_aoi_index[4]=A,此时再去处理4->1,从m_aoi_index[4]中获得的已经是A了,而不是期望的B。因此这里额外增加了两个循环,第一个循环负责设置为nullptr,第二个循环负责设置真实的值。
属性同步保序
除了这个aoi_index重新映射之外,分布式大世界里的属性同步还有一个非常大的问题,迁移前后的属性消息接收顺序是不能保证的。举个例子来说,我们在actor_entity上有个int counter字段会参与客户端同步,因此在real_entity上每次修改这个属性字段都会生成一个消息广播到其所有的ghost_entity上。此时我们可以构造出一种ghost_entity上属性修改的接收顺序并不是real_entity的属性修改发送顺序的情况:
- 时刻
1,在cell_space(A)上的real_entity(O)修改了这个counter字段为1,此时会向cell_space(B)上的ghost_entity(P)和cell_space(C)上的ghost_entity(Q)发出这个同步消息S - 时刻
2,real_entity(O)准备迁移到cell_space(B),real_entity(O)成为了ghost_entity(O) - 时刻
3,cell_space(B)上的ghost_entity(P)成为了real_entity(P) - 时刻
4,real_entity(P)修改counter为2,向cell_space(A)上的ghost_entity(O)和cell_space(C)上的ghost_entity(Q)发出这个同步消息T - 时刻
5,cell_space(C)上的ghost_entity(Q)收到了cell_space(B)发出的counter=2的消息T,修改本地counter为2 - 时刻
6,cell_space(C)上的ghost_entity(Q)收到了cell_space(A)发出的counter=1的消息S,修改本地counter为1
出现这种情况是因为网络层只能保证单TCP连接的消息有序性,不能保证A->C的消息会比A->B-C先到,因为不同机器之间的网络延迟是完全不一样的。此外我们目前的网络层设计里,业务层发送一个消息只是将这个消息推送到一个网络连接的等待发送队列中,具体什么时候被发送出去其实也是不可控的,如果消息队列里消息太多,就可能有百毫秒以上的延迟,上不封顶,反之消息队列为空时最大发送时延只有5ms。
为了解决这个迁移导致的同步消息接收时不保证有序的问题,最简单的解决方式保证迁移后所有的ghost_entity读取到的属性状态都是一致的。具体策略如下:
- 在
real_entity发生迁移时,先将打包好的数据在当前进程的space_manager上进行保留,然后向所有的ghost_entity发出一个迁移开始的通知notify_real_migrate_begin。 - 当一个
ghost_entity接收到这个迁移开始通知notify_real_migrate_begin时,对这个消息的来源进行回复确认ack_real_migrate_begin - 当
space_manager上收集到了这个real_entity所有ghost_entity发出的ack_real_migrate_begin,才真正的将数据传递到目标进程去执行ghost_entity到real_entity的切换。
一旦一个ghost_entity回复了ack_real_migrate_begin,说明在这个real_entity迁移之前的所有属性同步数据都已经收到。因此当所有的ghost_entity都回复了ack_real_migrate_begin就代表所有的ghost_entity都拥有了同样的属性状态,达到了强制一致性同步的目标。
但是这个强制统一快照的方案会造成无缝迁移的延迟显著增大,之前的逻辑链路的中间只多了一个与relay_entity之间的通信,现在又多了与所有ghost_entity的通信,而且增大的延迟是所有ghost_entity里延迟的最大值。随着ghost_entity的数量增多,这个延迟最大值也逐渐变得不可控,虽然一般情况下一个actor_entity的ghost_entity数量不超过3个。
强制快照的延迟代价太大,此时我们从最基础的通信原理中吸取在不可靠信道中维持消息有序的智慧,即TCP的可靠消息机制。在TCP中,每个包都有一个递增的uint32_t来表示这个包的序列号。每个发出的包都会存储在本地已发送队列中,直到对端返回确认时再删除,长时间未确认则重发。如果对端接收到一个乱序的包,则会先在本地缓存起来,等待其他包一起组成连续包之后再处理。由于我们目前的网络底层已经使用的是TCP,所以可以不去考虑丢包,只考虑乱序。接下来将介绍MosaicGame中是如何实现这个属性同步序列号机制的。
首先需要定义一个带序列号的消息结构sync_msg,这里的version就是对应actor_entity的ghost_entity属性同步序列号:
struct sync_msg_header
{
std::uint32_t version;
std::uint8_t cmd;
std::uint8_t ts;// 时间戳字段 用来淘汰过期数据 std::uint8_t((utility::timer_manager::now_ts() / 1000) % 256)
std::uint16_t data_sz;
};
struct sync_msg: public sync_msg_header
{
std::shared_ptr<const std::string> data;
std::string to_bytes();
bool from_bytes(const char* buffer, std::uint32_t buffer_sz, std::uint16_t new_aoi_idx);
};
当一个real_entity需要向所有的ghost_entity发送属性同步消息时,会有一个专用的接口sync_other_by_ghost,这个接口会在属性同步的入口sync_to_others_with_aoi_data中自动被调用:
void actor_entity::sync_to_others_with_aoi_index(enums::entity_packet entity_packet_cmd, std::shared_ptr<const std::string> with_aoi_data)
{
auto cur_space = get_space();
if(!cur_space)
{
return;
}
if(!aoi_idx())
{
return;
}
auto cur_ghost_comp = get_component<actor_ghost_component>();
if(cur_space->is_cell_space())
{
cur_ghost_comp->sync_other_by_ghost(entity_packet_cmd, with_aoi_data);
}
sync_to_aoi_players(entity_packet_cmd, with_aoi_data);
}
这个sync_other_by_ghost负责将传入的同步数据封装成一个sync_msg,每次一个新的sync_msg被创建时, actor_ghost_component::m_sync_version就会自增:
void actor_ghost_component::sync_other_by_ghost(enums::entity_packet cur_entity_packet, std::shared_ptr<const std::string> sync_data)
{
sync_data_to_ghost_impl(cur_entity_packet, sync_data, true);
}
void actor_ghost_component::sync_data_to_ghost_impl(enums::entity_packet cur_entity_packet, std::shared_ptr<const std::string> sync_data, bool is_sync_others)
{
if(sync_data->size() >= std::numeric_limits<std::uint16_t>::max())
{
m_owner->logger()->error("sync_other_by_ghost sync_data size {} too big sync_cmd {} ", sync_data->size(), std::uint32_t(cur_entity_packet));
return;
}
m_sync_version++;
sync_msg cur_sync_msg;
cur_sync_msg.version = m_sync_version;
cur_sync_msg.data = sync_data;
auto cur_ts = utility::timer_manager::now_ts();
cur_sync_msg.ts = std::uint8_t((cur_ts / 1000) % 256);
cur_sync_msg.data_sz = sync_data->size();
cur_sync_msg.cmd = std::uint8_t(cur_entity_packet);
if(!m_owner->is_ghost())
{
m_owner->get_server()->call_server_multi(m_owner, std::make_shared<std::string>(cur_sync_msg.to_bytes()),enums::entity_packet::sync_ghost, m_anchors_for_created_ghost);
}
m_sync_msgs.push_back(cur_sync_msg);
if(cur_ts > m_next_check_cache_msg_expire_ts)
{
m_next_check_cache_msg_expire_ts = cur_ts + m_cache_msg_expire_gap * 1000;
check_cached_msg_expire();
}
}
sync_msg被创建完成之后,就会通过call_server_multi接口将这条同步数据广播到所有的ghost_entity上处理。ghost_entity接收这个同步消息的时候,直接调用handle_out_order_sync_msgs来处理可能的消息乱序:
utility::rpc_msg::call_result actor_ghost_component::on_entity_raw_msg(std::uint8_t cmd, std::shared_ptr<const std::string> msg)
{
switch(cmd)
{
case std::uint8_t(enums::entity_packet::sync_ghost):
{
if(!m_owner->is_ghost())
{
m_owner->logger()->error("{} on_entity_raw_msg sync_ghost while self is real", m_owner->entity_id());
return utility::rpc_msg::call_result::invalid_format;
}
sync_msg cur_sync_msg;
if(!cur_sync_msg.from_bytes(msg->data(), msg->size(), m_owner->aoi_idx()))
{
return utility::rpc_msg::call_result::invalid_format;
}
handle_out_order_sync_msgs(cur_sync_msg);
return utility::rpc_msg::call_result::suc;
}
default:
return utility::rpc_msg::call_result::rpc_not_found;
}
}
在handle_out_order_sync_msgs中,会使用插入排序的方式将当前消息插入到m_out_order_sync_msgs这个有序数组中,使得数组中的元素都按照version的递增序排列:
void actor_ghost_component::handle_out_order_sync_msgs(sync_msg new_msg)
{
if(new_msg.version <= m_sync_version)
{
// 已经处理过的消息 直接丢弃
m_owner->logger()->error("{} handle_out_order_sync_msgs new_msg version {} smaller than current version {}", m_owner->entity_id(), new_msg.version, m_sync_version);
return;
}
if(new_msg.version != m_sync_version + 1)
{
m_owner->logger()->warn("{} handle_out_order_sync_msgs new_msg version {} expected {}", m_owner->entity_id(), new_msg.version, m_sync_version + 1);
}
m_out_order_sync_msgs.push_back(new_msg);
// 进行简单的冒泡排序 把新加入的消息放到正确的位置
auto cur_msg_idx = m_out_order_sync_msgs.size() - 1;
while(cur_msg_idx > 0)
{
if(m_out_order_sync_msgs[cur_msg_idx - 1].version > m_out_order_sync_msgs[cur_msg_idx].version)
{
std::swap(m_out_order_sync_msgs[cur_msg_idx - 1], m_out_order_sync_msgs[cur_msg_idx]);
cur_msg_idx--;
}
else
{
break;
}
}
if(cur_msg_idx > 0)
{
// 说明不是紧接着的消息 直接返回 等待补齐
return;
}
// 这里先反过来 避免频繁的pop_front操作
std::reverse(m_out_order_sync_msgs.begin(), m_out_order_sync_msgs.end());
while(!m_out_order_sync_msgs.empty() && m_out_order_sync_msgs.back().version == m_sync_version + 1)
{
const auto& cur_sync_msg = m_out_order_sync_msgs.back();
m_sync_version++;
// 这里暂时忽略处理具体消息的逻辑
// 为了保持连号 需要把所有的sync other与sync ghost的消息都放进去
m_sync_msgs.push_back(cur_sync_msg);
m_out_order_sync_msgs.pop_back();
}
std::reverse(m_out_order_sync_msgs.begin(), m_out_order_sync_msgs.end());
auto cur_ts = utility::timer_manager::now_ts();
if(cur_ts > m_next_check_cache_msg_expire_ts)
{
m_next_check_cache_msg_expire_ts = cur_ts + m_cache_msg_expire_gap * 1000;
check_cached_msg_expire();
}
}
在排列好之后,就开始使用while来循环处理所有连续的消息,注意到这里对于不同的数据请求执行的操作是不一样的:
switch(cur_sync_msg.cmd)
{
case std::uint8_t(enums::entity_packet::sync_aoi_rpc):
{
m_owner->sync_to_aoi_players(m_sync_version, enums::entity_packet::sync_aoi_rpc, cur_sync_msg.data);
break;
}
case std::uint8_t(enums::entity_packet::sync_aoi_prop):
{
m_owner->sync_to_aoi_players(m_sync_version, enums::entity_packet::sync_aoi_prop, cur_sync_msg.data);
break;
}
case std::uint8_t(enums::entity_packet::sync_aoi_locomotion):
{
m_owner->sync_to_aoi_players(m_sync_version, enums::entity_packet::sync_aoi_locomotion, cur_sync_msg.data);
m_owner->on_sync_pos_yaw_diff(cur_sync_msg.data_without_aoi_index());
break;
}
case std::uint8_t(enums::entity_packet::sync_ghost_rpc):
{
m_owner->on_entity_raw_msg(std::uint8_t(enums::entity_packet::json_rpc), std::make_shared<std::string>(cur_sync_msg.data_without_aoi_index()));
break;
}
case std::uint8_t(enums::entity_packet::sync_ghost_prop):
{
auto real_msg_data = cur_sync_msg.data_without_aoi_index();
if(!json::accept(real_msg_data))
{
m_owner->logger()->error("on_sync_self_by_ghost sync_prop not json data");
break;
}
auto cur_json = json::parse(real_msg_data);
std::uint64_t prop_offset;
std::uint8_t prop_cmd;
json prop_data;
if(!spiritsaway::serialize::decode_multi(cur_json, prop_offset, prop_cmd, prop_data))
{
m_owner->logger()->error("fail to decode prop_delta msg {}", real_msg_data);
break;
}
m_owner->replay_prop_msg(spiritsaway::property::property_replay_offset(prop_offset), spiritsaway::property::property_cmd(prop_cmd), prop_data);
break;
}
default:
m_owner->logger()->warn("{} on_sync_other_by_ghost unknown cmd {}", m_owner->entity_id(), cur_sync_msg.cmd);
break;
}
-
enums::entity_packet::sync_aoi_rpc这个代表一个real_entity向其所有的在客户端里的client_actor推送一条rpc指令,因此ghost_entity收到后直接调用sync_to_aoi_players将当前需要同步的玩家进行广播 -
enums::entity_packet::sync_aoi_prop这个代表一个real_entity将自身所有客户端可见的属性都同步到其所有的在客户端里的client_actor,因此ghost_entity收到后直接调用sync_to_aoi_players将当前需要同步的玩家进行广播 -
enums::entity_packet::sync_aoi_locomotion这个代表一个位置同步消息,类似于所有客户端可见的属性,因此这里也会调用sync_to_aoi_players进行广播,不过这里还会顺带的更新一下ghost_entity的最新位置, -
enums::entity_packet::sync_ghost_rpc这个代表一个real_entity对所有ghost_entity的一次广播rpc调用,因此接到之后直接进行rpc调用即可 -
enums::entity_packet::sync_ghost_prop,这个代表real_entity的一些需要给ghost_entity同步属性,所以这里会执行属性的replay
值得注意的是如果一个属性是所有客户端可见的,那么这个属性也一定是ghost_entity可见的。但是我们在同步属性变化的时候,会将这个同步数据分别用sync_clients与sync_ghost编码两遍,并生成两个消息发送到ghost_entity。所以ghost_entity在接收到sync_aoi_prop的时候,并不会执行属性的replay,只有在sync_ghost_prop的时候才会执行属性的replay:
void actor_entity::add_prop_msg(const spiritsaway::property::property_record_offset& offset, spiritsaway::property::property_cmd cmd, spiritsaway::property::property_flags need_flag, spiritsaway::property::property_flags data_flag, const json& data)
{
// m_logger->info("add_prop_msg cmd {} need_flag {} data_flag {} data {} is_ghost {}", cmd, need_flag.value, data_flag.value, data, m_is_ghost);
// std::string sync_cmd = "prop_delta";
std::vector<json> sync_args;
sync_args.reserve(4);
sync_args.push_back(offset.value());
sync_args.push_back(std::uint8_t(cmd));
sync_args.push_back(data);
auto sync_str = std::make_shared<const std::string>(json(sync_args).dump());
const auto sync_self_flag = spiritsaway::mosaic_game::property::property_flags::sync_self;
const auto sync_ghost_flag = spiritsaway::mosaic_game::property::property_flags::sync_ghost;
const auto sync_other_flag = spiritsaway::mosaic_game::property::property_flags::sync_clients;
// 以前的方式来处理prop是错误的 对于一个item来说 里面可能有多个不同同步范围的field 假设有一个self的a与all的b
// 当我们insert一个{a:1, b:2}时 由于匹配优先级 会导致只有 {b:2} 这个json对象会经过sync_to_others_without_aoi_index 同步给所有客户端及ghost {a:1}这个分量会丢失
// 正确的做法应该是根据每种flag单独处理同步
// 以 {a:1, b:2}同步给 self
// 以 {b:2} 同步给ghost
// 以 {b:2} 同步给others 这里包括ghost的中转
// 同时 同步给ghost 要早于同步给other
switch(need_flag.value)
{
case sync_other_flag:
{
sync_to_others_without_aoi_index(enums::entity_packet::sync_aoi_prop, sync_str);
return;
}
case sync_ghost_flag:
{
auto cur_space = get_space();
if(cur_space && cur_space->is_cell_space())
{
auto cur_ghost_comp = get_component<actor_ghost_component>();
cur_ghost_comp->sync_self_to_ghost(enums::entity_packet::sync_ghost_prop, sync_str);
}
return;
}
case sync_self_flag:
{
sync_to_self_client(enums::entity_packet::sync_prop, sync_str);
return;
}
default:
m_logger->error("invalid sync flag {} offset {}", need_flag.value, offset.value());
return;
}
}
当real_entity创建好一个sync_msg的时候,会向ghost_entity广播,同时调用sync_to_aoi_players通知给当前进程里的其他real_entity。然后当ghost_entity接收到一个sync_msg的时候,也会通过sync_to_aoi_players通知给当前进程里的其他real_entity。
void actor_entity::sync_to_aoi_players(std::uint32_t sync_version, enums::entity_packet entity_packet_cmd, std::shared_ptr<const std::string> with_aoi_data)
{
for(const auto& one_pair: get_component<actor_aoi_component>()->aoi_sync_players())
{
if(one_pair.second->is_ghost())
{
continue;
}
one_pair.second->sync_to_client_from_other(entity_id(), sync_version, aoi_idx(), entity_packet_cmd, with_aoi_data);
}
}
由于其他real_entity也是有迁移能力的,所以对于同一个actor_entity的real/ghost发送过来的sync_msg,可能会出现消息的乱序、丢包等现象,不过现在我们的sync_msg都带上了版本号,这个消息连续性问题就可以解决了,在往下发送一个sync_msg之前做一个序列号校验check_other_sync_version。
void player_entity::sync_to_client_from_other(const std::string& other_entity_id, std::uint32_t other_sync_version, std::uint16_t other_aoi_idx, enums::entity_packet entity_packet_cmd, const std::shared_ptr<const std::string> data)
{
auto cur_aoi_comp = get_component<player_aoi_component>();
if(!cur_aoi_comp->check_other_sync_version(other_entity_id, other_sync_version))
{
return;
}
// 省略具体处理代码
}
check_other_sync_version的工作原理是在real_entity上保存当前客户端里所有其他actor_entity的最新已同步版本号在m_other_sync_versions这个map中。当一个新的带版本号的数据过来的时候,检查这个版本号是否等于所期待的下一个版本,如果是的话才允许同步到客户端,同时对这个版本号进行更新。注意这个版本号机制只有在cell_space时才开启,对于普通的非分布式大世界,这个检查永远都返回true。
bool player_aoi_component::check_other_sync_version(const std::string& other_entity_id, std::uint32_t other_sync_version)
{
auto cur_space = m_owner->get_space();
if(!cur_space)
{
return false;
}
if(!cur_space->is_cell_space())
{
return true;
}
auto cur_iter = m_other_sync_versions.find(other_entity_id);
if(cur_iter == m_other_sync_versions.end())
{
return false;
}
if((cur_iter->second + 1)!= other_sync_version)
{
return false;
}
cur_iter->second++;
return true;
}
这个检查可以有效的过滤掉重复数据的向下同步,但是对于缺失数据的处理还需要额外工作。下面就是一个同步数据缺失的例子:
- 在进程
A上的real_entity(M)接收到的ghost_entity(N)的最新同步版本号是100 real_entity(M)迁移到了real_entity(N)所在的进程B,发现此时N的最新同步版本号是110real_entity(N)的后续广播数据版本号都不会小于110,这样就导致M永远无法再同步N发出的广播消息
为了解决这个问题,每个actor_entity都会有一个vector<sync_msg> m_sync_msgs;队列来缓存一些最近发出的广播消息,real_entity创建sync_msg和ghost_entity接收到sync_msg的时候都会往这个队列里添加有序数据。在real_entity迁移的时候,除了带上最新版本号之外,这个缓存队列也会带上,迁移完成之后再将这个数据解析出来,设置回m_sync_msgs。
json::object_t actor_ghost_component::encode(bool for_ghost)
{
auto cur_space = m_owner->get_space();
if(!cur_space)
{
return {};
}
if(!cur_space->is_cell_space())
{
return {};
}
json::object_t result;
if(for_ghost)
{
result["sync_version"] = m_sync_version;
return result;
}
result["ghost_creating"] = m_ghost_creating;
result["ghost_created"] = m_ghost_created;
result["from_real"] = *(m_owner->get_space()->get_call_proxy());
result["sync_version"] = m_sync_version;
result["sync_msgs"] = m_sync_msgs;
m_sync_msgs.clear();
return result;
}
每次调用完广播接口,都会将这个sync_msg放到m_sync_msgs这个队列中,为了避免队列无限膨胀,会加入一个过期机制。这个机制依赖于sync_msg.ts字段,构造时时间戳设置为当前秒对256取模,然后定期调用check_cached_msg_expire来淘汰太老的数据:
void actor_ghost_component::check_cached_msg_expire()
{
if(m_sync_msgs.size() == 1)
{
return;
}
std::vector<sync_msg> temp_msg_vec;
std::uint8_t cur_ts = m_sync_msgs.back().ts;
std::uint64_t last_remain_index = m_sync_msgs.size() - 1;
if(cur_ts >= m_cache_msg_expire_gap)
{
auto min_expire_ts = cur_ts - m_cache_msg_expire_gap;
while(last_remain_index > 0)
{
const auto& cur_msg = m_sync_msgs[last_remain_index - 1];
if(cur_msg.ts < min_expire_ts)
{
break;
}
last_remain_index--;
}
}
else
{
auto max_expire_ts = cur_ts + 255 - m_cache_msg_expire_gap;
while(last_remain_index > 0)
{
const auto& cur_msg = m_sync_msgs[last_remain_index - 1];
if(cur_msg.ts > cur_ts && cur_msg.ts < max_expire_ts)
{
break;
}
last_remain_index--;
}
}
if(last_remain_index == 0)
{
return;
}
if(last_remain_index < m_sync_msgs.size() / 4)
{
// 如果要删除的元素太少 就先不删除了
return;
}
m_sync_msgs.erase(m_sync_msgs.begin(), m_sync_msgs.begin() + last_remain_index);
}
由于我们设置时间戳时使用了取模操作,所以判定过期数据是要小心的处理时间戳回环问题。
有了这个m_sync_msgs数据之后,每个player_entity迁移到新进程,需要在新进程上找到其客户端里的所有actor_entity,利用这个缓存来补充之间漏的一些同步数据,这部分代码在之前介绍过的player_aoi_component::restore_aoi中:
void player_aoi_component::restore_aoi()
{
// 省略之前已经介绍过的aoi_radius恢复代码
std::unordered_map<actor_entity*, std::uint16_t> remain_aois;
std::map<std::uint16_t, std::uint16_t> remain_aoi_ids;
for(auto one_remain_actor: remain_aois)
{
// 迁移进来之后 对于还在自己客户端aoi的actor 检查同步版本号是否匹配 如果落后则需要使用cache来补充
remain_aoi_ids[one_remain_actor.second] = one_remain_actor.first->aoi_idx();
m_actors_in_client.insert(one_remain_actor.first);
one_remain_actor.first->get_component<actor_aoi_component>()->add_sync_to_player(m_player->entity_id(), m_player);
auto other_ghost_comp = one_remain_actor.first->get_component<actor_ghost_component>();
check_resync_by_cache(one_remain_actor.first, other_ghost_comp->sync_version(), other_ghost_comp->sync_msgs());
}
// 省略一些已经介绍过的aoi_reindex代码
}
这里的check_resync_by_cache作用就是根据本地的m_other_sync_versions来获得之前存储的最新同步版本,然后从other_msgs拿出所有后续版本来做补充同步:
void player_aoi_component::check_resync_by_cache(actor_entity* other, std::uint32_t other_sync_ver, const std::vector<sync_msg>& other_msgs)
{
auto other_aoi_idx = other->aoi_idx();
auto temp_iter = m_other_sync_versions.find(other_aoi_idx);
if(temp_iter == m_other_sync_versions.end())
{
return;
}
auto pre_sync_ver = temp_iter->second;
if(pre_sync_ver >= other_sync_ver)
{
// 本地收到的版本号已经大于了other的版本号 说明不需要补充数据
return;
}
temp_iter->second = other_sync_ver;
if(!other_msgs.empty() && pre_sync_ver + 1< other_msgs.front().version)
{
// 如果本地版本号与other缓存队列中的开头版本号不匹配 说明有信息丢失 直接使用完整数据进行同步
m_owner->logger()->info("player_aoi_component {} detect other {} aoi_idx {} sync version miss match local {} other {}", m_owner->entity_id(), other->entity_id(), other_aoi_idx, pre_sync_ver, other_msgs.front().version);
auto other_encode_info = other->encode_with_flag(std::uint32_t(enums::encode_flags::other_client));
utility::rpc_msg resync_msg;
resync_msg.cmd = "notify_aoi_resync";
resync_msg.set_args(other->aoi_idx(), other_encode_info);
m_owner->sync_to_self_client(resync_msg);
return;
}
// 使用缓存数据进行补充
for(const auto& one_msg: other_msgs)
{
if(one_msg.version > pre_sync_ver)
{
m_player->sync_to_client_from_other(other->entity_id(), one_msg.version, m_owner->aoi_idx(), enums::entity_packet(one_msg.cmd), one_msg.data);
}
}
}
在做补充同步的时候可能会出现other_msgs的第一个版本号与当前同步到的最新版本号之间有空洞,此时能做的只有根据other_entity的当前数据来执行一个aoi_resync,将最新的数据encode之后下发到客户端通知客户端来直接覆盖。
异步业务流程
在之前的介绍中我们可以看出所有的状态修改者必须是real_entity,ghost_entity的作用就是负责作为一些客户端可见以及服务端其他real_entity可见的属性的副本而存在的。所以actor_entity之间做交互的时候,所要修改的actor_entity在本地有三种情况:
- 对应的
real/ghost在当前cell_space中并不存在 - 对应的
ghost在当前cell_space中存在 - 对应的
real在当前的cell_space中存在
如果是最后一种情况,业务逻辑就简单了,处理起来与非分布式大世界中的代码没有什么不同。但是在前两种情况下,正常的业务逻辑将会被打断,此时的逻辑上下文需要通过rpc发送到对应的real_entity上执行,当对端的real_entity执行完成之后再以rpc的形式通知回来,然后再恢复上下文继续执行。这样完整的业务逻辑就被拆成了多个零碎的部分,如果期间涉及到多个real_entity之间的交互,业务流就被彻底切碎了,变得极其难以维护。下面就是一个非常简单的战斗结算例子。
战斗的发起者是客户端的玩家,调用了下面的这个rpc来发起一个攻击:
void player_combat_component::request_begin_hit(const utility::rpc_msg& msg, const std::string& target_id, std::uint64_t client_hit_seq)
{
m_owner->logger()->info("request_begin_hit target {} client_hit_seq {}", target_id, client_hit_seq);
auto server_hit_seq = m_actor_combat_comp->try_hit(target_id);
utility::rpc_msg reply_msg;
reply_msg.cmd = "reply_begin_hit";
reply_msg.set_args(client_hit_seq, server_hit_seq);
m_player->call_client(reply_msg);
}
这里的actor_combat_component::try_hit会检查一下攻击目标是否在当前的mono_space/cell_space里,如果不在则直接返回,否则走后续的逻辑:
std::uint64_t actor_combat_component::try_hit(const std::string& target_id)
{
auto target_actor = m_owner->get_space()->get_entity(target_id);
if(!target_actor)
{
return 0;
}
return try_hit(target_actor);
}
粗看一下觉得在cell_space环境下没有找到(real/ghost)_entity直接返回有点暴力,但是其实如果当前当前场景找不到的话,客户端其实也应该无法同步到这个actor_entity,那么客户端请求攻击一个当前看不到的actor_entity就是一个非法操作,所以直接返回逻辑上是正确的。
如果找到了,则使用第二个try_hit来构造一个攻击上下文hit_record:
struct hit_record
{
std::uint64_t from_online_id; // 攻击发起者的id
std::uint64_t target_online_id; // 受击者的id
std::uint64_t from_entity_flag; // 攻击发起者的entity_flag
std::uint64_t hit_ts; // 攻击时间戳
double hit_damage; // 预期伤害
std::uint64_t hit_seq; // 攻击序列号
json encode() const;
bool decode(const json& data);
bool operator==(const hit_record& other) const;
};
std::uint64_t actor_combat_component::try_hit(actor_entity* target)
{
auto cur_ts = utility::timer_manager::now_ts();
if(m_owner->combat_prop()->last_hit_ts() + m_owner->attr_prop()->attack_gap() > cur_ts)
{
return 0;
}
if(!can_hit(target))
{
return 0;
}
hit_record cur_hit_record;
cur_hit_record.hit_seq = m_owner->combat_prop()->last_hit_seq() + 1;
m_owner->combat_prop_proxy()->last_hit_seq().set(cur_hit_record.hit_seq);
cur_hit_record.hit_ts = cur_ts;
// 现在设置为0.5s之后检查命中
m_owner->combat_prop_proxy()->do_hit_ts().insert(cur_hit_record.hit_seq, cur_ts + 500);
// 现在设置为5s之后检查技能超时
m_owner->combat_prop_proxy()->hit_expire_ts().insert(cur_hit_record.hit_seq, cur_ts + 5000);
cur_hit_record.from_online_id = m_owner->online_entity_id();
cur_hit_record.target_online_id = target->online_entity_id();
cur_hit_record.hit_damage = m_owner->attr_prop()->attack();
cur_hit_record.from_entity_flag = m_owner->entity_flag();
m_owner->combat_prop_proxy()->hit_records().insert(cur_hit_record.hit_seq, cur_hit_record);
m_owner->combat_prop_proxy()->last_hit_ts().set(cur_ts);
m_hit_begin_dispatcher.dispatch(cur_hit_record);
if(!m_hit_check_timer.valid())
{
m_hit_check_timer = m_owner->add_timer_with_gap(std::chrono::milliseconds(100), [this]()
{
check_hits();
});
}
return cur_hit_record.hit_seq;
}
构造之前使用can_hit来检查目标是否可以攻击,为了让这个can_hit检查尽可能的细致,避免后续的攻击到对方real_entity被前置检查无效,ghost_entity需要同步很多的属性,例如当前血量和阵营等字段,真正的业务中其实需要检查很多东西:
bool actor_combat_component::can_hit(const actor_entity* target)
{
if(!target->attr_prop())
{
return false;
}
if(target->attr_prop()->hp() <= 0)
{
return false;
}
if(target == m_owner)
{
return false;
}
if(target->combat_prop()->faction() == m_owner->combat_prop()->faction())
{
return false;
}
return true;
}
当构造好这个hit_record之后,正常的逻辑根据攻击动画来计算物理上是否命中。但是目前我们的服务器很粗糙,所以设置的是0.5s之后直接假设命中。当命中的时候会调用do_hit,这里会根据指定的actor_entity的状态来做具体的逻辑:
- 如果不存在,则直接返回,等待这个攻击自动超时删除
- 如果目标是
ghost_entity,则发送一个server_on_hit来通知对方被击中,此时需要带上当前real_entity的回调地址call_proxy - 如果目标是
real_entity,则直接调用on_hit来执行命中结算后处理
void actor_combat_component::do_hit(const hit_record& cur_hit)
{
auto other_entity = m_owner->get_space()->get_entity(utility::entity_desc::gen_local_id(cur_hit.target_online_id));
if(!other_entity)
{
return;
}
if(other_entity->is_ghost())
{
utility::rpc_msg cur_hit_msg;
cur_hit_msg.cmd = "server_on_hit";
cur_hit_msg.set_args(m_owner->entity_id(), *m_owner->get_call_proxy(), serialize::encode(cur_hit));
m_owner->call_server(other_entity->get_call_proxy(), cur_hit_msg);
}
else
{
auto other_combat_comp = other_entity->get_component<actor_combat_component>();
other_combat_comp->on_hit(m_owner, m_owner->entity_id(), *m_owner->get_call_proxy(), cur_hit);
}
}
其实这里的server_on_hit就是on_hit的一个简单的异步封装,只不过第一个参数设置为了nullptr,攻击发起者不在当前进程:
void actor_combat_component::server_on_hit(const utility::rpc_msg& msg, const std::string& from_eid, const std::string& from_proxy, const hit_record& hit_info)
{
on_hit(nullptr, from_eid, from_proxy, hit_info);
}
这里的on_hit先计算当前应该扣除的血量,修改相关属性之后,将攻击结算的伤害通知回攻击者,这里又会根据是否是real/ghost来区分逻辑,如果是real则直接调用on_hit_feedback,如果是ghost则发送server_hit_feedback这个rpc:
void actor_combat_component::on_hit(actor_entity* from_entity, const std::string& from_eid, const std::string& from_proxy, const hit_record& hit_info)
{
// 省略伤害结算逻辑
bool is_kill = m_owner->attr_prop()->hp() <= 0.f;
if(from_entity && !from_entity->is_ghost())
{
from_entity->get_component<actor_combat_component>()->on_hit_feedback(m_owner, hit_info.hit_seq, real_dmg, is_kill);
}
else
{
utility::rpc_msg cur_hit_back_msg;
cur_hit_back_msg.cmd = "server_hit_feedback";
cur_hit_back_msg.set_args(serialize::encode(hit_info), real_dmg, is_kill);
m_owner->call_server(std::make_shared<std::string>(from_proxy), cur_hit_back_msg);
}
// 省略一些代码
}
大家也可以猜到这里的server_hit_feedback其实也是一个对on_hit_feedback的简单封装,第一个参数设置为了nullptr代表受击方来自另外一个进程:
void actor_combat_component::server_hit_feedback(const utility::rpc_msg& msg, std::uint64_t hit_seq, double real_dmg, bool is_kill)
{
on_hit_feedback(nullptr, hit_seq, real_dmg, is_kill);
}
当一个on_hit_feedback回来之后,这个攻击算是生命周期结束,可以从未完成攻击中删除了:
void actor_combat_component::on_hit_feedback(actor_entity* dest_entity, std::uint64_t hit_seq, double real_dmg, bool is_kill)
{
auto temp_hit_iter = prop_hit_records().find(hit_seq);
if(temp_hit_iter == prop_hit_records().end())
{
m_owner->logger()->error("on_hit_feedback invalid hit_seq {} real_dmg {}", hit_seq, real_dmg);
return;
}
if(!dest_entity)
{
dest_entity = m_owner->get_space()->get_entity_by_online_id(temp_hit_iter->second.target_online_id);
}
m_owner->logger()->debug("on_hit_feedback dest {} hit_damage {} real_dmg {} is_kill {}", temp_hit_iter->second.target_online_id, temp_hit_iter->second.hit_damage, real_dmg, is_kill);
const auto& new_hit_record = temp_hit_iter->second;
m_owner->combat_prop_proxy()->hit_expire_ts().erase(hit_seq);
m_hit_end_dispatcher.dispatch(new_hit_record);
m_owner->combat_prop_proxy()->hit_records().erase(hit_seq);
}
全套流程走下来非常冗长,涉及到多个异步调用:
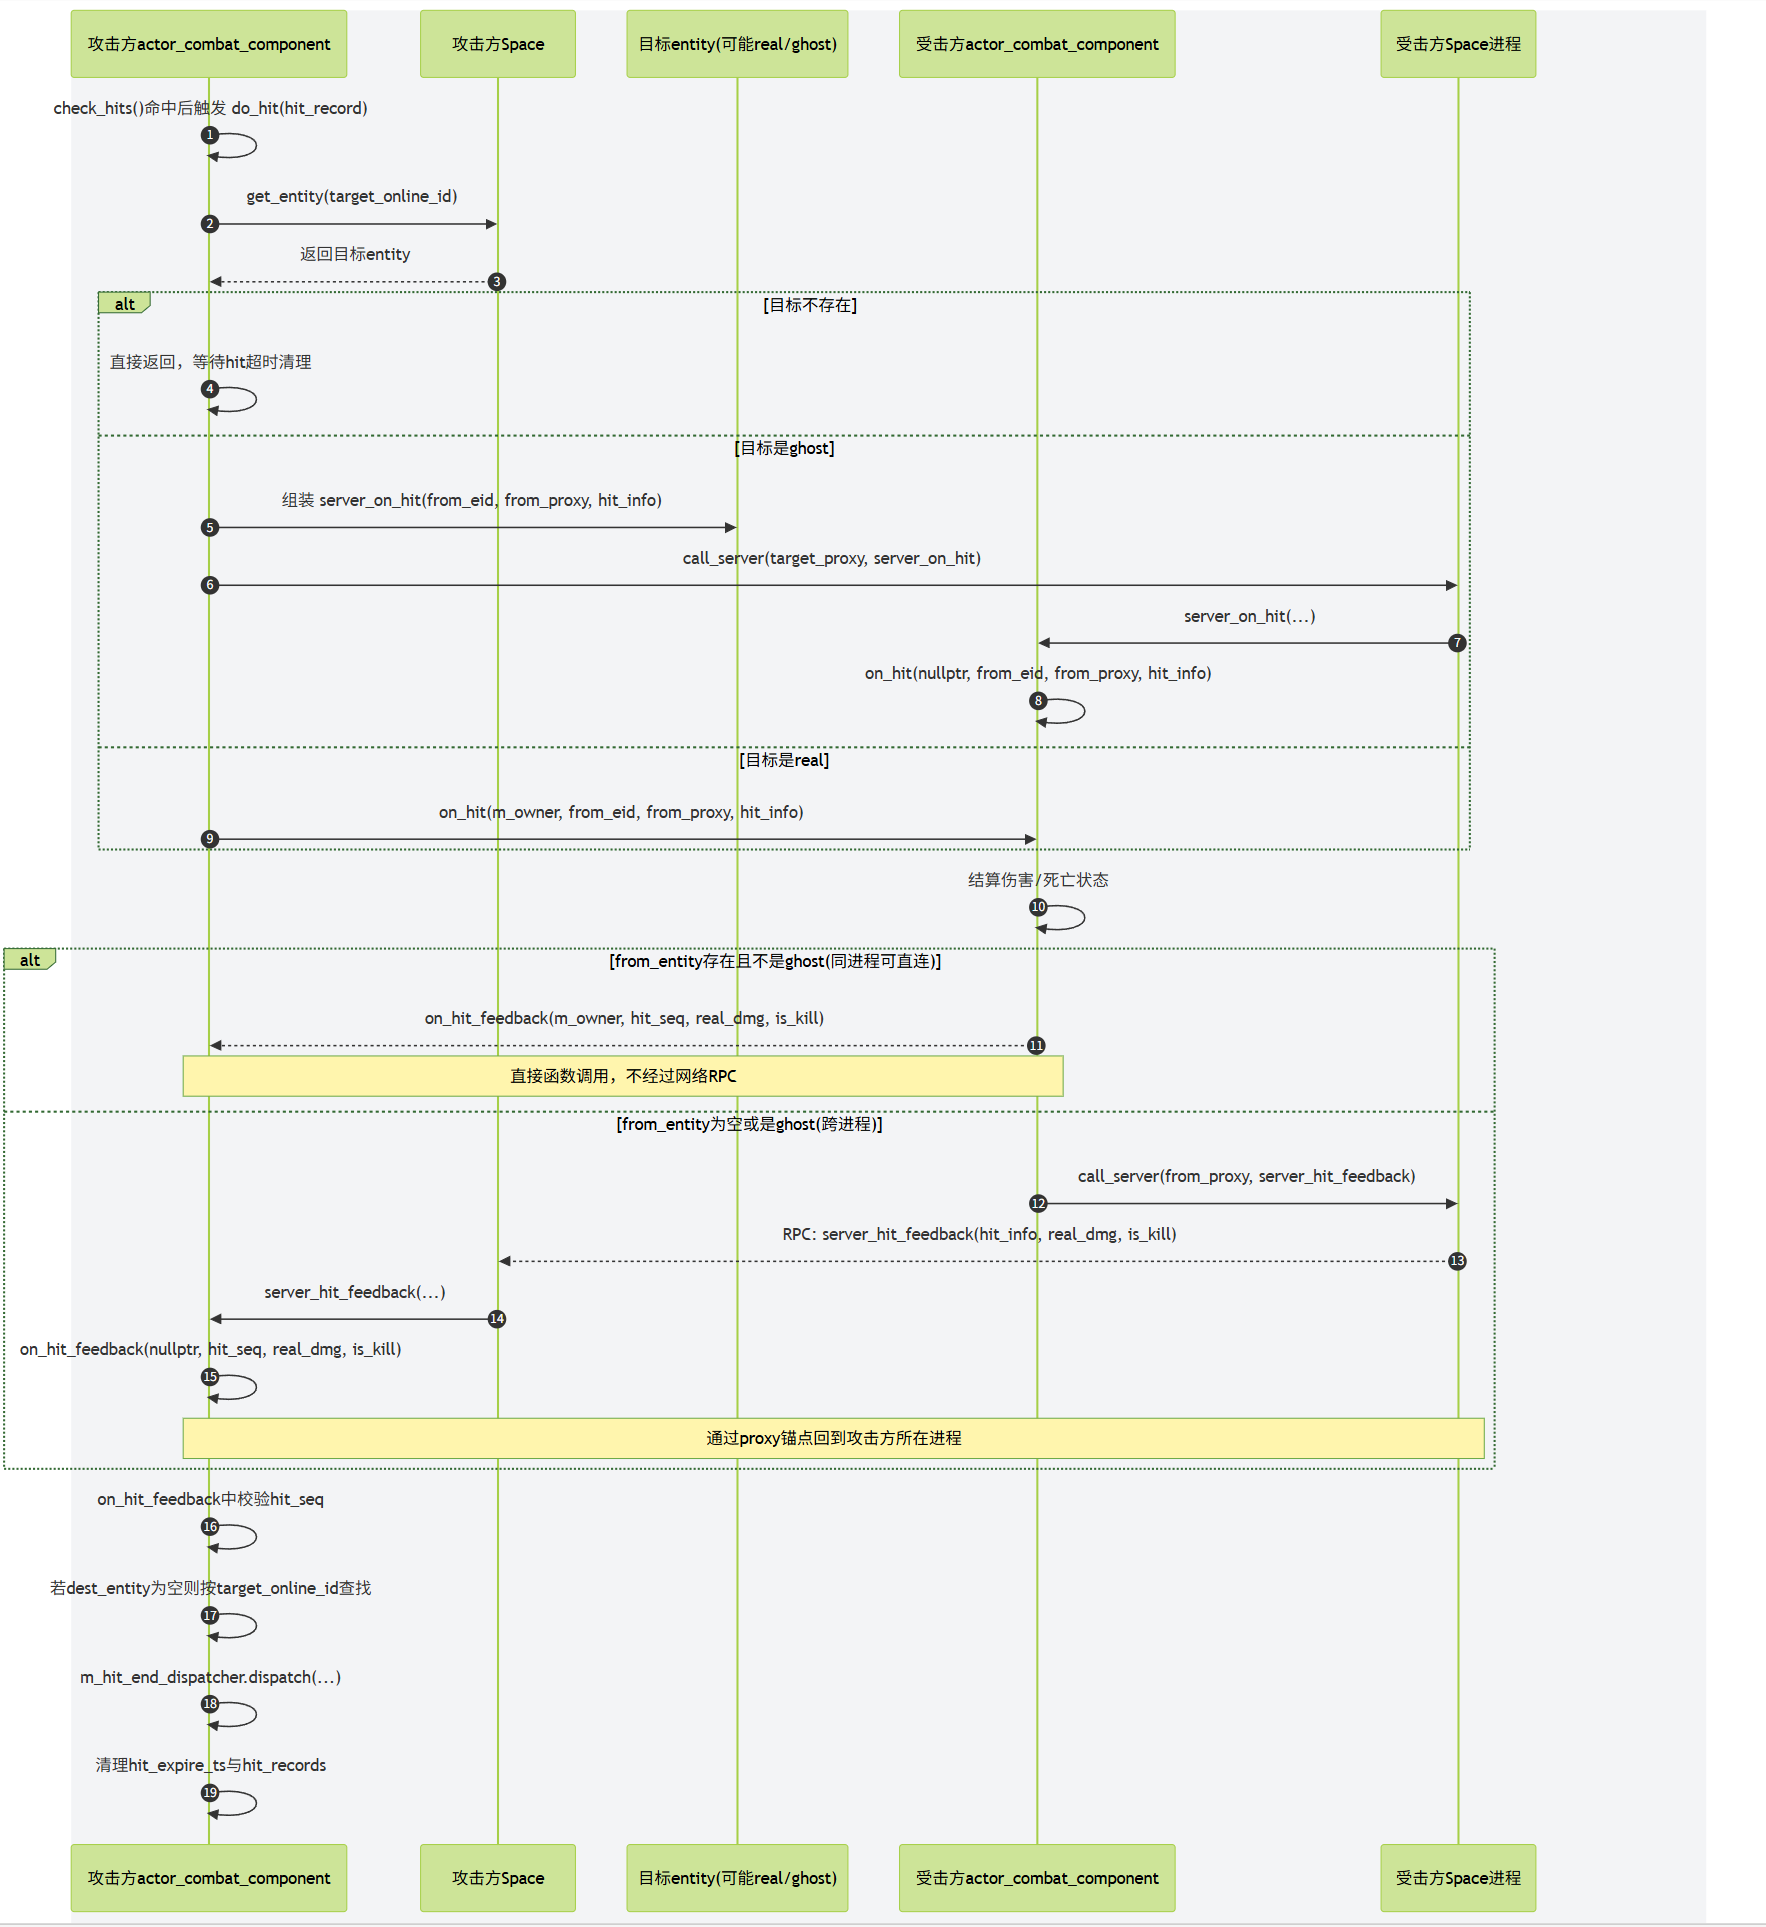
使用libclang实现自动代码生成
llvm 与clang介绍
LLVM 是 Low Level Virtual Machine 的简称,这个库提供了与编译器相关的支持,能够进行程序语言的编译期优化、连接优化、在线编译优化、代码生成。目前已经可以作为c、c++、object-c、rust、swift等语言的后端。
Clang 是一个 C++ 编写、基于 LLVM、发布于 LLVM BSD 许可证下的 C/C++/Objective C/Objective C++ 编译器前端。
Apple 使用 LLVM 在不支持全部 OpenGL 特性的 GPU (Intel 低端显卡) 上生成代码 (JIT),令程序仍然能够正常运行。之后 LLVM 与 GCC 的集成过程引发了一些不快,GCC 系统庞大而笨重,而 Apple 大量使用的 Objective-C 在 GCC 中优先级很低。此外 GCC 作为一个纯粹的编译系统,与 IDE 配合很差。加之许可证方面的要求,Apple 无法使用修改版的 GCC 而闭源。于是 Apple 决定从零开始写 C family 的前端,也就是基于 LLVM 的 Clang 了。
Clang相对gcc的前端来说设:计清晰简单,容易理解,易于扩展增强。clang基于库的模块化设计,易于 IDE 集成及其他用途的重用。主要工具有clang-format, clang-ast,libclang, libtooling, address sanitizer等。
当前用来给代码增加反射,我们使用的主要组件是libclang。 libclang提供了一系列的C语言的接口,但是这些接口并不能完全提供存储在Clang C++ AST中的所有信息,只能提供部分基本信息。而且这些c接口,尽管每个函数都有对应的doxygen注释,但是作为how to的指引来说这些文档远远不够。为了实现特定功能,还需要自己去摸索。
clang ast
ast全称叫做abstract syntax tree,即抽象语法树。clang可以把源代码解析成抽象语法树的形式,并通过相关工具可以进行导出。考虑下面的代码:
int f(int x) {
int result = (x / 42);
return result;
}
经过手工分析,我们可以将上述代码解析为如下的形式:
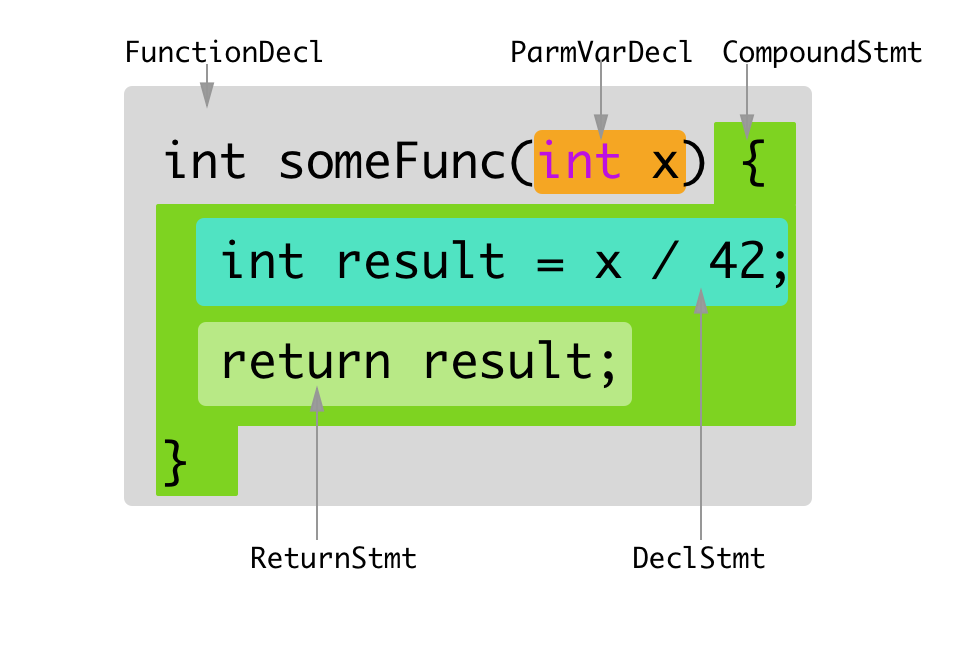
我们可以用clang -Xclang -ast-dump -fsyntax-only test.hxx这个指令打印出这段代码的ast输出:
TranslationUnitDecl 0x5aea0d0 <<invalid sloc>>
... cutting out internal declarations of clang ...
`-FunctionDecl 0x5aeab50 <test.cc:1:1, line:4:1> f 'int (int)'
|-ParmVarDecl 0x5aeaa90 <line:1:7, col:11> x 'int'
`-CompoundStmt 0x5aead88 <col:14, line:4:1>
|-DeclStmt 0x5aead10 <line:2:3, col:24>
| `-VarDecl 0x5aeac10 <col:3, col:23> result 'int'
| `-ParenExpr 0x5aeacf0 <col:16, col:23> 'int'
| `-BinaryOperator 0x5aeacc8 <col:17, col:21> 'int' '/'
| |-ImplicitCastExpr 0x5aeacb0 <col:17> 'int' <LValueToRValue>
| | `-DeclRefExpr 0x5aeac68 <col:17> 'int' lvalue ParmVar 0x5aeaa90 'x' 'int'
| `-IntegerLiteral 0x5aeac90 <col:21> 'int' 42
`-ReturnStmt 0x5aead68 <line:3:3, col:10>
`-ImplicitCastExpr 0x5aead50 <col:10> 'int' <LValueToRValue>
`-DeclRefExpr 0x5aead28 <col:10> 'int' lvalue Var 0x5aeac10 'result' 'int'
如果shell支持彩色的话,输出是这样的:
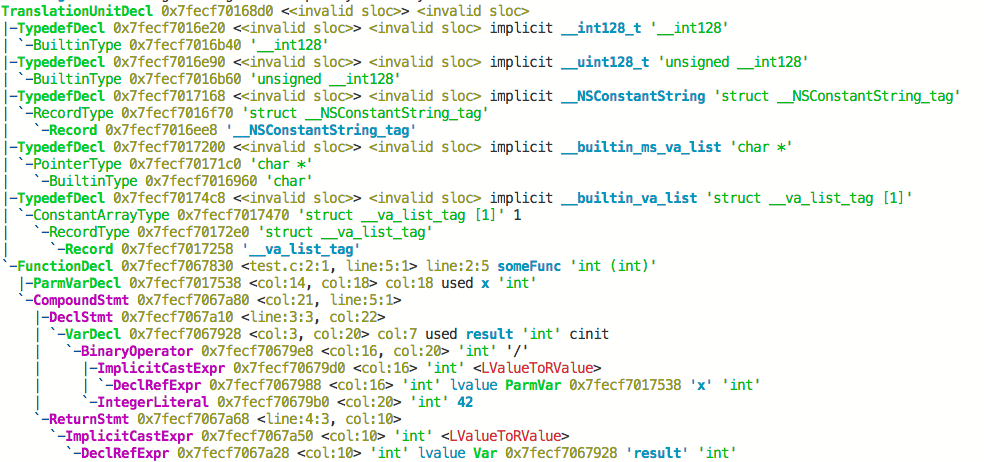
看到这些输出,围观的同志们估计现在很兴奋,准备用祖传的hello world.cpp来一发试试。你们的输出结果应该是长这样:
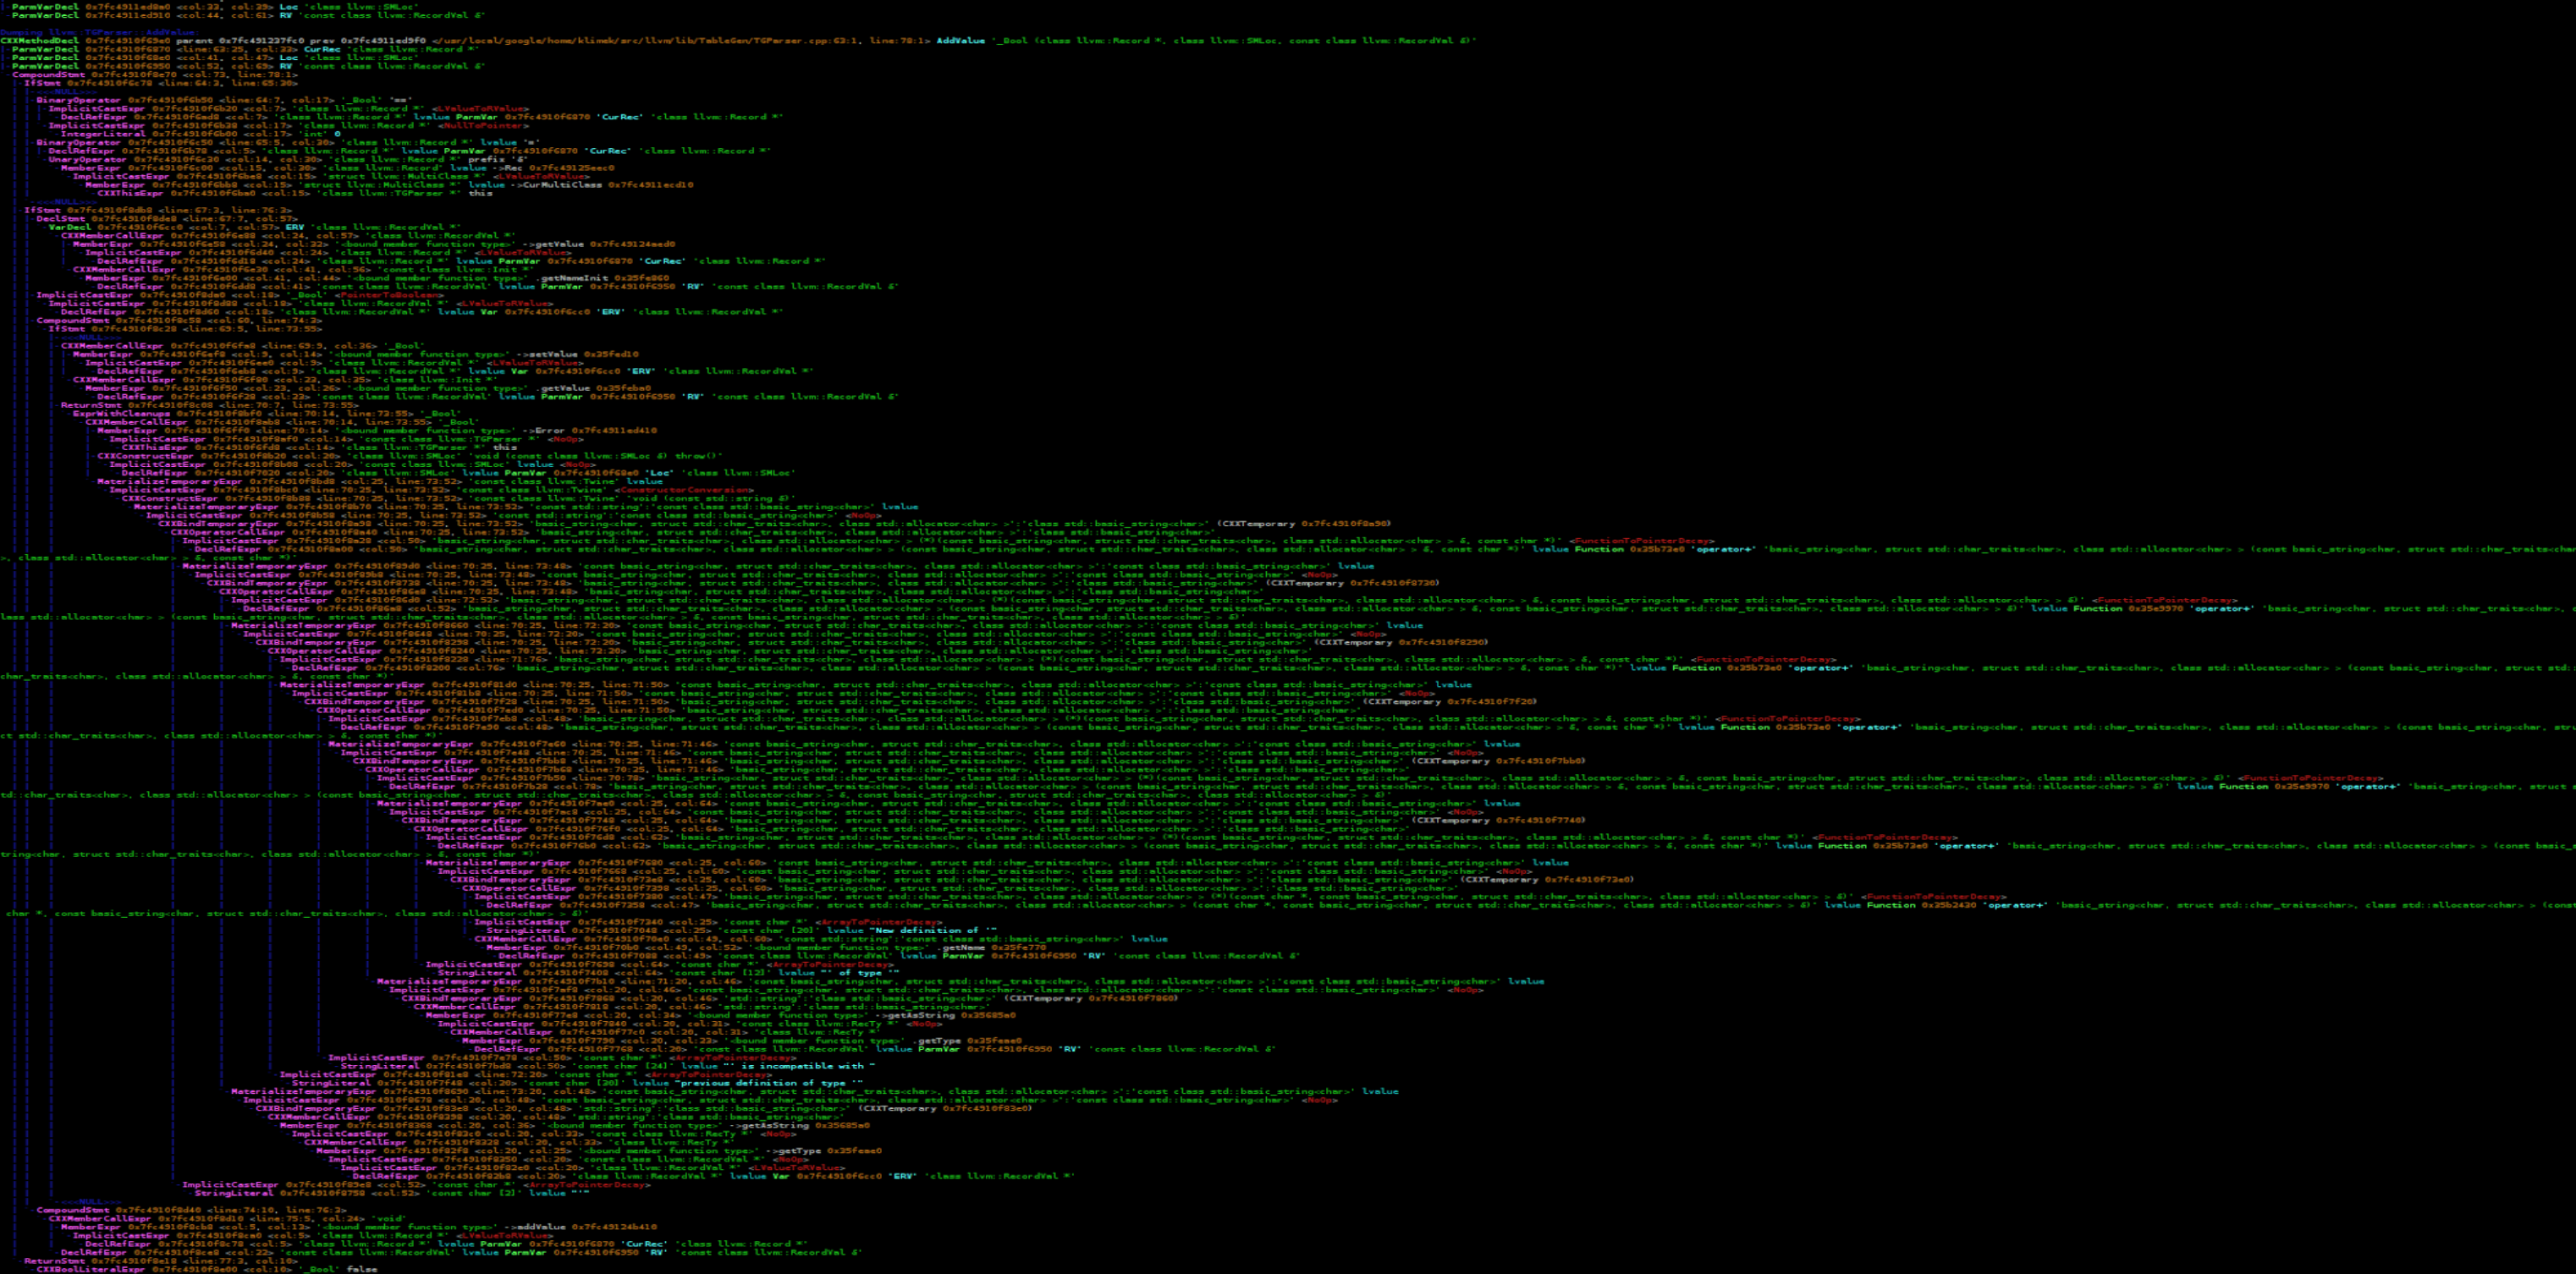
所有输出都展开的话应该有几十万行,这里面有非常多我们不需要关心的部分。幸亏clang提供了ast matcher相关组件,我们可以使用ast matcher来过滤ast dump的输出,来获取我们所感兴趣的部分。下面就是一个只打印参数类型有std::vector的所有函数声明:
DeclarationMatcher Matcher = functionDecl(
hasAnyParameter(hasType(recordDecl(matchesName("std::vector"))));
class VecCallback : public clang::ast_matchers::MatchFinder::MatchCallback {
public:
virtual void
run(const clang::ast_matchers::MatchFinder::MatchResult &Result) final {
llvm::outs() << ".";
if (const auto *F =
Result.Nodes.getDeclAs<clang::FunctionDecl>(FunctionID)) {
const auto& SM = *Result.SourceManager;
const auto& Loc = F->getLocation();
llvm::outs() << SM.getFilename(Loc) << ":"
<< SM.getSpellingLineNumber(Loc) << ":"
<< SM.getSpellingColumnNumber(Loc) << "\n";
}
}
};
对于我们的反射需求来说,我们需要获得如下信息:
- 所有需要反射的类声明
- 每个需要反射的类里面的成员变量声明
- 每个需要反射的类里面的成员函数声明
- 每个反射类的继承链
- 特定的全局函数
这些信息我们都可以通过ast matcher来获得,获取这些信息之后,我们可以dump出每个类的信息。
对于namespace A下面的这个类:
struct s_1
{
optional<int> a = 0;
pair<int, optional<float>> b;
tuple<int, float, string> c;
};
我们dump出来的结果是这样的:
{
"bases": null,
"constructors": null,
"fields": {
"A::s_1::a": {
"name": "A::s_1::a",
"node_type": "variable",
"qualified_name": "A::s_1::a",
"var_type": "std::optional<int>",
"with_default": true
},
"A::s_1::b": {
"name": "A::s_1::b",
"node_type": "variable",
"qualified_name": "A::s_1::b",
"var_type": "std::pair<int,std::optional<float>>",
"with_default": false
},
"A::s_1::c": {
"name": "A::s_1::c",
"node_type": "variable",
"qualified_name": "A::s_1::c",
"var_type": "std::tuple<int,float,std::basic_string<char,std::char_traits<char>,std::allocator<char>>>",
"with_default": false
}
},
"methods": null,
"name": "A::s_1",
"node_type": "class",
"qualified_name": "A::s_1",
"static_fields": null,
"static_methods": null,
"template_args": []
}
剩下的问题就是,我们如果找到我们所关心的那些信息,因为一个简单的hello world程序里面所带入的声明有上万个。我们需要加进一步的过滤,过滤出特定类、特定字段、特定函数。这个时候attribute就派上用场了
c++ attribute
属性(Attribute)是构成程序基本结构的元数据,开发者可以通过属性来给编译器传递必要的语义信息.例如,属性可以改变程序的代码生成结构,或者提供额外的静态分析的语义信息。下面就是一个标准的给声明加属性的代码片段:
[[gnu::always_inline]] [[gnu::hot]] [[gnu::const]] [[nodiscard]]
inline int f(); // declare f with four attributes
[[gnu::always_inline, gnu::const, gnu::hot, nodiscard]]
int f(); // same as above, but uses a single attr specifier that contains four attributes
// C++17:
[[using gnu : const, always_inline, hot]] [[nodiscard]]
int f[[gnu::always_inline]](); // an attribute may appear in multiple specifiers
int f() { return 0; }
属性的语法跟平常的代码不怎么相同,推荐看一下这个连接https://en.cppreference.com/w/cpp/language/attributes。
上面的是c++标准里关于属性的语法,其实在gcc和msvc里面早就有了对应语义的属性定义,但是语法方式采取的不相同。
下面的是gnu的属性定义方式:
extern void exit(int) __attribute__((noreturn));
extern void abort(void) __attribute__((noreturn));
- (CGSize)sizeWithFont:(UIFont *)font NS_DEPRECATED_IOS(2_0, 7_0, "Use -sizeWithAttributes:") __TVOS_PROHIBITED;
//来看一下 后边的宏
#define NS_DEPRECATED_IOS(_iosIntro, _iosDep, ...) CF_DEPRECATED_IOS(_iosIntro, _iosDep, __VA_ARGS__)
define CF_DEPRECATED_IOS(_iosIntro, _iosDep, ...) __attribute__((availability(ios,introduced=_iosIntro,deprecated=_iosDep,message="" __VA_ARGS__)))
//宏展开以后如下
__attribute__((availability(ios,introduced=2_0,deprecated=7_0,message=""__VA_ARGS__)));
//ios即是iOS平台
//introduced 从哪个版本开始使用
//deprecated 从哪个版本开始弃用
//message 警告的消息
下面的是msvc的属性定义方式:
_declspec(dllimport) class X {} varX;
__declspec(align(32)) struct Str1{
int a, b, c, d, e;
};
#define MY_TEXT "function is deprecated"
void func1(void) {}
__declspec(deprecated) void func1(int) {}
__declspec(deprecated("** this is a deprecated function **")) void func2(int) {}
__declspec(deprecated(MY_TEXT)) void func3(int) {}
class X {
__declspec(noinline) int mbrfunc() {
return 0;
} // will not inline
};
这些属性都是编译器预先定义好了的,来实现标准之外的特定扩展功能的。但是有一个属性是例外的,他就是annotate属性,这个属性不带任何语义信息,只是为了标注用。我们可以这么利用annotate属性:
#define CLASS() class __attribute__((annotate("reflect-class")))
#define PROPERTY() __attribute__((annotate("reflect-property")))
CLASS() User
{
public:
PROPERTY()
uint64_t id;
PROPERTY()
string name;
PROPERTY()
vector<string> pets;
};
这个annotate属性可以被clang ast dump出来,作为AnnotateAttr来存在:
CXXRecordDecl 0x7fcda1bae7e0 <./metareflect.hxx:19:24, test.hxx:130:1> line:115:9 class User definition
|-AnnotateAttr 0x7fcda1bae908 <./metareflect.hxx:19:45, col:83> "reflect-class;"
|-CXXRecordDecl 0x7fcda1bae960 <col:24, test.hxx:115:9> col:9 implicit class User
|-FieldDecl 0x7fcda1baea80 <./metareflect.hxx:21:27, test.hxx:121:14> col:14 id 'uint64_t':'unsigned long long'
|-`-AnnotateAttr 0x7fcda1baeac8 <./metareflect.hxx:21:42, col:83> "reflect-property"
|-FieldDecl 0x7fcda1baebb0 <./metareflect.hxx:21:27, test.hxx:125:12> col:12 name 'string':'std::__1::basic_string<char>'
|-`-AnnotateAttr 0x7fcda1baebf8 <./metareflect.hxx:21:42, col:83> "reflect-property"
|-FieldDecl 0x7fcda227a228 <./metareflect.hxx:21:27, test.hxx:129:20> col:20 pets
|-'vector<string>':'std::__1::vector<std::__1::basic_string<char>, std::__1::allocator<std::__1::basic_string<char> > >'
|-`-AnnotateAttr 0x7fcda227a270 <./metareflect.hxx:21:42, col:83> "reflect-property"
好了, 现在我们有了任意声明的Annotate属性,但是他的值只是一个字符串。一个简单的字符串是无法承担丰富的语义的,我们需要某种将元数据转变为字符串的功能。作为启发,我们来回顾一下Unreal里的代码:
UCLASS(BlueprintType)
class HELLO_API UMyClass : public UObject
{
GENERATED_BODY()
public:
UPROPERTY(BlueprintReadWrite)
float Score;
public:
UFUNCTION(BlueprintCallable, Category = "Hello")
void CallableFunc(); //C++实现,蓝图调用
UFUNCTION(BlueprintNativeEvent, Category = "Hello")
void NativeFunc(); //C++实现默认版本,蓝图可重载实现
UFUNCTION(BlueprintImplementableEvent, Category = "Hello")
void ImplementableFunc(); //C++不实现,蓝图实现
};
现在我们的代码已经与unreal很相近的,唯一缺少的就是带多参数的属性定义,纠结一番之后,只能拉下脸去找宏这个老大哥帮忙:
#define CLASS(...) class __attribute__((annotate("reflect-class;" #__VA_ARGS__)))
#define UNION(...) union __attribute__((annotate("reflect-class;" #__VA_ARGS__)))
#define PROPERTY(...) __attribute__((annotate("reflect-property;" #__VA_ARGS__)))
#define FUNCTION(...) __attribute__((annotate("reflect-function;" #__VA_ARGS__)))
CLASS(Serialized) User
{
PROPERTY(Serialized)
uint64_t id;
PROPERTY(Serialized)
string name;
PROPERTY(Serialized)
vector<string> pets;
};
这样看起来就跟Unreal长的一样了。这样再dump一次,得到的输出如下:
CXXRecordDecl 0x7fcda1bae7e0 <./metareflect.hxx:19:24, test.hxx:130:1> line:115:9 class User definition
|-AnnotateAttr 0x7fcda1bae908 <./metareflect.hxx:19:45, col:83> "reflect-class;"
|-CXXRecordDecl 0x7fcda1bae960 <col:24, test.hxx:115:9> col:9 implicit class User
|-FieldDecl 0x7fcda1baea80 <./metareflect.hxx:21:27, test.hxx:121:14> col:14 id 'uint64_t':'unsigned long long'
|-`-AnnotateAttr 0x7fcda1baeac8 <./metareflect.hxx:21:42, col:83> "reflect-property;Serialized"
|-FieldDecl 0x7fcda1baebb0 <./metareflect.hxx:21:27, test.hxx:125:12> col:12 name 'string':'std::__1::basic_string<char>'
|-`-AnnotateAttr 0x7fcda1baebf8 <./metareflect.hxx:21:42, col:83> "reflect-property;Serialized"
|-FieldDecl 0x7fcda227a228 <./metareflect.hxx:21:27, test.hxx:129:20> col:20 pets
|-'vector<string>':'std::__1::vector<std::__1::basic_string<char>, std::__1::allocator<std::__1::basic_string<char> > >'
|-`-AnnotateAttr 0x7fcda227a270 <./metareflect.hxx:21:42, col:83> "reflect-property;Serialized"
剩下的工作就是将字符串解析回原来的k, k=v形式。在mosaic_game中,也定义了一个类似的宏Meta,支持了一下k(k1=v1, k2=v2)的形式,扩充了一下注释的表达。
#pragma once
#if defined(__meta_parse__)
#define Meta(...) __attribute__((annotate(#__VA_ARGS__)))
#else
#define Meta(...)
#endif
这样定义Meta宏的好处就是,如果我们编译的时候不传递__meta_parse__的定义到预处理器,则我们添加的这个注释是没有任何影响的,不修改任何语义。
代码自动生成
现在我们通过对代码声明做Annotate属性标记,然后利用ast matcher获取感兴趣的声明,最终生成了一个个类似于下面的元数据:
{
"bases": null,
"constructors": null,
"fields": {
"A::s_1::a": {
"name": "A::s_1::a",
"node_type": "variable",
"qualified_name": "A::s_1::a",
"var_type": "std::optional<int>",
"with_default": true
},
"A::s_1::b": {
"name": "A::s_1::b",
"node_type": "variable",
"qualified_name": "A::s_1::b",
"var_type": "std::pair<int,std::optional<float>>",
"with_default": false
},
"A::s_1::c": {
"name": "A::s_1::c",
"node_type": "variable",
"qualified_name": "A::s_1::c",
"var_type": "std::tuple<int,float,std::basic_string<char,std::char_traits<char>,std::allocator<char>>>",
"with_default": false
}
},
"methods": null,
"name": "A::s_1",
"node_type": "class",
"qualified_name": "A::s_1",
"static_fields": null,
"static_methods": null,
"template_args": []
}
剩下的任务就是如何利用这些获取的元数据生成额外的代码了。而这里的代码生成,其实就是拼字符串,留好空位,把需要的名字填进去,类似于撸网页。
小明是一个撸网页的,终于有一天他受够了裸写c/c++ cgi或者一些奇怪的都是括号的语言。于是他打算撸一套库出来。
于是他写了一套网络库,字符串,线程池,数据库之类的一大堆东西。然后他发现他还是在愚蠢地花样拼接字符串。
于是他想为什么我们要在代码里面嵌入字符串,而不是在字符串里面嵌入代码呢?
于是他仿照c的风格写了一套脚本语言,于是他发现他写出了一个PHP。
所以PHP是最好的语言
众所周知,拼接字符串从来不是c++的强项,所以我们这里采取了模板语言来辅助拼接字符串,本项目采取的是mustache, mustache的规则很简单,参考 https://mustache.github.io/mustache.5.html 。下面是一个mustache的例子:
mustache tmpl{"Hello {{what}}!"};
std::cout << tmpl.render({"what", "World"}) << std::endl;
// Hello World!
mustache tmpl{"{{#employees}}{{name}}, {{/employees}}"};
data employees{data::type::list};
employees << data{"name", "Steve"} << data{"name", "Bill"};
tmpl.render({"employees", employees}, std::cout);
// Steve, Bill,
下面就是我的项目里面对枚举生成代码的模板:
class {{class_name}}_helper
{
public:
static std::optional<{{class_name}}> from_string(const std::string& val)
{
static std::unordered_map<std::string, {{class_name}}> enum_map = {
{{#enum_items}}
{ "{{enum_name}}", {{class_name}}::{{enum_name}} }{{^last_item}},{{/last_item}}
{{/enum_items}}
};
auto cur_iter = enum_map.find(val);
if(cur_iter == enum_map.end())
{
return {};
}
else
{
return cur_iter->second;
}
}
static std::string to_string({{class_name}} val)
{
switch(val)
{
{{#enum_items}}
case {{class_name}}::{{enum_name}}:
return "{{enum_name}}";
{{/enum_items}}
default:
return "invalid_enum_{{class_name}}_with_value_" + std::to_string(int(val));
}
}
};
对应的还有类的encode和decode模板:
json encode() const
{
json result = json::array();
//begin base encode
{{#bases}}
result.push_back(meta::serialize::encode(static_cast<const {{base_type}}&>(*this)));
{{/bases}}
//begin encode_fields encode
{{#encode_fields}}
result.push_back(meta::serialize::encode({{field_name}}));
{{/encode_fields}}
return result;
}
bool decode(const json& data)
{
if(!data.is_array()) return false;
std::size_t total_size = data.size();
std::size_t index = 0;
//begin base decode
{{#bases}}
if(index >= total_size) return false;
if(!meta::serialize::decode(data[index], static_cast<{{base_type}}&>(*this)))
{
return false;
}
index++;
{{/bases}}
//begin field decode
{{#encode_fields}}
if(index >= total_size) return false;
if(!meta::serialize::decode(data[index], {{field_name}}))
{
return false;
}
index++;
{{/encode_fields}}
return true;
}
项目代码里面还有很多实现其他功能的模板,包括Property, Method, Rpc, 等等,这里就不再列举了,感兴趣的可以直接去看项目代码 https://github.com/huangfeidian/meta 。
编译流程
代码生成完成之后,留给我们的就是最后一个问题,如何把新生成的代码插入到原来的编译流程之中去。我这里的实现基本采用了unreal的方案。
对于一个需要反射的类ABC, 我们单独给他两个文件,一个ABC.h, 一个ABC.cpp。反射生成的代码将声明和实现分别进入ABC.generated.h和ABC.generated.cpp。ABC.h里面include ABC.generated.h, ABC.cpp 里面include ABC.generated.cpp。项目在编译前,触发一下反射工具去扫描头文件,来生成额外的代码文件,然后再执行编译。这个就是我能想出来的最简单的不修改编译流程的方法。
这个方法其实很蠢,他把一些自动生成的接口也塞进到原来的类声明之中。作为优化,我们可以利用pimpl模式,将所有的接口实现都放在XXX_HELPER的类之中,而XXX类里面拥有一个指向XXX_HELPER的指针。这样xxx.h就不需要include任何生成的代码,只需要xxx.cpp加入一下xxx.generated.h, 同时目标文件列表里面加入一下xxx.generated.cpp。这个流程可以通过cmake来实现,基本类似于protobuf所提供的cmake文件。
后记
没想到本书从2019年写到了2026年,在这七年多时间里,这个项目一直是本永远写不完的寒假作业,消耗掉了绝大部分的周末以及工作日的深夜。本书的编写也从开始的兴趣使然的项目变成了困住自己的项目,逢年过节都想着抽出几天时间来加快进度。然而近两年的AI辅助编程工具大行其道,以前觉得很复杂的东西现在能够很容易被AI理解,只要有源代码任何系统的实现机制AI都可以几秒内给你生成一个图文并茂的文档。继续做人肉解析源代码这种工作像是旧时代的残党,意义不是很大。而且随着家庭和工作这两边需要投入的精力增加,内容的填充进度也是越来越慢,于是决定在完成分布式大世界相关章节之后就不再对内容进行扩充。至于开头所说的消息总线等各种功能的补充,那就从长计议了,先让我把体重降到七年前再说。