Mosaic Game 的行为树
mosaic_game中的行为树是作为一个独立库存在的,已经开源为behavior_tree。这个库包含了编辑器、运行时、调试器三个部分。编辑器负责产生Json格式的行为树文件,运行时负责执行编辑器生成的行为树文件并在指定条件下将执行过程引发的状态改变输出为Json字符串,而调试器则在编辑器的基础上增加了读取运行时生成的Json格式调试字符串并高亮执行节点和黑板值改变的功能。接下来将对这三个部分做具体的介绍。
behavior_tree中的行为树编辑器
behavior_tree中的行为树编辑器编辑器相关代码在behavior_tree/editor目录下,是一个以Qt5编写的GUI程序,源代码位于工程目录下的editor文件夹,其基本界面如下图:
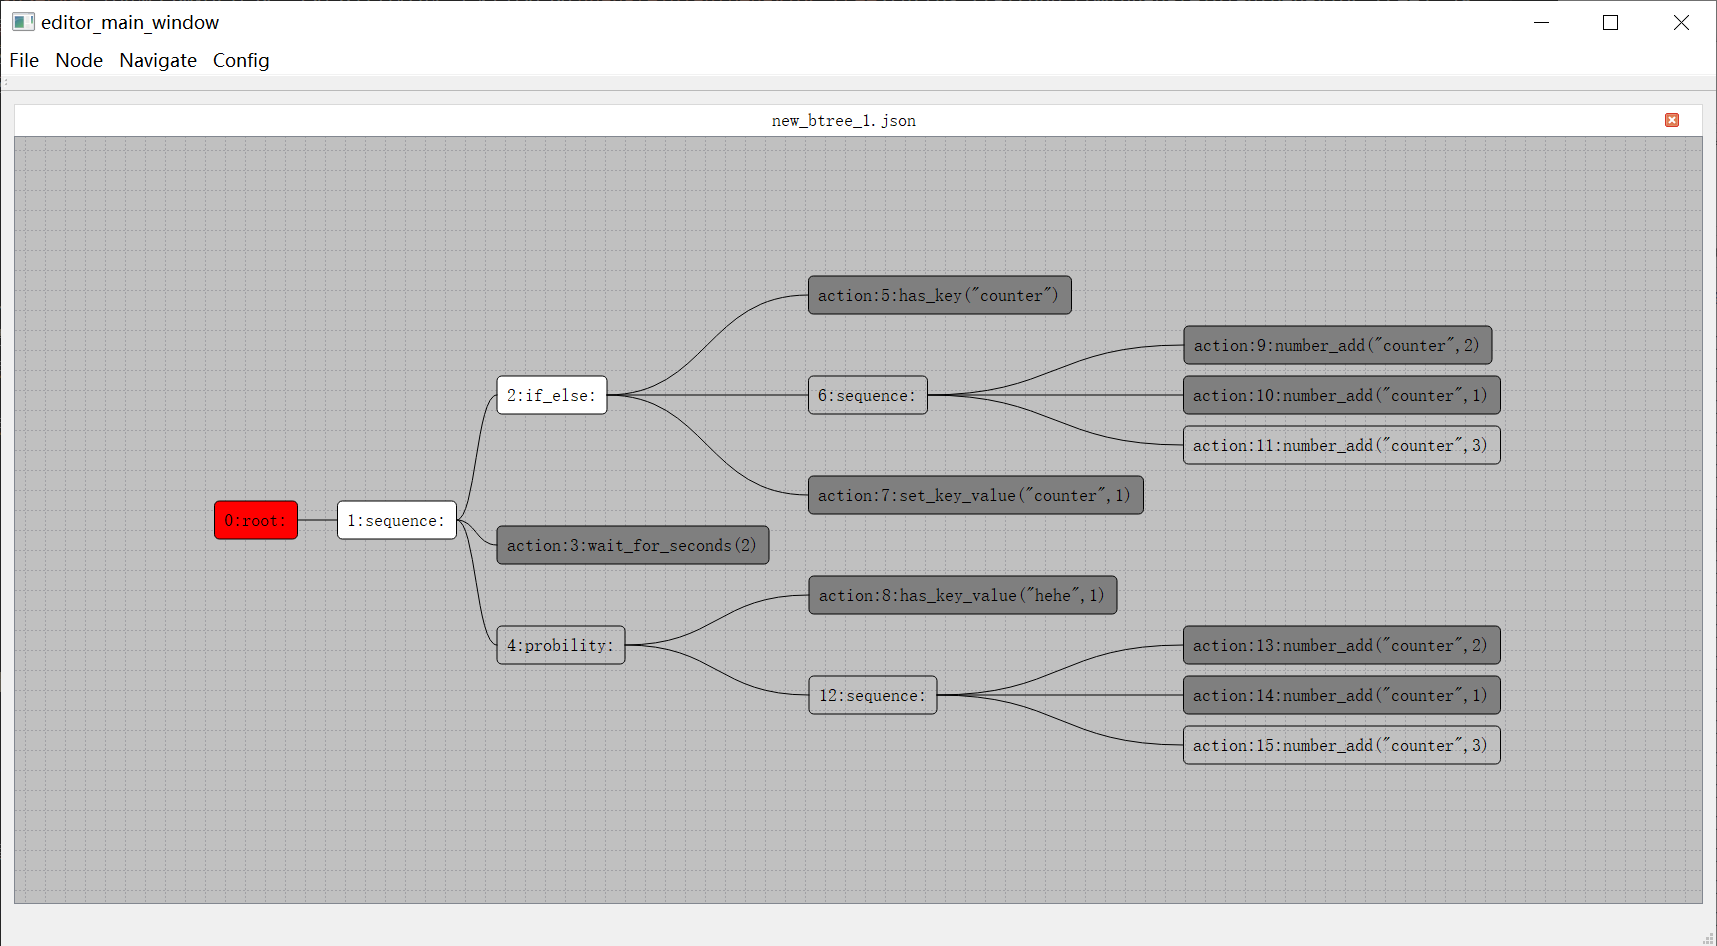
这个编辑器支持多tab,每个tab都是是行为树树形结构展示窗口。值得注意的是这里的树根节点在左侧,之前介绍的UE4行为树根节点是顶部。与此同时行为树节点遍历顺序也从UE的从上到下从左到右变成了从左到右从上到下。每个节点都以圆角矩形框来显示,框内左侧的数字代表这个节点的编号,注意这里的编号并不代表节点的遍历顺序,只是作为节点的唯一标识符使用,内部实现是这个节点在当前行为树的创建顺序。
节点编辑时,首先需要选中一个节点,然后按下对应的快捷键:
Insert代表插入一个节点,作为当前节点排序最低的子节点Delete代表删除一个节点,root节点不可删除MoveUp,快捷键为Ctrl加上方向箭头, 代表把提升当前节点在父节点里的排序MoveDown快捷键为Ctrl加下方向箭头,代表降低当前节点在父节点里的排序Copy代表把当前节点为根的子树复制Paste代表把上次复制的节点粘贴为当前节点排序最低的新的子节点Cut代表剪切当前节点
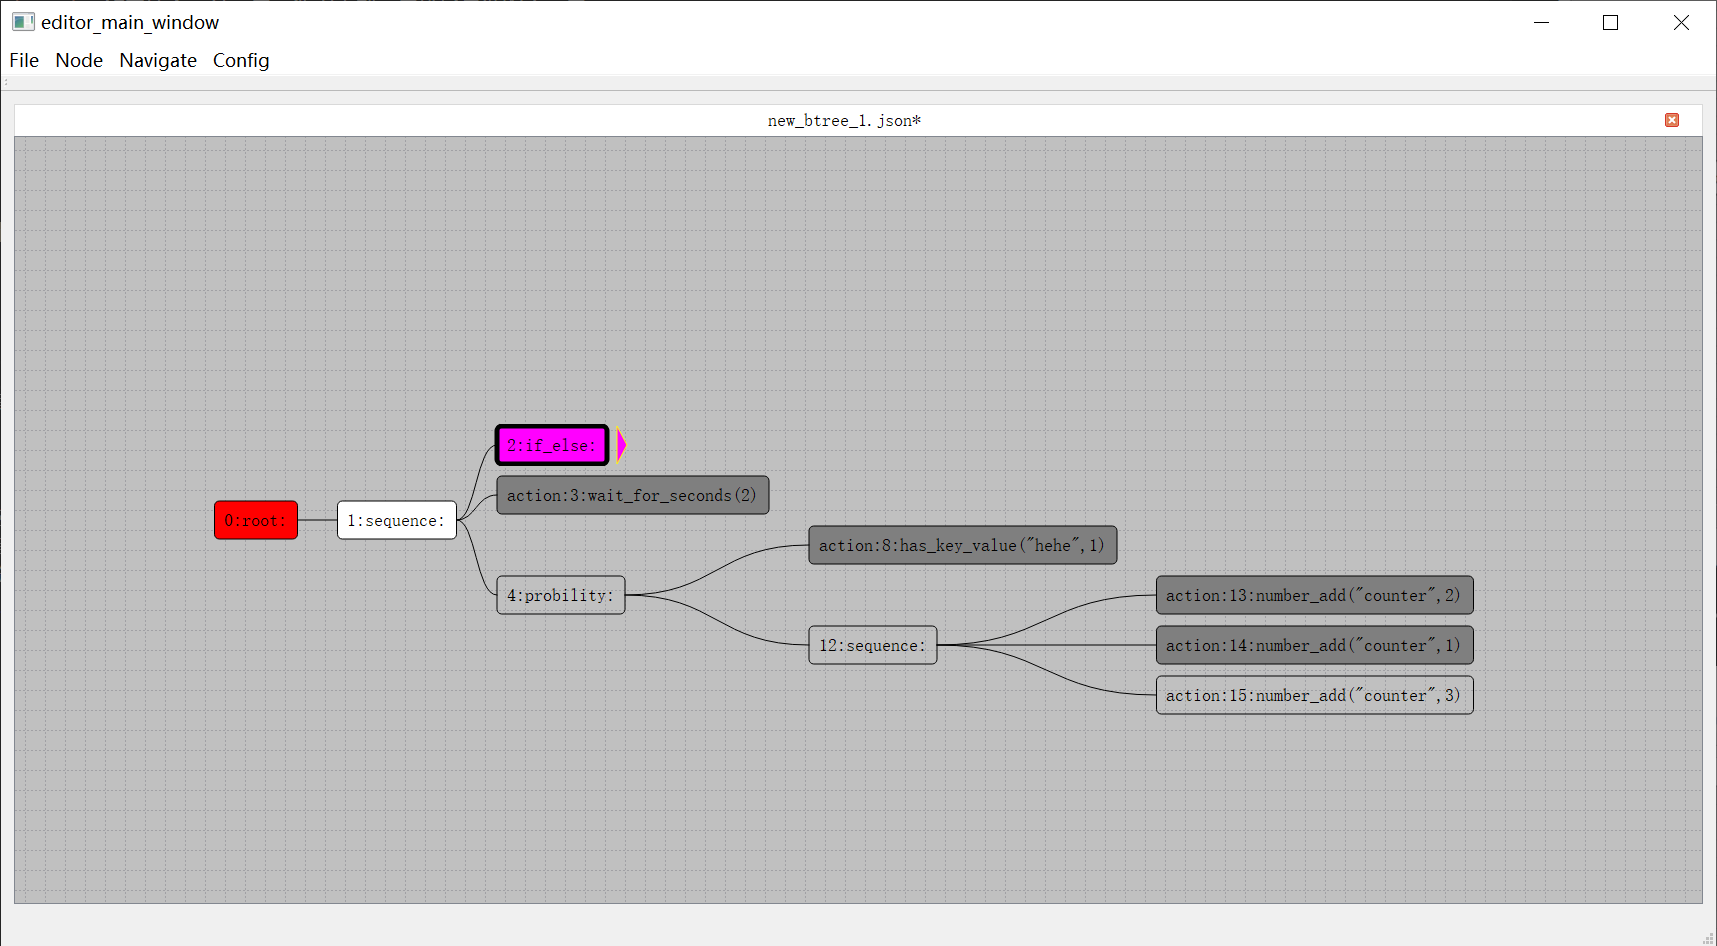
另外如果树里面的某个节点对应的子树节点太多,可以通过双击这个节点,将对应的子树进行折叠,同时这个节点右侧将会出现一个小的粉色钝角三角形,再双击则会展开折叠:
如果需要为一个复合节点增加一个新的子节点,则需要在选中一个复合节点之后按下Insert键,此时会弹出一个子节点创建选择窗口:
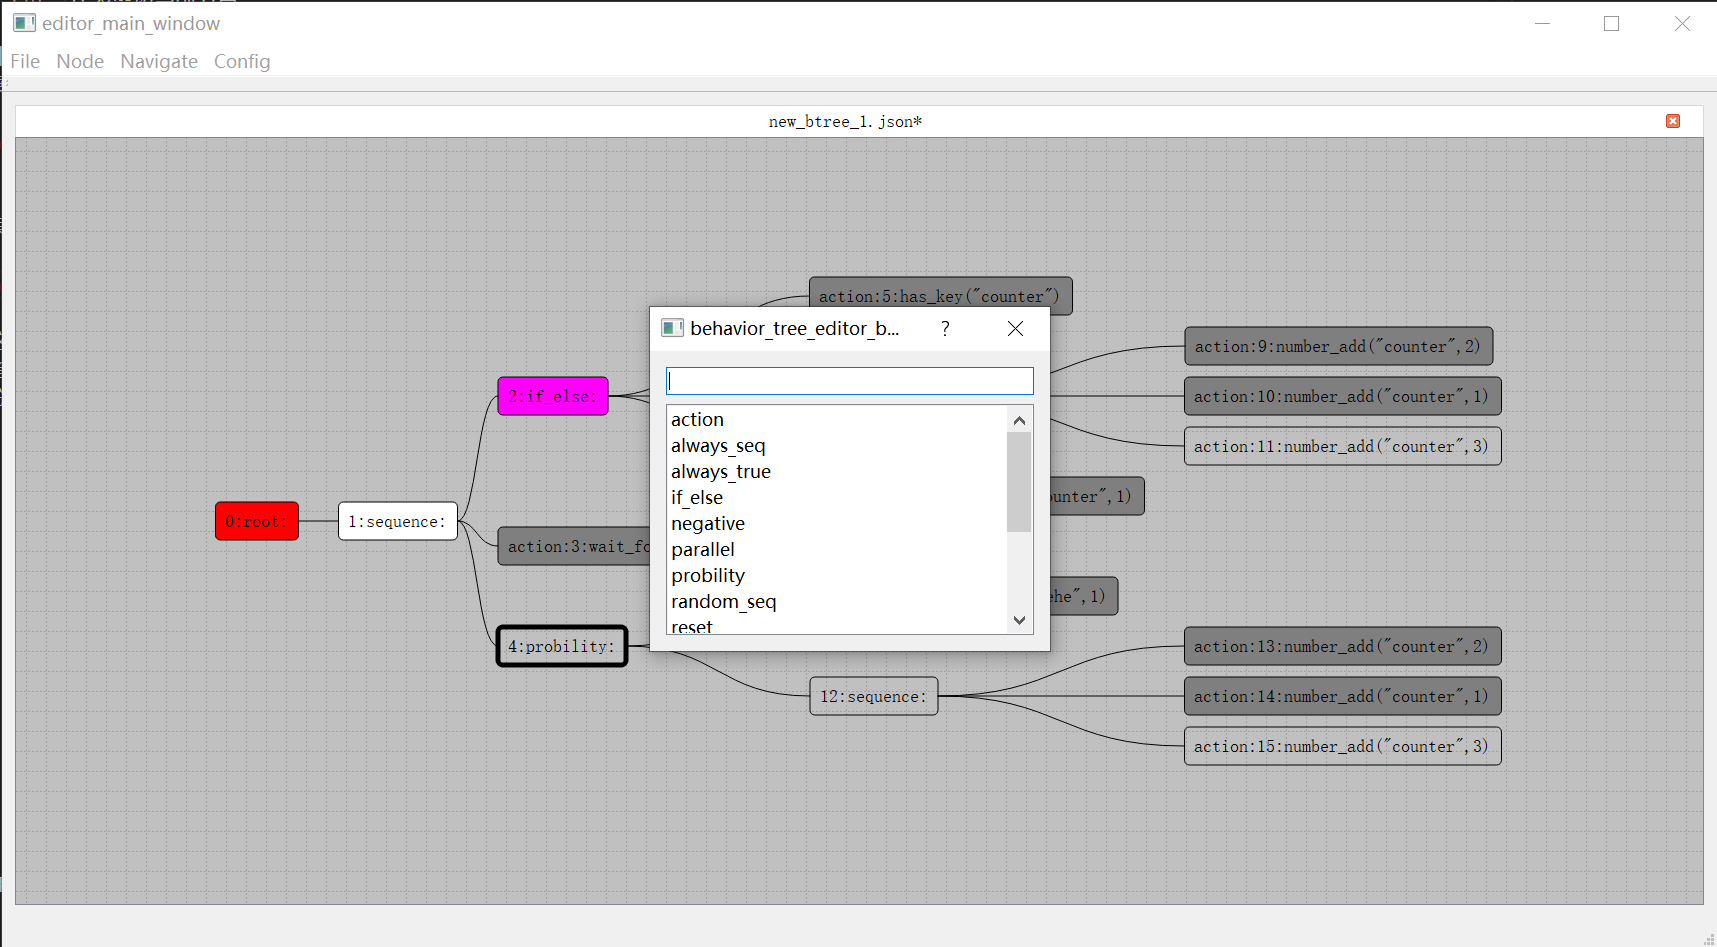
在这个文本框中可以执行搜索过滤,双击下面列表中的一项即为确认选择并以选择的节点类型来创建子节点。子节点的类型并没有在编辑器中写死,而是以配置文件来指定。使用者需要提供一个Json格式的节点类型说明文件,来表明可以创建的复合节点类型以及其子节点的数量限制。下面就是使用中的节点类型说明文件的部分:
{
    "root": {
        "child_min": 0,
        "child_max": 1,
    },
    "negative": {
        "child_min": 1,
        "child_max": 1,
    },
    "sequence": {
        "child_min": 1,
        "child_max": 20,
    }
}
在样例工程中,除了常规的root,sequence,select,parallel复合节点之外,为了很方便的映射到常规的代码逻辑,提供了以下类型的复合节点定义:
AlwaysSequence, 顺序执行所有子节点,不管子节点的返回值,执行完所有子节点之后返回true;RandomSequence, 每次执行的时候都以随机序列去执行所有的子节点,任一子节点在执行时返回false则中断执行并返回false,否则返回trueProbility,允许有多个子节点,每次进入当前Probility时都会随机的选择其中一个子节点来执行,这个子节点的返回值就是当前Probility节点的返回值,编辑器界面可以配置每个节点的相对权重Negative,只允许有一个子节点,代表把这个子节点的执行结果取反作为当前节点的返回值AlwaysTrue,只允许有一个子节点,不管这个子节点的返回值,当前节点永远返回true
然后对于任务节点,也是需要提供一个Json格式的任务节点配置文件来指定任务列表以及各个任务的相关参数,下面就是工程中自带的任务节点配置文件的部分内容:
{
	"has_key": {
		"args": [
			{
				"comment": "key的名字",
				"name": "bb_key",
				"type": "const std::string &"
			}
		],
		"brief": "判断黑板内是否有特定key",
		"name": "has_key",
		"return": "如果有这个key返回true 否则返回false"
	},
	"has_key_value":{
		"args": [
			{
				"comment": "黑板key的名字.",
				"name": "bb_key",
				"type": "const std::string &"
			},
			{
				"comment": "要比较的值",
				"name": "value",
				"type": "any_value"
			}
		],
		"brief": "判断黑板里特定key是否等于特定值",
		"name": "has_key_value",
		"return": "如果没有这个key或者这个key的值不等于value 返回false 否则返回true"
	}
}
在任意节点上右键将会出现右键菜单,包括四个菜单项:
Comment字段是个文本编辑区域,默认为空,如果有值,对应的值会作为节点图形展示信息;Color字段用来更改节点的颜色。Content字段会弹出这个节点的详细信息界面Collapse字段会将当前的复合节点进行折叠,如果已经为折叠状态此时菜单名字切换为Expand
这个Content菜单主要是为Action节点服务的,在一个Action节点双击之后,将会弹出同样的详情界面:
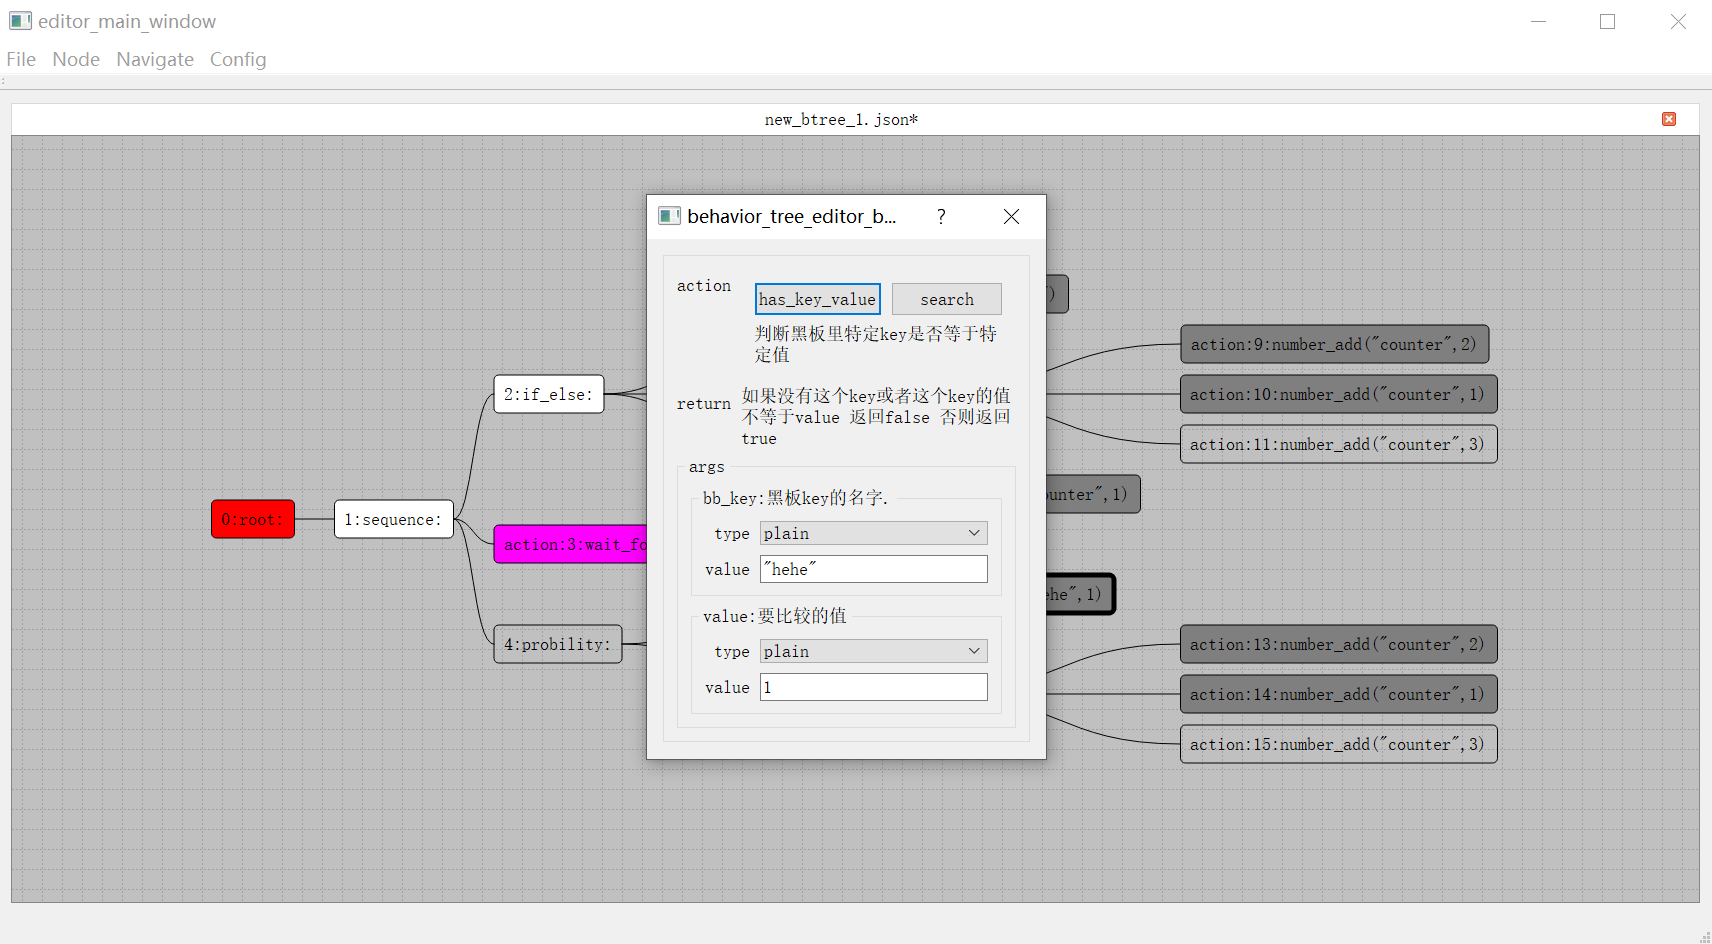
这个界面展示了任务节点里执行的任务名字以及相关的参数设置,包括如下几个部分:
-
action当前任务节点的action图里显示的action是has_key_value,下面的文本区域代表这个action的意义是什么,后面的return文本编辑区域代表这个action的各个情况的返回值是什么 -
args这个是当前action的所有参数的编辑部分。当前图中对应区域有两个参数,分别是log_level和log_info。每个参数的可选值类型有两种:- 一个是
plain,代表直接使用编辑器内输入的值, - 另外一种是
blackboard,代表使用当前输入的key对应的黑板值,
输入框里面允许输入的都是
json字符串,但是目前不允许输入object类型的值。如果想输入object类型,请转换为[[key,value]]的数组形式去输入。 - 一个是
在编辑完成一个行为树之后,其保存的文件为Json格式的文本文件,可以很方便的进行源代码管理的Diff操作。除了这个Json数据文件之外,还会保存一个对整个行为树最后编辑状态进行截图的Png文件,方便使用者能够快速的预览当前行为树的结构。
behavior_tree 中的行为树运行时
行为树运行时相关代码在behavior_tree/runtime目录下,整体实现是非常简洁的,include子目录下只有四个头文件:
nodes.h定义了所有的运行时节点的基类base_node,以及相关派生的各种子节点,如sequence,if_else等agent.h定义了驱动行为树运行的agent,这个文件负责加载行为树开始其执行,同时负责执行中的节点调度和事件监听,此外还管理了行为树所依赖的黑板,提供了黑板的get/set接口action_agent.h提供了一些最基础的action实现,如行为树的黑板读写,一些数值计算与比较,以及计时器相关actiontimer_manager.h提供了一个非常基础的计时器管理类,可以用来注册计时器回调,同时对外暴露poll接口来执行已过期的计时器的回调
其实timer_manager.h并不属于行为树运行时的核心代码,因为计时器相关操作一般都会转接到Agent所属的Entity去执行并管理相关回调与生命周期,这里提供一个非常简单的计时器管理类的实现主要是为了让行为树运行时测试程序能够跑起来。所以在action_agent类声明的创建计时器的接口是virtual的,方便具体的实现去覆盖这个实现。
行为树必须依附于一个Agent去执行,这里的Agent可以理解为Entity的一个组件,提供了一些行为树操作的对外接口,例如运行、暂停、黑板值读写、事件发送等:
bool poll(); // first handle events then handle fronts
void dispatch_event(const event_type& new_event);
bool is_running() const
{
	return m_enabled;
}
void notify_stop();
bool load_btree(const std::string& btree_name);
json blackboard_get(const std::string& key) const;
void blackboard_set(const std::string& key, const json& value);
bool blackboard_has(const std::string& key) const;
bool blackboard_pop(const std::string & key);
此外针对行为树的调试器需求,也提供了一些接口来对接,这些调试相关接口的含义将在调试器部分介绍:
cmd_receiver* set_debug(cmd_receiver* _in_receiver);
void push_cmd_queue(std::uint32_t teee_idx, std::uint32_t node_idx, agent_cmd _cmd, const json::array_t& _param);
void push_cmd_queue(agent_cmd _cmd, const json::array_t& _param) ;
bool during_debug() const;
运行一个指定行为树的入口为load_btree,这个函数负责从行为树Json文件中反序列化出一个行为树:
bool agent::load_btree(const std::string& btree_name)
{
	if (cur_root_node)
	{
		reset();
		if (cur_root_node->tree_name() == btree_name)
		{
			return true;
		}
		else
		{
			delete cur_root_node;
			cur_root_node = nullptr;
		}
	}
	cur_root_node = create_tree(btree_name, nullptr);
	if (!cur_root_node)
	{
		return false;
	}
	add_to_front(cur_root_node);
	return true;

}
在加载之前会判断一下当前是否已经在运行其他行为树,决定是否要做一下清理工作。加载完成之后调用add_to_front将这个行为树的根节点加入到活动节点集合中:
std::vector<node*> m_fronts; // node ready to run

void agent::add_to_front(node* cur_node)
{
	for (auto one_node : m_fronts)
	{
		if (one_node == cur_node)
		{
			return;
		}
	}
	m_fronts.push_back(cur_node);
}
这里使用vector来做集合的原因是普通情况下这个集合里只会有一个节点,只有在执行路径上引入了一个Parallel节点之后这个集合才会有额外的节点。这个fronts集合会被轮询函数poll_fronts来读取,遍历其中的每一个节点,触发这个节点的执行:
bool agent::poll_fronts()
{
	if (m_fronts.empty())
	{
		return false;
	}
	m_pre_fronts.clear();
	std::swap(m_pre_fronts, m_fronts);
	int ready_count = 0;
	for (const auto& one_node : m_pre_fronts)
	{
		if (one_node->node_state_is_ready())
		{
			ready_count++;
			poll_node(one_node);
			if (!m_enabled)
			{
				break;
				return false;
			}
		}
		else
		{
			if (one_node->m_state == node_state::blocking)
			{
				add_to_front(one_node);
			}
		}
	}
	m_pre_fronts.clear();
	return m_enabled && ready_count > 0;
}
由于在遍历的过程中可能会触发节点从fronts删除,所以这里先用m_pre_fronts来制造一个副本来处理遍历,同时将原有的fronts清空,遍历过程会重新填充fronts集合。
遍历节点的最主要逻辑就是判断一个节点的状态,这里我们使用枚举类型来规定节点的状态:
enum class node_state
{
	init = 0,
	entering,
	awaken,
	revisiting,
	blocking,
	wait_child,
	dead,
};
init代表节点只是刚初始化好,并没有参与调度entering代表当前节点正式开始执行,这是一个临时状态awaken代表当前复合节点由于其某个子节点的执行完成,成为了下一个要执行的节点revisiting代表当前复合节点在awaken状态被调度执行时的临时状态,此时还未选择下一个要执行的节点blocking代表当前节点正在执行一个持续性任务,只有Action节点才能有这个状态wait_child代表当前复合节点已经将其一个子节点指定为了下一个要执行的节点,正在等待这个子节点的执行完成dead代表当前节点已经执行完成
因此这里的m_fronts存储的活动节点的状态只会有三种:
init状态 代表因为被父节点选中, 引发当前节点加入到活动节点集合awaken状态 代表因为子节点执行完成,引发当前节点加入到活动节点集合blocking状态 代表这个Action节点的任务在执行中,因此保持在活动节点集合
这里在节点上封装了node_state_is_ready()接口,代表这个节点需要执行逻辑:
bool node_state_is_ready()
{
	return m_state == node_state::init || m_state == node_state::awaken;
}
在行为树刚加载的时候,所有的节点状态都是node_state::init状态,代表刚初始化完成。在将root节点添加到fronts之后,poll_fronts会遍历到这个节点,执行poll_node,触发对应节点的visit:
void agent::poll_node(node* cur_node)
{
	current_poll_node = cur_node;
	cur_node->visit();
	current_poll_node = nullptr;
}
void node::visit()
{

	switch (m_state)
	{
	case node_state::init:
		create_children();
		on_enter();
		if (m_state == node_state::entering)
		{
			m_logger->warn("btree {} on_enter node {} while after state {}",
				btree_config.tree_name, node_config.idx, int(m_state));
			m_agent->notify_stop();
		}
		break;
	case node_state::awaken:
		on_revisit();
		if (m_state == node_state::revisiting)
		{
			m_logger->warn("btree {} revisit node {} while after state {}",
				btree_config.tree_name, node_config.idx, int(m_state));
			m_agent->notify_stop();
		}
		break;

	default:
		m_logger->warn("btree {} visit node {} with invalid state {}",
			btree_config.tree_name, node_config.idx, int(m_state));
		m_agent->notify_stop();
		break;
	}
}
init状态与awaken状态的区别我们之前已经介绍过了。当前节点的状态为init的时候会调用create_children来按需创建当前节点的子节点,因为我们之前的load_btree只负责创建出root节点。创建好子节点之后再执行on_enter:
void node::on_enter()
{
	m_state = node_state::entering;
	next_child_idx = 0;
	result = false;
	for (auto one_child : m_children)
	{
		one_child->m_state = node_state::init;
	}
	if (m_agent->during_debug())
	{
		m_agent->push_cmd_queue(m_agent->get_tree_idx(btree_config.tree_name), node_config.idx, agent_cmd::node_enter, {});
	}
}
on_enter这里会设置为当前节点的状态为entering,同时将所有的子节点状态设置为init以保证可以调度,同时将当前节点被激活的消息发送到调试器中。
实际上这个on_enter是一个虚函数,复合节点的on_enter负责选择一个子节点去运行:
void root::on_enter()
{
	node::on_enter();
	visit_child(0);
}
void sequence::on_enter()
{
	node::on_enter();
	next_child_idx = 0;
	visit_child(0);
}
这里的visit_child负责将指定的子节点放入到活动节点集合中,同时将自身状态切换为wait_child:
void node::visit_child(std::uint32_t child_idx)
{
	if (child_idx >= m_children.size())
	{
		m_logger->warn("btree {} visit child {} at node {} while m_children size is {}",
			btree_config.tree_name, child_idx, node_config.idx, m_children.size());
		m_agent->notify_stop();
		return;
	}
	m_children[child_idx]->m_state = node_state::init;
	m_agent->add_to_front(m_children[child_idx]);
	m_state = node_state::wait_child;
}
而Action节点的on_enter负责执行其封装的任务,这里主要的逻辑就是对所需的参数进行求值,生成一个vector<json>的参数,并根据指定的action名字去执行函数调用:
void action::on_enter()
{
	node::on_enter();
	if (!load_action_config())
	{
		m_logger->warn("{} fail to load action args with extra {}", debug_info(), serialize::encode(node_config.extra).dump());
		m_agent->notify_stop();
		return;
	}
	json::array_t real_action_args; // 负责解析action所需的所有参数 主要是处理黑板值
	for (const auto& one_arg : action_args)
	{
		if (one_arg.first == action_arg_type::blackboard)
		{
			auto cur_key = one_arg.second.get<std::string>();
			if (!m_agent->blackboard_has(cur_key))
			{
				m_logger->warn("{} invalid blackboard arg name {}", debug_info(), cur_key);
				m_agent->notify_stop();
				return;
			}
			auto cur_bb_value = m_agent->blackboard_get(cur_key);
			real_action_args.push_back(cur_bb_value);
		}
		else
		{
			real_action_args.push_back(one_arg.second);
		}
	}
	if (m_agent->during_debug()) // 将执行时的信息发送到调试器消息队列
	{
		m_agent->push_cmd_queue(agent_cmd::node_action, {action_name, real_action_args});
	}
	std::optional<bool> action_result = m_agent->agent_action(action_name, real_action_args);
	if (m_agent->during_poll())
	{
		if (!action_result)
		{
			m_state = node_state::blocking;
			m_agent->add_to_front(this);
			return;
		}
		else
		{
			set_result(action_result.value());
		}
	}
	else
	{
		return;
	}
}
这里执行任务函数的接口为agent_action,这是一个虚函数,返回值为std::optional<bool>:
virtual std::optional<bool> agent::agent_action(const std::string& action_name,
	const json::array_t& action_args)
{
	return std::nullopt;
}
这个agent_action函数的具体实现在agent的子类action_agent上,action_agent内部使用了一个map来存储所有注册过来的action:
using action_func_type = std::function<std::optional<bool>(const std::vector<json>&)>;
std::unordered_map<std::string, action_func_type> m_action_funcs_map;

std::optional<bool> action_agent::agent_action(const std::string& action_name,
	const json::array_t& action_args)
{
	auto action_iter = m_action_funcs_map.find(action_name);
	if (action_iter == m_action_funcs_map.end())
	{
		m_logger->warn("cant find action {}", action_name);
		notify_stop();
		return std::nullopt;
	}
	return action_iter->second.operator()(action_args);
}
注册函数action函数的时候,使用模板技巧来支持所有能与json进行转换的函数参数,这样就可以自动的将函数签名类型擦除为action_func_type了:
template <typename T, typename... Args>
void add_action(const std::string& name, T* c, bool (T::* action_func)(Args...))
{
	auto cur_lambda = [=](const std::vector<json>& input_args) -> std::optional<bool>
	{
		if (sizeof...(Args) != input_args.size())
		{
			return false;
		}
		std::tuple<std::remove_const_t<std::remove_reference_t<Args>>...> temp_tuple;
		if (!spiritsaway::serialize::decode(input_args, temp_tuple))
		{
			return false;
		}
		return apply_impl(c, action_func, temp_tuple, std::index_sequence_for<Args...>{});
	};
	m_action_funcs_map[name] = cur_lambda;
}

template <typename T, typename... Args>
void add_async_action(const std::string& name, T* c, std::optional<bool>(T::* action_func)(Args...))
{
	auto cur_lambda = [=](const std::vector<json>& input_args)-> std::optional<bool>
	{
		if (sizeof...(Args) != input_args.size())
		{
			return false;
		}
		std::tuple<std::remove_const_t<std::remove_reference_t<Args>>...> temp_tuple;
		if (!spiritsaway::serialize::decode(input_args, temp_tuple))
		{
			return false;
		}
		return apply_impl(c, action_func, temp_tuple, std::index_sequence_for<Args...>{});
	};
	m_action_funcs_map[name] = cur_lambda;
}
在这两个辅助函数的帮助下,注册一个action就只需要一行代码即可:
bool action_agent::has_key(const std::string& bb_key);
bool action_agent::set_key_value(const std::string& bb_key,
	const json& new_value);
std::optional<bool> action_agent::wait_for_seconds(double duration)
add_action("has_key", this, &action_agent::has_key);
add_action("has_key_value", this, &action_agent::has_key_value);
add_async_action("wait_for_seconds", this, &action_agent::wait_for_seconds);
当agent_action返回后,如果optional内有值,代表这个action立即执行完成,optional内的值就是action的返回结果,此时通过set_result接口来回溯到其父节点并重新激活,进入awaken状态;
void node::set_result(bool new_result)
{
	if (node_state_is_forbid_enter())
	{
		m_logger->warn("current state is {} while set result {} at node {}", int(m_state), new_result, node_config.idx);
		m_agent->notify_stop();
		return;
	}
	result = new_result;
	m_state = node_state::dead;
	backtrace();
}
void node::backtrace()
{
	leave();
	if (m_parent)
	{
		m_agent->add_to_front(m_parent);
		m_parent->m_state = node_state::awaken;
	}
	else
	{
		m_agent->add_to_front(this);
		m_state = node_state::awaken;
	}
	m_agent->poll();
}
这里的leave()函数负责清理这个节点的状态,以及将节点执行完成的消息推送到行为树调试器:
void node::leave()
{
	m_closure.reset();
	if (m_agent->during_debug())
	{
		m_agent->push_cmd_queue(m_agent->get_tree_idx(btree_config.tree_name), node_config.idx, agent_cmd::node_leave, {});
	}
}
如果optional内没有值,则代表发起了一个异步任务,此节点的状态设置为blocking,同时加入到活动节点集合中。
当一个复合节点从awaken状态进入执行时,对应的接口是on_revisit,这也是一个虚接口,子类中负责重写并继承实现:
void node::on_revisit()
{
	m_state = node_state::revisiting;
}
void root::on_revisit()
{
	node::on_revisit();
	if (!m_parent)
	{
		on_enter();
	}
	else
	{
		bool result = m_children[0]->result;
		set_result(result);
	}
}
void sequence::on_revisit()
{
	node::on_revisit();
	if (!m_children[next_child_idx]->result)
	{
		set_result(false);
		return;
	}
	next_child_idx += 1;
	if (next_child_idx == m_children.size())
	{
		set_result(true);
		return;
	}
	visit_child(next_child_idx);
}
对于非root节点的复合节点而言,on_revisit的工作就是选取下一个子节点去执行,如果无法选择下一个子节点,则设置好当前节点的执行结果,并使用set_result将父节点激活,加入到活动节点集合中,等待下一次poll。
至此行为树单次处理活动节点集合的poll_fronts逻辑基本完成,由于poll_fronts的执行可能会引入新的节点加入到fronts集合,如果在下一次Tick的时候再执行poll_fronts的话会导致行为树的节点调度延迟极大,所以在poll_fronts之上增加了一个poll函数,这个poll函数负责循环执行poll_fronts,直到poll_fronts不再引发fronts集合修改为止:
bool agent::poll()
{
	if (m_during_poll)
	{
		return false;
	}
	m_during_poll = true;
	push_cmd_queue(agent_cmd::poll_begin, {});
	std::size_t poll_count = 0;

	while (true)
	{
		if (!m_enabled)
		{
			return false;
		}

		bool poll_result = false;
		poll_result |= poll_events();
		poll_result |= poll_fronts();
		if (!reset_flag)
		{
			if (!poll_result)
			{
				break;
			}
		}
		else
		{
			reset_flag = false;
			add_to_front(cur_root_node);
		}
		poll_count += 1;
	}
	m_during_poll = false;

	if (poll_count)
	{
		return true;
	}
	else
	{
		return false;
	}
}
这个poll内部while循环内处理处理poll_fronts之外,还调用了poll_events,这个函数用来处理外部向行为树传递的事件,主要是为了对接wait_event这个节点注册的事件等待:
bool agent::poll_events()
{
	if (m_events.empty())
	{
		return false;
	}
	for (const auto& one_event : m_events)
	{
		m_pre_fronts.clear();
		std::swap(m_pre_fronts, m_fronts);
		bool event_has_handled = false;
		for (auto one_node : m_pre_fronts)
		{
			if (!event_has_handled)
			{
				if (one_node->handle_event(one_event))
				{
					one_node->set_result(true);
					event_has_handled = true;
				}
				else
				{
					add_to_front(one_node);
				}
			}
			else
			{
				add_to_front(one_node);
			}

		}
	}
	m_events.clear();
	return true;

}

virtual bool node::handle_event(const event_type& cur_event)
{
	return false;
}
bool wait_event::handle_event(const event_type& cur_event)
{
	if(cur_event == event)
	{
		return true;
	}
	else
	{
		return false;
	}
}
一般来说,只使用事件通知是不够的,还需要获取事件所携带的一些额外数据。实际使用这个事件系统的时候,在发送事件之前会将事件相关的参数设置到黑板之中的特定黑板值之上,这样行为树中的事件处理逻辑可以通过黑板查询接口来获取相关参数。
behavior_tree 中的行为树调试器
行为树是一种配置NPC预期行为表现有力工具,但是实践过程中难免会因为各种原因导致NPC的行为并没有达到预期。在出现异常表现之后策划经常会让程序去排查行为树是否有配置问题,而行为树这个类似于虚拟机的结构比较难一眼就看出问题的所在,特别是执行逻辑会被黑板值和外部事件影响。在本人负责项目AI的早期阶段深受这个行为树表现异常的问题困扰,早期的问题定位手段就只有给关键的节点添加日志,然后人肉根据日志来模拟此时行为树的执行流程。这种方式去定位问题费时费力费眼睛,为此对原来的行为树运行时增加了运行状态记录到日志队列的功能,对应的接口为push_cmd_queue:
void agent::push_cmd_queue(std::uint32_t tree_idx, std::uint32_t node_idx, agent_cmd _cmd, const json::array_t& _param)
{

	if (m_cmd_receiver)
	{
		m_cmd_receiver->add(tree_idx, node_idx, _cmd, _param);
	}

}
void agent::push_cmd_queue(agent_cmd _cmd, const json::array_t& _param)
{
	if (current_poll_node)
	{
		push_cmd_queue(get_tree_idx(current_poll_node->btree_config.tree_name), current_poll_node->m_node_idx, _cmd, _param);
	}
	else
	{
		push_cmd_queue(0, 0, _cmd, _param);
	}
}
这里的cmd_receiver是一个纯虚类,作为一个消息投递的目标来使用,实际项目中可以设置为直接输出日志或者打印到单独文件,也可以通过网络输出到指定服务器:
struct cmd_receiver
{
	virtual void add(std::uint32_t tree_idx, std::uint32_t node_idx, agent_cmd _cmd, const json::array_t& _param)
	{

	}
};
push_cmd_queue在节点的enter/leave时都会记录一次数据到日志队列中:
void node::on_enter()
{
	m_state = node_state::entering;
	next_child_idx = 0;
	result = false;
	for (auto one_child : m_children)
	{
		one_child->m_state = node_state::init;
	}
	if (m_agent->during_debug())
	{
		m_agent->push_cmd_queue(m_agent->get_tree_idx(btree_config.tree_name), node_config.idx, agent_cmd::node_enter, {});
	}
}
void node::leave()
{
	m_closure.reset();
	if (m_agent->during_debug())
	{
		m_agent->push_cmd_queue(m_agent->get_tree_idx(btree_config.tree_name), node_config.idx, agent_cmd::node_leave, {});
	}
}
调试日志所支持的日志类型并不只限制于node_enter/node_leave这两个agent_cmd,完整的agent_cmd定义如下:
enum class agent_cmd
{
	poll_begin = 0,
	snapshot, //tree_indexes node_idxes blackboard
	push_tree,// new tree name, tree_idx
	node_enter,//
	node_leave,//
	node_action,//action_name, action_args
	bb_set,//key, value
	bb_remove, //key
	bb_clear,
	reset,
};
poll_begin,记录一次行为树状态更新的开始snapshot,当开启调试时,记录此时的活动节点状态和黑板值push_tree,这个代表触发了一颗行为树子树时的加载node_enter,一个行为树节点由于其父节点的调度导致被加入到活跃节点集合node_leave, 一个行为树节点由于其对应子树的任务结束引发的节点从活跃节点集合中删除node_action, 一个Action节点执行的任务名字以及相关的运行时参数bb_set记录所有的黑板值赋值bb_remove记录所有的黑板值删除一个keybb_clear记录所有的黑板值清空reset记录一次行为树状态完全重置
了解了行为树运行时对调试的支持之后,我们再来介绍一下行为树的调试器,调试器的代码位于behavior_tree/debugger目录下,首先需要明确的是调试器的日志输入目前支持两种格式:
enum class debug_source
{
	no_debug,
	file_debug,
	http_debug,
};
这里的file_debug对应的是记录了调试日志的一个Json文件,而http_debug则代表开启一个非常简单的http服务器来接受调试日志的网络传输。file_debug偏离线分析,而http_debug对应的则是在线分析。
在指定了调试日志数据源之后,调试器界面就可以打开了,这个也是一个QT5的GUI程序,其运行界面如下:
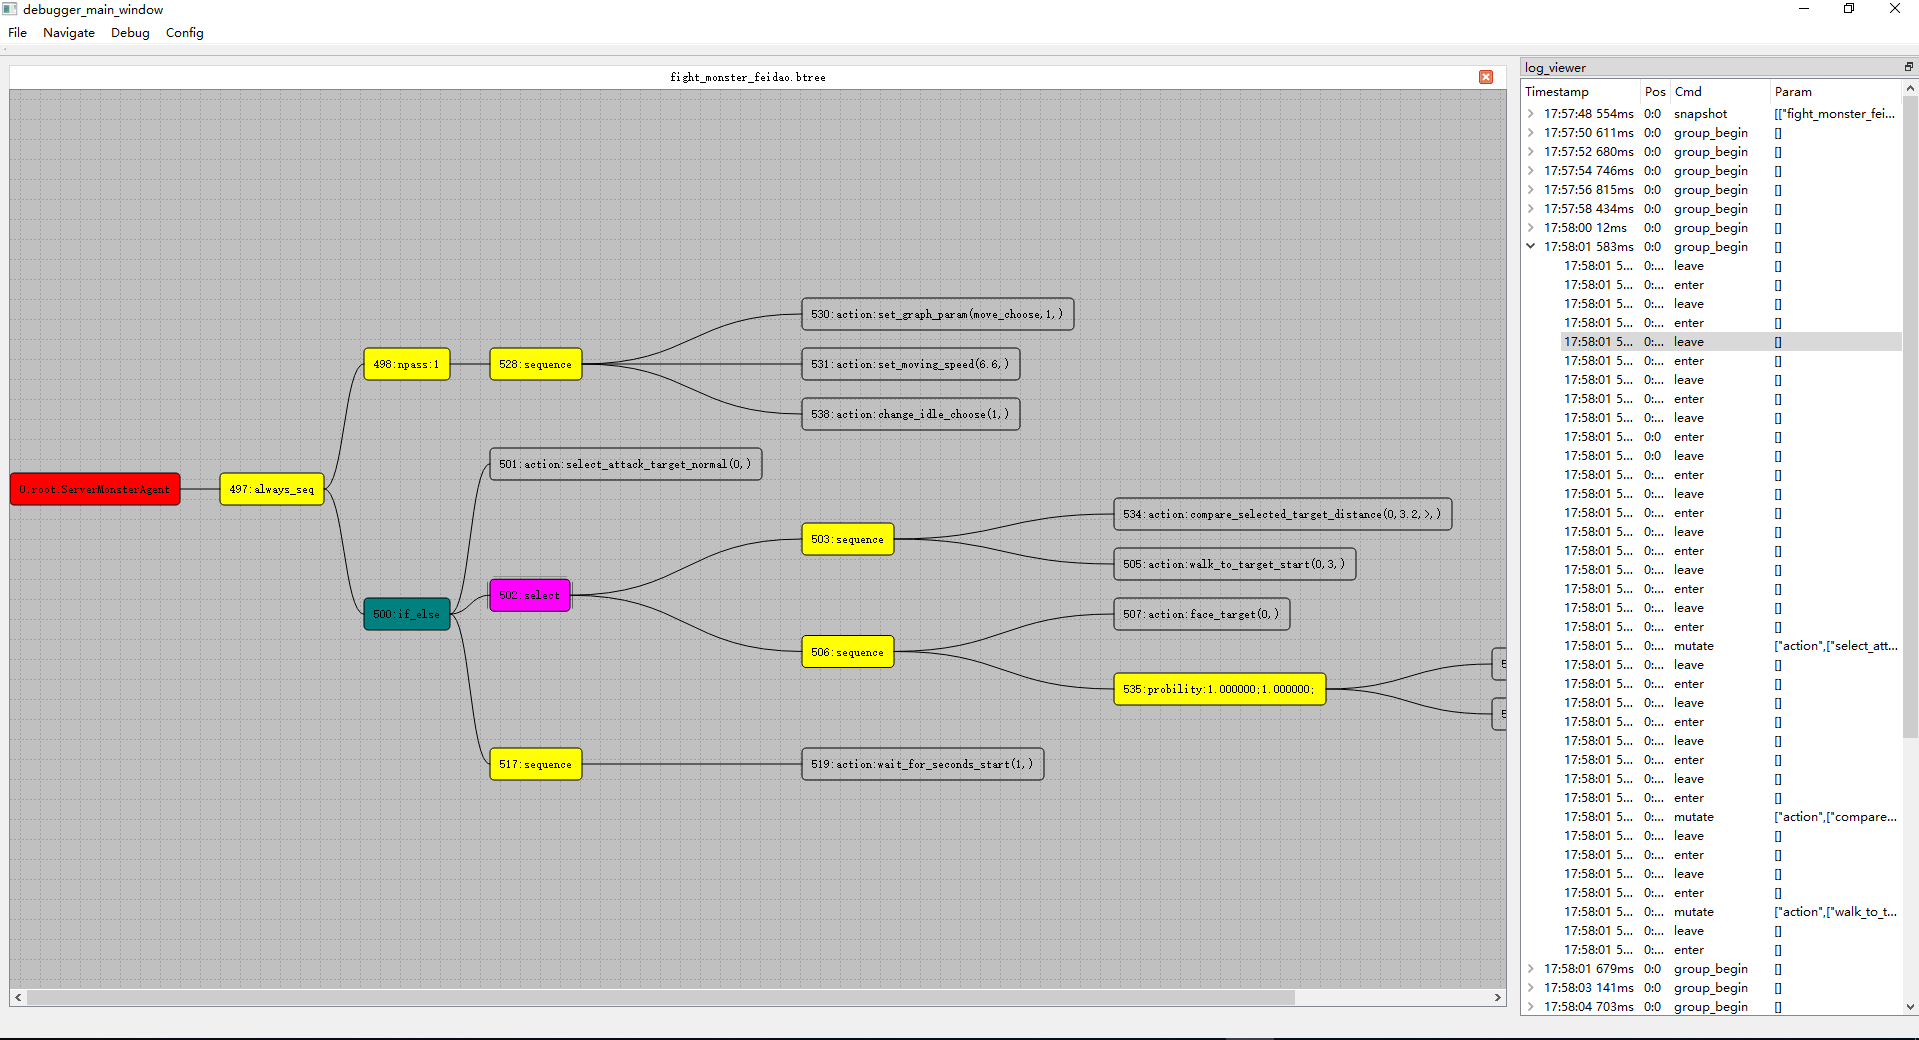
界面左侧窗口负责展示当前正在被执行的行为树,而右侧窗口则是调试日志的基于记录时间的有序列表展示。调试日志里的每一项都会有这四个字段来记录信息:
TimeStamp代表这个日志的发生时间Pos代表这个日志对应的节点编号Cmd代表这个日志对应的行为树运行时操作agent_cmdParams代表这个操作时所携带的运行参数
同时所有的日志都会被归类到所属的poll日志下,呈现为两层目录结构,默认被对应的poll日志所折叠,点击左侧箭头时即可展开折叠。这样设计就可以更加
明显的看出某一行日志所发生的时机。
双击调试窗口中的任意一项都会使得当前正在执行的节点被粉红色高亮,在这个项上右键可以获取此时的所有黑板值状态。
有了这个行为树调试器之后,查找行为树表现异常的问题就可以以图形化的形式来定位了,相对于之前的人肉阅读日志来模拟行为树执行来说轻松了很多。
Mosaic Game 的行为树接入
mosaic_game的NPC行为控制对接了bahavior_tree/runtime,在下面列举的Actor中添加了管理行为树的xxx_ai_component:
mosaic_game::entity::monster上使用monster_ai_component来驱动monster_agent来实现战斗和巡逻相关流程mosaic_game::entity::client_player上使用player_ai_component来驱动client_player_agent,以实现压测时的各种操作模拟和副本流程中的挂机mosaic_game::entity::client_account上使用account_ai_component来驱动account_agent,以实现压测时的自动注册、登录、创建玩家等行为
上面三个agent类型中monster_agent提供的功能最典型,因此这里只对monster_agent做详细介绍。monster_agent并没有直接继承自behavior_tree运行时提供的action_agent,中间还有一层actor_agent。这个actor_agent实现了常规的计时器、寻路、搜索entity等action.计时器的实现很简单,就是重写了一下action_agent上对应的虚接口:
std::uint64_t actor_agent::create_timer(std::uint64_t expire_gap_ms)
{
	auto cur_migrate_timer = m_ai_component->add_ai_timer(expire_gap_ms);
	return cur_migrate_timer;
}

void actor_agent::do_remove_timer(std::uint64_t handler)
{
	m_ai_component->cancel_ai_timer(handler);
}

std::uint64_t actor_agent::gen_next_timer_seq()
{
	m_next_timer_seq++;
	return m_next_timer_seq;
}
为了支持统一管理一个actor上的所有行为树创建的计时器,方便随时执行行为树的终止与重启,actor_ai_component上使用了一个专用接口add_ai_timer管理创建,同时使用cancel_ai_timer来管理取消。这里需要再详细解释一下action_agent的计时器创造细节:
std::optional<bool> action_agent::wait_for_seconds(double duration)
{
	duration = std::max(0.5, duration);

	auto cur_timer_handler = create_timer(int(duration*1000));

	auto cur_timeout_closure = std::make_shared<timeout_closure>(current_poll_node, json(cur_timer_handler));
	current_poll_node->m_closure = cur_timeout_closure;
	add_timer(cur_timer_handler, current_poll_node);
	return std::nullopt;
}
在获取了一个计时器的handler之后,需要在构造一个timerout_closure来保存这个计时器的信息到节点的m_closure上
std::shared_ptr<node_closure> m_closure;
class timeout_closure : public node_closure
{
public:
	const std::uint64_t m_timer_handler;
	timeout_closure(node* cur_node, const json& data);

	static std::string closure_name()
	{
		return "time_out";
	}
	virtual ~timeout_closure();
};
设计这个node_closure的目的是为了支持异常中断,以处理持续性任务被行为树的高优先级事件中断时的现场清理。例如在攻击状态下在超目标移动的过程中接收到了目标死亡的事件,此时会导致整个处理战斗的行为树reset,reset的时候需要终止所有持续性任务的运行,此时我们需要通知寻路系统来取消当前正在执行的寻路。所以我们将这个节点结束清理的逻辑都统一放在node_closure的析构函数中,这样在节点退出的时候清空m_closure对应的智能指针就会触发清理操作:
void node::leave()
{
	m_closure.reset();
	if (m_agent->during_debug())
	{
		m_agent->push_cmd_queue(m_agent->get_tree_idx(btree_config.tree_name), node_config.idx, agent_cmd::node_leave, {});
	}
}
void node::interrupt()
{
	m_closure.reset();
	if (m_state == node_state::dead)
	{
		return;
	}
	if (next_child_idx < m_children.size())
	{
		m_children[next_child_idx]->interrupt();
	}
	m_state = node_state::dead;
	next_child_idx = 0;
}
所以在actor_agent上提供的所有寻路接口都会设置一个寻路的closure:
void actor_agent::add_navi_finish_callback()
{
	auto cur_navi_closure = std::make_shared<navi_closure>(current_poll_node, json{});
	current_poll_node->m_closure = cur_navi_closure;
}
class navi_closure: public behavior_tree::runtime::node_closure
{
protected:
	utility::listen_handler<utility::enum_type_value_pair> m_navi_finish_handler;
	entity::actor_entity* m_actor;
public:
	navi_closure(behavior_tree::runtime::node* cur_node, const json& data);
	void on_finish(const utility::enum_type_value_pair& cmd, const utility::navi_reply& cur_navi_rep);
	static std::string closure_name()
	{
		return "navi";
	}
	~navi_closure();

};

void navi_closure::on_finish(const utility::enum_type_value_pair& cmd, const utility::navi_reply& cur_navi_rep)
{
	m_actor->dispatcher().remove_listener(m_navi_finish_handler);
	m_node->set_result(true);
}

navi_closure::~navi_closure()
{
	if(m_navi_finish_handler.valid())
	{
		m_actor->dispatcher().remove_listener(m_navi_finish_handler);
		auto cur_navi_comp = m_actor->get_component<entity::actor_navi_component>();
		if(cur_navi_comp)
		{
			cur_navi_comp->navi_cancel();
		}
	}

}
类似的我们在actor_agent上设计了一个hit_end_closure来处理攻击结束的清理操作。
由于行为树的黑板被我们设计成了一个map<string,json>,所以无法方便的保存计算所需的其他actor的指针,因此这里提供了actor_entity*与uint64_t相互转换的函数来进行actor_entity*的黑板值读写操作,这个uint64就是actor_entity在第一次创建时所赋予的全局唯一在线编号:
entity::actor_entity* actor_agent::entity_from_u64(std::uint64_t eid)
{
	return m_owner->get_space()->actor_from_u64(eid);
}

std::uint64_t actor_agent::entity_to_u64(const entity::actor_entity* in_actor)
{
	return m_owner->get_space()->actor_to_u64(in_actor);
}