使用libclang实现自动代码生成
llvm 与clang介绍
LLVM 是 Low Level Virtual Machine 的简称,这个库提供了与编译器相关的支持,能够进行程序语言的编译期优化、连接优化、在线编译优化、代码生成。目前已经可以作为c、c++、object-c、rust、swift等语言的后端。
Clang 是一个 C++ 编写、基于 LLVM、发布于 LLVM BSD 许可证下的 C/C++/Objective C/Objective C++ 编译器前端。
Apple 使用 LLVM 在不支持全部 OpenGL 特性的 GPU (Intel 低端显卡) 上生成代码 (JIT),令程序仍然能够正常运行。之后 LLVM 与 GCC 的集成过程引发了一些不快,GCC 系统庞大而笨重,而 Apple 大量使用的 Objective-C 在 GCC 中优先级很低。此外 GCC 作为一个纯粹的编译系统,与 IDE 配合很差。加之许可证方面的要求,Apple 无法使用修改版的 GCC 而闭源。于是 Apple 决定从零开始写 C family 的前端,也就是基于 LLVM 的 Clang 了。
Clang相对gcc的前端来说设:计清晰简单,容易理解,易于扩展增强。clang基于库的模块化设计,易于 IDE 集成及其他用途的重用。主要工具有clang-format, clang-ast,libclang, libtooling, address sanitizer等。
当前用来给代码增加反射,我们使用的主要组件是libclang。 libclang提供了一系列的C语言的接口,但是这些接口并不能完全提供存储在Clang C++ AST中的所有信息,只能提供部分基本信息。而且这些c接口,尽管每个函数都有对应的doxygen注释,但是作为how to的指引来说这些文档远远不够。为了实现特定功能,还需要自己去摸索。
clang ast
ast全称叫做abstract syntax tree,即抽象语法树。clang可以把源代码解析成抽象语法树的形式,并通过相关工具可以进行导出。考虑下面的代码:
int f(int x) {
  int result = (x / 42);
  return result;
}
经过手工分析,我们可以将上述代码解析为如下的形式:
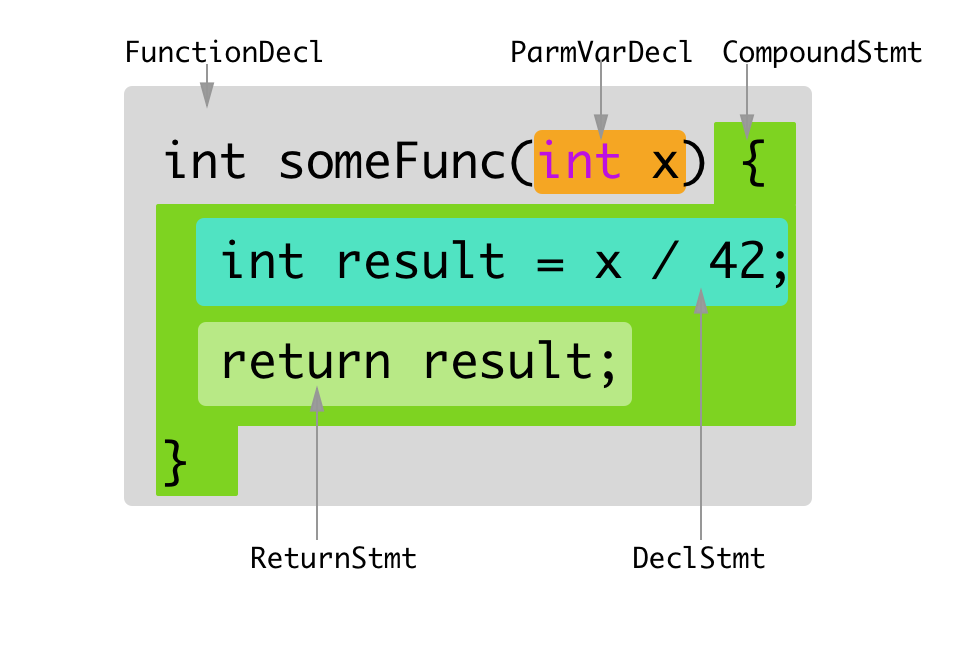
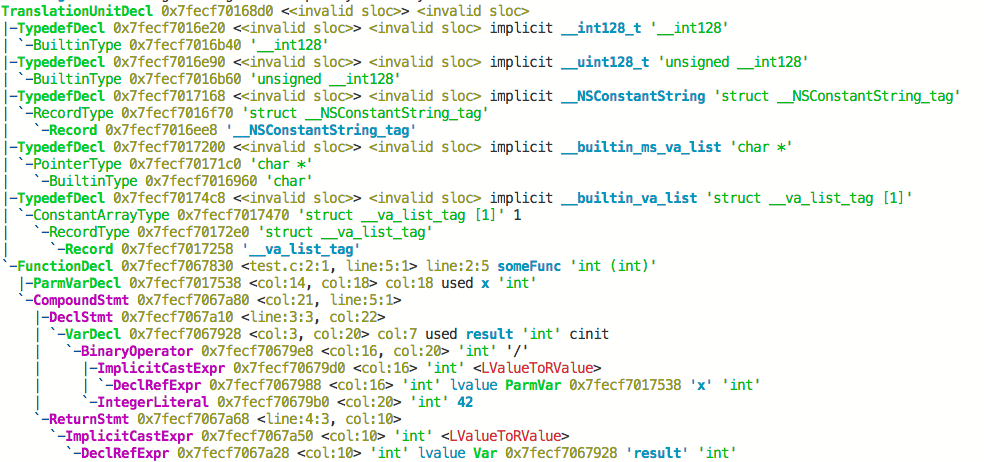
我们可以用clang -Xclang -ast-dump -fsyntax-only test.hxx这个指令打印出这段代码的ast输出:
TranslationUnitDecl 0x5aea0d0 <<invalid sloc>>
... cutting out internal declarations of clang ...
`-FunctionDecl 0x5aeab50 <test.cc:1:1, line:4:1> f 'int (int)'
  |-ParmVarDecl 0x5aeaa90 <line:1:7, col:11> x 'int'
  `-CompoundStmt 0x5aead88 <col:14, line:4:1>
    |-DeclStmt 0x5aead10 <line:2:3, col:24>
    | `-VarDecl 0x5aeac10 <col:3, col:23> result 'int'
    |   `-ParenExpr 0x5aeacf0 <col:16, col:23> 'int'
    |     `-BinaryOperator 0x5aeacc8 <col:17, col:21> 'int' '/'
    |       |-ImplicitCastExpr 0x5aeacb0 <col:17> 'int' <LValueToRValue>
    |       | `-DeclRefExpr 0x5aeac68 <col:17> 'int' lvalue ParmVar 0x5aeaa90 'x' 'int'
    |       `-IntegerLiteral 0x5aeac90 <col:21> 'int' 42
    `-ReturnStmt 0x5aead68 <line:3:3, col:10>
      `-ImplicitCastExpr 0x5aead50 <col:10> 'int' <LValueToRValue>
        `-DeclRefExpr 0x5aead28 <col:10> 'int' lvalue Var 0x5aeac10 'result' 'int'
如果shell支持彩色的话,输出是这样的:
看到这些输出,围观的同志们估计现在很兴奋,准备用祖传的hello world.cpp来一发试试。你们的输出结果应该是长这样:
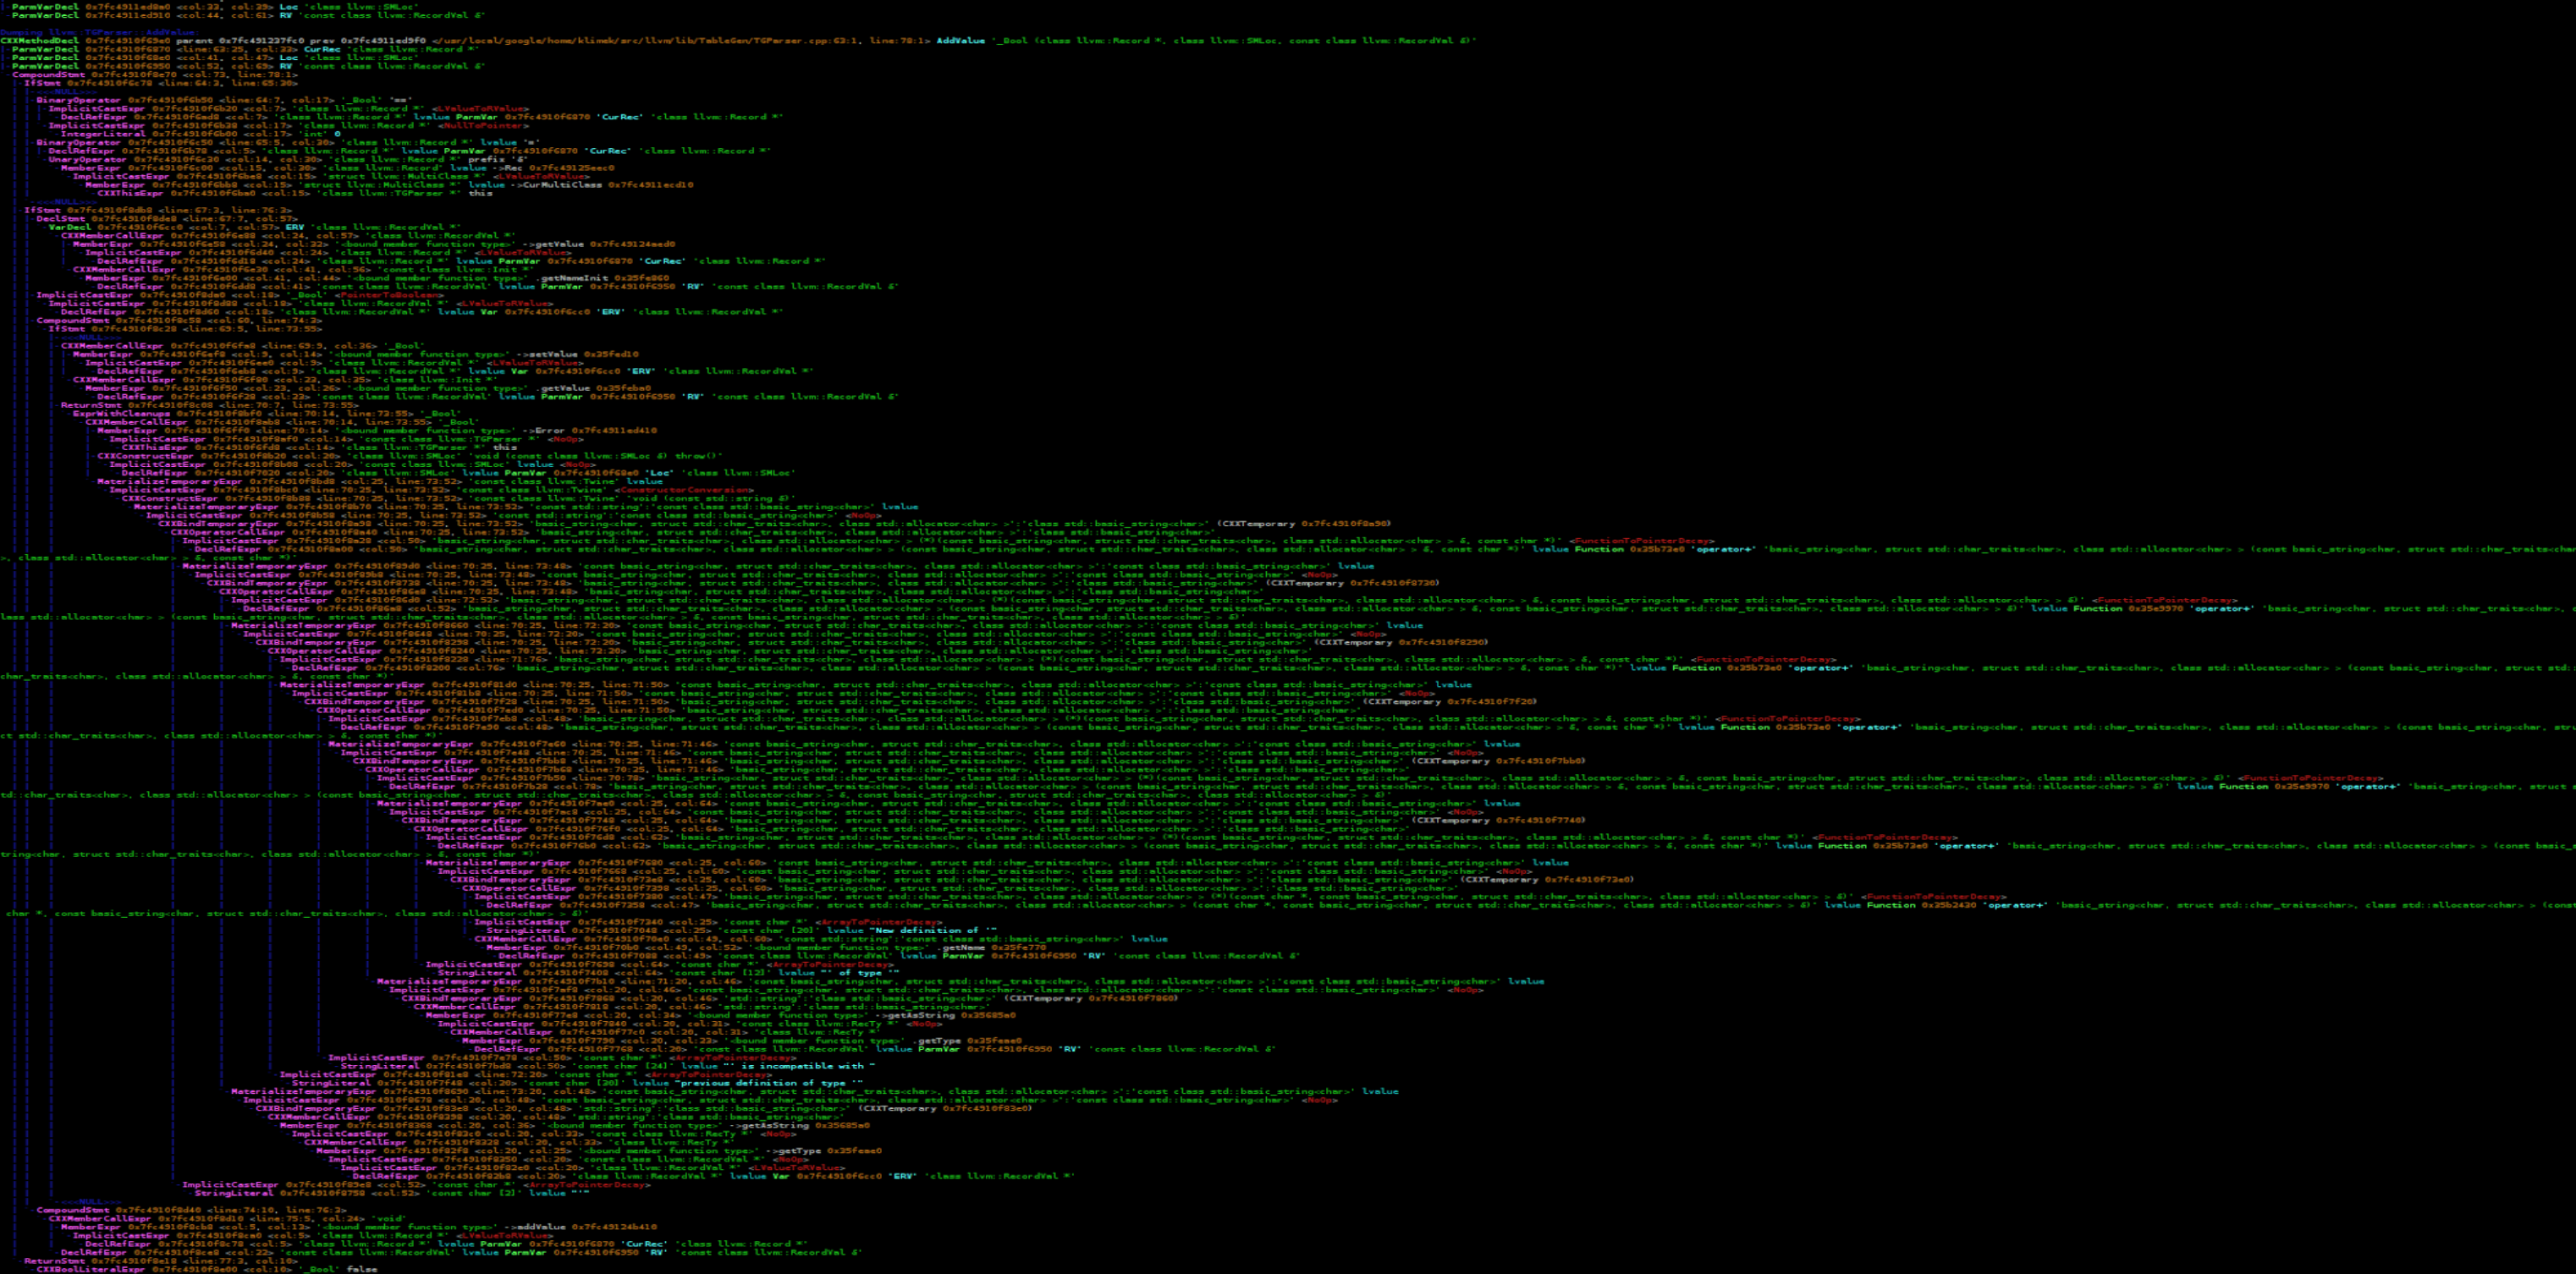
所有输出都展开的话应该有几十万行,这里面有非常多我们不需要关心的部分。幸亏clang提供了ast matcher相关组件,我们可以使用ast matcher来过滤ast dump的输出,来获取我们所感兴趣的部分。下面就是一个只打印参数类型有std::vector的所有函数声明:
DeclarationMatcher Matcher = functionDecl(
hasAnyParameter(hasType(recordDecl(matchesName("std::vector"))));

class VecCallback : public clang::ast_matchers::MatchFinder::MatchCallback {
public:
virtual void
run(const clang::ast_matchers::MatchFinder::MatchResult &Result) final {
	llvm::outs() << ".";
	if (const auto *F =
	Result.Nodes.getDeclAs<clang::FunctionDecl>(FunctionID)) {
			const auto& SM = *Result.SourceManager;
			const auto& Loc = F->getLocation();
			llvm::outs() << SM.getFilename(Loc) << ":"
			<< SM.getSpellingLineNumber(Loc) << ":"
			<< SM.getSpellingColumnNumber(Loc) << "\n";
		}
	}
};
对于我们的反射需求来说,我们需要获得如下信息:
- 所有需要反射的类声明
- 每个需要反射的类里面的成员变量声明
- 每个需要反射的类里面的成员函数声明
- 每个反射类的继承链
- 特定的全局函数
这些信息我们都可以通过ast matcher来获得,获取这些信息之后,我们可以dump出每个类的信息。
对于namespace A下面的这个类:
struct s_1
{

    optional<int> a = 0;
    pair<int, optional<float>> b;
    tuple<int, float, string> c;
};
我们dump出来的结果是这样的:
{
	"bases": null,
	"constructors": null,
	"fields": {
		"A::s_1::a": {
			"name": "A::s_1::a",
			"node_type": "variable",
			"qualified_name": "A::s_1::a",
			"var_type": "std::optional<int>",
			"with_default": true
		},
		"A::s_1::b": {
			"name": "A::s_1::b",
			"node_type": "variable",
			"qualified_name": "A::s_1::b",
			"var_type": "std::pair<int,std::optional<float>>",
			"with_default": false
		},
		"A::s_1::c": {
			"name": "A::s_1::c",
			"node_type": "variable",
			"qualified_name": "A::s_1::c",
			"var_type": "std::tuple<int,float,std::basic_string<char,std::char_traits<char>,std::allocator<char>>>",
			"with_default": false
		}
	},
	"methods": null,
	"name": "A::s_1",
	"node_type": "class",
	"qualified_name": "A::s_1",
	"static_fields": null,
	"static_methods": null,
	"template_args": []
}
剩下的问题就是,我们如果找到我们所关心的那些信息,因为一个简单的hello world程序里面所带入的声明有上万个。我们需要加进一步的过滤,过滤出特定类、特定字段、特定函数。这个时候attribute就派上用场了
c++ attribute
属性(Attribute)是构成程序基本结构的元数据,开发者可以通过属性来给编译器传递必要的语义信息.例如,属性可以改变程序的代码生成结构,或者提供额外的静态分析的语义信息。下面就是一个标准的给声明加属性的代码片段:
[[gnu::always_inline]] [[gnu::hot]] [[gnu::const]] [[nodiscard]]
inline int f(); // declare f with four attributes

[[gnu::always_inline, gnu::const, gnu::hot, nodiscard]]
int f(); // same as above, but uses a single attr specifier that contains four attributes

// C++17:
[[using gnu : const, always_inline, hot]] [[nodiscard]]
int f[[gnu::always_inline]](); // an attribute may appear in multiple specifiers

int f() { return 0; }
属性的语法跟平常的代码不怎么相同,推荐看一下这个连接https://en.cppreference.com/w/cpp/language/attributes。
上面的是c++标准里关于属性的语法,其实在gcc和msvc里面早就有了对应语义的属性定义,但是语法方式采取的不相同。
下面的是gnu的属性定义方式:
extern void exit(int)  __attribute__((noreturn));
extern void abort(void)  __attribute__((noreturn));

- (CGSize)sizeWithFont:(UIFont *)font NS_DEPRECATED_IOS(2_0, 7_0, "Use -sizeWithAttributes:") __TVOS_PROHIBITED;

//来看一下 后边的宏
 #define NS_DEPRECATED_IOS(_iosIntro, _iosDep, ...) CF_DEPRECATED_IOS(_iosIntro, _iosDep, __VA_ARGS__)

define CF_DEPRECATED_IOS(_iosIntro, _iosDep, ...) __attribute__((availability(ios,introduced=_iosIntro,deprecated=_iosDep,message="" __VA_ARGS__)))

//宏展开以后如下
__attribute__((availability(ios,introduced=2_0,deprecated=7_0,message=""__VA_ARGS__)));
//ios即是iOS平台
//introduced 从哪个版本开始使用
//deprecated 从哪个版本开始弃用
//message    警告的消息
下面的是msvc的属性定义方式:
_declspec(dllimport) class X {} varX;
__declspec(align(32)) struct Str1{
   int a, b, c, d, e;
};
#define MY_TEXT "function is deprecated"
void func1(void) {}
__declspec(deprecated) void func1(int) {}
__declspec(deprecated("** this is a deprecated function **")) void func2(int) {}
__declspec(deprecated(MY_TEXT)) void func3(int) {}

class X {
   __declspec(noinline) int mbrfunc() {
      return 0;
   }   // will not inline
};
这些属性都是编译器预先定义好了的,来实现标准之外的特定扩展功能的。但是有一个属性是例外的,他就是annotate属性,这个属性不带任何语义信息,只是为了标注用。我们可以这么利用annotate属性:
#define CLASS() class __attribute__((annotate("reflect-class")))
#define PROPERTY() __attribute__((annotate("reflect-property")))
CLASS() User
{
	public:
	PROPERTY()
	uint64_t id;
	PROPERTY()
	string name;
	PROPERTY()
	vector<string> pets;
};
这个annotate属性可以被clang ast dump出来,作为AnnotateAttr来存在:
CXXRecordDecl 0x7fcda1bae7e0 <./metareflect.hxx:19:24, test.hxx:130:1> line:115:9 class User definition
|-AnnotateAttr 0x7fcda1bae908 <./metareflect.hxx:19:45, col:83> "reflect-class;"
|-CXXRecordDecl 0x7fcda1bae960 <col:24, test.hxx:115:9> col:9 implicit class User
|-FieldDecl 0x7fcda1baea80 <./metareflect.hxx:21:27, test.hxx:121:14> col:14 id 'uint64_t':'unsigned long long'
|-`-AnnotateAttr 0x7fcda1baeac8 <./metareflect.hxx:21:42, col:83> "reflect-property"
|-FieldDecl 0x7fcda1baebb0 <./metareflect.hxx:21:27, test.hxx:125:12> col:12 name 'string':'std::__1::basic_string<char>'
|-`-AnnotateAttr 0x7fcda1baebf8 <./metareflect.hxx:21:42, col:83> "reflect-property"
|-FieldDecl 0x7fcda227a228 <./metareflect.hxx:21:27, test.hxx:129:20> col:20 pets
|-'vector<string>':'std::__1::vector<std::__1::basic_string<char>, std::__1::allocator<std::__1::basic_string<char> > >'
|-`-AnnotateAttr 0x7fcda227a270 <./metareflect.hxx:21:42, col:83> "reflect-property"
好了, 现在我们有了任意声明的Annotate属性,但是他的值只是一个字符串。一个简单的字符串是无法承担丰富的语义的,我们需要某种将元数据转变为字符串的功能。作为启发,我们来回顾一下Unreal里的代码:
UCLASS(BlueprintType)
class HELLO_API UMyClass : public UObject
{
    GENERATED_BODY()
public:
    UPROPERTY(BlueprintReadWrite)
    float Score;
public:
    UFUNCTION(BlueprintCallable, Category = "Hello")
    void CallableFunc();    //C++实现,蓝图调用
    UFUNCTION(BlueprintNativeEvent, Category = "Hello")
    void NativeFunc();  //C++实现默认版本,蓝图可重载实现
    UFUNCTION(BlueprintImplementableEvent, Category = "Hello")
    void ImplementableFunc();   //C++不实现,蓝图实现
};
现在我们的代码已经与unreal很相近的,唯一缺少的就是带多参数的属性定义,纠结一番之后,只能拉下脸去找宏这个老大哥帮忙:
#define CLASS(...) class __attribute__((annotate("reflect-class;" #__VA_ARGS__)))
#define UNION(...) union __attribute__((annotate("reflect-class;" #__VA_ARGS__)))
#define PROPERTY(...) __attribute__((annotate("reflect-property;" #__VA_ARGS__)))
#define FUNCTION(...) __attribute__((annotate("reflect-function;" #__VA_ARGS__)))
CLASS(Serialized) User
{
	PROPERTY(Serialized)
	uint64_t id;
	PROPERTY(Serialized)
	string name;
	PROPERTY(Serialized)
	vector<string> pets;
};
这样看起来就跟Unreal长的一样了。这样再dump一次,得到的输出如下:
CXXRecordDecl 0x7fcda1bae7e0 <./metareflect.hxx:19:24, test.hxx:130:1> line:115:9 class User definition
|-AnnotateAttr 0x7fcda1bae908 <./metareflect.hxx:19:45, col:83> "reflect-class;"
|-CXXRecordDecl 0x7fcda1bae960 <col:24, test.hxx:115:9> col:9 implicit class User
|-FieldDecl 0x7fcda1baea80 <./metareflect.hxx:21:27, test.hxx:121:14> col:14 id 'uint64_t':'unsigned long long'
|-`-AnnotateAttr 0x7fcda1baeac8 <./metareflect.hxx:21:42, col:83> "reflect-property;Serialized"
|-FieldDecl 0x7fcda1baebb0 <./metareflect.hxx:21:27, test.hxx:125:12> col:12 name 'string':'std::__1::basic_string<char>'
|-`-AnnotateAttr 0x7fcda1baebf8 <./metareflect.hxx:21:42, col:83> "reflect-property;Serialized"
|-FieldDecl 0x7fcda227a228 <./metareflect.hxx:21:27, test.hxx:129:20> col:20 pets
|-'vector<string>':'std::__1::vector<std::__1::basic_string<char>, std::__1::allocator<std::__1::basic_string<char> > >'
|-`-AnnotateAttr 0x7fcda227a270 <./metareflect.hxx:21:42, col:83> "reflect-property;Serialized"
剩下的工作就是将字符串解析回原来的k, k=v形式。在mosaic_game中,也定义了一个类似的宏Meta,支持了一下k(k1=v1, k2=v2)的形式,扩充了一下注释的表达。
#pragma once

#if defined(__meta_parse__)
#define Meta(...) __attribute__((annotate(#__VA_ARGS__)))
#else
#define Meta(...)
#endif
这样定义Meta宏的好处就是,如果我们编译的时候不传递__meta_parse__的定义到预处理器,则我们添加的这个注释是没有任何影响的,不修改任何语义。
代码自动生成
现在我们通过对代码声明做Annotate属性标记,然后利用ast matcher获取感兴趣的声明,最终生成了一个个类似于下面的元数据:
        {
            "bases": null,
            "constructors": null,
            "fields": {
                "A::s_1::a": {
                    "name": "A::s_1::a",
                    "node_type": "variable",
                    "qualified_name": "A::s_1::a",
                    "var_type": "std::optional<int>",
                    "with_default": true
                },
                "A::s_1::b": {
                    "name": "A::s_1::b",
                    "node_type": "variable",
                    "qualified_name": "A::s_1::b",
                    "var_type": "std::pair<int,std::optional<float>>",
                    "with_default": false
                },
                "A::s_1::c": {
                    "name": "A::s_1::c",
                    "node_type": "variable",
                    "qualified_name": "A::s_1::c",
                    "var_type": "std::tuple<int,float,std::basic_string<char,std::char_traits<char>,std::allocator<char>>>",
                    "with_default": false
                }
            },
            "methods": null,
            "name": "A::s_1",
            "node_type": "class",
            "qualified_name": "A::s_1",
            "static_fields": null,
            "static_methods": null,
            "template_args": []
        }
剩下的任务就是如何利用这些获取的元数据生成额外的代码了。而这里的代码生成,其实就是拼字符串,留好空位,把需要的名字填进去,类似于撸网页。
小明是一个撸网页的,终于有一天他受够了裸写c/c++ cgi或者一些奇怪的都是括号的语言。于是他打算撸一套库出来。
于是他写了一套网络库,字符串,线程池,数据库之类的一大堆东西。然后他发现他还是在愚蠢地花样拼接字符串。
于是他想为什么我们要在代码里面嵌入字符串,而不是在字符串里面嵌入代码呢?
于是他仿照c的风格写了一套脚本语言,于是他发现他写出了一个PHP。
所以PHP是最好的语言
众所周知,拼接字符串从来不是c++的强项,所以我们这里采取了模板语言来辅助拼接字符串,本项目采取的是mustache, mustache的规则很简单,参考 https://mustache.github.io/mustache.5.html 。下面是一个mustache的例子:
mustache tmpl{"Hello {{what}}!"};
std::cout << tmpl.render({"what", "World"}) << std::endl;
// Hello World!
mustache tmpl{"{{#employees}}{{name}}, {{/employees}}"};
data employees{data::type::list};
employees << data{"name", "Steve"} << data{"name", "Bill"};
tmpl.render({"employees", employees}, std::cout);
// Steve, Bill,
下面就是我的项目里面对枚举生成代码的模板:
class {{class_name}}_helper
{
public:
	static std::optional<{{class_name}}> from_string(const std::string& val)
	{
		static std::unordered_map<std::string, {{class_name}}> enum_map = {
		{{#enum_items}}
			{ "{{enum_name}}", {{class_name}}::{{enum_name}} }{{^last_item}},{{/last_item}}
		{{/enum_items}}
		};
		auto cur_iter = enum_map.find(val);
		if(cur_iter == enum_map.end())
		{
			return {};
		}
		else
		{
			return cur_iter->second;
		}
	}
	static std::string to_string({{class_name}} val)
	{
		switch(val)
		{
		{{#enum_items}}
		case {{class_name}}::{{enum_name}}:
			return "{{enum_name}}";
		{{/enum_items}}
		default:
			return "invalid_enum_{{class_name}}_with_value_" + std::to_string(int(val));
		}
	}
};
对应的还有类的encode和decode模板:
json encode() const
{
	json result = json::array();

	//begin base encode
	{{#bases}}
	result.push_back(meta::serialize::encode(static_cast<const {{base_type}}&>(*this)));
	{{/bases}}

	//begin encode_fields encode
	{{#encode_fields}}
	result.push_back(meta::serialize::encode({{field_name}}));
	{{/encode_fields}}
	return result;
}
bool decode(const json& data)
{
	if(!data.is_array()) return false;

	std::size_t total_size = data.size();
	std::size_t index = 0;
	//begin base decode
	{{#bases}}
	if(index >= total_size) return false;
	if(!meta::serialize::decode(data[index], static_cast<{{base_type}}&>(*this)))
	{
		return false;
	}
	index++;
	{{/bases}}
	//begin field decode
	{{#encode_fields}}
	if(index >= total_size) return false;
	if(!meta::serialize::decode(data[index], {{field_name}}))
	{
		return false;
	}
	index++;
	{{/encode_fields}}
	return true;
}
项目代码里面还有很多实现其他功能的模板,包括Property, Method, Rpc, 等等,这里就不再列举了,感兴趣的可以直接去看项目代码 https://github.com/huangfeidian/meta 。
编译流程
代码生成完成之后,留给我们的就是最后一个问题,如何把新生成的代码插入到原来的编译流程之中去。我这里的实现基本采用了unreal的方案。
对于一个需要反射的类ABC, 我们单独给他两个文件,一个ABC.h, 一个ABC.cpp。反射生成的代码将声明和实现分别进入ABC.generated.h和ABC.generated.cpp。ABC.h里面include ABC.generated.h, ABC.cpp 里面include ABC.generated.cpp。项目在编译前,触发一下反射工具去扫描头文件,来生成额外的代码文件,然后再执行编译。这个就是我能想出来的最简单的不修改编译流程的方法。
这个方法其实很蠢,他把一些自动生成的接口也塞进到原来的类声明之中。作为优化,我们可以利用pimpl模式,将所有的接口实现都放在XXX_HELPER的类之中,而XXX类里面拥有一个指向XXX_HELPER的指针。这样xxx.h就不需要include任何生成的代码,只需要xxx.cpp加入一下xxx.generated.h, 同时目标文件列表里面加入一下xxx.generated.cpp。这个流程可以通过cmake来实现,基本类似于protobuf所提供的cmake文件。